113


OFFENSIVE PLAYBOOK
Introduction Offensive Goals Terminology The Basics The Huddle Calling Plays Numbering System Cadence and Snap Count Audibles Attack Offense Passing Tree Diagrams Play Action Passing Game Scramble Rules Personnel Groupings Formations Basic Offensive Formations Backfield Alignments Shifting & Motion Defensive Recognition Fronts Coverages Interior Line Blocking Rules Run Blocking Rules and Line Calls Pass Blocking Rules and Line Calls Plays Base Runs Base Passing Red Zone Passes Fire Passes Screens, Draws, and Specials Attack Offense

INTRODUCTION
EXPECTATIONS
As an offensive unit, we expect the following from our coaches and players: 1. We will be precise in our execution of plays. This will be derived from our attention to detail in
everything we do as a team. We will be efficient and machine-like, regardless of the environment and the situation at hand.
2. We will be disciplined and consider assignment errors and mental mistakes unacceptable.
Turnovers will not be tolerated! 3. We will be a physically and mentally tough team. By structuring our practices as we do, you
should not see anything in a game that you have not seen before in practice. No situation on the field should be unexpected.
4. We will play hard and with great effort on every play from the snap until the whistle blows. There is
no reason to take plays off! DEFINITION Our offense is based upon Bill Walsh’s ‘West Coast Offense’. It is an offense that has been proven successful at the highest levels of football. With the proper commitment and attitude, it will continue to be successful here too! The West Coast Offense is not easy to define, but two statements help to explain what it is all about. First, our offense uses precision-timed passing, variable formations, and the exploitation of each player’s skills to attack the opposition. We will feature a “fully dimensional passing attack” (including a short passing game that compliments the running game) and a running game that controls the clock. We use multiple formations and personnel groupings to get favorable match-ups (i.e. flanker on a linebacker), run similar plays from different looks, hide our key receivers, and let our quarterback see and read the defense. We want to force the defense to adjust and react to us, while at the same time taking what the defense gives us. Second, the West Coast Offense still amounts to nothing more than the total attention to detail and an appreciation for every facet of offensive football. The refinement of those things are needed to provide an environment that allows people to perform at maximum levels of self-actualization. It is that attention to detail that will allow us to perform at our best and win football games. As important as X’s and O’s are, it is our commitment to and proper execution of the entire system that will make us successful. PRINCIPLES OF THE WEST COAST OFFENSE
Protecting the Quarterback — We will protect the passer with a variety of protection schemes. Additionally, we will use the principle of a ‘hot receiver’. This means that when the defense sends more rushers than we have blockers, one of our receivers will be available immediately, allowing the quarterback to get rid of the ball before the rushers get to him. Timing Passes — Our routes have been set up so that the quarterback is able to deliver the ball right as the receiver is making his break. In other words, the depth of the receiver’s route has been timed so as to correspond to the depth of the quarterback’s drop. Use of Multiple Receivers — We will use as many as five eligible receivers on every pass play. Our routes will compliment each other so that against man coverage there will be a ‘clearing’ action; and against zone, defenders will have to choose who to cover and who not to cover. Reading the Defense — it is important that both the quarterback and the receivers be able to read the defensive coverage. The quarterback needs to be able to choose the receiver he is going to throw the ball. The receivers need to be able to recognize the coverage, too, so they can make the necessary adjustment to their routes, or even run completely different routes.

Running and Passing Plays are Complimentary — Our offense is a system, with the running game and passing game complimenting each other. We will run and pass from all personnel groupings and formations. Runs will set up passes and passes will set up runs. It is an entire system, and an entire offensive philosophy we intend to establish, not just a running or passing philosophy. Practicing the Fundamentals — We will practice, over and over, the fundamentals of our offense. From this we will be able to execute our offense in a highly efficient manner. PASSING GAME
Our passing offense will include several types of passes, which gives us a variety of weapons and will enhance our ability to handle each contingency and situation as it occurs. We will group passes into “play groups”. Each play group may have several different types of passes in it. These groups will roughly correspond to game situations. 1. Base Passes — Passes that can be used in nearly any down and distance situation, from any
location on the field. These plays are the core of our offense. 2. Play Passes — Play action passes are passes that will be used in conjunction with our running
game. 3. Action Passes — Roll outs, sprint outs, and bootlegs make up the action portion of our passing
game. 4. Screen Passes — A group of plays consisting of various screen passes 5. Nickel Passes — Pass plays designed to be run in ‘nickel’ situations (i.e. second and long, third and
long, two-minute offense, etc.) 6. Short Yardage — Pass plays designed to be run in short yardage situations, such as second, third
or fourth and short. 7. Goal Line — Pass plays that are designed to be run from inside the opponent’s five-yard line.
These plays also may be used when attempting a two-point conversion. 8. Red Zone — Pass plays designed to be run from inside the opponent’s 20-yard line. These plays
can be further be divided into +5, +10, +15 and +20 yard sections. RUNNING GAME We are committed to running the football. While we will throw the ball, we are also going to run the ball, and do so successfully. Our running game has been designed so that we will have an advantage over our opponents. We will, through play calling and practice, create conditions under which we will run the football. To do so, we will:
• Make use of formational variations.
• Use motion and shifting to force desirable defensive adjustments just prior to the snap of the ball.
• Package running plays with the appropriate play action passes.
• Use ‘special’ plays that take advantage of defensive commitment and aggressiveness. Additionally, we will do four things to ensure our running plays will be successful:
• We will double-team at the point of attack, thereby securing a numerical advantage for our blockers.
• Create good blocking angles by the use of line calls, motion, and variable formations.
• Cause the defense to hesitate in reading the play, and react more slowly.
• Slow support of the defensive backs. As with our passing offense, we have several different play groups for our running game. These play
groups, as with our passing game, will correspond to game situations. SITUATION OFFENSE
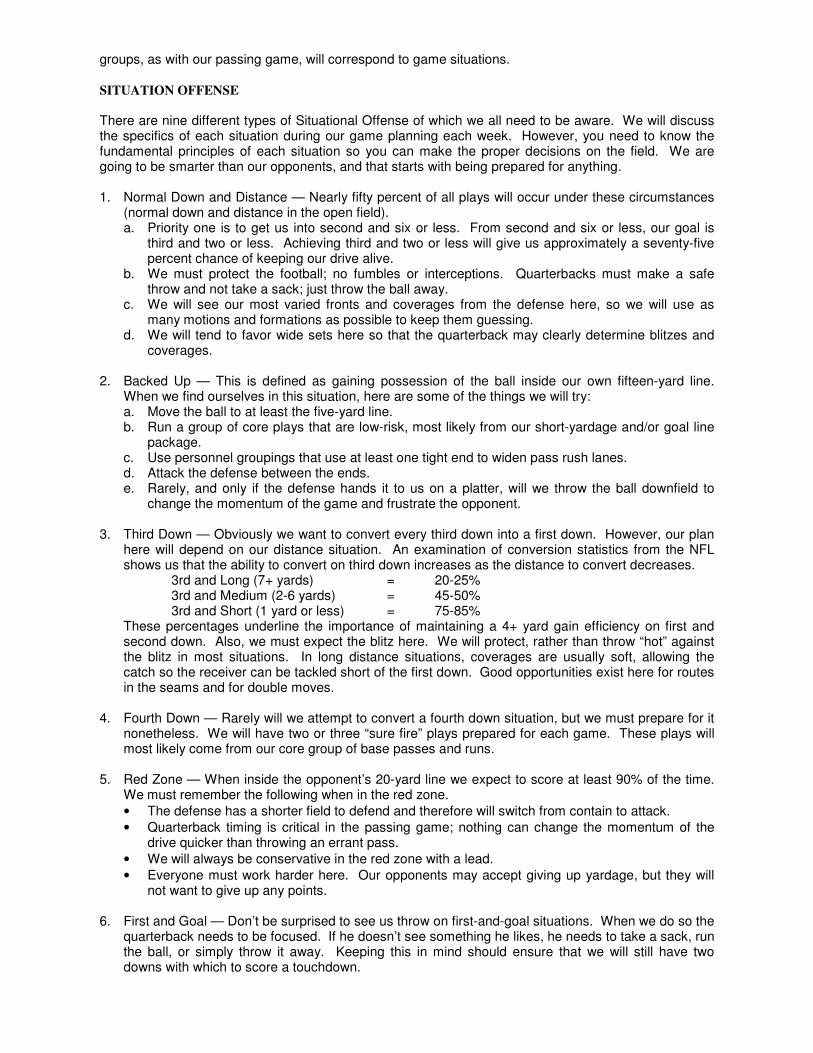
There are nine different types of Situational Offense of which we all need to be aware. We will discuss the specifics of each situation during our game planning each week. However, you need to know the fundamental principles of each situation so you can make the proper decisions on the field. We are going to be smarter than our opponents, and that starts with being prepared for anything. 1. Normal Down and Distance — Nearly fifty percent of all plays will occur under these circumstances
(normal down and distance in the open field). a. Priority one is to get us into second and six or less. From second and six or less, our goal is
third and two or less. Achieving third and two or less will give us approximately a seventy-five percent chance of keeping our drive alive.
b. We must protect the football; no fumbles or interceptions. Quarterbacks must make a safe throw and not take a sack; just throw the ball away.
c. We will see our most varied fronts and coverages from the defense here, so we will use as many motions and formations as possible to keep them guessing.
d. We will tend to favor wide sets here so that the quarterback may clearly determine blitzes and coverages.
2. Backed Up — This is defined as gaining possession of the ball inside our own fifteen-yard line.
When we find ourselves in this situation, here are some of the things we will try: a. Move the ball to at least the five-yard line. b. Run a group of core plays that are low-risk, most likely from our short-yardage and/or goal line
package. c. Use personnel groupings that use at least one tight end to widen pass rush lanes. d. Attack the defense between the ends. e. Rarely, and only if the defense hands it to us on a platter, will we throw the ball downfield to
change the momentum of the game and frustrate the opponent. 3. Third Down — Obviously we want to convert every third down into a first down. However, our plan
here will depend on our distance situation. An examination of conversion statistics from the NFL shows us that the ability to convert on third down increases as the distance to convert decreases.
3rd and Long (7+ yards) = 20-25% 3rd and Medium (2-6 yards) = 45-50% 3rd and Short (1 yard or less) = 75-85%
These percentages underline the importance of maintaining a 4+ yard gain efficiency on first and second down. Also, we must expect the blitz here. We will protect, rather than throw “hot” against the blitz in most situations. In long distance situations, coverages are usually soft, allowing the catch so the receiver can be tackled short of the first down. Good opportunities exist here for routes in the seams and for double moves.
4. Fourth Down — Rarely will we attempt to convert a fourth down situation, but we must prepare for it
nonetheless. We will have two or three “sure fire” plays prepared for each game. These plays will most likely come from our core group of base passes and runs.
5. Red Zone — When inside the opponent’s 20-yard line we expect to score at least 90% of the time.
We must remember the following when in the red zone.
• The defense has a shorter field to defend and therefore will switch from contain to attack.
• Quarterback timing is critical in the passing game; nothing can change the momentum of the drive quicker than throwing an errant pass.
• We will always be conservative in the red zone with a lead.
• Everyone must work harder here. Our opponents may accept giving up yardage, but they will not want to give up any points.
6. First and Goal — Don’t be surprised to see us throw on first-and-goal situations. When we do so the
quarterback needs to be focused. If he doesn’t see something he likes, he needs to take a sack, run the ball, or simply throw it away. Keeping this in mind should ensure that we will still have two downs with which to score a touchdown.

7. Goal Line — This situation exists when we are inside the opponent’s five-yard line. Our goal line plays will be run in one direction only so as to eliminate confusion and maximize efficiency.
8. Two-Point Plays — A three to four play package that will encompass both first-and-goal and two-
point conversion plays. 9. Blitz Beaters — Our game plans will include two or three “blitz beaters”. These plays will allow us to
take advantage of the fact that a team is blitzing. Remember that the best way to discourage a team from blitzing is to hurt it, and hurt it big (with a big play or score). When the defense blitzes, we need to be aggressive and attack.
CONTINGENCY OFFENSE
There are two types of contingency offense: the four-minute offense and the two-minute offense. Four-minute offense — The primary goal of the four-minute offense is to take as much time off the clock as possible. This will enable us to protect a lead late in a game. These are our basic objectives to this offense:
a. Move the ball on the ground b. Make first downs c. Keep the clock running d. Protect the football
Here are some things that each player should keep in mind when we are in our four-minute offense:
• The ball carrier should not struggle for extra yards. It is more important to maintain possession of the ball than to gain an extra yard or two.
• The ball carrier needs to be aware that the defense is going to attempt to strip the ball. Our downfield blockers must make sure that they maintain blocks so the defense does not get extra shots at the ball carrier.
• The quarterback should follow every running play in case of a fumble.
• The quarterback should ALWAYS take a sack rather than throw a risky pass.
• The quarterback should run the play clock down whenever possible.
• The quarterback should be prepared to run with the ball on any pass play. Have a feel for the game!
• Receivers need to be aware of the distance needed for a first down to keep the drive alive.
• Lineman must be prepared for stunts and blitzes.
• POISE is crucial! DO NOT let the opponent get to you. NEVER RETALIATE under any circumstances!
• Avoid penalties! Not only do they stop the clock, but they make it more difficult to get first downs.
Two-minute offense — The two-minute offense is designed to enable us to score within a limited amount of time. For example, we might activate our two-minute offense at the end of the first half to get us into field goal range. Additionally, if we are trailing at the end of a game, we will employ our two- minute offense to score whatever points necessary to tie or win the game. Here are some things you need to know when we are in out two-minute offense:
• If the situation permits, the quarterback should discuss strategies with the coach. Additionally, the entire offense should gather together to review the circumstances (i.e. We need a field goal to tie) and what to expect from the defense.
• The quarterback should alert the referee that he will be calling a quick timeout should the ball stay in play.
• The quarterback should be prepared to kill the clock by spiking the ball. Use a distinct motion when doing so.
• The quarterback must remain poised and avoid desperate acts. Only employ high-risk throws in the waning seconds of a half/game.
• Receivers should be prepared to remain on the same side of the field as the previous play unless otherwise dictated by the quarterback.
• Receivers and lineman need to be prepared to react to a scrambling quarterback.
• Running backs should be prepared to knock down meaningless catches (i.e. One that will result

in a loss or negligible gain and allow the clock to continue to run).
• Running backs should be prepared to receive a lateral downfield from receivers if the clock is running down.
• Running backs should not struggle for extra yards; it will just waste time.
• Lineman should avoid suspicion of holding.
• Everyone should be alert to a no-huddle (“Attack”) call by the quarterback.
• Hustle back to the LOS after every play. Assume the next play is a no-huddle call.
• The entire offensive unit should establish a rhythm as practiced. No one should panic or act in a hysterical manner.
• Everyone must remain poised and concentrate before the ball is snapped.
• Assume the defense is going to blitz. NO ONE should be surprised by a blitz!
• Get enough for a first down and then get out of bounds!
• Protect the ball! This may be our last possession of the game!
• Catch the ball before running with it. Once you have it, run decisively and avoid desperate acts.
• Remain focused. Our best chance for success is for everyone to execute properly their responsibilities as planned and practiced.
PRACTICE
“Win the war, then fight the war.” — Sun Tzu
“Games are won and lost on the practice field.” — Paul Brown
The success of the West Coast Offense is less due to the actual X’s and O’s than the comprehensive approach Coach Walsh took to creating a structured plan for everything on the field. Therefore, when we practice, we are practicing with a purpose. We need to get things done, whether it is to get ready for the season or an upcoming game, so we need your best effort. Our practices are structured so that we can accomplish as much as possible in the time we have. Because we don’t have time to waste, everything we do will be full speed — just like the game. There will be no excuse for not getting things done in practice. Our primary reasons for having our practices so rigidly structured are:
• No wasted time on the practice field.
• The learning process is accelerated.
• The game can be approached on a broad base, rather than piecemeal. Because there is a lot to learn, we need everyone to be committed to our philosophy and the team. This starts with being in good physical condition and shape. It means studying your playbook — we can’t afford any mental or assignment errors. Turnovers cost games! It means that when we practice, we practice to learn and to get better and prepare. GAMES
Because of the way we have structured our offense and conduct our practices, the games should be free from the unexpected. Our preparation for games should allow us to be ready and relaxed. Playing the games should come naturally. Remember that this is still a game. And the game is time to have fun! We need you to concentrate and play hard, but don’t forget to play relaxed and enjoy the game. A FEW FINAL WORDS
1. Attitude means a lot. Stay positive and focused. 2. Don’t be afraid to work hard and don’t be afraid to fail. We want you to play smart, but also play
hard! 3. Help each other learn. If you understand something better than another player does, help them out.
It will only make the team better and other players will respect you for it. 4. Do not be afraid to ask questions if you don’t understand something. We want you to know what
you are doing out there, so don’t worry about asking someone to explain something you don’t understand.

5. We are a team — offense, defense, special teams, coaches, and players. We will not tolerate finger pointing or infighting. Save that energy for our opponents!
6. We expect you to be good citizens off the field. Our reputation as role models extends far beyond the football field!
7. HAVE FUN! Enjoy learning this offense and performing on the field!


FOOTBALL: THE UVM WAY
1.1.1.1. Never underestimate your opponent.Never underestimate your opponent.Never underestimate your opponent.Never underestimate your opponent.
2.2.2.2. Work on your weaknesses until they become your strengths.Work on your weaknesses until they become your strengths.Work on your weaknesses until they become your strengths.Work on your weaknesses until they become your strengths.
3.3.3.3. Remember that great effort is usually the result of a great Remember that great effort is usually the result of a great Remember that great effort is usually the result of a great Remember that great effort is usually the result of a great
attitude.attitude.attitude.attitude.
4.4.4.4. Dedicate yourself to a mighty purpose.Dedicate yourself to a mighty purpose.Dedicate yourself to a mighty purpose.Dedicate yourself to a mighty purpose.
5.5.5.5. Win with humility, lose with grace.Win with humility, lose with grace.Win with humility, lose with grace.Win with humility, lose with grace.
6.6.6.6. Ignore those that discourage you.Ignore those that discourage you.Ignore those that discourage you.Ignore those that discourage you.
7.7.7.7. Work to improve your moral and spiritual strengths as well as Work to improve your moral and spiritual strengths as well as Work to improve your moral and spiritual strengths as well as Work to improve your moral and spiritual strengths as well as
your physical ones.your physical ones.your physical ones.your physical ones.
8.8.8.8. Remember that how you conduct yourself off the field is just Remember that how you conduct yourself off the field is just Remember that how you conduct yourself off the field is just Remember that how you conduct yourself off the field is just
as important as how you conduct yourself on the field.as important as how you conduct yourself on the field.as important as how you conduct yourself on the field.as important as how you conduct yourself on the field.
9.9.9.9. Talent is GodTalent is GodTalent is GodTalent is God----given given given given ---- be humble. Fame is man given be humble. Fame is man given be humble. Fame is man given be humble. Fame is man given ---- be be be be
thankful. Conceit is selfthankful. Conceit is selfthankful. Conceit is selfthankful. Conceit is self----given given given given ---- be careful. be careful. be careful. be careful.
10.10.10.10. Don't ask to be deprived of tension and disciplineDon't ask to be deprived of tension and disciplineDon't ask to be deprived of tension and disciplineDon't ask to be deprived of tension and discipline---- these are these are these are these are
the tools that shape success.the tools that shape success.the tools that shape success.the tools that shape success.
11.11.11.11. Do what has to be done, when it has to be done, and as well as Do what has to be done, when it has to be done, and as well as Do what has to be done, when it has to be done, and as well as Do what has to be done, when it has to be done, and as well as
it can be done.it can be done.it can be done.it can be done.
12.12.12.12. Remember that when you're not working to improve, your Remember that when you're not working to improve, your Remember that when you're not working to improve, your Remember that when you're not working to improve, your
competition is.competition is.competition is.competition is.
13.13.13.13. Always give your best.Always give your best.Always give your best.Always give your best.
14.14.14.14. Practice like a champion.Practice like a champion.Practice like a champion.Practice like a champion.
15.15.15.15. Play like a champion.Play like a champion.Play like a champion.Play like a champion.
16.16.16.16. Live like a champion. Live like a champion. Live like a champion. Live like a champion.
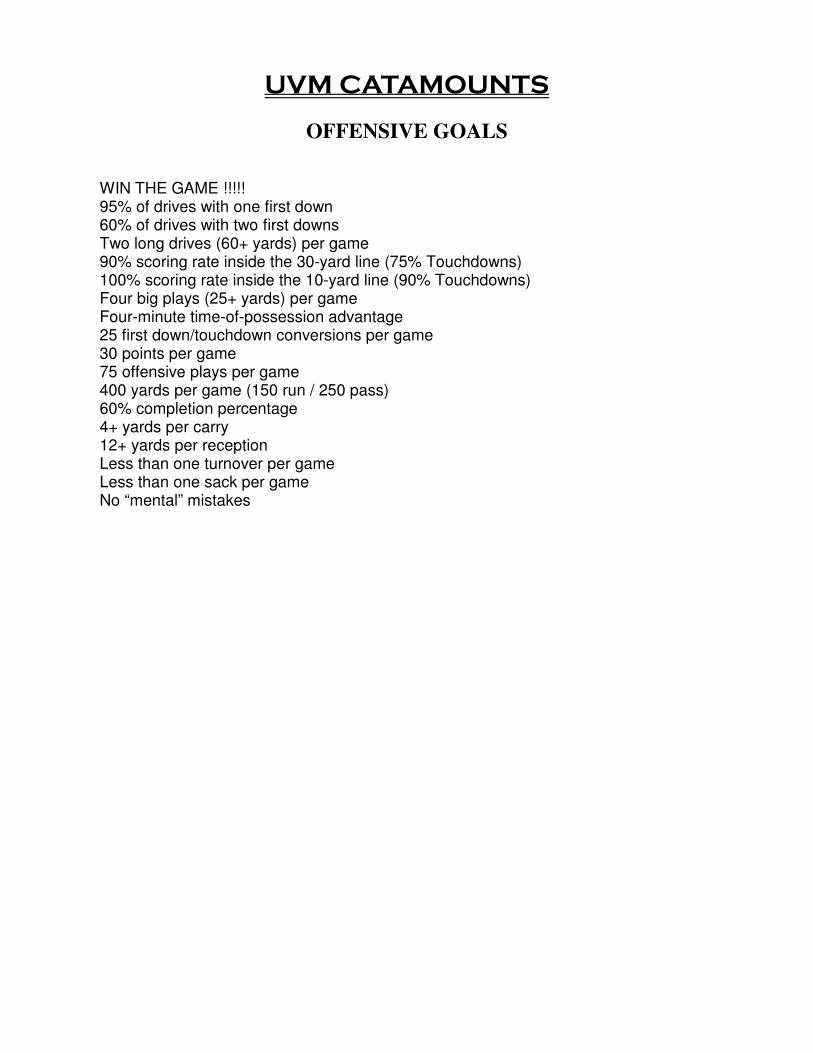
UVM CATAMOUNTS
OFFENSIVE GOALS
WIN THE GAME !!!!! 95% of drives with one first down 60% of drives with two first downs Two long drives (60+ yards) per game 90% scoring rate inside the 30-yard line (75% Touchdowns) 100% scoring rate inside the 10-yard line (90% Touchdowns) Four big plays (25+ yards) per game Four-minute time-of-possession advantage 25 first down/touchdown conversions per game 30 points per game 75 offensive plays per game 400 yards per game (150 run / 250 pass) 60% completion percentage 4+ yards per carry 12+ yards per reception Less than one turnover per game Less than one sack per game No “mental” mistakes

THE BASICS
THE HUDDLE
C RG
Z X T Q
LT LG RT
F Y
• The center is in charge of forming the huddle and should always set the huddle seven yards from
the line of scrimmage (LOS). He should set up quickly.
• The huddle will be oval shaped. It is shaped this way so that everyone can hear the quarterback.
• Linemen will align closest to the LOS with backs and receivers farthest away. The quarterback
should align closest to our sideline with the tight end to the away side.
• All players should line up quickly with their hands on their knees ready to see and hear the
quarterback. When the quarterback enters the huddle, everyone stops talking.
• The quarterback has complete control of the huddle.
• The quarterback will call the play and the snap count (repeated twice). If anyone does not hear
the play or the snap call, he should call “check”.
• “Ready - break” is the signal to leave the huddle; clap hands and set up on the LOS quickly.
• The huddle reflects the attitude of each man and the team - keep it sharp!
CALLING PLAYS The quarterback does all the talking. He will relay the formation, the play, and the snap count (twice) in the huddle. Then he will call “ready - break” and the team will approach the LOS. The play call sequence will relay the following information: 1. Shift (if any) 2. Formation 3. Strength 4. Backfield Set (if any) 5. Motion (if any) 6. Pass Protection (if needed) 7. Play Call 8. Backfield Pass Routes (if needed) Play calls will sound similar to the following:
• Pro Right 26 Sweep, On One, On One, Ready - Break
• Ace Left 25 Toss, On Two, On Two, Ready - Break
• Slot Right 81, On Three, On Three, Ready - Break
The ball may be snapped on the following counts:
• On Quick (“Set - Go”)

• On One
• On Two (our default count)
• On Three (with hard count on Two)
• Freeze (“Go” is repeated several times, then the ball is snapped after “Set, Go”.)
PROCEDURE AT THE LOS
• All players set up quickly! Make the defense expect a quick count! If shifting, designated players will
come to the LOS in a formation other than the one called in the huddle and stay in a two-point stance.
• The quarterback calls the defensive front first. On the front call, everyone should be in a ready position.
• The quarterback will make the front call first. If shifting, the designated players will shift into the called
formation when the quarterback makes the front call.
• The quarterback then calls, “Set”.
• The quarterback calls a color and number to each side of the formation.
• The quarterback completes the snap count with “Go” (as many times as the snap count).
• When the count is “on Quick”, then the quarterback snaps the ball on “Set - Go” (no color-number).
• When the count is “on Quick” and the quarterback needs to audible, he will call “Easy” before calling
“Set” to alert the offense than an audible is coming.
• When the count is “on Freeze”, the quarterback attempts to draw the defense offside by calling “Go”
several times. If a defensive player jumps offsides, the center snaps the ball and the quarterback takes a knee. If the defense does not jump, the quarterback calls “Set, Go” and the offense runs the play called in the huddle.
• When the quarterback calls the play “On Three”, he will try to draw the defense offside by accenting the
second “Go”, pausing, and then calling the third “Go”. NUMBERING SYSTEM All plays will use a two-digit numbering system. The first digit of each play will be it’s “series” number. The 10-40 series is our running game and series 50-90 is our passing game. The series number for all plays are as follows:
10 Series - Quarterback Runs 20 Series - Tailback Runs 30 Series - Fullback Runs 40 Series - Slot/Wing/Deep Back Runs 50 Series - Rollout pass protection to the left 60 Series - Rollout pass protection to the right 70 Series - Base pass protection to the left 80 Series - Base pass protection to the right 90 Series - Quick pass protection. “Rip/Liz” call will determine right/left.
Running plays will be called with a two digit number followed by a block-action term (ex. 26 Power). The first number is the series number and will designate which player will carry the ball. The second number is the hole number and designates the gap the ball carrier is expected to run through. The block-action term designates the blocking angles or techniques used to open the hole. Passing plays will be called with a two digit number followed by any special route assignments or backfield releases (if any). These special route assignments are called “tags”. We will most often tag a route to compensate for specific adjustments made by the defense to stop our base patterns. Sometimes a passing play will be preceded by a protection call. These special protection calls are used when we want to deviate from our base protection calls. The first number in a passing play is the series number and will determine the quarterback’s drop, the line protection used, and the front side of any pass patterns. The second number is the pattern number and designates which one of our pass patterns our receivers will run. We will hold all backs in the backfield for pass protection unless specifically called into the route (ex. F Swing designates the fullback to run a swing route).

PLAY ACTION PASSING The system we use for play action passes is possibly the most complicated part of our offense. Play action passes will use a three digit number followed by a pass series descriptor. Because this system is cumbersome to call, we will never audible into a play action pass. A possible play action call may sound like this: “Slot Right 723 Slant F Middle”. The first digit of our three digit number tells the QB and receivers which pass protection we are using. The number “5” designates the left side as the front side with the QB rolling to that side and the offensive line using roll protection. The number “7” designates the left side as the front side with the QB using a straight drop back and the line using base protection, etc. The next two numbers will describe the run action that we are faking, as follows:
• 23/24 Zone/BOB
• 33/34 Belly
• 25/26 Power
• 27/28 Stretch
• 47/48 Reverse
The run action numbers are followed by a verbal description of the pass series we want to run and any tags or backfield routes. So, “723 Slant F Angle” means we are faking “23 Zone”, the receivers are running the Route #3 Slant series patterns, the Fullback is running an Angle route, the line is using base protection, and the QB is dropping straight back after faking. AUDIBLES We have several ways to get into another play at the LOS. With the use of “hot” calls and “check with me” calls, our offensive system becomes “live” and can change and adapt to weaknesses in the defense. We are able to audible to another play in the following ways:
• Hot Call — We will choose a “hot” color before each game. If this hot color is called at the LOS,
it alerts the offense that the QB is changing the play at the line. On all hot color calls, the snap count will change to 1. 1. Ex.: Hot color is Black. In the huddle, the QB calls “31 Belly on 1”. At the LOS, the QB calls,
“Even, Set, Black 27 Stretch, Black 27 Stretch”, the play changes to 27 Stretch on 1.
• Check with Me — Sometimes we will want to take advantage to a defensive alignment by
choosing between the same type of play (Run to Run, Pass to Pass). The snap call of a Check with Me will be the same as the QB calls in the huddle. 1. Ex.: In the huddle, the QB calls “Check Zone on 3”. At the LOS, the QB calls, “Ray, Set,
Blue 24 Zone, Blue 24 Zone”, the play becomes 24 Zone on 3. 2. Ex.: In the huddle, the QB calls “Check Slant on 2”. At the LOS, the QB calls, “Bear, Set,
Green 63 Out, Green 63 Out”, the play becomes 63 Out on 2.
• Uncovered Calls — We will attempt to throw to uncovered receivers at every opportunity. If the
QB notices that a receiver is uncovered at he LOS, he has the option to change the huddle call and throw to the receiver immediately. The two calls are “Silver” and “Gold” and each call represents a different type of throw and will be detailed in a later section. On all Silver/Gold calls, the snap count changes to 1. 1. Ex.: In the huddle, the QB calls, “25 Power on 1”. At the LOS, the QB calls, “Lou, Set, Silver
26 Power, Silver 26 Power”, the play changes to a “Silver” uncovered throw on 1.
• “Easy” — If a situation arises when the QB has called a Quick snap count in the huddle, but then
wants to change the play at the LOS, we need a way to alert the offense that an audible is coming. If the QB calls Easy, the offense is alerted to wait for the audible call. The QB can use

any color after an Easy call and the snap count changes to 1. 1. Ex.: In the huddle, the QB calls, “89 F Swing on Quick”. At the LOS, the QB calls, “Easy,
Ray, Set, Red 86, Red 86”. The play changes to 86 on 1. ATTACK OFFENSE “Attack” is our code word for no huddle. The coach will give the quarterback the attack signal and the players will hurry to the line in a Twins formation. Then the coach will call a series of three play numbers (ex. 26-71-91). The middle number is the live play call. The snap count during our attack offense is always “On Quick”. There may be situations when we want to tag a route or add a pass protection call to the play. In that case, the tag is added after the three play numbers are called in. For example, a call of “71 - 83 - 99 - Short”, means the play to be run is “83 Short”. The quarterback relays the three numbers to each side of the formation then gets ready to call the snap. The quarterback does not call “Ready - Go” until he sees that all players are set. When we are in Attack mode, controlling the clock is vital. We need to be mindful of the clock at all times and get out of bounds with the ball at every opportunity. It is the responsibility of the QB to keep everyone appraised of the time remaining and to know how many timeouts we have left. Champions are people who can do their best in emergencies, whereas the ordinary player collapses. Our attack offense requires poise, hustle, execution, confidence, communication, and the ability to make a big play when a big play is needed.

The most critical component of our offense is that we must force defenses to cover down on each and every split receiver in our formations. We will accomplish this by throwing to an uncovered receiver at every opportunity. This relentless attack on the defense gives us many advantages in the implementation of our game plan. First, by forcing the defense to cover down on each receiver, we put a defender in pass coverage that might have been used in run support or in the pass rush. We would rather have this defender outside the box because it allows us to soften running lanes and lessen the pass rush. In terms of pass protection, when a defense is forced to cover all receivers more closely, identifying pass rushers and coverage men is greatly simplified. If a defender who has been consistently forced
C
S F
W B M C C
S F
W B M
C
Uncovered Receiver
Seven defenders (potential rushers) in the box.
Six defenders (potential rushers) in the box.
W “covers down” on the #2 receiver
outside the box is going to rush, he must either make his intentions known by abandoning his receiver or be forced to rush from a greater distance. If a defender shifts into rush position, we have the ability to call a receiver into pass protection, if necessary, or throw hot. Throwing to uncovered receivers is also important because of the consistency and proficiency of the throws we will make. If we execute them properly, we should complete these passes nearly 100% of the time and average between five and ten yards-per-attempt. At best, these uncovered throws can turn into big gains in the hands of an elusive receiver. At worst, we should gain four to five yards, keep ourselves in good down-and-distance situations, and eventually force honesty by the defense. We have two types of uncovered throws, each with a distinct audible color. Keep in mind that we must take a common sense approach to our uncovered throws. For example, we do not want to throw uncovered in third-and-long or in situations where we need long gains late in the game.
C
S F
W B M C C
S F
W B M
C
If “W” moves into rush position, we have the ability to call in an extra protector or throw hot.
If “W” does not shift into blitz position before the snap, he is forced to rush from a greater distance.
UNCOVERED RECIEVERS

step, level on the second step, and turn upfield on the third step and look for the ball. Once the receiver catches the ball, he should look to split defenders north and south. The key to Gold lies in the other receiver, or receivers, who block the most dangerous receivers over them. These receivers must initiate and maintain contact in their blocks until the whistle blows. Once the defense comes to grips with the fact that we will throw uncovered, they will employ tactics to attempt to derail our quick throws. Quarterbacks and receivers must constantly be aware of these tactics so that the following adjustments may be made. The first common problem is defenders that break hard on the uncovered routes after the snap. We will usually see this tactic first in practice as our own defenders start to recognize our uncovered audibles. We will first discuss the Silver adjustment after the snap. The QB must read the adjusting defender and “fake” the uncovered throw, letting the defender go by and allowing the receiver to break upfield. The
Our first uncovered audible color is “Silver”. At the line, the QB uses Silver as the hot color to alert all players that we are throwing uncovered. Silver can be run to any receiver, but is most commonly run to the #2 receiver. The technique for the uncovered receiver in Silver is to take two 45º angle steps, then turn and show his numbers to the QB. All other receivers use releases that turn the hips and shoulders of the nearest defender away from the player getting the ball. The QB takes one angled step and makes the throw to the receiver’s upfield number. The second uncovered throw we will use is called “Gold”. Gold functions much like a quick, bubble screen and is an excellent alternative when the alignment of the defenders makes the Silver throw awkward. Gold is always run to the inside most “loose” receiver who runs a “bubble” route—gain depth on the first
M B C
F
M B
C
F “SILVER” “SILVER”
Uncovered: take two 45º steps then show numbers to QB.
Covered: outside release, force C to turn away from uncovered.
Uncovered: take two 45º steps then show numbers to QB.
Covered: release away from uncovered, force defenders to turn away from uncovered.
M B C
F
M B
C
F “GOLD” “GOLD”
Uncovered: runs miniature swing route (bubble).
Covered: blocks most dangerous defenders.
Uncovered: runs miniature swing route (bubble).
Covered: blocks most dangerous defenders.
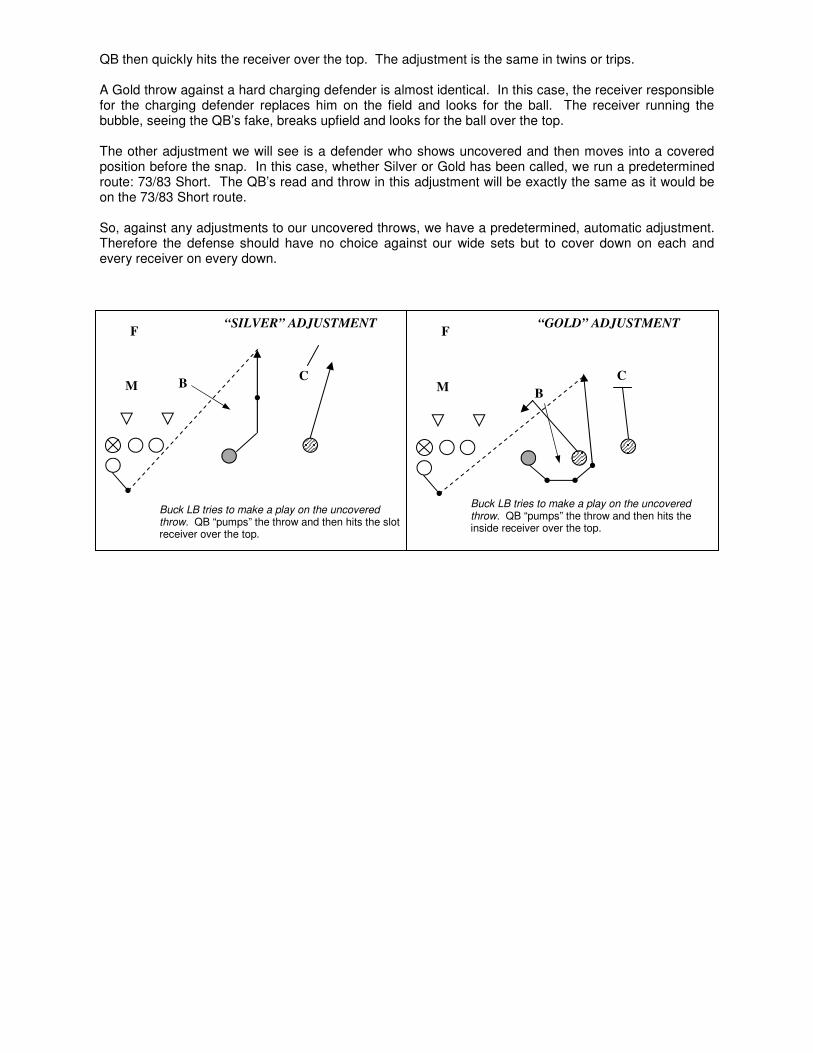
QB then quickly hits the receiver over the top. The adjustment is the same in twins or trips. A Gold throw against a hard charging defender is almost identical. In this case, the receiver responsible for the charging defender replaces him on the field and looks for the ball. The receiver running the bubble, seeing the QB’s fake, breaks upfield and looks for the ball over the top. The other adjustment we will see is a defender who shows uncovered and then moves into a covered position before the snap. In this case, whether Silver or Gold has been called, we run a predetermined route: 73/83 Short. The QB’s read and throw in this adjustment will be exactly the same as it would be on the 73/83 Short route. So, against any adjustments to our uncovered throws, we have a predetermined, automatic adjustment. Therefore the defense should have no choice against our wide sets but to cover down on each and every receiver on every down.
M B C
F
M
F “SILVER” ADJUSTMENT “GOLD” ADJUSTMENT
Buck LB tries to make a play on the uncovered throw. QB “pumps” the throw and then hits the slot receiver over the top.
Buck LB tries to make a play on the uncovered throw. QB “pumps” the throw and then hits the inside receiver over the top.
B
C

QB
GO
HITCH
SLANT
CURL
DIG
POST FLAG
OUT
STOP
QK OUT
SWING
WHEEL
MIDDLE DRAG
WHIP
WR & TE PASSING TREE
QB
RB PASSING TREE
GO
WHEEL
SWING
MIDDLE
ANGLE
STOP
FLAT
POST
FLAG
PLUG CURL
CROSS
DOG
THRU
HOOK
PASSING TREES
ARROW FLAT
OUT

HOLE NUMBERING & BASE SPLITS
3 ft. 3 ft. 3 ft. 3 ft. 3 ft. 3 ft. 8-14 yds. 8-14 yds.
5 yds.
7 yds.
GAP IDENTIFIERS
DEFENSIVE ALIGNMENT IDENTIFIERS
0 3 5 7 1 2 4 8 6
D C B A A B C D
9 8 7 6 5 4 3 2 1 7 8 9 4 5 6 1 2 3 0 0 N

Come downhill toward
the QB if you are
deeper than 18 yards
and on the sideline.
S T A Y O N Y O U R L E V E L
S T A Y O N Y O U R L E V E L
S T A Y O N Y O U R L E V E L
“AWAY” SIDE SCRAMBLE SIDE
6
18
12
18
12
6
If you’re on a level deeper than 18
yards and coming from the away side,
angle deep behind everyone when you
cross the original position of the ball.
When you reach the side-
line, turn upfield deep.
When you reach the sideline, come
back in toward the QB under control
and aware of the next inside defender.
SCRAMBLE RULESSCRAMBLE RULESSCRAMBLE RULESSCRAMBLE RULES
Scramble rules accomplish two specific things for our offense. First they enable us to stay out of bad plays by creating a longer, legitimate opportunity for our quarterback to find a place to throw the ball. Second, understanding where to go on a scramble opens up big play opportunities since coverage responsibilities and angles often break down late in the play. Some general rules apply when we are in a scramble situation: Receivers:
• Outside of a few select spots on the field, work toward the quarterback and into his field of vision.
• If you are coming from the “away” side, stay on your level and do not drift to different depths.
• If someone ahead of you is on your level, move up to the next level of the grid.
• Once you are in the quarterback’s vision, cut the throttle to stay in an open window.
Quarterbacks:
• Throw between defenders into clearly open lanes, not over them.
• Never attempt to drop a ball over a retreating defender.
• Never lose the ball late in the middle.
• Always be aware of the original line of scrimmage.


PERSONNEL GROUPINGSPERSONNEL GROUPINGSPERSONNEL GROUPINGSPERSONNEL GROUPINGS
We have the ability to use up to six different personnel packages in any game. In each game we will have a default package — this group will begin the game and every series unless we call for a change. The coach will call the name of the personnel group three times (ex. Quick, Quick, Quick) and the appropriate players should enter the game immediately. We will announce the groupings and associated players at our Thursday practice and have a list of the packages posted in the locker room before each game.
FORMATIONSFORMATIONSFORMATIONSFORMATIONS
When assigning names to our formations, single-syllable words are used whenever possible to cut down the “wordiness” of the play call. Backs should remember that our default backfield set is “I”. We will use split and offset backfields as well, but our primary alignment is “I”. The “Pro” formation is out default formation. If we “tag” the Pro formation in any way, the tag can, and will, replace Pro in the formation call. For example, “Pro Right Strong” becomes “Strong Right”. The following pages diagram some of the various formations we will use throughout the season. Following the base formations is a list of backfield sets and receiver sets that we will use. We will use these abbreviations for the skill positions in the formation diagrams:
• T — Tailback
• F — Fullback
• X — Split End
• Y — Tight End
• Z — Flanker
• H — Second Tight End or Third Wide Receiver
BASE BIG JUMBO
2 RB’s 1 RB 2 RB’s
2 WR’s 2 WR’s No WR’s
1 TE 2 TE’s 3 TE’s
SPREAD QUICK FAST
2 RB’s 1 RB No RB’s
3 WR’s 4 WR’s 5 WR’s
No TE’s No TE’s No TE’s
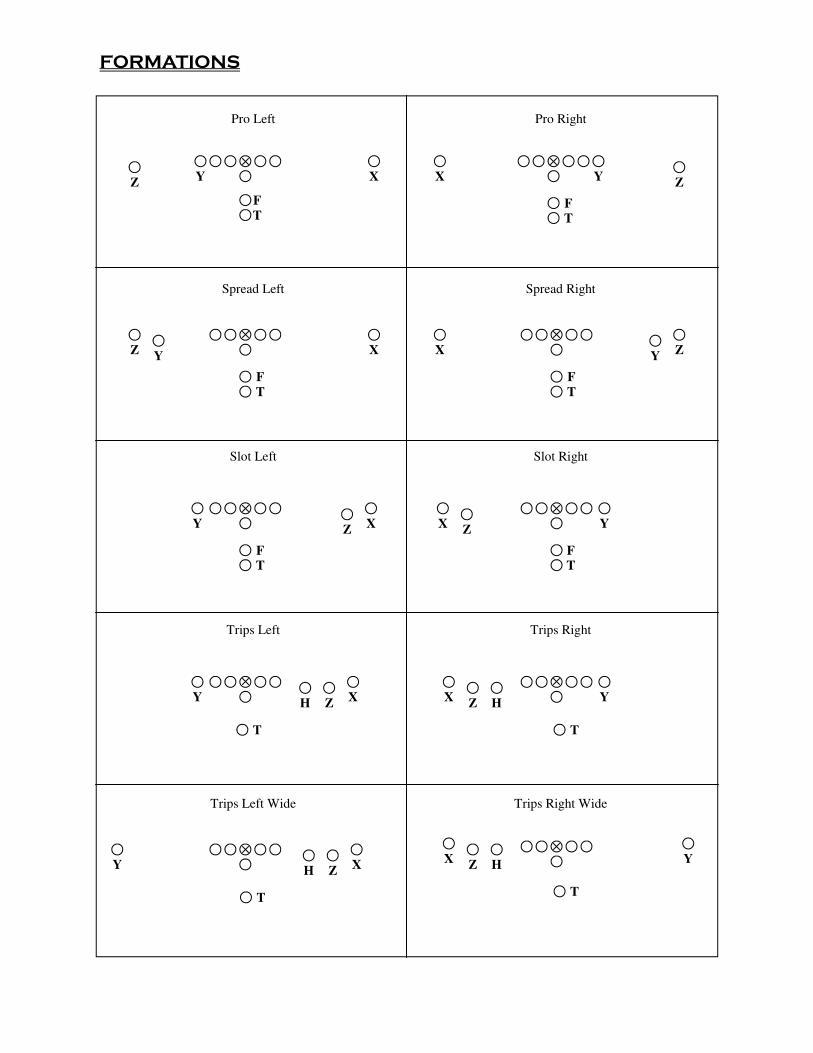
Pro Left Pro Right
Spread Right
Slot Right
Trips Right
Trips Right Wide
Slot Left
Trips Left
Trips Left Wide
X Y Z
T F
Spread Left
X Y
Z
T F
X Y Z
T F
X Y Z H
T
X Y Z H
T
X Y
Z
T F
X Y Z
T
F
X Y Z
T F
X Y Z H
T
X Y Z H
T
FORMATIONS

Trey Left Trey Right
Trey Right Tight Trey Left Tight
Ace Right
Twins Right
Doubles Right
Ace Left
Twins Left
Doubles Left
X Y Z H
T
X Y Z H
T
X Y Z H
T
X Y Z H
T
X Y Z
T
F X Y Z
T
F
X Y
Z H
T
X Y
Z H
T
X Y Z
H
T
X Y Z
H
T
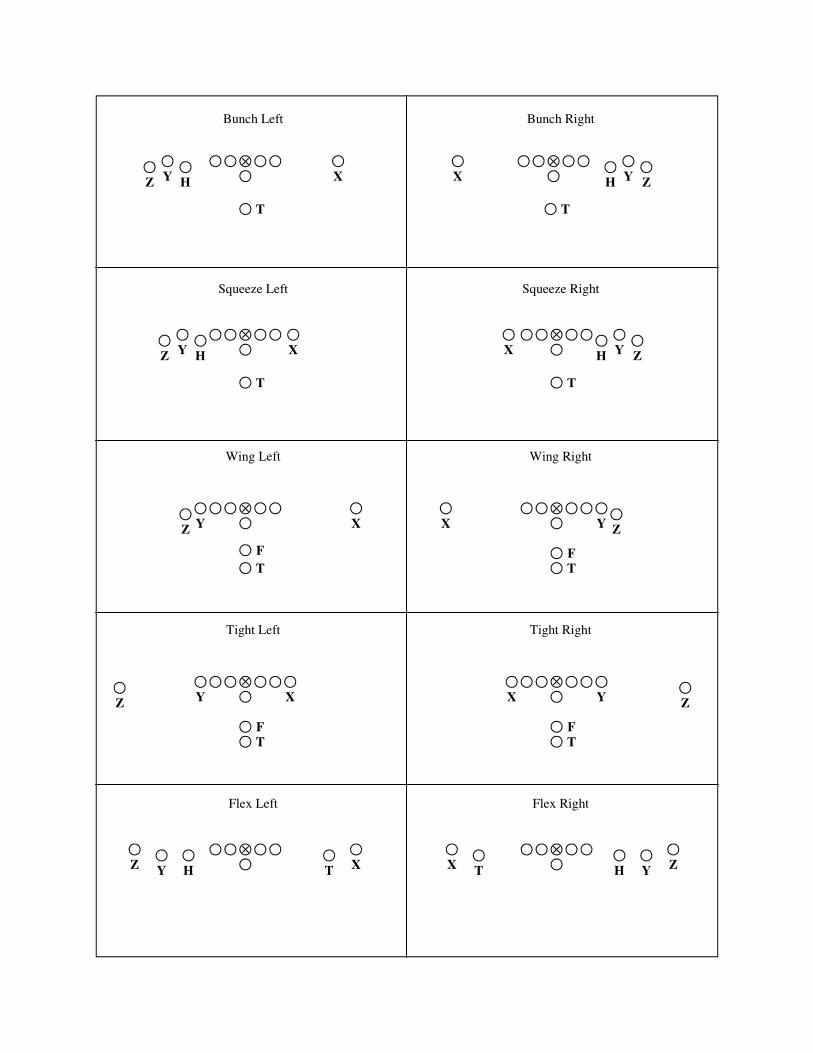
Bunch Left Bunch Right
Squeeze Right Squeeze Left
Wing Right
Tight Right
Wing Left
Tight Left
X Y Z H
T
X Y Z H
T
X Y
F
T
Z X Y
F T
Z
X Y Z
T
F
X Y Z
T
F
X Y Z H
T
X Y Z H
T
Flex Right Flex Left
X Y
Z H T
X Y
Z H T

Tank Right Tank Left
X Y Z
T
F
X Y Z
T
F
Victory (Right)
X Y
Z
T F

Spread Left Split
X Y Z
T F
Split tells running backs to break from the “I” formation. FB aligns to the strong side and the TB to the weak side.
Spread Left Switch
X Y Z
F T
Switch tells running backs to break from the “I” formation. TB aligns to the strong side and the FB to the weak side.
Pro Right Strong
X Y Z
T
F
Strong tells the FB to offset to the strong side.
Pro Right Weak
X Y Z
T
F
Weak tells the FB to offset to the weak side.
Ace Left Gun
X Y Z H
T
Gun from a single-back formation will have the remaining back aligning opposite his teammate.
Spread Right Gun
X Y Z
T F
Gun tells QB to align 6 yards behind LOS even with running backs. Backs use Split alignment rule.
Spread Left Near
X Y Z
T F
Near tells the TB to offset to the strong side.
Spread Left Far
X Y Z
T F
Far tells the TB to offset to the weak side.
BACKFIELD & RECIEVER ALIGNMENTS

Plus Right (Pro Right Plus)
X Y Z
T
F
Plus tells the FB to align one yard outside the TE.
Slot Right Minus
Y Z X F
T
Plus tells the FB to align one yard inside the TE.
Slot Right Wide
X Y Z
T F
Wide tells the TE to align wide to the formation side instead of in his usual tight alignment.
Wing Right Weak
X Y Z
T
F
Wing tells the Z receiver to align on the wing instead of in his usual wide alignment.
Trey Right Tight Flop
X Y Z H
T
Flop tells the X & Y receivers to swap positions.
Trey Left Flip
X Y Z
H
T
Flip tells X and Z to change positions.
Trey Left Tight
X Y Z H
T
Tight tells the X receiver align tight to the formation instead of wide.
Ace Right Close
X Y Z H
T
Close tells the outside receivers to align next to the slot receivers.
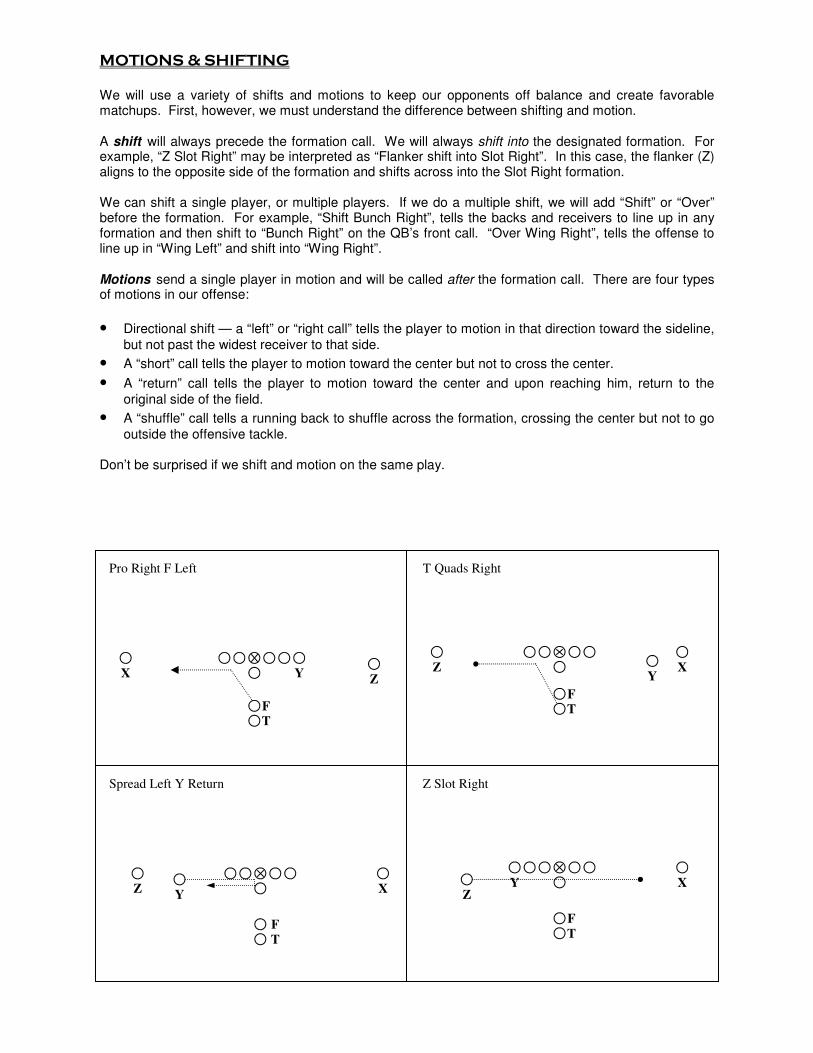
We will use a variety of shifts and motions to keep our opponents off balance and create favorable matchups. First, however, we must understand the difference between shifting and motion. A shift will always precede the formation call. We will always shift into the designated formation. For example, “Z Slot Right” may be interpreted as “Flanker shift into Slot Right”. In this case, the flanker (Z) aligns to the opposite side of the formation and shifts across into the Slot Right formation. We can shift a single player, or multiple players. If we do a multiple shift, we will add “Shift” or “Over” before the formation. For example, “Shift Bunch Right”, tells the backs and receivers to line up in any formation and then shift to “Bunch Right” on the QB’s front call. “Over Wing Right”, tells the offense to line up in “Wing Left” and shift into “Wing Right”. Motions send a single player in motion and will be called after the formation call. There are four types of motions in our offense:
• Directional shift — a “left” or “right call” tells the player to motion in that direction toward the sideline,
but not past the widest receiver to that side.
• A “short” call tells the player to motion toward the center but not to cross the center.
• A “return” call tells the player to motion toward the center and upon reaching him, return to the
original side of the field.
• A “shuffle” call tells a running back to shuffle across the formation, crossing the center but not to go
outside the offensive tackle. Don’t be surprised if we shift and motion on the same play.
MOTIONS & SHIFTING
X Y Z
F
T
Z Slot Right Spread Left Y Return
X Y
Z
F
T
X Y Z
F T
X Y
Z
F T
Pro Right F Left T Quads Right

It is vital, almost critical, that every offensive player is familiar with the variety of fronts and coverages we will see throughout the season. Knowing what to expect and when to expect it will help us feel more comfortable in any given situation on the field. Furthermore, by studying the most common defensive fronts and coverages we will see, we gain a distinct advantage over the defense in several ways. First, it helps us to more readily discern if the front we are seeing is better against the run or the pass. Also, certain fronts are easier to blitz or run stunts from than others. Sometimes a front can also reveal the defense’s coverage to us. By knowing our coverages, we should also know what adjustments we must make in running pass routes and throwing the ball. Versus man coverages, receivers must keep moving in their routes to maintain separation from the defender. QB’s must also throw the ball in a way that “leads” the receiver away from his defender. Versus zone coverages, receivers must find an “open window” to the QB and “sit” in it. QB’s must throw between defenders and let the receiver adjust to the ball. Although defensive coordinators are continually “inventing” new and exotic defenses every year, we can be relatively assured that our study of base fronts and coverages will be adequate for most situations. That being said, the fronts and coverages presented here are only a sample of what we may encounter during the season. We will treat any front or coverage not presented here as a variation on what we already know. Therefore, these pages will serve as a baseline for our knowledge of defenses and any exotic wrinkles that a we expect a team to throw at us will be covered in our weekly scouting report.
DEFENSIVE RECOGNITION
FRONTS
Our front recognition will be based upon the structure of six fronts that we will number 30, 40, 50, 60, 70 & 80. If the fronts are balanced, only the base number will be used. On unbalanced fronts, we will call a two-digit number with the strongside digit first and the weakside second. If a linebacker walks off, the front will be tagged with “Soft” for strongside and “Off” for weakside. A reduced 80 front will be called “Tight”. There are six front calls the that QB will make:
• Odd — indicates the center is covered and both guards uncovered.
• Even — indicates the center is uncovered and both guards covered.
• Bear/Double — indicates a Bear (8-man front) or Double Eagle (7-man front) defense with the
center and both guards covered.
• Ray/Lou — Right/Left strength indication of the four-man side. If two four-man sides exist, the front
call will be made to the offense’s weak side. We will use the following abbreviations for the defensive personnel:
• T — Defensive Tackle
• E — Defensive End
• G — Nose Guard
• B — Buck Linebacker (strong LB in 3-LB sets, strong outside LB in 4-LB sets)
• M — Middle Linebacker (middle LB in 3-LB sets, weak inside LB in 4-LB sets)
• W — Weakside Linebacker (weak LB in 3-LB sets, weak outside LB in 4-LB sets)
• P — Plugger Linebacker (strong inside LB in 4-LB sets)
• C — Cornerback
• S — Strong Safety
• F — Free Safety
• N — Nickel Back
• D — Dime Back

BASE DEFENSIVE FRONTS
E B
M
W G
P
E
W E B
M
T T E E T
M W
G E B
E
M W
T T E
E S
M W
G E B E
B M W
T T E
B
30
“ODD”
40
“EVEN”
50
“DOUBLE”
60
“ODD”
80
“LOU”
70
“BEAR”
S
T
E
B M W
T T E E
M
T T E
40 Off
“EVEN”
40 Soft
“EVEN”
W S
B M
E G E E
W
T T E
Tight
“BEAR”
34 Off
“ODD”
W S
M B S


B M
W
F
S C C
BANJO
COVER 0 No help in the deep middle
WHAT IS IT? A pure man-to-man coverage with no free safety in the middle that enables a maximum number of players to rush the passer and provide excellent run support. HOW IS IT RECOGNIZED? There is no coverage in the deep middle and corners play inside man leverage, extra people lined up to rush off edge from various places. WHAT IS THE PHILOSOPHY BEHIND IT? A roll of the dice that reflects extreme confidence in the cornerback’s and safety’s coverage abilities. The defense feels they will break down our protection before we can get people into the deep middle. WHAT ARE IT’S WEAKNESSES? There is no underneath help for defenders so we must keep moving in our routes. We MUST get a receiver into the deep middle. WHAT MUST WE DO TO BEAT IT?
• Make certain we are fully protected through the use of “check bandit” calls.
• Use effective releases and violent misdirection moves: attack the coverage.
• Lead receivers away from the pressure to create run-after-catch opportunities.
• Create and take advantage of good matchups.
• Make use of rubs and picks.
• Whenever possible, get to the deep middle quickly.
vs. Doubles vs. Trips
C S W M
F
B
C C
W M B
F S C

B M W
F
S C C
COVER 1
WHAT IS IT? A pure man-to-man coverage with a free safety left in the deep middle one-third to help, serving as a “center-fielder”. HOW IS IT RECOGNIZED? Corners tightened down with inside leverage, staring straight at their receiver, a tighter strong safety, and/or defenders chasing motion men across the field instead of bumping or sliding. WHAT IS THE PHILOSOPHY BEHIND IT? To play a pressuring style of defense, gambling that their people can cover receivers one-on-one long enough for the front to pressure the quarterback, knowing that the deep middle defender help can prevent the big play. WHAT ARE IT’S WEAKNESSES? Play-action passes work well here because of the aggressive nature of the defense. Outside routes, picks, and crossing routes are also good choices here because of the inside leverage given and the lack of underneath help. WHAT MUST WE DO TO BEAT IT?
• Use effective releases and violent misdirection moves: attack the coverage.
• Lead receivers away from the pressure to create run-after-catch opportunities.
• Create and take advantage of good matchups.
• Make use of rubs and picks.
• Whenever possible, get to the deep middle quickly.
• Avoid losing the ball deep down the middle where the FS is.
vs. Doubles vs. Trips
C S W M B
C
C W M
B S C
Deep middle 1/3 help, especially vs. Post
Corner depth varies
F F

B M W
C C
COVER 2 ZONE
WHAT IS IT? Zone coverage that plays with two deep safeties each responsible for half of the field, and five short defenders in underneath zones, including two “hard” corners. HOW IS IT RECOGNIZED? Corners are tightened down, normally to six yards or tighter, usually with outside leverage (i.e. quarterbacks can see the stripes on their helmets). Safeties are aligned in the vicinity of each hash at 12 yards or so. WHAT IS THE PHILOSOPHY BEHIND IT? To cut down underneath throwing lanes with extra droppers, and to funnel routes to the inside with hard, low corners. Many times will entail physical cornerback play to try to destroy the timing of pass routes with the jam. Is generally a balanced coverage that also has the ability to “bracket” single receivers. Also used as a run support defense vs. outside runs. WHAT ARE IT’S WEAKNESSES? With only two deep defenders, the deep fade area and deep middle are vulnerable to three fast receivers. The strong side curl zone is also particularly vulnerable if the Buck LB/Nickel Back can be occupied. WHAT MUST WE DO TO BEAT IT?
• Use purposeful, violent releases on the outside to maintain route timing.
• Get people to the deep dead spots quickly and deliver the ball on time.
• Get into open windows, with the quarterback stopping receivers in those windows.
• Use formations to either isolate one underneath player on two receivers or cause an imbalance that
favors us.
vs. Doubles vs. Trips
C
S
W M
F
B C
C W M N
F S
C
F Zone 1/2
Flat Flat Hook/Curl Hook/Curl
Middle S Zone 1/2

B M W
F S
C C
COVER 2 MAN
WHAT IS IT? Man-to-man coverage underneath with two deep safeties to help on either side. Underneath coverage often with tight, inside leverage, or “trail technique”. HOW IS IT RECOGNIZED? Safeties at normal Cover 2 depth near the hashes with corners playing head up to inside leverage instead of outside. WHAT IS THE PHILOSOPHY BEHIND IT? Often a long yardage coverage, Cover 2 Man enables a defense to play aggressive man technique underneath (to eliminate zone holes) while having two safeties to help over the top and prevent deep shots. WHAT ARE IT’S WEAKNESSES? With only two deep defenders, the deep fade area and deep middle are vulnerable to three fast receivers. Picks and crosses are good here especially if receivers remember to keep moving away from their defender when running routes. WHAT MUST WE DO TO BEAT IT?
• Use effective releases and violent misdirection moves: attack the coverage and separate.
• Lead receivers away from the pressure to create run-after-catch opportunities.
• Create and take advantage of good matchups.
• Make use of rubs and picks.
• Whenever possible, get to the deep middle quickly.
• Understand where safety help is and take people away from those safeties with the right reads and
throws.
vs. Doubles vs. Trips
C
S
W M
F
B
C C
F
M
S
D N C
Zone 1/2 Zone 1/2
B M W
F
S C C
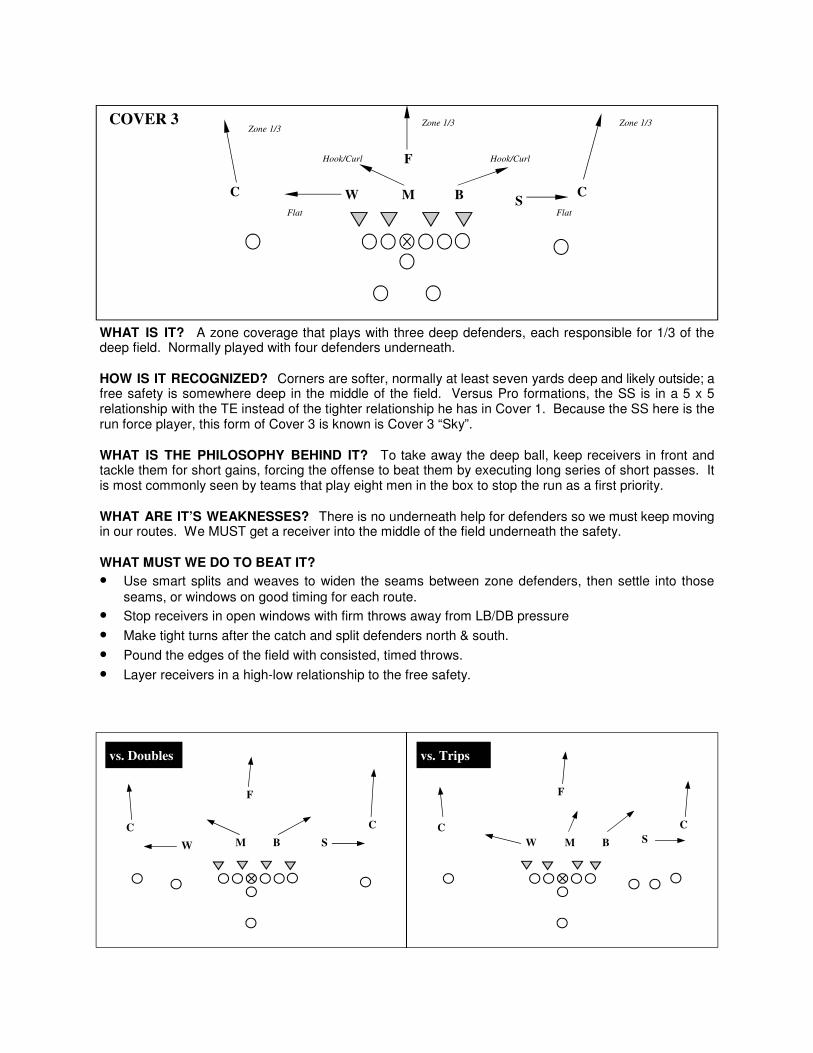
COVER 3
WHAT IS IT? A zone coverage that plays with three deep defenders, each responsible for 1/3 of the deep field. Normally played with four defenders underneath. HOW IS IT RECOGNIZED? Corners are softer, normally at least seven yards deep and likely outside; a free safety is somewhere deep in the middle of the field. Versus Pro formations, the SS is in a 5 x 5 relationship with the TE instead of the tighter relationship he has in Cover 1. Because the SS here is the run force player, this form of Cover 3 is known is Cover 3 “Sky”. WHAT IS THE PHILOSOPHY BEHIND IT? To take away the deep ball, keep receivers in front and tackle them for short gains, forcing the offense to beat them by executing long series of short passes. It is most commonly seen by teams that play eight men in the box to stop the run as a first priority. WHAT ARE IT’S WEAKNESSES? There is no underneath help for defenders so we must keep moving in our routes. We MUST get a receiver into the middle of the field underneath the safety. WHAT MUST WE DO TO BEAT IT?
• Use smart splits and weaves to widen the seams between zone defenders, then settle into those
seams, or windows on good timing for each route.
• Stop receivers in open windows with firm throws away from LB/DB pressure
• Make tight turns after the catch and split defenders north & south.
• Pound the edges of the field with consisted, timed throws.
• Layer receivers in a high-low relationship to the free safety.
vs. Doubles vs. Trips
C
S W M
F
B
C C
W M B
F
S
C
Flat
Hook/Curl Hook/Curl
Flat
Zone 1/3 Zone 1/3 Zone 1/3
B M W
F S
C C
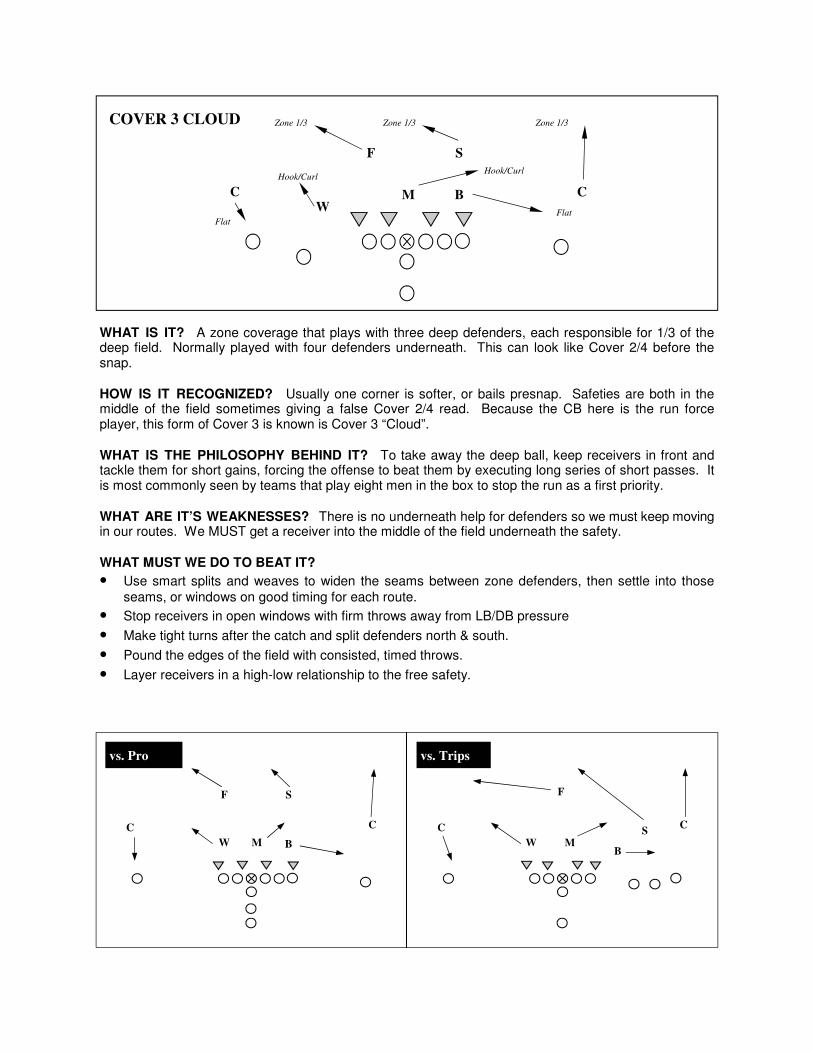
COVER 3 CLOUD
WHAT IS IT? A zone coverage that plays with three deep defenders, each responsible for 1/3 of the deep field. Normally played with four defenders underneath. This can look like Cover 2/4 before the snap. HOW IS IT RECOGNIZED? Usually one corner is softer, or bails presnap. Safeties are both in the middle of the field sometimes giving a false Cover 2/4 read. Because the CB here is the run force player, this form of Cover 3 is known is Cover 3 “Cloud”. WHAT IS THE PHILOSOPHY BEHIND IT? To take away the deep ball, keep receivers in front and tackle them for short gains, forcing the offense to beat them by executing long series of short passes. It is most commonly seen by teams that play eight men in the box to stop the run as a first priority. WHAT ARE IT’S WEAKNESSES? There is no underneath help for defenders so we must keep moving in our routes. We MUST get a receiver into the middle of the field underneath the safety. WHAT MUST WE DO TO BEAT IT?
• Use smart splits and weaves to widen the seams between zone defenders, then settle into those
seams, or windows on good timing for each route.
• Stop receivers in open windows with firm throws away from LB/DB pressure
• Make tight turns after the catch and split defenders north & south.
• Pound the edges of the field with consisted, timed throws.
• Layer receivers in a high-low relationship to the free safety.
vs. Pro vs. Trips
C
S
W M
F
B
C C
W M B
F
S C
Flat
Hook/Curl Hook/Curl
Flat
Zone 1/3 Zone 1/3 Zone 1/3

B M W
F S
C C
COVER 4
WHAT IS IT? A zone coverage that plays with four deep defenders, each responsible for 1/4 of the deep field. Safeties are usually more aggressive - reading the EMLOS and able to play run or pass. Safeties can also align deep and play a true “Quarters” coverage with three to four defenders underneath. HOW IS IT RECOGNIZED? Corners are softer, normally at least seven yards deep and likely outside. Both safeties are closer to the LOS than usual; perhaps as shallow as seven yards. DB’s are usually looking in at the QB at the beginning of the drop. WHAT IS THE PHILOSOPHY BEHIND IT? This is an aggressive run stop defense that also has the flexibility to protect deep. As a “prevent” defense, the safeties align deeper to prevent the big play. The defense wants to take away the deep ball, keep receivers in front and tackle them for short gains in the field of play. WHAT ARE IT’S WEAKNESSES? There is little underneath help for defenders so we must keep moving in our routes. We must get a receiver into the deep middle to hold the safeties if we are to execute in the underneath routes. If we are in our “two minute” offense, RAC is a priority. WHAT MUST WE DO TO BEAT IT?
• Use smart splits and weaves to widen the seams between zone defenders, then settle into those
seams, or windows on good timing for each route.
• Stop receivers in open windows with firm throws away from LB/DB pressure
• Make tight turns after the catch and split defenders north & south.
• Use quick, timed throws to create RAC opportunities and allow receivers to get out of bounds.
vs. Doubles vs. Trips
C
S W M
F
B
C C
W M B
F
S
C
Flat/Curl
Short Middle
Deep 1/4 Deep 1/4
Deep 1/4 Deep 1/4
Flat/Curl

ZONE BLOCKING While we also have running plays in our playbook that use some form of man blocking, the majority of our running plays will use zone blocking. “Zone” blocking gives our offense a “cutback” running game feel and, with the addition of traditional “power”, man blocking plays, fits well within our philosophy of being a multiple offense. The “zone” is different than other running plays because there is no specific point of attack. Though they are usually called to either side of the guard or tackle, they can break open anywhere from tight end to tight end. As a result, the whole defensive front will be stressed. We say that our zone running plays are zero-loss plays; meaning that at worst, we expect a loss or gain of zero yards. At best, however, a talented runningback can pierce the defense for a huge gain. Our goal, however, is to maintain a rush average of 4-5 yards which fits within our philosophy of controlling the clock and the game with the run. On our base inside zone play (ZONE), we must first completely block the first level of the defense. We will create movement from the down defenders by creating double-teams and driving the first level defenders to LB depth at an angle between 30º-45º. This will allow the runner to find a crease for a cutback upfield. It is important to note that the blockers do not release to the LB until either the LB penetrates or the down lineman is driven to LB depth. Our base outside zone play (STRETCH) is designed to stretch the defense laterally across the field at angles between 45º-90º. This lateral movement creates seams that allow the runner to puncture the defense. Because we are attempting to create very wide holes in the defense, the blockers will release to LB depth a bit earlier than on Zone. At the LOS, he first thing a lineman must do is determine whether or not a he is “covered”. If a down lineman is head-up on you or in a playside gap, you are considered “covered”. If there is no down lineman head-up or if there is a lineman in a back side shade, you are considered “uncovered”. If a blocker is uncovered, he is responsible for combo blocking with his playside teammate. If the playside teammate is also uncovered, he works to LB depth immediately. If a blocker is covered, he first checks backside. If his backside teammate is uncovered, they combo block. If his backside teammate is covered, he man blocks the defender alone. The way we combo block to the second level is what differentiates our two zone running plays: ZONE: From the combo block, both blockers keep their eyes on the LB at the second level. If the LB penetrates playside, the playside blocker peels off and blocks him while the backside teammate remains on the down lineman. If the LB penetrates backside, the backside blocker peels. STRETCH: From the combo block, the backside blocker attempts to “take over” the block on the lineman from his playside teammate and bumps him off the block and to LB depth. Once this “take over and bump” is accomplished, the playside blocker attempts to seal the first level two defender to the inside.
INTERIOR LINE BLOCKING RULES

COVERED vs. UNCOVERED
∗ LG, RG, TE are covered
∗ LT, C, RT are uncovered
INSIDE ZONE BLOCK RULES (ZONE)
∗ LG & LT combo as well as C & RG
∗ C & RG are responsible for Mike LB, since Mike was
initially lined up over C.
OUTSIDE ZONE BLOCKING RULES (STRETCH)
∗ LT, C, & RT reach block, getting movement on the DL
and releasing the combo blocker
∗ RG, RT, TE get initial movement on DL and then block
to level two when released by backside blocker
ZONE vs. Double/Bear (44, 40 Nickel, Split-6)
∗ LG is uncovered with uncovered teammate playside
∗ LG chips backside and goes to level two
∗ Other Lineman Zone normally
∗ C & RG responsible for Buck LB
PLAYSIDE PLAYSIDE
STUNTS vs. ZONE
∗ If LB stunts inside, playside blocker man blocks DL and
backside blocker man blocks LB
∗ If LB stunts outside, backside blocker blocks normally
and playside blocker waits for LB and stretches him
LB Alignments
∗ Here, the Buck LB crowds the line before the snap and
the linemen change the blocking scheme
∗ The RT is now covered along with the RG and TE
∗ TE & RT must man block, all others zone block
∗
∗
M B
B
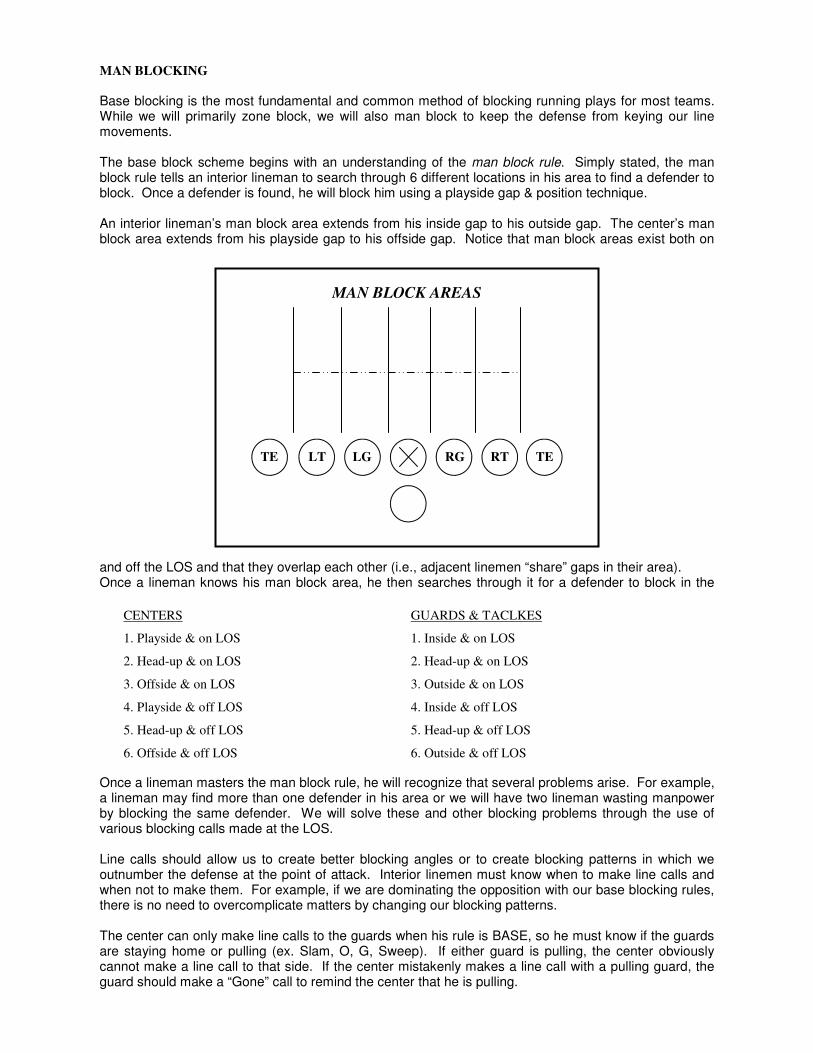
MAN BLOCKING
Base blocking is the most fundamental and common method of blocking running plays for most teams. While we will primarily zone block, we will also man block to keep the defense from keying our line movements. The base block scheme begins with an understanding of the man block rule. Simply stated, the man block rule tells an interior lineman to search through 6 different locations in his area to find a defender to block. Once a defender is found, he will block him using a playside gap & position technique. An interior lineman’s man block area extends from his inside gap to his outside gap. The center’s man block area extends from his playside gap to his offside gap. Notice that man block areas exist both on
TE LT LG RG RT TE
MAN BLOCK AREAS
and off the LOS and that they overlap each other (i.e., adjacent linemen “share” gaps in their area). Once a lineman knows his man block area, he then searches through it for a defender to block in the
CENTERS GUARDS & TACLKES
1. Playside & on LOS 1. Inside & on LOS
2. Head-up & on LOS 2. Head-up & on LOS
3. Offside & on LOS 3. Outside & on LOS
4. Playside & off LOS 4. Inside & off LOS
5. Head-up & off LOS 5. Head-up & off LOS
6. Offside & off LOS 6. Outside & off LOS
Once a lineman masters the man block rule, he will recognize that several problems arise. For example, a lineman may find more than one defender in his area or we will have two lineman wasting manpower by blocking the same defender. We will solve these and other blocking problems through the use of various blocking calls made at the LOS. Line calls should allow us to create better blocking angles or to create blocking patterns in which we outnumber the defense at the point of attack. Interior linemen must know when to make line calls and when not to make them. For example, if we are dominating the opposition with our base blocking rules, there is no need to overcomplicate matters by changing our blocking patterns. The center can only make line calls to the guards when his rule is BASE, so he must know if the guards are staying home or pulling (ex. Slam, O, G, Sweep). If either guard is pulling, the center obviously cannot make a line call to that side. If the center mistakenly makes a line call with a pulling guard, the guard should make a “Gone” call to remind the center that he is pulling.

TE LT LG RG RT TE
Example of an interior lineman’s search through his area for a defender to block.
6 5 4
3 2 1 1 2 3
4 5 6
TE LT LG RG RT TE
Example of center’s search through his area for a defender to block.
6 5 4
3 2 1
PLAYSIDE
Guards may receive line calls from either the center or the tackle, but does not make calls himself. If the guard receives calls from both the center and tackle, he must always honor the center’s call and call “Off” to the tackle. Tackles make calls to either the guard or tight end (if available). One thing for the tackle to remember is that if the guard returns an “Off” call, the tackle must simply man block the defender to his side. If there are multiple defenders, the tackle blocks the defender closest to the point of attack. The following pages will diagram the various line calls we will employ. If other calls are needed for specific opponents, they will be added during our preparation for that opponent.

GAS (playside guard & snapper)
∗ Defender in or shaded to the playside gap
∗ Defender on playside guard’s inside shoulder
∗ Extremely tough head-up nose guard
SAG (backside guard & snapper)
∗ Defender in or shaded to the backside gap
∗ Defender on backside guard’s inside shoulder
∗ Backside guard covered in an even front
TAE (tackle & end) (pronounced “tee”)
∗ Best used against a long front to free the TE to block at
the C gap POA or allow him better access upfield
TAG or GAT (tackle & guard)
∗ POA outside tackle’s position
∗ Defender shading tackles inside
∗ Defender in B gap
∗ Defender covering the guard
PLAYSIDE PLAYSIDE
“G”
∗ Used by playside guard on Sweep & Toss
∗ Kick out a penetrating DE or LB
∗ If defender crashes, block him into the pile
∗ If guard is covered, convert to “DOWN” block
“O”
∗ Used by backside guard on Counter & Reverse
∗ Kick out a penetrating DE or LB
∗ If defender crashes, block him into the pile
BINGO
∗ Defenders in both A gaps
∗ Playside guard blocks MAN, backside guard and
center execute SAG block
∗ Backside guard must loop two blockers
DOWN
∗ Used when “G” must be called off because the guard if
covered.
∗ Tackle blocks man over guard, TE blocks man over
tackle.
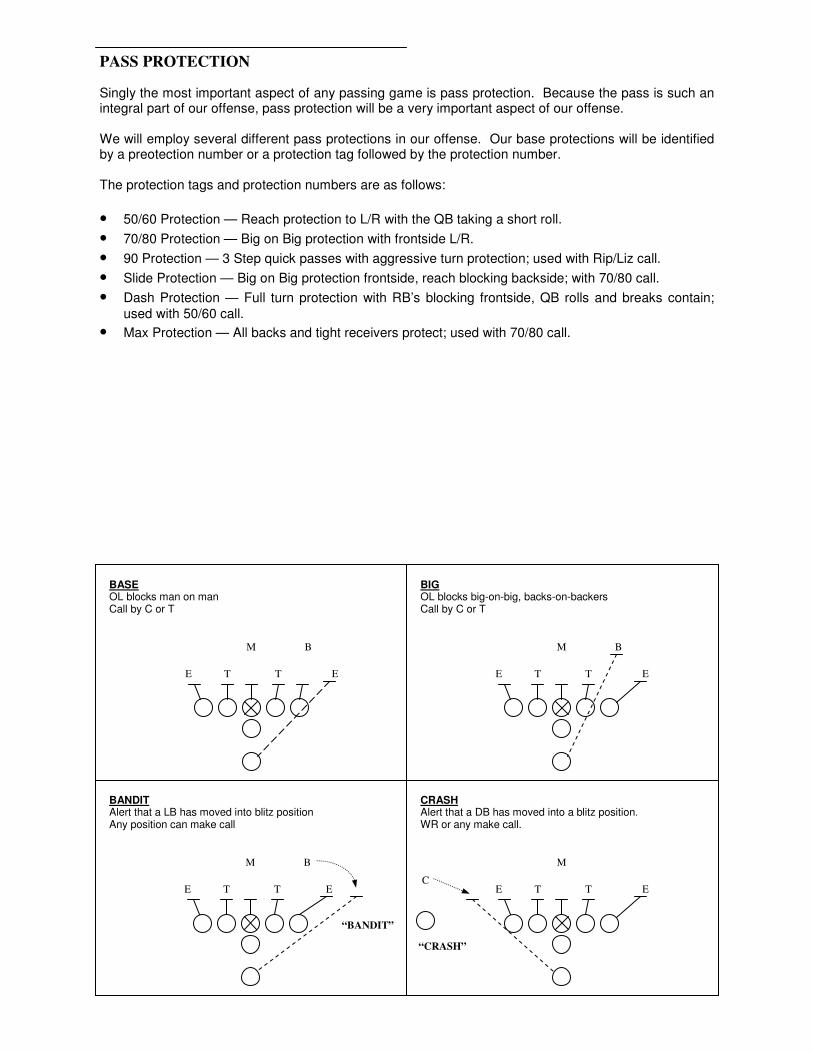
PASS PROTECTION
Singly the most important aspect of any passing game is pass protection. Because the pass is such an integral part of our offense, pass protection will be a very important aspect of our offense. We will employ several different pass protections in our offense. Our base protections will be identified by a preotection number or a protection tag followed by the protection number. The protection tags and protection numbers are as follows:
• 50/60 Protection — Reach protection to L/R with the QB taking a short roll.
• 70/80 Protection — Big on Big protection with frontside L/R.
• 90 Protection — 3 Step quick passes with aggressive turn protection; used with Rip/Liz call.
• Slide Protection — Big on Big protection frontside, reach blocking backside; with 70/80 call.
• Dash Protection — Full turn protection with RB’s blocking frontside, QB rolls and breaks contain;
used with 50/60 call.
• Max Protection — All backs and tight receivers protect; used with 70/80 call.
BASE OL blocks man on man Call by C or T
E E T
B M
T E E T
B M
T
BIG OL blocks big-on-big, backs-on-backers Call by C or T
BANDIT Alert that a LB has moved into blitz position Any position can make call
E E T
B M
T
CRASH Alert that a DB has moved into a blitz position. WR or any make call.
E E T
M
T C
“BANDIT”
“CRASH”
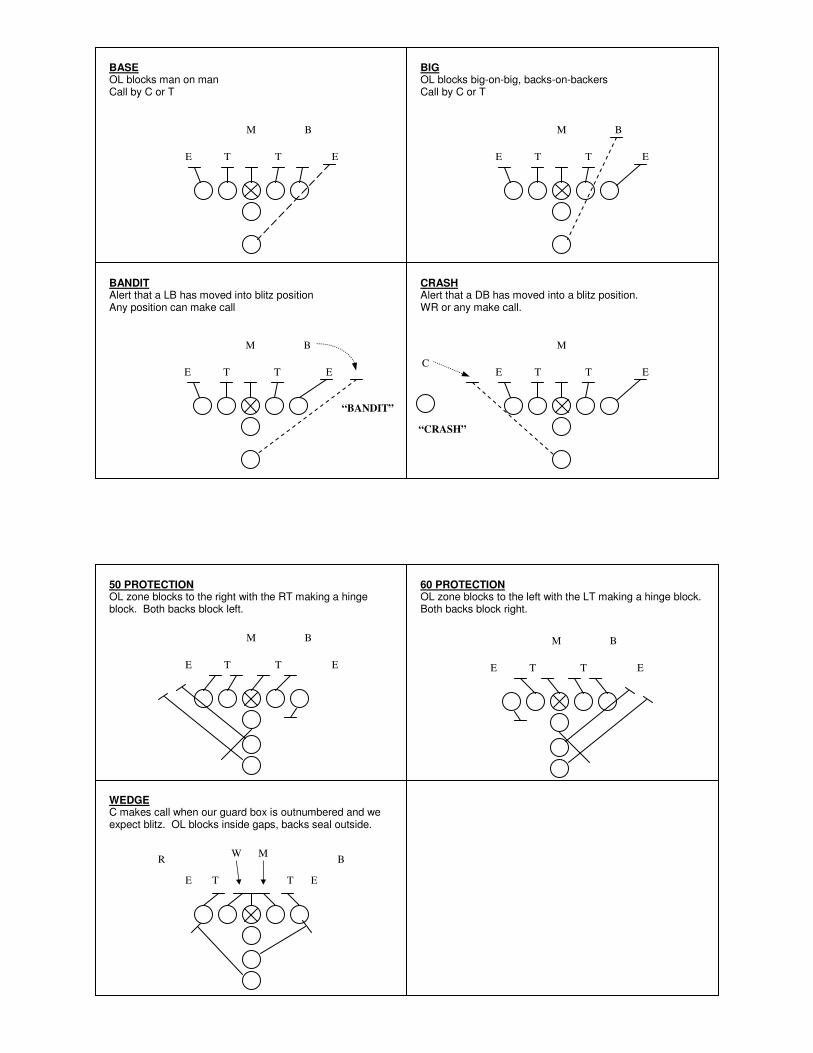
50 PROTECTION OL zone blocks to the right with the RT making a hinge block. Both backs block left.
60 PROTECTION OL zone blocks to the left with the LT making a hinge block. Both backs block right.
E E T
B M
T E E T
B M
T
WEDGE C makes call when our guard box is outnumbered and we expect blitz. OL blocks inside gaps, backs seal outside.
E E T
M W
T
R B
BASE OL blocks man on man Call by C or T
E E T
B M
T E E T
B M
T
BIG OL blocks big-on-big, backs-on-backers Call by C or T
BANDIT Alert that a LB has moved into blitz position Any position can make call
E E T
B M
T
CRASH Alert that a DB has moved into a blitz position. WR or any make call.
E E T
M
T C
“BANDIT”
“CRASH”

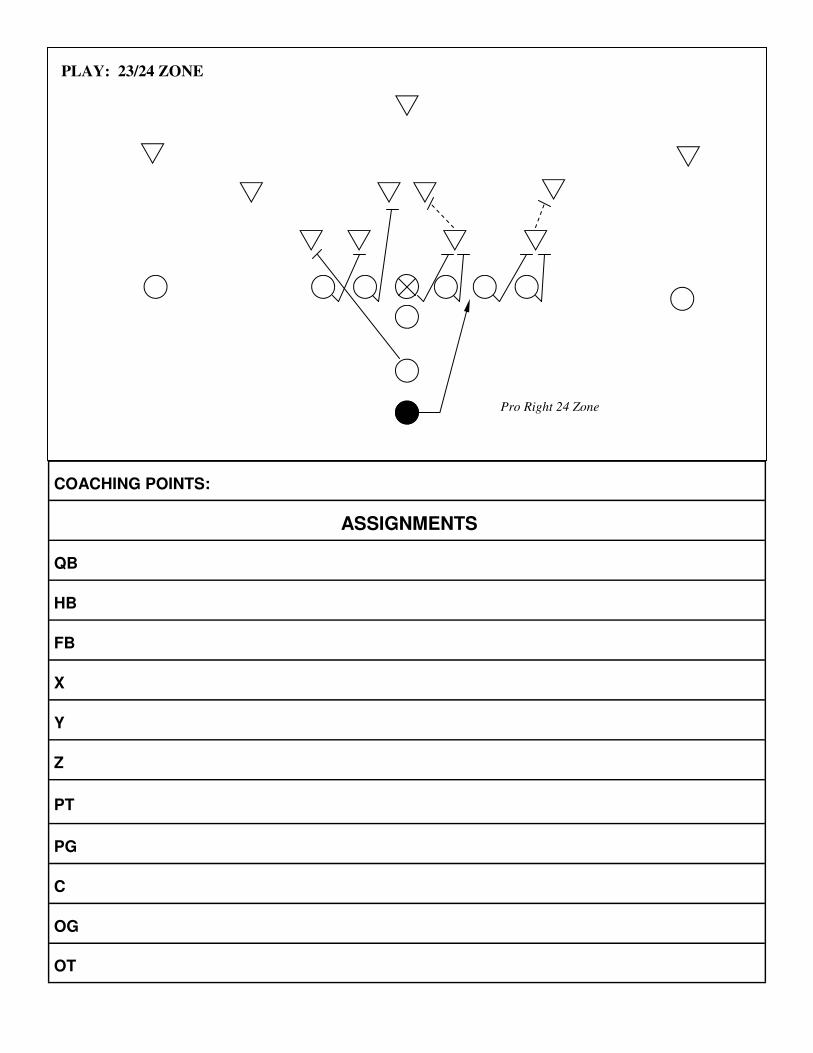
PLAY: 23/24 ZONE
Pro Right 24 Zone
ASSIGNMENTS
QB
HB
FB
X
Y
Z
PT
PG
C
OG
OT
COACHING POINTS:

“TAG” “SAG” “GAS”
23/24 LEAD vs. various fronts

PLAY: 25/26 POWER
C.P.: F kicks EMLOS if he penetrates, hook block if he flattens.
Pro Right 26 Power
vs. 4-3
vs. 3-4 vs. 46
vs. 5-2

vs. 4-3
vs. 3-4 vs. 46
vs. 5-2
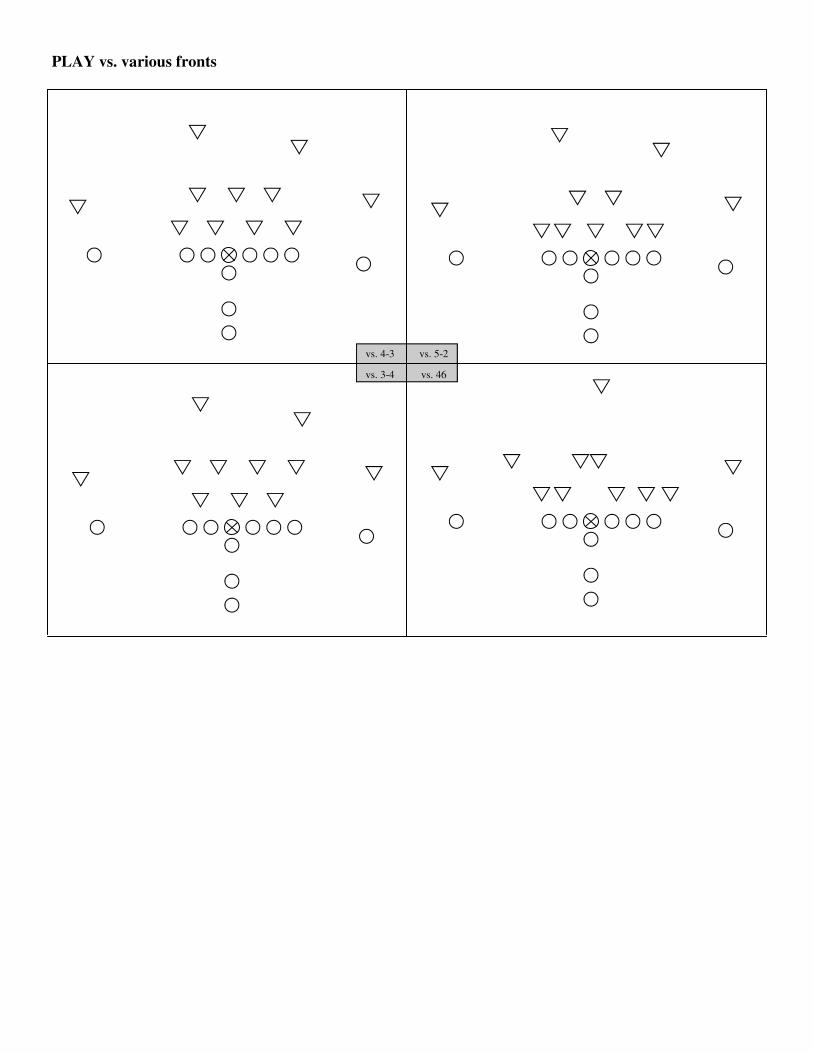
PLAY vs. various fronts

vs. 4-3
vs. 3-4 vs. 46
vs. 5-2
PLAY: 31/32 DIVE
C.P.:
Pro Right 31 Dive

vs. 4-3
vs. 3-4 vs. 46
vs. 5-2
PLAY vs. various fronts
vs. 4-3
vs. 3-4 vs. 46
vs. 5-2
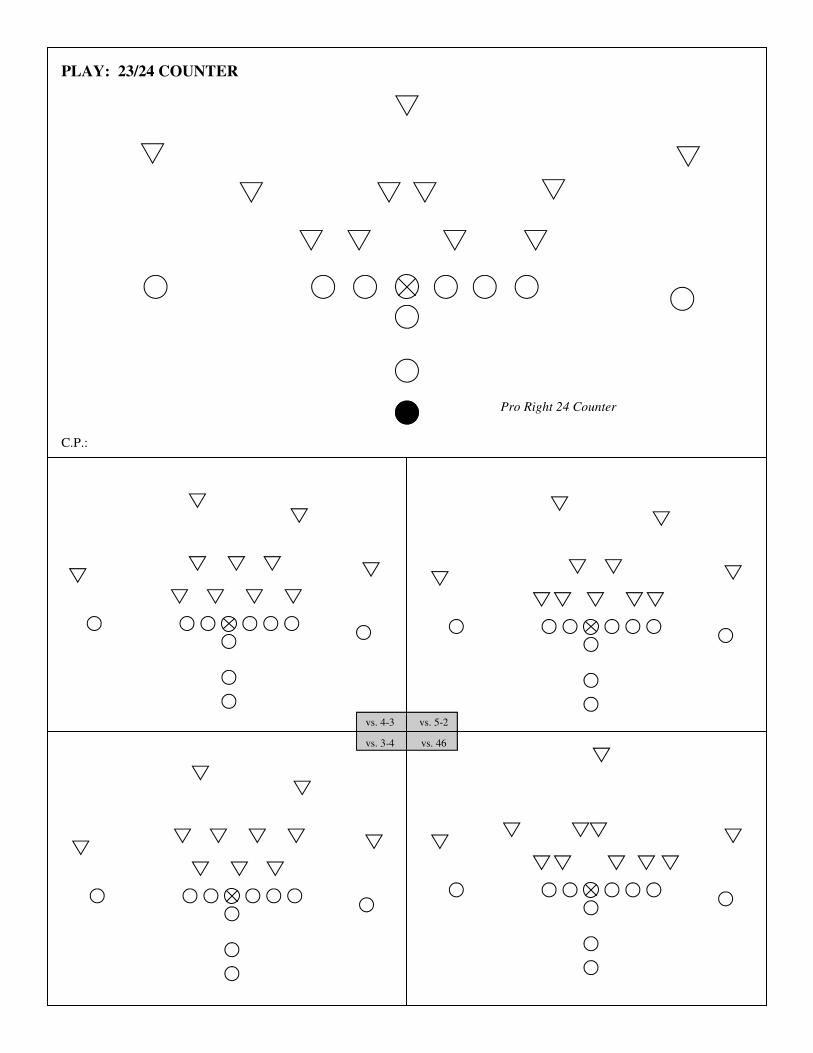
PLAY: 23/24 COUNTER
C.P.:
Pro Right 24 Counter

vs. 4-3
vs. 3-4 vs. 46
vs. 5-2
PLAY vs. various fronts

vs. 4-3
vs. 3-4 vs. 46
vs. 5-2
PLAY: 47/48 REVERSE
C.P.:
Pro Right

vs. 4-3
vs. 3-4 vs. 46
vs. 5-2
PLAY vs. various fronts

vs. 4-3
vs. 3-4 vs. 46
vs. 5-2
PLAY: TOSS
C.P.:
Pro Right 26 Power

vs. 4-3
vs. 3-4 vs. 46
vs. 5-2
PLAY vs. various fronts

vs. 4-3
vs. 3-4 vs. 46
vs. 5-2
PLAY: GUT
C.P.:
Pro Right 26 Power

vs. 4-3
vs. 3-4 vs. 46
vs. 5-2
PLAY vs. various fronts

vs. 4-3
vs. 3-4 vs. 46
vs. 5-2
PLAY: STRETCH
C.P.:
Pro Right 26 Power

vs. 4-3
vs. 3-4 vs. 46
vs. 5-2
PLAY vs. various fronts

vs. 4-3
vs. 3-4 vs. 46
vs. 5-2
PLAY: FLICK
C.P.:
Pro Right 26 Power

vs. 4-3
vs. 3-4 vs. 46
vs. 5-2
PLAY vs. various fronts

vs. 4-3
vs. 3-4 vs. 46
vs. 5-2
PLAY: CHOICE
C.P.:
Pro Right 26 Power
vs. 4-3
vs. 3-4 vs. 46
vs. 5-2
PLAY vs. various fronts

PATTERN #1—”CURL” PACKAGE
FIVE-STEP DROP
DOUBLES RULE TRIPS RULE
8 8
6 6
POS ASSIGNMENT COACHING POINTS
#1 Curl/fade read. Option technique based on coverage.
Attack CB to the outside, threaten him deep getting him
out of his backpedal, and break at 8 yards. Receiver plants
outside foot and snaps shoulders and head to the inside,
hands ready for the ball. If the corner levels at six yards or
less, receiver executes an outside swim move and converts
to a fade.
Proper technique is a must on this route. Receivers must
not “drift” backward, but actively work back toward the
quarterback after the curl break. Both quarterback and
receiver must make the right read if the corner levels off or
if the receiver beats him to the break point because
converting to the fade will yield big play opportunities.
A tight decisive spin is necessary for RAC opportunities.
#2 Seam. Attack the outside shoulder of the short defender
and try to “pin” him and prevent him from getting
underneath the outside route. Expect the ball quickly if the
short defender moves outside. If there is no receiver inside
running a “get open”, receiver has the option to convert the
seam into a post.
Receiver must avoid collisions and stay in his “tube”.
Against two-deep in doubles, convert seam to post.
Against MOF safety, stay in seam. #2 must always be
aware of “sandbox” principles in trips.
#3 Get Open. Receiver has the freedoms to get open
anywhere above seven yards in “the box” area.
If there is no MOF safety, #3 must replace him. If there is
a MOF safety, level off.
QB Quick five step drop working the side of the deepest
cornerback. If CB depths are the same, then make the
shortest throw. If a walkout player exists to either side,
then all previous considerations are off and we must throw
opposite him. Deliver the ball away from pressure—right
at the receiver’s number on the side away from the nearest
defender.
Pre-snap rules:
#1—Attack deepest corner
#2—Make shortest throw
#3—Never throw over a walk
Bad route vs. Cover 2, weak route vs. Cover 4.
COACH Pattern #1 is best in situations in which we see some sort
of soft corner. In general, we prefer to run it against soft
Cover 1, Cover 3, and possibly Cover 4. Against hard
corner teams, it is preferable to avoid this pattern.
#1 #2 #1 #2 #3

PATTERN #1—TAGS AND VARIATIONS
FIVE-STEP DROP
DOUBLES RULE TRIPS RULE
8 8 8
8
#1 #2 #1 #2 #3
71/81 DUPE
FIVE-STEP DROP
DOUBLES RULE TRIPS RULE
8 8
#1 #2 #1 #2 #3
71/81 SLANT
DUPE—Tells the #2 receiver to duplicate the curl route of the #1 receiver. This is NOT a curl/fade read, however, but simply a curl
route. The #2 receiver is still responsible for controlling the flat defender as he would running the seam route.
This route is good against Cover 4 as it controls the flat defender without the deep safety becoming a factor.
Keys:
• Get good width on the initial split so that the inside linebackers do not become a factor.
• Use the same RAC technique as the outside curl, spinning very quickly after the catch and splitting defenders.
SLANT—Tells the #2 receiver to run a 8 yard slant route. The QB read is the same, except that if the flat defender widens, the QB
hits the slant in stride.
The #2 receiver must also be aware of how the safety on his side is attacking him. If the safety is “soft” and high, he should be no
problem. However, if the safety settles, he must threaten briefly to the corner as though he is running a quick smash to get his hips
opened enough that he can drive back inside him to the hole.
This route is good against Cover 4 as it controls the flat defender without the deep safety becoming a factor. It also gives us greater
big play possibilities than the duplicated curl.
8
8
6

PATTERN #1—TAGS AND VARIATIONS
FIVE-STEP DROP
DOUBLES RULE TRIPS RULE
8 8
6 6
#1 #2 #1 #2 #3
71/81 PUMP
FIVE-STEP DROP + 2
DOUBLES RULE TRIPS RULE
8
6
#1 #2 #1 #2 #3
71/81 STUTTER
PUMP—Changes the callside curl to a “curl and go”. As man and even Cover 3 cornerbacks begin to see a number of hitches
completed in front of them, they begin to get jumpy and break very quickly on these routes. Pump is a great way to exploit
defenders who become jumpy over the course of a game.
Pump routes are usually best if a seam route is present on the same side to hold the free safety.
The pump fake should be compact and done mostly with the shoulders; not a time consuming “full-arm fake”.
STUTTER—Refers tot eh fact that we are running “a curl on top of a curl.” Although this tag requires substantial work, it is an
excellent way to attack smart, quick cornerbacks, especially those that recover rapidly on the “pump” move. On a stutter tag, the
receiver makes a very quick fake of the initial curl, then drives to sell the go as though running by his corner. Then he breaks his
hips down for his final break at 16-18 yards.
Protection must be a vital concern when running this route. Therefore we will usually use a seven-man protection when running
stutter.
6

PATTERN #1—TAGS AND VARIATIONS
THREE-STEP DROP
DOUBLES RULE TRIPS RULE
8 8
#1 #2 #1 #2 #3
71/81 OUT
OUT—Changes the #2 receiver’s route to a quick out/flat route. By getting to the flat as soon as possible, we put immediate
pressure on the cornerback (zone) or the flat defender (man).
Against zone, we immediately put two receivers in the cornerback’s area and puts pressure on the flat. If the corner drops, the #2
receiver should open quickly as the flat defender is in a trail position. If the corner closes on the flat, the #1 receiver converts to fade
and the QB hits him over the top.
Against man, the QB should have a clear lane to the curl once the flat defender bears down on the flat route. QB throws through the
defender’s ear hole just as the corner makes his break.

PATTERN #1—BY FORMATION
Pro Left 51
Quads Left 71 Pump
Ace Right 61 Slot Left 61 Dupe
Spread Left 51 Slant
Trips Right 71 Out
Trey Right 81 Wing Left Y81 Stutter

PATTERN #2—”QUICK OUT” PACKAGE
THREE-STEP DROP
DOUBLES RULE TRIPS RULE
8 8
6 6
POS ASSIGNMENT COACHING POINTS
#1 Quick out/fade read. Option technique based on coverage.
Attack CB to the inside, threaten him deep getting him out
of his backpedal, and break at 6 yards executing a speed
turn. Receiver “rolls” into the break at six yards, snaps
head and arms around and straightens at 8 yards with
hands ready for the ball. If the corner levels at six yards or
less, receiver gets to the corner’s outside and converts to a
fade.
Receivers must align closer to the LOS to allow proper
space for the route. Receivers must also know how close
they are to the sideline. This will allow the receiver to
know if he has to “toe dance” at the sideline or has room to
turn up the sideline for extra yardage.
#2 Seam. Attack the outside shoulder of the short defender
and try to “pin” him and prevent him from getting
underneath the outside route. Expect the ball quickly if the
short defender moves outside. If there is no receiver inside
running a “get open”, receiver has the option to convert the
seam into a post.
Receiver must avoid collisions and stay in his “tube”.
Against two-deep in doubles, convert seam to post.
Against MOF safety, stay in seam. #2 must always be
aware of “sandbox” principles in trips.
#3 Get Open. Receiver has the freedoms to get open
anywhere above seven yards in “the box” area.
If there is no MOF safety, #3 must replace him. If there is
a MOF safety, level off.
QB Quick five step drop working the side of the deepest
cornerback. If CB depths are the same, then make the
shortest throw. If a walkout player exists to either side,
then all previous considerations are off and we must throw
opposite him. Deliver the ball away from pressure—right
at the receiver’s number on the side away from the nearest
defender.
Pre-snap rules:
#1—Attack deepest corner
#2—Make shortest throw
#3—Never throw over a walk
Bad route vs. Cover 2, weak vs. Cover 4.
#1 #2 #1 #2 #3

PATTERN #2—TAGS AND VARIATIONS
THREE-STEP DROP
DOUBLES RULE TRIPS RULE
8 8
6 6
#1 #2 #1 #2 #3
72/82 PUMP
THREE-STEP DROP + 2
DOUBLES RULE TRIPS RULE
8
6
#1 #2 #1 #2 #3
72/82 STUTTER
PUMP—Changes the callside out to an “out and go”. As man and even Cover 3 cornerbacks begin to see a number of outs
completed in front of them, they begin to get jumpy and break very quickly on these routes. Pump is a great way to exploit
defenders who become jumpy over the course of a game.
Pump routes are usually best if a seam route is present on the same side to hold the free safety.
The pump fake should be compact and done mostly with the shoulders; not a time consuming “full-arm fake”.
STUTTER—Refers to the fact that we are running “an out on top of an out.” Although this tag requires substantial work, it is an
excellent way to attack smart, quick cornerbacks, especially those that recover rapidly on the “pump” move. On a stutter tag, the
receiver makes a very quick fake of the initial out, then drives to sell the go as though running by his corner. Then he breaks his hips
down for his final break at 16-18 yards.
Protection must be a vital concern when running this route. Therefore we will usually use a seven-man protection when running
stutter.
6
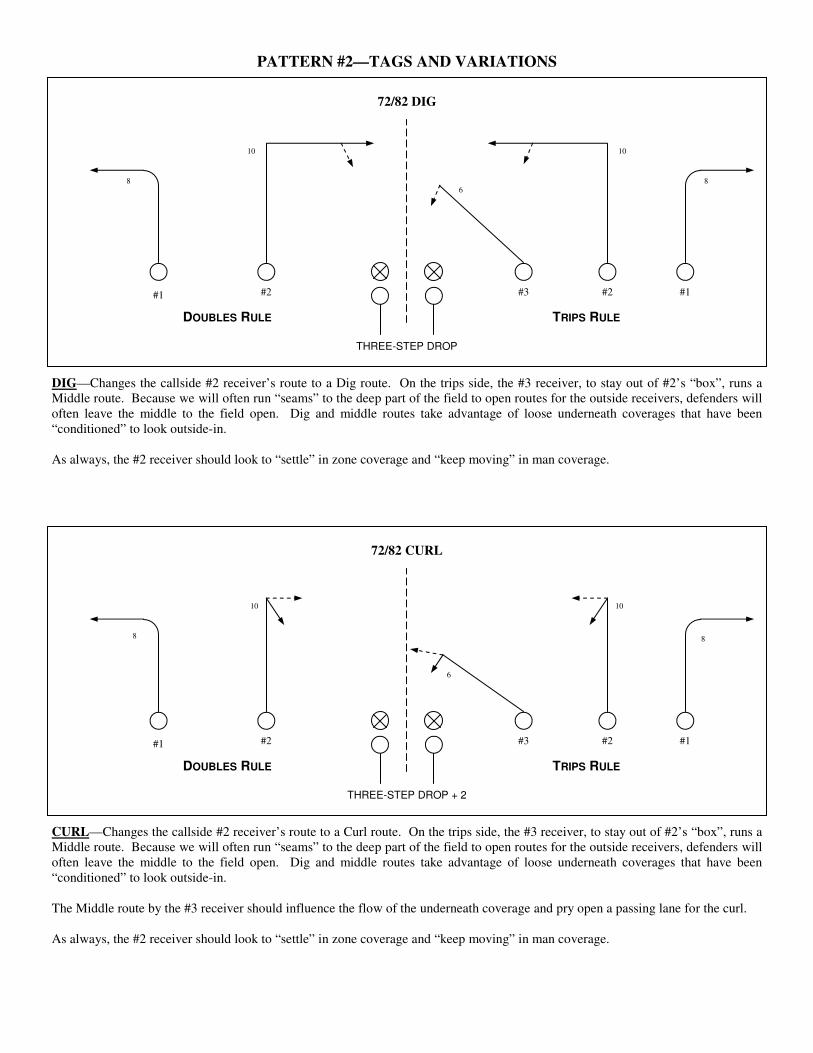
PATTERN #2—TAGS AND VARIATIONS
THREE-STEP DROP
DOUBLES RULE TRIPS RULE
8 8
10 10
#1 #2 #1 #2 #3
72/82 DIG
THREE-STEP DROP + 2
DOUBLES RULE TRIPS RULE
8
10
#1 #2 #1 #2 #3
72/82 CURL
DIG—Changes the callside #2 receiver’s route to a Dig route. On the trips side, the #3 receiver, to stay out of #2’s “box”, runs a
Middle route. Because we will often run “seams” to the deep part of the field to open routes for the outside receivers, defenders will
often leave the middle to the field open. Dig and middle routes take advantage of loose underneath coverages that have been
“conditioned” to look outside-in.
As always, the #2 receiver should look to “settle” in zone coverage and “keep moving” in man coverage.
CURL—Changes the callside #2 receiver’s route to a Curl route. On the trips side, the #3 receiver, to stay out of #2’s “box”, runs a
Middle route. Because we will often run “seams” to the deep part of the field to open routes for the outside receivers, defenders will
often leave the middle to the field open. Dig and middle routes take advantage of loose underneath coverages that have been
“conditioned” to look outside-in.
The Middle route by the #3 receiver should influence the flow of the underneath coverage and pry open a passing lane for the curl.
As always, the #2 receiver should look to “settle” in zone coverage and “keep moving” in man coverage.
6
6
8
10

PATTERN #2—BY FORMATION
Pro Left 52
Quads Left 72 Pump
Ace Right 62 Slot Left 62 Y Dig
Spread Left 52
Trips Right 72 Curl
Bunch Right 82 Swap Wing Left 82

PATTERN #3—”SLANT” PACKAGE
POS ASSIGNMENT COACHING POINTS
Outside
Rec.
Slant—Receiver attacks the defender over him and breaks
to the slant at a depth of 8 yards. Look for the ball
immediately as the QB will usually have to release the ball
before the break.
#1—Make a distinct, sharp break.
#2—Gain inside leverage so that the rec. has open air to
run into.
#3—Head and hands snap upon the break looking for the
ball immediately.
Inside
Most Rec.
Shoot—This is, in essence, a flat route. The receiver aims
for a point approximately three yards deep along the
sideline. Usually the push upfield before the break will be
three quick steps.
On the wide side of he field, the receiver should angle his
push up the field because he has further to go and must
keep the timing of the route the same.
QB 1 Rec.—QB will always throw to any singled slant if the
first short defender to the side gives it to him.
2 Rec.—To a two receiver side, throw the shoot if the first
inside defender levels or hangs. If the first short defender
widens, the QB throws in the hole he vacates.
3 Rec.—There are two inside danger players to read in
trips. Again the shoot is the first option unless the first flat
defender widens. In this case, read the second defender,
and if he widens, hit the second slant.
Because of the difficulty in reading the trips combination,
it must be practiced for the QB to get the proper feel.
Reads:
#1—Single receiver slant with no inside help (LB/SS tight
or inside DE)
#2—First inside defender in doubles; first two inside
defenders in trips.
#2 of 3 in
Trips
Slant—Receiver takes best release past the defender over
him and breaks to the slant at 6 yards. If the second short
defender widens quickly, the receiver should expect the
ball immediately.
Receiver must run a somewhat flatter slant since there is
another slant over the top of him.
THREE-STEP DROP
DOUBLES RULE TRIPS RULE
8 8
5
#1 #2 #1 #2 #3
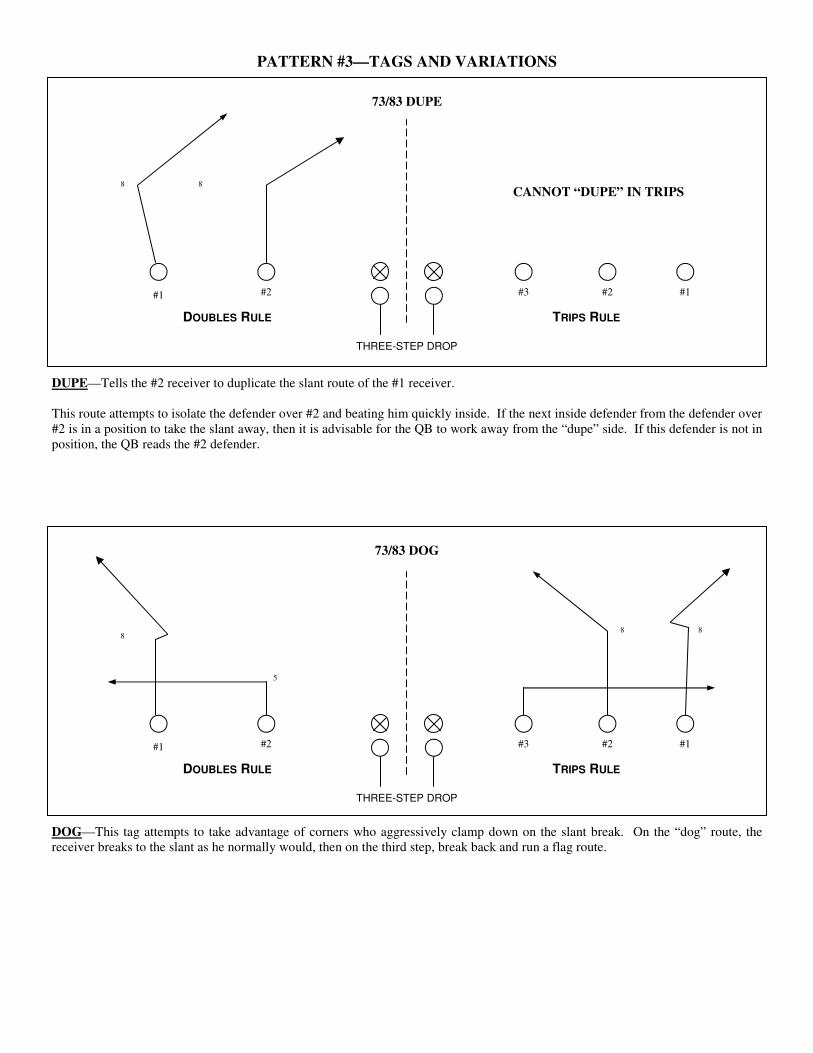
PATTERN #3—TAGS AND VARIATIONS
73/83 DOG
DUPE—Tells the #2 receiver to duplicate the slant route of the #1 receiver.
This route attempts to isolate the defender over #2 and beating him quickly inside. If the next inside defender from the defender over
#2 is in a position to take the slant away, then it is advisable for the QB to work away from the “dupe” side. If this defender is not in
position, the QB reads the #2 defender.
DOG—This tag attempts to take advantage of corners who aggressively clamp down on the slant break. On the “dog” route, the
receiver breaks to the slant as he normally would, then on the third step, break back and run a flag route.
73/83 DUPE
THREE-STEP DROP
DOUBLES RULE TRIPS RULE
8 8
#1 #2 #1 #2 #3
THREE-STEP DROP
DOUBLES RULE TRIPS RULE
8 8
5
8
#1 #2 #1 #2 #3
CANNOT “DUPE” IN TRIPS

PATTERN #3—TAGS AND VARIATIONS
73/83 SEAM
73/83 SHORT
SEAM— Tells the inside most receiver to convert his flat route to a seam route. Good against teams that rotate their safeties to
overcompensate for our wide sets.
SHORT—Tells the outside most receiver to run a Short, or Arrow, route and all other receivers run slants. The QB should read the
first short defender and throw the Short if he deepens on the Slant and throw the Slant if he flattens on the Short.
THREE-STEP DROP
DOUBLES RULE TRIPS RULE
8 8
#1 #2 #1 #2 #3
THREE-STEP DROP
DOUBLES RULE TRIPS RULE
#1 #2 #1 #2 #3

PATTERN #3—TAGS AND VARIATIONS
73/83 STICK
STICK—Tells the #2 receiver to run an outside-facing curl route underneath the Slant. Against man coverage, the receiver should
keep moving toward the sideline and run away from the coverage. Against zone, the receiver settles into an open area of the field
and stays in the QB’s vision.
THREE-STEP DROP
DOUBLES RULE TRIPS RULE
#1 #2 #1 #2 #3
73/83 WHEEL
WHEEL—Tells the #2 receiver to run a wheel route underneath the Slant.
THREE-STEP DROP
DOUBLES RULE TRIPS RULE
#1 #2 #1 #2 #3
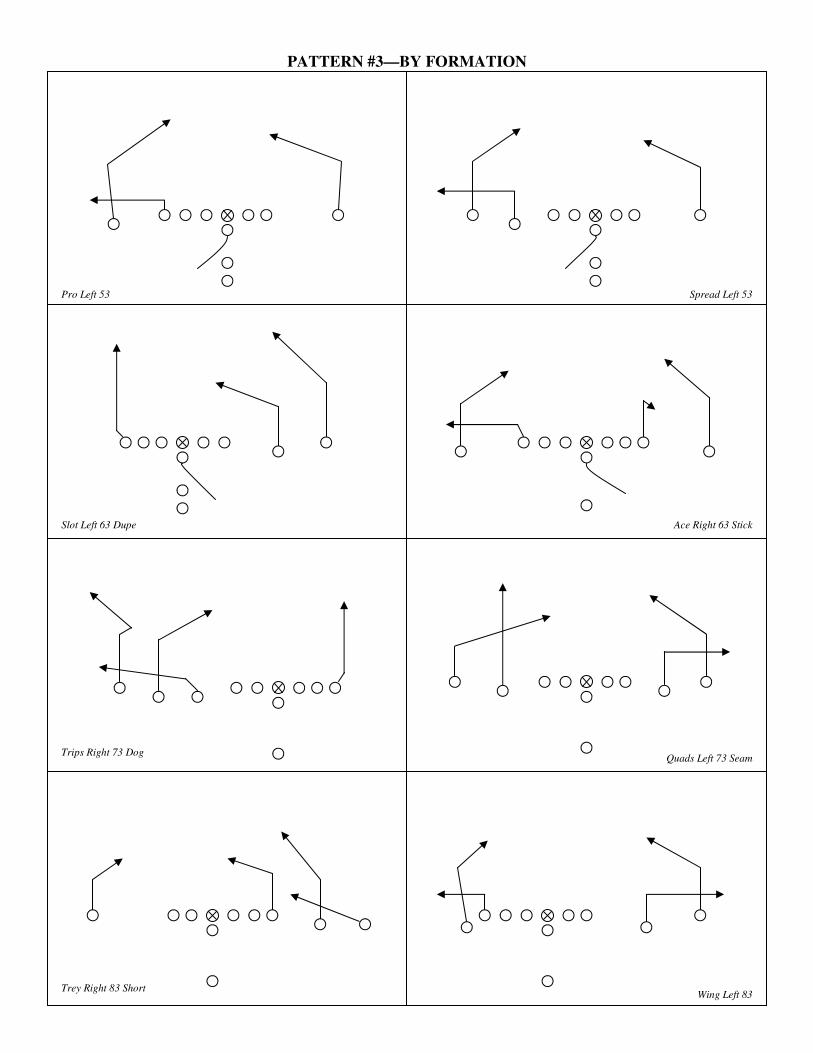
PATTERN #3—BY FORMATION
Pro Left 53
Quads Left 73 Seam
Ace Right 63 Stick Slot Left 63 Dupe
Spread Left 53
Trips Right 73 Dog
Trey Right 83 Short Wing Left 83
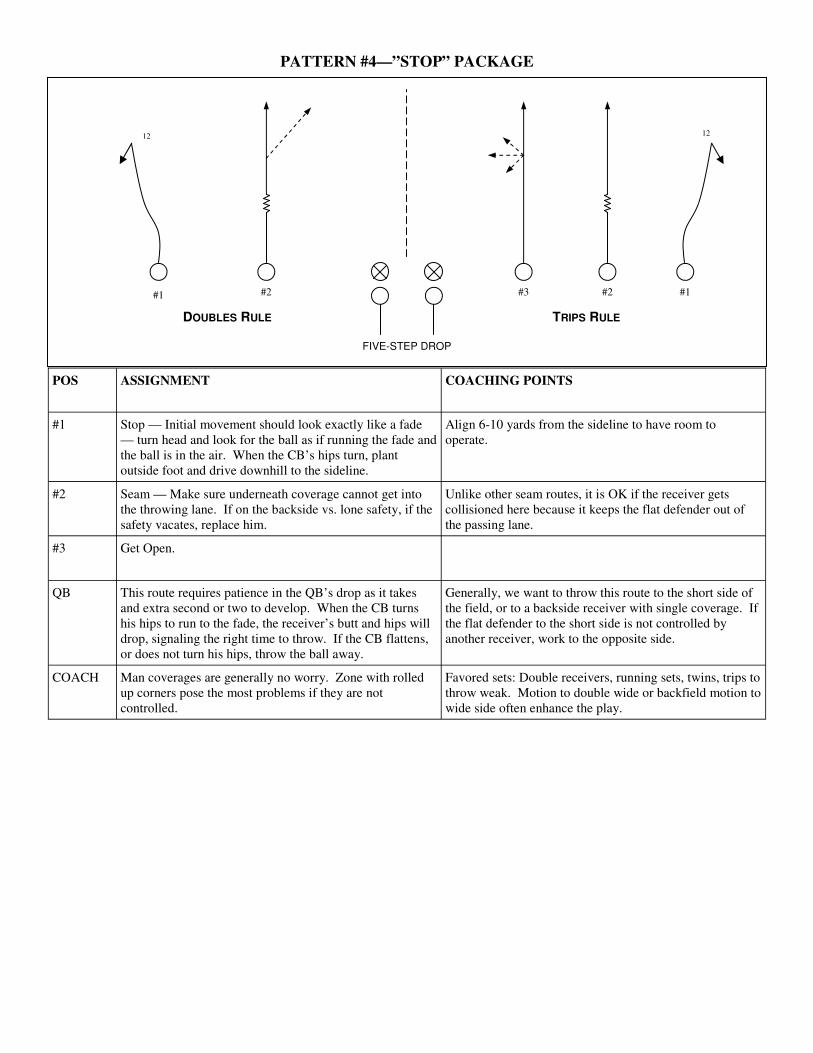
PATTERN #4—”STOP” PACKAGE
FIVE-STEP DROP
DOUBLES RULE TRIPS RULE
12
POS ASSIGNMENT COACHING POINTS
#1 Stop — Initial movement should look exactly like a fade
— turn head and look for the ball as if running the fade and
the ball is in the air. When the CB’s hips turn, plant
outside foot and drive downhill to the sideline.
Align 6-10 yards from the sideline to have room to
operate.
#2 Seam — Make sure underneath coverage cannot get into
the throwing lane. If on the backside vs. lone safety, if the
safety vacates, replace him.
Unlike other seam routes, it is OK if the receiver gets
collisioned here because it keeps the flat defender out of
the passing lane.
#3 Get Open.
QB This route requires patience in the QB’s drop as it takes
and extra second or two to develop. When the CB turns
his hips to run to the fade, the receiver’s butt and hips will
drop, signaling the right time to throw. If the CB flattens,
or does not turn his hips, throw the ball away.
Generally, we want to throw this route to the short side of
the field, or to a backside receiver with single coverage. If
the flat defender to the short side is not controlled by
another receiver, work to the opposite side.
COACH Man coverages are generally no worry. Zone with rolled
up corners pose the most problems if they are not
controlled.
Favored sets: Double receivers, running sets, twins, trips to
throw weak. Motion to double wide or backfield motion to
wide side often enhance the play.
#1 #2 #1 #2 #3
12
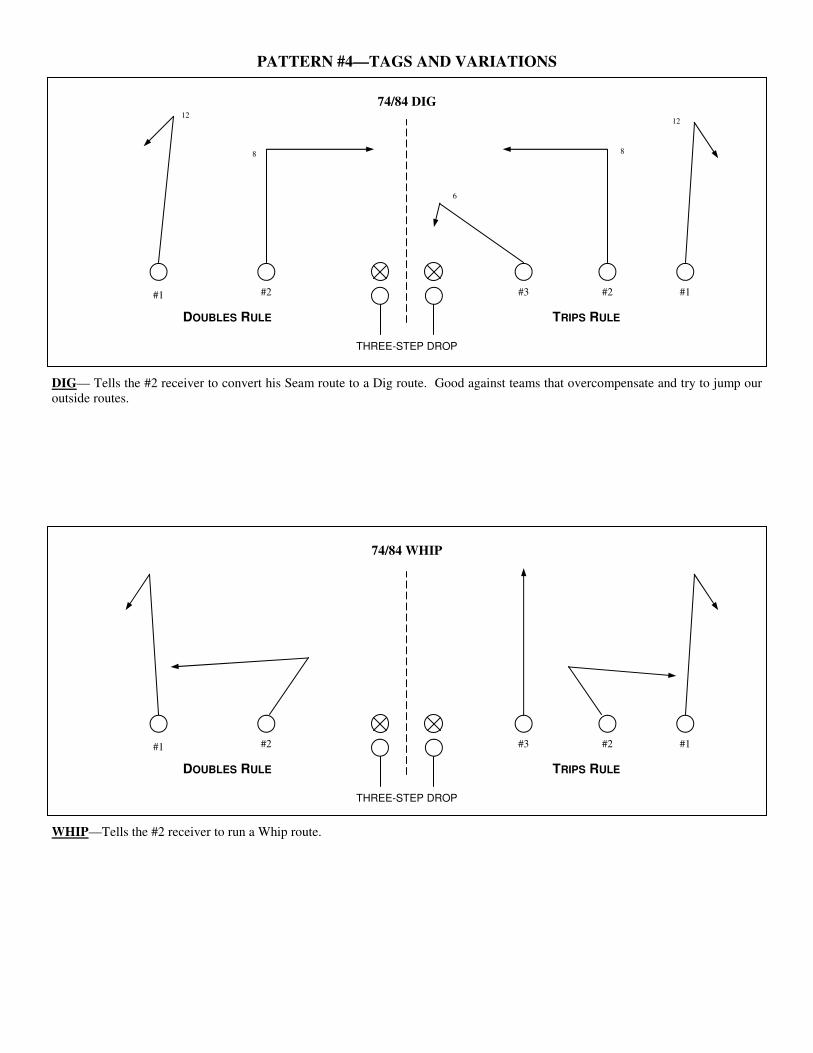
PATTERN #4—TAGS AND VARIATIONS
74/84 DIG
74/84 WHIP
DIG— Tells the #2 receiver to convert his Seam route to a Dig route. Good against teams that overcompensate and try to jump our
outside routes.
WHIP—Tells the #2 receiver to run a Whip route.
THREE-STEP DROP
DOUBLES RULE TRIPS RULE
12 12
8
#1 #2 #1 #2 #3
THREE-STEP DROP
DOUBLES RULE TRIPS RULE
#1 #2 #1 #2 #3
6
8

PATTERN #4—BY FORMATION
Pro Left 54
Quads Left 74
Ace Right 64 Slot Left 64
Spread Left 54
Trips Right 74
Bunch Right 84 Wing Left 84

TRIPS
DOUBLES
PATTERN #5—”STICK” PACKAGE
THREE-STEP DROP
POS ASSIGNMENT COACHING POINTS
#1
#2
#3
QB
COACH
BACKSIDE FRONTSIDE
#1 — #1 #2 #3 SINGLE
DOUBLE #1 #2 #2 #1 —
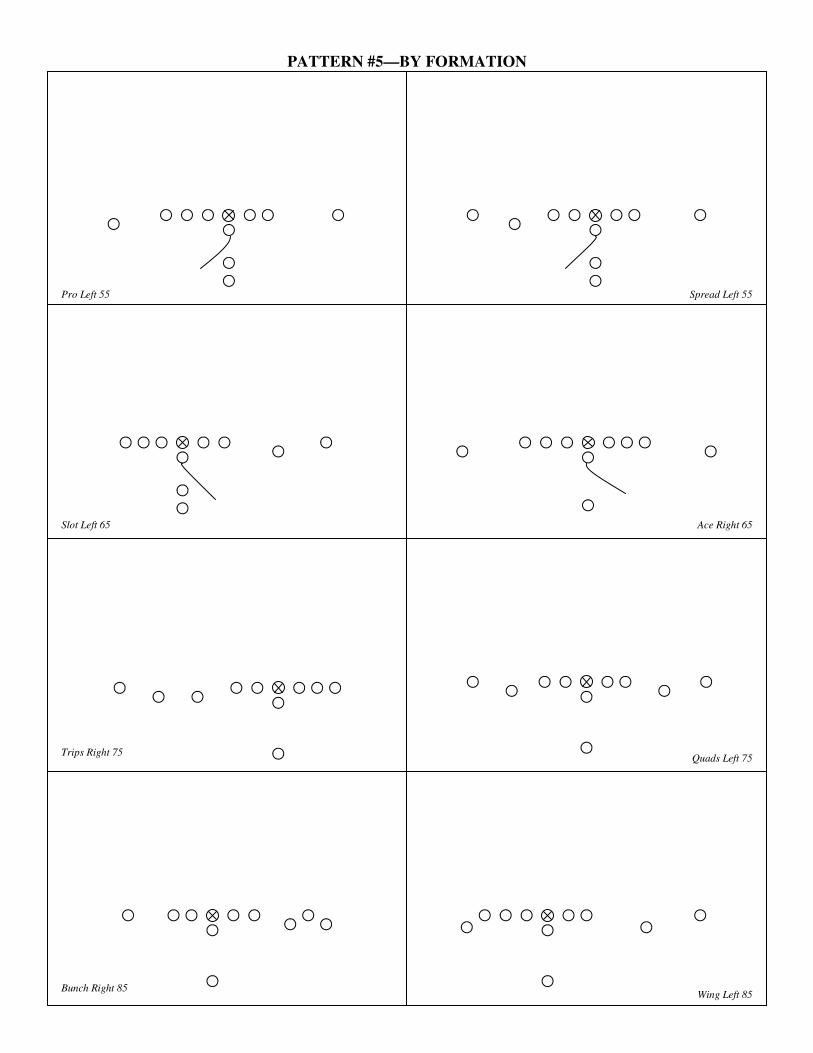
PATTERN #5—BY FORMATION
Pro Left 55
Quads Left 75
Ace Right 65 Slot Left 65
Spread Left 55
Trips Right 75
Bunch Right 85 Wing Left 85

PATTERN #6—”SMASH” PACKAGE
FIVE-STEP DROP
DOUBLES RULE TRIPS RULE
8 8
POS ASSIGNMENT COACHING POINTS
#1
#2
#3
QB
COACH
#1 #2 #1 #2 #3
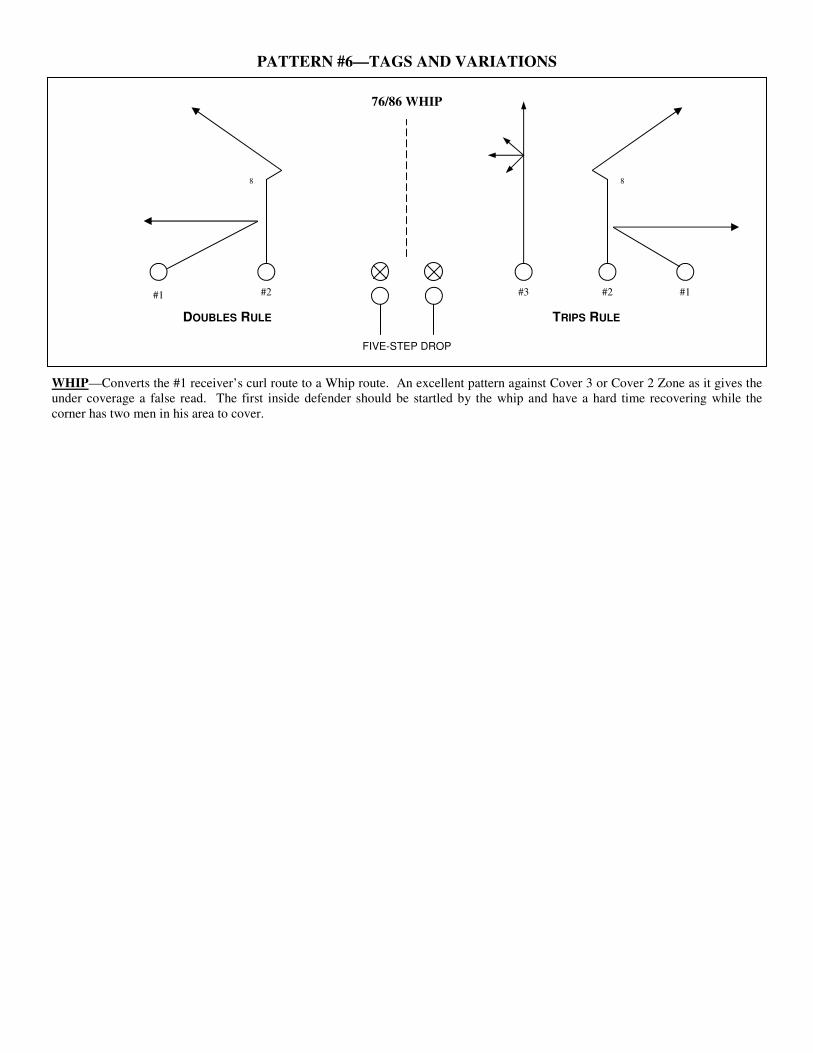
PATTERN #6—TAGS AND VARIATIONS
76/86 WHIP
WHIP—Converts the #1 receiver’s curl route to a Whip route. An excellent pattern against Cover 3 or Cover 2 Zone as it gives the
under coverage a false read. The first inside defender should be startled by the whip and have a hard time recovering while the
corner has two men in his area to cover.
FIVE-STEP DROP
DOUBLES RULE TRIPS RULE
8 8
#1 #2 #1 #2 #3

PATTERN #6—BY FORMATION
Pro Left 56
Quads Left 76
Ace Right 66 Slot Left 66
Spread Left 56
Trips Right 76
Bunch Right 86 Wing Left 86

PATTERN #7—”MESH” PACKAGE
FIVE-STEP DROP
POS ASSIGNMENT COACHING POINTS
#1
#2
#3
QB
COACH
BACKSIDE FRONTSIDE
— #1 #1 #2 #3 TRIPS
DOUBLES
SINGLE
DOUBLE #1 #2 — #2 #1

PATTERN #7—BY FORMATION
Pro Left 57
Quads Left 77
Ace Right 67 Slot Left 67
Spread Left 57
Trips Right 77
Bunch Right 87 Wing Left 87

PATTERN #8—”DRIVE” PACKAGE
THREE-STEP DROP
POS ASSIGNMENT COACHING POINTS
#1
#2
#3
QB
BACKSIDE FRONTSIDE
#1 — #1 #2 #3 TRIPS
DOUBLES
SINGLE
DOUBLE #1 #2 — #2 #1
Coaching Points: This is the Shallow Crossing pattern made famous by Jerry Rice and the San Francisco 49ers of the 1980’s. The
front side offers a clearing action for the underneath route to the backside. When the backside of the pattern features two receivers,
there is a high-low relationship between them that should cause the under coverage to overplay one receiver, leaving his partner
open.

PATTERN #8—BY FORMATION
Pro Left 58
Quads Left 78
Ace Right 68 Slot Left 68
Spread Left 58
Trips Right 78
Bunch Right 88 Wing Left 88

PATTERN #9—”FADE” PACKAGE
FIVE-STEP DROP
DOUBLES RULE TRIPS RULE
POS ASSIGNMENT COACHING POINTS
#1
#2
#3
QB
COACH
#1 #2 #1 #2 #3

PATTERN #9—BY FORMATION
Pro Left 59
Quads Left 79
Ace Right 69 Slot Left 69
Spread Left 59
Trips Right 79
Bunch Right 89 Wing Left 89

PATTERN #0—”BOX” PACKAGE
FIVE-STEP DROP
DOUBLES RULE TRIPS RULE
POS ASSIGNMENT COACHING POINTS
#1
#2
#3
QB
COACH
#1 #2 #1 #2 #3

PATTERN #0—BY FORMATION
Pro Left 50
Quads Left 70
Ace Right 60 Slot Left 60
Spread Left 50
Trips Right 70
Bunch Right 80 Wing Left 80

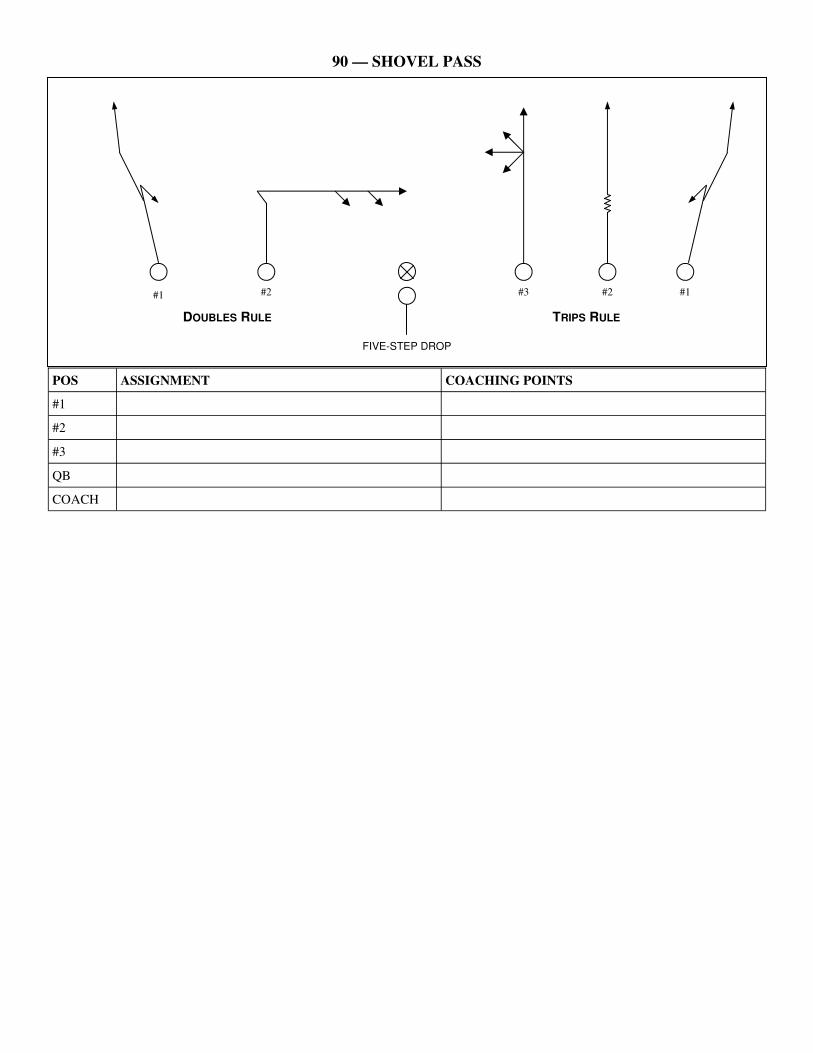
90 — SHOVEL PASS
FIVE-STEP DROP
DOUBLES RULE TRIPS RULE
POS ASSIGNMENT COACHING POINTS
#1
#2
#3
QB
COACH
#1 #2 #1 #2 #3
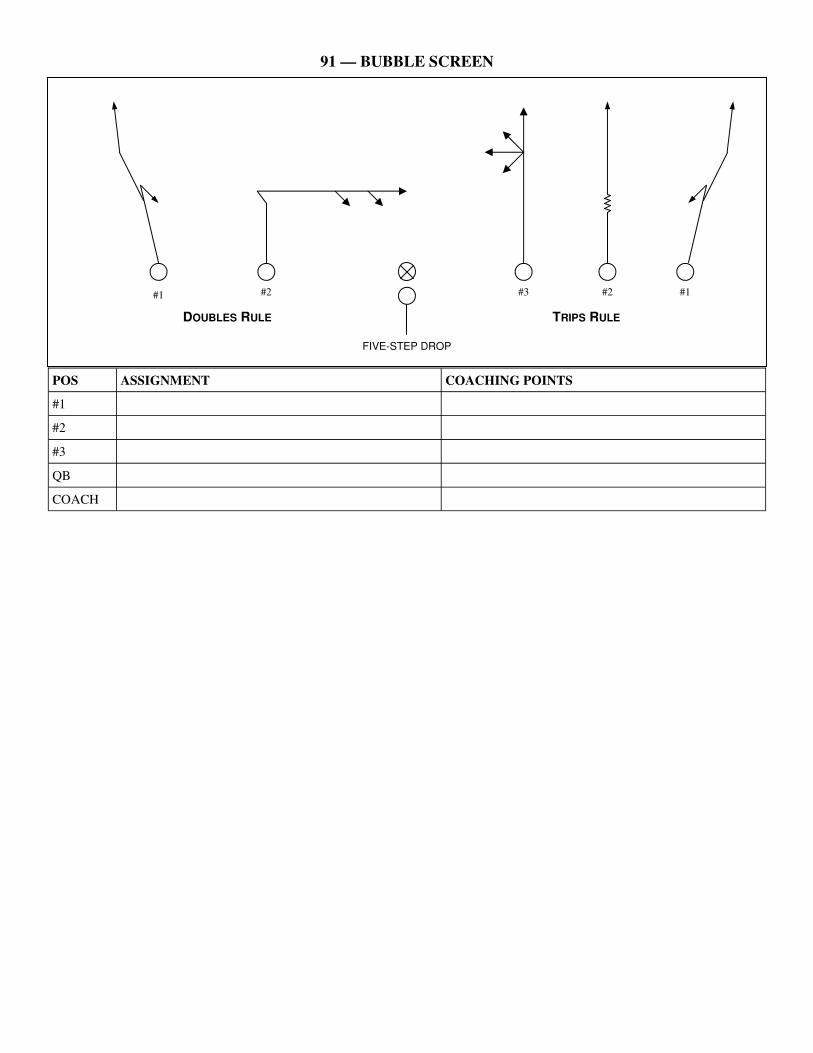
91 — BUBBLE SCREEN
FIVE-STEP DROP
DOUBLES RULE TRIPS RULE
POS ASSIGNMENT COACHING POINTS
#1
#2
#3
QB
COACH
#1 #2 #1 #2 #3

92 — TUNNEL SCREEN
FIVE-STEP DROP
DOUBLES RULE TRIPS RULE
POS ASSIGNMENT COACHING POINTS
#1
#2
#3
QB
COACH
#1 #2 #1 #2 #3

93 — SLIP SCREEN
FIVE-STEP DROP
DOUBLES RULE TRIPS RULE
POS ASSIGNMENT COACHING POINTS
#1
#2
#3
QB
COACH
#1 #2 #1 #2 #3

94 — BOOT PASS
FIVE-STEP DROP
DOUBLES RULE TRIPS RULE
POS ASSIGNMENT COACHING POINTS
#1
#2
#3
QB
COACH
#1 #2 #1 #2 #3

95 —
FIVE-STEP DROP
DOUBLES RULE TRIPS RULE
POS ASSIGNMENT COACHING POINTS
#1
#2
#3
QB
COACH
#1 #2 #1 #2 #3

96 —
FIVE-STEP DROP
DOUBLES RULE TRIPS RULE
POS ASSIGNMENT COACHING POINTS
#1
#2
#3
QB
COACH
#1 #2 #1 #2 #3

97 —
FIVE-STEP DROP
DOUBLES RULE TRIPS RULE
POS ASSIGNMENT COACHING POINTS
#1
#2
#3
QB
COACH
#1 #2 #1 #2 #3

98 —
FIVE-STEP DROP
DOUBLES RULE TRIPS RULE
POS ASSIGNMENT COACHING POINTS
#1
#2
#3
QB
COACH
#1 #2 #1 #2 #3
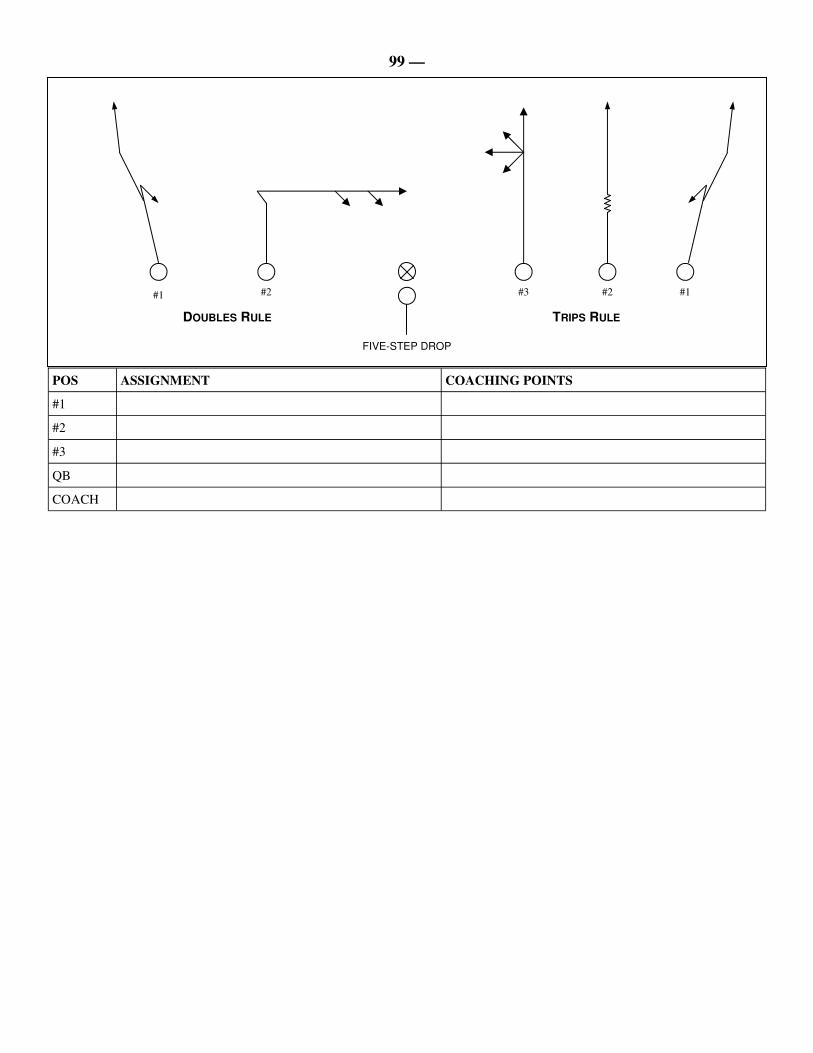
99 —
FIVE-STEP DROP
DOUBLES RULE TRIPS RULE
POS ASSIGNMENT COACHING POINTS
#1
#2
#3
QB
COACH
#1 #2 #1 #2 #3


