Understanding System Manager ................................................................. 4Supported versions of Data ONTAP ........................................................................... 5
Where to find additional 7-Mode information ............................................................ 5
Where to find additional clustered Data ONTAP information .................................... 6
Installing, upgrading, or uninstalling System Manager ........................... 8System requirements for System Manager .................................................................. 8
Downloading the System Manager software ............................................................. 10
Installing System Manager on Windows ................................................................... 10
Installing System Manager on Linux ........................................................................ 11
Upgrading to System Manager on Windows ............................................................. 12
Upgrading to System Manager on Linux .................................................................. 14
Uninstalling System Manager on Windows .............................................................. 14
Uninstalling System Manager on Linux .................................................................... 15
Launching System Manager ...................................................................... 16Getting started with System Manager ...................................................... 18
Ports used by System Manager ................................................................................. 18
Creating an SNMP community for clustered Data ONTAP 8.2 .................... 19
Enabling or disabling SNMP ......................................................................... 21
Adding storage systems or clusters ........................................................................... 21
Discovering storage systems ..................................................................................... 22
Configuring storage systems ..................................................................................... 23
Copyright information ............................................................................... 24Trademark information ............................................................................. 25How to send comments about documentation and receive update
System Manager is a graphical management interface that enables you to manage storage systemsand storage objects (such as disks, volumes, and aggregates) and to perform common managementtasks related to storage systems from a web browser. As a cluster administrator, you can use SystemManager to administer the entire cluster and its resources.
Note: In the Data ONTAP 8.x operating in 7-Mode product name, the term 7-Mode signifies thatthe 8.x release operates in the same way as the prior Data ONTAP 7.1, 7.2, and 7.3 releasefamilies.
You can also use System Manager to manage V-Series systems.
System Manager enables you to perform many common tasks such as the following:
• Configure and manage storage objects, such as disks, aggregates, volumes, qtrees, and quotas.
• Configure protocols, such as CIFS and NFS, and provision file sharing.
• Configure protocols such as FC and iSCSI for block access.
• Verify and configure network configuration settings in the storage systems.
• Create vFiler units and configure CIFS.
• Set up and manage SnapMirror relationships and SnapVault relationships.
• Set up and manage mirroring and vaulting relationships.
• Manage HA configurations and perform takeover and giveback operations.
• Perform cluster management, storage node management, and virtual storage server (Vserver)management operations.
• Create and configure Vservers, manage storage objects associated with a Vserver, and manageVserver services.
• Monitor HA configurations in a cluster.
Note: System Manager replaces FilerView as the tool to manage storage systems running DataONTAP 8.1 or later.
4 | Quick Start Guide
Supported versions of Data ONTAPYou should be aware of the Data ONTAP versions that are supported by System Manager .
For storage system running Data ONTAP operating in 7-Mode, System Manager supports thefollowing versions:
• Data ONTAP 7.3.7
• Data ONTAP 8.0.4 and 8.0.5
• Data ONTAP 8.1.2 and 8.1.3
• Data ONTAP 8.2
For storage system running clustered Data ONTAP, System Manager supports the following versions:
• Data ONTAP 8.1.2 and 8.1.3
• Data ONTAP 8.2
Where to find additional 7-Mode informationSystem Manager Help provides basic Data ONTAP operating in 7-Mode conceptual information tohelp you perform tasks using System Manager. For in-depth conceptual information to help youconfigure, monitor, and manage storage objects and storage systems, you can see the Data ONTAPdocumentation available on the NetApp Support Site.
You might find the following Data ONTAP documentation useful:
Data ONTAP Storage Management Guide for 7-Mode
Describes how to configure, operate, and manage the storage resources for storagesystems running Data ONTAP operating in 7-Mode, using disks, RAID groups,aggregates, volumes, FlexClone volumes, files and LUNs, FlexCache volumes,deduplication, compression, qtrees, and quotas.
Data ONTAP System Administration Guide for 7-Mode
Describes general system administration for storage systems that run Data ONTAPsoftware.
Data ONTAP High Availability and MetroCluster Configuration Guide for 7-Mode
Describes how to install and manage high-availability configurations.
Data ONTAP MultiStore Management Guide for 7-Mode
Describes how to administer vFiler units (virtual storage systems) with the MultiStoresoftware available by license with Data ONTAP operating in 7-Mode.
Understanding System Manager | 5
Data ONTAP Network Management Guide for 7-Mode
Describes how to configure and manage networks associated with storage systems runningData ONTAP operating in 7-Mode.
Data ONTAP Storage Efficiency Management Guide for 7-Mode
Describes the features and functionalities that help to significantly improve storageutilization.
Data ONTAP SAN Administration Guide for 7-Mode
Describes how to configure and manage the iSCSI and FC protocols for SANenvironments.
Data ONTAP File Access and Protocols Management Guide for 7-Mode
Describes how to manage file access on storage systems with Data ONTAP operating in 7-Mode for NFS, CIFS, HTTP, FTP, and WebDAV protocols.
Data ONTAP Data Protection Online Backup and Recovery Guide for 7-Mode
Describes how to back up and recover data using Data ONTAP operating in 7-Modeonline backup and recovery features.
Data ONTAP Archive and Compliance Management Guide for 7-Mode
Describes how to archive and protect data for compliance purposes.
Related information
Documentation: By Product Library: support.netapp.com/documentation/productsatoz/index.html
Where to find additional clustered Data ONTAP informationSystem Manager Help provides basic clustered Data ONTAP conceptual information to help youperform tasks using System Manager. For in-depth conceptual information to help you configure,monitor, and manage storage objects and storage systems, you can see the Data ONTAPdocumentation available on the NetApp Support Site.
Note: The terms Data ONTAP operating in Cluster-Mode and clustered Data ONTAP are usedinterchangeably in this document.
You might find the following Data ONTAP documentation useful:
Clustered Data ONTAP Physical Storage Management Guide
Describes how to configure, operate, and manage the physical storage resources forstorage systems running clustered Data ONTAP. It provides information about disks,RAID groups, plexes, and aggregates.
Clustered Data ONTAP Logical Storage Management Guide
Describes how to configure, operate, and manage the storage resources for storagesystems running clustered Data ONTAP. It provides information about volumes,FlexClone volumes, files and LUNs, deduplication, compression, qtrees, and quotas.
Clustered Data ONTAP System Administration Guide for Cluster Administrators
Describes general system administration for storage systems that run Data ONTAPsoftware.
Clustered Data ONTAP High-Availability Configuration Guide
Describes installation and management of high-availability configurations.
Clustered Data ONTAP System Administration Guide for Vserver Administrators
Describes the capabilities of a Vserver administrator to administer Vservers (virtualstorage systems) in clustered Data ONTAP.
Clustered Data ONTAP Network Management Guide
Describes how to configure and manage networks associated with storage systems runningclustered Data ONTAP and how to manage file access with NFS and CIFS protocols.
Clustered Data ONTAP SAN Administration Guide
Describes how to configure and manage the iSCSI and FC protocols for SANenvironments.
Clustered Data ONTAP File Access and Protocols Management Guide
Describes how to configure and manage networks and how to manage file access withNFS and CIFS protocols.
Clustered Data ONTAP Data Protection Guide
Describes how to back up and recover data using clustered Data ONTAP online backupand recovery features.
Related information
NetApp Support Site: support.netapp.comDocumentation: By Product Library: support.netapp.com/documentation/productsatoz/index.html
Installing, upgrading, or uninstalling SystemManager
You can download and install System Manager on a desktop or laptop that is running a Windows or aLinux operating system. You can upgrade to System Manager 3.0 from the earlier versions of theproduct. You can uninstall System Manager at any time.
On Windows, you can install System Manager by using the standard wizard-based installer. OnLinux, you can use Red Hat Package Manager (RPM).
System requirements for System ManagerYou must ensure that you have the required host system configuration, operating system, and browserto run the System Manager software. You must also have the necessary administrative privileges toaccess the software.
Your host system must meet the following minimum requirements:
• Pentium x86 processor
• 1-GB RAM
• 1-GB video display RAM
• 1-GB free disk spaceIf you are upgrading from an earlier version, you might require additional disk space for theexisting log files.
• Wireless or Ethernet connection to the network
• A 32-bit or 64-bit Windows or Linux operating system
• Adobe Flash Player 11.0 or later
• 32-bit or 64-bit Oracle Java Runtime Environment (JRE) 7
◦ Installing 32-bit or 64-bit JRE depends on the operating system. If you have a 32-bit Windowsor Linux operating system, 32-bit JRE must be installed.Similarly, if you have a 64-bit Windows or Linux operating system, 64-bit JRE must beinstalled.
◦ You can download 32-bit or 64-bit Oracle Java Runtime Environment (JRE) 7 from www.java.com/en/.
Your Windows system must be running one of the following:
Downloading the System Manager softwareBefore you install System Manager, you must download the software from the NetApp Support Site.The software is available to all registered users for free download.
Before you begin
You must have access to the NetApp Support Site.
Steps
1. Log in to the NetApp Support Site.
2. In the NetApp Support page, click Downloads > Software.
3. In the OnCommand System Manager row, select the platform, and click Go!
4. Follow the prompts and download the software file to a local directory.
Related information
NetApp Support Site: support.netapp.com
Installing System Manager on WindowsYou can install System Manager on your Windows system by using the wizard-based installer.
Before you begin
• Your Windows host system must be running the supported software versions.
• The System Manager software must be downloaded from the NetApp Support Site.
• You must have the necessary administrator privileges to install the application.
• You must have read/write permission to your home directory.By default, your home directory is used to store configuration files and log files.
• If you manually specify the port for the Jetty Web server that System Manager installs, theselected port must not already be used by another application when the System Managerapplication is launched.
Note: The System Manager installation is completed even if the configured port is used byanother application. However, you cannot launch System Manager and you must reinstall it ona different port or ensure the port to be used is free.
• Oracle Java Runtime Environment (JRE) 7 must be installed.
Steps
1. Run the System Manager setup (.exe) file from the directory where you downloaded and savedthe software.
2. Follow the on-screen prompts to complete your installation.
By default, the installation path is C:\Program Files\NetApp\OnCommand SystemManager.
By default, System Manager configuration details and logs are stored in the following userpreference directories:
• For systems running Windows Vista or later, the location is: C:\Users\user_name\NetApp\SystemManager.
• For systems running Windows XP, the location is: C:\Documents and Settings\user_name\NetApp\SystemManager.
After you finish
You can launch System Manager and start managing your storage systems and objects.
Related tasks
Downloading the System Manager software on page 10Launching System Manager on page 16
Related references
System requirements for System Manager on page 8
Related information
NetApp Support Site: support.netapp.com
Installing System Manager on LinuxYou can install System Manager on your Linux system through the command-line interface by usingRed Hat Package Manager (RPM). You must perform this task if you are installing System Managerfor the first time.
Before you begin
• Your Linux host system must be running the supported software versions.
Installing, upgrading, or uninstalling System Manager | 11
• The System Manager software must be downloaded from the NetApp Support Site.
• You must have the necessary privileges to install the application.
• You must have read/write permission to your home directory.By default, your home directory is used to store configuration files and log files.
• Oracle Java Runtime Environment (JRE) 7 must be installed.
Steps
1. Install System Manager using the following command:
rpm -i downloaded_rpm_file_name
2. Check the progress of the installation by using the following command:
rpm -ivv downloaded_rpm_file_name
By default, the System Manager configuration details and logs are stored in the following userpreference directory: /root/Netapp.
After you finish
You can launch System Manager and start managing your storage systems and objects.
Related tasks
Downloading the System Manager software on page 10Launching System Manager on page 16
Related references
System requirements for System Manager on page 8
Related information
NetApp Support Site: support.netapp.com
Upgrading to System Manager on WindowsYou can upgrade to the latest version of System Manager from the earlier versions. After the upgrade,you can continue to manage the storage systems that you were managing with the earlier versions.
Before you begin
• Your host system must be running the supported software versions.
• The latest version of System Manager software must be downloaded from the NetApp SupportSite.
• All browser windows or tabs must be closed.
• Oracle Java Runtime Environment (JRE) 7 must be installed.
About this task
If you are upgrading from System Manager 1.x, you do not have to uninstall the earlier version.
Steps
1. Run the downloaded System Manager software file.
2. Follow the on-screen instructions to complete the upgrade.
After the upgrade, the IP addresses of all the storage systems that you managed using the earlierversion of System Manager are migrated.
After you finish
You can launch System Manager and start managing your storage systems.
If you are upgrading from System Manager 1.x, the storage system credentials are not migrated.Therefore, you must provide the credentials before you use System Manager to manage your storagesystems.
If you are upgrading from System Manager 2.x, the storage system credentials are migrated and youneed not provide the credentials.
Related tasks
Downloading the System Manager software on page 10Launching System Manager on page 16
Related references
System requirements for System Manager on page 8
Related information
NetApp Support Site: support.netapp.com
Installing, upgrading, or uninstalling System Manager | 13
Upgrading to System Manager on LinuxYou can upgrade to the latest version of System Manager through the command-line interface byusing Red Hat Package Manager (RPM). After the upgrade, you can continue to manage the storagesystems that you were managing with the earlier versions.
Before you begin
• Your host system and the storage systems must be running the supported software versions.
• The latest version of System Manager software must be downloaded from the NetApp SupportSite.
• All browser windows or tabs must be closed.
• Oracle Java Runtime Environment (JRE) 7 must be installed.
Step
1. From the command-line interface, enter the following command:
rpm -U download_file_name
Related information
NetApp Support Site: support.netapp.com
Uninstalling System Manager on WindowsYou can uninstall System Manager by using the Windows Add or Remove Programs utility.
Before you begin
If the System Manager application is running, it must be closed.
About this task
You cannot uninstall System Manager from the control panel if you have renamed the directory inwhich it is installed. However, you can uninstall System Manager by running uninst.exe from theinstallation directory.
Steps
1. Click Start > Control Panel.
2. Open the utility to add or remove programs and uninstall System Manager version_number.
Uninstalling System Manager on LinuxYou can uninstall System Manager through the command-line interface by using Red Hat PackageManager (RPM).
Before you begin
If the System Manager application is running, it must be closed.
Step
1. From the command-line interface, enter the command:
rpm -e system_manager_package_name
Installing, upgrading, or uninstalling System Manager | 15
Launching System Manager
After installing System Manager, you must launch the application to configure and manage yourstorage systems from a Web browser.
Before you begin
• If you are using a Windows Server operating system and Internet Explorer, the URL http://127.0.0.1 must be added as a trusted site in Internet Explorer.
• If you are using a proxy server, it must be disabled.
• If you are using a Linux system, Oracle Java Runtime Environment (JRE) 7 must be installed andit must be set as the default JRE.You can use the java -d32 -version command and the java -d64 -version command toverify that you are using the correct JRE version and the associated platform.
• If you are running Windows or Linux guest OS on Mac OS by using VMware Fusion, you mustensure the following:
◦ The Shared folders feature must be disabled.
◦ The desktop option of the Mirrored folders feature must be disabled.
• To access System Manager through a VPN connection on a machine running Windows 7 andWindows Server 2008, you must have installed the hotfix 2750841 from the Microsoft web site.
Steps
1. Launch System Manager in one of the following ways:
• Double-click the NetApp OnCommand System Manager icon on your desktop.
• For Windows, click Start > All Programs > NetApp > OnCommand System Manager >NetApp OnCommand System Manager version_number.
• For Red Hat Enterprise Linux, click Applications > System Tools > NetApp OnCommandSystem Manager version_number.
• For SUSE Linux Enterprise Server, click Computer > Applications > NetApp OnCommandSystem Manager version_number.
2. Double-click the storage system that you want to manage.
Depending on your browser settings, the storage system management tab opens in a new tabwindow or a new browser window.
16 | Quick Start Guide
Note: If you try to open a storage system that is already open in a browser tab, the browserdoes not switch to the opened tab.
Launching System Manager | 17
Getting started with System Manager
The System Manager user interface enables you to configure your storage systems and managestorage objects such as disks, aggregates, volumes, quotas, qtrees, and LUNs; protocols such asCIFS, NFS, iSCSI, and FC; vFiler units; Vservers; HA configurations; V-Series systems; and vaultand mirror relationships.
For more information about how to configure and manage your storage systems from SystemManager, see the System Manager Help. You can access the Help in PDF format from the NetAppSupport Site or from the Help provided with the System Manager software.
Before you can start managing a storage system from System Manager, you have to add the system toSystem Manager.
Related information
NetApp Support Site: support.netapp.com
Ports used by System ManagerSystem Manager uses specific ports when it accesses the storage system by using managementprotocols such as HTTPS, HTTP, and SNMP.
System Manager uses the following ports to communicate with the storage systems:
• Port TCP/443 for HTTPS
• Port TCP/80 for HTTP
• Port UDP/161 for SNMP
It is best to use HTTPS for secure communication with the storage system. You must enable SSL onyour storage system to allow administrative requests over HTTPS to succeed. For storage systemsrunning Data ONTAP 8.1 operating in Cluster-Mode, if SSL is not enabled, you have to enable SSLfrom the command-line interface (CLI).
System Manager does not allow you to specify a port range to start the Jetty Web server. SystemManager either allows you to select a specific port or automatically selects the port. If you manuallyspecify the port, you can start only one instance of System Manager. Running a single instance doesnot allow multiple users to access the application simultaneously. For example, in a multiuserenvironment with a terminal server, if System Manager does not start with a predefined port range,multiple users cannot access the application simultaneously.
Enabling SNMPFor System Manager to discover storage systems, you must ensure that the SNMP protocolsSNMPv1 and SNMPv2c are enabled and an SNMP community is created on the storage system.
About this task
SNMPv1 and SNMPv2c protocols are less secure compared to SNMPv3 protocol. In storage systemsrunning Data ONTAP 8.1 or a later version in the Data ONTAP 8.1 family, SNMPv1 and SNMPv2cprotocols are enabled by default. In storage systems running clustered Data ONTAP 8.2, SNMPv1and SNMPv2c are disabled by default. SNMPv2c is enabled when an SNMP community is created.
You must use the command-line interface (CLI) to enable SNMP because System Manager does notsupport enabling SNMP.
Creating an SNMP community for clustered Data ONTAP 8.2
You can create an SNMP community that acts as an authentication mechanism between themanagement station and the cluster when using SNMPv1 and SNMPv2c.
About this task
You must use the CLI to enable SNMP on the cluster.
• Starting from Data ONTAP 8.2, SNMPv1 and SNMPv2c are disabled by default.SNMPv1 and SNMPv2c are enabled when an SNMP community is created.
• Data ONTAP supports read-only communities.
• By default, a firewall data policy has SNMP service set to deny.
• You can create SNMP communities for the SNMPv1 and SNMPv2c users for the Vserver.
Steps
1. Use the system snmp community add command to create an SNMP community.
Example
The following command creates an SNMP community:
cluster1::> system snmp community add -type ro -community-name public
The default string in System Manager is public. However, you can use other community strings.You must specify the correct community string while adding or discovering clusters in SystemManager.
Getting started with System Manager | 19
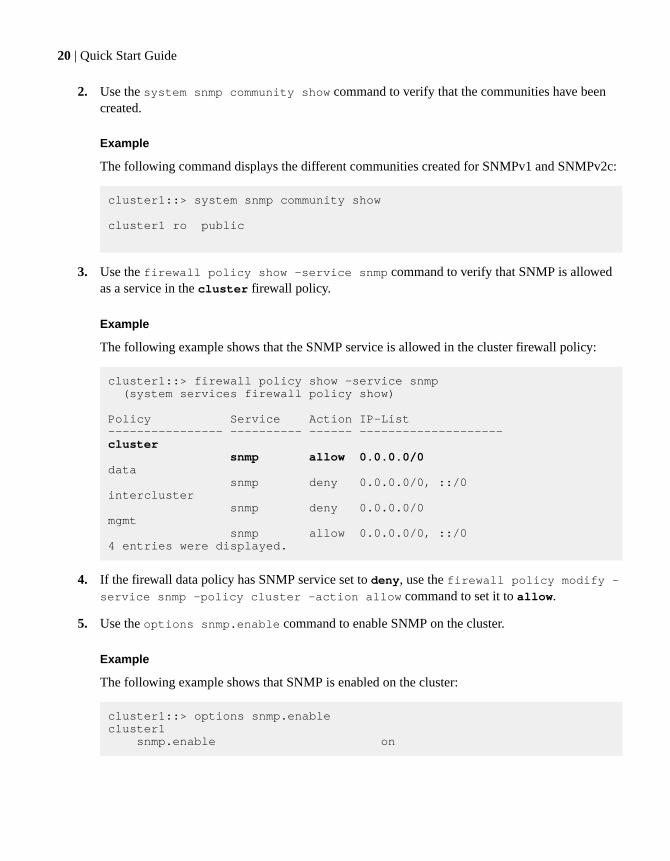
2. Use the system snmp community show command to verify that the communities have beencreated.
Example
The following command displays the different communities created for SNMPv1 and SNMPv2c:
cluster1::> system snmp community show
cluster1 ro public
3. Use the firewall policy show -service snmp command to verify that SNMP is allowedas a service in the cluster firewall policy.
Example
The following example shows that the SNMP service is allowed in the cluster firewall policy:
4. If the firewall data policy has SNMP service set to deny, use the firewall policy modify -service snmp -policy cluster -action allow command to set it to allow.
5. Use the options snmp.enable command to enable SNMP on the cluster.
Example
The following example shows that SNMP is enabled on the cluster:
cluster1::> options snmp.enablecluster1 snmp.enable on
20 | Quick Start Guide
Enabling or disabling SNMP
You can enable or disable SNMP from the command-line interface by entering the optionssnmp.enable command.
Step
1. To enable or disable SNMP, enter the following command:
options snmp.enable {on|off}
on—Enables SNMP
off—Disables SNMP
Adding storage systems or clustersBefore you use System Manager to manage your storage systems and clusters, you have to add themto the application. You can also add storage systems that are in an HA configuration.
Before you begin
• Your storage systems must be running a supported version of Data ONTAP.
• SSL must be enabled on the storage system.
• All the nodes in the cluster must be running Data ONTAP 8.1 or later.
• You must have the Data ONTAP credentials (user name and password) of the storage object thatyou are adding to System Manager.
About this task
If you are adding one of the storage systems from an HA pair, the partner node is automaticallyadded to the list of managed systems. If the partner node in an HA pair is down, you can add theworking storage node.
Steps
1. From the home page, click Add.
2. Type the fully qualified DNS host name or the IPv4 address of the storage system or cluster.
You can specify the IPv6 address of the storage system if you are adding a system that is runninga supported version of Data ONTAP operating in 7-Mode.
If you are adding a cluster, you must enter the IP address of the cluster management interface.
3. Click the More arrow.
Getting started with System Manager | 21
4. Select the method for discovering and adding the storage system or cluster:
• SNMPYou must specify the SNMP community and SNMP version (SNMPv1 or SNMPv2).
Note: Although you can use SNMP to communicate with the nodes, you must provide thecontroller credentials to manage these nodes.
• CredentialsYou must specify the Data ONTAP credentials (user name and password) of the storage objectthat you are adding to System Manager.You can use SNMP to communicate with the nodes. However, controller credentials arerequired for managing the nodes.
5. Click Add.
Result
The storage system that you have added is displayed in the home page.
Discovering storage systemsYou can use the Discover Storage Systems dialog box to discover storage systems, clusters, orstorage systems in an HA pair on a network subnet and add them to the list of managed systems.
Before you begin
• Your storage systems must be running a supported version of Data ONTAP.
• All the nodes in the cluster must be running Data ONTAP 8.1 or later.
• The SNMP protocols SNMPv1 and SNMPv2c must be enabled, and an SNMP community mustbe configured.
About this task
If you are adding one of the nodes in an HA pair, the partner system is automatically added to the listof managed systems.
Steps
1. From the home page, click Discover.
2. In the Discover Storage Systems dialog box, type the subnet IP address and click Discover.
3. Select one or more storage systems from the list of discovered systems and click Add SelectedSystems.
22 | Quick Start Guide
4. Verify that the storage system or the HA pair that you added is included in the list of managedsystems in the System Manager home page.
Configuring storage systemsYou can use the Storage Configuration wizard to configure your storage system or an HAconfiguration running Data ONTAP operating in 7-Mode. You must separately configure eachstorage system when you configure an HA configuration.
Before you begin
The storage system must not be configured previously.
Your storage systems must be running one of the following versions of Data ONTAP operating in 7-Mode:
• Data ONTAP 7.3.x (starting from 7.3.7)
• Data ONTAP 8.0.4 and 8.0.5
• Data ONTAP 8.1.3
• Data ONTAP 8.2
You must have enabled HTTP by using the httpd.admin.ssl.enable option for storage systemsrunning Data ONTAP 8.2 operating in 7-Mode.
Note: In the Data ONTAP 8.x operating in 7-Mode product name, the term 7-Mode signifies thatthe 8.x release operates in the same way as the prior Data ONTAP 7.1, 7.2, and 7.3 releasefamilies.
Steps
1. From the home page, double-click the appropriate storage system.
2. In the navigation pane, click Storage.
3. Click the Storage Configuration wizard.
4. Type or select information as prompted by the wizard.
5. Confirm the details and click Finish to complete the wizard.
No part of this document covered by copyright may be reproduced in any form or by any means—graphic, electronic, or mechanical, including photocopying, recording, taping, or storage in anelectronic retrieval system—without prior written permission of the copyright owner.
Software derived from copyrighted NetApp material is subject to the following license anddisclaimer:
THIS SOFTWARE IS PROVIDED BY NETAPP "AS IS" AND WITHOUT ANY EXPRESS ORIMPLIED WARRANTIES, INCLUDING, BUT NOT LIMITED TO, THE IMPLIEDWARRANTIES OF MERCHANTABILITY AND FITNESS FOR A PARTICULAR PURPOSE,WHICH ARE HEREBY DISCLAIMED. IN NO EVENT SHALL NETAPP BE LIABLE FOR ANYDIRECT, INDIRECT, INCIDENTAL, SPECIAL, EXEMPLARY, OR CONSEQUENTIALDAMAGES (INCLUDING, BUT NOT LIMITED TO, PROCUREMENT OF SUBSTITUTEGOODS OR SERVICES; LOSS OF USE, DATA, OR PROFITS; OR BUSINESS INTERRUPTION)HOWEVER CAUSED AND ON ANY THEORY OF LIABILITY, WHETHER IN CONTRACT,STRICT LIABILITY, OR TORT (INCLUDING NEGLIGENCE OR OTHERWISE) ARISING INANY WAY OUT OF THE USE OF THIS SOFTWARE, EVEN IF ADVISED OF THEPOSSIBILITY OF SUCH DAMAGE.
NetApp reserves the right to change any products described herein at any time, and without notice.NetApp assumes no responsibility or liability arising from the use of products described herein,except as expressly agreed to in writing by NetApp. The use or purchase of this product does notconvey a license under any patent rights, trademark rights, or any other intellectual property rights ofNetApp.
The product described in this manual may be protected by one or more U.S. patents, foreign patents,or pending applications.
RESTRICTED RIGHTS LEGEND: Use, duplication, or disclosure by the government is subject torestrictions as set forth in subparagraph (c)(1)(ii) of the Rights in Technical Data and ComputerSoftware clause at DFARS 252.277-7103 (October 1988) and FAR 52-227-19 (June 1987).
24 | Quick Start Guide
Trademark information
NetApp, the NetApp logo, Go Further, Faster, ASUP, AutoSupport, Campaign Express, CloudONTAP, clustered Data ONTAP, Customer Fitness, Data ONTAP, DataMotion, Fitness, Flash Accel,Flash Cache, Flash Pool, FlashRay, FlexArray, FlexCache, FlexClone, FlexPod, FlexScale,FlexShare, FlexVol, FPolicy, GetSuccessful, LockVault, Manage ONTAP, Mars, MetroCluster,MultiStore, NetApp Insight, OnCommand, ONTAP, ONTAPI, RAID DP, SANtricity, SecureShare,Simplicity, Simulate ONTAP, Snap Creator, SnapCopy, SnapDrive, SnapIntegrator, SnapLock,SnapManager, SnapMirror, SnapMover, SnapProtect, SnapRestore, Snapshot, SnapValidator,SnapVault, StorageGRID, Tech OnTap, Unbound Cloud, and WAFL are trademarks or registeredtrademarks of NetApp, Inc., in the United States, and/or other countries. A current list of NetApptrademarks is available on the web at http://www.netapp.com/us/legal/netapptmlist.aspx.
Cisco and the Cisco logo are trademarks of Cisco in the U.S. and other countries. All other brands orproducts are trademarks or registered trademarks of their respective holders and should be treated assuch.
How to send comments about documentation andreceive update notification
You can help us to improve the quality of our documentation by sending us your feedback. You canreceive automatic notification when production-level (GA/FCS) documentation is initially released orimportant changes are made to existing production-level documents.
If you have suggestions for improving this document, send us your comments by email to [email protected]. To help us direct your comments to the correct division, include in thesubject line the product name, version, and operating system.
If you want to be notified automatically when production-level documentation is released orimportant changes are made to existing production-level documents, follow Twitter account@NetAppDoc.
You can also contact us in the following ways:
• NetApp, Inc., 495 East Java Drive, Sunnyvale, CA 94089 U.S.
how to send feedback about documentation 26System Manager
about 4downloading software 10getting started 18installing 8installing on Linux 11installing on Windows 10launching 16requirements
for installing System Manager 8supported Data ONTAP versions 5system requirements 8tasks you can perform from 4uninstalling 8uninstalling on Linux 15uninstalling on Windows 14upgrading 8
upgrading on Linux 14upgrading on Windows 12
T
twitterhow to receive automatic notification ofdocumentation changes 26
U
uninstallingSystem Manager on Linux 15System Manager on Windows 14
upgradingSystem Manager, on Linux 14System Manager, on Windows 12