24
Confidential Online Enrollment and Eligibility Management System Employee User Guide Where employers, employees and carriers connect www.BenelinkConnect.com

Confidential
Online Enrollment and Eligibility Management System Employee User Guide
Where employers, employees and carriers connectwww.BenelinkConnect.com
2
Online Enrollment and Eligibility Management System Employee Service GuideTable of Contents
Getting StartedLogin and password information
Logging into the Benefit Administration System
Helpful information about the Benefit Administration System
Helpful information about the Enrollment process
Beginning the enrollment process
Providing a digital signature
Personal information verification
Family member information verification and updating
Making your benefit selections
Confirming your enrollment
Confirming benefit elections
Confirmation statement review
Product resources
My account – password change
Logging out

3
Online Enrollment and Eligibility Management System Employee Service GuideGetting Started – Logon & Password Information
www.BenelinkConnect.com
Employees personal login:
Your personal Login ID: BS09 plus the first initial of your first name and the first initial of your last name, followed by your full birth date (mmddyyyy) with no spaces. (For example; employee “Linda Test” was born on September 17, 1971, her login ID would be “BS09LT09171971”)
Your personal Password: If this is your first time going to your personal records, you will need to create a temporary passwordby typing your company initials “BS09” followed by the last six digits of your Social Security Number. For example: employee “Linda Test” full Social Security number is 123‐45‐6789, then the password in this case would be “BS09456789”)
Key notes: Log on prefix BS09 is AlphaAlphaNumberNumberPasswords are case sensitiveFor security purposes, the system will then automatically request that you change your temporary password. Please record and keep a record of your new password for system access in the future.

4
Online Enrollment and Eligibility Management System Employee Service GuideGetting Started – How to Login to the Benefit Administration System
www.BenelinkConnect.comBenelinkConnect is your benefit administration tool. It is your resource for benefits information, enrollment and life event updates. Your can enroll from the convenience of your home computer, your iPad or using your work computer. The website also provides you with detailed information and tools to help you make decisions about your benefit options and elections.
Open a web browser (for best results use Firefox Chrome or the latest version of Internet Explorer) and enter www.BenelinkConnect.com.Enter the personal user login ID and password that has been provided to you (reference slide 3). Then select the “Login” button.

5
Online Enrollment and Eligibility Management System Employee Service GuideHelpful Information About Benefit Admin System
After logging into www.BenelinkConnect.com you will be taken to your customized personal Home Page. From there you will be able to access various tools including enrollment in your benefits, reviewing your benefit elections and supporting documentation.
Enrollment Process Benefit Statement & Product Resources Reset Password

6
Online Enrollment and Eligibility Management System Employee Service GuideHelpful Information About the Enrollment Process
As you start the enrollment process (Begin Enrollment, Personal Information, Manage Family Members/Dependents, and make benefit elections) orange check marks will appear for each stage of the process that is completed by you. To start the enrollment process please select/click on the “CONTINUE ENROLLMENT” button within each section. After you select “CONTINUE ENROLLMENT” the system will guide you through each of the steps outlined below. As you complete each of these sections, when you return to the HOME page you will notice the orange check mark appears for each section you have completed.
To confirm and process the enrollment you must choose “Authorize Deductions” button when you have finished your benefit elections and are prompted by the system.
Note: If you want to access any of the sections/screens identified below directly you can do so from the Home page. For example, to access the Personal Information Verification section, you can select/click on the “Personal Information” tab below and go directly to that section

7
Online Enrollment and Eligibility Management System Employee Service GuideBeginning the Enrollment Process
Once you have logged in and arrive at your personal home page, you can find the step by step enrollment guide under “Product Resources” tab. To enroll follow the tasks along the left side of the home page. To begin the enrollment process select the “Begin Enrollment” tab and follow the instructions as the system takes you through each step. At anytime during the process you may review your benefits, plan summaries, beneficiaries, family members by logging on to your home page a selecting the item for review. Forms and other benefit product information can be fund under the “Product Resources” section of the home page.
Note: After you have begun the enrollment process and you navigate back to the Home page you will notice that the status of your enrollment has changed from “Begin Enrollment” to “Continue Enrollment” and green check marks appear next to each section of the enrollment that you have completed.

8
Online Enrollment and Eligibility Management System Employee Service GuideContinue the Enrollment Process – Provide Digital Signature
After you select the “Begin/Continue Enrollment” button, you will be directed to the digital signature page.
Before you begin the enrollment process the system will request that you authorize the use of a digital signature for enrollment purposes. Please type employee’s name EXACTLY as it appears on the top of the enrollment screen (including upper/lower case and punctuation) into
the text box, and then click on the “Submit Approval or Disapproval” button to continue.

9
Online Enrollment and Eligibility Management System Employee Service GuideContinue the Enrollment Process – Personal Information Verification & Update
Once you have provided your digital signature the next step is to verify and/or update your personal information. Key fields for review are address, date of birth, and Social Security Number. If you need to update any of your personal information select the “Update Personal Information” button in the top left of your screen. If you are satisfied with your information, select the “Continue Enrollment” button at the bottom right of the screen to continue the next step of the enrollment process.

10
Online Enrollment and Eligibility Management System Employee Service GuideContinue the Enrollment Process – Personal Information Update
If your selected “Update Personal Information” your will be directed to the following update screen. When you have finished entering and reviewing changes to your personal information select the “Save Changes” button at the bottom middle.
Note: Insurance carriers will mail ID cards and other key materials to the address listed on this Personal Information screen. It is important that you keep your address current and up‐to‐date. If your information is incorrect please also contact your HR Representative to ensure you information is updated in other company systems.

11
Online Enrollment and Eligibility Management System Employee Service GuideContinue the Enrollment Process – Personal Information Verification & Update
Once you have updated your personal information you will be guided to the personal information review page for another opportunity to confirm information. After reviewing, select the “Continue Enrollment” button at the bottom center of the page.
Note: If you need to go back to a previous screen within the enrollment process, you can use the “Go Back” button located at the bottom middle of the page. At any time you may return to the Home page by selecting the “ ” button at the top right of any page.
Every page during the enrollment process also has a help button “?” located at the top right of each page. Select this button anytime for additional information about the system.
12
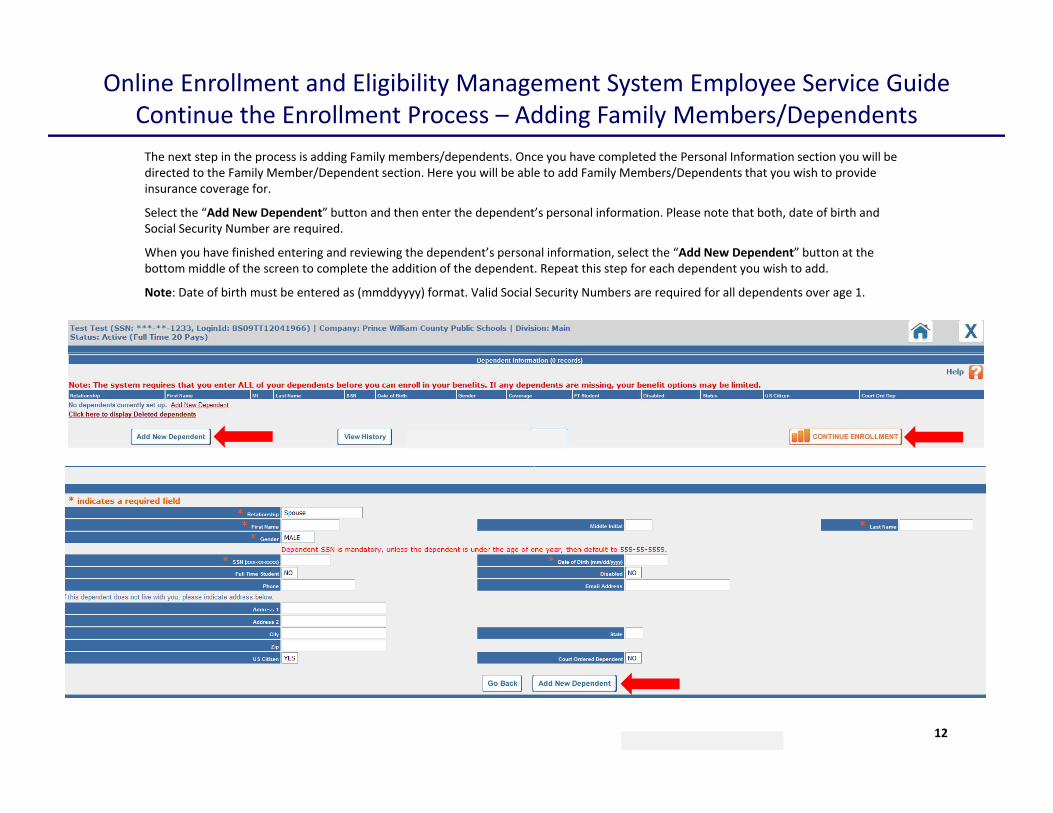
Online Enrollment and Eligibility Management System Employee Service GuideContinue the Enrollment Process – Adding Family Members/DependentsThe next step in the process is adding Family members/dependents. Once you have completed the Personal Information section you will be directed to the Family Member/Dependent section. Here you will be able to add Family Members/Dependents that you wish to provideinsurance coverage for.
Select the “Add New Dependent” button and then enter the dependent’s personal information. Please note that both, date of birth and Social Security Number are required.
When you have finished entering and reviewing the dependent’s personal information, select the “Add New Dependent” button at the bottom middle of the screen to complete the addition of the dependent. Repeat this step for each dependent you wish to add.
Note: Date of birth must be entered as (mmddyyyy) format. Valid Social Security Numbers are required for all dependents over age 1.

13
Online Enrollment and Eligibility Management System Employee Service GuideContinue the Enrollment Process – Adding Family Members/Dependents
All dependents added will show up on this screen with the information you have provided. Please make sure that all dependents you wish to enroll in a benefit is listed on this screen. When you have finished verifying your dependents information, click the: “Continue Enrollment” button at the bottom of the page.
If you need to edit any information for a dependent , or add a dependent, you can simply click the ‘[Edit]’ button that will appear next to each listed dependent. Only the Benefit Service Call Center can add or delete a Court Ordered Dependent. All Court Orders are to be forward to the Benefit Service Call Center for processing.
Note: You will have the opportunity to remove any existing dependents from their benefit plans later in the enrollment process, this include Court Ordered Dependents.

14
Online Enrollment and Eligibility Management System Employee Service GuideContinue the Enrollment Process – Making Benefit Elections
The next step in the enrollment process is making benefit elections. From the benefit election screen you can select to enroll in the medical benefit be selecting the “Edit” button next to medical. By selecting the “Edit” button you may make new elections.

15
Online Enrollment and Eligibility Management System Employee Service GuideContinue the Enrollment Process – Making Benefit Elections
Once “Edit” has been selected you will receive the product selection screen below. From here you will have the ability to select the product and coverage type you wish to enroll in from the dropdown selection box list. If you are not selecting coverage for any dependents then select the product you wish to be enrolled for the new plan year and select “Save Changes”
To add dependent coverage, select the box next to the dependent name you wish to have coverage for. A check mark will appear in the box once selected to confirm the dependent enrollment for this plan. To remove a dependent from your current election, select the box next to the dependents name to remove the check mark. The dependent will not be covered in this plan.
After choosing the plan option and coverage type (adding applicable dependents), select the “Save Changes” button at the middle bottom of the screen.
Note: The per pay period deduction amounts are displayed in the election dropdown list next to the corresponding plan option.Note: If you wish to waive the benefit coverage, simply select the “Waive” option in the dropdown box.Note: If the benefit type allows dependent enrollment, a list of Family member / dependents you entered in a previous step will appear.Note: You will be required to select dependents with the correct relationships before you will be allowed to save the plan selection. (For example; Employee + Spouse coverage requires that you enroll a spouse by placing a check mark next to Spouse).
16
Online Enrollment and Eligibility Management System Employee Service GuideContinue the Enrollment Process – Confirming Enrollment
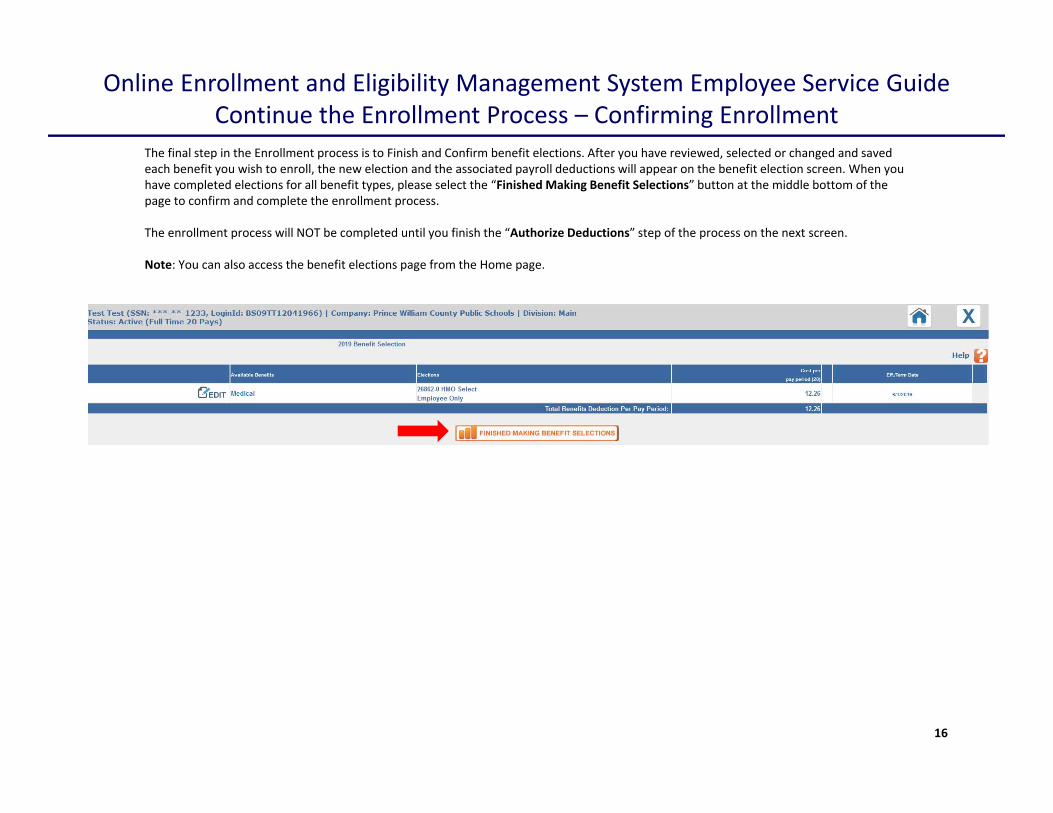
The final step in the Enrollment process is to Finish and Confirm benefit elections. After you have reviewed, selected or changed and saved each benefit you wish to enroll, the new election and the associated payroll deductions will appear on the benefit election screen. When you have completed elections for all benefit types, please select the “Finished Making Benefit Selections” button at the middle bottom of the page to confirm and complete the enrollment process.
The enrollment process will NOT be completed until you finish the “Authorize Deductions” step of the process on the next screen.
Note: You can also access the benefit elections page from the Home page.

17
Online Enrollment and Eligibility Management System Employee Service GuideContinue the Enrollment Process – Confirming & Completing Enrollment
After selecting your insurance coverage and completing enrollment the system will bring you to the benefit enrollment finish andconfirmation page. It will require an electronic signature that authorizes the benefit deduction(s) to be taken from your paycheck. Please confirm that your name is entered EXACTLY as it appears at the top of the enrollment screen, including upper/lower case and punctuation. It will also require that the deductions be taken from the employees paycheck and is authorized be selecting the box next to the statement that begins with “Yes”. When you select this box a “check mark” will appear in the box. When you have finished, select the “Click this button to finish enrollment” button.

18
Online Enrollment and Eligibility Management System Employee Service GuideContinue the Enrollment Process – Benefit Statement
Once the enrollment has be confirmed and completed, you will be directed to the “View Benefit Statement” page which provides a view of all available benefits as well as the benefits you elected and the associated beneficiaries and Family Members/dependents.
In order to view only the elected benefits, you may return to the Home page by selecting “ “ at the top right of the previous screen. From the Home page select the “View Selected Benefits Statement” link located in the middle of the Home page. The online benefit statement provides a summary of elections, dependents, costs, and effective dates for the benefits the employee has elected.
Note: If you wish to print a statement for your records, you can do so from both the Home page and the Confirmation page. For best results, please select the “Print Friendly” link located on the Benefit Statement (refer to next page)
Note: Refer to next page for a Screen view of the Benefit Statement

19
Online Enrollment and Eligibility Management System Employee Service GuideContinue the Enrollment Process – Benefit Statement
Note: Screen view of the Benefit Statement

20
Online Enrollment and Eligibility Management System Employee Service GuideContinue the Enrollment Process – Benefit Statement
The “Benefit Statements” section of the Home page provides you a summary statement of your benefit elections. There are two ways to view your statement.
1. View the “Benefit Statement” ‐ This view displays all available benefits and your elections2. View “Selected Benefit Statement” – This view displays only your benefit elections
21
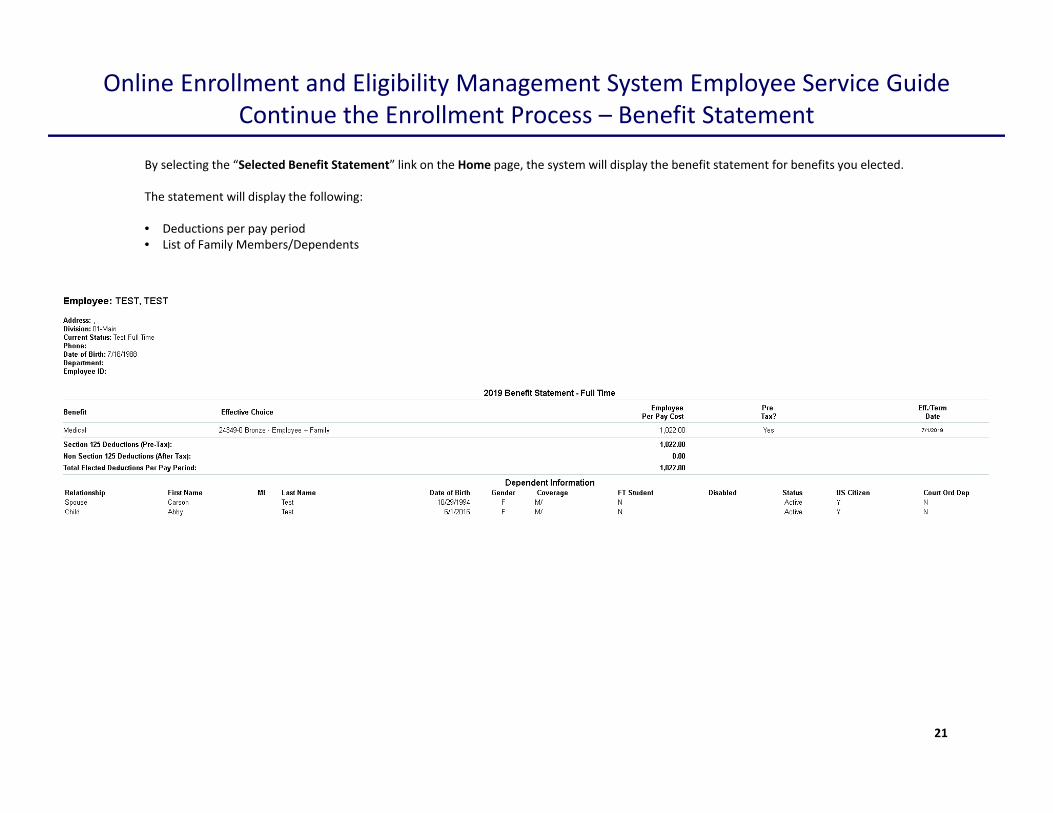
Online Enrollment and Eligibility Management System Employee Service GuideContinue the Enrollment Process – Benefit Statement
By selecting the “Selected Benefit Statement” link on the Home page, the system will display the benefit statement for benefits you elected.
The statement will display the following:
• Deductions per pay period• List of Family Members/Dependents

22
Online Enrollment and Eligibility Management System Employee Service GuideProduct Resources
The “Product Resources” section of the Home page provides you with help aid for your benefit election process. This is where helpful resources such as forms and documents will be loaded for your review along with links to other helpful websites.
1. View “ Benefit Documents” 2. View “Carrier and HR forms”3. View “Carrier website links and tools”
23
Online Enrollment and Eligibility Management System Employee Service GuideMy Account
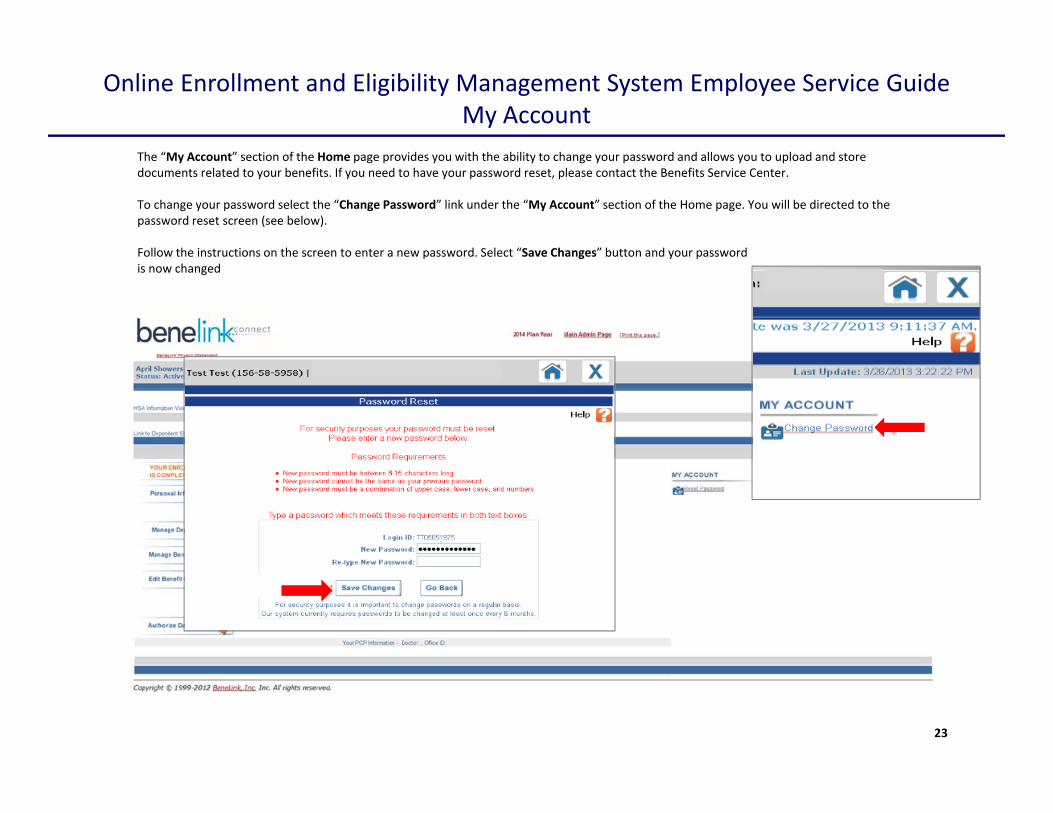
The “My Account” section of the Home page provides you with the ability to change your password and allows you to upload and store documents related to your benefits. If you need to have your password reset, please contact the Benefits Service Center.
To change your password select the “Change Password” link under the “My Account” section of the Home page. You will be directed to the password reset screen (see below).
Follow the instructions on the screen to enter a new password. Select “Save Changes” button and your passwordis now changed

24
Online Enrollment and Eligibility Management System Employee Service GuideLogging Out of the Benefits Administration System
To log out of the enrollment website, Benefit Administration System, select the “ “ icon located on the top right hand corner of the page.


