32
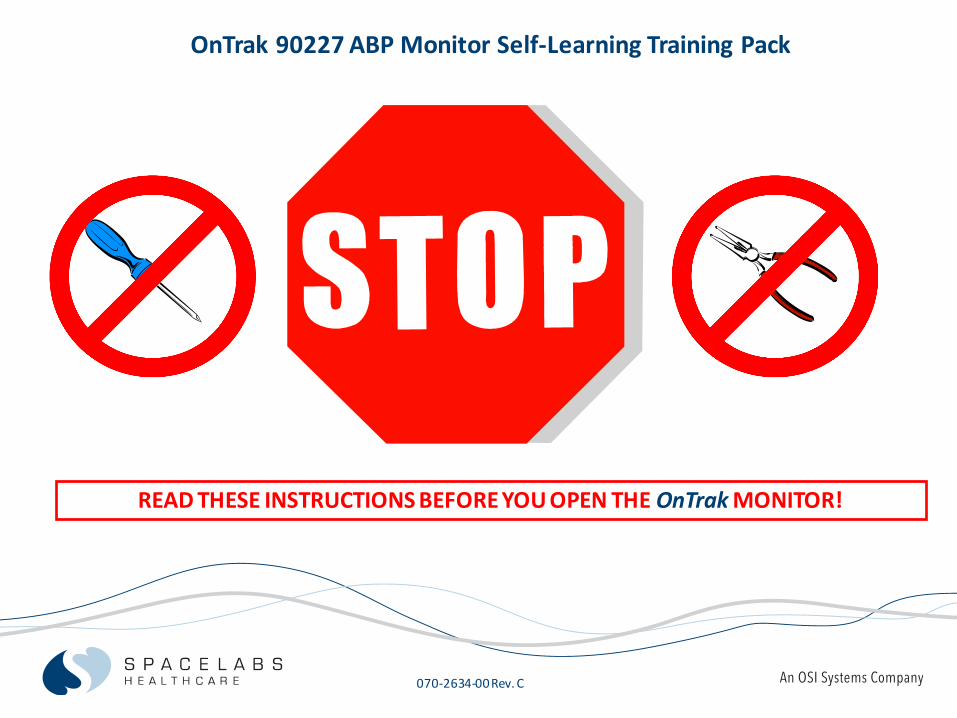
070-2634-00 Rev. C READ THESE INSTRUCTIONS BEFORE YOU OPEN THE OnTrak MONITOR! OnTrak 90227 ABP Monitor Self-Learning Training Pack
070-2634-00 Rev. C
READ THESE INSTRUCTIONS BEFORE YOU OPEN THE OnTrak MONITOR!
OnTrak 90227 ABP Monitor Self-Learning Training Pack

070-2634-00 Rev. C
OnTrak 90227 ABP MonitorSelf-Learning Training Pack

070-2634-00 Rev. C
OnTrak 90227 ABP MonitorSelf-Learning Training Pack
070-2634-00 Rev. C
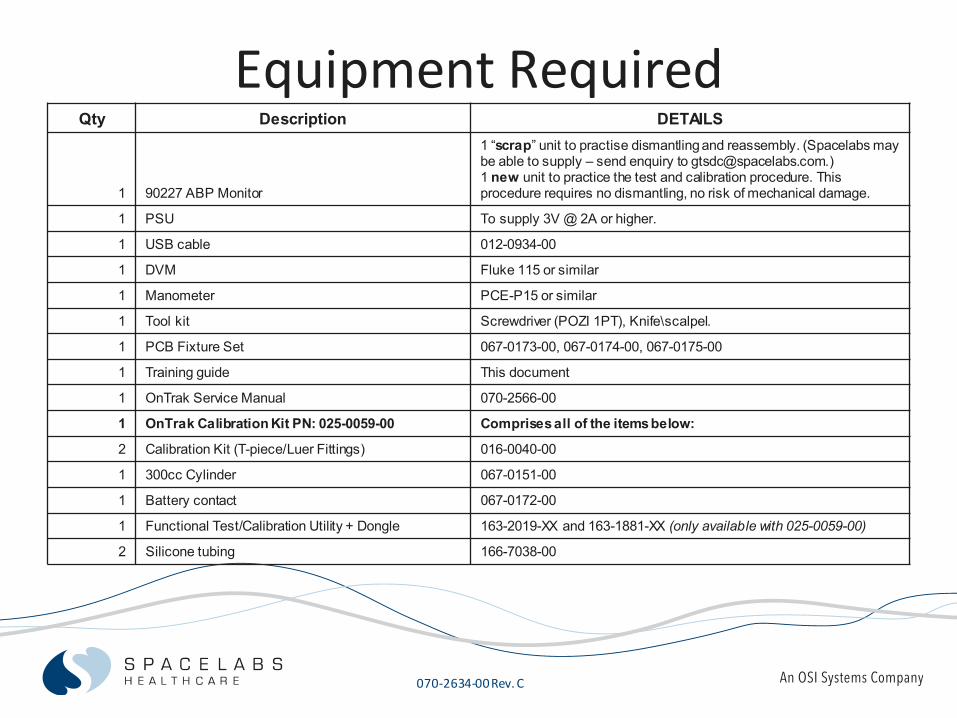
Equipment RequiredQty Description DETAILS
1 90227 ABP Monitor
1 “scrap” unit to practise dismantling and reassembly. (Spacelabs may be able to supply – send enquiry to [email protected].)1 new unit to practice the test and calibration procedure. This procedure requires no dismantling, no risk of mechanical damage.
1 PSU To supply 3V @ 2A or higher.
1 USB cable 012-0934-00
1 DVM Fluke 115 or similar
1 Manometer PCE-P15 or similar
1 Tool kit Screwdriver (POZI 1PT), Knife\scalpel.
1 PCB Fixture Set 067-0173-00, 067-0174-00, 067-0175-00
1 Training guide This document
1 OnTrak Service Manual 070-2566-00
1 OnTrak Calibration Kit PN: 025-0059-00 Comprises all of the items below:
2 Calibration Kit (T-piece/Luer Fittings) 016-0040-00
1 300cc Cylinder 067-0151-00
1 Battery contact 067-0172-00
1 Functional Test/Calibration Utility + Dongle 163-2019-XX and 163-1881-XX (only available with 025-0059-00)
2 Silicone tubing 166-7038-00
070-2634-00 Rev. C
Technical Highlights• OnTrak can be configured and downloaded using:
– 92506 Report Management Software V3.0.3 (and above)– CardioNavigator V2.700.30 (and above)– Sentinel V9 (and above)
• It is not compatible with 90121, and 90239A. • The “Office Check Mode” displays the first 5 successful readings. For
subsequent readings, OnTrak uses your Display Configuration settings.• OCM is automatically enabled each time OnTrak is switched Off/On.• Terminate OCM by starting, then cancelling a manual reading.

070-2634-00 Rev. C
Technical Highlights
• The built-in Patient Protection system ensures that:– Cuff pressure is always less than 300 mmHg– Cuff pressure is never above 15 mmHg for longer than 180
seconds– Cuff pressure is below 15 mmHg for at least 30 seconds
between measurements– Single faults are detected– Minimum 30 seconds between measurements
070-2634-00 Rev. C
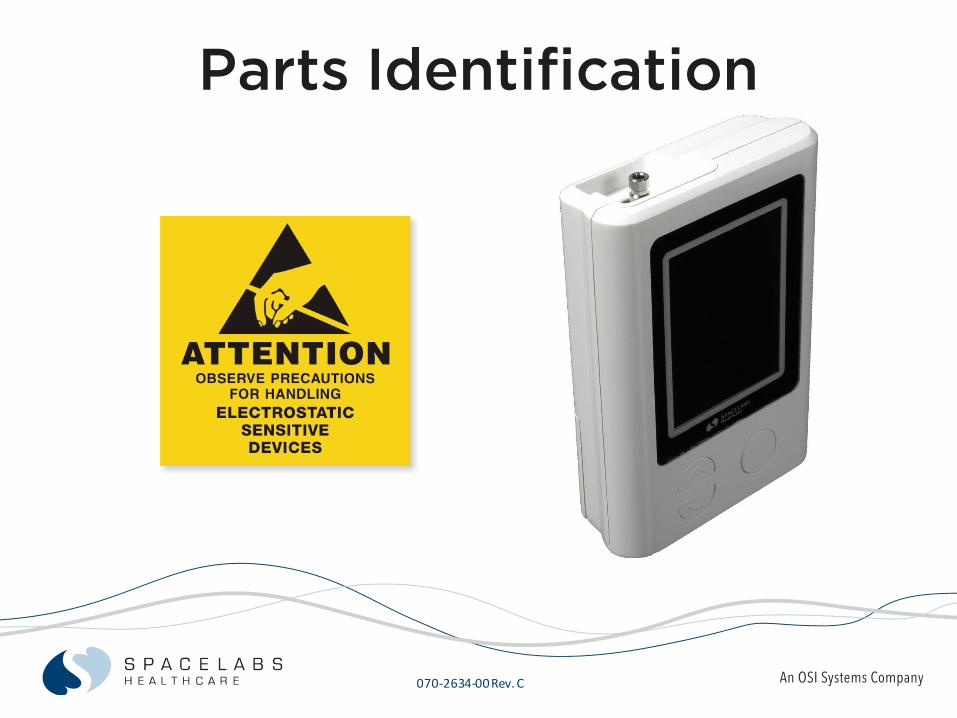
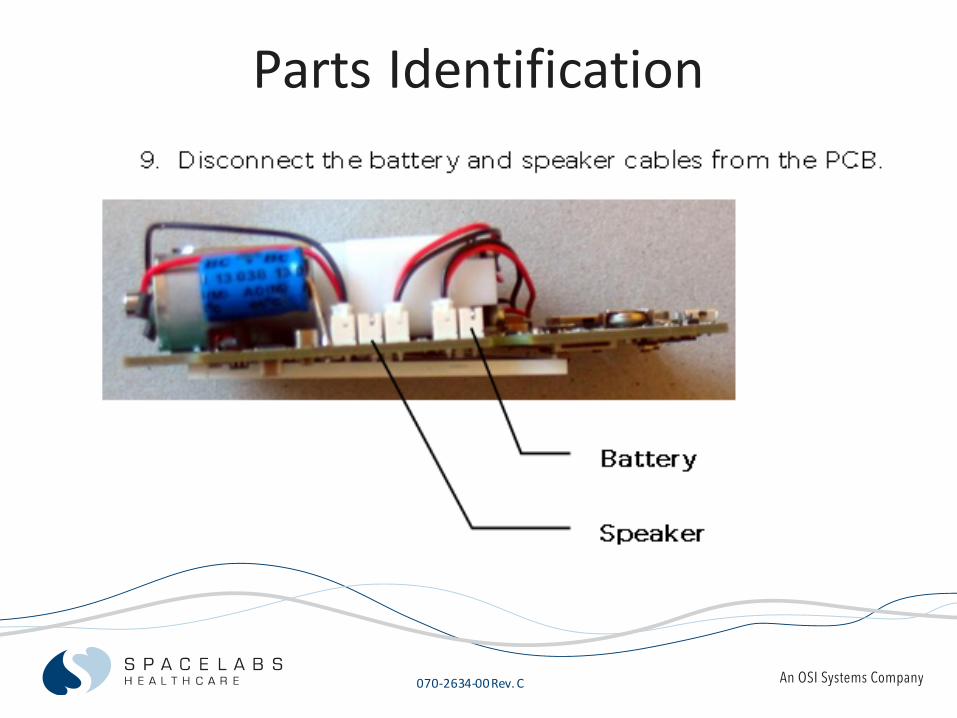
Parts Identification
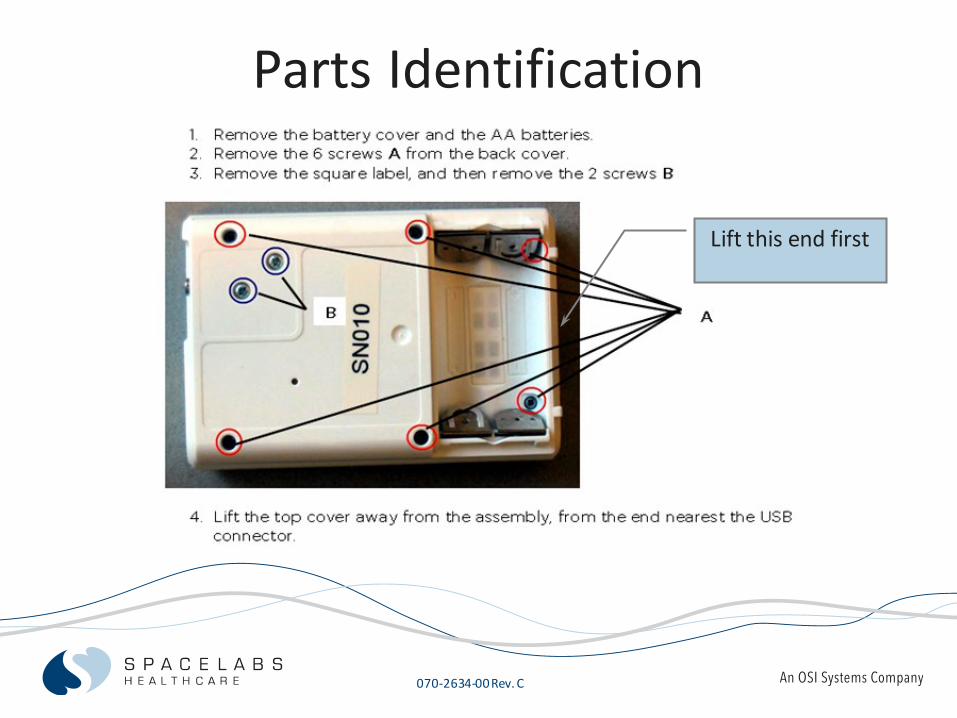
070-2634-00 Rev. C
Parts Identification
Lift this end first
070-2634-00 Rev. C
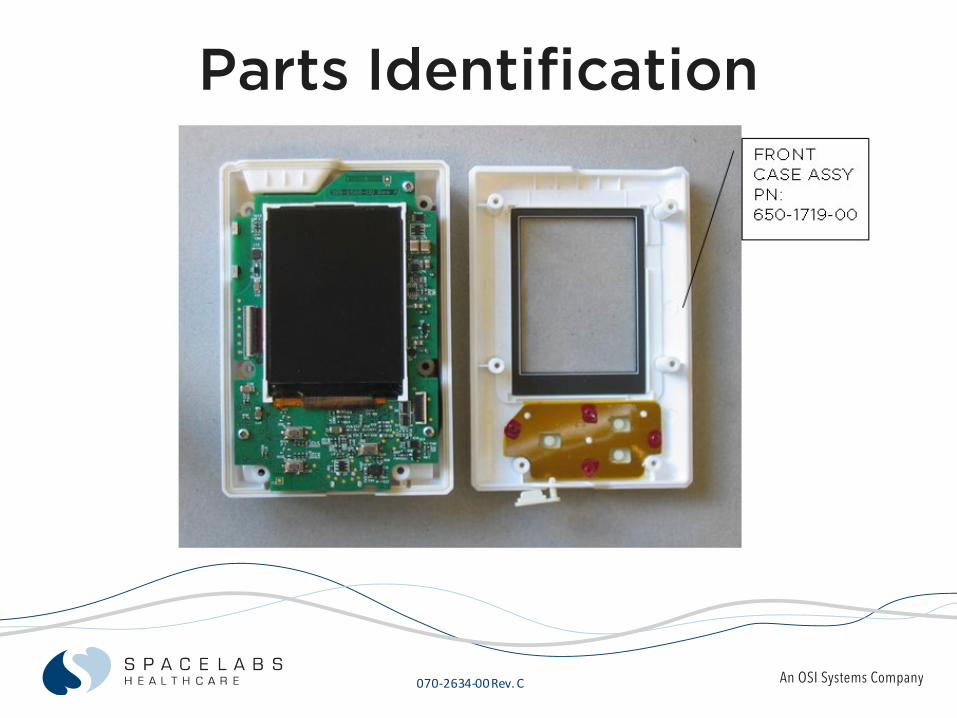
Parts Identification
070-2634-00 Rev. C
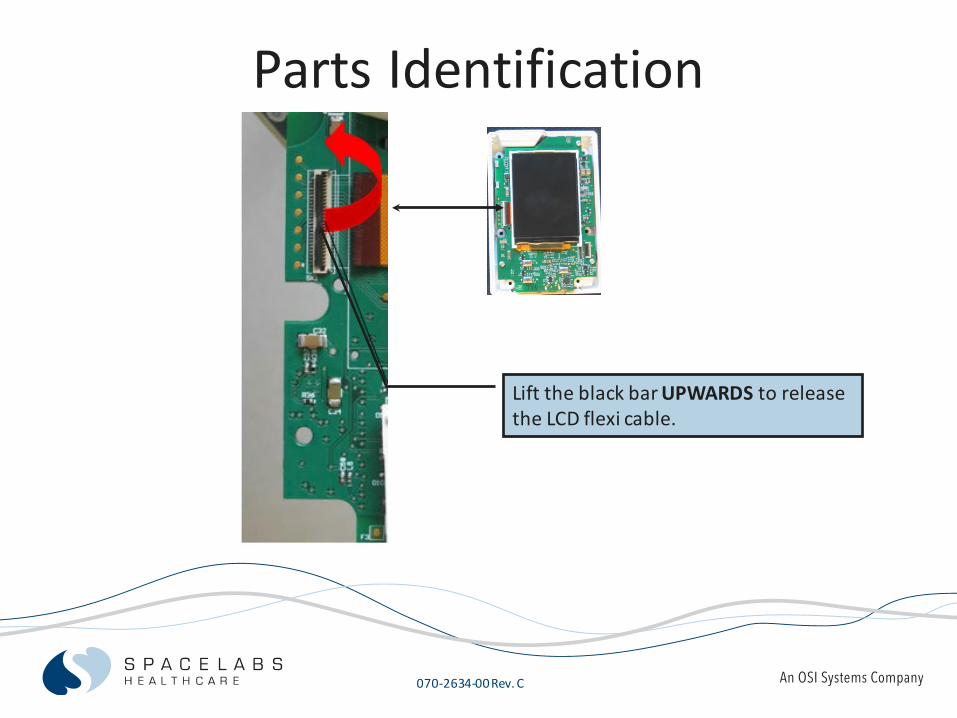
Parts Identification
Lift the black bar UPWARDS to release the LCD flexi cable.
070-2634-00 Rev. C
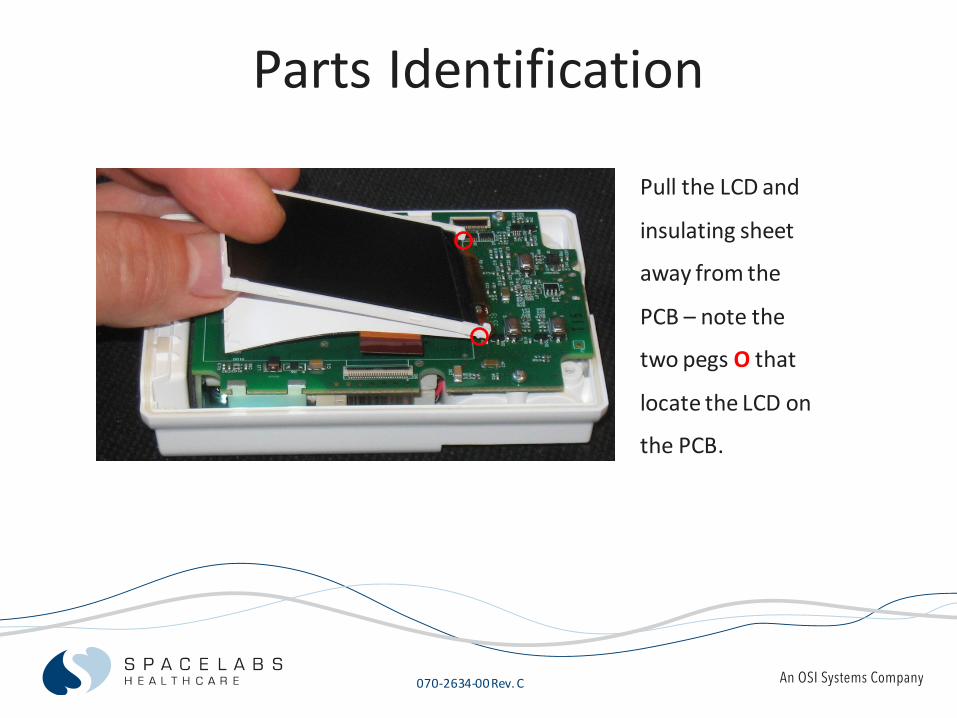
Parts Identification
Pull the LCD and
insulating sheet
away from the
PCB – note the
two pegs O that
locate the LCD on
the PCB.
070-2634-00 Rev. C
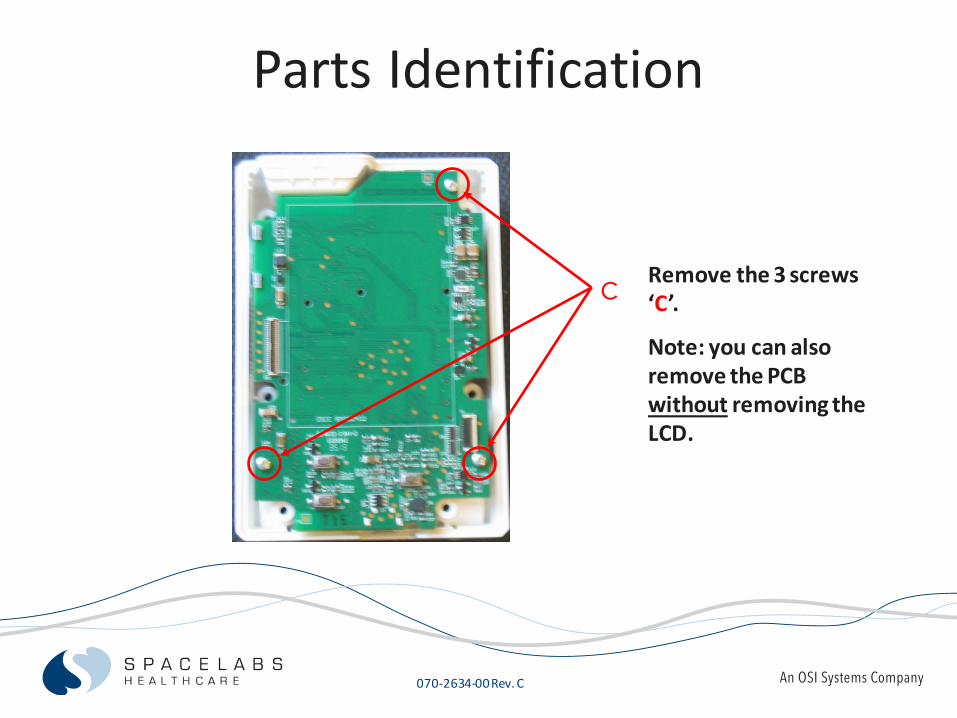
Parts Identification
Remove the 3 screws ‘C’.
Note: you can also remove the PCB without removing the LCD.
C
070-2634-00 Rev. C
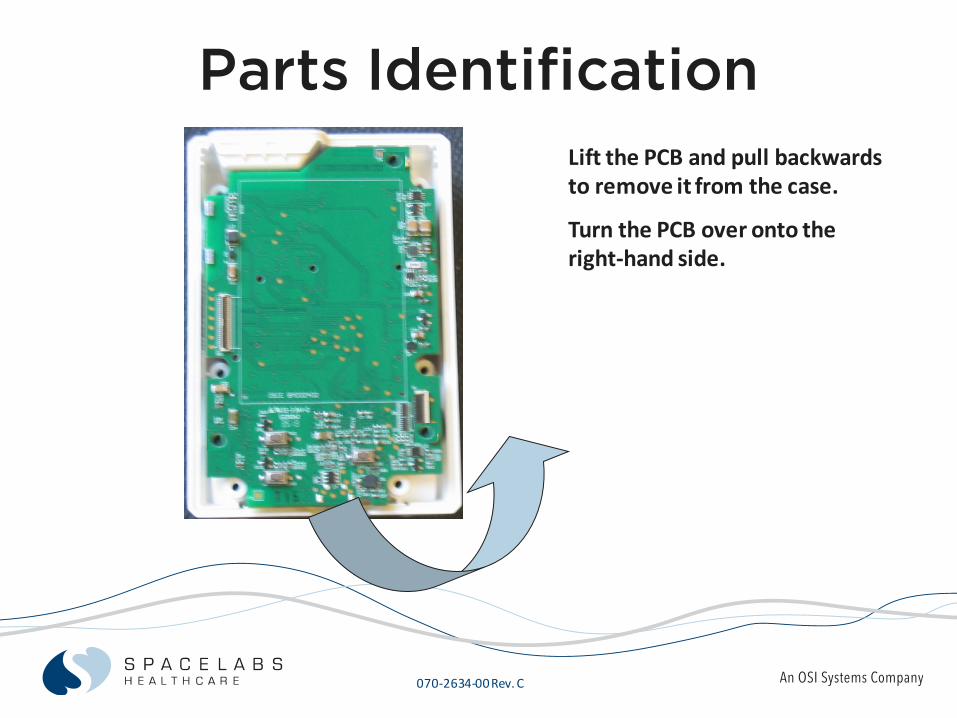
Parts IdentificationLift the PCB and pull backwards to remove it from the case.
Turn the PCB over onto the right-hand side.
070-2634-00 Rev. C
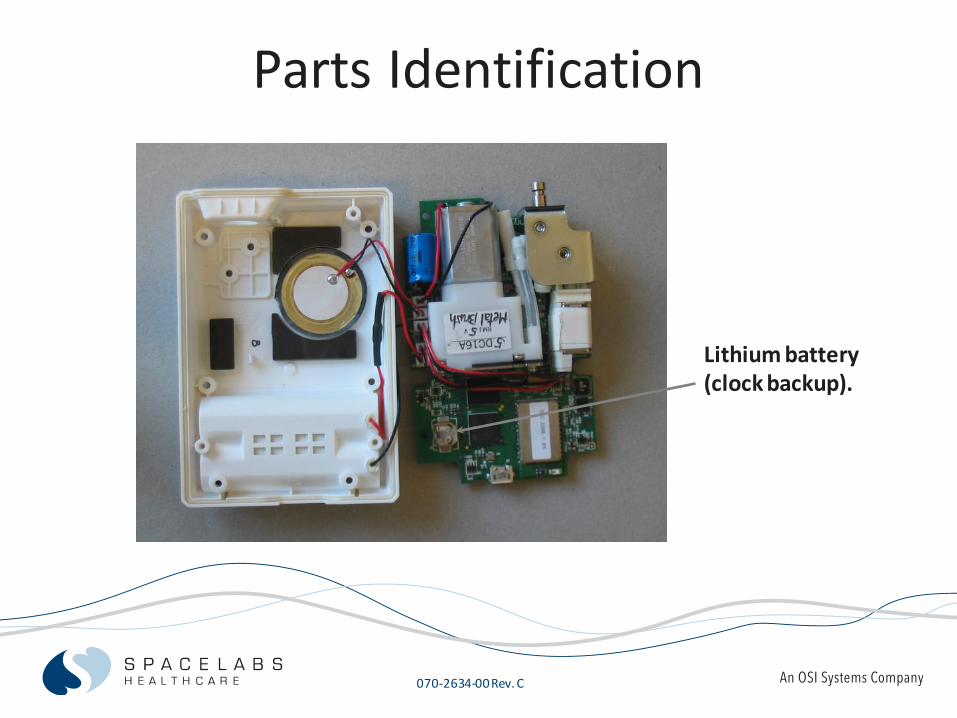
Parts Identification
Lithium battery (clock backup).
070-2634-00 Rev. C
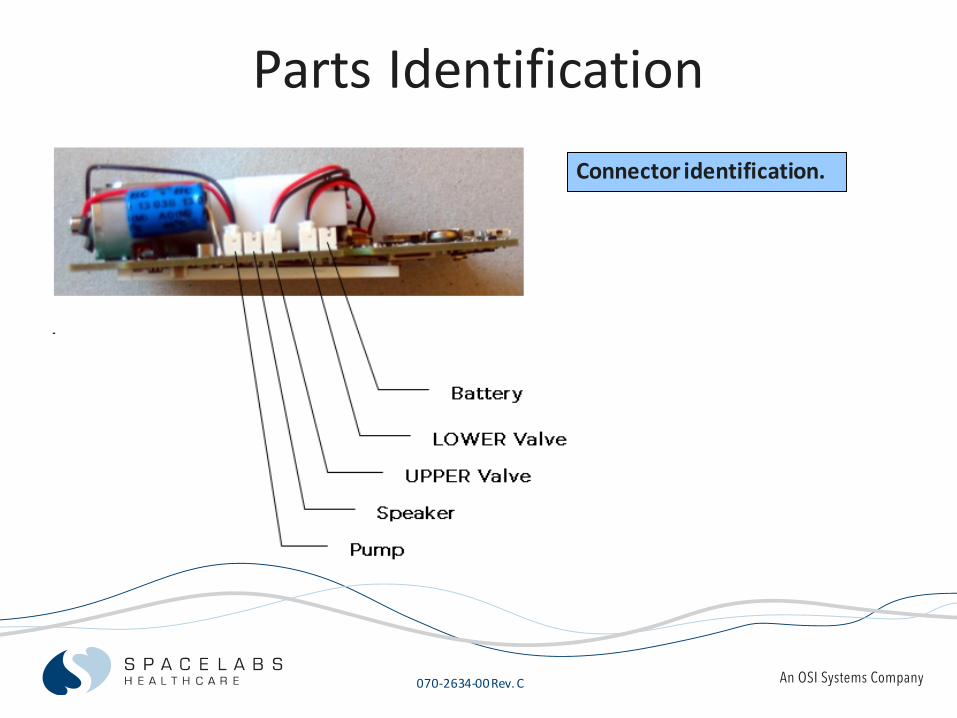
Parts IdentificationConnector identification.
070-2634-00 Rev. C
Parts Identification
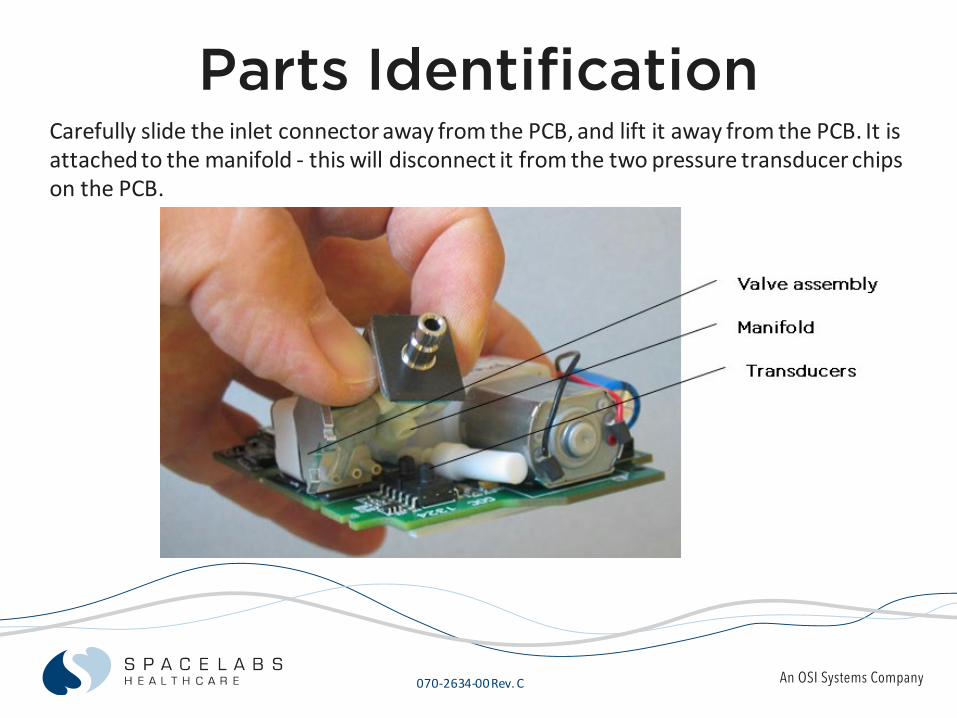
070-2634-00 Rev. C
Parts IdentificationCarefully slide the inlet connector away from the PCB, and lift it away from the PCB. It is attached to the manifold - this will disconnect it from the two pressure transducer chips on the PCB.
070-2634-00 Rev. C
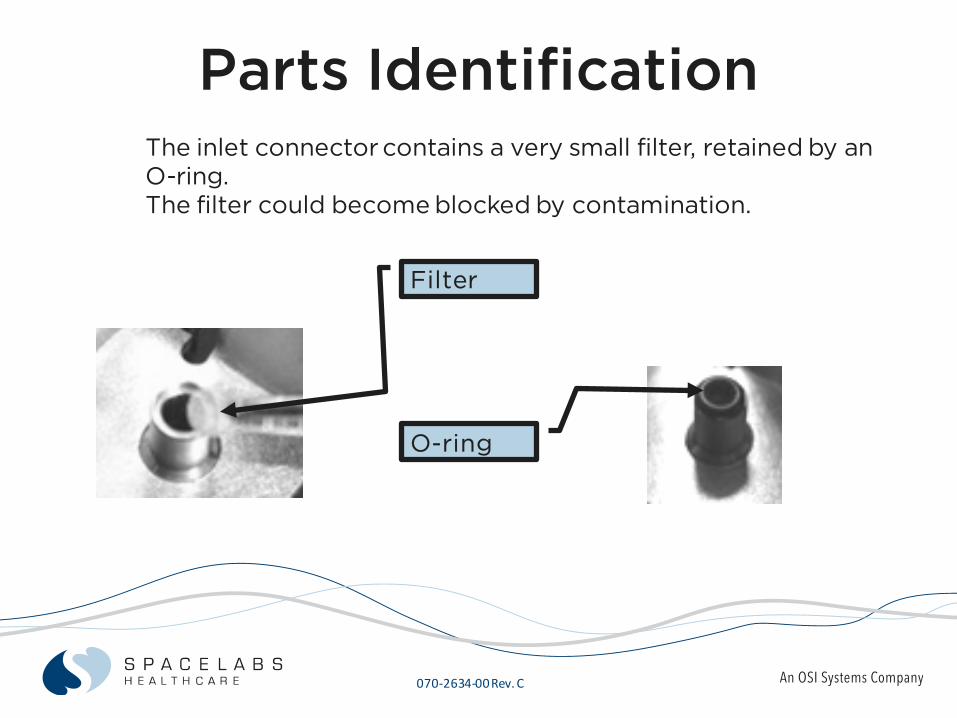
Parts IdentificationThe inlet connector contains a very small filter, retained by an O-ring. The filter could become blocked by contamination.
Filter
O-ring
070-2634-00 Rev. C
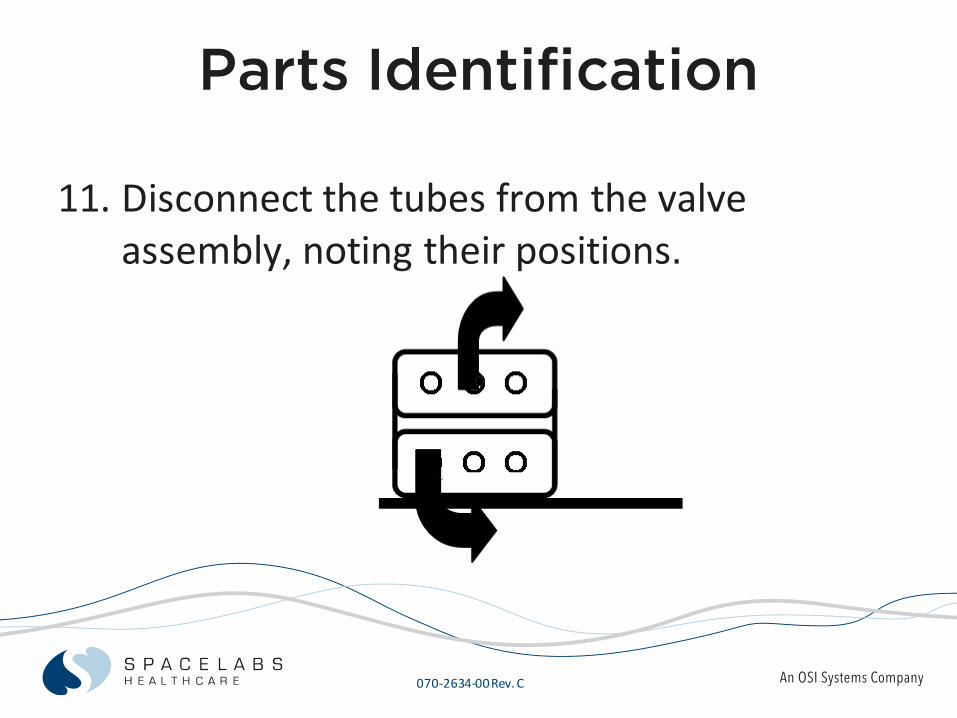
Parts Identification
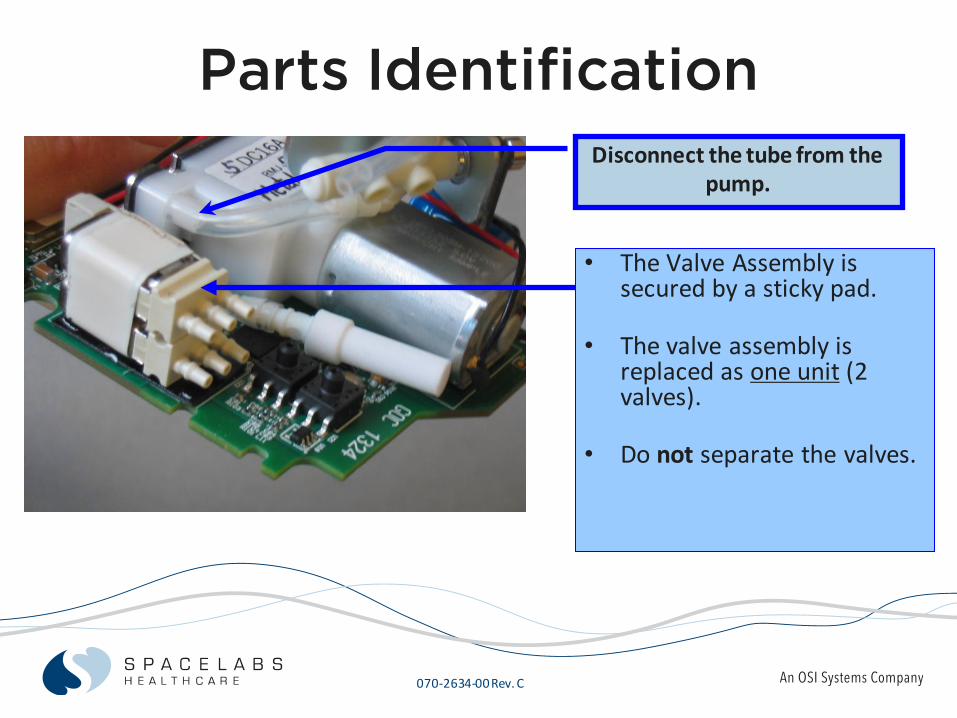
11. Disconnect the tubes from the valve assembly, noting their positions.
070-2634-00 Rev. C
Parts Identification
• The Valve Assembly is secured by a sticky pad.
• The valve assembly is replaced as one unit (2 valves).
• Do not separate the valves.
Disconnect the tube from the pump.
070-2634-00 Rev. C
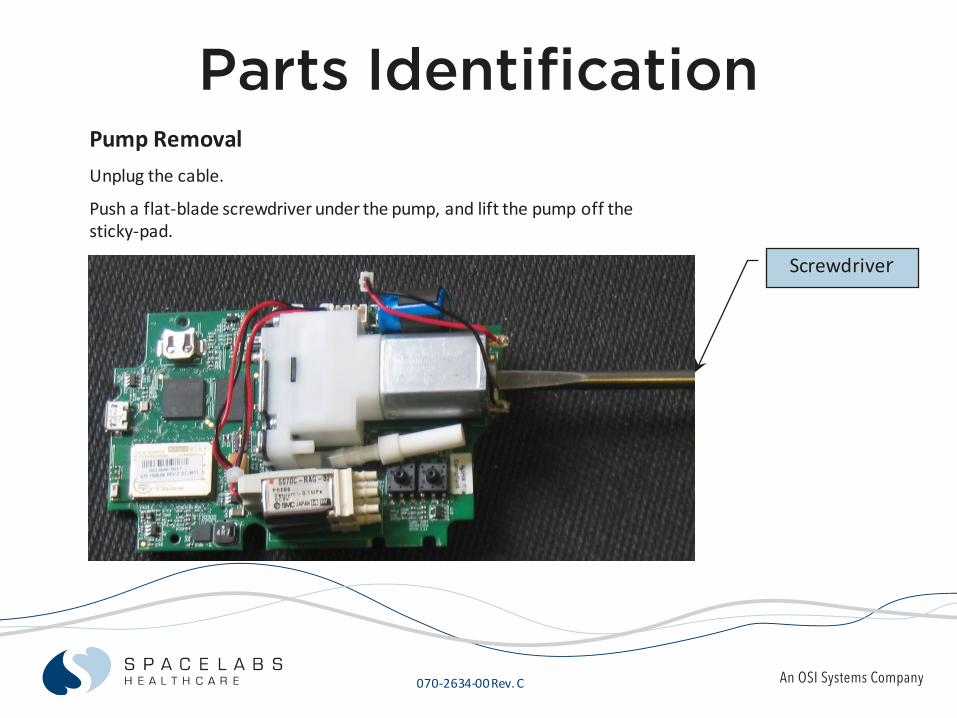
Parts IdentificationPump RemovalUnplug the cable.
Push a flat-blade screwdriver under the pump, and lift the pump off the sticky-pad.
Screwdriver
070-2634-00 Rev. C
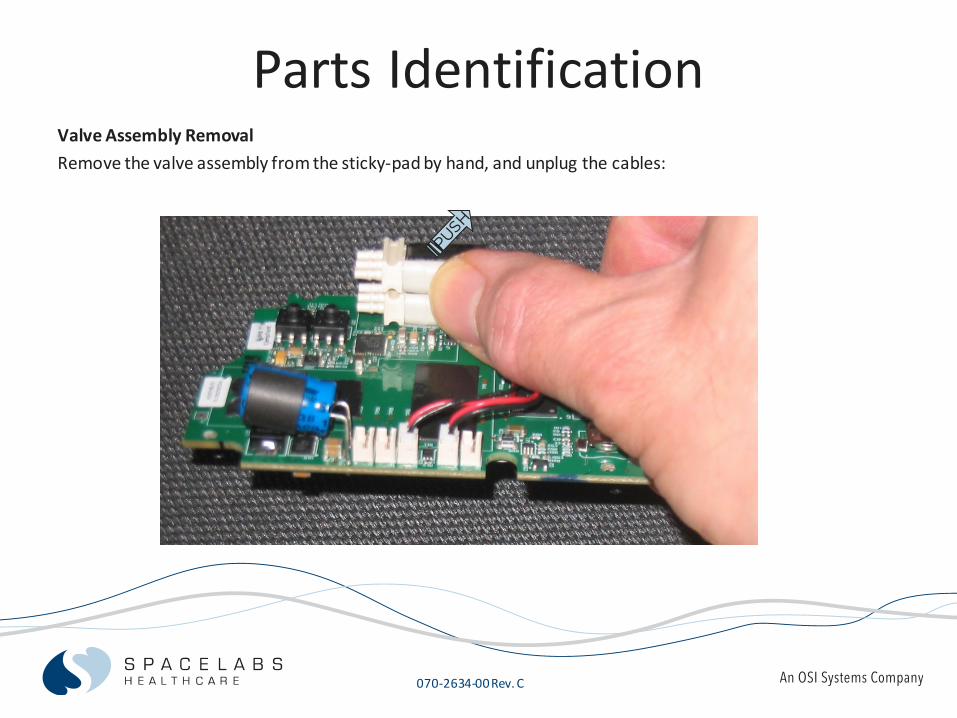
Parts IdentificationValve Assembly RemovalRemove the valve assembly from the sticky-pad by hand, and unplug the cables:
070-2634-00 Rev. C
Reassembly
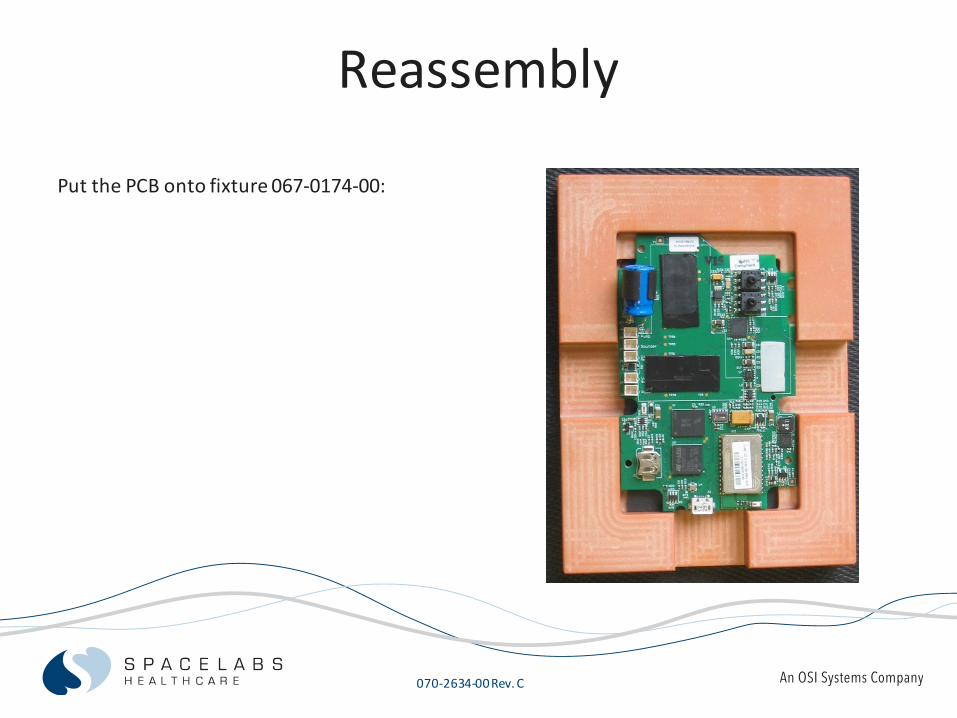
Put the PCB onto fixture 067-0174-00:

070-2634-00 Rev. C
ReassemblyPut fixture 067-0173-00 on top. This fixture shows you where to put new
sticky pads.
(For training only: do not remove the old sticky-pads - you can re-use them.)
070-2634-00 Rev. C
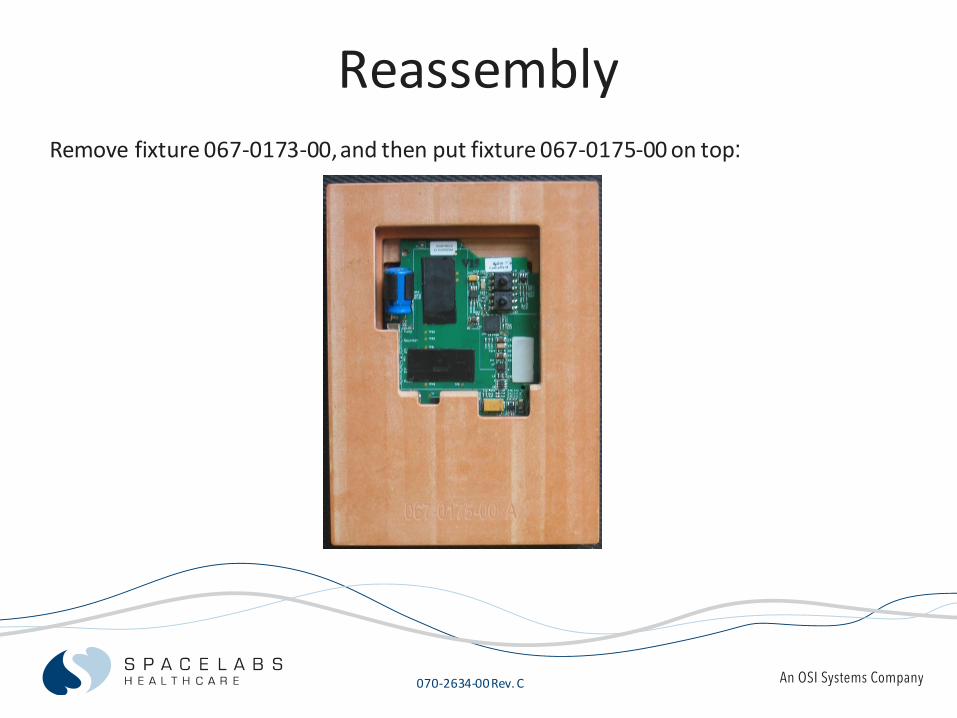
ReassemblyRemove fixture 067-0173-00, and then put fixture 067-0175-00 on top:
070-2634-00 Rev. C
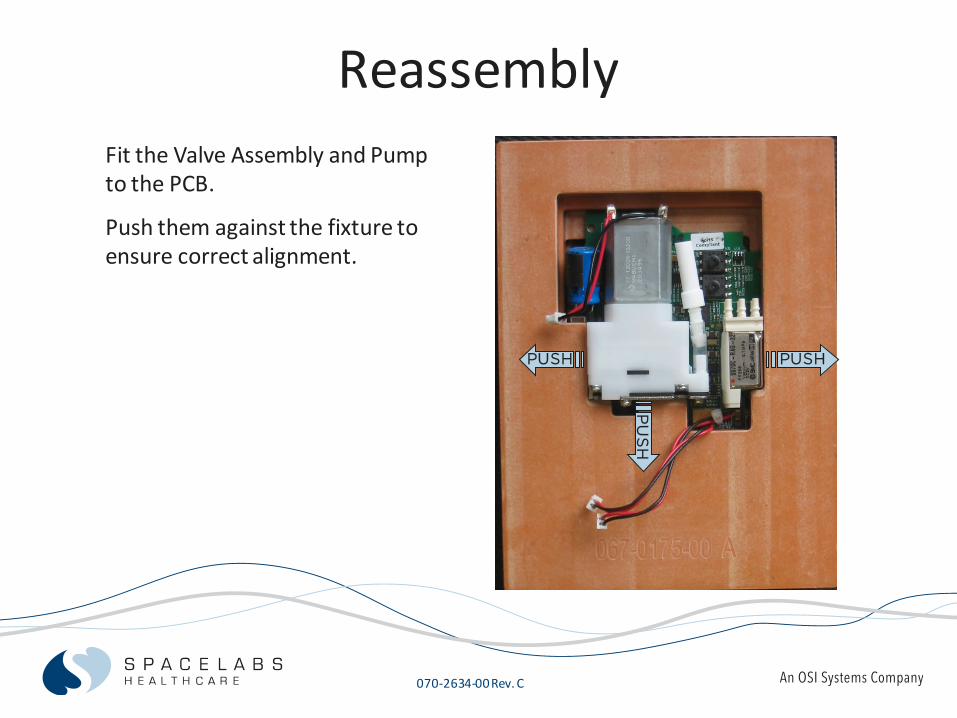
ReassemblyFit the Valve Assembly and Pump to the PCB.
Push them against the fixture to ensure correct alignment.
PU
SH
PUSHPUSH
070-2634-00 Rev. C
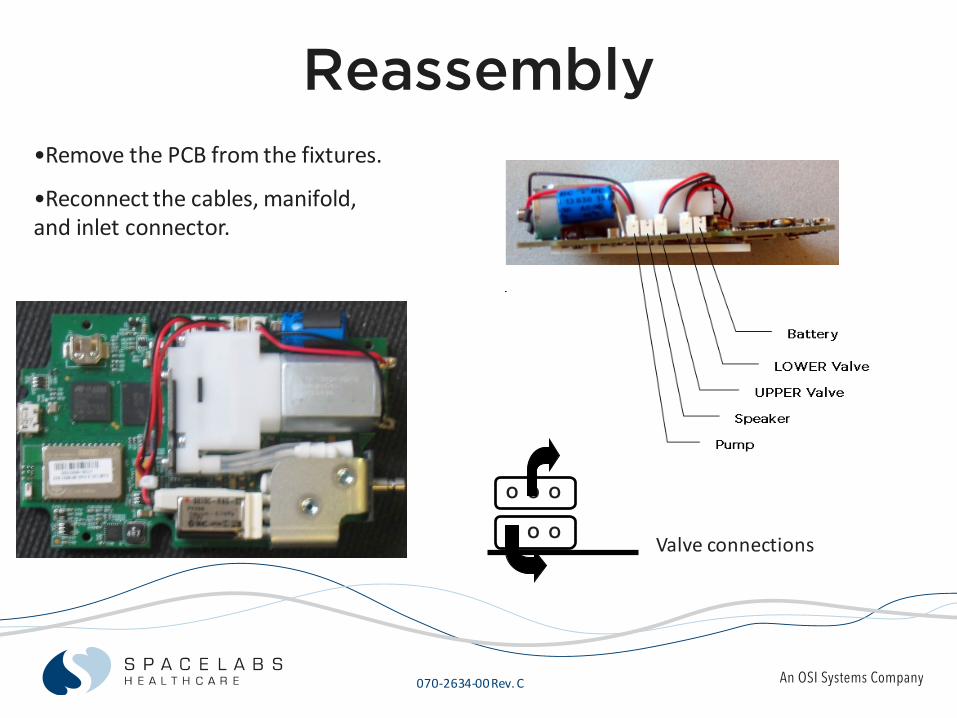
Reassembly•Remove the PCB from the fixtures.
•Reconnect the cables, manifold, and inlet connector.
О О О
О О О Valve connections
070-2634-00 Rev. C
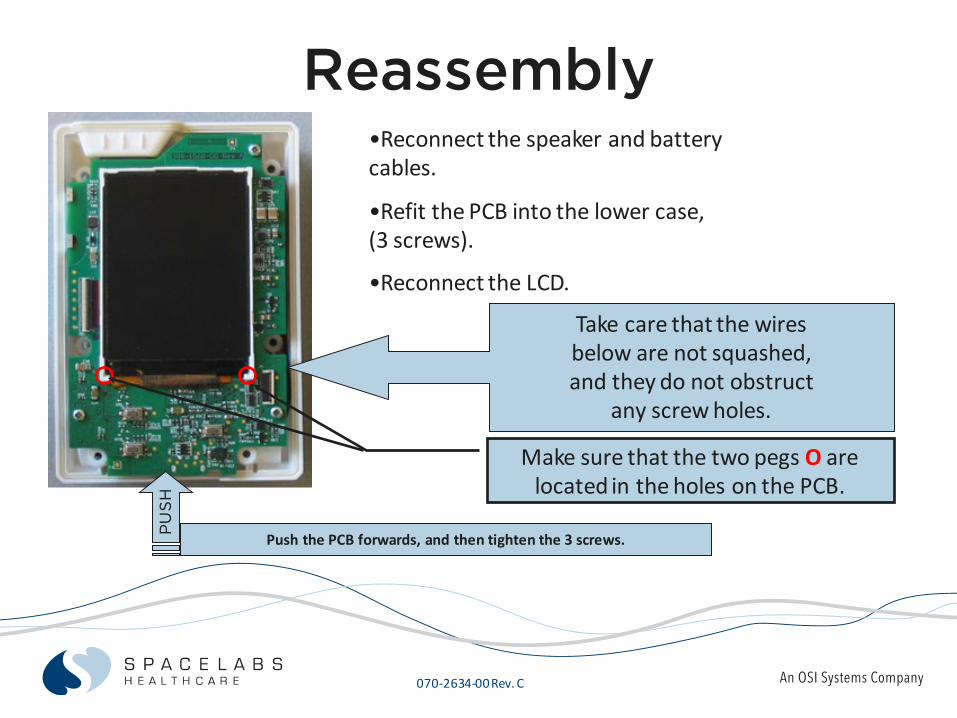
Reassembly•Reconnect the speaker and battery cables.
•Refit the PCB into the lower case,(3 screws).
•Reconnect the LCD.
Take care that the wiresbelow are not squashed,and they do not obstruct
any screw holes.
PU
SH
Push the PCB forwards, and then tighten the 3 screws.
Make sure that the two pegs O are located in the holes on the PCB.
070-2634-00 Rev. C
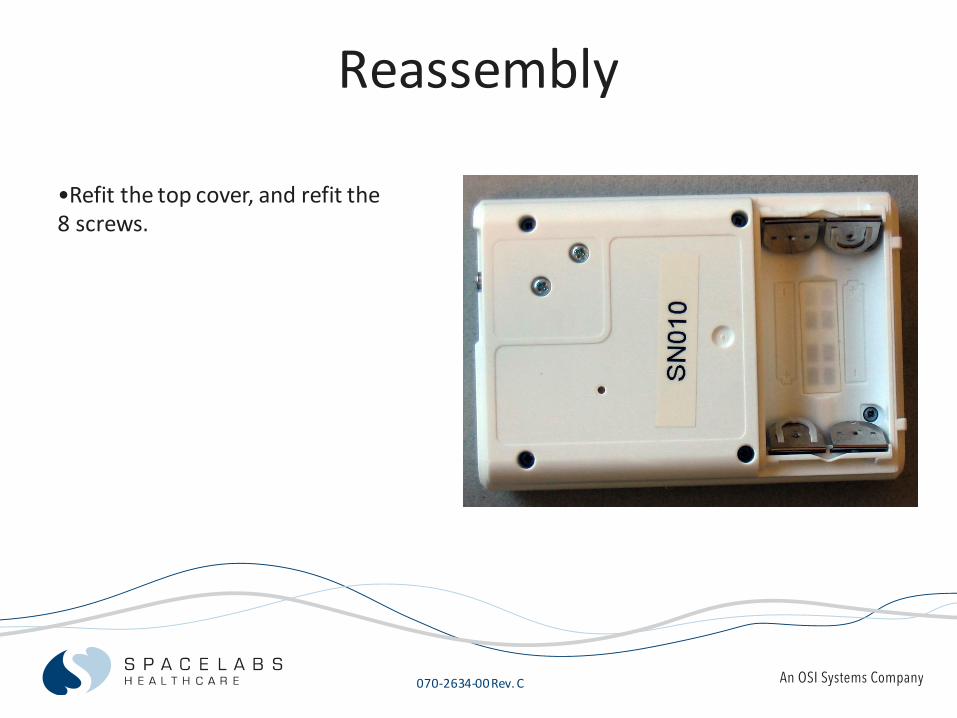
Reassembly
•Refit the top cover, and refit the 8 screws.
070-2634-00 Rev. C
REFER TO THE SERVICE MANUAL 070-2566-00“Firmware update”
Now do the Firmware Update Procedure
Firmware Update
The software utilities have been supplied with this Training Pack. Please check with Global Technical Support [email protected] that you have the latest release.

070-2634-00 Rev. C
REFER TO THE SERVICE MANUAL 070-2566-00“90227 Functional Test and Calibration
Procedure”
Now do the Test andCalibration Procedure
Calibration and Test
The software utilities have been supplied with this Training Pack. Please check with Global Technical Support [email protected] that you have the latest release.
070-2634-00 Rev. C
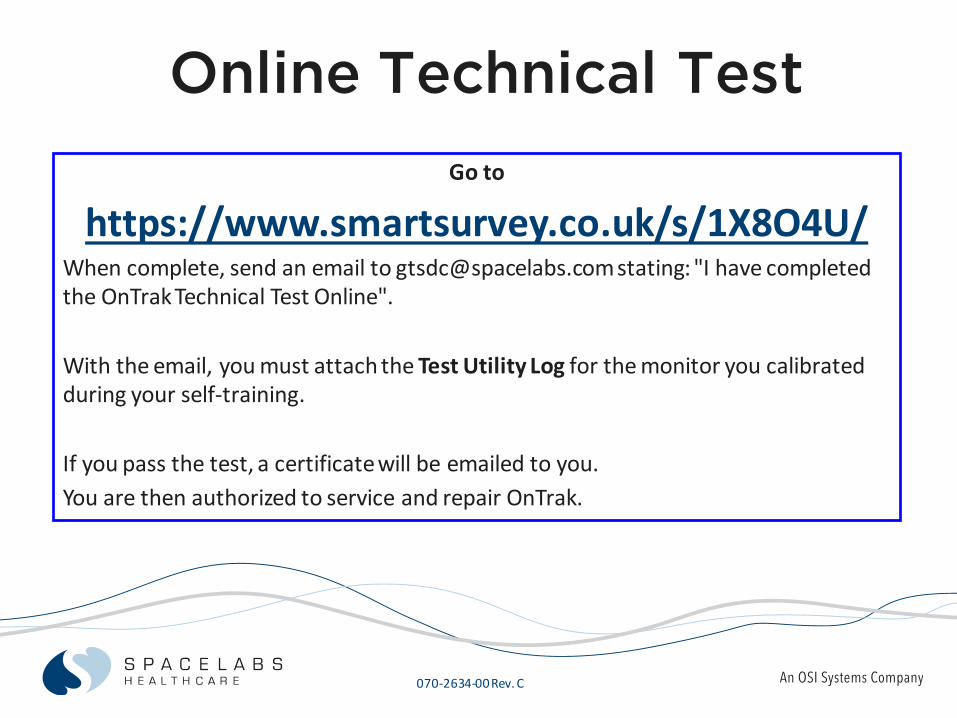
Online Technical TestGo to
https://www.smartsurvey.co.uk/s/1X8O4U/When complete, send an email to [email protected] stating: "I have completed the OnTrak Technical Test Online".
With the email, you must attach the Test Utility Log for the monitor you calibrated during your self-training.
If you pass the test, a certificate will be emailed to you. You are then authorized to service and repair OnTrak.


