CHAPTER 4-1 Cisco Mobile Workplace Solution with Citrix 4 Operations May 14, 2014 For the most part, the fact that a device is under management is seamless to the user with the exception of the enrollment process. If they are running the mobile client application, as recommended for ISE compliance checks, then the user has some additional information about their device that is useful for troubleshooting with ISE. Users are also required to complete the on-boarding procedure. MDM On-boarding The workflow that users must complete to on-board their device is set by the ISE policy. As presented in the CVD, the user first on-boards with ISE. When the user first joins the BYOD_Employee SSID, ISE checks the device’s MDM Registration status through the MDM API. If the device is not registered, then a captive ACL is activated. This ACL allows Internet access, but captures any attempts to access corporate resources. A full explanation is provided in the CVD. The device requires Internet access to complete the MDM on-boarding process, including downloading the client application from either Google Play or Apple’s App Store. When the device is captured, the user is presented with a screen that includes two buttons, as shown in Figure 4-1. The first redirects the client to the MDM registration page. The second button issues a CoA to force a re-evaluation of the AuthZ policy after MDM enrollment completes.
Transcript
C H A P T E R 4
Operations
May 14, 2014
For the most part, the fact that a device is under management is seamless to the user with the exception of the enrollment process. If they are running the mobile client application, as recommended for ISE compliance checks, then the user has some additional information about their device that is useful for troubleshooting with ISE. Users are also required to complete the on-boarding procedure.
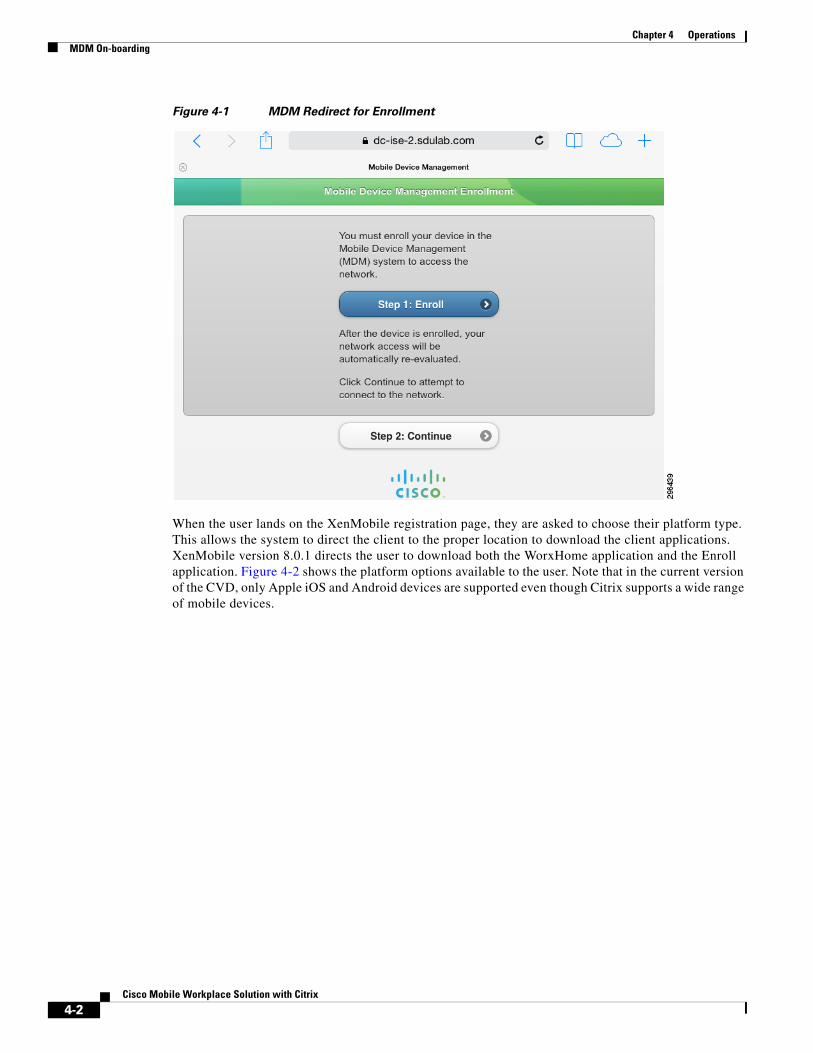
MDM On-boardingThe workflow that users must complete to on-board their device is set by the ISE policy. As presented in the CVD, the user first on-boards with ISE. When the user first joins the BYOD_Employee SSID, ISE checks the device’s MDM Registration status through the MDM API. If the device is not registered, then a captive ACL is activated. This ACL allows Internet access, but captures any attempts to access corporate resources. A full explanation is provided in the CVD. The device requires Internet access to complete the MDM on-boarding process, including downloading the client application from either Google Play or Apple’s App Store. When the device is captured, the user is presented with a screen that includes two buttons, as shown in Figure 4-1. The first redirects the client to the MDM registration page. The second button issues a CoA to force a re-evaluation of the AuthZ policy after MDM enrollment completes.
4-1Cisco Mobile Workplace Solution with Citrix
Chapter 4 OperationsMDM On-boarding
Figure 4-1 MDM Redirect for Enrollment
When the user lands on the XenMobile registration page, they are asked to choose their platform type. This allows the system to direct the client to the proper location to download the client applications. XenMobile version 8.0.1 directs the user to download both the WorxHome application and the Enroll application. Figure 4-2 shows the platform options available to the user. Note that in the current version of the CVD, only Apple iOS and Android devices are supported even though Citrix supports a wide range of mobile devices.
4-2Cisco Mobile Workplace Solution with Citrix
Chapter 4 OperationsMDM On-boarding
Figure 4-2 XenMobile Platform Selector
After the user launches the Enroll mobile application, they are asked for their credentials and the server to which they wish to connect, as shown in Figure 4-3. Server information should be provided to the user prior to starting the enrollment process. If the user successfully authenticates, a profile including the MDM payload and associated certificate is installed on the device. The user is led step by step through the enrollment process. The final step verifies the mobile device can establish a secure session with the XenMobile Device Manager.
4-3Cisco Mobile Workplace Solution with Citrix
Chapter 4 OperationsMDM On-boarding
Figure 4-3 XenMobile Enroll Mobile Application
After enrollment, the user returns to the page shown in Figure 4-1 and clicks the Continue button, which notifies ISE that the user has completed the MDM enrollment process. ISE responds by issuing a change of authority (CoA) to the device, causing the device to re-authorize. This time, the MDM should respond that the device’s status is now “enrolled”.
While this is occurring, the XenMobile Device Manager pushes a check-in request to the iOS device through APNS. During this initial check-in, additional profiles, applications, or Web Clips are provisioned on the device. Web Clips are HTML bookmarks that are displayed as application icons on an Apple mobile device. Android devices simply call these bookmarks.
iOS devices will attempt to auto-join networks, including the provisioning network even after the device has previously enrolled. Most users continue to re-enroll the device with ISE, which only provisions the WiFi settings on the device including a new user certificate. During this time, the device remains enrolled with the device manager and policy remains in effect. If this policy includes a restriction against installing third-party profiles, then the user will not be able to complete the re-enrollment process with ISE and the previous WiFi profile will remain. It most situations, rejoining the provisioning SSID is uncommon.
iOS devices use the following decision process when auto-joining a WiFi network:
1. Connect to the previously joined secure network.
2. Connect to any known secure network preferring the most secure.
3. Connect to an unknown secure network preferring the most secure.
4. Connect to a HotSpot, EAP-SIM or Captive network.
5. Connect to an unsecure or open network.
iOS prefers EAP, WPA, WEP, in that order. Where two SSIDs have the same security, the stronger RSSI is chosen.
4-4Cisco Mobile Workplace Solution with Citrix
Chapter 4 OperationsPass Code Complexity
Note When iOS initially boots, the device must be unlocked before the device attempts to join secured or non-secured WiFi networks
Pass Code ComplexityThe user may be required to configure a PIN lock on their device during the on-boarding process if the device is not already configured with one. When this occurs, the user must launch the client app and send data. This is explained in more detail in the next section, WorxHome Client App. The MDM administrator can chose the minimum password length and complexity. The natural tendency is to require very strong passwords, however there may be unintended consequences, especially with employee-owned devices. The PIN lock needs to be entered any time the employee wants to use their phone. While texting and driving is illegal in many locations, the PIN lock is also required to make phone calls. If the user is required to navigate through several keyboards to enter the PIN lock, the administrator may be creating an environment of risk taking. There may be legal implications outside the scope of this document that should be considered. The more likely scenario is that the user will opt-out of the BYOD network for their personal devices. Devices not managed could have no PIN lock at all and yet still contain corporate data that the employee improperly put on the device, such as SMS logs. A practical approach is to require a simple four-digit PIN on personal mobile phones. Corporate tablets can still be profiled with complex passcodes, including special characters. This provides a balanced approach and does not discourage participation. Four-digit PINs or the last four digits of a SSN are used fairly often to provide some level of security. Android and Apple devices can limit the ability to attempt to guess the code by implementing timed retries or in some cases wiping the device completely.
Note Apple iOS7 changed the behavior of full wipes on previously-owned devices. If the device was previously registered to an iTunes account, the device continues to require owner credentials even after a full wipe has been executed.
Note WorxHome has its own password link through Active Directory that is independent of the PIN Lock that should meet corporate security policy for password requirements.
WorxHome Client AppWith Apple devices, the majority of MDM features are implemented directly through the operating system and do not require a mobile device client application. However some of the advanced functionality does require a client running on the endpoint. In particular, jailbreak and rooted detection requires WorxHome client as does location-based policy. The WorxHome client application is installed on mobile devices during the enrollment process. It is recommended to mark WorxHome as a required application in the event that the user inadvertently deletes it.
In addition to providing specific device information, the client application offers the end users some useful troubleshooting information, including application logs that users can use to monitor the client’s interaction with the server. Users can also use the WorxHome application to determine their geographical location. If location services are enabled, this is also the location provided to the server. The XenMoble Device Manager can use location to establish geo-fencing and location-based policy.
4-5Cisco Mobile Workplace Solution with Citrix
Chapter 4 OperationsWorxHome Client App
One useful feature of the client application is the ability to manually refresh the device’s posture to the server. The need arises when the device has been placed in MDM quarantine due to a compliance violation. For example, the device may not have a PIN lock when one is required. When the user configures the device with a PIN lock, the phone’s OS does not trigger an update to the MDM agent. The agent detects the change during the next security scan interval. The server only discovers this the next time the device is polled. This could result in ISE continuing to place the device in quarantine ever after the user has corrected the issue. Rather than waiting for the MDM to poll the device for an update, the user could use the mobile application to send the current data to the server. Figure 4-4 shows the refresh button on the mobile client.
Figure 4-4 Manually Refresh Server Data
The WorxHome client also serves as the container for AppController and performs authentication tasks for managed applications. It also directs StoreFront application to Citrix Receiver.
When installing the WorxHome client, the user provides the Device Manager URL and user credentials that are authenticated by the device manager, typically through Active Directory integration. However once installed, WorxHome users authenticate against XenMobile AppController. If the user attempts to enroll the device off campus, where access is available to the device manager, but is not available to AppController withouth AnyConnect, the user will successfully authenticate initially, but will see an error message after the installation completes. When this occurs, the device has been enrolled successfully with the device manager and depending on policy, may have AnyConnect provisioned and pushed to iOS devices. AnyConnect can then be used to launch WorxHome. Modifications to the ASA or the use of NetScaler Gateway can be used to eliminate the requirement for VPN access for remote enrollment.
MDM ReportsCisco ISE provides a logging mechanism that is used for auditing, fault management, and troubleshooting. Several reports provide information related to endpoints. In Figure 4-5, the Mobile Device Management report shows the endpoints connected to the ISE and several attributes collected from the MDM. Other reports provide additional information that may be used for reporting and troubleshooting.
Figure 4-5 MDM Reports Available on ISE
XenMobile AppController OperationsThe Citrix XenMoble AppController interfaces with both the WorxHome agent and Citrix Receiver. This provides some operational functions from the administrator console for devices enrolled with the AppController. For example, devices can be deleted, locked, or erased. The console allows the administrator to preform these actions on any device in the system. However, a search term must be provided. When the All Devices tab is initially display, the table of entries is blank, as shown in Figure 4-6. By requiring a search, it reduces the possibility that a neighboring device in the table could be impacted. The most likely term to search against is the User ID. If a table of all devices is required,
4-7Cisco Mobile Workplace Solution with Citrix
Chapter 4 OperationsLost and Stolen Devices
the administrator can search on a lower case “i”, which matches all Android- and iOS-based products.
Figure 4-6 AppController Devices
Lost and Stolen DevicesA benefit of this solution is the ability to secure devices that have been lost or stolen. Both are serious situations, but they are treated differently. Lost devices may eventually be found, but quite often the user is slow to report the device until they are confident the device is really lost. Stolen devices are often more obvious. There may be other stolen items or the device is not where it was last left. Of course, some devices are lost and then stolen and these are the most serious due to the delay. Of course users are required to report lost devices immediately, but know the procedure may take longer to research than looking for the device one more time. In an effort to reduce the amount to time before a user decides to report a device lost, the user is provided a self-service location where they can inactivate the device on the network and later reinstate the device after it has been discovered, without having to launch a support case with security or IT. The user can also issue selective wipes to remove corporate data and managed applications. For this to be effective, the user must know intuitively how to do this without having to search the company website. One approach is to provide a desktop web clip to the self-help websites for ISE. There are other portals the administrator can use to sanitize a device that are not user reversible. Each provides specialized functions to manage security. There is some integration of select features across portals, which is discussed in the next section.
The ISE user portal allows users to self-report lost devices and prevent that device from joining the corporate network. ISE can also request the MDM remove corporate data from the device.
The BYOD CVD has an entire chapter that covers lost and stolen devices and what is required. The components that integrate with the user workspace and XenMobile Device Manager are included in this design. Enabling blacklisting devices on ISE, Endpoint protection services, and ISE Authz rules are not covered in this design.
4-8Cisco Mobile Workplace Solution with Citrix
Chapter 4 OperationsLost and Stolen Devices
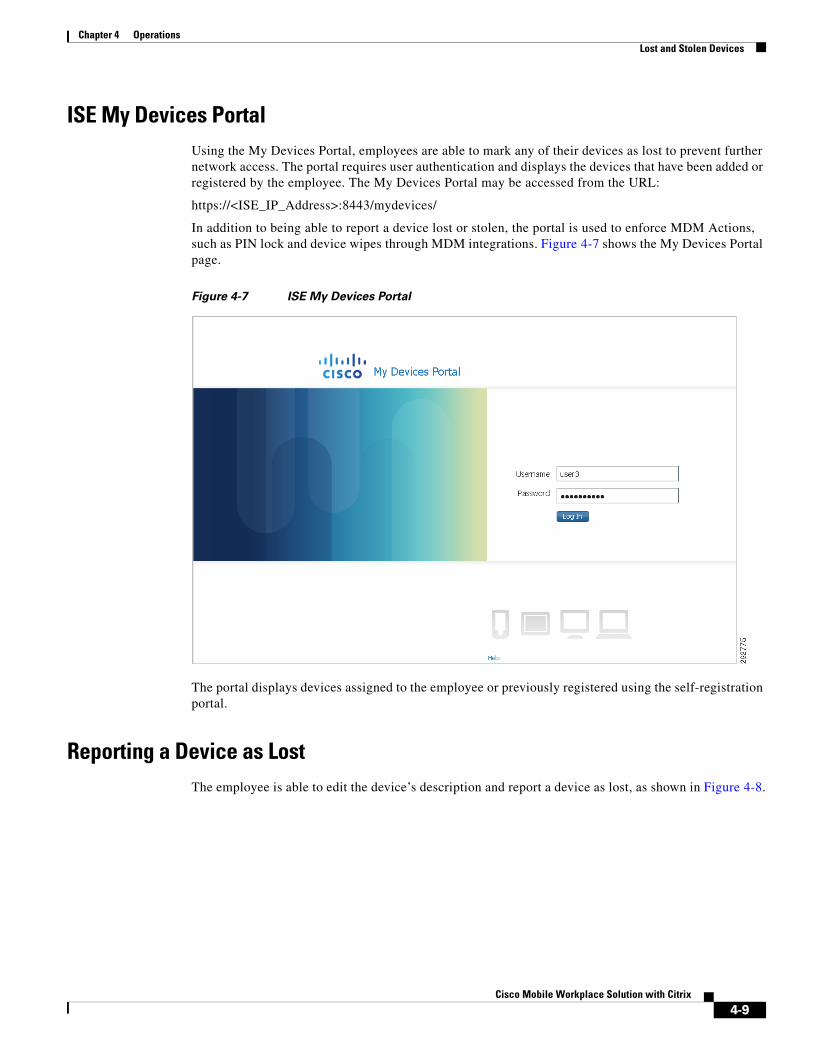
ISE My Devices PortalUsing the My Devices Portal, employees are able to mark any of their devices as lost to prevent further network access. The portal requires user authentication and displays the devices that have been added or registered by the employee. The My Devices Portal may be accessed from the URL:
https://<ISE_IP_Address>:8443/mydevices/
In addition to being able to report a device lost or stolen, the portal is used to enforce MDM Actions, such as PIN lock and device wipes through MDM integrations. Figure 4-7 shows the My Devices Portal page.
Figure 4-7 ISE My Devices Portal
The portal displays devices assigned to the employee or previously registered using the self-registration portal.
Reporting a Device as LostThe employee is able to edit the device’s description and report a device as lost, as shown in Figure 4-8.
4-9Cisco Mobile Workplace Solution with Citrix
Chapter 4 OperationsLost and Stolen Devices
Figure 4-8 ISE Self Reported Lost Devices
Before blacklisting a device, ISE displays the warning shown in Figure 4-9.
Figure 4-9 Blacklist Warning
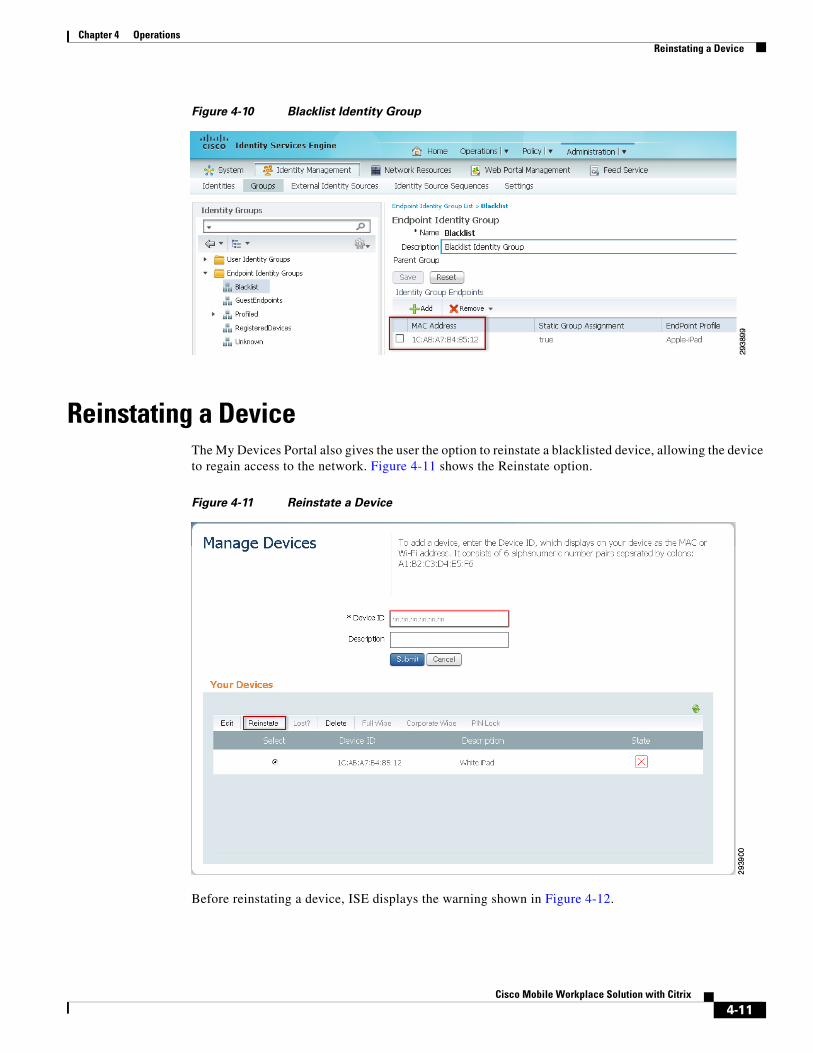
Once the device is marked as lost, the device is added to the Blacklist Identity Group. If the device is connected to the network at that time, ISE issues a Change of Authorization (CoA) and forces the device off the network. To verify that the device has been added to the Blacklist Identity group, click Administration > Identity Management > Groups > Endpoint Identity Groups and review the Blacklist. Figure 4-10 shows the MAC address added to the Blacklist.
4-10Cisco Mobile Workplace Solution with Citrix
Chapter 4 OperationsReinstating a Device
Figure 4-10 Blacklist Identity Group
Reinstating a DeviceThe My Devices Portal also gives the user the option to reinstate a blacklisted device, allowing the device to regain access to the network. Figure 4-11 shows the Reinstate option.
Figure 4-11 Reinstate a Device
Before reinstating a device, ISE displays the warning shown in Figure 4-12.
4-11Cisco Mobile Workplace Solution with Citrix
Chapter 4 OperationsPIN Lock and Device Wipes
Figure 4-12 Reinstate Warning
PIN Lock and Device WipesThe integration with an MDM provides additional device control to the user. With the My Devices Portal, the employee is able to:
• Initiate a Corporate Wipe—Remove settings and applications configured in the MDM policies.
• Initiate a Full Wipe—Remove all information from the device (factory reset).
• Enforce a PIN lock—Lock the device.
Figure 4-13 shows the MDM actions available from the My Devices Portal.
Figure 4-13 MDM Actions from My Devices Portal
Managing Lost Devices with AppControllerBoth AppController and Device Manager can lock and wipe lost or stolen devices, but do so in a slightly different fashion. AppController is discussed in this section and the Device Manager is covered in Securing Lost Devices with Device Manager.
4-12Cisco Mobile Workplace Solution with Citrix
Chapter 4 OperationsPIN Lock and Device Wipes
AppController issues locks and wipes specific to applications that are accessed by either the WorxHome client or Receiver. Although AppController and both a lock and wipe feature, it is better suited for lock while wipes are better accomplished on the Device Manager. To lock AppController managed applications, the administrator navigates to the devices tab in the console and locates the device. One approach is to search on the user name. Where a user has multiple devices, the administrator must determine which device has been lost. This maybe be challenging if the user has left the device name as the default. AppController adds a sequence number behind devices with the same name. This name can be see in the WorxHome client application by viewing the account information. Figure 4-14 illustrates how to lock a specific device. This is not a device lock and the user retains access to all applications outside of AppController, including any installed by the Device Manager. Locking applications is an administrative function. Users do not perform this action because AppController does not provide a self-help portal.
Figure 4-14 Locking Applications on AppController
AppController does not have native push access to iOS devices, which means locks are not pushed to the device. However WorxHome always authenticates back to AppController any time an application is launched. Therefore a lock is effective immediately and a user is able to gain access to applications. If WorxHome does not have reachability to AppController because the device is remote, then a connectivity error is displayed if the user launches WorxHome. As configured in this CVD, remote users need to connect to the corporate network using AnyConnect before they have access to WorxHome. Figure 4-15 shows the screen a user sees if they attempt to access WorxHome applications after their device has been locked on AppController. The user still sees the installed applications, but they will not launch. The administrator can unlock a device following the same procedure used to lock it. Locked devices are easier to find using either the username search or the locked tab on the left. Devices that are locked are indicated by the padlock icon, which represents the action that will be performed when selected. If a device is currently locked, the icon displays a padlock that is unlocked.
4-13Cisco Mobile Workplace Solution with Citrix
Chapter 4 OperationsPIN Lock and Device Wipes
Figure 4-15 WorxHome Locked Message
Securing Lost Devices with Device ManagerThe device manager is the primary tool for securing devices after they have been lost or stolen. It can reach devices on campus or off campus and remove all corporate data, applications, and profiles. After a device is wiped, the device manager can be set to disallow the device from re-enrolling with the system. This would be the case if an employee using their personal device or a contractor were no longer with the organization. As explained earlier, wipes can be full wipes or selective wipes. Full wipes erase all data on the device and return it to its factory settings. Normally only corporate devices are fully wiped and only after an acceptable use policy has been agreed to be the user. Selective wipes, also referred to as corporate wipes or partial wipes, only remove managed applications and profiles. WorxHome is left on a device after it has been selectively wiped. For a device to be managed by the device manager, the user must have selected to enroll the device during the enrollment process, as shown in Figure 4-16. If the user chooses No, then the device is not managed and can not be selectively wiped.
Figure 4-16 Enrolling with Device Manager
Because of the policy deployed on ISE in this CVD, devices that are not enrolled are not allowed access to corporate resources on the network. To prevent users from enrolling only in AppController and not in Device Manager, the administrator should require Device Management. This is done from the
4-14Cisco Mobile Workplace Solution with Citrix
Chapter 4 OperationsPIN Lock and Device Wipes
AppController console, as shown in Figure 4-17. When this option is checked, the user is not offered the option of not enrolling. This is the recommended setting when using ISE to secure the corporate network.
Figure 4-17 Require Device Manager Enrollment
Devices that are enrolled with the device manager can be wiped from the device manager console. When preforming Device Manager wipes, it is helpful to understand how the various components of XenMobile interconnect. Figure 4-18 shows a simplified map of the various connections. Receiver is responsible for rendering any applications offered through Store Front that may be available from WorxHome. Because of this, Receiver must be installed before any Store Front applications can be launched. The device manage places a web clip or web link to any Store Front applications. Device Manager installs any native applications launched via AppController on the iOS device. Applications installed by Device Manager on the behalf of AppController are removed when the device is selectively wiped.
Figure 4-18 XenMobile Interconnects
2964
49
Receiver
WorxHome
APNS(iOS)
AppController
StoreFront
DeviceManager
4-15Cisco Mobile Workplace Solution with Citrix
Chapter 4 OperationsCitrix Receiver
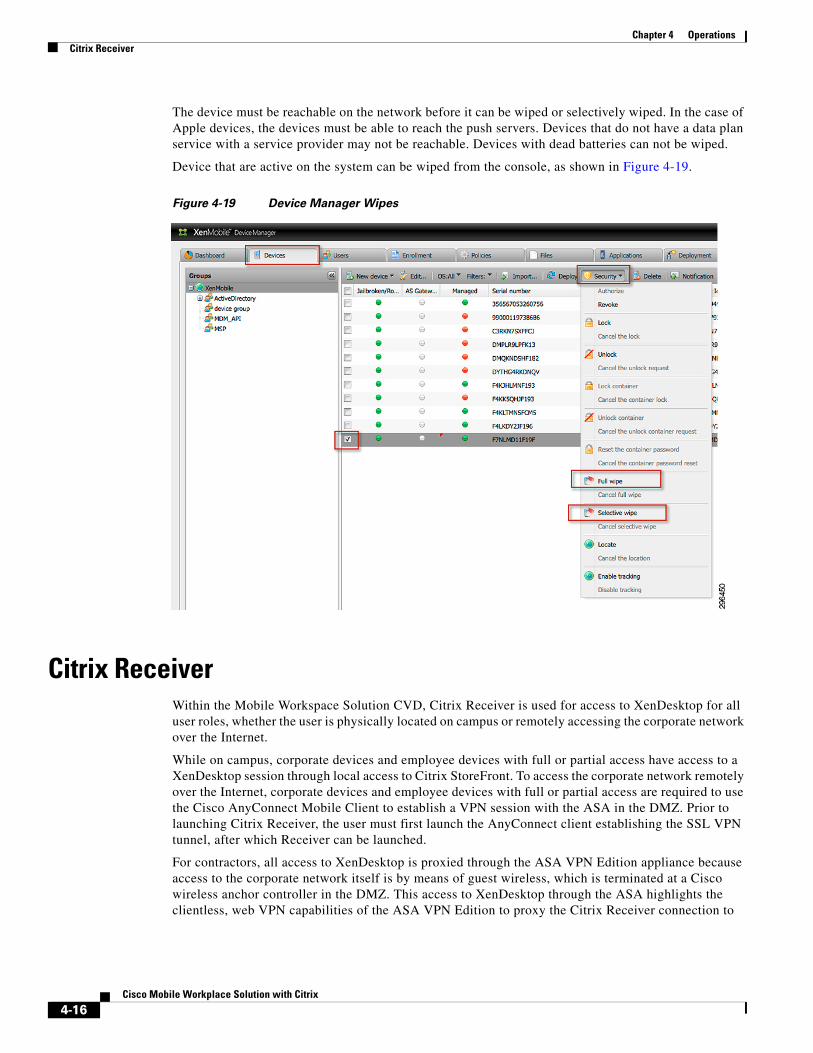
The device must be reachable on the network before it can be wiped or selectively wiped. In the case of Apple devices, the devices must be able to reach the push servers. Devices that do not have a data plan service with a service provider may not be reachable. Devices with dead batteries can not be wiped.
Device that are active on the system can be wiped from the console, as shown in Figure 4-19.
Figure 4-19 Device Manager Wipes
Citrix ReceiverWithin the Mobile Workspace Solution CVD, Citrix Receiver is used for access to XenDesktop for all user roles, whether the user is physically located on campus or remotely accessing the corporate network over the Internet.
While on campus, corporate devices and employee devices with full or partial access have access to a XenDesktop session through local access to Citrix StoreFront. To access the corporate network remotely over the Internet, corporate devices and employee devices with full or partial access are required to use the Cisco AnyConnect Mobile Client to establish a VPN session with the ASA in the DMZ. Prior to launching Citrix Receiver, the user must first launch the AnyConnect client establishing the SSL VPN tunnel, after which Receiver can be launched.
For contractors, all access to XenDesktop is proxied through the ASA VPN Edition appliance because access to the corporate network itself is by means of guest wireless, which is terminated at a Cisco wireless anchor controller in the DMZ. This access to XenDesktop through the ASA highlights the clientless, web VPN capabilities of the ASA VPN Edition to proxy the Citrix Receiver connection to
4-16Cisco Mobile Workplace Solution with Citrix
Chapter 4 OperationsCitrix Receiver
XenDesktop, eliminating the requirement for the AnyConnect Client. Remote access via the Internet to the corporate network for contractor devices is the same as if they were physically on-site inasmuch as their connection to XenDesktop is likewise proxied through the ASA in the DMZ.
The requirement for the Cisco AnyConnect mobile client on corporate or employee personal devices is driven by the fact that access to their network goes beyond the simple need to use Citrix Receiver for XenDesktop access. In the case of employees, it is assumed that they need to access numerous corporate applications, email, and collaboration services that require a full VPN tunnel to access the corporate network, as well as the XenMobile mobile applications which the contractors do not require nor have access to. Table 4-1 highlights the Citrix Receiver connection requirements in this CVD.
Citrix Receiver for Corporate and Employee Devices
Windows Laptops and MacBooks
For corporate laptops and MacBooks, it is anticipated that an organization has their own procedures for software distribution within the company. As such the CVD assumes those procedures would be followed as opposed to providing any prescriptive guidance as to the means by which Receiver can be installed on these devices.
However for employee personal PCs or MacBooks, it would be expected that they would not be enrolled in any automation providing automatic software installation and updating or, alternatively, have access to servers from which they could manually download the software. As such it may be desirable to provide an automated means by which the correct Receiver Client and Receiver configuration file (.cr) can be installed. For such situations, one method that could be used would be to provide the user with the necessary information to access Citrix Receiver for Web from the XenDesktop StoreFront site. When using a browser from Windows or Mac OS X to access the StoreFront site, the site tries to determine if Receiver is installed on the user’s device. If Receiver cannot be detected, the user is prompted to download and install the appropriate version of Citrix Receiver from the StoreFront website.
The following steps outline the user experience for accessing Citrix Receiver for Web from the XenDesktop StoreFront and subsequent downloading and installation of Receiver on their device.
Step 1 To access Citrix Receiver for Web from StoreFront, the user must have access to the corporate network either:
• While on-site
• Having established a VPN connection using the AnyConnect Client, opened a browser, and navigated to http://StoreFront_name.foo.com/Citrix/StoreWeb (the address used in the CVD is http://dc-xendesk.sdulab.com)
Upon accessing the site, StoreFront determines that Citrix Receiver is not installed on the Windows laptop. From here, the user simply needs to acknowledge the EULA and click Install.
Table 4-1 XenDesktop Access
Device Type On Campus Off Campus
Corporate Direct access to XenDesktop AnyConnect Client
Employee (Personal Full/Partial Access)
Direct access to XenDesktop AnyConnect Client
Contractor Clientless VPN through ASA Clientless VPN through ASA
4-17Cisco Mobile Workplace Solution with Citrix
Chapter 4 OperationsCitrix Receiver
Figure 4-20 Citrix StoreFront Receiver Detection
Step 2 Upon selecting Install, the user is prompted to run or save the Receiver executable, as shown in Figure 4-21.
Figure 4-21 Receiver Download and Installation
4-18Cisco Mobile Workplace Solution with Citrix
Chapter 4 OperationsCitrix Receiver
Step 3 Once the executable is downloaded, the Receiver Setup window is displayed and the installation begins, after which a logon is required.
Figure 4-22 Receiver Installation
Step 4 Once the Receiver installation has completed, the browser window changes to the login prompt, as shown in Figure 4-23. Upon entering credentials and successful authentication, Receiver access is now available and a XenDesktop server OS session can be launched for access to a virtual desktop.
4-19Cisco Mobile Workplace Solution with Citrix
Chapter 4 OperationsCitrix Receiver
Figure 4-23 Initial Receiver Log On
Step 5 To access XenDesktop later, the user simply needs to launch Citrix Receiver from their laptop or MacBook, as shown in Figure 4-24. In Figure 4-24, this user belongs to the “employee” role and has access to not only XenDesktop, but Windows applications available for that user role such as Firefox and Adobe reader.
4-20Cisco Mobile Workplace Solution with Citrix
Chapter 4 OperationsCitrix Receiver
Figure 4-24 Receiver for Windows Application
Mobile Devices
Installation of Citrix Receiver on corporate- or employee-owned mobile devices is automatic upon successful enrollment with the XenMobile MDM. After the initial enrollment with XenMobile and subsequent installation of the AnyConnect Client and the configuration profile, the user simply launches the AnyConnect VPN to access WorxHome with the resident WorxStore where users can choose to install approved Mobile Apps, as shown in Figure 4-25.
4-21Cisco Mobile Workplace Solution with Citrix
Chapter 4 OperationsCitrix Receiver
Figure 4-25 WorxHome Login Page and WorxStore
There is no specific need to access the “WorxStore” to install Citrix Receiver as it has been defined in XenMobile previously as a required mobile application for both employee and personal devices. As such, once this initial access to XenMobile has been established, the user is automatically prompted after a short time to install the Receiver client and once confirmed the installation begins, as shown in Figure 4-26.
4-22Cisco Mobile Workplace Solution with Citrix
Chapter 4 OperationsCitrix Receiver
Figure 4-26 Citrix Receiver Installation
Once Citrix Receiver has been successfully installed, the user must go back to the WorxStore via WorxHome and select the approved Citrix Receiver profile on which the profile will be installed on the WorxHome page, as shown in Figure 4-27.
4-23Cisco Mobile Workplace Solution with Citrix
Chapter 4 OperationsCitrix Receiver
Figure 4-27 Receiver Profile Installation
Finally, with the installation of the Receiver profile on the WorxHome page completed, the user simply selects that icon from WorxHome and Receiver automatically launches using this profile. The user is authenticated transparently, by virtue of the initial authentication to access WorxHome, and is connected with a XenDesktop session and a customized desktop with the appropriate applications for that user’s role, as shown in Figure 4-28. Recall that to open WorxHome and access Citrix Receiver, the user must first launch the AnyConnect Client for access to the corporate network.
4-24Cisco Mobile Workplace Solution with Citrix
Chapter 4 OperationsCitrix Receiver
Figure 4-28 Launching Receiver from Mobile Device with the AnyConnect Client
Citrix Receiver Installation and Operations for Contractor/Clientless AccessContractor access to XenDesktop is significantly different from that of corporate or employee personal devices. As discussed in this CVD, Contractor access to XenDesktop in the corporate network is limited to remote access through the use of an ASA VPN Edition appliance at the edge of the network. This design was discussed in Configuring the ASA for Clientless WebVPN Access Using Citrix Receiver in Chapter 2, “Configuring the Infrastructure.” Whereas employees’ personal and corporate devices utilize the Cisco AnyConnect Client for VPN access to XenDesktop, contractors use the “Clientless” SSL or WebVPN functionality of the ASA. This clientless functionality can be co-resident with client-based VPN connectivity or configured on dedicated appliances based on an organization’s needs. With this approach, access to a XenDesktop session is proxied through the ASA.
Although this CVD only validates remote network access via Clientless WebVPN for contractors, other options are available should an organization choose to provide limited access to the corporate network. One such option would be to deploy a dedicated SSID or make use of an existing guest network utilizing an anchor controller in the DMZ such that all contractor traffic terminates there and connectivity to XenDesktop would be through the ASA in similar fashion as remote users. It is however beyond the scope of this CVD to document such options.
Clientless Remote Access to XenDesktop for Contractor Laptops and MacBooks
For clientless access to XenDesktop from a laptop or a MacBook, the contractor launches a browser and enters the ASA’s fully qualified Domain Name along with the name of the connection profile that has been specified for their access, such as https://asa.foo.com/CitrixClientless, where the connection profile
4-25Cisco Mobile Workplace Solution with Citrix
Chapter 4 OperationsCitrix Receiver
is “CitrixClientless”. The fully customizable login form for WebVPN is diplayed, in which the user enters their credentials, as shown in Figure 4-29.
Figure 4-29 ASA WebVPN Login from a Laptop
Upon successful authentication, the connection is proxied by the ASA to Citrix StoreFront. As in the case of direct access to StoreFront without the ASA as a proxy, Receiver for Web launches and detects whether or not Citrix Receiver is installed locally on the user’s machine. As in the case of corporate- or employee-owned devices, if it is not installed, the user is prompted to install Citrix Receiver locally on their laptop or MacBook. This installation is identical to that previously described. If Citrix Receiver has been previously installed, the user is prompted to authenticate once again at Citrix StoreFront. After successful authentication, their XenDesktop session is launched.
After initial installation of Citrix Receiver, it is still necessary to access subsequent XenDesktop sessions through the use of a browser to first establish an SSL connection with the ASA. Upon connection with the ASA, the ASA proxies the connection to Citrix StoreFront using the Clientless WebVPN Connection Profile, previously documented in Configuring the ASA for Clientless WebVPN Access Using Citrix Receiver in Chapter 2, “Configuring the Infrastructure,” after which the Receiver client launches on the PC or MacBook automatically and the user is prompted for login, as shown in Figure 4-30.
4-26Cisco Mobile Workplace Solution with Citrix
Chapter 4 OperationsCitrix Receiver
Figure 4-30 Clientless Login to XenDesktop
When the user is finished with their XenDesktop session, they can simply disconnect from the session as normal and once back at the Receiver login screen, click the red logout icon, as shown in Figure 4-31, to clear the WebVPN session on the ASA.
Figure 4-31 Clientless Logout
Clientless Remote Access for Citrix Mobile Receiver to XenDesktop for Contractors
Citrix Mobile Receiver, unlike the desktop equivalent, can be configured to communicate directly with the ASA to access Citrix StoreFront to launch a XenDesktop session.
4-27Cisco Mobile Workplace Solution with Citrix
Chapter 4 OperationsCitrix Receiver
The following steps outline the procedure required to configure an iPad. It should be noted that although not discussed here, this procedure is virtually identical to that required to configure the Mobile Receiver on an Android device.
Step 1 The user must install Citrix Mobile Receiver from the Apple App Store. Once installed, open Citrix Receiver, as shown in Figure 4-32, and select Add Account.
Step 2 A New Account window is displayed. Enter the FQDN for the ASA VPN Edition appliance. Click Next.
Step 3 After attempting to connect, an error window is displayed. In that window, click Manual Setup.
Figure 4-32 Adding an Account for Mobile Receiver Clientless Access
Upon choosing the manual setup option, the New Account window expands for entry of additional information, as shown in Figure 4-33.
4-28Cisco Mobile Workplace Solution with Citrix
Chapter 4 OperationsCitrix Receiver
Step 4 Enter a description for the StoreFront account. This step is mandatory.
Step 5 Select Access Gateway and the New Account window expands for the entry of additional information.
Step 6 Select the Access Gateway Standard Edition.
Step 7 Enter the username, password, and domain for the XenDesktop session.
Step 8 Click Save.
Figure 4-33 Account Information for Mobile Receiver Clientless Access
Once saved, the Citrix Mobile Receiver application is displayed, as shown in Figure 4-34. From this view, the user can select the account icon in the top right of the screen and verify the account they created in the Accounts drop-down menu. To add any XenApp applications as well as the XenDesktop profile to the Receiver home screen, the user can just tap the plus sign (+).
4-29Cisco Mobile Workplace Solution with Citrix
Chapter 4 OperationsCitrix Receiver
Figure 4-34 Citrix Mobile Receiver
After tapping the plus sign, a Window pop-out box is displayed on the left side of the screen from which the user can select those XenApp applications, XenDesktop profile, and the Logout button to the Mobile Receiver home screen, as shown in Figure 4-35.
4-30Cisco Mobile Workplace Solution with Citrix
Chapter 4 OperationsCitrix Receiver
Figure 4-35 Adding Applications to the Mobile Receiver Home Screen
Upon tapping the CMW_Contractor Receiver icon, the XenDesktop session is automatically launched. To disconnect from the XenDesktop session, the user simply taps the icon in the top left corner of the screen, selects Disconnect, and once back at the home screen, taps Logout, as shown in Figure 4-36. Similar to the Logout button in Receiver for Windows, after the user has disconnected from the XenDesktop session and returned to the Mobile Receiver home screen, the user can then click the Logout button to terminate the session at the ASA. Note that this is purely optional, but reclaims ASA resources used for that connection.
4-31Cisco Mobile Workplace Solution with Citrix
Chapter 4 OperationsCitrix Receiver
Figure 4-36 Logging Out of XenDesktop
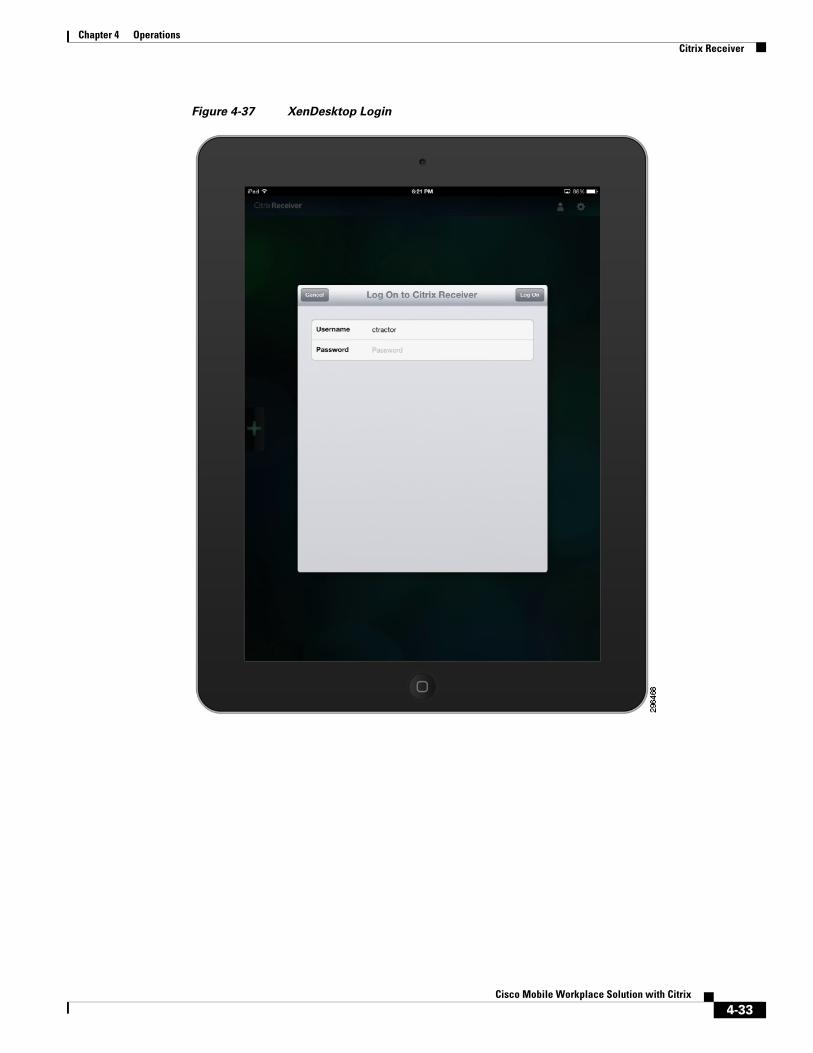
To log back in to XenDesktop, the user simply taps the CMW_Contractor Receiver icon and is prompted for credentials, as shown in Figure 4-37, after which the XenDesktop session launches immediately.