104
Oracle Procedural Gateway® Visual Workbench for WebSphere MQ Installation and User's Guide 10g Release 2 (10.2) for Microsoft Windows (32-Bit) B19082-01 August 2005
| Date post: | 19-May-2018 |
| Category: |
Documents |
| Upload: | trankhuong |
| View: | 226 times |
| Download: | 0 times |
Oracle Procedural Gateway® Visual Workbenchfor WebSphere MQ Installation and User's Guide
10g Release 2 (10.2) for Microsoft Windows (32-Bit)
B19082-01
August 2005

Oracle Procedural Gateway Visual Workbench for WebSphere MQ Installation and User's Guide, 10g Release 2 (10.2) for Microsoft Windows (32-Bit)
B19082-01
Copyright © 1996, 2005, Oracle. All rights reserved.
Primary Author: Maitreyee Chaliha
Contributing Author: Li-Te Chen
The Programs (which include both the software and documentation) contain proprietary information; they are provided under a license agreement containing restrictions on use and disclosure and are also protected by copyright, patent, and other intellectual and industrial property laws. Reverse engineering, disassembly, or decompilation of the Programs, except to the extent required to obtain interoperability with other independently created software or as specified by law, is prohibited.
The information contained in this document is subject to change without notice. If you find any problems in the documentation, please report them to us in writing. This document is not warranted to be error-free. Except as may be expressly permitted in your license agreement for these Programs, no part of these Programs may be reproduced or transmitted in any form or by any means, electronic or mechanical, for any purpose.
If the Programs are delivered to the United States Government or anyone licensing or using the Programs on behalf of the United States Government, the following notice is applicable:
U.S. GOVERNMENT RIGHTS Programs, software, databases, and related documentation and technical data delivered to U.S. Government customers are "commercial computer software" or "commercial technical data" pursuant to the applicable Federal Acquisition Regulation and agency-specific supplemental regulations. As such, use, duplication, disclosure, modification, and adaptation of the Programs, including documentation and technical data, shall be subject to the licensing restrictions set forth in the applicable Oracle license agreement, and, to the extent applicable, the additional rights set forth in FAR 52.227-19, Commercial Computer Software—Restricted Rights (June 1987). Oracle Corporation, 500 Oracle Parkway, Redwood City, CA 94065
The Programs are not intended for use in any nuclear, aviation, mass transit, medical, or other inherently dangerous applications. It shall be the licensee's responsibility to take all appropriate fail-safe, backup, redundancy and other measures to ensure the safe use of such applications if the Programs are used for such purposes, and we disclaim liability for any damages caused by such use of the Programs.
Oracle, JD Edwards, PeopleSoft, and Retek are registered trademarks of Oracle Corporation and/or its affiliates. Other names may be trademarks of their respective owners.
The Programs may provide links to Web sites and access to content, products, and services from third parties. Oracle is not responsible for the availability of, or any content provided on, third-party Web sites. You bear all risks associated with the use of such content. If you choose to purchase any products or services from a third party, the relationship is directly between you and the third party. Oracle is not responsible for: (a) the quality of third-party products or services; or (b) fulfilling any of the terms of the agreement with the third party, including delivery of products or services and warranty obligations related to purchased products or services. Oracle is not responsible for any loss or damage of any sort that you may incur from dealing with any third party.
iii
Contents
1 Introduction
Message Queuing Systems..................................................................................................................... 1-1The Oracle Procedural Gateway for Message Queuing Systems ................................................... 1-1The PG4MQ Visual Workbench Development Environment ......................................................... 1-2
The PG4MQ Visual Workbench....................................................................................................... 1-4Creating Data Profiles ................................................................................................................ 1-4Creating Message Queue Profiles............................................................................................. 1-4Creating Interface Profiles and Generating the MIP ............................................................. 1-4Testing the Gateway ................................................................................................................... 1-5Compiling the MIP ..................................................................................................................... 1-5Using the MIP Templates .......................................................................................................... 1-5Preparing the MIP for Production............................................................................................ 1-6
The PG4MQ Visual Workbench Repository .................................................................................. 1-6
2 Release Information
Product Set ................................................................................................................................................. 2-1Migration Considerations....................................................................................................................... 2-1Changes and Enhancements, Release 10.2.0.1.0.................................................................................. 2-2
Accessing release 10.2.0.1.0 and all earlier releases of PG4MQ Visual Workbench Repositories.. 2-2
Known Problems ...................................................................................................................................... 2-2Maximum Open Cursors .................................................................................................................. 2-2Incorrect Precision of PL/SQL Data Types .................................................................................... 2-2The MIP Is Too Large ........................................................................................................................ 2-2
3 Requirements
Hardware Requirements ......................................................................................................................... 3-1Processor.............................................................................................................................................. 3-1Memory ............................................................................................................................................... 3-1Disk Space ........................................................................................................................................... 3-1
Software Requirements........................................................................................................................... 3-1PG4MQ Visual Workbench Components....................................................................................... 3-1Operating System............................................................................................................................... 3-2Oracle Procedural Gateway.............................................................................................................. 3-2Oracle Server....................................................................................................................................... 3-2
iv
File Transfer ........................................................................................................................................ 3-2
4 Preinstallation
Preinstallation Tasks................................................................................................................................ 4-1About Oracle Universal Installer .......................................................................................................... 4-1
5 Installation
Installation................................................................................................................................................. 5-1Starting the Oracle Universal Installer............................................................................................ 5-1Installing Oracle Procedural Gateway Visual Workbench for WebSphere MQ....................... 5-1
Removing the Software........................................................................................................................... 5-2Removing Oracle Procedural Gateway Visual Workbench for WebSphere MQ using Oracle Universal Installer: 5-2
Starting the Oracle Universal Installer..................................................................................... 5-3Visual Workbench Installation Complete ........................................................................................... 5-3Installing the Visual Workbench Repository...................................................................................... 5-3
Preinstallation Tasks.......................................................................................................................... 5-3Step 1: Choose a repository server ........................................................................................... 5-4Step 2: Locate the installation scripts ....................................................................................... 5-4Step 3: Ensure that the UTL_RAW package is installed........................................................ 5-4Step 4: Ensure that the DBMS_OUTPUT package is enabled .............................................. 5-4Step 5: Ensure that the caths.sql script has been run ............................................................. 5-5Step 6: Create a database link.................................................................................................... 5-5
Visual Workbench Repository Installation Tasks ......................................................................... 5-5Step 1: Enter the database connection information................................................................ 5-5Step 2: Check for existing Workbench Repository................................................................. 5-5Step 3: Check for required PL/SQL packages ........................................................................ 5-6Step 4: Install the UTL_PG package ......................................................................................... 5-6Step 5: Create the admin user and all repository tables ........................................................ 5-6Step 6: Create public synonyms and development roles ...................................................... 5-6
After the Repository Is Created........................................................................................................ 5-6Remove the Visual Workbench Repository ................................................................................... 5-7
Step 1: Enter the database connection information................................................................ 5-7Step 2: Check for existing Workbench repository.................................................................. 5-7
6 Using the Oracle Procedural Gateway Visual Workbench for WebSphere MQ
Overview of PG4MQ Visual Workbench Development .................................................................. 6-1Starting the PG4MQ Visual Workbench and Connecting to a Repository ................................... 6-3Creating a Data Profile ............................................................................................................................ 6-5Updating a Data Profile .......................................................................................................................... 6-8
Removing a Data Profile ................................................................................................................... 6-9Creating a Message Queue Profile........................................................................................................ 6-9Updating a Message Queue Profile ................................................................................................... 6-13Removing a Message Queue Profile.................................................................................................. 6-13Creating an Interface Profile and Generating a MIP ..................................................................... 6-14
Alternative method for starting the Wizard to create an interface.......................................... 6-16
v
Viewing the Generated Code ........................................................................................................ 6-17Updating a MIP...................................................................................................................................... 6-19
Alternative method for starting the Wizard to update an interface........................................ 6-21Testing the Gateway.............................................................................................................................. 6-22Compiling the MIP ............................................................................................................................... 6-26Using the MIP Templates..................................................................................................................... 6-28
Completing the Templates............................................................................................................. 6-30Using a Template to Test the MIP................................................................................................. 6-31
Testing the ENQUEUE Procedure Template ....................................................................... 6-32Testing the DEQUEUE Procedure Template ....................................................................... 6-33
Preparing the MIP for Production...................................................................................................... 6-34Before You Compile the MIP on the Production Oracle Server ............................................... 6-34Compiling the MIP for the Production Oracle Server ............................................................... 6-35
Granting Execution Privileges to a MIP ............................................................................... 6-35Testing the MIP on a Production System .................................................................................... 6-36
7 Using the Generated MIP
About the Message Interface Package (MIP) ...................................................................................... 7-1What's in a MIP?................................................................................................................................. 7-2
QOPEN and QCLOSE ................................................................................................................ 7-2ENQUEUE and DEQUEUE....................................................................................................... 7-3
MIP Specification Example ............................................................................................................... 7-3MIP Procedures......................................................................................................................................... 7-6QOPEN Procedure.................................................................................................................................... 7-7
QOPEN Syntax ................................................................................................................................... 7-7QCLOSE Procedure.................................................................................................................................. 7-7
QCLOSE Syntax.................................................................................................................................. 7-7ENQUEUE Procedure .............................................................................................................................. 7-7
ENQUEUE Naming and Name Resolution.................................................................................... 7-8Basic ENQUEUE Procedure ............................................................................................................. 7-8
Syntax ........................................................................................................................................... 7-8Example ........................................................................................................................................ 7-8
Advanced ENQUEUE Procedure .................................................................................................... 7-9Syntax ........................................................................................................................................... 7-9Example ..................................................................................................................................... 7-10
DEQUEUE Procedure ........................................................................................................................... 7-11DEQUEUE Naming and Name Resolution................................................................................. 7-11Basic DEQUEUE Procedure........................................................................................................... 7-11
Syntax ........................................................................................................................................ 7-12Example ..................................................................................................................................... 7-12
Advanced DEQUEUE Procedure ................................................................................................. 7-12Syntax ........................................................................................................................................ 7-13Example ..................................................................................................................................... 7-13
Type Definitions.................................................................................................................................... 7-14OPEN_OPTIONS_Typ ................................................................................................................... 7-14
Syntax ........................................................................................................................................ 7-14ENQUEUE_OPTIONS_Typ........................................................................................................... 7-15
vi
Syntax ........................................................................................................................................ 7-15DEQUEUE_OPTIONS_Typ........................................................................................................... 7-15
Syntax ........................................................................................................................................ 7-15MESSAGE_PROPERTIES_Typ .......................................................................................................... 7-16
Syntax................................................................................................................................................ 7-16PGM_BQM Package ............................................................................................................................. 7-17
Exceptions ........................................................................................................................................ 7-17Naming ............................................................................................................................................. 7-18
Using the MIP for WebSphere MQ.................................................................................................... 7-18PGM_SUP Package ......................................................................................................................... 7-18Exceptions ........................................................................................................................................ 7-18
MIP Restrictions ...................................................................................................................... 7-19Data Conversion Package .................................................................................................................... 7-19COBOL Data Type Conversion .......................................................................................................... 7-21
PIC X ................................................................................................................................................. 7-21PIC G ................................................................................................................................................. 7-22PIC 9 .................................................................................................................................................. 7-22FILLER .............................................................................................................................................. 7-23
COBOL Format Conversion ................................................................................................................ 7-23JUSTIFIED and JUSTIFIED RIGHT .............................................................................................. 7-23JUSTIFIED LEFT.............................................................................................................................. 7-23OCCURS n TIMES........................................................................................................................... 7-24OCCURS m TO n TIMES DEPENDING ON field-2 .................................................................. 7-24RENAMES item-2 THRU item-3................................................................................................... 7-24RENAMES item-2 WHEN item-3=value .................................................................................... 7-24SYNCHRONIZED and SYNCHRONIZED RIGHT ................................................................... 7-25SYNCHRONIZED LEFT ................................................................................................................ 7-25
PL/SQL Naming Algorithm................................................................................................................. 7-25Delimiters ......................................................................................................................................... 7-25Qualified Compound Names ........................................................................................................ 7-25Truncated and Non-Unique Names............................................................................................. 7-26Duplicate Names ............................................................................................................................. 7-26
A Preparing the Production Oracle Server
Introduction .............................................................................................................................................. A-1Verifying and Installing PL/SQL Packages ....................................................................................... A-2Removing the PL/SQL Packages ......................................................................................................... A-3
Index
vii
Preface
The Oracle Procedural Gateway Visual Workbench for WebSphere MQ (referred to in this guide as "Visual Workbench"), is a development tool that simplifies integrating Oracle applications with non-Oracle message queuing applications. It is used by developers who write Oracle applications that communicate with non-Oracle messaging and queuing applications, using a procedural gateway for a message queuing system.
Procedural gateways for message queuing enable Oracle applications to send and retrieve messages from message queuing systems. For more information, see the gateway installation guide for your platform.
The Oracle 10g release of the Oracle Procedural Gateway for WebSphere MQ provides access to WebSphere MQ services. Read this guide if you are responsible for tasks such as:
■ Administering the gateway
■ Setting up gateway security
■ Using the gateway
■ Diagnosing gateway errors
You must understand the fundamentals of your operating system, the procedural gateways, PL/SQL, the Oracle server, and MQSeries software before using this guide to install, configure, or administer the gateway.
AudienceThis document is intended for application developers who install and use the Visual Workbench on their workstations.
Documentation AccessibilityOur goal is to make Oracle products, services, and supporting documentation accessible, with good usability, to the disabled community. To that end, our documentation includes features that make information available to users of assistive technology. This documentation is available in HTML format, and contains markup to facilitate access by the disabled community. Accessibility standards will continue to evolve over time, and Oracle is actively engaged with other market-leading technology vendors to address technical obstacles so that our documentation can be accessible to all of our customers. For more information, visit the Oracle Accessibility Program Web site at
http://www.oracle.com/accessibility/
viii
Accessibility of Code Examples in DocumentationScreen readers may not always correctly read the code examples in this document. The conventions for writing code require that closing braces should appear on an otherwise empty line; however, some screen readers may not always read a line of text that consists solely of a bracket or brace.
Accessibility of Links to External Web Sites in DocumentationThis documentation may contain links to Web sites of other companies or organizations that Oracle does not own or control. Oracle neither evaluates nor makes any representations regarding the accessibility of these Web sites.
TTY Access to Oracle Support ServicesOracle provides dedicated Text Telephone (TTY) access to Oracle Support Services within the United States of America 24 hours a day, seven days a week. For TTY support, call 800.446.2398.
Product NameThe complete name for this product is Oracle Procedural Gateway Visual Workbench for WebSphere MQ. In this document, this product is also called the Visual Workbench and may be abbreviated as PG4MQ Visual Workbench.
Related DocumentsDatabase administrators (DBAs) use this installation guide to create the Visual Workbench repository and install the Visual Workbench server. They also use the Oracle Open Gateways Guide for SQL-Based and Procedural Gateways.
You might also need Oracle server documentation or other related publications. Some references that you might find helpful are:
■ Oracle Database Platform Guide for Microsoft Windows (32-Bit)
■ Oracle Database Administrator's Guide
■ Oracle Database Application Developer's Guide - Fundamentals
■ Oracle Database Concepts
■ Oracle Database Error Messages
■ Oracle Database Net Services Administrator's Guide
ConventionsThe following text conventions are used in this document:
Convention Meaning
boldface Boldface type indicates graphical user interface elements associated with an action, or terms defined in text or the glossary.
italic Italic type indicates book titles, emphasis, or placeholder variables for which you supply particular values.
monospace Monospace type indicates commands within a paragraph, URLs, code in examples, text that appears on the screen, or text that you enter.
Introduction 1-1
1Introduction
The Oracle Procedural Gateway Visual Workbench for WebSphere MQ is for developers who are writing Oracle applications that communicate with non-Oracle message queuing applications and who are using an Oracle Procedural Gateway for WebSphere MQ for message queuing.
For detailed information about Oracle Procedural Gateways for message queuing systems, and about message queuing systems in general, refer to the gateway installation guide for your platform.
The following topics are included:
■ Message Queuing Systems
■ The Oracle Procedural Gateway for Message Queuing Systems
■ The PG4MQ Visual Workbench Development Environment
Message Queuing SystemsMessage queuing systems enable communication between applications. In a message queuing system, an application stores messages in a queue that is accessible to another application. One application sends a message to a queue, and the other application asynchronously retrieves the message and processes the information it contains.
The Oracle Procedural Gateway for Message Queuing SystemsOracle Procedural Gateways for message queuing systems enable Oracle applications to send messages to, and retrieve messages from, message queuing systems.
The gateway converts Oracle remote PL/SQL procedure calls into calls understood by the message queuing system's interface. Using the gateway, Oracle applications can access non-Oracle applications that are enabled for message queuing.
The Oracle Procedural Gateway for message queuing provides the basic mechanism that enables Oracle applications to communicate with non-Oracle applications using message queuing systems. To write these applications without a development tool like the PG4MQ Visual Workbench, you must:
■ Write PL/SQL code to call the gateway remote procedure calls that provide communication with the message queuing system
■ Often write code to handle incompatible data types between Oracle applications and target applications
The PG4MQ Visual Workbench automates these tasks for developers.
The PG4MQ Visual Workbench Development Environment
1-2 Oracle Procedural Gateway Visual Workbench for WebSphere MQ Installation and User's Guide
The PG4MQ Visual Workbench Development EnvironmentThe PG4MQ Visual Workbench simplifies the development work necessary to access message queuing applications through the gateway. The PG4MQ Visual Workbench does this by handling data conversion between incompatible data types in messages exchanged between Oracle applications and non-Oracle message queuing applications.
The PG4MQ Visual Workbench has two components:
■ Visual Workbench
■ Visual Workbench repository
Use the Visual Workbench to develop interface profiles that contain the information necessary to communicate with other message queuing applications. The Visual Workbench stores the interface profile information in the Visual Workbench repository. Using the Visual Workbench, you compile the interface profile, producing a MIP that contains the PL/SQL code needed for Oracle applications to communicate with non-Oracle message queuing applications in a run-time environment. You provide MIP templates as a starting point for your application to use the MIP, and then compile and test the MIP on the production server.
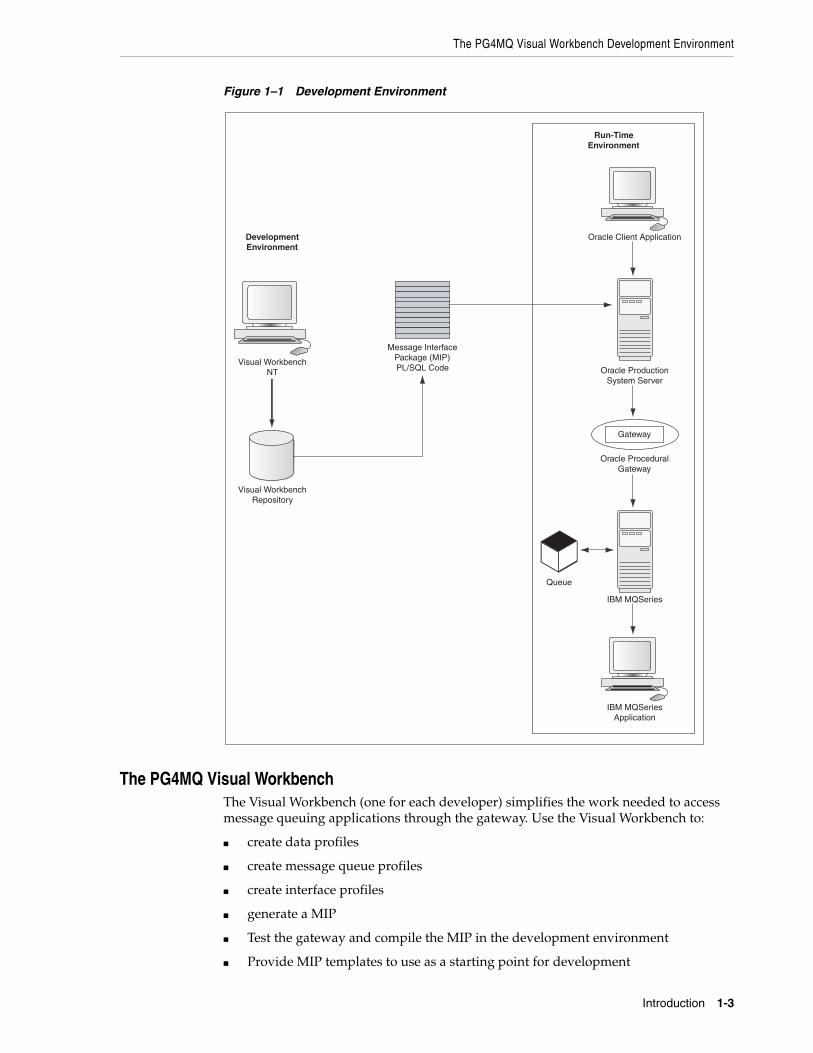
Figure 1–1 illustrates the PG4MQ Visual Workbench's development and run-time environments.
The PG4MQ Visual Workbench Development Environment
Introduction 1-3
Figure 1–1 Development Environment
The PG4MQ Visual WorkbenchThe Visual Workbench (one for each developer) simplifies the work needed to access message queuing applications through the gateway. Use the Visual Workbench to:
■ create data profiles
■ create message queue profiles
■ create interface profiles
■ generate a MIP
■ Test the gateway and compile the MIP in the development environment
■ Provide MIP templates to use as a starting point for development
DevelopmentEnvironment
Visual WorkbenchRepository
Visual WorkbenchNT
Message InterfacePackage (MIP)PL/SQL Code
Run-TimeEnvironment
Oracle ProductionSystem Server
Oracle ProceduralGateway
Gateway
Oracle Client Application
IBM MQSeriesApplication
IBM MQSeries
Queue

The PG4MQ Visual Workbench Development Environment
1-4 Oracle Procedural Gateway Visual Workbench for WebSphere MQ Installation and User's Guide
■ Compile the MIP and test it on the production system
The MIP uses the profile information you provide, enabling communication between an Oracle application and a non-Oracle message queuing application.
Creating Data ProfilesThe gateway and a message queuing system are the transport mechanisms for message data. They provide no data conversion capability. This means that usually you must supply code to convert data between Oracle data types and non-Oracle data types.
Using the Visual Workbench, you create data profiles that, when associated with an interface profile, automatically add the necessary conversion code before a message is sent or after a message has been retrieved. The Visual Workbench maintains the data profiles in the Visual Workbench repository.
To have the interface convert a COBOL structured message to PL/SQL, you create a COBOL data profile defining data conversion definitions. The Visual Workbench generates PL/SQL code to map between the COBOL data conversion definitions and those of PL/SQL. Currently, only COBOL version IBM VS/COBOLII is supported.
Creating Message Queue ProfilesUsing the Visual Workbench, you define the attributes of the message queues used to communicate between Oracle and non-Oracle applications. A message queue profile specifies how and where inter-application messages are sent to the message queuing system and are retrieved from it.
When a message queue profile is associated with an interface profile, the Visual Workbench generates the PL/SQL code necessary to access the message queuing gateway and stores it in the Visual Workbench repository. "Creating a Message Queue Profile" on page 6-9 for details
Creating Interface Profiles and Generating the MIPUsing the Visual Workbench Wizard, you combine one data profile and one message profile to define or update an interface profile. The interface profile:
■ Defines how messages are exchanged with the non-Oracle application, using the gateway and the message queuing system
■ Defines how message data is converted for communication between the applications
The Visual Workbench uses the interface profile information to generate a MIP, a PL/SQL package that provides a high-level interface between Oracle applications and non-Oracle message queuing applications. To create an interface profile you specify:
■ One data profile
■ One message queue profile
■ A unique name for the interface
See Also: "Creating a Data Profile" on page 6-5 for details
See Also: "Creating a Message Queue Profile" on page 6-9 for details
The PG4MQ Visual Workbench Development Environment
Introduction 1-5
■ The database link for communication between Oracle and a message queuing system, through the gateway
After you have defined the interface profile, the Visual Workbench automatically generates a MIP based on the interface profile information you specified. A MIP is a PL/SQL interface to send messages to, and retrieve messages from, a non-Oracle message queuing system.
When you generate a MIP, the Visual Workbench produces the MIP itself, data conversion code, and templates that show how to access the message queuing system using the MIP.
Using the Visual Workbench, you can install the generated MIP on any Oracle server where your application is running.
Testing the GatewayThe PG4MQ Visual Workbench produces PL/SQL test code in addition to the generated MIP. Use the test code to verify the interaction with the procedural gateway before you compile the MIP on the target server. Using the test code before compiling the MIP helps identify any problems in the interaction with the gateway. It is easier to identify such problems before compiling than when testing the MIP itself.
Compiling the MIPThe MIP and data conversion code must be compiled on an Oracle server before you can use them in your application. After completing the development and testing, use the Visual Workbench to compile the generated MIP on the server you choose for compiling.
Using the MIP TemplatesThe PG4MQ Visual Workbench produces templates for the generated MIP. After you have verified the test code and compiled the interface, you can complete the templates and test them from the PG4MQ Visual Workbench. The templates can be used as a starting point for your application to use the MIP for sending and retrieving messages.
Preparing the MIP for ProductionAfter completing development, you:
See Also: "Creating an Interface Profile and Generating a MIP" on page 6-14 and "About the Message Interface Package (MIP)" on page 7-1 for more information
See Also: "Testing the Gateway" on page 6-22 for more information
See Also: "Compiling the MIP" on page 6-26" for more information
See Also: "Creating an Interface Profile and Generating a MIP" on page 6-14 and "About the Message Interface Package (MIP)" on page 7-1 for more information. For more complete MIP information, refer to Chapter 7, "Using the Generated MIP".
The PG4MQ Visual Workbench Development Environment
1-6 Oracle Procedural Gateway Visual Workbench for WebSphere MQ Installation and User's Guide
■ Deploy the MIP on one or more production system servers where you plan to run your applications that use the MIP
■ Compile the MIP on the production system
■ Test the MIP on the production system
The PG4MQ Visual Workbench RepositoryThe Visual Workbench repository stores all data profiles, message queue profiles, interface profiles, and MIPs. The repository resides in an Oracle server and can be created in any Oracle server in the network. The Oracle server used for the repository need not be the same Oracle server that is used in the production system by the applications referencing the MIPs, it can be a different Oracle server.
See Also: "Preparing the MIP for Production" on page 6-34 for more information
Release Information 2-1
2Release Information
The Oracle Procedural Gateway Visual Workbench for WebSphere MQ is used with the Oracle Procedural Gateway for message queuing products. This release supports release 2 (10.2) of the Oracle Procedural Gateway for WebSphere MQ. For more information, see the Oracle Procedural Gateway for WebSphere MQ Installation and User's Guide for Microsoft Windows for your platform.
This release supports automatic data conversion between only two types of application, Oracle PL/SQL applications and IBM VS/COBOLII applications. You can add other data conversions manually.
This chapter contains the following sections:
■ Product Set
■ Migration Considerations
■ Changes and Enhancements, Release 10.2.0.1.0
■ Known Problems
Product SetThese components are included on the product installation media:
This release replaces Oracle Procedural Gateway Visual Workbench for WebSphere MQ release 9.0.1.1.1 and earlier, which used a client/server system.
Migration ConsiderationsThe message interface package (MIP) described in Chapter 7, "Using the Generated MIP", is not compatible with the MIP generated by the Visual Workbench release 9.0.1 and earlier. You must modify applications that use release 9.0.1 and earlier releases of the MIP.
ProductRelease Number
Oracle Universal Installer 2.0.1.6.0
Oracle Procedural Gateway Visual Workbench for WebSphere MQ 10.2.0.1.0
Oracle Net 10.2.0.1.0
See Also: Figure 1–1, "Development Environment"
Changes and Enhancements, Release 10.2.0.1.0
2-2 Oracle Procedural Gateway Visual Workbench for WebSphere MQ Installation and User's Guide
The Visual Workbench repository is not compatible with the repository released with the Visual Workbench releases 9.0.1 and earlier. You must re-create interface profiles that were created and stored in the repository using releases 9.0.1 and earlier.
Changes and Enhancements, Release 10.2.0.1.0There is only one enhancement in this release.
Accessing release 10.2.0.1.0 and all earlier releases of PG4MQ Visual Workbench Repositories.
The current release of the Oracle Procedural Gateway Visual Workbench for WebSphere MQ is enhanced to be able to access release 10.2.0.1.0 and all earlier releases of PG4MQ Visual Workbench repositories.
Known ProblemsThe description of problems includes suggestions for dealing with them when possible. If you have questions or concerns about the problems, then contact Oracle Support Services. A current list of problems is available online. Contact your local Oracle office for information about accessing this list.
Maximum Open CursorsThis error might appear during a PG4MQ Visual Workbench operation:
ORA-01000: Maximum open cursors exceeded
Most Visual Workbench operations do not work correctly after this error, and the error continues to appear. To resolve this problem, set the CLOSE_CACHED_OPEN_CURSOR initialization parameter to TRUE for the Oracle server where the Visual Workbench repository resides.
Incorrect Precision of PL/SQL Data TypesThe COBOL to PL/SQL map panel occasionally lists an incorrect precision for the PL/SQL data types shown. To see the correct PL/SQL precision, view the generated PL/SQL code of a MIP to which the COBOL data profile was added. Select the data mapping entry from the list on the PL/SQL Code panel for the MIP and click View.... The PL/SQL package specification includes the data type definitions generated and shows the correct precision of each data type.
The MIP Is Too LargeWhen creating an interface profile or adding data profiles to an interface profile, the MIP can become larger than the PG4MQ Visual Workbench can handle. The PG4MQ Visual Workbench reports this error as follows:
See Also: "Related Documents" on page -viii for a list of books that will provide more information about this parameter
See Also: "Viewing the Generated Code" on page 6-17 for more information

Known Problems
Release Information 2-3
ORA-20004: Message Interface Package getting too large.

Known Problems
2-4 Oracle Procedural Gateway Visual Workbench for WebSphere MQ Installation and User's Guide
Requirements 3-1
3Requirements
The Oracle Procedural Gateway Visual Workbench for WebSphere MQ is used with the Oracle Procedural Gateway for message queuing products. This release supports release 10.2 of the Oracle Procedural Gateway for WebSphere MQ. For more information, see the Oracle Procedural Gateway for WebSphere MQ Installation and User's Guide for Microsoft Windows for your platform.
This release supports automatic data conversion between only two types of application, Oracle PL/SQL applications and IBM VS/COBOLII applications. You can add other data conversions manually.
This chapter contains the following sections:
■ Hardware Requirements
■ Software Requirements
Hardware RequirementsThe hardware requirements are described in this section.
ProcessorAn Intel Pentium III processor is required.
MemoryA minimum of 128 MB memory is required. 256 MB of memory is recommended.
Disk SpaceThe PG4MQ Visual Workbench requires 300 MB (one Visual Workbench per developer).
Software RequirementsThe system software configuration described in these requirements is supported by Oracle as long as the underlying system software products are supported by their respective vendors. Verify the latest support status with your system software vendors.
PG4MQ Visual Workbench ComponentsThe PG4MQ Visual Workbench development environment has two components:
Software Requirements
3-2 Oracle Procedural Gateway Visual Workbench for WebSphere MQ Installation and User's Guide
■ Visual Workbench (client and server)
■ Visual Workbench repository
You install the PG4MQ Visual Workbench on your Microsoft Windows (32-bit) workstation.
The PG4MQ Visual Workbench repository may reside on a different platform than the PG4MQ Visual Workbench.
Operating SystemMicrosoft Windows (32-bit) is required.
Oracle Procedural GatewayThis release supports release 10.2 of the Oracle Procedural Gateway for WebSphere MQ. For more information, see the gateway installation guide for your platform.
Oracle ServerAn Oracle server is required to use the gateway and the PG4MQ Visual Workbench. For more information, refer to the gateway installation guide for your platform.
File TransferPG4MQ Visual Workbench requires a file transfer product (such as FTP) capable of moving files between systems.
Caution: Before using the Visual Workbench for development, ensure that the repository exists.
Preinstallation 4-1
4Preinstallation
This chapter guides you through the basic concepts and preinstallation steps for Oracle Procedural Gateway Visual Workbench for WebSphere MQ 10g release 2(10.2). The following topics provide information about Oracle Procedural Gateway Visual Workbench for WebSphere MQ, environment variables settings, and starting Oracle Universal Installer:
■ Preinstallation Tasks
■ About Oracle Universal Installer
Preinstallation TasksPerform the following tasks before installing the current release of PG4MQ Visual Workbench:
1. Start your operating system.
2. Log on as a member of the Administrators group to the computer on which to install the current release of PG4MQ Visual Workbench.
3. Stop all Oracle services (if any are running) for the Oracle home into which you want to install PG4MQ Visual Workbench:
a. Choose Start > Settings > Control Panel > Services
b. If any Oracle services (their names begin with Oracle) exist and have the status Started, then select the service and click Stop. In particular, ensure that the Oracle listener service is stopped.
c. Click Close to exit the Services window.
About Oracle Universal InstallerOracle Universal Installer is a Java-based graphical user interface (GUI) tool that enables you to install Oracle components from the installation media.
Note: Do not manually set ORACLE_HOME in the environment path. This is done automatically in the registry.
See Also: Oracle Universal Installer and OPatch User's Guide for more information about Oracle Universal Installer

About Oracle Universal Installer
4-2 Oracle Procedural Gateway Visual Workbench for WebSphere MQ Installation and User's Guide
Installation 5-1
5Installation
The development environment for the Oracle Procedural Gateway Visual Workbench for WebSphere MQ has two components:
■ PG4MQ Visual Workbench, one for each developer, which is installed on each developer's computer using the Oracle Universal Installer
■ PG4MQ Visual Workbench repository scripts, shipped with the PG4MQ Visual Workbench installation media for message queuing systems
This chapter guides you through the installation of the Oracle Procedural Gateway Visual Workbench for WebSphere MQ , including detailed installation steps. The following topics are included:
■ Installation
■ Removing the Software
■ Visual Workbench Installation Complete
■ Installing the Visual Workbench Repository
InstallationThis section describes the installation steps.
Starting the Oracle Universal InstallerTo start the installer, insert the PG4MQ Visual Workbench installation media into your computer's installation media drive and perform the following steps:
1. Choose Start > Run.
2. Enter drive:\setup.exe in the Open field of the Run dialog box, where drive is the drive designation for the installation media drive that contains the PG4MQ Visual Workbench installation media. For example, if your installation media drive is D:, then you would enter d:\setup.exe.
3. Click OK to start the installer.
Installing Oracle Procedural Gateway Visual Workbench for WebSphere MQOnce you have the installer up and running, you can proceed with the installation of Oracle Procedural Gateway Visual Workbench for WebSphere MQ. The installer is essentially a wizard that presents a number of pages to you so that you can complete the installation of the Visual Workbench.
Removing the Software
5-2 Oracle Procedural Gateway Visual Workbench for WebSphere MQ Installation and User's Guide
The first page that the installer presents is the Welcome page. To continue with the installation, click Next to display the File Locations page.
The Source section of the File Locations page lets you specify the source location that the installer will use to install PG4MQ Visual Workbench. You should not have to edit the file specification in the Path field. The default setting for this field points to the installer file on your PG4MQ Visual Workbench installation media.
The Name and Path fields in the Destination section of the File Locations page let you specify the destination for your installation. Type in the Name and Path of your choice. After you have set the fields in the File Locations page as necessary, click Next to continue. After loading the necessary information from the installation media, the installer will display the Oracle Procedural Gateway for Messaging Queuing Visual Workbench Installer page.
Click Next to continue and display the Summary page. The Summary page lets you review a tree list of options and componets for this installation. Click Install to display the Install page, which shows the status of the installation as it proceeds and also displays the location of the installer log file for this installation session.
Depending on your computer's CPU, installation media drive, and hard drive, the installer might take quite some time to complete the installation process.
After the installer copies the Oracle software to your computer, the Configuration Tools page is displayed, and Oracle Net Configuration Assistant is then run to configure Oracle's networking product (Oracle Net).
In the Oracle Net Configuration Assistant Welcome page, click Perform typical configuration and then click Next. Let the Oracle Net Configuration Assistant guide you through the rest of the installation until the End of Installation page is displayed.
The final page of the installer is the End of Installation page. If your installation was successful, then you can click Next to exit the installer.
Removing the SoftwareThis section describes how to use Oracle Universal Installer to remove Oracle components (which removes them from the Oracle Universal Installer inventory) instead of removing them manually.
Removing Oracle Procedural Gateway Visual Workbench for WebSphere MQ using Oracle Universal Installer:
This section describes how to remove PG4MQ Visual Workbench with Oracle Universal Installer.
WARNING: If you delete an Oracle home manually (for example, by deleting the directory structure with Microsoft Windows XP Explorer), then the components in the Oracle home remain registered in the Oracle Universal Installer inventory.
If you then attempt an installation in the same Oracle home, then some or all of the components selected may not be installed because Oracle Universal Installer determines that they are already installed.
Installing the Visual Workbench Repository
Installation 5-3
Starting the Oracle Universal InstallerTo start the installer, insert the PG4MQ Visual Workbench installation media into your computer's installation media drive and perform the following steps:
1. Choose Start > Run.
2. Enter Drive:\setup.exe in the Open field of the Run dialog box, where Drive is the drive designation for the installation media drive that contains the PG4MQ Visual Workbench installation media. For example, if your installation media drive is D:, then you would enter d:\setup.exe.
3. Click OK to start the installer.
4. Click Deinstall Products. The Inventory dialog box appears.
5. Expand the tree of installed components until you find the components to remove.
6. Check the boxes of the components to remove.
7. Click Remove. The Inventory Confirmation window appears.
8. Click Yes to remove the selected components.
The components are removed from your computer. The Inventory dialog box appears without the removed components.
9. Click Close to close the Inventory dialog box.
10. Click Exit to exit Oracle Universal Installer.
Visual Workbench Installation CompleteWhen the installation is complete, the PG4MQ Visual Workbench icon appears in the Oracle for Microsoft Windows (32-bit) folder:
Figure 5–1 Visual Workbench Icon
You can start the Visual Workbench after you have created the repository.
Installing the Visual Workbench RepositoryInstall the Visual Workbench repository following the steps in this section.
Preinstallation TasksThis section describes the preinstallation tasks.
Step 1: Choose a repository serverA repository server is an Oracle integrating server on which the Visual Workbench repository is installed.
Note: A message may be displayed indicating that removing some components may cause other components to not perform properly.
See Also: "Installing the Visual Workbench Repository"
Installing the Visual Workbench Repository
5-4 Oracle Procedural Gateway Visual Workbench for WebSphere MQ Installation and User's Guide
Step 2: Locate the installation scriptsThe Visual Workbench repository installation scripts are installed with the Visual Workbench. If the repository is to be installed on the same computer as Visual Workbench, then your repository server already has all the required installation scripts. Proceed to Step 3.
1. Create a directory on the repository server that is to be the script directory. For example:
> md ORACLE_HOME\pg4mq\admin\repo
2. Use a file transfer program to transfer the repository zip file (reposXXX.zip, where XXX is the release number) or move all script files with the suffix .sql from the script file directory (NT=ORACLE_HOME\pg4mqvwb\server\admin) on the Visual Workbench computer to the script file directory on the repository server computer.
Step 3: Ensure that the UTL_RAW package is installedAll data mapping packages generated by the Visual Workbench use the UTL_RAW package, which provides routines for manipulating raw data.
From SQL*Plus, as user SYS, run the following statement:
SQL> DESCRIBE UTL_RAW.COMPARE
If the DESCRIBE statement is successful, then your repository server already has UTL_RAW installed, and you can proceed to Step 4.
If the DESCRIBE statement fails, then install UTL_RAW:
From SQL*Plus, as user SYS, run the utlraw.sql and prvtrawb.plb scripts that are in the ORACLE_HOME\rdbms\admin directory. You must run the utlraw.sql script first.
SQL> @utlraw.sqlSQL> @prvtrawb.plb
Step 4: Ensure that the DBMS_OUTPUT package is enabledThe sample programs and installation verification programs on the distribution installation media use the standard DBMS_OUTPUT package.
From SQL*Plus, as user SYS, run the following statement:
SQL> DESCRIBE DBMS_OUTPUT.PUT_LINE
If the DESCRIBE statement is successful, then your repository server has DBMS_OUTPUT installed, and you can proceed to Step 5.
If the DESCRIBE statement fails, then install DBMS_OUTPUT. Refer to your Oracle server DBA.
Step 5: Ensure that the caths.sql script has been runEnsure that the caths.sql script has been run on the Oracle database server before starting the gateway. You can verify that this has been done by doing the following:
1. Use SQL*Plus to connect to the integrating server as user SYS.
2. Run the following statement from SQL*Plus:
SQL> DESCRIBE HS_FDS_INST
Installing the Visual Workbench Repository
Installation 5-5
If the DESCRIBE statement is successful, then it indicates that caths.sql has been run for the database server. Otherwise, you must run the caths.sql script first.
Step 6: Create a database linkCreate a database link on your Oracle Production System Server to access the Oracle Procedural Gateway for WebSphere MQ.
If you do not already have a database link, then refer to the gateway installation guide for your platform for information about creating database links.
Visual Workbench Repository Installation TasksUse pgvwbrepos.sql to install the Visual Workbench Repository on the current release. To run pgvwbrepos.sql, ensure that you are currently in the ORACLE_HOME\pg4mq\admin\repo directory and then enter:
sqlplus /nolog @pgvwbrepos.sql
The script takes you through the following steps:
Step 1: Enter the database connection informationUse the default of LOCAL by pressing Enter.
Next, you are prompted to enter the passwords for the SYSTEM and SYS accounts of the Oracle integrating server. Press Enter after entering each password.
The script stops if any of the information is incorrect. Verify the information before rerunning the script.
Step 2: Check for existing Workbench RepositoryThe script checks for an existing Visual Workbench repository and for the data dictionary. If neither one is found, the script proceeds to Step 3.
If the data dictionary exists, then the script stops. Choose another Oracle integrating server and rerun the script, starting at "Step 1: Choose a repository server" on page 5-4.
If a Visual Workbench repository exists, then the script gives you the following options:
A. Upgrade the existing private repository to public status and proceed to Step 3.
B. Replace the existing repository with the new private repository and proceed to Step 3.
C. Stop the script.
Step 3: Check for required PL/SQL packagesThe script checks for the existence of UTL_RAW, DBMS_OUTPUT, and DBMS_PIPE in the Oracle integrating server. If this software exists, then the script proceeds to Step 4.
Note: If you are installing the Visual Workbench Repository on Oracle8i or earlier, then you need to use pgvwbrepos8.sql. All the examples in this section are provided with the assumption that you are installing on the current release.
Installing the Visual Workbench Repository
5-6 Oracle Procedural Gateway Visual Workbench for WebSphere MQ Installation and User's Guide
The script stops if this software does not exist. Refer to your Oracle integrating server DBA about the missing software. After the software is installed, rerun the script.
Step 4: Install the UTL_PG packageThe script checks for the existence of the UTL_PG package. If it does not exist, then the UTL_PG package is installed. The script proceeds to Step 5.
If UTL_PG exists, then you are prompted to reinstall it. Press Enter to reinstall UTL_PG.
Step 5: Create the admin user and all repository tablesThis step creates the administrative user for the Visual Workbench repository as PGMADMIN with an initial password of PGMADMIN. This user owns all objects in the repository.
After this step, a private Visual Workbench repository, which includes the PGM_SUP, PGM_BQM, and PGM_UTL8 packages, is created in the Oracle integrating server, which only the user PGMADMIN can access.
Step 6: Create public synonyms and development rolesThis is an optional step to change the private access privileges of the Visual Workbench repository. The private status allows only the PGMADMIN user to have access to the repository. If you enter N and press Enter, then the repository retains its private status.
A public status allows the granting of access privileges to other users besides PGMADMIN. If you want to give the repository public status, then enter Y and press Enter.
After the Repository Is CreatedAfter creating the Visual Workbench repository, there is one optional step:
Grant development privileges for the Visual Workbench repository to users.
To allow users other than PGMADMIN to perform development operations on the Visual Workbench repository, PGMADMIN must grant them the necessary privileges. To do this, perform the following:
■ Ensure that the repository has a public status. It has this status if you created it by using Steps 1 through 6 of the pgvwbrepos.sql script. If you did not use Step 6, then rerun the script. When you get to Step 2 of the script, enter A at the prompt to upgrade the private repository to public status.
■ Use SQL*Plus to connect to the repository as user PGMADMIN and grant the PGMDEV role to each user. For example:
SQL> GRANT PGMDEV TO SCOTT;
Remove the Visual Workbench RepositoryTo remove a Visual Workbench repository on Oracle9i, use the repository script pgvwbremove.sql. To run this script, ensure that you are currently under the Oracle integrating server directory ORACLE_HOME\pg4mq\admin\repo (where you copied the scripts), and then enter:
sqlplus /nolog @pgvwbremove.sql

Installing the Visual Workbench Repository
Installation 5-7
The script takes you through the following steps:
Step 1: Enter the database connection informationUse the default of LOCAL by pressing Enter.
Next, you are prompted to enter the passwords for the SYSTEM, SYS, and PGMADMIN accounts of the Oracle integrating server. Press Enter after entering each password.
The script stops if any of the information is incorrect. Verify the information before rerunning the script.
Step 2: Check for existing Workbench repositoryEnter Y and press Enter for the prompt to remove public synonyms and development roles. This returns the repository to private status. You can exit the script now by entering N and pressing Enter, or you can proceed to the next prompt under this step.
If you are certain that you want to remove the private repository, then enter Y and press Enter. The script removes all repository tables and related packages.
Note: If you are removing the Visual Workbench Repository on Oracle8i or earlier, then you need to use pgvwbremove8.sql. All the examples in this section are provided with the assumption that you are installing on the current release.

Installing the Visual Workbench Repository
5-8 Oracle Procedural Gateway Visual Workbench for WebSphere MQ Installation and User's Guide
Using the Oracle Procedural Gateway Visual Workbench for WebSphere MQ 6-1
6Using the Oracle Procedural Gateway Visual
Workbench for WebSphere MQ
This chapter describes how to use the Oracle Procedural Gateway Visual Workbench for WebSphere MQ to connect to a PG4MQ Visual Workbench repository, create new data profiles, update and remove data profiles associated with an interface profile, create new message profiles, update and remove a message profile associated with an interface profile, create and update MIPs, test the message queuing gateway associated with a MIP, compile a MIP, use the MIP templates to test the generated MIP and the data conversion package, and prepare a MIP for production.
This chapter contains the following sections:
■ Overview of PG4MQ Visual Workbench Development
■ Starting the PG4MQ Visual Workbench and Connecting to a Repository
■ Creating a Data Profile
■ Updating a Data Profile
■ Creating a Message Queue Profile
■ Updating a Message Queue Profile
■ Removing a Message Queue Profile
■ Creating an Interface Profile and Generating a MIP
■ Testing the Gateway
■ Compiling the MIP
■ Using the MIP Templates
■ Preparing the MIP for Production
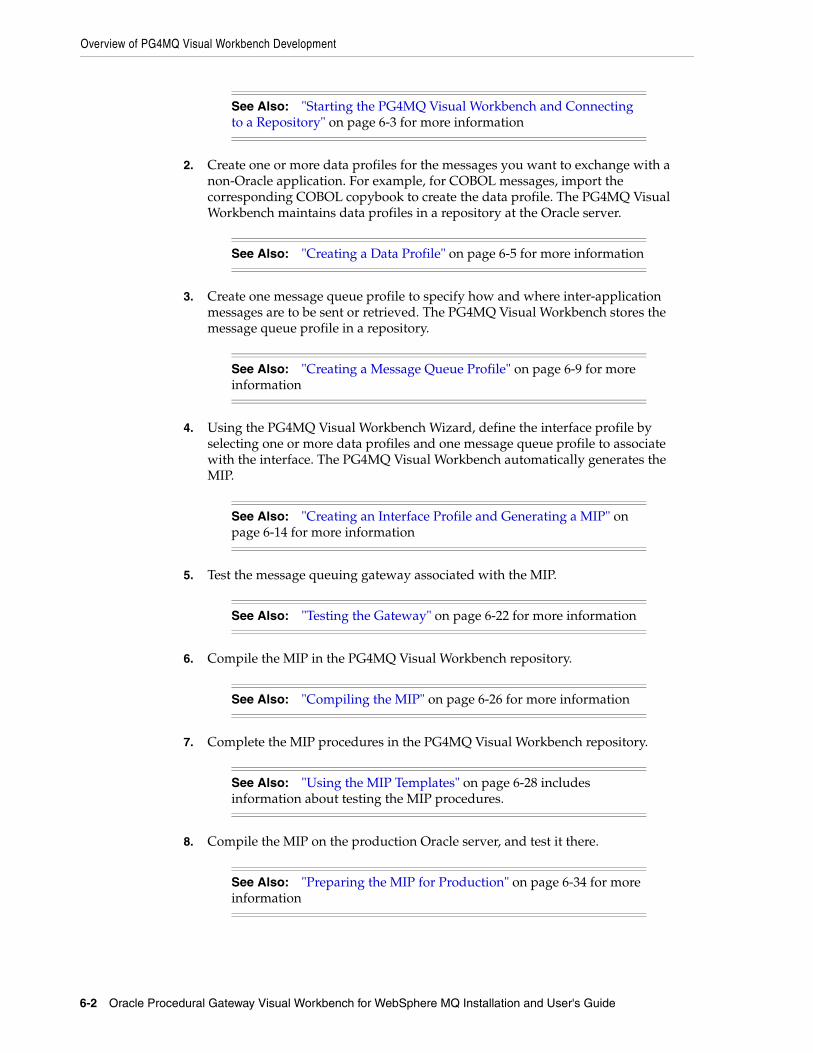
Overview of PG4MQ Visual Workbench DevelopmentDuring a typical PG4MQ Visual Workbench development session, you do the following:
1. Start the Oracle Procedural Gateway Visual Workbench for WebSphere MQ by double-clicking its icon in the Start menu list of programs in the Oracle for Microsoft Windows (32-bit) folder, then connect to the PG4MQ Visual Workbench for WebSphere MQ.
Overview of PG4MQ Visual Workbench Development
6-2 Oracle Procedural Gateway Visual Workbench for WebSphere MQ Installation and User's Guide
2. Create one or more data profiles for the messages you want to exchange with a non-Oracle application. For example, for COBOL messages, import the corresponding COBOL copybook to create the data profile. The PG4MQ Visual Workbench maintains data profiles in a repository at the Oracle server.
3. Create one message queue profile to specify how and where inter-application messages are to be sent or retrieved. The PG4MQ Visual Workbench stores the message queue profile in a repository.
4. Using the PG4MQ Visual Workbench Wizard, define the interface profile by selecting one or more data profiles and one message queue profile to associate with the interface. The PG4MQ Visual Workbench automatically generates the MIP.
5. Test the message queuing gateway associated with the MIP.
6. Compile the MIP in the PG4MQ Visual Workbench repository.
7. Complete the MIP procedures in the PG4MQ Visual Workbench repository.
8. Compile the MIP on the production Oracle server, and test it there.
See Also: "Starting the PG4MQ Visual Workbench and Connecting to a Repository" on page 6-3 for more information
See Also: "Creating a Data Profile" on page 6-5 for more information
See Also: "Creating a Message Queue Profile" on page 6-9 for more information
See Also: "Creating an Interface Profile and Generating a MIP" on page 6-14 for more information
See Also: "Testing the Gateway" on page 6-22 for more information
See Also: "Compiling the MIP" on page 6-26 for more information
See Also: "Using the MIP Templates" on page 6-28 includes information about testing the MIP procedures.
See Also: "Preparing the MIP for Production" on page 6-34 for more information
Starting the PG4MQ Visual Workbench and Connecting to a Repository
Using the Oracle Procedural Gateway Visual Workbench for WebSphere MQ 6-3
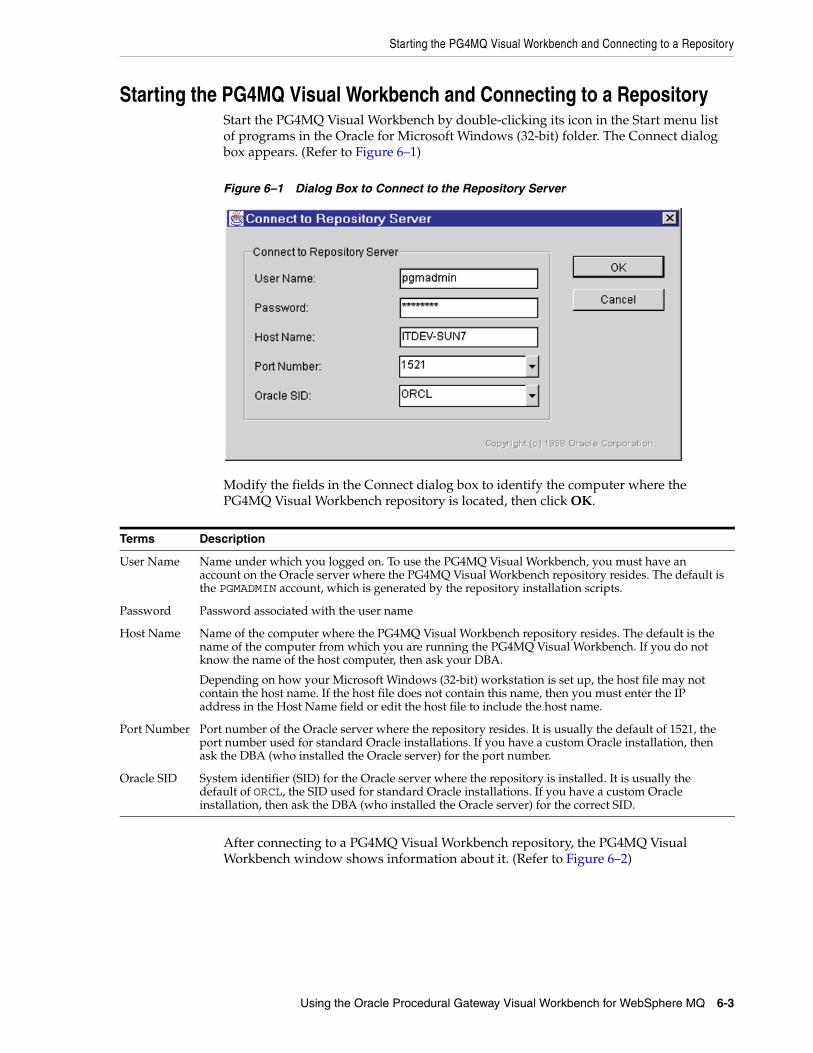
Starting the PG4MQ Visual Workbench and Connecting to a RepositoryStart the PG4MQ Visual Workbench by double-clicking its icon in the Start menu list of programs in the Oracle for Microsoft Windows (32-bit) folder. The Connect dialog box appears. (Refer to Figure 6–1)
Figure 6–1 Dialog Box to Connect to the Repository Server
Modify the fields in the Connect dialog box to identify the computer where the PG4MQ Visual Workbench repository is located, then click OK.
After connecting to a PG4MQ Visual Workbench repository, the PG4MQ Visual Workbench window shows information about it. (Refer to Figure 6–2)
Terms Description
User Name Name under which you logged on. To use the PG4MQ Visual Workbench, you must have an account on the Oracle server where the PG4MQ Visual Workbench repository resides. The default is the PGMADMIN account, which is generated by the repository installation scripts.
Password Password associated with the user name
Host Name Name of the computer where the PG4MQ Visual Workbench repository resides. The default is the name of the computer from which you are running the PG4MQ Visual Workbench. If you do not know the name of the host computer, then ask your DBA.
Depending on how your Microsoft Windows (32-bit) workstation is set up, the host file may not contain the host name. If the host file does not contain this name, then you must enter the IP address in the Host Name field or edit the host file to include the host name.
Port Number Port number of the Oracle server where the repository resides. It is usually the default of 1521, the port number used for standard Oracle installations. If you have a custom Oracle installation, then ask the DBA (who installed the Oracle server) for the port number.
Oracle SID System identifier (SID) for the Oracle server where the repository is installed. It is usually the default of ORCL, the SID used for standard Oracle installations. If you have a custom Oracle installation, then ask the DBA (who installed the Oracle server) for the correct SID.

Creating a Data Profile
6-4 Oracle Procedural Gateway Visual Workbench for WebSphere MQ Installation and User's Guide
Figure 6–2 PG4MQ Visual Workbench Repository Window
The example shows the expanded PG4MQ Visual Workbench repository directory tree and the General panel containing connect information and the repository's history of events. Select the Database tab to see information about the Oracle server where the PG4MQ Visual Workbench repository resides.
To connect to another repository, click the Open icon in the tool bar and enter the suitable connect information in the dialog box.
You can start actions in the PG4MQ Visual Workbench by clicking the suitable icons in the tool bar, or by opening the suitable drop-down list on the menu bar, then selecting a function from the menu. For example, to connect to a repository, you can open the File menu and select Open Repository.
Creating a Data ProfileAfter connecting to a PG4MQ Visual Workbench repository, create one or more data profiles. Data profiles define the data definitions that the PG4MQ Visual Workbench uses to map between non-Oracle data types and PL/SQL data types. The PG4MQ Visual Workbench maintains these definitions in the repository at the Oracle server.
For example, to create a COBOL data profile in a PG4MQ Visual Workbench repository:
1. Open the repository by double-clicking the repository icon or by clicking the plus sign next to the repository icon.
Creating a Data Profile
Using the Oracle Procedural Gateway Visual Workbench for WebSphere MQ 6-5
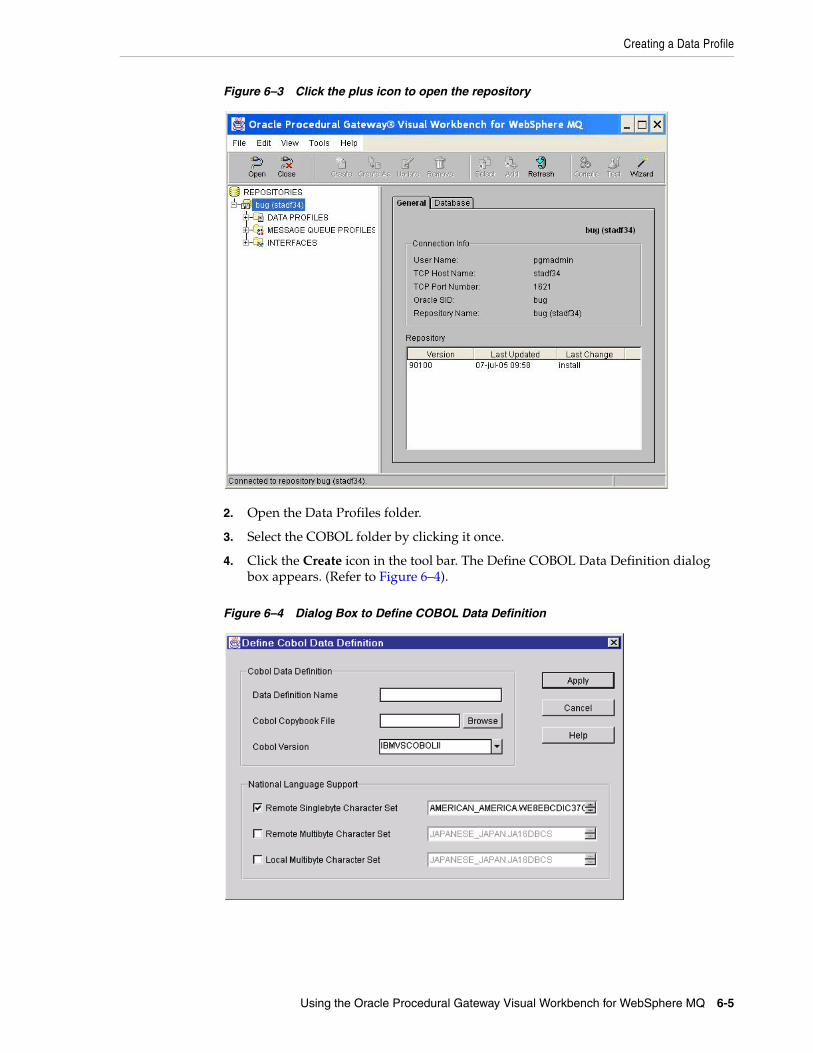
Figure 6–3 Click the plus icon to open the repository
2. Open the Data Profiles folder.
3. Select the COBOL folder by clicking it once.
4. Click the Create icon in the tool bar. The Define COBOL Data Definition dialog box appears. (Refer to Figure 6–4).
Figure 6–4 Dialog Box to Define COBOL Data Definition

Creating a Data Profile
6-6 Oracle Procedural Gateway Visual Workbench for WebSphere MQ Installation and User's Guide
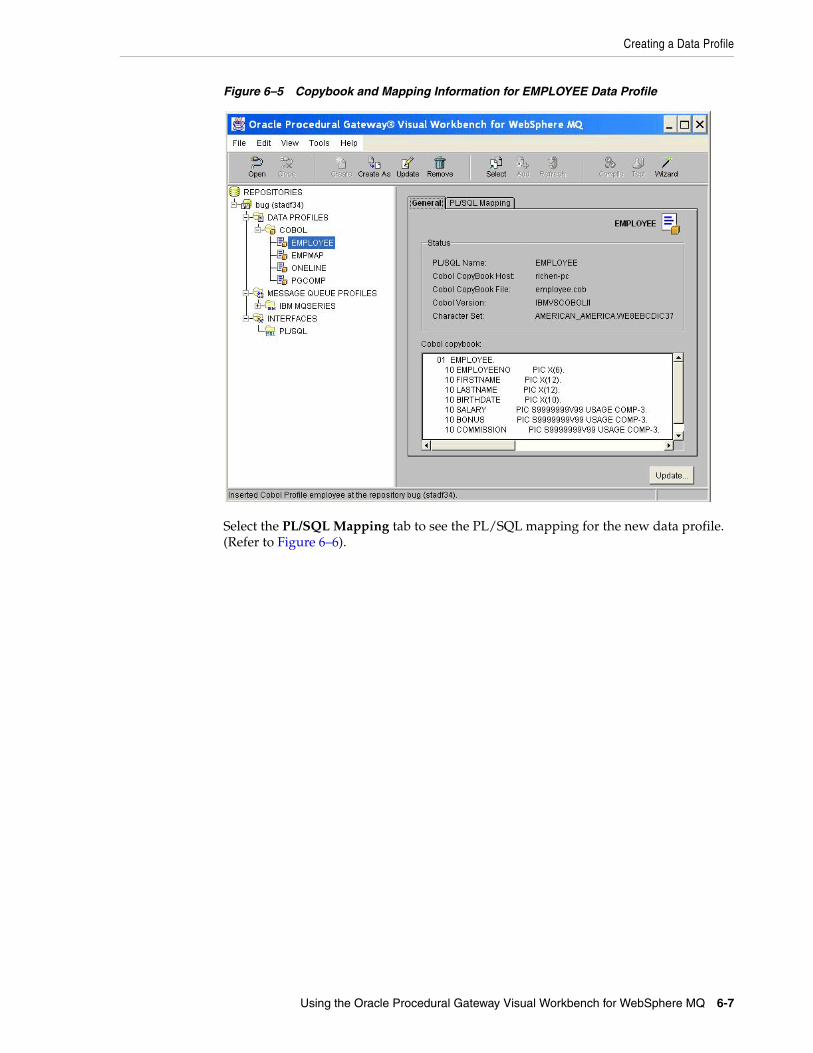
After entering the data definition information, click Apply. The PG4MQ Visual Workbench creates the data mapping to PL/SQL in the repository and displays the copybook and resulting mapping information.
The following example shows a newly created data profile named EMPLOYEE and its copybook file. (Refer to Figure 6–5).
Terms Description
Data Definition Name Name of the COBOL data definition to map to PL/SQL. The Data Definition Name:
■ Must be unique
■ Must be 1 to 22 characters in length
■ Can contain alphanumeric characters and the underscore (_) character
■ Is not case-sensitive
COBOL Copybook File Name of the COBOL copybook file containing the structure of the COBOL data definition. The PG4MQ Visual Workbench uses this file to determine the correct mapping to PL/SQL. Use Browse to search your local computer for copybook files. The sample copybook files are inORACLE_HOME\pg4mqvwb\demo\cobol, where ORACLE_HOME is the directory in which the PG4MQ Visual Workbench is installed. See Also: Chapter 5, "Installation" for more information.
COBOL Version Must be IBMVSCOBOLII
National Language Support Specifies the character sets for data conversion between the local and remote systems:
■ Remote Singlebyte Character Set specifies the Oracle national language support (NLS) name in which the remote system data for all single-byte character set fields are encoded. The default is AMERICAN_AMERICA.WE8EBCDIC37C, in the format language_territory.charset. If the remote system uses a different single-byte character set, then click Remote Singlebyte Character Set and select the appropriate set.
■ Remote Multibyte Character Set specifies the Oracle NLS name in which the remote system data for all multi-byte character set fields are encoded. The default is JAPANESE_JAPAN.JA16DBCS, in the format language_territory.charset. If the remote system uses a different multi-byte character set, then click Remote Multibyte Character Set and choose the appropriate set.
■ Local Multibyte Character Set specifies the Oracle NLS name in which the local system data for all multibyte character set fields are encoded. The default is JAPANESE_JAPAN.JA16DBCS, in the format language_territory.charset. If the local system uses a different multibyte character set, then click Local Multibyte Character Set and select the suitable set.
Creating a Data Profile
Using the Oracle Procedural Gateway Visual Workbench for WebSphere MQ 6-7
Figure 6–5 Copybook and Mapping Information for EMPLOYEE Data Profile
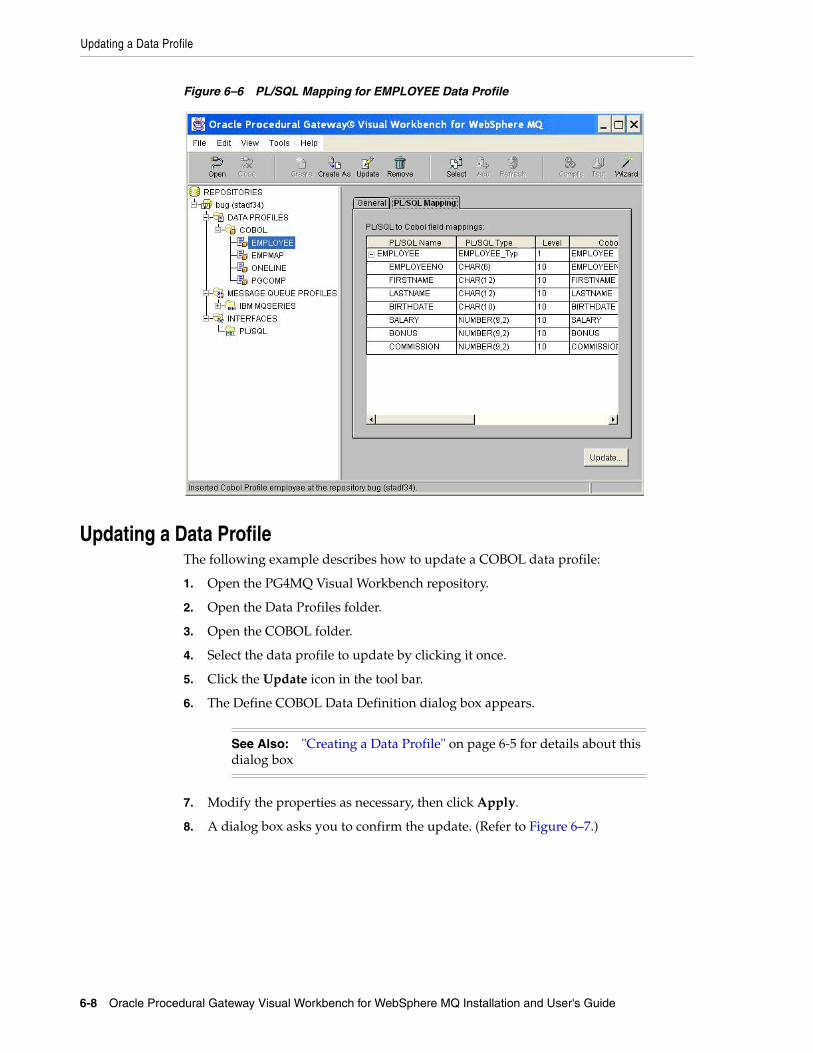
Select the PL/SQL Mapping tab to see the PL/SQL mapping for the new data profile. (Refer to Figure 6–6).
Updating a Data Profile
6-8 Oracle Procedural Gateway Visual Workbench for WebSphere MQ Installation and User's Guide
Figure 6–6 PL/SQL Mapping for EMPLOYEE Data Profile
Updating a Data ProfileThe following example describes how to update a COBOL data profile:
1. Open the PG4MQ Visual Workbench repository.
2. Open the Data Profiles folder.
3. Open the COBOL folder.
4. Select the data profile to update by clicking it once.
5. Click the Update icon in the tool bar.
6. The Define COBOL Data Definition dialog box appears.
7. Modify the properties as necessary, then click Apply.
8. A dialog box asks you to confirm the update. (Refer to Figure 6–7.)
See Also: "Creating a Data Profile" on page 6-5 for details about this dialog box

Creating a Message Queue Profile
Using the Oracle Procedural Gateway Visual Workbench for WebSphere MQ 6-9
Figure 6–7 Dialog Box to Update a Data Profile
9. Click OK to confirm the update.
Updating a data profile that is associated with an interface updates the interface profile and the generated MIP. Before updating the data profile, the PG4MQ Visual Workbench prompts you to confirm the change.
Removing a Data ProfileThis example tells how to remove a COBOL data profile:
1. Open the PG4MQ Visual Workbench repository.
2. Open the Data Profiles folder.
3. Open the COBOL folder.
4. Select the data profile to update by clicking it once.
5. Click the Remove icon in the tool bar.
6. A dialog box asks you to confirm the removal. (Refer to Figure 6–8.)
Figure 6–8 Dialog Box to Remove a Data Profile
7. Click OK to remove the data profile.
Removing a data profile that is associated with an interface removes the data profile both from that interface profile and from the generated MIP. Before removing the data profile, the PG4MQ Visual Workbench prompts you to confirm the removal.
Creating a Message Queue ProfileAfter connecting to a PG4MQ Visual Workbench repository and creating one or more data profiles, create a message queue profile. The message queue profile specifies how and where inter-application messages are to be sent and retrieved. The PG4MQ Visual Workbench maintains these definitions in the PG4MQ Visual Workbench repository at an Oracle server, where the message queuing system accesses it using a message queuing gateway.
For example, to create a message queue profile for a WebSphere MQ system:

Creating a Message Queue Profile
6-10 Oracle Procedural Gateway Visual Workbench for WebSphere MQ Installation and User's Guide
1. Open the PG4MQ Visual Workbench repository by double-clicking the repository icon or by clicking the plus sign next to the repository icon.
2. Open the Message Queue Profiles folder.
3. Select the WebSphere MQ folder by clicking it once.
4. Click the Create icon in the tool bar. The MQSeries Properties dialog box appears. (Refer to Figure 6–9.)
Figure 6–9 Dialog Box for MQSeries Properties
Message Queue Definitions
Profile Name Unique name you specify for this message queue definition. The Profile Name:
■ Must be unique
■ Can contain alphanumeric characters, plus the characters underscore (_), dollar sign ($), and number sign (#)
■ Is not case-sensitive
Queue Name Name of the message queue where messages are to be sent or retrieved. Queue Name is case-sensitive. You must enter the name in the correct case. Queue Name can be up to 48 characters long. The administrator who set up the message queuing system can supply this name.
Security ID Security identity associated with the application that is sending (enqueuing) the message. The security identity is an optional password that might be used between applications. If the sending application uses a security ID, then the message queuing system forwards it from the sending application to the retrieving (dequeuing) application. Security ID can be up to 12 characters long.
Message Options
Response Queue Name of the queue in which response messages are to be returned by the retrieving application. This queue name is forwarded by the message queuing system as is, from the enqueuing application to the dequeuing application.
The applications are responsible for usage of the specified response queue. Response Queue is case-sensitive and can be up to 48 characters long. A Response Queue must be specified if the Acknowledgment parameter is set to either Positive or Negative.
Creating a Message Queue Profile
Using the Oracle Procedural Gateway Visual Workbench for WebSphere MQ 6-11
Message Type Specifies an application-supplied, free-format description of the message forwarded by the message queuing system. Message Type indicators can be up to 8 characters long.
Priority Specifies the priority of the message for an ENQUEUE operation. Refer to the documentation for your message queuing system for a definition of priority, because definitions vary according to the message queuing system you are using.
For the WebSphere MQ product, the minimum value is 0, and the maximum value is 9. Default is the default for the queue, as specified by the message queuing system.
Expiration Specifies when the message expires, determining in seconds how long the message is available for dequeuing:
■ Never specifies that the message does not expire and is available on the queue for an unlimited time.
■ nn specifies the number of seconds the message remains on the queue. Depending on how the queues and the event handling of the message queuing system are configured, the message queuing system might place expired messages on dedicated event queues.
For the WebSphere MQ product, the minimum value is 1, and the maximum value is 231-1.
Acknowledgment Specifies whether the enqueuing application receives an acknowledgment when the dequeuing application retrieves a message:
■ None specifies no acknowledgment message.
■ Positive specifies that an acknowledgment message is provided both when a message is retrieved and when it is not retrieved.
■ Negative specifies that an acknowledgment message is provided only if the message is not retrieved.
The Acknowledgment message is delivered to the queue specified by the Response Queue parameter.
Delivery Mode Specifies whether messages are kept on the queue after a system failure:
■ Not Persistent specifies that the message is removed from the queue after a system failure. This is the default.
■ Persistent specifies that a message is kept on the queue after a system failure.
Enqueue Option
Visibility Specifies transaction behavior of the ENQUEUE requests:
■ On Commit specifies that the ENQUEUE is part of the current transaction. The operation is completed when the transaction commits. On Commit is the default.
■ Immediate specifies that the ENQUEUE is not part of the current transaction. The operation constitutes a transaction of its own.
Dequeue Option
Wait Interval Defines the time, in seconds for a DEQUEUE operation to wait if no message is available on the queue. For the WebSphere MQ product, the minimum value is 0, and the maximum value is 231-1.
■ Forever specifies that a DEQUEUE operation waits an unlimited time. Forever is the default.
■ No_Wait specifies that a DEQUEUE operation does not wait if no message is available.
■ nn specifies the wait time in seconds.
Visibility Specifies transaction behavior of the DEQUEUE requests:
■ On Commit specifies that the DEQUEUE is part of the current transaction. The operation is completed when the transaction commits. On Commit is the default.
■ Immediate specifies that the DEQUEUE is not part of the current transaction. The operation constitutes a transaction of its own.
Message Queue Definitions
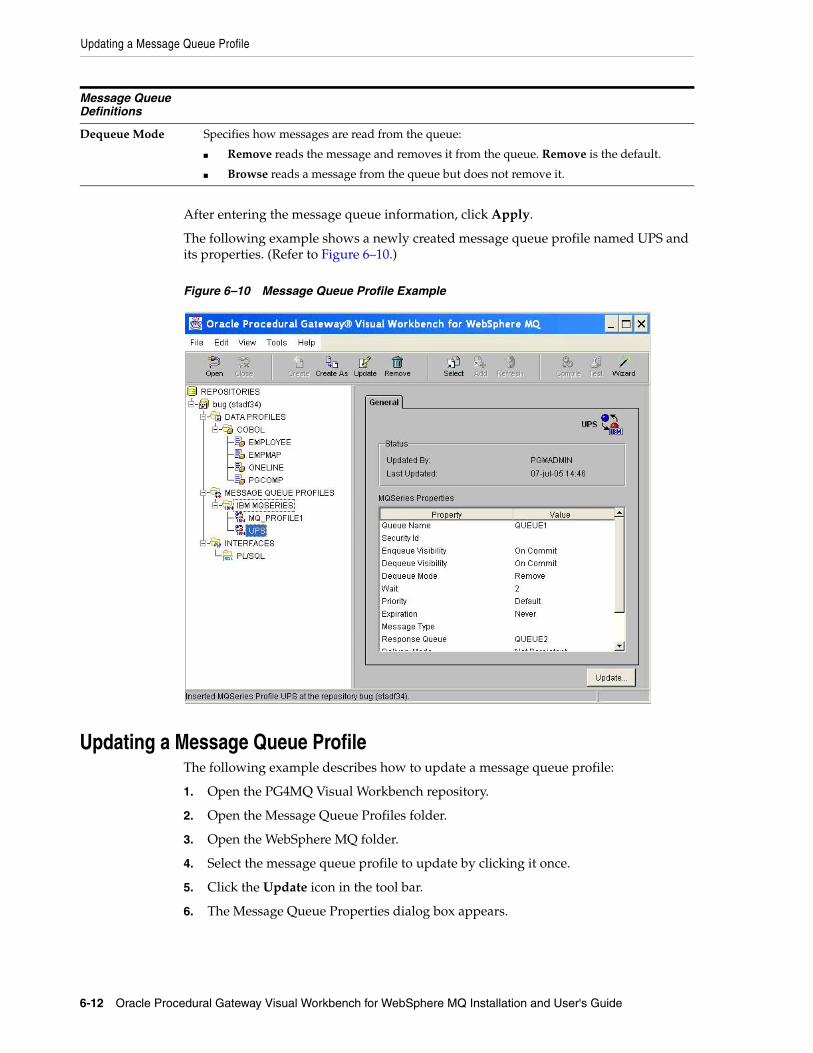
Updating a Message Queue Profile
6-12 Oracle Procedural Gateway Visual Workbench for WebSphere MQ Installation and User's Guide
After entering the message queue information, click Apply.
The following example shows a newly created message queue profile named UPS and its properties. (Refer to Figure 6–10.)
Figure 6–10 Message Queue Profile Example
Updating a Message Queue ProfileThe following example describes how to update a message queue profile:
1. Open the PG4MQ Visual Workbench repository.
2. Open the Message Queue Profiles folder.
3. Open the WebSphere MQ folder.
4. Select the message queue profile to update by clicking it once.
5. Click the Update icon in the tool bar.
6. The Message Queue Properties dialog box appears.
Dequeue Mode Specifies how messages are read from the queue:
■ Remove reads the message and removes it from the queue. Remove is the default.
■ Browse reads a message from the queue but does not remove it.
Message Queue Definitions
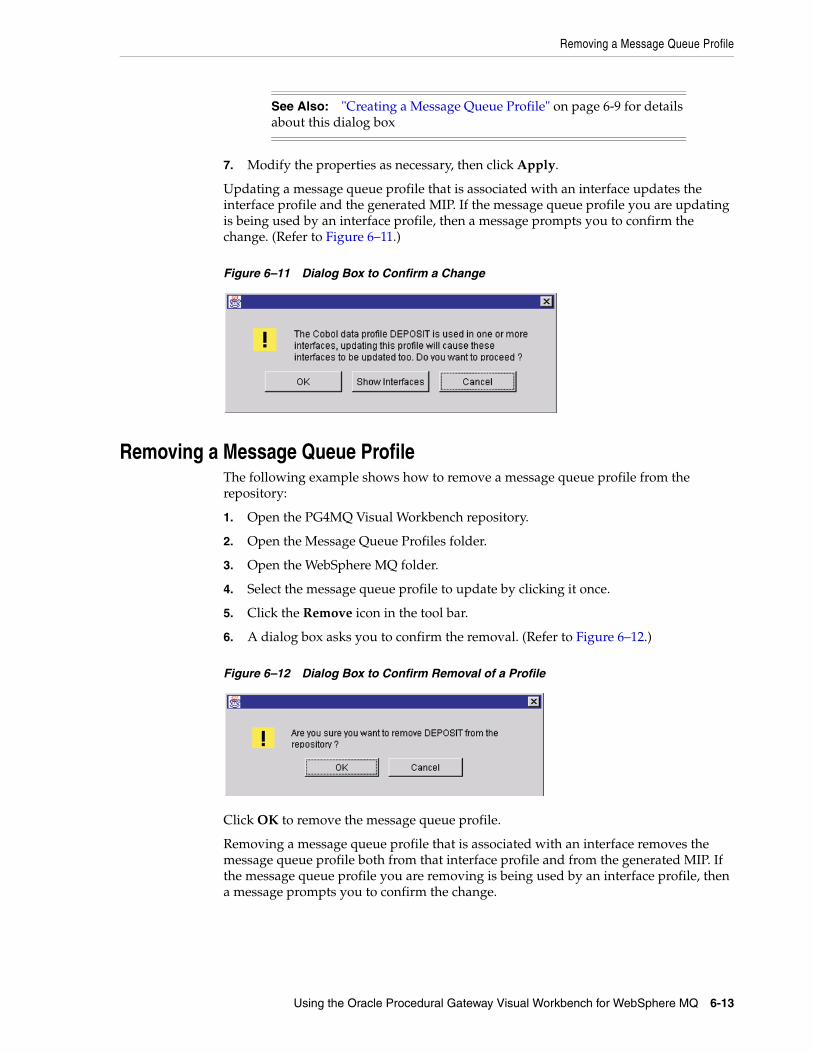
Removing a Message Queue Profile
Using the Oracle Procedural Gateway Visual Workbench for WebSphere MQ 6-13
7. Modify the properties as necessary, then click Apply.
Updating a message queue profile that is associated with an interface updates the interface profile and the generated MIP. If the message queue profile you are updating is being used by an interface profile, then a message prompts you to confirm the change. (Refer to Figure 6–11.)
Figure 6–11 Dialog Box to Confirm a Change
Removing a Message Queue ProfileThe following example shows how to remove a message queue profile from the repository:
1. Open the PG4MQ Visual Workbench repository.
2. Open the Message Queue Profiles folder.
3. Open the WebSphere MQ folder.
4. Select the message queue profile to update by clicking it once.
5. Click the Remove icon in the tool bar.
6. A dialog box asks you to confirm the removal. (Refer to Figure 6–12.)
Figure 6–12 Dialog Box to Confirm Removal of a Profile
Click OK to remove the message queue profile.
Removing a message queue profile that is associated with an interface removes the message queue profile both from that interface profile and from the generated MIP. If the message queue profile you are removing is being used by an interface profile, then a message prompts you to confirm the change.
See Also: "Creating a Message Queue Profile" on page 6-9 for details about this dialog box
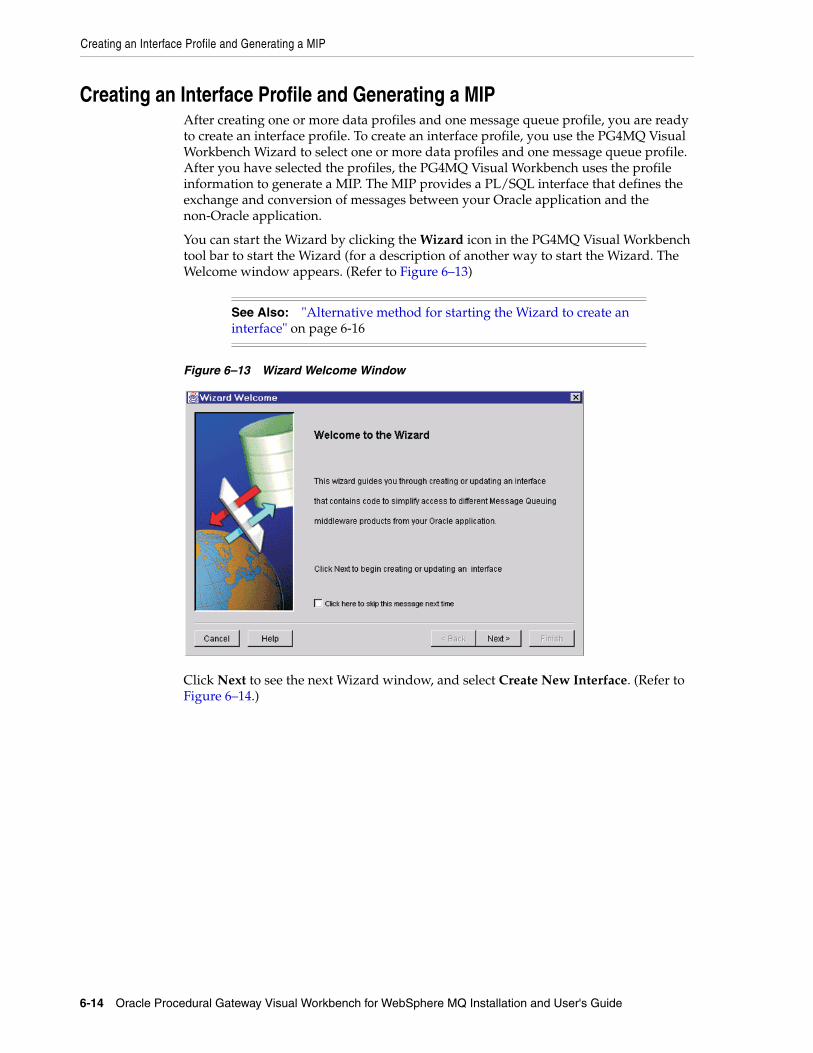
Creating an Interface Profile and Generating a MIP
6-14 Oracle Procedural Gateway Visual Workbench for WebSphere MQ Installation and User's Guide
Creating an Interface Profile and Generating a MIPAfter creating one or more data profiles and one message queue profile, you are ready to create an interface profile. To create an interface profile, you use the PG4MQ Visual Workbench Wizard to select one or more data profiles and one message queue profile. After you have selected the profiles, the PG4MQ Visual Workbench uses the profile information to generate a MIP. The MIP provides a PL/SQL interface that defines the exchange and conversion of messages between your Oracle application and the non-Oracle application.
You can start the Wizard by clicking the Wizard icon in the PG4MQ Visual Workbench tool bar to start the Wizard (for a description of another way to start the Wizard. The Welcome window appears. (Refer to Figure 6–13)
Figure 6–13 Wizard Welcome Window
Click Next to see the next Wizard window, and select Create New Interface. (Refer to Figure 6–14.)
See Also: "Alternative method for starting the Wizard to create an interface" on page 6-16
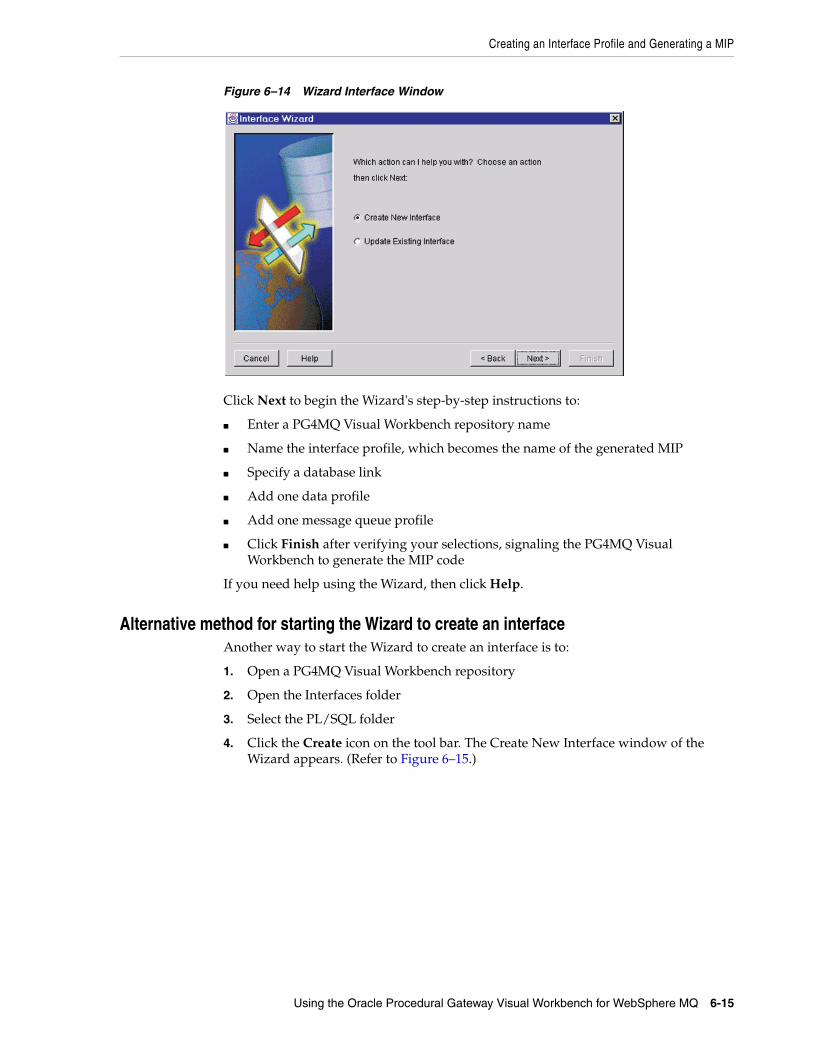
Creating an Interface Profile and Generating a MIP
Using the Oracle Procedural Gateway Visual Workbench for WebSphere MQ 6-15
Figure 6–14 Wizard Interface Window
Click Next to begin the Wizard's step-by-step instructions to:
■ Enter a PG4MQ Visual Workbench repository name
■ Name the interface profile, which becomes the name of the generated MIP
■ Specify a database link
■ Add one data profile
■ Add one message queue profile
■ Click Finish after verifying your selections, signaling the PG4MQ Visual Workbench to generate the MIP code
If you need help using the Wizard, then click Help.
Alternative method for starting the Wizard to create an interfaceAnother way to start the Wizard to create an interface is to:
1. Open a PG4MQ Visual Workbench repository
2. Open the Interfaces folder
3. Select the PL/SQL folder
4. Click the Create icon on the tool bar. The Create New Interface window of the Wizard appears. (Refer to Figure 6–15.)
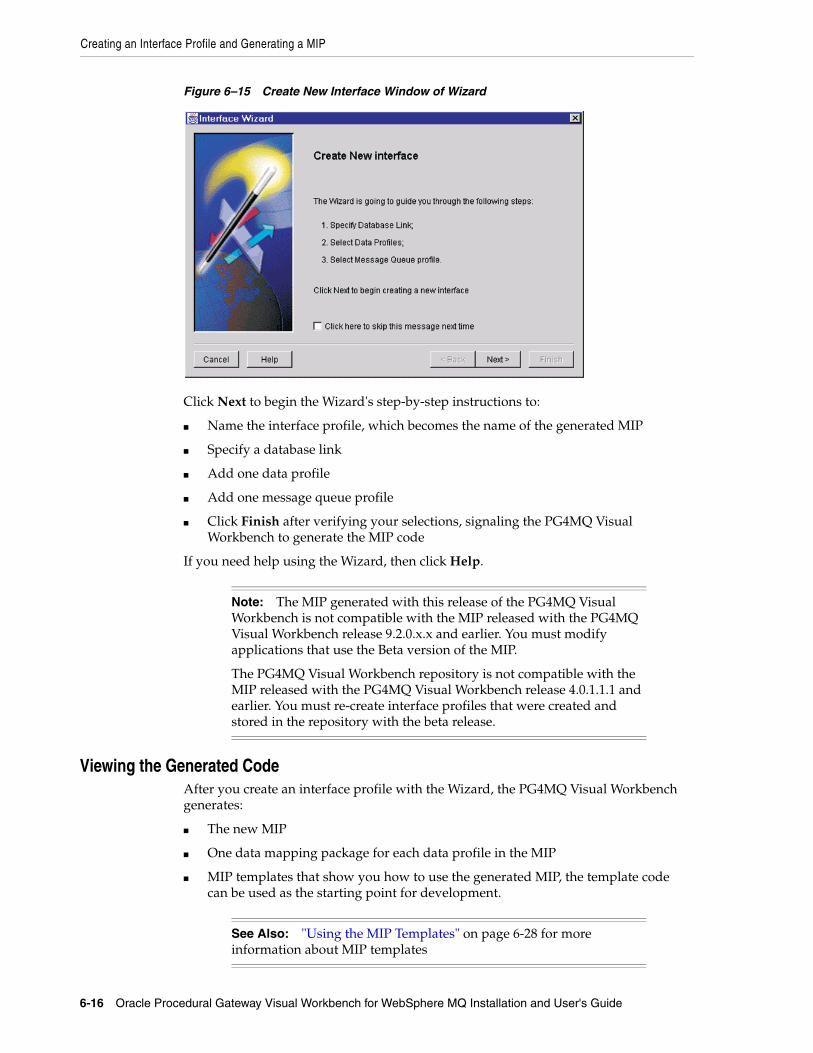
Creating an Interface Profile and Generating a MIP
6-16 Oracle Procedural Gateway Visual Workbench for WebSphere MQ Installation and User's Guide
Figure 6–15 Create New Interface Window of Wizard
Click Next to begin the Wizard's step-by-step instructions to:
■ Name the interface profile, which becomes the name of the generated MIP
■ Specify a database link
■ Add one data profile
■ Add one message queue profile
■ Click Finish after verifying your selections, signaling the PG4MQ Visual Workbench to generate the MIP code
If you need help using the Wizard, then click Help.
Viewing the Generated CodeAfter you create an interface profile with the Wizard, the PG4MQ Visual Workbench generates:
■ The new MIP
■ One data mapping package for each data profile in the MIP
■ MIP templates that show you how to use the generated MIP, the template code can be used as the starting point for development.
Note: The MIP generated with this release of the PG4MQ Visual Workbench is not compatible with the MIP released with the PG4MQ Visual Workbench release 9.2.0.x.x and earlier. You must modify applications that use the Beta version of the MIP.
The PG4MQ Visual Workbench repository is not compatible with the MIP released with the PG4MQ Visual Workbench release 4.0.1.1.1 and earlier. You must re-create interface profiles that were created and stored in the repository with the beta release.
See Also: "Using the MIP Templates" on page 6-28 for more information about MIP templates

Creating an Interface Profile and Generating a MIP
Using the Oracle Procedural Gateway Visual Workbench for WebSphere MQ 6-17
The following example shows generated code packages for a MIP named DO_DEPOSIT. (Refer to Figure 6–16.)
Figure 6–16 DO_DEPOSIT MIP Example
To see the MIP or template code, select the PL/SQL Code tab. Select an entry from the PL/SQL code list by clicking its name once, andthen clicking View Code.... The Code Viewer window appears.
The example shown in Figure 6–17 illustrates the MIP specification for the MIP named DO_DEPOSIT.
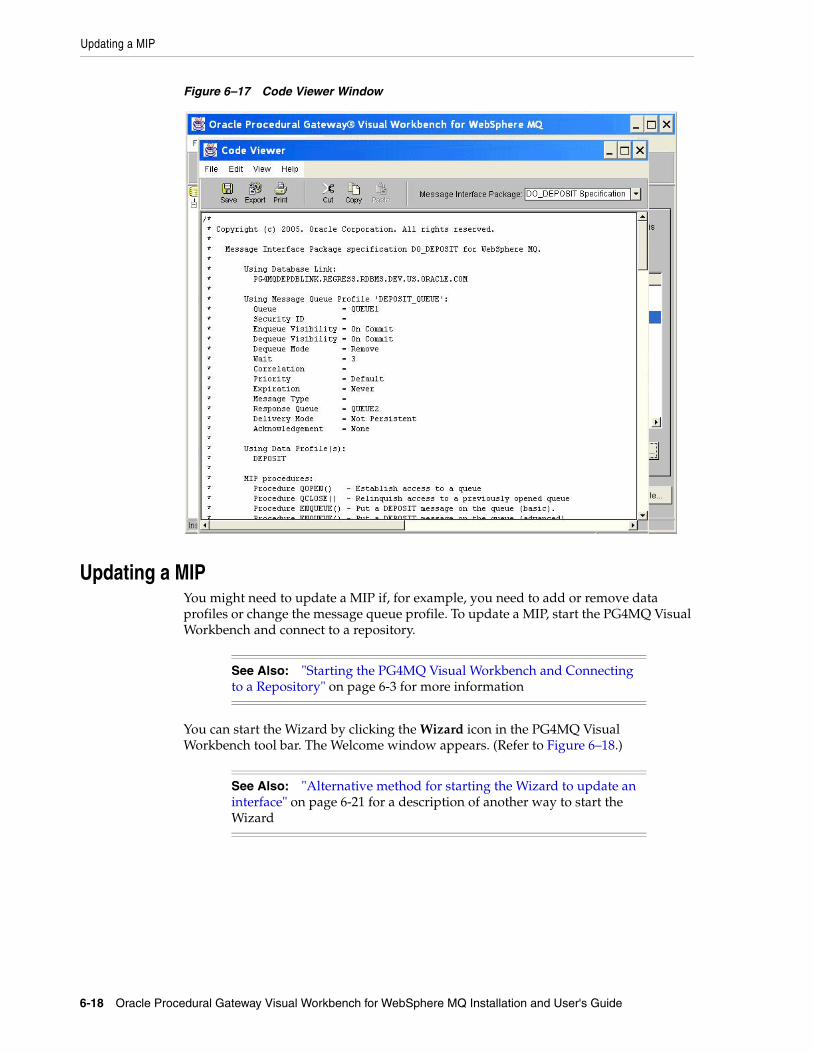
Updating a MIP
6-18 Oracle Procedural Gateway Visual Workbench for WebSphere MQ Installation and User's Guide
Figure 6–17 Code Viewer Window
Updating a MIPYou might need to update a MIP if, for example, you need to add or remove data profiles or change the message queue profile. To update a MIP, start the PG4MQ Visual Workbench and connect to a repository.
You can start the Wizard by clicking the Wizard icon in the PG4MQ Visual Workbench tool bar. The Welcome window appears. (Refer to Figure 6–18.)
See Also: "Starting the PG4MQ Visual Workbench and Connecting to a Repository" on page 6-3 for more information
See Also: "Alternative method for starting the Wizard to update an interface" on page 6-21 for a description of another way to start the Wizard

Updating a MIP
Using the Oracle Procedural Gateway Visual Workbench for WebSphere MQ 6-19
Figure 6–18 Wizard Welcome Window
Click Next to see the next Wizard window, and select Update Existing Interface (if you previously did not enable the Welcome window, then this is the first window you see). Refer to Figure 6–19.
Figure 6–19 Wizard Interface Window
Click Next to begin the Wizard's step-by-step instructions to:
■ Select the repository, programming language, and MIP to update
■ Specify another database link if necessary
■ Create a new data profile, or update the selected data profile as necessary
■ Create a new message queue profile, or update the selected message queue profile
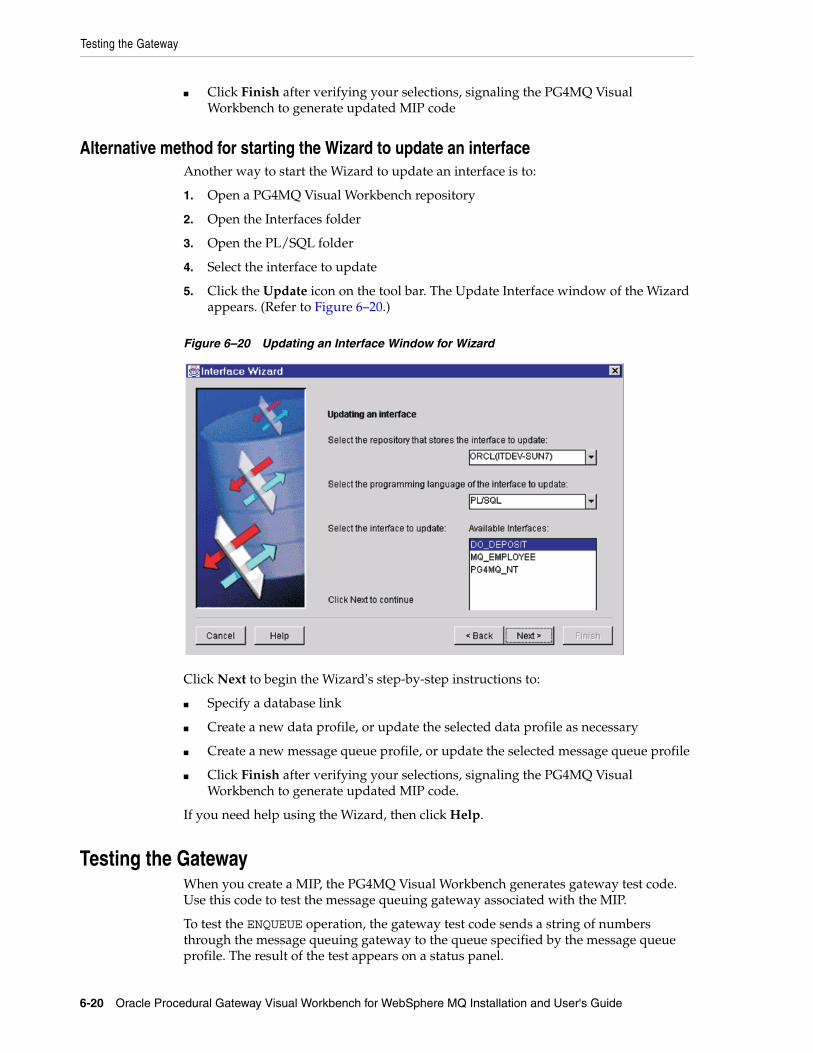
Testing the Gateway
6-20 Oracle Procedural Gateway Visual Workbench for WebSphere MQ Installation and User's Guide
■ Click Finish after verifying your selections, signaling the PG4MQ Visual Workbench to generate updated MIP code
Alternative method for starting the Wizard to update an interfaceAnother way to start the Wizard to update an interface is to:
1. Open a PG4MQ Visual Workbench repository
2. Open the Interfaces folder
3. Open the PL/SQL folder
4. Select the interface to update
5. Click the Update icon on the tool bar. The Update Interface window of the Wizard appears. (Refer to Figure 6–20.)
Figure 6–20 Updating an Interface Window for Wizard
Click Next to begin the Wizard's step-by-step instructions to:
■ Specify a database link
■ Create a new data profile, or update the selected data profile as necessary
■ Create a new message queue profile, or update the selected message queue profile
■ Click Finish after verifying your selections, signaling the PG4MQ Visual Workbench to generate updated MIP code.
If you need help using the Wizard, then click Help.
Testing the GatewayWhen you create a MIP, the PG4MQ Visual Workbench generates gateway test code. Use this code to test the message queuing gateway associated with the MIP.
To test the ENQUEUE operation, the gateway test code sends a string of numbers through the message queuing gateway to the queue specified by the message queue profile. The result of the test appears on a status panel.

Testing the Gateway
Using the Oracle Procedural Gateway Visual Workbench for WebSphere MQ 6-21
To test the DEQUEUE operation, the gateway test code tries to retrieve a message, through the gateway, from the message queue specified by the message queue profile. The result of the test appears on a status panel.
To test the gateway:
1. Open the PG4MQ Visual Workbench repository.
2. Open the Interfaces folder.
3. Open the PL/SQL folder.
4. Select a MIP by clicking it.
5. Click the Test icon in the tool bar or the Test button on a panel.
The Message Interface Package Tester dialog box appears. By default, the PG4MQ Visual Workbench runs the gateway test on the computer where the repository resides. To conduct the test on a different server, select the Connection tab and modify the connection information.
6. On the General panel, select Gateway ENQUEUE Operation. (Refer to Figure 6–21.)
Figure 6–21 Dialog Box for Message Interface Package Tester
7. Click Run Test. The Message Interface Package Tester shows the result of the test. The test fails if the database link is not set correctly, or if the gateway is not functioning properly.
Note: The gateway test code does not call the data conversion package or the MIP.
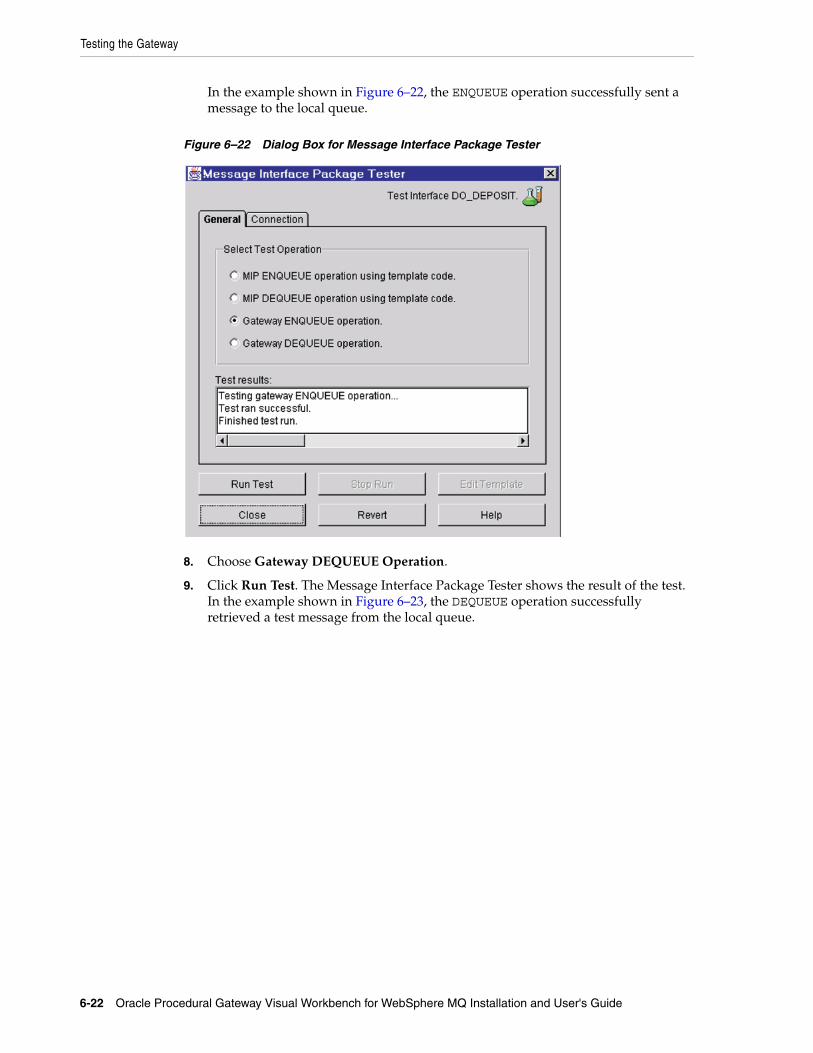
Testing the Gateway
6-22 Oracle Procedural Gateway Visual Workbench for WebSphere MQ Installation and User's Guide
In the example shown in Figure 6–22, the ENQUEUE operation successfully sent a message to the local queue.
Figure 6–22 Dialog Box for Message Interface Package Tester
8. Choose Gateway DEQUEUE Operation.
9. Click Run Test. The Message Interface Package Tester shows the result of the test. In the example shown in Figure 6–23, the DEQUEUE operation successfully retrieved a test message from the local queue.
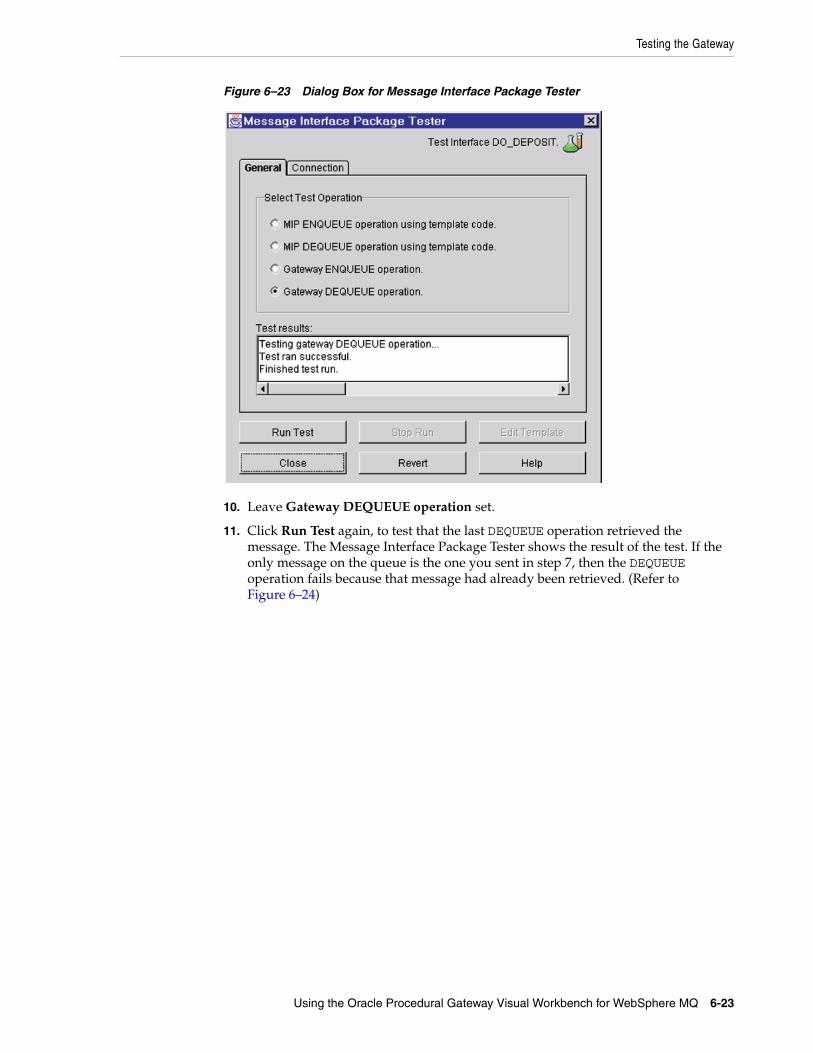
Testing the Gateway
Using the Oracle Procedural Gateway Visual Workbench for WebSphere MQ 6-23
Figure 6–23 Dialog Box for Message Interface Package Tester
10. Leave Gateway DEQUEUE operation set.
11. Click Run Test again, to test that the last DEQUEUE operation retrieved the message. The Message Interface Package Tester shows the result of the test. If the only message on the queue is the one you sent in step 7, then the DEQUEUE operation fails because that message had already been retrieved. (Refer to Figure 6–24)
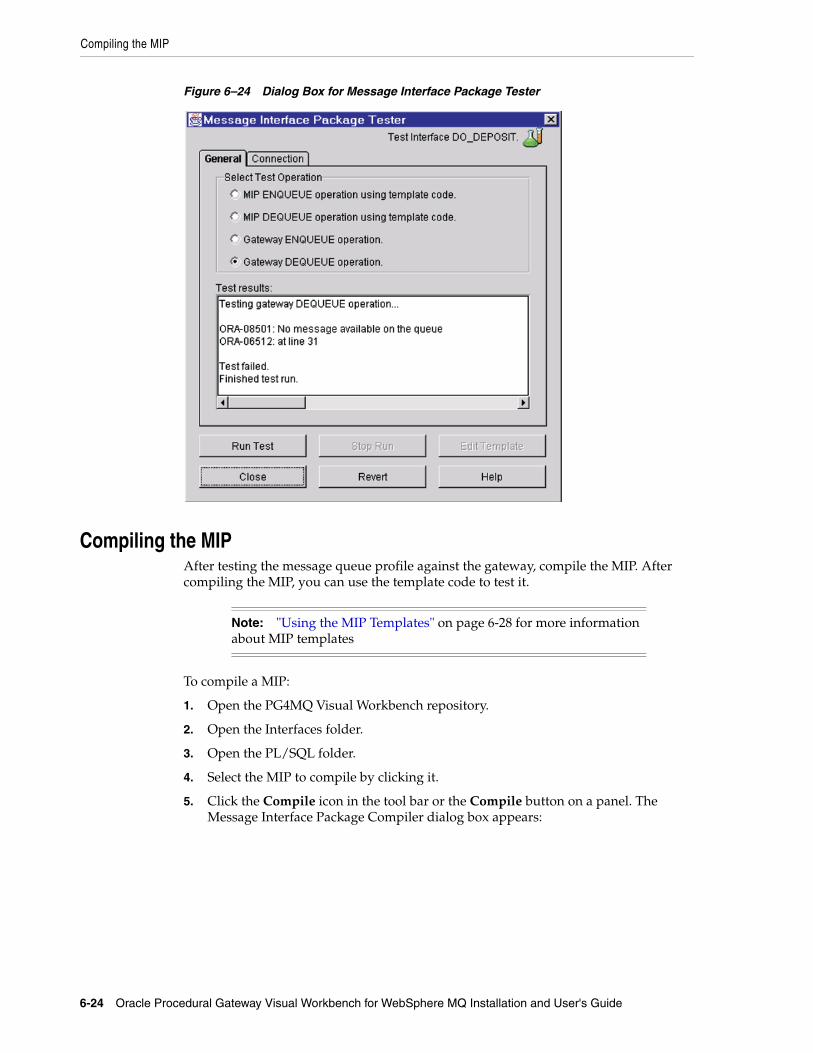
Compiling the MIP
6-24 Oracle Procedural Gateway Visual Workbench for WebSphere MQ Installation and User's Guide
Figure 6–24 Dialog Box for Message Interface Package Tester
Compiling the MIPAfter testing the message queue profile against the gateway, compile the MIP. After compiling the MIP, you can use the template code to test it.
To compile a MIP:
1. Open the PG4MQ Visual Workbench repository.
2. Open the Interfaces folder.
3. Open the PL/SQL folder.
4. Select the MIP to compile by clicking it.
5. Click the Compile icon in the tool bar or the Compile button on a panel. The Message Interface Package Compiler dialog box appears:
Note: "Using the MIP Templates" on page 6-28 for more information about MIP templates

Compiling the MIP
Using the Oracle Procedural Gateway Visual Workbench for WebSphere MQ 6-25
Figure 6–25 Dialog Box for Message Interface Package Compiler
By default, the PG4MQ Visual Workbench compiles the MIP on the Oracle server where the repository resides. Verify that the connection information is correct for the Oracle server on which you will compile the MIP, and modify it if necessary.
6. Select the Options tab if you want to set a compile option that removes generated packages if there are compile errors.
7. Click Compile. The Compilation Results window shows the progress of the compile. After the MIP is compiled with no errors, it is ready for use.
If the compile fails, then click Show Errors to see the list of compilation errors. Figure 6–26 shows the Error Messages dialog box.
See Also: "Using the MIP Templates" on page 6-28 and Chapter 5, "Installation" for more information
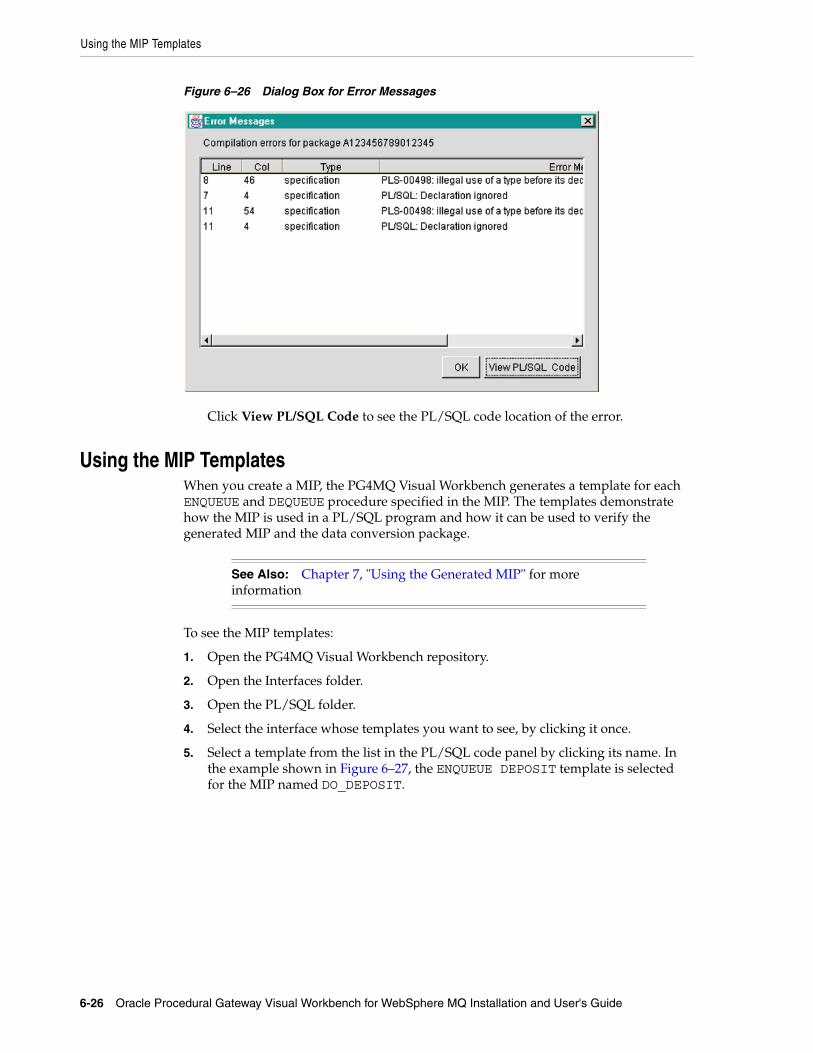
Using the MIP Templates
6-26 Oracle Procedural Gateway Visual Workbench for WebSphere MQ Installation and User's Guide
Figure 6–26 Dialog Box for Error Messages
Click View PL/SQL Code to see the PL/SQL code location of the error.
Using the MIP TemplatesWhen you create a MIP, the PG4MQ Visual Workbench generates a template for each ENQUEUE and DEQUEUE procedure specified in the MIP. The templates demonstrate how the MIP is used in a PL/SQL program and how it can be used to verify the generated MIP and the data conversion package.
To see the MIP templates:
1. Open the PG4MQ Visual Workbench repository.
2. Open the Interfaces folder.
3. Open the PL/SQL folder.
4. Select the interface whose templates you want to see, by clicking it once.
5. Select a template from the list in the PL/SQL code panel by clicking its name. In the example shown in Figure 6–27, the ENQUEUE DEPOSIT template is selected for the MIP named DO_DEPOSIT.
See Also: Chapter 7, "Using the Generated MIP" for more information
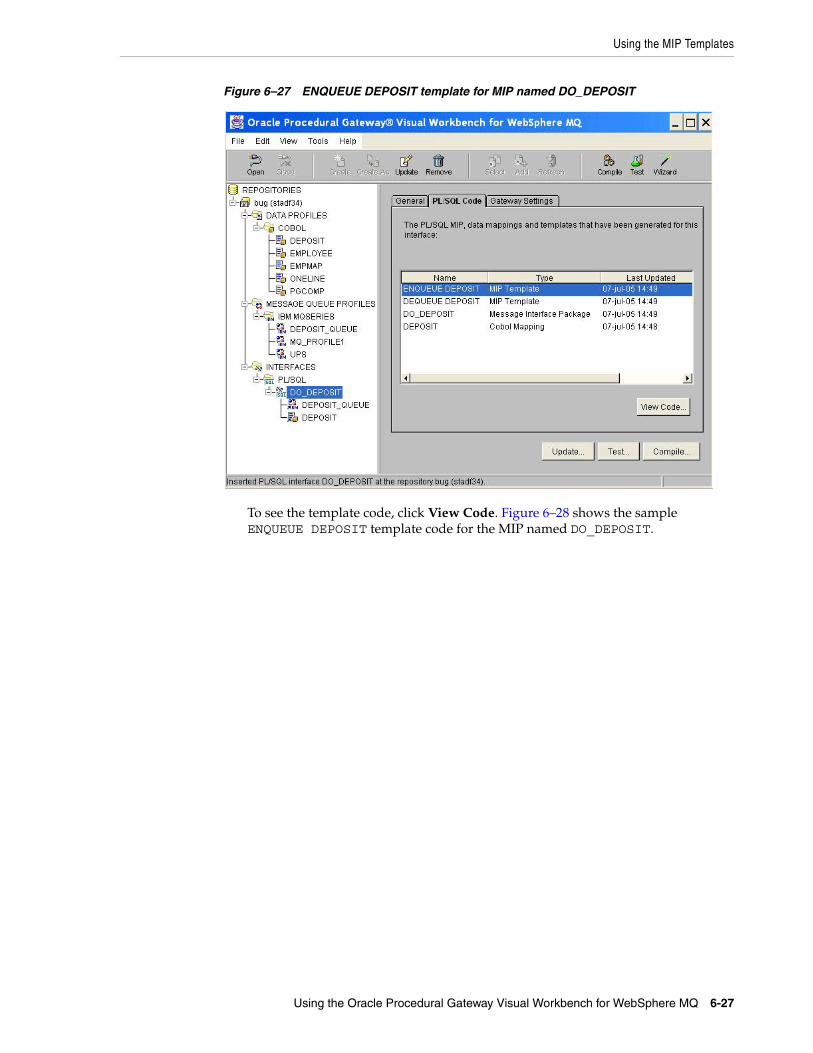
Using the MIP Templates
Using the Oracle Procedural Gateway Visual Workbench for WebSphere MQ 6-27
Figure 6–27 ENQUEUE DEPOSIT template for MIP named DO_DEPOSIT
To see the template code, click View Code. Figure 6–28 shows the sample ENQUEUE DEPOSIT template code for the MIP named DO_DEPOSIT.
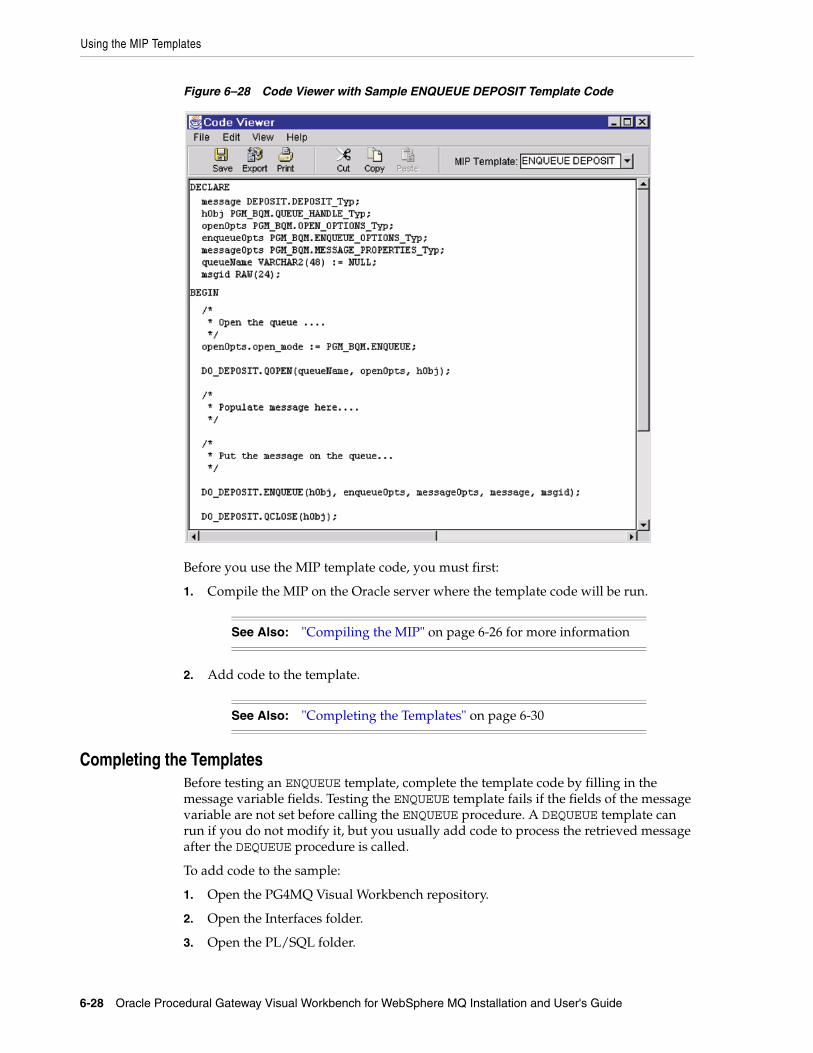
Using the MIP Templates
6-28 Oracle Procedural Gateway Visual Workbench for WebSphere MQ Installation and User's Guide
Figure 6–28 Code Viewer with Sample ENQUEUE DEPOSIT Template Code
Before you use the MIP template code, you must first:
1. Compile the MIP on the Oracle server where the template code will be run.
2. Add code to the template.
Completing the TemplatesBefore testing an ENQUEUE template, complete the template code by filling in the message variable fields. Testing the ENQUEUE template fails if the fields of the message variable are not set before calling the ENQUEUE procedure. A DEQUEUE template can run if you do not modify it, but you usually add code to process the retrieved message after the DEQUEUE procedure is called.
To add code to the sample:
1. Open the PG4MQ Visual Workbench repository.
2. Open the Interfaces folder.
3. Open the PL/SQL folder.
See Also: "Compiling the MIP" on page 6-26 for more information
See Also: "Completing the Templates" on page 6-30
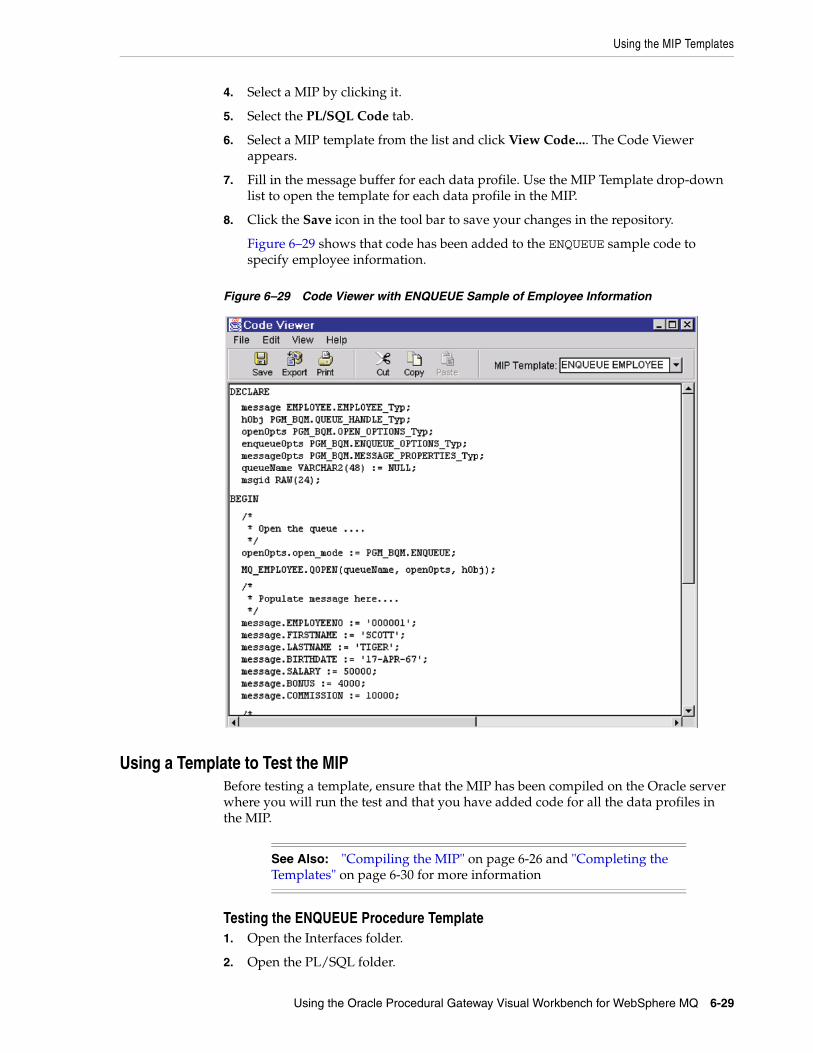
Using the MIP Templates
Using the Oracle Procedural Gateway Visual Workbench for WebSphere MQ 6-29
4. Select a MIP by clicking it.
5. Select the PL/SQL Code tab.
6. Select a MIP template from the list and click View Code.... The Code Viewer appears.
7. Fill in the message buffer for each data profile. Use the MIP Template drop-down list to open the template for each data profile in the MIP.
8. Click the Save icon in the tool bar to save your changes in the repository.
Figure 6–29 shows that code has been added to the ENQUEUE sample code to specify employee information.
Figure 6–29 Code Viewer with ENQUEUE Sample of Employee Information
Using a Template to Test the MIPBefore testing a template, ensure that the MIP has been compiled on the Oracle server where you will run the test and that you have added code for all the data profiles in the MIP.
Testing the ENQUEUE Procedure Template1. Open the Interfaces folder.
2. Open the PL/SQL folder.
See Also: "Compiling the MIP" on page 6-26 and "Completing the Templates" on page 6-30 for more information

Using the MIP Templates
6-30 Oracle Procedural Gateway Visual Workbench for WebSphere MQ Installation and User's Guide
3. Select a MIP by clicking it.
4. Click the Test icon on the tool bar or the Test... button on a panel. The Message Interface Package Tester dialog box appears. By default, the PG4MQ Visual Workbench runs the test on the Oracle server where the repository resides. To conduct the test on a different server, select the Connection tab and modify the connection information.
5. On the General panel, choose MIP ENQUEUE operation using template code. (Refer to Figure 6–30.)
Figure 6–30 Dialog Box for Message Interface Package Tester
6. Click Run Test. When the test completes, the results appear in the Test Results window. To see the test code for details of the test, click Edit Code.
Testing the DEQUEUE Procedure Template1. Open the Interfaces folder.
2. Open the PL/SQL folder.
3. Select a MIP by clicking it.
4. Click the Test icon on the tool bar or the Test... button on a panel. The Message Interface Package Tester dialog box appears. By default, the PG4MQ Visual Workbench runs the test on the Oracle server where the repository resides. To conduct the test on a different server, select the Connection tab and modify the connection information.
On the General panel, choose MIP DEQUEUE operation using template code, as illustrated in Figure 6–31.
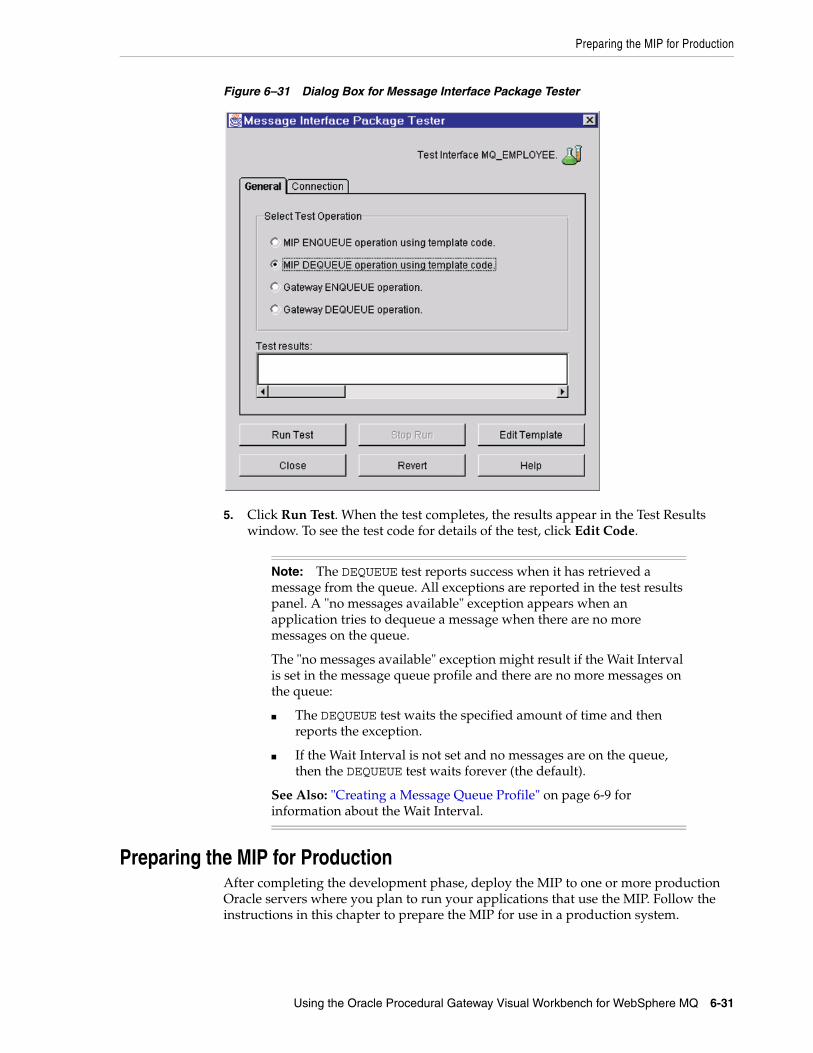
Preparing the MIP for Production
Using the Oracle Procedural Gateway Visual Workbench for WebSphere MQ 6-31
Figure 6–31 Dialog Box for Message Interface Package Tester
5. Click Run Test. When the test completes, the results appear in the Test Results window. To see the test code for details of the test, click Edit Code.
Preparing the MIP for ProductionAfter completing the development phase, deploy the MIP to one or more production Oracle servers where you plan to run your applications that use the MIP. Follow the instructions in this chapter to prepare the MIP for use in a production system.
Note: The DEQUEUE test reports success when it has retrieved a message from the queue. All exceptions are reported in the test results panel. A "no messages available" exception appears when an application tries to dequeue a message when there are no more messages on the queue.
The "no messages available" exception might result if the Wait Interval is set in the message queue profile and there are no more messages on the queue:
■ The DEQUEUE test waits the specified amount of time and then reports the exception.
■ If the Wait Interval is not set and no messages are on the queue, then the DEQUEUE test waits forever (the default).
See Also: "Creating a Message Queue Profile" on page 6-9 for information about the Wait Interval.
Preparing the MIP for Production
6-32 Oracle Procedural Gateway Visual Workbench for WebSphere MQ Installation and User's Guide
Before You Compile the MIP on the Production Oracle ServerYou must compile the MIP on the Oracle production server before your applications can use the MIP. The following requirements must be met before you compile a MIP at the production Oracle server:
■ A SQL*Net listener for the production Oracle server must be running. Refer to your Oracle SQL*Net documentation for information.
■ The tnsnames.ora file on the production Oracle server must contain an entry specifying the procedural gateway. Refer to the gateway installation guide for your platform for information.
■ A database link to the procedural gateway must be created at the production Oracle server to match the name of the database link that was used when you defined the interface profile for the MIP. Refer to the gateway installation guide for your platform for information about creating database links.
■ The PL/SQL packages DBMS_OUTPUT, DBMS_PIPE and UTL_RAW must exist in the production Oracle server. If they are not present, then see your DBA about installing these packages.
■ The PL/SQL packages PGM, PGM_BQM, PGM_SUP, and UTL_PG are also required in the production Oracle server. If they are not present, then run the deployment script on the production Oracle server before compiling the MIP.
If any of these requirements are not met, then the PG4MQ Visual Workbench reports an error when you try to compile.
Compiling the MIP for the Production Oracle ServerWhen you compile the MIP for a production Oracle server, the PG4MQ Visual Workbench reads the MIP code from the repository, establishes a connection with the designated production Oracle server, compiles the MIP, and stores the compiled MIP as an object in the production Oracle server.
To compile the MIP for the production system server:
1. Open the PG4MQ Visual Workbench repository.
2. Open the Interfaces folder.
3. Open the PL/SQL folder.
4. Select the MIP to compile by clicking it.
5. Click the Compile icon in the tool bar or the Compile button on a panel. The Message Interface Package Compiler dialog box appears ("Compiling the MIP" on page 6-26 shows this dialog box).
6. Change the User Name, Password, Host Name, Port Number, and SID fields to specify the production Oracle server.
7. Decide if you want to grant execution privileges to other Oracle users for this MIP before you compile or after you compile the MIP:
See Also: Appendix A, "Preparing the Production Oracle Server" for more information

Preparing the MIP for Production
Using the Oracle Procedural Gateway Visual Workbench for WebSphere MQ 6-33
■ Grant before compiling: Select the Options tab of the Message Interface Package Compiler dialog box and select the Grant public access to the packages option. Go to step 8.
■ Grant after compiling: Continue to step 8 to compile the MIP.
8. Click Compile.
Granting Execution Privileges to a MIPThe MIP packages are compiled on the production Oracle server in the schema of the user specified with the connection information. If the compiled MIP packages are used by other Oracle users, or by applications that are run by another user, then you must grant execution privileges to those users.
You can grant execution privileges during the MIP compilation procedure as described under "Compiling the MIP for the Production Oracle Server" on page 6-35 or use the GRANT statement at the computer where the production Oracle server resides. GRANT has this syntax:
GRANT EXECUTE ON MIP_name TO {user_name | PUBLIC}
Testing the MIP on a Production SystemAfter you have successfully compiled the MIP on a production Oracle server, you can test it there. The PG4MQ Visual Workbench reads the test code package from the PG4MQ Visual Workbench repository and runs it on the production system.
Modify the connection information in the Message Interface Package Tester dialog box to specify the production Oracle server for the test, instead of using the default Oracle server where the repository resides.
See Also: "Granting Execution Privileges to a MIP" on page 6-35 for more information
See Also: Oracle Database SQL Reference for more information about GRANT
See Also: "Testing the Gateway" on page 6-22 for information about navigating to the Message Interface Package Tester dialog box
See Also: "Using a Template to Test the MIP" on page 6-31 for instructions on running the test

Preparing the MIP for Production
6-34 Oracle Procedural Gateway Visual Workbench for WebSphere MQ Installation and User's Guide
Using the Generated MIP 7-1
7Using the Generated MIP
This chapter describes the contents of a MIP specification, the MIP procedures, examples of how to use a MIP in an Oracle application, the contents, and use of the data conversion package.
This chapter contains the following sections:
■ About the Message Interface Package (MIP)
■ MIP Procedures
■ QOPEN Procedure
■ QCLOSE Procedure
■ ENQUEUE Procedure
■ DEQUEUE Procedure
■ Type Definitions
■ MESSAGE_PROPERTIES_Typ
■ PGM_BQM Package
■ Using the MIP for WebSphere MQ
■ Data Conversion Package
■ COBOL Data Type Conversion
■ COBOL Format Conversion
■ PL/SQL Naming Algorithm
About the Message Interface Package (MIP)A MIP is a PL/SQL package that provides a high-level interface for Oracle applications to communicate with non-Oracle message queuing systems. Every time you create or update an interface profile, the Visual Workbench generates a MIP from the interface profile information you supply.
Note: "Creating Interface Profiles and Generating the MIP" on page 1-4 for more information

About the Message Interface Package (MIP)
7-2 Oracle Procedural Gateway Visual Workbench for WebSphere MQ Installation and User's Guide
What's in a MIP?A MIP contains the code needed to interact with the message queuing system:
■ The database link connects the MIP to a procedural gateway that can communicate with a non-Oracle message queuing system. The MIP includes all the code needed to communicate with the gateway.
■ A data profile defines the data types for messages exchanged between the Oracle and non-Oracle applications. The Visual Workbench generates data-mapping code according to these definitions, and the MIP calls this code to convert messages.
■ The message queue profile describes message properties and queuing operations. The MIP translates the properties and operations into gateway calls that control the message queuing system when sending or retrieving messages.
The MIP contains four interface procedures that can be called from any Oracle application: QOPEN, ENQUEUE, DEQUEUE, and QCLOSE.
Each data profile attached to the MIP has its own set of ENQUEUE and DEQUEUE procedures in the MIP. The ENQUEUE procedure takes a message on input, formatted according to the PL/SQL type created for the data profile. The DEQUEUE procedure delivers a message as output, formatted according to the PL/SQL type created for the data profile.
QOPEN and QCLOSEQOPEN opens a specified queue. You must call QOPEN before calling the advanced ENQUEUE and DEQUEUE procedures.
QCLOSE closes an open queue. You must call QCLOSE after processing messages with the advanced ENQUEUE and DEQUEUE procedures.
Note: The MIP described in this chapter is not compatible with the MIP released with the Visual Workbench release 4.0.1.1.1 and earlier. You must modify applications that use the beta version of the MIP.
The Visual Workbench repository is not compatible with the MIP released with the Visual Workbench release 4.0.1.1.1 and earlier. You must re-create interface profiles that were created with the beta release.
See Also: "Data Conversion Package" on page 7-19 for more information about data profiles and data mapping
Note: "MIP Procedures" on page 7-6 for more information
See Also: "Type Definitions" on page 7-14 for more information
See Also: "QCLOSE Procedure" on page 7-7 for more information

About the Message Interface Package (MIP)
Using the Generated MIP 7-3
ENQUEUE and DEQUEUEThe ENQUEUE procedure ends a message to the queue specified in the message queue profile.
The DEQUEUE procedure retrieves a message from the previously opened queue.
The MIP contains a basic and an advanced version of the ENQUEUE and DEQUEUE procedures for each data profile associated with the MIP:
■ The basic version takes all options and properties from the message queue profile. It requires one argument, a message-content buffer identified as payload, in the syntax described in this chapter.
■ The advanced version has additional parameters that let the calling application control how to send or retrieve a message. The calling application can override the options and properties specified in the message queue profile and can set other options.
Each data profile attached to the MIP has its own set of ENQUEUE and DEQUEUE procedures in the MIP. The ENQUEUE procedure takes a message on input, formatted according to the PL/SQL type created for the data profile. The DEQUEUE procedure delivers a message as output, formatted according to the PL/SQL type created for the data profile.
MIP Specification ExampleThis example shows a MIP specification generated for the interface profile named HIRE, a message queue profile named HR that is configured for WebSphere MQ, and a data profile named EMPLOYEE:
/* * Copyright (c) 1999. Oracle Corporation. All rights reserved. * * Message Interface Package specification HIRE for WebSphere MQ. * * Using Database Link: * GTWMQ.WORLD * * Using Message Queue Profile 'HR': * Queue = QUEUE1 * Security ID = * Enqueue Visibility = On Commit * Dequeue Visibility = On Commit * Dequeue Mode = Remove * Wait = No Wait * Correlation = * Priority = Default * Expiration = Never * Message Type = * Response Queue = QUEUE1 * Delivery Mode = Not Persistent * Acknowledgement = None
See Also: "ENQUEUE Procedure" on page 7-7 for more information
See Also: "DEQUEUE Procedure" on page 7-11 for more information
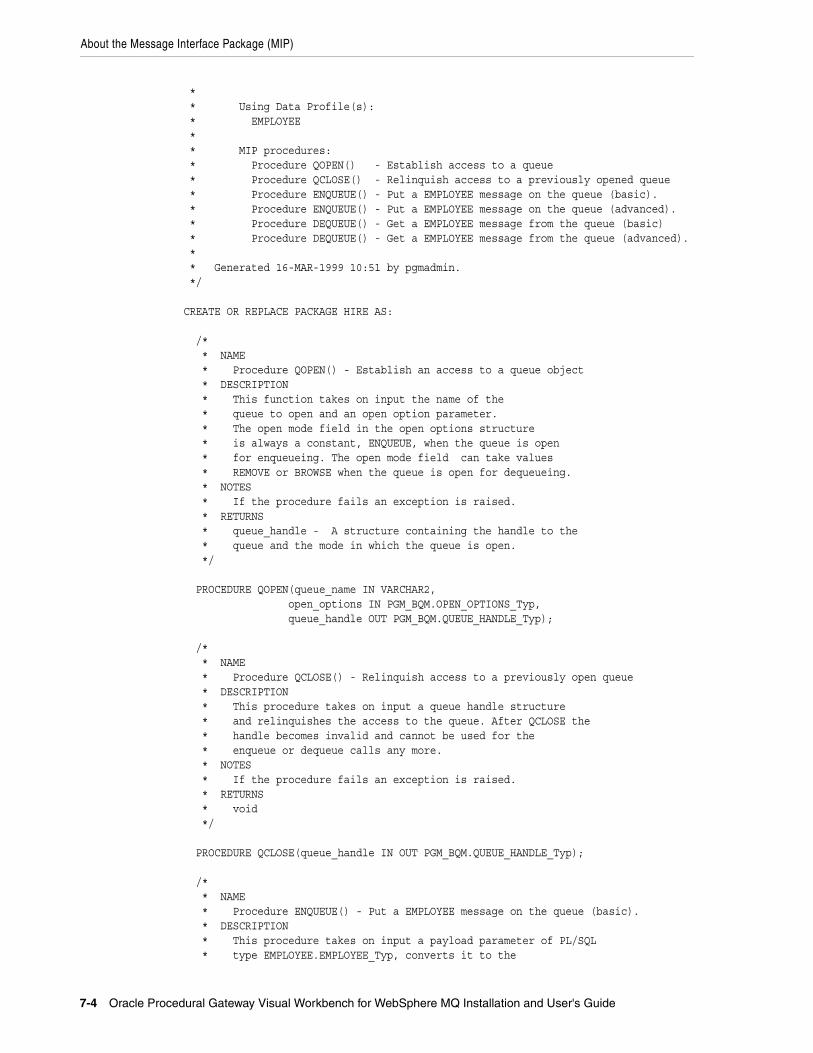
About the Message Interface Package (MIP)
7-4 Oracle Procedural Gateway Visual Workbench for WebSphere MQ Installation and User's Guide
* * Using Data Profile(s): * EMPLOYEE * * MIP procedures: * Procedure QOPEN() - Establish access to a queue * Procedure QCLOSE() - Relinquish access to a previously opened queue * Procedure ENQUEUE() - Put a EMPLOYEE message on the queue (basic). * Procedure ENQUEUE() - Put a EMPLOYEE message on the queue (advanced). * Procedure DEQUEUE() - Get a EMPLOYEE message from the queue (basic) * Procedure DEQUEUE() - Get a EMPLOYEE message from the queue (advanced). * * Generated 16-MAR-1999 10:51 by pgmadmin. */ CREATE OR REPLACE PACKAGE HIRE AS: /* * NAME * Procedure QOPEN() - Establish an access to a queue object * DESCRIPTION * This function takes on input the name of the * queue to open and an open option parameter. * The open mode field in the open options structure * is always a constant, ENQUEUE, when the queue is open * for enqueueing. The open mode field can take values * REMOVE or BROWSE when the queue is open for dequeueing. * NOTES * If the procedure fails an exception is raised. * RETURNS * queue_handle - A structure containing the handle to the * queue and the mode in which the queue is open. */ PROCEDURE QOPEN(queue_name IN VARCHAR2, open_options IN PGM_BQM.OPEN_OPTIONS_Typ, queue_handle OUT PGM_BQM.QUEUE_HANDLE_Typ); /* * NAME * Procedure QCLOSE() - Relinquish access to a previously open queue * DESCRIPTION * This procedure takes on input a queue handle structure * and relinquishes the access to the queue. After QCLOSE the * handle becomes invalid and cannot be used for the * enqueue or dequeue calls any more. * NOTES * If the procedure fails an exception is raised. * RETURNS * void */ PROCEDURE QCLOSE(queue_handle IN OUT PGM_BQM.QUEUE_HANDLE_Typ); /* * NAME * Procedure ENQUEUE() - Put a EMPLOYEE message on the queue (basic). * DESCRIPTION * This procedure takes on input a payload parameter of PL/SQL * type EMPLOYEE.EMPLOYEE_Typ, converts it to the
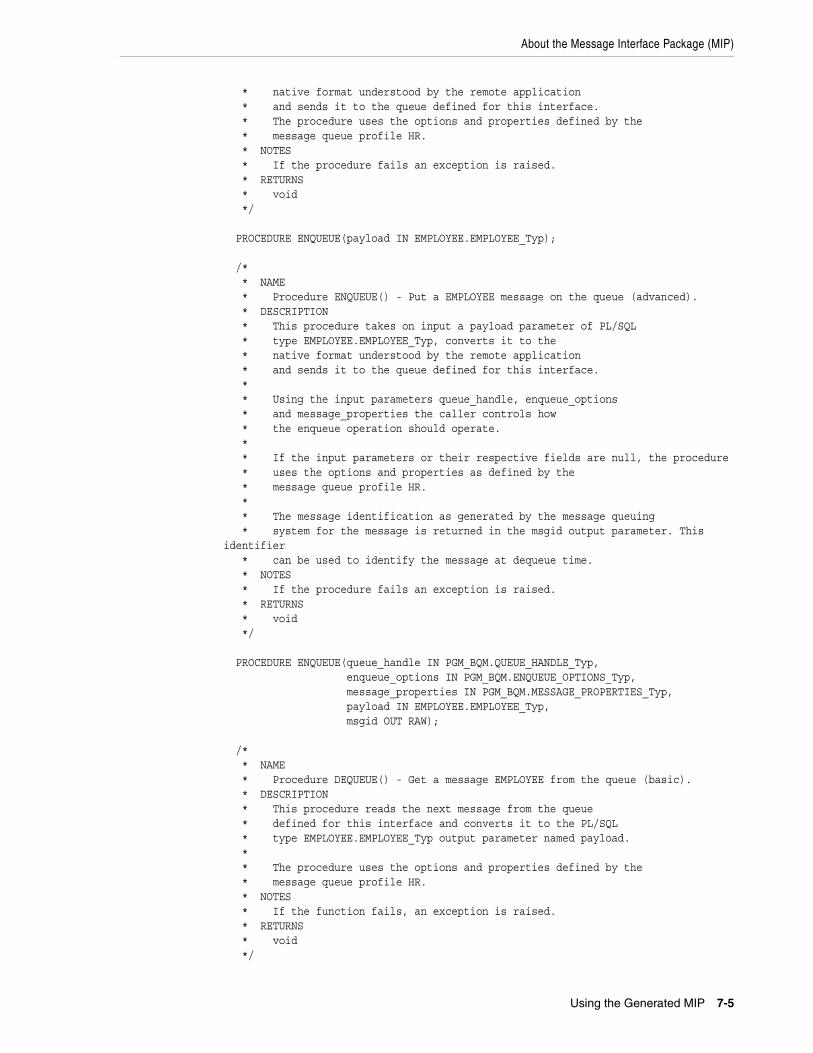
About the Message Interface Package (MIP)
Using the Generated MIP 7-5
* native format understood by the remote application * and sends it to the queue defined for this interface. * The procedure uses the options and properties defined by the * message queue profile HR. * NOTES * If the procedure fails an exception is raised. * RETURNS * void */ PROCEDURE ENQUEUE(payload IN EMPLOYEE.EMPLOYEE_Typ); /* * NAME * Procedure ENQUEUE() - Put a EMPLOYEE message on the queue (advanced). * DESCRIPTION * This procedure takes on input a payload parameter of PL/SQL * type EMPLOYEE.EMPLOYEE_Typ, converts it to the * native format understood by the remote application * and sends it to the queue defined for this interface. * * Using the input parameters queue_handle, enqueue_options * and message_properties the caller controls how * the enqueue operation should operate. * * If the input parameters or their respective fields are null, the procedure * uses the options and properties as defined by the * message queue profile HR. * * The message identification as generated by the message queuing * system for the message is returned in the msgid output parameter. This identifier * can be used to identify the message at dequeue time. * NOTES * If the procedure fails an exception is raised. * RETURNS * void */ PROCEDURE ENQUEUE(queue_handle IN PGM_BQM.QUEUE_HANDLE_Typ, enqueue_options IN PGM_BQM.ENQUEUE_OPTIONS_Typ, message_properties IN PGM_BQM.MESSAGE_PROPERTIES_Typ, payload IN EMPLOYEE.EMPLOYEE_Typ, msgid OUT RAW); /* * NAME * Procedure DEQUEUE() - Get a message EMPLOYEE from the queue (basic). * DESCRIPTION * This procedure reads the next message from the queue * defined for this interface and converts it to the PL/SQL * type EMPLOYEE.EMPLOYEE_Typ output parameter named payload. * * The procedure uses the options and properties defined by the * message queue profile HR. * NOTES * If the function fails, an exception is raised. * RETURNS * void */
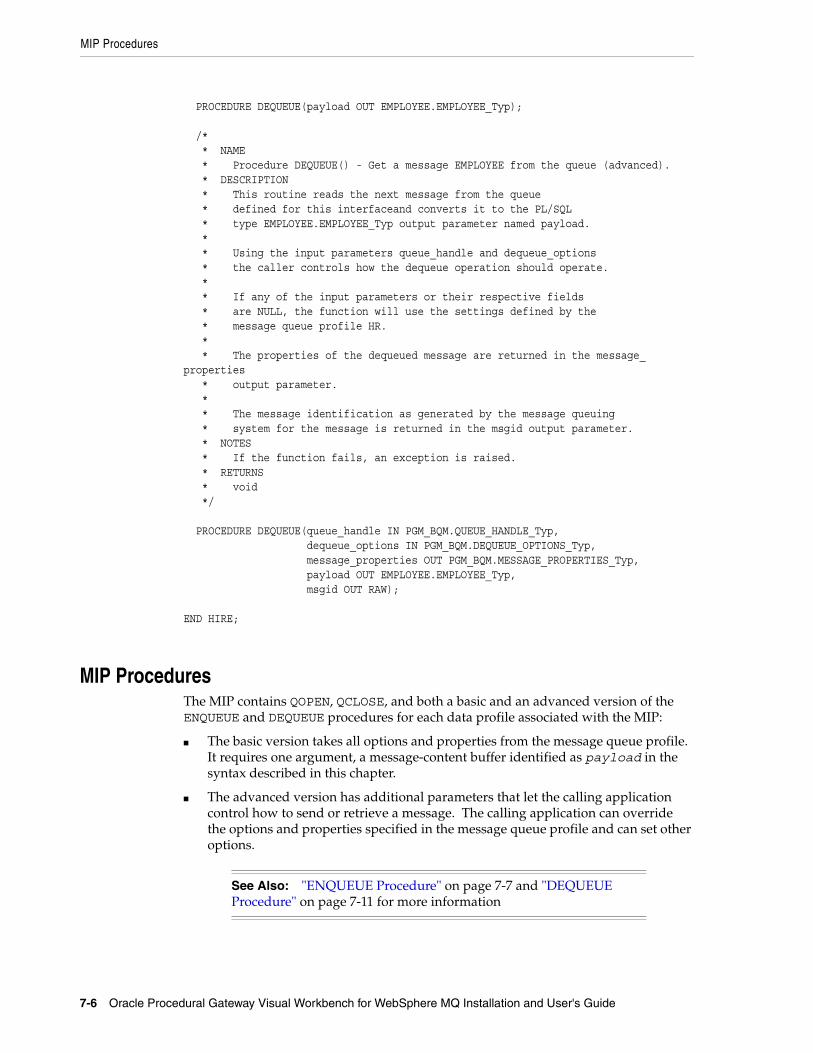
MIP Procedures
7-6 Oracle Procedural Gateway Visual Workbench for WebSphere MQ Installation and User's Guide
PROCEDURE DEQUEUE(payload OUT EMPLOYEE.EMPLOYEE_Typ); /* * NAME * Procedure DEQUEUE() - Get a message EMPLOYEE from the queue (advanced). * DESCRIPTION * This routine reads the next message from the queue * defined for this interfaceand converts it to the PL/SQL * type EMPLOYEE.EMPLOYEE_Typ output parameter named payload. * * Using the input parameters queue_handle and dequeue_options * the caller controls how the dequeue operation should operate. * * If any of the input parameters or their respective fields * are NULL, the function will use the settings defined by the * message queue profile HR. * * The properties of the dequeued message are returned in the message_properties * output parameter. * * The message identification as generated by the message queuing * system for the message is returned in the msgid output parameter. * NOTES * If the function fails, an exception is raised. * RETURNS * void */ PROCEDURE DEQUEUE(queue_handle IN PGM_BQM.QUEUE_HANDLE_Typ, dequeue_options IN PGM_BQM.DEQUEUE_OPTIONS_Typ, message_properties OUT PGM_BQM.MESSAGE_PROPERTIES_Typ, payload OUT EMPLOYEE.EMPLOYEE_Typ, msgid OUT RAW); END HIRE;
MIP ProceduresThe MIP contains QOPEN, QCLOSE, and both a basic and an advanced version of the ENQUEUE and DEQUEUE procedures for each data profile associated with the MIP:
■ The basic version takes all options and properties from the message queue profile. It requires one argument, a message-content buffer identified as payload in the syntax described in this chapter.
■ The advanced version has additional parameters that let the calling application control how to send or retrieve a message. The calling application can override the options and properties specified in the message queue profile and can set other options.
See Also: "ENQUEUE Procedure" on page 7-7 and "DEQUEUE Procedure" on page 7-11 for more information
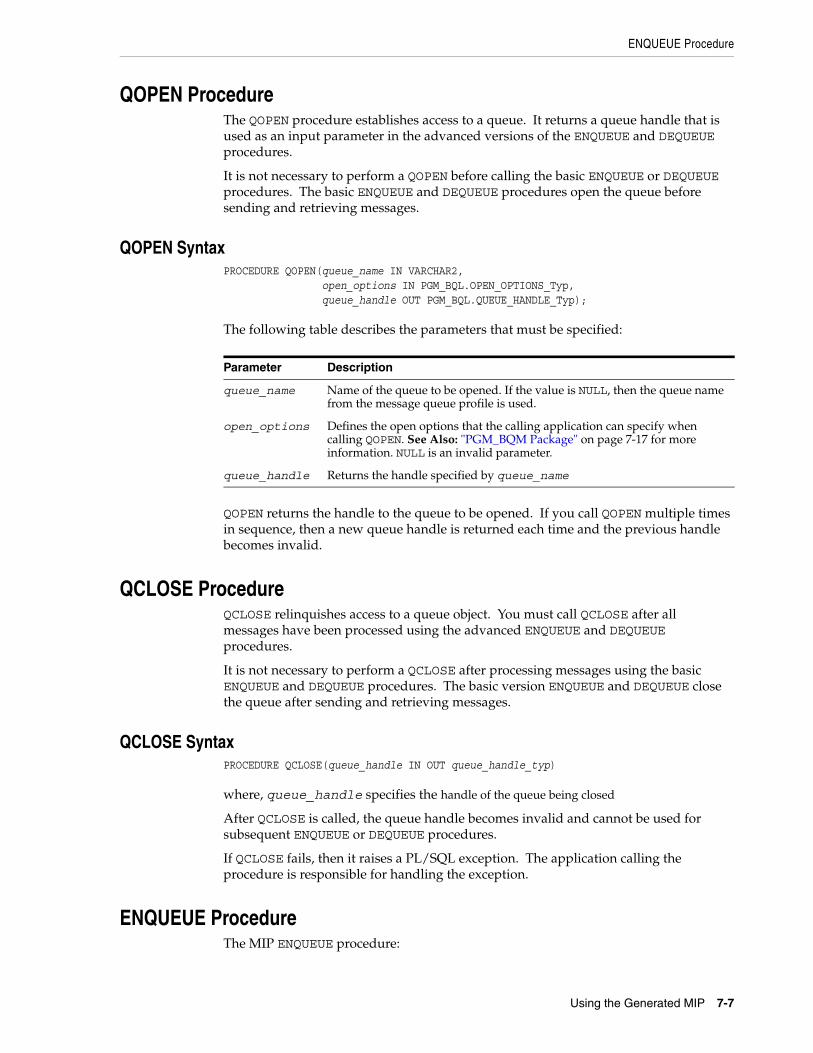
ENQUEUE Procedure
Using the Generated MIP 7-7
QOPEN ProcedureThe QOPEN procedure establishes access to a queue. It returns a queue handle that is used as an input parameter in the advanced versions of the ENQUEUE and DEQUEUE procedures.
It is not necessary to perform a QOPEN before calling the basic ENQUEUE or DEQUEUE procedures. The basic ENQUEUE and DEQUEUE procedures open the queue before sending and retrieving messages.
QOPEN SyntaxPROCEDURE QOPEN(queue_name IN VARCHAR2, open_options IN PGM_BQL.OPEN_OPTIONS_Typ, queue_handle OUT PGM_BQL.QUEUE_HANDLE_Typ);
The following table describes the parameters that must be specified:
QOPEN returns the handle to the queue to be opened. If you call QOPEN multiple times in sequence, then a new queue handle is returned each time and the previous handle becomes invalid.
QCLOSE ProcedureQCLOSE relinquishes access to a queue object. You must call QCLOSE after all messages have been processed using the advanced ENQUEUE and DEQUEUE procedures.
It is not necessary to perform a QCLOSE after processing messages using the basic ENQUEUE and DEQUEUE procedures. The basic version ENQUEUE and DEQUEUE close the queue after sending and retrieving messages.
QCLOSE SyntaxPROCEDURE QCLOSE(queue_handle IN OUT queue_handle_typ)
where, queue_handle specifies the handle of the queue being closed
After QCLOSE is called, the queue handle becomes invalid and cannot be used for subsequent ENQUEUE or DEQUEUE procedures.
If QCLOSE fails, then it raises a PL/SQL exception. The application calling the procedure is responsible for handling the exception.
ENQUEUE ProcedureThe MIP ENQUEUE procedure:
Parameter Description
queue_name Name of the queue to be opened. If the value is NULL, then the queue name from the message queue profile is used.
open_options Defines the open options that the calling application can specify when calling QOPEN. See Also: "PGM_BQM Package" on page 7-17 for more information. NULL is an invalid parameter.
queue_handle Returns the handle specified by queue_name

ENQUEUE Procedure
7-8 Oracle Procedural Gateway Visual Workbench for WebSphere MQ Installation and User's Guide
■ Converts a message from PL/SQL format to native format according to the specifications of a data profile
■ Sends the converted message to a queue of a non-Oracle message queuing system according to the specifications of a message queue profile or the input arguments of the procedure
ENQUEUE Naming and Name ResolutionBecause the ENQUEUE procedures are part of a MIP, applications must specify this fully qualified name when calling the procedure:
schema_name.mip_name.ENQUEUE
The following table describes the parameters that need to be specified:
PL/SQL runs the correct ENQUEUE procedure based on the parameters provided. For example, if only the payload output parameter is specified, the basic ENQUEUE procedure is run.
When more than one data profile is added to a MIP and multiple versions of basic and advanced ENQUEUE procedures are generated for the MIP, the type of payload parameter used determines which ENQUEUE procedure in the MIP is selected.
Basic ENQUEUE ProcedureThe basic ENQUEUE procedure converts the message content of payload according to the specifications of the data profile, and sends the message to a queue according the specifications of the message queue profile.
If the basic ENQUEUE procedure fails, then it raises a PL/SQL exception. Exceptions can be raised for various reasons, such as an error occurring during conversion or a problem reported by the message queuing system. The application calling the procedure is responsible for handling the exception.
SyntaxPROCEDURE ENQUEUE(payload IN type_definition)
The following table describes the parameters that need to be specified:
ExampleIn this example, message contains an employee record defined by a data profile named EMPLOYEE. It is populated with data, then passed to the basic ENQUEUE procedure of a MIP named HIRE.
Parameter Description
schema_name Name of the Oracle user that compiled the MIP
mip_name Name you specified when you created the MIP
Parameter Description
payload Must be specified according to type_definition. NULL is an invalid value.
type_definition See Also: "Type Definitions" on page 7-14 and "Data Conversion Package" on page 7-19.
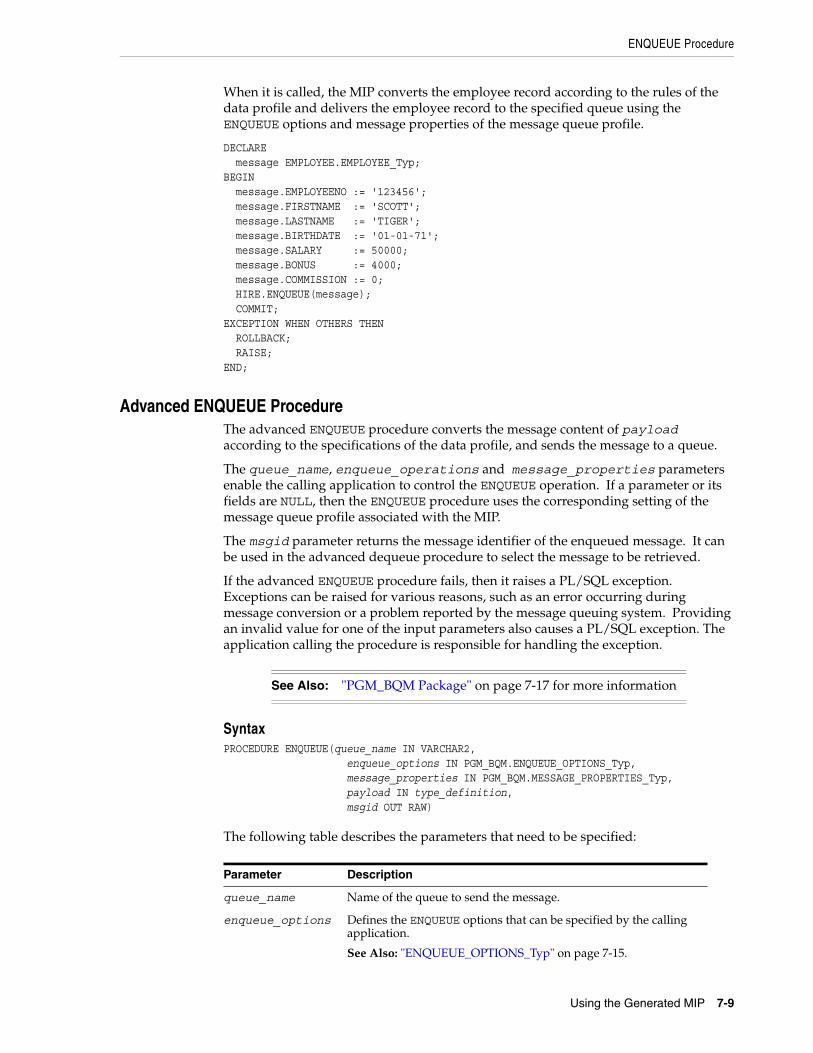
ENQUEUE Procedure
Using the Generated MIP 7-9
When it is called, the MIP converts the employee record according to the rules of the data profile and delivers the employee record to the specified queue using the ENQUEUE options and message properties of the message queue profile.
DECLARE message EMPLOYEE.EMPLOYEE_Typ;BEGIN message.EMPLOYEENO := '123456'; message.FIRSTNAME := 'SCOTT'; message.LASTNAME := 'TIGER'; message.BIRTHDATE := '01-01-71'; message.SALARY := 50000; message.BONUS := 4000; message.COMMISSION := 0; HIRE.ENQUEUE(message); COMMIT;EXCEPTION WHEN OTHERS THEN ROLLBACK; RAISE;END;
Advanced ENQUEUE ProcedureThe advanced ENQUEUE procedure converts the message content of payload according to the specifications of the data profile, and sends the message to a queue.
The queue_name, enqueue_operations and message_properties parameters enable the calling application to control the ENQUEUE operation. If a parameter or its fields are NULL, then the ENQUEUE procedure uses the corresponding setting of the message queue profile associated with the MIP.
The msgid parameter returns the message identifier of the enqueued message. It can be used in the advanced dequeue procedure to select the message to be retrieved.
If the advanced ENQUEUE procedure fails, then it raises a PL/SQL exception. Exceptions can be raised for various reasons, such as an error occurring during message conversion or a problem reported by the message queuing system. Providing an invalid value for one of the input parameters also causes a PL/SQL exception. The application calling the procedure is responsible for handling the exception.
SyntaxPROCEDURE ENQUEUE(queue_name IN VARCHAR2, enqueue_options IN PGM_BQM.ENQUEUE_OPTIONS_Typ, message_properties IN PGM_BQM.MESSAGE_PROPERTIES_Typ, payload IN type_definition, msgid OUT RAW)
The following table describes the parameters that need to be specified:
See Also: "PGM_BQM Package" on page 7-17 for more information
Parameter Description
queue_name Name of the queue to send the message.
enqueue_options Defines the ENQUEUE options that can be specified by the calling application.
See Also: "ENQUEUE_OPTIONS_Typ" on page 7-15.

ENQUEUE Procedure
7-10 Oracle Procedural Gateway Visual Workbench for WebSphere MQ Installation and User's Guide
ExampleIn this example, the queue to which messages are to be sent is opened with QOPEN. The openOpts.open_mode parameter is set to ENQUEUE, to open the queue for input. This parameter must be specified. A NULL value is invalid. A handle to the queue is returned and is used as an input parameter in each ENQUEUE call.
In this example, the message contains an employee record defined by a data profile named EMPLOYEE. It is populated with data, and then passed to the advanced ENQUEUE procedure of a MIP named HIRE. The priority and expiration of the message are set by the calling application and passed in using the values specified by enqueueOpts and msgProps.
After the messages are enqueued, the QCLOSE procedure is called.
When called, the MIP converts the employee record according to the specifications of the data profile and sends the employee record to the specified queue using the passed-in queue name, priority, and expiration, taking the other options and properties from the message queue profile.
The message property priority (msgProps.priority) directs the ENQUEUE procedure to give the message a priority of 4 when enqueuing the message, instead of using the value set by the message queue profile. The expiration property (msgProps.expiration) specifies that the message is to remain on the queue unless it is dequeued again.
DECLARE message EMPLOYEE.EMPLOYEE_Typ; enqueueOpts PGM_BQM.ENQUEUE_OPTIONS_Typ; msgProps PGM_BQM.MESSAGE_PROPERTIES_Typ; msgid RAW(24); queueHandle PGM_BQM.QUEUE_HANDLE_Typ; queueName VARCHAR2(48) CURSOR C1 IS SELECT EMP_NO EMP_FNAME FROM EMP;BEGIN msgProps.priority := 4; msgProps.expiration := PGM_BQM.NEVER; openOpts.open_mode := PGM_BQM.ENQUEUE; queueName := 'emp'; HIRE.QOPEN(queueName openOpts queueHandle); OPEN C1; LOOP FETCH C1 into message.employeeno, message.firstname; EXIT when C1 %NOTFOUND; HIRE.ENQUEUE(queueHandle, queueName, enqueueOpts, msgProps,
message_properties
Defines the message options for a message. See Also: "MESSAGE_PROPERTIES_Typ" on page 7-16.
payload Must be specified according to the type_definition. NULL is an invalid value.
type_definition See Also: "Type Definitions" on page 7-14 and "Data Conversion Package" on page 7-19.
msgid Identifier generated by the message queuing system for the message.
Parameter Description

DEQUEUE Procedure
Using the Generated MIP 7-11
message, msgid); ENDLOOP; CLOSE C1; HIRE.QCLOSE(queueHandle); COMMIT;EXCEPTION WHEN OTHERS THEN HIRE.QCLOSE(queueHandle); ROLLBACK; RAISE;END;
DEQUEUE ProcedureThe DEQUEUE procedure:
■ Retrieves a message from a queue at a non-Oracle message queuing system according to the specifications of a message queue profile or the input arguments of the procedure
■ Converts the retrieved message contents of payload from native to PL/SQL format, according to the specifications of a data profile
DEQUEUE Naming and Name ResolutionBecause the DEQUEUE procedures are part of a MIP, applications must specify this fully qualified name when calling the procedure:
schema_name.mip_name.DEQUEUE
The following table describes the parameters that need to be specified:
PL/SQL runs the correct DEQUEUE procedure based on the parameters provided upon invocation. For example, if only a payload output parameter is specified, the basic DEQUEUE procedure is run.
When more than one data profile is added to a MIP and multiple versions of basic and advanced DEQUEUE procedures are generated for the MIP, the type of payload used determines which DEQUEUE procedure in the MIP is selected.
Basic DEQUEUE ProcedureThe basic DEQUEUE procedure retrieves the message from a queue according to the specifications of the message queue profile, converts the message according to the specifications of the data profile, and returns the result in the payload output parameter.
If the basic DEQUEUE procedure fails, then it raises a PL/SQL exception. Exceptions can be raised for various reasons, such as an error occurring during conversion or a problem reported by the message queuing system. The application calling the procedure is responsible for handling the exception.
Parameter Description
schema_name Name of the Oracle user that compiled the MIP.
mip_name Name you specified when you created the MIP.
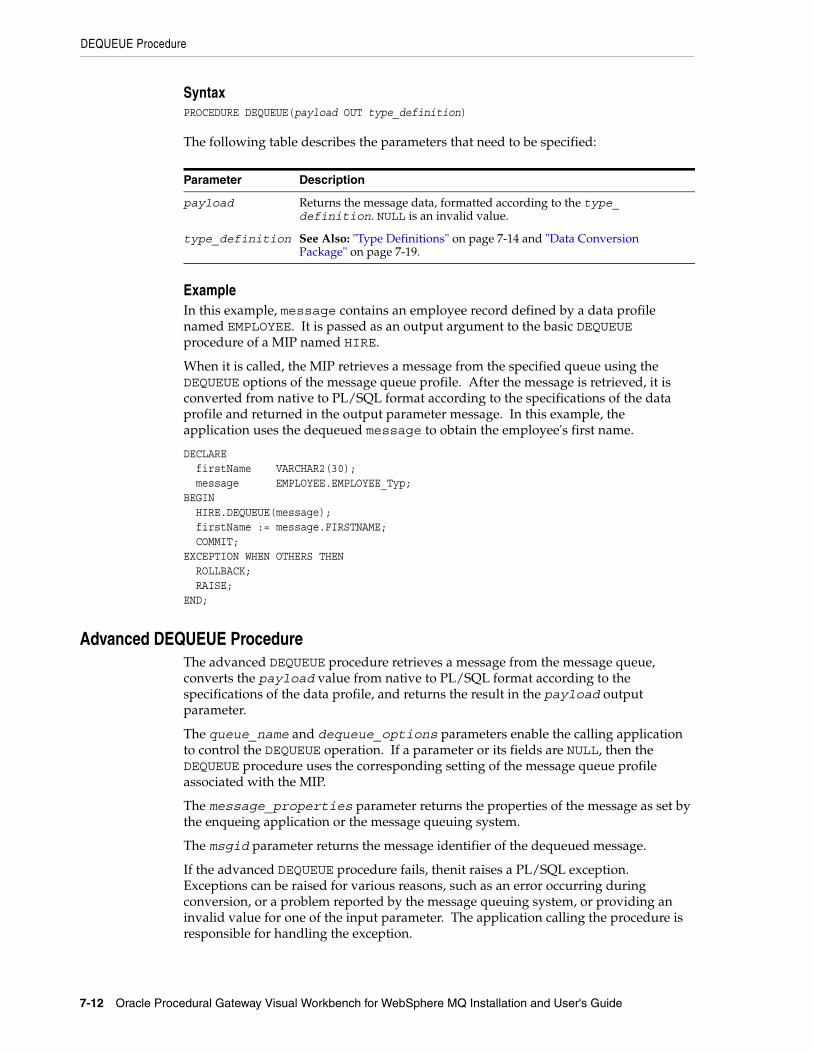
DEQUEUE Procedure
7-12 Oracle Procedural Gateway Visual Workbench for WebSphere MQ Installation and User's Guide
SyntaxPROCEDURE DEQUEUE(payload OUT type_definition)
The following table describes the parameters that need to be specified:
ExampleIn this example, message contains an employee record defined by a data profile named EMPLOYEE. It is passed as an output argument to the basic DEQUEUE procedure of a MIP named HIRE.
When it is called, the MIP retrieves a message from the specified queue using the DEQUEUE options of the message queue profile. After the message is retrieved, it is converted from native to PL/SQL format according to the specifications of the data profile and returned in the output parameter message. In this example, the application uses the dequeued message to obtain the employee's first name.
DECLARE firstName VARCHAR2(30); message EMPLOYEE.EMPLOYEE_Typ;BEGIN HIRE.DEQUEUE(message); firstName := message.FIRSTNAME; COMMIT;EXCEPTION WHEN OTHERS THEN ROLLBACK; RAISE;END;
Advanced DEQUEUE ProcedureThe advanced DEQUEUE procedure retrieves a message from the message queue, converts the payload value from native to PL/SQL format according to the specifications of the data profile, and returns the result in the payload output parameter.
The queue_name and dequeue_options parameters enable the calling application to control the DEQUEUE operation. If a parameter or its fields are NULL, then the DEQUEUE procedure uses the corresponding setting of the message queue profile associated with the MIP.
The message_properties parameter returns the properties of the message as set by the enqueing application or the message queuing system.
The msgid parameter returns the message identifier of the dequeued message.
If the advanced DEQUEUE procedure fails, thenit raises a PL/SQL exception. Exceptions can be raised for various reasons, such as an error occurring during conversion, or a problem reported by the message queuing system, or providing an invalid value for one of the input parameter. The application calling the procedure is responsible for handling the exception.
Parameter Description
payload Returns the message data, formatted according to the type_definition. NULL is an invalid value.
type_definition See Also: "Type Definitions" on page 7-14 and "Data Conversion Package" on page 7-19.
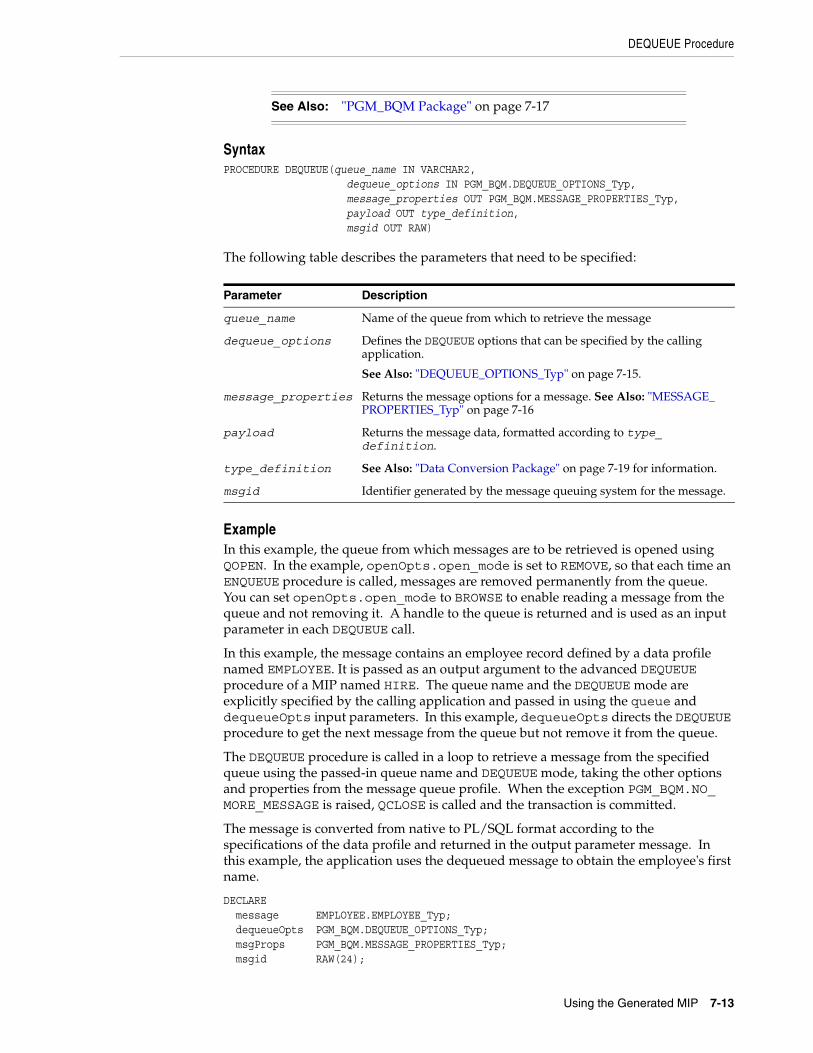
DEQUEUE Procedure
Using the Generated MIP 7-13
SyntaxPROCEDURE DEQUEUE(queue_name IN VARCHAR2, dequeue_options IN PGM_BQM.DEQUEUE_OPTIONS_Typ, message_properties OUT PGM_BQM.MESSAGE_PROPERTIES_Typ, payload OUT type_definition, msgid OUT RAW)
The following table describes the parameters that need to be specified:
ExampleIn this example, the queue from which messages are to be retrieved is opened using QOPEN. In the example, openOpts.open_mode is set to REMOVE, so that each time an ENQUEUE procedure is called, messages are removed permanently from the queue. You can set openOpts.open_mode to BROWSE to enable reading a message from the queue and not removing it. A handle to the queue is returned and is used as an input parameter in each DEQUEUE call.
In this example, the message contains an employee record defined by a data profile named EMPLOYEE. It is passed as an output argument to the advanced DEQUEUE procedure of a MIP named HIRE. The queue name and the DEQUEUE mode are explicitly specified by the calling application and passed in using the queue and dequeueOpts input parameters. In this example, dequeueOpts directs the DEQUEUE procedure to get the next message from the queue but not remove it from the queue.
The DEQUEUE procedure is called in a loop to retrieve a message from the specified queue using the passed-in queue name and DEQUEUE mode, taking the other options and properties from the message queue profile. When the exception PGM_BQM.NO_MORE_MESSAGE is raised, QCLOSE is called and the transaction is committed.
The message is converted from native to PL/SQL format according to the specifications of the data profile and returned in the output parameter message. In this example, the application uses the dequeued message to obtain the employee's first name.
DECLARE message EMPLOYEE.EMPLOYEE_Typ; dequeueOpts PGM_BQM.DEQUEUE_OPTIONS_Typ; msgProps PGM_BQM.MESSAGE_PROPERTIES_Typ; msgid RAW(24);
See Also: "PGM_BQM Package" on page 7-17
Parameter Description
queue_name Name of the queue from which to retrieve the message
dequeue_options Defines the DEQUEUE options that can be specified by the calling application.
See Also: "DEQUEUE_OPTIONS_Typ" on page 7-15.
message_properties Returns the message options for a message. See Also: "MESSAGE_PROPERTIES_Typ" on page 7-16
payload Returns the message data, formatted according to type_definition.
type_definition See Also: "Data Conversion Package" on page 7-19 for information.
msgid Identifier generated by the message queuing system for the message.
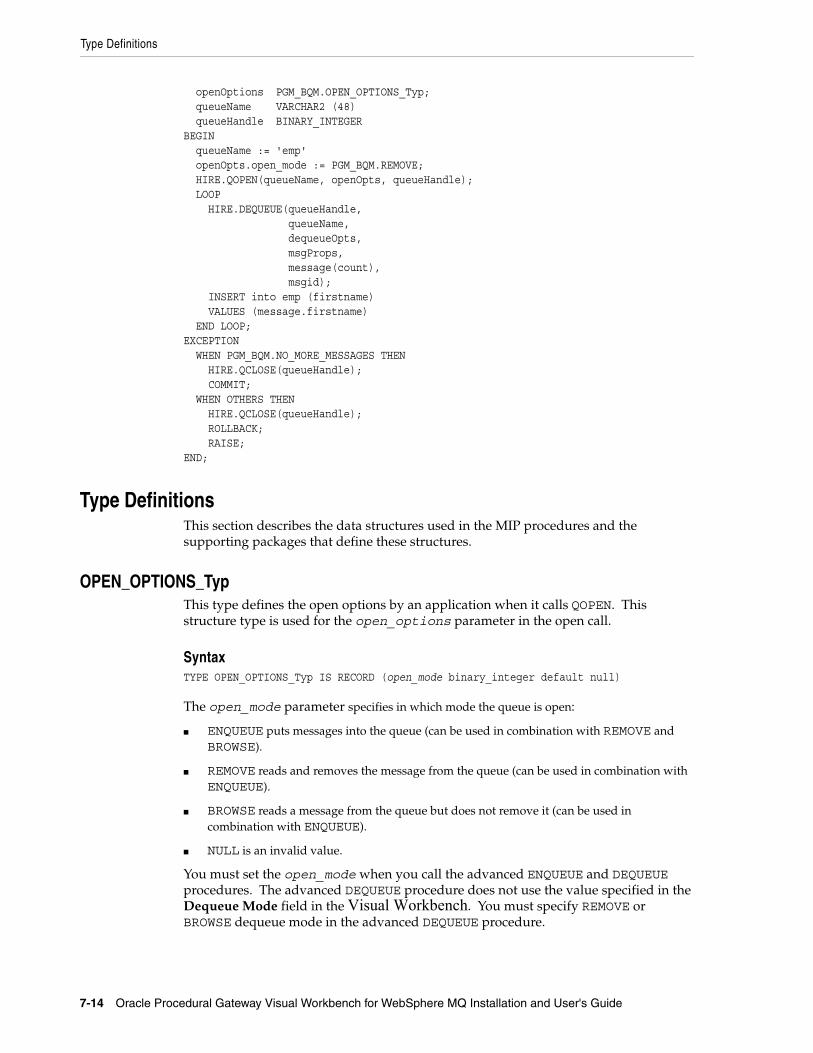
Type Definitions
7-14 Oracle Procedural Gateway Visual Workbench for WebSphere MQ Installation and User's Guide
openOptions PGM_BQM.OPEN_OPTIONS_Typ; queueName VARCHAR2 (48) queueHandle BINARY_INTEGERBEGIN queueName := 'emp' openOpts.open_mode := PGM_BQM.REMOVE; HIRE.QOPEN(queueName, openOpts, queueHandle); LOOP HIRE.DEQUEUE(queueHandle, queueName, dequeueOpts, msgProps, message(count), msgid); INSERT into emp (firstname) VALUES (message.firstname) END LOOP;EXCEPTION WHEN PGM_BQM.NO_MORE_MESSAGES THEN HIRE.QCLOSE(queueHandle); COMMIT; WHEN OTHERS THEN HIRE.QCLOSE(queueHandle); ROLLBACK; RAISE;END;
Type DefinitionsThis section describes the data structures used in the MIP procedures and the supporting packages that define these structures.
OPEN_OPTIONS_TypThis type defines the open options by an application when it calls QOPEN. This structure type is used for the open_options parameter in the open call.
SyntaxTYPE OPEN_OPTIONS_Typ IS RECORD (open_mode binary_integer default null)
The open_mode parameter specifies in which mode the queue is open:
■ ENQUEUE puts messages into the queue (can be used in combination with REMOVE and BROWSE).
■ REMOVE reads and removes the message from the queue (can be used in combination with ENQUEUE).
■ BROWSE reads a message from the queue but does not remove it (can be used in combination with ENQUEUE).
■ NULL is an invalid value.
You must set the open_mode when you call the advanced ENQUEUE and DEQUEUE procedures. The advanced DEQUEUE procedure does not use the value specified in the Dequeue Mode field in the Visual Workbench. You must specify REMOVE or BROWSE dequeue mode in the advanced DEQUEUE procedure.
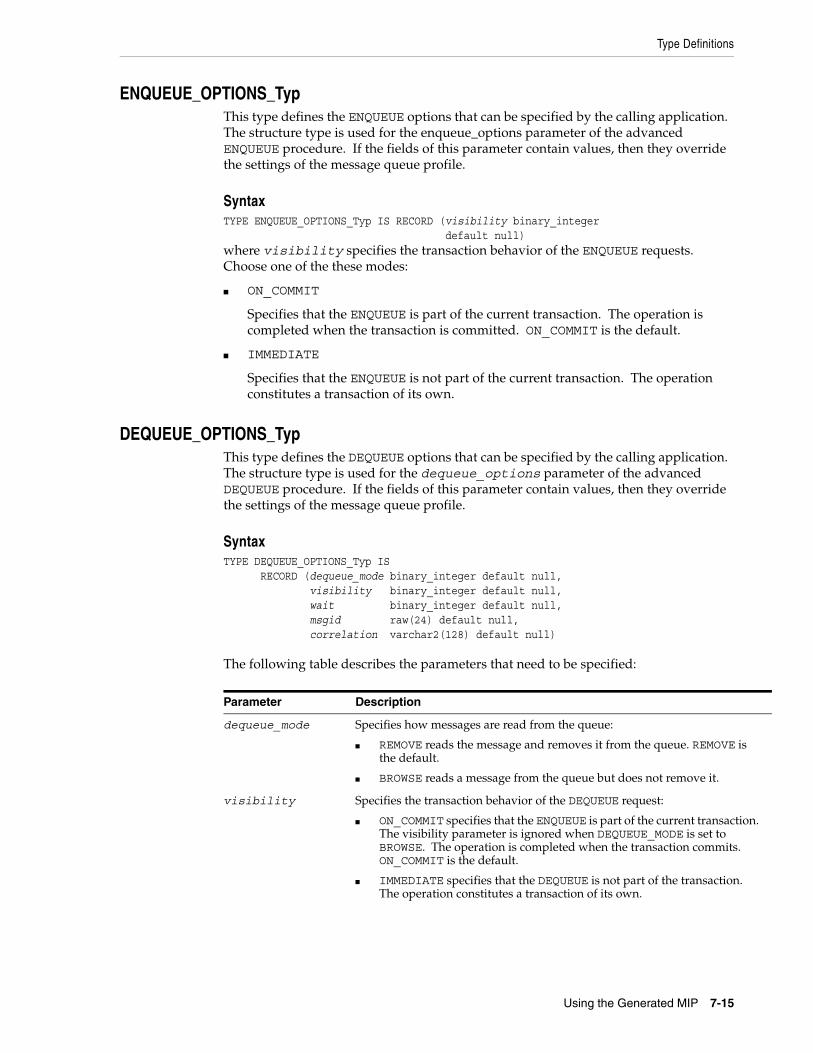
Type Definitions
Using the Generated MIP 7-15
ENQUEUE_OPTIONS_TypThis type defines the ENQUEUE options that can be specified by the calling application. The structure type is used for the enqueue_options parameter of the advanced ENQUEUE procedure. If the fields of this parameter contain values, then they override the settings of the message queue profile.
SyntaxTYPE ENQUEUE_OPTIONS_Typ IS RECORD (visibility binary_integer default null)where visibility specifies the transaction behavior of the ENQUEUE requests. Choose one of the these modes:
■ ON_COMMIT
Specifies that the ENQUEUE is part of the current transaction. The operation is completed when the transaction is committed. ON_COMMIT is the default.
■ IMMEDIATE
Specifies that the ENQUEUE is not part of the current transaction. The operation constitutes a transaction of its own.
DEQUEUE_OPTIONS_TypThis type defines the DEQUEUE options that can be specified by the calling application. The structure type is used for the dequeue_options parameter of the advanced DEQUEUE procedure. If the fields of this parameter contain values, then they override the settings of the message queue profile.
SyntaxTYPE DEQUEUE_OPTIONS_Typ IS RECORD (dequeue_mode binary_integer default null, visibility binary_integer default null, wait binary_integer default null, msgid raw(24) default null, correlation varchar2(128) default null)
The following table describes the parameters that need to be specified:
Parameter Description
dequeue_mode Specifies how messages are read from the queue:
■ REMOVE reads the message and removes it from the queue. REMOVE is the default.
■ BROWSE reads a message from the queue but does not remove it.
visibility Specifies the transaction behavior of the DEQUEUE request:
■ ON_COMMIT specifies that the ENQUEUE is part of the current transaction. The visibility parameter is ignored when DEQUEUE_MODE is set to BROWSE. The operation is completed when the transaction commits. ON_COMMIT is the default.
■ IMMEDIATE specifies that the DEQUEUE is not part of the transaction. The operation constitutes a transaction of its own.
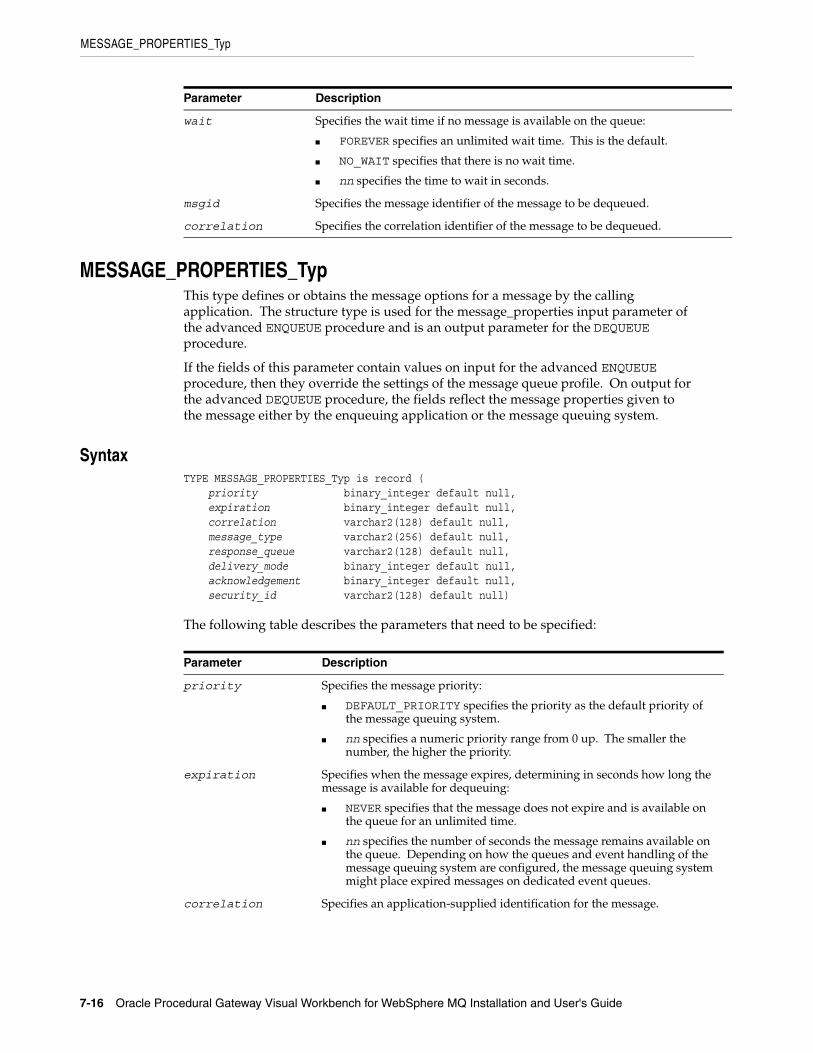
MESSAGE_PROPERTIES_Typ
7-16 Oracle Procedural Gateway Visual Workbench for WebSphere MQ Installation and User's Guide
MESSAGE_PROPERTIES_TypThis type defines or obtains the message options for a message by the calling application. The structure type is used for the message_properties input parameter of the advanced ENQUEUE procedure and is an output parameter for the DEQUEUE procedure.
If the fields of this parameter contain values on input for the advanced ENQUEUE procedure, then they override the settings of the message queue profile. On output for the advanced DEQUEUE procedure, the fields reflect the message properties given to the message either by the enqueuing application or the message queuing system.
SyntaxTYPE MESSAGE_PROPERTIES_Typ is record ( priority binary_integer default null, expiration binary_integer default null, correlation varchar2(128) default null, message_type varchar2(256) default null, response_queue varchar2(128) default null, delivery_mode binary_integer default null, acknowledgement binary_integer default null, security_id varchar2(128) default null)
The following table describes the parameters that need to be specified:
wait Specifies the wait time if no message is available on the queue:
■ FOREVER specifies an unlimited wait time. This is the default.
■ NO_WAIT specifies that there is no wait time.
■ nn specifies the time to wait in seconds.
msgid Specifies the message identifier of the message to be dequeued.
correlation Specifies the correlation identifier of the message to be dequeued.
Parameter Description
priority Specifies the message priority:
■ DEFAULT_PRIORITY specifies the priority as the default priority of the message queuing system.
■ nn specifies a numeric priority range from 0 up. The smaller the number, the higher the priority.
expiration Specifies when the message expires, determining in seconds how long the message is available for dequeuing:
■ NEVER specifies that the message does not expire and is available on the queue for an unlimited time.
■ nn specifies the number of seconds the message remains available on the queue. Depending on how the queues and event handling of the message queuing system are configured, the message queuing system might place expired messages on dedicated event queues.
correlation Specifies an application-supplied identification for the message.
Parameter Description
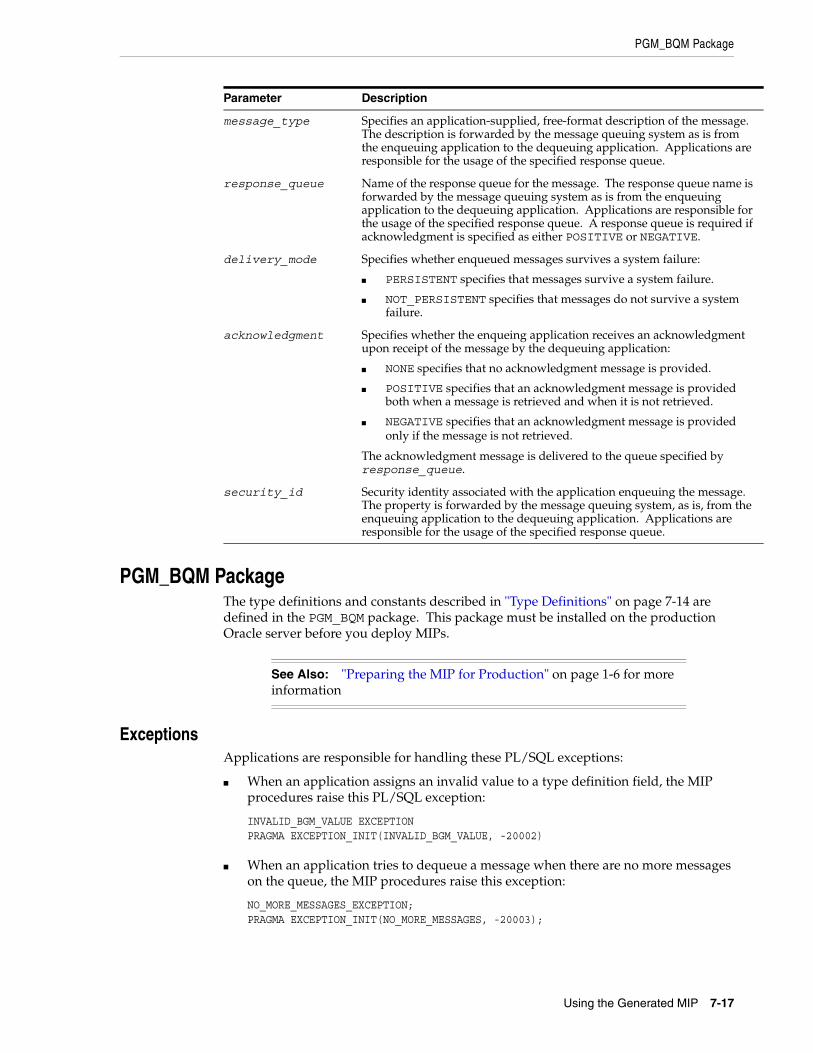
PGM_BQM Package
Using the Generated MIP 7-17
PGM_BQM PackageThe type definitions and constants described in "Type Definitions" on page 7-14 are defined in the PGM_BQM package. This package must be installed on the production Oracle server before you deploy MIPs.
ExceptionsApplications are responsible for handling these PL/SQL exceptions:
■ When an application assigns an invalid value to a type definition field, the MIP procedures raise this PL/SQL exception:
INVALID_BGM_VALUE EXCEPTIONPRAGMA EXCEPTION_INIT(INVALID_BGM_VALUE, -20002)
■ When an application tries to dequeue a message when there are no more messages on the queue, the MIP procedures raise this exception:
NO_MORE_MESSAGES_EXCEPTION;PRAGMA EXCEPTION_INIT(NO_MORE_MESSAGES, -20003);
message_type Specifies an application-supplied, free-format description of the message. The description is forwarded by the message queuing system as is from the enqueuing application to the dequeuing application. Applications are responsible for the usage of the specified response queue.
response_queue Name of the response queue for the message. The response queue name is forwarded by the message queuing system as is from the enqueuing application to the dequeuing application. Applications are responsible for the usage of the specified response queue. A response queue is required if acknowledgment is specified as either POSITIVE or NEGATIVE.
delivery_mode Specifies whether enqueued messages survives a system failure:
■ PERSISTENT specifies that messages survive a system failure.
■ NOT_PERSISTENT specifies that messages do not survive a system failure.
acknowledgment Specifies whether the enqueing application receives an acknowledgment upon receipt of the message by the dequeuing application:
■ NONE specifies that no acknowledgment message is provided.
■ POSITIVE specifies that an acknowledgment message is provided both when a message is retrieved and when it is not retrieved.
■ NEGATIVE specifies that an acknowledgment message is provided only if the message is not retrieved.
The acknowledgment message is delivered to the queue specified by response_queue.
security_id Security identity associated with the application enqueuing the message. The property is forwarded by the message queuing system, as is, from the enqueuing application to the dequeuing application. Applications are responsible for the usage of the specified response queue.
See Also: "Preparing the MIP for Production" on page 1-6 for more information
Parameter Description
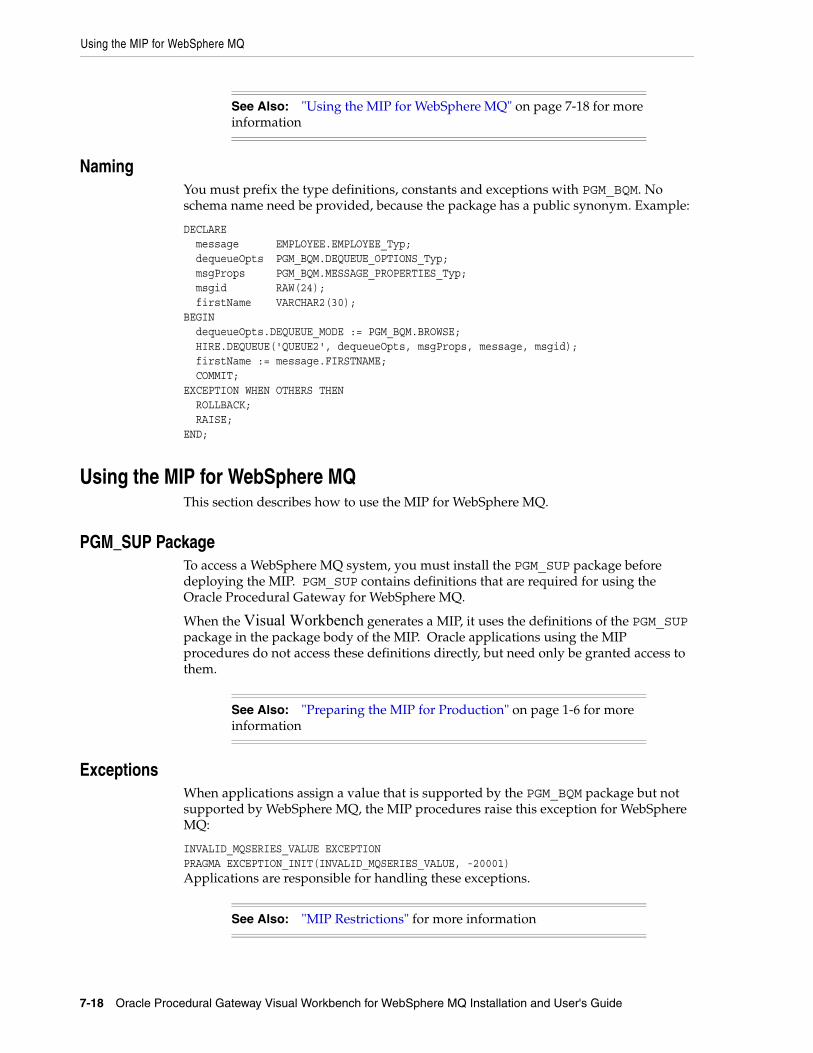
Using the MIP for WebSphere MQ
7-18 Oracle Procedural Gateway Visual Workbench for WebSphere MQ Installation and User's Guide
NamingYou must prefix the type definitions, constants and exceptions with PGM_BQM. No schema name need be provided, because the package has a public synonym. Example:
DECLARE message EMPLOYEE.EMPLOYEE_Typ; dequeueOpts PGM_BQM.DEQUEUE_OPTIONS_Typ; msgProps PGM_BQM.MESSAGE_PROPERTIES_Typ; msgid RAW(24); firstName VARCHAR2(30);BEGIN dequeueOpts.DEQUEUE_MODE := PGM_BQM.BROWSE; HIRE.DEQUEUE('QUEUE2', dequeueOpts, msgProps, message, msgid); firstName := message.FIRSTNAME; COMMIT;EXCEPTION WHEN OTHERS THEN ROLLBACK; RAISE;END;
Using the MIP for WebSphere MQThis section describes how to use the MIP for WebSphere MQ.
PGM_SUP PackageTo access a WebSphere MQ system, you must install the PGM_SUP package before deploying the MIP. PGM_SUP contains definitions that are required for using the Oracle Procedural Gateway for WebSphere MQ.
When the Visual Workbench generates a MIP, it uses the definitions of the PGM_SUP package in the package body of the MIP. Oracle applications using the MIP procedures do not access these definitions directly, but need only be granted access to them.
ExceptionsWhen applications assign a value that is supported by the PGM_BQM package but not supported by WebSphere MQ, the MIP procedures raise this exception for WebSphere MQ:
INVALID_MQSERIES_VALUE EXCEPTION PRAGMA EXCEPTION_INIT(INVALID_MQSERIES_VALUE, -20001)Applications are responsible for handling these exceptions.
See Also: "Using the MIP for WebSphere MQ" on page 7-18 for more information
See Also: "Preparing the MIP for Production" on page 1-6 for more information
See Also: "MIP Restrictions" for more information

Data Conversion Package
Using the Generated MIP 7-19
MIP Restrictions The following table lists the restrictions that apply when using the MIP procedures or the associated type definitions for WebSphere MQ:
The MQSeries profile complies with these restrictions because the Visual Workbench verifies all input when entering the message queue profile properties. You can, however, override the profile using the advanced ENQUEUE and DEQUEUE procedures, possibly causing the MIP to raise an exception at runtime.
Data Conversion PackageThe data conversion package generated by the Visual Workbench provides PL/SQL mapping for non-Oracle data types. It includes one or more user-defined types in PL/SQL that are mapped to the non-Oracle data type, and functions to convert between them.
Data conversion packages have two parts, a specification and a body. The specification declares the types, functions, and other information available for use by developers, and the body provides the implementation for the specification.
You use the data conversion package and so does the generated MIP:
■ You can use the generated PL/SQL type in the data conversion package specification to fill out information on a message. The message is then passed to the ENQUEUE operation and sent over the message queuing system to the non-Oracle application. It is the same structure you use to retrieve messages from the non-Oracle application through the DEQUEUE operation and to interpret the message information.
■ The generated MIP uses the data conversion functions to convert data. Because the data conversion is handled in the generated MIP, you need not call these conversion functions directly.
Read the generated package specification to learn about the PL/SQL types that were created. In most cases, you need not look at the package body.
01 EMPLOYEE. 10 EMPLOYEENOPIC X(6). 10 FIRSTNAME PIC X(12). 10 LASTNAME PIC X(12). 10 BIRTHDATE PIC X(10). 10 SALARY PIC S9999999V99 USAGE COMP-3.
Parameter Restriction
correlation Its value is limited to a length of 24 characters.
message_type Its value is limited to a length of 8 characters.
msgid Its value is limited to a length of 24 bytes.
priority Its value range is between 0 and 9.
queue_name Its value is limited to a length of 48 characters.
response_queue Its value is limited to a length of 48 characters.
security_id Its value is limited to a length of 12 characters.
See Also: "OPEN_OPTIONS_Typ" on page 7-14 for more information about overrides

Data Conversion Package
7-20 Oracle Procedural Gateway Visual Workbench for WebSphere MQ Installation and User's Guide
10 BONUS PIC S9999999V99 USAGE COMP-3. 10 COMMISSION PIC S9999999V99 USAGE COMP-3.
"Creating a Data Profile" on page 6-5 describes how to use the Visual Workbench to create a data profile. Use the Visual Workbench Wizard to add them to an interface profile.
The corresponding generated data conversion package EMPLOYEE for COBOL data profile EMPLOYEE contains the PL/SQL type used to map to the COBOL data type, and two functions to convert between the PL/SQL mapping data type and the COBOL data type. This is the package specification for the package EMPLOYEE:
* Copyright (c) 1999 Oracle Corporation. All rights reserved. * * PL/SQL and Cobol Data Mapping Package Body EMPLOYEE. * * PG DD release 4.0.1.0.0 * PGMAU release 8.0.4.1.0 * * Generated 11-MAR-99 at 15:06:33 by PGMADMIN */ CREATE or REPLACE PACKAGE EMPLOYEE IS /*---------------------------------------------------------------*/ /* EMPLOYEE public definitions */ /*---------------------------------------------------------------*/ TYPE MQGET_BUFFER IS TABLE OF RAW(32767) INDEX BY BINARY_INTEGER; TYPE MQPUT_BUFFER IS TABLE OF RAW(32767) NOT NULL INDEX BY BINARY_INTEGER; TYPE EMPLOYEE_Typ is RECORD ( EMPLOYEENO CHAR(6), FIRSTNAME CHAR(12), LASTNAME CHAR(12), BIRTHDATE CHAR(10), SALARY NUMBER(9,2), BONUS NUMBER(9,2), COMMISSION NUMBER(9,2)); FUNCTION raw2EMPLOYEE(message IN MQGET_BUFFER, EMPLOYEE OUT EMPLOYEE_Typ, mipdiag IN CHAR) RETURN INTEGER; FUNCTION EMPLOYEE2raw(EMPLOYEE IN EMPLOYEE_Typ, message OUT MQPUT_BUFFER, mipdiag IN CHAR) RETURN INTEGER; END EMPLOYEE;
The data conversion functions require these PL/SQL packages:
■ DBMS_OUTPUT
■ UTL_PG
See Also: "Creating an Interface Profile and Generating a MIP" on page 6-14 for more information
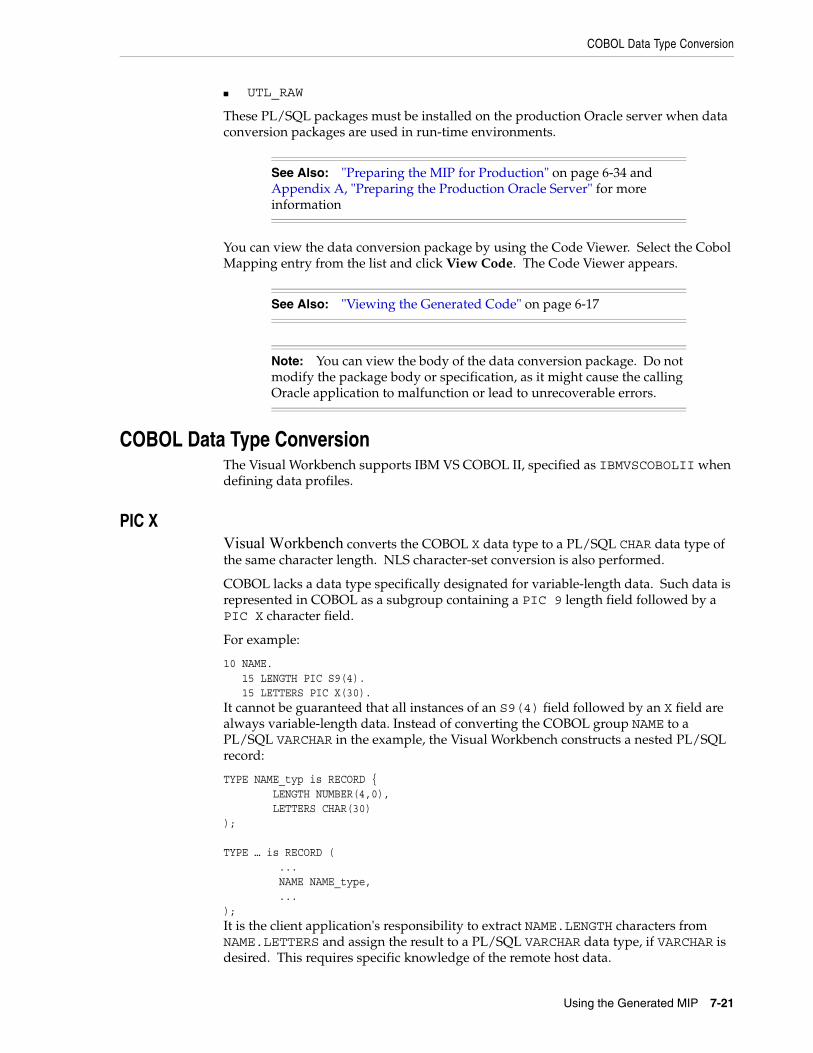
COBOL Data Type Conversion
Using the Generated MIP 7-21
■ UTL_RAW
These PL/SQL packages must be installed on the production Oracle server when data conversion packages are used in run-time environments.
You can view the data conversion package by using the Code Viewer. Select the Cobol Mapping entry from the list and click View Code. The Code Viewer appears.
COBOL Data Type ConversionThe Visual Workbench supports IBM VS COBOL II, specified as IBMVSCOBOLII when defining data profiles.
PIC XVisual Workbench converts the COBOL X data type to a PL/SQL CHAR data type of the same character length. NLS character-set conversion is also performed.
COBOL lacks a data type specifically designated for variable-length data. Such data is represented in COBOL as a subgroup containing a PIC 9 length field followed by a PIC X character field.
For example:
10 NAME. 15 LENGTH PIC S9(4). 15 LETTERS PIC X(30).It cannot be guaranteed that all instances of an S9(4) field followed by an X field are always variable-length data. Instead of converting the COBOL group NAME to a PL/SQL VARCHAR in the example, the Visual Workbench constructs a nested PL/SQL record:
TYPE NAME_typ is RECORD { LENGTH NUMBER(4,0), LETTERS CHAR(30) ); TYPE … is RECORD ( ... NAME NAME_type, ...);It is the client application's responsibility to extract NAME.LENGTH characters from NAME.LETTERS and assign the result to a PL/SQL VARCHAR data type, if VARCHAR is desired. This requires specific knowledge of the remote host data.
See Also: "Preparing the MIP for Production" on page 6-34 and Appendix A, "Preparing the Production Oracle Server" for more information
See Also: "Viewing the Generated Code" on page 6-17
Note: You can view the body of the data conversion package. Do not modify the package body or specification, as it might cause the calling Oracle application to malfunction or lead to unrecoverable errors.
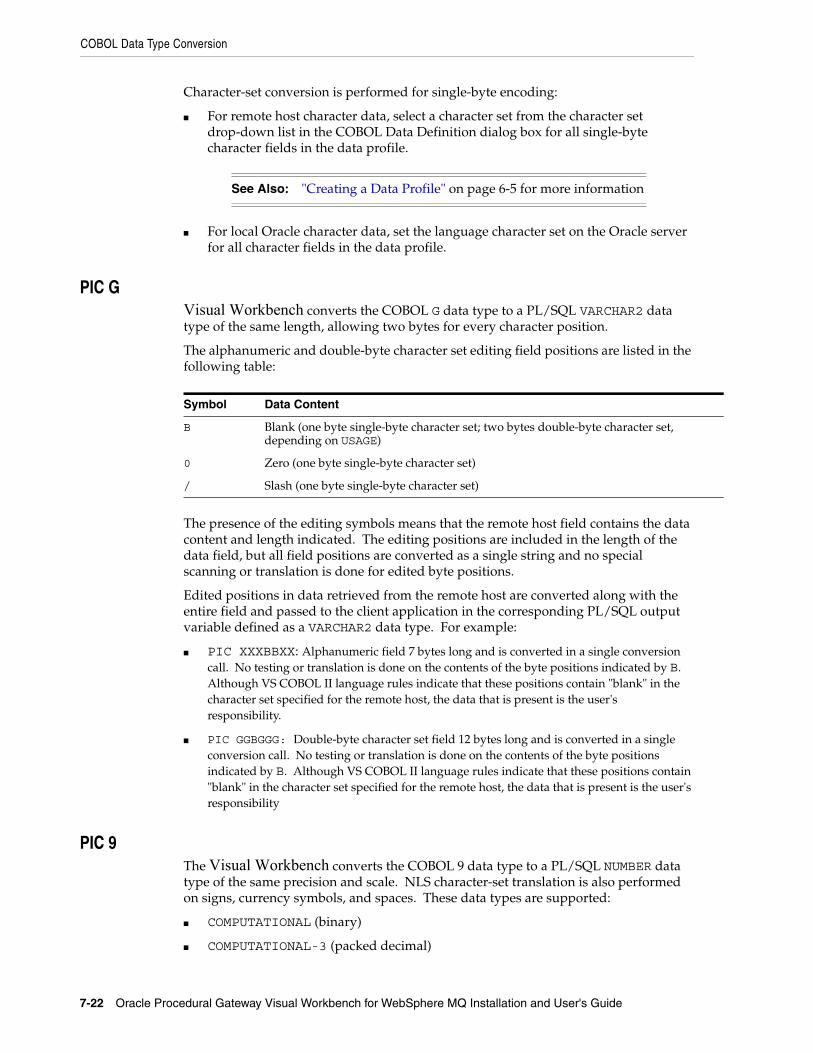
COBOL Data Type Conversion
7-22 Oracle Procedural Gateway Visual Workbench for WebSphere MQ Installation and User's Guide
Character-set conversion is performed for single-byte encoding:
■ For remote host character data, select a character set from the character set drop-down list in the COBOL Data Definition dialog box for all single-byte character fields in the data profile.
■ For local Oracle character data, set the language character set on the Oracle server for all character fields in the data profile.
PIC GVisual Workbench converts the COBOL G data type to a PL/SQL VARCHAR2 data type of the same length, allowing two bytes for every character position.
The alphanumeric and double-byte character set editing field positions are listed in the following table:
The presence of the editing symbols means that the remote host field contains the data content and length indicated. The editing positions are included in the length of the data field, but all field positions are converted as a single string and no special scanning or translation is done for edited byte positions.
Edited positions in data retrieved from the remote host are converted along with the entire field and passed to the client application in the corresponding PL/SQL output variable defined as a VARCHAR2 data type. For example:
■ PIC XXXBBXX: Alphanumeric field 7 bytes long and is converted in a single conversion call. No testing or translation is done on the contents of the byte positions indicated by B. Although VS COBOL II language rules indicate that these positions contain "blank" in the character set specified for the remote host, the data that is present is the user's responsibility.
■ PIC GGBGGG: Double-byte character set field 12 bytes long and is converted in a single conversion call. No testing or translation is done on the contents of the byte positions indicated by B. Although VS COBOL II language rules indicate that these positions contain "blank" in the character set specified for the remote host, the data that is present is the user's responsibility
PIC 9The Visual Workbench converts the COBOL 9 data type to a PL/SQL NUMBER data type of the same precision and scale. NLS character-set translation is also performed on signs, currency symbols, and spaces. These data types are supported:
■ COMPUTATIONAL (binary)
■ COMPUTATIONAL-3 (packed decimal)
See Also: "Creating a Data Profile" on page 6-5 for more information
Symbol Data Content
B Blank (one byte single-byte character set; two bytes double-byte character set, depending on USAGE)
0 Zero (one byte single-byte character set)
/ Slash (one byte single-byte character set)
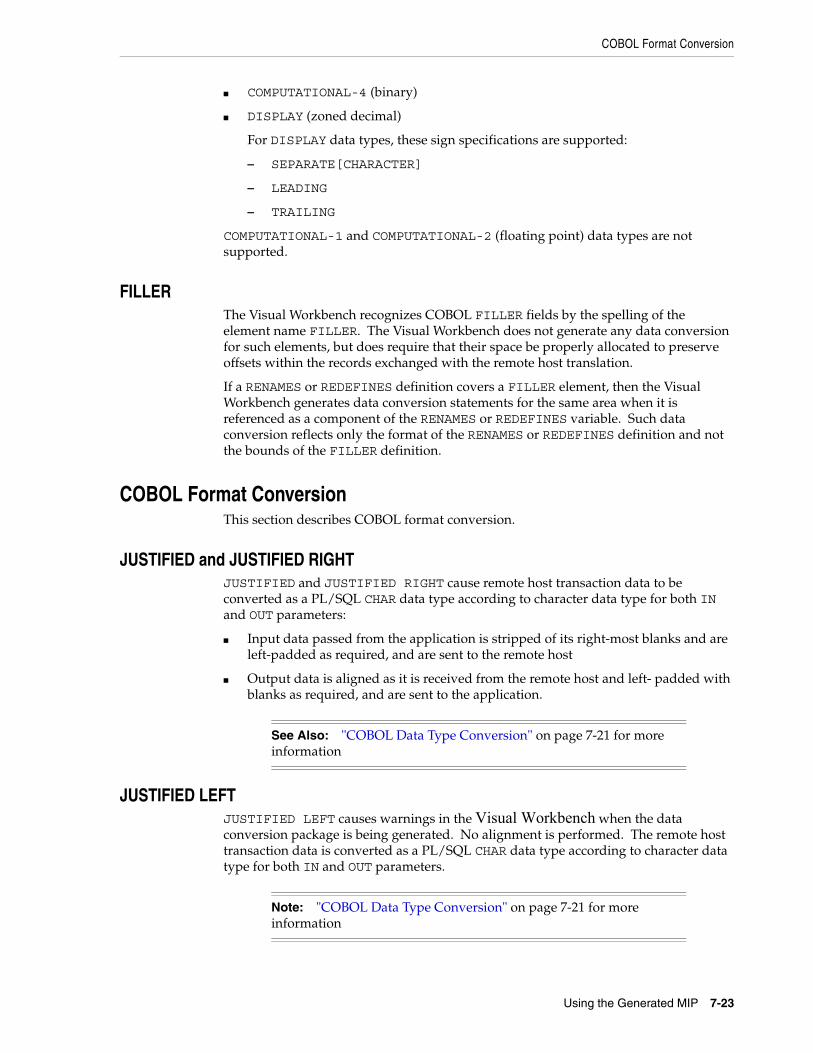
COBOL Format Conversion
Using the Generated MIP 7-23
■ COMPUTATIONAL-4 (binary)
■ DISPLAY (zoned decimal)
For DISPLAY data types, these sign specifications are supported:
– SEPARATE[CHARACTER]
– LEADING
– TRAILING
COMPUTATIONAL-1 and COMPUTATIONAL-2 (floating point) data types are not supported.
FILLERThe Visual Workbench recognizes COBOL FILLER fields by the spelling of the element name FILLER. The Visual Workbench does not generate any data conversion for such elements, but does require that their space be properly allocated to preserve offsets within the records exchanged with the remote host translation.
If a RENAMES or REDEFINES definition covers a FILLER element, then the Visual Workbench generates data conversion statements for the same area when it is referenced as a component of the RENAMES or REDEFINES variable. Such data conversion reflects only the format of the RENAMES or REDEFINES definition and not the bounds of the FILLER definition.
COBOL Format ConversionThis section describes COBOL format conversion.
JUSTIFIED and JUSTIFIED RIGHTJUSTIFIED and JUSTIFIED RIGHT cause remote host transaction data to be converted as a PL/SQL CHAR data type according to character data type for both IN and OUT parameters:
■ Input data passed from the application is stripped of its right-most blanks and are left-padded as required, and are sent to the remote host
■ Output data is aligned as it is received from the remote host and left- padded with blanks as required, and are sent to the application.
JUSTIFIED LEFTJUSTIFIED LEFT causes warnings in the Visual Workbench when the data conversion package is being generated. No alignment is performed. The remote host transaction data is converted as a PL/SQL CHAR data type according to character data type for both IN and OUT parameters.
See Also: "COBOL Data Type Conversion" on page 7-21 for more information
Note: "COBOL Data Type Conversion" on page 7-21 for more information
COBOL Format Conversion
7-24 Oracle Procedural Gateway Visual Workbench for WebSphere MQ Installation and User's Guide
OCCURS n TIMESOCCURS n TIMES causes conversion of n instances of a set of PL/SQL variables to or from a repeating group area within the remote host record. The size of the area equals the group length multiplied by n repetitions. The data conversion packages generated by the Visual Workbench use PL/SQL RECORDs of TABLEs to implement an array-like subscript on fields in a repeating group. Because PL/SQL supports a single dimension TABLE, the Visual Workbench supports only a single level of an OCCURS group. It does not support nested OCCURS groups. Conversion and formatting are dictated by the COBOL data type of each subfield defined in the repeating group.
OCCURS m TO n TIMES DEPENDING ON field-2This causes conversion of at least m and not more than n instances of a set of PL/SQL variables to or from a repeating group area within the remote host record. The size of the area equals the group length multiplied by the repetition count contained in the named field. The data conversion packages generated by the Visual Workbench use PL/SQL RECORDs of TABLEs to implement an array-like subscript on fields in a repeating group. Because PL/SQL supports a single dimension TABLE, the Visual Workbench supports only a single level of an OCCURS group. It does not support nested OCCURS groups. Conversion and formatting are dictated by the COBOL data type of each sub-field defined in the repeating group. The data conversion packages generated by the Visual Workbench use a FOR … LOOP algorithm with a range of 1 to the specified upper limit of TIMES.
RENAMES item-2 THRU item-3A single PL/SQL variable declaration corresponds to a RENAMES definition. If all the subfields covered by a RENAMES definition are PIC X, the PL/SQL variable is data type VARCHAR2. Otherwise, any non-PIC X subfield causes the PL/SQL variable data type to be RAW. Lengths of renamed fields do not contribute to the overall parameter data length because the original fields dictate the lengths.
RENAMES item-2 WHEN item-3=value WHEN item-3 = value is an Oracle extension to the COBOL copybook data definition as stored in the Visual Workbench repository. This extension exists only in the Visual Workbench context and is not valid IBM VS COBOL II syntax.
The gateway administrator or application developer can use this extension to specify the criteria by which to apply the redefinition. For example, a record-type field is often present in a record, and different record formats apply depending on which record type is being processed. The specification of which type values apply to which redefinition is typically contained in the application programming logic, not in the data definition. The WHEN criterion is included in data definitions to specify which conversion to perform on redefined formats in the data conversion package.
The Visual Workbench generates PL/SQL nested record declarations which correspond in name and data type to the subordinate elements covered by the REDEFINED definition.
LEVEL 01 REDEFINE is ignored, permitting remote host copybooks to include definitions which REDEFINE other transaction working storage buffers without having to define such buffers in the data conversion package or alter the copybook used as input for the definition.
PL/SQL Naming Algorithm
Using the Generated MIP 7-25
SYNCHRONIZED and SYNCHRONIZED RIGHTSYNCHRONIZED and SYNCHRONIZED RIGHT cause the numeric field to be aligned on boundaries as dictated by the remote host environment, compiler language, and data type.
Numeric conversion is performed on the aligned data fields according to numeric data type for IN and OUT parameters.
SYNCHRONIZED LEFTSYNCHRONIZED LEFT causes warnings to be displayed on the Visual Workbench during the generation of data conversion package, and no realignment is performed.
Numeric conversion is performed on the aligned data fields according to numeric data type for IN and OUT parameters.
PL/SQL Naming AlgorithmThis section describes the PL/SQL naming algorithm.
DelimitersSpecial COBOL characters in record, group, and element names are translated when data profiles are created using the Visual Workbench:
■ Hyphen (-) is translated to underscore (_)
■ Period (.) is deleted
Qualified Compound NamesPL/SQL variable names are fully qualified and composed from:
■ PL/SQL record name as the leftmost qualifier corresponding to level 01 or 77 COBOL record name
■ PL/SQL nested record names corresponding to COBOL group names
■ PL/SQL nested fields corresponding to COBOL elements of data type
■ CHAR or NUMBER corresponding to nonrepeating COBOL elements
■ TABLE corresponding to COBOL elements which fall within an OCCURS or OCCURS DEPENDING ON group (COBOL repeating fields correspond to PL/SQL nested RECORDs of TABLEs)
When referencing PL/SQL variables from calling applications, the data conversion package name (the data profile name created in the Visual Workbench) must be prefixed as the leftmost qualifier. These examples show the fully qualified reference to the PL/SQL variable:
BIRTHDAY is: EMPLOYEE.EMPLOYEE_Typ.BIRTHDAYBONUS is: EMPLOYEE.EMPLOYEE_Typ.BONUS
See Also: "COBOL Data Type Conversion" on page 7-21 for more information
See Also: "COBOL Data Type Conversion" on page 7-21 for more information

PL/SQL Naming Algorithm
7-26 Oracle Procedural Gateway Visual Workbench for WebSphere MQ Installation and User's Guide
Truncated and Non-Unique NamesThe Visual Workbench truncates field names and corresponding PL/SQL variable names when the name exceeds:
■ 26 bytes for fields within an aggregate record or group. This is because each field or PL/SQL variable name must have the suffix _Typ for group names and _Tbl for element names with a repeating group.
■ 30 bytes because of a PL/SQL limitation for any name
The rightmost four characters are truncated, imposing the restriction that names be unique to 26 characters.
Duplicate NamesCOBOL allows repetitive definition of the same group or element names within a record, and the context of the higher-level groups uniquely qualifies names. However, because data conversion packages generated by the Visual Workbench declare PL/SQL record variables that reference nested PL/SQL records for subordinate groups and fields, such nested record types can have duplicate names.
Given this COBOL definition, ZIP is uniquely qualified in COBOL, but the corresponding PL/SQL declaration would have a duplicate nested record type for ZIP. (The PL/SQL declaration is shown in "Generated PL/SQL" on page 7-26).
Example 7–1 COBOL definition
01 EMPREC. 05 HIREDATE PIC X(8). 05 BIRTHDATE PIC X(8). 05 SKILL PIC X(12)OCCURS 4. 05 EMPNO PIC 9(4). 05 EMPNAME. 10 FIRST-NAME PIC X(10). 10 LAST-NAME PIC X(15). 05 HOME-ADDRESS. 10 STREET PIC X(20). 10 CITY PIC X(15). 10 STATE PIC XX. 10 ZIP. 15 FIRST-FIVE PIC X(5). 15 LAST-FOUR PIC X(4). 05 DEPT PIC X(45). 05 OFFICE-ADDRESS. 10 STREET PIC X(20). 10 CITY PIC X(15). 10 STATE PIC XX. 10 ZIP. 15 FIRST-FIVE PIC X(5). 15 LAST-FOUR PIC X(4). 05 JOBTITLE PIC X(20).
Generated PL/SQLThe Visual Workbench avoids declaring duplicate nested record types, and generates this PL/SQL based on the COBOL definition in "COBOL definition" on page 7-26:
SKILL_Key BINARY_INTEGER; TYPE SKILL_Tbl is TABLE of CHAR(12) INDEX by BINARY_INTEGER;
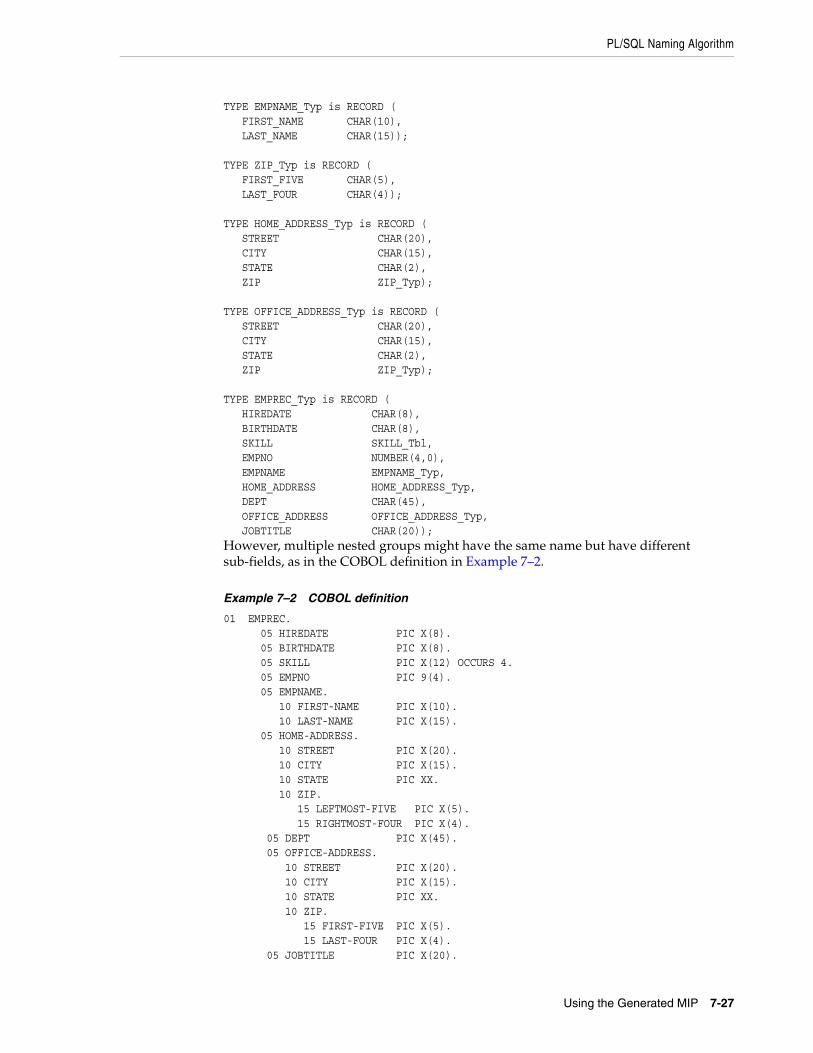
PL/SQL Naming Algorithm
Using the Generated MIP 7-27
TYPE EMPNAME_Typ is RECORD ( FIRST_NAME CHAR(10), LAST_NAME CHAR(15)); TYPE ZIP_Typ is RECORD ( FIRST_FIVE CHAR(5), LAST_FOUR CHAR(4)); TYPE HOME_ADDRESS_Typ is RECORD ( STREET CHAR(20), CITY CHAR(15), STATE CHAR(2), ZIP ZIP_Typ); TYPE OFFICE_ADDRESS_Typ is RECORD ( STREET CHAR(20), CITY CHAR(15), STATE CHAR(2), ZIP ZIP_Typ); TYPE EMPREC_Typ is RECORD ( HIREDATE CHAR(8), BIRTHDATE CHAR(8), SKILL SKILL_Tbl, EMPNO NUMBER(4,0), EMPNAME EMPNAME_Typ, HOME_ADDRESS HOME_ADDRESS_Typ, DEPT CHAR(45), OFFICE_ADDRESS OFFICE_ADDRESS_Typ, JOBTITLE CHAR(20));However, multiple nested groups might have the same name but have different sub-fields, as in the COBOL definition in Example 7–2.
Example 7–2 COBOL definition
01 EMPREC. 05 HIREDATE PIC X(8). 05 BIRTHDATE PIC X(8). 05 SKILL PIC X(12) OCCURS 4. 05 EMPNO PIC 9(4). 05 EMPNAME. 10 FIRST-NAME PIC X(10). 10 LAST-NAME PIC X(15). 05 HOME-ADDRESS. 10 STREET PIC X(20). 10 CITY PIC X(15). 10 STATE PIC XX. 10 ZIP. 15 LEFTMOST-FIVE PIC X(5). 15 RIGHTMOST-FOUR PIC X(4). 05 DEPT PIC X(45). 05 OFFICE-ADDRESS. 10 STREET PIC X(20). 10 CITY PIC X(15). 10 STATE PIC XX. 10 ZIP. 15 FIRST-FIVE PIC X(5). 15 LAST-FOUR PIC X(4). 05 JOBTITLE PIC X(20).
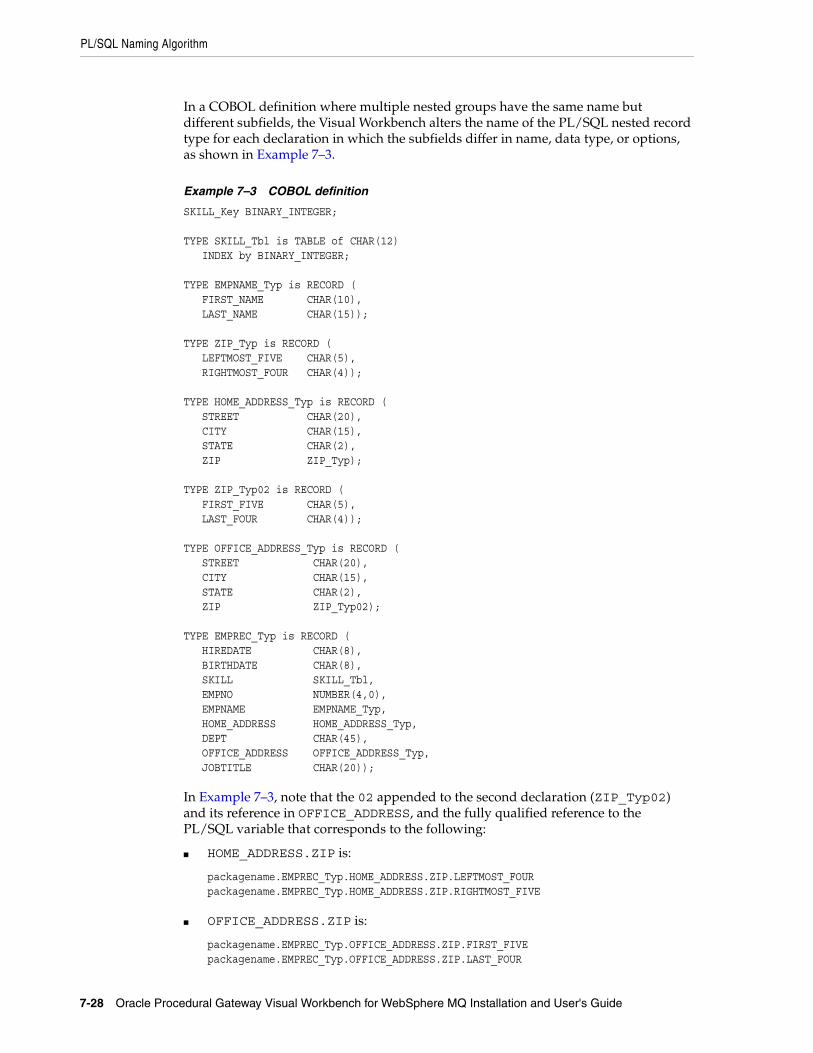
PL/SQL Naming Algorithm
7-28 Oracle Procedural Gateway Visual Workbench for WebSphere MQ Installation and User's Guide
In a COBOL definition where multiple nested groups have the same name but different subfields, the Visual Workbench alters the name of the PL/SQL nested record type for each declaration in which the subfields differ in name, data type, or options, as shown in Example 7–3.
Example 7–3 COBOL definition
SKILL_Key BINARY_INTEGER; TYPE SKILL_Tbl is TABLE of CHAR(12) INDEX by BINARY_INTEGER; TYPE EMPNAME_Typ is RECORD ( FIRST_NAME CHAR(10), LAST_NAME CHAR(15)); TYPE ZIP_Typ is RECORD ( LEFTMOST_FIVE CHAR(5), RIGHTMOST_FOUR CHAR(4)); TYPE HOME_ADDRESS_Typ is RECORD ( STREET CHAR(20), CITY CHAR(15), STATE CHAR(2), ZIP ZIP_Typ); TYPE ZIP_Typ02 is RECORD ( FIRST_FIVE CHAR(5), LAST_FOUR CHAR(4)); TYPE OFFICE_ADDRESS_Typ is RECORD ( STREET CHAR(20), CITY CHAR(15), STATE CHAR(2), ZIP ZIP_Typ02); TYPE EMPREC_Typ is RECORD ( HIREDATE CHAR(8), BIRTHDATE CHAR(8), SKILL SKILL_Tbl, EMPNO NUMBER(4,0), EMPNAME EMPNAME_Typ, HOME_ADDRESS HOME_ADDRESS_Typ, DEPT CHAR(45), OFFICE_ADDRESS OFFICE_ADDRESS_Typ, JOBTITLE CHAR(20));
In Example 7–3, note that the 02 appended to the second declaration (ZIP_Typ02) and its reference in OFFICE_ADDRESS, and the fully qualified reference to the PL/SQL variable that corresponds to the following:
■ HOME_ADDRESS.ZIP is:
packagename.EMPREC_Typ.HOME_ADDRESS.ZIP.LEFTMOST_FOURpackagename.EMPREC_Typ.HOME_ADDRESS.ZIP.RIGHTMOST_FIVE
■ OFFICE_ADDRESS.ZIP is:
packagename.EMPREC_Typ.OFFICE_ADDRESS.ZIP.FIRST_FIVEpackagename.EMPREC_Typ.OFFICE_ADDRESS.ZIP.LAST_FOUR

PL/SQL Naming Algorithm
Using the Generated MIP 7-29
The nested record type name ZIP_Typ02 is not used in the reference but is implicit within PL/SQL's association of the nested records.

PL/SQL Naming Algorithm
7-30 Oracle Procedural Gateway Visual Workbench for WebSphere MQ Installation and User's Guide
Preparing the Production Oracle Server A-1
APreparing the Production Oracle Server
Specific PL/SQL packages must be present on your production Oracle server before you can compile MIPs on that server. This appendix describes how to run scripts pgmdeploy.sql and pgmundeploy.sql and how to later remove any PL/SQL packages that are not needed on your system. The following topics are included:
■ Introduction
■ Verifying and Installing PL/SQL Packages
■ Removing the PL/SQL Packages
IntroductionBefore you can compile MIPs on a production Oracle server, the following PL/SQL packages must be present on the production Oracle server:
■ DBMS_PIPE, DBMS_OUTPUT, and UTL_RAW
These packages are shipped with each Oracle server and are usually already installed.
■ PGM, PGM_BQM, PGM_SUP, and UTL_PG
These packages are shipped with your Oracle Procedural Gateway for message queuing. They are installed during the creation process of the Visual Workbench repository. Do not run deployment script on the Oracle server with an installed Visual Workbench repository. If the Oracle server used for the repository is different than the Oracle server used in the production environment, then you must install these packages on the production Oracle server.
This section describes how to run:
■ pgmdeploy.sql, a deployment script to verify the existence of the required PL/SQL packages and to install some of them if they do not exist on the production Oracle server
■ pgmundeploy.sql, a script to remove the PL/SQL packages from a production Oracle server

Verifying and Installing PL/SQL Packages
A-2 Oracle Procedural Gateway Visual Workbench for WebSphere MQ Installation and User's Guide
Verifying and Installing PL/SQL Packages 1. Locate the necessary scripts:
■ pgm.sql
■ pgmbqm.sql
■ pgmdeploy.sql
■ pgmsup.sql
■ pgmundeploy.sql
■ prvtpg.sql
■ utlpg.sql
These scripts are installed with the gateway, in the directory ORACLE_HOME\pg4mq\admin\deploy, where ORACLE_HOME is the gateway home directory.
2. If your production Oracle server is on a different computer than the gateway, you need to use a file transfer method, such as ftp, to transfer files in the directory ORACLE_HOME\pg4mq\admin\deploy, where ORACLE_HOME is the gateway home directory on your gateway computer. On your production Oracle server computer, change directory to the directory containing the deployment scripts you just transferred and skip to step 4.
3. If your production Oracle server is on the same computer as the gateway, then change directory to ORACLE_HOME\pg4mq\admin\deploy, where ORACLE_HOME is the gateway home directory.
4. Run the deployment script by entering:
$ sqlplus /nolog @pgmdeploy.sql5. At the script prompt: Enter the connect string for the Oracle
server... [LOCAL], press Return to use the default of LOCAL.
6. At the script prompt Enter the following required Oracle server password, enter the password of the SYS account.
After the script verifies the SYS account password, it connects to the production Oracle server. The script verifies and reports on which PL/SQL packages are installed there:
■ If any of the Oracle server packages DBMS_OUTPUT, DBMS_PIPE or UTL_RAW are missing, the script stops. Have your DBA install the missing packages and re-run the deployment script.
■ If any of the Oracle packages PGM, PGM_BQM, PGM_SUP, and UTL_PG are missing, the script installs them on the production Oracle server.
Note: If your production Oracle server is Oracle8i or earlier, you need to use pgmdeploy8.sql to install the current release of PG4MQ Visual Workbench deployment packages, and you need to use pgmundeploy8.sql to remove previous release of PG4MQ Visual Workbench deployment packages.
All of the examples in this section are provided with the assumption that you are installing on the current release.
Removing the PL/SQL Packages
Preparing the Production Oracle Server A-3
Removing the PL/SQL Packages You can remove the PL/SQL packages that were installed by the pgmdeploy.sql script if, for example, none of your applications in the production environment uses a MIP. To remove these packages, perform the following steps:
1. On your production Oracle server computer, change directory to the directory containing the deployment scripts by entering the following command:
> cd ORACLE_HOME\pg4mq\admin\deploy2. Run the script by entering:
$ sqlplus /nolog @pgmundeploy.sql3. At the script prompt: Enter the connect string for the Oracle
server... [LOCAL], press Enter to use the default of LOCAL.
4. At the script prompt, Enter the required Oracle server passwords, enter the password of the SYS account.
After the script verifies the SYS account password, it connects to the production Oracle server and removes the packages installed by the pgmdeploy.sql script.
After the pgmundeploy.sql script completes successfully, applications on the production Oracle server fail if they attempt to reference any of the MIPs that are compiled there.

Removing the PL/SQL Packages
A-4 Oracle Procedural Gateway Visual Workbench for WebSphere MQ Installation and User's Guide
Index-1
Index
AAcknowledgment parameter
for message queue profile, 6-11with Response Queue, 6-11
administrative user, creating, 5-6
Ccharacter sets
in data profiles, 6-6choosing a repository server, 5-4CLOSE_CACHED_OPEN_CURSOR initialization
parameter, 2-2COBOL
copybook, 6-2copybook file parameter, 6-6data definition, 6-6data profile, 6-8, 6-9data profile (example), 6-5data type conversion, 7-21FILLER data type conversion, 7-23format conversion, 7-23JUSTIFIED, 7-23JUSTIFIED LEFT, 7-23JUSTIFIED RIGHT, 7-23messages, 6-2OCCURS clause, 7-24PIC 9 data type conversion, 7-22PIC G data type conversion, 7-22PIC X data type conversion, 7-21RENAMES clause, 7-24supported version, 1-4SYNCHRONIZED, 7-25SYNCHRONIZED LEFT, 7-25SYNCHRONIZED RIGHT, 7-25version, parameter for data profile, 6-6
codedata mapping, 6-17template, 6-17viewing the generated code, 6-17
compatibilityMIP and beta version MIP, 2-1, 6-17
compilation errors, 6-27compiling the MIP, 6-26Connect dialog box, 6-3
connecting to a repository, 6-3copybook
and data mapping information, 6-7COBOL, 6-2sample files, 6-6
correlation parameter, 7-19creating
a message queue profile, 6-9an interface profile and generating a MIP, 6-14data profiles, 6-5the administrative user, 5-6
cursors, maximum open, 2-2
Ddata conversion
COBOL, 7-21FILLER, 7-23package
description, 7-19duplicate names of record types, 7-26EMPLOYEE, 7-20gateway test code, 6-22in run-time environments, 7-21name prefixed as the leftmost qualifier, 7-25using MIP templates, 6-28using PL/SQL RECORDs of TABLEs, 7-24warnings with JUSTIFIED LEFT, 7-23with WHEN criterion, 7-24
PIC 9, 7-22PIC G, 7-22PIC X, 7-21PIC X example, 7-21PL/SQL mapping example, 7-20PL/SQL naming algorithm, 7-25required PL/SQL packages, 7-20
Data Definition Nameparameter for data profile, 6-6
data dictionarychecked by pgvwbrepos.sql script, 5-5
data mapping package, 6-17data profile
COBOL, 6-8, 6-9creating, 6-5Define COBOL Data Definition dialog box, 6-5definition, 6-5, 7-2
Index-2
EMPLOYEE, 7-3ENQUEUE and DEQUEUE procedures, 7-3generated data mapping, 6-17introduction, 1-4message exchange, 6-2PL/SQL mapping, 6-7removing, 6-9updating, 6-8
database linkconnecting MIP to a procedural gateway, 7-2
data-mapping codeinvoked by MIP, 7-2
DBMS_OUTPUT package, 5-4, 5-6, 6-34, 7-20, A-1, A-2
DBMS_PIPE package, 5-6, 6-34, A-1, A-2default
character set (NLS), 6-6gateway test, 6-22port number, 6-3SID, 6-4
Define COBOL Data Definition dialog box, 6-5, 6-8delimiters, in data conversion, 7-25Delivery Mode
parameter for message queue profile, 6-11DEQUEUE
advanced procedure, 7-12and "no messages available" exception, 6-34basic procedure, 7-11data conversion package and, 7-19DEQUEUE_OPTIONS_Typ, 7-15in the MIP, 7-11MESSAGE_PROPERTIES_Typ, 7-16mode, 6-12naming and name resolution, 7-11procedure, 6-28, 6-30, 7-2, 7-3template, 6-30test, 6-34testing
the procedure template, 6-33through the gateway, 6-22
Visibility parameter, 6-12Wait Interval parameter, 6-12
Dequeue Modeparameter for message queue profile, 6-12
dequeue_options parameter, 7-12, 7-15DEQUEUE_OPTIONS_Typ type definition, 7-15DESCRIBE statement, 5-4development, overview of process, 6-1dialog box
Connect, 6-3Define COBOL Data Definition, 6-5, 6-8Error Messages, 6-27Message Interface Package Compiler, 6-26, 6-35Message Interface Package Tester, 6-22, 6-32, 6-33WebSphere MQ Properties, 6-10
directory, script file, 5-4DO_DEPOSIT
ENQUEUE DEPOSIT example, 6-28MIP example, 6-17, 6-18
duplicate names, in data conversion, 7-26
EEMPLOYEE data profile, 7-3ENQUEUE
advanced procedure, 7-9basic procedure, 7-8data conversion package and, 7-19DEPOSIT template, 6-28ENQUEUE_OPTIONS_Typ, 7-15in the MIP, 7-7MESSAGE_PROPERTIES_Typ, 7-16naming and name resolution, 7-8on the General panel, 6-22procedure, 6-28, 6-30, 7-2, 7-3, 7-8procedure, advanced, 7-9sample code example, 6-31sample ENQUEUE DEPOSIT template code, 6-29template, 6-30testing the ENQUEUE procedure template, 6-32testing the procedure template, 6-32testing through the gateway, 6-22Visibility parameter, 6-11
enqueue_operations parameter, 7-9enqueue_options parameter, 7-15ENQUEUE_OPTIONS_Typ type definition, 7-15error
compilation, 6-27error message
ORA-01000, 2-2ORA-20004, 2-2
Error Messages dialog box, 6-27exceptions
no messages available (DEQUEUE test), 6-34PL/SQL, 7-17
Expirationparameter for message queue profile, 6-11
Ffile
tnsnames.ora, 6-34file transfer program, 5-4FILLER, 7-23format conversion, COBOL, 7-23
Ggateway
testing, 6-22gateway test code, 6-22gateway test, default, 6-22General panel, 6-4generated code package, 6-17generated code, viewing, 6-17generated package, 6-27GRANT statement, syntax, 6-35
Hhardware requirements, 3-1HIRE interface profile, 7-3
Index-3
host file, 6-3host name
parameter for connecting, 6-3HR message queue profile, 7-3
IIBMVSCOBOLII, 6-6IN parameter, 7-23, 7-25initialization parameter
CLOSE_CACHED_OPEN_CURSOR, 2-2input parameter, 7-7, 7-9, 7-10, 7-12, 7-13, 7-16installation scripts, 5-4installing
the repository, 5-3installing the PG4MQ Visual Workbench client, 5-1inter-application messages, 6-9interface procedures
four in a MIP, 7-2interface profile, 6-2
before you compile the MIP, 6-34compatibility with beta release, 6-17creating, 6-14generating a MIP, 7-1HIRE, 7-3introduction, 1-4MIP too large, 2-2removing a message queue profile, 6-14updating a message queue profile, 6-13
invalid parameter, 7-7IP address, in the Host Name field, 6-3
JJUSTIFIED, 7-23JUSTIFIED LEFT, 7-23JUSTIFIED RIGHT, 7-23
Kknown problems, 3-2
Mmapping
to PL/SQL, 6-6, 6-7maximum open cursors, 2-2message interface package (see MIP)Message Interface Package Tester dialog box, 6-33message queue profile, 6-2
creating, 6-9HR, 7-3introduction, 1-4removing, 6-13updating, 6-13UPS, 6-12
message queue propertiesAcknowledgment, 6-11Delivery Mode, 6-11Dequeue Mode, 6-12Expiration, 6-11
Message Type, 6-11Priority, 6-11Profile Name, 6-10Queue Name, 6-10Response Queue, 6-11Security ID, 6-10Visibility, 6-11, 6-12Wait Interval, 6-12
message queuing systems, 1-1Message Type
parameter for message queue profile, 6-11message_properties parameter, 7-9, 7-12MESSAGE_PROPERTIES_Typ, 7-16MESSAGE_PROPERTIES_Typ type definition, 7-16message_type parameter, 7-19MIP
adding code to a template, 6-30compiling, 6-26contains ENQUEUE and DEQUEUE
procedures, 7-3contents of, 7-2data profile in, 7-2database link, 7-2definition, 7-1DEQUEUE procedure, 7-11ENQUEUE procedure, 7-7example, 7-3example, DO_DEPOSIT, 6-17, 6-18for correct PL/SQL precision, 2-2generated data mapping package, 6-17generated templates, 6-17generating, 6-14generating gateway test code, 6-22incompatible with beta version, 2-1, 6-17introduction
description, 1-2introduction to generating, 1-4message queue profile, 7-2migration considerations, 2-1overview of PG4MQ Visual Workbench
development, 6-2parameter restrictions (a table), 7-19preparing for production, 1-6, 6-34procedures, 7-6testing the gateway for, introduction to, 1-5too large, 2-2updating, 6-19using a template to test, 6-31using the templates, 6-28using the templates, introduction, 1-5
msgid parameter, 7-9, 7-12, 7-19
Nnaming algorithm, PL/SQL, 7-25national language support
parameter for data profile, 6-6NLS, see national language supportno messages available, DEQUEUE application, 6-34NULL
Index-4
DEQUEUE procedure action, 7-12ENQUEUE procedure action, 7-9example syntax, 7-5, 7-6, 7-14, 7-15, 7-16, 7-20invalid for "open_mode", 7-14invalid for "payload", 7-8, 7-10, 7-12QOPEN syntax, 7-7
OOCCURS clause, 7-24open_options parameter, 7-14OPEN_OPTIONS_Typ type definition, 7-14openOpts.open_mode parameter, 7-10ORA-01000 error message, 2-2ORA-20004 error message, 2-2Oracle Procedural Gateway for message queuing
systems, 1-1Oracle SID
parameter for connecting, 6-4ORCL, default SID, 6-4OUT parameter, 7-23, 7-25output parameter, 7-8, 7-11, 7-12, 7-13, 7-16
Ppackage
data conversion, 6-22, 6-28, 7-19, 7-20, 7-21, 7-23, 7-24, 7-25, 7-26
data mapping, 6-17DBMS_OUTPUT, 5-4, 5-6, 6-34, A-1, A-2DBMS_PIPE, 5-6, 6-34, A-1, A-2generated, 6-27generated code, 6-17PGM_BQM, 5-6, 6-34, 7-17, 7-18, A-1, A-2PGM_SUP, 5-6, 6-34, 7-18, A-1, A-2PL/SQL, 1-5, 2-2, 6-34, 7-1, 7-20, A-1, A-2, A-3test code, 6-36UTL_PG, 5-6, 6-34, A-1, A-2UTL_RAW, 5-4, 5-6, 6-34, A-1, A-2
panelGeneral, 6-4
parameterAcknowledgment, 6-11COBOL copybook file, 6-6correlation, 7-19Data Definition Name, 6-6data length, 7-24Delivery Mode, 6-11Dequeue Mode, 6-12dequeue_options, 7-12, 7-15enqueue_operations, 7-9enqueue_options, 7-15Expiration, 6-11host name, 6-3if NULL, 7-9, 7-12IN, 7-23, 7-25initialization, CLOSE_CACHED_OPEN_
CURSOR, 2-2input, 7-7, 7-9, 7-10, 7-12, 7-13, 7-16invalid, 7-7
Message Type, 6-11message_properties, 7-9, 7-12message_type, 7-19MIP restrictions (a table), 7-19msgid, 7-9, 7-12, 7-19national language support, 6-6open_options, 7-14openOpts.open_mode, 7-10Oracle SID, 6-4OUT, 7-23, 7-25output, 7-8, 7-11, 7-12, 7-13, 7-16password, 6-3payload, 7-8, 7-11, 7-12port number, 6-3Priority, 6-11priority, 7-19Profile Name, 6-10Queue Name, 6-10queue_name, 7-9, 7-12, 7-19Response Queue, 6-11response_queue, 7-19Security ID, 6-10security_id, 7-19to control sending and receiving messages, 7-3user name, 6-3Visibility, 6-11, 6-12visibility, 7-15Wait Interval, 6-12
password, parameter for connecting, 6-3payload parameter, 7-8, 7-11, 7-12PG4MQ Visual Workbench
components, 1-2development environment, 3-1development privileges for repository, 5-6installing the client, 5-1installing the repository, 5-3overview of development process, 6-1remove repository, 5-7repository, 1-6repository directory tree, 6-4starting, 6-3uses, 1-4window, 6-4
PG4MQ Visual Workbench Wizard, 6-2, 6-14PGM_BQM package, 5-6, 6-34, 7-17, 7-18, A-1, A-2PGM_SUP package, 5-6, 6-34, 7-18, A-1, A-2pgm8.sql, A-2PGMADMIN, 5-6, 5-7, 6-3pgmbqm8.sql script, A-2pgmdeploy9.sql script, A-1PGMDEV role, 5-6pgmsup8.sql script, A-2pgmundeploy9.sql script, A-1pgvwbremove.sql script, 5-7pgvwbrepos.sql script, 5-5, 5-6PIC 9, 7-22PIC G, 7-22PIC X, 7-21PL/SQL
Code, 6-18
Index-5
code, 6-28code panel, 6-28data conversion package, 7-19incorrect precision of types, 2-2installing missing packages, A-1interface, 6-14mapping, 6-6, 6-7MIP in a PL/SQL program, 6-28naming algorithm, 7-25
delimiters, 7-25duplicate names, 7-26qualified compound names, 7-25truncated and non-unique names, 7-26
package, 1-5, 2-2, 6-34, 7-1, 7-20, A-1, A-2, A-3packages required for data conversion, 7-20removing packages, A-3verifying packages exist, A-1
port numberdefault, 6-3parameter for connecting, 6-3
priority parameter, 7-19priority, parameter for message queue profile, 6-11private access privileges, 5-6private repository, 5-7privileges, private access, 5-6privileges, public access, 5-6problems, incorrect precision of PL/SQL types, 2-2procedural gateway
database link for access, 5-5procedure
DEQUEUE, 6-28, 6-30, 7-2, 7-3ENQUEUE, 6-28, 6-30, 7-2, 7-3, 7-8ENQUEUE, advanced, 7-9QCLOSE, 7-2, 7-7QOPEN, 7-2, 7-7
productionintroduction to preparing the MIP for
production, 1-6preparing the MIP for production, 6-34
profiledata, for message exchange, 6-2HR, 7-3interface, 6-2message queue, 6-2
Profile Nameparameter for message queue profile, 6-10
programfile transfer, 5-4
prvtpg.sql script, A-2prvtrawb.plb script, 5-4public access privileges, 5-6
QQCLOSE
close an open queue, 7-2procedure, 7-2, 7-7syntax, 7-7
QOPENopen a specified queue, 7-2
procedure, 7-2, 7-7syntax, 7-7
qualified compound names, in data conversion, 7-25Queue Name
parameter for message queue profile, 6-10queue_name parameter, 7-9, 7-12, 7-19
Rremove
the PG4MQ Visual Workbench repository, 5-7removing a data profile, 6-9removing a message queue profile, 6-13RENAMES clause, 7-24repository
and compiling, 6-27choosing a server, 5-4connecting to, 6-3development privileges, 5-6directory tree, PG4MQ Visual Workbench, 6-4installation scripts, 5-4installing, 5-3installing the repository, 5-3PG4MQ Visual Workbench, 1-6private, 5-7remove, 5-7server, definition, 5-4
requirementshardware, 3-1software, 3-1
Response Queueparameter for acknowledgment message, 6-11parameter for message queue profile, 6-11
response_queue parameter, 7-19role
PGMDEV, 5-6
Ssample copybook files, 6-6script
file directory, 5-4pgmbqm8.sql, A-2pgmdeploy9.sql, A-1pgmsup8.sql, A-2pgmundeploy9.sql, A-1pgvwbremove.sql, 5-7pgvwbrepos.sql, 5-5, 5-6prvtpg.sql, A-2prvtrawb.plb, 5-4utlpg.sql, A-2utlraw.sql, 5-4
Security IDparameter for message queue profile, 6-10
security_id parameter, 7-19SID
(system identifier) parameter, 6-4default, 6-4
software requirements, 3-1starting the PG4MQ Visual Workbench, 6-3
Index-6
statementDESCRIBE, 5-4GRANT, 6-35
SYNCHRONIZED, 7-25SYNCHRONIZED LEFT, 7-25SYNCHRONIZED RIGHT, 7-25system identifier (SID) parameter, 6-4
Ttemplate
adding code to, 6-30MIP, 6-17testing the DEQUEUE, 6-33testing the ENQUEUE, 6-32using the MIP, 6-28using the MIP, introduction, 1-5using to test the MIP, 6-31
template code, 6-17to test the MIP, 6-26
test code package, 6-36testing
introduction to testing the gateway for a MIP, 1-5testing the gateway for a MIP, 6-22
tnsnames.ora file, 6-34truncated and non-unique names
in data conversion, 7-26type definition
an introduction, 7-14DEQUEUE_OPTIONS_Typ, 7-15ENQUEUE_OPTIONS_Typ, 7-15MESSAGE_PROPERTIES_Typ, 7-16OPEN_OPTIONS_Typ, 7-14
Uupdating
data profile, 6-8message queue profile, 6-13MIP, 6-19
UPSmessage queue profile, 6-12
user name, parameter for connecting, 6-3UTL_PG package, 5-6, 6-34, 7-20, A-1, A-2UTL_RAW package, 5-4, 5-6, 6-34, 7-21, A-1, A-2utlpg.sql script, A-2utlraw.sql script, 5-4
Vviewing the generated code, 6-17Visibility
DEQUEUE parameter for message queue profile, 6-12
ENQUEUE parameter for message queue profile, 6-11
visibility parameter, 7-15
WWait Interval
and "no messages available" exception (DEQUEUE test), 6-34
parameter for message queue profile, 6-12WebSphere MQ
using the MIP for, 7-18WebSphere MQ Properties dialog box, 6-10Wizard
PG4MQ Visual Workbench, 6-2, 6-14


