IMPORTANT Read ALL safety warnings berore install What’s Included Aluminum Arm w/Bracket (pre-installed) - 1 Light Fixture Clip w/Screw & Turn Nut - 2 Bracket Attachment Screws (pre-installed) - 4 Orbit Marine PRO Attachment Screws - 4 C A B D B Safety Warnings For step-by-step video instructions, visit our website at www.current-usa.com/videos Remove sliding docking mounts from fixture by pulling mounts outwards (it can take some pull). Save docking mounts for future use, do not discard. A B C D Before Installation Determine location on tank where the tank arm bracket will be installed. Clean glass of any algae or debris before installation. Limited Warranty ORBIT ADJUSTABLE TANK ARM BRACKET ORBIT ADJUSTABLE TANK ARM BRACKET Installation Instructions Model #4193 For use with Current-USA light fixtures: Orbit IC, Orbit Marine & Orbit Marine PRO LED Satellite LED Plus & Satellite LED Plus PRO LED www.current-usa.com This tank mount arm bracket is compatible only with Current-USA Orbit IC, Orbit Marine, Orbit Marine PRO, Satellite LED Plus and Satellite LED Plus PRO. Tank bracket will only fit aquariums up to 1" thick or a 1" frame. DO NOT CUT AQUARIUM FRAME. Use one arm per fixture for 18", 24" & 36" fixtures, 48" & 72" fixtures require two arm brackets. For Orbit Marine PRO fixtures, follow guidelines in these instructions. Use CAUTION when intalling and using bracket. DO NOT PUSH, PULL or BEND bracket arm in any manner while attached to aquarium. Doing so may cause glass breakage. ALWAYS disconnect light from power and remove both light and tank mount arms from aquarium when performing any cleaning or maintenance. This product MUST be purchased from an authorized Current-USA reseller. Visit our website for a list of unauthorized resellers. Current USA, Inc. warrants this product against defects in materials and worksmanship for ONE (1) YEAR from the date of original retail purchase and is none transferable. DC
Transcript
IMPORTANTRead ALL safety warnings berore install
What’s Included
Aluminum Arm w/Bracket (pre-installed) - 1
Light Fixture Clip w/Screw & Turn Nut - 2
Bracket Attachment Screws (pre-installed) - 4
Orbit Marine PRO Attachment Screws - 4
C
A
B
D
B
Safety Warnings
For step-by-step video instructions, visit our website at www.current-usa.com/videosRemove sliding docking mounts from fixture by pulling mounts outwards (it can take some pull).
Save docking mounts for future use, do not discard.
ABCD
Before Installation
Determine location on tank where the tank arm bracket will be installed. Clean glass of any algaeor debris before installation.
Limited Warranty
ORBIT ADJUSTABLETANK ARM BRACKETORBIT ADJUSTABLETANK ARM BRACKET
Installation Instructions Model #4193
For use with Current-USA light fixtures: Orbit IC, Orbit Marine & Orbit Marine PRO LEDSatellite LED Plus & Satellite LED Plus PRO LED
www.current-usa.com
This tank mount arm bracket is compatible onlywith Current-USA Orbit IC, Orbit Marine, OrbitMarine PRO, Satellite LED Plus and Satellite LED Plus PRO.
Tank bracket will only fit aquariums up to 1" thickor a 1" frame. DO NOT CUT AQUARIUM FRAME.
Use one arm per fixture for 18", 24" & 36" fixtures, 48" & 72" fixtures require two arm brackets. ForOrbit Marine PRO fixtures, follow guidelines inthese instructions.
Use CAUTION when intalling and using bracket.
DO NOT PUSH, PULL or BEND bracket arm inany manner while attached to aquarium. Doingso may cause glass breakage.
ALWAYS disconnect light from power and remove both light and tank mount arms from aquariumwhen performing any cleaning or maintenance.
This product MUST be purchased from an authorized Current-USA reseller. Visit our website for a list of unauthorized resellers.Current USA, Inc. warrants this product against defects in materials and worksmanship for ONE (1) YEAR from the date oforiginal retail purchase and is none transferable.
D C
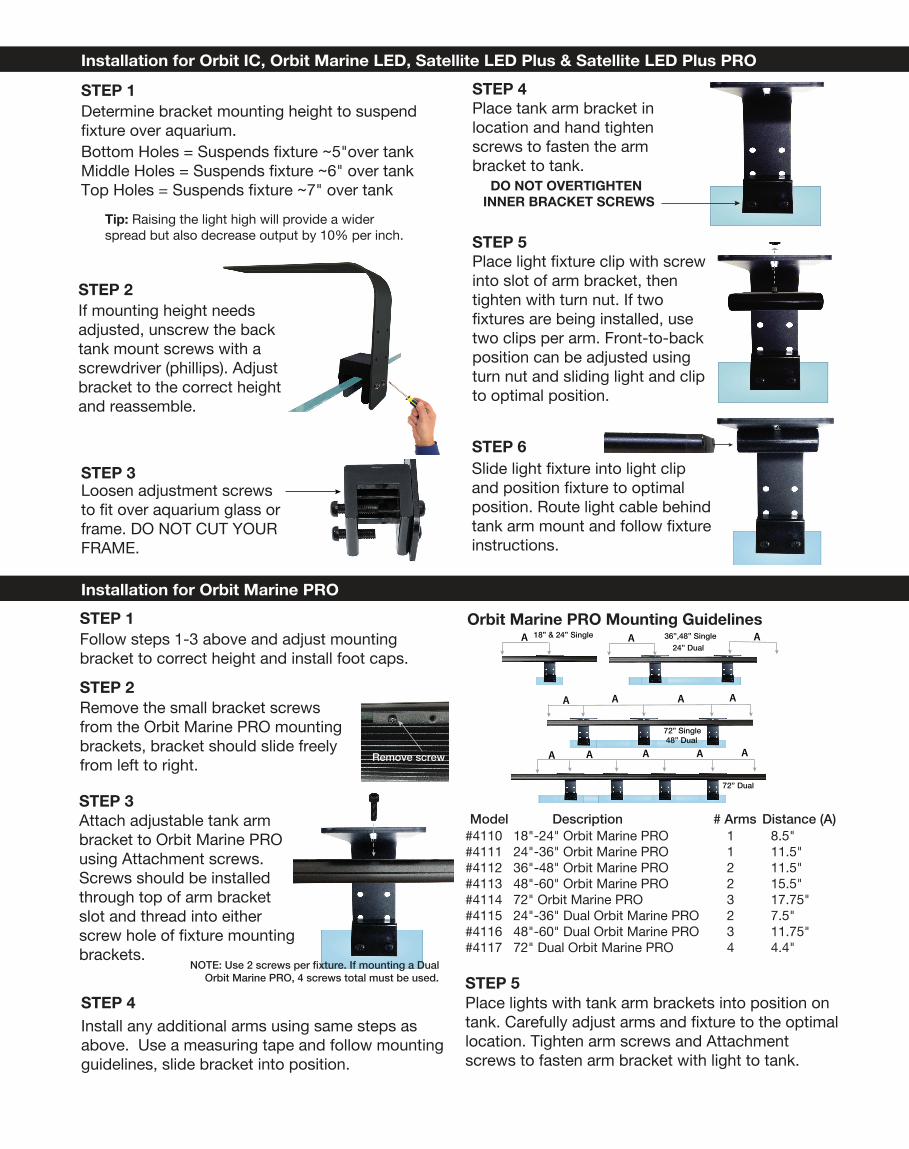
Installation for Orbit IC, Orbit Marine LED, Satellite LED Plus & Satellite LED Plus PRO
Install any additional arms using same steps as above. Use a measuring tape and follow mountingguidelines, slide bracket into position.
STEP 4
STEP 4Place tank arm bracket in location and hand tighten screws to fasten the arm bracket to tank.
STEP 5Place light fixture clip with screwinto slot of arm bracket, thentighten with turn nut. If twofixtures are being installed, usetwo clips per arm. Front-to-backposition can be adjusted usingturn nut and sliding light and clipto optimal position.
DO NOT OVERTIGHTENINNER BRACKET SCREWS
STEP 6Slide light fixture into light clip and position fixture to optimalposition. Route light cable behind tank arm mount and follow fixture instructions.
Determine bracket mounting height to suspend fixture over aquarium. Bottom Holes = Suspends fixture ~5"over tankMiddle Holes = Suspends fixture ~6" over tankTop Holes = Suspends fixture ~7" over tank
STEP 1
Tip: Raising the light high will provide a widerspread but also decrease output by 10% per inch.
If mounting height needs adjusted, unscrew the back tank mount screws with a screwdriver (phillips). Adjust bracket to the correct height and reassemble.
STEP 2
STEP 3Loosen adjustment screwsto fit over aquarium glass orframe. DO NOT CUT YOURFRAME.
Follow steps 1-3 above and adjust mounting bracket to correct height and install foot caps.
STEP 1
Remove the small bracket screws from the Orbit Marine PRO mountingbrackets, bracket should slide freelyfrom left to right.
STEP 2
Remove screw
Attach adjustable tank armbracket to Orbit Marine PROusing Attachment screws.Screws should be installedthrough top of arm bracketslot and thread into either screw hole of fixture mountingbrackets.
STEP 3
Installation for Orbit Marine PRO
NOTE: Use 2 screws per fixture. If mounting a Dual Orbit Marine PRO, 4 screws total must be used.
#4110 18"-24" Orbit Marine PRO 1 8.5"#4111 24"-36" Orbit Marine PRO 1 11.5"#4112 36"-48" Orbit Marine PRO 2 11.5"#4113 48"-60" Orbit Marine PRO 2 15.5"#4114 72" Orbit Marine PRO 3 17.75"#4115 24"-36" Dual Orbit Marine PRO 2 7.5"#4116 48"-60" Dual Orbit Marine PRO 3 11.75"#4117 72" Dual Orbit Marine PRO 4 4.4"
Model Description # Arms Distance (A)
Orbit Marine PRO Mounting GuidelinesA 18” & 24” Single 36”,48” Single
24” Dual A A
72” Single 48” Dual
A AA A
72” Dual
A AA AA
Place lights with tank arm brackets into position on tank. Carefully adjust arms and fixture to the optimallocation. Tighten arm screws and Attachment screws to fasten arm bracket with light to tank.