Computer Engineering Senior Project California Polytechnic State University, San Luis Obispo OTD 360 Corsa Plate and PCB Recreation Advisor: Andrew Danowitz Author: Patrick Malapira June 2018
Transcript
Computer Engineering Senior Project California Polytechnic State University, San Luis Obispo
3.1. Previous Custom PCB Designs 3.1.1. Open Source, QMK 3.1.2. Private Firmware, Jigon and NerDy
3.2. Previous Custom Plate Designs 3.2.1. Form Factor 3.2.2. Mounting Style 3.2.3. Plate Material
3.3. PCB Design Guide 4. Final Design Process 7
4.1. Final Plate Design 4.1.1. Plate Prototypes
4.2. PCB Design 4.2.1. PCB Prototype
5. Group Buy Process 14 6. Reflection and Future Considerations 14 7. Bill of Materials 15 8. References 16
2
1. Introduction Mechanical keyboards have a rich history alongside the development of personal
computers with keyboards from leading manufacturers such as IBM and Apple, which are sought after by today’s enthusiast. As the hobby matured and hobbyist began straying from original equipment manufacturer, OEM, mechanical keyboards, enthusiasts sought to create their own keyboards.The custom mechanical keyboard hobby’s origins can be traced back to Korea on an online forum otd.kr. Custom mechanical keyboards has progressed far past the provided OEM solutions focusing on various aspects such as ergonomics, programmability, and portability. In today’s do it yourself, DIY, culture, hobbyists can play a role in the manufacturing process of each individual component from design to fabrication to testing. Cases or housings can be 3D printed, laser cut, and computer numerically controlled machined, CNC’d provided the correct machinery and design tools for fabrication. Printed circuit boards and components can be tailored to each specific use case and form factor and produced at a low cost at small and large scales. Mechanical switch production is no longer solely controlled by IBM and Apple, but companies such as Corsair and Razer have taken a large share of the market. [1][2] 1.1 Project Overview
This project looks to bring the modern open source software capable of backlighting and indicator LEDs, n-key rollover, and anti-ghosting which allow the keyboard to register multiple keys at once, to outdated Korean custom keyboard, the On The Desk, OTD, 360 Corsa. [3] Currently custom manufactured printed circuit boards, PCBs, are not compatible with OTD 360 Corsa. During the time of production, specifications such as key placement and spacing were never standardized and enforced so current custom PCBs do not fit in OTD keyboards. By providing a modern replacement to the OTD 360 Corsa, enthusiast can bring their keyboard relics into the modern age. 1.2 Stakeholders
The target market for this product is the small group of users who own an OTD 360 Corsa or an OTD 456GT, as the PCB’s and mounting plates of both keyboards are the same. The original PCBs of these boards have been used and reused which has caused plate deformation, lifted pads, and broken traces. A replacement will allow users to rebuild their keyboards without fear of damaging the original components which play a large role in the price and usability of the keyboard.
This product would also look to provide users with more modern technology to program their keyboards with the open source firmware QMK.[4] The modern firmware allows users to program LEDs, macros, and multi-layer functionality as they see fit. As manufacturing costs for a single prototype is high, I plan to order a large quantity to provide users with an affordable replacement PCB and plate for their OTD 360 Corsa. 1.3 Project Goals and Deliverables
The project outcome is the recreation of the OTD 360 Corsa’s plate file and PCB, which can be remanufactured as needs arise. The base plate file allows users to produce the plate in any material which they see fit such as brass, aluminum, steel, or polycarbonate. The PCB file,
3
once verified and released, will allow users to tweak the components as more progress is made towards custom PCB firmware.
Figure 1: Original OTD Corsa 360 Plate
Figure 2: Original OTD Corsa 360 PCB
2.Background
Current and former mechanical keyboard enthusiasts will have at one point in their keyboard adventure come across a fabled keyboard from Korea known as an “OTD”. Forum members from otd.kr, notably user eungsam and korela created keyboards under the brand “On The Desk” or OTD.[5] Many iterations of their custom keyboards exist dating back to 2008 and earlier with iterations designed for specific keyswitches in mind.[6] Today, OTD keyboards are worth anywhere between five hundred to ten thousand dollars. They originally were sold for around three hundred dollars around the time of manufacturing. While these keyboards are rich in history, their firmware and hardware are severely outdated. OTD keyboards rely on a custom Korean firmware program that has not been maintained since the departure of the original designers, and hardware that is very similar to late 1990’s OEM Cherry keyboard controller chips.
4
3. Engineering Specifics Current custom mechanical keyboard PCBs all use the same base chip, an Atmega32u4
and follow the schematics and design of a Teensy, an Atmega32u4 development board, very closely.[7] Early PCBs were designed to use a teensy mounted to the custom fabricated PCB to control the switch matrix. The design has since been integrated into the PCB itself to create a single production quality board.
Custom mechanical keyboard plates have been CNC’d or laser cut from industry standard appropriate material such as 6061-T6 Aluminum or polycarbonate. Mechanical keyboard switch dimensions are available from Cherry’s website and all competing switches have followed the same dimensions to set an industry standard.[8] 3.1 Previous Custom PCB Designs
The primary English mechanical keyboard forum, Geekhack, hosts a thread for past, present, and upcoming PCB designs from various community members. Custom keyboard firmware has been developed as an open source project like QMK, and as proprietary such as Jigon and NerDy. The open source software and firmware have been constantly improved to be more user friendly and intuitive to program. However, the proprietary firmware remains a staple in the community due to the manufacturing capabilities of a few members who produce affordable custom PCB designs. 3.1.1 Open source firmware, QMK
QMK began as the open source firmware TMK designed by geekhack forum member hasu [9]. Once hasu no longer had time to update libraries for new layouts and keyboards, the project was taken over and transformed into QMK by forum member skullydazed and designer Jack Humbert.[4] QMK is used in almost all homebrew custom PCB designs created on geekhack and other English keyboard forums.
Various forum members have contributed prototype PCB schematics and layouts for critique, troubleshooting, and verification. Notable members such as skulldazed, creator of the clueboard, and hasu, designer of the alps64 PCB and HHKB controller converter, frequent the PCB design thread with advice and fixes with their expertise and background in PCB design.[10]
This thread provides the stable library for PCB design on KiCad so all designers can maintain some standardization with components and sizing. The thread has standardized the main controller for PCB as the Atmega32u4, allowing the keyboard to be flashed with arduino software. Contributions have been made as designs have become more efficient to lessen the amount of repeated work with specific designs.
Several non-standard PCBs utilizing QMK have come from Geekhack users, such as the popularized ErgoDox, ErgoDox infinity, ErgoDox EZ originally designed by Geekhack user, bpiphany, focusing on a split design for ergonomics.[11] What started as a hobbyist project has developed into a commercialized product readily available as a complete keyboard kit.[12] Another popularized non conventional design, The Van, originated on Geekhack as a miniature travel sized board, and has sparked community interest in a miniature form factor among hobbyists.[13][14]
5
3.1.2 Private firmware, Jigon and NerDy
While many PCB’s run the open source firmware TMK and fork QMK, the standard firmware for current Korean and Chinese custom PCBs are designed by community member Leeku, running his custom firmware Jigon. The usability of the Jigon software has been a barrier to many hobbyists, leading to many complaints among community members, but efforts have been made to setup guides for programming and troubleshooting the firmware.[15] However, Leeku’s firmware and programming software will remain a staple in the custom keyboard community due to the ability to mass produce PCB and the reputation that comes years of use.
Another private firmware and software implementation was held by the popular producer of GoN keyboards. The software was regarded as the most intuitive and easy to use while programming various functionalities.[16] However, the availability of compatible PCBs has diminished due to the lack of constant production from GoN and the PCBs can only be found in the aftermarket. The reputation of such PCBs has fallen due to mixed reviews of the overall product and lack of involvement by the designer. 3.2 Previous Custom Plate Designs
In a keyboard design, the plate is the part that holds the switches in a predetermined layout and where the pcb sits beneath. Three traits determine a keyboard plate: form factor, mounting style, and plate material. 3.2.1 Form Factor
The size and layout of the switches in a plate is determined by the form factor.[17] While tenkeyless and 60% are some of the most standard designs, hobbyists have experimented with different designs such as ortholinear, non staggered keys, and split ergonomics, seen in the Ergodox. The form factor also allows for various designs of certain keys such as the bottom row, shift keys, and enter style. While a plate can accommodate several layouts of one form factor, such plates sacrifice the stability of specific keys because the layout is designed to fit multiple keys in the same area.
3.2.2 Mounting style
Depending on the design, the plate can be part of the case or attach to the case internally. Korean and Chinese custom keyboards mainly follow the design of having the plate screw into the top of the case, known as top mounting, where-as many simple DIY designs have the plate screw into a one piece tray case, known as tray mounting. In top mounting, the number and size of the mounting tabs can increase the rigidity of the plate leaving very little room for the plate to flex during typing. Plates can also be secured through screws or rubber compression, both of which lead to their own unique typing feeling, with screws being the more standard.
3.2.3 Plate Material
The material that a plate is constructed from can determine the sound and feeling of a keyboard. Popular materials include aluminum, steel, brass, carbon fiber, and polycarbonate.
6
Plate flexibility is a trait that many hobbyists look to tune, with steel being the least flexible and polycarbonate being the most flexible. Metal plates tend to produce a sharper ping noise where-as composites such as polycarbonate and carbon fiber exhibit a deeper muted sound when typing.
3.3 PCB Design Guide
QMK has been popularized as the DIY solution because the firmware is open source and free, and comes with a guide to create a basic PCB. The PCB guide by ruiqi outlines all the steps to create a PCB from start to finish. A keyboard functions off of a matrix design so the PCB schematic is the first important part of the logical design. With five rows and ten columns ten, a tenkeyless schematic can be accommodated by the amount of pins of an atmega 32u4 without overlap. As formfactor increases and designs become more creative, another controller with more pins can replace the 32u4 or the designer can opt to overlap portions of the matrix and program the keyboard accordingly in the software.
The PCB layout of a tenkeyless has been optimized to place important components in one of the very few open spaces on the PCB above the arrow keys. The PCB guide outlines the concepts of various layers of a PCB and how to use two layers to correctly route traces without crossing and overlapping. 4. Final Design
Figure 3: Original plate and prototype PCB fitment test
7
Figure 4: Original PCB and prototype fitment test
4.1 Final Plate Design
The OTD 360 Corsa is a tenkeyless keyboard that only comes with a winkeyless bottom row, a bottom row without the Windows or menu key. The plate follows the basic design of a tenkeyless plate with slight differences that do not allow currently produced plates to fit in the OTD 360 Corsa case. The notable differences include the extra spacing between the number row and the function row, the extra spacing between the navigation side cluster and the main 60% typing portion, and the mounting tabs specifically designed for the OTD 360 Corsa.
To recreate the plate, I used Solidworks and Fusion 360 to model the design. I began by asking a fellow community member for a base plate to practice spacing and learning the controls for each Solidworks and Fusion 360. Once I was familiar with the software, I was able to create a generalized plate from scratch with correct spacing for conventional tenkeyless keyboards.
To correctly recreate the Corsa plate, I used calipers with .001mm precision to find where the dimensions of the plate differed from the base plate I had created. The spacing between the number row and function row measured to to be 1mm different and the spacing between the navigation side cluster and the main 60% typing portion measured to be .8mm different. The mounting tabs were measured from edge to center and the shape was roughly drawn and revised after prototypes were produced.
8
Figure 5: Fusion 360 OTD Corsa 360 plate design
4.1.1 Prototype Plates To test the fitment, a community member offered to laser cut the plate in acrylic at the
cost of materials and shipping. The first prototype had several flaws due to variation in switch cut outs. Switch cut outs measure 14mm x 14mm with 5.05mm between switch cutouts on conventional boards. The first prototype was created with 5.10mm spacing, while seemingly insignificant, across 13 switches the displacement measured to over .5mm significant enough to need a second revision. Another problem with laser cutting acrylic was the kerf, the extra material burned away from the laser, of each cut.[18] Each switch cut out was designed to be 14mm x 14mm, but due to the width of the laser, the switch cut outs on the 1st prototype measured to be 14.5mm x 14.5mm.
The second prototype was produced by the same community member after adjustments were made to the file and adjustments were made on the laser cutter to account for the kerf. With these adjustments in place, the plate produced was even more deformed than the first measuring 4mm taller and 2mm wider than intended. I decided to transition away from acrylic as
9
it would never be used in the production, and switched to aluminum, the same material the original plate was cut from.
The third prototype was produced by a personal friend who has access to a CNC machine at his work. As a mechanical engineer, he was able to discuss some of the specifics of the plate and help modify the design so the CNC’ing process would go smoothly. The main difference was shaping the corners and curves to match the smallest drill bit available on his machine. Since the mounting tabs were drawn by best guess, slightly altering the curves would not render the design obsolete. All other cuts from the plate were taken from standard schematics that are the same for most keyboards. The aluminum plate aligned perfectly with the original PCB allowing all switches to be mounted. However, two of the seven mounting tabs needed to be adjusted by 1mm. To save on cost, a fourth prototype was not produced.
Figure 6: Plate prototype #3
4.2 Final PCB Design
The final PCB design was constructed in KiCad following the instructions of the publically available PCB design guide. The guide laid out a step by step process for designing a PCB of any size by outlining controller component design and a scalable matrix design. Slight modifications were made to accommodate an internal mount for a cable versus a mini-USB port.
The internal PCB had very similar dimensions to the current custom PCB standard, the Leeku TX87. Following the component placement and switch spacing, I was able to replicate a PCB for a standard tenkeyless keyboard. Altering the function row spacing and nav spacing created a PCB that was suitable for the OTD 360 Corsa.
10
Figure 7: KiCad PCB Controller schematic
11
Figure 8: KiCad PCB key switch matrix
12
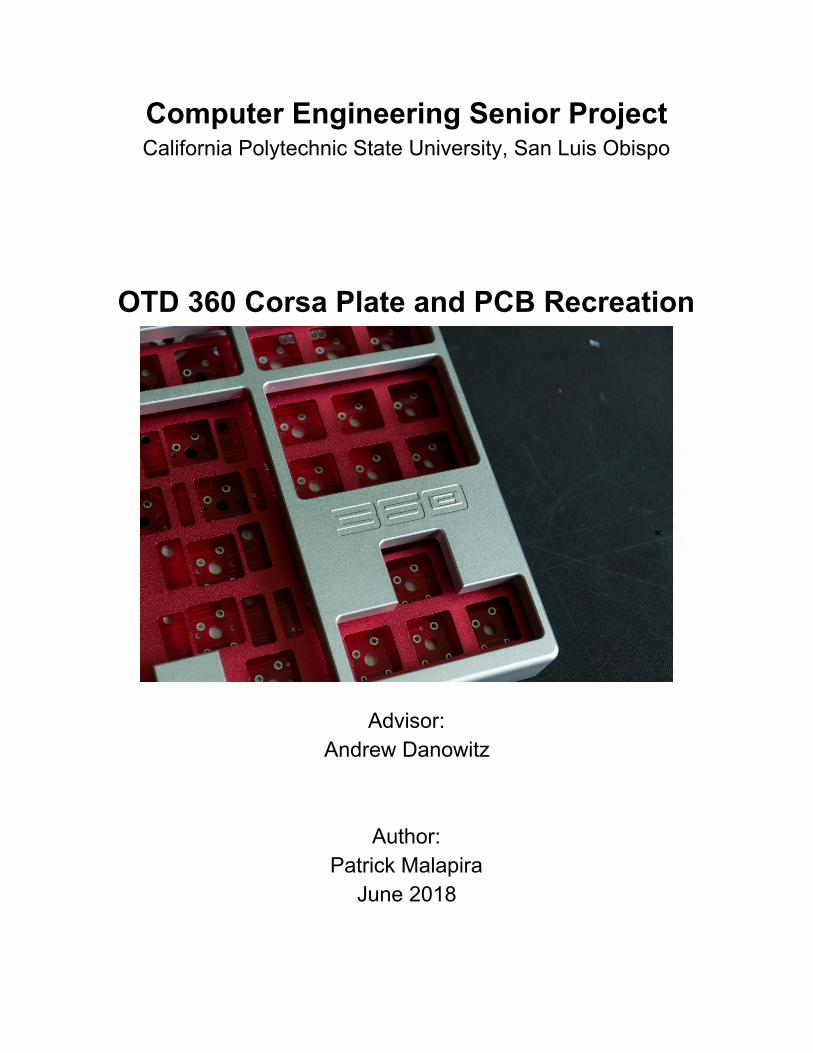
Figure 9: KiCad PCB back
Figure 10: KiCad PCB front
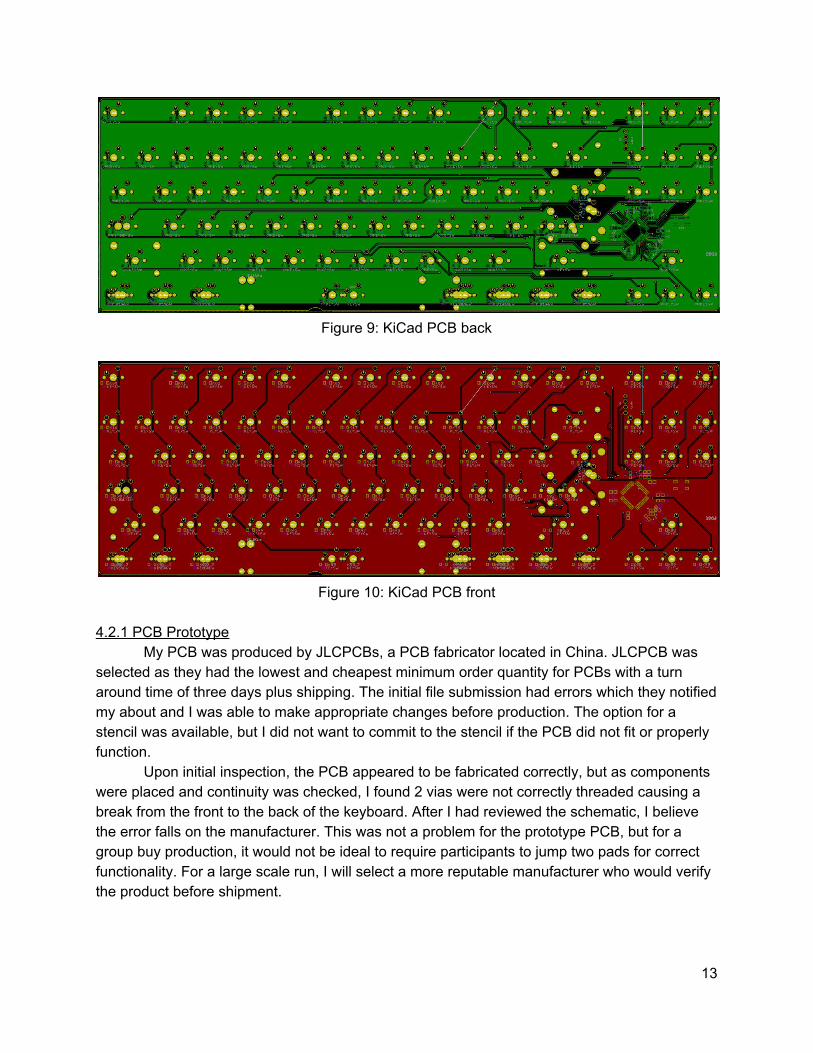
4.2.1 PCB Prototype
My PCB was produced by JLCPCBs, a PCB fabricator located in China. JLCPCB was selected as they had the lowest and cheapest minimum order quantity for PCBs with a turn around time of three days plus shipping. The initial file submission had errors which they notified my about and I was able to make appropriate changes before production. The option for a stencil was available, but I did not want to commit to the stencil if the PCB did not fit or properly function.
Upon initial inspection, the PCB appeared to be fabricated correctly, but as components were placed and continuity was checked, I found 2 vias were not correctly threaded causing a break from the front to the back of the keyboard. After I had reviewed the schematic, I believe the error falls on the manufacturer. This was not a problem for the prototype PCB, but for a group buy production, it would not be ideal to require participants to jump two pads for correct functionality. For a large scale run, I will select a more reputable manufacturer who would verify the product before shipment.
13
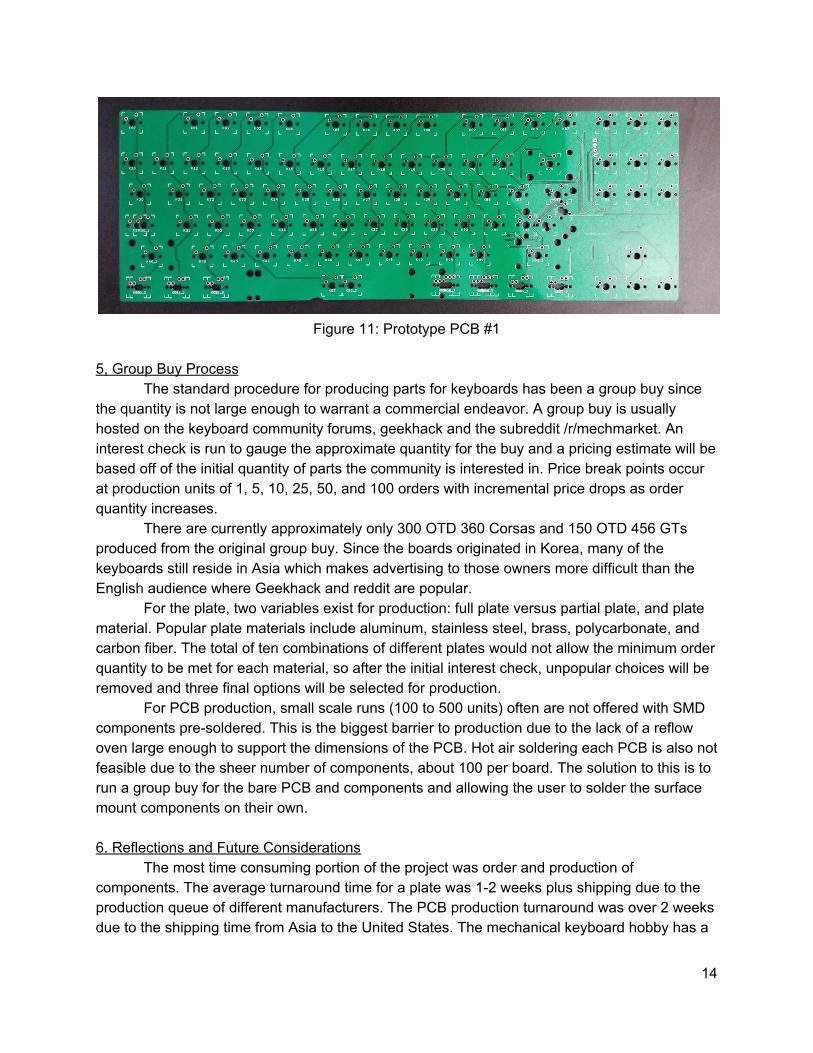
Figure 11: Prototype PCB #1
5, Group Buy Process
The standard procedure for producing parts for keyboards has been a group buy since the quantity is not large enough to warrant a commercial endeavor. A group buy is usually hosted on the keyboard community forums, geekhack and the subreddit /r/mechmarket. An interest check is run to gauge the approximate quantity for the buy and a pricing estimate will be based off of the initial quantity of parts the community is interested in. Price break points occur at production units of 1, 5, 10, 25, 50, and 100 orders with incremental price drops as order quantity increases.
There are currently approximately only 300 OTD 360 Corsas and 150 OTD 456 GTs produced from the original group buy. Since the boards originated in Korea, many of the keyboards still reside in Asia which makes advertising to those owners more difficult than the English audience where Geekhack and reddit are popular.
For the plate, two variables exist for production: full plate versus partial plate, and plate material. Popular plate materials include aluminum, stainless steel, brass, polycarbonate, and carbon fiber. The total of ten combinations of different plates would not allow the minimum order quantity to be met for each material, so after the initial interest check, unpopular choices will be removed and three final options will be selected for production.
For PCB production, small scale runs (100 to 500 units) often are not offered with SMD components pre-soldered. This is the biggest barrier to production due to the lack of a reflow oven large enough to support the dimensions of the PCB. Hot air soldering each PCB is also not feasible due to the sheer number of components, about 100 per board. The solution to this is to run a group buy for the bare PCB and components and allowing the user to solder the surface mount components on their own. 6. Reflections and Future Considerations
The most time consuming portion of the project was order and production of components. The average turnaround time for a plate was 1-2 weeks plus shipping due to the production queue of different manufacturers. The PCB production turnaround was over 2 weeks due to the shipping time from Asia to the United States. The mechanical keyboard hobby has a
14
long history of delays and extended shipping times so it is not unusual or unexpected for those in the hobby. But, the production of prototype plates in the United States significantly dropped the wait time between prototypes which was an important factor for the timeliness of the project.
In order to keep the PCB and plate readily available to interested parties, the original files or measurements may be shared to allow reproduction after I am no longer involved with the project.
The PCB currently only supports the basic functionality of switches. Modern PCBs support in-switch LEDs, surface mount LEDs, and several alternate keyboard layout options. In the future, one may be interested in furthering the capabilities of the PCB to enhance the programmability of the keyboard. 7. Bill of Materials
Bill of Materials
Name Manufacturer Quantity Price (Each) Price (Total)
Acrylic Plate Prototype 1
Joshua Henry (TheBeePhaha) 1 $25 $25
Acrylic Plate Prototype 2
Joshua Henry (TheBeePhaha) 1 $0 $0
Steel Prototype 1 Nick Hori (EulaFyi) 1 $0 $0
Prototype PCB JLCPCB 5 8.99 44.95
Atmega32u4 DigiKey 5 $4.20 $21.00
16MHz Crystal DigiKey 5 $0.43 $2.15
22pF Capacitor DigiKey 10 $0.06 $0.63
1uF Capacitor DigiKey 5 $0.18 $0.90
22 Ohm Resistor DigiKey 10 $0.02 $0.23
10K Ohm Resistor DigiKey 10 $0.02 $0.17
4.7uF Capacitor DigiKey 5 $0.19 $0.95
SMD Diode DigiKey 10 $0.10 $0.97
Tactile Reset Switch DigiKey 5 $0.63 $3.15
0.1uF Capacitor DigiKey 10 $0.44 $4.43
Total $105
Table 1: Bill of Materials
15
8. References [1] Corsair mechanical keyboards https://www.corsair.com/us/en/Categories/Products/Gaming-Keyboards/c/Cor_Products_Keyboards [2] Razer mechanical keyboards https://www.razer.com/gaming-keyboards [3] Key rollover https://en.wikipedia.org/wiki/Rollover_(key) [4] QMK opensource code https://github.com/qmk [5] ”356 Series <Powered by OTD>” https://geekhack.org/index.php?topic=78597.msg2011110#msg2011110 [6] ”The Korean Custom Keyboards #1: 356 Series” https://deskthority.net/keyboards-f2/the-korean-custom-keyboards-1-356-series-t255.html [7] Teensy https://www.pjrc.com/teensy/ [8] Cherry switch schematic http://cherryamericas.com/product/mx-series-2/ [9] TMK guide https://geekhack.org/index.php?topic=41989.0 [10] ”The Living PCB Design Thread” https://geekhack.org/index.php?topic=48851.0 [11] ”Ergodox” https://deskthority.net/wiki/ErgoDox [12] Commercially available Ergodox https://ergodox-ez.com/ [13] “TheVan 44 Keyboard Kit” https://geekhack.org/index.php?topic=80988.0 [14] Commercially available Van keyboard https://thevankeyboards.com/ [15] Jigon firmware guide http://keyboardcatalog.com/65-percent/lzst/Leeku_L3_Software.pdf [16] NerDy firmware guide http://www.gonskeyboardworks.com/manuals/110-nerdy-gui.html [17] ”The Ultimate Guide to Keyboard Layouts and Form Factors” http://blog.wooting.nl/the-ultimate-guide-to-keyboard-layouts-and-form-factors/ [18] ”What is laser kerf” http://www.cutlasercut.com/resources/tips-and-advice/what-is-laser-kerf