104
Owner’s Manual 2642 Hackberry Drive PO Box 2000 Goshen, IN 46527 (866) 425-4369
Owner’s Manual
2642 Hackberry DrivePO Box 2000
Goshen, IN 46527(866) 425-4369


This Manual Belongs to: VIN Number: ____________________________________________________ Dealer: ________________________________________________________ Address: _______________________________________________________ _______________________________________________________________ _______________________________________________________________ _______________________________________________________________ Dealer Phone: ___________________________________________________ Dealer Contact: __________________________________________________ Maintenance Record
Date Description of Service Serviced Performed By
Table of Contents
Introduction2 Important Safety Information 2 Danger, Warning, Caution and Note Boxes2 Terms and Symbols Used2 Important Safety Precautions and Information2 Appliances and Equipment2 Component Information & Warranties3 Controlling Sway or Fishtailing3 Generator Safety3 Know Your RV Before Heading Out3 Lug Nut Torquing3 Tire Safety4 Towing and Weight Distribution4 Tow Vehicle Disclaimer4 Safety Recalls/Service Campaign4 Reporting Safety DefectsChapter 1: How to Obtain Service5 Owner Responsibilities6 Obtaining Warranty Service6 Obtaining Warranty Service in Transit7 Contact Keystone
Chapter 2 : Limited Warranties (Five Pages)8 One Year Limited Warranty9 Three Year Limited Structural Warranty10 Repair Remedy10 How to Obtain Service10 What Is Not Covered11 Defects v. Damage11 Appliance and Component Warranty Service12 Legal RemediesChapter 3: Effects of Prolonged Occupancy and Indoor Air Quality13 Effects of Prolonged Occupancy14 Improving Indoor Air Quality15 Tips to Avoiding Condensation15 Where There Is Moisture, There May Be Mold16 Formaldehyde & Recreational Vehicles16 Web Sites of Interest
Chapter 4: Tires, Axles & Weights17 Tire Safety Information17 Preventing Tire Damage17 Safety Checklist18 Tire Labeling & US DOT Tire Identification19 Checking Tire Pressure19 Steps for Maintaining Proper Tire Pressure19 Understanding Tire Pressure and Load Limits
20 Tire Safety Tips20 Tire Tread20 Tire Aging20 Vehicle Load Limits21 Cargo Capacities21 How Overloading Affects Your RV and Tires21 Tire Size21 Tire Warranty22 Weight Ratings & Definitions22 GVWR (Gross Vehicle Weight Rating)22 UVW (Unloaded Vehicle Weight)22 CCC (Cargo Carrying Capacity)22 GAWR (Gross Axle Weight Rating)22 Hitch (Tongue/Pin) Weight22 Weight Ratings - Labels23 Weighing Your Trailer24 Axles & Suspension24 Suspension24 Shock Absorbers24 Spare Tire24 Tire Changing Basics24 Wheel Nut Torque25 Using Torque Wrenches26 Pre-Trip Maintenance 26 Wheel Reinstallation27 Wheel Nut Torque Sequence27 Summary
Chapter 5: Towing Considerations28 Getting Started28 Tow Vehicle Selection28 Hooking up to the Tow Vehicle29 Exterior Pre-Travel Checklist29 Interior Pre-Travel Checklist30 Tow Vehicle Set up30 Weight Distribution30 Brake Control30 Hitch Selection30 Weight Distribution Bars - Travel Trailer30 Sway Controls - Travel Trailer31 Safety Chains - Travel Trailers31 Breakaway Switch31 Lights31 Mirrors32 Towing32 Controlling Sway or Fishtailing 33 Backing 33 Braking 33 Passing and Accelerating33 Sharply Winding and Narrow Roads33 Steep or Long Grades 33 Slippery Pavement

33 Freeways and Highways33 Turning Corners33 Mud and Sand
Chapter 6: Camper Set Up at Destination34 Site Requirements and Selection34 Electrical34 Antenna/Satellite34 Sewer34 Water34 Campsite35 Camper Set Up35 Leveling Procedures35 Stabilizing Jacks36 Hook Ups36 Cold Weather Camping
Chapter 7: Appliances and Equipment37 IF YOU SMELL PROPANE37 Safety 37 Propane Appliance Maintenance38 Air Conditioner (Optional)38 Capability vs. Environment38 Antenna (TV)39 Awning, Patio 39 Awning, Electric Patio39 Awning, Slide-Out (Optional)39 Backup Monitor39 Cable Hook-Up40 Carbon Monoxide (CO) Detector41 Generator (Optional)42 Furnace 42 Thermostat - Wall Mounted42 Thermostat - Remote Control 42 Dual Zone Thermostat42 Fireplace (Optional)42 Microwave / Convection Oven (Optional)43 Oven Or Cooktop (Range)43 Range Hood43 Range / Cook-Top (outside)44 Refrigerator44 Refrigerator-Residential Style46 Remote Control System46 Roof Vents (Power/Manual)46 Satellite46 Solar Prep46 Televisions46 Washer/Dryer Ready46 Egress Windows47 Fire Extinguisher47 IN-Command47 Smoke Detector
47 Elevated Beds And Electric Bed Lift Systems48 Murphy Beds50 Battery Disconnect50 Touch Panel50 Equa-Flex, E-Z Flex50 Pin Box50 Level Up (4, 6 or 7-point leveling)50 Under Mount Spare Tire50 Keyless Entry50 4GLTE50 4GLTE /WiFi Antenna51 Components Suppliers That Could Have Warranty Beyond 1 Year
Chapter 8: Electrical System53 12 Volt System - DC53 RV Battery53 120 Volt System - AC53 Shore Line Cord / Power Cord53 30 Amp Service54 50 Amp Service55 Available Power55 Adapters/Reducers56 Extension Cords 56 Power Center/Converter56 Mini Power Controp System56 Power Share57 120V Circuit Breakers57 12V Fuses57 GFCI – (Ground Fault Circuit Interrupter)57 GFCI-Testing57 7-Way Trailer Plug58 Brakes, Electric58 Breakaway Switch
Chapter 9: Propane Gas System59 General Information59 IF YOU SMELL PROPANE59 Propane Gas System60 Regulator60 Split-Bottle Systems – (Primarily on Fifth Wheels)61 Propane Gas Pigtails61 Propane Gas Lines61 Propane Gas Leak Detector62 If the Alarm Sounds...
Chapter 10: Plumbing System63 Fresh (Potable) Water System63 Water Pump63 Fresh Water Tank64 City Water Fill64 Water Supply and Odor
64 Sanitizing the Fresh Water System65 Water Heater65 Water Heater By-Pass Kit 65 Water Heater Storage & Draining 66 Winterization67 De-winterization / Removal of Anti-freeze68 Waste Water System68 Black Water Waste68 Toilet68 Drain Lines68 Black Water Tank68 Solid Build-Up in the Black Water Tank69 Termination Valve69 Dumping Instructions69 Tank Flushing69 Gray Water Waste70 No Fuss Flush (Optional)70 Odor Control70 Monitor Panel
Chapter 11: Slide Out Systems71 Basic Slide-Out Tips72 Electrically Operated Systems72 Schwintek - In-Wall System72 Manual Override72 Hydraulically Operated Systems72 System Operation 72 Individual Room Control (IRC)73 Manual Override to Retract or Extend the Slide-Out Room
Chapter 12: Sport Utility Recreational Vehicles74 Bed Lifts74 Ramp Trailer Weight Distribution74 Cargo Placement75 Ramp Trailer Loading Safety75 Loading Equipment75 Chocks And Blocks76 Tie Downs76 Loading Ramp Operation77 Loading And Unloading Motorized Cargo78 Ramp Positioning78 Loading Under Power79 Secure The Load79 Unloading Motorized Cargo80 Side/Rear Patio System80 Fuel Transfer System81 Fuel Transfer System Safety81 Fuel Transfer System Operation
Chapter 13: Care & Maintenance83 Exterior83 Frame/Chassis/Attachments83 Steps83 Hitch Couplers (Travel Trailers)83 Pin Box (Fifth Wheel) & Hitch Equipment83 Safety Chains (Travel Trailers)84 Tongue Jacks, Manual/Power (Travel Trailers)84 Fifth Wheel Jacks84 Siding & Sidewall Attachments84 RV Gel Coat Finish - Care and Maintenance84 General Maintenance84 Cleaning84 Waxing84 Compounding85 Removing the Discoloration85 Other Alternatives85 Metal85 ABS Plastic / Molded Parts85 Windows 86 Corner Moldings86 Moldings86 Other Wall Attachments86 Slide-out’s 86 Roof87 Rubber Roof87 Alpha Superflex TPO Roof87 Roof Seams and/or Joints88 Axles88 Brake Adjustment88 Battery89 120V Electric89 Interior89 Appliances: See Chapter 789 Bedspreads89 Blinds and Shades89 Cabinet Doors and Drawers 89 Carpeting89 Ceilings and Walls89 Countertops90 Solid Surface Countertops90 Draperies90 Fabric, Upholstery and Furniture90 Faucets and Fixtures90 Flooring, Vinyl90 Glass and Mirrors90 Sinks, Tubs and Toilets91 Maintenance RequirementsAppendix92 Appendix93 Glossary of Common Terms and Definitions
1Keystone RV Company Owners Manual 4/1/2018
This manual is based on the latest information available at the time of publication. Due to continuous product development and improvements, Keystone RV Company reserves the right to make changes in product specifications and components without prior notice. The most recent version of the owner’s manual can be found on our web site www.keystonerv.com under the Customer Service heading.
Introduction
Dear Keystone Owner,
Congratulations and thank you for your purchase of your new Keystone Recreational Vehicle, including its divisions Dutchmen and CrossRoads (“Keystone”). As you may know, Keystone RV Company is the #1 selling Travel Trailer & Fifth Wheel brand in North America. This is not a position we take for granted and we want your experience with your new Travel Trailer or Fifth Wheel to be enjoyable.
To help get you started, please take a few minutes and review the Owner’s Manual thoroughly. There are multiple components, appliances, and equipment unique to a recreational vehicle and understanding how they function will be important to your overall enjoyment and safe operation. The Owner’s Manual not only contains the Keystone Limited Base and Limited Structural Warranties, but will also help you understand many of the functions along with the required maintenance of your RV. If you have any questions please contact your selling dealer or the Keystone Customer Service Group at 866-425-4369.
For product news and updates you can go to our website(s) through the links below; where you will also discover a multitude of topics such as frequently asked questions, dealer locator, a video library and much, much more:
Keystone RV - www.keystonerv.com
Cross Roads RV - www.crossroadsrv.com
Dutchmen Manufacturing - www.dutchmen.com
Again, on behalf of everyone at Keystone RV Company we want to thank you for purchasing a Keystone product. Enjoy camping in your new recreational vehicle.
Sincerely,
Your Keystone RV Team
2 Keystone RV Company Owners Manual 4/1/2018
Important Safety Information
Danger, Warning, Caution and Note BoxesWe have provided many important safety messages in this manual. Always read and obey all safety messages.
DANGER indicates an imminently hazardous situation that, if not avoided, will result in death or serious injury.
WARNING indicates a potentially hazardous situation that, if not avoided, could result in death or serious injury.
CAUTION indicates a potentially hazardous situation that, if not avoided, may result in minor or moderate injury.
NOTICE is used to address practices not related to personal injury. This applies to hazardous situations involving property damage only.
Note Important information regarding the maintenance of your recreational vehicle.
Terms and Symbols Used(Optional) This denotes items that may be an option on all or particular models. Additionally, some optional items can only be included during the manufacturing phase and cannot be added. The inclusion of optional items does not imply or suggest the availability, application suitability or inclusion for any specific RV.
Important Safety Precautions and Information
Appliances and Equipment The appliances (stove, refrigerator, outdoor grills, etc.) and equipment (water heater, furnace generator, etc.) typically operate on propane. Propane is flammable and is contained under high pressure. Improper use may result in a fire and/or explosion. Be sure to follow all instructions and warnings in this manual (see Chapter 7) as well as the specific owner’s manuals of the appliances and equipment.
Component Information & Warranties Keystone RV Company has provided this manual solely for the purpose of providing instructions about the operation and maintenance of its recreational vehicle. Nothing in this manual creates any warranty, either express or implied. The only warranty offered by Keystone RV Company is set forth in the Limited Warranty applicable to your vehicle.Your RV, as well as all components and appliances, require periodic service and maintenance. The failure to provide these services and/or maintenance may result in loss of warranty coverage. The owner should review Keystone RV Company’s Limited Warranty and the warranties of all other manufacturers prior to use. This manual is NOT intended to be inclusive of every operational aspect of your RV, but to work in conjunction with the manuals supplied by the different component manufacturers of the components in your RV. Please note that some components may be optional or not available for specific models.

3Keystone RV Company Owners Manual 4/1/2018
In addition to this Owner’s Manual, any manuals supplied to us by a specific component manufacture for products installed in your RV are supplied with the RV. You may be entitled to additional warranties beyond the Keystone’s Limited One (1) Year Warranty on individual components. Individual product warranty registrations may be required by each component manufacturer. If supplied to Keystone, they are passed on in the RV at the time of manufacture. We recommend these be completed and mailed promptly if applicable.
Controlling Sway or Fishtailing Sway or fishtailing is the sideways action of a trailer caused by external forces. Excessive sway of your travel trailer can lead to the rollover of the RV and tow vehicle resulting in serious injury or death. Be sure to follow the instructions and warnings in Chapter 5.
Generator Safety Do not operate the generator in an enclosed building or in a partly enclosed area such as a garage. Do not operate the generator while sleeping. Be sure to follow all instructions and warnings in this manual in Chapter 7 and the manual provided by the generator manufacturer.
Know Your RV Before Heading OutThroughout the manufacturing process, your recreational vehicle has been inspected by qualified inspectors and then again at the dealership. As the owner, however, you will be the first to camp and extensively use every system. Keystone RV wants the first camping experience to be a happy one and recommends a “trial camping experience” before heading out. Plan a weekend in the yard or driveway and really camp in your RV. By camping for several days, full-time in your RV, you will have the opportunity to use and become accustomed to the systems within your RV and find out what items are needed or not needed while camping. Note any questions that arise, difficulties encountered or problems that occur. After your trial, call your dealer and ask any questions that have arisen. Getting to know your RV before the first adventure can save frustration and leave more time for fun!
Lug Nut Torquing Being sure wheel mounting nuts (lug nuts) on trailer wheels are tight and properly torqued is an important responsibility that trailer owners and users need to be familiar with and practice. Inadequate and/or inappropriate wheel nut torque (tightness) is a major reason that lug nuts loosen in service. Loose lug nuts can rapidly lead to a wheel separation with potentially serious safety consequences. Please see Chapter 4 for more information.
Tire Safety Properly maintained tires improve the steering, stopping, traction, and load-carrying capability of your vehicle. Under inflated tires and overloaded vehicles are a major cause of tire failure. For more information on tire safety, please see Chapter 4.
DO NOT ALLOW PASSENGERS TO RIDE IN THE TRAILER DURING TRAVEL. THE TRAILER DOES NOT HAVE SEAT BELTS AND IS NOT DESIGNED TO CARRY
PASSENGERS. THIS MAY ALSO BE PROHIBITED BY STATE LAW.
4 Keystone RV Company Owners Manual 4/1/2018
Towing and Weight Distribution Weight distribution is an important factor when loading your fifth wheel and travel trailer. A recreational vehicle with the cargo distributed properly will result in efficient, trouble-free towing. See Chapter 5 for more information.
Tow Vehicle DisclaimerIn connection with the use and operation of Keystone recreational vehicles, Keystone customers and owners of Keystone recreational vehicles are solely responsible for the selection and proper use of tow vehicles. All customers should consult with a motor vehicle manufacturer or dealer concerning the purchase and use of suitable tow vehicles for Keystone products. Keystone further disclaims any liability with respect to damages which may be incurred by a customer or owner of Keystone recreational vehicles as a result of the operation, use or misuse of a tow vehicle. NOTE: KEYSTONE’S LIMITED WARRANTY DOES NOT COVER DAMAGE TO THE RECREATIONAL VEHICLE OR THE TOW VEHICLE AS A RESULT OF THE OPERATION, USE OR MISUSE OF THE TOW VEHICLE.
Safety Recalls/Service CampaignFrom time to time Keystone may initiate a Safety Recall or Service Campaign in an effort to prevent a possible product failure from manifesting itself. A Safety Recall involves a likely failure that can lead to property damage or personnel injury. Notifications are mailed to the registered owner’s address and it is critical the issue be remedied before the RV or component that is compromised is used again. A Service Campaign is a potential product failure but is not likely to lead to personal injury. Notifications are mailed to the registered owner’s address. Repairs should be scheduled at the owner’s earliest convenience.
Reporting Safety DefectsIf you believe your vehicle has a defect which could cause a crash or could cause injury or death, you should immediately inform National Highway Traffic Safety Administration (NHTSA) in addition to notifying Keystone Rv Company.If NHTSA receives similar complaints, it may open an investigation, and if it finds that a safety defect exists in a group of vehicles, it may order a recall and remedy campaign. However, NHTSA cannot become involved in individual problems between you, your dealer, or Keystone RV Company.To contact NHTSA , you may call the Vehicle Safety Hot line toll-free at 1-888- 327-4236 (TTY; 1-800-424-9153); go to www.safercar.gov; or write to: Administrator, NHTSA, 1200 New Jersey Ave. SE, Washington, DC 20590. You can also obtain other information about motor vehicle safety from www.safercar.gov.
5Keystone RV Company Owners Manual 4/1/2018
Chapter 1: How to Obtain ServiceThe Keystone dealer network is the exclusive provider of Parts, Service and Warranty for Keystone RV. We recommend your selling dealer be contacted first as they have a vested interest in your satisfaction.
OWNER RESPONSIBILITIESReview the information contained within this manual and all supplied component manuals.
1. Ensure the proper care and maintenance outlined in the manual is executed by appropriately trained personnel according to the Maintenance Schedule outlined in this manual including taking whatever preventative measures necessary to maintain the exterior sealants of the RV and to prevent foreseeable secondary moisture or water damage to the RV from rain, plumbing leaks, condensation and other natural accumulation of water in the RV. Owners should not leave a RV unattended while attached to an internal or external water source which could lead to a ‘flooding’ condition. Examples of secondary damage include, but are not limited to, stained upholstery, carpeting or drapes, mold formation and growth, furniture, cabinetry or floor damage, etc. Mold is a natural growth given certain environmental conditions and is not covered by the terms of the Limited Warranties.
2. Make an appointment to return the RV, at your expense, to your selling dealer for the necessary service.
3. If the dealer is unable to timely resolve any warrantable issues, or for assistance in arranging repairs, please contact: Customer Service Department Keystone RV, P.O. Box 2000 Goshen, Indiana 46527. Telephone Number (866) 425-4369 (www.keystonerv.com - Customer Service Link). Upon receipt of notice of a claim, where the dealer was unable or unwilling to resolve the problem, Keystone may then direct you to another dealer or service center for the repairs to be completed. Keystone may, at its option, request that the recreational vehicle be returned to one of its Customer Service facilities in Goshen, Indiana or Pendleton, Oregon where Keystone RV will repair or replace any parts necessary to correct defects in material or workmanship or will take other appropriate action as may be required. If the dealer is unable to correct any covered defects that you believe substantially impairs the value, use or safety of your recreational vehicle, you must, to the extent permitted by law, notify Keystone directly of the failure to successfully repair the defect(s) so that Keystone can become directly involved for the purpose of performing a successful repair to the identified defect(s).
Service Calls (except for Travel Trailers with a detachable A-Frame) or repairs completed by Non-Authorized dealers are not warranted by
Keystone. Should you encounter a situation that may require such a service, contact your selling dealer for assistance PRIOR to incurring
these types of expense.
Note
6 Keystone RV Company Owners Manual 4/1/2018
OBTAINING WARRANTY SERVICEPlease note that in almost every situation, you will need to make an appointment with the dealer. Whenever possible, follow these steps to help assure a smooth Service experience:
1. Call Ahead - Give thought to an appointment time and call ahead. Mondays and Fridays are generally the busiest times at a dealer’s service center, as are right before seasonal holidays. All shipping or towing expenses incurred in transporting the recreational vehicle for warranty service shall be owner’s responsibility (Travel Trailers with detachable hitch such as a destination trailer may qualify for on-site service call assistance). Upon requesting the warranty services you will be asked for:
(a) Your name (b) Date of purchase (c) Keystone vehicle ID number (d) An explanation of the anticipated warranty claim
2. Be Prepared/Make a List – Have a detailed list ready to review with the dealer when making the appointment. Clearly identify what occurred, when and how the RV was being used at the time it occurred (Shore cord plugged in or on battery power, using the water pump or on city water, only happens when I use the shower, etc.). The more information provided up front, the better chance the concern will be addressed timely and accurately the first time.
3. Parts Lead Times – While many of the parts needed for warranty repairs are in stock at your dealer or at Keystone RV Company, a number of them may be special order. Many of these parts need to be manufactured with extended lead times that can delay the repair process. In those situations, we recommend the dealer complete the repairs that can be completed and the retail owner take the RV to use. Once the parts needed to complete the repairs are received by the dealer, return the RV for completion of the remaining repairs.
4. Inspecting your repairs – Your dealer and Keystone want you to be satisfied with any repair. After a repair is performed, inspect it thoroughly. Go over the repairs with the dealer service representative and check of your list as you go. In the event a problem should reoccur after you have left the dealership, contact the repair center or Keystone as soon as possible so the situation can be resolved expediently.
OBTAINING WARRANTY SERVICE IN TRANSITShould you encounter an issue affecting the use, value or safety of your RV while traveling, contact your selling dealer for assistance. Should you need to locate an Authorized Keystone Service Center, a dealer locator can be found at www.keystonerv.com or by contacting Keystone Owner Relations Monday-Friday 9am – 4pm Eastern time at 866-425-4369.

7Keystone RV Company Owners Manual 4/1/2018
Contact Keystone
For assistance with your recreational vehicle we suggest the following steps to insure customer satisfaction:
1. Contact your Sales Representative or Service Advisor at your dealership.
2. For further assistance contact the Sales Manager, Service Manager or General Manager at the dealership.
3. If the concern cannot be resolved at the dealership, please locate your Vehicle Identification Number (VIN) and contact Keystone:
2642 Hackberry DrivePO Box 2000
Goshen, IN 46527Phone (866) 425 4369
Fax (574) 534 9057
www.keystonerv.com – Customer Service Link

8 Keystone RV Company Owners Manual 4/1/2018
Chapter 2: LIMITED WARRANTIES (Five Pages)WHAT IS COVEREDKeystone RV Company, including its divisions, Dutchmen and CrossRoads (“Keystone”), provides the following limited warranties with this recreational vehicle (“RV”) which sets forth what Keystone will cover and what Keystone will do if a defect exists. Neither limited warranty is a guarantee about the RV for any time period. Please read them closely before your purchase of the RV.
PLEASE NOTE: WHEN YOU REQUEST AND ACCEPT THE PERFORMANCE OF WARRANTY REPAIRS UNDER THE TERMS OF EITHER LIMITED WARRANTY, YOU ARE ACCEPTING ALL TERMS OF BOTH LIMITED WARRANTIES, INCLUDING BY WAY OF EXAMPLE, THE RESPECTIVE WARRANTY LIMITATIONS AND DISCLAIMERS, THE FORUM SELECTION CLAUSE AND THE CLAUSE REDUCING THE TIME PERIOD WHEN SUIT MUST BE FILED FOR BREACH.
ONE-YEAR LIMITED BASE WARRANTY:
The Keystone Limited Base Warranty covers this RV for a period of one (1) year from the date of purchase by the first retail owner. This Limited Base Warranty covers defects in materials and workmanship supplied by and attributable to Keystone’s manufacturing and assembly of the RV, when the RV is used solely for its intended purposes of recreational camping. This Limited Base Warranty does not cover the items excluded under the section “What is Not Covered”.
IN ADDITION, SINCE IT IS REASONABLE TO EXPECT THAT THE RV WILL NEED SOME SERVICE DURING THE WARRANTY PERIOD, THIS LIMITED BASE WARRANTY DOES NOT EXTEND TO FUTURE PERFORMANCE. IT ONLY SETS FORTH WHAT KEYSTONE WILL DO IF A DEFECT EXISTS AND DOES NOT GUARANTEE ANYTHING ABOUT THE RV FOR ANY TIME PERIOD. Keystone is not responsible for any undertaking, representation, service agreement, or warranty beyond what is expressly set forth in this Limited Base Warranty.
Transferability: This Limited Base Warranty may be transferred by the first retail purchaser to a subsequent retail purchaser; however, the Limited Base Warranty will in no way be extended beyond the one (1) year coverage period. For the second retail purchaser to receive the unexpired balance of the base warranty coverage as described above, after purchasing the RV you must go to our website at www.keystonerv.com and provide Keystone your VIN, name, address, phone, and email address (proof of purchase may be requested). You may also notify Keystone of the transfer by phone at (866) 425-4369 or by email at [email protected].
PLEASE NOTE: The limited one-year base warranty is not part of the separate limited three-year structural warranty provided below with the RV. The Limited Base Warranty will expire on the one-year anniversary date from the date of the first retail purchase.
LIMITATIONS AND DISCLAIMERS: THE LIMITED BASE WARRANTY IS PROVIDED EXPRESSLY IN LIEU OF ALL OTHER WARRANTIES, EXPRESS OR IMPLIED, INCLUDING ANY IMPLIED WARRANTY OF MERCHANTABILITY OR FITNESS FOR ANY PARTICULAR PURPOSE, AND IN LIEU OF ALL OTHER OBLIGATIONS OR LIABILITIES ON THE PART OF KEYSTONE. IMPLIED WARRANTIES, INCLUDING IMPLIED WARRANTY OF MERCHANTABILITY OR FITNESS FOR A PARTICULAR PURPOSE, IF ANY, GIVEN BY LAW, WILL BE LIMITED TO AND NOT EXTEND BEYOND THE SCOPE OF COVERAGE AND BEYOND THE DURATION OF THE ABOVE ONE-YEAR LIMITED BASE WARRANTY.
KEYSTONE WILL NOT BE RESPONSIBLE OR LIABLE FOR INCIDENTAL OR CONSEQUENTIAL DAMAGES OF ANY KIND OR NATURE THAT RESULT FROM ANY DEFECT IN THE RECREATIONAL VEHICLE. THE DISCLAIMER OF CONSEQUENTIAL DAMAGES IS NOT DEPENDENT UPON THE LIMITED BASE WARRANTY FULFILLING ITS ESSENTIAL PURPOSE.
SOME STATES DO NOT ALLOW LIMITATIONS OF HOW LONG AN IMPLIED WARRANTY LASTS, OR ALLOW THE EXCLUSION OF LIMITATION OF INCIDENTAL OR CONSEQUENTIAL DAMAGES, SO THE ABOVE LIMITATION OR EXCLUSIONS MAY NOT APPLY TO YOU.
9Keystone RV Company Owners Manual 4/1/2018
THREE-YEAR LIMITED STRUCTURAL WARRANTY:
The Keystone Limited Structural Warranty covers this RV for a period of three (3) years from the date of purchase by the first retail owner. This Limited Structural Warranty covers defects in materials and workmanship supplied by and attributable to Keystone’s manufacturing and assembly of the “structural” (as defined below) portions of the RV, when the RV is used solely for its intended purposes of recreational camping. This Limited Structural Warranty does not cover the items excluded under the section “What is Not Covered”.
“Structural” means the RV’s (i) main steel frame and steel support members (outriggers and cross members) (ii) exterior sidewalls, laminated or non-laminated, including fiberglass, aluminum siding and wall studs (iii) floors, laminated or non-laminated, including decking and floor joists (iv) roofs, laminated or non-laminated, including decking, roof rafters and roof material installation (v) fiberglass cap(s) including paint application, and windshield installation, if applicable (this structural warranty item does not cover damages to the cap(s) such as impact, rock chips, dents, scratches or failure to maintain all as addressed in the disclaimers below and elsewhere in this Owner’s Manual), and (vi) slide out box exterior sidewalls/end walls/roofs/floors, skeletal framing, decking and roof material installation.
IN ADDITION, SINCE IT IS REASONABLE TO EXPECT THAT THE RV WILL NEED SOME SERVICE DURING THE WARRANTY PERIOD, THIS LIMITED STRUCTURAL WARRANTY DOES NOT EXTEND TO FUTURE PERFORMANCE. IT ONLY SETS FORTH WHAT KEYSTONE WILL DO IF A DEFECT EXISTS AND DOES NOT GUARANTEE ANYTHING ABOUT THE RV FOR ANY TIME PERIOD. Keystone is not responsible for any undertaking, representation, service agreement, or warranty beyond what is expressly set forth in this Limited Structural Warranty.
Transferability: This Limited Structural Warranty may be transferred by the first retail purchaser to a subsequent retail purchaser; however, the Limited Structural Warranty will in no way be extended beyond the three (3) year coverage period. For the second retail purchaser to receive the unexpired balance of the structural warranty coverage as described above, after purchasing the RV you must go to our website at www.keystonerv.com and provide Keystone your VIN, name, address, phone, and email address (proof of purchase may be requested). You may also notify Keystone of the transfer by phone at (866) 425-4369 or by email at [email protected].
PLEASE NOTE: The limited three-year structural warranty is not part of the separate limited base warranty provided with the RV. The Limited Structural Warranty will terminate on the third-year anniversary date from the date of the first retail purchase.
LIMITATIONS AND DISCLAIMERS: THE LIMITED STRUCTURAL WARRANTY IS PROVIDED EXPRESSLY IN LIEU OF ALL OTHER WARRANTIES, EXPRESS OR IMPLIED, INCLUDING ANY IMPLIED WARRANTY OF MERCHANTABILITY OR FITNESS FOR ANY PARTICULAR PURPOSE, AND IN LIEU OF ALL OTHER OBLIGATIONS OR LIABILITIES ON THE PART OF KEYSTONE. IMPLIED WARRANTIES, INCLUDING IMPLIED WARRANTY OF MERCHANTABILITY OR FITNESS FOR A PARTICULAR PURPOSE, IF ANY, GIVEN BY LAW, WILL BE LIMITED TO AND NOT EXTEND BEYOND THE SCOPE OF COVERAGE AND BEYOND THE DURATION OF THE ABOVE WRITTEN THREE-YEAR LIMITED STRUCTURAL WARRANTY PERIOD.
KEYSTONE WILL NOT BE RESPONSIBLE OR LIABLE FOR INCIDENTAL OR CONSEQUENTIAL DAMAGES OF ANY KIND OR NATURE THAT RESULT FROM ANY DEFECT IN THE RECREATIONAL VEHICLE. THE DISCLAIMER OF CONSEQUENTIAL DAMAGES IS NOT DEPENDENT UPON THE LIMITED STRUCTURAL WARRANTY FULFILLING ITS ESSENTIAL PURPOSE.
SOME STATES DO NOT ALLOW LIMITATIONS OF HOW LONG AN IMPLIED WARRANTY LASTS, OR ALLOW THE EXCLUSION OF LIMITATION OF INCIDENTAL OR CONSEQUENTIAL DAMAGES, SO THE ABOVE LIMITATION OR EXCLUSIONS MAY NOT APPLY TO YOU.
10 Keystone RV Company Owners Manual 4/1/2018
REPAIR REMEDY
If within the stated limited warranty periods as set forth above a defect in materials or workmanship is found to exist that is not excluded from coverage, whether under the Limited Base Warranty or the Limited Structural Warranty, Keystone’s sole and exclusive obligation will be to repair the defect.
Back-Up Remedy: As a limited back-up remedy in the event the defect cannot be repaired, after receiving a reasonable opportunity to repair and after a reasonable number of repair attempts, Keystone may, at its option, either (i) pay you the diminution in value damages, or (ii) provide a similar replacement recreational vehicle, less a reasonable allowance for the owner’s use of the original RV. The primary and back-up remedies must both fail to fulfill their essential purpose before other uniform commercial code remedies can be obtained for breach of express or implied warranty.
Please note that any performance of repairs after the stated coverage periods expire or any performance of repairs to those portions of your RV excluded from coverage will be considered “good will” repairs and will not alter the express terms of the above base and structural limited warranties.
HOW TO OBTAIN SERVICE
To obtain service please refer to your Owner’s Manual where Keystone recommends that you first contact your local selling dealer for warranty service. If you encounter any difficulty obtaining warranty service, please contact the Customer Service Department at Keystone, P.O. Box 2000, Goshen, Indiana 46527. Telephone Number (866) 425-4369 (www.keystonerv.com - Customer Service Link).
WHAT IS NOT COVERED
THE LIMITED BASE AND STRUCTURAL WARRANTIES WILL NOT APPLY TO:
• Routine maintenance including, without limitation, caulking, re-caulking and waxing of the body of the RV, tightening screws, brake squeak/lock-up/adjustment, latches, locks, combustion systems, changing fuses, or light bulbs, and maintaining the air conditioning and heating systems;
• Any water leaks or related consequential damages that are a result of your failure to properly maintain the exterior seals as required in the Owner’s Manual.
• Any water leaks or related consequential damages that arise after the limited one-year base warranty expires (water leaks are covered under the base warranty and not the structural warranty);
• Adjustments to all doors, drawers, locks, latches, slide outs, awnings and window treatments beyond 90 days after retail sale;
• Equipment, products, components, appliances, or accessories not manufactured by Keystone; • Recreational vehicles used for business, rental, residential, commercial, or disaster relief purposes, or any
purposes other than recreational travel and family camping; • Recreational vehicles that are not originally purchased through an authorized dealer or those purchased
through auction, repossession, salvage or an otherwise damaged or distressed condition; • Damage or loss caused in whole or in part by the misuse, abuse, neglect, theft, vandalism, product
modification, improper customer or dealer installation, improper stowing of equipment, overloading or improper balancing of the load, low or high voltage, unauthorized repair or failure to follow instructions supplied with the recreational vehicle;
11Keystone RV Company Owners Manual 4/1/2018
• Damage or loss caused in whole or in part by the unauthorized attachments, modifications or alterations to the structure, body, pin box, or frame of the RV including but not limited to trailer hitches for towing, or platforms for supporting cargo;
• Any fading or die lot changes of fabrics or carpet or cosmetic issues with the roof material(s) or its installation;
• Design defects; redesign/re-construction of any part of the RV; or anything related to wheel or axle alignment;
• Rust or corrosion due to the environment; or any broken glass damage; • Damage or loss caused in whole or in part by animals, exposure to natural or atmospheric elements,
corrosive chemicals, ash or fumes generated or released by vehicles, collision, road hazards, rock chips, condensation, or any other source; impact, rock chips, dents, scratches or failure to maintain;
• Damage or loss caused in whole or in part by extreme weather conditions such as extreme cold or heat, winds, rain, lightning, hail, ice, and/or flooding;
• Damage or loss caused in whole or in part by the willful or negligent acts of the driver of the vehicle pulling the RV, an accident involving the RV, or the condition of any road surface;
• Damage or loss to the RV caused in whole or in part by the tow vehicle selected by the owner, owner’s operation or use of the tow vehicle, improper selection or installation of towing hitch on tow vehicle, weight distribution, sway control or equalizer equipment, or damage to the owner’s tow vehicle;
• Any injury, loss or damage due to mold or fungi; and• Any RV licensed, registered, or primarily used outside the USA or Canada. DEFECTS V. DAMAGE
Please note the distinction between “defect” and “damage”. “Defect” means the failure of the workmanship performed and/or materials used to conform with the design and manufacturing specifications and tolerances of Keystone. Defects are covered because Keystone is responsible; on the other hand, Keystone has no control over “damage” caused by such things as collision, misuse, or lack of maintenance that occurs after the RV is delivered to the owner. Therefore, “damage” for any reason which occurs after the RV is delivered is not covered under this warranty. Maintenance services are also excluded from the warranty because it is the owner’s responsibility to maintain the RV.
APPLIANCE AND COMPONENT WARRANTY SERVICE/ADMINISTRATIONAppliance and component manufacturer warranties, if any, are separate from the above Keystone Limited Warranties. Keystone administers the separate appliance and component warranties only during the Keystone one (1) year base limited warranty coverage period except for tires, batteries, generators, and ASA supplied electronics (those items are not only excluded, but Keystone does not administer those components’ separate warranties). All warranty service claims on components must therefore be directed during the one-year base limited warranty coverage period to Keystone through an authorized Keystone dealer or service center. After the Keystone one-year base coverage period expires, all appliance and component warranty claims must be directed to the respective appliance and component manufacturers. Keystone is not warranting any appliance or components. In no way will Keystone’s Limited Warranties be modified or amended by this provision.

12 Keystone RV Company Owners Manual 4/1/2018
LEGAL REMEDIES
ANY ACTION TO ENFORCE ANY PORTION OF THE LIMITED BASE OR STRUCTURAL WARRANTIES, OR ANY IMPLIED WARRANTY, MUST BE COMMENCED WITHIN SIX (6) MONTHS AFTER EXPIRATION OF THE ABOVE STATED RESPECTIVE LIMITED WARRANTY PERIODS OR THE ACTION WILL BE BARRED BECAUSE OF THE PASSAGE OF TIME. ANY PERFORMANCE OF REPAIRS WILL NOT SUSPEND THIS LIMITATION PERIOD FROM EXPIRING. SOME STATES ALSO DO NOT ALLOW THE REDUCTION IN THE STATUTE OF LIMITATIONS, SO THEY MAY NOT APPLY TO YOU.
EXCLUSIVE JURISDICTION FOR DECIDING LEGAL DISPUTES RELATING TO ALLEGED BREACH OF WARRANTY OR REPRESENTATIONS OF ANY NATURE MUST BE FILED IN THE COURTS WITHIN THE STATE OF MANUFACTURE. ALSO, THE ABOVE LIMITED WARRANTIES WILL BE INTERPRETED AND CONSTRUED IN ACCORDANCE WITH THE LAWS OF THE STATE OF INDIANA. ANY AND ALL CLAIMS, CONTROVERSIES, AND CAUSES OF ACTION ARISING OUT OF OR RELATING TO THE ABOVE LIMITED WARRANTIES, WHETHER SOUNDING IN CONTRACT, TORT OR STATUTE, WILL BE GOVERNED BY THE LAWS OF THE STATE OF INDIANA, INCLUDING ITS STATUTE OF LIMITATIONS, WITHOUT GIVING EFFECT TO ANY CONFLICT OF LAW RULE THAT WOULD RESULT IN THE APPLICATION OF THE LAWS OF A DIFFERENT JURISDICTION.
THE ABOVE LIMITED WARRANTIES GIVES YOU SPECIFIC LEGAL RIGHTS, AND YOU MAY ALSO HAVE OTHER RIGHTS WHICH VARY FROM STATE TO STATE.
13Keystone RV Company Owners Manual 4/1/2018
Chapter 3: Effects of Prolonged Occupancy and Indoor Air Quality
Effects of Prolonged Occupancy
Unlike a home which can be thousands of square feet in size, your RV is only a few hundred square feet. The relatively small volume and tight compact construction of modern recreational vehicles means that the normal living activities of even a few occupants (or animals) will lead to rapid moisture saturation of the air contained in the RV. Estimates indicate that a family of four can vaporize up to three gallons of water daily through breathing, cooking, bathing and washing. Unless the water vapor is carried outside by ventilation or condensed by a dehumidifier, it will condense on the inside of the RV. It may condense out of sight inside cabinets, closets, etc. where the air temperature within may be slightly different. This can not only cause damage to your RV but also your personal belongings. Appearance of these conditions can be misconstrued as a water leak.Good indoor air quality is essential for long term enjoyment of your Keystone recreational vehicle. To maintain good air quality you need to be attentive to proper ventilation of your recreational vehicle, keeping the RV clean, and avoiding unnecessary air pollutants. Common indoor air pollution sources include molds, pollen, dander from pet fur, secondhand smoke, carbon monoxide from burning propane and other fuels (and charcoal), and household cleaners. Inadequate ventilation can increase indoor pollutant levels by not bringing enough outdoor air to dilute emissions from indoor sources and by not carrying indoor air pollutants outside. High temperatures and humidity levels can also increase concentrations of some air pollutants. Those people most at risk for poor indoor air quality include: people with asthma, people with allergies, people who have chronic lung diseases such as bronchitis and emphysema, people with pre-existing heart disease, children, and the elderly.
Your recreational vehicle was designed primarily for recreational use and short-term occupancy. Prolonged Occupancy can lead to premature component wear/failure and create conditions, which if not managed properly, may be hazardous to your health and/or cause significant damage to your recreational
vehicle. These types of “Damage” are NOT covered under the Limited Warranty.
14 Keystone RV Company Owners Manual 4/1/2018
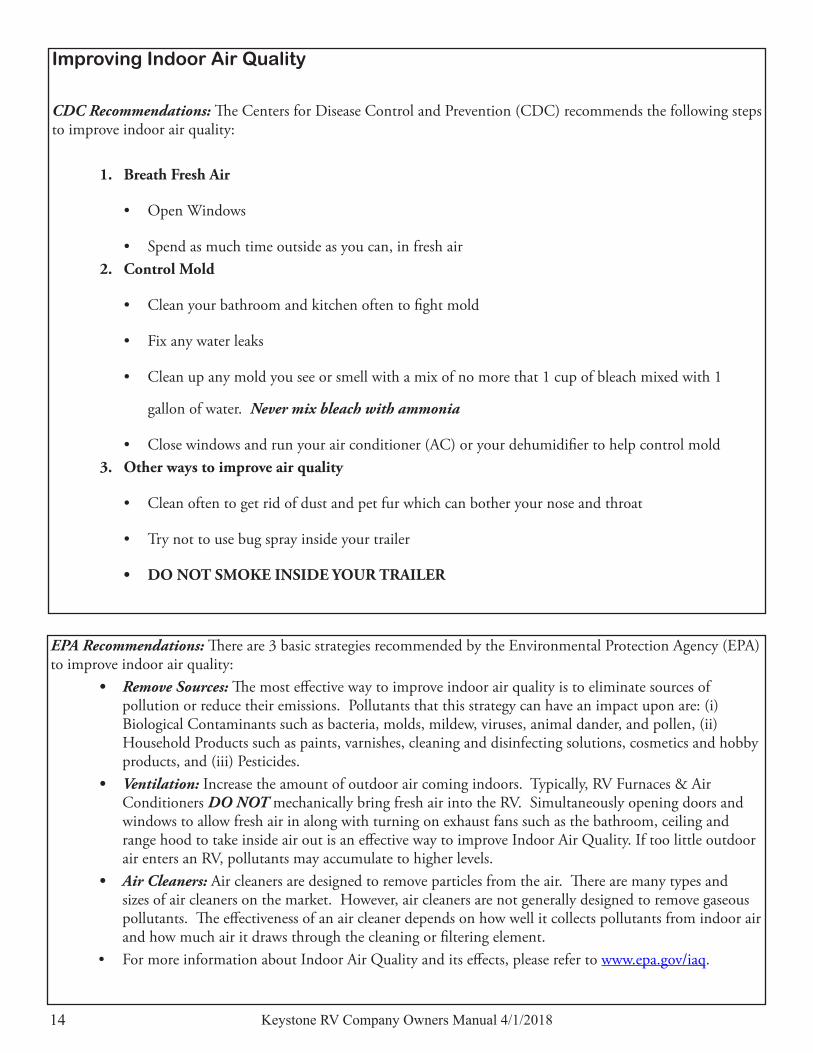
Improving Indoor Air Quality
CDC Recommendations: The Centers for Disease Control and Prevention (CDC) recommends the following steps to improve indoor air quality:
1. Breath Fresh Air
• Open Windows
• Spend as much time outside as you can, in fresh air2. Control Mold
• Clean your bathroom and kitchen often to fight mold
• Fix any water leaks
• Clean up any mold you see or smell with a mix of no more that 1 cup of bleach mixed with 1
gallon of water. Never mix bleach with ammonia
• Close windows and run your air conditioner (AC) or your dehumidifier to help control mold3. Other ways to improve air quality
• Clean often to get rid of dust and pet fur which can bother your nose and throat
• Try not to use bug spray inside your trailer
• DO NOT SMOKE INSIDE YOUR TRAILER
EPA Recommendations: There are 3 basic strategies recommended by the Environmental Protection Agency (EPA) to improve indoor air quality:
• Remove Sources: The most effective way to improve indoor air quality is to eliminate sources of pollution or reduce their emissions. Pollutants that this strategy can have an impact upon are: (i) Biological Contaminants such as bacteria, molds, mildew, viruses, animal dander, and pollen, (ii) Household Products such as paints, varnishes, cleaning and disinfecting solutions, cosmetics and hobby products, and (iii) Pesticides.
• Ventilation: Increase the amount of outdoor air coming indoors. Typically, RV Furnaces & Air Conditioners DO NOT mechanically bring fresh air into the RV. Simultaneously opening doors and windows to allow fresh air in along with turning on exhaust fans such as the bathroom, ceiling and range hood to take inside air out is an effective way to improve Indoor Air Quality. If too little outdoor air enters an RV, pollutants may accumulate to higher levels.
• Air Cleaners: Air cleaners are designed to remove particles from the air. There are many types and sizes of air cleaners on the market. However, air cleaners are not generally designed to remove gaseous pollutants. The effectiveness of an air cleaner depends on how well it collects pollutants from indoor air and how much air it draws through the cleaning or filtering element.
• For more information about Indoor Air Quality and its effects, please refer to www.epa.gov/iaq.
15Keystone RV Company Owners Manual 4/1/2018
Tips to Avoiding Condensation• When bathing, washing dishes, hair- drying, laundering, cooking and using appliances and non-vented
gas burners always turn on the nearest exhaust fan.• Keep the bathroom door closed and the vent open (if equipped, exhaust fan on) when bathing/
showering and for a period of time after you have finished.• Do not hang wet clothes in the coach to dry.• In hot weather, start the air conditioner early as it removes excess humidity from the air while lowering
the temperature.• Manage the inside temperature during cold weather. The higher inside temperature along with colder
outside temperatures will cause condensation to form on areas that are not insulated as well as others (windows, vents, wall studs, etc).
• Poor air circulation inside the RV can cause condensation to form inside closets and cabinets. Allow air to circulate inside closets and cabinets (leave doors partially open) so the temperature inside the cabinet is the same as in the rest of the RV. Please keep in mind that a closed cabinet full of stored goods prevents circulation and can cause condensation.
• The natural tendency would be to close the vehicle tightly during cold weather. This will actually compound the problem. Simply put, you need to get the moisture in the air that is created from normal use outside. The most effective way is utilizing your vents and vent fans.
• Use fluorescent ceiling lights and minimize prolonged use of incandescent lights, which produce heat and contribute to condensation in the roof above the ceiling lights.
If the tips presented here are not effective in controlling condensation, it may be necessary for you to invest in a dehumidifier to reduce the health risk to you or your family as well as prevent damage to your RV.
Where There Is Moisture, There May Be MoldMolds, which are pollutants, are microscopic organisms that naturally occur in virtually every environment, indoors and out. Outdoors, mold growth is important in the decomposition of plants. Indoors, mold growth is unfavorable. Left unchecked, molds break down natural materials such as wood products and fabrics. For mold growth to occur temperatures must be between 40 degrees and 100 degrees Fahrenheit and there must be a source of moisture such as humidity, standing water, damp materials, etc. Indoors, the most rapid growth occurs with warm and humid conditions. By controlling relative humidity (moisture), the growth of mold and mildew can be inhibited.
• In warm climates, use of the air conditioner will reduce the relative humidity. • Opening vents and operating exhaust fans when introducing high levels of moisture to the inside of the
RV (bathing, showering, cooking, washing dishes, etc.) will help control the environment needed for mold to grow.
• Clean any spills immediately.• Avoid leaving damp towels, cloths, etc. out to dry inside the RV.• On safe surfaces, use mold or mildew-killing cleaning products. • Check sealants regularly and reseal when necessary to avoid water leaks. Proper preventive maintenance
to the RV and its accessories, as described both in this manual and in accompanying literature, will provide the best protection for your RV.
• In extreme conditions, a dehumidifier may be necessary.

16 Keystone RV Company Owners Manual 4/1/2018
Formaldehyde & Recreational VehiclesFormaldehyde is a naturally occurring substance. Formaldehyde may be released from smoking, cooking, use of soaps and detergents such as carpet shampoos, cosmetics, and many other household products. It is also a by-product of combustion and certain other natural processes. Thus it may be present in concentrations both indoors and outdoors. Formaldehyde is also an industrial chemical used in the manufacture of some of the components used in the construction of recreational vehicles and is also contained in some holding tank chemicals. Some people are very sensitive to formaldehyde while others may not have any reaction to the same levels of formaldehyde. Formaldehyde is a colorless, pungent-smelling gas that can cause watery eyes, burning sensations in the eyes and throat, nausea, and difficulty breathing. As recommended by the CDC and the EPA, improving the air quality can be accomplished by actions such as opening windows, opening roof vents, operating fans and vents, running the air conditioner, or some combination thereof. In particular, to the extent that formaldehyde is contained in some of the components used to construct your RV or holding tank chemicals, you should properly ventilate your RV to maintain good indoor air quality in the RV. Recreational vehicles are much smaller than homes and therefore the exchange of air inside a recreational vehicle is significantly less than a home. Therefore, ventilation should occur frequently before, during and after use, and at times when the temperatures and humidity are elevated. Decreasing the flow of air by sealing the recreational vehicle may increase the presence and/or concentration of indoor air pollutants, such as mold, household chemicals and formaldehyde.Finally, we recommend that you do not smoke inside your recreational vehicle. In addition to causing damage to your recreational vehicle, tobacco smoke releases formaldehyde and other air pollutants.If you have any questions regarding the health effects of formaldehyde or any other air pollutants, please consult your doctor or local health department.
California Air Resource Board (CARB) NoticeFormaldehyde is used widely in building materials such as pressed wood products, particleboard, hardwood plywood paneling, medium density fiberboard (MDF), and plywood which are commonly used throughout the Recreational Vehicle Industry. As mandated by the RV Industry, Keystone recreational vehicles contain composite wood products (hardwood plywood, particle board, and MDF) that comply with the California Air Resource Board (CARB) [Phase 2] formaldehyde emission standards under California Code of Regulations § 93120.2(a).
Web Sites of InterestWe also recommend that you visit the following web sites which maintain information about indoor air pollutants, including molds and formaldehyde, along with ways to improve indoor air quality:
• http://www.epa.gov/iaq/pubs/insidest.html• http://www.atsdr.cdc.gov/tfacts111.html • http://www.epa.gov/iaq/molds/moldguide.html (Applies to controlling mold in the home, but the same
recommendations would apply to trailers)• http://www.formaldehyde.org/ (Formaldehyde Council’s Web site)• http://www.rvia.org/ (Recreational Vehicle Industry Association’s Web site – Under the Technical
Information & Training tab, click on Facts about Formaldehyde)
17Keystone RV Company Owners Manual 4/1/2018
Chapter 4: Tires, Axles & Weights
Tire Safety InformationThis portion of the Owner’s Manual contains tire safety information as required by 49 CFR 575.6(4) and is based in part on the National Highway Traffic Safety Administration’s Brochure entitled “Tire Safety-Everything Rides on It.” It can be obtained and downloaded from NHTSA, free of charge, from the following web site:
http://www.NHTSA.dot.gov/cars/rules/TireSafety/ridesonit/tires_index.htmlStudies of tire safety show that maintaining proper tire pressure, observing tire and vehicle load limits (not carrying more weight in your vehicle than your tires or vehicle can safely handle), avoiding road hazards, driving within the designated tire speed ratings, and inspecting tires for cuts, slashes, and other irregularities are the most important things you can do to avoid tire failure, such as tread separation or blowout and flat tires. These actions, along with other care and maintenance activities, can also:
• Improve vehicle handling.• Help protect you and others from avoidable breakdowns and accidents.• Improve fuel economy.• Increase the life of your tires.
Preventing Tire Damage• Slow down if you have to go over a pothole or other obect in the road.• Do not run over curbs or other foreign object in the roadway or when parking.
Safety Checklist • Check tire pressure at least once a month (including the spare) and before any long trip. See Tire Information Loading Label on page 22 for recommended tire size, inflation pressure, Cargo Carrying Capacity as well as weight and axle weight ratings. • Inspect tires for uneven wear patterns on the tread, cracks, foreign objects, or other signs of wear or trauma and remove bits of glass and foreign objects wedged in the tread.
• Do not exceed the safe age to operate the tire.• Make sure your tire valves have valve caps. • Do not overload your vehicle and distribute weight evenly in the RV. See Federal Certification Label and Cargo Carrying Capacity labels on page 22 and 23.• Do not exceed tire speed ratings regardless of the posted maximum speed limit. See Breaking down tire codes on Page 18.
Use this information to make tire safety a regular part of your vehicle maintenance routine and use good judgment to adjust towing to road conditions, weather conditions, traffic and posted speed limits while operating the vehicle. Recognize that the time you spend is minimal compared with the inconvenience and safety consequences of a flat tire or other tire failure.
18 Keystone RV Company Owners Manual 4/1/2018
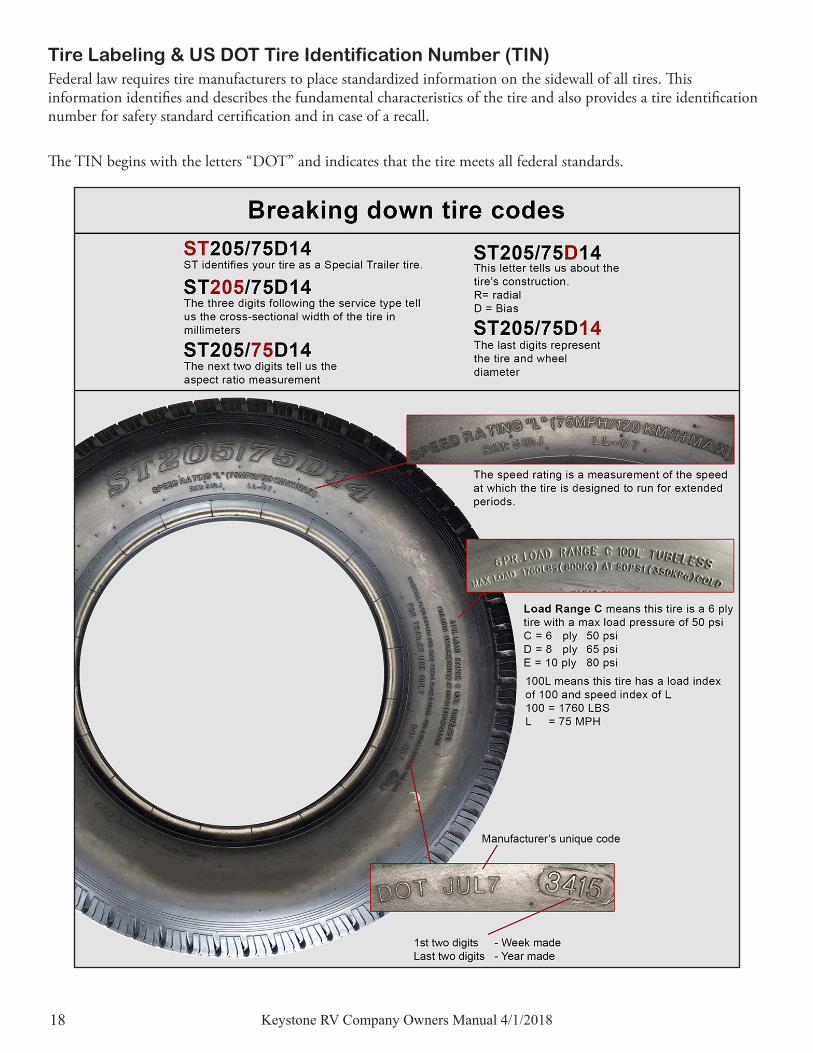
Tire Labeling & US DOT Tire Identification Number (TIN)Federal law requires tire manufacturers to place standardized information on the sidewall of all tires. This information identifies and describes the fundamental characteristics of the tire and also provides a tire identification number for safety standard certification and in case of a recall.
The TIN begins with the letters “DOT” and indicates that the tire meets all federal standards.
19Keystone RV Company Owners Manual 4/1/2018
Checking Tire PressureIt is important to check your vehicle’s tire pressure at least once a month for the following reasons:
• Most tires may naturally lose air over time.• Tires can lose air suddenly if you drive over a pothole or other object or if you strike the curb when
parking.• With radial tires, it is usually not possible to determine under-inflation by visual inspection.
For convenience, purchase a tire pressure gauge to keep in your vehicle. Gauges can be purchased at tire dealerships, auto supply stores, and other retail outlets.The recommended tire inflation pressure that vehicle manufacturers provide reflects the proper psi when a tire is cold. The term cold does not relate to the outside temperature. Rather, a cold tire is one that has not been driven on for at least three hours. When you drive, your tires get warmer, causing the air pressure within them to increase. Therefore, to get an accurate tire pressure reading, you must measure tire pressure when the tires are cold or compensate for the extra pressure in warm tires.
Steps for Maintaining Proper Tire Pressure1. Locate the recommended tire pressure on the vehicle’s Tire and Loading Information label located on the
exterior front left side wall.2. Record the tire pressure of all tires.3. If the tire pressure is too high in any of the tires, slowly release air by gently pressing on the tire valve
stem with the edge of your tire gauge until you get to the correct pressure.4. If the tire pressure is too low, note the difference between the measured tire pressure and the correct tire
pressure. These “missing” pounds of pressure are what you will need to add.5. At a service station or using an air compressor, add the missing pounds of air pressure to each tire that is
under-inflated.6. Check all the tires to make sure they have the same air pressure.
If you have been driving your vehicle and think that a tire is under-inflated, fill it to the recommended cold inflation pressure indicated on your vehicle’s Tire and Loading Information label. While your tire may still be slightly under-inflated due to the extra pounds of pressure in the warm tire, it is safer to drive with air pressure that is slightly lower than the vehicle manufacturer’s recommended cold inflation pressure than to drive with a significantly under-inflated tire. Since this is a temporary fix, don’t forget to recheck and adjust the tire’s pressure when you can obtain a cold reading.
Understanding Tire Pressure and Load LimitsTire inflation pressure is the level of air in the tire that provides it with load-carrying capacity and affects the overall performance of the vehicle. The tire inflation pressure is a number that indicates the amount of air pressure– measured in pounds per square inch (psi)–a tire requires to be properly inflated. (You will also find this number on the vehicle information placard expressed in kilo pascals (KPA), which is the metric measure used internationally.)Vehicle manufacturers determine this number based on the vehicle’s design load limit, that is, the greatest amount of weight a vehicle can safely carry and the vehicle’s tire size. Because tires are designed to be used on more than one type of vehicle, tire manufacturers list the “maximum permissible inflation pressure” on the tire sidewall. This number is the greatest amount of air pressure that should ever be put in the tire under normal driving conditions.
20 Keystone RV Company Owners Manual 4/1/2018
Tire Safety Tips
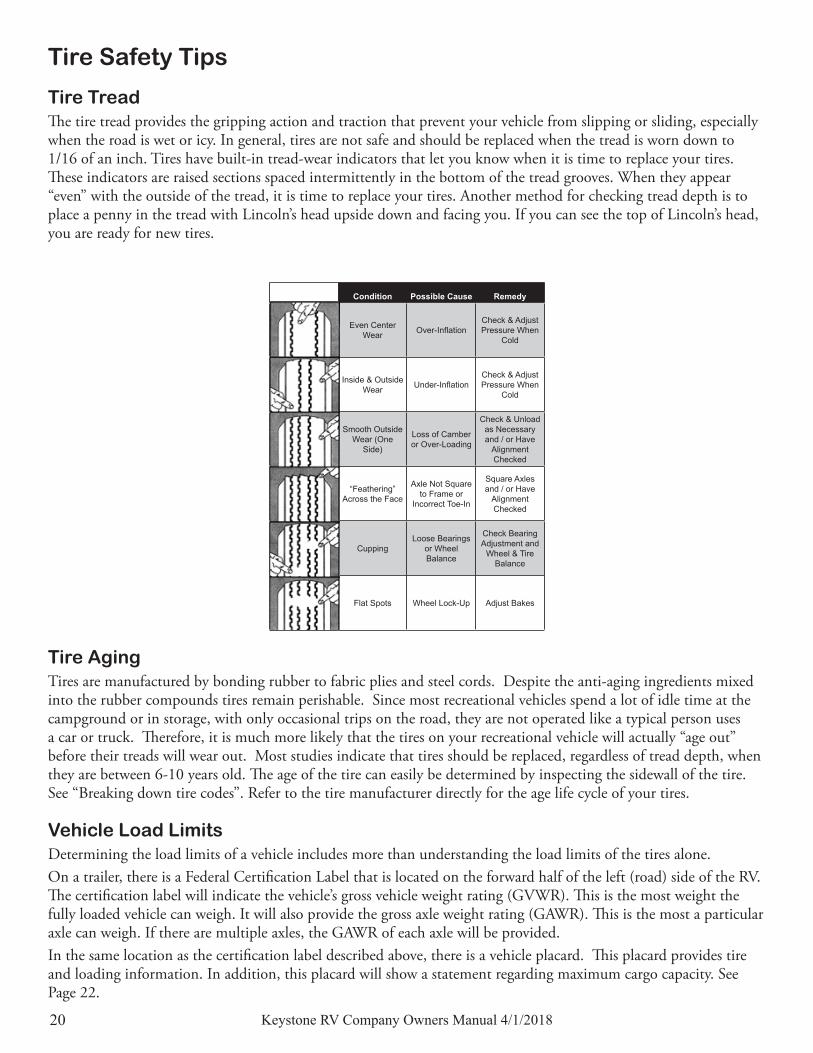
Tire TreadThe tire tread provides the gripping action and traction that prevent your vehicle from slipping or sliding, especially when the road is wet or icy. In general, tires are not safe and should be replaced when the tread is worn down to1/16 of an inch. Tires have built-in tread-wear indicators that let you know when it is time to replace your tires. These indicators are raised sections spaced intermittently in the bottom of the tread grooves. When they appear “even” with the outside of the tread, it is time to replace your tires. Another method for checking tread depth is to place a penny in the tread with Lincoln’s head upside down and facing you. If you can see the top of Lincoln’s head, you are ready for new tires.
Tire AgingTires are manufactured by bonding rubber to fabric plies and steel cords. Despite the anti-aging ingredients mixed into the rubber compounds tires remain perishable. Since most recreational vehicles spend a lot of idle time at the campground or in storage, with only occasional trips on the road, they are not operated like a typical person uses a car or truck. Therefore, it is much more likely that the tires on your recreational vehicle will actually “age out” before their treads will wear out. Most studies indicate that tires should be replaced, regardless of tread depth, when they are between 6-10 years old. The age of the tire can easily be determined by inspecting the sidewall of the tire. See “Breaking down tire codes”. Refer to the tire manufacturer directly for the age life cycle of your tires.
Vehicle Load LimitsDetermining the load limits of a vehicle includes more than understanding the load limits of the tires alone.On a trailer, there is a Federal Certification Label that is located on the forward half of the left (road) side of the RV. The certification label will indicate the vehicle’s gross vehicle weight rating (GVWR). This is the most weight the fully loaded vehicle can weigh. It will also provide the gross axle weight rating (GAWR). This is the most a particular axle can weigh. If there are multiple axles, the GAWR of each axle will be provided.In the same location as the certification label described above, there is a vehicle placard. This placard provides tire and loading information. In addition, this placard will show a statement regarding maximum cargo capacity. See Page 22.
Condition Possible Cause Remedy
Even Center Wear Over-Inflation
Check & Adjust Pressure When
Cold
Inside & Outside Wear Under-Inflation
Check & Adjust Pressure When
Cold
Smooth Outside Wear (One
Side)
Loss of Camber or Over-Loading
Check & Unload as Necessary and / or Have
Alignment Checked
“Feathering” Across the Face
Axle Not Square to Frame or
Incorrect Toe-In
Square Axles and / or Have
Alignment Checked
CuppingLoose Bearings
or Wheel Balance
Check Bearing Adjustment and
Wheel & Tire Balance
Flat Spots Wheel Lock-Up Adjust Bakes
21Keystone RV Company Owners Manual 4/1/2018
Cargo CapacitiesCargo can be added to the vehicle, up to the maximum weight specified on the placard. The combined weight of the cargo is provided as a single number. In any case, remember: the total weight of a fully loaded vehicle cannot exceed the stated GVWR.Water and propane also need to be considered. The weight of fully filled propane containers is considered part of the weight of the RV before it is loaded with cargo and is not considered part of the disposable cargo load. Water however, is a cargo weight and is treated as such. If there is a fresh water storage tank of 100 gallons, this tank when filled would weigh about 800 pounds. If more cargo is being transported, water can be off-loaded to keep the total amount of cargo added to the vehicle within the limits of the GVWR so as not to overload the vehicle. Understanding this flexibility will allow you, the owner, to make choices that fit your travel and camping needs. See Page 23.For more information on cargo weight distribution, see the section “Weight Distribution” in Chapter 5.
How Overloading Affects Your RV and TiresThe results of overloading can have serious consequences for passenger safety. Too much weight on your vehicle’s suspension system can cause spring, shock absorber, or brake failure, handling or steering problems, irregular tire wear, tire failure or other damage. An overloaded vehicle is hard to drive and hard to stop. In cases of serious overloading, brakes can fail completely, particularly on steep hills. The load a tire will carry safely is a combination of the size of tire, its load range, and corresponding inflation pressure. Excessive loads and/or under-inflation causetire overloading and, as a result, abnormal tire flexing occurs. This situation can generate an excessive amount of heat within the tire. Excessive heat may lead to tire failure. It is the air pressure that enables a tire to support the load, so proper inflation is critical. Since RVs can be configured and loaded in many ways, air pressures must be determined from actual loads (determined by weighing) and taken from the load and inflation tables provided by the tire manufacturer. These air pressures may differ from those found on the certification label. However, they should never exceed the tire limitation for load or air pressure. If you discover that your tires cannot support the actual weights,the load will need to be lightened.
Tire Size
To maintain tire safety, purchase new tires that are the same size as the vehicle’s original tires or another size recommended by the manufacturer. Look at the Tire and Loading Information label, or the sidewall of the tire you are replacing to find this information. If you have any doubt about the correct size to choose, consult with the tire dealer.
Tire WarrantyKeystone RV does not administer the warranty for tires. Please contact the tire manufacturer direct at:
1. Americana (Kenda) - 800-225-4714 www.americanatire.com2. Goodyear - US 800–321-2136/CA 800-387-3288 www.goodyear.com3. HiSpec Wheel & Tire, Inc (Provider, Grand Ride, Good Ride) – 574-807-8588 www.hispecwheel.com4. Lionshead Specialty Tire (Westlake, Sterling, Ridgeway, Constancy) - 574-533-6169 www.lionsheadtireandwheel.com5. TBC (Towmax, Trailer King, Sailun) - 800-238-6469 www.tbccorp.com6. Tireco (Mudstar) - 800-937-9433 www.tireco.com7. Tredit Tire and Wheel (Rainier, Arisun) - 855-8-Tredit www.tredittire.com

22 Keystone RV Company Owners Manual 4/1/2018
Weight Ratings & Definitions
GVWR (Gross Vehicle Weight Rating)The maximum permissible weight of this trailer when fully loaded. It includes the maximum allowable weight at the trailer axle(s) plus the hitch (tongue/pin) weight.
UVW (Unloaded Vehicle Weight)The weight of this trailer as manufactured at the factory. It includes all weight at the trailer’s axle(s) and hitch. If applicable, it also includes full generator fluids, fuel, engine oil and coolants.
CCC (Cargo Carrying Capacity)U.S.-Equal to GVWR minus the UVW and LP gas weight. (Water is considered a component of cargo) Canada-Equal to GVWR minus the UVW, full fresh (potable) water weight (including the water heater) and full LP gas weight.
GAWR (Gross Axle Weight Rating)The maximum permissible weight on an axle(s) when fully loaded.
Hitch (Tongue/Pin) WeightThe weight of the trailer that is transferred to the hitch of the tow vehicle when hooked up.
Weight Ratings - LabelsThere are four labels that use weight information. They are the Federal tag, Tire and Loading Information label and the Cargo Carrying Capacity label and, in the case of a Canadian trailer, a different Cargo Carrying Capacity label.
• Federal Certification Label - This label specifies maximum capacities for GVWR, GAWR and tires. It is located on exterior left front of vehicle.
• Tire and Loading Information label - This label specifies the maximum amount of cargo that can be safely added to the trailer. It is located on the exterior front left of vehicle.
23Keystone RV Company Owners Manual 4/1/2018
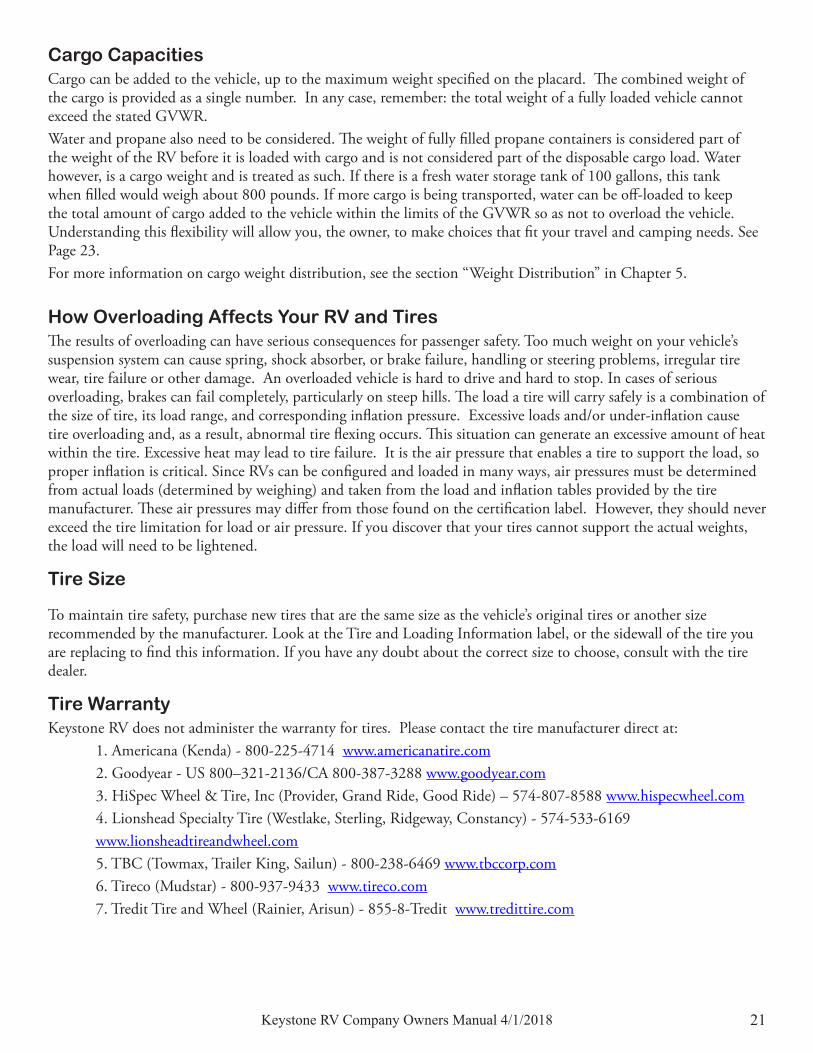
• Cargo Carrying Capacity (CCC) label (US) - This label supplies the CCC information for the customer. It is located on the backside of the screen door or the door jam of the main entry into the trailer.
• Cargo Carrying Capacity label (Canada) - This label supplies the CCC information for the customer. It is located on the exterior front left of the vehicle, next to the Federal Certification label.
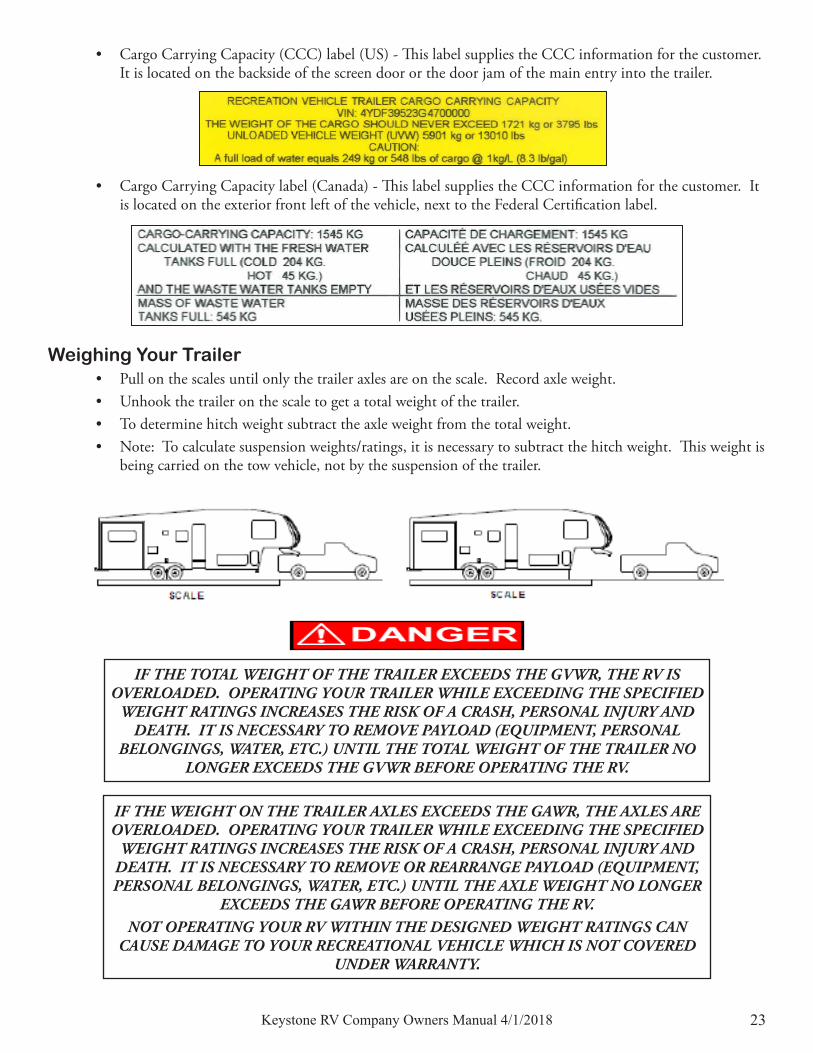
Weighing Your Trailer• Pull on the scales until only the trailer axles are on the scale. Record axle weight.• Unhook the trailer on the scale to get a total weight of the trailer.• To determine hitch weight subtract the axle weight from the total weight.• Note: To calculate suspension weights/ratings, it is necessary to subtract the hitch weight. This weight is
being carried on the tow vehicle, not by the suspension of the trailer.
IF THE WEIGHT ON THE TRAILER AXLES EXCEEDS THE GAWR, THE AXLES ARE OVERLOADED. OPERATING YOUR TRAILER WHILE EXCEEDING THE SPECIFIED
WEIGHT RATINGS INCREASES THE RISK OF A CRASH, PERSONAL INJURY AND DEATH. IT IS NECESSARY TO REMOVE OR REARRANGE PAYLOAD (EQUIPMENT, PERSONAL BELONGINGS, WATER, ETC.) UNTIL THE AXLE WEIGHT NO LONGER
EXCEEDS THE GAWR BEFORE OPERATING THE RV.NOT OPERATING YOUR RV WITHIN THE DESIGNED WEIGHT RATINGS CAN
CAUSE DAMAGE TO YOUR RECREATIONAL VEHICLE WHICH IS NOT COVERED UNDER WARRANTY.
IF THE TOTAL WEIGHT OF THE TRAILER EXCEEDS THE GVWR, THE RV IS OVERLOADED. OPERATING YOUR TRAILER WHILE EXCEEDING THE SPECIFIED
WEIGHT RATINGS INCREASES THE RISK OF A CRASH, PERSONAL INJURY AND DEATH. IT IS NECESSARY TO REMOVE PAYLOAD (EQUIPMENT, PERSONAL
BELONGINGS, WATER, ETC.) UNTIL THE TOTAL WEIGHT OF THE TRAILER NO LONGER EXCEEDS THE GVWR BEFORE OPERATING THE RV.
24 Keystone RV Company Owners Manual 4/1/2018
Axles & SuspensionKeystone selects the axles, suspension, tires and wheels applicable to the specific application of the RV. In addition to the Gross Vehicle Weight Rating (GVWR), each of these components have specific weight ratings and limitations for proper operation.
EXCEEDING THE ESTABLISHED WEIGHT RATINGS FOR THE AXLES, RUNNING GEAR, TIRES AND WHEELS CAN LEAD TO FAILURE THAT CAN AFFECT MOTOR VEHICLE
SAFETY AND LEAD TO PROPERTY DAMAGE OR DAMAGE TO THE TRAILER.
Please refer to the manufacturer instructions supplied with the RV for care and operation and/or www.dexteraxle.com or www.lci1.com.
SuspensionIn most cases, there are two types of suspension used on Keystone RVs, Leaf Spring or Rubberized suspension. Please refer to the manufacturer instructions supplied with the RV for care and operation.
Shock AbsorbersIf equipped, shock absorbers may provide a “ride enhancement” to the trailer. They do not affect the stability or towability of the trailer.
Spare TireIf equipped, can be utilized in an emergency if a trailer tire loses air pressure or goes flat. Certain brands use different wheels than original with the intent for the spare to be temporary.
Tire Changing Basics1. Use emergency flares when near a road or highway. 2. Block the wheels on the opposite side from the tire you wish to change to prevent accidental movement.3. Position a hydraulic jack on the frame close to the spring hanger. (Never attempt to use a stabilizer jack
to lift the RV)4. Raise the trailer until the tire clears the ground.5. Set a jack stand under the frame just to the rear of the tire being changed.6. Follow the Wheel Nut Torque and Wheel Reinstallation instructions provided in this section.
Wheel Nut TorqueThe information contained in these printed instructions outlines the most recently recommended processes involving Lug Nut Torque and takes precedent over any information regarding Lug Nut Torque shown in your Lippert or Dexter Owner’s Manuals.
ALWAYS TORQUE WHEEL NUTS TO THE WHEEL MANUFACTURER’S SPECIFICATIONS. OVER OR UNDER-TORQUED WHEEL NUTS CAN CAUSE THE WHEEL TO SEPARATE
FROM THE WHEEL MOUNTING SURFACE DURING OPERATION, CAUSING PROPERTY DAMAGE, PERSONAL INJURY OR LOSS OF LIFE.

25Keystone RV Company Owners Manual 4/1/2018
The axle and wheel assemblies of your RV are designed differently than those on your car. The overall size, weight and center of gravity of a recreational vehicle subject the wheels to pressures unique to trailering. During normal cornering, the tires and wheels experience a considerable amount of stress called “side-load”. Therefore, the lug nuts on your recreational vehicle require periodic torque maintenance.These instructions will show you how to maintain proper lug nut torque by following these important steps:
1. Check torque before every trip. 2. Use proper tools.3. Follow the appropriate star pattern sequence.4. Torque lug nuts in the correct stages and follow-up
intervals after any wheel reinstallation.Torque is the amount of rotating force applied to a fastener, such as a lug nut. Proper torque of lug nuts can only be achieved by using:
• Torque wrench (Dial indicator or Adjustable dial, not supplied by Keystone).
• 7/8” or 13/16” socket (Not supplied by Keystone).
Using Torque Wrenches• Most torque wrenches are required to be set at “0” when not in use to maintain calibration.• Please refer to the manufacturer’s instructions for further information on care and use.
Setting Torque Value on a Dial Indicator Wrench1. Make sure your indicator needle is set to “0”.2. As you apply clockwise pressure to the lug nut, both needles will show the current amount of torque
being applied.3. When you reach your desired torque value, stop applying pressure and your indicator needle will stay at
the highest torque value reached. Setting Torque Value of Adjustable Dial Wrench
1. Unlock the handle and set the dial to your desired torque value.2. Lock the handle back in place.3. As you apply clockwise pressure to the lug nut, you will hear an audible “click” when the desired torque
wrench value is reached. Do not apply further pressure once you hear the “click”.
NoteSome wheel assemblies require an extension. DO NOT USE a flexible
extension. Also, DO NOT USE a 4-way socket or any other type of wrench which does not measure the actual pressure applied to the lug nut.
26 Keystone RV Company Owners Manual 4/1/2018
Pre-Trip Maintenance Always remember
• Check lug nut torque before every trip. Keystone RV recommends this maintenance procedure to ensure proper torque has been applied to lug nuts before heading out on the road.
• Lug nuts should be torqued to 110-120 ft/lbs (140-150 ft/lbs on hubs using a 9/16” stud).• Always follow the appropriate star pattern as indicated in these instructions or in your axle
manufacturer’s owner’s manual to assure proper torque.Pre-Trip Procedure
1. Set your torque wrench to 110-120 ft/lbs (140-150 ft/lbs for 9/16” stud).2. Begin with the appropriate bolt for your wheel (12 o’clock position for 8 and 6 hole wheels and 2 o’clock
position for 5 hole wheels, as illustrated) and apply torque to all lug nuts following the star pattern indicated.
3. Complete the procedure on each wheel. Before moving to each new wheel, be sure to verify your preset torque wrench value.
ALWAYS TORQUE WHEEL NUTS TO THE WHEEL MANUFACTURER’S SPECIFICATIONS. OVER OR UNDER-TORQUED WHEEL NUTS CAN CAUSE THE WHEEL TO SEPARATE
FROM THE WHEEL MOUNTING SURFACE DURING OPERATION, CAUSING PROPERTY DAMAGE, PERSONAL INJURY OR LOSS OF LIFE.
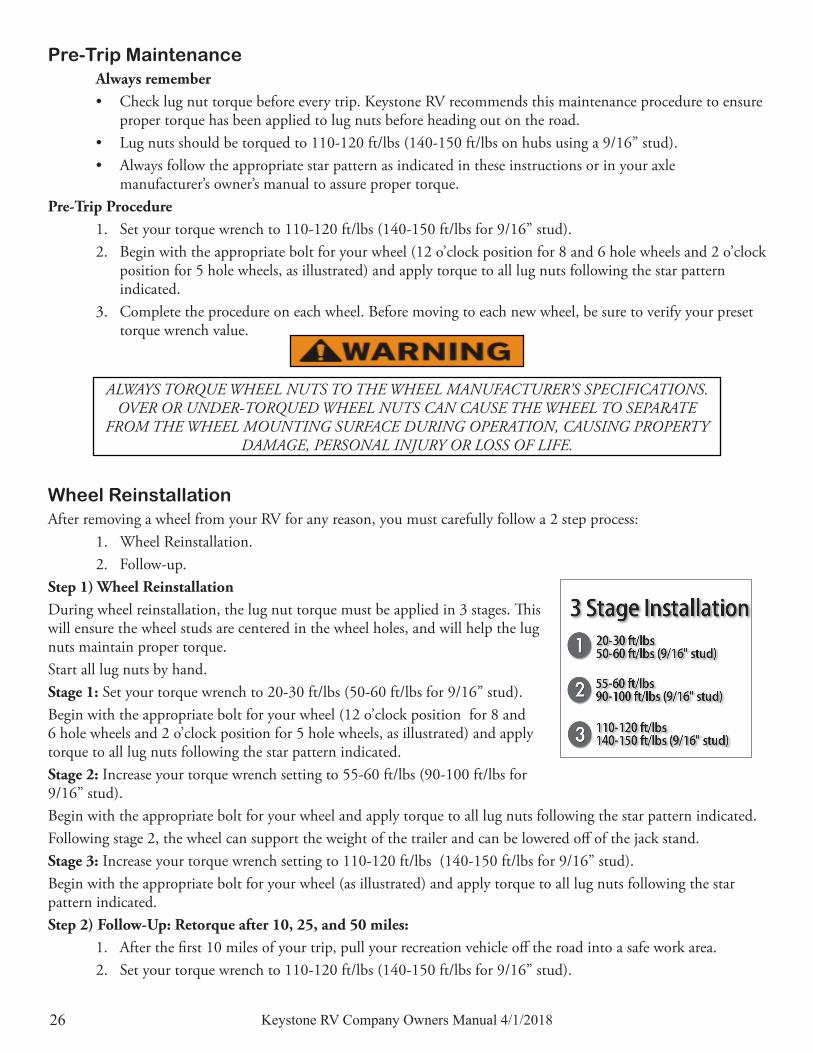
Wheel ReinstallationAfter removing a wheel from your RV for any reason, you must carefully follow a 2 step process:
1. Wheel Reinstallation.2. Follow-up.
Step 1) Wheel ReinstallationDuring wheel reinstallation, the lug nut torque must be applied in 3 stages. This will ensure the wheel studs are centered in the wheel holes, and will help the lug nuts maintain proper torque.Start all lug nuts by hand.Stage 1: Set your torque wrench to 20-30 ft/lbs (50-60 ft/lbs for 9/16” stud). Begin with the appropriate bolt for your wheel (12 o’clock position for 8 and 6 hole wheels and 2 o’clock position for 5 hole wheels, as illustrated) and apply torque to all lug nuts following the star pattern indicated.Stage 2: Increase your torque wrench setting to 55-60 ft/lbs (90-100 ft/lbs for 9/16” stud). Begin with the appropriate bolt for your wheel and apply torque to all lug nuts following the star pattern indicated.Following stage 2, the wheel can support the weight of the trailer and can be lowered off of the jack stand.Stage 3: Increase your torque wrench setting to 110-120 ft/lbs (140-150 ft/lbs for 9/16” stud).Begin with the appropriate bolt for your wheel (as illustrated) and apply torque to all lug nuts following the star pattern indicated.Step 2) Follow-Up: Retorque after 10, 25, and 50 miles:
1. After the first 10 miles of your trip, pull your recreation vehicle off the road into a safe work area.2. Set your torque wrench to 110-120 ft/lbs (140-150 ft/lbs for 9/16” stud).
27Keystone RV Company Owners Manual 4/1/2018
3. Begin with the appropriate bolt for your wheel and apply torque to all lug nuts following the star pattern indicated.
4. Reapply torque (at 110-120 ft/lbs or 140-150 ft/lbs for 9/16” stud) and repeat steps 1, 2, & 3 again at 25 miles and at 50 miles of your first trip.
The follow up process is complete and you should refer to the general lug nut torque maintenance process described in “Pre-Trip Maintenance”.
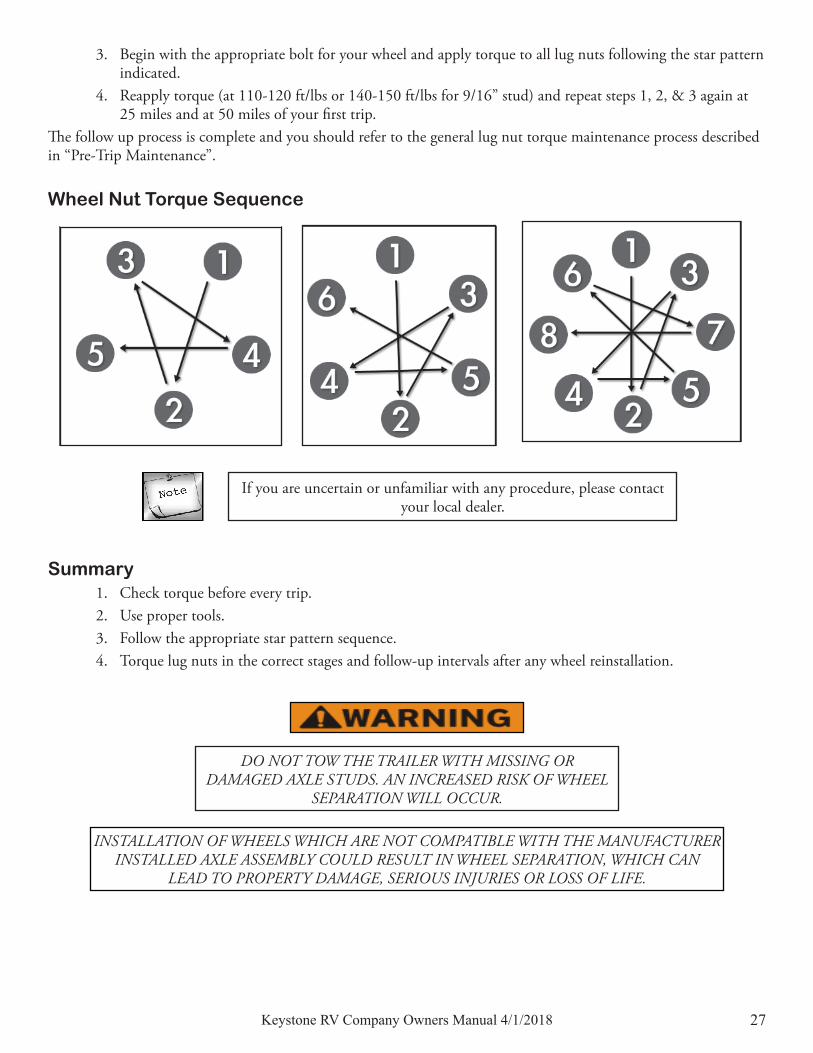
Wheel Nut Torque Sequence
Summary1. Check torque before every trip.2. Use proper tools.3. Follow the appropriate star pattern sequence.4. Torque lug nuts in the correct stages and follow-up intervals after any wheel reinstallation.
DO NOT TOW THE TRAILER WITH MISSING OR DAMAGED AXLE STUDS. AN INCREASED RISK OF WHEEL
SEPARATION WILL OCCUR.
INSTALLATION OF WHEELS WHICH ARE NOT COMPATIBLE WITH THE MANUFACTURER INSTALLED AXLE ASSEMBLY COULD RESULT IN WHEEL SEPARATION, WHICH CAN
LEAD TO PROPERTY DAMAGE, SERIOUS INJURIES OR LOSS OF LIFE.
If you are uncertain or unfamiliar with any procedure, please contact your local dealer.
Note
28 Keystone RV Company Owners Manual 4/1/2018
Chapter 5: Towing Considerations
Getting Started
Tow Vehicle SelectionWe recommend the tow vehicle selected have a trailer weight rating to handle at least the Gross Vehicle Weight Rating (GVWR) of the RV you have selected. Please consult with your tow vehicle’s dealer for more information about the specific ratings of your tow vehicle.
Hooking up to the Tow Vehicle Fifth Wheel
1. Adjust the landing gear jacks until coach is at level for hooking to the tow vehicle.2. Place wheel chocks behind fifth wheel’s tires.3. Lower the tailgate on truck.4. Release the fifth wheel lock handle on the tow vehicle.5. Back up slowly to line up the tow vehicle so the fifth wheel is within 12” to 15” of accepting kingpin.6. Close and latch tailgate.7. Back truck slowly until kingpin engages the fifth wheel and automatically locks.8. Engage the hitch lock and secure with a padlock or pin.9. Connect the power cord between the tow vehicle and the fifth wheel.10. Connect the emergency breakaway switch cable.11. Check all lights on trailer and tow vehicle (running, turn signals, brake, back-up) for proper operation.12. Completely raise the landing gear and stabilizer jacks and store the wheel chocks.13. Pull forward and check the operation of the trailer brakes with the hand control to assure proper
operation. Refer to manufacturer specifications on setting the brake control. Travel Trailer
1. Crank the tongue of the trailer jack up until the hitch coupler is high enough to clear the tow vehicle hitch ball.
2. Back the tow vehicle to the trailer until the hitch ball is directly under the coupler. 3. Set the parking brakes, raise the locking latch on the coupler and lower it down on the ball with the
tongue jack. 4. Engage the locking latch to lock it on the ball. Secure with a padlock or pin.5. Connect the power cord between the tow vehicle and the trailer.6. Connect the breakaway switch to the tow vehicle.7. Install the weight distribution bars and sway control. Refer to the hitch manufacturers directions for
proper hook up and adjustment.8. Crank the tongue jack all the way up and raise all stabilizer and leveling jacks. 9. Check all lights on the trailer and tow vehicle (running, turn signals, brakes, back-up) for proper
operation.10. Pull forward and check the operation of the trailer brakes with the hand control to assure proper
operation. Refer to manufacturer specifications on setting the brake control.
29Keystone RV Company Owners Manual 4/1/2018
Pre-Travel Checklist
Now that the unit is properly hooked to your tow vehicle, please use the following Pre-Travel checklists to verify the rest of the unit is safe for travel.
Exterior • Close the valves on the LP bottles.• Empty the holding tanks.• Inspect the awning(s) and ensure that they are properly retracted and secured for travel.• Inspect all exterior baggage doors and hatches ensuring they are locked.• Inspect the tires and check the pressures. Refer to Chapter 4.• Check the wheel nut torque. Refer to Chapter 4.• Position the battery disconnect to the on position.• Ensure the steps are retracted.• Remove all snow from the roof.• Disconnect all park connections and securely store.
Interior • Close all vents and windows.• Place the television antenna in the “down” position.• Retract the slide rooms.• Inspect the interior of the RV ensuring that all cabinet, interior, and the shower doors are closed and
secured.• Secure all loose items in storage compartments.• Ensure that the refrigerator door is closed and latched.• Verify the smoke, carbon monoxide and LP alarms are in working condition.• Engage the deadbolt on entrance door for transport.
30 Keystone RV Company Owners Manual 4/1/2018
Tow Vehicle Set up
Weight DistributionProper weight and load distribution is absolutely essential to safe towing. Before your first trip, load your RV with the weight distributed evenly (front to rear, side to side) with all personal belongings, equipment, food, water, etc. you feel are needed and weigh the RV as shown in Chapter 4 “Weighing Your Trailer”. Compare the weights of the RV to the weight ratings of the RV. Keep the loaded tongue weight between 10% and 15% of the total weight for travel trailers and between 15% and 25% of total weight for fifth wheels. More detailed information for Ramp Trailers can be found in Chapter 12 under the heading “Ramp Trailer Weight Distribution”.
Brake ControlA brake control is a device that is installed in the tow vehicle that activates the electric trailer brakes. Your trailer brakes should work in synchronization with your tow vehicle brakes. Never use your tow vehicle or trailer brakes alone to stop the combined load. Your brake controller must be set up according to the brake control manufacturer’s specifications to ensure proper synchronization between the tow vehicle and the trailer. Additionally, you may have to make small adjustments occasionally to accommodate changing loads and driving conditions.
Hitch SelectionThe hitch must be rated over the GVWR and the hitch weight of the trailer. Weight specifications can be found at www.Keystonerv.com. Keystone RV does not supply the tow vehicle hitch, weight distribution bars or the sway control. Your RV dealer will be able to help with proper hitch selection for your tow vehicle.
Weight Distribution Bars - Travel TrailerWeight distribution bars transfer weight from the rear axle of the tow vehicle to the front axle and the trailer axles. Properly set up, they will control up and down oscillation at the hitch while towing. Weight distribution bars do not control sway. Keystone recommends weight distribution bars for safe towing. Your dealer will be able to assist with proper selection for your specific tow vehicle and travel trailer setup.
Sway Controls - Travel TrailerA sway control device is installed by dealers as part of the hitch set up and prevents sway (or fishtailing) while towing. Keystone recommends a sway control device that will prevent sway (or fishtailing) for safe towing. If you experience sway while towing, contact your dealer immediately for corrective action. Some less expensive brands of sway control are not adequate to control sway in larger travel trailers. The sway control must be properly set up for it to be effective. Your dealer will be able to assist with proper selection for your specific tow vehicle and travel trailer setup. See Page 32.
LOCATE AND SECURE CARGO AND VEHICLES TO MAINTAIN SAFE WEIGHT DISTRIBUTION IN THE CARGO AREA AND THROUGHOUT THE TRAILER.
IMPROPER WEIGHT DISTRIBUTION OR OVERLOADING COULD LEAD TO LOSS OF VEHICLE CONTROL DURING TRAVEL RESULTING IN SERIOUS INJURY OR DEATH.
THE ROOF SHOULD BE FREE OF SNOW PRIOR TO TRANSPORTING THE TRAILER.FOLLOW ALL GUIDELINES CONTAINED IN THIS MANUAL FOR LOADING AND WEIGHING PROCEDURES. MAINTAIN THE LOADED HITCH WEIGHT WITHIN THE PERCENT LEVELS
STATED ABOVE. WHERE APPLICABLE, A HITCH WITH BUILT IN SWAY CONTROL IS RECOMMENDED. DO NOT EXCEED THE GVWR (GROSS VEHICLE WEIGHT RATING) OR THE
GAWR (GROSS AXLE WEIGHT RATING) OF EITHER THE TOW TRAILER OR TOW VEHICLE.

31Keystone RV Company Owners Manual 4/1/2018
Safety Chains - Travel TrailersSafety chains are included with every travel trailer and, in most states, are required when towing a travel trailer. Hook them to the safety chain loops provided on the tow vehicle’s hitch, crossing them under the trailer tongue. Inspect the length of the chains once attached to the tow vehicle frame. They should be long enough to allow for turns, but short enough to avoid any drag.
ALWAYS USE SAFETY CHAINS WHEN TOWING. THEY MAINTAIN THE CONNECTION BETWEEN THE TRAVEL TRAILER AND TOW VEHICLE IN THE EVENT
OF THE TRAILER BECOMING DETACHED DURING TRAVEL.
Breakaway SwitchThe breakaway switch is another safety device as it provides a means of automatically slowing and stopping your RV if it should become detached from the tow vehicle during transit. The cable from the breakaway switch should be attached to the tow vehicle and if a separation occurs, the pin is pulled out of the switch which activates the brakes of the trailer to slow and eventually stop the trailer. The breakaway switch is only powered by a 12 volt RV battery on the trailer. The RV battery is not supplied by Keystone. Please consult your RV dealer to purchase the proper battery.How to Test the Breakaway Switch
1. Disconnect the 7-way trailer cord from the RV to the tow vehicle. 2. Pull the lanyard pin out to the first stage.3. Brakes should audibly engage.4. Double check by moving the tow vehicle forward slightly to be sure the RV brakes have locked and are
operating correctly.
Disconnect the seven-way trailer cord from the tow vehicle prior to testing the breakaway switch. Failure to do so may cause damage to the brake controller.
LightsCheck all electrical connections to ensure all lights on the tow vehicle and travel trailer are functioning properly. The brake lights, hazards and turn signals should be in synchronization with the tow vehicle. See “7-way Plug” in Chapter 8.
MirrorsAdjust the mirrors on the tow vehicle prior to departure. Having someone to assist you will make this safety step quick and easy. First line up the tow vehicle and trailer. Next, sit in the driver’s seat and adjust the left mirror to where you can see the entire left side of the trailer and well beyond. Finally, while still sitting in the driver’s seat, have someone adjust the right mirror until the same result is achieved. Some vehicles may require the use of mirror extensions to properly see down the side of the trailer. See your Keystone dealer for recommendations.
32 Keystone RV Company Owners Manual 4/1/2018
TowingTowing a recreational vehicle can be enjoyable if special attention toward safety is applied every time you tow your trailer. Before heading out on your first camping trip practice turning, stopping and backing in low traffic areas or large parking lots.Driving with a trailer in tow is different. Start out slowly, checking the traffic after signaling and being sure the road is clear. Accelerate slowly and evenly, checking the mirrors frequently as you move into the proper lane. Try to drive with an anticipation of problems that may occur way ahead and prepare for them, even though they may never happen.As a motorist sharing the road, you are taller, heavier, longer and require more time and distance to stop. Weather and road conditions will require adjustments to speed. Anticipate dips, gutters, and depressions in the road, slowing down well in advance, these are the hardest jolts of any kind on your vehicle, hitch, recreational vehicle and items stored inside the RV. Take dips and bumps slowly and be certain the trailer wheels have passed the point before accelerating.
Controlling Sway or Fishtailing Sway or fishtailing is the sideways action of a trailer caused by external forces. It is common for travel trailers to sway in response to strong winds or crosswinds or when passed by or passing a semi-tractor and trailer or driving downhill.
EXCESSIVE SWAY OR FISHTAILING OF YOUR TRAVEL TRAILER CAN LEAD TO THE ROLLOVER OF THE TRAILER AND TOW VEHICLE. SERIOUS INJURY OR DEATH CAN OCCUR. IT IS
IMPORTANT THAT YOU READ AND UNDERSTAND THE INFORMATION IN THIS SECTION.
Sway or fishtailing of your recreation vehicle can be controlled and is primarily impacted by four factors:• Equipment.• Tongue weight.• Driving.• Corrective measures.
Equipment – When hitched together, the trailer and the tow vehicle must be level. The tires of both the trailer and tow vehicle should be in good condition and inflated to the pressure recommended as noted on the tire placards of the trailer and tow vehicle. See “Hitch Selection”, “Weight Distribution Bars”, & “Sway Controls” in this chapter for more information on equipment to control sway.Tongue Weight - See “Weight Distribution” in this chapter for information on maintaining proper tongue weight.Driving – This is the most important component. The tendency for the vehicle to sway increases with speed therefore, obey all speed limits and reduce speed during inclement weather or windy conditions.Corrective measures – If sway occurs the following techniques should be used:
1. Slow down immediately, remove your foot from the accelerator. Avoid using the tow vehicle brakes unless there is a danger of collision. Reduce speed gradually whenever possible. If you can do so safely, use the brake hand controller (independent of the tow vehicle brakes) to gently and progressively apply the trailer brakes. This will help to keep the vehicles aligned. Practice using the brake hand controller in a deserted parking lot. Don’t wait until an emergency occurs before using it. Location of the brake hand controller is important and should be made easily accessible.
2. Steer as little as possible while maintaining control of the vehicle. Because of natural reaction lag time, quick steering movements to counter trailer sway will actually cause increased sway and loss of control. Keep both hands on the wheel. Hold the wheel as straight as possible until stability is regained.
3. Do not jam on the brakes or attempt to press on the accelerator to speed your way out of the fishtailing. Both actions make the situation worse and could cause severe injury or death.

33Keystone RV Company Owners Manual 4/1/2018
4. Once the swaying is under control, stop as soon as possible. Check tire pressures, cargo weight distribution and look for any signs of mechanical failure. Travel at reduced speeds that permit full control until the problem can be identified and corrected.
Backing Back with care. Having a person outside to assist is a good idea. If no one is available to help, the driver should inspect the area behind the vehicle to avoid any unseen obstacles and unpleasant surprises.
Braking Start braking sooner than you would if driving without a trailer in tow. Stopping distances are increased while towing a trailer. See “Brake Control” in this chapter.
Passing and AcceleratingRemember when you pass another vehicle that it takes longer to accelerate and additional time must be allowed due to the added length of the trailer. Passing should be done on level terrain and downshift, if necessary for added acceleration. Whenever deciding to pass another vehicle, exercise caution and always use the turn signals.
Sharply Winding and Narrow RoadsKeep well to the center of the lane, equally away from both the center line and pavement edge. This allows the trailer to clear the edge of the pavement without the likelihood of the wheels dropping onto the shoulder, causing potential dangerous sway. Do not crowd or cross the center line.
Steep or Long Grades Down shifting into a lower gear or range in advance assists braking on descents and adds power on the climb. Avoid situations that require excessive and prolonged use of the brakes. Apply and release brakes at short intervals to give them a chance to cool.
Slippery Pavement On slippery and icy pavement, reduce speed and drive slowly. Hydroplaning can occur with little water on the pavement. If skidding begins, remove your foot from the throttle and gently apply the trailer brakes only.
Freeways and HighwaysTry to pick the lane in which you want to move and stay in it, preferably keeping to the slower lane on the right.
Turning CornersHere is where you find a first basic difference when towing. The trailer wheels do not follow the path of your tow vehicle’s wheels. The trailer will make a closer turn than the tow vehicle. Compensate by pulling further into the intersection so that the trailer will clear the curb or clear any parked vehicles along the road. Left turns require a wider than normal swing into the new lane of traffic to keep the trailer from edging into the opposing lane. Use the turn signals early to communicate to traffic behind and slow down well in advance.
Mud and SandLet the momentum of the tow vehicle and trailer carry you through. Apply power gently and stay in the tracks of the previous vehicle. If stuck, tow the trailer and tow vehicle out together without unhitching.
Additional towing safety information can be found at the National Highway Traffic Safety Administration’s web site. http://www.nhtsa.dot.gov/Cars/problems/Equipment/towing/Towing.pdf
34 Keystone RV Company Owners Manual 4/1/2018
Chapter 6: Camper Set Up at Destination
Site Requirements and Selection
ElectricalDo you need 30 or 50 amp service? What will you be running in the camper will help decide this. If you will be running one roof a/c, refrigerator and converter most of the time and the microwave periodically, we would recommend at least 30 amp service. You may not be able to run the microwave and roof a/c at the same time, but it is easy to adjust the thermostat of the roof a/c so it will not be running while the microwave is. Two roof a/c’s will need 50 amp service. Please refer to Chapter 8 Electrical System for an amperage consumption chart which will help decide your needs. See video at www.keystonerv.com.
Antenna/SatelliteIf equipped, be sure your selected site will allow you to set-up to get these signals.
SewerHolding tank sizes can vary significantly by brand and floor plan. How large are your holding tanks? How long and how many people will be using the facilities? How much water is typically used? Answering these questions will help you decide if you should go for the added cost of a sewer hook up at your campsite. You might just consider a site closer to the campground facilities. If you do choose a site with a sewer hook up, DO NOT leave the valves open. Please refer to Chapter 10 Plumbing for more detail.
WaterIn most instances, water and electric come in combination. Should you be without a water source for city water, you can fill your water tank and utilize the on board water pump. Once again, holding tank sizes can vary significantly by brand and floor plan so know how many gallons your fresh water tank is and monitor how many people are using the facilities and how often so you don’t leave yourself dry.
CampsiteMany campsites offer ‘pull through’ sites that require no backing up. When you do not have this option and backing will be required, set yourself up to back into the site from the left. This allows you to see the entire “Drivers Side” while you are backing into your site. Backing in from the right can be done, you are just not able to see as well. Before beginning, safely park and survey the campsite for fire pits, stumps, posts, trees, low tree branches, etc and decide where you want the camper to end up. Use a spotter to help guide you into position. If you are alone, ask a neighbor for some help, you might meet a new friend.While entering and exiting your campsite, be careful not to cut your turn short and clip something. Once again, we recommend a spotter to assist.
35Keystone RV Company Owners Manual 4/1/2018
Camper Set UpOnce you have arrived and parked in your campsite, before removing the camper from your tow vehicle, your camper needs to be leveled to assure proper operation of certain features (refrigerator, slide-outs, etc.)
Leveling Procedures1. Choose a site that is as level as possible (Some sites are equipped with a prepared surface such as concrete
or asphalt). Ensure the ground is not soft and will support the weight of jacks and/or other support devices.
2. Before uncoupling, level the RV from side to side with suitable lengths of 2” x 6” wood blocks under the tires. Place the wood blocks on the ground forward of the wheels and tow the RV onto the blocks. Use wheel chocks to be sure the RV cannot roll.
3. Use a small level in the refrigerator, on a counter top or floor of the trailer to make sure it is level.4. Lower the A-frame jack (Travel Trailers) or landing jacks (Fifth Wheel) onto wood blocks (or other). 5. Once the RV is level, put wheel chocks or blocks in place so the RV can’t move, uncouple the RV from
the tow vehicle.
6. If equipped, lower the stabilizing jacks onto blocks until they firmly engage. Be sure all 4 jacks have about the same pressure on them as to not put the RV in a twist. Doing so can cause slide-outs, doors, etc. to bind and/or operate intermittently. DO NOT attempt to lift the RV with the stabilizer jacks. These are not designed to bear weight, only help stabilize the RV from movement.
7. Before resuming travel, be sure the stabilizer jacks are fully retracted.
Stabilizing JacksDependent upon the type (travel trailer/fifth wheel), product and model purchased, the stabilizer jacks included will vary. Although stabilizer jacks come in different types and sizes, all perform the same function: To stabilize the front and rear of all recreational vehicles while parked for camping. DO NOT attempt to lift the RV with the stabilizer jacks. These are not designed to bear weight, only help stabilize the RV from movement. Please refer to the manufacturer instructions supplied with the RV for care and operation and/or www.lci1.com, www.davecarter.com, www.domarproducts.com, www.nationalsales.us, www.norcoind.com.
DO NOT overextend or retract the a-frame or landing jacks as that could cause damage which would not be warrantable.

36 Keystone RV Company Owners Manual 4/1/2018
Hook Ups1. Once the RV is safely leveled and stabilized, continue with set-up.2. Connect the shore-line cord.3. Open the step.4. Inside, set the Thermostat to the desired temperature (air conditioning/furnace), open a roof vent
and turn on the fan (if applicable) to create air exchange, turn on the refrigerator then complete the remainder of the set up.
5. Turn on the LP.6. Connect the water hose.7. Connect the sewer hose, park cable, (if applicable).8. Open slide-outs.9. Set up the remaining features as needed.
Cold Weather CampingSome RVs are equipped with additional features to enhance your ability to camp in cold weather. Depending on your specific want/needs, it may be necessary for you to take additional actions or invest in additional enhancements to suit your particular needs. Consult your local Keystone dealer for more information regarding after market equipment that may be available to adapt a model to your needs. The cost of these enhancements would not be warrantable.
37Keystone RV Company Owners Manual 4/1/2018
Chapter 7: Appliances and Equipment
IF YOU SMELL PROPANE1. EXTINGUISH ANY OPEN FLAMES AND ALL SMOKING
MATERIALS.2. SHUT OFF THE PROPANE SUPPLY AT THE CONTAINER
VALVE(S) OR PROPANE SUPPLY CONNECTION.3. DO NOT TOUCH ELECTRICAL SWITCHES.4. OPEN DOORS AND OTHER VENTILATING OPENINGS.5. LEAVE THE AREA UNTIL THE ODOR CLEARS.6. HAVE THE PROPANE SYSTEM CHECKED AND LEAKAGE
SOURCE CORRECTED BEFORE USING AGAIN.IGNITION OF FLAMMABLE VAPORS COULD LEAD TO A FIRE OR
EXPLOSION AND RESULT IN DEATH OR SERIOUS INJURY.
PORTABLE FUEL-BURNING EQUIPMENT, INCLUDING WOOD AND CHARCOAL GRILLS AND STOVES, MUST NOT BE USED INSIDE THE
RECREATIONAL VEHICLE. THE USE OF THIS EQUIPMENT INSIDE THE RECREATIONAL VEHICLE MAY CAUSE FIRES OR ASPHYXIATION.
Safety Always follow the manufacturers’ instructions on the use of all appliances and observe all safety warnings and instructions included.Before camping, all campers should review and understand the locations of all safety equipment inside the coach and all emergency exit windows as well as doors. An escape plan for emergencies whether at home or camping is always a good idea.
Propane Appliance MaintenanceFollow the instructions and warnings noted in the appliance and equipment owner’s manual as well as the ones listed below:
• Annual maintenance should be conducted on the propane appliances and equipment by an authorized dealer or repair facility.
• Insects can build nests in the burners of the various appliances and equipment. The burner and burner orifice of the propane appliances and equipment should be cleaned out by an authorized dealer or repair facility anytime circumstances or conditions warrant, but no less frequently than on an annual basis.
Note
In this section of the manual, we rely on the component manufacture manuals that have been supplied with the RV for detailed operating instructions. Keystone can only provide a
summary operational description and recommend you review each of the component manuals before use of the component.
DIAGNOSIS AND REPAIR OR REPLACEMENT OF YOUR RV’S APPLIANCES SHOULD BE PERFORMED BY A DEALER OR PROPERLY CERTIFIED RV TECHNICIAN. IMPROPERLY DIAGNOSED, REPAIRED OR
REPLACED APPLIANCES COULD LEAD TO AN INCREASED RISK OF DEATH OR SERIOUS INJURY.
38 Keystone RV Company Owners Manual 4/1/2018
Air Conditioner (Optional)For those RVs equipped with roof mounted or sidewall/window air conditioners, they operate on 120V AC power. There are different sizes and variations available depending on the RV. An air conditioner takes a sizable amount of power to run. Most RV electrical systems are designed with 30 amps of available power with some having 50 amp capability (See Chapter 8, Electrical System). It may be necessary to reduce other loads when using air conditioning to reduce the chance of overload and possibly tripping the main breaker. (For thermostat operation on the air conditioner, see “Thermostat” in this section). In climates that experience high temperatures, a second air conditioner may be necessary to maintain a comfortable indoor temperature on larger trailers. A second air conditioner requires 50 amp service. Please refer to the manufacturer instructions supplied with the RV for care and operation and/or www.dometicusa.com or www.rvcomfort.com.
Capability vs. EnvironmentAt best, a properly functioning roof air conditioner will cool the intake air it receives by 20 degrees F. The capability of the air conditioner to maintain the desired inside temperature is directly affected by the heat gain of the RV. During extreme high outdoor temperatures, the heat gain of the vehicle may be reduced by:
1. Parking in a shaded area.2. Keeping blinds down or drapes shut.3. Operation on High Fan/Cooling mode will provide the maximum efficiency in high humidity or high
temperatures.4. Using awnings to block direct sunlight exposure on the RV.5. Avoiding use of heat producing appliances.6. Giving the A/C a “head start” by turning the air conditioner on early in the morning.
Antenna (TV)The two (2) primary components are the Antenna and the Booster. The booster will be typically located near one of the TV locations and has switch to turn it on & off. The booster is designed to amplify the TV (Air) signal. The antenna is designed to capture the best signal available by moving it to the optimal position. If your RV is equipped with “Cable”, the booster must be off for the “Cable” signal to reach your desired TV locations.Before raising the TV Antenna, be sure the area is clear of any electrical wires or other obstructions. Also, be sure to properly stow the antenna before moving the RV. Please refer to the manufacturer instructions supplied with the RV for care and operation and/or www.winegard.com.
DO NOT RAISE TV ANTENNA NEAR OVERHEAD ELECTRICAL WIRES AS CONTACT MAY CAUSE INJURY OR DEATH.
Never run the A/C without the filter. This could plug the RV evaporator substantially effecting performance.
Note
Operating Appliances at High Altitude:All gas appliances experience lowered efficiency (or rating) at high altitude. This is a direct
result of lower atmospheric pressure and oxygen levels, and is not a defect of appliance.See Components manual for each Appliance.
Note
39Keystone RV Company Owners Manual 4/1/2018
Awning, Patio If equipped, Keystone RV Company uses a variety of styles and sizes of awnings. They are primary designed as a sun/rain protection. During any rain it will be necessary to tilt one end of the awning for proper water run off and/or store the awning. Typically the end farthest away from the entry door is tilted so the door won’t hit and damage the awning fabric when it is opened and closed. Awnings that experience damage from wind or rain are not considered warrantable. Please refer to the manufacturer instructions supplied with the RV for care and operation and/or www.dometicusa.com, www.carefreeofcolorado.com, www.lci1.com.
Awning, Electric PatioIf equipped, this awning can be extended and retracted electrically. This awning may or may not have tilt functionality. Awnings without tilt functionality will need to be stored during any rain. For awnings equipped with tilt functionality, during rain, it will be necessary to tilt one end of the awning for proper water run off and/or store the awning. Please refer to the awning manufacturer instructions supplied with the RV for care and operationand/or www.dometicusa.com, www.carefreeofcolorado.com, www.lci1.com.
Awning, Slide-Out (Optional)If equipped, a slide-out awning will automatically open and close along with the slide-room. Fully extended the awning is level, which may cause water to puddle on top of the canopy. As the slide-room is closed, the awning will roll up and cause any puddles to spill over the sides of the awning. Before retracting the slide-room, check to make sure the slide out awning is free of any debris (leaves, twigs, etc.), which can damage the awning or slide-room components. Please refer to the manufacturer instructions supplied with the RV for care and operation and/or www.dometicusa.com, www.carefreeofcolorado.com, www.lci1.com.
DO NOT ATTEMPT ANY REPAIRS TO ANY AWNING. THE AWNING ROLLER TUBE IS UNDER EXTREME SPRING TENSION. REPAIRS SHOULD ONLY BE PERFORMED BY AN AUTHORIZED
DEALER / REPAIR CENTER.
Backup MonitorIf equipped, the back up monitor will allow you to see directly behind your trailer. Please refer to the manufacturers’ instructions supplied with the RV for care and operation.
Cable Hook-UpIf equipped, locate the exterior hookup on the side of the recreational vehicle. Attach the cable source to the cable jack on the RV. The TV Antenna booster must be off for the cable signal to reach the TV location.
It is best to close the awning when unattended. Damage to the awning due to wind, rain or any weather condition is not covered under warranty
by Keystone or the awning manufacturer.
An awning damaged from wind or rain is not covered under warranty even if it was tilted. The safest way is to put it away if you are unsure.
Note
Note
40 Keystone RV Company Owners Manual 4/1/2018
Carbon Monoxide (CO) DetectorFor your safety, a carbon monoxide (CO) detector is installed in every RV. Depending on the model, it may be operated by battery (9V, AA) or wired so that it will be powered by a RV battery (if equipped) or 12V power from the converter. Please refer to the manufacturer instructions supplied with the RV for care and operation and/or www.atwoodmobile.com, www.qginc.com, or www.mtiindustries.com. Common sources of CO are malfunctioning or misuse of gas appliances, vehicle engines, generators and many other fuel burning products.
Some indications of CO poisoning include (but not limited to) the following:
Mild Exposure• Symptoms of the flu (minus a fever)• Slight Headache• Dizziness• Fatigue
Medium Exposure• Severe Throbbing Headache• Drowsiness• Confusion• Fast Heart Rate
Extreme Exposure• Unconsciousness• Convulsions• Cardiorespiratory Failure• Death
For your safety and to keep your carbon monoxide alarm in good working order, follow the steps below. • Verify the alarm’s lights and battery function by pushing the “Test” button weekly.• Vacuum the CO alarm cover with a soft brush attachment once a month to remove accumulated dust.• Instruct children never to play with the CO alarm. Warn children of the dangers of carbon monoxide
poisoning. • Never use detergents or solvents to clean the carbon monoxide alarm.• Avoid spraying paint, hair spray, air fresheners or other aerosols near the CO detector.• Do Not paint the CO detector. Paint will seal the vents and interfere with the sensor ability to detect
CO.• Do not place near a diaper pail.• Test the alarm operation after your coach has been in storage, before each trip and at least once a week
during the camping season.• Replace the CO detector when recommended by the manufacturer (typically every five years).
IF THE ALARM SOUNDS, EXIT THE VEHICLE IMMEDIATELY. THE CO BUILD-UP MAY DISSIPATE
BEFORE HELP ARRIVES, BUT MAY BE ONLY TEMPORARILY SOLVED. IT IS CRUCIAL THAT
THE SOURCE OF THE CO IS DETERMINED AND REPAIRED.
GASOLINE GENERATORS AND LP GENERATORS AND APPLIANCES PRODUCE CARBON MONOXIDE.
CARBON MONOXIDE CAN BE FATAL! WHEN THE DEVICE DETECTS CARBON MONOXIDE IN THE
AIR IT WILL SOUND. CONSULT THE INDIVIDUAL DETECTOR’S USER MANUAL FOR SPECIFIC
INSTRUCTIONS AND/OR AUDIBLE WARNING MEANINGS.
THE CO ALARM CAN ONLY WARN YOU IN THE PRESENCE OF CO. IT DOES NOT PREVENT CO FROM
OCCURRING NOR CAN IT SOLVE AN EXISTING CO PROBLEM.
41Keystone RV Company Owners Manual 4/1/2018
Generator (Optional)IMPORTANT: MAKE SURE TO READ AND UNDERSTAND THE GENERATOR OWNER’S MANUAL BEFORE OPERATING THE GENERATOR. Observe all operating instructions and warnings as well as all recommended maintenance schedules and procedures. Generators are not warranted by Keystone RV. Contact the manufacturer direct at: www.cumminsonan.com or 800-888-6626.If equipped, a generator can provide you flexibility when you are unable to plug your shoreline cord into a power source. When running, the generator supplies 120V power to the RV very similar to having your shoreline cord plugged in to the campground. In order to operate, it requires 12V power and a fuel source to burn (gasoline or propane depending on the application). Please refer to the manufacturer instructions supplied with the RV for care and operation and/or www.cumminsonan.com.The onboard generator makes your RV fully self-contained. It allows you access to 120 volts when there is no shore power available, but keep in mind that carbon monoxide is deadly! Test the carbon monoxide detector every time you use the RV. Before you start and use the generator inspect the exhaust system. Do not use it if the exhaust system is damaged. NEVER sleep in the RV with the generator running unless the vehicle is equipped with a working carbon monoxide detector and you test the carbon monoxide detector immediately before sleeping with the generator operating. Know what the symptoms of carbon monoxide poisoning are. See “Carbon Monoxide Detector” section for further information.
If you or anyone else experience any of these symptoms get to fresh air immediately. Shut the generator down and do not operate it until it has been inspected and repaired by a professional. If the symptoms persist seek medical attention.
1. DO NOT operate the generator while sleeping unless the vehicle is equipped with a working carbon monoxide detector and you test the carbon monoxide detector immediately before sleeping.
2. Never store anything in generator compartment. Always keep compartment clean and dry.3. DO NOT operate the generator in an enclosed building or in a partly enclosed area such as a garage.4. Review the safety precautions for fuel and exhaust fumes elsewhere in this manual.5. DO NOT operate the generator when the recreation vehicle is parked in high grass or brush. Heat from
the exhaust could cause a fire in dry conditions.6. Never operate your tow vehicle or generator engine, or the engine of any vehicle, longer than necessary
when the vehicle is parked.7. DO NOT simultaneously operate generator and a ventilator which could result in the entry of exhaust
gas. When exhaust ventilators are used, we recommend that a window on the opposite side of the RV “upwind” of exhaust gases be opened to provide cross ventilation.
CARBON MONOXIDE IS POISONOUS AND CAN CAUSE UNCONSCIOUSNESS AND
DEATH.FOLLOW ALL INSTRUCTIONS IN THIS
SECTION AS WELL AS THE ONES OUTLINED IN THE GENERATOR OPERATOR’S MANUAL.
TEST THE OPERATION OF THE CARBON MONOXIDE DETECTOR AS FOLLOWS:
• AFTER VEHICLE HAS BEEN IN STORAGE,• BEFORE EACH TRIP,• AT LEAST ONCE PER WEEK,• AND IMMEDIATELY BEFORE SLEEPING
WITH THE GENERATOR OPERATING.FAILURE TO DO SO CAN RESULT IN DEATH
OR SERIOUS INJURY.
42 Keystone RV Company Owners Manual 4/1/2018
8. When parked, orient the vehicle so that the wind will carry the exhaust away from the vehicle. DO NOT open nearby windows, ventilators, or doors into the passenger compartment, particularly those which can be “down wind”, even part of the time.
9. DO NOT operate the generator when parked in close proximity to vegetation, snow, buildings, vehicles, or any other object could deflect the exhaust under or into the vehicle.
10. DO NOT touch the generator when running, or immediately after shutting off. Heat from the generator can cause burns. Allow the generator to cool before attempting maintenance or service.
Furnace The furnace is a propane gas appliance that requires 12 volt power to electronically light. New furnaces sometimes emit smoke and an odor during the first 5 - 10 minutes of initial use due to paint burning off the heating chamber. Do not mistake this for a malfunctioning furnace. Follow the suggestions in Chapter 3 regarding maintaining Indoor Air Quality if this occurs. Please refer to the manufacturer instructions supplied with the RV for care and operation. Please refer to the manufacturer instructions supplied with the RV for care and operation and/or www.atwoodmobile.com or www.rvcomfort.com.
ALL PILOT LIGHTS, APPLIANCES AND THEIR IGNITORS (SEE OPERATING INSTRUCTIONS) SHALL BE TURNED OFF BEFORE REFUELING OF FUEL TANKS AND/OR PROPANE
CONTAINERS. FAILURE TO COMPLY COULD RESULT IN DEATH OR SERIOUS INJURY.
DO NOT STORE GASOLINE OR ANY OTHER FLAMMABLE VAPORS OR LIQUIDS IN THE VICINITY OF ANY APPLIANCE BECAUSE A
FIRE OR EXPLOSION CAN RESULT.
Thermostat - Wall MountedIf equipped, a wall mounted thermostat can be for furnace only or a combination air conditioner / furnace thermostat. Please refer to the manufacturer instructions supplied with the RV for care and operation.
Thermostat - Remote Control If equipped, a remote control thermostat can control the furnace and air conditioner. Please refer to the manufacturer instructions supplied with the RV for care and operation.
Dual Zone ThermostatIf equipped, the main A/C and furnace are typically programmed to regulate the temperature in Zone 1 and the 2nd roof air conditioner to Zone 2 which can be regulated at a different temperature. Please refer to the manufacturer instructions supplied with the RV for care and operation and/or www.dometicusa.com or www.rvcomfort.com.
Fireplace (Optional)If equipped, a fireplace requires 120V to operate. Please refer to the manufacturer instructions supplied with the RV for care and operation. DO NOT leave the fireplace unattended while in operation.
Microwave / Convection Oven (Optional)If equipped, microwaves operate on 120V power. Please refer to the manufacturer instructions supplied with the RV for care and operation.
43Keystone RV Company Owners Manual 4/1/2018
Oven Or Cooktop (Range)If equipped, the oven and/or cooktop can be used for general baking. It requires propane gas to operate. Some models require a pilot to be lit while others light electronically using 12V. Please refer to the manufacturer instructions supplied with the RV for care and operation and/or www.atwoodmobile.com.
Range HoodRange Hoods operate on 12V power and should be used to ventilate the RV while cooking. Operational switches for the fan and/or light are on the front panel of the range hood. They are designed to exhaust to the exterior or the interior of the RV. If your range hood exhausts to the exterior, unlock the exterior flap before turning the fan on and lock the flap before transporting the unit. Range hoods that re-circulate through a filter (requires periodic cleaning) to the interior will have a ceiling vent within 5 feet of the range hood. Open the ceiling vent and turn on the range vent while cooking. Please refer to the manufacturer instructions supplied with the RV for care and operation and/or visit www.ventline.com.
Range / Cook-Top (outside)If equipped, this feature typically is located behind a compartment door and slides out or folds down. There is a quick-disconnect LP connection near the frame in the vicinity of the appliance. Please refer to the manufacturer instructions supplied with the RV for care and operation.
DO NOT USE COOKING APPLIANCES FOR COMFORT HEATING. CAN LEAD TO CARBON MONOXIDE POISONING WHICH CAN LEAD TO DEATH OR SERIOUS INJURY.
GAS COOKING APPLIANCES NEED FRESH AIR FOR SAFE OPERATION.BEFORE OPERATING:
OPEN VENTS OR WINDOWS SLIGHTLY OR TURN ON EXHAUST FAN PRIOR TO USING COOKING APPLIANCE. GAS FLAMES CONSUME OXYGEN WHICH SHOULD BE REPLACED TO ENSURE
PROPER COMBUSTION. IMPROPER USE CAN RESULT IN DEATH OR SERIOUS INJURY.
WHEN USING OUTDOOR COOKING ARE:• THE VEHICLE MUST BE LEVEL AND STABILIZED.• DO NOT VIOLATE MANUFACTURERS’ INSTRUCTIONS ON REQUIRED CLEARANCES FOR
COOKING APPLIANCES DURING USE.• DO NOT STORE COOKING APPLIANCES UNTIL COOL TO THE TOUCH.
CAN LEAD TO A FIRE AND EXPLOSION AND RESULT IN DEATH OR SERIOUS INJURY.
44 Keystone RV Company Owners Manual 4/1/2018
DO NOT LEAVE THE COOK TOP UNATTENDED WHILE IN USE. IF WINDY CONDITIONS CAUSE THE FLAME TO INVERT INTO THE COOK TOP, STOP USING IMMEDIATELY. CONTINUED USE
WILL RESULT IN HEAT BUILD UP IN THE COOK TOP CAUSING DAMAGE TO THE COOK TOP AND INCREASED RISK OF FIRE.
DO NOT USE OVERSIZE COOKWARE. THE COOKWARE SHOULD NOT BE MORE THAN ONE INCH LARGER THAN THE BURNER GRATE. THE MAXIMUM SIZE COOKWARE IS 10 INCHES IN DIAMETER. OVERSIZE COOKWARE WILL RESULT IN HEAT BUILD UP IN THE COOK TOP CAUSING DAMAGE TO
THE COOK TOP AND INCREASED RISK OF FIRE.DO NOT USE COOKWARE THAT COVERS MORE THAN ONE BURNER AT A TIME. OVERSIZE
COOKWARE WILL RESULT IN HEAT BUILD UP IN THE COOK TOP CAUSING DAMAGE TO THE COOK TOP AND INCREASED RISK OF FIRE.
FOLLOW ALL WARNING LABELS ON THE COOK TOP AND IN THE MANUFACTURERS INSTRUCTIONS SUPPLED WITH THE RV.
RefrigeratorThe refrigerator can operate on 120V or on LP gas (requires 12V to light). The RV must be level to operate properly. The refrigerator will operate most efficiently when:
1. The RV is level.2. It is allowed 4 hours to cool prior to putting items in it.3. The items are already cold or frozen before putting them in the refrigerator.
Some brands may have altitude limits for proper operation on LP gas. Please refer to the manufacturer instructions supplied with the RV for care and operation and/or www.norcold.com, www.dometicusa.com, or www.atwoodmobile.com.
Refrigerator-Residential StyleBy design, these refrigerators will not operate properly when indoor air temperatures exceed approximately 110 degrees Fahrenheit. In addition, operating the refrigerator in these conditions could cause compressor failure which may not be considered warrantable. Leave the air conditioner set at a temperature below this if the refrigerator is left running in a vehicle that is not being used or shut it off.
ALL PILOT LIGHTS, APPLIANCES AND THEIR IGNITORS (SEE OPERATING INSTRUCTIONS) SHALL BE TURNED OFF BEFORE REFUELING OF FUEL TANKS AND/OR PROPANE
CONTAINERS. FAILURE TO COMPLY COULD RESULT IN DEATH OR SERIOUS INJURY.
DO NOT STORE GASOLINE OR ANY OTHER FLAMMABLE VAPORS OR LIQUIDS IN THE VICINITY OF ANY APPLIANCE BECAUSE A FIRE OR EXPLOSION CAN RESULT.
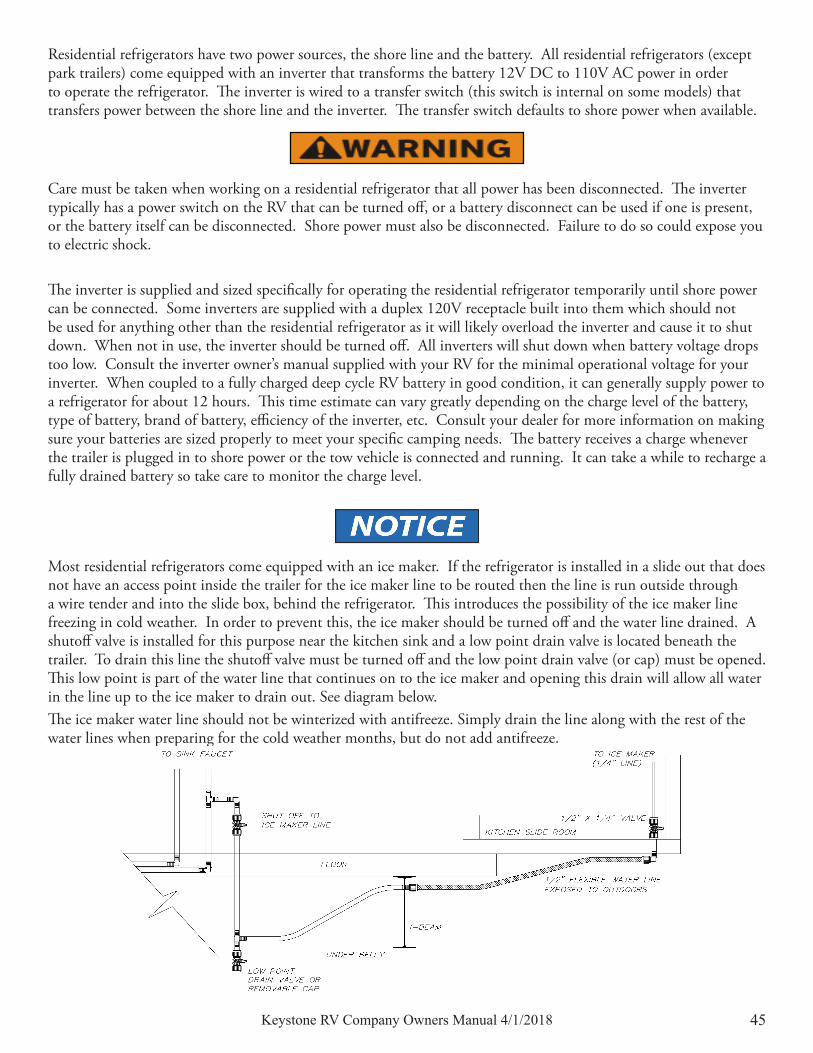
45Keystone RV Company Owners Manual 4/1/2018
Residential refrigerators have two power sources, the shore line and the battery. All residential refrigerators (except park trailers) come equipped with an inverter that transforms the battery 12V DC to 110V AC power in order to operate the refrigerator. The inverter is wired to a transfer switch (this switch is internal on some models) that transfers power between the shore line and the inverter. The transfer switch defaults to shore power when available.
Care must be taken when working on a residential refrigerator that all power has been disconnected. The inverter typically has a power switch on the RV that can be turned off, or a battery disconnect can be used if one is present, or the battery itself can be disconnected. Shore power must also be disconnected. Failure to do so could expose you to electric shock. The inverter is supplied and sized specifically for operating the residential refrigerator temporarily until shore power can be connected. Some inverters are supplied with a duplex 120V receptacle built into them which should not be used for anything other than the residential refrigerator as it will likely overload the inverter and cause it to shut down. When not in use, the inverter should be turned off. All inverters will shut down when battery voltage drops too low. Consult the inverter owner’s manual supplied with your RV for the minimal operational voltage for your inverter. When coupled to a fully charged deep cycle RV battery in good condition, it can generally supply power to a refrigerator for about 12 hours. This time estimate can vary greatly depending on the charge level of the battery, type of battery, brand of battery, efficiency of the inverter, etc. Consult your dealer for more information on making sure your batteries are sized properly to meet your specific camping needs. The battery receives a charge whenever the trailer is plugged in to shore power or the tow vehicle is connected and running. It can take a while to recharge a fully drained battery so take care to monitor the charge level.
Most residential refrigerators come equipped with an ice maker. If the refrigerator is installed in a slide out that does not have an access point inside the trailer for the ice maker line to be routed then the line is run outside through a wire tender and into the slide box, behind the refrigerator. This introduces the possibility of the ice maker line freezing in cold weather. In order to prevent this, the ice maker should be turned off and the water line drained. A shutoff valve is installed for this purpose near the kitchen sink and a low point drain valve is located beneath the trailer. To drain this line the shutoff valve must be turned off and the low point drain valve (or cap) must be opened. This low point is part of the water line that continues on to the ice maker and opening this drain will allow all water in the line up to the ice maker to drain out. See diagram below. The ice maker water line should not be winterized with antifreeze. Simply drain the line along with the rest of the water lines when preparing for the cold weather months, but do not add antifreeze.
46 Keystone RV Company Owners Manual 4/1/2018
Remote Control SystemIf equipped, the remote control fob will operate any or all of the following: slide out, jacks, awning, ramp door, and lights. Use caution when operating these items with the remote and always watch the component being operated to be sure adequate clearance is available to open or close the component. Individual remote controls may also be provided with the stereo, TV, DVD, & etc.
Roof Vents (Power/Manual)If equipped, a powered ceiling vent fan runs on 12V. This equipment is an excellent tool in help manage indoor air quality (See Chapter 3). Please refer to the manufacturer instructions supplied with the RV for care and operation.
SatelliteIf equipped, please refer to the manufacturer instructions supplied with the RV for Care & Operation. When selecting your campsite, make sure you have a clear line of site (no obstruction from trees, etc.) to the southwest so you can obtain the satellite signal.
Solar PrepIf equipped, a solar prep quick connect will be mounted on the exterior sidewall or roof. An aftermarket solar panel kit can be purchased to utilize this feature. Please refer to the manufacturer instructions supplied with the RV for care and operation and/or www.furrion.com, www.gpelectric.com, www.futuresales.com.
TelevisionsIf equipped, please refer to the manufacturers instructions included in the RV for care and operation. The typical operation temperature range for a LCD TV is 41° F (5° C) to 104 ° F (40 ° C). Please refer to the manufacturer instructions supplied with the RV for care and operation and/or www.sony.com or www.asaelectronics.com
Washer/Dryer Ready
If equipped, there are 3 ways this option can be plumbed to drain.1. It could be routed into the Gray water holding tank.2. It could be routed into the Black water holding tank.3. It could be routed directly to a termination valve and not to any holding tank.
This is determined floor plan to floor plan so be sure to verify which scenario applies to you should you have a dealer install a Washer/Dryer in your RV. Some Washer/Dryers will cycle as much as 30 gallons of water for one load of laundry. Be sure to know your holding tank sizes and holding tank levels prior to operating the Washer/Dryer if routed into a tank. If routed directly to a termination valve, be sure the sewer hose is connected (to an approved dump station) and the termination valve is open before operating.
Egress WindowsEgress or “Emergency Exit” Windows are labeled from the factory with the word EXIT. All Egress windows can be distinguished by red operational handles or levers. Dependent upon the window type, an egress window may be a large section or an entire window. Review the locations and operational instructions posted upon the window with all people staying in the trailer.
NoteOperating a Washer/Dryer without opening the termination valve or without ample storage capacity in a holding tank can lead to the RV being flooded with gray water and damage to the trailer which
is not considered warrantable.
47Keystone RV Company Owners Manual 4/1/2018
Fire ExtinguisherEach recreational vehicle includes a fire extinguisher, which is located near the main entry door. The fire extinguishers are rated for Class B (gasoline, grease, and flammable liquids) and Class C (electrical) fires. Please refer to the manufacturer instructions supplied with the RV for care and operation.
IN-CommandThe IN-Command™ system is a next generation control for your RV. Using a “Display Commander” (DC-LCD screen) and “Body Control Module” (BCM-Brain), you can sync with a mobile application (App) to a “Smart device” (“Android” or “Apple” phone or tablet) to monitor and operate many features from the smart device or DC. Please refer to the manufacturer instructions supplied with the RV for care and operation and/or www.asaelectronics.com.
Smoke DetectorFor your safety a smoke detector is installed in every RV. Most detectors are powered by a 9 volt battery. Check the manufacturer’s expiration date on the label, replace the batteries if needed, and clean dust away from the slots so that smoke can enter freely. All smoke alarms, hard-wired and battery powered, should be replaced every ten years. Please refer to the manufacturer instructions supplied with the RV for care and operation.
Elevated Beds And Electric Bed Lift Systems
TEST SMOKE ALARM OPERATION AFTER VEHICLE HAS BEEN IN STORAGE, BEFORE EACH TRIP, AND AT LEAST ONCE PER WEEK DURING USE.
FAILURE TO COMPLY MAY RESULT IN SERIOUS INJURY.
Each vehicle with elevated beds has a warning label listing the maximum load capacity.Failure to comply with the load capacity could cause bed failure which may result in injury.
Bed(s) must be stowed in the up position during travel. Elevated beds may present a fall hazard which may result in injury. Please follow the guidelines
below regarding elevated beds and the use of bed rails.
DO NOT OPERATE ANY MOVING PARTS (INCLUDING, BUT NOT LIMITED TO, AWNINGS, JACKS AND SLIDES), UNLESS YOU HAVE A CLEAR LINE OF SIGHT TO THE MOVING PART. THE MOBILE
APPLICATION, DISPLAY COMMANDER OR BODY CONTROL MODULE MAY BE USED ONLY IF YOU ARE GIVING INSTRUCTIONS TO, AND RECEIVING INSTRUCTIONS FROM, ANOTHER PERSON
AT LEAST AGE 18 OR OLDER WHO CAN CLEARLY SEE THE MOVING PART. FAILURE TO FOLLOW THESE INSTRUCTIONS MAY RESULT IN SERIOUS PERSONAL INJURY OR PROPERTY DAMAGE.

48 Keystone RV Company Owners Manual 4/1/2018
Standard Elevated Beds – Various Keystone RV products are equipped with standard built-in elevated beds or bed loft areas. These beds can be upwards of 4 to 5 feet above the floor level and are often enclosed on one, two, or three sides and sometimes even partially on a fourth side. Because there are so many potential users and different types of elevated bed designs, elevated beds are not equipped with bed rails. Electric Bed Lift Systems – Many of the Keystone RV Sport Utility Trailers/Ramp Trailers come equipped with rear cargo area electric bed lift systems. (See the label in the Ramp Trailer for proper operation of the rear cargo area electric bed lift systems). The bottom beds in some floor plans also can be converted to dual sofas. Again, like the standard built-in elevated beds, because of the design and the various uses, the rear electric beds are not equipped with a bed rail system.
Use of Bed Rails – We feel that you, as the customer, are best equipped to determine if a bed rail system is necessary or best for you based on your intended uses, the actual users of the elevated beds, and the comfort level of the users.For those customers who would prefer using an elevated bed with a bed rail, there are numerous bed rail styles, sizes, heights, and designs available, even in the style of bumpers, which can be purchased at various retail locations and/or on the internet.When installing a bed rail please make sure that you follow the manufacturer’s installation instructions carefully and that you take in to account the size and height of the mattress (either originally installed by Keystone RV or later replaced by you) so that the rails are the appropriate height above the top of the mattress. This is important because residential mattresses differ in size from the RV mattresses originally installed by Keystone RV. Please also make sure that the bed rail you select allows for adequate room to get in and out of the elevated bed after installation, especially in the event of an emergency. Tips for Safe Usage:
• Please use sound judgment when allowing children to sleep in any style of elevated bed. Generally, it is not suitable for children under the age of 6 to sleep in an elevated bed or bed loft area.
• Discuss proper usage of any elevated bed/electric bed lift system with your children and make sure they are supervised if playing in the bedroom/sleeping area of the trailer with elevated beds. Please do not allow horseplay on or under the elevated beds and no items such as hooks, belts, jump ropes, or towels should hang from any part of the elevated bed.
• Place a night light in the bedroom/sleeping area so users can see at night when getting in and out of the beds.
• No more than one person should be in an elevated bed at once and make sure you follow the weight restrictions posted on the warning label near the beds.
• Do not allow children to operate the rear cargo area electric bed lift systems in Ramp Trailers. The lowering and raising of the electric beds should be only conducted by an adult. No person should be on the electric beds when being lowered or raised.
If you have any questions about elevated beds, Ramp Trailer electric bed lift systems, or bed rails please contact Keystone RV Customer Service. Please refer to the manufacturer instructions supplied with the RV for care and operation and/or www.lci1.com.
Murphy BedsSupervision – For your safety do not allow any individual under the Murphy bed when lowering the bed. Likewise, do not allow an individual on the bed when it is being raised to its stowed position. Pinch Points – Pinch points exist between the base of the bed and the sofa when lowering the bed and between the base of the bed and the storage compartment when raising/stowing the bed. On certain Murphy bed designs the footboard can also create a pinch point. Use caution when moving the bed from one position to another. Crush Hazard – Use care when lowering the bed to ensure no adult, child or pet is underneath the bed base area when deployed.

49Keystone RV Company Owners Manual 4/1/2018
User Entrapment – Under no circumstances should an adult, child, or pet be on the bed when raising it to its upright, stowed position. There are two basic Murphy bed designs in use today. The first has a forward storage area and a piano hinge attachment to the bed base at the edge of the storage compartment in order to raise or lower the bed. There is no cavity cutout in the storage compartment with this design, and a portion of the bed does not rotate into the storage compartment. The only danger of entrapment in this design would be above the storage compartment and behind the bed base. In the second design the full length of the bed rotates around a pivot point. When lowered the bed base functions as the ceiling of the storage compartment. On this design Keystone installs a mechanism that automatically latches the bed in place when lowered. The mechanism has a red ball on the handle and is easy to spot next to the bed. Make sure the mechanism has engaged by attempting the lift the bed base after you have lowered it. It should not allow you to return it to its upright position without first releasing the handle. The bed is now ready to use. This mechanism is in place to prevent the bed from inadvertently raising up if enough weight were forward of the pivot point, potentially trapping an individual inside. In that event a person could become trapped and serious personal injury or death could result.
MURPHY BED SETUP AND STORAGE
1. Using two people take up a position on either side of the Murphy bed. Before lowering the Murphy bed make certain the sofa is folded down and that no person is beneath the bed area.
2. Use one hand to brace the bed and pull the barrel latch pins installed on both sides of the bed. This will unlock the bed and it will be free to move. Make sure you have it held steady at this point.
3. Slowly lower the bed, taking care to ensure the footboard has unfolded and swung down to support the bed in its horizontal position. Beware of pinch points. The bed should be resting on the foot board in the horizontal position.
4. Verify the automatic latch mechanism has engaged and the bed cannot be returned to its upright position. If your RV has the second version of murphy bed design you will see a red handled knob next to the bed.
5. Bed is now ready for use. 6. To stow the bed, again using two people, first pull the red handle on the release mechanism (if so equipped) to
free the bed to move. 7. Ensure no individual or pet is on the bed.
8. Slowly lift the bed to its upright, stowed position. Beware of pinch point whenever the bed is in motion.9. While holding the bed steady in the upright position latch the barrel latch pins on either side of the Murphy
bed. Verify the bed is securely restrained by the barrel latch pins.
NoteThe head of the bed rotates into the storage compartment when stored,
make sure the storage compartment is clear of objects that could potentially interfere with this rotation.
MAXIMUM CAPACITY OF THE MURPHY BED IS TWO AVERAGE-SIZED ADULTS. UNDER NO CIRCUMSTANCE EXCEED A MAXIMUM RATING OF 500
POUNDS.
IMPROPER USE OF THE MURPHY BED COULD LEAD TO INJURY OR DEATH.

50 Keystone RV Company Owners Manual 4/1/2018
Battery DisconnectIf equipped, is designed to give you the ability to disconnect all loads to your 12V battery (not supplied by Keystone) without disconnecting the battery cables. Typically, this is used to prevent your battery from being discharged during storage. The battery disconnect should be on while driving to allow the batteries to be charged. Please refer to the manufacturer instructions supplied with the RV for care and operation and/or www.intellitic.com.
Touch PanelIf equipped, is designed to give you the ability to control your interior lights, exterior lights, slide rooms, awning and tank monitors from one convenient location.
Equa-Flex, E-Z FlexThese are ride enhancement features available on certain models. Please refer to the manufacturer instructions supplied with the RV for care and operation and/or www.lci1.com or www.dexteraxle.com.
Pin BoxSome models come equipped with a specialized Pin Box designed to reduce the stress and enhance the pulling experience. Please refer to the manufacturer instructions supplied with the RV for care and operation and/or www.lci1.com or www.morryde.com.
Level Up (4, 6 or 7-point leveling)If equipped, Level Up is a hydraulic or electrical leveling system designed for towable RV’s. Please refer to the manufacturer instructions supplied with the RV for care and operation and/or www.lci1.com, www.norcoind.com.
Under Mount Spare TireIf equipped, is a cable hoist designed to stow the spare tire under the RV, typically behind the rear axle. An access hole in the lower skirt metal is provided to insert a crank handle to lower/raise the spare tire.
Keyless EntryIf equipped, allows you to lock/unlock the deadbolt via a wireless keypad or in some cases key fob transmitters. Please refer to the manufacturer instructions supplied with your RV for care and operation and/or www.southco.com, www.trimarkcorp.com, or www.lci1.com.
4G LTE If equipped, 4G LTE Antenna, provides in-motion nationwide 4G LTE connection when WiFi is not available. This feature requires a data service plan which is not attributable or warranted by Keystone RV. See Antenna Manufacturer Instructions for applicable service plans and options.
4G LTE/WiFi Antenna PrepIf equipped, 12V power is provided, typically near the Antenna power booster, to supply power to an aftermarket modem (not provided). This feature requires additional aftermarket equipment (router/modem/antenna upgrade) available from the antenna manufacturer and data plan (not provided) in order to function. Visit www.winegard.com for more information.
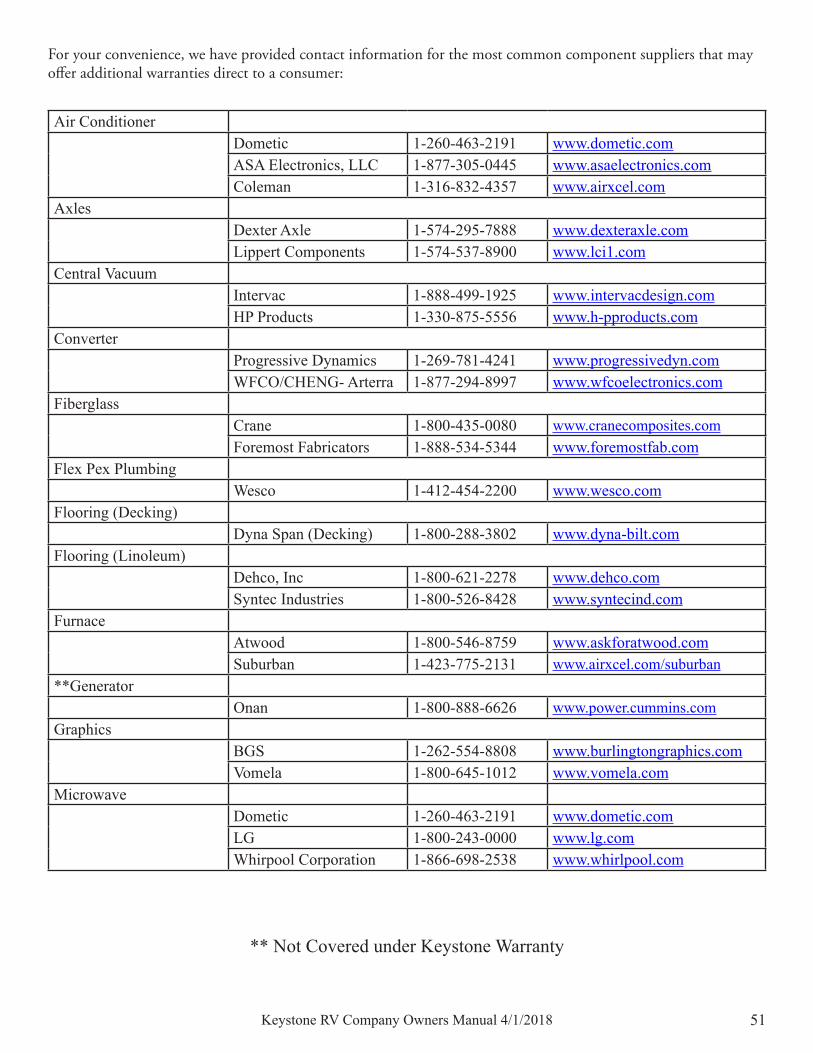
51Keystone RV Company Owners Manual 4/1/2018
For your convenience, we have provided contact information for the most common component suppliers that may offer additional warranties direct to a consumer:
Air ConditionerDometic 1-260-463-2191 www.dometic.comASA Electronics, LLC 1-877-305-0445 www.asaelectronics.comColeman 1-316-832-4357 www.airxcel.com
AxlesDexter Axle 1-574-295-7888 www.dexteraxle.comLippert Components 1-574-537-8900 www.lci1.com
Central VacuumIntervac 1-888-499-1925 www.intervacdesign.comHP Products 1-330-875-5556 www.h-pproducts.com
ConverterProgressive Dynamics 1-269-781-4241 www.progressivedyn.comWFCO/CHENG- Arterra 1-877-294-8997 www.wfcoelectronics.com
FiberglassCrane 1-800-435-0080 www.cranecomposites.comForemost Fabricators 1-888-534-5344 www.foremostfab.com
Flex Pex PlumbingWesco 1-412-454-2200 www.wesco.com
Flooring (Decking)Dyna Span (Decking) 1-800-288-3802 www.dyna-bilt.com
Flooring (Linoleum)Dehco, Inc 1-800-621-2278 www.dehco.comSyntec Industries 1-800-526-8428 www.syntecind.com
FurnaceAtwood 1-800-546-8759 www.askforatwood.comSuburban 1-423-775-2131 www.airxcel.com/suburban
**GeneratorOnan 1-800-888-6626 www.power.cummins.com
GraphicsBGS 1-262-554-8808 www.burlingtongraphics.comVomela 1-800-645-1012 www.vomela.com
MicrowaveDometic 1-260-463-2191 www.dometic.comLG 1-800-243-0000 www.lg.comWhirpool Corporation 1-866-698-2538 www.whirlpool.com
** Not Covered under Keystone Warranty
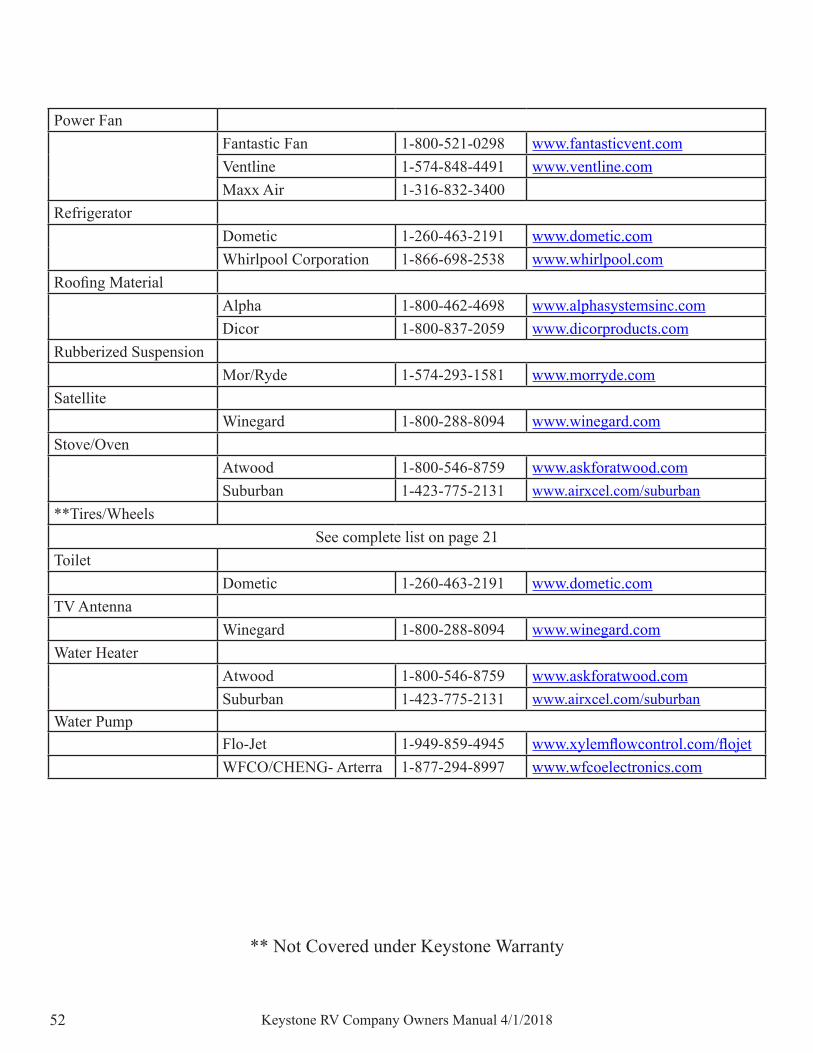
52 Keystone RV Company Owners Manual 4/1/2018
** Not Covered under Keystone Warranty
Power FanFantastic Fan 1-800-521-0298 www.fantasticvent.comVentline 1-574-848-4491 www.ventline.comMaxx Air 1-316-832-3400
RefrigeratorDometic 1-260-463-2191 www.dometic.comWhirlpool Corporation 1-866-698-2538 www.whirlpool.com
Roofing MaterialAlpha 1-800-462-4698 www.alphasystemsinc.comDicor 1-800-837-2059 www.dicorproducts.com
Rubberized SuspensionMor/Ryde 1-574-293-1581 www.morryde.com
SatelliteWinegard 1-800-288-8094 www.winegard.com
Stove/OvenAtwood 1-800-546-8759 www.askforatwood.comSuburban 1-423-775-2131 www.airxcel.com/suburban
**Tires/WheelsSee complete list on page 21
ToiletDometic 1-260-463-2191 www.dometic.com
TV AntennaWinegard 1-800-288-8094 www.winegard.com
Water HeaterAtwood 1-800-546-8759 www.askforatwood.comSuburban 1-423-775-2131 www.airxcel.com/suburban
Water PumpFlo-Jet 1-949-859-4945 www.xylemflowcontrol.com/flojetWFCO/CHENG- Arterra 1-877-294-8997 www.wfcoelectronics.com

53Keystone RV Company Owners Manual 4/1/2018
Chapter 8: Electrical System
The electrical system in your RV is a combination 12 volt DC (Direct Current) and 120 volt AC (Alternating Current) system. In simpler terms, the 12 Volt system is what an automobile uses and the 120 volt system is what most households use. Every facet of the electrical system is built to the Recreational Vehicle Industry Standard (RVIA) which complies with the “American National Standard #A119.2” and the “National Electric Code.”
12 Volt System - DCThe 12 volt system can be powered in three different ways: a RV battery (not included by Keystone), the converter changing 120V AC to 12V DC or by the tow vehicle’s 12 volt system. Almost all equipment except the microwave and roof air conditioner operate using 12V.
RV BatteryThe heart of the 12 volt system is the RV battery so choose yours wisely. Your battery is essentially a storage device for electrical energy. We recommend a RV / Marine Deep Cycle battery for our applications. Before you select your battery, define your camping needs thoroughly. For example, if you will typically camp with access to 120V to plug in the shoreline cord, a standard deep cycle battery should suffice. If you will be camping without access to 120V and will rely heavily on battery to run the many features in your RV, you need to consider a deep cycle battery that has considerable amperage available or possibly installing 2 batteries for your needs.A well charged and maintained battery is critical for proper operation of the appliances and features within your RV. A battery which is not well charged and maintained can cause intermittent or failure of operation with most of the 12V components in your RV. Follow the charging and maintenance instructions closely for the battery you select.Your Keystone RV will charge your RV battery when plugged into the tow vehicle and when the shoreline cord is plugged into a 120V power source.
120 Volt System - ACThe 120 volt system is supplied by plugging the Shore line cord (power cord) into an outside power source (campground, house, etc.) or running the generator if equipped. Once connected or powered, the RV is furnished with power to operate the roof air conditioner(s), microwave, and 120V receptacles throughout the RV. If equipped, some refrigerators and water heaters can run from 120V power in addition to 12V and LP.
Shore Line Cord / Power CordThe shore line cord is a heavy-duty cable with a 3 or 4 prong grounding plug on one end and connects directly to the power converter inside the RV on the other end. This cord is used to plug into an external 120V source. Depending on the application, we use a 30 amp (3 prong) or a 50 amp (4 prong) shore line cord.
30 Amp Service30 amp service is the most common in the RV industry and used widely in campgrounds. 30 amp service is 120 volt service limited to a total of 30 amps of power at one time if your shore line cord is plugged into a 30 amp service. With this service, you will be able to run any single appliance in the RV, however, you may not be able to run a certain group or equipment/appliances at the same time. See video at www.keystonerv.com for more information.For instance, most air conditioners will draw up to 15 amps and a Microwave about 10 amps. While running the air conditioner if you turn the microwave, it may blow a breaker either in the trailer or at the pole. This is because the air conditioner and the microwave draw 25 amps combined and the converter (which runs continuous) is drawing an additional 5 - 13 amps depending on the 12V load (battery charging, lights, etc.). Also consider common loads such as the refrigerator, water heater, coffee maker, and other appliances. Following is a reference chart to show typical amperage draw on common appliances. It is recommended to operate the water heater on gas only when using other high amp draw appliances to prevent tripping of breakers.
54 Keystone RV Company Owners Manual 4/1/2018
• DO NOT plug your RV 30 amp shore cord into any receptacle that is not wired to National Electric Code for 30 amp 120 volt configuration. Doing so will supply the RV with the incorrect electrical power causing extensive damage to the electrical system and 120 volt components which would not be warrantable.
• DO NOT plug in or unplug the shore cord while under load. Make sure all 120 volt components are turned off prior to connecting or disconnecting the shore cord or damage to the 120 volt systems may result. Turn off the breakers at the pedestal first before connecting or disconnecting the shore cord to prevent damage.
50 Amp ServiceIf equipped, a 50 amp shore line cord utilizes four wires. With the 50 amp service, two of the four wires carry 120 volts at 50 amps each when plugged into a true 50 amp power source. 50 amp service gives the versatility to operate more components simultaneously because more power is available. Keep in mind, it is not unlimited and it still may be necessary to choose between your equipment based on the power available. Please use the chart supplied as a reference.
• DO NOT plug your RV 50 amp shore cord into any receptacle that is not wired to National Electric Code for 50 amp 120/240V configuration. Doing so will supply the RV with the incorrect electrical power causing extensive damage to the electrical system and 120 volt components which would not be warrantable.
• DO NOT disconnect the 50 amp male plug connection by pulling up on the cord. This will cause a loss of neutral and 240 volts AC will be supplied to the electrical system and 120 volt components causing extensive damage which would not be warrantable. Always pull straight out on the head of the cord so all 4 prongs disengage the receptacle simultaneously.
• DO NOT plug in or unplug the shore cord while under load. Make sure all 120 volt components are turned off prior to connecting or disconnecting the shore cord or damage to the 120 volt systems may result. Turn off the breakers at the pedestal first before connecting or disconnecting the shore cord to prevent damage.
FAILURE TO PLUG YOUR SHORELINE CORD INTO A PROPERLY WIRED 30 AMP RECEPTACLE COULD LEAD TO AN INCREASED RISK
OF DEATH, SERIOUS INJURY OR PROPERTY DAMAGE.
FAILURE TO PLUG YOUR 50 AMP SHORELINE CORD INTO ANY RECEPTACLE THAT IS NOT WIRED TO THE NATIONAL ELECTRIC CODE FOR 50 AMP
120/240VCONFIGURATION COULD LEAD TO AN INCREASED RISK OF DEATH, SERIOUS INJURY OR PROPERTY DAMAGE.
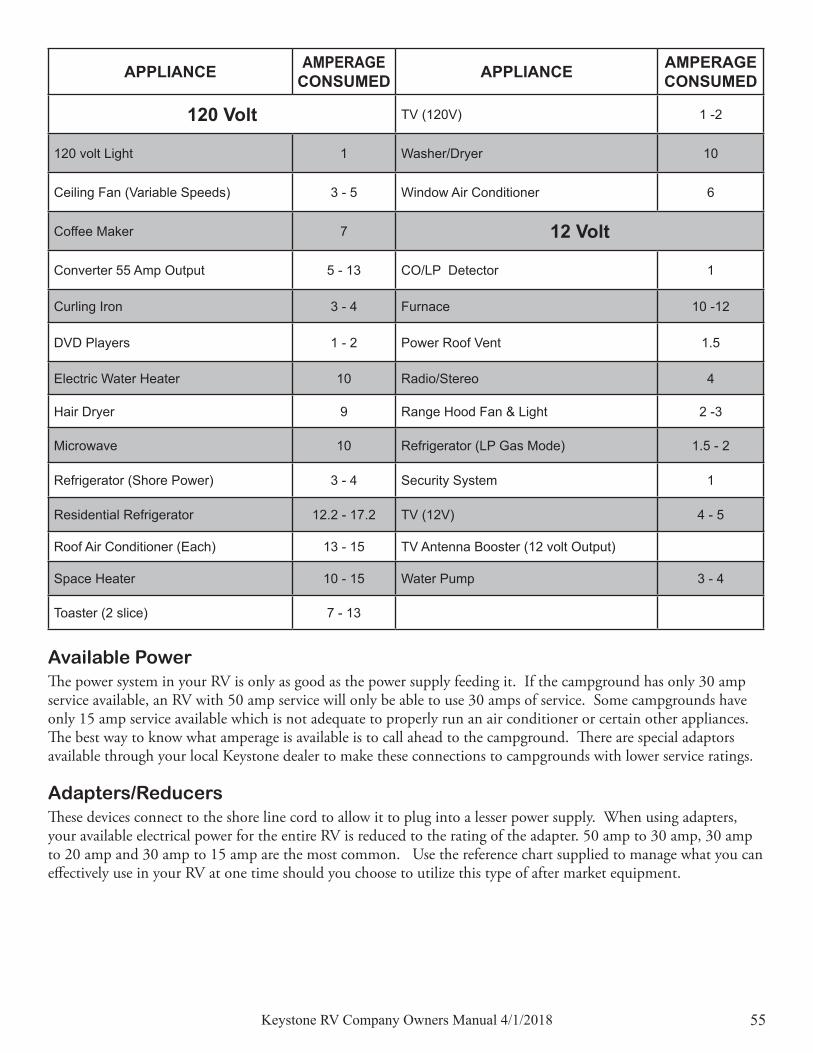
55Keystone RV Company Owners Manual 4/1/2018
APPLIANCE AMPERAGE CONSUMED APPLIANCE AMPERAGE
CONSUMED
120 Volt TV (120V) 1 -2
120 volt Light 1 Washer/Dryer 10
Ceiling Fan (Variable Speeds) 3 - 5 Window Air Conditioner 6
Coffee Maker 7 12 Volt
Converter 55 Amp Output 5 - 13 CO/LP Detector 1
Curling Iron 3 - 4 Furnace 10 -12
DVD Players 1 - 2 Power Roof Vent 1.5
Electric Water Heater 10 Radio/Stereo 4
Hair Dryer 9 Range Hood Fan & Light 2 -3
Microwave 10 Refrigerator (LP Gas Mode) 1.5 - 2
Refrigerator (Shore Power) 3 - 4 Security System 1
Residential Refrigerator 12.2 - 17.2 TV (12V) 4 - 5
Roof Air Conditioner (Each) 13 - 15 TV Antenna Booster (12 volt Output)
Space Heater 10 - 15 Water Pump 3 - 4
Toaster (2 slice) 7 - 13
Available PowerThe power system in your RV is only as good as the power supply feeding it. If the campground has only 30 amp service available, an RV with 50 amp service will only be able to use 30 amps of service. Some campgrounds have only 15 amp service available which is not adequate to properly run an air conditioner or certain other appliances. The best way to know what amperage is available is to call ahead to the campground. There are special adaptors available through your local Keystone dealer to make these connections to campgrounds with lower service ratings.
Adapters/ReducersThese devices connect to the shore line cord to allow it to plug into a lesser power supply. When using adapters, your available electrical power for the entire RV is reduced to the rating of the adapter. 50 amp to 30 amp, 30 amp to 20 amp and 30 amp to 15 amp are the most common. Use the reference chart supplied to manage what you can effectively use in your RV at one time should you choose to utilize this type of after market equipment.
56 Keystone RV Company Owners Manual 4/1/2018
Extension Cords If it is necessary to use an extension cord to extend your recreational vehicle shore cord to the available campground electrical outlet, the correct size of the extension cord must be utilized i.e. 30 amp service- 30 amp 10 gauge extension cord not to exceed 50 feet. Adapters/Reducers are not to be used when using an extension cord and do not plug multiple extension cords together. Your local Keystone dealer can assist you in obtaining the proper extension cord for your needs.
Power Center/ConverterOnce connected to a power source (Shore line/Generator), the Power Center/Converter serves 3 primary purposes: 1) Power distribution-all the incoming power is distributed to the RV through the 120V circuit breakers and 12V fuses within the Power Center. 2) Converting 120V to 12V power - In essence, utilization of the converter will reduce the usage of the RV battery. 3) Battery charger-It will charge the RV battery.When plugged in to a power source for long periods of time, it will be necessary to maintain your RV Battery more frequently. Because the battery is being charged constantly, checking battery water levels (if applicable) is critical to properly maintain your RV battery.
Mini Power Control SystemIf equipped the Mini Power Control System monitors the total Amp draw of an RV and prevents circuits breakers from tripping by momentarily shedding (turning off) designated appliances as determined by the manufacturer. As additional appliances such as a Microwave, Coffee Pot, or Toaster are turned on, the Mini PCS will turn off the appliances it controls such as the Water Heater or Air Conditioners, (Compressor Only, fan may continue to run). As the additional appliances are turned back off the controlled appliances will begin to turn back on as power consumption decreases. Please refer to the manufacturer instructions for care and operation at www.precisioncircuitsinc.com.
Power ShareIf equipped with a Power Share Switch it affords the ability to wire 2 air conditioners to a single circuit breaker. The Primary a/c never loses power and the Secondary a/c is allowed to run as long as the Primary is not drawing any current. Please refer to the manufacturer instructions for care and operation at www.precisioncircuitsinc.com.
THE USE OF THE INCORRECT SIZE OR LENGTH OF EXTENSION CORD AND/OR OVERLOADING THE EXTENSION CORD, ADAPTERS OR REDUCERS WILL INCREASE THE
RISK OF FIRE, PERSONAL INJURY OR PROPERTY DAMAGE.
THE USE OF SHORELINE CORDS, RECEPTACLES, EXTENSION CORDS, ADAPTERS OR REDUCERS WITH LOOSE, MISSING, DAMAGED, DEGRADED OR CORRODED TERMINALS/
CONNECTIONS WILL INCREASE THE RISK OF FIRE, PERSONAL INJURY OR PROPERTY DAMAGE.

57Keystone RV Company Owners Manual 4/1/2018
120V Circuit BreakersThe 120V circuits are protected by circuit breakers and can handle from 15 to 30 amps depending upon the circuit. The most common cause of a circuit breaker to open is an overloaded circuit. An example of an overloaded circuit is when a space heater is plugged into the same outlet as the toaster. The circuit is protected by a 15 amp breaker and the combined amp draw of the space heater and toaster is at least 17 amps. If this happens, reduce the load on the circuit and reset the breaker.
12V FusesThe fuses that protect the 12V system are located in the distribution panel next to the 120V breakers. Typically, the fuse panel is labeled to indicate fuse size and which components are on each circuit.
GFCI – (Ground Fault Circuit Interrupter)Bathroom, kitchen and exterior receptacles are protected by a highly sensitive device, known as a “Ground Fault Circuit Interrupter”, which is designed to sense the slightest electrical “short” at those receptacles and instantly disconnect the current before a person can be injured. This works like a circuit breaker and has a reset button on the face of the receptacle. Typically, they are located in the bathroom or kitchen.
GFCI-TestingThe GFCI receptacle should be tested at least once a month or prior to every trip. To test the GFCI, push the TEST button. The RESET button will pop out. Power is now off at all outlets protected by the GFCI receptacle. Push in the RESET button to restore power. The test is complete when the reset button remains pushed in. If the RESET button does not pop out when testing, the GFCI is malfunctioning and no outlets should be used on this circuit, as protection is lost. Call your dealer if the GFCI malfunctions.
7-Way Trailer PlugA 7-pin plug supplies the electrical connection between the tow vehicle and the RV. This plug connects into a receptacle on the tow vehicle to allow operation of the RV’s marker lights, taillights, brake lights and electric brakes. When connected, the tow vehicle alternator will also charge the RV battery in the RV. Typically, the wires within the 7-Way trailer plug are color-coded as identified in the graphics on this page.
Black Green Battery Clearance
Brown Red Right Left
Blue White Electric Brakes Reverse Ground
No. Color Item
1 White Common Ground
2 Blue Electric Brake
3 Green Tail Lights and Clearance
4 Black Battery Charge
5 Red Left Stop and Turn
6 Brown Right Stop and Turn
7 Yellow Reverse (if equipped)
NEVER REPLACE CIRCUIT BREAKERS OR FUSES OF HIGHER CURRENT RATING THAN THOSE ORIGINALLY INSTALLED. THIS
COULD OVERHEAT THE WIRING AND START A FIRE.

58 Keystone RV Company Owners Manual 4/1/2018
Brakes, ElectricKeystone RVs are equipped with electric brakes or optional electric over hydraulic disc brakes. These brakes are designed to work in conjunction with a properly installed brake controller which would be installed in the tow vehicle. Please refer to the axle manufacturer instructions supplied with the RV for care & operation and/or www.dexteraxle.com or www.lci1.com.
Breakaway SwitchSee Chapter 5.
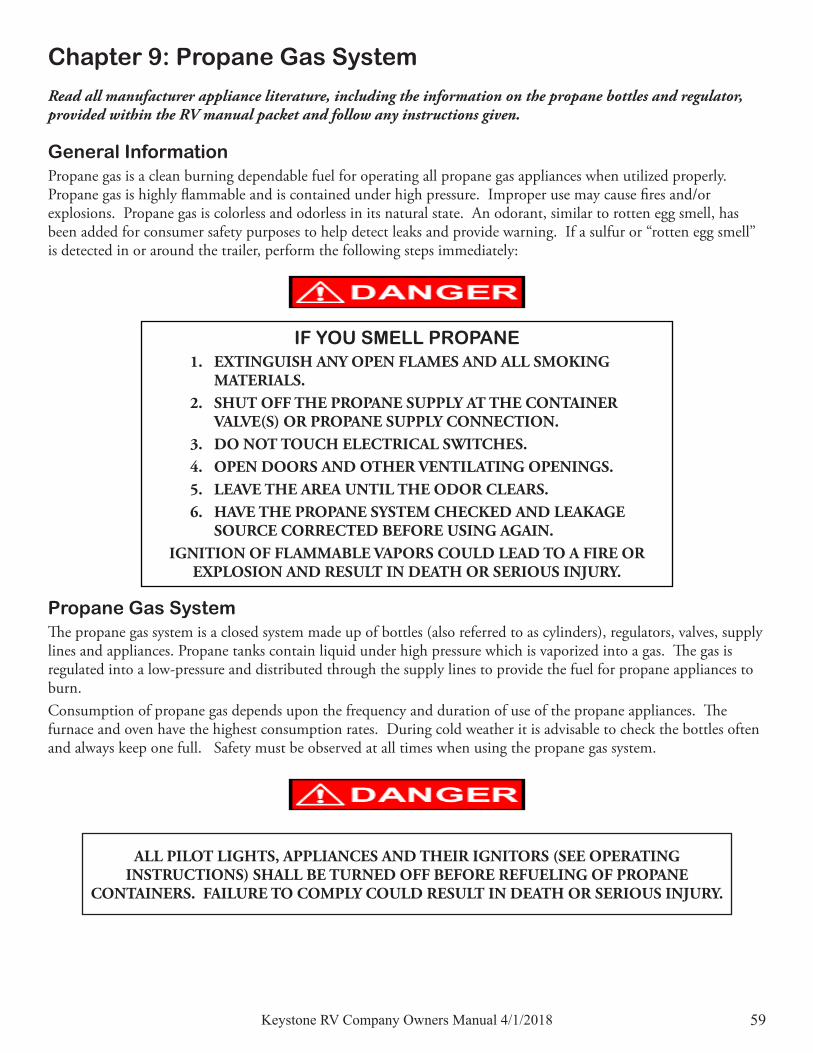
59Keystone RV Company Owners Manual 4/1/2018
Chapter 9: Propane Gas System
Read all manufacturer appliance literature, including the information on the propane bottles and regulator, provided within the RV manual packet and follow any instructions given.
General InformationPropane gas is a clean burning dependable fuel for operating all propane gas appliances when utilized properly. Propane gas is highly flammable and is contained under high pressure. Improper use may cause fires and/or explosions. Propane gas is colorless and odorless in its natural state. An odorant, similar to rotten egg smell, has been added for consumer safety purposes to help detect leaks and provide warning. If a sulfur or “rotten egg smell” is detected in or around the trailer, perform the following steps immediately:
Propane Gas SystemThe propane gas system is a closed system made up of bottles (also referred to as cylinders), regulators, valves, supply lines and appliances. Propane tanks contain liquid under high pressure which is vaporized into a gas. The gas is regulated into a low-pressure and distributed through the supply lines to provide the fuel for propane appliances to burn. Consumption of propane gas depends upon the frequency and duration of use of the propane appliances. The furnace and oven have the highest consumption rates. During cold weather it is advisable to check the bottles often and always keep one full. Safety must be observed at all times when using the propane gas system.
ALL PILOT LIGHTS, APPLIANCES AND THEIR IGNITORS (SEE OPERATING INSTRUCTIONS) SHALL BE TURNED OFF BEFORE REFUELING OF PROPANE
CONTAINERS. FAILURE TO COMPLY COULD RESULT IN DEATH OR SERIOUS INJURY.
IF YOU SMELL PROPANE1. EXTINGUISH ANY OPEN FLAMES AND ALL SMOKING
MATERIALS.2. SHUT OFF THE PROPANE SUPPLY AT THE CONTAINER
VALVE(S) OR PROPANE SUPPLY CONNECTION.3. DO NOT TOUCH ELECTRICAL SWITCHES.4. OPEN DOORS AND OTHER VENTILATING OPENINGS.5. LEAVE THE AREA UNTIL THE ODOR CLEARS.6. HAVE THE PROPANE SYSTEM CHECKED AND LEAKAGE
SOURCE CORRECTED BEFORE USING AGAIN.IGNITION OF FLAMMABLE VAPORS COULD LEAD TO A FIRE OR
EXPLOSION AND RESULT IN DEATH OR SERIOUS INJURY.
60 Keystone RV Company Owners Manual 4/1/2018
RegulatorThe regulator is the heart of the propane system. Propane is under high pressure in the bottle and the regulator reduces this pressure to allow safe use with the appliances in recreational vehicles. The lower pressure is distributed to the appliances. The lever on the automatic gas regulator will point to the gas bottle in service. When the red flag appears in the inspection glass, this indicates that bottle is empty. The lever should be then turned toward the other bottle and the empty filled as soon as possible. The regulator has a vent that allows it to breathe. Propane regulators must always be installed with the regulator vent facing downward. Regulators that are not in compartments have been equipped with a protective cover; make sure that the regulator vent faces downward and the cover is kept in place to minimize vent blockage that could result in excessive propane pressure, causing fire or explosion. Check the vent frequently to keep the vent clean and clear of any debris, corrosion or obstruction. A clogged regulator can result in higher pressures, loss of fuel and/or component failure. The vent can be cleaned by using a toothbrush and should be checked periodically for correct pressure output by a qualified propane service center.
DO NOT ATTEMPT TO ADJUST OR REPAIR REGULATOR. ADJUSTMENTS AND REPAIRS REQUIRE SPECIALIZED TRAINING AND TOOLS. CONTACT A QUALIFIED PROPANE
SERVICE TECHNICIAN. FAILURE TO FOLLOW THESE INSTRUCTIONS COULD RESULT IN A FIRE, EXPLOSION AND/OR INJURIES, INCLUDING LOSS OF LIFE.
Split-Bottle Systems – (Primarily on Fifth Wheels)Some Keystone fifth wheels use a split-bottle system where there is one propane bottle located on each side of the RV. There are some instances where this system may inadvertently activate the “excess flow device” located in the propane pigtail.The “excess flow device” is a safety feature that is designed to detect a large leak in the propane system such as a broken gas line and reduce the flow of propane from the bottle. It also activates when the propane bottle service valve is turned on and the propane system is not completely closed such as when the range burner is left on. The device is not designed to completely stop the flow of propane, but to reduce it to approximately 20,000 BTUs/hr.When activated, one appliance at a time may operate normally, however, when a large demand is placed on the system such as turning on several appliances or the furnace, they will not receive sufficient propane pressure to operate properly. Follow the procedure below to avoid inadvertently activating the “excess flow device” and to operate the split bottle propane system.
DO NOT FILL PROPANE CONTAINER(S) TO MORE THAN 80 PERCENT OF CAPACITY. A PROPERLY FILLED CONTAINER CONTAINS APPROXIMATELY 80 PERCENT OF ITS
VOLUME AS LIQUID PROPANE. OVERFILLING THE PROPANE CONTAINER(S) CAN RESULT IN UNCONTROLLED
PROPANE FLOW, WHICH COULD LEAD TO A FIRE OR EXPLOSION AND RESULT IN DEATH OR SERIOUS INJURY.
DO NOT PLACE PROPANE CYLINDERS INSIDE THE VEHICLE.PROPANE CYLINDERS ARE EQUIPPED WITH SAFETY DEVICES THAT RELIEVE
EXCESSIVE PRESSURE BY DISCHARGING PROPANE TO THE ATMOSPHERE.PROPANE GAS IS HIGHLY FLAMMABLE.
MAY LEAD TO A FIRE OR EXPLOSION AND RESULT IN DEATH OR SERIOUS INJURY.

61Keystone RV Company Owners Manual 4/1/2018
Follow this procedure for the following conditions: After refilling either or both bottles; After any part of the propane system has been disconnected; Appliance burners are not operating correctly; Low operating pressure exists downstream from the regulator when operating heavy demand appliances such as the furnace.
1. Verify both propane bottles contain sufficient propane. Refill if necessary.2. Close both propane bottle service valves.3. Attach the propane pigtails to the service valve.4. Close manually operated gas valves on the range or water heater.5. Turn the indicator on the regulator to the bottle closest to it.6. Slowly open the service valve on the bottle closest to the regulator. This is typically the bottle on the
entry door side. Open the valve all the way.7. Slowly open the service valve on the bottle that is furthest from the regulator until you can hear gas start
to flow through. Do not open the valve all the way. Wait 1 minute.8. Re-close the service valve and then slowly re-open it all the way. The system is now ready to operate.
Propane Gas PigtailsKeystone propane systems are equipped with a Type I cylinder connection, the same as you see on current gas grills. The Type I connection system uses the Excess Flow Pigtail Hose, distinguished by the large green nylon swivel nut. The green swivel nut attaches to the outside of the cylinder valve with right hand threads. Tighten the swivel nut by hand. DO NOT use tools.The safety features of this system prevent gas from flowing unless the connection is tight and will limit excessive gas flow. In cases of extreme heat, 240° to 300°F, at the connection, the connection to the cylinder will be shut down.
Propane Gas LinesThe primary manifold is a black pipe located beneath the RV. Copper tubing, with flare fittings, are used as secondary lines running to the gas appliances. If repairs are needed to these lines or any component of the propane system, DO NOT ATTEMPT to repair yourself and follow the steps listed under the warning “IF YOU SMELL PROPANE” in this chapter. Although your propane gas system was thoroughly inspected for leaks before delivery, the propane gas system should be inspected and checked for leaks by a RV dealer at least once a year or any time the system is opened.
The propane piping system is designed for use with propane only. Do not connect natural gas to this system.
Propane Gas Leak DetectorPlease refer to the manufacturer instructions supplied with the RV for care & operation and/or www.atwoodmobile.com. Keystone RV installs a propane gas leak detector in every camper. It is a safety device that is permanently mounted near the floor and is powered by 12V (the RV battery and/or converter). The detector is operational only as long as 12V power is available. If the power is disconnected, the monitor will not operate. Should a propane leak occur, the detector will sound an alarm and continue until the gas has dissipated or until a mute button is pressed. The mute button will only stop the alarm from sounding for 60 seconds and alarm will reoccur if gas is still present. The alarm may sound at times when no propane is present when household products are in use such as aerosol hair spray, cleaners, adhesives, alcohol etc. Be sure to air out the trailer thoroughly after delivery and when using these products.
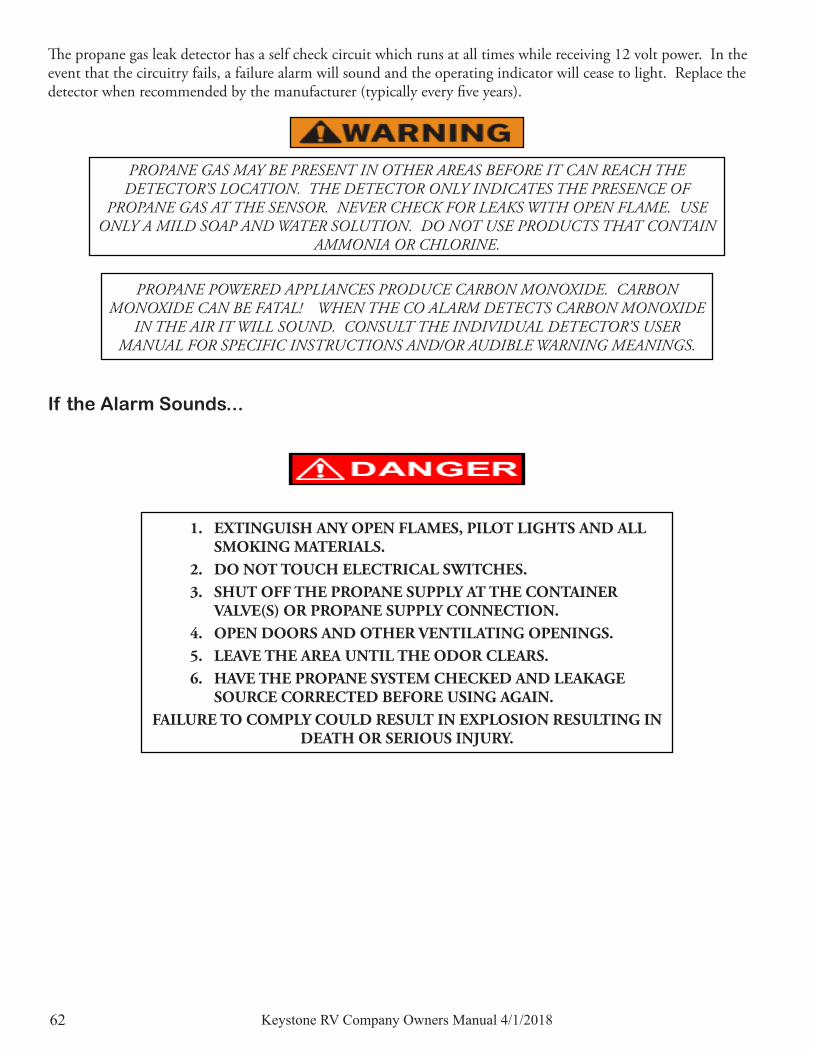
62 Keystone RV Company Owners Manual 4/1/2018
The propane gas leak detector has a self check circuit which runs at all times while receiving 12 volt power. In the event that the circuitry fails, a failure alarm will sound and the operating indicator will cease to light. Replace the detector when recommended by the manufacturer (typically every five years).
PROPANE GAS MAY BE PRESENT IN OTHER AREAS BEFORE IT CAN REACH THE DETECTOR’S LOCATION. THE DETECTOR ONLY INDICATES THE PRESENCE OF
PROPANE GAS AT THE SENSOR. NEVER CHECK FOR LEAKS WITH OPEN FLAME. USE ONLY A MILD SOAP AND WATER SOLUTION. DO NOT USE PRODUCTS THAT CONTAIN
AMMONIA OR CHLORINE.
PROPANE POWERED APPLIANCES PRODUCE CARBON MONOXIDE. CARBON MONOXIDE CAN BE FATAL! WHEN THE CO ALARM DETECTS CARBON MONOXIDE
IN THE AIR IT WILL SOUND. CONSULT THE INDIVIDUAL DETECTOR’S USER MANUAL FOR SPECIFIC INSTRUCTIONS AND/OR AUDIBLE WARNING MEANINGS.
If the Alarm Sounds...
1. EXTINGUISH ANY OPEN FLAMES, PILOT LIGHTS AND ALL SMOKING MATERIALS.
2. DO NOT TOUCH ELECTRICAL SWITCHES.3. SHUT OFF THE PROPANE SUPPLY AT THE CONTAINER
VALVE(S) OR PROPANE SUPPLY CONNECTION.4. OPEN DOORS AND OTHER VENTILATING OPENINGS.5. LEAVE THE AREA UNTIL THE ODOR CLEARS.6. HAVE THE PROPANE SYSTEM CHECKED AND LEAKAGE
SOURCE CORRECTED BEFORE USING AGAIN.FAILURE TO COMPLY COULD RESULT IN EXPLOSION RESULTING IN
DEATH OR SERIOUS INJURY.

63Keystone RV Company Owners Manual 4/1/2018
Chapter 10: Plumbing System
Your RV plumbing consists of two primary systems: The fresh (potable) water system and the waste water system.
Fresh (Potable) Water SystemPotable fresh water is supplied to the RV in two ways: 1) By filling the fresh water tank and pumping the water through the system with the water pump. 2) Connecting a potable water hose to the “City Water Fill” which automatically pressurizes the system.
USE POTABLE WATER ONLY IN THE FRESH WATER SYSTEM. SANITIZE, FLUSH AND DRAIN BEFORE USING. SEE INSTRUCTIONS UNDER HEADING “SANITIZING THE FRESH WATER
SYSTEM. FAILURE TO COMPLY COULD RESULT IN DEATH OR SERIOUS INJURY.
Water PumpThe 12V water pump installed is self-priming and operates upon demand. In simpler terms, when you open a faucet, the pump will turn on and pump the water from the tank to that faucet. For the pump to operate, please note the following:
1. The fresh water tank must have sufficient water in it.2. The pump on/off switch must be in the on position. Typically located on the monitor panel.3. There must be sufficient 12V power (battery or converter) to operate the pump. 4. The water heater has a by-pass valve that can prevent water from entering the water heater. 5. The water pump should prime itself and stop running after the open faucet(s) is closed.6. Pump should now run on demand when a faucet is opened, and stop when the faucet is closed.
Never let the water pump run while the fresh water tank is empty. Damage to the pump and/or a blown circuit may occur.
Please refer to the manufacturer instructions supplied with the RV for care and operation and/or www.shurflo.com.
Fresh Water TankAll Keystone RVs are equipped with a fresh water tank. Tanks vary significantly in size by RV brand & model. Keystone RV uses 2 different methods to fill the fresh water tank depending on the brand & model. Gravity Water Fill - Remove the cap, on the exterior connection labeled ”Fresh Water Connection”, and insert the hose from your water source and turn on the water. While filling the tank, periodically check the monitor panel to determine the level of water in the tank. When full turn the water source off. If overfilled, water will “spit” back out of the gravity fill as there is no automatic shutoff. DO NOT leave the RV unattended while filling the fresh water tank. Overfilling the tank can cause damage to the system components which may not be considered warrantable.Pressure Water Fill - Hook a potable water supply to the city water fill valve, turn the valves to the tank fill position and turn on the water supply. While filling the tank, periodically check the monitor panel to determine the level of water in the tank. When full turn the water source off immediately. DO NOT overfill and DO NOT leave the RV unattended while filling the fresh water tank. Overfilling the tank can cause damage to the system components which may not be considered warrantable.
Note
64 Keystone RV Company Owners Manual 4/1/2018
All RVs are equipped with “Low-Point” drains that are designed to drain water from the water tank and all lines. These are located underneath the RV, typically near the water tank. These drains must be closed or the water system will drain itself of any water entering. Water should be drained from the fresh water system when not in use. Over time, water quality can degrade which can contaminate the plastic used in the water system and/or cause ill health affects.Fresh Water is considered “Cargo”, therefore, your Cargo Carrying Capacity (CCC) is reduced by the weight of the water you choose to carry.
City Water FillThe city water fill allows a pressurized potable water line connection (water spigot) direct to the RV. Because the connection is pressurized, there is no need to use the water pump. This method also bypasses the water tank and feeds the entire water system directly. Connect the city water fill by using a hose manufactured for potable water use and turn on the source. When in need of water, open the desired faucet or spigot. Air will purge itself when the faucet is opened.Each time this connection is made, we recommend inspection of visible water connections for leaks. DO NOT leave the RV unattended when hooked to City Water fill for extended periods of time. Always use a water pressure regulator to control the water pressure entering the trailer.City water fills may be in a combination housing with the gravity water fill or stand alone.Although the fresh water system was thoroughly inspected for leaks before delivery, fittings can loosen over time and with normal use. Periodically check the fittings at the faucets and all other visible connections and tighten as necessary.
Water Supply and OdorLocal water supplies (well or city) sometimes contain high levels of sulphur or other chemicals which can causes unpleasant odors. Some, like sulphur, can be very unpleasant. Sanitizing the water system, as described and allowing the sanitizing solution to remain for a few days, should eliminate the odor.
Sanitizing the Fresh Water SystemKeeping the fresh water system clean and free of any potential contaminations should be a top priority. Sanitizing the system before initial use and thereafter annually, or whenever water remains unused for prolonged durations, is recommended. This will help keep the water system fresh and discourage harmful bacterial or viral growth. To sanitize your system, perform the below: Gravity Fill Models:
1. Drain the tank by opening the low point drains. Close the drains after water has drained.2. Prepare a chlorine bleach solution of ¼ cup to one gallon of water for every 15 gallons of tank capacity.
Example: Use 2 ¾ gallons of the solution for a 40-gallon tank. If using Ultra bleach concentrations, reduce bleach to 1/8 cup to one gallon of water.
3. Add solution to tank through the gravity fill port and fill with water. Open each faucet/fixture until a distinct chlorine odor is smelled. Close faucets and let stand 4 hours.
4. Drain system and flush with fresh water until chlorine odor and smell is gone. (If a water filter has been added, change it at this time).
Power Fill Models:1. Drain the tank by opening the low point drains. Close the drains after water has drained.2. Prepare a chlorine bleach solution of ¼ cup to one gallon of water for every 15 gallons of tank capacity.
Example: Use 2 ¾ gallons of the solution for a 40-gallon tank. If using Ultra bleach concentrations, reduce bleach to 1/8 cup to one gallon of water.
65Keystone RV Company Owners Manual 4/1/2018
3. Add solution to tank through the tank vent located on the side of the coach. This vent is an arched shape part with the words “tank vent” on the vent cover. The vent cover is removable and held in place by detents on either side of the vent. Remove the bug screen inside the vent. Using a funnel and tube, add the sanitizing solution. Reinstall the screen and cover when done.
4. Open each faucet/fixture until a distinct chlorine odor is smelled. Close faucets and let stand 4 hours.5. Drain system and flush with fresh water until chlorine odor and smell is gone. (If a water filter has been
added, change it at this time).
Water HeaterPlease refer to the manufacturer instructions supplied with the RV for care & operation of the water heater. The water heaters used in Keystone products range in size from 6-12 gallons depending on the brand and model. There are 2 types used: 1) Operates only on LP gas (utilizing 12V to light) 2) Operates on LP gas or 120V electric. The on/off switch for the 12V is mounted inside. The on/off switch for the 120V may be mounted inside or on the water heater itself. DO NOT start the water heater unless it has water in it. To verify there is water in the water heater, open the relief valve located on the outside of the water heater. If water is present at the relief valve, you can be sure there is sufficient water in the water heater to operate. Then verify the by-pass valve located on the back side of the water heater is set to the use position and open a “hot” water spigot on any faucet. The water will travel from the source, into the water heater and then present itself at the spigot when the water heater is full. Water heaters are equipped with pressure relief valve designed to relieve water or air pressure therefore dripping may be normal. Please refer to the manufacturer instructions supplied with the RV for care and operation and/or www.atwoodmobile.com or www.airxcel.com.
ALL PILOT LIGHTS, APPLIANCES AND THEIR IGNITORS (SEE OPERATING INSTRUCTIONS) SHALL BE TURNED OFF BEFORE REFUELING OF FUEL TANKS AND/OR PROPANE
CONTAINERS. FAILURE TO COMPLY COULD RESULT IN DEATH OR SERIOUS INJURY.
Water Heater By-Pass Kit If equipped, a by-pass kit allows winterization of the fresh water system without putting RV anti-freeze into the water heater. The by-pass valve(s) are located on the back of the water heater (which is inside the RV) and in by-pass mode, allow water to travel through a “cross-over” line connecting the input and the output lines of the water heater. BE CAREFUL, if in by-pass mode, turning on a “hot” water spigot, WILL NOT put water in the water heater and lighting the water heater with an empty tank could damage the tank which may not be warrantable.
Water Heater Storage & Draining When not using the RV, drain the water from the water heater tank. Over time, water quality can degrade which can permanently contaminate the lining of the water heater tank. Also, drain the water heater during cold weather to avoid damage from freezing.To Drain the Water Heater:
1. Turn off power to the water heater at the switch or the main breaker. 2. Shut off the gas supply and the water pump. 3. Open all fixtures, both hot and cold throughout the RV. 4. Remove/open the exterior access door to the water heater.5. Remove the drain plug (or anode rod if equipped) from the tank.6. Open the pressure relief valve to allow air in and water will drain out tank.
66 Keystone RV Company Owners Manual 4/1/2018
WinterizationRV components can be damaged from the effects of freezing. Protection of the plumbing system and related components is crucial. Damages due to weather are not covered under warranty at any time. Many recreational vehicle owners choose to have their RVs winterized by their dealer, while others choose to do it themselves. Following are descriptions of two methods used to winterize:
1. Compressed Air (Dry) Method - Uses compressed air to blow out any remaining water in the system after draining the system of all water. This method requires an air compressor and appropriate adapters.
2. RV Anti-Freeze (Wet) Method - Uses RV approved, nontoxic, potable, anti-freeze in the system and does not require any special tools.
Many Keystone products include an optional by-pass kit that allows the plumbing system to bypass the hot water heater, reducing the amount of anti-freeze that will be needed (by-pass kits are available at most RV service centers for a reasonable expense and can be installed during winterization). Without a by-pass kit installed, an additional 6 – 10 gallons of anti-freeze will be required.On the following page are the procedures for both methods. Your local dealer is best suited to answering any questions as well as providing information on winterization and storage that may be particular to the climate in your area. If using the compressed air method, a special adapter should be purchased to allow compressed air to be delivered through the city water fill. These adapters are available at most RV supply stores.
Method 1 - Compressed Air (With By-Pass Kit Installed)1. Purchase 1-2 gallons of RV non-toxic anti-freeze.2. Use compressed air (max 30 psi) to blow out the black tank flush system if equipped.3. Drain the fresh water tank and empty the waste water holding tanks.4. Drain water heater. 5. Turn water heater by-pass valve to by-pass position. (The by-pass valve is located near the water heater
incoming lines – an access panel may have to be removed depending upon the model.)6. If installed, remove water filter from assembly and discard. Install diverter if included.7. Open all faucets, including shower head sprayer, toilet flushing device and water line drains. Remember
the outside shower if equipped.8. Turn on the water pump for 30 seconds to clear out any water in the suction line.9. Connect an air hose with an adapter to the city water fill connection.10. Set the pressure no greater than 30 pounds and blow out the water lines until no water can be seen
coming out of the fixtures and lines.11. Close all drains. 12. Pour about one quart of RV anti-freeze into drains, p-traps, toilet, and tanks.
See video at www.keystonerv.com (Customer Service) for more information.
Method 2A - RV Anti-Freeze (With By-Pass Kit Installed)1. Purchase 4 -6 gallons of RV approved, non-toxic, anti-freeze.2. Use compressed air (max 30 psi) to blow out the black tank flush system if equipped. An alternate
method is to pump antifreeze into the inlet with a hand pump available from your RV dealer.3. Drain all tanks, fresh water and sewage tanks. 4. Drain water heater. Close the drains after water has drained.
67Keystone RV Company Owners Manual 4/1/2018
5. Turn water heater by-pass valve to by-pass position. (The by-pass valve is located near the water heater incoming lines – an access panel may have to be removed depending upon the model.)
6. If installed, remove water filter from assembly and discard. Install diverter if included.7. Pour an amount of RV non-toxic anti-freeze into the fresh water tank to fill the tank above minimum
water pump operating level. (Use of a long funnel may be helpful) Add more, if necessary, during procedure. An alternate method is to install a bypass hose on the suction side of the water pump and pull direct from the anti-freeze container. See your RV dealer for necessary hose and fittings.
8. Turn on pump switch and open the cold water side of all faucet fixtures. Leave open until the anti-freeze comes out (generally, pink in color). Repeat for hot water side. Remember the outside shower if equipped.
9. Flush toilet until anti-freeze begins to flow into the bowl and then pour one quart of anti-freeze down the toilet to winterize the black tank. Leave a small amount of antifreeze in the toilet to cover the seals.
10. Pour about one quart of anti-freeze down each shower/tub, lavatory sink, and kitchen sink to fill p-traps.See video at www.keystonerv.com (Customer Service) for more information.
Method 2B - RV Anti-Freeze with EZ Winterizing System - Not included on all Models (With By-Pass Kit Installed)
1. Purchase 4 -6 gallons of RV approved, non-toxic, anti-freeze. Drain all tanks, fresh water and sewage tanks.
2. Drain all tanks, fresh water and sewage tanks.3. Turn water heater by-pass valve to by-pass position. (The by-pass valve is located near the water heater
incoming lines – an access panel may have to be removed depending upon the model.)4. Drain water heater.5. If installed, remove water filter from assembly and discard. Install diverter if included.6. Locate the EZ winterizing system found near water pump or on some models in water management
panel. Turn valve to close flow from fresh tank and allow flow from EZ winterizing hose. Place hose into supply of anti-freeze.
7. Turn on pump switch and open the cold water side of all faucet fixtures. Leave open until the anti-freeze comes out (generally, pink in color). Repeat for hot water side.
8. Flush toilet until anti-freeze begins to flow into the bowl and then pour one gallon of anti-freeze down the toilet to winterize the black tank.
9. Pour anti-freeze down each shower/tub, lavatory sink, and kitchen sink to fill p-traps.10. To winterize gray tank(s) pour one gallon down each related sink drain.
De-winterization / Removal of Anti-freezeIf purchasing a coach which is winterized with RV anti-freeze, or having had an existing RV winterized before winter storage, the plumbing system must be flushed and sanitized prior to use. Do not attempt to turn on water heater if system is winterized. Perform the following prior to attempting to operate the water heater or use the plumbing system.
DO NOT USE AUTOMOTIVE ANTI-FREEZE. AUTOMOTIVE ANTI-FREEZE IS POISONOUS AND NOT FOR USE IN POTABLE
WATER SYSTEMS.
68 Keystone RV Company Owners Manual 4/1/2018
1. Drain all tanks, fresh water and sewage. Close the drains after water has drained.2. Attach garden hose to fresh water fill and fill tank.3. Turn on pump switch and open cold water side of all faucet/ shower fixtures. Leave open until water
runs clear. Repeat for hot water side.4. Flush toilet until clear water runs into bowl.5. Dump tanks again. Close the drains after water has drained.6. Sanitize water system.7. If a water filter is installed, drain lines, remove filter assembly, clean and reinstall with new filter.8. When ready to use the water heater, turn by-pass valve to open position to allow water to enter hot water
heater tank and fill according to instructions.
Waste Water SystemThe wastewater system is self-contained within the RV. There are 2 primary waste systems in a trailer: Black Water Waste and Gray Water Waste. In some floorplans, a sink(s) or shower may empty into the Black Water Tank. Components are the toilet, holding tanks and termination valves. As in residential households, the drainage system has drain lines, p-traps and plumbing vents that route gases/odors out through the roof assembly.
Black Water WasteThis system consists of the toilet, drains lines, black water tank, and termination valves.
ToiletThe toilet operates with fresh water supplied by the fresh water tank or city water fill. When flushed, the toilet drains into the black water tank. Please refer to the manufacturer instructions supplied with the RV for care & operation.
Drain LinesThe drain lines carry the waste from the toilet to the tank and from the tank to the termination valves where it will be drained from the RV.
Black Water TankThe term “black water” refers to the by-products of using the toilet. Once the black water tank reaches the desired capacity, the contents can be dumped from the termination valve into an approved dump station. We recommend using a tank deodorizer to help control odors and breakdown solids, available from dealer.
Solid Build-Up in the Black Water TankWhen camping and using a “Full Hook-up” (includes a dump station at the site), DO NOT leave termination valves open. When solids are flushed, the water will run into the dump station and the solids will stick to the bottom of the tank and build up. Leave the termination valves closed until the tank level warrants dumping. Not using enough water when flushing solids can also cause build up. To prevent this from occurring, add plenty of water to the bowl prior to using/flushing the toilet when solids will be involved. Only use toilet paper approved for use in recreational vehicles. Should you ever have a build up of solids, close the valves, fill the tanks about ¾ full with fresh water, drive a distance to agitate the solids and drain the tanks. If the problem continues, it may be necessary to purchase a waste water digester from your local RV dealer which can be added to the tank to help break down solids. Follow the instructions of the digester. Depending on the severity of the situation, it may be necessary to repeat this procedure.
69Keystone RV Company Owners Manual 4/1/2018
Do not put these items in toilet or drains1. Facial tissues, paper towels, sanitary products (including those labeled flushable).2. Detergents or bleach. 3. Automotive anti-freeze, ammonia, alcohols, or acetones.4. Grease from cooking, table scraps or other solids that may cause clogging.
Termination ValveTypically, there is a termination valve for each waste holding tank in the RV and they are located on the roadside. The termination valves are closed to hold waste in the waste tank and open to drain it. See “Dumping Instructions” to drain the waste water system. RVs with multiple bathrooms and/or dual gray/black tanks may have termination valves separated from the RVs primary termination valves/dumping location. The following label has been placed near the side-vented termination that reads:
Dumping Instructions1. Use PPE (Personal Protective Equipment) - Eye Protection, Face Mask, Proper Gloves.2. Twist off the termination outlet cap.3. Connect the sewer hose by turning clockwise, locking the end levers over the termination end.4. Place the other end of the sewer hose into an approved dump station.5. Open the black tank termination valve first and drain.6. After the black tank is almost empty, open the gray tank termination valve and drain. This will use gray
water to help flush any remaining solids from draining the black tank through the sewer hose. (If the RV has 2 gray tanks, drain one at a time).*
7. Close termination valves.8. Disconnect sewer hose, rinse and store.9. Replace termination cap on the outlet.10. Add chemical deodorant / breakdown agent approved for RV use.11. Wash hands with approved soap/hand sanitizer.
*If the RV is equipped with the No-Fuss Flush System, perform flush at this time.
Tank FlushingPeriodically for correct monitor panel function and to control odor, it is necessary to fill all waste water tanks (black or gray) with fresh water and repeat the dump procedure to help flush any remaining residue from usage. The intervals for this need vary based on amount of use, type of use, holding tank chemical usage, etc.
Gray Water WasteTypically, this system consists of all sink/shower drains, gray water tank(s) and termination valves. Gray water is the wastewater from the sinks, tub/shower drains and is stored within one (or more) gray tank(s). Gray water is drained through a termination valve on the roadside of the RV. On some floorplans, some of the gray water waste will empty into the black water tank.
Keep drain valve closed to minimize the presence of sewer gases. Sewer gases may be present when RV is connected to campground sewage hookup.
May lead to illness or personal injury.
Note
70 Keystone RV Company Owners Manual 4/1/2018
No Fuss Flush (Optional)If equipped, the no fuss flush kit has been installed to assist in rinsing the black water tank after dumping. Similar to the city water fill, it is located on the exterior of the RV and a fresh water hose can be hooked to it. To operate, drain the black tank as outlined previously, Connect a hose to the inlet labeled “Sewer Valve Must be Open When Using This Inlet” OR “Black Tank Flush.” Open the water supply to full pressure to flush tank. When water runs clear from sewer hose, shut off water supply and disconnect garden hose from source. Do not disconnect hose from flush inlet until water has drained from system.
Odor ControlThe secret to good air quality in (and around) your RV lies with finding an effective holding tank chemical and applying the proper amount based on use and ambient temperature. It is important to note some brands work more effectively than others! If you are experiencing unpleasant odors from your holding tank(s), try switching brands to something proven to work before thinking something may be wrong with the plumbing. The gray tank can produce offending odors as well as the black tank. Follow the guidelines supplied with the chemical for usage directions.
Monitor PanelThe monitor panel is designed to give approximate liquid levels of the fresh, gray and black water tanks at a given moment as well as a charge value (based on voltage) of the battery. Please refer to the manufacturer instructions supplied with the RV for care and operation and/or www.kibenterprises.com, www.atcomp.com, www.precisioncircuitsinc.com.
OperationDepress the button for the desired reading (tank or battery.) The levels readout for the tanks will read at Empty (E), 1/3, 2/3, or Full (F). All lights will be lit when full. The battery conditions are as follows (+ or - 5%):
• C Charge <12.7V• G Good 12.1V-12.7V• F Fair 11.6V-12.1 • L Low 6V-11.6V
Erroneous ReadingsThe monitor panel displays readings from sensors attached to the tanks. These sensors can send false readings when:
1. Water with low mineral content. Minerals in water help conduct the electrical signal to the monitor display.
2. Contamination-Residue remaining on the inside of the tanks after dumping (caused by normal use or putting grease, oils, etc. in the tanks). Refer to Tank Flushing.
3. Low Battery.4. Loose wiring connections (bad ground).
DO NOT leave the RV unattended during this process and make sure the black tank termination valve is open and your sewer hose is connected to an approved dump station.
Overfilling the black water tank will result in water overflowing into the interior of your RV from the toilet and the resulting damage is not covered by warranty.
71Keystone RV Company Owners Manual 4/1/2018
Chapter 11: Slide Out Systems
Keystone uses two (2) basic types of slide-room systems depending on the product application, Electric and Hydraulic. Please refer to the manufacturer instructions supplied with the RV for care and operation of the system in your RV.
STAND CLEAR OF THE SLIDE ROOM’S INTERIOR PATH AND VERIFY THAT THERE ARE NO EXTERIOR OBSTRUCTIONS BEFORE EXTENDING OR RETRACTING THE SLIDE-OUT.
ALSO, THERE ARE HARD, SHARP METAL EDGES UNDER THE SLIDE-OUT(S) AND IN THE SLIDE-OUT MECHANISMS. CHILDREN SHOULD BE MONITORED AT ALL TIMES,
AND NOT ALLOWED TO PLAY UNDER THE SLIDE-OUT(S) WHEN EXTENDED. KEEP ALL PEOPLE, PETS AND OBJECTS AWAY FROM THE SLIDE-OUT ROOM AND MECHANISM DURING OPERATION. THE MECHANISM ASSEMBLY MAY CATCH LOOSE CLOTHING
OR PINCH OR CRUSH APPENDAGES. FAILURE TO FOLLOW THESE WARNINGS COULD RESULT IN SERIOUS INJURY OR DEATH.
Basic Slide-Out TipsBefore operating any slide-out:
1. The RV must have a fully charged RV battery (having the shore-line cord plugged in may NOT be enough).
2. Turn off all necessary lights and 12V components prior to extending/retracting.3. The RV must be leveled and stabilizer jacks extended.4. Make sure the room has clearance, inside and outside, to extend/retract.5. Make sure water and debris are removed from the top of the room before retracting6. Avoid injury by keeping all body parts out of the way of the slide-room.7. Make sure other parties are clear of the slide-out before extending/retracting.8. DO NOT ride in the slide-out when extending/retracting.9. DO NOT step on the floor of the slide out when the room is retracted. The slide out floor is not
supported by the main floor and stepping on the floor may cause structural damage to the slide room.
• Weather and atmospheric conditions will cause rubber to deteriorate over time. Inspect seals around slide-rooms regularly and replace at the first sign of a problem.
• Periodically, during the normal course of operation, Slide-out systems and rooms will require adjustment. This is covered under warranty the first ninety (90) days after original retail sale.
• Slide-out rooms should be stored retracted.• Keep mechanical components clean of road debris, salt, etc using a mild soap and water.• Rooms that will be extended for long periods of time should be actuated 1-2 times a week. • Failure to follow these basic steps can lead to intermittent operation of the slide-out system,
improper sealing, personal injury and damage to the RV which is not warrantable.
Note

72 Keystone RV Company Owners Manual 4/1/2018
Electrically Operated SystemsKeystone uses 2 different styles of electric Slide systems: 1) Rack and Pinion 2) Cable driven. For both systems, the RV battery drives a motor to actuate the room in and out. Please refer to the manufacturer instructions supplied with the RV for the care & operation and/or www.lci1.com for rack and pinion systems by Lippert, and www.norcoind.com for cable driven systems by Norco Industies. DO NOT apply any petroleum products (grease) to the slide system. This will attract dirt and can cause damage to the functional components of the slide system.
Schwintek - In-Wall SystemPlease refer to the manufacturer instructions supplied with the RV for care and operation and/or www.lci1.com for more information. (Customer Service/Slideouts/In Wall Slide-Out)
Manual OverrideThese systems include the ability to manually retract the room in the event of a mechanical failure. Please refer to the manufacturer instructions supplied with the RV for detailed instruction on this feature. See video at www.keystonerv.com for more information.
Hydraulically Operated Systems
System Operation The HydraGear™ Slide-Out System uses a 12 volt DC hydraulic pump which powers the double-acting hydraulic cylinder to move the room(s). Electricity for the pump assembly is supplied by the RV battery. Normal operation is performed by pressing the wall mounted slide-out switch to extend or retract the room. Please refer to the manufacturer instructions supplied with the RV for care & operation of the system in your RV. The pump is installed with hydraulic oil rated at -33°F and should not be changed without completely flushing the system. In cold weather environments an additive can be used to reduce popping and “stiction” (see vendor LIP Sheet – 0295 on www.lci1.com for details). For the best performance, using the see-through reservoir, maintain the fluid level within ½” of the top with the room(s) retracted (closed).The system is designed so that the slide-room with the least resistance will extend/retract. The Hydraulic pump is wired to an auto reset breaker that is typically within 18” of the RV battery. If overloaded, this breaker will interrupt the operation of the slide-room temporarily which can be perceived as intermittent operation. Causes for this to occur:
1. Low Battery. 2. Loose or corroded battery terminal or ground wire.3. Slide-Room binding (RV not level, sticks/leaves or other wedged between the room and the wall).4. Slide-Room/system out of adjustment.5. Something blocking extending/retracting the slide-room.
Individual Room Control (IRC)If equipped, this control panel allows each room to be operated independently.
73Keystone RV Company Owners Manual 4/1/2018
Manual Override to Retract or Extend the Slide-Out RoomThe HydraGear™ system can be manually overridden in cases of hydraulic system failure or when electrical power is either interrupted or unavailable. Please refer to the manufacturer instructions supplied with the RV for care and operation and/or www.lci1.com or www.norcoind.com. See video at www.keystonerv.com for more information.
THE SLIDE-OUT ROOM AND MECHANISM ARE A POTENTIAL CRUSH HAZARD. DISCONNECT THE BATTERIES TO DISABLE POWER TO THE SLIDE-OUT(S) BEFORE WORKING ON OR UNDER THE SLIDE-OUT(S). FAILURE TO DO SO COULD RESULT IN SERIOUS INJURY OR DEATH.
74 Keystone RV Company Owners Manual 4/1/2018
Chapter 12: Sport Utility Recreational VehiclesThis chapter deals with trailers equipped with cargo loading ramps and fuel transfer systems. These recreational vehicles are sometimes referred to as “ramp trailers” or “toy haulers”. These trailers combine RV living quarters with a large cargo area and special consideration must be given to the topics in this chapter.
Bed LiftsSee Chapter 7 under the heading “Elevated Beds And Electric Bed Lift Systems” for complete information including use and safety. Please refer to the manufacturer instructions supplied with the RV for care and operation and/or www.lci1.com.
Ramp Trailer Weight DistributionAll loaded trailers must remain within GVWR and GAWR limits. However, proper load distribution is of particular importance for ramp trailers. These trailers are designed to carry a variety of vehicles and cargo in the cargo storage area. These cargo items are typically heavy and consideration must be given to how they are loaded. Because most storage areas are at the rear of the vehicle the biggest concern is maintaining the correct hitch or pin weight percentage. Vehicles loaded incorrectly can have too little weight resting on the hitch or pin and can become unstable when towing. Keep the loaded tongue weight between 10% and 15% of the total weight for travel trailers and between 15% and 25% of total weight for fifth wheels. For example, if the loaded vehicle weighs 8000 pounds, the hitch weight for a travel trailer should be between 800 – 1200 pounds (10 – 15% of the 8000 pound total). For a fifth wheel this same 8000 pound vehicle should have a pin weight of 1600 – 2000 pounds (20 – 25%). By maintaining the correct hitch percentage and staying within the limits of the GVWR and GAWR you can help insure a safe towing experience with your trailer.
LOCATE AND SECURE CARGO AND VEHICLES TO MAINTAIN SAFE WEIGHT DISTRIBUTION IN THE CARGO AREA AND THROUGHOUT THE TRAILER.
IMPROPER WEIGHT DISTRIBUTION OR OVERLOADING COULD LEAD TO LOSS OF VEHICLE CONTROL DURING TRAVEL RESULTING IN SERIOUS INJURY OR DEATH.
FOLLOW ALL GUIDELINES CONTAINED IN THIS MANUAL FOR LOADING AND WEIGHING PROCEDURES. MAINTAIN THE LOADED HITCH WEIGHT WITHIN THE
PERCENT LEVELS STATED ABOVE. WHERE APPLICABLE, A HITCH WITH BUILT IN SWAY CONTROL IS RECOMMENDED. DO NOT EXCEED THE GVWR (GROSS VEHICLE WEIGHT RATING) OR THE GAWR (GROSS AXLE WEIGHT RATING) OF
EITHER THE TOW TRAILER OR TOW VEHICLE.
Cargo PlacementLoad vehicles and heavy cargo items in the cargo area as far forward as possible. Big, heavy items should be loaded where they can be securely tied down. Start with top heavy items if you have them. That’s usually a good place to start because you must have plenty of room available to properly tie them down. Tying them straight down is not secure enough. They need to be tied off at several angles or they could fall over in an abrupt change in speed or direction. You need room to accomplish this. Smaller items can be used to fill the spaces around them later. Once you have the heavy items located, check the hitch weight. If the hitch weight is significantly more or less than the guidelines in section “Ramp Trailer Weight Distribution”, make the changes necessary to get close. Then the smaller items can be placed to bring the hitch weight into the recommended range. They should be located so that they will not move during travel. Placing them next to items that have already been tied down helps, but your main concern should be to not lose the balance of the trailer. Don’t forget you can also get one side of a trailer heavier than the other without a little planning. This can cause tire failures from overloading an individual tire or tires. This can also cause a very serious problem when cornering, even causing the trailer to turn over in a sudden turn.

75Keystone RV Company Owners Manual 4/1/2018
Top heavy loads can cause problems not only in cornering but also in hard braking. They have a tendency to make the trailer “dive” in hard braking conditions. This suddenly increases tongue weight and can decrease tow vehicle front axle loading just when you need steering and brakes the most. Arrange the remainder of the load to act as a counter weight to minimize this effect. Never place heavy objects on add-on devices hung on the rear bumper or placed across the tongue frame. This places heavy objects where they will dramatically effect handling in corners or bumps. Heavy weights placed well behind the axle can also reduce stability. A bicycle may be fine to hang out in back, but not a motorcycle. Use good common sense and to always allow plenty of margin for safety.
Ramp Trailer Loading SafetyThe cargo door/loading ramp gives you complete access to the trailer cargo area. When lowered, the loading ramp allows you to easily load rolling cargo, bicycles, small motorcycles and ATVs, and small vehicles. This section outlines the safety precautions you should take when loading and unloading cargo and vehicles, as well as loading/unloading procedures, techniques and tips.Use caution when using the loading ramp/door area of your trailer. This area has many uses and some things to be aware of are:
• Ramps and inclines.• Dissimilar surfaces that may be wet and slippery.• Awkward, heavy or unbalanced loads.
Continuous attention to safety measures will help prevent accidents and possibly serious injuries and property damage. You can help minimize these risks, avoid hazards, and enjoy your recreational activities safely by using an effective decision-making strategy as follows:
• Identify hazards or specific problems in your path. Equipment, materials, debris, other vehicles, children, pets, or any number of other things may be in your way when you load or unload cargo or vehicles.
• Predict what may happen and think of the consequences of your actions. Be sure you are physically capable of handling the load safely and keeping it under control.
• Decide what to do based on your capabilities and the capabilities of your equipment. • Be sure your cargo does not exceed the capacity of your loading ramp and the trailer.
Loading Equipment
The loading equipment furnished with your trailer consists of the ramp door and tie down attachment points in the cargo floor area. The rated capacity of the ramp door is 3000 pounds. Our products offer a multitude of tie down attachment points with various ratings but the minimum for any one is 1200 pounds. Typically, tie down straps, cables, hooks, chains, wheel chocks, blocks, etc. are not supplied with your trailer.
Chocks And BlocksWheel chocks are wedge-shaped blocks placed in front of and behind the rear tires of a trailer to prevent the trailer from moving while it is being loaded. Always hitch the trailer to the tow vehicle, and use wheel chocks or other vehicle-restraining devices when loading and unloading the trailer. When chocking, use wheel chocks of the appropriate size and material to securely hold the vehicle. Don’t use lumber, cinder blocks, rocks, or other make-shift items to chock.
76 Keystone RV Company Owners Manual 4/1/2018
Tie DownsUse tie downs rated for the weight of the object to be secured. Be sure to attach and secure each tie down so that it cannot come loose, unfastened, opened or released while the trailer is in motion. Also, use edge protection whenever a tie down could be damaged or cut at the point where it touches an article of cargo. Note: Do not over tighten tie downs as this will cause damage to the attachment hardware, floor structure and cargo.The working load limit of a tie down, associated connector, or attachment mechanism is the lowest working load limit of any of its components (including any tensioner device), or the working load limit of the anchor points to which it is attached, whichever is less. When you choose tie down hardware, choose items that are strong enough to hold the load you are securing. The load limit of each tie down used should be at least one-half the working load limit of each tie down that goes from an anchor point on the trailer to an attachment point on an article of cargo. Check the tie down manufacturer’s specifications to determine working load limits. Note: Tie down hardware is typically not supplied with your trailer.When an article of cargo is not blocked or positioned to prevent movement in the forward direction, the number of tie downs needed depends on the length and weight of the articles. In all cases, use enough tie downs to secure the cargo from moving in any direction. Heavy tool chests or cabinets may require tie downs around bottom, middle and top to secure them. Be sure to lock or secure drawers in these chests or cabinets so they can’t open while traveling. Keep handle bars, mirrors, etc. away from the trailer interior walls. The walls can be damaged by contact with hard, sharp objects.
Loading Ramp Operation1. Hitch the trailer to a tow vehicle before loading and unloading the rear cargo area. Select a parking site
where the edge of the rear door/loading ramp will rest entirely on a flat, level surface, and the corners of the door will be supported. Avoid soft sand or mud surfaces. When the trailer is loaded, the added cargo weight may cause the trailer and/or tow vehicle to become stuck.
ALWAYS HOOK THE TRAILER TO THE TOW VEHICLE BEFORE MOVING CARGO OR USING THE LOADING RAMP. FAILURE TO DO SO COULD CAUSE THE
TRAILER TO TIP BACK AS THE LOAD IS SHIFTED TO THE REAR OF THE CARGO AREA CAUSING PROPERTY DAMAGE, PERSONAL INJURY, AND/OR DEATH.
2. Set the parking brake on the tow vehicle and install wheel chocks in front and behind the tires on one axle on each side of the trailer. DO NOT use the emergency brake away switch on the trailer.
3. Lower the front and rear jacks on the trailer to stabilize it.4. Unlock the rear door loading ramp and carefully lower it to the ground. If equipped, extend the ramp
extension and install the supporting hardware.5. If equipped with a power bunk, raise both bunks fully.6. Move things out of the way of your cargo, whether you are loading, or unloading. Have an idea where
your cargo will be positioned after your load/unload activities.7. Use caution and proper lifting techniques when loading and unloading items from the cargo area.8. Use extreme caution when loading/unloading ATVs, motorcycles, or other vehicles (“motorized cargo”
or “vehicle(s)”). These machines are generally heavy, and may be hot from operation and/or covered with dirt, oil, or other substances that may make them slippery. See the section “Loading and Unloading Motorized Cargo” for more details.

77Keystone RV Company Owners Manual 4/1/2018
9. Make certain that the door seals and hinge area are free of any debris, such as sand or snow before closing the rear door loading ramp.
10. Inspect the hinges, assist springs, and latch mechanism before each trip for signs of wear or damage, and make any needed repairs for safe operation and towing.
Loading And Unloading Motorized CargoMany recreation ATV or motorcycle accidents and injuries happen while loading or unloading. Steep inclines, unstable ramps, power and a short stopping area can make loading motorized cargo difficult. There is no absolute safe way to drive your motorized cargo into the trailer. Take the following steps to aid in reducing the risks associated with transporting, storing, or occupying the trailer with motorized equipment and vehicles.
• Wear personal protective equipment while loading and unloading vehicles to/from the trailer. This includes but is not limited to, an approved motor vehicle helmet, leather boots, appropriate gloves, and eye protection.
• Never stand in the path of equipment when loading/unloading with the ramp, and keep bystanders away from the ramps.
• Keep body parts completely clear of the ramp door hinge pinch area at all times.• Check parking brakes on the vehicle(s) you are loading/unloading, and on the tow vehicle.• Inspect ramp and trailer floor/loading area for cracks, damage, oil or other debris that may cause
slippage.• Remove carpet from section where fueled vehicles or motorized equipment will be stored.
VEHICLES AND EQUIPMENT POWERED BY INTERNAL COMBUSTION ENGINES AND PLACED IN RECREATIONAL VEHICLES CAN CAUSE CARBON MONOXIDE POISONING OR
ASPHYXIATION, WHICH COULD RESULT IN DEATH OR SERIOUS INJURY.THE FLAMMABLE LIQUIDS USED TO POWER THESE ITEMS CAN CAUSE A FIRE OR
EXPOLSION, WHICH CAN RESULT IN DEATH OR SERIOUS INJURY.
TO REDUCE RISK:
1. DO NOT RIDE IN THE VEHICLE STORAGE AREA WHILE VEHICLES ARE PRESENT.2. DO NOT SLEEP IN THE VEHICLE STORAGE AREA WHEN VEHICLES ARE PRESENT.3. CLOSE DOORS AND WINDOWS IN WALLS OF SEPARATION (IF INSTALLED) WHILE ANY VEHICLE IS PRESENT.4. RUN FUEL OUT OF THE ENGINES OF STORED VEHICLES AFTER SHUTTING OFF FUEL AT THE FUEL TANK.5. DO NOT STORE, TRANSPORT, OR DISPENSE FUEL INSIDE THE VEHICLE.6. OPEN THE WINDOWS, OPENINGS, OR AIR VENTILATION SYSTEMS PROVIDED FOR VENTING THE TRANSPORTATION AREA WHEN VEHICLES ARE PRESENT.7. DO NOT OPERATE PROPANE APPLIANCES, PILOT LIGHTS, OR ELECTRICAL EQUIPMENT WHEN MOTORIZED VEHICLES ARE PRESENT.
78 Keystone RV Company Owners Manual 4/1/2018
Ramp PositioningThe ramp angle from the trailer floor to the ground affects the risk when loading/unloading cargo. If the ramp angle is reduced, and all other conditions remain the same, risk is reduced. Always try to reduce the loading ramp angle; the shallower the ramp angle, the easier cargo loading will be. Position the trailer to take advantage of any terrain features that will help reduce the ramp angle. In all cases, be sure the ends of the ramp door can be fully supported. Always position the loading ramp so the ends in contact with the ground are level or at the same height. An uneven ramp may cause the cargo to tip over sideways during loading/unloading.
Loading Under PowerAlways follow the instructions in the owner’s manual for the motorized cargo. If not available, following are generalized suggestions for loading motorized cargo. At no time should these instructions over-ride the instructions contained in the motorized cargo owner’s manual.
1. Shift into lowest gear before ascending ramps.2. Align wheels with ramps both loading and unloading.3. Approach straight on, not on an angle. If you are off to one side and the ground is uneven where the
ramp touches the ground, an unbalanced situation can occur.4. The operator should apply throttle smoothly and climb the ramp at low speed. Too much or sudden
increases in throttle will cause the vehicle to be harder to control and may cause the vehicle to impact the front of the trailer cargo area or over-turn.
5. Stop when fully in the trailer. Keep handle bars, mirrors, etc. away from the trailer interior walls. The walls can be damaged by contact with hard, sharp objects.
6. After loading, close the fuel valve and run the engine until it stops (motorcycles and ATVs). Turn the ignition key off and remove it. Set the parking brake. For manual clutch machines, leave the machine in gear.
7. Secure the vehicle with tie downs. The attachment points you select on your equipment must be strong enough to support the weight of the equipment. Usually attachment points that are low and centered
CARBON MONOXIDE GAS CAN KILL YOU. FUEL BURNING DEVICES SUCH AS ATVS OR MOTORCYCLES THAT BURN GASOLINE, DIESEL, OR OTHER FUELS PRODUCE CARBON
MONOXIDE WHEN THEY ARE OPERATING. CARBON MONOXIDE GAS IS INVISIBLE, ODORLESS, AND COLORLESS. DANGEROUS LEVELS OF CARBON MONOXIDE GAS
CAN ACCUMULATE IN A TRAILER WHICH CANNOT BE DETECTED BY SIGHT, SMELL, OR TASTE. EVEN SMALL QUANTITIES OF CARBON MONOXIDE CAN CAUSE CARBON MONOXIDE POISONING AND SUFFOCATION, WHICH WILL CAUSE DEATH, SERIOUS INJURY, OR PERMANENT DISABILITY. EXPOSURE TO HIGH CONCENTRATIONS OF
CARBON MONOXIDE FOR EVEN A FEW MINUTES WILL ALSO CAUSE DEATH, SERIOUS INJURY, OR PERMANENT DISABILITY. DO NOT START ATVS, MOTORCYCLES, OR OTHER
FUEL BURNING DEVICES WHILE THEY ARE LOCATED IN YOUR TRAILER.
THERE IS A HAZARD OF SERIOUS PERSONAL INJURY WHEN USING A LOADING RAMP. IF THE MOTORIZED CARGO LOSES TRACTION AND SPINS SIDEWAYS, IT MAY SLIP SIDEWAYS OFF THE RAMP, TIPPING SIDEWAYS, AND
POSSIBLY FALLING ON THE RIDER CAUSING INJURY. ALWAYS FOLLOW THE RAMP LOADING INSTRUCTIONS IN THE OWNER’S MANUAL FOR THE
MOTORIZED CARGO.
79Keystone RV Company Owners Manual 4/1/2018
on the equipment frame will be good. An attachment to a decorative piece of chrome or plastic will usually not be a good tie-down point. Consider any leverage action that may occur. An attachment point past the center of the equipment could cause the equipment to either swing around or flip over, causing damage to the equipment, or personal injury. If you have any doubt about the attachment point you have selected, stop and find a better attachment point.
Secure The LoadInstall blocking devices in the front, back, and on both sides of the wheels to keep it from rolling. This block is strictly an additional safety precaution and does not reduce the need for strapping the vehicle in securely. Use a minimum of three tie downs to secure the vehicle to the trailer. Use one tie down to secure the front of the vehicle to the trailer. Use two tie downs to secure the rear of the vehicle to the trailer, four tie downs (one at each corner) are preferred. Attach tie down hooks to the vehicle’s frame, not to an accessory such as a mirror, handle bar, pedal, etc. Hooks on the other end must be attached to vehicle cargo anchors installed in the trailer. For transport, motorized cargo with manual transmissions should be left in first gear. Vehicles with automatic transmissions should be in the Park position. The vehicle’s ignition key should be turned off and removed, the parking brake set, the run/stop switch in the stop (or off) position and the fuel lever turned to the off position.
Unloading Motorized CargoThe safest method of unloading is to push the vehicle down the ramp, carefully braking to ensure control of the vehicle. If you loaded your vehicle forward (front in) that means you will unload it in reverse. Driving a motorized vehicle in reverse down the ramp is not recommended. A slight turn of the handle or a slip of the wheel can cause your vehicle to fall, tip or roll sideways. If you are on or in the vehicle you can be injured or killed. Unload the vehicle safely as follows:
1. Be sure the back tires of the vehicle are aligned with the ramp, and there are no people, pets or obstructions in the unloading area at the end of the ramp. Assure that the ground surface will support the vehicle, and that the vehicle cannot roll away uncontrolled.
2. Stand at the front of the vehicle.3. Push the vehicle backward in line with the ramp.4. As the rear tires start down the ramp let it roll slowly backwards braking enough to control the speed but
not so much as to skid and loose control.
FAILURE TO PROPERLY SECURE CARGO COULD CAUSE, PROPERTY DAMAGE, INJURY, AND/OR DEATH.
80 Keystone RV Company Owners Manual 4/1/2018
Side/Rear Patio Doors
If equipped, some ramp doors can also be used as a patio. You will need to support the door with the supplied cables, engage the safety clips, extend the patio hand railings and properly lock everything into place. Once in patio mode, if equipped, install the step into the retainer provided and lock into place. Keep the gate closed and properly locked at all times when not entering or exiting. Operating instructions for the LCI brand are available at www.lci1.com/support master-manuals, videos are available at www.morryde.com/videos for the MORryde brand of patio system.
Fuel Transfer System
A fuel transfer system allows you to store gasoline for use in motorcycles, snowmobiles, ATVs or other vehicles and equipment while at a campsite. This system consists of a fuel tank, fuel tank filler, fuel gauge, fuel transfer pump, fuel transfer valve and hose with fill nozzle. Some vehicles will be equipped with a switch at the battery and a switch at the pump. Other vehicles will be equipped with a timer switch allowing the pump to run for five minute
NO SMOKING.BEFORE DISPENSING OF FUEL, TURN OFF ALL ENGINES, FUEL BURNING APPLIANCES, AND THEIR IGNITORS (SEE OPERATING INSTRUCTIONS). CONNECT THE BONDING JUMPER WIRE TO THE VEHICLE RECEIVING FUEL. GROUND THE RV. DO NOT DISPENSE FUEL WITHIN 20 FEET OF AN IGNITION SOURCE OR WITHIN 10 FEET OF ANOTHER RECREATIONAL VEHICLE OR STRUCTURE. FAILURE TO COMPLY COULD RESULT IN FIRE, DEATH OR SERIOUS INJURY.
DO NOT EXCEED THE RECOMMENDED MAXIMUM CAPACITY RATING OF YOUR PATIO DOOR . WEIGHT CAPACITY WILL BE LOCATED ON THE PERIMETER FRAME OF THE DOOR.
Note
Avoid high point loads when using the ramp door as a patio. High point loads are loads that put a lot of pressure on a small area and those can damage the ramp door. Items such as chair legs or table legs with a small footprint combined with a lot of weight run the risk of denting or puncturing the ramp door, which is not
covered under warranty.
Note
Return the patio to the stored position when unattended or in periods of inclement weather. The patio or steps may become slippery when wet. Damage
to the patio/ramp door due to wind, rain, or any weather condition is not covered under warranty.
IMPROPER USE OF THE PATIO SYSTEM COULD LEAD TO INJURY OR DEATH.
81Keystone RV Company Owners Manual 4/1/2018
intervals. A bonding jumper wire reduces the possibility of static electricity discharge between the fuel station and the equipment being fueled. To fill the tank, remove the fuel filler cap and fill the tank with the grade of gasoline required by your equipment. When replacing the fuel fill cap, be sure it seats squarely and turn it firmly to lock it on the fill pipe neck.
Fuel Transfer System SafetyStatic electricity-related incidents when refueling are extremely unusual. They appear to happen most often during cool or cold and dry climate conditions. In rare circumstances, these static related incidents have resulted in a brief flash fire occurring at the fill point. You can minimize these and other potential fueling hazards by following safe refueling procedures. A build-up of static electricity can be caused by reentering a vehicle during fueling, particularly in cool or cold and dry weather. If you return to the fuel fill pipe during refueling, the static may discharge at the fill point, causing a flash fire or small sustained fire with gasoline refueling vapors.Here are some additional refueling safety guidelines when refueling your vehicle or filling up gasoline storage containers:
• Turn off vehicle engines. Disable or turn off any auxiliary sources of ignition: the trailer furnace, water heater, cooking unit, and any pilot lights. Turn off main propane valve.
• Do not smoke, light matches or lighters while operating the refueling system, or when using gasoline.• Use only the refueling latch provided on the gasoline dispenser nozzle.• Never jam or otherwise try to lock the refueling latch on the nozzle open.• Do not re-enter your vehicle during refueling. If you cannot avoid reentering your vehicle, discharge any
static build-up BEFORE reaching for the nozzle by touching something metal with a bare hand, such as the vehicle body or frame, away from the nozzle.
• In the unlikely event a static-caused fire occurs when refueling, leave the nozzle in the fill pipe and back away from the vehicle. Turn off the fuel pump master switch immediately.
• Do not over-fill or top-off your vehicle tank, which can cause gasoline spillage.• Never allow children under licensed driving age to operate the pump.• Avoid prolonged breathing of gasoline vapors, use gasoline only in open areas that get plenty of fresh air.
Keep your face away from the nozzle or container opening.• Never siphon gasoline by mouth. Never put gasoline in your mouth for any reason. Gasoline can
be harmful or fatal if swallowed. If someone swallows gasoline, do not induce vomiting; contact a emergency medical service provider immediately.
• Keep gasoline away from your eyes and skin; it may cause irritation. Remove gasoline-soaked clothing immediately.
• Use gasoline as a motor fuel only. Never use gasoline to wash your hands or as a cleaning solvent.
Fuel Transfer System OperationTo operate the fuel transfer system (also see the “Fuel Pump Owner’s Manual” in your Owner’s InformationPackage):
1. Lower the tongue jack or 5th-wheel jacks to the ground. This will electrostatically ground the trailer to reduce the possibility of static discharge while refueling.
2. Set the master disconnect switch to ON. This will either be located at the battery or at the fuel pump area.
3. Close the vents in the side of the trailer to prevent fuel vapor from entering the trailer.4. Attach the ground clip securely to a bare metal part of the equipment to be fueled (frame, handle bar,
axle bolt, etc.)

82 Keystone RV Company Owners Manual 4/1/2018
IF A FUEL SPILL OCCURS IN THE STORAGE AREA OF THE TRAILER, OPEN THE WINDOWS AND SIDEWALL VENTS, AND WIPE UP THE FUEL WITH CLOTH OR PAPER TOWELS. DISPOSE OF THE TOWELS IN A SUITABLE HAZARDOUS WASTE CONTAINER. DO NOT HOSE OUT THE TRAILER
WITH WATER. CLEAN THE FUEL SPILL AREAS WITH A GREASE/OIL DISSOLVING CLEANER SUCH AS 409®. THOROUGHLY DRY THE SPILL AREAS.
ALL PARTS OF THE FUEL TRANSFER SYSTEM INCLUDING BUT NOT LIMITED TO THE HOSES, PUMP, NOZZLE, FITTINGS, AND TANK HAVE BEEN SELECTED FOR THEIR QUALITY, SAFETY, AND INTENDED APPLICATION. ANY ALTERATION OR REPLACEMENT OF ANY PART BY OTHER THAN
KEYSTONE ORIGINAL EQUIPMENT MANUFACTURING PARTS COULD JEOPARDIZE THE INTEGRITY OF THE SYSTEM AND MAY RESULT IN SERIOUS INJURY OR EVEN DEATH.
IF YOUR FUELING SYSTEM IS NOT WORKING PROPERLY OR YOU NEED ADDITIONAL INFORMATION ON THE USE OF THE SYSTEM CONTACT YOUR AUTHORIZED KEYSTONE DEALER
IMMEDIATELY OR CALL KEYSTONE DIRECTLY.
FUEL-SOAKED RAGS OR OTHER MATERIALS CONTAIN FLAMMABLE AND/OR EXPLOSIVE FUEL VAPORS AND OTHER HAZARDOUS SUBSTANCES. CLEAN UP MATERIALS SHOULD BE TEMPORARILY STORED IN A NONFLAMMABLE, VAPOR-TIGHT CONTAINER UNTIL PROPER DISPOSAL FACILITIES
ARE AVAILABLE. DO NOT STORE FLAMMABLE CLEAN UP RAGS OR MATERIALS INSIDE THE TRAILER, INSIDE ANY OTHER VEHICLE OR NEAR ANY SOURCE OF FLAME OR IGNITION BECAUSE A FIRE OR
EXPLOSION CAN RESULT.
5. Turn the fuel transfer pump switch ON. For vehicles equipped with a timer, turn the timer to on and this will allow the pump to run 5 minutes. When the pump stops, turn on again if necessary for another 5 minute run.
6. Remove the fuel hose and nozzle from its compartment. An automatic bypass valve prevents pressure buildup when the pump is on with the nozzle closed.
7. Place the nozzle into the equipment fuel filler and squeeze the handle to allow fuel to flow. Be careful not to overfill the equipment fuel tank. Wipe up any spilled fuel.
8. When finished release the nozzle handle and return the nozzle to its compartment and shut off the pump switch.
9. When you are finished with all fueling, turn off the pump master switch either at the pump or at the battery if equipped.
10. Lock the fuel transfer nozzle compartment to prevent unauthorized use. The nozzle compartment must be locked at all times when not dispensing fuel.

83Keystone RV Company Owners Manual 4/1/2018
Chapter 13: Care & Maintenance
The instructions and recommendations in this manual are meant to be used in conjunction with the individual component manufacturers manuals accompanying the RV. Be sure to thoroughly review each component manual to avoid any specific requirement not reviewed here. Care and maintenance of the recreational vehicle is an important step in maintaining the safety, dependability and the appearance, both interior and exterior, of the RV. Keep good records of all maintenance performed as these may be necessary for warranty information or may assist in possible repairs needed. Operational usage and climates may affect the frequency of maintenance needed on certain components. Preventative maintenance is important to the life and enjoyment of any recreational vehicle as many problems can be caught before they occur. Please do not hesitate to call your dealer with a question on the care and maintenance of any item.
Exterior
Frame/Chassis/AttachmentsIt is normal for the frame and its’ components to corrode. When and how much depend on the environment the RV is subjected to, how often it is subjected to it and the preventative maintenance performed. The more exposure to snow, rain, road salt, road chemicals, salt water, etc. the more accelerated and more severe the corrosion will be. Diligence on the part of the owner when a RV is subjected to these elements can significantly reduce the severity and how quickly this occurs. When your RV is exposed to a known corrosive (road salt, road chemicals, salt water, etc.) take the time to rinse off the frame, frame components, under carriage, axles & running gear as soon as possible after reaching your destination. Wash the exterior. Taking these simple steps will greatly reduce the extent and slow corrosive action significantly. Inspect the frame and frame components periodically. If a spot of rust is developing or the frame was nicked or scratched by road debris, sand (or wire brush) and touch it up with rustproof enamel paint. Think of it as a tooth with a cavity developing. Take care of it before it gets to deep and causes bigger issues.
StepsKeep clean of dirt, salt, mud, etc. and lubricate pivot points with a dry lubricant spray every 30 – 60 days.
Hitch Couplers (Travel Trailers)Inspect prior to each trip. The ball socket and clamp should be cleaned and lubricated monthly with wheel bearing grease. If coupler or coupler components appear damaged or worn, contact your dealer immediately.
Pin Box (Fifth Wheel) & Hitch EquipmentInspect monthly or prior to each trip. The hitch plate and locking mechanism should be generously lubricated with a high temperature rated grease at all times. Consult the hitch manufactures manual for the brand you selected. Please refer to the manufacturer instructions supplied with the RV for care and operation and/or www.lci1.com or www.morryde.com.
Safety Chains (Travel Trailers)Safety chains should be inspected before every trip and if damaged or weakened, replace immediately. Never tow without use of the safety chains.
84 Keystone RV Company Owners Manual 4/1/2018
Tongue Jacks, Manual/Power (Travel Trailers)When preparing to travel, inspect the jack for any damage and test operation. If jack is difficult to operate, clean and oil lightly (Manual). If jack is still difficult to operate or freezes, it should be serviced or replaced by a qualified RV technician. Please refer to the manufacturer instructions supplied with the RV for care and operation and/or www.lci1.com, www.davecarter.com, www.domarproducts.com, www.nationalsales.us, www.norcoind.com.
Fifth Wheel JacksWhen preparing to travel, inspect the inner/outer arms (legs) and be sure they are not bent. Check the operation and if the jacks are difficult to operate, have them service by a qualified RV technician. Please refer to the manufacturer instructions supplied with the RV for care and operation and/or www.lci1.com.
Siding & Sidewall Attachments“Black streaks” are caused when pollution, rain, dirt and sealant deterioration mix. We are not aware of any way to prevent “black streaks”. However, keeping your exterior washed and waxed often will make them much easier to remove. There are many products in the market that are effective in removing “black streaks”. Consult you dealer for these products.
RV Gel Coat Finish - Care and MaintenanceFiberglass is a common term for fiber-reinforced plastic, or FRP, which is a plastic material, strengthened using glass fiber cloth and used on many RV’s for sidewalls and caps. To give the fiberglass a smooth and shiny surface, a clear or colored gel resin material is applied to the outer surface. Gelcoat is available in many colors and is very durable, but it can become dull or faded as it weathers. Sunlight, heat and moist air combine to oxidize the gelcoat surface, fading it and making the surface cloudy. So how do you keep your fiberglass looking good? Simple, you clean and apply a top quality wax twice a year or every 3 months in cases where the vehicle is in constant exposure to the elements.
General MaintenanceNormal maintenance of your gel coated fiberglass RV is similar to the care you would give your automobile. In general, automotive cleaners and waxes work well. Do not use caustic, highly alkaline (high pH) cleaners or those containing ammonia. These cleaning agents may darken white or off-white weathered gel coat surfaces. The staining that results is a chemical reaction within the weathered gel coat, and can be removed with a rubbing compound or by light sanding with 400 grit sandpaper followed by application of rubbing compound and waxing.
CleaningPeriodic cleaning with a mild detergent product is necessary to remove normal accumulations of soil. This soil is the result of regular use of your RV as well as environmental pollutants, soot, smog, etc. General washing as needed prevents soil build-up, staining, etc.
WaxingAs the gel coat begins to lose its gloss from constant exposure to the natural environment and pollutants, it will require some special attention to restore the original gloss and color. After washing with mild soaps and detergents, a good polishing with a self-cleaning automotive wax will restore most of the original gloss. A fall and spring wax job is generally all that is needed to maintain the original appearance. If the surface has been allowed to weather badly, and cleaning and wax polishing does not restore the finish satisfactorily, then compounding will be necessary.
CompoundingPolishing compound (fine abrasive) or rubbing compound (coarser abrasive) is recommended for use on fiberglass RVs to remove scratches, stains, or a severely weathered surface. Polishing or rubbing compound can be applied by hand or by mechanical means, such as an electrical or pneumatic buffer. After the scratched, stained or weathered

85Keystone RV Company Owners Manual 4/1/2018
surface has been removed, it should be waxed to enhance the gloss and color while providing a seal to retard staining or new soil accumulation.
Removing the DiscolorationDiscoloration of the gel coated fiberglass surface may occur if regular washing and waxing has been neglected. Discolored areas are very shallow in depth and, in fact, are on the surface. They can be removed by gently wet-sanding only the affected areas with 600 grit “wet or dry” sandpaper to remove the blemishes. Always sand in one direction, using plenty of water. After sanding, dry the areas and ensure all the discoloration has been removed. If not, repeat the process. Once all discoloration has been removed the affected surface area will need to be buffed. Buffing, using an electrical or pneumatically operated buffer at low speed (1750 rpm - 2250 rpm), will restore the luster to the sanded surface. Use a soft wool pad and apply a generous amount of rubbing compound using circular motion. When the buffing has been completed, wash off the rubbing compound with clean water. Dry the surface. Wax your RV with a high-grade automotive wax.
Other AlternativesPoli Glow products, Inc provides several products that work well to clean protect and restore a beautiful shine to your fiberglass cap. Poli Glow is not a wax and is easily applied. It wipes on without the need for rubbing or buffing. It will not wash off with soap and water and lasts for over 12 months! The website is www.poliglow-int.com which has a video showing how to use and apply the Poli Glow products. The Poli Glow Kit along with Poli Ox is recommended for caps that have begun to oxidize. Manufacturer instructions must be followed for best results.
MetalThe aluminum exterior has a baked on enamel finish. Washing frequently with an automotive or RV wash solution will help avoid staining from debris and soil build up. Always rinse the RV with clear water prior to washing to remove any loose dirt. Waxing two to three times a year with a good automotive paste wax will help preserve the finishDO’S and DON’TS
• DO Use Automotive / Marine grade non-abrasive waxes.• DO Use Soft cloths to clean and wax.• DO be careful around graphics. Wax and wash with the graphic, not against it.• DO NOT use products containing ammonia or caustic harsh cleaners as they may cause discoloration to
the fiberglass surface. • DO NOT use high-pressure washers, rotating brushes, such as in car washes, and power buffers. Use of
these products can damage graphics and/ or paint finishes. • DO NOT dry wipe surfaces. • DO NOT use rubbing compounds.
ABS Plastic / Molded PartsSome components are constructed of strong ABS molded plastic. A mild solution of soap and water should be used when cleaning. When using any product, make sure the product is recommended for use on plastics. Avoid harsh abrasive cleaners, ammonia or citric-based products as discoloration may result.
Windows The seals/sealants used to seal the windows to the sidewall of the RV are subject to deterioration over time. Every six months, inspect the area between the window frame and the side wall for sealant gaps/voids, cracks, shrinkage, etc. and reseal as necessary. In addition, after a rain, inspect the interior of the RV around windows for any evidence of

86 Keystone RV Company Owners Manual 4/1/2018
water penetration. If any interior leaks are noticed, contact an authorized dealer immediately. If caught early, it may save you much time, frustration and money. To ensure window operation, adjust and lubricate latches and any moving parts annually. A light oil or powdered graphite can be used for lubrication. Periodically use a vacuum attachment to clean any debris out of the window weep holes, which are necessary to drain any condensation or moisture from hard driving rains that may collect.
Corner MoldingsA corner molding is the trim that covers the joint between a front/rear wall and a sidewall. The sealants used here are subject to deterioration in time. As sealants dry out and the RV twists and turns during normal operation, these areas are subject to leaks. This area is very important because a leak may not manifest itself inside the RV where it is easily identifiable. This type of leak may take time to be evident and by then, there could be substantial damage. Every six months, inspect these areas for sealant gaps/voids, cracks, shrinkage, etc. and reseal as necessary. Please consult your local Keystone dealer for assistance if needed.
MoldingsThere are a variety of other moldings used on the exterior of our applications that include but are not limited to floor line, awning rail, roof line, flat trim with screw cover. Every six months, inspect these areas for sealant gaps/voids, cracks, shrinkage, etc. and reseal as necessary. Please consult your local Keystone dealer for assistance if needed.
Other Wall AttachmentsThese can include but are not limited to compartment doors, door holders, range vent, refer vent, lights, awning feet, water fills, cable hatches, furnace vents, grab handles, speakers, receptacles, water heater, etc. Every six months, inspect these areas for sealant gaps/voids, cracks, shrinkage, etc. and reseal as necessary. Please consult your local Keystone dealer for assistance if needed.
Slide-out’s Don’t forget this important feature when it comes to maintenance. A slide-out has it’s own roof, end walls, rear wall, floor with similar moldings and attachments as the rest of the RV. The sidewall opening moldings and all components of the slide-out room “box” should be inspected every six months for sealant gaps/voids, cracks, shrinkage, etc. and resealed as necessary. Please consult your local Keystone dealer for assistance if needed.CAUTION ABOUT SEALANTS - Be careful when selecting a sealant, as it is not recommended to use 2 different sealants on top of each other. It may appear sealed, but water may be able to slip between the 2 sealants if they do not bond to each other. It is recommended to use the same type/brand sealant as was used originally or to remove all old seal, clean the area/component and install all new fresh sealant. Please consult your local Keystone dealer for assistance if needed. Please refer to the manufacturer instructions supplied with the RV for care and operation and/or www.lci1.com or www.norcoind.com.
RoofIn most cases, the roof assembly consists of the interior paneling, a truss system, insulation, roof decking (plywood, OSB) and a rubber roof or TPO which is glued to the roof decking. Because of the manufacturing process, air pockets and/or visible spots may be seen in the roof material. These visible spots can be caused by debris (wood, staples, screws, etc.) that are between the roof material and decking or by imperfections occurring during the roof material manufacturer. In most cases, these are considered cosmetic in nature and seldom require any corrective action.
87Keystone RV Company Owners Manual 4/1/2018
Rubber RoofThe rubber roof is a polymer membrane that will not rust or corrode and is very strong and durable. Other than periodic washing, the rubber roof material itself does not require maintenance or coatings. However, be advised that any attachment, seams or joints in the rubber roof requires maintenance often! Know the height of your RV and avoid contract with trees, overpasses, etc. This roof material can be punctured, snagged or cut by contact from objects. Whether a warranty or non-warranty repair, this material can be easily repaired utilizing a local company specializing in restoration (vinyl, rubber, leather, fabric, plastic repair of furniture, car seats, fabrics, dashboards, etc.) or with patch kits available from your local dealer and seldom would replacement of the entire material be necessary. Please refer to the manufacturer instructions supplied with the RV for care and operation and/or www.dicor.com.
Alpha Superflex TPO RoofThe TPO roof will not rust or corrode and is very strong and durable. Other than periodic washing, the rubber roof material itself does not require maintenance or coatings. However, be advised that any attachment, seams or joints in the rubber roof requires maintenance often! Alpha products must be used on a RV with the Alpha system. These items can be obtained from your dealership. Know the height of your RV and avoid contract with trees, overpasses, etc. This roof material can be punctured, snagged or cut by contact from objects. Whether a warranty or non-warranty repair, this material can be easily repaired utilizing a local company specializing in restoration (vinyl, rubber, leather, fabric, plastic repair of furniture, car seats, fabrics, dashboards, etc.) or with patch kits available from your local dealer and seldom would replacement of the entire material be necessary. Please refer to the manufacturer instructions supplied with the RV for care and operation and/or www.alphasystemsinc.com.
Roof Seams and/or JointsRoof sealants will deteriorate which can lead to leaks. Deterioration can be accelerated in heavy sun, changes in climates (expansion/contraction with aggressive temperature change), and cold climates. Once the RV leaves our manufacturing facilities, we can no longer maintain the sealants, this becomes your responsibility. Take this seriously because it can help prevent a very frustrating situation that can be expensive to remedy (damage from water leaks). Inspect the roof at least every 90 days, paying close attention to all seams and/or joints and attachments where sealant is used. Look for cracks, shrinkage and/or gaps/voids in the sealants. These must be carefully cleaned and resealed. It is necessary to use the same sealant as originally installed if touching up cracks, shrinkage and gaps/voids. There is no way to know if 2 different brands of sealant will seal to each other. DO NOT use any type of silicone product on the rubber roof material.
THE ROOFING MATERIAL MAY BE SLIPPERY WHEN WET. ALWAYS USE CAUTION WHEN WORKING ON TOP OF THE RV.
Snow loads in excess of 2 feet or 30 pounds per square foot can lead to damage of the roof structure as well as to the axles and suspension. The roof should be free of
snow prior to transporting the trailer.Note
Note These roofs are not designed to accommodate chairs, coolers, multiple people, etc, only for the ease of an individual to perform routine maintenance.
Only RVs with factory installed ladders have walkable roofs.Note
88 Keystone RV Company Owners Manual 4/1/2018
If there any doubt in your mind in performing this maintenance, please contract with your local dealer to have it done. Please refer to the manufacturer instructions supplied with the RV for care and operation and/or www.dicor.com, www.alphasystemsinc.com.
AxlesEven with normal usage, Axles may require periodic alignment which is not considered warrantable.
Brake AdjustmentPlease refer to the manufacturer instructions supplied with the RV for care and operation and/or www.dexteraxle.com, www.lci1.com.
• Drum Brakes - The electric brakes are of the drum and two-shoe type and adjust the same as most automotive brakes. Adjust brakes after the first 200 miles. Every 3 months or 3000 miles, test the brake drag and adjust if required. Full procedures are outlined in the component manufacturer’s guide, included in the RV’s manual packet. Never adjust just one brake. When adjusting brakes on any vehicle, either replace or adjust all brakes at the same time, or at least both brakes on the same axle.
• Optional Disc Brakes - Follow the recommendations for use and replacement of brake fluid per the manufacturer instructions.
BatteryBatteries are not installed or warranted by Keystone RV. Please refer to the battery manufacturer instructions for the product you selected for the detailed safety and maintenance requirements.
General Information Never place batteries in any compartment or near anything that could spark, even a 12 volt switch. Never smoke or use open flames anywhere near the battery. Secure batteries in a battery box or in a compartment specially designed for battery storage. Wear safety glasses and appropriate clothing when performing any maintenance on a battery. In case of a spill or splash, immediately flush the affected area with cold water for 15 minutes and call the poison control center for further instructions.If the shore line cord will be plugged in for long periods of time, battery water will evaporate quicker and maintenance will be required more often (does not apply to maintenance free battery). Keep battery terminals clean of corrosion and tightened.When storing the RV for an extended period, fully charge the battery before storage. Batteries will self-discharge over time and are subject to freezing, especially if in a discharged condition. We recommend removing the fully charged battery and storing in a cool dry place. Periodically check the charge of the battery while in storage and recharge as needed.
BEFORE PERFORMING ANY MAINTENANCE ON THE BATTERY, ALWAYS DISCONNECT THE BATTERY, REMOVING THE NEGATIVE (-) CABLE FIRST
AND THEN DISCONNECTING THE POSITIVE (+).
THE ACID IN BATTERIES IS HIGHLY CORROSIVE AND HYDROGEN GAS IS PRODUCED WHICH IS EXTREMELY FLAMMABLE. AVOID PLACING NEAR A POSSIBLE IGNITION SOURCE SUCH AS
OPEN FLAME OR POTENTIAL SPARK PRODUCING WIRING.
89Keystone RV Company Owners Manual 4/1/2018
120V ElectricalBefore each use, inspect the shoreline cord, receptacles, extension cords, adapters or reducers for loose, missing, damaged, degraded or corroded terminals/connections. Any found in these conditions must be replaced before use.
Interior
Appliances: See Chapter 7
BedspreadsRefer to the label attached to the bed spread by the manufacturer. Dry-clean only unless the care instructions on the label indicate otherwise. Washing a dry-clean only bedspread could cause premature deterioration, fading, shrinkage and/or possible damage.
Blinds and ShadesVenetian blinds and day/night shades should be vacuumed regularly with a soft brush attachment. Use of a soft cloth and mild cleaner on blinds will help keep them new looking. For fabric shades, upholstery cleaners are not recommended. Instead, spot clean when necessary, using a mild soap and water solution on area.
Cabinet Doors and Drawers The cabinet doors and drawer fronts should be cared for similar to the fine furniture in your home. Using a quality furniture polish will help maintain the beauty and luster of the wood as well as keep the wood from drying out. The accidental scratches can be covered satisfactory with a good quality commercial furniture scratch remover.
CarpetingThe carpeting installed is made of nylon and is easy to maintain. Vacuum regularly to remove abrasive grit. Water based spills and spots should be removed immediately with a damp cloth. Grease or oil based stains and spots should be spot cleaned with a good commercial spot cleaner made for this purpose. If complete shampooing is desired, it is best to have it done be a competent professional carpet cleaner. Never soak or water-log your carpeting. Whether a warranty or non-warranty repair, this material can be easily repaired utilizing a local company specializing in restoration (vinyl, rubber, leather, fabric, plastic repair of furniture, car seats, fabrics, dashboards, etc).
Ceilings and WallsClean only with a mild detergent in warm water, using a damp cloth to clean the ceiling. Never use strong chemicals or excessive water / moisture, as either can damage the ceiling or walls.
CountertopsMost countertops are made of high-pressure plastic laminates and are highly resistant to normal spills and scuffs. Soap and lukewarm water or a mild, non-abrasive cleaner are recommended. Avoid use of abrasive pads and scouring powders, which can dull the surface and make it more stain-prone. Always use a chopping block or cutting board when using knives. Pots and pans straight from the burner or oven should be placed on lined hot pads and not directly on the counter surface.
THE USE OF SHORELINE CORDS, RECEPTACLES, EXTENSION CORDS, ADAPTERS OR REDUCERS WITH LOOSE, MISSING, DAMAGED, DEGRADED OR CORRODED TERMINALS/
CONNECTIONS WILL INCREASE THE RISK OF FIRE, PERSONAL INJURY OR PROPERTY DAMAGE.
90 Keystone RV Company Owners Manual 4/1/2018
Solid Surface CountertopsThe solid surface composite countertops can be cleaned with soap and mild detergents, which will remove most stains. DO NOT use products containing bleach. Stubborn stains may require the use of a white Scotch Brite pad and a non-abrasive cleaner like Soft Scrub. Most scratches and defects in solid surface countertops can be repaired without replacement.
DraperiesDraperies and upholstery fabrics are treated with fire-retardants and are dry-clean only unless the manufacturer label indicates otherwise. When dry cleaning, be sure to inform attendant of fire retardant items. Spots and stains should be removed with a non-water based commercial spot remover manufactured for this purpose.
Fabric, Upholstery and FurnitureDo not laundry upholstery fabrics. Blot up stains promptly and use an upholstery cleaner or mild solvent, depending on the stain. Never soak the fabric and use as little water as possible. Blot rather than rub. Towel dry or have professionally cleaned. Upholstery can be vacuumed regularly using a soft brush attachment. Do not remove law tags from furniture, they are use to identify the products for part replacements. Whether a warranty or non-warranty repair, this material can be easily repaired utilizing a local company specializing in restoration (vinyl, rubber, leather, fabric, plastic repair of furniture, car seats, fabrics, dashboards, etc).
Faucets and FixturesTo protect the finishes on your kitchen and bath faucets and fixtures, use only a damp soft cloth or sponge. Do not use abrasive cleaners or materials as they can damage the finish.
Flooring, VinylFor routine cleaning, sweep or vacuum regularly. Follow by using a damp mop with warm water and clean a small area at a time. Rinse the mop frequently as to not redistribute the dirt picked up. If washing is needed, use a quality product designed for no-wax flooring. To polish the floor, do not use solvent-based waxes or polishes as damage to the flooring may result. Use only polishes recommended for no-wax flooring. Whether a warranty or non-warranty repair, this material can be easily repaired utilizing a local company specializing in restoration (vinyl, rubber, leather, fabric, plastic repair of furniture, car seats, fabrics, dashboards, etc).
Glass and MirrorsClean glass and mirrors as you would at home using a cleaner designed for glass. To reduce “spotting” on outside windows, use a squeegee promptly after rinsing with water. For stubborn spots, cleaning with a mixture of vinegar and water is recommended and is safe for most finishes.
Sinks, Tubs and ToiletsMany of these products are made of acrylics, plastics or composite materials and use of non-abrasive cleaners is recommended to protect the finish. Use of harsh cleaning products can cause premature deterioration and/or yellowing of the surface finish.
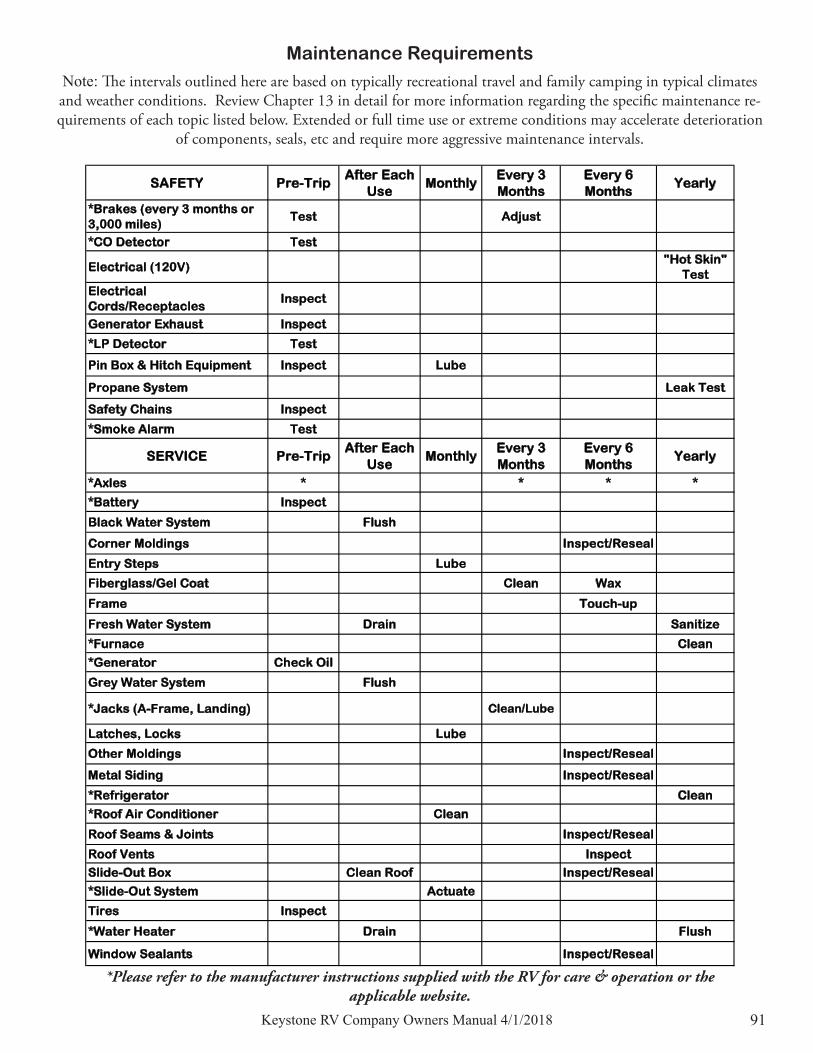
91Keystone RV Company Owners Manual 4/1/2018
Maintenance RequirementsNote: The intervals outlined here are based on typically recreational travel and family camping in typical climates and weather conditions. Review Chapter 13 in detail for more information regarding the specific maintenance re-quirements of each topic listed below. Extended or full time use or extreme conditions may accelerate deterioration
of components, seals, etc and require more aggressive maintenance intervals.
*Please refer to the manufacturer instructions supplied with the RV for care & operation or the applicable website.
SAFETY Pre-TripAfter Each
UseMonthly
Every 3 Months
Every 6 Months
Yearly
*Brakes (every 3 months or 3,000 miles)
Test Adjust
*CO Detector Test
Electrical (120V)"Hot Skin"
TestElectrical Cords/Receptacles
Inspect
Generator Exhaust Inspect
*LP Detector Test
Pin Box & Hitch Equipment Inspect Lube
Propane System Leak Test
Safety Chains Inspect
*Smoke Alarm Test
SERVICE Pre-TripAfter Each
UseMonthly
Every 3 Months
Every 6 Months
Yearly
*Axles * * * *
*Battery Inspect
Black Water System Flush
Corner Moldings Inspect/Reseal
Entry Steps Lube
Fiberglass/Gel Coat Clean Wax
Frame Touch-up
Fresh Water System Drain Sanitize
*Furnace Clean
*Generator Check Oil
Grey Water System Flush
*Jacks (A-Frame, Landing) Clean/Lube
Latches, Locks Lube
Other Moldings Inspect/Reseal
Metal Siding Inspect/Reseal
*Refrigerator Clean
*Roof Air Conditioner Clean
Roof Seams & Joints Inspect/Reseal
Roof Vents Inspect
Slide-Out Box Clean Roof Inspect/Reseal
*Slide-Out System Actuate
Tires Inspect
*Water Heater Drain Flush
Window Sealants Inspect/Reseal

92 Keystone RV Company Owners Manual 4/1/2018
AppendixFor assistance with this manual, warranty information or information on Keystone RV Products, please visit us on the web or contact Keystone RV Company Retail Customer Service.
Address: Keystone RV Company Owner Relations
2642 Hackberry DriveP.O. Box 2000
Goshen, IN 46527Fax: 574-534-9057
Toll Free Phone: 866-425-4369Website: www.keystonerv.com
Owner Relations Hours:9:00AM - 4:00PM (EST) Monday - Friday
93Keystone RV Company Owners Manual 4/1/2018
Glossary of Common Terms and Definitions
AC ELECTRICITY: Alternating Current. Standard Household 120V AC current.ANODE ROD: Part of the water heater that attracts impurities in the water that cause corrosion.BLACK TANK: The holding tank into which the toilet directly drains.BLACK WATER: The term associated with sewage contained within the black tank.BRAKE CONTROLLER: Device located in the tow vehicle that activates the trailer brakes.BTU: The measurement of the amount of heat required to raise the temperature of one (1) pound of water, one (1) degree F.BUSINESS: Any particular occupation or employment engaged in for livelihood or gainCOLD INFLATION PRESSURE: The pressure in the tire before it is driven.COMMERCIAL: Connected with or engaged in or sponsored by or used in commerce or commercial enterprises.CITY WATER: Refers to exterior water source, not water from the fresh water tank that you hook up to at campgrounds. “City Water” refers to pulling water from a central source (like in a city).CONDENSATION: The result of warm humid air coming in contact with cold glass also known as ‘Sweat’.CONVERTER: Device that converts 120V AC to 12V DC.COLD INFLATION PRESSURE: The pressure in the tire before you drive.CURB WEIGHT: The weight of a motor vehicle with standard equipment including the maximum capacity of fuel, oil, and coolant, and, if so equipped, air conditioning and additional weight optional engine.CURBSIDE: Term used to refer to the side of your coach, which faces the curb or shoulder when parked. Also called DOOR SIDE (the main entrance door) or OFFROAD SIDE. DC ELECTRICITY: Direct Current. Also termed Battery Power. Used to run all 12 volt powered systems or lighting. DRY CAMPING: Refers to camping using only the resources within your RV and without amenities such as city water hook-ups, electrical hook-ups, etc., often provided at commercial campsites.DSI IGNITION: Direct Spark Ignition – The method of lighting a main burner on a LP fired appliance.DUCTED AC: Air conditioning distributed through a ducting system.DUCTED HEAT: Warm air distributed through a ducting system.DUAL ELECTRICAL SYSTEM: Trailer equipped with appliances and lights, which operate on 12V power when self-contained, and with a converter, on 120V AC when in campgrounds or run off of a generator.DUMP STATION: Term used for locations to drain the waste holding tanks (gray and black tanks). In most states, it is illegal to dump your tanks anywhere except at dump stations.DUMP VALVE: Another name for the T-Handle used to drain the black and gray tanks.EGRESS WINDOW: Term for the emergency exit windows within recreational vehicles: Usually identified by a red handles or levers.FULL HOOK-UP SITE: A campsite that offers full amenities: city water, sewer, and electrical hook ups – many have cable and phone available.GALLEY TANK: A gray water holding tank used specifically for the kitchen waste water.GENERATOR: Powered by LP gas, generates 120V power.GRAY TANK: the waste holding tank into which water from the kitchen and bath sinks, shower and tub drains.GRAY WATER: Water drained into the gray holding tank.

94 Keystone RV Company Owners Manual 4/1/2018
GROSS AXLE WEIGHT RATING (GAWR): Maximum amount of weight (in lbs.) that can be placed on the axle.GROSS COMBINED WEIGHT RATING (GCWR): Maximum load weight (in lbs.) allowed for the coach and tow vehicle.GROSS VEHICLE WEIGHT RATING (GVWR): Maximum load weight (in lbs.) allowed for the vehicle.HITCH WEIGHT: Amount of a trailers weight that rests on the tow vehicle’s hitch. See also pin weight.HOLDING TANKS: Refers to the tanks typically known as fresh water, gray and black, where the water is held.HOOK-UPS: Where you connect to a campground’s facilities.IN-Command: Commander to monitor and operate a host of features of your RV.LOAD RATING: The maximum load that a tire is rated to carry for a given inflation pressure.LOW POINT/LOW POINT DRAIN: Low point in the plumbing system. LP GAS: Liquefied Petroleum Gas used to fuel appliances. Propane is a LP gas.MAXIMUM LOAD RATING: The load rating for a tire at the maximum permissible inflation pressure for that tire.MAXIMUM PERMISSIBLE INFLATION PRESSURE: The maximum cold inflation pressure to which a tire may be inflated.MODIFICATION: The act of making something different.PILOT: Small flame that is used to ignite the main burner of a LP-fired appliance.PIN WEIGHT: The vertical trailer load supported by the king pin of a fifth wheel hitch. Also called hitch weight.PRIMITIVE CAMPSITE: Campsite that offers limited connections. May have city water or electrical available but not both.PULL-THROUGH SITES: Camp sites that you can pull your recreational vehicle through, eliminating the need to back in.RADIAL PLY TIRE: A pneumatic tire in which the ply cords that extend to the beads are laid at substantially 90 degrees to the center line of the tread.RECOMMENDED TIRE INFLATION PRESSURE: This is the inflation pressure provided by the vehicle manufacturer on the Tire Information label and on the Certification/VIN tag.RENTAL: Property that is leased or rented out or let.RESIDENTIAL: The act or fact of residing, abiding, or dwelling in a place for some continuance of time.ROADSIDE: Refers to the side of the RV that faces the road when parked. Also commonly referred to as “Off DOOR SIDE.”.RV: Short for Recreational Vehicle.RVIA: Recreational Vehicle Industry AssociationSHORE LINE: The electrical cord that connects 120V from an exterior outlet (such as campgrounds) to the RV. Also called ‘Power Cord’SHORE POWER: The 120V outlet that connects to the Shore Line.SPEED RATING: The speed rating denotes the maximum speed at which a tire is designed to be operated.UNLOADED VEHICLE WEIGHT (UVW): Weight of the RV without adding fuel, water, propane, supplies and passengers. Also referred to as ‘Dry Weight’
95Keystone RV Company Owners Manual 4/1/2018
NOTES:

NOTES:

97Keystone RV Company Owners Manual 4/1/2018
NOTES:


![Beverage World - April 2016 [46 - 47]](https://static.documents.pub/doc/80x56/587dae951a28abae2f8b5947/beverage-world-april-2016-46-47.jpg)


