31
Owner´s Manual TDAI-2170 Version 1.7
| Date post: | 03-Dec-2018 |
| Category: |
Documents |
| Upload: | trinhduong |
| View: | 224 times |
| Download: | 1 times |

Owner´s Manual TDAI-2170
Version 1.7

2 3
Welcome
Congratulations on your purchase of the Lyngdorf Audio TDAI-2170 fully digital amplifier with RoomPerfect™.
With this purchase, you have joined the ranks of an elite group of people who believe that perfect sound is more than a luxury. It’s a requirement. The TDAI-2170 will deliver an audio experience that will far
exceed your expectations. We thank you for placing your confidence in Lyngdorf Audio.
This manual will give you an overview of how to set up your system. Please read the manual carefully to better understand the capabilities of your TDAI-2170. For more in-depth information about
the technologies used in Lyngdorf Audio products, please visit www.lyngdorf.com.
What’s in the box .......................................................4
Speaker setup guide ..................................................8
Using the TDAI-2170 in a Surround System ...............15
RoomPerfect™........................................................18
Installing the USB streaming audio driver ..................27
Menu walkthrough ...................................................28
1 RoomPerfect™.....................................................28
2 Voicing .................................................................28
3 Speaker setup ......................................................28
4 Setup ...................................................................28
4.1 Inputs ...............................................................28
4.2 RoomPerfect™ setup ........................................31
4.3 Volume ..............................................................33
4.4 Voicings.............................................................33
4.5 Display ..............................................................33
4.6 HDMI.................................................................34
5 Advanced settings .................................................38
5.1 Auto off .............................................................38
5.2 Remote control ..................................................38
5.3 ICC ...................................................................38
5.4 Speaker setup guide ..........................................39
5.5 Second speaker setup ........................................40
5.6 Outputs .............................................................40
5.7 Trigger mode .....................................................48
5.8 Lock setup.........................................................48
5.9 Software info .....................................................49
5.10 Factory reset ...................................................49
FAQ and recommendations .......................................50
RoomPerfect™ troubleshooting ................................52
Cleaning and maintenance .......................................54
Serial control manual ...............................................54
Technical assistance ................................................55
Specifications ..........................................................56

4 5
What’s in the box
Microphone stand TDAI-2170
Mains cord 8 m (26 feet) XLR – XLR cable Microphone
Remote control
AMP
digital
AMP
ENTER
CD
info menu
source volume
random repeat
analog
CD

6 7
Remote control- the most frequently used buttons
1. Standby Turns the TDAI-2170 on and into standby.
2. Digital and Analog Selects, or if already active, cycles to the next input.
3. Up/Down Toggles between the available RoomPerfect™ fi lters and increases or decreases settings in the menu.
4. Left/Right Toggles between neutral and the available voicings and is used to browse in the menu.
5. Info Shows information of level and type of input signal.
6. Menu Press to enter the menu. When in the menu press to go back or cancel.
7. Source -/+ Toggles between active inputs.
Note: If the TDAI-2170 isn’t responding to the remote, press the AMP key and try again. If that doesn´t work, check the two AAA batteries.
AMP
digital
AMP
ENTER
CD
info menu
source volume
random repeat
analog
CD
2
5 6
3
4
7
1 Front panel controls
1 2 3
1. Source/menu Press and hold to access the menu, press to select a menu item, press and hold to exit a menu. Rotate left and right to toggle between audio sources and browse while in the menu. Press to mute and unmute.
2. Volume wheel Adjust the volume with left or right rotation.
3. Standby button Turns the TDAI-2170 on and into standby.

8 9
Speaker setup guideWhen starting up the TDAI-2170, you will be
prompted to start the setup guide. This tip sheet
will provide setup guide help.
When connecting the speakers, always connect + and - from the amplifi er to the corresponding + and - terminals on the speaker.
Warning: Never run the TDAI-2170 in bridge mode.Bridging the +/+ and -/- speaker output terminals will, because of the way a fully digital amplifi er works, result in overloading the amplifi er.
ANALOGINPUT OUTPUT INPUT OUTPUT
A2 MICROPHONE
L
R
RIGHT
CLASS 2 WIRING
LEFT
DIGITAL
D2
D1
D3 D4 D5 D6RS232
TRIGGERIN
TRIGGEROUT
SWUPDATE TDAI 2170
A1
USB AUDIO INUSB MODULE
L
R
ANALOG AUDIO MODULE
A6 RIGHT A6 LEFTA4 A5A3
HDMI MODULE
HDMI 1 HDMI 3
HDMI 2 HDMI 4 OUT
INPUT OUTPUT
Tips for setting up speakers
Tip: You can reduce refl ections from the hard fl oors and hard surface walls by positioning a carpet, painting, a book shelf, or other furnishings between you and the speakers. These objects act as diffusers.
Find the position of the diffusers by having someone hold a mirror fl at against the wall or fl oor. When you can see the speaker in the mirror from the listening position, you have found the optimal position for the diffuser.
Stereo triangle
You can use the stereo triangle as a good rule of thumb when determining where to place your
speakers. The distance between the speakers should be the same as the distance from your listening
position to both speakers.
10 11
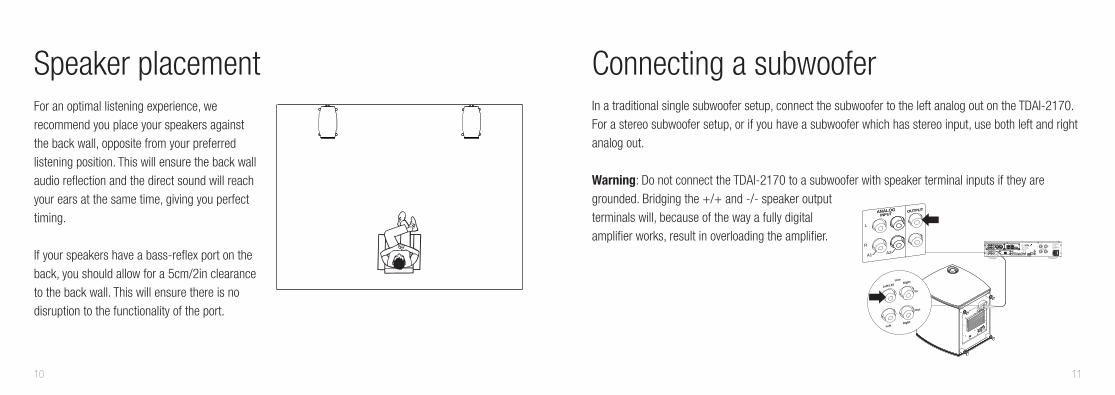
Speaker placementFor an optimal listening experience, we recommend you place your speakers against the back wall, opposite from your preferred listening position. This will ensure the back wall audio refl ection and the direct sound will reach your ears at the same time, giving you perfect timing.
If your speakers have a bass-refl ex port on the back, you should allow for a 5cm/2in clearance to the back wall. This will ensure there is no disruption to the functionality of the port.
Connecting a subwooferIn a traditional single subwoofer setup, connect the subwoofer to the left analog out on the TDAI-2170. For a stereo subwoofer setup, or if you have a subwoofer which has stereo input, use both left and right analog out.
Warning: Do not connect the TDAI-2170 to a subwoofer with speaker terminal inputs if they are grounded. Bridging the +/+ and -/- speaker output terminals will, because of the way a fully digital amplifi er works, result in overloading the amplifi er.
ANALOGINPUT OUTPUT INPUT OUTPUT
A2 MICROPHONE
L
R
RIGHT
CLASS 2 WIRING
LEFT
DIGITAL
D2
D1
D3 D4 D5 D6RS232
TRIGGERIN
TRIGGEROUT
SWUPDATE
100-240 V ~ 50/60Hz 80W
Designed and manufactured in Denmark by SL Audio A/S
www.lyngdorf.com
TDAI 2170
Avertissement: Pour réduire le risque d'incendie et de décharge électrique l'appareil ne doit pas être exposé à l'eau ou à l'humidité
Warning. To reduce the risk of fire or electric shock, do not expose this apparatus to rain or moisture
Audio Equipment3YZ9
A1
USB AUDIO INUSB MODULE
L
R
ANALOG AUDIO MODULE
A6 RIGHT A6 LEFTA4 A5A3
HDMI MODULE
HDMI 1 HDMI 3
HDMI 2 HDMI 4 OUT
INPUT OUTPUT
ANALOGINPUT OUTPUT
A2
L
R
A1

12 13
Subwoofer controls1. Phase adjustment should be 0°. 2. The subwoofer cut-off frequency should be set to the highest possible frequency range.3. Level should be set to 50% of maximum volume.
Phase Cut-off
1800 20040
Level
1000
Subwoofer placement
With a single subwoofer, we recommend placing the subwoofer against the wall between the main speakers.
With two subwoofers, you should position one in each front corner, in line with the main speakers.

14 15
Measuring distances
When measuring the distance to your main speakers, measure from the preferred listening position (the focus position) to the front of the speakers.
When measuring the distance to a subwoofer, measure from the preferred listening position to the back corner of the subwoofer.
Using the TDAI-2170 in a Surround SystemIntegrating a TDAI-2170 with RoomPerfect™ into your surround sound setup enables you to make the most of your system’s front speakers and subwoofer(s) and enjoy the full benefi ts of RoomPerfect™. The process is easier than you might expect.
Important note: make sure your surround sound receiver has a front speaker “pre-out” connector.
16 17
Setup of surround receiver
On the surround receiver, adjust the settings as follows:1. No subwoofer connected; this must be connected to the TDAI-2170 instead. 2. Front speakers: X-Large, or corresponding reference for full frequency range speakers.3. Measure and set up the distances/delays to the front speakers.
• Measure the distance to your front left and right speaker, and the subwoofer if you have one in your setup.
• Take the longest distance measured and add 52 cm / 20.5 in. This adjusts for the delay caused by the processing of the TDAI-2170.
• Input this number for BOTH the left and right speaker in the surround receiver menu. 4. Connect the surround processor´s front speaker “pre-out” to a stereo analog input on the TDAI-
2170.
Setup of the TDAI-2170 in a surround sound system
For the TDAI-2170, adjust the settings as follows:1. Set up two front speakers, and subwoofer(s) as described in “Speaker setup guide” on page 8. 2. Measure and input the correct distances to the speakers and subwoofer.3. Perform a RoomPerfect™ calibration of the stereo system.4. In the surround processor, adjust the levels to uniform between the surround, center, and stereo system.
Hot Tips
--------------------------------------------------------------------------------------------------------------You can set the TDAI-2170 to dedicate a specifi c voicing when you select the input connected to the surround receiver; see how in “4.1.4 Default voicing” on page 29.--------------------------------------------------------------------------------------------------------------Turn the TDAI-2170 into a dedicated power amplifi er when used in a surround sound setup. Select the input connected to the surround processor and enter the menu system:1. Go to ‘Setup’ / ‘Inputs’ / ‘Home Theater’ / Choose ‘Enable’.
Warning: Do not test this setting with a CD player or similar unregulated signal!--------------------------------------------------------------------------------------------------------------

18 19
RoomPerfect™RoomPerfect™ is designed to analyze and correct for the negative effects that the listening room has on the speaker sound.
Global listening The global fi lter improves sound quality across the whole room. When you are moving around a room, the global fi lter gives the best result.
Focus listening The focus fi lter improves the sound quality at a specifi c listening position, called a “focus position.” This makes the focus fi lter the best solution for optimal sound quality at a single listening position.
Voicings A voicing is an equalizer fi lter that can be activated to amplify or attenuate certain frequencies according to your personal preferences. This equalization is an addition to the RoomPerfect™ corrections. The equalizer settings of a given voicing can be seen on the display of the amplifi er.
Placing the microphone in the focus positionWhen you are prompted to place the microphone in the focus position, connect the microphone to the microphone input on the back panel using the provided microphone cable and place the microphone, using the microphone stand, in your primary listening position. The height and the orientation of the microphone should correspond to your head’s height and direction.
Press enter and a test signal will start from the left speaker. The TDAI-2170 will give an estimated optimal volume for calibrating the system or will accept the current volume. Adjust the volume if required and retry the measurement.
The calibration volume should not be so loud that it is inconvenient to you, or that it causes damage to your loudspeakers. If this is the case, set it to a lower and more appropriate level. A low volume can result in a longer calibration time (in excess of two minutes) or a measurement time out. A low volume and long measurement will not affect the quality of the end result.
20 21
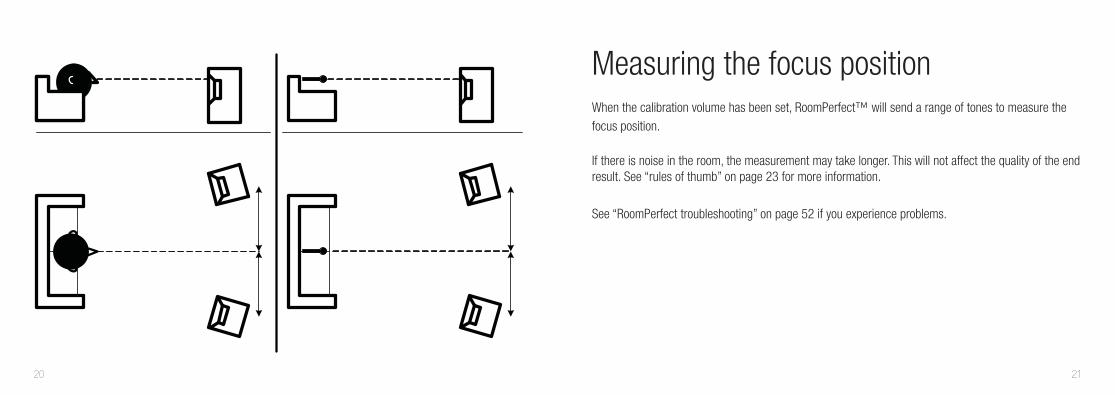
Measuring the focus positionWhen the calibration volume has been set, RoomPerfect™ will send a range of tones to measure the focus position.
If there is noise in the room, the measurement may take longer. This will not affect the quality of the end result. See “rules of thumb” on page 23 for more information.
See “RoomPerfect troubleshooting” on page 52 if you experience problems.

22 23
Measuring random room positionsWhen the focus position has been measured, the next step is to measure the acoustical properties of the room. It is important to perform well spaced measurements to get a comprehensive image of the acoustical properties of the room. See “RoomPerfect troubleshooting” on page 52 if the measurement stops prematurely.
Keep taking measurements until RoomKnowledge reaches 90%.
These are the rules of thumb when measuring the room:• the microphone must always have a clear line of sight to the tweeter mid-range of the speaker.• the microphone should be in random and varying positions, heights, and orientations.
Point it up/down/sideways, the more random positions the better.• the measurements should cover the entire room, not only your listening area.
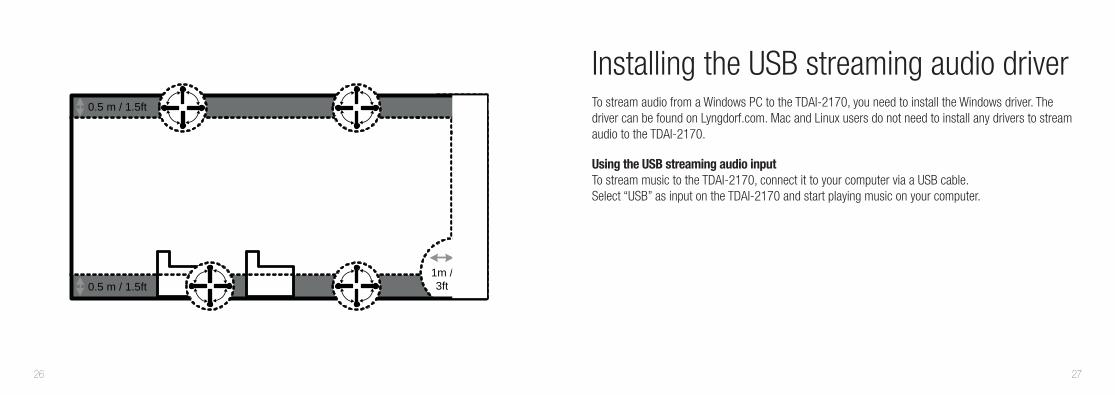
0.5 m / 1.5ft
0.5 m / 1.5ft
Min. 0.5m /1.5ft 1m /
3ft

24 25
• the microphone should not be closer than 0.5m/1.5ft from the fl oor, ceiling and walls.• the microphone should be at least 1m/3ft from the front of the loudspeakers.• there should be at least 50cm/1.5ft between each measurement.• do not take symmetrical measurements in the room.
Min.0.5m1.5ft
1m /3ft
0.5 m / 1.5ft
Room measurements above 90% Room-KnowledgeWhen RoomKnowledge has reached 90%, you can decide to add more room measurements or to do it at a later time. We recommend taking a couple of measurements within 50cm/1.5ft of the walls and ceiling when above 90% RoomKnowledge
To fully optimize RoomPerfect™’s understanding of the room’s acoustical properties, we recommend you keep doing measurements until the RoomKnowledge is above 95%. The higher the RoomKnowledge, the more accurate the room correction fi lters will be.
Calculation of focus and global fi lters
When room measurements are complete, the TDAI-2170 will calculate the focus and global fi lters automatically.
26 27
0.5 m / 1.5ft
0.5 m / 1.5ft
Min. 0.5m /1.5ft 1m /
3ft
Installing the USB streaming audio driver To stream audio from a Windows PC to the TDAI-2170, you need to install the Windows driver. The driver can be found on Lyngdorf.com. Mac and Linux users do not need to install any drivers to stream audio to the TDAI-2170.
Using the USB streaming audio input
To stream music to the TDAI-2170, connect it to your computer via a USB cable.Select “USB” as input on the TDAI-2170 and start playing music on your computer.

28 29
1 RoomPerfect™Selects between the available focus and global RoomPerfect™ fi lters.
2 VoicingToggles between the available voicings, which adjusts the sound to your liking.
3 Speaker setupSelect to toggle between speaker setup 1 and 2.
Note: Only active if enabled in Advanced Setting -> 2nd speaker setup.
4 Setup
4.1 Inputs In general, the settings in these sub-menus are specifi cally for the current active input.
Note: We recommend setting the output of a CD-player to 44.1 kHz. The TDAI-2170 will then get the original signal from the disc, which allows for ICC (Intersample Clipping Correction) to function.
Menu walkthrough 4.1.1 Active inputsEnables and disables individual inputs so you do not have to scroll through unused inputs.
Note: To store the changes made, scroll to the right in the menu and press the “Enter” button when you see “Enter to continue” text.
4.1.2 Input nameChanges the name of the selected input.
Note: To remove all text after the blinking marker, press and hold the “Down” button on the remote.
4.1.3 SensitivityEnables you to match input levels from different sources. Can be adjusted up to +24dB.
4.1.4 Default voicingSelects a default voicing for the input which is active when in this menu. If you always want extra bass on your gaming console audio, for example, set that voicing here.
4.1.5 Home theaterTurns the amplifi er into a dedicated power amplifi er for the input which is active when in this menu. This feature bypasses the volume control.
30 31
Warning: Do not test this setting with a CD player or similar unregulated signal!
This feature might be selected if you are using the TDAI-2170 in a home theater setup where it is used to power and calibrate the front speakers and/or subwoofer. Connect your home theater processor to the selected input.
When selecting other inputs, the amplifi er returns to the last current volume.
4.1.6 Lipsync delayIf the connection of a display has introduced asynchronous playback of audio and video, you can select a delay time in to ensure that the video and audio signals are played back simultaneously.
4.2 RoomPerfect™ setup4.2.1 RoomPerfect™ guide
This will start the guided RoomPerfect™ setup and will erase previously stored calibrations. When completed, the following menu items are available in the RoomPerfect™ setup menu.
4.2.2 Status
This screen shows how many room measurements have been made, together with the RoomKnowledge and RoomCorrection index.
The RoomKnowledge index is an estimate of how much of the room’s acoustical properties have been learned from the room measurements. The higher the RoomKnowledge index, the greater the accuracy of the calibration.
The RoomCorrection index is an estimate of how much the calibration fi lter will affect the sound reproduction by evaluating the size of the fi lters as well as the frequencies adjusted. This index is not absolute. For best results, rely on your own experience of the effects of the fi lter.
A low RoomCorrection fi lter on the focus position could indicate that you have positioned your speakers in order to optimize the frequency response and not the timing.
Check “Tips for setting up speakers” on page 9, and complete a new RoomPerfect™ calibration.
32 33
4.2.3 Add focus position
If you would like to add an additional focus position, the chair next to the couch perhaps, it can be done here. It is possible to have up to 8 different focus positions.
The saved calibration volume from the RoomPerfect™ guided setup is used as a default when adding extra focus positions. The volume can be changed at any time between measurements to suit a particular situation. This will not affect the quality of the measurement or the end result.
4.2.4 Add room measurement
It is possible to add more room measurements, which can increase RoomKnowledge and thereby fi ne tune all the room correction fi lters.
4.3 Volume4.3.1. Default volume
The default volume setting controls the default volume at startup.
4.3.2 Maximum volume
The maximum volume setting is a safety precaution used for limiting the maximum volume which can be achieved by spinning the wheel or increasing volume via the remote. This can be set to protect your loudspeakers against overload.
4.4 VoicingsEnables and disables voicings to enable quicker selection of your preferred equalization.
4.5 Display4.5.1 Display brightness
Display brightness is used to control the brightness of the display.
4.5.2 Display timeout
If enabled, the main display will switch off after 10 seconds of inactivity.

34 35
4.6 HDMINote: As default, CEC is not active on HDMI to comply with regulations requiring a very low standby power. Turning it on will raise standby power to 1.2W.
What is CEC?
Consumer Electronics Control (CEC) is an HDMI feature designed to allow you to command and control CEC-enabled devices that are connected through HDMI, by using only one of their remote controls (for example, controlling the TDAI-2170 audio by using the remote control of the TV).
The level of CEC implementation depends on the manufacturer of each product, and even if brand new, not all electronic devices, including TV or other sources, support CEC.
4.6.1 CEC enable
Enables and disables CEC (Consumer Electronics Control) over HDMI.
4.6.2 CEC power control
Note: Menu only appears if CEC is enabled.Enables and disables CEC power handling.
This means when you turn on your TV or Blu-Ray player, the TDAI-2170 will automatically switch on from standby as well. Furthermore, if you switch the HDMI input to a product which is in standby, it will be turned on.
4.6.3 CEC audio system
Enables and disables CEC audio system.
When enabled the TDAI-2170 tells the TV to disable its built-in speaker and to use the ones connected to the TDAI-2170. Furthermore, this enables you to control the TDAI-2170 volume with the TV´s remote.

36 37
4.6.4 TV input
Select “HDMI ARC” if your TV supports ARC (Audio Return Channel) over its HDMI connection. This means your TV can stream audio back through its HDMI connection to the TDAI-2170.
If your TV doesn´t support ARC, you can connect an analog or digital audio output from the TV to an audio input on TDAI-2170. Select the used input in this menu so the TDAI-2170 will know from which input the audio from the TV is coming. Remember to set up the TV to output to PCM on the digital output.
Note: If you don´t get any sound when the TV is connected to an alternative audio input, you may need to turn off your TV and turn it back on again.
4.6.5 Output enable
Enables and disables HDMI audio output to the TV. This feature is only available if the digital output connector is not in use.
When enabled, this feature will send the current digital audio signal though the HDMI cable to the TV. Disable if you want the TDAI-2170 to send the current audio signal to the digital output connector on the back.

38 39
5 Advanced settings
5.1 Auto offIf you don´t press any buttons or audio isn´t being played, this sets the idle time required for automatic shut-down of the amplifi er.
5.2 Remote controlActivate or deactivate the remote control. This function is useful if you are using a home automation system and other remotes are using the same IR codes as the TDAI-2170 remote.
A home automation system is connected to the TDAI-2170 through the RS232 connector. Codes are available for download from www.lyngdorf.com
5.3 ICCAudio signals that exceed 0 dBFS (decibels relative to full scale) will be clipped when processed in the audio chain and will result in more or less distortion. With ICC (Intersample Clipping Correction) the TDAI-2170 will dynamically allow for extra headroom to avoid clipping.
ICC (Intersample Clipping Correction) can be set to auto or disabled.
The TDAI-2170 will continuously adjust the ICC in order to avoid clipping. Changing inputs or going into standby mode will reset the ICC.
If you switch to an active audio input and press info on the remote, you will see a “peak level” measurement. This will show you if your signal has exceeded 0 dBFS.
5.4 Speaker setup guideThis starts the guided speaker setup and RoomPerfect™ setup. See “RoomPerfect” on page 18 for instructions in how to calibrate your system.
Warning: This will erase all previously stored speaker settings and RoomPerfect™ measurements.
40 41
5.5 Second Speaker SetupHere you have the option to store a second speaker setup. This will allow you to test another setup or to
have calibrated setups with and without a subwoofer, etc.
Enabling this will start the Guided Speaker Setup. When complete, the menu item Speaker Setup will be
available in the main menu, allowing you to switch between the two setups.
5.6 OutputsThe menus in outputs are where you will manually set up delays and crossover fi lters for your speaker system. If the guided speaker setup has been completed the pre-made settings will be shown; these can be optimized as well.
When building active speaker systems, it is recommended that you use the original crossover point(s) used by the manufacturer. Due to the short wavelengths of the mid/high frequencies, it is essential that crossover frequency, fi lter type, order, and delay are set correctly. Therefore, creating fi lters for speakers is an iterative process that requires great knowledge and several critical listening sessions in order to achieve seamless integration of the different speaker drivers.
Note: If you change the output setting, you have to do a new RoomPerfectTM calibration.
5.6.1 Delays
The available settings are:
Distance
If you are using a setup with speakers and/or subwoofers located at an identical distance to the listening position, you don’t need to set a distance. If the distances are not identical, you need to enter it in order to ensure that the sound from each loudspeaker reaches the listening position simultaneously.
To correctly measure the distance, please see Guided Speaker Setup.
Amplifi er delay
On analog and digital out, you can set an amplifi er delay. If you have an active subwoofer or an additional amplifi er, there will be a natural electronic delay in these products.
Refer to the original manufacturer’s instructions to obtain the correct amplifi er delay.

42 43
5.6.2 Main speaker output
The available settings are:
High pass removes the frequencies below the crossover frequency. Low pass removes the frequencies above the crossover frequency. Full range allows the signal to pass unfi ltered. Off mutes the output.
5.6.3 Analog output
The available settings are:
High pass removes the frequencies below the crossover frequency. Low pass removes the frequencies above the crossover frequency. Full range allows the signal to pass unfi ltered.Headphone disables RoomPerfect™, voicings are still available. Muting the TDAI-2170 will only mute the speakers, not this output.Tape Out disables RoomPerfect™, voicings and volume control.Off mutes the output.
Volume
The volume can be set to regulated or full scale. Regulated means that the output level will follow the level of the volume control. Full scale means there is a constant full scale output.
Warning: If full scale is selected, you will have full volume output, and this can overload and damage speakers.
Output level
This adjusts the overall output level in order to align the level of a subwoofer to the level of your main speakers. Making the output adjustment here is far better than attenuating the level on the subwoofer itself.

44 45
L/R signals
Choose whether you want the output to be a stereo or mono signal. Choose mono if you use a single subwoofer with mono analog input; choose stereo if you have two subwoofers or one with a stereo input. See “Connecting the subwoofer” chapter.
5.6.4 Digital output
The available settings are:
High pass removes the frequencies below the crossover frequency. Low pass removes the frequencies above the crossover frequency. Full range allows the signal to pass unfi ltered. Headphone disables RoomPerfect™, voicings are still available. Muting the TDAI-2170 will only mute the speakers, not this output.Tape Out disables RoomPerfect™, voicings and volume control.
Volume
The volume can be set to regulated or full scale. Regulated means that the output level will follow the level of the volume control.
Warning: If full scale is selected, you will have full volume output. This can overload and damage connected active speakers.
Output level
This adjusts the overall output level in order to align the level of a subwoofer to the level of your main speakers. Making the output adjustment here is far better than attenuating the level on the subwoofer itself.
L/R signals
Choose whether you want the output to be a stereo or mono signal. Choose mono if you use a single subwoofer with mono digital input; choose stereo if you have two subwoofers or one with a stereo input.
46 47
5.6.5 Low pass fi lter
If a fi lter is selected, the frequencies below the selected crossover frequency will be directed through the designated output terminals.
The available settings are:Type
LR: (Linkwitz Riley) 2nd, 4th or 8th order.BW: (Butterworth) 1st, 2nd or 4th order.
In setups using conventional active subwoofers, we recommend using a 2nd order Butterworth fi lter.In active speaker systems, we recommend starting with a 4th order Linkwitz Riley fi lter.In a confi guration with Lyngdorf Audio BW-1 speakers, we recommend using a 4th order Linkwitz Riley fi lter.
5.6.6 High pass fi lter
If a fi lter is selected, the frequencies above the selected crossover frequency will be directed through the designated output terminals.
The available settings are:Type
LR: (Linkwitz Riley) 2nd, 4th or 8th order.BW: (Butterworth) 1st, 2nd or 4th order.
Choose a fi lter type that matches the one you have selected for the low pass fi lter.
Frequency
The crossover frequency can be selected anywhere between 20 – 9999Hz.

48 49
5.7 Trigger ModeThe trigger input can be used to activate the TDAI-2170 from a source.
The available settings are Amp. Power Mode or a specifi c input.
Amp. Power Mode will start the TDAI-2170 on the input last used.If you want the TDAI-2170 to start on a specifi c input when triggered, choose it here.
Note: If the TDAI-2170 has been switched to another input, the trigger command from the source connected will not turn off the amplifi er.
5.8 Lock setupLock the menu system to avoid unintentional changes. Unlock the menu system by entering the code 7800. When the code has been entered, and you exit the setup menus, the menu lock will reactivate automatically after 5 minutes.
5.9 Software infoLists the software versions the TDAI-2170 is using. Refer to www.lyngdorf.com for the latest software.
To update the TDAI-2170:1. Save the new software on a FAT formatted USB drive.2. Insert the USB drive into the “SW Update” connector on the back of the TDAI-2170. 3. Turn off the TDAI-2170 at the main switch on the back.4. Hold down the standby button on the front and turn on the main switch on the back.5. When the display says UPDATING, release the standby button and the TDAI-2170 will update the
software. When the update is fi nished, the amplifi er goes into standby.
5.10 Factory resetRestores the system to the default factory settings.
Warning: All user preference settings, system data, and RoomPerfect™ data are lost when restoring to default settings!

50 51
FAQ and recommendationsWhen do I need to do a new RoomPerfect™ calibration?If you change the position of speakers, the crossover settings or if you change your furniture position or type, you need to do a new calibration, as these changes have an impact on the room acoustics.
What should I set my CD-players sample rate output to?
44.1 kHz. This will allow the ICC feature of the TDAI-2170 to avoid clipping of the signal.
What does the Info button on the remote do?
If you switch to an active audio input and press Info on the remote, you will see the following:
Peak Level
This will show you the peak signal relative to 0 dBFS (decibels relative to full scale) and is used for manually setting up the Input Gain or ICC (Intersample Clipping Correction). If the peak level shows +3.4, you should set the ICC to -3.4.
When you switch to a new input or go into standby mode, all measurements, including Peak Level, are reset. As long as you stay on an input, the Peak Level data is stored and the maximum value is shown.
Note: We recommend that you set the ICC function to AUTO, which will activate if a signal is too high.
Sample frequency
Sample frequency of the input signal.
Bit resolution
Resolution of the digital input signal.
Audio format
Can show the following: No signal / PCM / DSD / UnknownIf Unknown is shown, the TDAI-2170 cannot read the type of signal and you will not hear anything from your speakers.
My remote control does not work properly
1. Press the “AMP” button to enable the remote control to operate the TDAI-2170 amplifi er.The multifunction remote control can operate several Lyngdorf Audio products.
2. Check the batteries.

52 53
RoomPerfect™ troubleshootingThe calibration microphone is very sensitive and may pick up unwanted noise, including subsonic signals and background noise, which disturbs the measurements. If the signal is disturbed it will take longer for the system to make a correct measurement.
A measurement that has been disturbed by noise but completed will always be correct; it is not necessary to redo it. If the measurement has stopped due to an error, one of the following error messages will be shown.
Signal error! Check microphone and cable, then press enter
No microphone is connected or the microphone cable is not working. Check that the microphone cable is connected to the microphone socket on the back panel. If the problem continues, test the microphone cable by connecting the microphone directly to the microphone socket and select Retry.
If the microphone is detected, replace the microphone cable and retry the measurement.Error: Signal clipping - or - Error: Too much noise
Either the incoming signal has been classifi ed as too loud, resulting in clipping or distortion, or a loud
noise in the immediate environment has corrupted the measurement results. If a loud noise has in fact occurred, such as the sound of a closing door, reduce noise levels inside and in the immediate vicinity of the room and repeat the measurement. If no loud noise has occurred, reduce the volume of the signal and repeat the measurement.
Error: Signal too low.
This error message is displayed when the measurement has lasted more than 5 minutes for the low-frequency signal or more than 2 minutes for the high-frequency signal. This happens most often when using a low level measuring signal compared to the background noise in the listening environment, which results in prolonged measuring times. Raise the measuring signal volume or reduce the noise in the environment before continuing with the measurement.

54 55
Cleaning and maintenanceThe TDAI-2170 does not require any regular maintenance except to keep its exterior clean. Simply wipe it with a clean, soft cloth. A small amount of non-abrasive cleaner may be used on the cloth to remove any dirt or fi ngerprints. Do not use abrasive cleaners or cleaners containing liquid solvents.
Serial Control ManualTo get a copy of the Serial Control Manual, which describes how the serial control interface of the device works, download it from www.lyngdorf.com, or contact your local Lyngdorf Audio representative.
Writing software for controlling requires special knowledge. Lyngdorf Audio will not support in writing any serial control software.
Technical assistanceFor the latest version of this manual, please check the Lyngdorf Audio website: www.lyngdorf.com.
If you have any problems with or questions regarding your Lyngdorf Audio product, please contact your nearest Lyngdorf Audio representative or:
SL Audio A/S
Ulvevej 287800 Skive
DenmarkE-mail: [email protected]
Web: www.lyngdorf.com

56 57
SpecificationsDigital audio inputs
COAXIAL
PCM data sampling frequency 32 kHz, 44.1 kHz, 48 kHz, 88.2 kHz, 96 kHz,
176.4 kHz, 192 kHz
Bit resolution 16/24-bit
OPTICAL
PCM data sampling frequency 32 kHz, 44.1 kHz, 48 kHz, 88.2 kHz, 96 kHz,
Bit resolution 16/24-bit
USB Type B connector x 1 (USB 2.0 compliant). ASIO drivers are available.
PCM data sampling frequency 44.1 kHz, 48 kHz, 88.2 kHz, 96 kHz, 176.4 kHz,
192 kHz, 352.8 kHz, 384 kHz
Bit resolution 16/24/32-bit
DSD data sampling frequency 2.8/5.6 MHz (DSD64/DSD128)
HDMI audio 2-channel support only
PCM data sampling frequency 8 kHz, 11.025 kHz, 22.050kHz, 32 kHz, 44.1 kHz, 48 kHz, 88.2 kHz,
96 kHz, 176.4 kHz, 192 kHz
Bit rates 16/24-bit
DSD data sampling frequency 2.8/5.6 MHz (DSD64/DSD128)
HDMI Audio output 24bit PCM, 48kHz sample rate
HDMI ARC PCM format only32 kHz, 44.1 kHz, 48 kHz, 88.2 kHz, 96 kHz, 176.4 kHz, 192 kHz sample rates 16/24 bit resolution
Digital video inputs
HDMI video (HDMI 2.0a support)
Supported resolutions 4K - both UHD (3840x2160) and DCI (4096x2160)HDR, Deep Color and 3D supportHDCP v2.2 compliantExpress View switching between HDMI ports
58 59
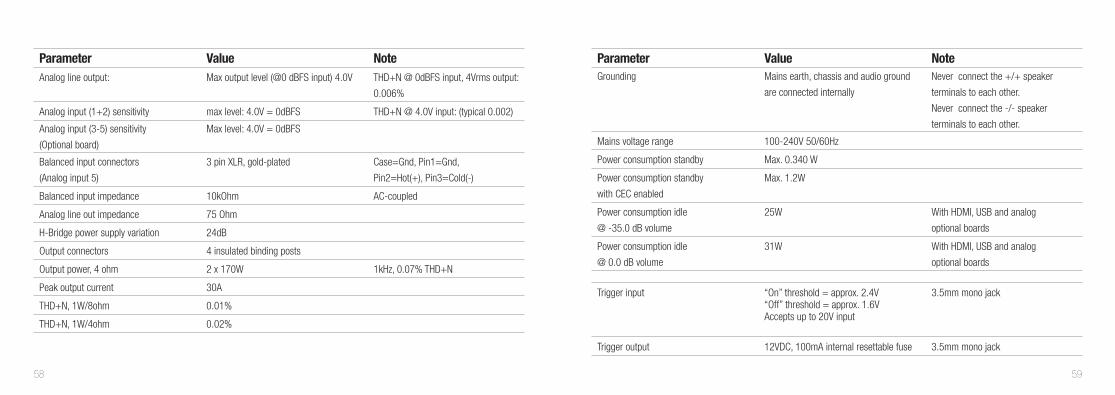
Parameter Value Note
Analog line output: Max output level (@0 dBFS input) 4.0V THD+N @ 0dBFS input, 4Vrms output:
0.006%
Analog input (1+2) sensitivity max level: 4.0V = 0dBFS THD+N @ 4.0V input: (typical 0.002)
Analog input (3-5) sensitivity
(Optional board)
Max level: 4.0V = 0dBFS
Balanced input connectors
(Analog input 5)
3 pin XLR, gold-plated Case=Gnd, Pin1=Gnd,
Pin2=Hot(+), Pin3=Cold(-)
Balanced input impedance 10kOhm AC-coupled
Analog line out impedance 75 Ohm
H-Bridge power supply variation 24dB
Output connectors 4 insulated binding posts
Output power, 4 ohm 2 x 170W 1kHz, 0.07% THD+N
Peak output current 30A
THD+N, 1W/8ohm 0.01%
THD+N, 1W/4ohm 0.02%
Parameter Value Note
Grounding Mains earth, chassis and audio ground
are connected internally
Never connect the +/+ speaker
terminals to each other.
Never connect the -/- speaker
terminals to each other.
Mains voltage range 100-240V 50/60Hz
Power consumption standby Max. 0.340 W
Power consumption standby
with CEC enabled
Max. 1.2W
Power consumption idle
@ -35.0 dB volume
25W With HDMI, USB and analog
optional boards
Power consumption idle
@ 0.0 dB volume
31W With HDMI, USB and analog
optional boards
Trigger input “On” threshold = approx. 2.4V“Off” threshold = approx. 1.6VAccepts up to 20V input
3.5mm mono jack
Trigger output 12VDC, 100mA internal resettable fuse 3.5mm mono jack


