34
1 P-60 MP5-player User’s manual

1
P-60 MP5-player
User’s manual

2
Foreword
First of all, thank you very much for using the MP5
digital walkman of our company!
This player is a specialized top quality portable
player product with a series of remarkable functions. In
order to give full play to all functions of the new player,
please read this manual carefully before using the unit.
There will be no separate notice in the case of any
change in content of this text.
This company will continue to provide new
functions for the development of the product, and there
will be no separate change in the case of any change in
the product’s performance and functions. While this unit
is used as a mobile hard disk, this company will not be
held liable for the security of files saved in the disk.
If the actual setup and the application methods are
not identical to those as set forth in this manual, please
access to the latest product information of this company's
web sit.

3
Points for attention
1. Do not use the player in exceptionally cold or hot, dusty, damp or dry
environments.
2. Do not allow the player to fall down while using it.
3. Please charge your battery
A. Battery power icon shows an empty icon;
B. The system automatically shuts down and the power is soon off
when you switch on the unit once again;
C. There is no response if you operate on any key
4. Please do not disconnect power abruptly when the player is being
formatted or in the process of uploading or downloading. Otherwise it
may lead to the error in the program.
5. When this unit is used as a moving disk, the user shall store or export files
in the proper file management operation method. Any improper operation
method may lead to the loss of files, for which this Company will be held
no liable.
6. Please do not dismantle this unit by yourself. If there is any inquiry,
please contact the dealer.
7. There will be no separate notice in the case of any change in the functions
and performance of this product.

4
Key functions
3.0 inch, 400*240 full color touch screen
Supports multiple formats video play such as RM/RMVB, AVI, MKV,
MOV, VOB, DAT, and FLV etc.
Supports maximum 720P resolution video file putout
Supports multiple audio formats such as MP3, WMA, AAC, APE and
FLAC, etc;
Supports music lyric and video subtitle synchronous display
Integrated High-definition TV output function
Supports picture browsing, rotation and lantern slide playing in the formats
of JPG, BMP, PNG and GIF, etc.
Supporting E-book reading, independent bookmarks and automatic rotate
functions.
Built-in microphone and long time recording
Supporting FM radio
Supports Micro SD Card to extend capacity.
Supports energy saving settings, various font color for your choice,
adjustable brightness, automatic shutdown and background setting
USB2.0 high rate transmission

5
Shapes and Keys
1. Power/play/pause 2. Micro SD 3. reset
4. USB 5. ear jack/TV-OUT 6. horn

6
Display screen
Video playing
Music playing
E-Book

7
Photo
FM Radio

8
Record
9
Basic operation
Power on
In the power off state, press "power " key, the unit will display the starting
logo, and then access the main menu interface.
Power off
Under power on state, long press "power " key to turn off MP4 player.
Power reset
If the screen frozen or breaking down in the process of MP4 player
operation, you can turn of f and restart the player by pressing "reset" key.
Connecting the computer and data file transmission
Start computer and connect unit with it by USB cable. Then you can make
data transmission and MP4 player charging. Also MP4 player can be used as
removable disk. Then you can copy your favorite files into correspondent folder
of this unit.
Close screen
Set the [close screen] option time under [set] function. If you do not
contact the player within the set time for long, and when do no operate by the
button, the contact screen will be automatically locked up. In order to prevent
error operation,the screen will auto close.
In the charging or playing video state, short press "power" button for
unlocking.
If it is necessary to deactivate the contact screen lockup function, you can
set the [close screen] option under [set] function into “always on”.
Volume Control
In the states of playing music, FM radio and video, etc, you can perform
volume control using "+/-"icon. "+" icon is for increased volume and "-" icon is
for reduced volume. Hold the icon "+" or icon"-" to continuously increase or
reduce volume

10
Battery
High capacity Polymer battery is used for this unit.
The duration available of the battery power depends on volume, types of
playing files and operation of batteries. The player can be set up by the user as
“user define power off time” or “display setup” to save batteries.
Note
A new battery will reach its best performance after a number cycles of
charging and discharging.
If the device is not used for long time, it is better to charge it to full
capacity every 2 or 3 months during storage.
If not using the device for a long time, it is wise to take out the battery.
Charging
This unit can be recharged by USB port, you can also use the designated
normal charger which was provided to you with the unit (output current
500MA~1000MA, output voltage 5V~5.2V) to charge it. Connect the unit with
the charger to charge it.
If you connect the player with the computer, when the battery icon
displays as full, it indicates that the charging is full. Otherwise, when the
battery icon displays as charging, it display “ ”icon
Using the Micro SD card
After this unit is connected with the computer, you will find two movable
disks. The first one is the built-in memory disk of this unit and the other is the
disk for the Micro SD card. If no card is inserted, the second disk can not be
opened. This unit supports the extension of the Micro SD card from 128MB to
8GB.

11
Inserting and Pulling out the Micro SD card
Inserting:
Put the Micro SD card face up (side with words) (with the direction of the
display screen as the face), and slightly insert the card into the socket of the
card, i.e. connecting the unit. Under this state, you can play the content in the
Micro SD card.
Pulling:
Slightly push the Micro SD, and it will bounce by a section, and then you
can take it out.
Caution:
Please perform inserting and pulling operation under power off state!
Otherwise, there will be data loss or damaged to the files of the unit! If no card
is inserted, the computer will be unable to perform read and write operation for
the disk notes of the later removable disk (Micro SD card).
Power adapter is a key component of the portable player, which play a
crucial role in keeping the portable player’s normal work and protecting your
security when using the player, a long-term customer surveys and after-sales
service Practice shows that the malfunction of the portable player In many cases
were caused by using inappropriate accessories, in particular the power adapter.
Use the substandard power adapter will shorten the life of the portable
player by considerably, the voltage instability will seriously affected the normal
work of the portable player and bring permanent damage on the player’s
performance and reliability, Use the substandard power adapter will also
reduced the vocal quality of the players, shutdown the player when you using it,
In addition, Use the substandard power adapter will cause combustion and
explosion which will disserve the safety of the consumers.
12
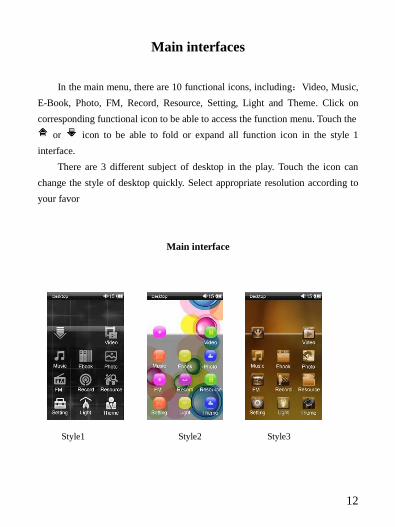
Main interfaces
In the main menu, there are 10 functional icons, including:Video, Music,
E-Book, Photo, FM, Record, Resource, Setting, Light and Theme. Click on
corresponding functional icon to be able to access the function menu. Touch the
or icon to be able to fold or expand all function icon in the style 1
interface.
There are 3 different subject of desktop in the play. Touch the icon can
change the style of desktop quickly. Select appropriate resolution according to
your favor
Main interface
Style1 Style2 Style3

13
Video
In the main menu, select the option of "Video" to be able to access video
folder. This menu list includes 2 options: Local disk and TF Card.
Description of functions:
Local disk
Users can choose the file and its subdirectories from local drive.
TF Card
If no card is inserted, the TF card can not be display. Otherwise,
users can choose the file and its subdirectories from Micro TF Card
File list interface
Function of keys
: Return to main interface
: Return to the upper folder or menu
rolling screen up or down to switch over to PREV/NEXT screen
Video playing interface

14
Function of icons
: switch over to TV out
: Video playing setting
/ : play or pause current movie
: short press to play the last movie, long press for fast rewind
: short press to play the next movie, long press for fast forward
: control volume up or down
: return to the upper folder or menu
Description of keys
Power: In TV-OUT state, short press it can turn off TV-OUT and
return to the player screen for playback.
Setup video interface
In video playing interface, click on “ ” functional icon to be able to
export the video setup menu. There are 5 options such as break point, subtitle,
subtitle size set, CH Channel and subtitle color.
Description of functions
1. Break point
You can continue playing video place where you stopped the last time. The
default setting is "YES", if you select "YES", this video will be played from the
picture you exit last time; if you select "NO", this video will be played from the
beginning.
2. Subtitle
If the video file embedded multiple subtitles, through this option to select
the different subtitle synchronized display.
3. Scale size
By this function, you can perform aspect ratio to video image. This player
provides 3 display scales such as: default, 4:3 and 16:9, which can be set
flexibly according to the solution of video source files for an optimal visual
effect.

15
4. CH channel
By the CH channel function, you can perform CH channel effect. This
player provides 3 CH channel such as: stereo, left channel and right channel
which can be set flexibly according to the solution of video source files for an
optimal sound effect.
5. Subtitle color
In the option, you can set color of subtitle. You can set flexibly according
to the solution of video files for better visual effect.
Tips:
1、 This MP4 player support maximum 1280 *720 resolution video files.
2、 Subtitle display
This player supports "*.SRT" subtitle files (The user can download it
from the website) for the synchronous playing of subtitle and video.
When there is any subtitle file with the same name in the folder for
playing video, the player will be able to achieve synchronous subtitle
display
3、 It’s supports video playing in multiple formats such as, RMVB, AVI, MKV,
VOB, MOV, FLV and MP4, H.264 encoding high-definition video etc. As
parameters such as formats, coding modes, definition and code flow rates of
video files provided by the internet differ, the player is unable to be compatible
with all video files (especially those video files with high definition or high
code rates). If the downloaded video files are out of the range supported by the
player, which renders it impossible to play normally in the player, it is
recommended that the video conversion software from a third party be used,
and file formats be converted via computers into the ones within the range
supported by the player before the same are duplicated into the player for
playing.
16
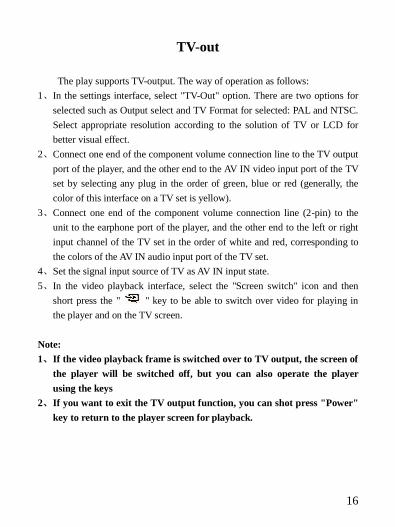
TV-out
The play supports TV-output. The way of operation as follows:
1、 In the settings interface, select "TV-Out" option. There are two options for
selected such as Output select and TV Format for selected: PAL and NTSC.
Select appropriate resolution according to the solution of TV or LCD for
better visual effect.
2、 Connect one end of the component volume connection line to the TV output
port of the player, and the other end to the AV IN video input port of the TV
set by selecting any plug in the order of green, blue or red (generally, the
color of this interface on a TV set is yellow).
3、 Connect one end of the component volume connection line (2-pin) to the
unit to the earphone port of the player, and the other end to the left or right
input channel of the TV set in the order of white and red, corresponding to
the colors of the AV IN audio input port of the TV set.
4、 Set the signal input source of TV as AV IN input state.
5、 In the video playback interface, select the "Screen switch" icon and then
short press the " " key to be able to switch over video for playing in
the player and on the TV screen.
Note:
1、 If the video playback frame is switched over to TV output, the screen of
the player will be switched off, but you can also operate the player
using the keys
2、 If you want to exit the TV output function, you can shot press "Power"
key to return to the player screen for playback.

17
Music
In the main menu, select the option of "Music" icon to be able to access
music folder. This menu list includes: Media library, Last play, Update media
library, Local disk, TF Card and so on.
Description of functions:
Media library
You can use the "Update Media Library" feature in the local disk to
classify all the music files, Users can through the media library options, to
play all or category pay the media library music. Such as "All ","Artist",
"Album","Genre", "Star", "Year", etc.
Last play
Select the option, the player return to the played music interface.
Update play
This option will update all music in the player to the "All Music" List.
Local disk
Users can choose the file and its subdirectories from local drive.
TF Card
If no card is inserted, the TF card can not be display. Otherwise,
User can choose the file and its subdirectories from Micro TF Card.
File list interface
Function of keys
: Return to main interface
: Return to the upper folder or menu
rolling screen up or down to switch over to PREV/NEXT screen

18
Music playing interface
Function of icons
: Return to main interface
: Music playing setting menu
/ : play or pause music
: short press it can play the last music, long press for fast rewind
: short press it can play the next music, long press for fast
forward
NORM: Setup the EQ mode. This menu includes 8 options such as
Nature, DBB, POP, Rock, Classic, Jazz, Dance and Soft.
: Setup the Play mode
: Repeat all : only once : repeat one
Random play Sequence play
: control volume up or down
: return to the upper folder or menu
Setup music interface
In music playing interface, click on “ ” functional icon to be able to
export the music setup menu. There are 4 options such as play effect, play mode,
star level and lyric color.
Description of functions
19
1. Setup the EQ mode.
This menu includes 8 options such as Nature, DBB, POP, Rock, Classic
Jazz, Dance and Soft.
2. Playing mode setup
This menu supply 5 options such as only once, rotate one, rotate all,
sequence and Random for you selected.
3. Setting star level
Users can intercalate the relevant star information for the current music in
order to facilitate the broadcast in accordance with star.
4. Lyric color
In the option, you can set lyric color. You can set flexibly according to the
solution of video files for better visual effect.
Lyric Display
When there is any lyric file with the same name in the folder for playing
music, the player will directly access the lyric display interface.
This player supports "*.Lrc" lyric files (The user can download it from the
website of "http://www.51lrc.com", or search "LRC Lyric" to have the lyric file)
for the synchronous playing of lyrics and music.

20
E-Book
In the main menu, select the option of "E-Book" to be able to access
E-Book folder. This menu list includes 2 options: Local disk and TF Card
Description of functions:
Local disk
Users can choose the file and its subdirectories from local drive.
TF Card
If no card is inserted, the TF card can not be display. Otherwise,
users can choose the file and its subdirectories from Micro TF Card
File list interface
Function of icons
: Return to main interface
: Return to the upper folder or menu
rolling screen up or down to switch over to PREV/NEXT screen
E-Book viewing interface

21
Function of keys
: Return to main interface
: E-Book setting
: Rotating the current the text
Power: play or pause auto-page glide
: return to the upper folder or menu
Touch the right of screen can switch over the next screen browsing
Touch the left of screen can switch over the last screen browsing
Touch the blow of screen can pop up and hide set menu
Setup E-book interface
In reading book interface, touch the blow of screen can pop up set
menu .Then click on “ ” functional icon to be able to export the setup menu.
There are 8 options such as Auto play, Rotate, Add bookmark, Open bookmark,
Font size, Font color, Switch mode, Background picture.
Description of Functions:
1. Auto page
Users can choose to open or close the e-book auto-browsing, when the
book auto-browsing features opened, the users can choose the automatic
switching time.
2. Rotate
There are 2 different ways of rotate for you select, such as horizontal and
vertical.
3. Add bookmark
Use can increase the current location of bookmarks to facilitate the future
reading from the set position to continue reading

22
4. Open bookmark
Bookmark list displays all of the bookmarks, the user can select the
appropriate bookmark to continue browsing e-books.
5. Font size
You can set the font size as big, medium and small for read
6. Font color
There are 5 different colors for you select, such as white, red, green, blue
and black.
7. Switch mode
You can set switch mode to glide or close switch mode.
8. background picture
There are 4 different pictures in which you can pick your favorite picture
as the background picture display.

23
Photo
In the main menu, select the option of "photo" to be able to access photo
folder. This menu list includes 2 options: Local disk and TF Card
Local disk
Users can choose the file and its subdirectories from local drive.
TF Card
If no card is inserted, the TF card can not be display. Otherwise,
users can choose the file and its subdirectories from Micro TF Card
File list interface
Function of icons
: Return to main interface
: Return to the upper folder or menu
rolling screen up or down to switch over to PREV/NEXT screen
Picture browsing interface

24
Function of keys
: Return to main interface
: Picture setting
Power: play or pause auto-play
: return to the upper folder or menu
Touch the right of screen can switch over the next screen browsing
Touch the left of screen can switch over the last screen browsing
Touch the blow of screen can pop up and hide set menu
Setup photo browsing interface
In Picture browsing interface, touch the blow of screen can pop up set
menu .Then click on “ ” functional icon to be able to export the setup menu.
There are 7 options such as Auto play, View, Thumb, Translation, Zoom, Rotate,
Set to background.
Description of Functions:
1. Auto play
This option is used to set the image switching time interval while the
image auto-playing
2. View
In the picture view interface, click the corresponding icon can enlarge or
narrow, translate and rotating the current picture.
3. Thumb
Select this option will show all of picture thumb. Click one to access the
viewing interface quickly.
4. Translation
Under set the image switching time, set the way of the current image
changed
5. Zoom
In the picture view interface, click the option can enlarge or narrow the

25
picture.
6. Rotating pictures
In the picture view interface, rotary the current picture by 90
degrees anticlockwise or clockwise.
7. Setting the wallpaper
Under the option, user can set the current picture as the wallpaper.

26
FM
In the main menu, select “FM Radio” icon to be able to access the FM
Radio interface.
FM Radio interface
Function of keys
: FM setting
: :Control volume up or volume down
: Return to the upper folder or menu
: In auto-search mode, search previous radio channel; in manual
search mode, previous search by 1.0 MHZ
: In auto-search mode, search forward radio channel; in manual
search mode, forward search by 1.0 MHZ
Setup FM Radio interface
In FM Radio interface, click on “ ” functional icon to be able to export
the setup menu. There are 5 options such as Manual Search, Auto-Search,
Channel list, Add channel and Delete Channel.

27
Manual Search: in manual search mode, press / icon can manual
previous or forward search channels by 0.1MHZ.
Automatic search: in automatic search mode, automatic search and save
the channel .
Channel list: show all saved radio channels.
Save Radio Channel: to save the radio channels manually searched.
Delete radio channel: to delete the radio channels in the radio channel list.
Note: 1. While listening to FM radio, please insert the earphone used as the
antenna. Otherwise, you will be unable to find any radio
channels;
2. The FM radio doesn’t support background playing.

28
Record
In the main menu, select “Record” icon to be able to access the Record
interface.
Record interface
Function of keys
/ : Start or pause record
: Save current record
: record folder
: recording setting
: :Control volume up or volume down
: Return to the upper folder or menu
record set interface
Description of Functions:
In Recording interface, before recording or at "Pause" status, click on
“ ” functional icon to be able to export the setup menu. There are 3 options
such as Good quality, Normal Quality and poor Quality. The higher the quality
of recording, the greater size of the file. A recorded file can be found, touch the
button record folder " ", tap one to be able to play.

29
Resource
In the main menu, select the option of "resource" to be able to access
resource folder. This menu list includes 2 options: Local disk and TF Card
Description of functions:
Local disk
Users can choose the file and its subdirectories from local drive.
TF Card
If no card is inserted, the TF card can not be display. Otherwise,
users can choose the file and its subdirectories from Micro TF Card
File list interface
Function of icons
: Return to main interface
: Return to the upper folder or menu
: Open, copy, paste and delete the current file.
rolling screen up or down to switch over to PREV/NEXT screen

30
Setting
In the main menu, select the option of "setting" to be able to access the
System Set fold. Directly click can assess picture set options interface. This
menu list includes 11 options such as System information, Output, power,
Language, Auto power off, Sleeping power off time, close screen, key tone,
bright, adjust and restore default.
1. System information
In setting list interface, select the system information and access the option
interface. In this menu you can view the information on the capacity of U-disk,
the available capacity, model and firmware version of U-disk.
2. TV-OUT Set
This unit support High-definition TV output. So, the user can set output
mode and size of resolution in the option.
3. Power
Select the option, information of batteries display on the screen.
4. Language set
Under this menu there are 3 languages to be selected.
5. Auto power off time
This option allows the users to set the automatic shutdown time, and if the

31
player without playing or any key operation within the specified time it will
automatically shut down to save battery power consumption. The player offers
4 different times to selected, such as: 10sec, 30sec, 60sec and close.
6. Auto Sleep power off time
This option allows the users to set the automatic sleep shutdown time, and
whether the player was used or not within the specified time it will
automatically shut down to save battery power consumption. In this menu, there
are5 different options: 10min, 30min, 60min and close.
7. Close screen
This option allows the users to set the automatic sleep close time, and
whether the player was used or not within the specified time it will
automatically shut down to save battery power consumption. In this menu, there
are 6 different options: 5sec, 10sec, 15sec, 30sec, 60sec and always on.
8. Key tone
Set open or close the key sound
9. Bright
The player offers 1-5 different screen brightness levels to adjust brightness,
1 is the faintest, while 5 is the brightest, the higher the brightness of the screen,
the greater the player's power consumption
10. Calibration of contact screen
When you find that the position of the contact screen is not so accurate,
you can recalibrate the buttons on the contact screen using this function
11. Restore default
Select this option, a dialog box is popped up in this menu screen .Select
whether to perform system restoration. If not, the system restoration will quit.

32
Light
The option is a short-cut icon for screen brightness. Touch the icon can
change screen brightness to adjust brightness quickly. The function of the
button is the same as the [Bright] function under [Set] menu.
Theme
There are 3 different subject of desktop in the play. Touch the icon can
change the style of desktop quickly. Select appropriate resolution according to
your favor.

33
Common troubleshooting
1. Products cannot be opened.
Check the battery. If the battery is discharged, please use the provided
adaptor to charge the battery and then retry. Based on the discharging state, the
charging of full battery needs some time. If there is no response of the product,
please RESET the unit. Note that RESET will be disconnected, but there is no
influence on the product.
2. No sound.
Check whether the voice is set to "0". If it is so, please control it to your
favorite position. Check whether there is any playing source on the product. If
there is no playing source on the product, there will be no output of sound.
3. Noise in playing.
The damaged music files may utter noise, or discontinued sound output.
Check whether the earphone is connected. There is impurity in the jack/terminal
in the earphone and there is noise.
4. The time for playing the files in the connected memory is shortened.
Compared with the files in the built-in memory, it requires more sources
while playing the files on the external memory of MP5. Therefore, if the
product playing is respectively saved in the same file in the memory and the
outside memory and the built-in memory, the time for playing the former may
be shortened.
5. Unable to download files
Make sure that the computer and the player are properly connected.
Make sure that the memory space of the memory is full.
Make sure that the USB connection lines are not damaged.

34
Specification
Items Specifications
Display 3.0 inch, 400*240 full color touch screen
USB Port USB2.0 High Speed
FM Channel Range 87.5 ~ 108MHz
Audio Format MP3, WMA, WAV, FLAC, APE, OGG, AAC……
Voice Format AVI,XVID,MOV,DIVX,MPEG1,MPEG2,MPEG4,
RMVB/RM,MKV, DAT, VOB,FLV,H.264……
Picture Format JPEG, JPG, BMP, PNG, GIF
Document
File Format txt, lrc, srt
Play Time
About 4 hours( MP3, 128kbps, EQ Natural, Vol and light is
default )
About 1.5 hours (RMVB, EQ Natural, Vol15, Display Off )
Battery Built-in rechargeable Lithium Battery
EQ Natural, Rock, Pop, Classic, Soft, Jazz, DBB,Dance
Language Multiple languages
Compression Bit-rate MP3, WMA: 8Kbps~320 Kbps
Support OS WINDOWS XP/2000/ME/ 98(require to install the
program), linux, Mac, Vista
Dimension 50*92*11mm ( W*H*D)
Weight About 58.5g


