20
PA-7272 User Manual PA-7272 Manual del Usuario

PA-7272 User ManualPA-7272 Manual del Usuario


Pg. 3
PA-7272 - USER MANUAL
Thanks for purchasing Panacom Telephone PA-7272. Please read this manual carefully before using this Telephone, which is the best guide-line offering best service.
Features1. Main Functions:- FSK/DTM Two mode incoming mode display - 50 groups incoming numbers and time memory (8 digits). Note: if one or two-key memory store number, Correspondingly reduced the groups incoming numbers. - 15 outgoing numbers and talk time memory (8 digits).- Real time date and weekday display, LCD 5 grades selectable.- 1~99 hours no-disturb.- 16 normal rings for selectable.- Ring volume and Hand-free volume adjustable by software setting - Guard against theft set by software; P/T selectable by software.- Flash time 100ms- 3 groups of alarm setting with different sounds.- Auto hook on when forget to hook on (without noise wave disturb) - Local area code 8 digits setting, Auto filtrate the local area codein incoming calls
2. special Keys functionsVOL key:At on hook state, press the key enter to ring volumeselect menu, press up or down key to select; At off hook state, it is HF volume select key;(there are 4 grades ring volumes and 2 HF volumes for select in circle, default is high ); At incomingcheck state, it is for VIP setting.
FLasH/set key:At on hook state, press the key enter setting function; At off hook state, press the key does flash function

Pg. 4
reDIaL key: At on hook pre-dial state and incomingor outgoing check state, press the key is Auto-RD function; At off hook state, it is redial the former dialed numbers; Press the key for awhile it will add “0” and do the back call function.
DeL key:At pre-dial state incoming or outgoing check state andcalculate state, it does the del function; At incoming or outgoing check state press the key for 2 seconds will delete all the stored numbers.
r Key:The R key’s main function is to give the phone system an order of 100ms delay to hold the call and to dial an extension, pressing the R key again resend the command to retrieve the call.
3. Setting function table
4. Functions instruction4.1 Menu function settingAt off hook state, press SET key to enter the setting state, LCD dis-plays SET 12345678, press the digit key or UP/DOWN key to choose
1 51 1
1
2
1
22
3
4
6
7
8
3
1
2
3
TIME SETTING
RING SELECT
VIP RING SELECT
RING VOLUME SELECT
NO1 ALARM
NO2 ALARM
NO 3 ALARM
NO DISTURB
GUAR AGAINS THEFT
LOCAL AREA CODE SETTING
EX-CODE SETTING
LCD LIGHT ADJUST
AUTO IP
MANUAL IP1
MANUAL IP2
P-T EXCHANGE2
1
2
3
1
2
3
DATE SETTING FLASH TIME SETTING
Pg. 5
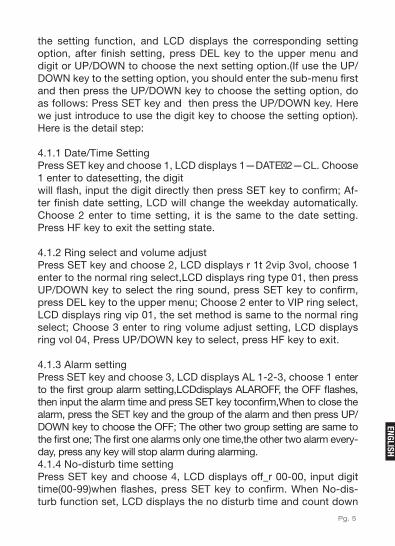
the setting function, and LCD displays the corresponding setting option, after finish setting, press DEL key to the upper menu and digit or UP/DOWN to choose the next setting option.(If use the UP/DOWN key to the setting option, you should enter the sub-menu first and then press the UP/DOWN key to choose the setting option, do as follows: Press SET key and then press the UP/DOWN key. Here we just introduce to use the digit key to choose the setting option). Here is the detail step:
4.1.1 Date/Time Setting Press SET key and choose 1, LCD displays 1—DATE、2—CL. Choose 1 enter to datesetting, the digitwill flash, input the digit directly then press SET key to confirm; Af-ter finish date setting, LCD will change the weekday automatically. Choose 2 enter to time setting, it is the same to the date setting. Press HF key to exit the setting state.
4.1.2 Ring select and volume adjust Press SET key and choose 2, LCD displays r 1t 2vip 3vol, choose 1 enter to the normal ring select,LCD displays ring type 01, then press UP/DOWN key to select the ring sound, press SET key to confirm, press DEL key to the upper menu; Choose 2 enter to VIP ring select, LCD displays ring vip 01, the set method is same to the normal ring select; Choose 3 enter to ring volume adjust setting, LCD displays ring vol 04, Press UP/DOWN key to select, press HF key to exit.
4.1.3 Alarm setting Press SET key and choose 3, LCD displays AL 1-2-3, choose 1 enter to the first group alarm setting,LCDdisplays ALAROFF, the OFF flashes, then input the alarm time and press SET key toconfirm,When to close the alarm, press the SET key and the group of the alarm and then press UP/DOWN key to choose the OFF; The other two group setting are same to the first one; The first one alarms only one time,the other two alarm every-day, press any key will stop alarm during alarming.4.1.4 No-disturb time setting Press SET key and choose 4, LCD displays off_r 00-00, input digit time(00-99)when flashes, press SET key to confirm. When No-dis-turb function set, LCD displays the no disturb time and count down

Pg. 6
to 00-00 then it will auto exit the no-disturb state. Pick up or hand free also can exit the no-disturb state. It doesn’t ring during the no-disturb state.(VIP is allow.)
4.1.5 Special function choose setting Press SET key and choose 5, LCD displays 1-f 2-pt 3-d, choose 1 enter to flash time setting, LCD displays flash 600 and flashes, press UP/DOWN key to choose the time. There are 90-95-100-120-180-300-600-1000ms for selectable; Choose 2 enter to P—T exchange, LCD displays pt tone, press UP/DWON key to choose the dial mode, the init value is tone dial mode; Choose 3 enter guard against theft setting, LCD displays defend off, press UP/DOWN key to choose on/off state.(The passwords are#).
4.1.6 Local area code and Ex-code setting Press SET key and choose 6, LCD displays 1-LOC 2-OL,choose1enter to local area code setting, LCD displays lock, input the digits 1~8 for selectable, then press SET key to confirm, press DEL key to delete the input numbers, also press SET key to confirm. Choose 2 enter to Ex-code setting, LCD displays out off, the setting method is same to the local area code setting. Press UP/DOWN key to choose OFF to delete the Ex-code.
4.1.7 LCD light adjust Press SET key and choose 7, LCD displays LCD con 4, press UP/DOWN key to adjust light grade, default is the 4th grade, there are 5 grades for selectable.
4.1.8 IP function setting Press SET key and choose 8, LCD displays 1-au 2-3-ip, choose 1 enter to auto IP setting, LCD displays au IP off, press UP/DOWN key to choose the IP numbers, IP1, IP2,17909, 17908, 193, 17911, 17921,17931,17951,17991, 068, 96300, 96333, 196, 190,17969,197, off for selectable, default is off. (IP1,IP2 are manual IP setting mode); Choose 2 enter manual IP1 setting, LCD displays null, input the numbers directly and press SET key to confirm, LCD displays ip1 code means it is successfully stored the numbers.Choose 3 enter to manual IP2 setting, it is the same to the manual IP1 setting.
Pg. 7
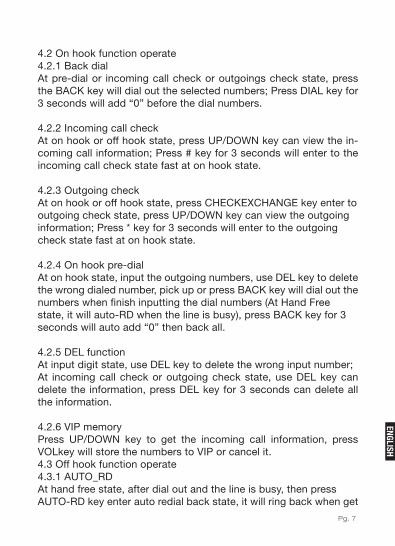
4.2 On hook function operate 4.2.1 Back dial At pre-dial or incoming call check or outgoings check state, press the BACK key will dial out the selected numbers; Press DIAL key for 3 seconds will add “0” before the dial numbers.
4.2.2 Incoming call check At on hook or off hook state, press UP/DOWN key can view the in-coming call information; Press # key for 3 seconds will enter to the incoming call check state fast at on hook state.
4.2.3 Outgoing check At on hook or off hook state, press CHECKEXCHANGE key enter to outgoing check state, press UP/DOWN key can view the outgoing information; Press * key for 3 seconds will enter to the outgoing check state fast at on hook state.
4.2.4 On hook pre-dial At on hook state, input the outgoing numbers, use DEL key to delete the wrong dialed number, pick up or press BACK key will dial out the numbers when finish inputting the dial numbers (At Hand Free state, it will auto-RD when the line is busy), press BACK key for 3 seconds will auto add “0” then back all.
4.2.5 DEL function At input digit state, use DEL key to delete the wrong input number;At incoming call check or outgoing check state, use DEL key can delete the information, press DEL key for 3 seconds can delete all the information.
4.2.6 VIP memory Press UP/DOWN key to get the incoming call information, press VOLkey will store the numbers to VIP or cancel it.4.3 Off hook function operate4.3.1 AUTO_RD At hand free state, after dial out and the line is busy, then press AUTO-RD key enter auto redial back state, it will ring back when get
Pg. 8
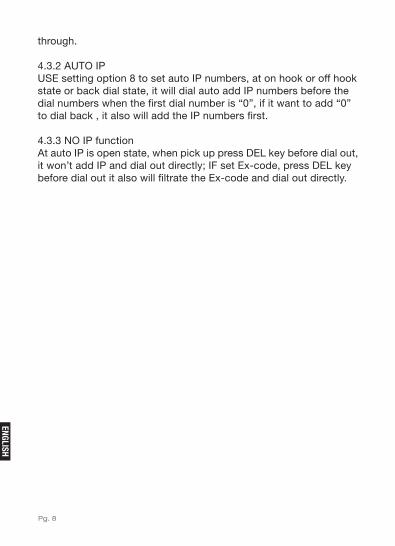
through.
4.3.2 AUTO IP USE setting option 8 to set auto IP numbers, at on hook or off hook state or back dial state, it will dial auto add IP numbers before the dial numbers when the first dial number is “0”, if it want to add “0” to dial back , it also will add the IP numbers first.
4.3.3 NO IP function At auto IP is open state, when pick up press DEL key before dial out, it won’t add IP and dial out directly; IF set Ex-code, press DEL keybefore dial out it also will filtrate the Ex-code and dial out directly.

Pg. 9
PA-7272 - MANUAL dEL USUARio
Gracias por la compra de su Teléfono de Mesa/Pared PANACOM PA-7272. Por favor lea este manual cuidadosamente antes de utilizar este Teléfono, para seguir las mejores pautas tendientes a ofrecer el mejor servicio.
CaraCterístICas
1 . FunCIOnes prInCIpaLes:- Visualización del modo de entrada DTMF / FSK- 50 grupos de números entrantes y Memoria de 8 dígitos- 15 números salientes y el tiempo de conversación con memoria de 8 dígitos- LCD 5 grados seleccionables- 16 tonos seleccionables- Volumen de tono y el volumen de manos libres ajustable- Tiempo de Flash de 90/95/100/120/180/300/600/1000ms seleccio-nables- 3 tipos de ajuste de alarma con diferentes sonidos- Auto corte cuando olvide colgar el teléfono (sin ondulaciones ruido molestar)
2 . FunCIOnes De teCLas espeCIaLes:tecla VOL:Cuando el teléfono este colgado, pulse la tecla Enter para que suene el volu-men menú seleccionar, presione hacia arriba o hacia abajo para seleccionar.Cuando el teléfono este descolgado, es el volumen HF tecla de se-lección, (hay 4 niveles de volumen para tonos y 2 niveles de volumen para HF, por defecto es alto) y, al entranteComprobar el estado, es para la configuración VIP .tecla FLasH / set:Cuando el teléfono este colgado pulse la tecla Intro ajusteFunción; En estado descolgado pulse la tecla tiene la función de flash.tecla reDIaL:Cuando el teléfono este colgado pre - marcación y llamadas entran-tes o el estado de activación de salida, pulse la tecla es la función Auto - RD ; En el estado descolgado , es volver a marcar los antiguos
Pg. 10
números marcados , pulse la tecla durante un tiempo va a añadir “ 0 “ y hacer la función de devolución de llamada.
tecla DeL:En el estado de pre-marcado, estado de activación entrante o saliente y calcular el estado , que hace la función del ; En el estado de veri-ficación de entrada o salida , pulse la tecla durante 2 segundos , se borrarán todos los números almacenados .
tecla “r”:La Tecla R tiene como función principal enviarle a la Central Telefónica una orden de retardo de 100ms para retener la llamada y poder discar un interno, presionando nuevamente la tecla R vuelve a enviar la or-den para recuperar el llamado.
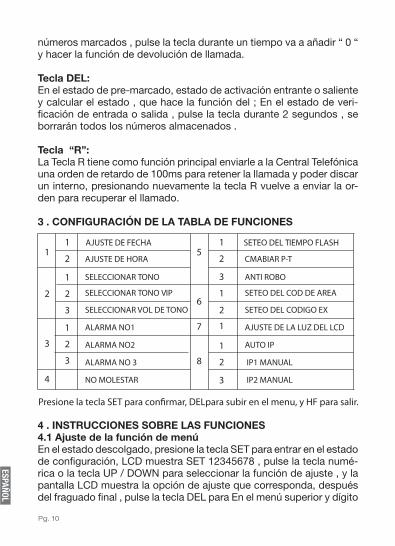
3 . COnFIguraCIón De La tabLa De FunCIOnes
4 . InstruCCIOnes sObre Las FunCIOnes4.1 ajuste de la función de menúEn el estado descolgado, presione la tecla SET para entrar en el estado de configuración, LCD muestra SET 12345678 , pulse la tecla numé-rica o la tecla UP / DOWN para seleccionar la función de ajuste , y la pantalla LCD muestra la opción de ajuste que corresponda, después del fraguado final , pulse la tecla DEL para En el menú superior y dígito
1 51 1
1
2
1
22
3
4
6
7
8
3
1
2
3
AJUSTE DE HORA
SELECCIONAR TONO
SELECCIONAR TONO VIP
SELECCIONAR VOL DE TONO
ALARMA NO1
ALARMA NO2
ALARMA NO 3
NO MOLESTAR
ANTI ROBO
SETEO DEL COD DE AREA
SETEO DEL CODIGO EX
AJUSTE DE LA LUZ DEL LCD
AUTO IP
IP1 MANUAL
IP2 MANUAL
CMABIAR P-T2
1
2
3
1
2
3
AJUSTE DE FECHA SETEO DEL TIEMPO FLASH

Pg. 11
o ARRIBA / ABAJO para elegir la opción de configuración siguiente. ( Si utiliza los botones UP / DOWN para la opción de configuración , debe entrar en el submenú y pulse el primero / ABAJO ARRIBA para seleccionar la opción de ajuste , haga lo siguiente : Pulse la tecla SET y pulse el / ABAJO ARRIBA Aquí nos presentamos a utilizar el dígito.para escoger la opción de ajuste). Aquí está el paso detalle :
4.1.1 Fecha / horaPulse la tecla SET y seleccione 1 , pantalla LCD muestra 1 ,2 - FECHA -CL . Elegir 1 Intro para configuracion de fecha , el dígito parpadea , el dígito de entrada directamente a continuación, pulse la tecla SET para confirmar; Después de ajustar la fecha de finalización , LCD cambia-rá el día de la semana de forma automática. Selecciona 2 Intro para ajuste de la hora , que es el mismo que el ajuste de la fecha . Clave de HF Pulse para salir del estado de configuración.
4.1.2 selección de tono y ajuste de volumenPulse la tecla SET y seleccione 2 , LCD muestra r 1t 2vip 3vol , elija 1 en-trar al ring normal de selección , la pantalla LCD muestra el tipo de anillo 01 , a continuación, pulse ARRIBA / ABAJO para seleccionar el sonido del timbre , presione la tecla SET para confirmar , pulse la tecla Supr al menú superior , elige 2 para entrar VIP anillo de selección , la pantalla LCD muestra el anillo vip 01 , el método de juego es el mismo que el anillo normal de seleccionar , elegir 3 enter para ajustar la configuración del vo-lumen del timbre , la pantalla LCD muestra el anillo vol 04 , Pulse ARRIBA / ABAJO para seleccionar , pulse la tecla HF para salir.
4.1.3 ajuste de la alarmaPulse la tecla SET y seleccione 3 , pantallas LCD AL 1-2-3 , elija 1 entrar a la primera configuración de grupo de alarmas , LCD mostrara ALAR OFF , a continuación, introduzca la hora de la alarma y pulse SETun tono confirmara clave , cuando se cierre la alarma, pulse la te-cla SET y el grupo de la alarma y luego la tecla ARRIBA / ABAJO para seleccionar el apagado y el otro ajuste de dos grupos son los mismos que el primero , el primero alarmas de una sola vez, los otros dos alar-ma diaria, pulse cualquier llave dejará de alarma durante alarmante.
4.1.4 no molestar - ajuste de la horaPulse la tecla SET y seleccione 4 , LCD muestra off 00-00 , el tiempo

Pg. 12
de dígitos de entrada ( 00-99 ) cuando parpadee, pulse la tecla SET para confirmar . Cuando No molestar conjunto de funciones, LCD muestra el tiempo y no molestar a contar a 00-00 luego que se auto salga del estado de no molestar . cuando descuelgue el telefono o oprima manos libres también se puede salir del estado no molestar . No tocar durante el estado de no- molestar ( VIP es permitir . ) .
4.1.5 Función especial elija la configuraciónPulse la tecla SET y seleccione 5 , la pantalla LCD muestra 1 -f 2 -pt 3 -d , elija 1 entrar a parpadear ajuste de la hora , la pantalla LCD mues-tra Flash 600 y parpadea , pulse ARRIBA / ABAJO para seleccionar el tiempo. Hay 90,95,100,120,180,300,600,1000 ms para seleccionar , elegir 2 entrar para intercambiar P -T , la pantalla LCD muestra el tono pt, pulse la tecla ARRIBA / dwon para elegir el modo de marcación , el valor de init es el tono disco de modo , elegir 3 Introduzca guardia contra robo ajuste , la pantalla LCD muestra defender apagado, pulse ARRIBA / ABAJO para seleccionar on / off ( Las contraseñas son # )
4.1.6 código y código de área ex seteo localPulse la tecla SET y seleccione 6 , LCD muestra LOC 1 - 2 - OL, elija 1entrar para ajuste del código de área local , la pantalla LCD muestra loc. . . . . . , Ingrese los dígitos 1 ~ 8 para seleccionar, a continuación, pulse la tecla SET para confirmar , pulse tecla DEL para borrar los números ingresados , también presione SET para confirmar. Selec-ciona 2 entrar al ajuste de código Ex , LCD muestra fuera apagado, el método de configuración es el mismo que el ajuste de código de área local. Pulse ARRIBA / ABAJO para seleccionar OFF para borrar el código de Ex .
4.1.7 ajuste de brillo del LCDPulse la tecla SET y seleccione 7 , pantallas LCD LCD con 4 , presione UP / DOWN para ajustar el grado de luz , por defecto es el cuarto grado, hay 5 grados para seleccionar.
4.1.8 ajuste de la función IpPulse la tecla SET y seleccione 8 , LCD muestra 1 - 2-3 au -ip , elija 1 Ingrese a la configuración IP automática , pantallas LCD au IP desac-tivado, pulse ARRIBA / ABAJO para elegir los números IP, IP1 , IP2 , 17909 , 17908 , 193, 17911 , 17921,17931,17951,17991 , 068 , 96300
Pg. 13
, 96333 , 196, 190,17969,197 , fuera de seleccionable, por defecto es desactivado . ( IP1 , IP2 son el modo de configuración de IP manual) ; 2 Elija introduzca ajuste manual IP1 , LCD muestra null, introducir los números directamente y pulse la tecla SET para confirmar , la pantalla LCD muestra ip1 código significa que se almacena con éxito el num-bers.Choose 3 Introduzca el manual IP2 ajuste , que es el mismo para el ajuste manual de IP1 .
4.2 en función de enlace 4.2.1 Volver a marcar:En el registro de llamadas o gastos comprobar el estado pre - dial o entrante, pulse la tecla BACK marcará los números seleccionados, Pulse una tecla durante 3 segundos, se añade “ 0 “ antes de los nú-meros de marcación.
Ver 4.2.2 Chequeo de llamada entranteColgado o descolgado, pulse ARRIBA / ABAJO se puede ver la in-formación de la llamada entrante , oprima # llave por 3 segundos , entrará a la llamada entrante comprobar rápidamente el estado en el estado de gancho.
4.2.3 Chequeo de llamada salienteColgado o descolgado, llave CHECK EXCHANGE pulse Enter para estado de activación de salida, pulse tecla Arriba / Abajo pueden ver la salida información; Pulse la tecla * durante 3 segundos entrará a la salida comprobar rápidamente el estado en el estado de gancho.
4.2.4 Marcación previaCuando el telefono este colgado , introduzca los números salientes, use la tecla DEL para borrar el número marcado mal, recoger o pulse BACK marcará los números al terminar de introducir los números de marcación ( At Hand libre estado, que se auto - RD cuando la línea está ocupada ) , pulse la tecla Atrás para 3 segundo se auto añadir “ 0 “ luego de vuelta de todo.
4.2.5 Función DeLEn el estado de dígitos de entrada, utilice la tecla DEL para borrar el número de entrada incorrecta.En el registro de llamada entrante o estado de activación de salida,

Pg. 14
utilice la tecla DEL puede borrar la información , pulse la tecla DEL durante 3 segundos se puede eliminar toda la información.
4.2.6 Memoria VIpPulse ARRIBA / ABAJO para obtener la información de la llamada entrante, pulse VOL key almacenará los números VIP o cancelará. 4.3 función de enlace Off 4.3.1 autO_rDAl lado del estado libre, después de marcar hacia fuera y la línea está ocupada , a continuación, pulse Tecla AUTO - RD entrar remarcación nuevo estado, volverá a sonar al pasar.
4.3.2 autO IpUtilice la opción 8 para ajustar los números Configuración automática de IP , en el gancho o descolgado estado o posterior estado de línea , que marcará auto añadir números de IP antes de la marcar números en el primer número de línea es “ 0 “ , si quieren añadir “ 0 “ volver a marcar , también sumará los números IP primero .
4.3.3 Función de nO IpEn IP automática es el estado abierto, al recoger tecla DEL presione antes de marcar, no se sumará IP y marcar directamente, si SET - Código Ex , pulse la tecla Supr antes de marcar también filtrado el código Ex y marcar directamente .

Pg. 15
InternatIOnaL WarrantY
Terms and Conditions 1. PANACOM warrants the operation of this product to be free from any manufacturing and/or material defect for a period of 12 months from the date of purchase by the user. 2. This warranty is limited to the repair and/or replacement of this product, according to our own criterion, free of charge within the stipulated term and it does not extend to consequential or incidental damages to other products that may be used with this unit. 3. The warranty shall be voided in the following cases: a) repair or attempt to repair by third parties not authorized by the company. b) in case of performing any type of cut in connection cables, plugs, connectors, or other adapters different from the original ones pro-vided by the company. 4. To make this warranty effective, you shall contact the Authorized Service Center of your country and they shall carry out the perti-nent procedure; said information is available at www.panacom.com. In order to start the necessary procedure to get said warranty, you shall hand in the Original Purchase Invoice where the purchase date, dealer name and product identification shall be stated clearly. 5. Transportation, freight, stay and/or insurance expenses, if any, are not covered by this warranty.
Pg. 16
GARANTiA iNTERNACioNALTérminos y Condiciones
1. PANACOM garantiza el funcionamiento de este producto ante cual-quier defecto de fabricación y/o vicio de material por el término de 6 meses contado a partir de la fecha de compra por parte del usuario. 2. Esta garantía se limita a la reparación y/o reemplazo de este pro-ducto, a nuestro criterio, sin cargo alguno dentro del plazo de vi-gencia y no se extiende a daños concecuentes o incidentales hacia otros productos que fueran utilizados con esta unidad. 3. La garantía queda anulada ante: a) reparación o intento de repa-ración por terceros no autorizados por la compañía. b) en el caso de realizar cualquier tipo de corte de los cables de conexión, fichas, co-nectores, u otros adaptadores distintos de los originales de fábrica. 4. Para hacer valer esta garantía se deberá remitir al centro de ser-vicios autorizado de su país quienes gestionarán la misma, dicha información se encuentra www.panacom.com. Para gestionar dicha garantía deberá presentar la Factura Original de compra en la cual deberá constar claramente la fecha de compra, nombre del comer-cio e indentificación del producto. 5. No quedan cubiertos por esta garantía gastos de traslado, flete, estadía, y/o seguro si los hubiera.
Pg. 17
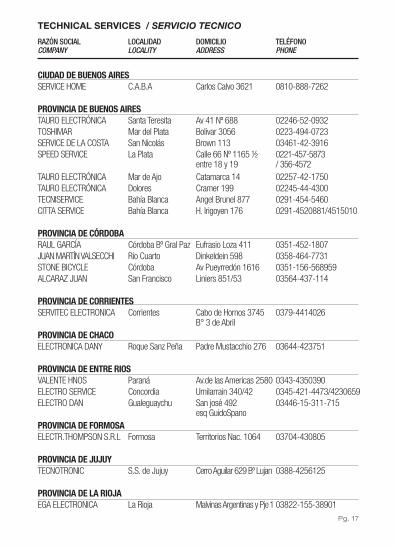
Razón Social localidad domicilio TeléfonoCompany LoCaLity address phone
Ciudad de Buenos airesSERVICE HOME C.A.B.A Carlos Calvo 3621 0810-888-7262
ProvinCia de Buenos airesTAURO ELECTRÓNICA Santa Teresita Av 41 Nº 688 02246-52-0932TOSHIMAR Mar del Plata Bolivar 3056 0223-494-0723SERVICE DE LA COSTA San Nicolás Brown 113 03461-42-3916SPEED SERVICE La Plata Calle 66 Nº 1165 ½ 0221-457-5873
entre 18 y 19 / 356-4572TAURO ELECTRÓNICA Mar de Ajo Catamarca 14 02257-42-1750TAURO ELECTRÓNICA Dolores Cramer 199 02245-44-4300TECNISERVICE Bahía Blanca Angel Brunel 877 0291-454-5460CITTA SERVICE Bahía Blanca H. Irigoyen 176 0291-4520881/4515010
ProvinCia de CórdoBaRAUL GARCÍA Córdoba Bº Gral Paz Eufrasio Loza 411 0351-452-1807JUAN MARTÍN VALSECCHI Río Cuarto Dinkeldein 598 0358-464-7731STONE BICYCLE Córdoba Av Pueyrredón 1616 0351-156-568959ALCARAZ JUAN San Francisco Liniers 851/53 03564-437-114
ProvinCia de CorrientesSERVITEC ELECTRONICA Corrientes Cabo de Hornos 3745 0379-4414026
B° 3 de AbrilProvinCia de ChaCoELECTRONICA DANY Roque Sanz Peña Padre Mustacchio 276 03644-423751
ProvinCia de entre riosVALENTE HNOS Paraná Av.de las Americas 2580 0343-4350390ELECTRO SERVICE Concordia Urnilarrain 340/42 0345-421-4473/4230659ELECTRO DAN Gualeguaychu San josé 492 03446-15-311-715
esq GuidoSpano ProvinCia de FormosaELECTR.THOMPSON S.R.L Formosa Territorios Nac. 1064 03704-430805
ProvinCia de JuJuyTECNOTRONIC S.S. de Jujuy Cerro Aguilar 629 Bº Lujan 0388-4256125 ProvinCia de La rioJa EGA ELECTRONICA La Rioja Malvinas Argentinas y Pje 1 03822-155-38901
teCHnICaL serVICes / SERVICIO TECNICO

Pg. 18
ProvinCia de mendoza PLAY SERVICE Mendoza San Juan 1630 0261-489-9691OMEGA.COM San Rafael Gutierrez 489 02627-429-206
ProvinCia de misiones TOTAL SERVICE Posadas Chacra 32-33 edif 18 03764-47-1360
escalera 38 dto A PBProvinCia de neuquén ELECTRONICA INTEGRAL Neuquén Comb. de S. Lorenzo 445 0299-155-717212SOSA PAGANO SERVICIO Zapala Ejercito Argentino 229 02942-421980ZENER ELECTRONICA San M. de los Andes Elordi 614 02972-425155NORTE SERV ELECTRO. Chos Malal Catamarca 56 02942-155-77671
ProvinCia de rio negro ELECTRO POWER Cipolletti J Kennedy 70 0299-478-2300
ProvinCia de saLta ELECTRONICA SALTA Salta Alberdi 510 0387-422-3498CASA EL GATO Tartagal Alberdi 11 03875-422-849
ProvinCia de san Juan CAMPORA ERNESTO San Juan Laprida oeste 533 0264- 4084125
ProvinCia de santa Fe ELECTROAUDITEL Rafaela Pellegrini 86 03492-570068METAL CARCARAÑA Carcarañá Río Colorado 940 0341-4624782STA. FE ELECTRONICA Santa Fe Blas Parera 9282 0342-4891088SET INGENIERIA Rosario España 470 0341-425-8180
ProvinCia de santiago deL estero ING.RAUL BARCHINI Sgo.del Estero Rivadavia 833 0385-423872/4223755
ProvinCia de tuCumán CASA SILVESTRO Tucumán San Juan 610 0381-421-5763SERVICE ELECTR. CENTRAL Tucumán Salta 190 0381-421-9230/ 155-308894
Razón Social localidad domicilio TeléfonoCompany LoCaLity address phone


![PA Driver's Manual [2011]](https://static.documents.pub/doc/80x56/577d218a1a28ab4e1e9574ae/pa-drivers-manual-2011.jpg)


