22
SCIEX Anion Analysis Kit For P/ACE™ MDQ and P/ACE™ MDQ plus Capillary Electrophoresis Systems Instruction Guide A49108AE May 2015

SCIEX Anion Analysis KitFor P/ACE™ MDQ and P/ACE™ MDQ plus Capillary Electrophoresis Systems
Instruction Guide
A49108AEMay 2015

AB Sciex Pte. Ltd and its affiliates disclaims all warranties with respect to this document, expressed or implied, including but not limited to those of merchantability or fitness for a particular purpose. In no event shall AB Sciex Pte. Ltd. and its affiliates be liable, whether in contract, tort, warranty, or under any statute or on any other basis for special, incidental, indirect, punitive, multiple or consequential damages in connection with or arising from this document, including but not limited to the use thereof.
For research use only. Not for use in diagnostic procedures.
The trademarks mentioned herein are the property of AB Sciex Pte. Ltd. or their respective owners.
AB SCIEX™ is being used under license and SCIEX Separations is a part of AB Sciex.
© 2015 AB Sciex
Find us on the World Wide Web at www.sciex.com.
AB Sciex500 Old Connecticut PathFramingham, MA 01701USA
SCIEX Anion Analysis Kit Instruction Guide
2 of 22 A49108AE
Contents
Chapter 1 Using the Anion Analysis Kit . . . . . . . . . . . . . . . . . . . . . . . . . . . . . . . . 5
Introduction . . . . . . . . . . . . . . . . . . . . . . . . . . . . . . . . . . . . . . . . . . . . . . . . . . . . . .5Safety . . . . . . . . . . . . . . . . . . . . . . . . . . . . . . . . . . . . . . . . . . . . . . . . . . . . . . . .5
Materials and Reagents . . . . . . . . . . . . . . . . . . . . . . . . . . . . . . . . . . . . . . . . . . . .6Storing Kit Components . . . . . . . . . . . . . . . . . . . . . . . . . . . . . . . . . . . . . . . . . . .6
Cleaning Vial Caps . . . . . . . . . . . . . . . . . . . . . . . . . . . . . . . . . . . . . . . . . . . . . . . .7Turning on the UV Lamp . . . . . . . . . . . . . . . . . . . . . . . . . . . . . . . . . . . . . . . . . . . .7Cleaning the Capillary Interface . . . . . . . . . . . . . . . . . . . . . . . . . . . . . . . . . . . . . .7Installing the Capillary . . . . . . . . . . . . . . . . . . . . . . . . . . . . . . . . . . . . . . . . . . . . . .7Conditioning a New Capillary . . . . . . . . . . . . . . . . . . . . . . . . . . . . . . . . . . . . . . . .8Storing the Capillary . . . . . . . . . . . . . . . . . . . . . . . . . . . . . . . . . . . . . . . . . . . . . . .8Preparing the Buffer Trays . . . . . . . . . . . . . . . . . . . . . . . . . . . . . . . . . . . . . . . . . .8Preparing the Sample . . . . . . . . . . . . . . . . . . . . . . . . . . . . . . . . . . . . . . . . . . . . . .9
PCR Vial Setup–P/ACE MDQ System . . . . . . . . . . . . . . . . . . . . . . . . . . . . . .10Universal Vial Setup–P/ACE MDQ plus System . . . . . . . . . . . . . . . . . . . . . . .11
Running Methods . . . . . . . . . . . . . . . . . . . . . . . . . . . . . . . . . . . . . . . . . . . . . . . .11Initial Conditions for All Methods . . . . . . . . . . . . . . . . . . . . . . . . . . . . . . . . . . .12Time Programs for Anion Separation Methods . . . . . . . . . . . . . . . . . . . . . . . .13Time Program for Anion Shutdown Method . . . . . . . . . . . . . . . . . . . . . . . . . .14
Checking System Performance . . . . . . . . . . . . . . . . . . . . . . . . . . . . . . . . . . . . . .14Using the Anion Organic Test Mix . . . . . . . . . . . . . . . . . . . . . . . . . . . . . . . . . .14Using the Anion Inorganic Test Mix . . . . . . . . . . . . . . . . . . . . . . . . . . . . . . . . .15
Integration Parameters . . . . . . . . . . . . . . . . . . . . . . . . . . . . . . . . . . . . . . . . . . . .15Troubleshooting . . . . . . . . . . . . . . . . . . . . . . . . . . . . . . . . . . . . . . . . . . . . . . . . .16
Appendix A Filter Installation . . . . . . . . . . . . . . . . . . . . . . . . . . . . . . . . . . . . . . . .17
Installing the 230 nm Filter . . . . . . . . . . . . . . . . . . . . . . . . . . . . . . . . . . . . . . . . .17
Appendix B System Configuration . . . . . . . . . . . . . . . . . . . . . . . . . . . . . . . . . . . .19
Configuring the P/ACE™ MDQ or P/ACE™ MDQ plus System . . . . . . . . . . . . .19Activating Caesar Integration . . . . . . . . . . . . . . . . . . . . . . . . . . . . . . . . . . . . .21
Instruction Guide SCIEX Anion Analysis Kit
A49108AE 3 of 22

Contents
SCIEX Anion Analysis Kit Instruction Guide
4 of 22 A49108AE
1
Using the Anion Analysis KitIntroductionThe SCIEX Anion Analysis Kit contains the supplies necessary for the separation and quantitation of anions, using the SCIEX P/ACE MDQ and P/ACE MDQ plus Capillary Electrophoresis Systems. Each anion kit yields approximately 500 tests.
This kit permits the analysis of small inorganic anions and organic acids, which are often UV transparent. For this reason, the separation buffer contains a chromophore, and detection is achieved in indirect mode.
The separation method is performed under reverse polarity so that the negatively charged ions migrate toward the anode (the positively-charged electrode). In addition, the capillary is dynamically coated with a polycation, which reverses the electro-osmotic flow (EOF) toward the anode, thus reducing the separation time while maximizing migration time reproducibility.
IMPORTANT: The main focus of this application is in the biopharmaceutical market. This product can also be used for environmental testing and food and beverage markets. This product is for research use only. It is not for use in diagnostic procedures. No clinical decision or patient notification may be made based on results using this research assay.
Safety Refer to the Safety Data Sheets (SDS) information, available at sciex.com/safety-data-sheets, regarding the proper handling of materials and reagents. Always follow standard laboratory safety guidelines.
Note: The system must be equipped with a UV detector and a 230 nm filter to perform this assay.
Instruction Guide SCIEX Anion Analysis Kit
A49108AE 5 of 22

Using the Anion Analysis Kit
Materials and Reagents
Storing Kit ComponentsUpon receipt, store all components at room temperature and away from direct sunlight.
Table 1-1 Kit Contents (PN A53537)
Component QuantityAnion Coating 1
Anion Separation Buffer 1
Conditioner — Na 1
Anion Acid Rinse 1
Anion Internal Standard 1
Anion Organic Test Mix 1
Anion Inorganic Test Mix 1
Capillary, 50 cm, 75 µm I.D. 3 pieces
Rinse Solution 1
Ion Analysis Insert 1
Table 1-2 Materials Required but Not Included in This Kit
Description Part Number
P/ACE SystemMDQ MDQ plus
230 nm filter (see note below) 144433
Adequate pipettes and pipette tips
PCR vials (100-pack) 144709
2 mL glass vials (100-pack) 144980
Red caps for 2 mL glass vials (100-pack) 144648
PCR vial holders (50-pack) 144657
PCR vial springs (10-pack) 358821
Gray caps for PCR vials (50-pack) 144656
Universal plastic vials (100-pack) A62251
Blue rubber caps for universal vials (100-pack) A62250
Note: A 230 nm filter is required for the analysis. This filter is included with the P/ACE MDQ plus system and is installed at position 4. However, it is not provided for the P/ACE MDQ system and must be purchased separately.
SCIEX Anion Analysis Kit Instruction Guide
6 of 22 A49108AE
Using the Anion Analysis Kit
Cleaning Vial Caps
1. Using a clean beaker, rinse the vial caps twice with double-deionized (DDI) water. Do not use soap.
2. Let the caps soak in DDI water for at least one hour, making sure the caps are completely submerged.
3. Remove the caps from the water.
4. To dry the caps, either place them in an oven set at 55°C for two hours, or allow them to dry overnight at room temperature covered by clean, lint-free laboratory tissue.
The vial caps become compressed and lose elasticity during use, which can lead to pressure failures and current leakage errors. Therefore, reusing caps is not recommended.
Turning on the UV LampTurn on the UV lamp and allow the system to warm up for at least 30 minutes prior to experimentation.
Cleaning the Capillary InterfaceCarefully clean the system electrodes and interface block as described in the “Maintenance Procedure” section of the instrument manual. Repeat this procedure after every 24 hours of operation.
Installing the Capillary1. Install a 75 µm I.D., 60.2 cm long (50 cm from injection site to detector) fused-silica
capillary into a capillary cartridge using the Capillary Cartridge Rebuild Instructions (PN 144655).
2. Use an 800 µm aperture in the cartridge. This aperture is labeled with an “8.”
3. After the capillary has been installed in the cartridge, insert the cartridge in the instrument.
4. Close the cartridge cover and tray cover.
Note: The vial caps may contain impurities that can be detected with the Anion Analysis Kit, therefore wash the caps before use.
Instruction Guide SCIEX Anion Analysis Kit
A49108AE 7 of 22

Using the Anion Analysis Kit
Conditioning a New CapillaryAfter installing a new capillary, rinse the capillary for one minute with Conditioner — Na. Wait four minutes, then rinse for 30 seconds with Conditioner — Na. Rinse for one minute with Rinse Solution. Use 20 psi of pressure for all rinses.
Storing the CapillaryAfter use, store the capillary on the instrument or in the original capillary storage box, with both ends submerged in Rinse Solution. Do not allow the capillary ends to dry, because the capillary may become plugged.
After a long storage period, or at the start of each day, condition the capillary using the Capillary Conditioning method described in Running Methods on page 11.
Caution: Do not share capillaries between applications. If the capillary has been used for cation analysis, do not use it for anion analysis.
Preparing the Buffer TraysUse the correct vials and caps for your system:
• For the P/ACE MDQ system–use glass vials and red caps
• For the P/ACE MDQ plus system–use universal vials and blue caps
Replace all vials after twenty runs or after 24 hours inside the instrument. The increment option in the method can be used to automatically increment the vials every twenty runs on both buffer trays.
1. Fill the vials with equal volumes of each reagent in Table 1-1 and position them in the buffer trays (refer to Figure 1.1).
Use the correct volume for your system:
• For the P/ACE MDQ system–1.4 mL
• For the P/ACE MDQ plus system–1.5 mL
2. In the Waste position, place a vial partially filled with Rinse Solution.
Use the correct volume for your system:
• For the P/ACE MDQ system–700 µL
• For the P/ACE MDQ plus system–600 µL
3. Close each vial with a clean cap.
SCIEX Anion Analysis Kit Instruction Guide
8 of 22 A49108AE

Using the Anion Analysis Kit
4. Load the Inlet Buffer and Outlet Buffer trays in the instrument.
Note: The rinse solution used in this kit is ultra-purified water specifically for capillary electrophoresis analysis of ions.
Preparing the SampleDepending on the concentration of the analytes, the sample should be injected as is or diluted. Dilution should be done so that the final concentration of the sample anions is between 5 ppm and 200 ppm. Special care should be taken to verify the pH of the sample, which should be above pH 5. A 50 mM NaOH solution can be used to dilute the sample and adjust its pH value.
The Anion Internal Standard (I.S.) consists of 30 mM sodium octanoate (sodium caprylate), which is equivalent to 4296 ppm of octanoate ion. The I.S. can be used in the quantitation of the sample anions. To use it, dilute the I. S. by a factor of 50 with the sample. For example, mix 4 µL of I.S. with 200 µL of sample to yield 86 ppm of octanoate ion.
Figure 1.1 Buffer Tray Configuration for Anion Analysis
Note: When analyzing fluoride and/or phosphate ions, fill a vial with Anion Acid Rinse and place it in position F1 of the Inlet Buffer Tray. The use of the Anion Acid Rinse is required when running the Anion Inorganic Test Mix to avoid peak tailing.
Instruction Guide SCIEX Anion Analysis Kit
A49108AE 9 of 22
Using the Anion Analysis Kit
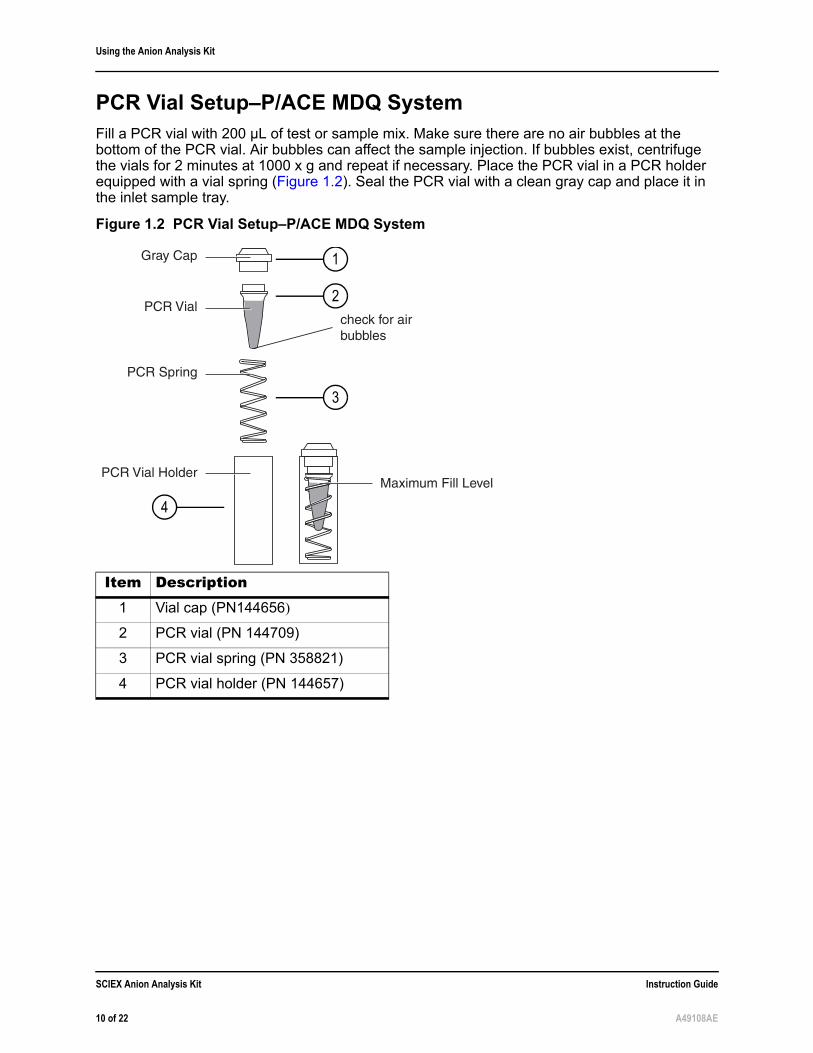
PCR Vial Setup–P/ACE MDQ SystemFill a PCR vial with 200 µL of test or sample mix. Make sure there are no air bubbles at the bottom of the PCR vial. Air bubbles can affect the sample injection. If bubbles exist, centrifuge the vials for 2 minutes at 1000 x g and repeat if necessary. Place the PCR vial in a PCR holder equipped with a vial spring (Figure 1.2). Seal the PCR vial with a clean gray cap and place it in the inlet sample tray.
Figure 1.2 PCR Vial Setup–P/ACE MDQ System
Item Description1 Vial cap (PN144656)
2 PCR vial (PN 144709)
3 PCR vial spring (PN 358821)
4 PCR vial holder (PN 144657)
1
4
3
2
SCIEX Anion Analysis Kit Instruction Guide
10 of 22 A49108AE

Using the Anion Analysis Kit
Universal Vial Setup–P/ACE MDQ plus SystemFill a PCR vial or micro vial with 200 µL of test or sample mix. Make sure there are no air bubbles at the bottom of the vial. Air bubbles can affect the sample injection.If bubbles exist, centrifuge the vials for 2 minutes at 1000 x g and repeat if necessary. Place the vial into the universal vial and seal with a blue cap (Figure 1.3).–P
p
Running MethodsThree methods are required for performing anion analysis:
• Anion Capillary Conditioning
• Anion Separation
• Anion Shutdown
Save all three methods, with their respective names, in the 32 Karat folder.
Figure 1.3 Universal Vial Setup–P/ACE MDQ plus System
Item Description1 Universal vial cap (PNA62250)
2 PCR vial (PN 144709)
3 Universal vial (PN A62251)
4 Micro vial inside of universal vial
Note: These methods can be downloaded from sciex.com/products/capillary-electrophoresis-instruments/p/ace-mdq-plus (click Resources).
2
1
3 43
Instruction Guide SCIEX Anion Analysis Kit
A49108AE 11 of 22

Using the Anion Analysis Kit
Initial Conditions for All MethodsAll three methods utilize the same Initial Conditions (Figure 1.4) and UV Detector Settings (Figure 1.5).
Note: When analyzing samples containing inorganic anions or organic acids that absorb in the low UV (such as nitrate and azide), the detection wavelength (Figure 1.5) should be set at 254 nm for optimal detection. Save this method with a different name, such as “Anion Separation Method at 254 nm”.
Figure 1.4 Initial Conditions for Anion Capillary Conditioning, Anion Separation, and Anion Shutdown Methods
Figure 1.5 UV Detector Initial Conditions for Anion Capillary Conditioning, Anion Separation, and Anion Shutdown Methods
SCIEX Anion Analysis Kit Instruction Guide
12 of 22 A49108AE
Using the Anion Analysis Kit
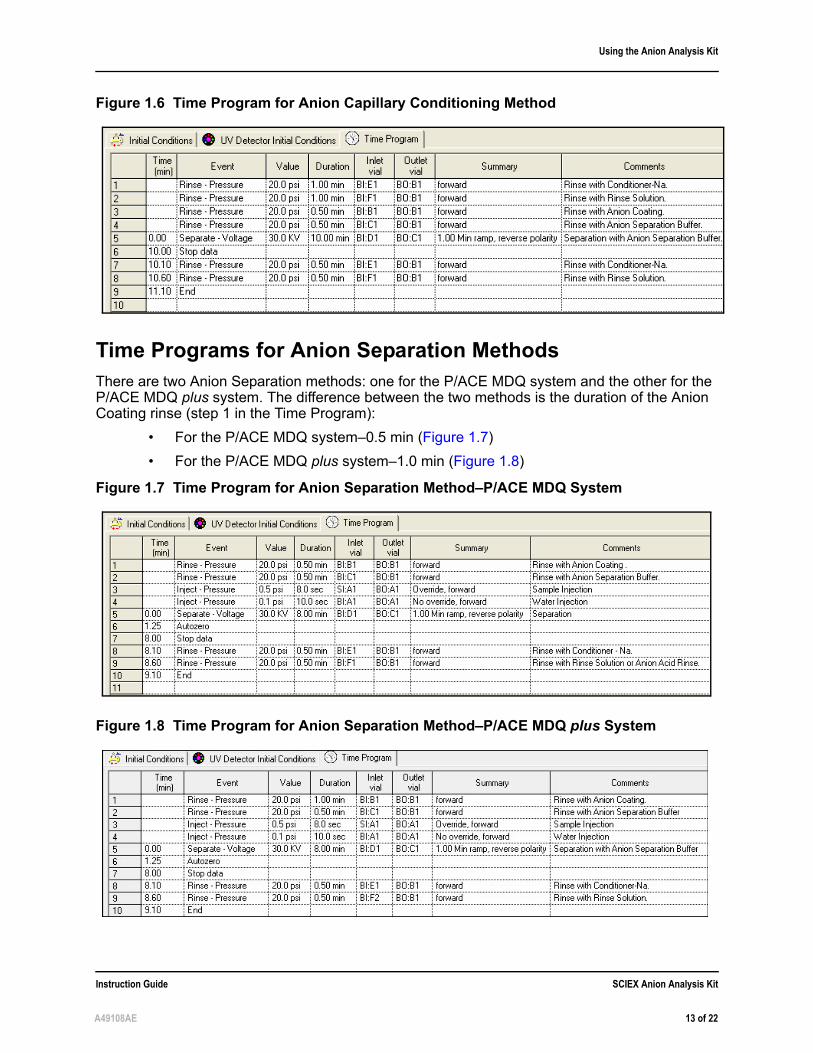
Time Programs for Anion Separation MethodsThere are two Anion Separation methods: one for the P/ACE MDQ system and the other for the P/ACE MDQ plus system. The difference between the two methods is the duration of the Anion Coating rinse (step 1 in the Time Program):
• For the P/ACE MDQ system–0.5 min (Figure 1.7)
• For the P/ACE MDQ plus system–1.0 min (Figure 1.8)
Figure 1.6 Time Program for Anion Capillary Conditioning Method
Figure 1.7 Time Program for Anion Separation Method–P/ACE MDQ System
Figure 1.8 Time Program for Anion Separation Method–P/ACE MDQ plus System
Instruction Guide SCIEX Anion Analysis Kit
A49108AE 13 of 22
Using the Anion Analysis Kit
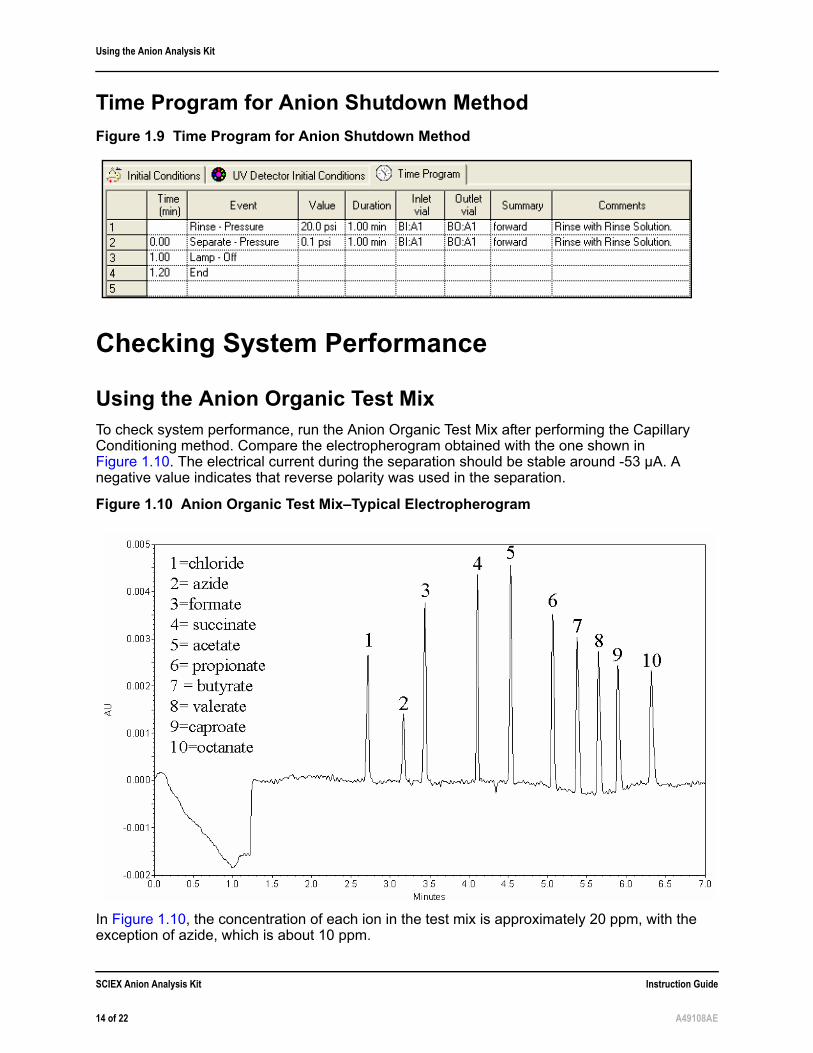
Time Program for Anion Shutdown Method
Checking System Performance
Using the Anion Organic Test MixTo check system performance, run the Anion Organic Test Mix after performing the Capillary Conditioning method. Compare the electropherogram obtained with the one shown in Figure 1.10. The electrical current during the separation should be stable around -53 µA. A negative value indicates that reverse polarity was used in the separation.
In Figure 1.10, the concentration of each ion in the test mix is approximately 20 ppm, with the exception of azide, which is about 10 ppm.
Figure 1.9 Time Program for Anion Shutdown Method
Figure 1.10 Anion Organic Test Mix–Typical Electropherogram
SCIEX Anion Analysis Kit Instruction Guide
14 of 22 A49108AE
Using the Anion Analysis Kit
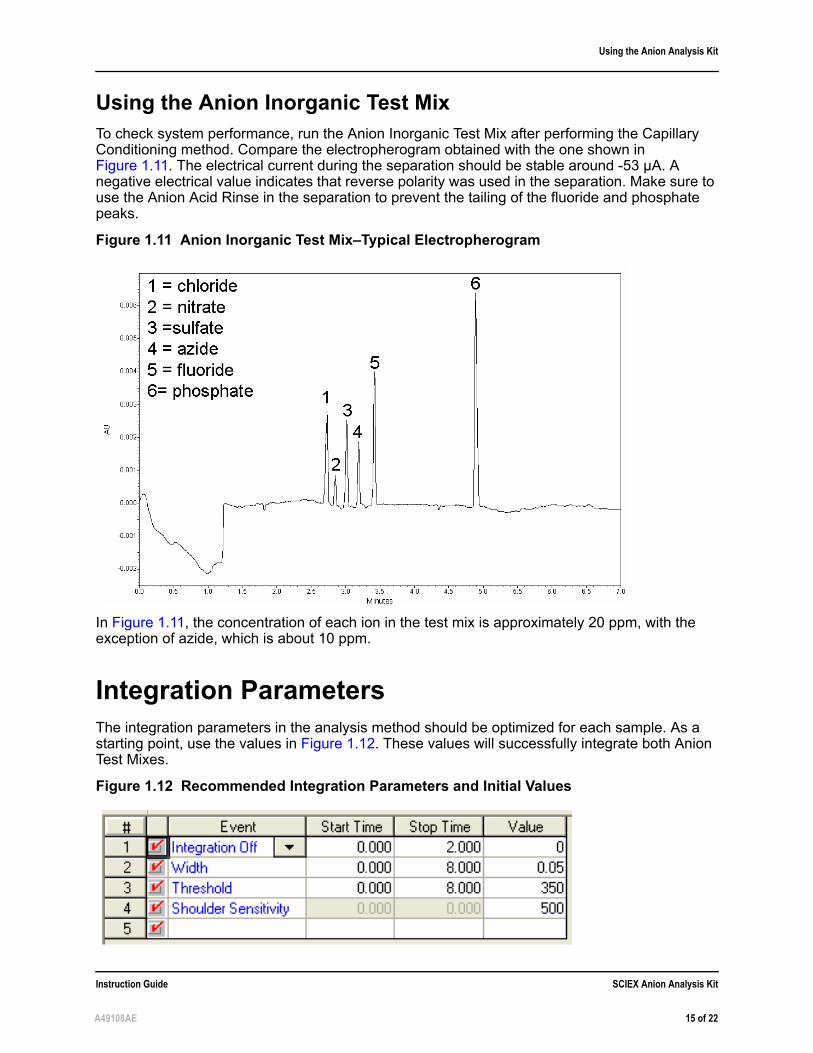
Using the Anion Inorganic Test MixTo check system performance, run the Anion Inorganic Test Mix after performing the Capillary Conditioning method. Compare the electropherogram obtained with the one shown in Figure 1.11. The electrical current during the separation should be stable around -53 µA. A negative electrical value indicates that reverse polarity was used in the separation. Make sure to use the Anion Acid Rinse in the separation to prevent the tailing of the fluoride and phosphate peaks.
In Figure 1.11, the concentration of each ion in the test mix is approximately 20 ppm, with the exception of azide, which is about 10 ppm.
Integration ParametersThe integration parameters in the analysis method should be optimized for each sample. As a starting point, use the values in Figure 1.12. These values will successfully integrate both Anion Test Mixes.
Figure 1.11 Anion Inorganic Test Mix–Typical Electropherogram
Figure 1.12 Recommended Integration Parameters and Initial Values
Instruction Guide SCIEX Anion Analysis Kit
A49108AE 15 of 22
Using the Anion Analysis Kit
The parameters have the following effects on the integration:
• Integration off sets time intervals in the electropherogram that are not integrated.
• Width sets the sensitivity of the peak detection regarding changes in the baseline.
• Threshold determines how high a peak must rise above the baseline noise before it is recognized as a peak.
• Shoulder sensitivity enables the detection of shoulders in large peaks. Its value specifies the slope value for splitting a peak.
• (Optional, not shown) Minimum Cluster Distance can be used to split peaks when shoulder sensitivity does not provide proper integration. It specifies the distance between non-baseline separated peaks so that they are not identified as one peak.
Additional help is available from the 32 Karat Software Online Help.
Troubleshooting
Problem Possible Cause Corrective ActionUnstable current Problem with capillary Replace capillary with new one
No peaks Wrong polarity in method Use reverse polarity in method
No sample vial or sample at wrong location
Check sample vial position
No stable migration time
Buffer depletion Replace all buffer vials after every 20 runs
Presence of ghost peaks
Contaminated buffer vials Replace all buffer vials after every 20 runs
Vial caps are wet Replace caps with clean, dry caps
Vial caps are dirty Always use clean caps
Fluoride and phosphate peaks are tailing
Using Rinse Solution instead of Anion Acid Rinse.
Make sure that a vial filled with Anion Acid Rinse is placed at position F1 and successive incremental positions in the Inlet Buffer Tray
Anion peaks have longer migration times.
Rinse time with Anion Coating is too short.
Increase Anion Coating rinse time from 0.5 min to 1.0 min in the separation method when using the P/ACE MDQ plus system.
SCIEX Anion Analysis Kit Instruction Guide
16 of 22 A49108AE

A
Filter InstallationInstalling the 230 nm Filter
1. Before installing the 230 nm filter, check the condition of the filter as instructed in the appropriate guide for your system.
• For the P/ACE MDQ system–“Installation UV detector wavelength filters” in the P/ACE MDQ Installation and Maintenance Guide (PN A36419).
• For the P/ACE MDQ plus system–”Install Wavelength Filters for the UV Detector” in the P/ACE MDQ plus System Maintenance Guide (PN B54955).
2. Set the buffer trays to the load position in the Direct Control window.
3. Lift the cartridge cover door and allow the coolant to drain from the capillary cartridge.
4. Turn off the instrument.
5. Loosen the two thumb screws and lift the insertion bar.
6. Remove the capillary cartridge.
7. Loosen the thumb screws and remove the optics source assembly.
8. Wearing clean gloves, remove the filter wheel access cover and rotate the filter wheel to the correct position for your system:
• For the P/ACE MDQ system–position 6
• For the P/ACE MDQ plus system–position 4
9. Place the 230 nm filter at the appropriate position with the reflective side facing inward (toward the back of the instrument). Do not touch the filter with your hands.
10. Reinstall the filter wheel cover on the optics source assembly.
11. Replace the optics source assembly and tighten the two thumb screws.
12. Place the cartridge inside the instrument, lower the insertion bar, and tighten the two thumb screws.
13. Close the cartridge cover door.
14. Turn on the instrument.
15. Follow the instructions in Configuring the P/ACE™ MDQ or P/ACE™ MDQ plus System on page 19 to configure the 32 Karat software for performing anion analysis.
Note: A 230 nm filter is required for the analysis. This filter is included in the P/ACE MDQ plus system and is installed at position 4. However, it is not provided for the P/ACE MDQ system and must be purchased separately.
Instruction Guide SCIEX Anion Analysis Kit
A49108AE 17 of 22
Filter Installation
SCIEX Anion Analysis Kit Instruction Guide
18 of 22 A49108AE

B
System ConfigurationConfiguring the P/ACE™ MDQ or P/ACE™ MDQ plus System
IMPORTANT: Make sure that the system is turned on, and that the UV detector has been installed.
1. Open the 32 Karat software.
2. Right-click in the right pane of the Enterprise window.
3. Select New > Instrument.
A new icon that looks like a question mark appears.
4. Right-click the question mark icon and select Rename.
5. Rename this icon Anion.
6. Right-click the Anion icon and select Configure.
7. Select P/ACE MDQ CE as the instrument type and click Configure.
A new window opens.
8. Click the UV detector icon on the left.
9. Click the Green arrow. The UV detector icon should now be on the right side under Configured Modules.
10. Double-click the UV Detector icon to display the configuration settings.
Figure B.1 P/ACE MDQ CE Configuration for Anion Analysis
Instruction Guide SCIEX Anion Analysis Kit
A49108AE 19 of 22

System Configuration
If necessary, edit the settings to match the appropriate figure.
• For the P/ACE MDQ system–refer to Figure B.2.
• For the P/ACE MDQ plus system–refer to Figure B.3.
11. Click OK to accept the detector configuration.
Figure B.2 Anion Analysis Settings–P/ACE MDQ System
Figure B.3 Anion Analysis Settings–P/ACE MDQ plus System
SCIEX Anion Analysis Kit Instruction Guide
20 of 22 A49108AE

System Configuration
12. Follow the instructions in Activating Caesar Integration.
Activating Caesar IntegrationThe Caesar Integration must be activated in the anion configuration to perform peak integration and quantitation.
1. In the CE Configuration dialog, click Options (Figure B.4)
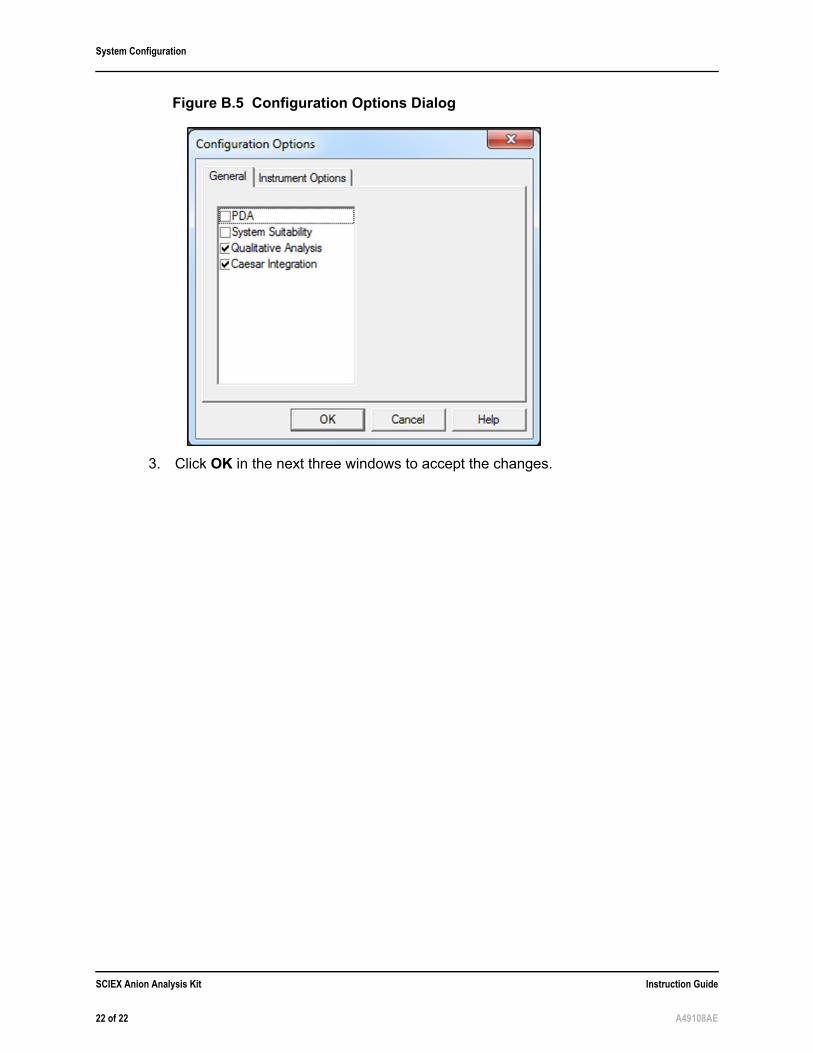
2. Under General, make sure that only Qualitative Analysis and Caesar Integration are selected (Figure B.5).
Figure B.4 P/ACE MDQ CE Configuration for Anion Analysis
Instruction Guide SCIEX Anion Analysis Kit
A49108AE 21 of 22
System Configuration
3. Click OK in the next three windows to accept the changes.
Figure B.5 Configuration Options Dialog
SCIEX Anion Analysis Kit Instruction Guide
22 of 22 A49108AE


![P2020 QorIQ Integrated Processor Hardware[1] ma [8] mcke [2] mck [3] mdm [7] lgpl [3] mdq [41] mdq [61] mdm [5] mdqs [5] mdq [60] lad [13] mdq [56] lwe [1] lad [15] lad [11] lclk [1]](https://static.documents.pub/doc/80x56/6006250dd91d683d27518c79/p2020-qoriq-integrated-processor-1-ma-8-mcke-2-mck-3-mdm-7-lgpl-3-mdq.jpg)


