44
ParTech, Inc. 8383 Seneca Turnpike, New Hartford, NY 13413 | p. 800.458.6898 | www.partech.com EMV Card Processor Configuration Guide August 2019 — Revision 7

ParTech, Inc. 8383 Seneca Turnpike, New Hartford, NY 13413 | p. 800.458.6898 | www.partech.com
EMV Card Processor Configuration Guide
August 2019 — Revision 7

Publication Details
PAR Brink POS EMV Card Processor Configuration Guide ii
Publication Details
Copyright Copyright © 2016–2019 by PAR Technology Corporation, Inc. All Rights Reserved. This product and related
documentation are protected by copyright and are distributed under licenses restricting their use, copying,
distribution, and decompilation. No part of this product or related documentation may be reproduced in any form
by any means without prior written authorization of PAR and any requisite licensors.
Trademarks, Patents, etc. Brink, Brink POS, PAR, ParTech, and all of their respective logos are trademarks or registered trademarks of PAR
Technology Corporation, Inc.
PAR holds the following patents in the United States that pertain to the Brink POS software suite: 6,382,850;
6,871,325; 8,146,077. PAR may have other patents, patent applications, trademarks, copyrights, or other
intellectual property rights covering subject matter in this document.
Except as expressly provided in any written license agreement from PAR, the furnishing of this document does not
convey any license to these patents, trademarks, copyright, or other intellectual property.
Microsoft® and Windows® are registered trademarks of Microsoft Corporation in the United States and other
countries. Other product names may be trademarks or registered trademarks of their respective companies and
are hereby acknowledged.
Disclaimer This document is provided for informational purposes only. PAR makes no warranties, either expressed or implied,
in this document. Information in this document is subject to change without notice. Risk of use and responsibility
for the results of use of this document lie with the user.
Revision History August 2016, Revision 1: Initial release.
August 2016, Revision 2: Updated Features Matrix to include additional gateway/processor combinations.
October 2016, Revision 3: Updated Features Matrix to include additional features supported by various gateways
and processors.
November 2016, Revision 4: Updated Features Matrix to indicate VeriFone Point Enterprise certification for First
Data.
August 2018, Revision 5: Redesigned Features Matrix, added PAR Pay section.
July 2019, Revision 6: Updated Firewall Port and Exclusion Info.
August 2019, Revision 7: Updated Features Matrix and details for PAR Certified Configurations, content formatting.
PAR Brink POS EMV Card Processor Configuration Guide iii
Table of Contents
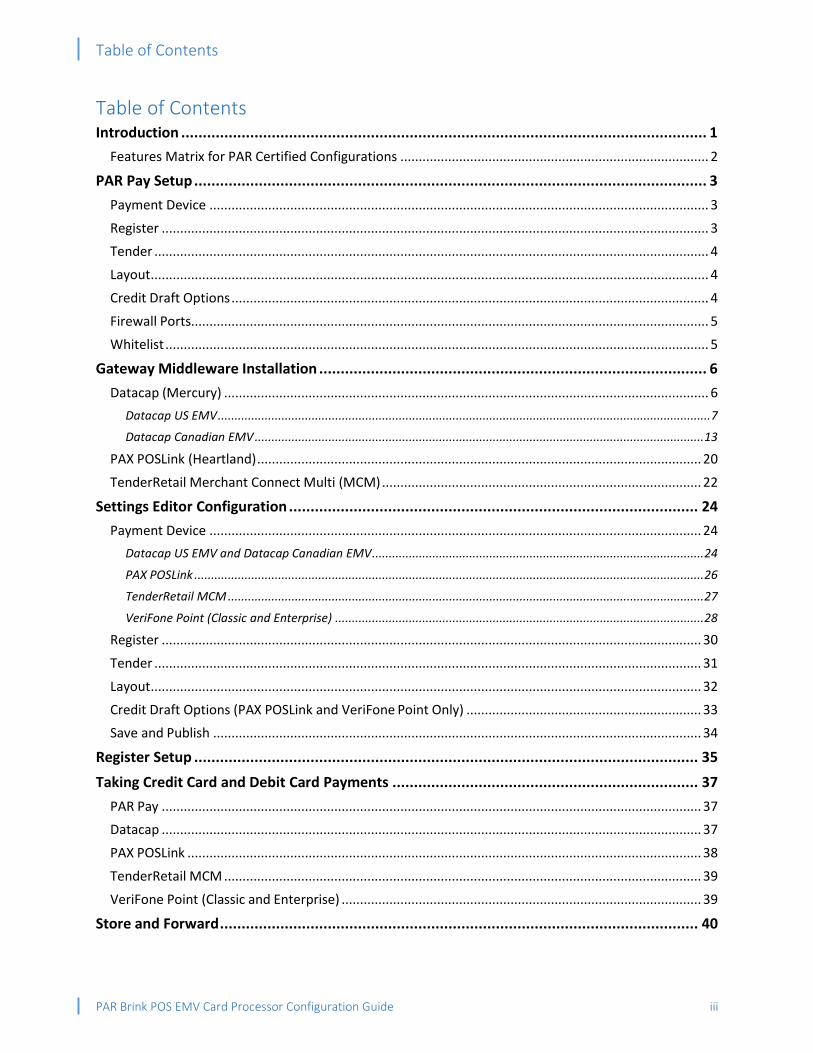
Table of Contents Introduction .......................................................................................................................... 1
Features Matrix for PAR Certified Configurations .................................................................................... 2
PAR Pay Setup ....................................................................................................................... 3
Payment Device ........................................................................................................................................ 3
Register ..................................................................................................................................................... 3
Tender ....................................................................................................................................................... 4
Layout ........................................................................................................................................................ 4
Credit Draft Options .................................................................................................................................. 4
Firewall Ports............................................................................................................................................. 5
Whitelist .................................................................................................................................................... 5
Gateway Middleware Installation .......................................................................................... 6
Datacap (Mercury) .................................................................................................................................... 6
Datacap US EMV ................................................................................................................................................... 7
Datacap Canadian EMV ...................................................................................................................................... 13
PAX POSLink (Heartland) ......................................................................................................................... 20
TenderRetail Merchant Connect Multi (MCM) ....................................................................................... 22
Settings Editor Configuration ............................................................................................... 24
Payment Device ...................................................................................................................................... 24
Datacap US EMV and Datacap Canadian EMV ................................................................................................... 24
PAX POSLink ........................................................................................................................................................ 26
TenderRetail MCM .............................................................................................................................................. 27
VeriFone Point (Classic and Enterprise) .............................................................................................................. 28
Register ................................................................................................................................................... 30
Tender ..................................................................................................................................................... 31
Layout ...................................................................................................................................................... 32
Credit Draft Options (PAX POSLink and VeriFone Point Only) ................................................................ 33
Save and Publish ..................................................................................................................................... 34
Register Setup ..................................................................................................................... 35
Taking Credit Card and Debit Card Payments ....................................................................... 37
PAR Pay ................................................................................................................................................... 37
Datacap ................................................................................................................................................... 37
PAX POSLink ............................................................................................................................................ 38
TenderRetail MCM .................................................................................................................................. 39
VeriFone Point (Classic and Enterprise) .................................................................................................. 39
Store and Forward ............................................................................................................... 40

PAR Brink POS EMV Card Processor Configuration Guide iv
Table of Contents
Multiple Payments .............................................................................................................. 40
Voiding Payments ................................................................................................................ 40
Reports ............................................................................................................................... 40

Introduction
PAR Brink POS EMV Card Processor Configuration Guide 1
Introduction EMV stands for Europay-MasterCard-Visa. It is the chipped card technology that allows for more secure
transactions when used in EMV-equipped payment terminals and ATMs. Brink POS supports several
payment processors for accepting EMV card payments.
NOTE: This document only covers EMV payment systems. Non-EMV credit and debit card processing is
beyond the scope of this guide.
The tables on the following pages display information regarding payment gateways, processors, and the
features available to each combination. The rows are:
• Gateway: The “engine” of the payment processing system. This can be software installed on the
POS system, a firmware operating system on the payment device, or an external server through
which the payment data is passed. The Tender Retail, PAX, and Datacap gateways are locally-
installed software; the VeriFone Point Enterprise gateway is a firmware operating system; and
PAR Pay and the VeriFone Point Classic gateway use external servers.
• Processor: The company that processes the payment.
• Payment Device Model: The specific device or devices that the gateway/processor combination
requires.
• Country: The country or countries in which the gateway/processor combination is valid.
• Features: A selection of features that each combination of gateway and processor has.

PAR Brink POS EMV Card Processor Configuration Guide 2
Introduction
Features Matrix for PAR Certified Configurations GATEWAY PAR Pay Datacap US EMV Datacap Canadian
EMV PAX POSLink Tender Retail
Merchant Connect Multi
VeriFone Point Classic
VeriFone Point Enterprise
PROCESSOR Assorted* Mercury NETePay (Vantiv Integrated
Payments)
Mercury NETePay (Vantiv Integrated
Payments)
Heartland Portico
Chase Paymentech
Vantiv First Data
PAYMENT DEVICE MODEL Assorted* VeriFone VX805 VeriFone VX805 PAX S300 Ingenico iPP320, VeriFone VX820
VeriFone MX915,
VX820, VX805
VeriFone MX915
COUNTRY USA, Canada USA Canada USA Canada USA USA
F E A T U R E S
Adjust payment at register Yes Yes No No No Yes No
Can print signature line on chit Yes No No No No Yes Yes
Cash back on debit No No No No No Yes No
Debit Yes Yes Yes No Yes Yes Yes
Gift card support on device Yes No No No No Pass-through Pass-through
Loyalty input No No No No No Yes Yes
Manual entry Yes No No No No No No
Adjust tip at Register Yes Yes No No No Yes No
Prints chit on device No Yes Yes Yes Yes Yes Yes
Print tip line on chit Yes No No No No Yes Yes
Prompt for CC/Debit at device Yes Yes No No Yes Yes Yes
Prompt for CC/Debit at Register No No Yes Yes No No No
Receipt threshold Yes Yes Yes No No No No
Show items on device No No No No No Yes Yes
Signature capture No No No No No Yes Yes
Store and forward Yes No No No No Yes Yes
Swipe ahead No No No No No Yes Yes * See PAR Pay Information Sheet
Features supported by all PAR certified configurations: ApplePay, bypass PIN, prompt for swipe/tap/insert, refund to CC or Debit, swipe and EMV, tip prompt.
Features supported ONLY by PAR Pay: Device and state management/alerts, display choice of tip percentages, quick chip, real- time reporting, settlement reporting with alerts, toggle EMV on/off, tokenization, virtual terminal, void CC with card not present (via Portal), void Debit with card not present (via Portal).
PAR Pay Setup
PAR Brink POS EMV Card Processor Configuration Guide 3
PAR Pay Setup PAR Pay is a unique payment processing service that is owned and operated by PAR and is fully
integrated into Brink POS. Payment devices are purchased from PAR instead of from the payment
processor and come pre-configured with all the necessary information to begin processing order
payments right away. The following settings need to be set in Settings Editor, however, before PAR Pay
can process credit card and gift card payments.
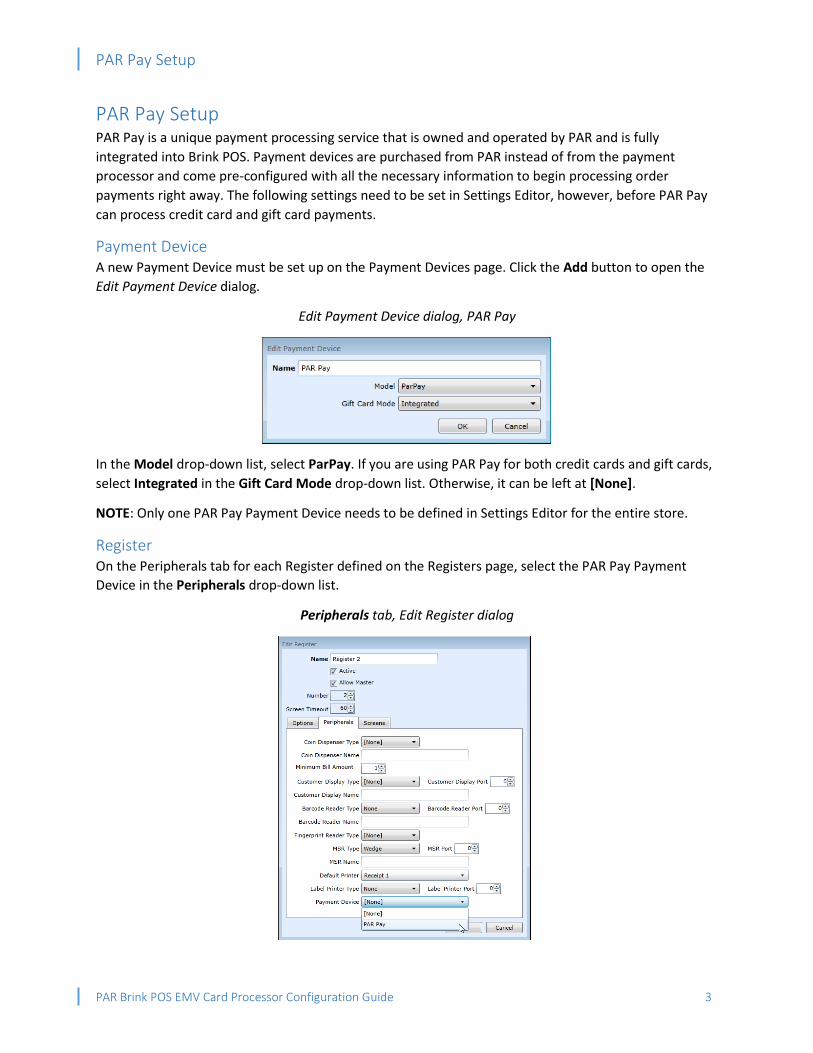
Payment Device A new Payment Device must be set up on the Payment Devices page. Click the Add button to open the
Edit Payment Device dialog.
Edit Payment Device dialog, PAR Pay
In the Model drop-down list, select ParPay. If you are using PAR Pay for both credit cards and gift cards,
select Integrated in the Gift Card Mode drop-down list. Otherwise, it can be left at [None].
NOTE: Only one PAR Pay Payment Device needs to be defined in Settings Editor for the entire store.
Register On the Peripherals tab for each Register defined on the Registers page, select the PAR Pay Payment
Device in the Peripherals drop-down list.
Peripherals tab, Edit Register dialog

PAR Pay Setup
PAR Brink POS EMV Card Processor Configuration Guide 4
Tender Tenders must be created for all types of credit card accepted, and one must also be created for debit
transactions. If you are using PAR Pay for gift cards, then one must be created for gift card transactions
as well. The Active check box must be checked for all Tenders.
Edit Tender dialog
Layout Only one button with the ‘Payment Device’ behavior needs to be created for both credit card and debit
card transactions. The Do Not Prompt radio button should be left selected in the Prompt Employee for
Payment Method dialog. See Layout later in this document for full instructions on how to create and
configure a ‘Payment Device’ button.
If you are using PAR Pay for gift cards as well, a separate button with the ‘Tender’ behavior (configured
to use the gift card Tender) must be created.
Credit Draft Options The only settings on the Printing > Credit tab on the Options page that apply to PAR Pay are the draft
and suggested tip options on the left. No other Options settings apply.
Printing > Credit tab on Options page
If you do not wish to print Credit Drafts go to Options > Payment > Credit Options > Set Minimum Printing
Threshold to desired dollar amount, check 'Card Present' checkbox. A customer can dip, swipe, tap or
PAR Pay Setup
PAR Brink POS EMV Card Processor Configuration Guide 5
manually enter their card to pay for their order and the Merchant Copy receipt(s) will only print if the set
threshold has been exceeded.
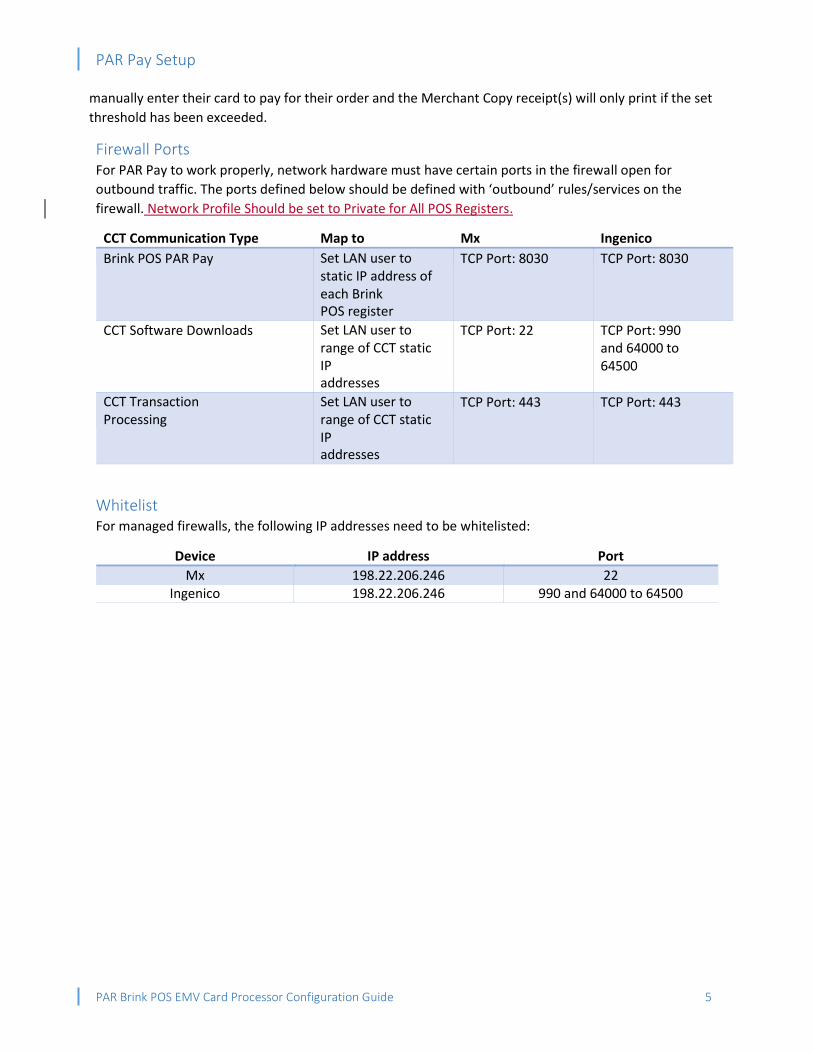
Firewall Ports For PAR Pay to work properly, network hardware must have certain ports in the firewall open for
outbound traffic. The ports defined below should be defined with ‘outbound’ rules/services on the
firewall. Network Profile Should be set to Private for All POS Registers.
CCT Communication Type Map to Mx Ingenico
Brink POS PAR Pay Set LAN user to static IP address of each Brink POS register
TCP Port: 8030 TCP Port: 8030
CCT Software Downloads Set LAN user to range of CCT static IP addresses
TCP Port: 22 TCP Port: 990 and 64000 to 64500
CCT Transaction Processing
Set LAN user to range of CCT static IP addresses
TCP Port: 443 TCP Port: 443
Whitelist For managed firewalls, the following IP addresses need to be whitelisted:
Device IP address Port
Mx 198.22.206.246 22 Ingenico 198.22.206.246 990 and 64000 to 64500

PAR Brink POS EMV Card Processor Configuration Guide 6
Gateway Middleware Installation
Gateway Middleware Installation Four of the seven supported gateways require software to be installed onto the same system that is
running the Brink POS software.
Datacap (Mercury) The Datacap EMV payment processing software comes in several parts and can be downloaded by going
to http://cdn.brinkpos.net/Downloads.html or by clicking the More downloads… link on the
Administrator Portal’s Help > Downloads page. Every terminal connected to the payment device must
have all parts installed and running.
Brink POS is certified by Vantiv Integrated Payments to process transactions through their Mercury
payment service and the Datacap gateway in both the United States and Canada. The software that
must be installed differs depending on country.
Administrator Portal Help > Downloads screen
Location of software download links on PAR Brink POS Downloads web page

PAR Brink POS EMV Card Processor Configuration Guide 7
Gateway Middleware Installation
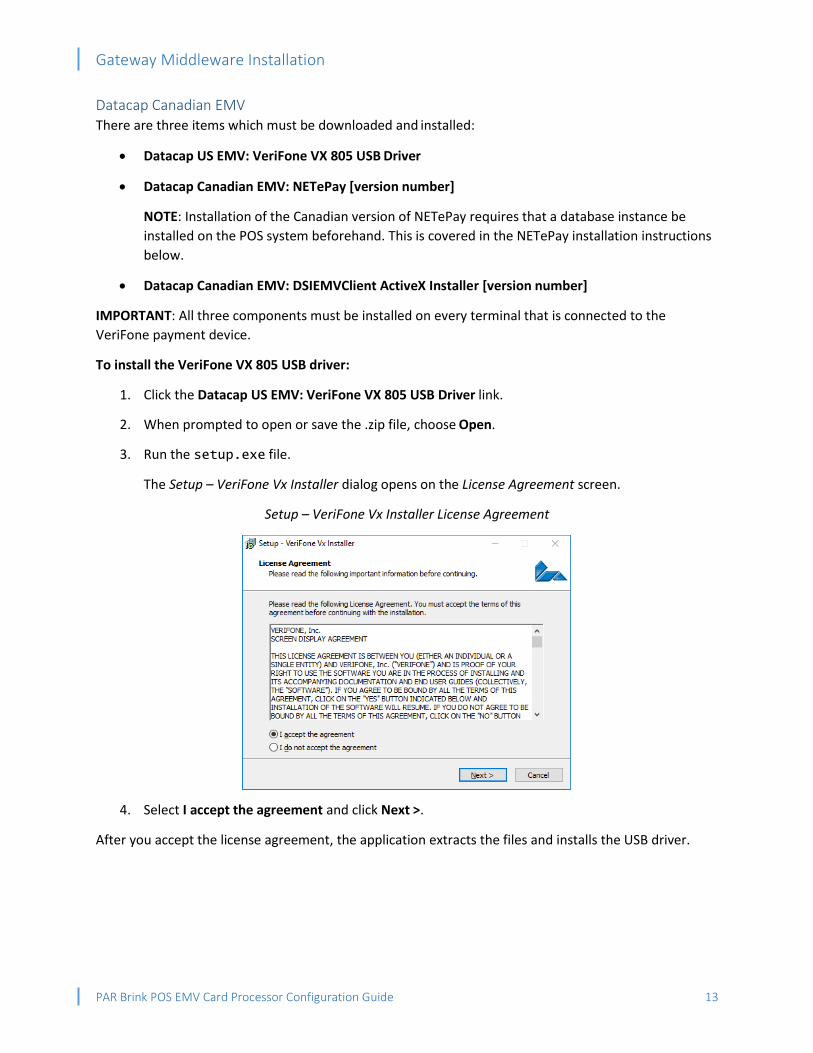
Datacap US EMV There are three items which must be downloaded and installed:
• Datacap US EMV: VeriFone VX 805 USB Driver
• Datacap US EMV: NETePay for Mercury “In-Store” [version number]
• Datacap US EMV: dsiEMVUS
IMPORTANT: All three components must be installed on every terminal that is connected to the
VeriFone payment device.
To install the VeriFone VX 805 USB driver:
1. Click the Datacap US EMV: VeriFone VX 805 USB Driver link.
2. When prompted to open or save the .zip file, choose Open.
3. Run the setup.exe file.
The Setup – VeriFone Vx Installer dialog opens on the License Agreement screen.
Setup – VeriFone Vx Installer License Agreement
4. Select I accept the agreement and click Next >.
After you accept the license agreement, the application extracts the files and installs the USB driver.

PAR Brink POS EMV Card Processor Configuration Guide 8
Gateway Middleware Installation
To install NETePay for Mercury “In-Store”:
1. Click the Datacap US EMV: NETePay for Mercury “In-Store” [version number] link.
The Datacap Systems website opens in a new tab/window.
2. Scroll down to the section called Step 2 – Install NETePay Mercury US EMV – MPH [version
number] and click the Download button on the far right.
Datacap Systems website downloads page
A message is displayed: “All Datacap software is provided ‘as is’….”
Datacap Systems disclaimer
3. Read the statement and click the I Agree button.
4. When prompted to run or save the .exe file, choose Run.
The NETePay [version number] Mercury Payment Systems installer window opens on the
Welcome screen.
5. Click Next > to go to the License Agreement screen.
Datacap NETePay License Agreement screen

PAR Brink POS EMV Card Processor Configuration Guide 9
Gateway Middleware Installation
6. Select I accept the terms of the license agreement and click Next >.
The Customer Information screen is displayed.
Datacap NETePay Customer Information screen
7. Enter your User Name and Organization and click Next >.
8. On the next screen, verify the installation settings, then click Install.
The InstallShield Wizard installs the NETePay software. When the installation is finished, the
InstallShield Wizard Completed screen is displayed.
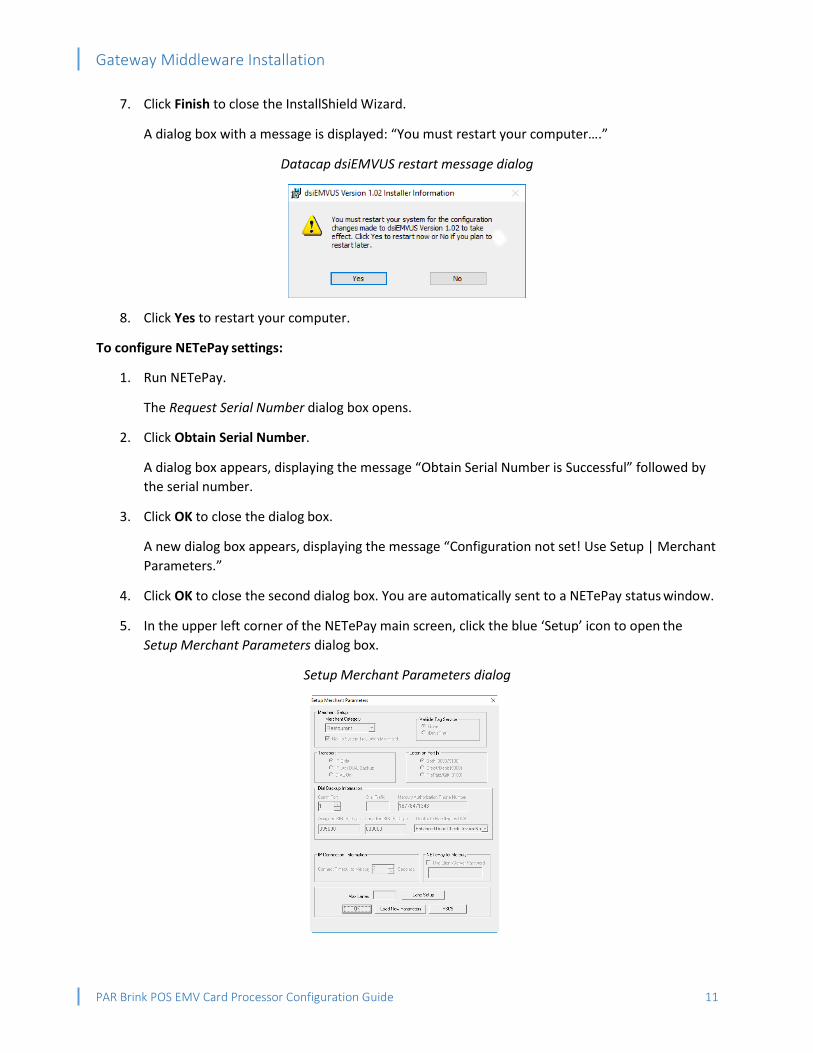
9. Click Finish to close the InstallShield Wizard.
A dialog box with a message is displayed: “You must restart your computer….”
Datacap NETePay restart message dialog
10. Click Yes to restart your computer.
PAR Brink POS EMV Card Processor Configuration Guide 10
Gateway Middleware Installation
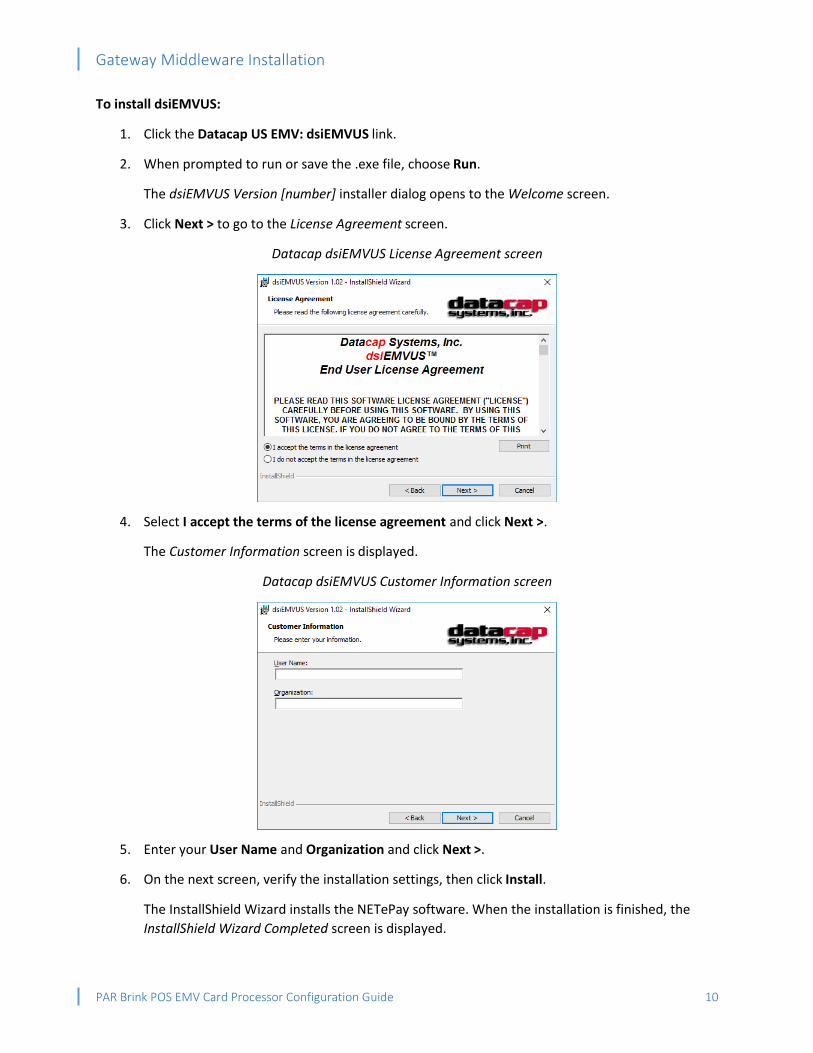
To install dsiEMVUS:
1. Click the Datacap US EMV: dsiEMVUS link.
2. When prompted to run or save the .exe file, choose Run.
The dsiEMVUS Version [number] installer dialog opens to the Welcome screen.
3. Click Next > to go to the License Agreement screen.
Datacap dsiEMVUS License Agreement screen
4. Select I accept the terms of the license agreement and click Next >.
The Customer Information screen is displayed.
Datacap dsiEMVUS Customer Information screen
5. Enter your User Name and Organization and click Next >.
6. On the next screen, verify the installation settings, then click Install.
The InstallShield Wizard installs the NETePay software. When the installation is finished, the
InstallShield Wizard Completed screen is displayed.
PAR Brink POS EMV Card Processor Configuration Guide 11
Gateway Middleware Installation
7. Click Finish to close the InstallShield Wizard.
A dialog box with a message is displayed: “You must restart your computer….”
Datacap dsiEMVUS restart message dialog
8. Click Yes to restart your computer.
To configure NETePay settings:
1. Run NETePay.
The Request Serial Number dialog box opens.
2. Click Obtain Serial Number.
A dialog box appears, displaying the message “Obtain Serial Number is Successful” followed by
the serial number.
3. Click OK to close the dialog box.
A new dialog box appears, displaying the message “Configuration not set! Use Setup | Merchant
Parameters.”
4. Click OK to close the second dialog box. You are automatically sent to a NETePay status window.
5. In the upper left corner of the NETePay main screen, click the blue ‘Setup’ icon to open the
Setup Merchant Parameters dialog box.
Setup Merchant Parameters dialog

PAR Brink POS EMV Card Processor Configuration Guide 12
Gateway Middleware Installation
6. Click Load New Parameters at the bottom of the dialog.
NOTE: If the parameters load correctly, then the system is ready as soon as you click OK to close
the Setup Merchant Parameters dialog box. STOP HERE.
However, if the parameters do not load correctly, then a dialog box appears, displaying the
message “Parameter load failed – Error (PSCS):… Attempt activation?” Proceed to step 7.
7. Click Yes to open the Collect Merchant Information dialog box.
8. Select I Have My Deployment ID and click Next.
9. Enter the deployment ID given to you by Vantiv on the Setup Sheet and click Next.
10. Verify your information. If it is correct, click the Yes, This Is the Correct Merchant button.
A dialog box appears, displaying the message “Parameters Successfully Loaded. Some changes
may not take effect until you ‘OK’ the Setup Screen.”
11. Click OK to close the dialog box.
12. Click OK on the Setup Merchant Parameters dialog to close it.
NOTE: The NETePay application must be running in order for the VeriFone payment device to
communicate with Brink POS.
PAR Brink POS EMV Card Processor Configuration Guide 13
Gateway Middleware Installation
Datacap Canadian EMV There are three items which must be downloaded and installed:
• Datacap US EMV: VeriFone VX 805 USB Driver
• Datacap Canadian EMV: NETePay [version number]
NOTE: Installation of the Canadian version of NETePay requires that a database instance be
installed on the POS system beforehand. This is covered in the NETePay installation instructions
below.
• Datacap Canadian EMV: DSIEMVClient ActiveX Installer [version number]
IMPORTANT: All three components must be installed on every terminal that is connected to the
VeriFone payment device.
To install the VeriFone VX 805 USB driver:
1. Click the Datacap US EMV: VeriFone VX 805 USB Driver link.
2. When prompted to open or save the .zip file, choose Open.
3. Run the setup.exe file.
The Setup – VeriFone Vx Installer dialog opens on the License Agreement screen.
Setup – VeriFone Vx Installer License Agreement
4. Select I accept the agreement and click Next >.
After you accept the license agreement, the application extracts the files and installs the USB driver.

PAR Brink POS EMV Card Processor Configuration Guide 14
Gateway Middleware Installation
To install NETePay:
1. Click the Datacap Canadian EMV: NETePay [version number] link.
The Datacap Systems, Inc. website opens in a new tab/window.
2. Click NETePay [version number] to expand the section.
3. In the Rental column, click Mercury Canadian Host EMV - MRH to open the Software Downloads
page for the application.
Datacap Software website download page, top
4. In the section called Step 1 - Install Database, check that the drop-down list in the lower right
corner displays the correct operating system. If it does not, select your operating system in the
drop-down list.
5. Click the Download button to begin the download.
NOTE: If the operating system on your POS server is Windows 7, 8, or 10, then click either the
Download (32 bit) or Download (64 bit) button, depending on which version of these operating
systems (32 bit or 64 bit) you are running.
6. When prompted to run or save the .exe file, choose Run.
7. Go through the InstallShield Wizard and allow it to install the program with all default settings. If
you are prompted to restart your computer, click Yes and then allow the computer to restart.
8. If necessary, repeat steps 1 through 3 to return to the Datacap Systems NETePay Mercury
Canadian Host EMV – MRH 5.05.06 download page.
9. Scroll down to the section called Step 3 – Install NETePay Paymentech Canadian Host EMV –
PNH [version number] and click the Download button on the far right.

PAR Brink POS EMV Card Processor Configuration Guide 15
Gateway Middleware Installation
Datacap Systems website download page, bottom
A message is displayed: “All Datacap software is provided ‘as is’….”
Datacap Systems disclaimer
10. Read the statement and click the I Agree button.
11. When prompted to run or save the .exe file, choose Run.
The NETePay [version number] Mercury Pay EMV installer window opens on the Welcome
screen.
12. Click Next > to go to the License Agreement screen.
Datacap NETePay License Agreement screen
13. Select I accept the terms of the license agreement and click Next >.
The Customer Information screen is displayed

PAR Brink POS EMV Card Processor Configuration Guide 16
Gateway Middleware Installation
Datacap NETePay Customer Information screen
14. Enter your User Name and Organization and click Next >.
15. On the next screen, verify the installation settings, then click Install.
The InstallShield Wizard installs the NETePay software. When the installation is finished, the
InstallShield Wizard Completed screen is displayed.
16. Click Finish to close the InstallShield Wizard.
A dialog box with a message is displayed: “You must restart your computer….”
Datacap NETePay restart message dialog
17. Click Yes to restart your computer.

PAR Brink POS EMV Card Processor Configuration Guide 17
Gateway Middleware Installation
To install DSIEMVClient:
1. Click the Datacap US EMV: DSIEMVClient ActiveX Installer [version number] link.
2. When prompted to run or save the .exe file, choose Run.
The DSIEMVClientX [version number] installer window opens on the Welcome screen.
3. Click Next > to go to the License Agreement screen.
DSI EMV Client License Agreement screen
4. Select I accept the terms of the license agreement and click Next >.
The Customer Information screen is displayed
DSI EMV Client Customer Information screen
5. Enter your User Name and Organization and click Next >.
6. On the next screen, verify the installation settings, then click Install.

PAR Brink POS EMV Card Processor Configuration Guide 18
Gateway Middleware Installation
The InstallShield Wizard installs the DSI EMV Client software. When the installation is finished,
the InstallShield Wizard Completed screen is displayed.
7. Click Finish to close the InstallShield Wizard.
8. A dialog box with a message is displayed: “You must restart your computer….”
Datacap NETePay restart message dialog
9. Click Yes to restart your computer.
To configure NETePay settings:
1. Run NETePay.
The Request Serial Number dialog box opens.
2. Click Obtain Serial Number.
A dialog box appears, displaying the message “Obtain Serial Number is Successful” followed by
the serial number.
3. Click OK to close the dialog box.
A new dialog box appears, displaying the message “Configuration not set! Use Setup | Merchant
Parameters.”
4. Click OK to close the second dialog box.
5. In the upper left corner of the NETePay main screen, click the blue “Setup” icon to open the
Setup NETePay Parameters dialog box.
Setup NETePay Parameters dialog box

PAR Brink POS EMV Card Processor Configuration Guide 19
Gateway Middleware Installation
6. Click Load New Parameters at the bottom of the dialog.
A message appears: “After a successful load of parameters, you will have to do an EMV
PARAMETER DOWNLOAD at each Lane. Are you sure?”
7. Click Yes.
NOTE: If the parameters load correctly, then the system is ready as soon as you click OK to close
the Setup Merchant Parameters dialog box. STOP HERE.
However, if the parameters do not load correctly, then a dialog box appears, displaying the
message “Parameter load failed – Error (PSCS):… Attempt activation?” Proceed to step 8.
8. Click Yes to open the Collect Merchant Information dialog box.
9. Select I Have My Deployment ID and click Next.
10. Enter the deployment ID given to you by Vantiv on the setup sheet and click Next.
11. Verify your information. If it is correct, click the Yes, This Is the Correct Merchant button.
A dialog box appears, displaying the message “Parameters Successfully Loaded. Some changes
may not take effect until you ‘OK’ the Setup Screen….”
12. Click OK to close the dialog box.
13. Click OK on the Setup Merchant Parameters dialog to close it.
NOTE: The NETePay application must be running in order for the VeriFone payment device to
communicate with Brink POS.

PAR Brink POS EMV Card Processor Configuration Guide 20
Gateway Middleware Installation
PAX POSLink (Heartland) Brink POS is certified by Heartland Payment Systems to process transactions through the PAX POSLink
gateway. The software can be downloaded by going to http://cdn.brinkpos.net/Downloads.html or by
clicking the More downloads… link on the Administrator Portal’s Help > Downloads page.
Administrator Portal Help > Downloads screen
Location of software download link on PAR Brink POS Downloads web page
PAR Brink POS EMV Card Processor Configuration Guide 21
Gateway Middleware Installation
NOTE: The Brink POS integration with PAX POSLink uses Portico, not Exchange.
To install the Pax POSLink software:
1. Click the Pax POSLink: [version number] link in the Dependencies section of the Downloads
page.
2. When prompted to save or open the .zip file, choose Open.
3. Extract and run the POSLinkSetup.exe file.
4. On the POSLink Setup Wizard dialog, click Setup.
The installer then installs the Pax POSLink software.
PAR Brink POS EMV Card Processor Configuration Guide 22
Gateway Middleware Installation
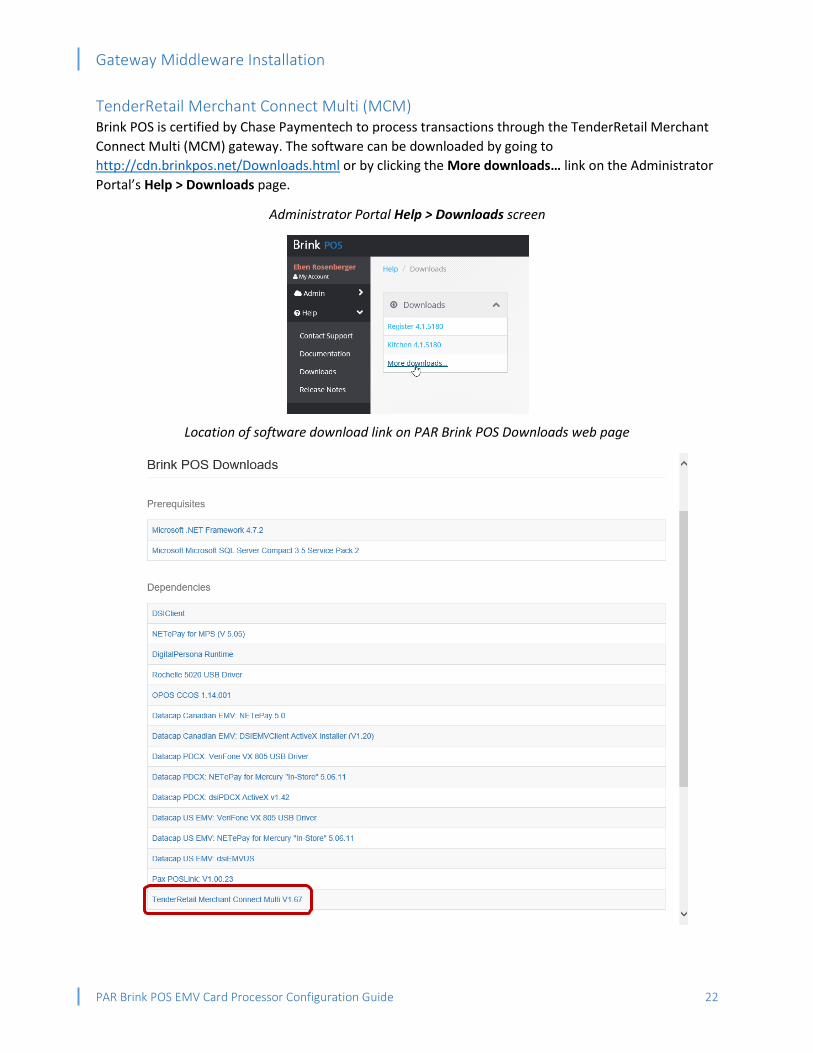
TenderRetail Merchant Connect Multi (MCM) Brink POS is certified by Chase Paymentech to process transactions through the TenderRetail Merchant
Connect Multi (MCM) gateway. The software can be downloaded by going to
http://cdn.brinkpos.net/Downloads.html or by clicking the More downloads… link on the Administrator
Portal’s Help > Downloads page.
Administrator Portal Help > Downloads screen
Location of software download link on PAR Brink POS Downloads web page
PAR Brink POS EMV Card Processor Configuration Guide 23
Gateway Middleware Installation
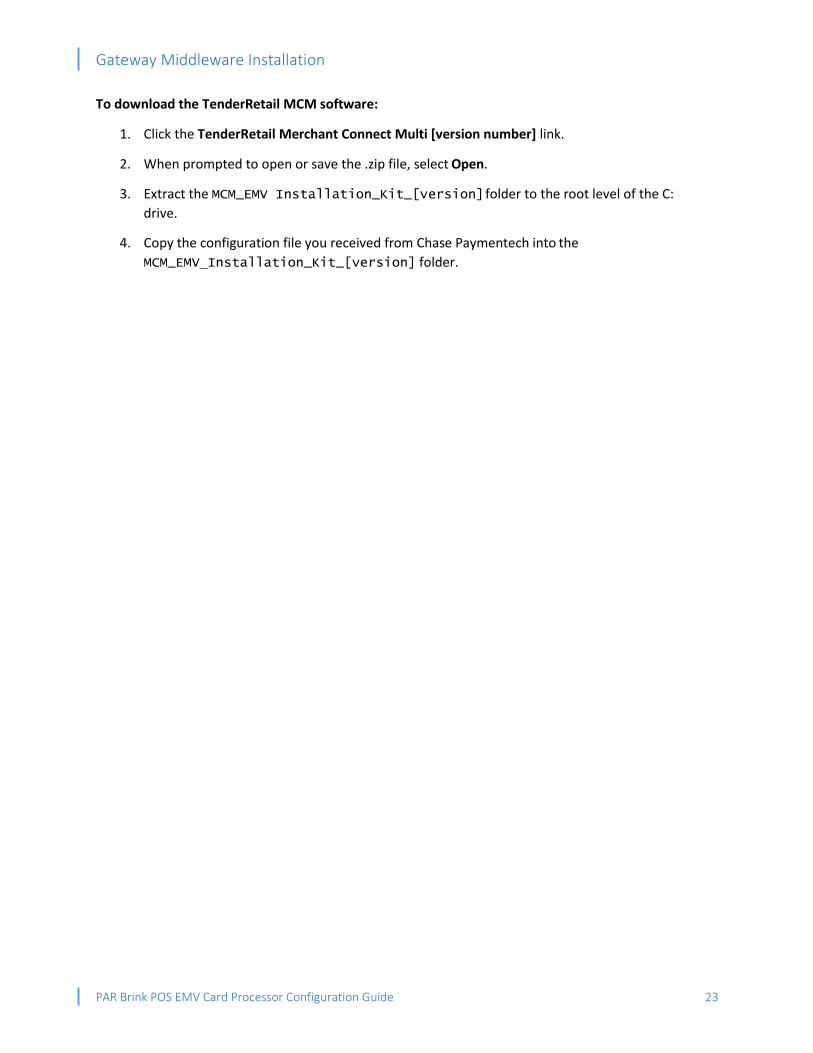
To download the TenderRetail MCM software:
1. Click the TenderRetail Merchant Connect Multi [version number] link.
2. When prompted to open or save the .zip file, select Open.
3. Extract the MCM_EMV Installation_Kit_[version] folder to the root level of the C:
drive.
4. Copy the configuration file you received from Chase Paymentech into the
MCM_EMV Installation_Kit_[version] folder.

PAR Brink POS EMV Card Processor Configuration Guide 24
Settings Editor Configuration
Settings Editor Configuration Several settings must be configured in Settings Editor for Brink POS to recognize and accept data from
the card reader.
Payment Device A new payment device must be added to the Payment Devices section.
Datacap US EMV and Datacap Canadian EMV To create a Datacap EMV payment device:
1. Go to Payment Devices in Settings Editor and click the Add button.
The Edit Payment Device dialog opens.
Edit Payment Device dialog (with Datacap US EMV selected)
2. Enter a Name for the device.
3. In the Model drop-down list, select Datacap US EMV or Datacap Canadian EMV.
Several new options are displayed.
4. In the Processor drop-down list, select Mercury Payment Systems.
5. In the Host List field, enter 127.0.0.1.
6. In the Merchant Id and Terminal Id fields, enter the numbers provided to you by Vantiv on their
Setup Sheet.
7. In the COM Port field, select the number of the COM port that the card reader is using. You may
need to use Device Manager to determine which COM port is being used.

PAR Brink POS EMV Card Processor Configuration Guide 25
Settings Editor Configuration
8. Check or uncheck the following check boxes according to your preference or policy:
• Prompt for Tip: the card reader asks the customer if they wish to add a tip to their
payment.
• Open cash drawer: the cash drawer opens when a tip is added at the payment device.
• Show tip amount: the amount of a tip added at the payment device is displayed on the
register screen.
• Prompt for total: the register’s payment dialog is displayed when the payment device is
selected as the tender method for an order, allowing the cashier to change the amount
of the payment before processing.
9. Click OK.
The new payment device is listed on the Payment Devices page.

PAR Brink POS EMV Card Processor Configuration Guide 26
Settings Editor Configuration
PAX POSLink To create a PAX POSLink payment device:
1. Following the instructions provided in the documentation for your card reader, locate and write
down the device’s IP address.
2. Go to Payment Devices in Settings Editor and click the Add button.
The Edit Payment Device dialog opens.
Edit Payment Device dialog
3. Enter a Name for the device.
4. In the Model drop-down list, select PAX POSLink.
Several new options are displayed.
5. In the IP Address field, enter the IP address you wrote down in step 1.
6. Don’t change the default port number in the Port field.
7. Check or uncheck the following check boxes according to your preference or policy:
• Prompt for Tip: the card reader asks the customer if they wish to add a tip to their
payment.
• Open cash drawer: the cash drawer opens when a tip is added at the payment device.
• Show tip amount: the amount of a tip added at the payment device is displayed on the
register screen.
• Prompt for total: the register’s payment dialog is displayed when the payment device is
selected as the tender method for an order, allowing the cashier to change the amount
of the payment before processing.
8. Click OK.
The new payment device is listed on the Payment Devices page.

PAR Brink POS EMV Card Processor Configuration Guide 27
Settings Editor Configuration
TenderRetail MCM To create a TenderRetail payment device:
1. Go to Payment Devices in Settings Editor and click the Add button. The Edit Payment Device
dialog opens.
Edit Payment Device dialog
2. Enter a Name for the device.
3. In the Model drop-down list, select Tender Retail. The IP Address, Port, and Terminal Id options
are displayed.
4. In the IP Address field, enter the IP address of the host computer. If you are using localhost,
then leave it at 127.0.0.1.
5. In the Port field, leave the default number unchanged.
6. In the Terminal Id field, enter the terminal ID number provided to you by Chase Paymentech.
7. Check or uncheck the following check boxes according to your preference or policy:
• Open cash drawer: the cash drawer opens when a tip is added at the payment device.
• Show tip amount: the amount of a tip added at the payment device is displayed on the
register screen.
• Prompt for total: the register’s payment dialog is displayed when the payment device is
selected as the tender method for an order, allowing the cashier to change the amount
of the payment before processing.
8. If you plan to also accept gift cards, choose the Gift Card Mode using the drop-down list.
• Passthrough: the card reader will act as a magnetic stripe reader for gift card purchases.
This setting does not require any specific gift card processor.
• Integrated: the card reader sends gift card information to ValueLink for processing. This
setting only works with ValueLink as the gift card processor.
9. Click OK.
The new payment device is listed on the Payment Devices page.
PAR Brink POS EMV Card Processor Configuration Guide 28
Settings Editor Configuration
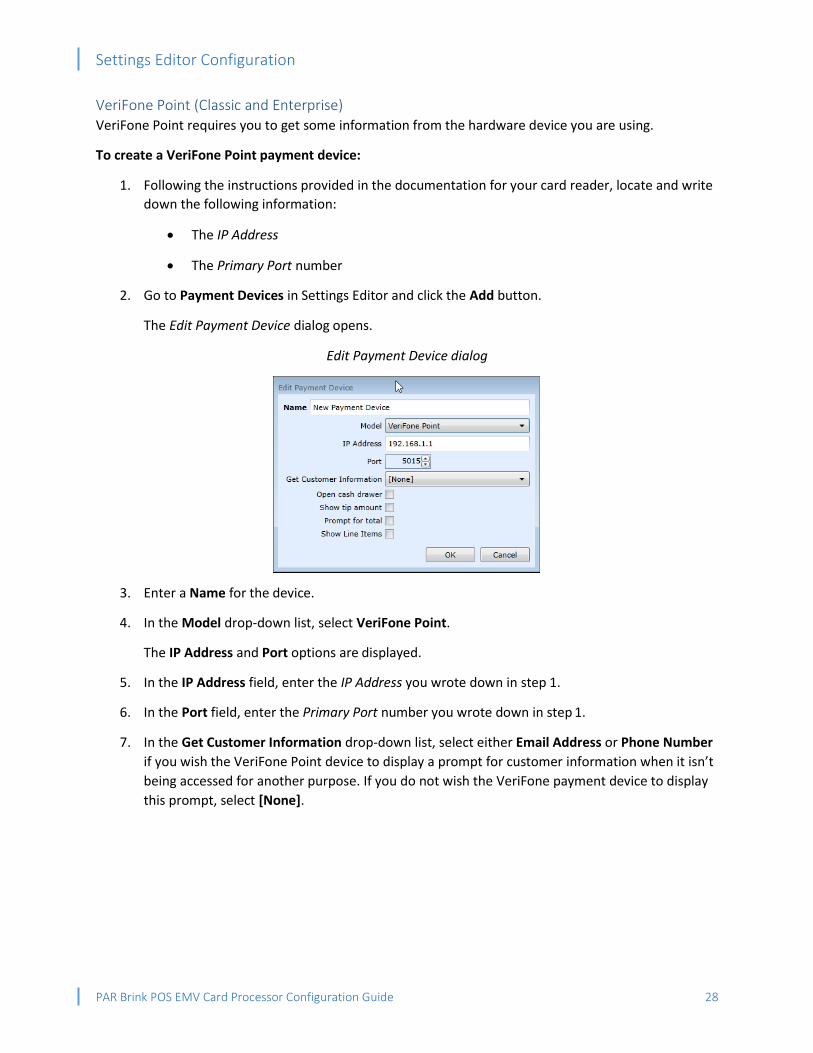
VeriFone Point (Classic and Enterprise) VeriFone Point requires you to get some information from the hardware device you are using.
To create a VeriFone Point payment device:
1. Following the instructions provided in the documentation for your card reader, locate and write
down the following information:
• The IP Address
• The Primary Port number
2. Go to Payment Devices in Settings Editor and click the Add button.
The Edit Payment Device dialog opens.
Edit Payment Device dialog
3. Enter a Name for the device.
4. In the Model drop-down list, select VeriFone Point.
The IP Address and Port options are displayed.
5. In the IP Address field, enter the IP Address you wrote down in step 1.
6. In the Port field, enter the Primary Port number you wrote down in step 1.
7. In the Get Customer Information drop-down list, select either Email Address or Phone Number
if you wish the VeriFone Point device to display a prompt for customer information when it isn’t
being accessed for another purpose. If you do not wish the VeriFone payment device to display
this prompt, select [None].
PAR Brink POS EMV Card Processor Configuration Guide 29
Settings Editor Configuration
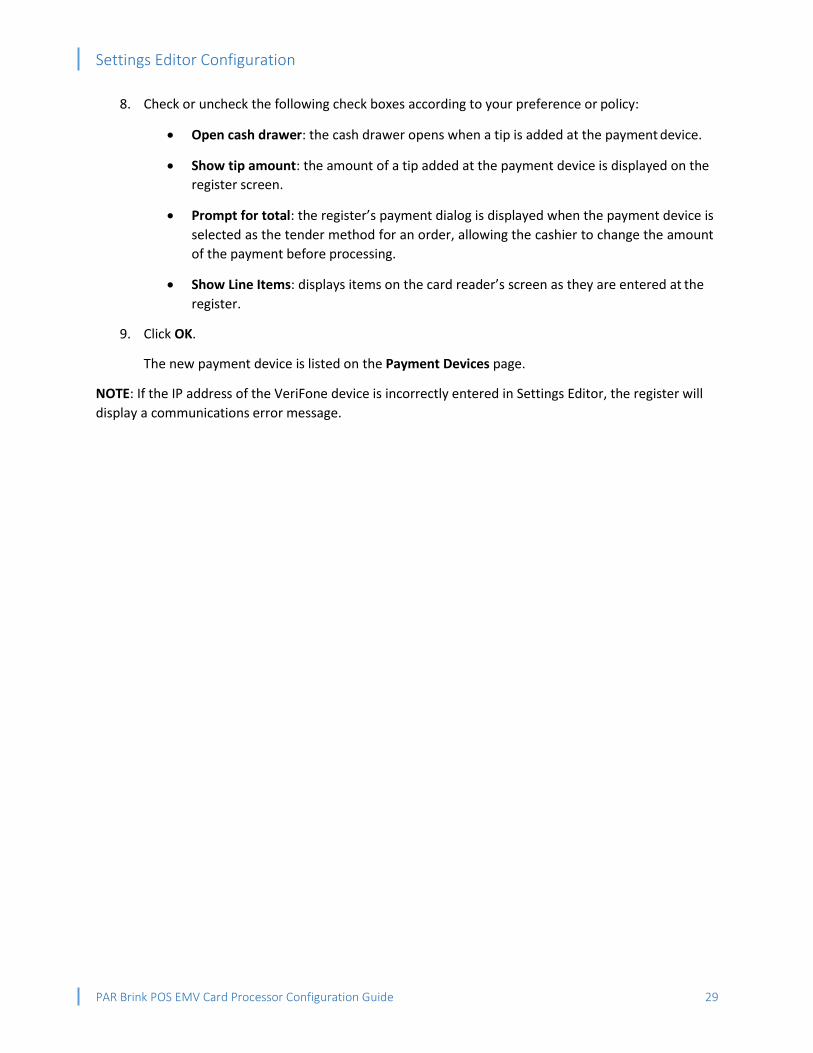
8. Check or uncheck the following check boxes according to your preference or policy:
• Open cash drawer: the cash drawer opens when a tip is added at the payment device.
• Show tip amount: the amount of a tip added at the payment device is displayed on the
register screen.
• Prompt for total: the register’s payment dialog is displayed when the payment device is
selected as the tender method for an order, allowing the cashier to change the amount
of the payment before processing.
• Show Line Items: displays items on the card reader’s screen as they are entered at the
register.
9. Click OK.
The new payment device is listed on the Payment Devices page.
NOTE: If the IP address of the VeriFone device is incorrectly entered in Settings Editor, the register will
display a communications error message.

PAR Brink POS EMV Card Processor Configuration Guide 30
Settings Editor Configuration
Register The register to which the device is attached must have its Payment Device parameter set.
To set up the register:
1. Go to Registers in Settings Editor.
2. Click the name of the register that the card reader is attached to.
The Edit Register dialog opens.
3. Select the Peripherals tab.
4. In the Payment Device drop-down list, select the name of the device.
Setting the Payment Device in the Edit Register Peripherals tab
5. Click OK.

PAR Brink POS EMV Card Processor Configuration Guide 31
Settings Editor Configuration
Tender A debit card tender must be configured in order for the card reader to recognize debit card transactions.
NOTE: If your location already has a debit card tender, you don’t need to create another one.
To set up a debit card tender:
1. Go to Tenders in Settings Editor and click the Add button.
The Edit Tender dialog box opens.
Edit Tender dialog (with Debit selected)
2. Enter a Name for the tender.
NOTE: The Id field is generated automatically by the system and is not editable.
3. In the Tender Type drop-down list, select Debit.
4. Make sure that the Active check box in Options is checked.
5. Select other Options according to your preference or policy.
6. Click OK.
The new tender is listed on the Tenders page.

PAR Brink POS EMV Card Processor Configuration Guide 32
Settings Editor Configuration
Layout Buttons must be added to a register panel so that payments can be processed through the payment
device.
To add a ‘Payment Device’ button (all gateways):
1. Go to Layout in Settings Editor.
Layout page in Settings Editor
2. Select the appropriate panel in the panels list.
3. From the upper toolbar, add a new button to the layout by selecting Button in the drop-down
list and clicking the Add New Control button.
Adding a new button to the panel
4. Size and style the button as appropriate.
5. In the Behavior drop-down list, select Payment Device.
6. Enter the display text for the button in the Text field, or leave the default text in place.

PAR Brink POS EMV Card Processor Configuration Guide 33
Settings Editor Configuration
To add a ‘Manage Payment Device’ button (Datacap US, Datacap Canadian, and TenderRetail only):
1. Go to Layout in the Settings Editor.
2. Select the appropriate panel in the panels list. This is typically a Manager Functions panel.
3. Add a new button to the layout using the Add New Control button in the toolbar.
Adding a new button to the panel
4. Size and style the button as appropriate.
5. In the Behavior drop-down list, select Manage Payment Device.
6. Enter the display text for the button in the Text field, or leave the default text in place.
Credit Draft Options There are two settings in the Options section that control credit draft printing behavior
On the Options > Payment > Credit Options tab, the Signature Required Ceiling setting is used to set
the minimum order total that requires a customer signature. Order totals below this setting will not
trigger the payment device to print a credit draft. Order totals equal to or above this setting will cause
credit drafts to be printed.
NOTE: If this setting is $0.00, all credit card transactions will trigger the payment device to print
credit drafts.
Signature Required Ceiling setting on the Options > Payment > Credit Options page

PAR Brink POS EMV Card Processor Configuration Guide 34
Settings Editor Configuration
• On the Options > Printing > Credit tab, the Draft Copies drop-down list and Draft Copy N fields
control how many credit drafts are printed by the system and what messages are printed at the
bottom of each draft.
Draft Copies drop-down and fields on Options > Printing > Credit page
Also, if you wish to print a tip line on credit drafts, check the Show Additional Tip Line check
box.
NOTE: These options do not apply to PAX POSLink and Tender Retail , Brink will always print two credit
drafts, no matter what the settings are for these controls.
Save and Publish After you have set up the payment device, register, tender, layout, and print settings, Save and Publish
your changes.

PAR Brink POS EMV Card Processor Configuration Guide 35
Register Setup
Register Setup For Datacap US EMV, Datacap Canadian EMV, and TenderRetail MCM, each register that will process
payments through the gateway must also be configured. For VeriFone Point (Classic and Enterprise), the
device must be paired to the system by entering a code.
To configure the registers—Datacap US EMV and Datacap Canadian EMV:
1. At each register, press the ‘Manage Payment Device’ button to display the Manage Payment
Device dialog box.
Manage Payment Device dialog
2. Press the EMV Param Download button.
The EMV parameters are downloaded to the register. This process may take over a minute to
complete.
3. When the EMV parameters are finished downloading, press EMV Pad Reset.
The EMV pad resets. This may take a few seconds to complete.
To configure the registers—TenderRetail MCM:
1. At each register, press the ‘Manage Payment Device’ button to display the Manage Payment
Device dialog box.
Manage Payment Device dialog
2. Press the Initialize Pin Pad button.
The PIN pad is initialized. This process may take over a minute to complete.
PAR Brink POS EMV Card Processor Configuration Guide 36
Register Setup
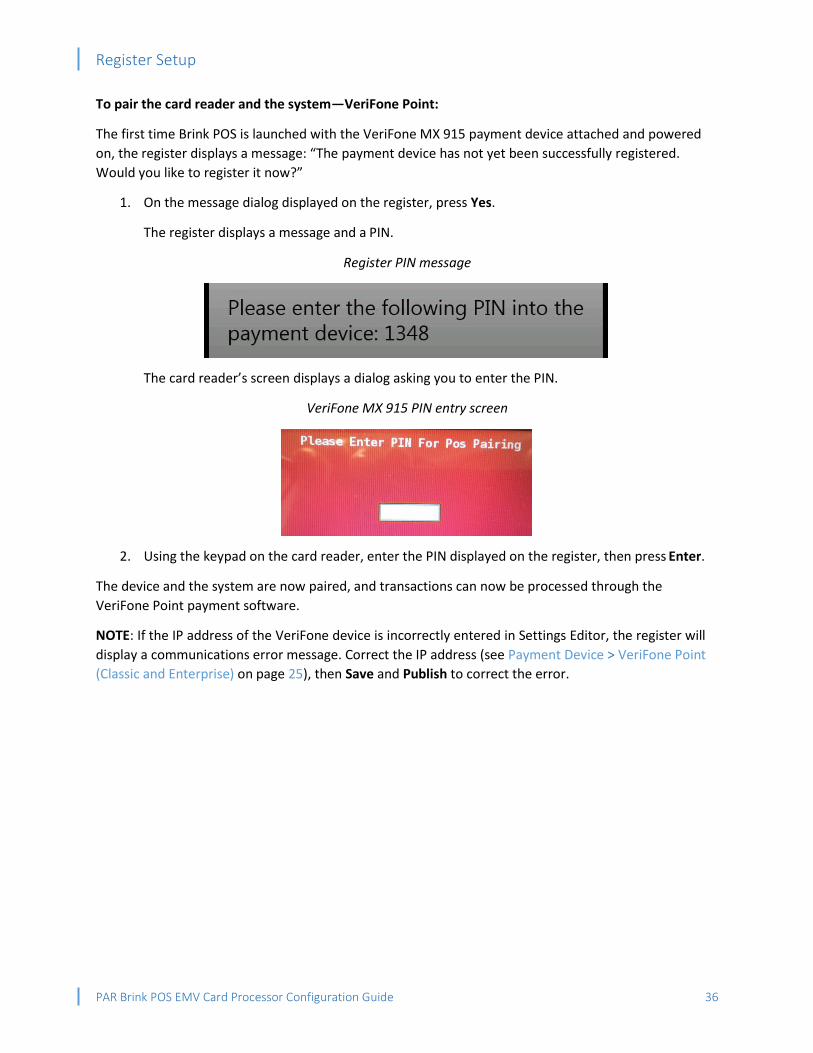
To pair the card reader and the system—VeriFone Point:
The first time Brink POS is launched with the VeriFone MX 915 payment device attached and powered
on, the register displays a message: “The payment device has not yet been successfully registered.
Would you like to register it now?”
1. On the message dialog displayed on the register, press Yes.
The register displays a message and a PIN.
Register PIN message
The card reader’s screen displays a dialog asking you to enter the PIN.
VeriFone MX 915 PIN entry screen
2. Using the keypad on the card reader, enter the PIN displayed on the register, then press Enter.
The device and the system are now paired, and transactions can now be processed through the
VeriFone Point payment software.
NOTE: If the IP address of the VeriFone device is incorrectly entered in Settings Editor, the register will
display a communications error message. Correct the IP address (see Payment Device > VeriFone Point
(Classic and Enterprise) on page 25), then Save and Publish to correct the error.

PAR Brink POS EMV Card Processor Configuration Guide 37
Taking Credit Card and Debit Card Payments
Taking Credit Card and Debit Card Payments With one exception, all gateways and processors support the four major credit card types (Visa,
MasterCard, American Express, Discover/Diner’s Club) and debit cards. The exception, Heartland/PAX
POSLink, supports only Visa, MasterCard, and Discover/Diner’s Club. There is only one payment button
for all card types.
NOTE: This procedure only covers transactions processed with the EMV chip reader. Swiped and
manually entered card payments are processed in a similar fashion, but are beyond the scope of this
document.
PAR Pay To process a PAR Pay EMV credit card or debit card transaction:
1. Place items into an order as usual.
2. Press the ‘Payment Device’ button.
3. Have the customer insert the card.
4. For debit card transactions only, have the customer enter the PIN.
5. (Optional) If the customer wants to pay only part of the order, use the ‘Split Order’ button to
enter how much will be paid by the credit card.
6. When the tip prompt appears on the payment device, have the customer select the tip amount
and press OK.
The payment is then processed. When it is done processing, the payment device screen will display an
authorization message and then return to the idle screen.
Datacap To process a Datacap EMV credit card or debit card transaction:
1. Place items into an order as usual.
2. Press the ‘Payment Device’ button.
3. On the register’s payment device screen, do one of the following:
• If the full amount is to be paid on the payment device, press Done.
• If only a partial amount is to be paid on the payment device, enter the amount using the
keypad, then press Done.
4. On the payment device, have the customer select either Credit or Debit.
5. When the tip prompt appears on the payment device, have the customer do one of the
following:
• To add a tip, select Yes and enter the tip amount.
• To skip this step, select No.
PAR Brink POS EMV Card Processor Configuration Guide 38
Taking Credit Card and Debit Card Payments
NOTE: The tip prompt only appears if Prompt for Tip is selected under Options > Accounting >
Reporting in Settings Editor. See Payment Device > Datacap US EMV and Datacap Canadian EMV
on page 24.
6. Have the customer insert the card.
7. For debit card transactions only, have the customer enter their PIN on the device keypad.
The payment is then processed. When it is done processing, the payment device screen will display
“WELCOME”.
PAX POSLink NOTE: At this time, Heartland Payment Systems does not support paying for debit transactions using the
EMV chip reader.
To process a PAX POSLink EMV credit card transaction:
1. Place items into an order as usual.
2. Press the ‘Payment Device’ button.
3. When prompted to select the payment type, select Credit Card.
4. Have the customer do one of the following:
• If paying the entire amount of the check, the customer should press Done.
• If the customer is only paying part of the check through the payment device, they
should enter the new amount and press Done.
5. Have the customer insert the credit card.
6. When the tip prompt appears on the payment device, have the customer do one of the
following:
• To add a tip, select Yes and enter the tip amount.
• To skip this step, select No.
NOTE: The tip prompt only appears if Prompt for Tip is selected under Options > Accounting >
Reporting in Settings Editor. See Payment Device > PAX POSLink on page 26.
7. Have the customer follow the instructions on the payment device to complete the transaction.
The Pax POSLink payment device will indicate if the transaction was approved or declined. Also,
a credit draft may be printed, depending on the settings under Options > Printing > Credit >
Draft Counts in Settings Editor.
8. When prompted, select whether to print a receipt at the register.

PAR Brink POS EMV Card Processor Configuration Guide 39
Taking Credit Card and Debit Card Payments
TenderRetail MCM To process a TenderRetail MCM EMV credit card or debit card transaction:
1. Place items into an order as usual.
2. Press the ‘Payment Device’ button.
3. On the payment device, have the customer select either Credit or Debit.
4. Have the customer insert the card.
5. For debit card transactions only, have the customer enter their PIN on the keypad.
6. Have the customer follow the instructions on the payment device, which may include one or
more of the following:
• (Debit only) Choose whether or not to receive cash back and, if so, the amount of the
cash back.
• Choose whether or not to pay the full amount.
The payment is then processed. When it is done, the device will display “Approved”.
VeriFone Point (Classic and Enterprise) To process a VeriFone Point EMV credit card or debit card transaction:
1. Place items into an order as usual.
2. Press the ‘Payment Device’ button.
3. Have the customer follow the instructions on the VeriFone device until they get to the Select
Payment Type screen.
4. On the payment device, have the customer select either Credit or Debit.
5. Have the customer insert the card.
6. For debit card transactions only, have the customer enter their PIN on the device keypad.
7. Have the customer follow the instructions on the payment device, which may include one or
more of the following:
• (Debit only) Choose whether or not to receive cash back and, if so, the amount of the
cash back.
• Choose whether or not to pay the full amount.
• (Credit only) Sign with the stylus when prompted.
NOTE: The tip prompt only appears if Prompt for Tip is selected under Options > Accounting >
Reporting in Settings Editor. See Payment Device > VeriFone Point (Classic and Enterprise) on
page 25.
The payment is then processed. When it is done, the VeriFone Point will display “Captured”.

PAR Brink POS EMV Card Processor Configuration Guide 40
Store and Forward
Store and Forward PAR Pay and both versions of VeriFone Point have a feature called “Store and Forward”, which allows
you to take credit card payments even if the connection to the Internet is down. The payment device
stores the payment information until such time as the Internet connection is restored, then sends the
payment to the processor when communication is re-established.
Multiple Payments All gateways and payment processors allow for multiple payments on the same order. Orders can be
paid with any combination of EMV cards, swiped cards, cards entered at the register, or cash.
Instructions for how to do this are in the card payment procedures, above. Also, the cashier can initiate
this processing using the ‘Split Order’ function.
Voiding Payments Credit card or debit card payments made through EMV-enabled card readers can be voided normally. As
with swiped card transactions, EMV credit card voids do not require further action by the customer, but
EMV debit card voids require the customer to re-insert their card and re-enter their PIN.
NOTE: (VeriFone Point only) If a void is not processed properly, this may be because the second port on
the payment device is not open. Contact your service provider for assistance in opening the second port.
Reports EMV payments are shown in the Credit Card Audit report (in Reports > Audits) and in the Credit Card
Detail and Credit Card Summary by Merchant reports (in Reports > Accounting).


