Technology Help Desk 412 624-HELP [4357] http://technology.pitt.edu Centrify DirectControl Agent: Installation on Mac OS X IMPORTANT: Before installing, • Be sure the machine is pre-staged in Active Directory • Be certain that the Apple Directory Utility is not open. • If currently on the domain, unbind from the domain before proceeding. • Be sure to create or maintain a local administrator account for your Mac other than the account you want to link to your AD credentials so that you can re-grant local Admin privileges if they are removed Part 1: Download and Install the Centrify Client 1. Log on to the Mac using a local Administrator account. 2. Open a Web browser to my.pitt.edu. Log in and navigate to the Software Download Service. 3. Locate the Centrify installation package and download it to your desktop. Double-click the DMG file (for example: CentrifyDC-5.1.1-mac10.7.dmg) to launch the installer. 4. Before installing Centrify, it is necessary to run AD Check on your Mac. AD Check performs a set of operating system, network, and Active Directory checks to verify that the Mac OS X computer you are on meets the system requirements necessary to install the DirectControl Agent and join an Active Directory domain. Double-click the AD Check icon. 5. Enter the domain you intend to join (in this case, univ.pitt.edu ) with your Mac OS X computer, and click AD Check. 6. Review the results of the checks performed. If the target computer, DNS environment, and Active Directory configuration pass all checks with no warnings or errors you should be able to perform a successful installation and join the specified domain (this is typically the case.) If you receive errors or warnings, you must correct them before proceeding with the Centrify installation. You can then close the AD Check window. 2013-12 Installing Centrify on a Mac.docx Page 1 of 3
Transcript
Technology Help Desk 412 624-HELP [4357] http://technology.pitt.edu
Centrify DirectControl Agent: Installation on Mac OS X IMPORTANT: Before installing,
• Be sure the machine is pre-staged in Active Directory • Be certain that the Apple Directory Utility is not open. • If currently on the domain, unbind from the domain before proceeding. • Be sure to create or maintain a local administrator account for your Mac other than the account you want to link
to your AD credentials so that you can re-grant local Admin privileges if they are removed
Part 1: Download and Install the Centrify Client 1. Log on to the Mac using a local Administrator account.
2. Open a Web browser to my.pitt.edu. Log in and navigate to the Software Download Service.
3. Locate the Centrify installation package and download it to your desktop. Double-click the DMG
file (for example: CentrifyDC-5.1.1-mac10.7.dmg) to launch the installer.
4. Before installing Centrify, it is necessary to run AD Check on your Mac. AD Check performs a set of operating system, network, and Active Directory checks to verify that the Mac OS X computer you are on meets the system requirements necessary to install the DirectControl Agent and join an Active Directory domain. Double-click the AD Check icon.
5. Enter the domain you intend to join (in this case, univ.pitt.edu ) with your Mac OS X computer, and click AD Check. 6. Review the results of the checks performed. If the target computer, DNS environment, and Active Directory
configuration pass all checks with no warnings or errors you should be able to perform a successful installation and
join the specified domain (this is typically the case.) If you receive errors or warnings, you must correct them before proceeding with the Centrify installation. You can then close the AD Check window.
2013-12 Installing Centrify on a Mac.docx Page 1 of 3
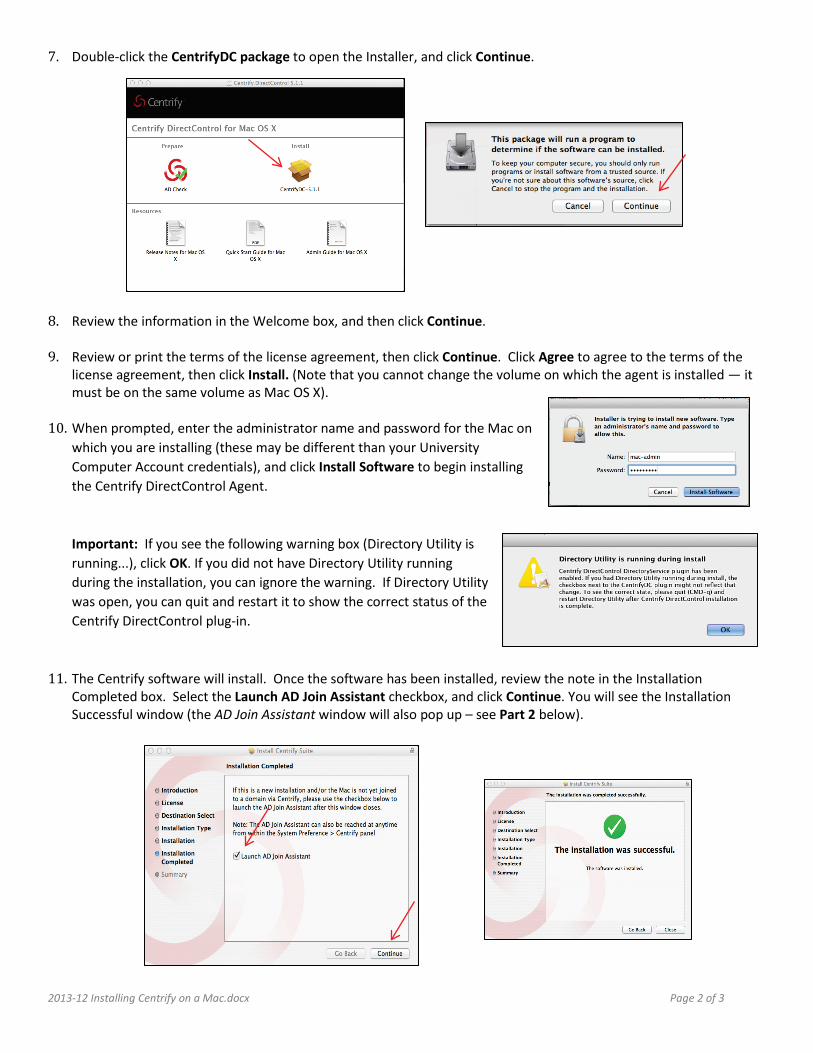
7. Double-click the CentrifyDC package to open the Installer, and click Continue.
8. Review the information in the Welcome box, and then click Continue. 9. Review or print the terms of the license agreement, then click Continue. Click Agree to agree to the terms of the
license agreement, then click Install. (Note that you cannot change the volume on which the agent is installed — it must be on the same volume as Mac OS X).
10. When prompted, enter the administrator name and password for the Mac on
which you are installing (these may be different than your University Computer Account credentials), and click Install Software to begin installing the Centrify DirectControl Agent. Important: If you see the following warning box (Directory Utility is running...), click OK. If you did not have Directory Utility running during the installation, you can ignore the warning. If Directory Utility was open, you can quit and restart it to show the correct status of the Centrify DirectControl plug-in.
11. The Centrify software will install. Once the software has been installed, review the note in the Installation Completed box. Select the Launch AD Join Assistant checkbox, and click Continue. You will see the Installation Successful window (the AD Join Assistant window will also pop up – see Part 2 below).
2013-12 Installing Centrify on a Mac.docx Page 2 of 3
Part 2: Use the AD Join Assistant to join the Mac computer to Active Directory
In this section you will join your Mac to the AD. You should be logged in with a local Administrator account.
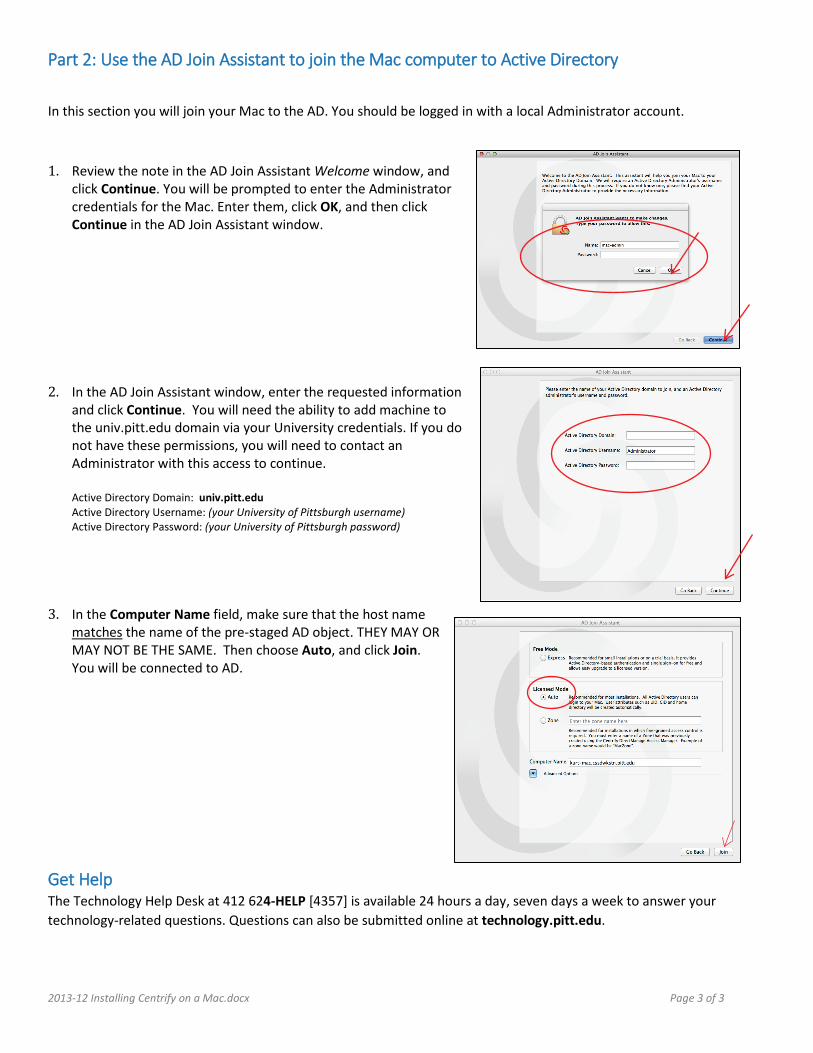
1. Review the note in the AD Join Assistant Welcome window, and click Continue. You will be prompted to enter the Administrator credentials for the Mac. Enter them, click OK, and then click Continue in the AD Join Assistant window.
2. In the AD Join Assistant window, enter the requested information and click Continue. You will need the ability to add machine to the univ.pitt.edu domain via your University credentials. If you do not have these permissions, you will need to contact an Administrator with this access to continue. Active Directory Domain: univ.pitt.edu Active Directory Username: (your University of Pittsburgh username) Active Directory Password: (your University of Pittsburgh password)
3. In the Computer Name field, make sure that the host name
matches the name of the pre-staged AD object. THEY MAY OR MAY NOT BE THE SAME. Then choose Auto, and click Join. You will be connected to AD.
Get Help The Technology Help Desk at 412 624-HELP [4357] is available 24 hours a day, seven days a week to answer your technology-related questions. Questions can also be submitted online at technology.pitt.edu.
2013-12 Installing Centrify on a Mac.docx Page 3 of 3