................................................................................................................................... 23 Zip Code and Tax ID Issues
................................................................................................................................... 34 Using The Format Cells Dialog
................................................................................................................................... 45 Creating The Source File
Part III Learning The Basics 5
................................................................................................................................... 51 The User Interface
................................................................................................................................... 52 The Mapping Page
.......................................................................................................................................................... 5Tax Form Group
.......................................................................................................................................................... 6Mapping Group
.......................................................................................................................................................... 6Source File Group
.......................................................................................................................................................... 6Decimal Group
.......................................................................................................................................................... 7Delimiter Group
.......................................................................................................................................................... 7Header Group
................................................................................................................................... 93 The Source Page
................................................................................................................................... 104 The Output Page
................................................................................................................................... 105 Contextual Help
................................................................................................................................... 112 Select The Tax Form
................................................................................................................................... 113 Select The Source File
................................................................................................................................... 124 Create The Mapping
................................................................................................................................... 146 Forcing Destination Field Values
................................................................................................................................... 157 Editing Source Field Values
................................................................................................................................... 158 Deleting Source Records
................................................................................................................................... 159 Execute The Mapping
................................................................................................................................... 1610 Testing The Output
Part V Tools 16
................................................................................................................................... 161 Tools Menu Button
................................................................................................................................... 172 Map by Name
................................................................................................................................... 173 Reset The Mapping
................................................................................................................................... 184 Create a Delimited Header File
Account Ability can import Information Returns, Annual Wage Reports, and Client information from a commadelimited ASCII Text File that conforms to a pre-defined record layout ("Schema"). Although most third partyapplications are capable of exporting to a delimited text file, the likelihood of the output being compatible withthis schema is nil. The Import Mapping Utility ("IMU") resolves this dilemma by allowing the end user toconvert any delimited text file ("Source") to a compatible text file ("Destination") via a series of drags, drops,and overrides, referred to as a mapping.
Main Topics
Importing from Microsoft ExcelLearning The BasicsYour First MappingToolsFrequently Asked Questions
Note
· Account Ability can also import IRSTAX and W2REPORT files that comply with IRS Publication 1220 and SSAEFW2 (formerly MMREF-1) specifications, respectively. Do not use IMU with these types of files. Instead, seethe Import selection on Account Ability's File menu.
Microsoft Excel® is a registered trademark of Microsoft CorporationAccount Ability® is a registered trademark of Integrated Data Management Systems, Inc. (IDMS)
2 Importing from Microsoft Excel
2.1 Overview
The primary step in importing an Excel spreadsheet is to save the spreadsheet as a delimited text file. This textfile is then opened as the Source file in The Import Mapping Utility ("IMU"). A mapping is then created andexecuted, resulting in a text file that Account Ability can import.
The following topics illustrate how to create a tab delimited text file from a sample spreadsheet,1099MISC_EXAMPLE, created with Excel. Although this illustration uses a tab delimiter, one could also use acomma (,) or pipe (|) delimiter.
Topics
Spreadsheet ConsiderationsZip Code and Tax ID IssuesUsing The Format Cells DialogCreating The Source File
Notes
· If you don't already have an existing spreadsheet of information returns, annual wage reports, or clientinformation, it is not necessary to create one in order to use Account Ability. Account Ability can accept inputfrom the keyboard.
· If you already have a delimited text file that you want to import, skip directly to the chapter Learning TheBasics (since delimited text files are the ultimate target of Excel spreadsheets).
2.2 Spreadsheet Considerations
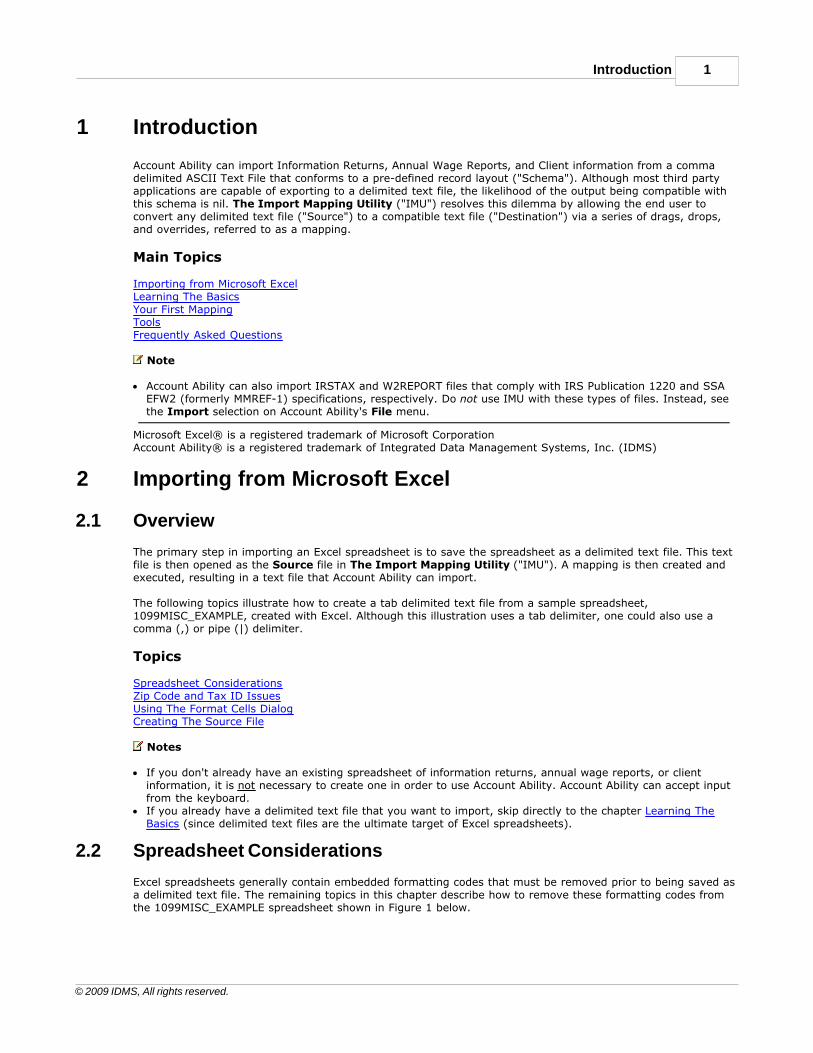
Excel spreadsheets generally contain embedded formatting codes that must be removed prior to being saved asa delimited text file. The remaining topics in this chapter describe how to remove these formatting codes fromthe 1099MISC_EXAMPLE spreadsheet shown in Figure 1 below.
· Each field of this spreadsheet resides within its own column. Ensure that each field of your spreadsheetresides within its own column as well. If necessary, the Text to Columns selection on Excel's Data menucould be used to partition a single column into distinct columns. For example, if your spreadsheet contains asingle column containing CITY, STATE ZIP, Excel's Text to Columns feature could be used repeatedly toseparate this column into three distinct columns, | CITY | STATE | ZIP |.
· The order of the columns is irrelevant since the primary objective of IMU is to map your source file to a textfile that is compatible with Account Ability, regardless of column order.
· Row 1 contains descriptions, not actual data. Although not necessary, including descriptions in row 1 willfacilitate the mapping procedure. IMU refers to row 1 as the Header record. If you decide to include aheader record, make sure that it does not span more than one row.
· This spreadsheet contains only 7 columns (A-G). Clearly, this is less than the number of fields on an actualtax form (e.g. Form 1099-MISC also has boxes for Other Income, Nonemployee Compensation, etc...). It is not necessary to include a column for each field of a tax form since IMU will supply the missing defaults.
· If your spreadsheet contains aggregate rows (e.g. totals, sub-totals, etc.), remove them. You must ensurethat each row of your spreadsheet, with the possible exception of row 1, contains recipient information only.
· If you examine the Zip and Tax ID columns in Figure 1 you will notice an invalid Zip code (8701 is missing aleading 0) on row 1 and an invalid Tax ID (98129999 is missing a leading 0) on row 2. Apparently, Excel hasdropped the leading zero in both fields. The reason for this is that Excel regards these columns as numeric soleading zeros are insignificant. The next topic describes how to overcome this obstacle.
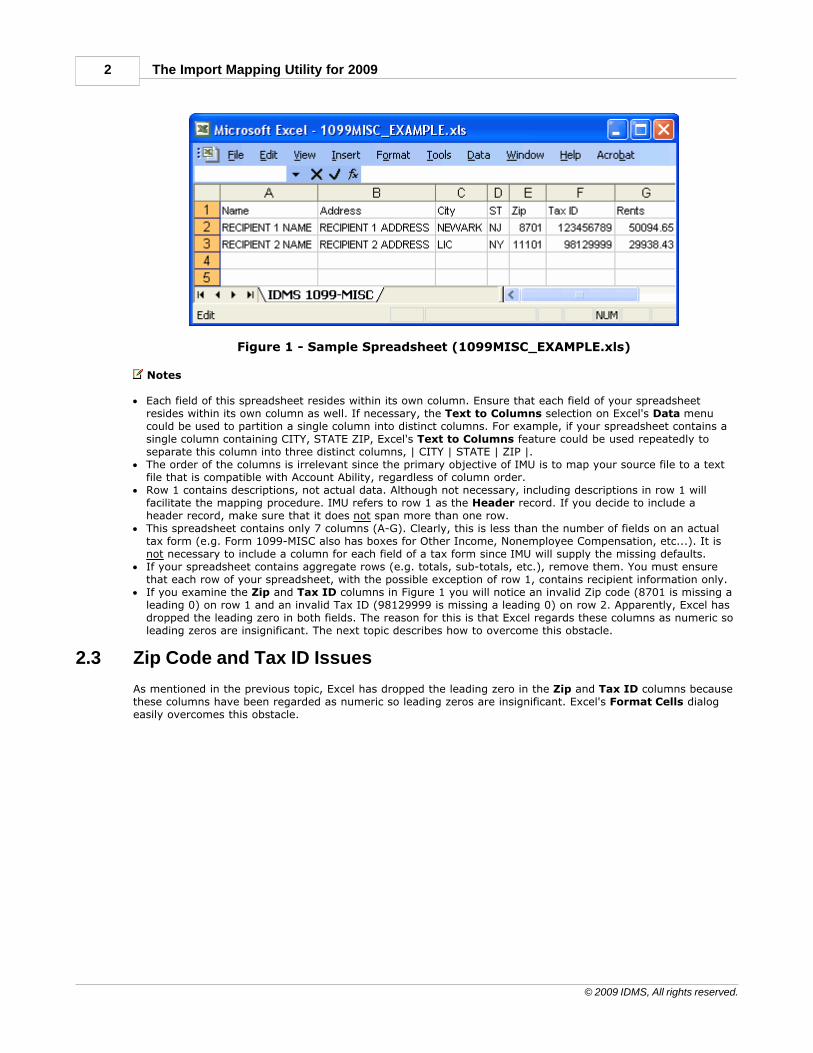
2.3 Zip Code and Tax ID Issues
As mentioned in the previous topic, Excel has dropped the leading zero in the Zip and Tax ID columns becausethese columns have been regarded as numeric so leading zeros are insignificant. Excel's Format Cells dialogeasily overcomes this obstacle.
There are two ways to open Excel's Format Cells dialog: (a) Right-click on the column to be formatted andselect Format Cells from the popup menu. This is illustrated in figure 2 above. (b) Highlight the column to beformatted and select Format Cells from Excel's Format menu.
In either case, the Format Cells dialog is opened (see Figure 3 in the next topic).
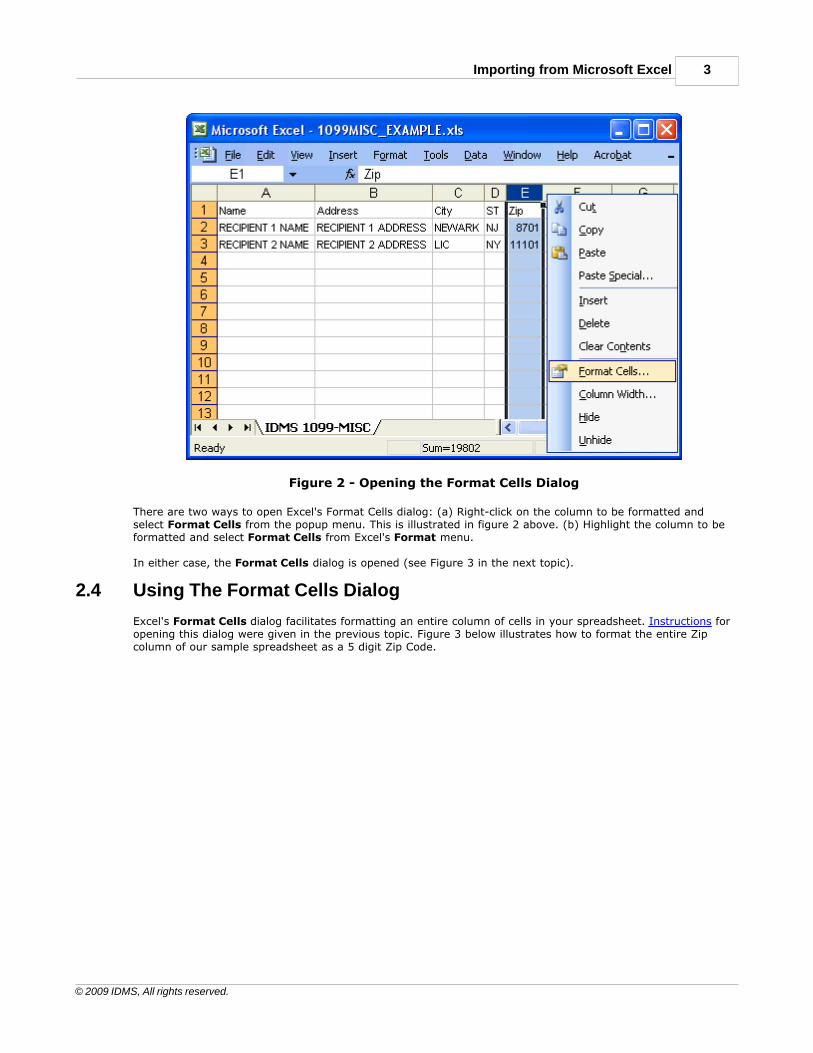
2.4 Using The Format Cells Dialog
Excel's Format Cells dialog facilitates formatting an entire column of cells in your spreadsheet. Instructions foropening this dialog were given in the previous topic. Figure 3 below illustrates how to format the entire Zipcolumn of our sample spreadsheet as a 5 digit Zip Code.
In a similar fashion, the entire Tax ID column could be formatted as a Social Security Number. The next topicshows the original sample spreadsheet after all cells have been formatted appropriately.
2.5 Creating The Source File
Figure 4 shows the original spreadsheet with all cells appropriately formatted. Notice that the Zip and Tax IDcolumns now include the leading zeros. This spreadsheet is now ready to be stripped of all formatting codesand saved as a tab delimited text file.
Figure 4 - Properly Formatted Spreadsheet
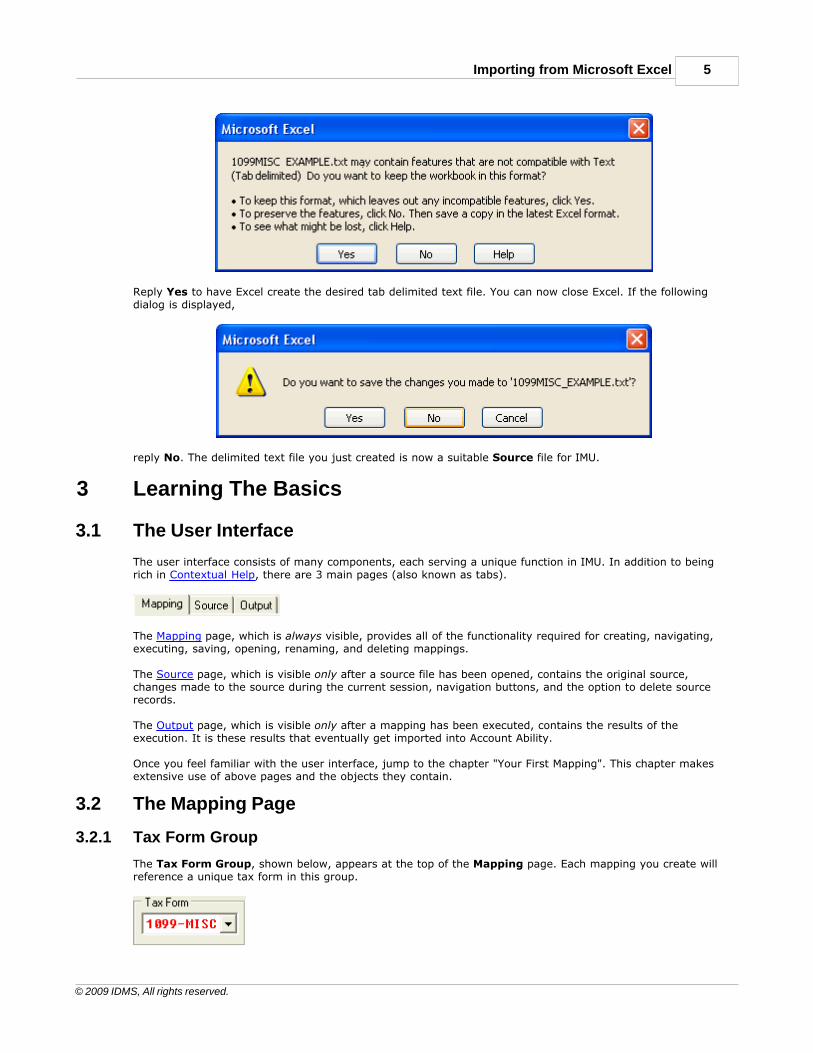
Select Save As from Excel's File menu. This will display Excel's Save As dialog. Select Text (tab delimited)from the Save as type drop down list and click the Save button. The following dialog will be displayed,
Reply Yes to have Excel create the desired tab delimited text file. You can now close Excel. If the followingdialog is displayed,
reply No. The delimited text file you just created is now a suitable Source file for IMU.
3 Learning The Basics
3.1 The User Interface
The user interface consists of many components, each serving a unique function in IMU. In addition to beingrich in Contextual Help, there are 3 main pages (also known as tabs).
The Mapping page, which is always visible, provides all of the functionality required for creating, navigating,executing, saving, opening, renaming, and deleting mappings.
The Source page, which is visible only after a source file has been opened, contains the original source,changes made to the source during the current session, navigation buttons, and the option to delete sourcerecords.
The Output page, which is visible only after a mapping has been executed, contains the results of theexecution. It is these results that eventually get imported into Account Ability.
Once you feel familiar with the user interface, jump to the chapter "Your First Mapping". This chapter makesextensive use of above pages and the objects they contain.
3.2 The Mapping Page
3.2.1 Tax Form Group
The Tax Form Group, shown below, appears at the top of the Mapping page. Each mapping you create willreference a unique tax form in this group.
A drop down box located within the Tax Form Group contains a list of all supported tax forms. As illustratedabove, Form 1099-MISC has been selected from this list. Account Ability supports the entire family of Information Returns and Annual Wage Reports.
Note
· The first entry in the drop down list of supported tax forms is Clients. Although this is not a tax form, oneshould use this entry in order to map an entire list of clients into Account Ability.
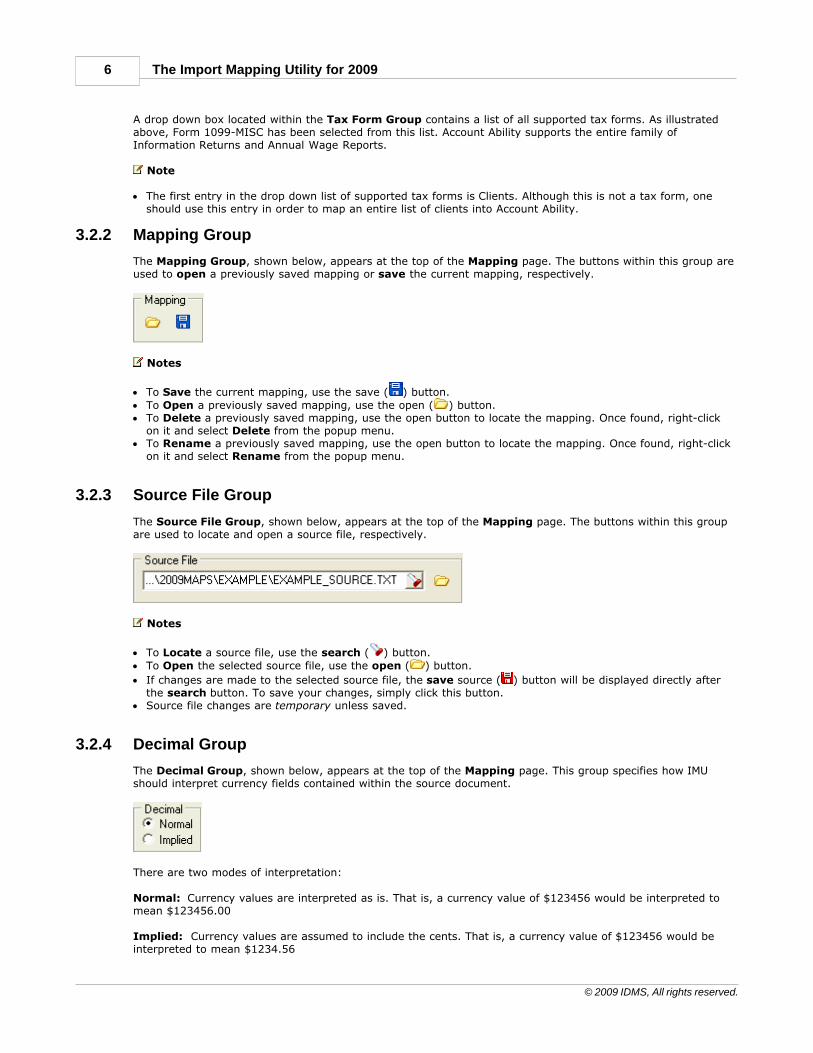
3.2.2 Mapping Group
The Mapping Group, shown below, appears at the top of the Mapping page. The buttons within this group areused to open a previously saved mapping or save the current mapping, respectively.
Notes
· To Save the current mapping, use the save ( ) button.· To Open a previously saved mapping, use the open ( ) button.· To Delete a previously saved mapping, use the open button to locate the mapping. Once found, right-click
on it and select Delete from the popup menu.· To Rename a previously saved mapping, use the open button to locate the mapping. Once found, right-click
on it and select Rename from the popup menu.
3.2.3 Source File Group
The Source File Group, shown below, appears at the top of the Mapping page. The buttons within this groupare used to locate and open a source file, respectively.
Notes
· To Locate a source file, use the search ( ) button.· To Open the selected source file, use the open ( ) button.
· If changes are made to the selected source file, the save source ( ) button will be displayed directly afterthe search button. To save your changes, simply click this button.
· Source file changes are temporary unless saved.
3.2.4 Decimal Group
The Decimal Group, shown below, appears at the top of the Mapping page. This group specifies how IMUshould interpret currency fields contained within the source document.
There are two modes of interpretation:
Normal: Currency values are interpreted as is. That is, a currency value of $123456 would be interpreted tomean $123456.00
Implied: Currency values are assumed to include the cents. That is, a currency value of $123456 would beinterpreted to mean $1234.56
· If a currency value already contains a decimal point it will be interpreted as is, regardless of the modeselected.
· The mode you select applies to all currency values in the source file.
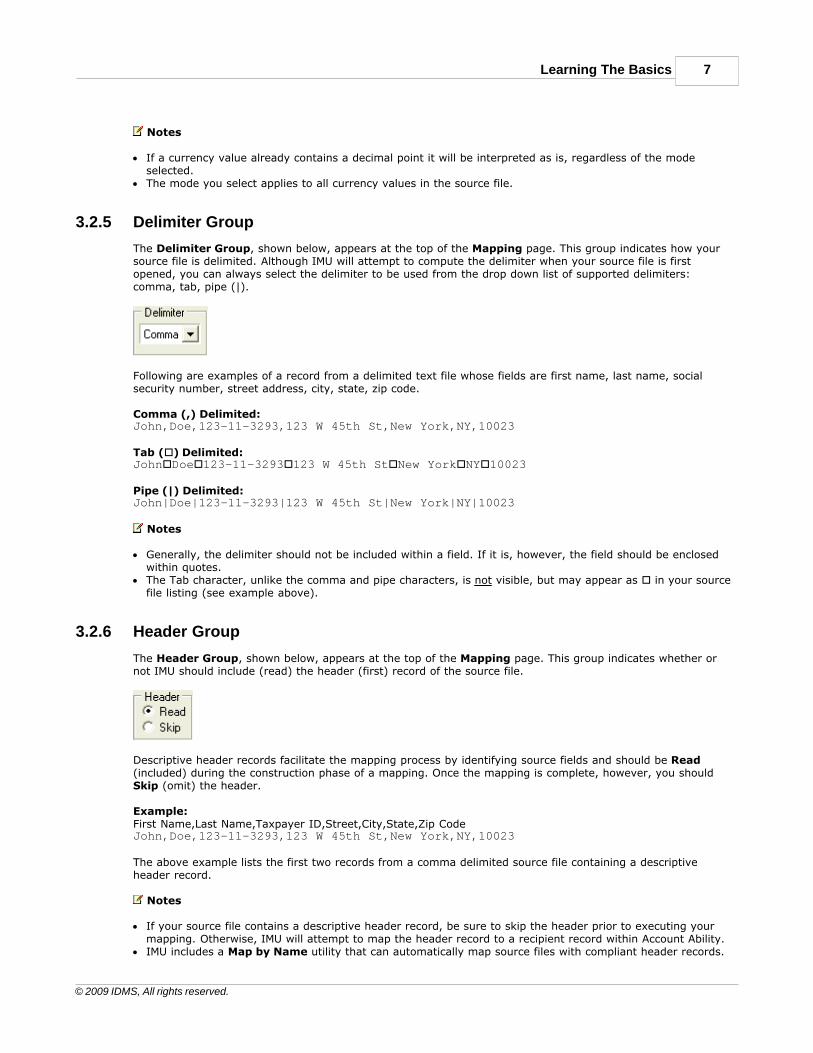
3.2.5 Delimiter Group
The Delimiter Group, shown below, appears at the top of the Mapping page. This group indicates how yoursource file is delimited. Although IMU will attempt to compute the delimiter when your source file is firstopened, you can always select the delimiter to be used from the drop down list of supported delimiters:comma, tab, pipe (|).
Following are examples of a record from a delimited text file whose fields are first name, last name, socialsecurity number, street address, city, state, zip code.
Comma (,) Delimited: John,Doe,123-11-3293,123 W 45th St,New York,NY,10023
Tab (o) Delimited: JohnoDoeo123-11-3293o123 W 45th StoNew YorkoNYo10023
Pipe (|) Delimited: John|Doe|123-11-3293|123 W 45th St|New York|NY|10023
Notes
· Generally, the delimiter should not be included within a field. If it is, however, the field should be enclosedwithin quotes.
· The Tab character, unlike the comma and pipe characters, is not visible, but may appear as o in your sourcefile listing (see example above).
3.2.6 Header Group
The Header Group, shown below, appears at the top of the Mapping page. This group indicates whether ornot IMU should include (read) the header (first) record of the source file.
Descriptive header records facilitate the mapping process by identifying source fields and should be Read(included) during the construction phase of a mapping. Once the mapping is complete, however, you should Skip (omit) the header.
Example:First Name,Last Name,Taxpayer ID,Street,City,State,Zip Code John,Doe,123-11-3293,123 W 45th St,New York,NY,10023 The above example lists the first two records from a comma delimited source file containing a descriptiveheader record.
Notes
· If your source file contains a descriptive header record, be sure to skip the header prior to executing yourmapping. Otherwise, IMU will attempt to map the header record to a recipient record within Account Ability.
· IMU includes a Map by Name utility that can automatically map source files with compliant header records.
For more information, refer to the Tools Menu Button topic.
3.2.7 Source View
The Source View, shown below, appears on the left hand side of the Mapping page. When a source file isopened, IMU reads the header (first) record. Fields within the header (source fields) are then enumerated anddisplayed in the source view.
As mentioned in the Header Group topic, descriptive header records facilitate the mapping process. The sourceview listing above illustrates a descriptive header.
Notes
· The No. column displays the position of each field within the record.· The illustration above is the actual header record from the comma delimited text file EXAMPLE_SOURCE.TXT,
which is included with IMU for illustrative purposes.
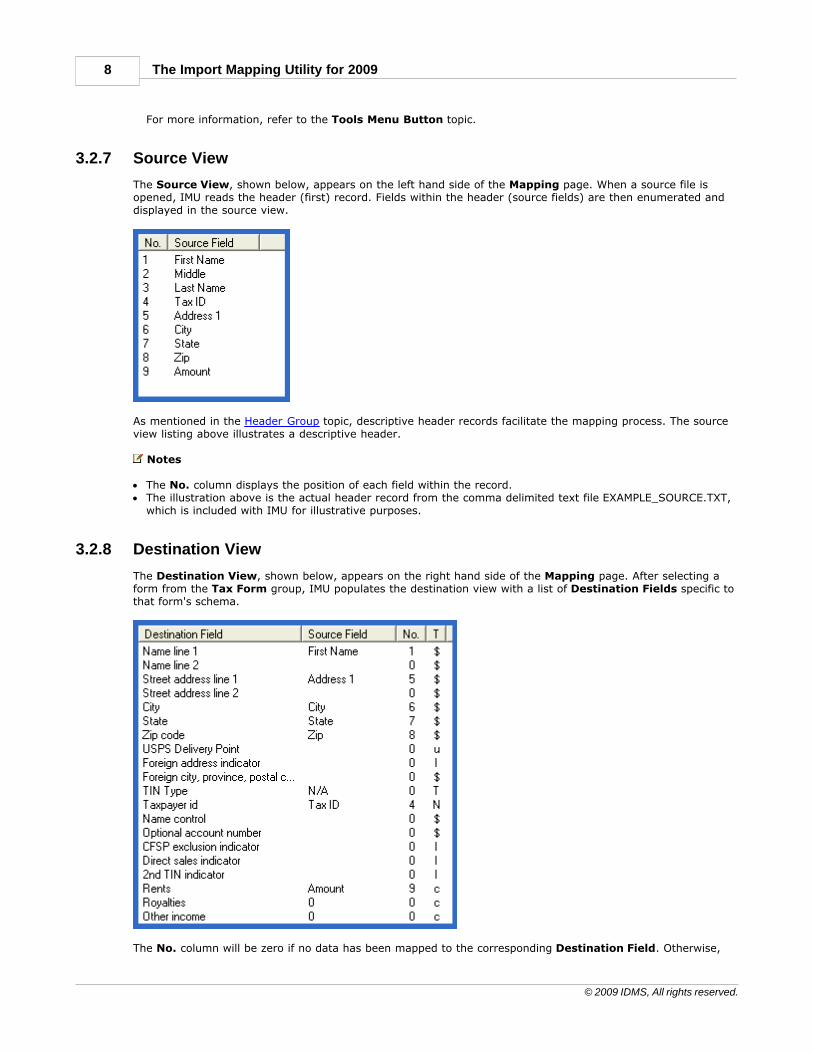
3.2.8 Destination View
The Destination View, shown below, appears on the right hand side of the Mapping page. After selecting aform from the Tax Form group, IMU populates the destination view with a list of Destination Fields specific tothat form's schema.
The No. column will be zero if no data has been mapped to the corresponding Destination Field. Otherwise,
the line number and corresponding source value appearing in the Source View are displayed.
Notes
· The destination view shown above is a subset of the actual destination view for Form 1099-MISC. Sourcefields displayed in this view result from a mapping that will be created in the chapter Your First Mapping.
· Column T is used internally by IMU and can be disregarded.· If the message (N) NOT ALLOCATED? appears in the Source Field column, there is an inconsistency in
your source file at field position N of the current record. Inconsistencies, which generally arise when expecteddelimiters are missing, must be eliminated prior to executing a mapping.
3.2.9 Source Navigation Panel
The Source Navigation Panel, shown below, appears on the bottom of the Mapping page. When a source fileis open, this panel displays the current source record and the total source records. In the illustration below, thesource file contains 7 records and record 2 is current.
One can easily navigate a source file using the navigation buttons (shown in blue above). These buttons can beused to move to the first, previous, next, or last source record, respectively.
Note
· In order to jump to a specific source record, click the current Record field.
3.3 The Source Page
The Source page, which is visible only after a source file has been opened, contains the original source,changes made to the source during the current session, navigation buttons, and the option to delete sourcerecords.
The active source record is clearly highlighted at the top of the Source page (Record 2 above). Below theactive source record, the entire source file is displayed in the source list window. Navigation buttons (shown inblue) can be used to activate the first, previous, next, or last source record, respectively.
Notes
· Clicking directly in the source list window changes the active source record.· As illustrated above, EXAMPLE_SOURCE.TXT contains two null (blank) records. These have been included
intentionally. Although source files, in general, should not contain null records, IMU will attempt to avoidthem during the execution phase of your mapping.
· The Delete ( ) button can be used to delete the active source record, if necessary. Unless saved, deletionsare temporary. For instructions on saving source file changes, see the topic Source File Group.
The Output page, which is visible only after a mapping has been successfully executed, contains the results ofthe execution. It is these results that eventually get imported into Account Ability.
Regardless of how your source file is delimited, the results of the execution will always be a comma delimitedtext file whose field order complies with the schema of the selected tax form.
3.5 Contextual Help
Contextual Help provides you with immediate assistance without having to leave the context in which you areworking. It provides information about a particular object and its context. It answers questions such as "What isthis?", "Why would I use it?" and "How do I use it?"
IMU implements contextual help in three ways:
· Context-sensitive Help · Hints· Online Help Documentation
Context-sensitive HelpThis method of contextual help provides information about particular objects. It provides answers to questionssuch as "What is this?" and "Why would I use it?". In order to request context-sensitive help, either
1. Click the context-sensitive help button ( ) located at the bottom of the Mapping page, then point andclick the resulting help cursor ( ) directly on a specific object, or
2. Depress the SHIFT-F1 key sequence, then point and click the resulting help cursor ( ) directly on aspecific object, or
3. Right-click your mouse directly on an object. If help is available, a What's this? window will appear. Clickonce on What's this? in order to display context-sensitive help specific to the object, or
4. While focused on an object, depress the F1 key to display help specific to the object.
HintsHints are informative messages that are displayed after resting the mouse on an object for a few seconds. Forexample, if you rest your mouse on the Delimiter group, a hint similar to the following will be displayed
Online Help DocumentationAt the bottom of the Mapping page you will notice one of two help buttons: either an HTML Help Button or aWinHelp Help Button. Although each of these buttons displays the same online help, the one you see willdepend upon your operating system.
HTML Help Button: The current generation of Microsoft help systems is known as HTML Help. It uses the Internet Explorer browserengine, with a special ActiveX control to provide extra capabilities to HTML pages. If your operating systemsupports HTML help, the HTML Help Button will be displayed.
Notes
· Right-clicking on some objects may not display context-sensitive help. The reason for this is that theright-click event may have been assigned to another procedure or popup menu. If this should happen, usethe SHIFT-F1 key sequence as described above.
· Not all objects have hints associated with them.
This chapter explains the steps required to map a sample source file, EXAMPLE_SOURCE.TXT, to Form1099-MISC. It also discusses the various tools and procedures available to help you manage your ownmappings.
It is strongly suggested that you read each of the following topics in the order listed. Once understood, similarsteps can then be followed to map your own source files to any supported tax form.
Topics
· Select The Tax Form· Select The Source File· Create The Mapping· Merging Source Fields· Forcing Destination Values· Editing Source Field Values· Deleting Source Records· Execute The Mapping· Testing The Output
Note
· EXAMPLE_SOURCE.TXT is included with IMU. It can be found in the sub-folder \2009MAPS\EXAMPLE\ of theIMU installation folder.
4.2 Select The Tax Form
The first step in creating a mapping is to select a tax form. The drop down box located within the tax formgroup contains a list of all supported tax forms. Since we will be mapping to Form 1099-MISC, select1099-MISC from this list. Fields specific to Form 1099-MISC will be displayed in the destination view.
Notes
· The No. column appearing in the destination view contains only zeros since nothing has been mapped yet.· The Source Field column appearing in the destination view contains blanks, zeros, N/A, etc. since nothing
has been mapped yet.
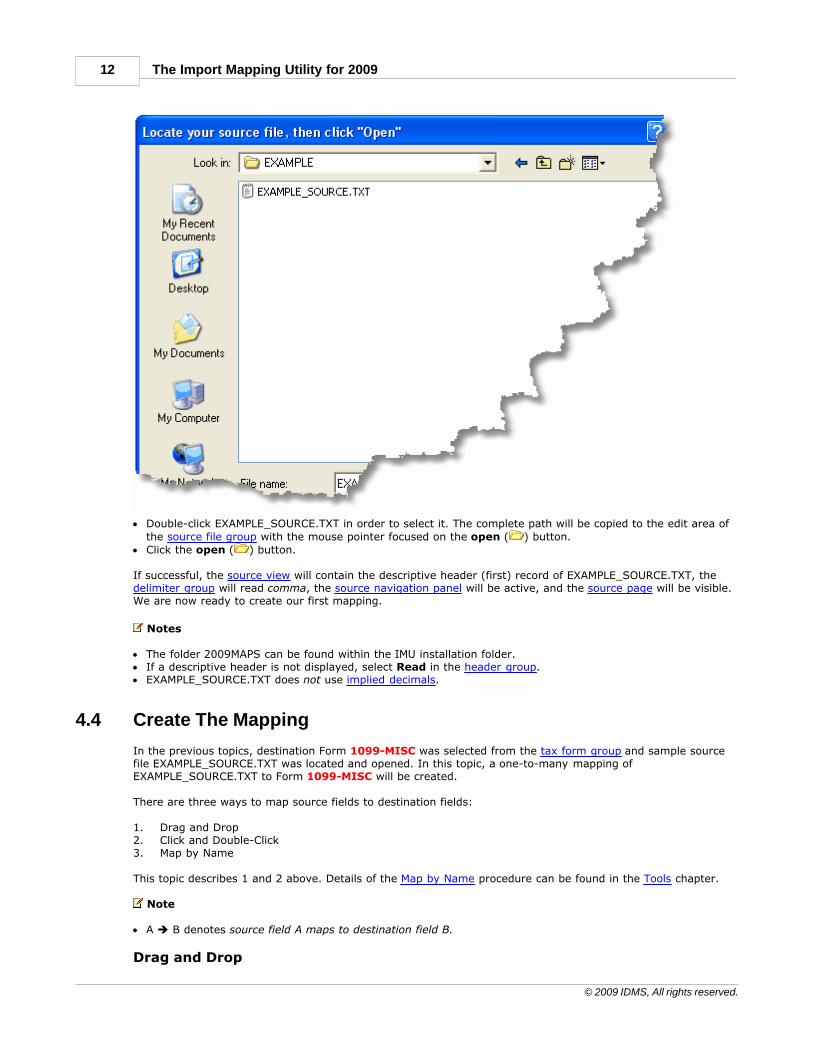
4.3 Select The Source File
In the previous topic, destination Form 1099-MISC was selected from the tax form group. The next step increating a mapping is that of opening sample source file EXAMPLE_SOURCE.TXT.
To Locate source file EXAMPLE_SOURCE.TXT,
· Click the search ( ) button appearing in the source file group.· Look in the folder 2009MAPS for the folder EXAMPLE.· Look in the folder EXAMPLE for the source file EXAMPLE_SOURCE.TXT (see below).
· Double-click EXAMPLE_SOURCE.TXT in order to select it. The complete path will be copied to the edit area ofthe source file group with the mouse pointer focused on the open ( ) button.
· Click the open ( ) button.
If successful, the source view will contain the descriptive header (first) record of EXAMPLE_SOURCE.TXT, thedelimiter group will read comma, the source navigation panel will be active, and the source page will be visible.We are now ready to create our first mapping.
Notes
· The folder 2009MAPS can be found within the IMU installation folder.· If a descriptive header is not displayed, select Read in the header group.· EXAMPLE_SOURCE.TXT does not use implied decimals.
4.4 Create The Mapping
In the previous topics, destination Form 1099-MISC was selected from the tax form group and sample sourcefile EXAMPLE_SOURCE.TXT was located and opened. In this topic, a one-to-many mapping ofEXAMPLE_SOURCE.TXT to Form 1099-MISC will be created.
There are three ways to map source fields to destination fields:
1. Drag and Drop2. Click and Double-Click3. Map by Name
This topic describes 1 and 2 above. Details of the Map by Name procedure can be found in the Tools chapter.
Note
· A è B denotes source field A maps to destination field B.
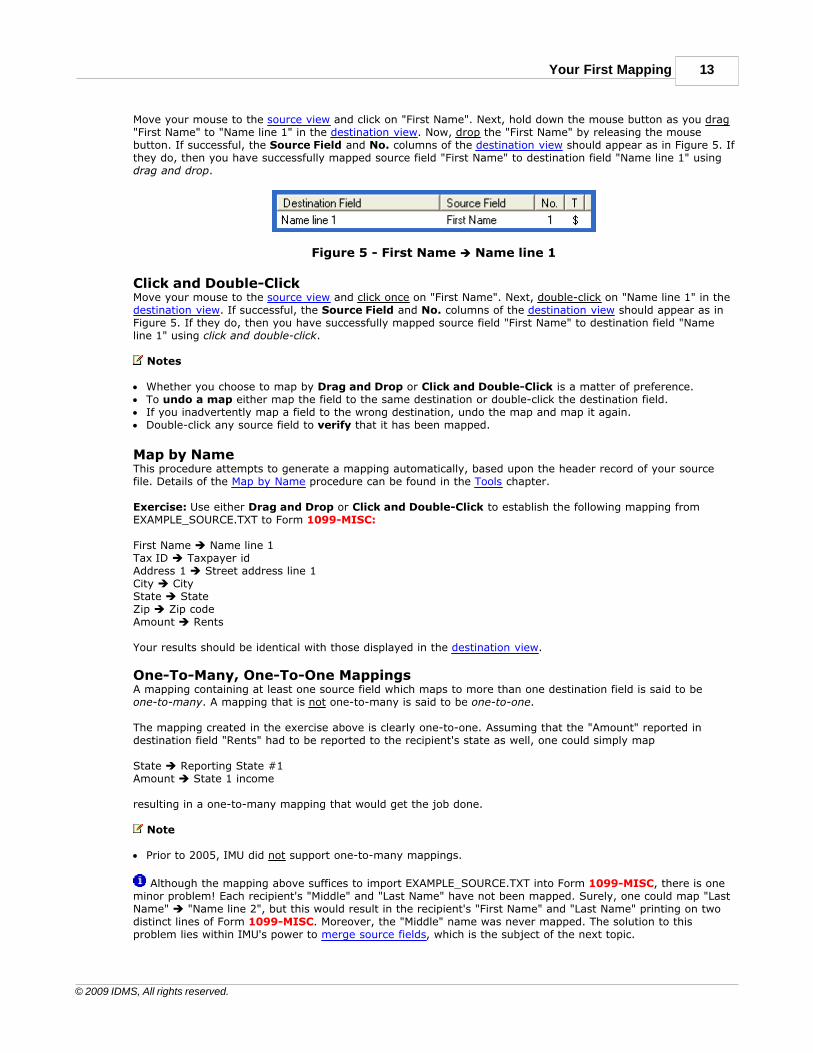
Move your mouse to the source view and click on "First Name". Next, hold down the mouse button as you drag"First Name" to "Name line 1" in the destination view. Now, drop the "First Name" by releasing the mousebutton. If successful, the Source Field and No. columns of the destination view should appear as in Figure 5. Ifthey do, then you have successfully mapped source field "First Name" to destination field "Name line 1" using drag and drop.
Figure 5 - First Name è Name line 1
Click and Double-ClickMove your mouse to the source view and click once on "First Name". Next, double-click on "Name line 1" in thedestination view. If successful, the Source Field and No. columns of the destination view should appear as inFigure 5. If they do, then you have successfully mapped source field "First Name" to destination field "Nameline 1" using click and double-click.
Notes
· Whether you choose to map by Drag and Drop or Click and Double-Click is a matter of preference.· To undo a map either map the field to the same destination or double-click the destination field.· If you inadvertently map a field to the wrong destination, undo the map and map it again.· Double-click any source field to verify that it has been mapped.
Map by NameThis procedure attempts to generate a mapping automatically, based upon the header record of your sourcefile. Details of the Map by Name procedure can be found in the Tools chapter.
Exercise: Use either Drag and Drop or Click and Double-Click to establish the following mapping fromEXAMPLE_SOURCE.TXT to Form 1099-MISC:
First Name è Name line 1Tax ID è Taxpayer idAddress 1 è Street address line 1City è CityState è StateZip è Zip codeAmount è Rents
Your results should be identical with those displayed in the destination view.
One-To-Many, One-To-One MappingsA mapping containing at least one source field which maps to more than one destination field is said to be one-to-many. A mapping that is not one-to-many is said to be one-to-one.
The mapping created in the exercise above is clearly one-to-one. Assuming that the "Amount" reported indestination field "Rents" had to be reported to the recipient's state as well, one could simply map
State è Reporting State #1Amount è State 1 income
resulting in a one-to-many mapping that would get the job done.
Note
· Prior to 2005, IMU did not support one-to-many mappings.
Although the mapping above suffices to import EXAMPLE_SOURCE.TXT into Form 1099-MISC, there is oneminor problem! Each recipient's "Middle" and "Last Name" have not been mapped. Surely, one could map "LastName" è "Name line 2", but this would result in the recipient's "First Name" and "Last Name" printing on twodistinct lines of Form 1099-MISC. Moreover, the "Middle" name was never mapped. The solution to thisproblem lies within IMU's power to merge source fields, which is the subject of the next topic.
There may be times when a specific destination field requires the merging of distinct source fields. Theone-to-many mapping of EXAMPLE_SOURCE.TXT to Form 1099-MISC, created in the previous topic, clearlyillustrates this. The problem with this mapping is that each recipient's "Middle" and "Last Name" has not beenmapped. A simple solution would be to map "Last Name" è "Name line 2", but this would result in therecipient's "First Name" and "Last Name" printing on two distinct lines of Form 1099-MISC. Moreover, the"Middle" name was never mapped. The solution to this problem lies within IMU's power to merge source fields.
Merging Source FieldsThe following steps illustrate how to merge the "First Name", "Middle", and "Last Name" fields of EXAMPLE_SOURCE.TXT into a single field, which is then be mapped to "Name line 1".
1. Click on source field 3, "Last Name".2. With the mouse button depressed, drag the "Last Name" up and drop it onto source field 2, "Middle".3. Note that source field 3 has been merged with source field 2, which now reads "Middle Last Name".4. Click on source field 2, "Middle Last Name".5. With the mouse button depressed, drag the "Middle Last Name" up and drop it onto source field 1, "First
Name".6. Note that source field 2 has been merged with source field 1, which now reads "First Middle Last Name".7. The "First Middle Last Name" field can now be mapped to "Name line 1".
If successful, destination field "Name line 1" should now read "First Middle Last Name", the results of themerge.
Notes
· Merging the same source fields twice will undo the merge.· When merging exactly two source fields, the order of the fields relative to each other isn't important.· When merging more than two source fields, the order of the fields relative to each other is essential. That is,
in order to successfully merge source fields I, J, K, ..., it must be true that source field I precedes source fieldJ, source field J precedes source field K, ..., and so on.
4.6 Forcing Destination Field Values
Occasionally, a destination field may require a value that is not contained within the source file. If such a valuehappens to be the same for all recipients, one can force the destination value into the field by right-clicking thedestination field.
For example, assume that the "2nd TIN indicator" field had to be set to TRUE for all recipients. Since EXAMPLE_SOURCE.TXT does not contain a field for "2nd TIN indicator", you would right-click on "2nd TINindicator" and type in TRUE, as shown in Figure 6 below.
Figure 6 - Force "2nd TIN indicator"=TRUE
Notes
· You cannot force data into a previously mapped destination field.· Mapping to a previously forced destination field will delete the forced value.
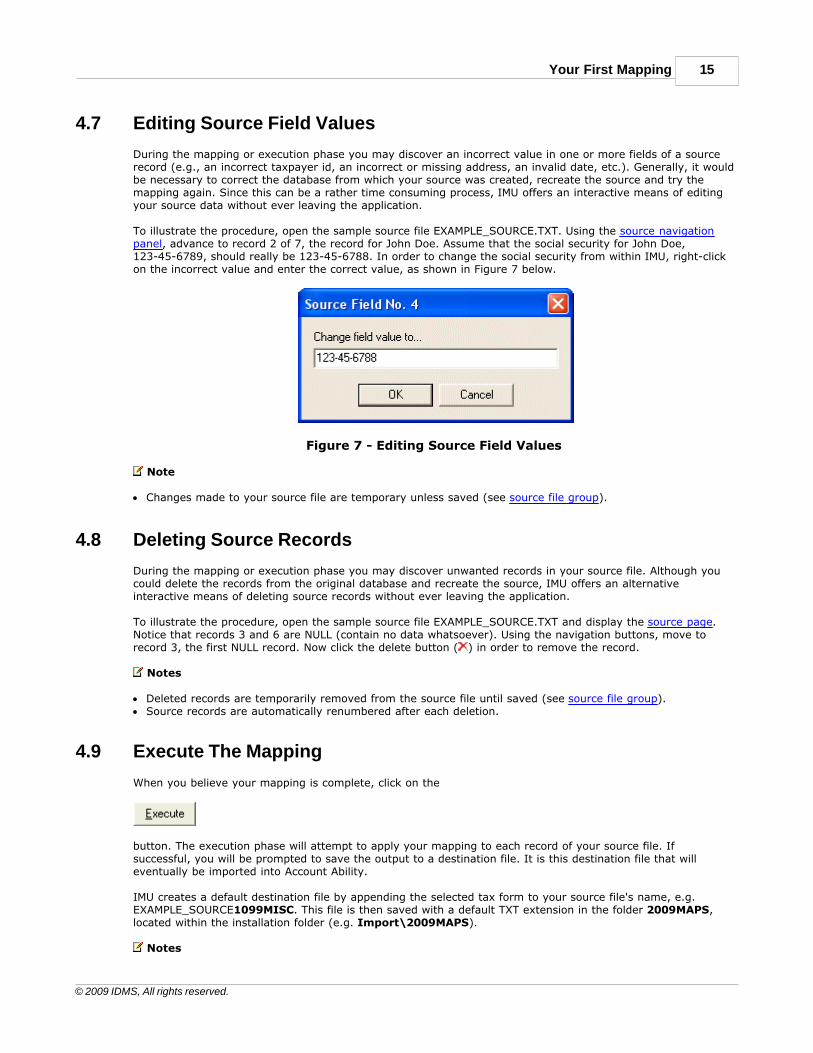
During the mapping or execution phase you may discover an incorrect value in one or more fields of a sourcerecord (e.g., an incorrect taxpayer id, an incorrect or missing address, an invalid date, etc.). Generally, it wouldbe necessary to correct the database from which your source was created, recreate the source and try themapping again. Since this can be a rather time consuming process, IMU offers an interactive means of editingyour source data without ever leaving the application.
To illustrate the procedure, open the sample source file EXAMPLE_SOURCE.TXT. Using the source navigationpanel, advance to record 2 of 7, the record for John Doe. Assume that the social security for John Doe,123-45-6789, should really be 123-45-6788. In order to change the social security from within IMU, right-clickon the incorrect value and enter the correct value, as shown in Figure 7 below.
Figure 7 - Editing Source Field Values
Note
· Changes made to your source file are temporary unless saved (see source file group).
4.8 Deleting Source Records
During the mapping or execution phase you may discover unwanted records in your source file. Although youcould delete the records from the original database and recreate the source, IMU offers an alternativeinteractive means of deleting source records without ever leaving the application.
To illustrate the procedure, open the sample source file EXAMPLE_SOURCE.TXT and display the source page.Notice that records 3 and 6 are NULL (contain no data whatsoever). Using the navigation buttons, move torecord 3, the first NULL record. Now click the delete button ( ) in order to remove the record.
Notes
· Deleted records are temporarily removed from the source file until saved (see source file group).· Source records are automatically renumbered after each deletion.
4.9 Execute The Mapping
When you believe your mapping is complete, click on the
button. The execution phase will attempt to apply your mapping to each record of your source file. Ifsuccessful, you will be prompted to save the output to a destination file. It is this destination file that willeventually be imported into Account Ability.
IMU creates a default destination file by appending the selected tax form to your source file's name, e.g.EXAMPLE_SOURCE1099MISC. This file is then saved with a default TXT extension in the folder 2009MAPS,located within the installation folder (e.g. Import\2009MAPS).
· If your file contains a descriptive header record, be sure to skip the header before executing your mapping.Otherwise, Account Ability will attempt to import this descriptive header as an actual tax form.
· You can view the results of a successful execution on the output page.· If you forget to save the output, you can save it by clicking on the Save Output button. · You can execute your mapping as many times as desired.· If you make changes to your source file, you must execute the mapping once again.
4.10 Testing The Output
After successfully executing your mapping, IMU displays Importing Instructions in a dialog similar to thatshown in Figure 8 below,
Figure 8 - Importing Instructions
At this point, it is suggested that you test the output by following the instructions displayed on your screen. Ifacceptable, you have successfully mapped your source file into Account Ability. Otherwise, make the necessarychanges, re-execute the mapping and try again.
Note
· If you need to test your results multiple times, use the Kill This File selection located on the Tools menu ofthe desired tax form prior to each import. Otherwise, Account Ability will attempt to append each importsession to the previous import session resulting in duplicate records.
5 Tools
5.1 Tools Menu Button
The Tools Menu Button,
contains the following menu selections:
Map by NameReset This MappingCreate a Delimited Header File
If you include a header record in your source file with field names exactly matching any or all of thosedisplayed in the destination view, the Map by Name procedure can be used to automatically map each sourcefield to its matching destination. To facilitate the creation of such a header record, the last selection, Create aDelimited Header File, can be used to create a file containing a comma, tab, or pipe delimited header recordfor the selected tax form. Once a header has been created, it can be pasted into Excel or any other text editorthat contains your source file.
Note
· The last selection, Create a Delimited Header File, requires that a delimiter and tax form first be selectedfrom the delimiter and tax form groups, respectively.
5.2 Map by Name
After selecting a form from the tax form group, IMU populates the destination view with a list of destinationfields specific to that form's schema. If your source file includes a descriptive header record with field namesmatching any or all of those displayed in the destination view, the Map by Name procedure can be used toautomatically map each source field to its respective destination. To facilitate the inclusion of such a headerrecord, a tool to create either a comma, tab, or pipe delimited header record is included on the Tools MenuButton (see Create a Delimited Header File).
To use the map by name procedure,
· Select the tax form (or "Clients") from the tax form group.· Select the source file to be used.· From the decimal group indicate whether or not the decimal is implied in all currency fields of your source
file.· Select the delimiter to be used from the delimiter group (tab, comma, and pipe delimited source files are
supported). If you are not sure of the delimiter you can skip this step. IMU will attempt to calculate thedelimiter for you.
· Select Read in the header group.· Select Map by Name from the Tools Menu Button.
After the mapping is complete, choose Skip in the header group and use the navigation buttons in the sourcenavigation panel to verify the accuracy of the mapping. If successful, click the Execute button in order toexecute the mapping. This will create the output file to be imported into Account Ability.
Note
· The Map by Name menu selection appears disabled (dimmed out) if either (i) the source view is empty, (ii)the destination view is empty, or, (iii) the header group is not set to Read.
5.3 Reset The Mapping
Resetting a mapping will erase all mapped fields, merges, and overrides while maintaining the selected taxform and source file. This is the quickest way to erase a mapping and start over.
Prior to resetting a mapping, IMU will confirm your intentions,
After selecting a form from the tax form group, IMU populates the destination view with a list of destinationfields specific to that form's schema. If your source file includes a descriptive header record with field namesexactly matching any or all of those displayed in the destination view, the Map by Name procedure can be usedto automatically map each source field to its respective destination.
To facilitate the creation of such a header record, the Create a Delimited Header File tool should be used.Once a header has been created, it can be pasted into Excel or any other text editor that contains your sourcefile. You can then edit this file in order to remove unwanted fields and columns.
To create a delimited header file,
· Select the tax form (or "Clients") from the tax form group.· Select the delimiter to be used from the delimiter group (tab, comma, and pipe delimiters are supported).· Select Create ... Delimited Header File for ... from the Tools Menu Button (the ellipses are replaced with
the delimiter and form you've selected, respectively).
IMU will suggest a filename (e.g. 1099MISC_2009_Header_Comma) based upon the delimiter and tax formselected. By default, this file will be saved with a TXT extension in the folder 2009MAPS\HEADERS locatedwithin the installation folder (e.g. IMPORT\2009MAPS\HEADERS).
Note
· The Create a Delimited Header File menu selection appears disabled (dimmed out) if either (i) a delimiterhas not been selected or (ii) a tax form has not been selected.