146


This manual and the software are furnished under license and may only be used or copied in accor-dance with the terms of that license. This manual is furnished for informational use only and is sub-ject to change without notice and in no way construes a commitment from Jasc Software, Inc. Jasc Software, Inc., assumes no responsibility or liability for any errors or omissions in this manual. Except as permitted under license, no part of this publication may be reproduced, stored, or trans-mitted in any form or by any means, electronic, mechanical, recording or otherwise.
Paint Shop Photo Album is a registered trademark or trademark of Jasc Software, Inc., in the United States and/or other countries. Copyright © 2002 Jasc Software, Inc. All rights reserved.
This software contains Macromedia Shockwave™ Player and Macromedia Flash™ Player software by Macromedia, Inc. Code Copyright © 1995-2002 Macromedia, Inc. All rights reserved. Macrome-dia, Shockwave, and Flash are trademarks of Macromedia, Inc.
QuickTime and the QuickTime logo are trademarks used under license from Apple Computer, Inc. Code Copyright © 1995-2002 Apple Computer, Inc.
Microsoft, Windows and the Microsoft Internet Explorer logo are registered trademarks of Microsoft Corporation in the United States and/or other countries. Copyright © 2002 Microsoft Cor-poration. One Microsoft Way, Redmond, Washington 98052-6399 U.S.A. All rights reserved.
ImageSynthesis is a trademark of Enroute, Inc. © 1997-1998 Enroute Inc.
Imaging Technology provided under License by AccuSoft Corporation. ImageGear © 1996-2001 by AccuSoft Corporation. All Rights Reserved.
i-mode is a trademark or registered trademark of NTT DoCoMo, Inc. In Japan and other countries.
Kodak is a trademark of Eastman Kodak Company.
Portions (upload SDK and selected graphics) copyright 1999-2001 Shutterfly.com, Inc. All rights reserved. Shutterfly and Shutterfly.com are trademarks of Shutterfly.com, Inc.
Portions copyright © 1995-2002 Xceed Software Inc. All rights reserved
Portions copyright © 2002-2003 Enterprise Corporation International (ECI). All rights reserved.
Portions of PhotoBox upload plugin are copyright © PhotoBox Limited, 2002-2003.
Printed in the United States of America
Second Printing
2003

i
Chapter 1 Welcome to Paint Shop Photo Album . . . . . 1What’s New in Version 4 . . . . . . . . . . . . . . . . . . . . . . . . . . . . . . . 1Learning Paint Shop Photo Album . . . . . . . . . . . . . . . . . . . . . . . . 2
Using this Guide . . . . . . . . . . . . . . . . . . . . . . . . . . . . . . . . . . . . 2Viewing the Product Tour . . . . . . . . . . . . . . . . . . . . . . . . . . . . . 3
Using Online Help . . . . . . . . . . . . . . . . . . . . . . . . . . . . . . . . . . . . . 3Accessing Online Help . . . . . . . . . . . . . . . . . . . . . . . . . . . . . . . 3Understanding the Help window . . . . . . . . . . . . . . . . . . . . . . . . 4Jasc Learning Center . . . . . . . . . . . . . . . . . . . . . . . . . . . . . . . . . 5
Accessing Free Customer Support . . . . . . . . . . . . . . . . . . . . . . . . . 6
Chapter 2 Getting Started . . . . . . . . . . . . . . . . . . . . . . 7System Requirements . . . . . . . . . . . . . . . . . . . . . . . . . . . . . . . . . . 7Installing Paint Shop Photo Album . . . . . . . . . . . . . . . . . . . . . . . . 8Exploring the User Interface . . . . . . . . . . . . . . . . . . . . . . . . . . . . . 9
Starting and Exiting Paint Shop Photo Album . . . . . . . . . . . . . . 9Albums and Images . . . . . . . . . . . . . . . . . . . . . . . . . . . . . . . . . . 9The Main Windows and Tabs . . . . . . . . . . . . . . . . . . . . . . . . . 10The Program Tabs . . . . . . . . . . . . . . . . . . . . . . . . . . . . . . . . . . 15The Main Bars . . . . . . . . . . . . . . . . . . . . . . . . . . . . . . . . . . . . . 15
Using Keyboard Shortcuts . . . . . . . . . . . . . . . . . . . . . . . . . . . . . . 16
Chapter 3 Using a Digital Camera With Paint Shop Photo Album . . . . . . . . . . . . . . . . . . . . . . . . . . . . 21Configuring Paint Shop Photo Album to Access a Camera . . . . . 21Viewing the Images in the Camera . . . . . . . . . . . . . . . . . . . . . . . 24Downloading Images to a Computer . . . . . . . . . . . . . . . . . . . . . . 24
Using a Camera or Memory Card Connection . . . . . . . . . . . . . 25Using Windows XP and a USB Cable . . . . . . . . . . . . . . . . . . . 26Using a TWAIN Connection . . . . . . . . . . . . . . . . . . . . . . . . . . 26
C O N T E N T S C

Contentsii
Chapter 4 Working With Albums and Images . . . . . . . 29Opening and Closing Albums . . . . . . . . . . . . . . . . . . . . . . . . . . . 30Opening and Closing Images . . . . . . . . . . . . . . . . . . . . . . . . . . . . 30Creating a New Album . . . . . . . . . . . . . . . . . . . . . . . . . . . . . . . . . 32Sorting Images in an Album . . . . . . . . . . . . . . . . . . . . . . . . . . . . . 33Moving Images . . . . . . . . . . . . . . . . . . . . . . . . . . . . . . . . . . . . . . 33Adding and Viewing Information and Keywords . . . . . . . . . . . . . 36
Adding Titles and Descriptions to Albums and Images . . . . . . 36Associating Keywords With Images . . . . . . . . . . . . . . . . . . . . 38
Renaming Albums and Images . . . . . . . . . . . . . . . . . . . . . . . . . . . 39Deleting Albums and Images . . . . . . . . . . . . . . . . . . . . . . . . . . . . 40Saving Images . . . . . . . . . . . . . . . . . . . . . . . . . . . . . . . . . . . . . . . 41Creating and Using Album Shortcuts . . . . . . . . . . . . . . . . . . . . . . 42Adding an Album Soundtrack . . . . . . . . . . . . . . . . . . . . . . . . . . . 43
Chapter 5 Sharing Images . . . . . . . . . . . . . . . . . . . . . 45Sending Images Via E-mail . . . . . . . . . . . . . . . . . . . . . . . . . . . . . 45Making a VCD . . . . . . . . . . . . . . . . . . . . . . . . . . . . . . . . . . . . . . . 46Viewing Slide Shows . . . . . . . . . . . . . . . . . . . . . . . . . . . . . . . . . . 51Sharing Slide Shows . . . . . . . . . . . . . . . . . . . . . . . . . . . . . . . . . . 53Using a Photo Sharing Service . . . . . . . . . . . . . . . . . . . . . . . . . . . 54
Setting Up an Account With a Photo Sharing Service . . . . . . . 55Uploading Images a Photo Sharing Service . . . . . . . . . . . . . . . 55
Making and Publishing a Web Gallery . . . . . . . . . . . . . . . . . . . . . 57Making a Web Gallery . . . . . . . . . . . . . . . . . . . . . . . . . . . . . . . 57Changing the Web Template . . . . . . . . . . . . . . . . . . . . . . . . . . 58Saving Web Pages . . . . . . . . . . . . . . . . . . . . . . . . . . . . . . . . . . 59Publishing Web Pages . . . . . . . . . . . . . . . . . . . . . . . . . . . . . . . 59
Making a Screen Saver . . . . . . . . . . . . . . . . . . . . . . . . . . . . . . . . . 60Modifying Screen Saver Properties . . . . . . . . . . . . . . . . . . . . . 61
Making Desktop Wallpaper . . . . . . . . . . . . . . . . . . . . . . . . . . . . . 61Using i-mode . . . . . . . . . . . . . . . . . . . . . . . . . . . . . . . . . . . . . . . . 62
Chapter 6 Searching and Cataloging . . . . . . . . . . . . . 65Searching on Information . . . . . . . . . . . . . . . . . . . . . . . . . . . . . . . 65Searching on Keywords . . . . . . . . . . . . . . . . . . . . . . . . . . . . . . . . 66Cataloging Albums and Images . . . . . . . . . . . . . . . . . . . . . . . . . . 67
Backing Up the Database File . . . . . . . . . . . . . . . . . . . . . . . . . 68Restoring Backup Files . . . . . . . . . . . . . . . . . . . . . . . . . . . . . . 69Importing and Exporting the Database File . . . . . . . . . . . . . . . 69

Contents iii
Chapter 7 Working With Images . . . . . . . . . . . . . . . . . 71Zooming In and Out . . . . . . . . . . . . . . . . . . . . . . . . . . . . . . . . . . 72Panning Images . . . . . . . . . . . . . . . . . . . . . . . . . . . . . . . . . . . . . . 72Rotating Images . . . . . . . . . . . . . . . . . . . . . . . . . . . . . . . . . . . . . 73Flipping an Image . . . . . . . . . . . . . . . . . . . . . . . . . . . . . . . . . . . . 74Resizing an Image . . . . . . . . . . . . . . . . . . . . . . . . . . . . . . . . . . . . 75Cropping an Image . . . . . . . . . . . . . . . . . . . . . . . . . . . . . . . . . . . 76Adding Text to an Image . . . . . . . . . . . . . . . . . . . . . . . . . . . . . . . 78Adding Audio to an Image . . . . . . . . . . . . . . . . . . . . . . . . . . . . . 79
Playing Audio . . . . . . . . . . . . . . . . . . . . . . . . . . . . . . . . . . . . . 79Recording an Audio Annotation . . . . . . . . . . . . . . . . . . . . . . . 80Editing Audio . . . . . . . . . . . . . . . . . . . . . . . . . . . . . . . . . . . . . 80Configuring Audio Properties . . . . . . . . . . . . . . . . . . . . . . . . . 81
Making Movie Files . . . . . . . . . . . . . . . . . . . . . . . . . . . . . . . . . . 82Exporting Movies . . . . . . . . . . . . . . . . . . . . . . . . . . . . . . . . . . . . 83Viewing a Movie File . . . . . . . . . . . . . . . . . . . . . . . . . . . . . . . . . 85Adding a Pen Annotation . . . . . . . . . . . . . . . . . . . . . . . . . . . . . . 86Making a Panoramic Image . . . . . . . . . . . . . . . . . . . . . . . . . . . . . 87
Chapter 8 Enhancing Images . . . . . . . . . . . . . . . . . . . 91Fixing Images in One Step . . . . . . . . . . . . . . . . . . . . . . . . . . . . . 91Fixing Images Using the Adjust Wizard . . . . . . . . . . . . . . . . . . . 92Manually Adjusting Images . . . . . . . . . . . . . . . . . . . . . . . . . . . . . 94Removing Red Eye . . . . . . . . . . . . . . . . . . . . . . . . . . . . . . . . . . . 97
Chapter 9 Adding Image Effects . . . . . . . . . . . . . . . 101Converting an Image to Black and White . . . . . . . . . . . . . . . . . 101Making a Sepia Image . . . . . . . . . . . . . . . . . . . . . . . . . . . . . . . . 102Thinning an Image . . . . . . . . . . . . . . . . . . . . . . . . . . . . . . . . . . 102Adding Borders to an Image . . . . . . . . . . . . . . . . . . . . . . . . . . . 103Adding a Picture Frame to an Image . . . . . . . . . . . . . . . . . . . . . 104Adding a Photo Edge to an Image . . . . . . . . . . . . . . . . . . . . . . . 104Adding Special Effects . . . . . . . . . . . . . . . . . . . . . . . . . . . . . . . 105
Adding a Ripples Effect . . . . . . . . . . . . . . . . . . . . . . . . . . . . 105Adding a Glass Blocks Effect . . . . . . . . . . . . . . . . . . . . . . . . 106Adding an Edges Effect . . . . . . . . . . . . . . . . . . . . . . . . . . . . . 106Adding a Fisheye Effect . . . . . . . . . . . . . . . . . . . . . . . . . . . . 107Adding an Invert Effect . . . . . . . . . . . . . . . . . . . . . . . . . . . . . 107

Contentsiv
Chapter 10 Printing . . . . . . . . . . . . . . . . . . . . . . . . . . 109Printing Albums . . . . . . . . . . . . . . . . . . . . . . . . . . . . . . . . . . . . . 109Printing Images Using Templates . . . . . . . . . . . . . . . . . . . . . . . . 110
Modifying the Images in the Print Template . . . . . . . . . . . . . 111Printing Custom Layouts . . . . . . . . . . . . . . . . . . . . . . . . . . . . . . 112Making Print Adjustments . . . . . . . . . . . . . . . . . . . . . . . . . . . . . 113
Changing Labels . . . . . . . . . . . . . . . . . . . . . . . . . . . . . . . . . . 113Making Image Adjustments . . . . . . . . . . . . . . . . . . . . . . . . . . 115Changing Layout Options . . . . . . . . . . . . . . . . . . . . . . . . . . . . 116
Chapter 11 Multiple Image Operations . . . . . . . . . . . . 119Automatically Adjusting Multiple Images . . . . . . . . . . . . . . . . . 119Renaming Multiple Images . . . . . . . . . . . . . . . . . . . . . . . . . . . . 120Resizing Multiple Images . . . . . . . . . . . . . . . . . . . . . . . . . . . . . . 121Saving Multiple Images . . . . . . . . . . . . . . . . . . . . . . . . . . . . . . . 122Converting Multiple Images to Black and White . . . . . . . . . . . . 123Converting Multiple Images to Sepia . . . . . . . . . . . . . . . . . . . . . 123
Chapter 12 Configuring Program Options . . . . . . . . . 125Configuring the Toolbars . . . . . . . . . . . . . . . . . . . . . . . . . . . . . . 125Configuring the Program Launch Bar . . . . . . . . . . . . . . . . . . . . 126Setting Image View Options . . . . . . . . . . . . . . . . . . . . . . . . . . . 127Configuring Tool Options . . . . . . . . . . . . . . . . . . . . . . . . . . . . . 127
Thumbnail Options . . . . . . . . . . . . . . . . . . . . . . . . . . . . . . . . 127General Options . . . . . . . . . . . . . . . . . . . . . . . . . . . . . . . . . . . 128View/Print Options . . . . . . . . . . . . . . . . . . . . . . . . . . . . . . . . 129Undo/Redo Options . . . . . . . . . . . . . . . . . . . . . . . . . . . . . . . . 129Download Options . . . . . . . . . . . . . . . . . . . . . . . . . . . . . . . . . 130File Formats Options . . . . . . . . . . . . . . . . . . . . . . . . . . . . . . . 131Database Backup Options . . . . . . . . . . . . . . . . . . . . . . . . . . . 131Photo Sharing Options . . . . . . . . . . . . . . . . . . . . . . . . . . . . . . 132Proxy Setting Options . . . . . . . . . . . . . . . . . . . . . . . . . . . . . . 133Web Gallery Options . . . . . . . . . . . . . . . . . . . . . . . . . . . . . . . 133

1
Welcome to Paint Shop Photo AlbumPaint Shop Photo Album is an easy-to-use program that allows you to view, download, organize, enhance, and share digital images. With Paint Shop Photo Album, you can make the most out of your digital images!
This guide provides you with complete information about Paint Shop Photo Album’s advanced features, and provides simple procedures to help you get started using the program.
Contents What’s New in Version 4 . . . . . . . . . . . . . . . . . . . . . . . . . . . . . . . 1Learning Paint Shop Photo Album . . . . . . . . . . . . . . . . . . . . . . . . 2Using Online Help . . . . . . . . . . . . . . . . . . . . . . . . . . . . . . . . . . . 3Accessing Customer Service . . . . . . . . . . . . . . . . . . . . . . . . . . . . 6
What’s New in Version 4Some of the new features in this version of Paint Shop Photo Album include the following:
Video CD Use your images to create a video CD that you can share with others
Adjust Wizard Correct problems in images by selecting the best correction.
Borders Add colorful borders around images.
Picture Frames Frame your images using one of the many picture frames.
C H A P T E R 1

Chapter 1: Welcome to Paint Shop Photo Album2
Edge Effects Make the edges of an image look unique by adding an edge effect.
Sepia Make images look old-fashioned by converting them to sepia.
Thinify Make the subject of images look thinner or wider.
Slide Shows
� Edit slide shows while you create them - rotate, and flag images.
� Share your images using slide shows that run automatically.
E-mail Automatically optimize photos for e-mail.
Online Help Quickly access information about the program using the new online help system.
Learning Paint Shop Photo AlbumThere are a variety of ways to learn Paint Shop Photo Album: use this guide, view the Product Tour, access Online Help, work through the tutorials in the online help, visit the Jasc Learning Center, or contact Technical Support.
Using this GuideThe chapters in this guide are presented in an order intended to help you learn the program as quickly as possible. When using this guide, be aware of the following formatting conventions:
� Words that appear in bold in the middle of a sentence relate to actions. For example: “Choose File > Save As” instructs you to click on the File menu, and then choose the Save As command.
� Words that appear in italics are references to other chapters or sections of the User Guide. For example: “Chapter 1, Welcome to Paint Shop Photo Album.”
� Words that appear in angle brackets refer to specific keys on the keyboard. For example: <Ctrl>.
� Words that appear in courier font describe a directory path on your computer. For example, C:\My Documents\Paint Shop Photo Album\ would describe a directory named “Paint Shop Photo Album,” contained in directory named “My Documents,” located on the C: drive of your computer.

Chapter 1: Welcome to Paint Shop Photo Album 3
NoteThis User Guide features common terminology that relates to images, and the Windows desktop. If you’ve used other software programs on your Windows PC, then you’ll probably find the descriptions and steps in this guide easy to follow and understand.
Viewing the Product TourThis program includes an interactive Product Tour that shows you how to use Paint Shop Photo Album. By default the Product Tour opens whenever you open the program. For information about setting the program options to turn off the Product Tour, see “Configuring Tool Options” on page 127.
To view the Product Tour:
1 In the Windows desktop, click the Start button and choose Programs. The Programs pop-out menu appears to the right.
2 Choose Jasc Software - Jasc Paint Shop Photo Album to open Paint Shop Photo Album.
3 Choose Help > Product Tour.
When you are finished viewing the Product Tour, click Start Using Paint Shop Photo Album to return to the main program window.
Using Online HelpUse the new built-in help system to quickly access information about using the program. In addition there are tutorials that guide you through completing specific tasks using Paint Shop Photo Album.
Accessing Online HelpUse context sensitive help to quickly find help about the active window or dialog. Open the help window to search for help from the Contents, Index, or Search tabs. Use the Favorites tab to create a list of your favorite help topics.

Chapter 1: Welcome to Paint Shop Photo Album4
To access online help:
� Press F1 to open the Help window and view help about the active window or dialog.
� Click the Help button on a dialog to open the help topic for that dialog in the Help window.
� Choose Help > Help Topics to open the Help window.
Understanding the Help windowThe Online Help window is divided into two sections:
� The Navigation pane (on the left side of the window) contains four navigational tabs: Contents, Index, Search, and Favorites.
� The Topic pane (on the right side of the window) displays the selected help topic, or the default help topic.
Note: To link to another topic, or view an image in a pop-up window click the colored, underlined words.
Using the Help Table of ContentsUse the Contents to view help topics, organized in books by subject.
To use the Contents:
1 Click a book to expand it and display the list of help topics in that book. Click the book again to contract it.
2 Click a topic to display it in the Topic pane.
Searching for HelpUse the Search tab of the help window to search for words in the title of body of help topics, including those topics that are not listed on the Contents tab.
To search for words in help topics:
1 Click the Search tab.
2 Type the word or phrase you want to find in the text entry box.
3 Click the List Topics button, select a topic, and then click the Display button to open the topic in the topic pane.
Another way to learn:Learn specific tasks by completing the tutorials in the online help system. Choose Help > Online Help to open the Help window, click the Contents tab, and then select a tutorial from the Tutorials book.
Highlighting Search WordsWhen searching for words in help topics, you can have each occurrence of the word or phrase highlighted in the topics that are found.
To turn on Search Highlight, in the Help window choose Options > Search Highlight On.
To turn off this option, in the Help window choose Options > Search Highlight Off.

Chapter 1: Welcome to Paint Shop Photo Album 5
Using the Index to find helpUse the Index tab of the help window to find topics using indexed keywords. Topics are often indexed under more than one entry.
To use the Index to find help topics:
1 Click the Index tab.
2 Type the keyword that you want to find in the text box, or click a keyword in the index.
3 Click the Display button to open the topic in the topic pane.
Creating a List of Frequently Used Help Topics Use the Favorites tab of the help window to create a list of your favorite help topics.
To create and use a list of favorite topics:
1 Find the help topic you want to save as a favorite topic.
2 Click the Favorites tab, and then click the Add button.
3 To view topic saved on your Favorites tab, click the Favorites tab, select the topic, and then click the Display button.
Jasc Learning CenterThe Jasc Software Learning Center shows you how to use Paint Shop Photo Album’s features to get organized and share your images.
To access the Jasc Software Learning Center, browse to www.jasc.com/learncenter.asp, Or, go to Jasc.com, click the Support tab, and then select Learning Center.
Maintaining the topic list:If you want to rename a topic, select the topic, and then type a new name in the Current topic box.
To remove a favorite topic, select the topic and then click the Remove button.

Chapter 1: Welcome to Paint Shop Photo Album6
Accessing Free Customer SupportWhen you buy Paint Shop Photo Album, you have free access to Jasc’s staff of support personnel. Contact us to get assistance in any of the following ways:
US / Canada Contact Method Address or Number
Call Technical Support 952-930-9171
Technical Support on the Web www.jasc.com/dell/support
Fax Technical Support 952-930-9172
Call Customer Service800-622-2793
(8am - 5pm CST, Monday - Friday)
Go to the Jasc Website www.jasc.com/dell
International Contact Method
Address or Number
Find your local country contact details on the Web
www.jasc.com/dell/world
International e-mail [email protected]
Call International Customer Service(English Only)
+1- 952-930-9800
(8am - 5pm GMT-6:00, Monday - Friday)
Fax International Customer Service
+1- 952-930-9172

7
Getting StartedGet your photos out of your camera and into your life with Jasc Paint Shop Photo Album. It is easy to install and use, and offers the tools you need to perform common photo tasks quickly and easily.
Contents System Requirements . . . . . . . . . . . . . . . . . . . . . . . . . . . . . . . . . 7Installing Paint Shop Photo Album . . . . . . . . . . . . . . . . . . . . . . . . 8Exploring the User Interface . . . . . . . . . . . . . . . . . . . . . . . . . . . . . 9Using Keyboard Shortcuts . . . . . . . . . . . . . . . . . . . . . . . . . . . . . 16
System RequirementsBefore you install this program, make sure that your computer meets or exceeds these following requirements:
� An IBM or compatible computer with a Pentium processor
� Windows 98 SE, 2000, ME, XP, or Windows NT 4.0 with Service Pack 3 or later
� 64 MB RAM
� 24 MB available hard disk free space
� A CD-ROM drive
� A color monitor that can display at least 256-colors
� A video card that supports at least 256 colors
� Help system requires Microsoft Internet Explorer 4.0 or higher
C H A P T E R 2
How do I find out what my color settings are?To determine if you have True Color settings, Right-click on the Windows desktop and choose Properties to open the Display Properties dialog. Click the Settings tab, and then choose a True Color setting (either 24-bit or 32-bit) from the Color drop-down list.

Chapter 2: Getting Started8
To view your digital images with photographic image quality use a video card and monitor that can display the True Color (24-bit or 32-bit color) setting.
Installing Paint Shop Photo AlbumBefore you install the program, close any programs or applications that you have running on your Windows PC.
If you have a previous version of Paint Shop Photo Album installed on your computer, a prompt will display indicating that you can import the old database file containing album and image information (keywords, information, etc.). If you do not import the database file from the previous version, the information that you entered about images and albums will not be retained in this version of the program.
NoteIf you have downloaded Paint Shop Photo Album from our web site, follow the installation instructions on the web site.
To install Paint Shop Photo Album from the CD:
1 Insert the Paint Shop Photo Album CD in your CD-ROM drive. The Installation program starts automatically.
Note: If the installation program does not start automatically, double-click the My Computer icon, and then double-click on the CD-ROM icon. When the window opens that displays the contents of the CD-ROM, double-click Setup.exe.
2 Follow the prompts to install the program.
Want to use Paint Shop Photo Album as
the default JPEG viewer?On the JPEG Viewer installation screen, click the Yes option to make Paint Shop Photo Album the default viewer for JPEG files. This setting is recommended for most users.

Chapter 2: Getting Started 9
Exploring the User InterfaceThis section provides an overview of the user interface, and describes the main windows, tabs, and bars. Please review this section thoroughly to help you understand this program, and become familiar with the user interface.
Starting and Exiting Paint Shop Photo Album
To start Paint Shop Photo Album:
1 On the Windows desktop, click the Start button and choose Programs. The Programs pop-out menu appears to the right.
2 Choose Jasc Software to display a menu, and then choose Jasc Paint Shop Photo Album to open the program.
Note: You can also double-click the program shortcut icon on the Windows desktop to open the program.
To Exit Paint Shop Photo Album:
Choose File > Exit or click the Close button .in the upper-right corner of the program window.
Albums and ImagesAlbums are collections of digital images that are stored in folders on the computer hard drive or a removable disk, such as a CD-ROM. The Browse tab, on the left side of the program window, displays the directory structure of the albums. This directory structure directly corresponds to the directory structure of Windows Explorer.
Images are individual files, one for each digital photograph. In the program windows, these files display as thumbnail images (small digital representations of the actual images). Images are usually stored in the JPEG (.jpg) file format.
Paint Shop Photo Album Program Icon

Chapter 2: Getting Started10
The Main Windows and TabsMost of your time spent working in the program will be in the two main windows: the Album View window and the Image View window. Additionally, there are three secondary windows the: Print Layout window, Web Gallery window, and the VCD window.
On the left side of the Image and Album View windows are five tabs, the Browse, Info, Keywords, Search, and Album tabs.
NoteThe Album tab only displays when the Image View window is open.
Album View WindowThe Album View window is the default window and displays each time you open the program. Select albums, create a slide show, access other windows, connect to a digital camera, e-mail images to others, run batch processes, sort and delete images, and create new albums using the Album View window, shown below:
The first time you open the program the Album View window displays thumbnails of the images in the Samples Album.
To open an album:
Click an album in the Browse tab to open the thumbnail images in the Album View window. Click the plus sign (+) next to the album to expand the album to display additional albums.
To close an album:
Click the close icon in the right corner of the open album, or choose File > Close.
Want to change the size of the thumbnail images?In the Album View window, choose View > Thumbnail Size, and then choose Large, Medium, or Small.

Chapter 2: Getting Started 11
Image View WindowAdjust, enhance, crop, rotate, add text, borders, and picture frames to images using the Image View window, shown below:
If there is more than one image open in the Image View window a tab displays at the bottom of the window for each open image. To view an open image, click the tab for that image.
To open an image:
� In the Album View window, double-click a thumbnail to open the image in the Image View window.
� In the Image View window, click the Album tab, and then click an image to open it in the Image View window.
� In the Image View window, to view an open image, click the tab, for the image at the bottom of the Image View window.
To close an image:
� Click the Close button, or choose File > Close.
Window Layout OptionsThe Normal Image View is selected by default and displays only one image in the Image View window. To display two or more images in the Image View window choose View > Two-Image View, or View > Multiple-Image View.

Chapter 2: Getting Started12
Print Layout WindowPrint images using multi-image layouts that make efficient use of paper, create custom print layouts, and print images using the Print Layout window, shown below:
The Print Layout window displays the selected template containing the selected images in the template view. In addition, there are two tabs on the left side of the window:
Templates tab The default tab used to select a printing format. Click (+) next to a template group to expand the options. You can print single or multiple images on one page using the print templates.
Adjustments tab Click the tab to change the header, footer, image label, make image adjustments, and change layout options.
For information about printing images, see Chapter 10, Printing.
To open the Print Layout window:
On the Album View window, click the Print button on the toolbar, or choose File > Print.
To close the Print Layout window:
Click the Close Preview button on the toolbar.
Adjustments tab

Chapter 2: Getting Started 13
VCD Window Create a Video CD (Video Compact Disc) of the images in your albums, add slide shows, music, text, and select a background for the VCD using the VCD View window, shown below:
The VCD window contains three main areas:
Slide Show view Add and delete albums as slide shows on the VCD. Add, select, and delete slide shows.
Selected Slide Shows view Displays the thumbnails of the slide shows that are included on the VCD. Click a chapter thumbnail to view the images in the chapter in the Image view.
Images view Displays the images in the selected slide show.
For information about making a Video CD, see “Making a VCD” on page 46.
To open the VCD window:
On the Album View window, click the Video CD button, or choose Share > Create Video CD.
To close the VCD window:
Click the Close VCD Layout button on the toolbar.
Important:In order to burn VCD’s using the VCD Window, your computer must have either an internal or external CD-RW drive.

Chapter 2: Getting Started14
Web Gallery WindowTurn albums into web photo galleries using the Web Gallery window, shown below:
The Web Gallery window contains two tabs on the left side of the window:
Templates tab The default tab used to select a web page format. Select a template from the list to preview the layout.
Adjustments tab Click this tab to change the template background color, pattern, or texture, an to change text and link colors.
For information about making and publishing web pages, see “Making and Publishing a Web Gallery” on page 57.
To open the Web Gallery window:
To open the Web Gallery window, select an album from the Browse tab, and then choose Share > Create Web Gallery.
To close the Web Gallery window:
Click the Close Web Gallery button on the toolbar.
Adjustments tab
Chapter 2: Getting Started 15
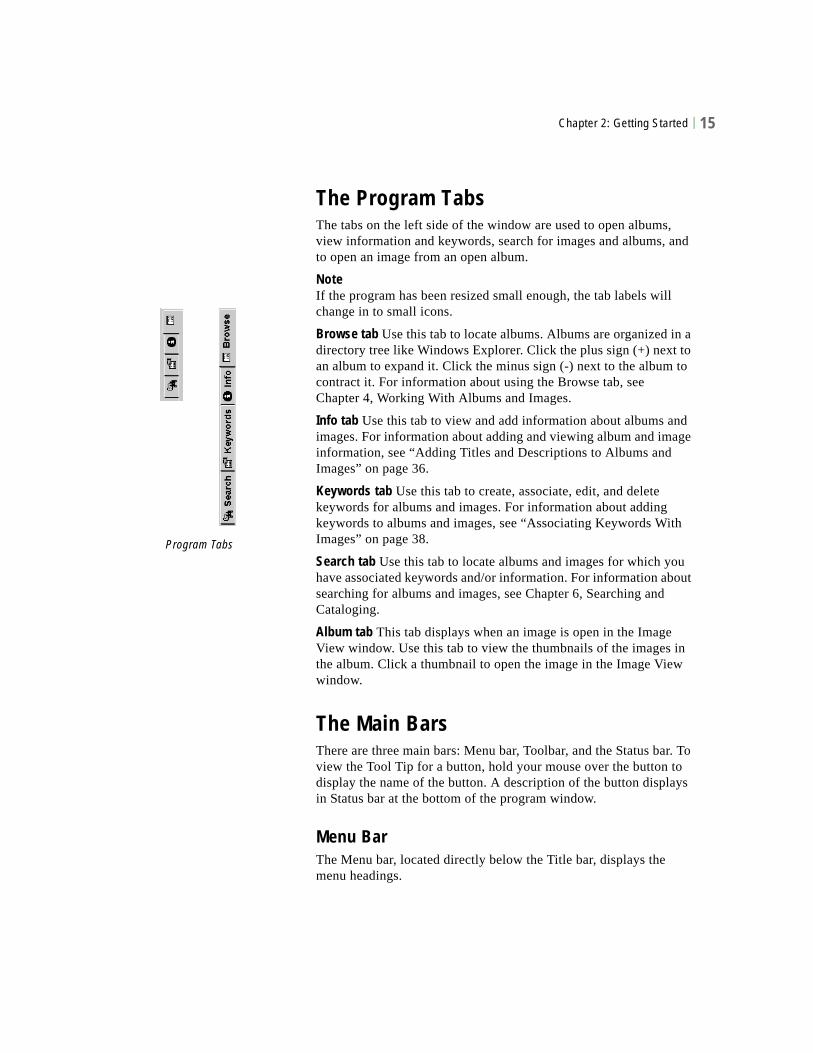
The Program TabsThe tabs on the left side of the window are used to open albums, view information and keywords, search for images and albums, and to open an image from an open album.
NoteIf the program has been resized small enough, the tab labels will change in to small icons.
Browse tab Use this tab to locate albums. Albums are organized in a directory tree like Windows Explorer. Click the plus sign (+) next to an album to expand it. Click the minus sign (-) next to the album to contract it. For information about using the Browse tab, see Chapter 4, Working With Albums and Images.
Info tab Use this tab to view and add information about albums and images. For information about adding and viewing album and image information, see “Adding Titles and Descriptions to Albums and Images” on page 36.
Keywords tab Use this tab to create, associate, edit, and delete keywords for albums and images. For information about adding keywords to albums and images, see “Associating Keywords With Images” on page 38.
Search tab Use this tab to locate albums and images for which you have associated keywords and/or information. For information about searching for albums and images, see Chapter 6, Searching and Cataloging.
Album tab This tab displays when an image is open in the Image View window. Use this tab to view the thumbnails of the images in the album. Click a thumbnail to open the image in the Image View window.
The Main BarsThere are three main bars: Menu bar, Toolbar, and the Status bar. To view the Tool Tip for a button, hold your mouse over the button to display the name of the button. A description of the button displays in Status bar at the bottom of the program window.
Menu Bar The Menu bar, located directly below the Title bar, displays the menu headings.
Program Tabs

Chapter 2: Getting Started16
Click a menu heading to display the list of commands associated with the menu heading.
ToolbarsThe toolbar, located below the Menu bar, contains buttons for accessing frequently used menu commands. The buttons on the toolbar change depending on which window is currently active.
Click a button to execute the associated menu command. Clicking the down-arrow on the right side of the button displays a menu with additional options associated with that command.
If a menu option or button on the toolbar is greyed-out, that command is not available for the current mode. For example, Image > Red Eye is not available when the Album View window is open. In order to use the Red Eye tools, you must open an image in the Image View window.
Status BarThe Status bar, located at the bottom of the program window, displays the directory location for albums and images, and Tool Tips.
Using Keyboard ShortcutsKeyboard shortcuts are a quick and easy way to execute a commands. Many users find that familiarizing themselves with keyboard shortcuts saves them a lot of time, especially when performing repetitive tasks.
Most keyboard shortcuts involve the Alt, Ctrl, or Shift keys in combination with another key. Some shortcuts are activated by a Function key, such as pressing F1 to display online help.
For example, you can display the Browse tab by using the keyboard combination Ctrl + B. The following tables list the keyboard shortcuts and function keys that are available in this program.
Where are all the toolbar buttons?Depending on the size of your screen window, you may need to click on the >> button of the toolbar to display all of the toolbar buttons

Chapter 2: Getting Started 17
Keyboard Shortcuts
Menu Command Keyboard Shortcut
File Menu Alt + F
New Album Ctrl + N
Open Album Ctrl + O
Open File Ctrl + Shift + O
Save Ctrl + S
Print Ctrl + P
Jump to Paint Shop Pro Ctrl + J
Edit Menu Alt + E
Undo Ctrl + Z
Redo Ctrl + Alt + Z
Cut Ctrl + X
Copy Ctrl + C
Paste Ctrl + V
Delete Delete
Select All Ctrl + A
Select None Ctrl + D
View Menu Alt+ V
Browse Ctrl + B
Keywords Ctrl + K
Info Shift + I
Search Ctrl + F
Album
Camera Menu Alt + M
View Images Ctrl + Shift + V
Get All Images Ctrl + Shift + G

Chapter 2: Getting Started18
Erase All Images Ctrl + Shift + E
Share Menu Alt + S
View Slide Show Ctrl + W
Online Services
> Add Selected to Upload Ctrl + U
Create Web Gallery Ctrl + Shift + W
i-mode Ctrl + Shift + I
Image Menu Alt + I
Quick Fix Ctrl + Q
Red Eye Ctrl + Shift + D
Zoom Ctrl + Shift + Z
Pan Ctrl + Shift + P
Selection
> Rectangular
> Freehand
Ctrl + Shift + R
Ctrl + Shift + F
Rotate
> Right
> Left
> Free
Ctrl + R
Ctrl + L
Ctrl + E
Flip
> Horizontal
> Vertical
Ctrl + M
Ctrl + I
Image Resize Shift + S
Add Text Ctrl + T
Menu Command Keyboard Shortcut

Chapter 2: Getting Started 19
Function Keys
Command Function Key
Show Help F1
View Previous Image F3
View Next Image F4
Close Active Window Alt + F4
Close Current View Ctrl + F4
View Refresh F5
Next Window Alt + F6
Next Sub Window Ctrl + F6
File > Save as F12
File > Delete Ctrl + Del
Toggle tabs in active dialog Ctrl + Tab
Tab forward through controls in active window or dialog
Tab
Tab backward through controls in active window or dialog
Shift + Tab
Select Spacebar
Cancel Esc
View Previous Image Alt + Left Arrow
View Next Image Alt + Right Arrow
View Previous Album Alt + Up Arrow

Chapter 2: Getting Started20

21
Using a Digital Camera With Paint Shop Photo Album
Use Paint Shop Photo Album to download images from your digital camera to your computer. Even if Paint Shop Photo Album doesn’t directly support your camera type, you can still use it to download and view images.
Contents Configuring Paint Shop Photo Album to Access a Camera . . . . . . 21Viewing the Images in the Camera . . . . . . . . . . . . . . . . . . . . . . . 24Downloading Images to a Computer . . . . . . . . . . . . . . . . . . . . . . 24
Configuring Paint Shop Photo Album to Access a Camera
Before you can view and download images from a digital camera, you must first configure the program to access the camera.
Your digital camera may require special software (called drivers) that enables your computer to connect to the camera. You must install this software on your computer before connecting the camera to the computer, and configuring the program to access the camera. Refer to the documentation supplied with your camera for more information about this software.
C H A P T E R 3
Chapter 3: Using a Digital Camera With Paint Shop Photo Album22
NoteIf you are using the Windows XP operating system, your camera uses the WIA connection system, and you connect your camera to the computer using a USB cable, then you do not need to configure Paint Shop Photo Album to access your camera. For more information about using a WIA camera with Windows XP, see “Using Windows XP and a USB Cable” on page 26.
To configure Paint Shop Photo Album for your camera:
1 Connect the camera to the computer. Follow the instructions in the documentation provided with your camera to connect your camera to the computer.
Note: If you are using a memory-card reader, make sure that it is connected to the computer, and that you have inserted the memory card from your camera into the card reader.
2 Start Paint Shop Photo Album, click the Windows Start button, and then choose Programs > Jasc Software > Jasc Paint Shop Photo Album. Or, double-click the Paint Shop Photo Album program icon on your desktop.
3 Choose Camera > Connection to open the Connection dialog.
4 From the Connect Via drop-down list choose the type of cable or accessory connection used to connect the camera to the computer:
WIA The default for WIA compatible computers. This option only displays for computers running the Windows XP operating system.
Serial/USB Use this setting if your camera is connected to either a serial or USB port on your computer.
USB (Mounted Drive) The default for non-WIA computers, and the most common type of camera connection. Some cameras are viewed as an additional disk drive when they are connected to the USB port of your computer. Use this setting if your camera uses this option.
PC Card Many cameras use removable memory cards. To use this setting, you will need a computer with a PC Card Reader. Use this setting if you will use the PC Card Reader to retrieve images from your camera’s memory card.
FlashPath A FlashPath adapter is used with SmartMedia camera memory cards. Insert the SmartMedia memory card into the FlashPath adapter, and then insert the adapter into the floppy-

Chapter 3: Using a Digital Camera With Paint Shop Photo Album 23
disk drive of your computer. Use this setting if you’re using a FlashPath adapter.
Note: For this to work properly, you need to have the current FlashPath driver installed on your computer. The necessary driver is usually available on the web site for your FlashPath or camera manufacturer.
TWAIN Most cameras and scanners are TWAIN-compliant. Use this setting if your camera is not directly supported by Paint Shop Photo Album, but is TWAIN-compliant.
5 In the Connection Settings group box, configure the settings for the type of device selected in step 4:
Serial/USB Select Auto and the program will automatically detect the port location and transmission speed.
USB (Mounted Drive), PC Card, and FlashPath Define the path to the image data. You may need to add a subdirectory path describing where your image files are located on the on the extra disk drive.
You can include more than one directory in the search path by separating them with semi-colons (e.g., Photos_1; Photos_2). If multiple directories are listed, Paint Shop Photo Album searches the directories in the order that you entered them. It then displays the images in the first directory that contains images.
TWAIN Choose the TWAIN device from the list of available devices.
6 Click OK to close the Options dialog and apply the setting.
NoteIt is only necessary to configure the program the first time you connect your camera to the computer. The next time you want to access the camera and download pictures to the computer, simply click the Camera button on the toolbar.

Chapter 3: Using a Digital Camera With Paint Shop Photo Album24
Viewing the Images in the CameraAfter you connect your camera to your computer and configure Paint Shop Photo Album, you can view the images in the camera without downloading them to the computer.
To view images before downloading them to the computer:
Choose Camera > View Images, or click the down-arrow on the Camera button to display a drop-down menu and choose View Images.
Images, called thumbnails, display in a scrollable window. Thumbnails are special miniature images that represent the actual contents of the image in your camera.
NoteThe camera icon in the upper left corner of each thumbnail indicates that the image currently resides in the camera or on a storage card. You can easily download the complete image to your computer, as described in the following section.
Downloading Images to a ComputerOnce you have connected your camera to your computer, and configured the program to access the camera, you can easily download and store the images as files on your computer.
You can download selected images, or all of the images in the camera to the computer. Paint Shop Photo Album automatically downloads images to an album named with the current date. You can download images to another album by typing the name of that album, or by browsing for another album.
NoteWhen the transfer is complete, the camera icon on the image changes to an album icon to show that the image has been downloaded to your computer.
The manner in which you connect your camera to your computer determines how you download images to Paint Shop Photo Album.
� If you connect your camera to your computer using a camera or memory card connection see, “Using a Camera or Memory Card Connection” on page 25.
� If you connect your camera to your computer using a TWAIN connection, see “Using a TWAIN Connection” on page 26.
Want to erase all of the images in the digital camera?To erase all of the images in your camera directly from Paint Shop Photo Album, choose Camera > Erase All Images.
Chapter 3: Using a Digital Camera With Paint Shop Photo Album 25
� If you have a WIA enabled camera and Windows XP, see“Using Windows XP and a USB Cable” on page 26.
Using a Camera or Memory Card ConnectionUse these instructions if you connect your camera to your computer using a FlashPath adapter or a PC Card-Reader.
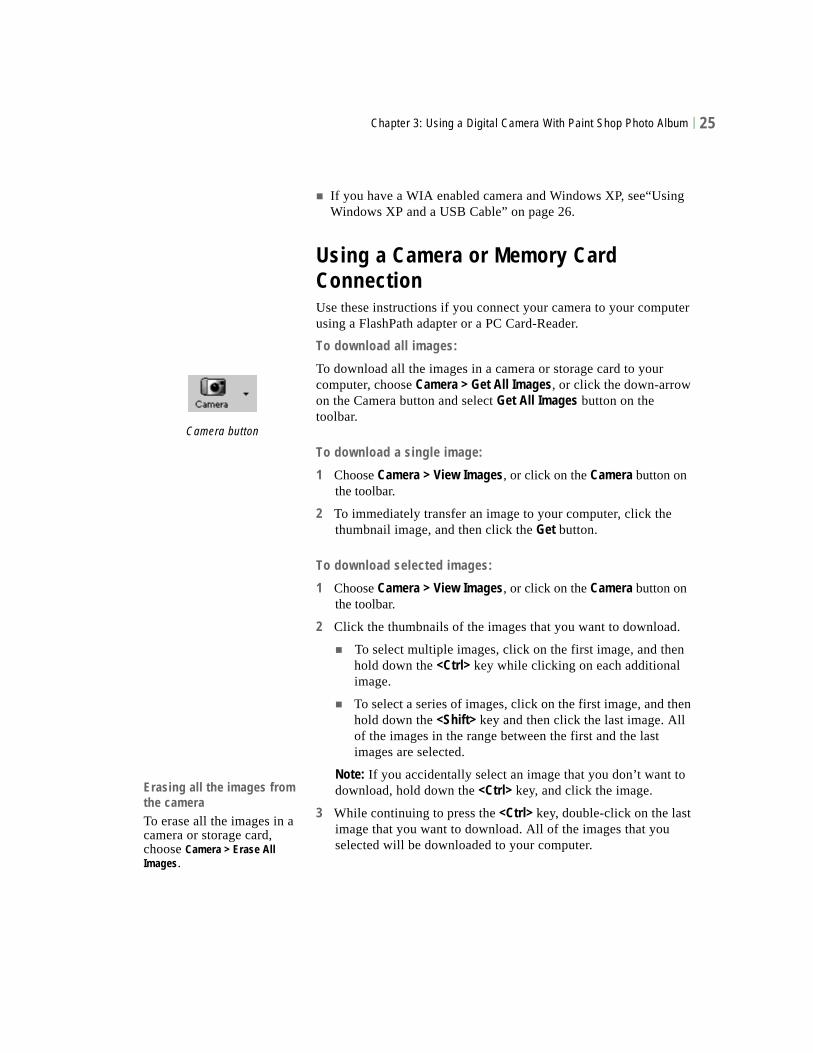
To download all images:
To download all the images in a camera or storage card to your computer, choose Camera > Get All Images, or click the down-arrow on the Camera button and select Get All Images button on the toolbar.
To download a single image:
1 Choose Camera > View Images, or click on the Camera button on the toolbar.
2 To immediately transfer an image to your computer, click the thumbnail image, and then click the Get button.
To download selected images:
1 Choose Camera > View Images, or click on the Camera button on the toolbar.
2 Click the thumbnails of the images that you want to download.
� To select multiple images, click on the first image, and then hold down the <Ctrl> key while clicking on each additional image.
� To select a series of images, click on the first image, and then hold down the <Shift> key and then click the last image. All of the images in the range between the first and the last images are selected.
Note: If you accidentally select an image that you don’t want to download, hold down the <Ctrl> key, and click the image.
3 While continuing to press the <Ctrl> key, double-click on the last image that you want to download. All of the images that you selected will be downloaded to your computer.
Camera button
Erasing all the images from the cameraTo erase all the images in a camera or storage card, choose Camera > Erase All Images.
Chapter 3: Using a Digital Camera With Paint Shop Photo Album26
Using Windows XP and a USB CablePaint Shop Photo Album supports the WIA connection system. If your computer has the Windows XP operating system, your camera uses the WIA connection system, and you connect your camera to the computer using a USB cable, then Paint Shop Photo Album and Windows XP will automatically detect when you have connected your camera to your computer.
To download from a WIA camera with Windows XP:
1 Make sure that the power for your camera is turned on.
2 Connect the camera to the computer using the USB cable.
3 When connected, a confirmation dialog opens. Choose Paint Shop Photo Album.
Note: If you want to skip this confirmation in the future, mark the “Always use this program for this action” check box.
4 Click OK to launch Paint Shop Photo Album and view the images in your camera.
Note If your camera supports PTP (Picture Transport Protocol), and you’re using Windows XP, it’s very likely that your camera will be detected automatically, and this procedure will work as described.
Using a TWAIN ConnectionPaint Shop Photo Album is TWAIN compliant, which means you can import an image from virtually any scanner or camera directly into Paint Shop Photo Album.
To download images using a TWAIN connection:
1 Choose File > Acquire to open the Select Source dialog.
2 In the Sources group box, select the device from which you want to download images, and then click the OK button to open the Select Album dialog.
3 By default images are downloaded to a folder named with the current date. To change the album name, enter a new name in the Download Images to Album field.
4 Depending on your computers’ operating system, images are automatically placed in either the My Pictures, or the in the My Documents directory. To change the directory location for the

Chapter 3: Using a Digital Camera With Paint Shop Photo Album 27
album, click the Browse button to open the Select Album dialog and select a new directory. Click the Select button to change the directory location and close the Select Album dialog.
5 Click the OK button to open the download window for your camera. Refer to the documentation supplied with your camera for more information about using this software.

Chapter 3: Using a Digital Camera With Paint Shop Photo Album28

29
Working With Albums and ImagesThe images that you acquire from a digital camera, CD-ROM, scanner, or other sources are stored in folders on your hard drive. In Paint Shop Photo Album, any folder containing images is called an “album”.
Contents Opening and Closing Albums . . . . . . . . . . . . . . . . . . . . . . . . . . . 30Opening and Closing Images . . . . . . . . . . . . . . . . . . . . . . . . . . . 30Creating a New Album . . . . . . . . . . . . . . . . . . . . . . . . . . . . . . . . 32Sorting Images in an Album . . . . . . . . . . . . . . . . . . . . . . . . . . . . 33Moving Images . . . . . . . . . . . . . . . . . . . . . . . . . . . . . . . . . . . . . 33Adding and Viewing Information and Keywords . . . . . . . . . . . . . . 36Renaming Albums and Images . . . . . . . . . . . . . . . . . . . . . . . . . . 39Deleting Albums and Images . . . . . . . . . . . . . . . . . . . . . . . . . . . 40Saving Images . . . . . . . . . . . . . . . . . . . . . . . . . . . . . . . . . . . . . 41Creating and Using Album Shortcuts . . . . . . . . . . . . . . . . . . . . . 42Adding an Album Soundtrack . . . . . . . . . . . . . . . . . . . . . . . . . . . 43
C H A P T E R 4

Chapter 4: Working With Albums and Images30
Opening and Closing AlbumsUse the Browse tab or File menu to open albums. The Browse tab functions the same as the directory tree in Windows Explorer. When you select an album, thumbnails of the images in the album display in the Album View window. Use the Close button or File menu to close an album.
To open an album using the Browse tab:
1 Click the Browse tab. A “directory tree” displays the contents of your disk drive, organized by drives and folders.
2 Click the album name or folder icon to display thumbnail views of the images in the album in the Album View window.
To open an album using the File menu:
1 Choose File > Open Album to display the Open Album dialog.
2 Select the location of the album from the Look in drop-down list.
3 Click Open to open the album in the Album View window.
NoteIf no thumbnails appear in an album, it is either because there are no images in the album, or that the images in the album are in a file format that Paint Shop Photo Album does not support.
To close an album:
Click the Close button in the upper-right corner of the Album View window, or choose File > Close.
Opening and Closing ImagesOpen images from an open album, using the File menu, from the Album tab, or a Picture CD. Close images using the File menu, or by clicking the Close buttons.
For information about adjusting images, see “Working With Images” on page 71.
To open an image from an open album:
With an album open in the Album View window, double-click an image thumbnail to open the image in the Image View window.
Browse tab displaying albums
Want to keep an album open?Click the Push Pin in the upper left corner of the Album View window to keep the album open while you open other albums.

Chapter 4: Working With Albums and Images 31
To open an Image using the File menu:
1 Choose File > Open File to display the Open File dialog.
2 Select the location of the image file from the Look in drop-down list.
3 Click Open to open the image in the Image View window.
To open an image from the Album tab:
1 Click the Album tab to view the contents of the album.
Note: The Album tab only displays when the Image View window is open.
2 Click the thumbnail of the image to open the image in the Image View window.
To open an image from a Picture CD:
1 Insert the Picture CD in the CD-ROM drive.
2 Choose File > Open Picture CD. The files on the Picture CD display in the Album View window.
Note: You can make changes to the images on a Picture CD, but you must save the changed image into an album on the hard drive of the computer. For information about saving images, see “Saving Images” on page 41.
To open an image In Jasc Paint Shop Pro:
1 Click the Album tab to view the contents of the album in the Album View window.
2 In the Album View window, select the image thumbnail, and then choose File > Jump to Paint Shop Pro to open the image in Paint Shop Pro.
To close an image and return to the Album View window:
� Choose File > Close.
� Click the Close button on the toolbar.
� Click the Close button in the right corner of the Image View window.
Image View window Layout OptionsThe Normal Window Layout is selected by default and displays only one image in the Image View window. You can open two or more images by choosing View > Two-Image, or View > Multiple-Image Views.

Chapter 4: Working With Albums and Images32
Creating a New AlbumCreate new albums to organize sets of images. Drag thumbnail images between albums to reorganize images into topic-based albums.
For information about moving images between albums, see “Moving Images” on page 33.
NoteDepending on your computer’s operating system, images are automatically placed in the Paint Shop Photo Album sub-directory of either the My Pictures, or the My Documents directory.
To create a new album:
1 Choose File > New Album, or right-click in the Album View Window to display a context menu and select New Album to open the New Album dialog.
Note: To create an album within a specific folder, on the Browse tab right-click the folder in which you want to create a new album and select New Album.
2 Enter a name for the new album in the New Album field.
Note: This name is also the name of the directory that you are creating on your hard drive.
3 In the Create In group box, choose the location for the new album.
� By default, Paint Shop Photo Album will place the new album as a sub-folder inside the currently the selected album.
� To place the new album in a different directory in your computer, click Browse to open the Select Album dialog. Choose the folder in which you want to place the new album from the Look in drop-down list, and then click Select.
4 Click OK. The new (empty) album opens in the Album View window.
Chapter 4: Working With Albums and Images 33
Sorting Images in an AlbumSort thumbnails by name, date, size, or type to organize and compare images in the Album View or Search Results windows.
NoteThe sort selection is not “remembered” by the program. If you manually reorder thumbnails, you will need to sort the thumbnails again.
To sort the thumbnail images:
In the Album View window, Choose View > Sort Thumbnails to display a drop-down menu, and then choose an option:
By Name Sorts thumbnails according to the image name.
By Date Sorts thumbnails by the date that the image was created or last updated.
By Size Sorts thumbnails by the size of the file (in KB) from smallest to largest.
By Type Sorts thumbnails alphabetically by file type. For example, all files of the .jpg type would be grouped together, followed by .tif files, and so on.
By Album Sorts the thumbnails in the Search Results window by album name. This option is only available after searching for images.
Moving ImagesThere are two ways to move images into a different album. You can move them, thus removing them from one album and placing them into another album. Or, you can copy them from one album and paste them into another album.
To place an image directly into a document in another application (such as placing a picture into a word-processing document), use the drag-and-drop technique to move an image into another open application.
To move an image into another album:
1 On the Browse tab, click the album that contains the image that you want to move to a different album. The album opens in Album View window.

Chapter 4: Working With Albums and Images34
2 Click the Push Pin in the left corner of the Album View window to keep the album open while you open another album.
3 On the Browse tab, click another album to open it in the Album View window.
4 Select the images that you want to move.
� To select one image, click the image.
� To select multiple images, press and hold the <Ctrl> key and click the images.
� To select multiple images in a sequence, press and hold the <Shift> key, click the first image in the sequence, and then click the last image in the sequence.
5 To move the image(s) into another album, press and hold the <Shift> key, click on one of the selected images and hold the mouse, and then drag the selected image(s) to the other album.
The original images are removed from the first album and placed in the selected album.
To copy an image into another album:
1 On the Browse tab, click the album that contains the image that you want to copy to a different album. The album opens in Album View window.
2 Click the Push Pin to keep the album open while you open another album.
3 On the Browse tab, click another album to open it in the Album View window.
4 Select the images that you want to move.
� To select one image, click the image.
� To select multiple images, press and hold the <Ctrl> key and click the images.
� To select multiple images in a sequence, press and hold the <Shift> key, click the first image in the sequence, and then click the last image in the sequence.
5 To copy the selected image(s) to another album, click and hold the mouse and drag the image(s) to the album.
The original images stay in the first album, and are copied to the second album.
Using Keyboard ShortcutsFor information about using keyboard shortcuts to copy and paste images, see “Using Keyboard Shortcuts” on page 16.
Quick SummaryClick to select a single image.
Ctrl + Click to select multiple images.
Shift + Click to select a sequence of images.
Drag to copy image to a different folder.
Shift + Drag to move images to a different folder.

Chapter 4: Working With Albums and Images 35
To copy an image into another open application:
1 Open the application into which you want to copy an image.
2 Switch back to Paint Shop Photo Album.
3 On the Browse tab, click the album to display thumbnail views of the images in the album in the Album View window.
4 Click the thumbnail of the image that you want to copy.
5 Click and hold the mouse button and drag the image into the other application.
Note: When you drag the image into the other application, the mouse cursor will change shape to indicate the locations where you can drop the image.
6 Release the mouse button over the location where you want to place the image.
Note: To cancel a drag, press <Esc> before releasing the mouse button.
To copy a selected portion of an image to another application:
1 On the Browse tab, click the album to display thumbnail views of the images in the album in the Album View window.
2 Double-click the thumbnail of the image to open the image in the Image View window.
3 Choose Image > Selection to display a menu, and then choose a selection type:
Rectangular Makes a square or rectangular selection.
Elliptical Makes a circular selection.
Freehand Click and hold the mouse, and then drag around the image to manually create a selection area.
4 Choose Edit > Copy, press Ctrl + C, or right-click to display a context menu and choose Copy.
5 Switch to the destination application, place the cursor at the location where you want to insert the image, and then choose Edit > Paste, press Ctrl + V, or right-click to display a context menu and choose Paste.
NoteIf the destination application is OLE-compliant (and most recent applications are), double-click the inserted image to edit the image in Paint Shop Photo Album without leaving that application.
Mouse Cursor
Open an Image in Paint Shop ProTo open an image in Paint Shop Pro, select the image or images, and then choose File > Jump to Paint Shop Pro.
Chapter 4: Working With Albums and Images36
Adding and Viewing Information and KeywordsAdd titles, descriptions, and keywords to albums and images to help you organize, locate, and label them when using the other program features.
� Names All albums and images have a name. With albums, the name is the name of the folder that displays in the Browse tab. With images, the name is the actual file name.
� Titles Add descriptive titles to images and albums. When you create slide shows, VCD’s, photo galleries for the web, or upload images to a photo sharing service, the image title can be displayed on screen.
� Descriptions Add longer descriptions about the subject of the image or the place where it was taken. Use the description information when searching for images, creating slide shows, and when using other program features.
� Keywords Add, associate, and edit keywords to further categorize, sub-categorize, and organize albums and images.
For information about searching for albums and images, see Chapter 6, Searching and Cataloging.
Adding Titles and Descriptions to Albums and ImagesAdd album and image titles and descriptions, and view additional album and image information on the Info tab.
� When an album is selected the Info tab displays the album name, title, description, the number of images in the album, the number of images selected, the size of the selected images, and the date the album was created.
� When an image is selected, the Info tab displays image information (image file name, image title, image description, image size, image type, color depth, file size, and the date that the image was last changed) and the camera settings (camera name, the date the image was taken, shutter speed, flash, and camera resolution) if available.
Plan AheadIf you plan to display titles in your slide shows, make sure that they are short enough to fit on the screen (30 characters or less).
What is EXIF?EXIF stands for Exchangeable Image File Format. If your camera supports this standard, it will record the time & date the image was taken, exposure information (ISO, shutter, aperture) and other camera details in the header of each image file.

Chapter 4: Working With Albums and Images 37
To add a title and description to an album:
1 On the Album View window, click the background behind the thumbnail images (to be sure that no images are selected), and then click the Info tab.
2 In the Album Title field, enter a title for the album. This can be any title that is meaningful for the contents of your album.
3 In the Description field, enter the description for the pictures in your album.
To add a title and description to an image:
1 In the Album View window, click the image for which you want to view or add information, and then click the Info tab.
The name of the image displays next to the file icon on the Info tab.
2 In the Image Title field, enter a title that is meaningful to the subject of the image.
3 In the Image Description field, enter a longer description of the image.
4 Image information group box displays information about the image size, type, color depth, file size, and the date that the image was last changed.
5 If EXIF information was stored by the camera when the photo was taken, the camera name, the date the image was taken, shutter speed of the camera, and the flash indicator information will display in the Camera Settings group box. Choose View > Show Image Details, to view additional EXIF camera data information for the image.
Info tab - Album Selected
Info tab - Image Selected

Chapter 4: Working With Albums and Images38
Associating Keywords With ImagesAssociate keywords to help you further categorize, sub-categorize, organize, and find images.
To associate keywords with images:
1 Select the image:
� To associate a keyword to an image, in the Album View window, click the image for which you want to add a keyword, and then click the Keywords tab.
� To associate the same keyword to multiple images, in the Album View window press and hold the <Ctrl> key, click the images, and then click the Keywords tab.
2 On the Keywords tab, click the (+) next to a keyword to expand the list of sub-keywords. Mark the check boxes to assign the keywords to the image(s).
To create a new keyword or sub-keyword:
New keyword Click the background on the Keywords tab to be sure that no keywords are selected. Enter the new keyword in the field at the bottom of the Keywords tab, and then click Add.
New Sub-keyword Select the keyword for which you want to add a sub-keyword. Enter the keyword in the field at the bottom of the keywords tab, and then click Add.
To edit a keyword:
Select the keyword or sub-keyword that you want to edit, and then choose an option at the bottom of the Keywords tab:
Delete Removes the selected keyword or sub-keyword from the list.
Rename Selects the keyword name. Enter the new name for the keyword and press <Enter>.
Why should I assign keywords?Once you have assigned keywords to images, you can perform custom searches on those keywords. For example, you could search for images that were taken of your dog on a specific date, time, and place.

Chapter 4: Working With Albums and Images 39
Renaming Albums and ImagesAs you work with albums and images, you may find it necessary to rename them.
To rename an album:
On the Browse tab, select the album that you want to rename, and then do one of the following:
� Choose Edit > Rename Album, to open the Rename Album dialog. Enter the new album name in the New Name field.
� Right-click the album name at the top of the album window to display a context menu, and select Rename Album to open the Rename Album dialog. Enter the new album name in the New Name field.
� Click the Info tab and enter the new name for the album in the Album field.
Note: The new name also changes the name of the directory (folder) used to store the image files of the album.
To rename an image:
On the Browse tab, select the album that contains the image that you want to rename, select the thumbnail image, and then do one of the following:
� Click the image title on the thumbnail, and type the new name in the text box, and then press enter.
� Choose Edit > Rename Image to open the Rename Image dialog. Enter the new image name in the New Name field.
� Right-click on the image to display a context menu, and then choose Rename Image to open the Rename Image dialog. Enter the new album name in the New Name field.
� Click the Info tab and enter the new name for the image in the File Name field.
Note: The new name changes the file name on your computer hard drive.
Are the images on a CD?If you are working with a CD-R or PictureCD, then the disc cannot be written to (except through special software), so the album and image names can’t be changed, edited or deleted. First save the images to an album, and then rename them.

Chapter 4: Working With Albums and Images40
Deleting Albums and ImagesAs you work with albums and images, you may find it necessary to delete them.
To delete an album:
1 On the Browse tab, click the album that you want to delete.
2 Click the down-arrow on the Delete button and choose Delete Album, Choose Edit > Delete Album, or right-click to display a context menu and select Delete Album.
3 On the Confirm Folder Delete dialog, click Yes to move the album and all of the images in the album to the Recycle Bin. The next time you empty the Recycle Bin, all of the images and albums will be removed from the hard drive.
To delete an image:
1 In the Album View window, select the image that you want to delete.
2 Click the Delete button on the toolbar, choose Edit > Delete, or right-click to display a context menu a context menu and select Delete.
3 On the Confirm File Delete dialog, click Yes to move the image to the Recycle Bin. The next time you empty the Recycle Bin, the image will be removed from the hard drive.
To delete multiple images:
1 In the Album View window, select the images that you want to delete:
� To select multiple images, press and hold the <Ctrl> key and click the images.
� To select multiple images in a sequence, press and hold the <Shift> key, click the first image in the sequence, and then click the last image in the sequence.
2 Click the Delete button on the toolbar, choose Edit > Delete, or right-click to display a context menu and select Delete.
3 On the Confirm Multiple File Delete dialog, click Yes to move the images to the Recycle Bin. The next time you empty the Recycle Bin, all of the images will be removed from the hard drive.
Delete button

Chapter 4: Working With Albums and Images 41
Saving ImagesYou can save an image, save an image with a different file name and/or location, or save an image to a drive (CD-ROM, or floppy disk). If you modify an image and forget to save it, you will be prompted to save the image when you try to close the image.
For information about saving multiple images at one time, see “Saving Multiple Images” on page 122.
To save an image:
Choose File > Save to automatically save the image with the same file name and location. This will overwrite the original image with the modified image.
To save an image when prompted by Paint Shop Photo Album:
In the Save Changes dialog, click the Save button to replace the file with the same name and album location. If you want to discard your changes, click No. If you want to save changes, but not overwrite the original file, click Cancel and use Save As, as described below.
To save an image with a different file name and/or location:
1 With the image open in the Image View window, click the down-arrow on the Save button and choose Save Image As, or choose File > Save As to open the Save Image dialog.
2 In the Save in drop-down list choose the album location where you want to save the image. Generally, you will save the image in the same album.
3 Enter the name for the file in the File name field.
4 Select the file type from the Save as type drop-down list. Generally, you will save the image with the same file extension.
5 Select the quality level of the image (Low, Medium, High, Best) from the Quality level drop-down list.
Note: The image compression settings are not available for all file types.
6 Click Save to save the image with the new file name and/or album location.
Be careful when editing!If you make major changes to an image, consider using Save As to save the image with a different file name. This preserves the original image so you can go back to it if you need to.

Chapter 4: Working With Albums and Images42
Note: By saving the image with a different file name or location, you will not overwrite the original image file.
To save an image or multiple images to another drive:
1 In the Browse tab, select the album that contains the image or images that you want to save.
2 Select the images that you want to save to another drive.
� To select one image, click the image.
� To select multiple images, press and hold the <Ctrl> key and click the images.
� To select multiple images in a sequence, press and hold the <Shift> key, click the first image in the sequence, and then click the last image in the sequence.
3 Choose Share > Save Slide Show to open the Save Slide Show dialog.
4 In the Name field enter the album name for the image(s) you have selected.
5 Select the drive where you want to save the image(s).
6 If you want to include a program that allows anyone to view the images as a slide show, mark the Include Slide Show Player check box.
7 If you want your computer to copy only the selected images to the destination drive, check the box next to Selected Image Only. Otherwise, the entire album will be copied.
8 Click on the OK button to save the images to the selected drive.
Creating and Using Album ShortcutsIf you frequently work with certain albums you can use Paint Shop Photo Album to create Shortcuts to them. Once you have created Shortcuts, you can reorder and delete them from the list.
To create a shortcut to an album:
1 On the Browse tab, click the album to which you want to create a shortcut.
Want to protect an image from being changed or deleted?In the Album View window, right-click an image to display a context menu and choose Lock. The locked image will be protected from changes or being deleted until you un-lock the image by right-clicking on the image and selecting Un-lock from the context menu.
Be sure to format your CD!If saving to a CD, you must format the CD before attempting to copy images to it. For example, if you have Adaptec Direct CD software, you would run the Direct CD Wizard and follow the directions to format the CD.

Chapter 4: Working With Albums and Images 43
2 Click the Add Shortcut button at the bottom of the Browse tab. The Shortcut is added to the list.
To use a shortcut:
1 Click the Shortcuts button at the bottom of the Browse tab. A pop-up list opens showing all of the Shortcuts that are available.
2 Click the Shortcut to open the album in the Album View window.
To edit the shortcut list:
1 Click the Shortcuts button at the bottom of the Browse tab, and select Edit Shortcut List to open the Edit Shortcut List dialog.
2 Select the shortcut that you want to edit, and then choose an option:
Move up Moves the selected shortcut up in the list order.
Move down Moves the selected shortcut down in the list order.
Remove Deletes selected shortcut from the list.
OK Applies the changes made to the Shortcut list.
Cancel Cancels the changes and closes the dialog.
Adding an Album SoundtrackAssociate an audio file (.wav, mp3) with an album that plays when the album is opened in the Album View window, view an album as a slide show, add an album to a Video CD, or save a slide show to a drive to share with others.
To add an album soundtrack:
1 On the Browse tab, click the album for which you want to associate a soundtrack.
2 Choose Audio > Album Soundtrack > Choose to open the Choose Album Soundtrack dialog
3 Click the Browse button to open the Choose Album Soundtrack dialog.
4 From the Look in drop-down list, select the audio file (.wav, mp3).
5 Click the Open button to display the Choose Album Soundtrack dialog.
Add Shortcut button
Shortcut button
Shortcut KeysTo quickly access an album that you have added to the Shortcuts list, use the program assigned shortcut key. For example, the shortcut key for the first album on the list would be Ctrl + 1.

Chapter 4: Working With Albums and Images44
6 Click the OK button to add the soundtrack to the album.
To play an album soundtrack:
1 On the Browse tab, click the album with an associated soundtrack.
2 Choose Audio > Album Soundtrack > Play to play the album soundtrack.
Note: To stop playing the album soundtrack, choose Audio > Album Soundtrack > Stop.
To remove a soundtrack associated with an album:
1 On the Browse tab, click the album with an associated soundtrack.
2 Choose Audio > Album Soundtrack > Remove.

45
Sharing ImagesUse the images in an album to make a screen saver, slide show, desktop wallpaper, or a web page. Share your images with others by sending them an e-mail message containing images, creating a Video CD, uploading images to a photo sharing service, or sending images to a cellular telephone.
Contents Sending Images Via E-mail . . . . . . . . . . . . . . . . . . . . . . . . . . . . 45Making a VCD . . . . . . . . . . . . . . . . . . . . . . . . . . . . . . . . . . . . . . 46Viewing Slide Shows . . . . . . . . . . . . . . . . . . . . . . . . . . . . . . . . . 51Sharing Slide Shows . . . . . . . . . . . . . . . . . . . . . . . . . . . . . . . . . 53Using a Photo Sharing Service . . . . . . . . . . . . . . . . . . . . . . . . . . 54Making and Publishing a Web Gallery . . . . . . . . . . . . . . . . . . . . . 57Making a Screen Saver . . . . . . . . . . . . . . . . . . . . . . . . . . . . . . . 60Making Desktop Wallpaper . . . . . . . . . . . . . . . . . . . . . . . . . . . . . 61Using i-mode . . . . . . . . . . . . . . . . . . . . . . . . . . . . . . . . . . . . . . . 62
Sending Images Via E-mailUse Paint Shop Photo Album to send images via your e-mail program. You can send the original images, or optimize images to ensure a fast and easy download on even the slowest Internet connections.
NoteIn order to send images via e-mail, your computer must have a default e-mail application that supports the MAPI Standard, such as AOL, Microsoft Outlook, or Outlook Express.
C H A P T E R 5

Chapter 5: Sharing Images46
To send images via e-mail:
1 On the Browse tab, click the album to display thumbnail views of the images in the album in the Album View window.
2 Select the images that you want to send via e-mail.
� To select one image, click the image.
� To select multiple images, press and hold the <Ctrl> key and click the images.
� To select multiple images in a sequence, press and hold the <Shift> key, click the first image in the sequence, and then click the last image in the sequence.
3 Click the down-arrow on the E-mail button, and then select an option.
Optimized Images The program automatically reduces the size of the images and converts the images to JPEG so that they can be sent and opened quickly.
Original Images Sends the original images.
Note: To send an open image from the Image View window, choose Share > E-mail Optimized Images or Share > E-mail Original Images.
4 An alert message displays, asking if you want to send the selected images. Click Yes to open the e-mail application.
The selected images are automatically attached to an e-mail message.
5 Complete the To, Subject, and Message fields, and then click Send to deliver the e-mail message.
Making a VCDPaint Shop Photo Album makes it easy to share your photos as slide shows with family and friends— right on your television set. A VCD is an electronic photo album, inexpensive and easy to duplicate, playable on both DVD players and computers.
Use the Auto Archive feature to save full-resolution copies of all images used in the slide show. This protects images from being lost due to possible hard drive failure. All of your previous slide shows are stored in the All Slide Shows view until you delete them. This makes it easy to create new VCD’s with the slide shows that you have already created, and new slide shows.
E-mail button

Chapter 5: Sharing Images 47
Use the VCD window to create a slide show or set of multiple slide shows, select a background and music track for the VCD menu (used for multiple-show disks to select the slide show), insert text screens between images in a slide show, and add a slide show soundtrack. Then burn the VCD and play it in a DVD player, or a computer with a CD-ROM or DVD-ROM drive.
There are six main steps used to create a VCD:
� Add albums (called slide shows) to the All Slide Shows view.
� Select a background and soundtrack for the VCD Menu screen (optional, if your VCD has more than one slide show).
� Arrange the slide shows and images (optional).
� Add a slide show soundtrack (optional).
� Insert text screens between the images in a slide show (optional).
� Burn the VCD to a CD-ROM.
To add slide shows to the VCD menu:
1 On the Browse tab, click the album that you want to burn to VCD. Thumbnails of the images in the album display in the Album View window.
2 Click the VCD button, or choose Share > Create Video CD, to open the album in the VCD window. The album is added to the All Slide Shows view and a thumbnail of the slide show displays in the Selected Slide Shows view.
Note: In the Selected Slide Shows view, click the slide show thumbnail to view the images in the slide show in the Image view.
3 To add additional slide shows to the All Slide Shows view, click the Add button to open the Open Slide Show dialog.
4 From the Look in: drop-down list, select the directory location of the album that you want to add, and then double-click the folder to add the album as a slide show on the VCD.
5 Click the Open button to add the album as a slide show in the All Slide Shows view.
6 Repeat steps 4 - 5 for each album that you want to add as a slide show in the All Slide Shows view.
Note: The disk space required for the VCD displays at the top of the Selected Albums view. Be sure that the available space on the CD-ROM meets or exceeds this number.
What is a VCD?A VCD (Video Compact Disc) is a CD that contains images and sound, and looks like a regular CD. A VCD is designed to display high quality images on a television set. A VCD can be played on any DVD player that can read the VCD format and CD-R/CD-RW media. Most, but not all, DVD players have these capabilities. VCD’s can also be played on a PC at full-screen resolution for even sharper images.
VCD button

Chapter 5: Sharing Images48
To select a background and soundtrack for the VCD Menu:
1 Click the VCD Menu button to open the VCD Menu Settings dialog.
2 From the VCD Menu Background box select a background.
Use the scroll bar to display previews of all of the available backgrounds.
3 To add a soundtrack to the VCD Menu, click the Browse button to open the Choose Menu Soundtrack dialog and select an audio file (.wav, mp3) to play when the VCD is inserted into the CD-ROM or DVD-ROM drive of a computer or a DVD player.
4 Click the Open button to add the soundtrack to the VCD Menu Soundtrack field.
5 Click the Play button to listen the audio file, click the Stop button to end the audio file.
6 Click the OK button to apply the VCD menu and soundtrack settings.
To arrange slide shows and images:
1 Adjust the order, delete, or remove a slide show from the Selected Slide Shows view:
� To change the order of the slide shows in the menu, click and drag the slide show to a new position in the Selected Slide Shows View.
� To delete a slide show from the All Slide Shows view, select the slide show from the Selected Slide Shows view, and then click the Delete button.
� To keep a slide show in the All Slide Shows view for future use, but remove it from the Selected Slide Shows view, un-mark the check box next to the slide show in the All Slide Shows view.
2 Adjust the order, delete, or remove an image in a slide show, select the slide show from the Selected Slide Shows View to display the images in the slide show in the Image view, and then:
� To change the order of an image in a slide show, click and drag a image to a new position in the Image view.
� To delete an image from a slide show, select the image that you want to delete from the Image view, and then click the Delete Image button.
VCD Menu button
Will a VCD play on my DVD player?To find out if your DVD player can play VCD’s, go to www.vcdhelp.com and search for your specific DVD player.

Chapter 5: Sharing Images 49
Note: This deletes the image from the slide show, but the image is retained in the album on the hard drive of the computer.
To insert a slide show soundtrack and set loop options:
1 In the Selected Slide Shows View, click the thumbnail of the slide show for which you want to add a slide show soundtrack, and then click the Slide Show button to open the Slide Show Settings dialog.
2 Click the Browse button to open the Choose Slide Show Soundtrack dialog and select an audio file (.wav, mp3) to play when viewing the selected slide show.
3 Click the Play button to listen the audio file, click the Stop button to end the audio file.
4 In the Delay Time Between Slides (in seconds) field, enter the number of seconds that an image in a chapter displays on screen.
5 Choose one of the looping options:
Loop This Slide Show Mark this option if you want the slide show to continually replay. You must stop the slide show using the remote for the DVD player.
Loop All Slide Shows Mark this option if you want all of the slide shows automatically advance to the next slide show, and replay all of the slide shows once the last one has played.
6 Click the OK button to apply the selected options.
7 Repeat these steps for each slide show for which you want to add a soundtrack.
Inserting a text screen in slide shows:
1 In the Selected Slide Shows view, click the thumbnail of the slide show to view the images in the slide show in the Image view.
2 If you want to add the text screen in between images, select the image that should display after the text screen.
3 Click the Text button, or click the down-arrow on the Slide Show button and choose Insert Text Screen to open the Insert Text Screen dialog.
4 Enter up to three lines of text in the text boxes.
5 In the Background group box, choose an option:
Use VCD Menu Background to use the selected menu background as the background for the text screen. The color of the text is white.
Slide Show button

Chapter 5: Sharing Images50
White Text on Black Background to use a standard text screen with a black background and white text.
6 In the Insert Location group box, choose an option:
Insert at Beginning of Slide Show to insert the text screen as the first image in the slide show.
Insert Before First Selected Image to insert the text screen before the selected image in the slide show.
Insert at End of Slide Show insert the text screen as the last image in the slide show.
7 Click the OK button to add the text screen to the slide show.
Note: If necessary, you can drag the text screen to a new position in the slide show.
Burn the VCD:
1 Click the Create VCD button to open the Create VCD Settings dialog.
2 In the Select CD Drive, select the CD-RW device used to burn CD’s.
3 From the Select Write Speed drop-down list, select the appropriate write speed for the media.
Note: It is recommended that you accept the default, 4X, but you can experiment with the write speed that works best for your CD-RW.
4 Enter a name for the VCD in the Enter Label for CD field.
5 Select the number of copies of the VCD that you want to create in the Copies field.
6 In the Video Format group box, choose an option:
NTSC (North America, Japan) use this option if the VCD will be played in the United States, Canada, Japan and Mexico.
PAL/SECAM (Europe) use this option in the VCD will be played in countries other than the United States, Canada, Japan and Mexico.
7 In the Options group box, mark the following options:
Include Original Images to copy all of the original images in a folder on the VCD.
Create VCD button

Chapter 5: Sharing Images 51
Include PC Compatible Slide Show to include a slide show player that allows the VCD to be played on a computer with a CD-ROM, or DVD drive.
8 If you want to change the background of the VCD, select a different background from the VCD Menu Background box.
9 Insert a blank CD-ROM in to the CD/RW or DVD/RW drive.
Note: To get the best results, it is recommended that you close other programs before you burn the VCD to a CD-ROM.
10 Click the Create VCD button to burn the VCD. This burn process could take some time to complete.
Viewing Slide ShowsView the images in albums as slide show presentations. While viewing a slide show, use the toolbar to rotate and mark images.
To view images as a slide show:
1 On the Browse tab, click the album to display thumbnail views of the images in the album in the Album View window.
2 Choose Share > View Slide Show to view the images in the selected album as a slide show.
3 Use the buttons on the Slide Show toolbar to control the slide show. The buttons on the toolbar are described below:
Previous Displays the previous image in the slide show.
Next Displays the next image in the slide show.
Play Runs the slide show.
Stop Pauses the slide show.
Play Audio Plays an audio file associated with an image.
Show Description Displays the description of each image (if one exists).
Slide Show button
Previous
Next
Play
Stop
Audio
ShowDescription
Rotate
LeftRotate
Right Settings
ExitSelect Image
Use the search results to create Slide Shows!Search on keywords and descriptions to locate specific images. Then, use the Slide Show tool to automatically make a slide show using those images.

Chapter 5: Sharing Images52
Rotate Left Turns the image to the left.
Rotate Right Turns the image to the right.
Select Image Selects the image. When you exit the slide show, all images that have been marked are selected in the Album View window. You must stop the slide show in order to mark images. For example, you could mark the images that you want to delete or copy to another album.
Settings Displays the Slide Show Settings dialog. The next section in this chapter describes how to set the slide show settings.
Exit Slide Show Closes the Slide Show window.
Once you have made a slide show, configure how the slide show is played using the Slide Show Settings dialog.
To configure the slide show settings:
1 Open the Slide Show Settings dialog:
� Click the down-arrow on the Slide Show button and choose Settings to open the Slide Show Settings dialog.
� In an open slide show, click on the Settings icon on the slide show toolbar to open the Slide Show Settings dialog.
2 In the Show Pictures group box, choose an option:
Actual Size Images display at their original file size
Fit to Screen Images are sized to fill the entire screen.
3 In the Automatic Advance group box:
In the Seconds Per Picture field enter the number of seconds an image should display on screen.
Mark the Continuous Repeat check box if you want the slide show to start again after the last image in the slide show has been displayed.
4 In the Display Options group box:
From the Image Transitions drop-down list choose the type of transition between the images in the slide show.
Mark the Show Titles check box to display the image title below the image in the slide show.
Mark the Show Descriptions check box to display image descriptions in the description box of the slide show toolbar.
Slide Show Options dialog

Chapter 5: Sharing Images 53
Mark the Show Pen check box to display pen annotations for the images in the slide show.
5 In the Audio Options group box, choose an option:
Play Soundtrack Plays the soundtrack associated with the album. For information about associating a soundtrack with an album, see “Adding an Album Soundtrack” on page 43.
Play Image Audio Plays an audio file associated with an image. For information about adding audio to an image, see “Adding Audio to an Image” on page 79.
6 Click OK to apply the slide show settings.
Sharing Slide ShowsShare your slide shows with others by exporting a slide show to a drive on your computer. Configure slide show settings, save the album with Slide Show Player (player.exe), and then share the slide shows with others, even if they don’t have Paint Shop Photo Album.
The Slide Show Player is a separate application included along with the Paint Shop Photo Album software. Share your slide shows with others by sending them the slide show file and a copy of the Slide Show Player.
NoteMac computer users are not able to play slide shows created with Paint Shop Photo Album.
To share a slide show:
1 On the Browse tab, click the album to display thumbnail views of the images in the album in the Album View window.
2 Select the images that you want to include in the slide show:
� To select one image, click the image.
� To select multiple images, press and hold the <Ctrl> key and click the images.
� To select multiple images in a sequence, press and hold the <Shift> key, click the first image in the sequence, and then click the last image in the sequence.
Note: If you accidentally select an image that you don’t want to include in the slide show, click on the image again while holding down the <Ctrl> key to deselect the image.
Slide Shows Versus VCD’sIf you’d like to play a slide show on both your PC and television set, use the Video CD feature. For information about making a Video CD, see “Making a VCD” on page 46.

Chapter 5: Sharing Images54
3 Click the down-arrow on the Slide Show button and select Save Slide Show, or choose Share > Save Slide Show to open the Save Slide Show dialog.
4 Enter the name of the album in the Name field.
5 In the Create In group box, select the directory location where you want to save your slide show. Click the Browse button to browse for the directory.
Note: If you are saving the slide show to a CD-ROM, be sure that the CD has been formatted with the software supplied with your CD burner.
6 Select the transition style from the Image Transitions drop-down list.
7 Mark the following options:
Selected Images Only Includes only the selected images from the album in the slides show.
Include Image Audio Includes audio files associated with images.
Include Album Soundtrack Includes audio files associated with the album.
Include Slide Show Player Copies the slide show player.exe (a small program that allows the slide show to be played on a computer) to the selected directory along with your images.
8 Click the OK button to copy the selected image files and the Slide Show Player to the selected directory.
To play the slide show:
1 Navigate to the directory where you saved your slide show (from the previous procedure).
2 Double-click on the Player.exe icon to play the slide show.
Using a Photo Sharing ServiceUse Paint Shop Photo Album to easily upload your images to a photo sharing service. Photo sharing services allow you to upload and store your images online, order high-quality prints and greeting cards, and share your images online.

Chapter 5: Sharing Images 55
Setting Up an Account With a Photo Sharing ServiceBefore you can add, share, and print pictures at a photo sharing service, you must sign up. Signing up is free and it gives you space to store, print, and share your images.
To sign up with a Photo Sharing Service
1 Choose Share > Online Services > Visit (name of photo sharing service) to open the photo sharing services web site.
2 Click the Sign up button to open the Sign up page.
3 Complete the sign up form.
4 Click the Sign up button. After you sign up, you will receive e-mail providing additional information about the photo sharing service.
Uploading Images a Photo Sharing ServiceYou can use Paint Shop Photo Album to upload selected images or an entire album to a photo sharing service.
To upload images to a photo sharing service:
1 On the Browse tab, click the album to display thumbnail views of the images in the album in the Album View window.
2 Select the images that you want to move.
� To select one image, click the image.
� To select multiple images, press and hold the <Ctrl> key and click the images.
� To select multiple images in a sequence, press and hold the <Shift> key, click the first image in the sequence, and then click the last image in the sequence.
3 Click the Upload button in the toolbar, to open the Upload window.
Using Other Photo Sharing ServicesAs Paint Shop Photo Album is updated, support for additional photo sharing services may be included. To find out if support for additional photo sharing services is available, be sure your computer is connected to the Internet, and then choose Help > Update Software.

Chapter 5: Sharing Images56
Note: If you have a small screen, or the program window is reduced in size, you may have to click on the >> button on the right side of the toolbar to display the Upload button.
4 Add or remove images in the Upload window:
To add images, drag the thumbnail of the new image into the upload window. This can be from the current album, or from any other album.
To remove images, select the image and press <Delete>, or right-click on the image to display a context menu and choose Remove.
5 To add online titles and descriptions to images in the upload window. Choose an image, and then click the Add Info button, and enter the information:
Online Title Identifies an image on the web site after it has been uploaded.
Online Description A message that you want printed on the back of any prints that you order. This information is transmitted to the photo sharing site when the image is uploaded.
Note: To associate the same title and/or description with a group of images, or an entire album, simply select the images or album, type in the Online Title and Description information, and then use the Apply to All or Apply to Selected buttons that appear in the Info tab.
6 Click the Start Upload button in the Upload window to display the Login window appears for the photo sharing site.
7 Enter your login information, and then click the Login button.
8 The images are uploaded to the photo sharing site.
Notes about UploadingIf you are unable to log-in to a photo sharing service, first make sure that your computer is connected to the Internet, and that you have entered the correct e-mail address and password on the login screen.
If you are unable to log-in and are using Paint Shop Photo Album in a corporate environment, you may need to modify the Proxy Server settings. Check with your Network Administrator to get the Proxy Server information for your corporate network.
The process of uploading your images begins once you’ve logged into the photo sharing service. You can continue working in the program while the upload is in progress. Or, you can cancel the
Upload button

Chapter 5: Sharing Images 57
upload at any time by clicking on the Cancel button. During an upload, this button appears in the lower-left corner of the program window.
Making and Publishing a Web GalleryUse Paint Shop Photo Album to create web galleries that can be uploaded and viewed by anybody connected to the Internet. Any Album that you have created can be automatically converted into a complete, ready-to-use web gallery that includes scaled images, thumbnails, and hyperlinks that connect the web gallery pages together.
There are a variety of styles and themes that you can choose to create your web pages: professional, holidays, fun, fancy, etc. You can also choose from a wide range of backgrounds, textures, patterns and colors, and then preview your layout to make changes.
Making a Web Gallery If you want the images in the web gallery to display a title and description, add titles and descriptions for each image in the web gallery. For information about adding image titles and descriptions, see “Adding and Viewing Information and Keywords” on page 36.
To make web pages from the images in an album:
1 On the Browse tab, click the album to display thumbnail views of the images in the album in the Album View window.
2 Select the images that you want in your web gallery pages.
� To select one image, click the image.
� To select multiple images, press and hold the <Ctrl> key and click the images.
� To select multiple images in a sequence, press and hold the <Shift> key, click the first image in the sequence, and then click the last image in the sequence.
3 Choose Share > Create Web Gallery to open the Web Gallery window.
Depending upon the size of the album, a Progress dialog may appear as the program processes the images in the album.
4 Select a template from the Templates tab.
Use the search results to create web pages!Search on keywords and descriptions to locate specific images. Then, use the Web Gallery tool to automatically make a series of web pages showing pictures and descriptions of those images.

Chapter 5: Sharing Images58
Changing the Web TemplateOnce you find a template with a layout that you like, further customize the appearance of the web gallery pages by changing the color scheme, and the patterns used for the background.
To change the template background:
1 In the Web Gallery window, click the Adjustments tab.
2 In the Adjustments group box, click the Backgrounds option.
3 Select a background type from the backgrounds drop-down list.
4 Scroll the list of background thumbnails and click a background to change the background of the web template.
Note: To add a background image, click the Add Image button and browse for an image. The image will be added to the list of backgrounds.
5 To save the changes to the template, click the Save Adjustments button.
Note: To restore the default style of the template, click the Restore Defaults button.
To change the color of text in a template:
1 In the Web Gallery window, click the Adjustments tab.
2 In the Adjustments group box, click the Text Colors option.
3 Select a text type from the type drop-down list.
4 Click a color to change the selected text type to the selected color.
5 To save the changes to the template, click the Save Adjustments button.
Note: To restore the default style of the template, click the Restore Defaults button.

Chapter 5: Sharing Images 59
Saving Web PagesWhen you are finished making adjustments to the web gallery pages, you can publish them or save a copy of them to the computer hard drive.
To save the web pages:
1 In the Web Gallery window, click the down-arrow on the Save button and choose Save to Drive to open the Save HTML dialog.
2 Choose where you want to save the HTML files:
� By default, your web gallery will be saved in C:\My Documents\Jasc Paint Shop Photo Album Web Pages.
� To select a different directory location, click the Browse button to open the Select Folder dialog and choose an new directory location.
3 Click OK to save your web gallery in the selected directory. The entire contents of the Web Gallery is placed in a directory (folder) named with the same name as the album that was used to create the web gallery.
4 When the Save is complete, the Save Completed dialog opens.
A link appears highlighted in the Save Completed dialog. Click this link to start your Web Browser application, and view the web pages that you just saved in your Browser.
Publishing Web PagesUpload web pages and images to a web server using the Web Publishing Wizard.
To publish web pages:
1 In the Web Gallery window, click down-arrow on the Save button and choose Publish to Web Site to open the Publish Your Photos to the Web wizard window.
2 Click Next to open the Select a Web Server wizard page.
3 To configure the program to access a FTP server, click New and enter the FTP Server details. Contact your Internet Service Provider if you do not know the URL or FTP server name.
Descriptive name The name of your web site.

Chapter 5: Sharing Images60
URL for the web site The base URL that visitors will enter to access your web site.
FTP server name The address of the FTP server that hosts your web site.
User Name The user name assigned to you by the host service for the FTP server.
Password The password you use to gain access to the FTP server.
Subfolder containing your Web pages The folder where you want your web pages to be stored. This may be a sub-folder assigned to you by your Internet Service Provider (ISP).
4 Click Next to open the Ready to Publish Your Photos to the Web wizard page.
A series of screens display stepping you through the upload process. Follow the directions that appear on the screens.
5 Click Publish to post your files to the selected FTP site.
6 When the upload is complete, a screen is displayed with a link to the web page. Click the E-mail URL to e-mail the link to your web gallery pages to friends and family.
Note: Web gallery pages are automatically saved using the name of the Album containing the images, and uploaded to the site. On the web server, they will be located in folder called: JascPaintShopPhotoAlbum/<album_name>.
For information about configuring web gallery options, see “Web Gallery Options” on page 133.
Making a Screen SaverCreate a screen saver for your computer using the images in an album. When your computer is idle, your images will display as the screen saver for your computer
To create a screen saver for your computer:
1 On the Browse tab, click the album to display thumbnail views of the images in the album in the Album View window.
2 Choose Share > Set Image as Screen Saver. An alert appears, prompting you to confirm your selection.
FTP Sever Tips:Once you have added an FTP server to the list, the next time you upload web pages to that server you simply need to choose that server from the list. To modify the FTP server details, click the Edit button and make the changes. To delete an FTP server from the list, click the server name, and then click Delete.

Chapter 5: Sharing Images 61
3 Click Yes button to set the selected album as the screen saver for your computer.
Modifying Screen Saver PropertiesCustomize the screen savers that you create by applying additional settings using the Display Properties dialog.
To modify screen saver properties:
1 Right-click anywhere in the Windows Desktop, and choose Properties to open the Screen Properties dialog.
2 Click the Screen Saver tab and then select Jasc Paint Shop Photo Album from the Screen Saver drop-down list.
Note: The exact appearance and settings that are available in the Screen Properties depend upon your particular computer, and your computer monitor.
3 Click the Settings button to open the Screen Saver Options dialog and configure the settings:
Show pictures Select if you want the images to display at their actual size, or fit them to the size of the screen.
Seconds Per Picture Enter the number of seconds that the images should display on the screen.
Image Transitions Select the image transition. Choose whether to show the image title, description and, or pen annotations.
Audio Options Mark the check box if you want to play the soundtrack, or the sounds associated with images.
Show File Name Mark the check box if you want the image file name to display on screen.
Show Pen Mark this check box if you want pen annotations associated with images to display on screen.
4 Click the OK button to close the Screen Saver Options dialog and return to the Display Properties dialog.
5 Click the OK button to close the Display Properties dialog and apply the settings.
Making Desktop WallpaperSet an image as the background image on your windows desktop.

Chapter 5: Sharing Images62
To create wallpaper for your desktop:
1 On the Browse tab, click the album to display thumbnail views of the images in the album in the Album View window.
2 Select the image that you want to set as your desktop background.
3 Choose Share > Set Image As Wallpaper to open the Wallpaper dialog.
4 Select the Wallpaper options:
Center Places the image in the center of the screen.
Tile To cover your entire screen with small copies of the image.
Resize to fit screen Mark this check box if you want the image to fill the entire screen.
5 Click the Yes button to close the Set Wallpaper dialog and apply the setting.
Note: To remove desktop wallpaper, repeat steps 1 - 3, and then click the Remove Wallpaper button.
Using i-modeIf you subscribe to an i-mode cellular phone service, then you can use Paint Shop Photo Album to publish an image as an i-mode web page.
NoteThe web pages that Paint Shop Photo Album creates for i-mode are specifically designed for small screens. i-mode web pages must be less than 5K in size (including text and graphics).
To send an image to i-mode:
1 On the Browse tab, click the album to display thumbnail views of the images in the album in the Album View window.
2 Select the image for which you want to create an i-mode web page.
3 Choose Share > i-mode to open the i-mode Export dialog.
4 Enter a title for the image in the Title field.
5 Existing information about the image displays in the Description field. To add or change this information, enter a description of the image in the Description field.

Chapter 5: Sharing Images 63
6 In the Image Size group box, choose an option:
94 x 72 pixels Resizes the image to fit the average screen on a cell phone.
Custom size (pixels) Resizes the image to the dimensions that you enter in the Width and Height fields.
Preserve Aspect Ratio Mark this option to preserve the height and width ratio. This is recommended to avoid a stretched appearance after the image is resized.
7 Click the Apply Changes to apply the title, description, and image size settings.
8 Click the Save button open the Save i-mode Pages dialog.
Choose a directory location to save the i-mode pages, and then click the OK button.
9 Click the Publish button to open the Publish Your Photos to the Web dialog.
10 Click Next to open the Select a Web Server wizard page.
11 To configure the program to access a FTP server, click New and enter the FTP Server details.
Descriptive name The name of your web site
URL for the web site The base URL that your visitors will enter to access your web site.
FTP server name The address of the FTP server that hosts your web site.
User Name The user name assigned to you by the host service for the FTP server.
Password The password you use to gain access to the FTP server.
Subfolder containing your Web pages The folder where you want your web pages to be stored.
12 Click Next to open the Ready to Publish Your Photos to the Web wizard page.
A series of screens display stepping you through the upload process. Follow the directions that appear on the screens.
13 Click Publish to post your files to the selected FTP site.
14 When the upload is complete, a screen is displayed with a link to the web page.

Chapter 5: Sharing Images64
Note: i-mode pages are automatically saved using the name of the image, and uploaded to the site. On the web server, they will be located in folder called: <datetime>/img1.html.

65
Searching and CatalogingIf you own a digital camera, you likely find yourself taking lots of photos. Over time you will find that one of the most important uses of Paint Shop Photo Album is the ability to locate specific images in the growing library of photos that you have saved.
Contents Searching on Information . . . . . . . . . . . . . . . . . . . . . . . . . . . . . . 65Searching on Keywords . . . . . . . . . . . . . . . . . . . . . . . . . . . . . . . 66Cataloging Albums and Images . . . . . . . . . . . . . . . . . . . . . . . . . 67
Searching on InformationUse the Search tab to perform powerful searches of album and image information.
To search on information:
1 Click the Search tab on the left side of the program window.
2 In the Search By group box, select the Album and Image Info option.
3 In the Search group box, select an option:
All Cataloged Images Searches all cataloged information about albums and images.
Latest Search Results Once you have performed a search, use this option to search only the results from the previous search.
4 Click the Match Any or Match All button and choose an option.
C H A P T E R 6

Chapter 6: Searching and Cataloging66
Match All Displays thumbnails that match all of the selected information.
Match Any Displays thumbnails that match any of the selected information.
5 Choose the information type from the top drop-down list.
6 From the bottom drop-down list, select whether the image is, contains, or matches the type of information selected in step 5.
7 If applicable, enter a search word in the text field, or select the search criteria.
8 Click Search to view the matching thumbnails in the Search Results window.
9 To add additional search options, click More Options and repeat steps 5 -7 in the blank fields.
10 The images that match the search criteria display in the Search Results window.
Searching on KeywordsUse the Search tab to perform powerful searches of the keywords associated with images.
For information about associating keywords with images and albums, see “Associating Keywords With Images” on page 38.
To search on keywords:
1 Click the Search tab on the left side of the program window.
2 In the Search By group box, select the Keywords option.
3 In the Search group box, select an option:
All Cataloged Images Searches all cataloged information about albums and images.
Latest Search Results Once you have performed a search, use this option to search only the results from the previous search.
4 Click the Match Any or Match All button and choose an option.
Match All of the Selected Keywords Displays thumbnails of the images associated with the selected keywords.
Match Any of the Selected Keywords Displays thumbnails of images associated with the selected keywords.
Search the Results!Once you have completed a search using album and image information or keywords, choose the Latest Search Results option, change the search criteria and further narrow the search results.

Chapter 6: Searching and Cataloging 67
5 Click the “+” next to a keyword list to expand the folder and show the sub-keywords.
6 Mark the box next to the keywords and sub-keywords that you want to search on.
7 Click the Search button to display the images that match the selected keywords in the Search Results window.
Cataloging Albums and ImagesPaint Shop Photo Album collects information about images in your computer, and stores that information (such as file name, type and size) in a database file. This process is called Cataloging. Cataloging is automatic. You can also catalog removable media such as such as a floppy disk, CD ROM, or Picture CD.
About CatalogingYou must catalog your drives before using the Search tools. Once you have cataloged your drives, you can quickly find images based on such criteria as file type, size, date created, etc. If you’re working with removable media, cataloging a drive creates a source of thumbnail images and allows large albums to open quickly.
It’s important to understand that the Catalog process doesn’t actually create an album, or any image files that you can see and open on your computer. Instead, the Catalog process collects information about images, and stores that information in a database. When you double-click the thumbnail for cataloged images that reside on removable media, the program will prompt you to load the correct disk or CD-ROM into the appropriate media device.
To create a catalog of images and albums:
1 Choose Tools > Catalog, and then select one of the following options:
Floppy Catalogs the contents of the floppy disk in the disk drive.
CDROM Catalogs the contents on the CD ROM in the CD ROM drive.
Picture CD Catalogs the contents of the Picture CD in the CD ROM drive.
Hard Drive Catalogs all of the of the images on the hard drive of the computer.

Chapter 6: Searching and Cataloging68
Advanced Opens the Catalog Drive dialog. Use this to select multiple drives to catalog at one time, view the date that the drives were previously cataloged, and edit media titles.
2 On the Catalog dialog, click Start to begin a cataloging the drive that you selected.
Note: You can continue to work in Paint Shop Photo Album while the drive is being cataloged.
3 When the Catalog is complete, the Catalog Complete dialog displays. If you want to change the name of the cataloged media, then enter the new name in the Label field.
Note: When using the search feature Paint Shop Photo Album will prompt you to insert the media (floppy disk, CD ROM, or Picture CD) with a specific name into the appropriate drive.
4 Click OK and the catalog process is complete.
Backing Up the Database FileThe keywords, descriptions, titles, image thumbnails, and other important information that you enter for albums and images are stored in a database. Since the database file is an important file, the program will automatically prompt you to create a backup of the database, allowing you to restore the database should it become damaged. By default the database file is backed up to C:\Program Files\Jasc Software Inc\Jasc Paint Shop Photo Album\Backup.
NoteBacking up the database file does not backup actual image files. To archive images, see “Saving Images” on page 41.
To manually backup the database:
1 Choose Tools > Database > Backup to open the Backup Database dialog.
2 Click OK to backup the database file.
NoteTo change the directory location for the backup file, click the Browse button to open the Select Folder dialog. Choose a new directory, and then click Select.
Cataloging a single albumRight-click on a folder in the Browse tab to display a context menu and choose Catalog Album.
Automatically backing up the databaseTo configure the program to automatically backup the database on exit, see “Database Backup Options” on page 131.

Chapter 6: Searching and Cataloging 69
Restoring Backup FilesShould your database file become corrupt, you can easily restore the information from a previous backup.
To restore the database:
1 Choose Tools > Database > Restore to open the Restore Database dialog.
2 If you did not backup the database to the default directory then click the Browse button to open the Select Folder dialog. Choose directory where you backed up the database file, and then click Select.
3 Click OK to restore the database file.
Importing and Exporting the Database FileExport the database file for the album if you want to transfer an album to a different computer. This retains all of the information and keywords that you entered for the images. Then copy that album to the new computer, and import the database file.
Exporting a database file:
1 On the Browse tab, select the album for which you want to export album and image information.
2 Choose Tools > Database > Export, or right-click on the album to display a context menu, and choose Export to open the Export dialog.
3 If the album contains sub-folders, mark the Include subfolders check box.
4 Click the OK button to export the database file. The database file (pspa.dbt) is stored in the album.
5 Copy the entire album to a to an external drive (CD-ROM, Floppy, or network).
Importing a database file:
1 Copy the entire album from the external drive to a drive in the new computer.

Chapter 6: Searching and Cataloging70
Note: Be sure that Paint Shop Photo Album is installed on the new computer.
2 Open Paint Shop Photo Album, and select the album in the Browse tab.
3 Choose Tools > Database > Import, or right-click the album to display a context menu, and choose Import to open the Import dialog.
4 On the Import dialog, mark the following options:
Include subfolders Imports the information for all sub-folders in the album.
Overwrite existing Title/Description information Replaces any existing information with the imported information.
Remove exported data files when done Deletes the pspa.dbt file from the album.
5 Click the OK button to import the album and image information.

71
Working With ImagesUse Paint Shop Photo Album to change the view, orientation, and size of an image using the Zoom, Pan, Rotate, Flip, and Resize tools. You can also add text, audio, and pen annotations to images, make movie files, and panoramic images.
Contents Zooming In and Out . . . . . . . . . . . . . . . . . . . . . . . . . . . . . . . . . . 72Panning Images . . . . . . . . . . . . . . . . . . . . . . . . . . . . . . . . . . . . 72Rotating Images . . . . . . . . . . . . . . . . . . . . . . . . . . . . . . . . . . . . 73Flipping an Image . . . . . . . . . . . . . . . . . . . . . . . . . . . . . . . . . . . 74Resizing an Image . . . . . . . . . . . . . . . . . . . . . . . . . . . . . . . . . . . 75Cropping an Image . . . . . . . . . . . . . . . . . . . . . . . . . . . . . . . . . . 76Adding Text to an Image . . . . . . . . . . . . . . . . . . . . . . . . . . . . . . 78Adding Audio to an Image . . . . . . . . . . . . . . . . . . . . . . . . . . . . . 79Making Movie Files . . . . . . . . . . . . . . . . . . . . . . . . . . . . . . . . . . 82Exporting Movies . . . . . . . . . . . . . . . . . . . . . . . . . . . . . . . . . . . . 83Viewing a Movie File . . . . . . . . . . . . . . . . . . . . . . . . . . . . . . . . . 85Adding a Pen Annotation . . . . . . . . . . . . . . . . . . . . . . . . . . . . . . 86Making a Panoramic Image . . . . . . . . . . . . . . . . . . . . . . . . . . . . 87
C H A P T E R 7

Chapter 7: Working With Images72
Zooming In and OutUse the Zoom tool to magnify or reduce the size of the image in the Image View window without changing the actual size of the image.
To zoom in and out of an image:
1 On the Browse tab, click the album to display thumbnail views of the images in the album in the Album View window.
2 In the Album View window, double-click the image to open it in the Image View window.
3 Click the Zoom button on the toolbar to activate the Zoom tool.
When the Zoom tool is activated, the mouse cursor changes to a small “magnifying glass”.
4 To zoom in, click the image using the left mouse button. To zoom out, click the right mouse button. Or, use the mouse wheel to change the magnification level.
5 To zoom to a specific level, click the down-arrow on the Zoom button, and then select the magnification level.
Panning ImagesUse the Pan tool to view hidden areas of a large image in the Image View window.
NoteIf the entire image is viewable in the Image View window, then the Pan tool will not pan the image.
To pan an image:
1 On the Browse tab, click the album to display thumbnail views of the images in the album in the Album View window.
2 In the Album View window, double-click the image to open it in the Image View window.
3 Click the Pan button on the Paint Shop Photo Album toolbar to activate the Pan tool.
When the pan tool is activated, the mouse cursor changes to a small “hand”.
4 To pan an image, click the image using the left mouse button and drag the cursor around an image.
Zoom button
Pan button

Chapter 7: Working With Images 73
Rotating ImagesUse the Rotate tool to adjust the angle of images without degrading the quality of the image.
To rotate multiple images in the Album View window:
1 On the Browse tab, click the album to display thumbnail views of the images in the album in the Album View window.
2 Select the images that you want to rotate:
� To select multiple images, press and hold the <Ctrl> key and click the images.
� To select multiple images in a sequence, press and hold the <Shift> key, click the first image in the sequence, and then click the last image in the sequence.
3 To rotate the images to the left or right, click the down-arrow on the right side of the Rotate button, and then select an option:
Rotate Right Rotates the image 90º clockwise.
Rotate Left Rotates the image 90º counter-clockwise.
To rotate an image in the Image View window:
1 On the Browse tab, click the album to display thumbnail views of the images in the album in the Album View window.
2 In the Album View window, double-click an image to open the image in the Image View window.
3 To rotate the images to the left or right, click the down-arrow on the Rotate button, and then choose an option:
Rotate Right Rotates the image 90º clockwise.
Rotate Left Rotates the image 90º counter-clockwise.
4 For more advance rotation options, choose Image > Rotate, and then select an option:
Rotate Right Rotates the image 90º clockwise.
Rotate Left Rotates the image 90º counter-clockwise.
Exact Opens the Rotate dialog. Enter a number in degrees to rotate the image, and then click OK. Positive numbers rotate the image clockwise, and negative numbers rotate the image counter-clockwise.
Rotate button

Chapter 7: Working With Images74
Free The mouse cursor changes to the Rotation icon. Click the image and drag the arrow in the direction that you want to rotate the image. Release the mouse button to apply the rotation.
Flipping an ImageUse Flip tool to flip an image horizontally or vertically.
To flip multiple images in the Album View window:
1 On the Browse tab, click the album to display thumbnail views of the images in the album in the Album View window.
2 Select the images that you want to flip:
� To select multiple images, press and hold the <Ctrl> key and click the images.
� To select multiple images in a sequence, press and hold the <Shift> key, click the first image in the sequence, and then click the last image in the sequence.
3 Choose Image > Flip and then select an option:
� Flip Horizontal Flips the image from left to right.
� Flip Vertical Flips the image from top to bottom.
4 A confirmation window opens stating that this operation cannot be undone. Click Yes to continue, click No to cancel.
To flip an image in the Image View window:
1 On the Browse tab, click the album to display thumbnail views of the images in the album in the Album View window.
2 In the Album View window, double-click the image that you want to flip to open it in the Image View window.
3 Choose Image > Flip, and then select an option:
� Flip Horizontal Flips the image from left to right.
� Flip Vertical Flips the image from top to bottom.
4 A confirmation window opens stating that this operation cannot be undone. Click Yes to continue, click No to cancel.

Chapter 7: Working With Images 75
Resizing an ImageUse the Resize tool to change the actual pixel dimensions of an image without changing the image composition. When increasing the size of an image, pixels (the individual grid cells that make up a digital image) are added to create the enlarged image. When decreasing the size of an image, pixels are removed and the entire image is recalculated so that the image components fit into the reduced area. In either case, a new grid of pixels is created using mathematical processing.
For information about resizing multiple images at one time, see “Resizing Multiple Images” on page 121.
NoteResizing images may reduce the sharpness of an image, so it is a good idea to keep a backup copy of the original image.
To resize an image:
1 On the Browse tab, click the album to display thumbnail views of the images in the album in the Album View window.
2 In the Album View window, double-click an image to open it in the Image View window.
3 Choose Image > Resize to open the Image Resize dialog.
4 Enter in a new Width and Height (in pixels) for the image.
5 By default, the Preserve Aspect Ratio check box is activated. This preserves the relationship of width and height for the resized image.
To distort the image horizontally (width) or vertically (height), un-mark the Preserve Aspect Ratio check box.
6 Click the OK button. Paint Shop Photo Album calculates a new grid of image pixels, and shows the result in the Image View window.
Use the Zoom tool to magnify your image, for a detailed view of the changes to the image.
Close up of the individual pixels that make up an image.

Chapter 7: Working With Images76
Cropping an Image There are two ways to crop an image and trim away the parts that you don’t want. Use the Crop window to crop an image to a custom size, a ratio, or standard size. Or, make a selection on an image, and then crop the image to that selection.
About the Crop Window
When you open the Crop window, the window is placed on top of the image. The areas outside of the crop window will be removed when you crop the image. Use the buttons at the bottom of the window to control the size and orientation of the crop window.
The settings that you make with the Crop tool are “remembered” by the program. These settings are used each time you open the Crop window until you change them.
To crop an image using the Crop window:
1 On the Browse tab, click the album to display thumbnail views of the images in the album in the Album View window.
2 In the Album View window, double-click an image to open the image in the Image View window.
3 Choose Image > Crop, or click the Crop button on the toolbar to open the Crop window.
4 Position the Crop window on the image:
� Click and drag any side of the Crop window to change the size of the window. For example, click the right edge of the Crop window and then drag left or right, to change the width of the Crop window.
Crop button

Chapter 7: Working With Images 77
� Click and drag any corner of the Crop window to change the overall size of the window without changing the shape of the window.
� Click anywhere in the center of the Crop window, and drag the window to the proper crop position.
� Click the Portrait or Landscape buttons at the bottom of the window to change the orientation of the Crop window.
5 To select a specific crop size:
� Click the Pixel Dimensions button at the bottom of the Crop window to open the Set Crop Size dialog. Enter the pixel size in the Width and Height fields. Mark the Preserve Aspect Ratio check box to preserve the ratio of height to width.
� Click the Aspect Ratio button at the bottom of the Crop window and select a size (4x6, 5x7, etc.).
6 Click OK to crop the image and close the Crop window.
To crop an image to a selection:
1 On the Browse tab, click the album to display thumbnail views of the images in the album in the Album View window.
2 In the Album View window, double-click an image to open the image in the Image View window.
3 Choose Image > Selection, and then select a shape.
Rectangular To make a square or rectangular selection.
Elliptical To make a circular selection.
Freehand To make a manual selection area.
4 Click and drag the mouse on the image to make the selection.
5 Choose Image > Crop, or click the Crop button on the toolbar to crop the image to the selection.
Undo/Redo buttonsIf you want to reverse your change, click the Undo button on the toolbar, or press <Ctrl> + Z. To reapply a reversed change, click the Redo button on the toolbar, or press <Ctrl> + <Alt> + Z.

Chapter 7: Working With Images78
Adding Text to an ImageAdd text on an image using the Text window. The text that you add with the Text window represents actual picture changes that are “painted” onto the image. You cannot perform a Search on this text, nor can you remove this text once the image is saved.
To add text to an image:
1 On the Browse tab, click the album to display thumbnail views of the images in the album in the Album View window.
2 In the Album View window, double-click an image to open it in the Image View window.
3 Click the Add Text button to open the Text Editing window.
4 Choose the font type from the Font drop-down list.
5 Choose the font point size from the Size drop-down list.
6 For bold text, click the Bold button.
7 For italic text, click the Italic button.
8 For underlined text, click the Underline button.
9 To select a text color, click the Color button to open the Color dialog, and then select a color.
10 To create a custom color, click the Define Custom Colors button to display the color wheel, and then:
� Click a color from the color wheel, and then drag the slider up or down to create a custom color.
� Click the Add to Custom Colors button, and then click OK.
11 Choose the alignment (left, center and right) for the text.
12 Click the Drop Shadow button and choose the size of the shadow effect (No Shadow, Small Shadow, Medium Shadow, or Large Shadow).
13 Mark the Anti-alias check box if you want to eliminate the stair-stepping look (called “jaggies”).
14 Type the text in the text box.
15 Position the text on the image, click inside the Text Editing window, and then position the text over the image.
Note: To resize the Text Editing window, hold your mouse over the edge of the window to change the cursor into an arrow, and then click and drag the edge to resize the window.
Add Text button

Chapter 7: Working With Images 79
16 Click OK to close the Text Editing window to add the text to the image.
NoteIf you want to retain the original image, save the image containing text with a new file name. For information about saving an image with a new name, see “Saving Images” on page 41.
Adding Audio to an ImageRecord audio files and associate them with images using the Audio Annotation feature. If you have a camera that can record sound and associate it with an image, then you can use the Audio Annotation feature to modify the audio file. If your computer is equipped with a microphone then you can record an audio file, associate it with an image and edit the file.
NoteYour computer must be equipped with speakers and a sound card if you want to listen to audio files.
To add audio to an image:
1 On the Browse tab, click the album to display thumbnail views of the images in the album in the Album View window.
2 Select the image.
3 Choose Audio > Record to open the Record dialog.
4 Click Record New, or to add additional sound to an audio file that is already recorded, click on the Record Additional button to record audio.
5 When you have finished recording, click Stop.
Playing AudioTo play an audio file that is associated with an image, select the image, and then click on the Audio icon on the image, or choose Audio > Play.
How do I know if an image has an audio file?An image that contains audio has an audio icon in the lower right corner of the image, as shown below:

Chapter 7: Working With Images80
Recording an Audio AnnotationYou can record a new audio file or add additional audio to an existing audio file. To record an audio annotation, you must have a microphone connected to your computer.
To record an audio annotation:
1 On the Browse tab, click the album to display thumbnail views of the images in the album in the Album View window.
2 Choose Audio > Record to open the Record dialog.
3 Click Record New, or to add additional sound to an audio file that is already recorded, click on the Record Additional button to record audio.
4 When you have finished recording, click Stop.
5 To listen to the audio file click Play New. To compare the new audio annotation to the original audio annotation click the Play Original button.
6 When you are satisfied with your recording, click OK to close the Record dialog.
Editing AudioUse the audio editing tool if you have recorded an audio file with your camera and want to remove a blank portion at the beginning or the end of the recording.
To edit an existing audio file:
1 On the Browse tab, click the album to display thumbnail views of the images in the album in the Album View window.
2 In the Album View window, click the image with the associated audio file, and then choose Audio > Edit to open the Audio Editing window.
The “wavy” portion of the image in the Audio Editing window represents the sound that’s recorded. In fact, with this window displayed, click on the Audio button, and you can see the arrow indicator moving across the window as the audio is played.

Chapter 7: Working With Images 81
3 Click and drag to select the audio you want to change. The selected audio turns blue, shown below:
4 Right-click to display a context menu, and then choose an option:
Play To play the selected section of the audio file.
Record To open the Record Audio dialog and record audio to replace the selected section of the audio file.
Cut To remove the selection of audio.
Copy To copy a selected portion of the audio file.
Paste To paste a cut or copied selection into an audio file and replace the entire contents of the file with the cut or copied section of the audio file.
Crop To remove all parts of the audio file before and after the selected selection of the audio file.
Delete To permanently remove the selected section from the audio file.
5 When you are finished modifying the audio, choose File > Close. If you made changes to the audio, you are prompted to save those changes.
Configuring Audio PropertiesChange the audio properties for your computer system. These changes apply to the PC, not just how sounds work in Paint Shop Photo Album.
To view and configure the audio properties of your computer system:
1 Choose Audio > System Audio Properties to open a dialog with a series of tabs.
The exact appearance and settings that are available in this dialog depend upon the computer hardware and operating system in your computer.
2 Adjust the settings, and then click OK to apply the settings.
Selected section of audio

Chapter 7: Working With Images82
Making Movie FilesYou can turn selected images into “movies” with a click of your mouse. The Movie command enables you to turn the selected images into a QuickTime movie that you can share with family, friends or business associates. (The resulting QuickTime movie requires the QuickTime software to play and view the movie.) You can also load, play, and add effects to AVI or QuickTime movies.
In addition, some digital cameras have a special “burst mode” for rapid sequential pictures. In this case, the rapid sequence of images is recorded as one large image file. You can convert this multi-image file into a QuickTime movie, or into a series of separate images.
To turn a series of images into a QuickTime movie:
1 On the Browse tab, click the album to display thumbnail views of the images in the album in the Album View window.
2 Select the images that you want to create into a movie.
� To select one image, click the image.
� To select multiple images, press and hold the <Ctrl> key and click the images.
� To select multiple images in a sequence, press and hold the <Shift> key, click the first image in the sequence, and then click the last image in the sequence.
3 Choose Tools > Make Movie to open the Make Movie dialog.
4 Click the Browse button, and choose the directory and filename that you want for your movie.
5 Enter the number of Seconds/Frame that you want for your movie. The default setting is Seconds Per Frame.
6 Enter the Width and Height (in pixels) that you want for the completed movie.
7 Mark the Preserve Aspect Ratio check box to preserve the height to width ratio.
Uncheck the Preserve Aspect Ratio if you want the movie to appear “stretched” horizontally or vertically.
8 Click on the OK button. The images that you selected are incorporated into a QuickTime movie, located in the directory that you selected in step 4.
What is AVI and QuickTime?AVI (Audio Video Interleave) and QuickTime (developed by Apple Computer, Inc.) are common formats for audio/video data on the PC.

Chapter 7: Working With Images 83
To convert a multi-image file:
1 On the Browse tab, click the album to display thumbnail views of the images in the album in the Album View window.
2 Double-click on the thumbnail of the multi-view image to open the Edit window.
Note: Carefully count the number of columns (images across the top), and rows (images down the side) that you see in the image. You may want to write these numbers down for use in step 7.
3 Close the image to return to the Album View window.
4 Click thumbnail of the multi-image file.
5 Choose Tools > Convert Multi-Image to open the Convert Multi-Image dialog.
6 Choose whether you want the burst of images converted into a set of image files, or into a QuickTime movie.
7 In the Subdivide Multi-Image area, enter the number of columns and rows that make up the image.
8 Click OK to convert the file as you specified.
9 If you chose the Movie option, the Make Movie dialog opens.
10 In the Save To area, choose where you want the movie to be saved. You can click on the Browse button to help navigate to a directory.
11 Enter the number of Seconds/Frame, and the Width and Height dimensions that you want for the movie.
12 Click OK to create the movie using the array of picture images in the multi-image file. The finished movie appears in a new Movie Projector window.
Exporting MoviesShare your movies with others in a compatible file format using the Movie Projector tool. Export a movie in a different file format, apply one or more video effects, or change the video stream format.
NoteMovies exported with video effects added can only be saved as QuickTime (.mov) movies.

Chapter 7: Working With Images84
To export a movie:
1 On the Browse tab, click the album to display thumbnail views of the images in the album in the Album View window.
2 Double-click on the thumbnail of the movie that you want to export. The movie file opens in the Movie Projector window.
3 Choose File > Export to open the Save Exported File As dialog.
4 Choose where the exported movie will be saved from the Save in drop-down list.
5 Enter the name of the movie in the File Name field.
6 Choose the file type for the movie from the Export drop-down list.
7 Choose the type of video streaming format from the Use drop-down list.
If you’re not sure what setting to use, choose Default Settings.
8 Click Save to export the movie in file format that you selected.
To export a movie with video effects:
1 On the Browse tab, click the album to display thumbnail views of the images in the album in the Album View window.
2 Double-click on the thumbnail of the movie that you want to export. The movie file opens in the Movie Projector window.
3 Choose File > Export Effect Movie to open the Select Effect dialog.
4 Choose an effect:
� Select an effect from the list of effects, and then adjust the effect settings.
� To load an effect, click the Load button to open the Open dialog. Select the effect file (effect files have a.qfx extension), and then click the OK button.
Note: A preview of the effect displays in the Preview window
5 To save the effect settings, click the Save button to open the Save Effect dialog. Enter a name for the effect, and then click the OK button.
Note: Effects can be combined. For example, you can apply both the Film Noise and Emboss effects to your movie.
6 On the Select Effect dialog click the OK button to open the Save As dialog.

Chapter 7: Working With Images 85
7 From the Save in drop-down list, choose where the exported movie with effects will be saved.
8 Enter the name of the movie in the File Name field, and then click the Save button.
Viewing a Movie FileUse Paint Shop Photo Album to open and view movies that have been created in AVI, DV, FLC, MPG, and QuickTime digital video formats. In the Album View window, movie files are identified with a small “movie reel” icon in the top left of the thumbnail. Any image that shows this movie icon can be opened and played.
To view a movie:
1 On the Browse tab, click the album to display thumbnail views of the images in the album in the Album View window.
2 Double-click on the thumbnail of the movie that you want to play in the Movie Projector window.
3 Controls for the Movie Projector are at the bottom of the window.
4 Click the Play button on the left to start the movie. When the movie is playing, clicking on the Play button a second time will pause the movie.
5 Use the Manual Backward and Manual Forward buttons to move backwards and forwards through the movie while it’s playing.
6 The movie stops when it reaches the end. If you want to have the movie play repeatedly, choose Edit > Loop.
How do I know if a thumbnail is a movie file?A thumbnail of a movie file it has an movie reel icon in the upper left corner of the thumbnail, as shown below:

Chapter 7: Working With Images86
Adding a Pen AnnotationUse a Pen Annotation to highlight specific portions of the image, or to make comments about the image.
Images that have an associated Pen Annotation display a Pen icon in the lower right corner of the thumbnail on the Album View window.
To add a Pen annotation to an image:
1 On the Browse tab, click the album to display thumbnail views of the images in the album in the Album View window.
2 In the Album View window, double-click an image to open it in the Image View window.
3 Choose Image > Pen > Use Pen tool. When you move the mouse over the image, the cursor shape changes to a pen.
4 To write the annotation, click and drag on the image.
If you make a mistake and want to erase the pen line, choose Image > Pen > Delete, or click the Undo button.
Viewing Pen AnnotationsBy default, the program displays the ink annotations for an image. If you want to view the image without displaying the pen annotation, choose View > Show Pen and uncheck the option.
Configuring Pen AnnotationsChange the pen color, width, and to blend the pen annotation into the image.
To configure the Pen tool:
Choose Image > Pen to display a context menu and choose an option:
Width Determines the size of the pen; Width 1 is the smallest pen, while Width 4 is the largest.
Color Changes the color of the pen.
Blend into Image Merges the pen annotation into the image file. Pen annotations are stored as a separate files with an .ixi extension. If you want to give your annotated image to people who don’t have this program, you must permanently write the pen annotations into the image.
How do I know if an image has a pen annotation?An image that contains a pen annotation has an pen icon in the lower right corner of the image, as shown below:

Chapter 7: Working With Images 87
Note Once you use the blend the pen annotation into an image and save the changes to the image, you will not be able to erase the pen, or uncheck the Show Pen option for that image.
Making a Panoramic ImageUse the Panorama tool to combine two (or more) images together to create a horizontal or vertical panorama, high-resolution image, or wide-angle pictures.
Taking Pictures for a PanoramaTo achieve the best result, follow these tips when taking pictures for a panorama:
� Stand in one place, and rotate the camera around one spot.
� Overlap each picture with the previous one by approximately 50%.
� Don’t move from your position between shots.
� Hold the camera close to your face.
� Make sure that you’re at least 15 feet away from any subject.
� Keep the camera level to the ground.
� For the best results, place your camera on a tripod.
Once you have taken pictures using the above guidelines, you should have a series of images that can be combined as a single panoramic image. Use the Panorama tool to create large, high-resolution images by placing the images on a two-dimensional grid (for example, three-wide by two-high).
To make a panorama:
1 On the Browse tab, click the album to display thumbnail views of the images in the album in the Album View window.
2 Press and hold <Ctrl> and click the images for the panorama.
3 Click the Panorama button, or choose Tools > Panorama to open the selected images in the Panorama window.
4 Place the images in their proper order. Click and drag an image to change its position in the Panorama window.
Panorama button

Chapter 7: Working With Images88
Note: If you move an image on top of another image, the lower image will be removed from the Panorama window. If you accidently delete an image when moving them around, you can drag-and-drop the image from the album into the Panorama window.
5 Configure the projection options. Click the Settings button on the left side of the Panorama window to display a context menu, and then select the projection options:
Perspective Projection is best used for narrow to medium width horizontal panoramas. It is also well suited for vertical scenes such as buildings, trees, poles, or other tall objects. If this option is used over a wider field-of-view, you may notice that objects at the edges of the picture appear as warped or stretched.
Cylindrical Projection is best used for wide field-of-view scenes that are not very tall, such as a horizontal panorama of a distant mountain range. Although you won’t see the warping at the edges that perspective projection may produce, you may notice that lines with horizontal components are bent. Vertical straight lines will not be affected.
6 Configure the blend options to adjust the alignment and transition of the individual images in the final picture. Click the Settings button on the left side of the Panorama window to display a context menu, and then select the blend options:
Smooth Blend Works well for sets of images that align well with each other but vary in brightness. Smooth Blend will create soft transitions between matching image pairs, making it appropriate for use in most cases. This blending style is generally the fastest, although it may produce doubled images if the underlying fit isn’t good.
Sharp Blend Uses advanced error correction for cases where images align poorly due to severe camera tilt, movement, or other changes between image pairs. It does not provide as much exposure correction, so the transition between image pairs is usually sharper.
7 Configure the output size. Click the Settings button on the left side of the Panorama window to display a context menu, and select the output size:
Small Best for situations where small sizes are needed, such as Web applications.
Medium Sufficient for most uses.
Need to delete an image from the Panorama window?Click the image to select it, and then press the Delete.

Chapter 7: Working With Images 89
Large Good for situations that require high resolution, but uses more memory and produces large output files.
Very Large Best for applications that require very high resolution output. Requires a computer containing a large amount of RAM.
8 Click the Create button on the left side of the Panorama window to create the panorama. A blue bar progress bar displays the status of the operation.
Note: Though this operation takes time, it can take place in the “background.” In other words, you can keep working with your computer and other applications while processing the images into a panorama. To stop the operation at any time, click the Cancel Panorama button on the Status bar.
9 When the operation is complete, the finished picture displays in a new window.
The image assembled by the operation may have “ragged” edges on the sides indicating the recommended cropping rectangle due to the slight variation in the camera angle between shots. Using a tripod when taking the pictures will minimize this effect.
10 Click Crop to crop the image and remove the ragged edges.
11 Choose File > Save to open the Save Image dialog, and then save the image.

Chapter 7: Working With Images90

91
Enhancing ImagesUse Paint Shop Photo Album to correct color balance, brightness, contrast, and remove red eye using the Quick Fix, Adjust, and Red Eye Removal tools.
Contents Fixing Images in One Step . . . . . . . . . . . . . . . . . . . . . . . . . . . . . 91Fixing Images Using the Adjust Wizard . . . . . . . . . . . . . . . . . . . . 92Manually Adjusting Images . . . . . . . . . . . . . . . . . . . . . . . . . . . . . 94Removing Red Eye . . . . . . . . . . . . . . . . . . . . . . . . . . . . . . . . . . 97
Fixing Images in One StepUse the Quick Fix tool to automatically adjust the brightness, contrast, and color balance of an image.
For information about adjusting multiple images at one time, see “Automatically Adjusting Multiple Images” on page 119.
To use the Quick Fix tool:
1 On the Browse tab, click the album to display thumbnail views of the images in the album in the Album View window.
2 In the Album View window, double-click an image to open it in the Image View window.
3 Click the Quick Fix button on the toolbar, or choose Image > Quick Fix to automatically adjust the image.
C H A P T E R 8
Quick Fix button

Chapter 8: Enhancing Images92
Fixing Images Using the Adjust WizardUse the Adjust Wizard tool to correct the color balance, exposure, vividness, and sharpness of an image.
About the Adjust Wizard window
When you open the Adjust Wizard window, three previews of the image display. The left preview displays the image with less of the correction, the original displays in the center, and the image with more correction displays on the right.
For each correction, decide which preview looks the best, and then proceed to the next step. At any time you can use the buttons to preview, apply and change the view of the image previews.
� Click the Apply button to view the corrections on the original image.
� Click the Preview button to display a side-by-side comparison of the original image and the corrected image, click the Preview button again to close the preview.
� Click the Done button to apply the correction and close the Adjust Wizard window.
� Click Zoom button, left-click the mouse button to zoom-in (magnify) the image. Right-click the mouse to zoom-out (reduce the magnification of) the image. Click the Zoom button again to deactivate the zoom tool.

Chapter 8: Enhancing Images 93
� Click the Pan button, click an image preview, and then drag the mouse to pan the image. Click the Pan button again to deactivate the pan tool.
To use the Adjust Wizard:
1 On the Browse tab, click the album to display thumbnail views of the images in the album in the Album View window.
2 In the Album View window, double-click an image to open it in the Image View window.
3 Choose Image > Adjust Wizard, or click the down-arrow on the Adjust button and choose Adjust Wizard to open the Adjust Wizard window.
4 Step 1 Color of the correction adjusts the color balance of the image. Click the Select button for the image preview that looks the best. The wizard automatically advances to the next step.
5 Step 2 Exposure of the correction adjusts the exposure of the image. Click the Select button for the image preview that looks the best. The wizard automatically advances to the next step.
6 Step 3 Vividness of the correction adjusts the vividness of the image. Click the Select button for the image preview that looks the best. The wizard automatically advances to the next step.
7 Step 4 Sharpness of the correction adjusts the sharpness of the image. Click the Select button for the image preview that looks the best, to display previews of the original image and the adjusted image
8 Click the Done button to apply the adjustments.
Undo/Redo buttonsIf you want to reverse your change, click the Undo button on the toolbar, or press <Ctrl> + Z. To reapply a reversed change, click the Redo button on the toolbar, or press <Ctrl> + <Alt> + Z.

Chapter 8: Enhancing Images94
Manually Adjusting ImagesUse the Adjust dialog when you want complete control over image corrections. Use the tabs on the Adjust dialog to adjust the brightness and contrast, flash and backlighting, color balance, saturation, and sharpness of an image.
About the Adjust Dialog
Each tab on the Adjust dialog contains slide controls and a preview window. The preview window splits the original image in half, and shows the original image on the left, and the new (corrected) image on the right. To view more or less of the new image, click and drag on the arrow at the bottom of the preview window to the right or to the left.
To use the slide controls, simply click and drag the arrow to the left or to the right. If your mouse has a mouse wheel, you can also use it to adjust the slider.
To change the magnification of the image in the preview window move the mouse cursor over the preview image to change the cursor to a “magnifying glass” icon. Left-click the mouse button to zoom-in (magnify) the image. Right-click the mouse to zoom-out (reduce the magnification of) the image.
To manually adjust brightness and contrast:
1 On the Browse tab, click the album to display thumbnail views of the images in the album in the Album View window.
2 In the Album View window, double-click an image to open it in the Image View window.
Need more advanced image editing tools?To open an image in Paint Shop Pro choose File > Jump to Paint Shop Pro.

Chapter 8: Enhancing Images 95
3 Click the down-arrow on the Adjust button and choose Adjust, or choose Image > Adjust to open the Adjust dialog, and then click the Brightness/Contrast tab.
4 Drag the Brightness slider to the right to make the image lighter. Drag the brightness slider to the left to make the image darker.
5 Drag the Contrast slider to the right to make the dark areas darker, and light areas lighter. Drag the contrast slider to the left to make the dark areas lighter, and the light areas darker.
6 To view the adjustment on the original image without exiting the Adjust dialog, click the Apply button.
7 When you are finished making adjustments to the image, click OK, or to make another adjustment, click the tab for the adjustment that you want to make.
To manually adjust the flash and backlighting:
1 On the Browse tab, click the album to display thumbnail views of the images in the album in the Album View window.
2 In the Album View window, double-click an image to open it in the Image View window.
3 Click the down-arrow on the Adjust button and choose Adjust, or choose Image > Adjust to open the Adjust dialog, and then click the Flash/Backlighting tab.
4 Adjust the slide controls.
Add Flash Drag the slide control to adjust the brightness of the flash and open up the shadows in an image.
Reduce Backlighting Drag the slide control to adjust the contrast and bring back details lost in bright areas of the image.
5 To view the adjustment without exiting the Adjust dialog, click the Apply button.
6 When you are finished making adjustments to the image, click OK, or to make another adjustment, click the tab for the adjustment that you want to make.
To manually adjust color balance:
1 On the Browse tab, click the album to display thumbnail views of the images in the album in the Album View window.
2 In the Album View window, double-click an image to open it in the Image View window.
Adjust button
Undo/Redo buttonsIf you want to reverse your change, click the Undo button on the toolbar, or press <Ctrl> + Z. To reapply a reversed change, click the Redo button on the toolbar, or press <Ctrl> + <Alt> + Z.

Chapter 8: Enhancing Images96
3 Click the down-arrow on the Adjust button and choose Adjust, or choose Image > Adjust to open the Adjust dialog and then click the Color Balance tab.
4 Adjust the slide controls.
To reduce the amount of color in an image, you can either increase its opposite color or reduce the amount of the adjacent colors. For example, to color adjust an image containing too much yellow, either increase the amount of blue or decrease the amount of red and green.
5 To view the adjustment without exiting the Adjust dialog, click the Apply button.
6 When you are finished making adjustments to the image, click OK, or to make another adjustment, click the tab for the adjustment that you want to make.
To manually adjust saturation:
1 On the Browse tab, click the album to display thumbnail views of the images in the album in the Album View window.
2 In the Album View window, double-click an image to open it in the Image View window.
3 Click the down-arrow on the Adjust button and choose Adjust, or choose Image > Adjust to open the Adjust dialog and then click the Saturation tab.
4 Adjust the slide controls to change the purity of the hue.
5 To view the adjustment on the original image without exiting the Image Adjust dialog, click the Apply button.
6 When you are finished making adjustments to the image, click OK, or to make another adjustment, click the tab for the adjustment that you want to make.

Chapter 8: Enhancing Images 97
To manually adjust sharpness:
1 Open the album that contains the image that you want to adjust.
2 In the Album View window, double-click an image to open it in the Image View window.
3 Click the down-arrow on the Adjust button and choose Adjust, or choose Image > Adjust to open the Adjust dialog, and then click the Sharpness tab.
4 Adjust the slide control to the left to soften the image, or to the right to sharpen the image.
5 To view the adjustment without exiting the Adjust dialog, click the Apply button.
6 When you are finished making adjustments to the image, click OK, or to make another adjustment, click the tab for the adjustment that you want to make.
Removing Red EyeUse the Red Eye tools to remove the red-eye effect that frequently occurs in photographs of humans and animals.
� Use the One Click Removal tool to quickly remove red eyes.
� Use the Red Eye Brush to manually remove red eye.
� If a red eye removal tool removed the glint from the eye, use the Highlight Brush to add a bright spot in the eye.
Removing red eye with the One Click Removal tool:
1 On the Browse tab, click the album to display thumbnail views of the images in the album in the Album View window.
2 In the Album View window, double-click an image with red eye to open it in the Image View window.
3 Adjust the view of the image by using the Zoom and Pan tools. For information about using the Zoom and Pan tools, see “Fixing Images in One Step” on page 91 and “Panning Images” on page 72.
4 Click the down-arrow on the right side of the Red Eye button and select One Click Removal.
The cursor changes to a “cross hair”.
Red Eye button

Chapter 8: Enhancing Images98
5 Center the cursor over the red area of the eye, and then click the mouse to make the correction.
Note: If you are not satisfied with the result, try clicking on a different area of the red eye.
6 If needed, repeat step 5 to adjust the other eye.
Removing red eye with the Red Eye Brush:
1 On the Browse tab, click the album to display thumbnail views of the images in the album in the Album View window.
2 In the Album View window, double-click an image with red eye to open it in the Image View window.
3 Adjust the view of the image by using the Zoom and Pan tools. For information about using the Zoom and Pan tools, see “Fixing Images in One Step” on page 91 and “Panning Images” on page 72
4 Click the down-arrow on the right side of the Red Eye button and select Red Eye Brush.
5 To change the size of the brush, click the down-arrow on the right side of the Red Eye button, select Brush Width, and then select a brush size. Width 1 is the smallest brush, while Width 4 is the largest brush.
6 Click and drag the brush around the pupil to remove the red eye.
7 If needed, repeat step 6 to adjust the other eye.
Adding a highlight:
1 On the Browse tab, click the album to display thumbnail views of the images in the album in the Album View window.
2 In the Album View window, double-click an image with red eyes to open it in the Image View window.
3 Click the arrow on the right side of the Red Eye button and select Highlight Brush.
Note: If the brush is too large or too small click Brush Width from the Red Eye drop-down menu to select a brush width. Width 1 is the smallest brush, while Width 4 is the largest brush.
4 Click the brush on the area of the pupil where you want the highlight.
5 If needed, repeat step 4 to adjust the other eye.

Chapter 8: Enhancing Images 99
Changing the Red Eye Brush ColorBy default, the red eye tools use a shade of black as the base color used to fill-in the unwanted “red eye” effect on the subject’s eyes. As an option, you can set this base color to be any color that you want.
To change the Red Eye Brush color:
1 To change the brush color, click the down-arrow on the Red Eye button and select Brush Color to open the Red Eye Brush Color dialog, and then select a color.
2 To select a custom color, click the Custom Colors button to open the Color dialog and then do the following:
� Click the Define Custom Colors button to display the color wheel.
� Click a color in the color wheel, and then drag the slider up and down to adjust the hue.
� Click the Add Custom button.
� Click OK to close the dialog box and display the color in the in the Red Eye Brush Color dialog.
� Click OK to select the custom brush color and close the Red Eye Brush Color dialog.
NoteUntil you repeat this procedure and choose a different color, the color that you chose will always be used by the Red Eye Brush tool.

Chapter 8: Enhancing Images100

101
Adding Image EffectsAdd interest to images by making a black and white or sepia image, thinning or widening the subject of an image, adding picture frames, photo edges, borders, or by adding special effects.
Changes made to an image can be saved over the original image, or you can easily save a copy of the image with a different name. For information about saving images while preserving the original image file, see “Saving Images” on page 41.
Contents Converting an Image to Black and White . . . . . . . . . . . . . . . . . . 101Making a Sepia Image . . . . . . . . . . . . . . . . . . . . . . . . . . . . . . . 102Thinning an Image . . . . . . . . . . . . . . . . . . . . . . . . . . . . . . . . . . 102Adding Borders to an Image . . . . . . . . . . . . . . . . . . . . . . . . . . . 103Adding a Picture Frame to an Image . . . . . . . . . . . . . . . . . . . . . 104Adding a Photo Edge to an Image . . . . . . . . . . . . . . . . . . . . . . 104Adding Special Effects . . . . . . . . . . . . . . . . . . . . . . . . . . . . . . . 105
Converting an Image to Black and WhiteConvert an image to shades of grey (greyscale) and make an image look like a black and white photograph. For information about converting multiple images to black and white at one time, see “Converting Multiple Images to Black and White” on page 123.
To make a black and white image:
1 On the Browse tab, click the album to display thumbnail views of the images in the album in the Album View window.
C H A P T E R 9

Chapter 9: Adding Image Effects102
2 In the Album View window, double-click an image to open it in the Image View window.
3 Choose Effects > Convert to Black and White to change the image to black and white.
Making a Sepia ImageThe Sepia tool applies a a warm brown tone to an image to make it look like a photograph taken in the mid- to late 19th century.
To make a sepia tone image:
1 On the Browse tab, click the album to display thumbnail views of the images in the album in the Album View window.
2 In the Album View window, double-click an image to open it in the Image View window.
3 Choose Effects > Convert to Sepia to change the image to a sepia tone.
Thinning an ImageUse the Thinify tool to shrink or stretch the width of an image and make the subject look thinner or wider.
To use the Thinify tool:
1 On the Browse tab, click the album to display thumbnail views of the images in the album in the Album View window.
2 In the Album View window, double-click an image to open it in the Image View window.
3 Choose Effects > Thinify to open the Thinify dialog.
4 Adjust the slide control to shrink or stretch the image.
5 Mark the Maintain Image Size to preserve the size of the image, while still shrinking or stretching the subject.
6 Click OK. Paint Shop Photo Album calculates a new grid of image pixels, and shows the result in the Image View window.

Chapter 9: Adding Image Effects 103
Adding Borders to an ImageEnhance images by surrounding an image with a colored border. Borders can be asymmetrical, or symmetrical, and you can add multiple borders of different colors to an image.
If you want to retain the original image, save the image containing the border with a new file name. For information about saving an image with a new name, see “Saving Images” on page 41.
To add a border to an image:
1 On the Browse tab, click the album to display thumbnail views of the images in the album in the Album View window.
2 In the Album View window, double-click an image to open it in the Image View window.
3 Choose Effects > Add Border to open the Add Border dialog.
4 In the Border Size group box:
� Mark the Symmetric check box if you want all sides of the border to be the same width.
� Enter the pixel width for the top, bottom, left, and right sides of the border.
5 Click the Color box, or click the Pick Color button to open the Color dialog. Click a color, and then click OK.
6 To create a custom color, click the Define Custom Colors button to display the color wheel, and then:
� Click a color from the color wheel, and then drag the slider up or down to create a custom color.
� Click the Add to Custom Colors button, and then click OK.
Note: The colors that you select are “remembered” by the program and displayed the next time you use the Color dialog.
7 On the Add Borders dialog, click OK to apply the border to the image.
8 Save the image with a new file name.

Chapter 9: Adding Image Effects104
Adding a Picture Frame to an ImageSimulate the look of a framed image by adding a picture frame to an image.
If you want to retain the original image, save the image containing the frame with a new file name. For information about saving an image with a new name, see “Saving Images” on page 41.
To add a picture frame to an image:
1 On the Browse tab, click the album to display thumbnail views of the images in the album in the Album View window.
2 In the Album View window, double-click an image to open it in the Image View window.
3 Choose Effects > Add Picture Frame to open the Add Picture Frame dialog.
4 Use the scroll bar on the right to view all of the picture frames.
5 Click a picture frame to preview the image with the frame on the right side of the dialog.
6 Choose an option:
Over the image Places the frame on top of the image, covering the edges of the image.
Around the image Places the frame around the edges of the image, retaining all of the original photo and enlarging the image.
7 Click OK to apply the picture frame to the image.
8 Save the image with a new file name.
Adding a Photo Edge to an ImageAdd interest to an image by adding a photo edge effect.
If you want to retain the original image, save the image containing the edge with a new file name. For information about saving an image with a new name, see “Saving Images” on page 41.
To add a photo edge effect to an image:
1 On the Browse tab, click the album to display thumbnail views of the images in the album in the Album View window.
Want more picture frames?Use Paint Shop Pro to create your own picture frames. Save the frames you create with a Jasc PSP Frame extension in the C:\Program Files\Jasc Software Inc\Paint Shop Photo Album\Frames directory.

Chapter 9: Adding Image Effects 105
2 In the Album View window, double-click an image to open it in the Image View window.
3 Choose Effects > Add Photo Edge to open the Add Photo Edge dialog.
4 Use the scroll bar on the right to view all of the photo edges.
5 Click a photo edge to preview the image with the photo edge effect on the right side of the dialog.
6 Choose an option:
Over the image Places the photo edge on top of the image, covering the edges of the image.
Around the image Places the photo edge around the edges of the image, retaining all of the original photo and enlarging the image.
7 Click OK to apply the photo edge to the image.
8 Save the image with a new file name.
Adding Special EffectsApply a ripple, glass blocks, edges, fisheye or invert effect to create interesting images using the Special Effects dialog.
The Special Effects dialog contains a preview that displays the original image on the left side of the window, and the image with the effect on the right side of the window. Click and drag the arrow at the bottom of the preview window to the right to view more of the original image, and to the left to view more of the image with the effect.
Adding a Ripples EffectApplies concentric waves around a central point in an image. The effect is similar to the rings produced by a pebble dropped in water.
To add a ripples effect:
1 On the Browse tab, click the album to display thumbnail views of the images in the album in the Album View window.
2 In the Album View window, double-click an image to open it in the Image View window.

Chapter 9: Adding Image Effects106
3 Choose Effects > Special Effects to open the Special Effects dialog, and then click the Ripples tab.
4 In the Number of Ripples group box, drag the slider to select the number of ripples.
5 In the Magnitude of Ripples group box, drag the slider to select the size of the ripples.
6 Click the Apply button to add the effect to the original image.
7 Click the OK button to close the Special Effects dialog.
Adding a Glass Blocks EffectMakes an image appear as though you are looking at it through glass blocks.
To add a glass blocks effect:
1 On the Browse tab, click the album to display thumbnail views of the images in the album in the Album View window.
2 In the Album View window, double-click an image to open it in the Image View window.
3 Choose Effects > Special Effects to open the Special Effects dialog, and then click the Glass Blocks tab.
4 In the Number of Blocks group box, drag the slider to select the number of blocks.
5 In the Magnitude of Blocks group box, drag the slider to select the size of the blocks.
6 Click the Apply button to add the effect to the original image.
7 Click the OK button to close the Special Effects dialog.
Adding an Edges EffectEnhances the edges of the image and adjusts the background color bias.
To add an edges effect:
1 On the Browse tab, click the album to display thumbnail views of the images in the album in the Album View window.
2 In the Album View window, double-click an image to open it in the Image View window.

Chapter 9: Adding Image Effects 107
3 Choose Effects > Special Effects to open the Special Effects dialog, and then click the Edges tab.
4 In the Strength of Effect group box, drag the slider to select the intensity of the effect.
5 In the Background Color Bias group box, drag the slider to change background color of the image.
6 Click the Apply button to add the effect to the original image.
7 Click the OK button to close the Special Effects dialog.
Adding a Fisheye EffectCreates an effect of camera lens distortion.
To add a fisheye effect:
1 On the Browse tab, click the album to display thumbnail views of the images in the album in the Album View window.
2 In the Album View window, double-click an image to open it in the Image View window.
3 Choose Effects > Special Effects to open the Special Effects dialog, and then click the Fisheye tab.
4 In the Width of Fisheye group box, drag the slider to adjust the width of the distortion.
5 In the Height of Fisheye group box, drag the slider to adjust the height of the distortion.
6 Click the Apply button to add the effect to the original image.
7 Click the OK button to close the Special Effects dialog.
Adding an Invert EffectMakes an image look like a negative of a photograph.
To add a invert effect:
1 On the Browse tab, click the album to display thumbnail views of the images in the album in the Album View window.
2 In the Album View window, double-click an image to open it in the Image View window.
3 Choose Effects > Special Effects to open the Special Effects dialog, and then click the Invert tab.

Chapter 9: Adding Image Effects108
4 Drag the slider to select the intensity of the effect.
Solarize Converts all colors in an image or selection above a specific value into their inverse on the 255 scale.
Invert Replaces each pixel color with its opposite on the color wheel. The new image is like a photographic negative.
5 Click the Apply button to add the effect to the original image.
6 Click the OK button to close the Special Effects dialog.

109
PrintingThis program contains print templates that make it easy to print individual or multiple images on the same page.
Change page headers and footers, image labels, make image adjustments, and page layout adjustments using the Adjustments tab.
For best results in printing your images, use a good quality color inkjet printer, and photo-quality inkjet paper.
NoteThis chapter assumes that you have a color printer connected to your computer, and that you have configured your Windows computer to use this printer. If you have questions or problems in printing, refer to the documentation supplied with your printer.
Contents Printing Albums . . . . . . . . . . . . . . . . . . . . . . . . . . . . . . . . . . . . 109Printing Images Using Templates . . . . . . . . . . . . . . . . . . . . . . . 110Printing Custom Layouts . . . . . . . . . . . . . . . . . . . . . . . . . . . . . 112Making Print Adjustments . . . . . . . . . . . . . . . . . . . . . . . . . . . . 113
Printing AlbumsPrint the contents of albums in the form of a Contact Sheet. The Contact Sheet is simply a print-out of the thumbnail images in an album, along with the file name of each image to create a printed catalog of your pictures. Adjust the header, footer, and image label to further customize the contact sheet. For information about making
C H A P T E R 10

Chapter 10: Printing110
adjustments to the text information, see “Changing Labels” on page 113.
To print an entire album:
1 Open the album that contains the images that you want to print.
2 Click the Print button to open the Print Layout window
3 Click the Templates tab to view the Print Layout list.
4 Expand the Basic Layouts template group, and select Contact Sheet.
5 Click on the Print Setup button. The Print Setup dialog for your particular printer opens.
6 Confirm the settings for your printer. The Properties button usually contains advanced settings that relate to the image quality of the print. Click OK to proceed.
7 Click the Print button to open the Print dialog for your particular printer.
8 Choose the Page Range and Number of Copies that you want to print.
9 Click the OK button to print your Contact Sheet.
NoteIf you are configuring the layout for an entire album, Paint Shop Photo Album displays by default all the images in your album sequentially using the selected layout style. To place specific images at specific locations within the layout, click on the Pick Images button.
Printing Images Using TemplatesPaint Shop Photo Album makes it easy to choose certain images from an album, and quickly assemble them into a layout for printing. The whole process is fast and easy!
To print image(s) using a template layout:
1 In the Album View window, select the image(s) that you want to print.

Chapter 10: Printing 111
� To select one image, click the image to select it.
� To select multiple images, press and hold the <Ctrl> key and click the images.
� To select multiple images in a sequence, press and hold the <Shift> key, click the first image in the sequence, and then click the last image in the sequence.
2 Click on the Print button on the toolbar, or choose File > Print, to open the Print Layout window.
3 On the Templates tab, choose a print layout. Click the (+) next to a template group to expand the group.
4 Click Pick Images to view images on the Album tab.
5 Double-click an image to add it to the print template.
6 Click the Print button to open the Print dialog for your particular printer.
7 Choose the Page Range and Number of Copies that you want to print.
8 Click the OK button to print.
Modifying the Images in the Print TemplateOnce you pick images and add them to the print template, you can move, re-arrange, copy, and delete the images.
� Deleting an image from the layout Click on the image and press the <Delete> key.
� Replacing an image in the layout Drag a new image onto the slot occupied by the image you want to replace.
� Copying an image Click on the image you want to copy and drag the cursor to the new slot.
� Moving an image While holding down the <Shift> key, click on the image that you want to move and drag the cursor to the new slot.
� Changing the paper orientation Click Portrait or Landscape button on the toolbar to change the paper orientation.
Template tab - Print Layout

Chapter 10: Printing112
Printing Custom LayoutsUse the Custom Size layout to manually adjust the size of the printed image.
To print images using a custom size:
1 Open the album that contains the images that you want to print.
2 Click the Print button to open the Print Layout window
3 Click the Templates tab to view the Print Layout list.
4 Expand the Basic Layouts template group, and select Custom Size layout.
5 Change the size of the image.
� Click and drag one of the blue squares in the corners of the image to stretch or shrink the dimensions.
� Type in the exact dimensions that you want for the Width and Height in the fields at the top of the Print Layout window. Select the units of measurement (Inches or Centimeters) from the drop-down list.
6 Click the Print button to open the Print dialog for your particular printer.
7 Choose the Page Range and Number of Copies that you want to print.
8 Click the OK button to print.

Chapter 10: Printing 113
Making Print AdjustmentsAdjust the headers, footers, and image labels, make image adjustments, and change layout options using the Adjustments tab.
Changing LabelsThe Text group box is used to define the printing labels for the page header (the space at the top of the page), page footer (the space at the bottom of the page), and image labels.
NoteTo print or edit labels, make sure the check box is marked next to the label that you want printed for the images.
To change the page header label:
1 On the Adjustments tab, click the Page Header button to open the Change Print Text dialog.
2 On the Change Print Text dialog, Click in the field where you want to add special characters, and then click the Add Text button to select the special character.
For example, if you want the date the image was printed, centered in the header, click in the Center field, and then select or type %D.
3 To change the text font, click the Change Font button to open the Font dialog and make changes to the font type, style, size, effects, and color. Click OK to apply the font changes.
4 Mark the Save As Default check box to save these settings as your default.
5 Click OK to apply the changes to the page header.
To change the page footer label:
1 On the Adjustments tab, click the Page Footer button to open the Change Print Text dialog.
2 On the Change Print Text dialog, Click in the field where you want to add special characters, and then click the Add Text button to select the special character.
For example, if you want the date the image was printed, centered in the footer, click in the Center field, and then select or type %D.
Adjustments tab - Print Layout

Chapter 10: Printing114
3 To change the text font, click the Change Font button to open the Font dialog and make changes to the font type, style, size, effects, and color. Click OK to apply the font changes.
4 Mark the Save As Default check box to save these settings as your default.
5 Click the OK button to apply the changes to the page header.
To change image labels:
1 On the Adjustments tab, click the Image Caption button to open the Change Print Text dialog.
2 On the Change Print Text dialog, Click in the field where you want to add special characters, and then click the Add Text button to select the special character.
For example, if you want the date the image was printed, centered in the image caption, click in the Center field, and then select or type %D.
3 To change the text font, click the Change Font button to open the Font dialog and make changes to the font type, style, size, effects, and color. Click OK to apply the font changes.
4 From the Placement drop-down list, choose where the image label should display:
� Display Label On Image
� Display Label Below Image - Small
� Display Label Below Image - Medium
� Display Label Below Image - Large
5 Mark the Save As Default check box to save these settings as your default.
6 Click OK to apply the changes to the page header.

Chapter 10: Printing 115
About Special CharactersSpecial characters appear in default positions in the page header and footer. The following special characters are used in the Change Print Text dialog:
Making Image AdjustmentsOnce you have placed an image (or images) into a template layout, you can adjust the position of the image (in its printed frame), or zoom-in or pan the image.
To make adjustments to the image in the frame:
Click the image in the print layout that you want to change, and then select an option:
Fill Frame button, the image is resized so that it completely fills the print frame. Depending on the layout, some of the image may be cropped at the top or bottom, or at the sides. In this case, use the Pan tool to reposition the image in the frame for a pleasing picture composition.
Fit to Frame button, the image is resized to fit within the frame. This may mean that the picture does not completely fill the frame, but no parts of the picture are cropped and lost.
Rotate Right button, the image is rotated 90º clockwise. Depending on your print layout, this may be a better orientation to fit all of your pictures on the page. Each time you click on the Rotate Right button, the image is rotated 90º clockwise.
Rotate Left button, the image is rotated 90º counter-clockwise. Depending on your print layout, this may be a better orientation to fit all of your pictures on the page. Each time you click on the Rotate Left button, the image is rotated 90º counter-clockwise.
%D Date Printed %I Image Title
%T Time Printed %i Image Description
%n Album Name %d Date Taken
%A Album Title %t Time Taken
%a Album Description %p Page Number
%N File Name

Chapter 10: Printing116
Increasing or decreasing the displayed size of an image:
1 Click the image in the print layout for which you want to zoom in or out.
2 Click on the Zoom In Tool or Zoom Out Tool buttons.
3 Click on the selected image one or more times to increase or decrease the size.
4 When you have finished adjusting the size, double-click another image to edit, or click outside the image boundary to end the editing session.
Shifting the position of an image:
1 On the Adjustments Tab, click Pan Tool button.
2 Move the mouse cursor over the image. The cursor changes into the Pan tool.
3 Click and drag the Pan tool over the selected image to adjust the position.
4 When you have finished adjusting the position, double-click on another image to edit it or single-click outside the image boundary to end the move session.
Changing Layout OptionsUse the page layout options to set margins and alignment, rotate images, and print multiple images with different orientations on one page.
To adjust the page margins:
1 Click on the Margins button to open the Print Margins dialog.
2 Choose either Inches or Centimeters (cm) from the Units drop-down list.
3 Enter the unit in numbers for the Left, Right, Top and Bottom margins.
Note: To use these settings as the default margin settings, mark the Save as default check box.
4 Click on the OK button to close the Print Margins dialog and activate your settings.

Chapter 10: Printing 117
To set page alignment:
1 Click Alignment button to open the Print Alignment dialog.
The alignment settings are used to adjust the centering of the images generated by your printer.
2 If your images print too far to the left, increase the Horizontal Alignment setting.
3 If your images print too high on the page, increase the Vertical Alignment setting.
4 Click OK to close the Print Alignment dialog and activate your settings.
5 Make a test print to determine the affect of the settings. Any settings you make to the Margins and Alignment settings remain active until you deliberately change them.
To adjust the layout options:
In the Layout Options group box, mark the check box for the layout settings.
Rotate Image for Best Fit Chooses the best orientation of the image for its spot in the layout. For example, if the location in the layout is vertical (portrait) but the image is horizontal (landscape), the image will automatically be rotated 90° degrees to best fit the spot in the layout. This setting becomes a default for how the images are placed in the layout; you can still override this setting, and rotate any (or all) of the images that are placed in the layout.
Mix Portrait & Landscape Automatically mixes portrait (vertical) and landscape (horizontal) image orientations on the page — if those orientations will better fill the paper used for printing. For example, with this setting, you might be able to fit three 4x6 images on a single sheet if one of them were rotated. This option only applies to the Standard Size and Combinations layouts. It is automatically disabled for Basic Layouts and Specialty Paper (e.g., Epson and Kodak papers).
Default to Fit to Frame Automatically fits placed images into the frame space in the layout — rather than filling the frame. When an image is placed so that it fills the frame space, some of the image is cropped (not shown). This option reduces the image size so that it fits in the frame.

Chapter 10: Printing118

119
Multiple Image OperationsSave time and automate tasks using the Batch tools. Automatically rotate, flip, correct, rename, resize, save, and convert multiple images simultaneously.
For information about rotating multiple images, see “Rotating Images” on page 73.
Contents Automatically Adjusting Multiple Images . . . . . . . . . . . . . . . . . 119Renaming Multiple Images . . . . . . . . . . . . . . . . . . . . . . . . . . . 120Resizing Multiple Images . . . . . . . . . . . . . . . . . . . . . . . . . . . . 121Saving Multiple Images . . . . . . . . . . . . . . . . . . . . . . . . . . . . . . 122Converting Multiple Images to Black and White . . . . . . . . . . . . 123Converting Multiple Images to Sepia . . . . . . . . . . . . . . . . . . . . 123
Automatically Adjusting Multiple ImagesUse the Batch Quick Fix tool when you have multiple images that need to be corrected. For example, if you find that the images taken with your digital camera are always improved using Quick Fix, then you can use Batch Quick Fix to automatically fix all of the images from the camera at one time.
To adjust multiple images:
1 On the Browse tab, click the album to display thumbnail views of the images in the album in the Album View window.
2 In the Album View window, select the images that you want to correct.
C H A P T E R 11

Chapter 11: Multiple Image Operations120
� To select multiple images, press and hold the <Ctrl> key and click the images.
� To select multiple images in a sequence, press and hold the <Shift> key, click the first image in the sequence, and then click the last image in the sequence.
3 Click the down-arrow on the Batch button and choose Quick Fix to automatically fix the selected images.
Note: If no images are selected, all of the images in the selected album will be fixed.
4 A confirmation window opens stating that this operation cannot be undone. Click Yes to continue, click No to cancel.
Mark the Do not display this warning again check box, if you do not want to be warned when you perform an operation that cannot be undone.
Renaming Multiple ImagesUse the Batch Rename tool when you want to rename batches of images with a meaningful name. For example, you can rename images IMG001 - IMG020 as 1st Birthday001 - 1st Birthday020.
To rename multiple images:
1 On the Browse tab, click the album to display thumbnail views of the images in the album in the Album View window.
2 In the Album View window, select the images that you want to rename.
� To select multiple images, press and hold the <Ctrl> key and click the images.
� To select multiple images in a sequence, press and hold the <Shift> key, click the first image in the sequence, and then click the last image in the sequence.
3 Click the down-arrow on the Batch button and choose Rename to open the Batch Rename dialog.
4 Enter the new name for the images in the New Title field.
5 Enter the beginning number that you want to append to the file name, and then click OK to rename the images.

Chapter 11: Multiple Image Operations 121
Resizing Multiple ImagesUse the Batch Resize tool to resize multiple images to the same size. For example, you can resize all of the images that you will upload to a web photo gallery to a smaller size for faster download.
To resize multiple images:
1 On the Browse tab, click the album to display thumbnail views of the images in the album in the Album View window.
2 In the Album View window, select the images that you want to resize.
� To select multiple images, press and hold the <Ctrl> key and click the images.
� To select multiple images in a sequence, press and hold the <Shift> key, click the first image in the sequence, and then click the last image in the sequence.
3 Click the down-arrow on the Batch button and choose Resize to open the Batch Resize dialog.
4 To change the location where the images are saved:
� Enter the new Album location in the Save to Album field.
� Click the Browse button to open the Select Album dialog, select the new Album from the Look in drop-down list, and then click Select.
5 Enter in a new Max Width and Max Height (in pixels) for the image.
Note: Depending on the shape of your images, one or two dimensions may be sized smaller than the Max values, but the Batch Resize tool will create images that fit within the dimensions that you specified.
6 Click the OK button. Paint Shop Photo Album calculates the new image dimensions and saves the images in the selected album with a new file name.

Chapter 11: Multiple Image Operations122
Saving Multiple ImagesUse the Batch Save As tool to convert multiple images to a new file format.
To save multiple images with a new file format:
1 On the Browse tab, click the album to display thumbnail views of the images in the album in the Album View window.
2 In the Album View window, select the images that you want to save with a new format.
� To select multiple images, press and hold the <Ctrl> key and click the images.
� To select multiple images in a sequence, press and hold the <Shift> key, click the first image in the sequence, and then click the last image in the sequence.
3 Click the down-arrow on the Batch button and choose Save As to open the Batch Save As dialog.
4 Select the file type (.bmp, .fpx, .gif, .jpg) from the Save As Type drop-down list.
5 Select the image quality from the Quality drop-down list (for JPEG, JPEG 2000, and FlashPix formats only).
6 To change the location where the images are saved:
� Enter the new Album location in the Save To field.
� Click the Browse button to open the Select Album dialog, select the new Album from the Look in drop-down list, and then click Select.
7 Click the OK button. Paint Shop Photo Album changes the file type and saves the images in the selected album with a new file name.

Chapter 11: Multiple Image Operations 123
Converting Multiple Images to Black and WhiteUse the Batch Convert to Black and White tool to convert multiple color images to into black and white images.
To convert multiple images to black and white:
1 On the Browse tab, click the album to display thumbnail views of the images in the album in the Album View window.
2 In the Album View window, select the images that you want to convert.
� To select multiple images, press and hold the <Ctrl> key and click the images.
� To select multiple images in a sequence, press and hold the <Shift> key, click the first image in the sequence, and then click the last image in the sequence.
3 Click the down-arrow on the Batch button and choose Convert to Black and White.
4 A confirmation window opens stating that this operation cannot be undone. Click Yes to continue, click No to cancel.
Mark the Do not display this warning again check box, if you do not want to be warned when you perform an operation that cannot be undone.
Converting Multiple Images to SepiaUse the Batch Convert to Sepia tool to convert multiple color images to into sepia images.
To convert multiple images to sepia:
1 On the Browse tab, click the album to display thumbnail views of the images in the album in the Album View window.
2 In the Album View window, select the images that you want to convert.
Tip:If you want to preserve the original color images, create a new album, and drag the images into the new album to create copies of the original images, and then convert the copies to black and white.

Chapter 11: Multiple Image Operations124
� To select multiple images, press and hold the <Ctrl> key and click the images.
� To select multiple images in a sequence, press and hold the <Shift> key, click the first image in the sequence, and then click the last image in the sequence.
3 Click the down-arrow on the Batch button and choose Convert to Sepia.
4 A confirmation window opens stating that this operation cannot be undone. Click Yes to continue, click No to cancel.
Mark the Do not display this warning again check box, if you do not want to be warned when you perform an operation that cannot be undone.
Tip:If you want to preserve the original color images, create a new album, and drag the images into the new album to create copies of the original images, and then convert the copies to sepia.

125
Configuring Program OptionsThe program options determine how Paint Shop Photo Album displays and uses various features. You can use the default settings, or select new ones. In addition, you can configure the toolbars, image view settings, and turn on and configure the Program Launch Bar.
Contents Configuring the Toolbars . . . . . . . . . . . . . . . . . . . . . . . . . . . . . 125Configuring the Program Launch Bar . . . . . . . . . . . . . . . . . . . . 126Setting Image View Options . . . . . . . . . . . . . . . . . . . . . . . . . . 127Configuring Tool Options . . . . . . . . . . . . . . . . . . . . . . . . . . . . 127
Configuring the ToolbarsChoose whether to hide or show the text on toolbar buttons and the Status bar at the bottom of the program window. Hiding the toolbar text and the status bar will increase the viewable area of the program.
To configure the toolbars:
� To hide or show the text on toolbar buttons, Choose View > Show Toolbar Text and mark the Show Toolbar Text option. To hide the toolbar text Choose View > Show Toolbar Text to un- mark the Show Toolbar Text option.
� To hide or show the program Status Bar, Choose View > Show Status Bar mark the Show Status Bar option. To hide the
C H A P T E R 12

Chapter 12: Configuring Program Options126
Status Bar text Choose View > Show Status Bar to un-mark the Show Status Bar option.
Configuring the Program Launch BarAdd program icons for graphics and multimedia applications to the Program Launch bar, and use these icons to launch the program. Once you have added programs to the launch bar, you can easily remove or edit the program location.
To add programs to the launch bar:
1 Choose Tools > Program Launch Bar to open the Edit Program Launch dialog.
2 To activate the Program Launch Bar, mark the Show Program Launch Toolbar check-box.
3 If you want to display large application icons, mark the Use Large Icons check box.
4 Click Add to open the Edit Program Launch dialog.
5 In the Program Command Line group box, click the Browse button to open the Browse dialog.
6 Select the program.exe file, and then click Open to return to the Edit Program Launch dialog.
7 In the Display As field, enter the name of the application.
Mark the file types that you want to open from the Supported File Types group box.
For example, a certain application might be capable of working with both JPEG and GIF files, but you want it to edit GIF files. In this case, you would only click to select the GIF (.gif) option and use it to launch and open GIF images.
8 Click OK to return to the Edit Program Launch dialog.
9 Click Close to return to the main window, with the icons of the Program Launch Toolbar activated.
Note: The appearance of the icons depends on the type of files currently selected. Icons that appear “dimmed” (and can’t be selected) are set to edit certain types of files (e.g., GIF files). In this case, there are no files selected of the type supported by the application.
Another way to use the
Program Launch barDrag a thumbnail of an image onto
a program icon to open the image
in that application.

Chapter 12: Configuring Program Options 127
Setting Image View OptionsConfigure the Image View window to display one, two, or multiple images.
To configure the image view:
� To view one image in the Image View window, choose View > Normal Image View.
� To view two image at once in the Image View window, choose View > Two-Image View.
� To view multiple images at once in the Image View window, choose View > Multiple-Image View.
Configuring Tool OptionsUse the tabs on the Options dialog to configure advanced program options.
Thumbnail OptionsUse the Thumbnail tab to change the display size of thumbnails, select a new background template for program windows, and modify the memory and disk cache options.
To configure thumbnail options:
1 Choose Tools > Options to open the Options dialog, and then click the Thumbnails tab.
2 In the Properties group box, choose thumbnail options:
Size drop-down list, choose the display size of the thumbnails (Small, Medium, or Large). Click the Apply button to preview the thumbnail size.
Background drop-down list, choose a theme for the background of the program window. Click the Apply button to preview the background theme.
3 In the Memory Cache group box, set the maximum number of thumbnails cached into memory.

Chapter 12: Configuring Program Options128
4 In the Disk Cache group box, click the Move Cache Folder button to change the directory where the thumbnail images are cached.
5 From the Store Thumbnails for drop-down list, choose an option:
No Files The program will not cache thumbnails.
Offline Files Only caches offline thumbnails that are stored on removable media (CD’s, floppy disks, etc.).
Offline and Large Files Caches offline and large thumbnail files.
All Files Caches all thumbnail files.
6 Cache Size Increase the size of the cache folder to make thumbnail images load faster.
7 Click OK to close the Options dialog.
General OptionsThe General tab of the Options dialog is used to control start up options for the Product Tour, image audio, and Picture CD AutoRun.
To configure general options:
1 Choose Tools > Options to open the Options dialog, and then click the General tab.
2 Mark the Show Product Tour on startup option to start the Product Tour when you open Paint Shop Photo Album.
3 Mark the Play audio when image is opened option to automatically play an associated audio file when you open an image.
4 Mark the Disable Picture CD AutoRun while Paint Shop Photo Album is running to indicate that a Picture CD should not automatically load when it is inserted into the CD-ROM drive.
Note: To clear an option, click the check box to clear the mark for that option.
5 Click OK to close the Options dialog.
Why is the cache important?The program displays images in windows as thumbnails. The cache file stores important information about the thumbnails so that the thumbnail images display quickly when an album is opened.
Chapter 12: Configuring Program Options 129
View/Print OptionsThe View/Print tab of the Options dialog is used to control advanced view and print options.
To configure view options:
1 Choose Tools > Options to open the Options dialog, and then click the View/Print tab.
2 In the View group box, mark or select the following options:
Open images at 100% Configures the program to automatically open images at 100% in the Image View window.
Use alternative screen drawing Use this option if you are having trouble with screen drawing.
3 In the Print group-box, mark or select the following options:
Print multiple pages as separate jobs Prints each page as a separate print job.
Use alternative printing Use this option if you are having trouble printing to a printer.
4 Click OK to close the Options dialog.
Undo/Redo OptionsThis program supports the ability to undo and redo commands multiple times. Use the Undo/Redo options to control the amount of memory used to store command history, and/or the number of times the undo/redo information is stored for each active image.
To configure the Undo/Redo options:
1 Choose Tools > Options to open the Options dialog, and then click the Undo/Redo tab.
2 Mark the Limit undo/redo disk usage check box, and enter the number of megabytes that should be used to store undo/redo data for each open image in the Mbytes per open image field.
3 Mark the Limit number of undo/redo steps check box and enter the number of undo/redo steps allowed in the Steps per open image field.
4 Mark the Warn when operation cannot be undone check box if you want the program to display a warning message when an operation cannot be undone.

Chapter 12: Configuring Program Options130
5 Click OK to close the Options dialog.
Download OptionsUse the download options to configure how the program downloads images from a camera or other device.
To configure the download options:
1 Choose Tools > Options to open the Options dialog, and then click the Download tab.
2 In the Download actions group box, choose options:
Open image after download Automatically opens the downloaded image in the Image View window.
Prompt for keywords on download When downloading images from a digital camera, the program will automatically prompt you to enter keyword information for each image.
Preserve camera filename if possible When downloading images from a digital camera, use the filename assigned by the camera as the filename for the image in the program.
Note: If you configure your camera to reset the filename, the program will automatically protect existing images from being over-written by appending a number to the end of the filename.
3 In the TWAIN group box, mark the Use file transfers when acquiring via TWAIN check box to support devices/drivers for non-native TWAIN devices.
Note: It is recommended that you mark this option if you are having trouble connecting to a digital camera.
4 To change the default folder where images are automatically stored when acquired from a digital camera or other source, click the Browse button and select a new directory location.
5 Click OK to close the Options dialog.

Chapter 12: Configuring Program Options 131
File Formats OptionsUse the File Formats tab to indicate that all JPEG and JPEG 2000 files should automatically open in Paint Shop Photo Album, and to set the default file compression for JPEG, JPEG 2000, and FlashPix images.
To configure the file format options:
1 Choose Tools > Options to open the Options dialog, and then click the File Formats tab.
2 Mark the Use Paint Shop Photo Album as the default editor for JPEG files to automatically launch Paint Shop Photo Album when you double-click a JPEG (.jpg) file.
3 In the File Compression group box, select options:
JPEG quality level Defines the “quality” of the JPEG compression applied to images. Click the drop-down list and select an option: Low (Highest Compression), Medium, High, Best (Lowest Compression).
JPEG 2000 quality level Defines the “quality” of the JPEG 2000 compression applied to images. Click the drop-down list and select an option: Low (Highest Compression), Medium, High, Best (Lowest Compression), Lossless Compression.
FlashPix quality level Defines the “quality” of the compression applied to FlashPix images. Click the drop-down list and select an option: Low (Highest Compression), Medium, High, Best (Lowest Compression) and No Compression.
4 Click OK to close the Options dialog.
Database Backup OptionsIf you frequently add titles, descriptions, and keywords to albums and images, then you should configure the program to backup the database file automatically when you exit the program.
To automatically backup the database:
1 Choose Tools > Options to open the Options dialog, and then click the Database Backup tab.
2 Mark the Perform automatic backups of album and image information upon exit check box to automatically backup the database file when you close Paint Shop Photo Album.
Supported File FormatsStill image: GIF, TIFF, PNG, PSD, QIF, SGI, TGA, JPG (includes EXIF), BMP, FPX, PSP (read-only)
Movie formats: MOV, AVI, DX, FLC
Which JPEG quality level should I choose?Low setting uses the highest level of JPEG compression and makes web pages load more quickly, but sacrifices image quality.
Best setting uses the lowest level of JPEG compression and make the highest-quality images, but the web pages will take longer to load.
Medium and High are intermediate settings. You can experiment with the different settings to determine the smallest file sizes that still maintain the image quality that you want for your web site.

Chapter 12: Configuring Program Options132
3 Enter the number of times that you want to open and close the program before the automatic backup is performed.
4 Mark the Display a prompt each time before performing the backup check box if you want to be prompted before the program performs the backup.
5 If you want to change the directory where the database backup files are located, click the Browse button, and then select a new directory.
6 Click OK to close the Options dialog.
Photo Sharing OptionsUse the Photo Sharing tab to set up access to a Photo Sharing web site. When you click the Upload button on the toolbar, the Photo Sharing site selected from this tab opens in the Upload window.
To configure the Photo Sharing options:
1 Choose Tools > Options to open the Options dialog, and then click the Photo Sharing tab.
2 In the Select a photo sharing service list box, select the name of the service where you upload photos.
Information about the selected service displays in the About group box.
3 Click OK to close the Options dialog.
NoteAs Paint Shop Photo Album is updated, support for additional photo sharing services may be included. To find out if support for additional photo sharing services is available, be sure your computer is connected to the Internet, and then choose Help > Update Software, or click the Check for update link on the Photo Sharing tab.

Chapter 12: Configuring Program Options 133
Proxy Setting OptionsUse the Proxy Settings tab to configure how the program accesses the Internet from a corporate environment.
To configure the Proxy Setting options:
1 Choose Tools > Options to open the Options dialog, and then click the Proxy Settings tab.
2 Choose an option to identify how the program accesses the Internet:
Don’t use a proxy server Mark this option if your computer is not connected to the Internet.
Use system proxy configuration Mark this option to use the same proxy settings that other programs installed on the computer use to access the Internet.
Use manual proxy configuration Mark this option to use another proxy server to access the internet. Enter the proxy information in the appropriate fields. You may need to get this information from your System Administrator.
3 Click OK to close the Options dialog.
Web Gallery OptionsUse the Web Gallery tab to set the image size, thumbnails size, image quality, audio and movie options.
To configure the web gallery options:
1 Choose Tools > Options to open the Options dialog, and then click the Web Gallery tab.
2 In the Image Settings group box, configure the settings:

Chapter 12: Configuring Program Options134
Maximum Image Size Defines how large the images will be when posted to the FTP server. The default setting is 480 (pixels) wide by 360 (pixels) tall. If you choose a smaller image size, the pictures will be smaller on your web pages, but the web pages will load more quickly.
Maximum Thumbnail Size Determines the size of the thumbnail images when posted to the FTP server. Some of the Web Gallery Templates make use of thumbnails, and this setting is used to control their size. If you choose a smaller thumbnail size, the web pages will load more quickly.
JPEG Quality Level Defines the “quality” of the JPEG compression applied to your images. When you click on this drop-down list, you have four choices: Low (Highest Compression), Medium, High, Best (Lowest Compression).
3 Mark the following audio and movie options:
Include Audio Mark this check box to indicate that all Audio associated with images will be included in your web gallery. Some of the Web Gallery Templates support audio. This setting defines that audio is used, if it is associated with a file, and is appropriate for the Web Gallery Template.
Include Movie Files Mark this check box to specify that movie files will be included in your web gallery.
4 Click OK to close the Options dialog.
Which JPEG quality level should I choose?Low setting uses the highest level of JPEG compression and makes web page load more quickly, but sacrifices image quality.
Best setting uses the lowest level of JPEG compression and make the highest-quality images, but the web page will take longer to load.
Medium and High are intermediate settings. You can experiment with the different settings to determine the smallest file sizes that still maintain the image quality that you want for your web site.

135
1 3 I N D E X x IAadding
a pen annotation 86an audio annotation 79descriptions and titles to an album 37descriptions and titles to an image 37keywords 38
Adjust tools 94Adjust Wizard 92adjusting
print layout 113web layout 58
adjusting imagesbrightness/contrast 94color balance 95in one step 91manually 94multiple images 119red eye 97saturation 96sharpness 97using the Adjust Wizard 92
albumadding a shortcut to 42adding a title and description 37adding keywords 38cataloging 67creating 32deleting 40opening 30
renaming 39sound track 43
Album tab 15Album View window 10annotation
audio 79pen 86
audio annotationaudio properties 81editing 80playing 79recording 80
Audio Annotation tool 79Bbacking up information 68bars
Menu 15Status 16Toolbars 16
batch toolConvert to Black and White 123Convert to Sepia 123Quick Fix 119Rename 120Resize 121Save As 122
black and white, effect 101Border tool 103Brightness/Contrast, adjusting 94Browse tab 15

Index136
Ccamera
connection settings 22downloading images 24
cataloging information 67closing
an album 10, 30an image 11, 30Print Layout window 12
color balance, adjusting 95configuring
pen annotation 86the Program Launch Bar 126
copying images 34creating
an album 32Crop tool 76Customer Service 6Ddatabase
backing up 68restoring 69
deletingan album 40an image 40multiple images 40
descriptionof an album 37of an image 37
desktop wallpaper 61digital camera
connecting 21downloading images 24
using a camera connection 25using a TWAIN connection 26using Windows XP 26
Eediting
audio annotation 80images 71
effectsepia 102
effectsblack and white 101
e-mail 45enhancing
images 91erasing, images in camera 24EXIF camera data 36Ffile formats, supported 131flash and backlighting, adjusting 95Flip tool 74FTP server 59Hhelp
Favorites tab 5Index tab 5saving topics 5Search tab 4Table of Contents tab 4viewing the Product Tour 3
Iimage
adding a edge effects 104adding a pen annotation 86adding a picture frame 104adding a title 37adding an audio annotation 79adding borders 103adding keywords 38adding text 78closing 30cropping 76deleting 40deleting multiple 40flipping 74making a copy 34opening 30panning 72panorama 87renaming 39resizing 75rotating 73saving 41saving as 41saving to another drive 42saving when prompted 41

Index 137
thinning 102zooming 72
image effectedges 106fisheye 107glass blocks 106invert 107ripples 105
Image Effects 105Image View window 11images
cataloging 67downloading from camera 24moving 33rotating 73sorting 33viewing in camera 24
Info tab 15information, searching on 65installing, Paint Shop Photo Album 8JJasc Learning Center 5JPEG quality level 131Kkeywords
adding 38adding sub-keywords 38editing 38
Keywords tab 15Mmaking
a panorama 87VCD’s 46wallpaper 61
Menu bar 15movie
exporting 83viewing 85
moving, images 33multiple images 120Nnew features 1
Oonline help 3opening
an album 10, 30an album from the Browse tab 30an album using the File menu 30an image 11online help 3other programs 126Paint Shop Pro 31Print Layout window 12VCD View window 13Web Gallery window 14
PPaint Shop Photo Album
configuring view options 127closing 9configuring tool options 127configuring toolbars 125main bars 15new features 1Product Tour 3starting 9system requirements 7
Paint Shop Pro, opening 31Pan tool 72panorama 87
taking pictures for 87pen annotation
configuring 86viewing 86
Pen Annotation tool 86Photo Edge tool 104photo sharing service
setting up an account 55uploading images 55
Picture Frame tool 104playing
audio annotation 79audio annotations 79slide shows 53
Print Layout window 12printing

Index138
albums 109changing layout options 116choosing images 110custom layouts 112image adjustiments 115image label 114layout options 116making adjustments 113modifying images 111page alignment 117page footer 113page header 113page margin 116special characters 115using print templates 110
Product Tour 3Program Launch Bar 126program options
Database Backup tab 131Download tab 130File Formats tab 131General tab 128Photo Sharing tab 132Proxy Settings tab 133Thumbnail tab 127Undo/Redo tab 129View/Print tab 129Web Gallery tab 133
program tabsAlbum 15Browse 15Info 15Keywords 15Search 15
PTP connection 26publishing web pages 59QQuick Fix tool 91
Rrecording
audio annotation 80red eye
adding a highlight 98brush 98one click removal 97removing 97
Red Eye tool 97renaming 120
an album 39an image 39
Resize tool 75resizing
multiple images 121restoring fom backup 69Rotate tool 73rotating, images 73Ssaturation, adjusting 96saving
an image 41an image as 41an image to another drive 42an image when prompted 41multiple images 122
Search tab 15searching
for help 4on information 65
sendinga slide show 53e-mail 45
sepia, effect 102sharing images
through a VCD 46using a photo sharing service 54via e-mail 45
sharpness, adjusting 97shortcut
editing 43to an album 42using 43
sorting images 33

Index 139
sound trackfor an album 43
special effectsaudio annotation 79borders 103pen annotation 86photo edges 104picture frame 104text 78Thinify 102
Status bar 16supported file formats 131Ttabs
Adjustments, web 58Album 15Browse 15Info 15Keywords 15Print Adjustments 113Search 15
Text tool 78Thinify tool 102thumbnails, changing the size 10title
of an album 37of an image 37
toolbars 16, 125Uusing a shortcut 43VVideo CD 46viewing
a movie 85a slide show 53images in camera 24pen annotation 86
WWeb Gallery window 14web pages
changing the template 58gallery options 133publishing 59saving 59
WIA camera 26window
Album View 10Image View 11Print Layout 12VCD View 13Web Gallery 14
ZZoom tool 72

Index140


