R esource allocation is the process of assigning resources to tasks in a project. Because the potential for resource overallocation always accompanies resource assignment, this chapter explores the causes of resource overallocation and suggests methods to resolve the conflicts. Understanding How Resource Conflicts Occur As you assign resources to tasks, Project checks the resource’s calendar to make sure that the resource is working. However, Project doesn’t assess whether the resource is already obligated when you assign the resource to a new task; Project enables you to make the assignment. Be aware, though, that the addi- tional assignment may lead to overallocating the resource. Overallocation occurs when you assign more work to a resource than the resource can accom- plish in the time that you’ve allotted for the work to be completed. For example, if you assign Gayle to work full-time on two tasks that start on the same day, you actually assign Gayle to 16 hours of work in an 8-hour day — not possible unless Gayle is a really dedicated employee who has no life outside work. On the other hand, if you have a group of three mechanics and you assign two mechanics to work on two tasks that start on the same day, you still have one spare mechanic and no overallocation. Figure 10.1 shows a series of tasks under the Plan Entertainment and Public Relations tasks that begin on the same day. By assigning the same resource to them, an overallocation is inevitable. And overallocations can cause delays in the project schedule. 321 IN THIS CHAPTER Understanding how resource conflicts occur Spotting resource conflicts Resolving conflicts Resolving Resource Problems
Transcript
R esource allocation is the process of assigning resources to tasks in aproject. Because the potential for resource overallocation alwaysaccompanies resource assignment, this chapter explores the causes of
resource overallocation and suggests methods to resolve the conflicts.
Understanding How ResourceConflicts OccurAs you assign resources to tasks, Project checks the resource’s calendar to makesure that the resource is working. However, Project doesn’t assess whetherthe resource is already obligated when you assign the resource to a new task;Project enables you to make the assignment. Be aware, though, that the addi-tional assignment may lead to overallocating the resource. Overallocationoccurs when you assign more work to a resource than the resource can accom-plish in the time that you’ve allotted for the work to be completed.
For example, if you assign Gayle to work full-time on two tasks that start onthe same day, you actually assign Gayle to 16 hours of work in an 8-hourday — not possible unless Gayle is a really dedicated employee who has nolife outside work. On the other hand, if you have a group of three mechanicsand you assign two mechanics to work on two tasks that start on the sameday, you still have one spare mechanic and no overallocation.
Figure 10.1 shows a series of tasks under the Plan Entertainment and PublicRelations tasks that begin on the same day. By assigning the same resource tothem, an overallocation is inevitable. And overallocations can cause delays inthe project schedule.
321
IN THIS CHAPTERUnderstanding how resourceconflicts occur
Spotting resource conflicts
Resolving conflicts
Resolving Resource Problems
17_009926 ch10.qxp 12/5/06 10:11 PM Page 321
FIGURE 10.1
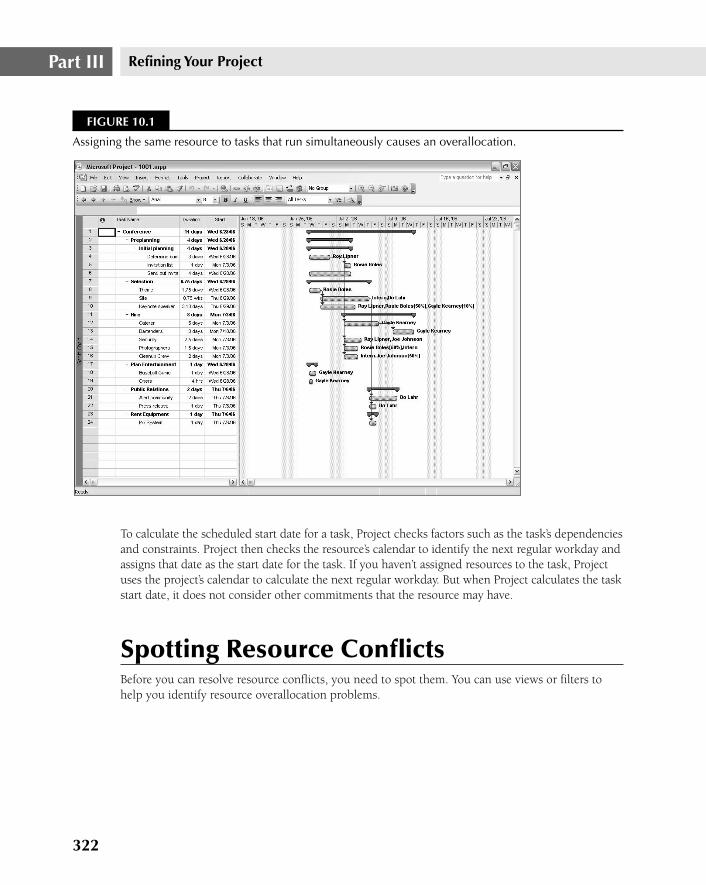
Assigning the same resource to tasks that run simultaneously causes an overallocation.
To calculate the scheduled start date for a task, Project checks factors such as the task’s dependenciesand constraints. Project then checks the resource’s calendar to identify the next regular workday andassigns that date as the start date for the task. If you haven’t assigned resources to the task, Projectuses the project’s calendar to calculate the next regular workday. But when Project calculates the taskstart date, it does not consider other commitments that the resource may have.
Spotting Resource ConflictsBefore you can resolve resource conflicts, you need to spot them. You can use views or filters tohelp you identify resource overallocation problems.
322
Refining Your ProjectPart III
17_009926 ch10.qxp 12/5/06 10:11 PM Page 322
Using views to spot resource conflictsUse a resource view, such as the Resource Sheet view or the Resource Usage view, to find resourceconflicts. In these views, overallocated resources appear in red. In addition, a Caution icon appearsin the Indicator column to signal an overassigned resource. You can see a message about the over-allocation if you point at the icon with your mouse. For information on addressing overallocations,see “Delaying tasks by leveling resource workloads,” later in this chapter.
To display the Resource Usage view that appears in Figure 10.2, select Resource Usage from theView bar or choose View ➪ Resource Usage.
You also can see a graphic representation of a resource’s allocation by switching to the ResourceGraph view. To display the view that appears in Figure 10.3, select Resource Graph from the Viewbar or choose View ➪ Resource Graph.
FIGURE 10.2
The Resource Usage view displays overallocated resources in red, and an icon appears in the Indicatorcolumn.
323
Resolving Resource Problems 10
17_009926 ch10.qxp 12/5/06 10:11 PM Page 323
FIGURE 10.3
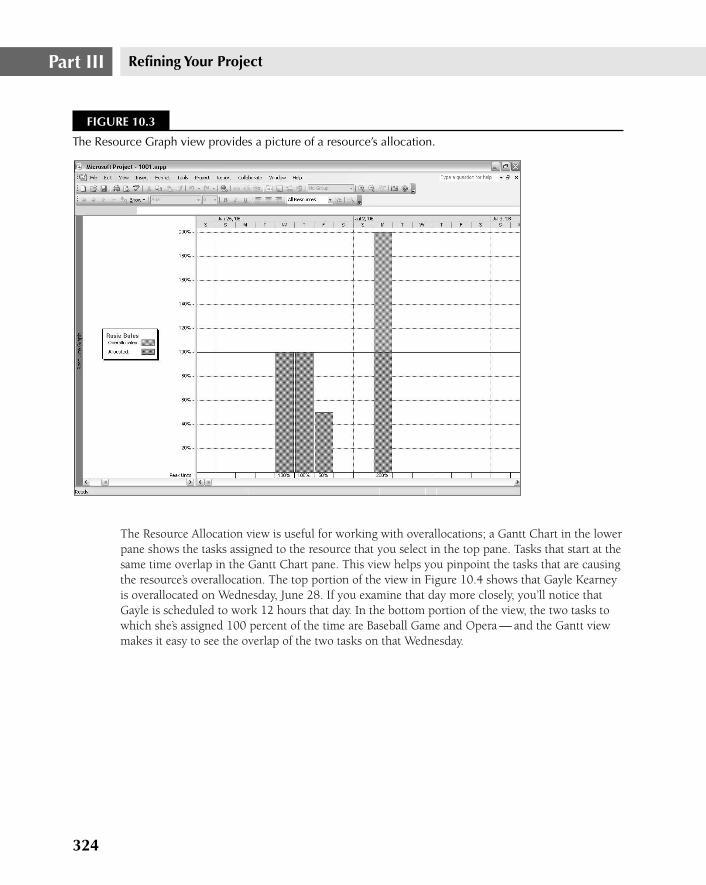
The Resource Graph view provides a picture of a resource’s allocation.
The Resource Allocation view is useful for working with overallocations; a Gantt Chart in the lowerpane shows the tasks assigned to the resource that you select in the top pane. Tasks that start at thesame time overlap in the Gantt Chart pane. This view helps you pinpoint the tasks that are causingthe resource’s overallocation. The top portion of the view in Figure 10.4 shows that Gayle Kearneyis overallocated on Wednesday, June 28. If you examine that day more closely, you’ll notice thatGayle is scheduled to work 12 hours that day. In the bottom portion of the view, the two tasks towhich she’s assigned 100 percent of the time are Baseball Game and Opera — and the Gantt viewmakes it easy to see the overlap of the two tasks on that Wednesday.
324
Refining Your ProjectPart III
17_009926 ch10.qxp 12/5/06 10:11 PM Page 324
FIGURE 10.4
The Resource Allocation view uses the Gantt Chart format to show the tasks assigned to the resourceselected in the top pane.
To switch to the Resource Allocation view, choose View ➪ More Views and then select ResourceAllocation.
Using filters to spot resource conflictsFiltering is another simple technique that you can use to resolve resource conflict problems. If you fil-ter the Resource Usage view to display only overallocated resources (see Figure 10.5), the problemsbecome even more apparent. To filter the view, switch to it first by choosing View ➪ Resource Usage.Then open the Filter list box on the Formatting toolbar and choose Overallocated Resources, orchoose Project ➪ Filtered ➪ Overallocated Resources.
325
Resolving Resource Problems 10
17_009926 ch10.qxp 12/5/06 10:11 PM Page 325
FIGURE 10.5
You can filter the Resource Usage view to show overallocated resources only.
Next, add the Overallocation field to the view to identify the extent of the resource’s overallocation.Choose Format ➪ Details ➪ Overallocation. As Figure 10.6 shows, Project adds a row to thetimescale portion of the view to show you the number of hours that you need to eliminate to cor-rect the overallocation.
326
Refining Your ProjectPart III
17_009926 ch10.qxp 12/5/06 10:11 PM Page 326
FIGURE 10.6
Add the Overallocation field to the Resource Usage view.
Resolving ConflictsAfter you find the overallocations, you need to resolve the conflicts. Project managers use severalmethods to resolve conflicts.
Changing resource allocationsIf you play around with resource allocations, you may be able to resolve a resource conflict. Adding aresource is one obvious way to resolve an overallocation. For example, suppose that Task 3 is aneffort-driven task that has a resource conflict with Task 4. The two tasks don’t run concurrently, butTask 3 is continuing when Task 4 is supposed to start. Suppose also that you need the same resource,Rosie Boles, to work on both tasks. Adding a resource (Do Lahr) to Task 3 reduces the amount oftime that it takes to finish Task 3, which can eliminate Rosie’s conflict between Tasks 3 and 4.
327
Resolving Resource Problems 10
17_009926 ch10.qxp 12/5/06 10:11 PM Page 327
You can add a resource by using the techniques that are described in Chapter 5, or youcan add a resource to a task by using the Resource Usage view (described in the section
“Adding a task assignment to a resource,” later in this chapter).
Switching resourcesYou also can resolve resource conflicts by switching resources. You can use this technique whenone resource is overallocated but you have another resource available that’s capable of doing thejob. You switch resources by replacing resources on the task in question.
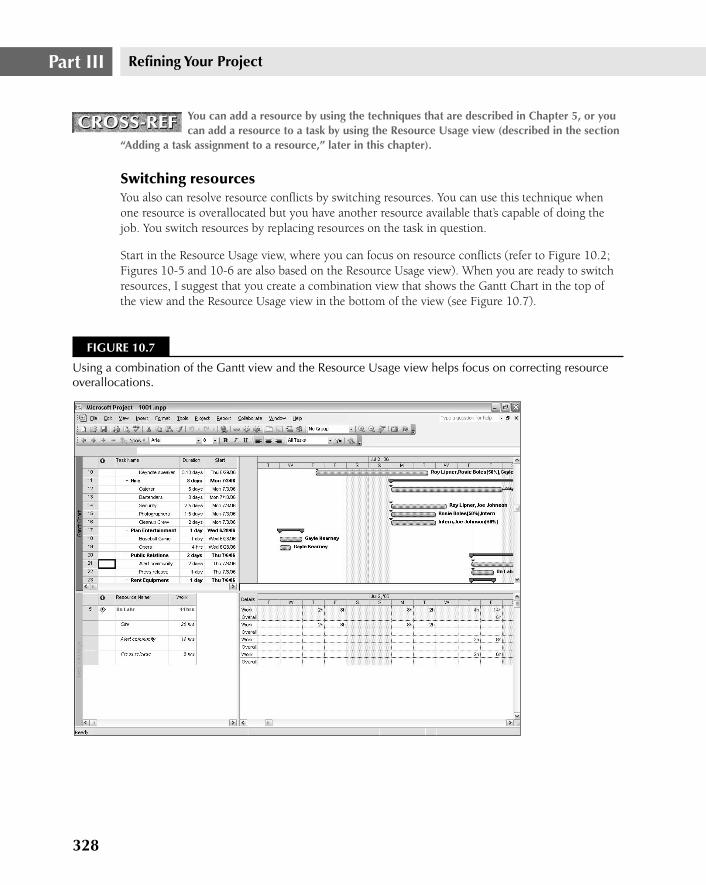
Start in the Resource Usage view, where you can focus on resource conflicts (refer to Figure 10.2;Figures 10-5 and 10-6 are also based on the Resource Usage view). When you are ready to switchresources, I suggest that you create a combination view that shows the Gantt Chart in the top ofthe view and the Resource Usage view in the bottom of the view (see Figure 10.7).
FIGURE 10.7
Using a combination of the Gantt view and the Resource Usage view helps focus on correcting resourceoverallocations.
CROSS-REFCROSS-REF
328
Refining Your ProjectPart III
17_009926 ch10.qxp 12/5/06 10:11 PM Page 328
See Chapter 6 to learn how to create a combination view.
Then, follow these steps:
1. In the upper pane, find and click the task on which you want to switch resources. In thebottom of the window, Project displays all the tasks assignments for each resourceassigned to the selected task.
2. Click the Assign Resources button to open the Assign Resources window.
3. Highlight the resource you want to switch.
4. Click the Replace button. The Replace Resource dialog box appears (see Figure 10.8).
5. Select the resource you want to use on the task.
6. Fill in the Units column.
FIGURE 10.8
Use the Replace Resource dialog box to substitute one resource for another.
CROSS-REFCROSS-REF
329
Resolving Resource Problems 10
17_009926 ch10.qxp 12/5/06 10:11 PM Page 329
7. Click OK in the Replace Resource dialog box.
Depending on your option settings, you may see a message from the Planning Wizard.Read the message and click OK to continue.
8. Click Close in the Assign Resources window.
Project will change the assignment without affecting historical actuals, and no resources areaffected other than the ones involved in the switch.
If you’re using Project Server, you can take advantage of the Resource SubstitutionWizard to substitute generic resources automatically. See Chapter 19 for more details.
Adding a task assignment to a resourceYou add a task assignment to a resource using essentially the same process as I describe in the pre-ceding section, “Switching resources” — except that you don’t replace a resource. Set up the combi-nation view where the Gantt Chart appears in the top pane and the Resource Usage view appearsin the bottom pane. In the upper pane, find and click the task to which you want to add a resource.In the bottom of the window, Project displays all the tasks assignments for each resource assignedto the selected task. Click the Assign Resources button to open the Assign Resources window.Highlight the resource you want to add, fill in the Units column, and click Close. Project will addthe resource to the task.
Adding or deleting a resource assignmentYou can add or delete a resource assignment using a number of techniques. For example, you canuse the Assign Resources window, or you can work in the Gantt Chart view and then split the view(choose Window ➪ Split) to display the Task Entry view — a combination of the Gantt Chart viewin the top pane and the Task Form view in the bottom pane (see Figure 10.9).
Select a task in the Gantt Chart view and then do the following:
n To add a resource assignment, select the resource from the list box that appears when youclick the Resource Name column of the Task Entry view.
n To delete a resource assignment, select the resource’s ID number in the Task Entry viewand press Delete.
n To switch resources, use the Replace Resource dialog box (see “Switching resources,”earlier in this chapter, for more details).
Working in the Gantt Chart view is effective, but the Resource Usage view helps you tofocus on resource conflicts.
You shouldn’t delete a resource assignment that contains actual work. If you do, you willsee misleading information about the task. Suppose, for example, that you assign one
resource to a task, the resource completes the task, and then you delete the resource assignment.Project shows the task as completed, but you won’t complete any work or actual work at the task level.
CAUTION CAUTION
TIPTIP
CROSS-REFCROSS-REF
NOTENOTE
330
Refining Your ProjectPart III
17_009926 ch10.qxp 12/5/06 10:11 PM Page 330
FIGURE 10.9
You can work in the Task Entry view to add or delete resource assignments.
Scheduling overtimeYou also can resolve a resource conflict by scheduling overtime for the resource. Overtime in Projectis the amount of work that is scheduled beyond an assigned resource’s regular working hours, andovertime hours are charged at the resource’s overtime rate. Overtime work does not represent addi-tional work on a task; instead, it represents the amount of time that’s spent on a task during nonreg-ular hours. By scheduling overtime, the resource may finish the task faster and therefore eliminatethe conflict. As you read in the last chapter, you assign overtime from the Gantt Chart view. Use thefollowing steps to schedule overtime:
1. Display the Task Entry view (choose View ➪ More Views ➪ Task Entry and selectApply).
2. Click the Task Form to make it the active pane.
3. Choose Format ➪ Details ➪ Resource Work. Project displays the Ovt. Work column inthe Task Form pane (see Figure 10.10). In this column, 0h means that you have not yetassigned overtime.
331
Resolving Resource Problems 10
17_009926 ch10.qxp 12/5/06 10:11 PM Page 331
FIGURE 10.10
Use the Task Form, and display the Overtime column to add overtime.
4. Select the task in the top pane to which you want to assign overtime.
5. Go to the bottom pane, and fill in the overtime amount for the appropriate resource.
When you finish entering overtime, you can hide the Task Form by choosing Window ➪Remove Split.
Redefining a resource’s calendarIf your resource is a salaried resource, you may have the option of redefining a resource’s calendarso that hours typically considered nonworking (and therefore charged at an overtime rate if worked)become working hours. If a resource has a conflict and the number of hours in conflict on a givenday is low enough, you can eliminate the conflict by increasing the working hours for the resourcefor that day.
You can make this kind of change to any resource — Project won’t stop you. But youneed to consider the effects on the cost of your project. If you are paying a resource at
an overtime rate for working during nonworking hours, you don’t want to change nonworking hoursto working hours in Project. If you do, you will understate the cost of your project.
NOTENOTE
TIPTIP
332
Refining Your ProjectPart III
17_009926 ch10.qxp 12/5/06 10:11 PM Page 332
To change a resource’s working calendar, go to the Resource Usage view. Identify the resource thathas a conflict and note the number of hours that the conflict involves. Double-click the resourcethat has a conflict to open the Resource Information dialog box for that resource. Click ChangeWorking Time to view that resource’s calendar (see Figure 10.11).
To change the standard working hours for a resource, follow these steps:
1. Click the Exceptions tab.
2. Click the first date on which the resource is overallocated.
3. In the Name column, type a name for the exception you’re about to create and click out-side the Name column. Project displays the date you clicked in Step 2 in both the Startand Finish columns.
4. Click the Details button.
5. Click the Working times option button and use the From and To boxes to set up nonstan-dard working hours for the resource.
FIGURE 10.11
Open the Change Working Time dialog box from the Resource Information dialog box tochange the standard working hours for a resource.
333
Resolving Resource Problems 10
17_009926 ch10.qxp 12/5/06 10:11 PM Page 333
6. If you want to change the resource’s standard working hours for more than one day, selectan option in the Recurrence pattern section and then set a date range in the Range ofrecurrence section. In Figure 10.12, I set the workday to last 10.5 hours for three days:July 5, July 6, and July 7.
FIGURE 10.12
Set nonstandard working hours during a specified time period for a particular resource.
7. Click OK to redisplay the Change Working Time dialog box; the working hours for thespecified dates will appear if you click those dates on the calendar.
8. Click OK to save the exception to standard working hours for the resource.
9. Click OK to close the Resource Information dialog box.
Assigning part-time workSuppose that a resource is assigned to several concurrent tasks and is also overallocated. Supposealso that you don’t want to add other resources, switch to a different resource, or add overtime.You can assign the resource to work part-time on each of the tasks to solve the conflict, althoughthe tasks may take longer to complete by using this method. Or, you may want to use this methodin conjunction with additional resources to make sure that you can complete the task on time.
To assign a resource to work part-time, you can change the number of units of the resource thatyou apply to the task. By default, Project sets task types to Fixed Units. Therefore, if you changethe amount of time that a resource works on a task, Project changes the duration of the taskaccordingly.
334
Refining Your ProjectPart III
17_009926 ch10.qxp 12/5/06 10:11 PM Page 334
To retain the duration and assign a resource to work part-time on a task, change the tasktype to Fixed Duration. By making this change, however, you are indicating that the task
can be completed by the resource in the allotted amount of time — effectively, you are shortening theamount of time that it takes to complete the task because you’re applying less effort during the sametime frame.
To change a task’s type to Fixed Duration and then assign a resource to work on the task part-timewithout changing the task’s duration, follow these steps:
1. Display the Resource Allocation view by using the More Views window (choose View ➪
More Views).
2. In the upper pane, click the task that you want to change. In the lower pane, Project dis-plays that task in Gantt format.
3. In the lower pane, double-click the task that you want to change. Project displays theTask Information dialog box. Click the Advanced tab (see Figure 10.13).
FIGURE 10.13
Use the Advanced tab of the Task Information dialog box to change the task type.
4. Open the Task type list box and select Fixed Duration.
5. Click OK.
6. Click the task in the top pane.
7. Click the Assignment Information button on the Standard toolbar, or double-click thetask to open the Assignment Information dialog box. Figure 10.14 shows the General tab.
NOTENOTE
335
Resolving Resource Problems 10
17_009926 ch10.qxp 12/5/06 10:11 PM Page 335
FIGURE 10.14
Use the Assignment Information dialog box to change a resource’s workload to part-time.
8. Change the default value in the Units box (100%) to reflect the percentage of time that youwant the resource to spend on the task — in this case, the value should be less than 100%.
9. Click OK.
Controlling when resources start working on a taskFor cases in which you’ve assigned more than one resource to a task, consider staggering the timesthat the resources begin working on the task to resolve resource conflicts. When you delay aresource’s start on a task, Project recalculates the start date and time for that resource’s work on thetask. To stagger start times for resources, work in the Task Usage view and follow these steps:
This technique can extend the duration of the task, which may not be a viable optionfor you.
1. Choose View ➪ Task Usage.
2. Select the resource whose work time you want to delay in the Task Name column.
3. Click the Assignment Information button or double-click the resource. Project displaysthe General tab of the Assignment Information dialog box (as shown previously inFigure 10.11).
4. Change the dates in the Start or Finish boxes.
5. Click OK.
You also can alter the assignment start and finish dates directly in the Task Usage table.TIPTIP
NOTENOTE
336
Refining Your ProjectPart III
17_009926 ch10.qxp 12/5/06 10:11 PM Page 336
Delaying tasks by leveling resource workloadsIf you have scheduled several tasks to run concurrently and you now find resource conflicts inyour project, you can delay some of these tasks to level — or, spread out — the demands that you’remaking on your resources. Leveling is the process of resolving resource conflicts by delaying orsplitting tasks to accommodate the schedules of assigned resources. You can ask Project to selectthe tasks to delay or split by using its leveling feature, or you can control the process manually byexamining the project to identify tasks that you are willing to delay or split.
Letting Project level resource loadsWhen Project does the leveling for you, it redistributes a resource’s assignments and reschedulesthem according to the resource’s working capacity, assignment units, and calendar. Project alsoconsiders the task’s duration, constraints, and priority.
What is a task’s priority? Well, leveling typically results in Project’s delaying some tasks, and youcan use the task’s priority to control the order in which Project levels tasks to try to avoid delayingcertain tasks. By default, Project assigns all tasks a priority of 500. When you assign different prior-ities to tasks, Project considers the priorities of each task when you level and attempts to avoiddelaying tasks in order of their priority, from highest to lowest — the higher the number, the higherthe priority. Effectively, Project delays tasks with lower priorities before delaying tasks with higherpriorities; if everything else is equal, Project will delay a task with a priority of 5 before it will delaya task with a priority of 15. So, before you start to use the automatic-leveling feature, consider howyou want to prioritize tasks.
The priority of 1000 is treated in a special way; Project will not consider delaying anytask to which you assign a priority of 1000.
To set a priority, follow these steps:
1. Choose View ➪ Gantt Chart.
2. Double-click the task for which you want to set a priority, or select the task and click theTask Information button on the Standard toolbar. Project displays the Task Informationdialog box.
3. Use the General tab to set a priority (see Figure 10.15).
You might prefer to set priorities from the table portion of the Gantt Chart view or theTask Usage, where you can easily see the priorities of neighboring tasks.
After you prioritize tasks — but before you level — you can sort tasks by priority to viewthe tasks that Project is most likely to level.TIPTIP
TIPTIP
TIPTIP
337
Resolving Resource Problems 10
17_009926 ch10.qxp 12/5/06 10:11 PM Page 337
FIGURE 10.15
Set a priority for the task.
To level tasks automatically, follow these steps:
1. Choose Tools ➪ Level Resources to open the Resource Leveling dialog box (seeFigure 10.16).
FIGURE 10.16
From the Resource Leveling dialog box, you can set resource leveling options.
338
Refining Your ProjectPart III
17_009926 ch10.qxp 12/5/06 10:11 PM Page 338
2. Select the Automatic option button to have Project automatically level resources, if neces-sary, whenever you make a change to your schedule. Select Manual to perform levelingonly when you click the Level Now button in this dialog box.
3. Use the Look for Overallocations on a . . . Basis list box to select a basis. The basis is atime frame, such as Day by Day or Week by Week. (The Indicator box in the ResourceUsage view may contain a note that suggests the appropriate basis.)
4. Select the Clear Leveling Values before Leveling check box to make Project 2007 reset allleveling delay values to 0 before leveling. If you don’t check this box, Project 2007 doesnot reset leveling values but builds upon the values. During leveling, the scheduling forpreviously leveled tasks will probably not change.
5. In the Leveling Range For panel, select either to level the entire project or to level only forspecified dates.
6. In the Leveling Order list box, select the order that you want Project to consider whenleveling your project. If you choose ID Only, Project delays or splits the task with thehighest ID number. If you choose Standard, Project looks at predecessor dependencies,slack, dates, and priorities when selecting the best task to split or delay. If you choosePriority, Standard, Project looks first at task priority and then at all the items that arelisted for the Standard leveling order.
7. Select any of the following options:
n Level Only Within Available Slack: This avoids changing the end date of your project.
n Leveling Can Adjust Individual Assignments on a Task: In this case, leveling adjustsone resource’s work schedule on a task independent of other resources that are work-ing on the same task.
n Leveling Can Create Splits in Remaining Work: This allows leveling to split tasks toresolve resource conflicts.
n Level Resources with the Proposed Booking Type: Check this box to have Projectinclude tasks containing proposed resources during the leveling process.
8. Click Level Now to apply leveling.
You can review the effects of leveling from the Leveling Gantt Chart view, as shown in Figure 10.17.Choose Views ➪ More Views ➪ Leveling Gantt and then click Apply. Project adds green bars toyour Gantt Chart, which represent the duration of tasks before leveling. Depending on the natureof your project, Project may build more slack into your tasks.
339
Resolving Resource Problems 10
17_009926 ch10.qxp 12/5/06 10:11 PM Page 339
FIGURE 10.17
The Leveling Gantt Chart view shows how leveling affects your project.
To remove the effects of leveling, reopen the Resource Leveling dialog box (choose Tools ➪ LevelResources) and click the Clear Leveling button. A subsequent dialog box enables you to clear level-ing for the entire project or for selected tasks only.
If you are scheduling from a finish date, you still can level to resolve resource conflicts.Project calculates the delay by subtracting it from a task’s or assignment’s finish date,
causing the finish date to occur earlier.
Making adjustments to levelingYou can adjust leveling when automatic leveling doesn’t provide acceptable results or when youhave just a few resource conflicts to resolve. To make leveling adjustments to resources in Project,use the Resource Allocation view and follow these steps:
1. Choose View ➪ More Views. From the More Views dialog box, highlight ResourceAllocation and click Apply.
NOTENOTE
340
Refining Your ProjectPart III
17_009926 ch10.qxp 12/5/06 10:11 PM Page 340
2. Highlight the task that you want to delay in the top pane.
3. In the bottom pane, enter an amount in the Leveling Delay field. Project delays the taskaccordingly and reduces the resource’s conflict.
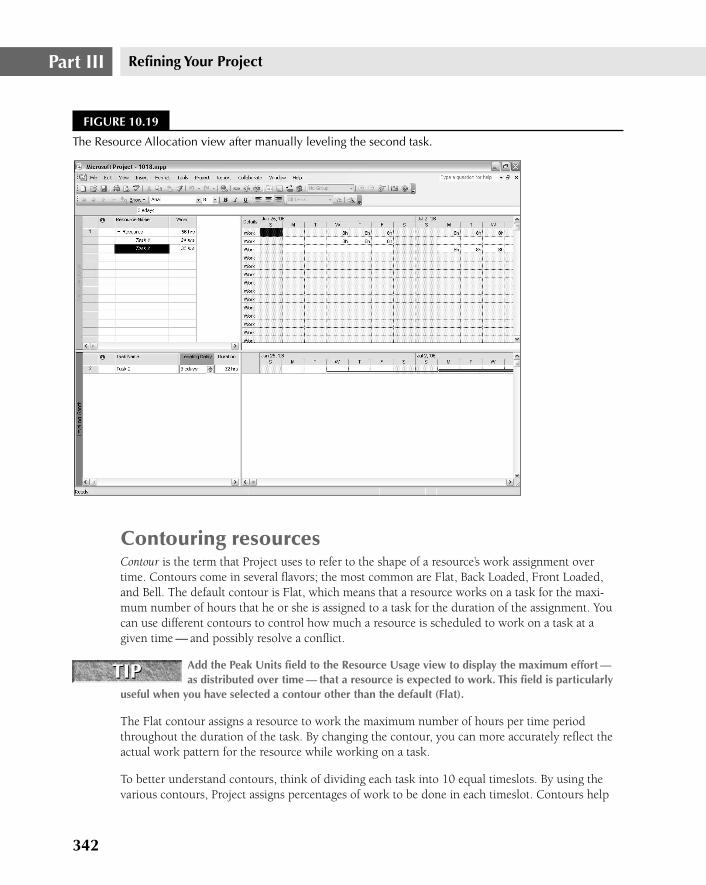
Figures 10-18 and 10-19 show “before” and “after” pictures for manual leveling. I used a simplesituation to demonstrate the effects of manual leveling: I set up a project with only two tasks andone resource, and I assigned the same resource full-time to both tasks. Notice that manually level-ing the second task delays the second task so that it starts when the first task finishes.
FIGURE 10.18
The Resource Allocation view before manual leveling.
341
Resolving Resource Problems 10
17_009926 ch10.qxp 12/5/06 10:11 PM Page 341
FIGURE 10.19
The Resource Allocation view after manually leveling the second task.
Contouring resourcesContour is the term that Project uses to refer to the shape of a resource’s work assignment overtime. Contours come in several flavors; the most common are Flat, Back Loaded, Front Loaded,and Bell. The default contour is Flat, which means that a resource works on a task for the maxi-mum number of hours that he or she is assigned to a task for the duration of the assignment. Youcan use different contours to control how much a resource is scheduled to work on a task at agiven time — and possibly resolve a conflict.
Add the Peak Units field to the Resource Usage view to display the maximum effort —as distributed over time — that a resource is expected to work. This field is particularly
useful when you have selected a contour other than the default (Flat).
The Flat contour assigns a resource to work the maximum number of hours per time periodthroughout the duration of the task. By changing the contour, you can more accurately reflect theactual work pattern for the resource while working on a task.
To better understand contours, think of dividing each task into 10 equal timeslots. By using thevarious contours, Project assigns percentages of work to be done in each timeslot. Contours help
TIPTIP
342
Refining Your ProjectPart III
17_009926 ch10.qxp 12/5/06 10:11 PM Page 342
you to assign work to a task, based on when the task requires the effort. For example, if a taskrequires less effort initially, consider using a Back Loaded contour. If a task requires most effort inthe middle of the task, consider using a Bell, Turtle, or even an Early Peak contour.
If you start changing contours from the default Flat contour, you may inadvertentlycreate a resource conflict. Therefore, viewing the contours that you set can help you
resolve resource conflicts.
Setting a contour patternTo set a contour pattern, follow these steps:
1. Choose View ➪ Task Usage. In the sheet portion of the view, Project displays each task inyour project with the resources that are assigned to it listed below the task, showing thenumber of hours per day that a resource is assigned to a task.
2. In the Task Name column, double-click the resource whose contour you want to change, orselect the resource and click the Assignment Information button on the Standard toolbar.Then click the General tab of the Assignment Information dialog box (see Figure 10.20).
FIGURE 10.20
Use the General tab of the Assignment Information dialog box to select a contour.
3. Open the Work contour list box and select a contour.
4. Click OK.
To change the start and end dates for the resource’s work on the task, use the Start andFinish list boxes.
When you select a contour other than Flat, an indicator showing the type of contour appears nextto the resource in the Indicator column. If you pass the mouse pointer over the indicator, Projectidentifies the contour that was applied to the resource (see Figure 10.21).
TIPTIP
CAUTION CAUTION
343
Resolving Resource Problems 10
17_009926 ch10.qxp 12/5/06 10:11 PM Page 343
FIGURE 10.21
Project displays an icon in the Indicator column next to a resource for which you have chosen a contourother than Flat.
The same icon appears in the Indicator column in the Resource Usage view.
Keep the following points in mind when working with contours:
n Suppose that you apply a contour other than the default Flat contour to a task, and lateryou add new total work values to the task. Project automatically reapplies the contourpattern to the task and the resources first by distributing the new task work values acrossthe affected time span and then by assigning new work values to the resources that areworking on the task.
n If you set a contour and then change the start date of the task or the start date of aresource’s work on the task, Project automatically shifts the contour and reapplies it toinclude the new date, thus preserving the pattern of the original contour.
n If you increase the duration of a task, Project stretches the contour to include the newduration.
TIPTIP
344
Refining Your ProjectPart III
17_009926 ch10.qxp 12/5/06 10:11 PM Page 344
n Suppose that you apply a contour other than the default contour to a task. If you manu-ally edit a work value on the portion of a view that displays the contour, Project no longerapplies the contour pattern automatically. However, you can reapply the contour to redis-tribute the new values.
n If you enter actual work and then change the task’s total work or total remaining work,Project automatically redistributes the changes to the remaining work values and not tothe actual work.
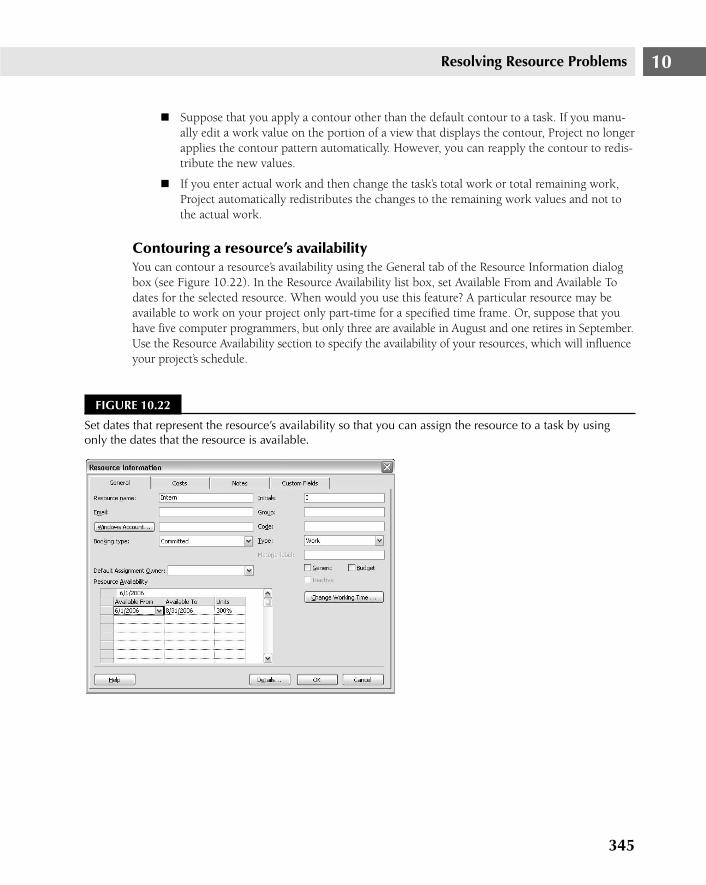
Contouring a resource’s availabilityYou can contour a resource’s availability using the General tab of the Resource Information dialogbox (see Figure 10.22). In the Resource Availability list box, set Available From and Available Todates for the selected resource. When would you use this feature? A particular resource may beavailable to work on your project only part-time for a specified time frame. Or, suppose that youhave five computer programmers, but only three are available in August and one retires in September.Use the Resource Availability section to specify the availability of your resources, which will influenceyour project’s schedule.
FIGURE 10.22
Set dates that represent the resource’s availability so that you can assign the resource to a task by usingonly the dates that the resource is available.
345
Resolving Resource Problems 10
17_009926 ch10.qxp 12/5/06 10:11 PM Page 345
Pooling resourcesFinally, you can try to solve resource conflicts by using a resource pool. A resource pool is a set ofresources that are available to any project. You can use resources exclusively on one project, or youcan share the resources among several projects.
Typically, resource pooling is useful only if you work with the same resources on multiple projectsand you don’t use Project Server. Different project managers can share the same resources. Becauseresource pooling is so closely tied to the topic of managing multiple projects, I postpone furtherdiscussion until Chapter 15; in that context, you’ll better understand the application of resourcepooling to resolving resource conflicts.
If you’re using Project Server, you don’t need to use resource pooling. Instead, you’ll be more inter-ested in using Enterprise resources and the Resource Substitution Wizard to resolve resource con-flicts. See Chapters 18 and 19 for more information.
SummaryThis chapter explained how to identify and resolve resource conflicts that can delay a project. Thetechniques involved include the following:
n Changing resource allocations
n Scheduling overtime
n Redefining a resource calendar
n Assigning part-time work
n Controlling resource start times
n Leveling resource workloads
n Contouring resources
In the next chapter, you discover the art of tracking your progress by comparing your project to itsbaseline.