Page 1
PEQI Droid Application : Project Setup , Data Upload and Management Tutorial
Go to www.peqiwalkability.appspot.com
To begin using the PEQI, you will need to “Sign In”. Click on “Sign In” at the top right of the page. Once
you click on “Sign In” you will need to “Sign In Using Google”.
If you do not already have a free Gmail account, you will need to create one for use with this website.
You can create your free Gmail account by going to www.gmail.com and clicking on “Create an
Account.”
If you already have a Gmail account, use it to sign into the PEQI site.
Once you Sign In using your Google account, a new page will open where you will need to “Allow”
Google to affiliate your email with your PEQI account.
Page 2
To “Activate Your Account” enter all the information required and read the Terms of Agreement
carefully.
Page 3
Once your Account is created you will have your own custom Home Page, where you can access all the
site’s services. You should see the email you used to log into your account at the top left of the page.
To get started, click on the “Projects” tap on the top toolbar of the page.
This will take you to the “Create Project” page. You can create up to five projects per account. We
recommend that you keep each project to a manageable scale for your organization. You can always
Page 4
add new projects as your geographic area of interest expands. You will have to enter the name of your
project on every form you fill out in the field, so it’s best to keep the Project Name short to save time.
Once you have created your project(s) you can view, edit and download the data at any time by clicking
on the “Projects” tab.
Page 5
DOWNLOADING THE PHONE APP
Next, you will need to “Download the phone app” to your Android smartphone. This is how you will
collect and upload your data to the website. Follow the directions carefully.
Using your Android phone:
1. Make sure your phone’s Wi-Fi is turned on and can access the internet
2. Open your browser and go to: www.peqiwalkability.appspot.com
3. You will need to “Sign In” just like you did on the website. Use the same email and password you
used to set up your Account.
4. Once you are Signed In to the website from your phone, you will again be at your custom Home page.
5. From your phone, click on the “Projects” tab.
6. Then click on the “Download phone app” link.
7. This is a MULTI-STEP process, so make sure to complete ALL THE STEPS.
a. From your phone, “Click to download file ODKCollect.apk” After clicking to download, the
application will go into your Download History folder on your phone. It should appear on your screen
once download is complete. If it does not immediately appear you will need to find it in your phone’s
folder.
b. When you see the “ODKCollect.apk” on your phone, click on it to open it. If your phone’s
settings are at high security, you will need to change them to allow applications to be downloaded from
other sources.
c. After you click on “ODKCollect.apk” it will ask if you “want to install this application?”
Click “Install”
d. When the application is done installing, click “Open”.
e. Click on the “Manage Forms and Data” option. This is where you will download the PEQI
forms onto your phone.
f. Under the “Forms” tab in the “Manage Forms and Data” option click on “Get New Forms”
g. Select both the “PEQI_Segment Form” AND the “PEQI_Intersect Form” and press “Get
Selected” The forms will automatically save themselves within the PEQI application.
h. Now that you have successfully downloaded the PEQI application (ODKCollect.apk) and the
forms (PEQI_Segment and PEQI_Intersect), it will all be stored in your phone’s “Applications”. You can
use the PEQI application anytime by going into your phone’s Applications and clicking on the PEQI icon.
Page 6
You can also add the PEQI icon to your phone’s home screen if you like (this procedure varies by phone
model).
8. Instructions for data collection can be found in the PDF document “PEQI Android Application
Protocol” which can be accessed by clicking on the “Demo” tab of the PEQI website.
Page 7
ADDING/VIEWING YOUR DATA & MAPS ON THE WEBSITE
Once you have created your PEQI account, created a project name and downloaded the phone app, you
are ready to go out into the field to collect data.
Review the PEQI Training Slides and Protocol, which can be downloaded from
www.coeh.ucla.edu/node/127 These will help your group understand how to answer the questions on
the forms.
To start collecting data, Open the P.E.Q.I. app on your phone. Click “Start New Form”.
After clicking “Start New Form” you will choose “Intersection Form” or “Segment Form” depending on
your location.
Make sure to enter your project name on the phone form EXACTLY as it was written when you created
the name of your project. This is how the phone directs your data to the website.
Continue to answer the questions on the phone. You will arrive at a prompt to “Record Location”. Click
the button to “Record Location” and wait until the proximity is within 4-12 meters. The phones rarely
get much closer than 4 meters of location precision.
Page 8
WAIT to “Record Location” until the location is within 4-12 meters of accuracy.
The questions are pretty straight forward, but refer to your “Full Protocol” or the field “Cheatsheets”
that can be downloaded from www.coeh.ucla.edu/node/127
If at any time you want to access a previous question quickly, or take a picture, go to the “Menu” option
on your phone. This will take you to the PEQI menu shown below.
Page 9
From the PEQI menu, you can do a number of things.
“Save Data” will allow you to save your data on the phone and exit the application. When you reopen
the app later, your data will still be saved in the phone.
“Take Picture” will let you take pictures to be associated with the intersection or segment you are
evaluating.
“Go to Prompt” will show you a list of all the questions. You can click on a question to jump to it, to
review or change your answer.
“Change Language” is important if you are using the app in Spanish. You will need to change the
language on this Menu AND in your phones “Settings”.
Page 10
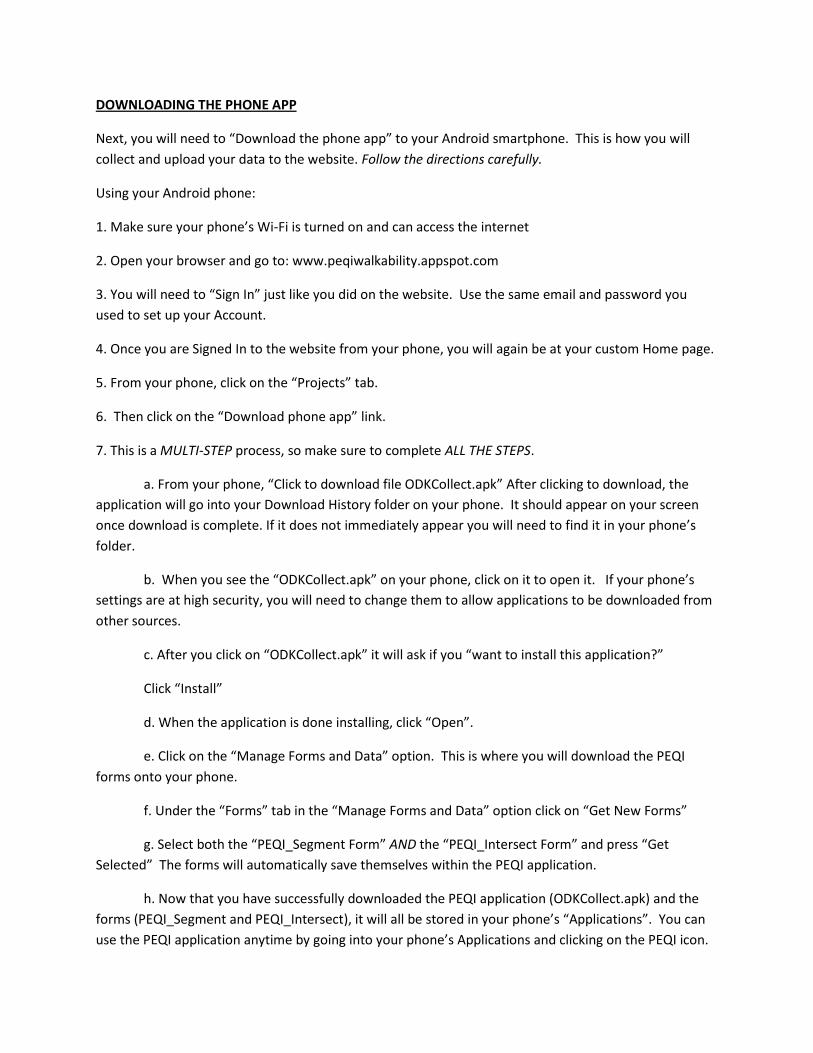
Once you have completed your data collection for the day, you will need to upload your forms to the
website. The website will automatically calculate each forms final score and reflect the scores on a map.
From the PEQI app home screen (what opens when you first open the app). Click on “Send Saved Data”
Make sure you are in a place with good reception, to ensure that all the forms get uploaded.
Page 11
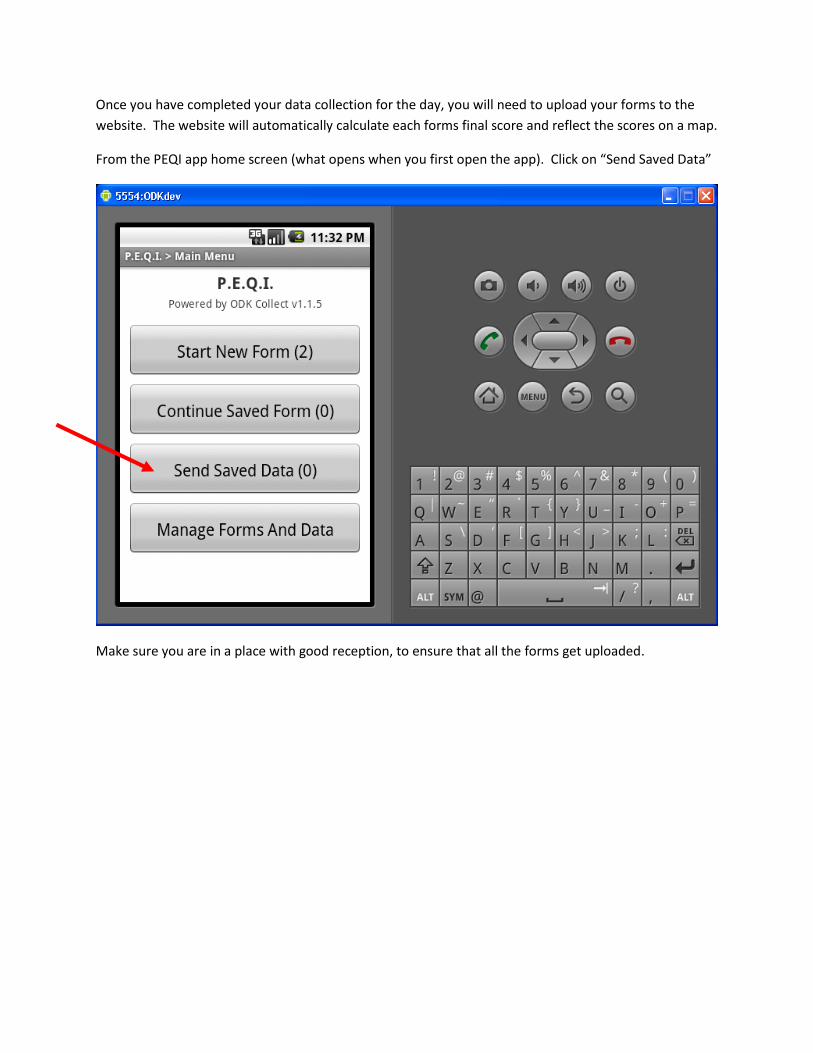
After the forms are uploaded from the phone, log onto www.peqiwalkability.appspot.com and go to
your projects.
VIEWING &SAVING DATA
To view your Project Data Click on the Projects Tab, then click on your specific Project. The “Tasks List”
on the left of the screen allows you to “View Intersection Data”, “View Segment Data” and “View Map.”
“View Intersection Data” and “View Segment Data”should appear as seen below:
If you have uploaded new data since the last time you visited the site, make sure to click “Update
Scores” to make sure you are viewing all your most recent data. If you don’t see all your data on the
website, go back to the phone to make sure all the forms uploaded successfully.
It is VERY IMPORTANT that you “Download Data” and save it on your own computer. It will only be
stored for a maximum of two months after your last upload on our server.
Page 12
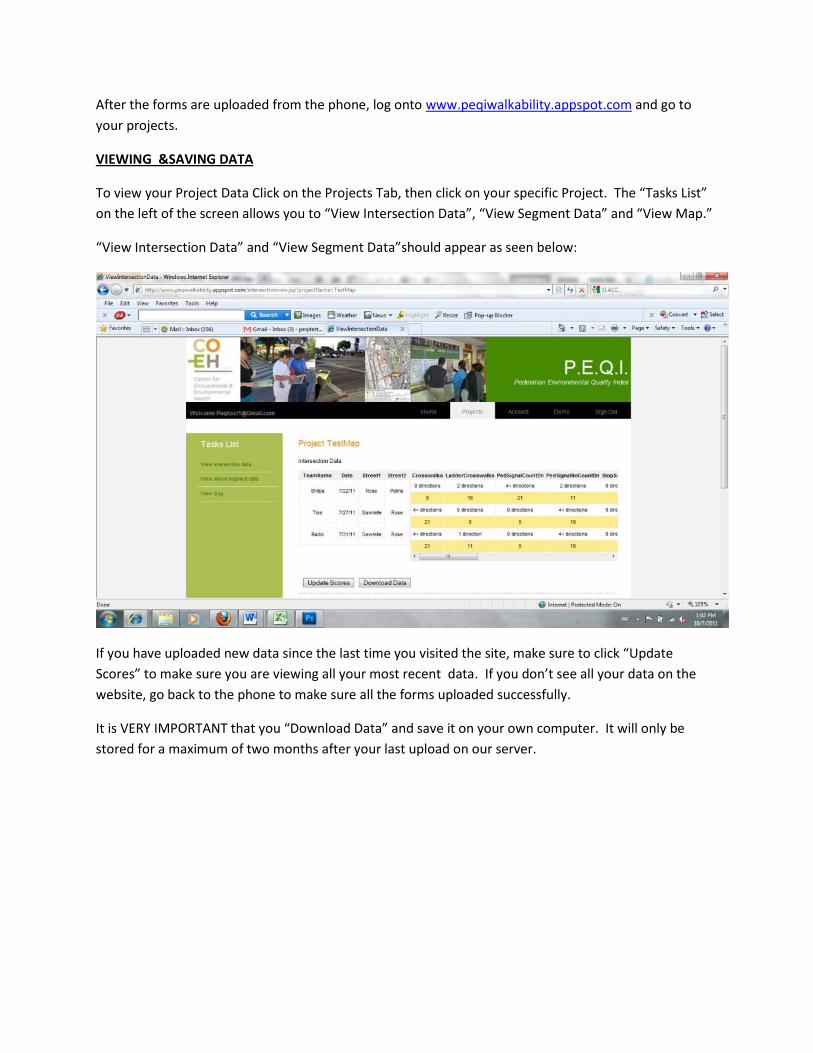
To “Download Data” click the tab at the bottom of the screen, and you will be prompted to Open or
Save the Excel (XLS) spreadsheet. Make sure to save it somewhere safe.
Your data will only stay on the website for two months after your last upload. Make sure to save copies
of your data and maps onto your own computer.
You can also “View Map” by clicking on the Tasks List on the left
Page 13
To save your Mapped Data and access it as a Google Earth (KML) file, click “Dowload KML” at the
bottom of the page.
Make sure to save it somewhere safe.
To Open the KML file you must install Google Earth on your computer. It’s free and can be downloaded
from: http://www.google.com/earth/index.html
Once Google Earth is installed you can open your KML file and it will appear as below:
Page 14
As long as your KML file is saved on your computer, you will never have to worry about losing your PEQI
data. However, to combine all of your data, and to make it easier every time you open Google Earth, we
recommend moving your KML data from “Temporary Places” to “My Places” (see red arrow on left
hand side of Google Earth toolbar).
The data and maps are yours and can be used for any number of community advocacy or campaign
activities that you choose.
Questions? Contact: Christina Batteate [email protected]
Elina Nasser [email protected]