13
| Date post: | 26-Mar-2016 |
| Category: |
Documents |
| Upload: | chaitanya-krishnan |
| View: | 217 times |
| Download: | 0 times |
http://www.instructables.com/id/Plastic-Bottle-Bee/
Plastic Bottle Beeby chaitanyak on July 28, 2010
Table of Contents
License: Attribution Non-commercial Share Alike (by-nc-sa) . . . . . . . . . . . . . . . . . . . . . . . . . . . . . . . . . . . . . . . . . . . . . . . . . . . . . . . . . . . . . . . . . . . . . . . . . . . . . 2
Intro: Plastic Bottle Bee . . . . . . . . . . . . . . . . . . . . . . . . . . . . . . . . . . . . . . . . . . . . . . . . . . . . . . . . . . . . . . . . . . . . . . . . . . . . . . . . . . . . . . . . . . . . . . . . . . . . . . . . 2
step 1: stuff you'll need . . . . . . . . . . . . . . . . . . . . . . . . . . . . . . . . . . . . . . . . . . . . . . . . . . . . . . . . . . . . . . . . . . . . . . . . . . . . . . . . . . . . . . . . . . . . . . . . . . . . . . . . 3
step 2: start cutting . . . . . . . . . . . . . . . . . . . . . . . . . . . . . . . . . . . . . . . . . . . . . . . . . . . . . . . . . . . . . . . . . . . . . . . . . . . . . . . . . . . . . . . . . . . . . . . . . . . . . . . . . . . 3
step 3: cut the legs . . . . . . . . . . . . . . . . . . . . . . . . . . . . . . . . . . . . . . . . . . . . . . . . . . . . . . . . . . . . . . . . . . . . . . . . . . . . . . . . . . . . . . . . . . . . . . . . . . . . . . . . . . . . 3
step 4: Optional: longer back legs . . . . . . . . . . . . . . . . . . . . . . . . . . . . . . . . . . . . . . . . . . . . . . . . . . . . . . . . . . . . . . . . . . . . . . . . . . . . . . . . . . . . . . . . . . . . . . . . 5
step 5: cut the wings . . . . . . . . . . . . . . . . . . . . . . . . . . . . . . . . . . . . . . . . . . . . . . . . . . . . . . . . . . . . . . . . . . . . . . . . . . . . . . . . . . . . . . . . . . . . . . . . . . . . . . . . . . 6
step 6: locking the abdomen . . . . . . . . . . . . . . . . . . . . . . . . . . . . . . . . . . . . . . . . . . . . . . . . . . . . . . . . . . . . . . . . . . . . . . . . . . . . . . . . . . . . . . . . . . . . . . . . . . . . 6
step 7: locking the back flap . . . . . . . . . . . . . . . . . . . . . . . . . . . . . . . . . . . . . . . . . . . . . . . . . . . . . . . . . . . . . . . . . . . . . . . . . . . . . . . . . . . . . . . . . . . . . . . . . . . . . 7
step 8: painting: base coat . . . . . . . . . . . . . . . . . . . . . . . . . . . . . . . . . . . . . . . . . . . . . . . . . . . . . . . . . . . . . . . . . . . . . . . . . . . . . . . . . . . . . . . . . . . . . . . . . . . . . . 9
step 9: done! . . . . . . . . . . . . . . . . . . . . . . . . . . . . . . . . . . . . . . . . . . . . . . . . . . . . . . . . . . . . . . . . . . . . . . . . . . . . . . . . . . . . . . . . . . . . . . . . . . . . . . . . . . . . . . . . 10
Advertisements . . . . . . . . . . . . . . . . . . . . . . . . . . . . . . . . . . . . . . . . . . . . . . . . . . . . . . . . . . . . . . . . . . . . . . . . . . . . . . . . . . . . . . . . . . . . . . . . . . . . . . . . . . . . . . . 12

http://www.instructables.com/id/Plastic-Bottle-Bee/
License: Attribution Non-commercial Share Alike (by-nc-sa)
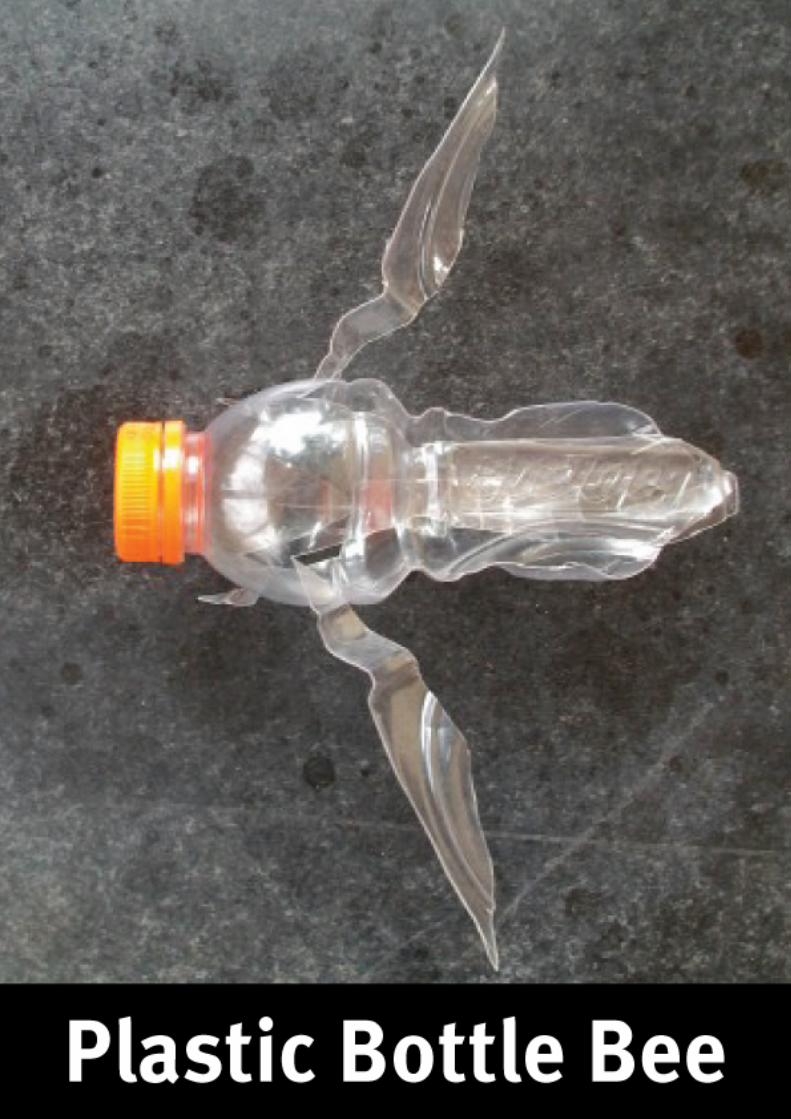
Intro: Plastic Bottle BeeMake a cool Bee decorative model out of an old plastic bottle!
http://www.instructables.com/id/Plastic-Bottle-Bee/
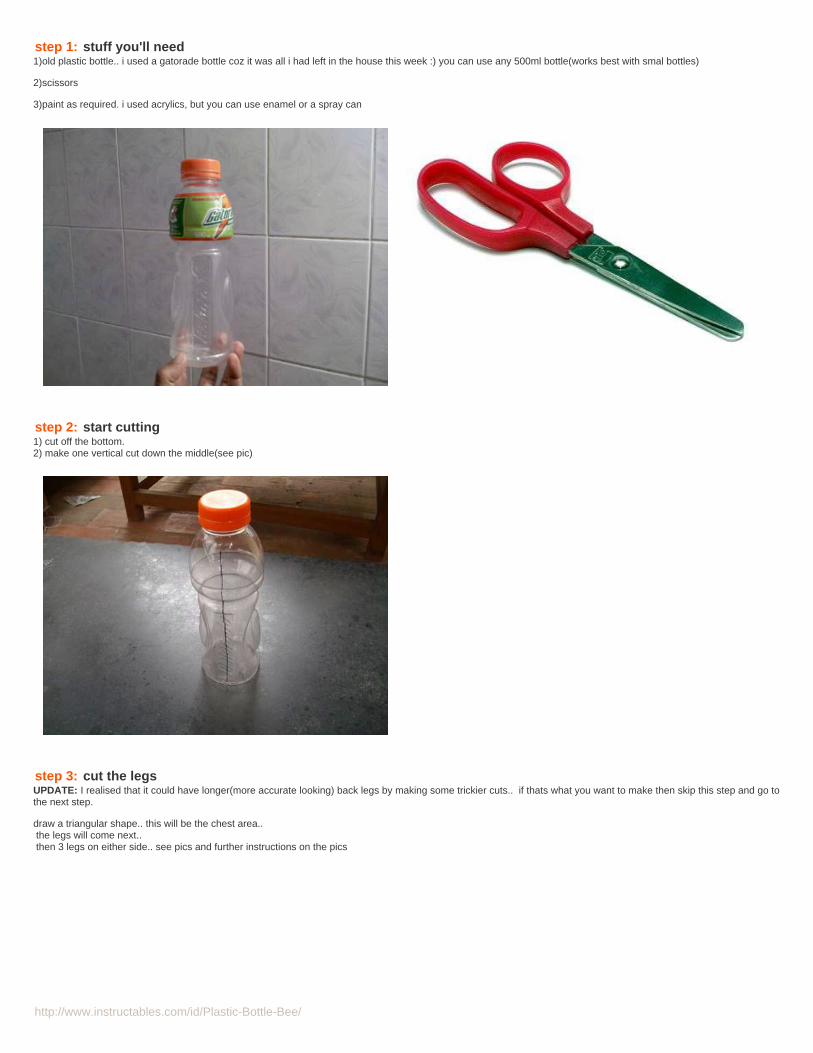
step 1: stuff you'll need1)old plastic bottle.. i used a gatorade bottle coz it was all i had left in the house this week :) you can use any 500ml bottle(works best with smal bottles)
2)scissors
3)paint as required. i used acrylics, but you can use enamel or a spray can
step 2: start cutting1) cut off the bottom.2) make one vertical cut down the middle(see pic)
step 3: cut the legsUPDATE: I realised that it could have longer(more accurate looking) back legs by making some trickier cuts.. if thats what you want to make then skip this step and go tothe next step.
draw a triangular shape.. this will be the chest area.. the legs will come next.. then 3 legs on either side.. see pics and further instructions on the pics
http://www.instructables.com/id/Plastic-Bottle-Bee/
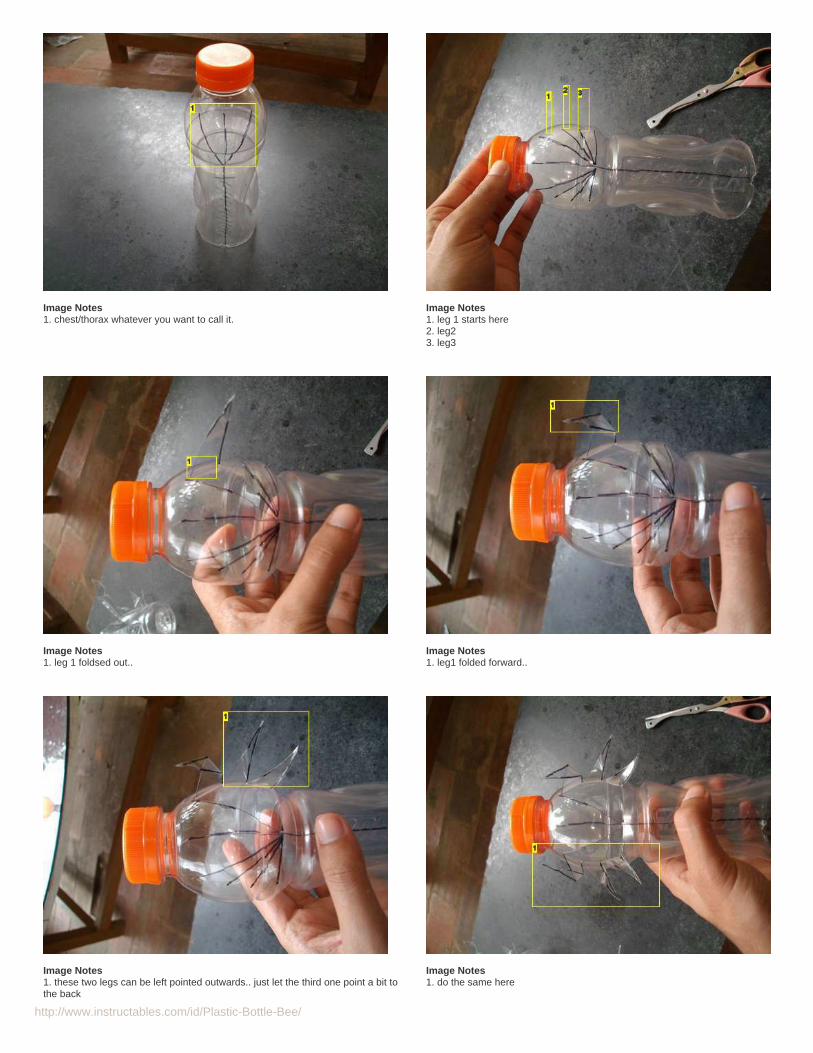
Image Notes1. chest/thorax whatever you want to call it.
Image Notes1. leg 1 starts here2. leg23. leg3
Image Notes1. leg 1 foldsed out..
Image Notes1. leg1 folded forward..
Image Notes1. these two legs can be left pointed outwards.. just let the third one point a bit tothe back
Image Notes1. do the same here

http://www.instructables.com/id/Plastic-Bottle-Bee/
step 4: Optional: longer back legsNOTE: This can be a difficult step for some of you, as cutting these shapes is a bit tricky (especially in small bottles).. if you find it tough, avoid it and go back to theprevious step with the simpler legs
draw a triangular shape.. this will be the chest area..the legs will come next..then 3 legs on either side..
For longer back legs..basically you have to cut the back legs differently (see pics)
the rest of the instructable stays the same.. regardless of wether you do short or long legs.
Image Notes1. chest/thorax whatever you want to call it.
Image Notes1. the back leg is longer, so cut this "L" shape
Image Notes1. fold them out.. and they should look like this.. if not just fiddle with the fold a bit.
Image Notes1. might have to make a fold here to make it point the right way2. might have to make a fold here to make it point the right way
http://www.instructables.com/id/Plastic-Bottle-Bee/
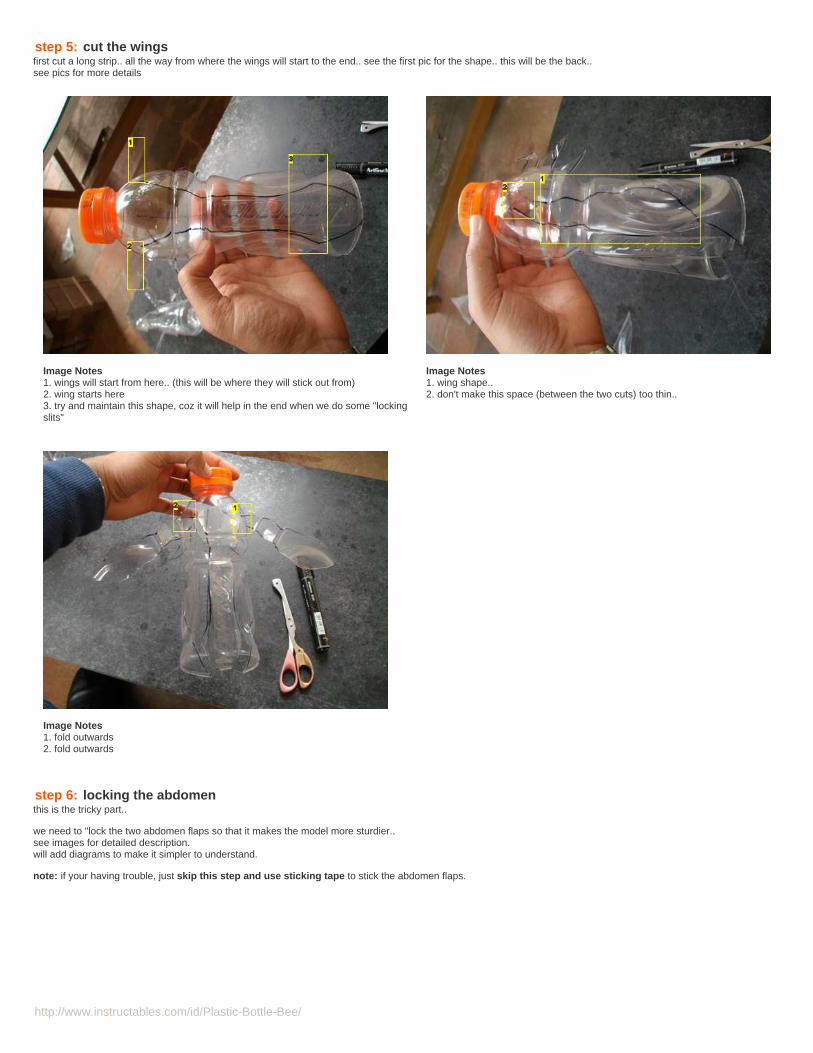
step 5: cut the wingsfirst cut a long strip.. all the way from where the wings will start to the end.. see the first pic for the shape.. this will be the back..see pics for more details
Image Notes1. wings will start from here.. (this will be where they will stick out from)2. wing starts here3. try and maintain this shape, coz it will help in the end when we do some "lockingslits"
Image Notes1. wing shape..2. don't make this space (between the two cuts) too thin..
Image Notes1. fold outwards2. fold outwards
step 6: locking the abdomenthis is the tricky part..
we need to "lock the two abdomen flaps so that it makes the model more sturdier..see images for detailed description.will add diagrams to make it simpler to understand.
note: if your having trouble, just skip this step and use sticking tape to stick the abdomen flaps.

http://www.instructables.com/id/Plastic-Bottle-Bee/
Image Notes1. draw two line like this2. the goal is to overlap and attach these two flaps.. to make a stronger andnarrower abdomen
Image Notes1. make a slit here2. and a slit here
Image Notes1. difficult to see, but the two flaps have overlapped, and the two slits areinterlocked
Image Notes1. i made a simpler single slit on both flaps.. a little towards the end, andinterlocked it here too
step 7: locking the back flapthis is where we add some finishing cuts and then lock all the loose ends..
first start with the side profile, and cut the back pointy bits off.. try and get that silhouette in the first pic..
note: again, if your having trouble, just skip this step and use sticking tape to stick the abdomen flaps to the top flap.

http://www.instructables.com/id/Plastic-Bottle-Bee/
Image Notes1. taper it off gradually..2. discard these bits
Image Notes1. now you have this flimsy flap between the wings..2. and this abdomen bit..
Image Notes1. add a slit here.. try and make them both parallel to the base2. add a slit here
Image Notes1. then pull this down and interlock it to the slit on the abdomen bit.. on eitherside
Image Notes1. if you have to .. make newer cuts on the lower flaps.. so that when interlocked..its nice and tight.. alternatively just use sticking tape if you want to.
Image Notes1. done! all locked and ready to go

http://www.instructables.com/id/Plastic-Bottle-Bee/
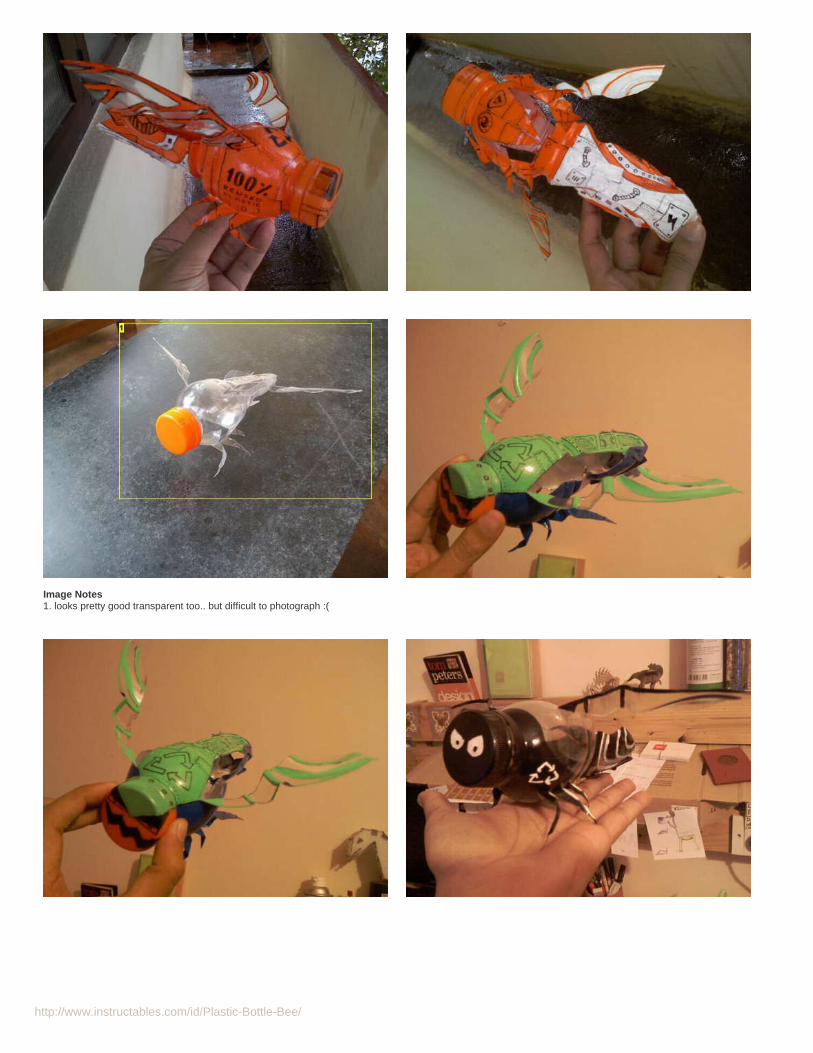
step 8: painting: base coatas usual i like to put a base coat of white.. so that all my colors really "pop"note the wings - you can either paint em or leave em transparent(with some detailing) like i did in the right wing.
now once the base coat is dry, go ahead and slap on whatever colors you like.. and for final touches/detailing you can use a marker.

http://www.instructables.com/id/Plastic-Bottle-Bee/
step 9: done!Thats it!i hope you enjoy it!
http://www.instructables.com/id/Plastic-Bottle-Bee/
Image Notes1. looks pretty good transparent too.. but difficult to photograph :(

http://www.instructables.com/id/Plastic-Bottle-Bee/
Advertisements


