58
SIEMENS SIEMENS SIEMENS Polarion 18 Enterprise Setup POL005 • 18

SIEMENSSIEMENSSIEMENS
Polarion 18Enterprise Setup
POL005 • 18


Contents
Terminology . . . . . . . . . . . . . . . . . . . . . . . . . . . . . . . . . . . . . . . . . . . . . . . . . . . . . . . . . 1-1
Overview . . . . . . . . . . . . . . . . . . . . . . . . . . . . . . . . . . . . . . . . . . . . . . . . . . . . . . . . . . . 2-1
Details . . . . . . . . . . . . . . . . . . . . . . . . . . . . . . . . . . . . . . . . . . . . . . . . . . . . . . . . . . . . . 3-1
Requirements . . . . . . . . . . . . . . . . . . . . . . . . . . . . . . . . . . . . . . . . . . . . . . . . . . . . . . . . 4-1
Server software requirements . . . . . . . . . . . . . . . . . . . . . . . . . . . . . . . . . . . . . . . . . . . . . 4-1Requirements for a Windows installation . . . . . . . . . . . . . . . . . . . . . . . . . . . . . . . . . . . . . . 4-1Server hardware requirements . . . . . . . . . . . . . . . . . . . . . . . . . . . . . . . . . . . . . . . . . . . . . 4-1
Server hardware requirements overview . . . . . . . . . . . . . . . . . . . . . . . . . . . . . . . . . . . 4-1Coordinator server . . . . . . . . . . . . . . . . . . . . . . . . . . . . . . . . . . . . . . . . . . . . . . . . . . 4-2Stand-alone instance server . . . . . . . . . . . . . . . . . . . . . . . . . . . . . . . . . . . . . . . . . . . . 4-3Cluster instance server . . . . . . . . . . . . . . . . . . . . . . . . . . . . . . . . . . . . . . . . . . . . . . . 4-4Shared Services server . . . . . . . . . . . . . . . . . . . . . . . . . . . . . . . . . . . . . . . . . . . . . . . 4-5Example hardware configurations for an instance . . . . . . . . . . . . . . . . . . . . . . . . . . . . . 4-7
License requirements . . . . . . . . . . . . . . . . . . . . . . . . . . . . . . . . . . . . . . . . . . . . . . . . . . . 4-7
Installation use cases . . . . . . . . . . . . . . . . . . . . . . . . . . . . . . . . . . . . . . . . . . . . . . . . . . 5-1
Overview . . . . . . . . . . . . . . . . . . . . . . . . . . . . . . . . . . . . . . . . . . . . . . . . . . . . . . . . . . . 5-1Common terms . . . . . . . . . . . . . . . . . . . . . . . . . . . . . . . . . . . . . . . . . . . . . . . . . . . . . . . 5-1Setting up a cluster from new installations . . . . . . . . . . . . . . . . . . . . . . . . . . . . . . . . . . . . . 5-2
Options and prerequisites . . . . . . . . . . . . . . . . . . . . . . . . . . . . . . . . . . . . . . . . . . . . . 5-2Configuring the cluster's coordinator . . . . . . . . . . . . . . . . . . . . . . . . . . . . . . . . . . . . . . 5-4License deployment on coordinator . . . . . . . . . . . . . . . . . . . . . . . . . . . . . . . . . . . . . . . 5-5Configuring the cluster's shared services . . . . . . . . . . . . . . . . . . . . . . . . . . . . . . . . . . . 5-6Configuring the cluster's nodes . . . . . . . . . . . . . . . . . . . . . . . . . . . . . . . . . . . . . . . . . . 5-8Configuring the cluster's activation application . . . . . . . . . . . . . . . . . . . . . . . . . . . . . . . 5-10
Multiple stand-alone instances setup . . . . . . . . . . . . . . . . . . . . . . . . . . . . . . . . . . . . . . . . 5-11Using the coordinator for license management. . . . . . . . . . . . . . . . . . . . . . . . . . . . . . . 5-11Configuring the coordinator for multiple stand-alone instances setup . . . . . . . . . . . . . . . 5-13Configuring Instance 1 . . . . . . . . . . . . . . . . . . . . . . . . . . . . . . . . . . . . . . . . . . . . . . . 5-13Configuring Instance 2 . . . . . . . . . . . . . . . . . . . . . . . . . . . . . . . . . . . . . . . . . . . . . . . 5-14Access URLs for multiple stand-alone instances . . . . . . . . . . . . . . . . . . . . . . . . . . . . . 5-15
Migrating From a Pre-2014 multi-instance installation . . . . . . . . . . . . . . . . . . . . . . . . . . . . 5-15Differences between the new and old multiple stand-alone instances" setups . . . . . . . . . . 5-15Configuring the coordinator . . . . . . . . . . . . . . . . . . . . . . . . . . . . . . . . . . . . . . . . . . . 5-16Migrating a remote instance to a non-clustered stand-alone instance . . . . . . . . . . . . . . . 5-16Moving local instances for the multiple stand-alone instances setup . . . . . . . . . . . . . . . . 5-17
Updating a multiple stand-alone instance or cluster setup . . . . . . . . . . . . . . . . . . . . . . . . . . 5-18
Configure shared data . . . . . . . . . . . . . . . . . . . . . . . . . . . . . . . . . . . . . . . . . . . . . . . . . 6-1
POL005 18 Polarion Enterprise Setup 3

Contents
Shared data configuration steps for both Windows and Linux . . . . . . . . . . . . . . . . . . . . . . . . 6-1Linux configuration . . . . . . . . . . . . . . . . . . . . . . . . . . . . . . . . . . . . . . . . . . . . . . . . . . . . . 6-2Windows configuration . . . . . . . . . . . . . . . . . . . . . . . . . . . . . . . . . . . . . . . . . . . . . . . . . . 6-3
Security options . . . . . . . . . . . . . . . . . . . . . . . . . . . . . . . . . . . . . . . . . . . . . . . . . . . . . . 7-1
Recommended setup . . . . . . . . . . . . . . . . . . . . . . . . . . . . . . . . . . . . . . . . . . . . . . . . . . . 7-1Recommended security options . . . . . . . . . . . . . . . . . . . . . . . . . . . . . . . . . . . . . . . . . . . . 7-2Advanced security options . . . . . . . . . . . . . . . . . . . . . . . . . . . . . . . . . . . . . . . . . . . . . . . . 7-3Authentication for server monitoring . . . . . . . . . . . . . . . . . . . . . . . . . . . . . . . . . . . . . . . . . 7-5
Using Resource Traceability in a cluster . . . . . . . . . . . . . . . . . . . . . . . . . . . . . . . . . . . . 8-1
Before setting up Resource Traceability . . . . . . . . . . . . . . . . . . . . . . . . . . . . . . . . . . . . . . . 8-1Standalone Resource Traceability server . . . . . . . . . . . . . . . . . . . . . . . . . . . . . . . . . . . . . . 8-1Embedded Resource Traceability server in cluster nodes . . . . . . . . . . . . . . . . . . . . . . . . . . . 8-4
Notes . . . . . . . . . . . . . . . . . . . . . . . . . . . . . . . . . . . . . . . . . . . . . . . . . . . . . . . . . . . . . . 9-1
Troubleshooting . . . . . . . . . . . . . . . . . . . . . . . . . . . . . . . . . . . . . . . . . . . . . . . . . . . . . 10-1
Appendix: Polarion instance architecture . . . . . . . . . . . . . . . . . . . . . . . . . . . . . . . . . . 11-1
4 Polarion Enterprise Setup POL005 18
Contents

Chapter 1: Terminology
• Polarion - General reference to the Polarion ALM software/server/system.
• Instance - A machine running a single Polarion installation.
• Stand-alone Instance - An instance, with its own repository on the same machine (i.e. notclustered), exposed to the user as a single Polarion Server.
• Cluster - A group of instances accessing the shared services, exposed to the user as a singlelogical Polarion server.
• Coordinator - A specially configured Polarion installation that manages communication andlicenses among Instances.
• Shared Services - A machine that hosts the Subversion repository, shared data and loadbalancer (user entry point). There is one shared services per cluster.
POL005 18 Polarion Enterprise Setup 1-1


Chapter 2: Overview
The following figure shows one clustered setup with two clustered instances sharing one repository.
POL005 18 Polarion Enterprise Setup 2-1


Chapter 3: Details
A cluster setup requires one dedicated physical or virtual machine for each Instance. Coordinator andshared services must also be dedicated machines.
Coordinator
• Distributes tasks that need to be executed on a single instance in the cluster.
• Serves as the Licensing Server for all instances connected to the coordinator.
• Provides a single entry point to all logical Polarion servers that are connected to the samecoordinator.
• Reconfigures the Load Balancer if some of the instances are offline.
Shared services
• Provides the Load Balancer that forwards users to a specific instance in the cluster.
• Entry point for one cluster.
• Provides a file repository shared by all instances in the cluster.
• Serves the Subversion repository that contains the data for the clustered logical Polarion server.
Instance 1, Instance 2
• Machines running the Polarion service, connected in a Cluster and all configured to use the sameshared services. (Each instance in the Cluster use the same Subversion repository.)
• Every instance in the Cluster has its own Polarion data (indexes, object maps), and PostgreSQLdatabase. (A shared database is not currently supported.)
POL005 18 Polarion Enterprise Setup 3-1


Chapter 4: Requirements
Server software requirementsSeveral virtual or physical machines are needed: one for the Coordinator, one for every Instance(stand-alone or from a cluster) and one shared services per cluster.
The server software requirements are the same for all machines, as described in the Windows andLinux installation guides, with one exception:
The minimum Apache HTTP Server version is 2.2.17. (The latest 2.4.x version is recommended.)
Although the Coordinator machine does not really need Subversion, it is still recommended to usethe standard Polarion Installer to install Polarion on it. It will install Subversion on the coordinator,and can just remain there.
Coordinator, Nodes, and stand-alone instances must all be running the same version of Polarion.
Requirements for a Windows installationA Polarion clustered setup in a Microsoft Windows environment requires the following:
• MS Active Directory.
• A DNS service is recommended, but you can also use static IP addresses. (The same subnet isexpected.)
• Testing for a proper network configuration by 'pinging' between all hosts in a cluster.
• A domain user. (example, yourDomain\polarion)
o For shared Services, CIFS/Samba requires a domain user, for example, yourDomain\polarion.
• A mail server or mail GW is required for sending e-mail notifications.
• For a proper configuration, you will need to open ports as described in Server hardware.
Server hardware requirements
Server hardware requirements overview
Generally the requirements for all server machines are similar to those described in the Polarioninstallation guides for Linux and Windows. All machines must be connected by a fast 1 Gbpslow-latency (< 10 ms) intranet network.
POL005 18 Polarion Enterprise Setup 4-1

Chapter 4: Requirements
Coordinator server
Requirement Description
CPU 2
RAM 2-4 GB
Disk space 10 GB
FQDN e.g coordinator.mycompany.com
Access from clients(http(s))
Coordinator provides signpost and server monitoring pages. Choosethe port (usually 80 for http, 443 for https) and configure Apache andPolarion to use them.
Related Polarion properties:
base.url=http(s)://host:port (FQDN or IP address)
Access fromInstances
Communication between instances and the coordinator(ZooKeeper) takes place on the TCP/IP port specified by thecom.polarion.zookeeper.port property of the coordinator. It is 2181 bydefault. This port on the Coordinator host must be accessible by allinstances.
Related Polarion properties:
com.polarion.zookeeper.port=port# (On the Coordinator.)
com.polarion.zookeeper=host:port# (On the Instances.)
4-2 Polarion Enterprise Setup POL005 18
Chapter 4: Requirements

Requirements
Stand-alone instance server
Requirement Description
CPU See the "Example Hardware Configurations" table.
RAM See the "Example Hardware Configurations" table.
Disk space See the "Example Hardware Configurations" table.
FQDN e.g. myserver1.mycompany.com
Access from clients(http(s))
Choose the port (usually 80 for http and 443 for https), then configureApache, and Polarion to use them.
Related Polarion properties:
base.url=http(s)://host:port (Must be FQDN or IP address.)
Access to Subversion The same as a simple installation. There should be http(s) access fromclients (end users), and svn protocol access is recommended for fastlocal access by system users.
Related Polarion properties:
repo=http(s)://host:port/repo
repoSystem=[svn/file/http(s)]://host:port
POL005 18 Polarion Enterprise Setup 4-3
Requirements

Chapter 4: Requirements
Cluster instance server
Requirement Description
CPU See the "Example Hardware Configurations" table.
RAM See the "Example Hardware Configurations" table.
Disk space See the "Example Hardware Configurations" table.
Time synchronization A system time that is synchronized with all other cluster instances.
Access from LoadBalancer
The Load Balancer needs to be able to redirect the requests to thecluster instances using the http(s) port where Polarion is running.
Related Polarion properties:
base.url=http(s)://host:port (Must be FQDN or IP address)
com.polarion.loadBalancer.workerUrl=http://host
Communicationbetween clusterinstances
RPC communication between cluster instances takes place on theTCP/IP port specified by the controlPort property of the instance. Allinstances of the cluster must be able to access the control ports of allother instances in the cluster.
Related Polarion properties:
controlPort=port#
controlHostname=host (Must be FQDN or IP address)
4-4 Polarion Enterprise Setup POL005 18
Chapter 4: Requirements

Requirements
Shared Services server
Requirement Description
CPU 4 (8 for XL)
RAM 8GB (16GB for XL)
Disk space 100GB (But can grow a lot depending on data.)
FQDN For example:myserver2.mycompany.com
Access from Clientsto Load Balancer(http(s))
The entry point to the Cluster. Choose the http(s) protocol, configureApache and adjust the configuration of the Cluster Instances.
Related Polarion properties:
base.url=http(s)://host:port
(On Instances - Must be an FQDN or IP address.)
Access fromCoordinator to LoadBalancer manager(http(s))
The Coordinator communicates with the Load Balancer manager viahttp(s). Configure Load Balancer manager application location inApache.
Related Polarion properties:
com.polarion.loadBalancer=http(s)://host/balancer-manager
(On Cluster Instances.)
com.polarion.cluster.#ClusterId#.loadBalancer.user=
(On a Coordinator.)
com.polarion.cluster.#ClusterId#.loadBalancer.password=
(On a Coordinator.)
Shared Folder
Linux paths are used below. For Windows, use analogical paths.
Folder /opt/polarion of Shared Services has to be mounted as/opt/polarion/shared on all cluster instances. This folder sharing shouldbe set up after the installation of Polarion.
User "polarion" on all nodes must have read access for:/opt/polarion/shared/**, and write access for at least the following:
/opt/polarion/shared/data/svn/*
/opt/polarion/shared/data/BIR/**
/opt/polarion/shared/data/RR/**
/opt/polarion/shared/data/workspace/**
POL005 18 Polarion Enterprise Setup 4-5
Requirements

Chapter 4: Requirements
Requirement Description
The Index is located on the nodes in a high availability setupand not in the shared folders.
(/* means files inside the directory, /** means everything including thesubdirectories recursively)
Files created by the user on behalf of which the polarion service isrunning (polarion) on any node in /opt/polarion/shared must bereadable by the user on behalf of which the Apache server is running onthe shared services.
Thumbnail Storage for attachment previews are found in:/polarion/shared/data/workspace/previews-data/thumbnails
Related Polarion properties:
com.polarion.shared=/shared/directory/path (on instances)
Access to Subversion
From clients (end users) and each instance of the cluster, the Subversionrepository must be accessible. Either the http(s) or svn protocols can beused. (Svn is recommended for fast access by a system user).
Related Polarion properties:
repo=http(s)://host:port/repo (On Instances)
repoSystem=[svn/http(s)]://host:port (On Instances)
4-6 Polarion Enterprise Setup POL005 18
Chapter 4: Requirements

Requirements
Example hardware configurations for an instance
Environment S M L XL
Operating system 64 - bit 64 - bit 64 - bit 64 - bit
CPU cores 4 8 16 16
OS GB RAM
(Polarion Java memory)16 (8) 32 (16) 64 (32) 128 (64)
Storage for Polarion500GB+
1TB+
(SCSi or similar)
1TB+
(RAID 10, NAS,SAN)
1TB+
(RAID 10, NAS,SAN)
# of Polarion Projects < 300 < 500 < 750 < 1000
# Concurrent, logged-onusers (on 1 instance) < 30 < 60 < 100 < 150
Make sure that there is enough RAM available to the OS for file-caching. If the SVN is hosted on adifferent machine, more memory could be allocated for the Polarion process.
License requirementsIf you host Polarion on your company’s infrastructure, you must provide all physical hardware and/orvirtual machines needed for the setup you want to implement, see Installation use cases), and obtaina license for the instances you run. If you utilize Polarion’s cloud-based hosting services, you mustorder a virtual server for each instance of a clustered or multiple stand-alone instance configuration.
Every node in a cluster or server in a multiple stand-alone instances setup counts towards themultiple instances limit set in the license. Please contact the Polarion ALM team for assistancewith any licensing questions.
POL005 18 Polarion Enterprise Setup 4-7
Requirements


Chapter 5: Installation use cases
OverviewSimple use cases are described for Cluster and a Multiple stand-alone instances setup. Seemigrate a pre-2014 "multi-instance" setup on how to migrate an older version of Polarion to thenew configuration released with version 2014.
The multi-instance setup with local instances configured with a pre-2014 of Polarion stillworks with Polarion 2014 and newer release without any changes in the configuration.However, it is no longer possible to create new local instances.
If you want to configure a clustered instance from any of your local instances, then you need tomigrate the whole setup to the new Multiple stand-alone instances setup, where instances alwaysrun on a dedicated machine.
Common terms• [INSTALL] - Root directory of your current installation. This would typically be C:\Polarion on
Windows or /opt/polarion on Linux.
• [APACHE] - Apache configuration directory. On Linux it should be /etc/httpd/conf.d/ and onWindows C:\Polarion\bundled\apache\conf\extra.
POL005 18 Polarion Enterprise Setup 5-1

Chapter 5: Installation use cases
Setting up a cluster from new installations
Options and prerequisites
Administrators can setup up either one of the following:
• A cluster of installations (below)
• Multiple stand-alone instances
To set up a simple Cluster with two Nodes from new/clean Polarion installations:
(These machines must be running the same version of Polarion.)
Prerequisites: 4 machines (virtual or physical:)
1. Coordinator (http://coordinator.yourdomain.com)
2. Node1(http://node1.yourdomain.com)
3. Node2 (http://node2.yourdomain.com)
4. Shared Services (http://cluster.yourdomain.com)
5-2 Polarion Enterprise Setup POL005 18
Chapter 5: Installation use cases

Installation use cases
Deployment diagram:
Start by installing the same version of Polarion on the following machines: coordinator, Node1,Node2 and shared services.
Different third-party software is required on individual machines:
• On the Nodes: Java, Apache HTTP Server, and PostgreSQL
• On the coordinator: Java, and Apache HTTP Server
• On the shared services: Apache HTTP Server, and Subversion
POL005 18 Polarion Enterprise Setup 5-3
Installation use cases

Chapter 5: Installation use cases
The easiest way is to use the standard installation procedure to install all dependencies and eventuallyuninstall the software that is not needed, if you need to save space on the storage. All third-partysoftware, except Java, is bundled in Windows distributions. It is already present on most Linuxinstallations. Refer to theWindows or Linux installation guides for complete installation instructions.
Instantiation of a local Subversion repository must be done only on the shared services machine, as itis the only repository that will actually be used.
Polarion should not be started immediately after installation, as further changes inconfiguration are required in order to set up the cluster.
Because the coordinator serves as a license hub for all the nodes and instances connected to it, youdo not need to activate any licenses on the nodes.
Once Polarion is successfully installed on each node and are specific for each machine, continue onwith configuring the cluster's coordinator.
Configuring the cluster's coordinator
1. Stop Polarion.
2. Make a backup of the original polarion.properties file.
3. Replace polarion.properties using the coordinator template file provided in[INSTALL]/polarion/install folder: polarion.properties.template.coordinator.
4. Make the following changes in the template-derived properties file, following the commentswithin the template:
• Specify base.url appropriately for the machine. Must be FQDN or IP address.
• Set the same value for ajp13-port as in the original polarion.properties file.
• Set the same value for controlPort as in the original polarion.properties file.
• Specify controlHostname appropriately for the machine.
5. (Optional) Uncomment the two properties about the load balancer credentials if the Apache loadbalancer is protected using basic authentication according to Step 3 in the Configuring thecluster's shared services section. (User name and password).
• The default setup uses the same credentials as the svn repository.
6. (Optional) Change the ZooKeeper port if the default port specified is not appropriate or blockedby a firewall policy.
7. (Optional) To disable the unused SVN repositories on the nodes, remove the polarionSVN.conffile from the Apache configuration directory and restart Apache.
• The Apache configuration directory on Linux should be: /etc/httpd/conf.d/
• The Apache configuration directory on Windows should be:C:\Polarion\bundled\apache\conf\extra
5-4 Polarion Enterprise Setup POL005 18
Chapter 5: Installation use cases

Installation use cases
8. (Windows only) Make sure that the Polarion service is started with the credentials of a domainuser created for Polarion. Use the same user for all Polarion installations.
9. Start Polarion.
Below is the configured polarion.properties file for the coordinator from the steps above:
com.polarion.application=polarion.coordinator
base.url=http://coordinator.yourdomain.com
TomcatService.ajp13-port=8889
# Control port and host name for shutdown requests
controlPort=8887
controlHostname=coordinator.yourdomain.com
# Credentials used to connect to the load balancer, if authentication is enabled
# Replace #ClusterId# with the id of the cluster.
#com.polarion.cluster.#ClusterId#.loadBalancer.user=
#com.polarion.cluster.#ClusterId#.loadBalancer.password=
# Port to connect to zookeeper
com.polarion.zookeeper.port=2181
License deployment on coordinator
Polarion 2015 and later: Activate the Polarion license using the Polarion Activation window on thecoordinator. Accessing http://coordinator.yourdomain.com/polarion or the logon screen of any Nodeor Instance will redirect you automatically to the Polarion Activation window. For more informationsee Activation Help.
Polarion 2014 and earlier: Make sure that the correct license file is placed in the license folderprior to starting the server:
• On Linux: /opt/polarion/polarion/license/
• On Windows: C:\Polarion\polarion\license\
A Cluster's license is activated in the same way as a single instance (described in the PolarionInstallation Guide documentation). The activation application runs on the Coordinator machine andinstructs the user how to activate on-line or off-line. Users accessing any entry point and the loginscreens of individual nodes and instances are redirected to the activation page on Coordinatoruntil activation is complete. Nodes and instances can start even if Polarion is not activated, butusers cannot log in.
POL005 18 Polarion Enterprise Setup 5-5
Installation use cases
Chapter 5: Installation use cases
Configuring the cluster's shared services
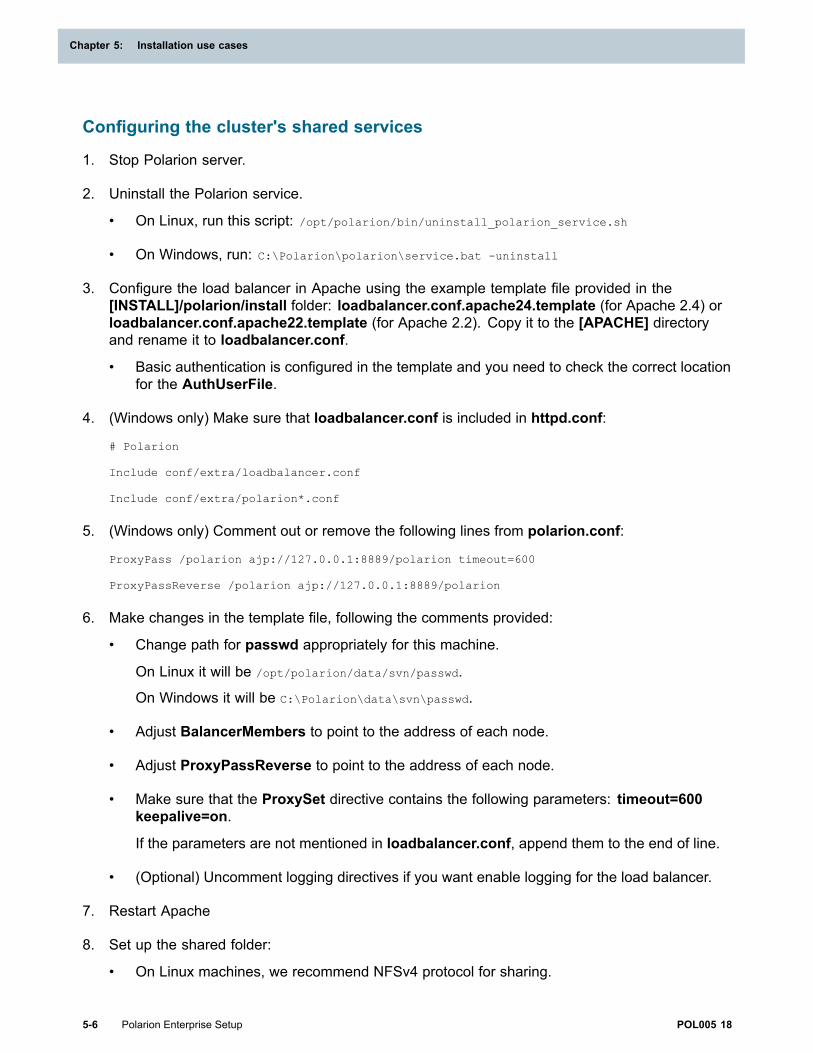
1. Stop Polarion server.
2. Uninstall the Polarion service.
• On Linux, run this script: /opt/polarion/bin/uninstall_polarion_service.sh
• On Windows, run: C:\Polarion\polarion\service.bat -uninstall
3. Configure the load balancer in Apache using the example template file provided in the[INSTALL]/polarion/install folder: loadbalancer.conf.apache24.template (for Apache 2.4) orloadbalancer.conf.apache22.template (for Apache 2.2). Copy it to the [APACHE] directoryand rename it to loadbalancer.conf.
• Basic authentication is configured in the template and you need to check the correct locationfor the AuthUserFile.
4. (Windows only) Make sure that loadbalancer.conf is included in httpd.conf:
# Polarion
Include conf/extra/loadbalancer.conf
Include conf/extra/polarion*.conf
5. (Windows only) Comment out or remove the following lines from polarion.conf:
ProxyPass /polarion ajp://127.0.0.1:8889/polarion timeout=600
ProxyPassReverse /polarion ajp://127.0.0.1:8889/polarion
6. Make changes in the template file, following the comments provided:
• Change path for passwd appropriately for this machine.
On Linux it will be /opt/polarion/data/svn/passwd.
On Windows it will be C:\Polarion\data\svn\passwd.
• Adjust BalancerMembers to point to the address of each node.
• Adjust ProxyPassReverse to point to the address of each node.
• Make sure that the ProxySet directive contains the following parameters: timeout=600keepalive=on.
If the parameters are not mentioned in loadbalancer.conf, append them to the end of line.
• (Optional) Uncomment logging directives if you want enable logging for the load balancer.
7. Restart Apache
8. Set up the shared folder:
• On Linux machines, we recommend NFSv4 protocol for sharing.
5-6 Polarion Enterprise Setup POL005 18
Chapter 5: Installation use cases

Installation use cases
• On Windows machines, you can use CIFS/Samba share for sharing. It must be shared forthe same domain user that is used for running all polarion installations in the cluster. Theuser needs all permissions for the share.
• Data sharing for different Operating systems and protocols is covered in Configuring shareddata.
9. Make backup of the original polarion.properties file on this machine.
10. Modify polarion.properties:
• The original properties from the clean installation must be preserved. These properties will beshared between nodes in the cluster, so everything that is common to nodes should be there.
• Add the com.polarion.zookeeper=coordinator.yourdomain.com:2181 property.
• Add the com.polarion.clusterId=cluster1 property.
• Add the com.polarion.clusterLabel=Main Cluster property.
• Add the com.polarion.clusterDescription=Description of Main Cluster property.
• Add the com.polarion.loadBalancer=http://cluster.yourdomain.com/balancer-manager
property.
• Modify the svn.access.file=$[com.polarion.shared]/data/svn/access property.
• Modify the svn.passwd.file=$[com.polarion.shared]/data/svn/passwd property.
• Modify the polarion.build.default.deploy.repository.url=
file://$[com.polarion.shared]/data/shared-maven-repo property
• Comment out the repoSystem property.
• Comment out the com.polarion.platform.internalPG property.
This URL must point to the Apache Load Balancer Manager URL. The domain ismachine-specific and will be used as the entry point for this cluster.
The com.polarion.platform.internalPG property must be present in all nodes of thepolarion.properties file.
The polarion.properties configuration that follows is for cluster and shared services. It is usedby each node in the cluster.
You should not use the file protocol in the repoSystem property while using a clustersetup for performance reasons. Either comment out, remove the line, or set up an svnserver to use with this property. If you still want to use the file protocol, you need topoint it to the shared repository.
POL005 18 Polarion Enterprise Setup 5-7
Installation use cases
Chapter 5: Installation use cases
# Newly added properties to original file
com.polarion.zookeeper=coordinator.yourdomain.com:2181
com.polarion.clusterId=cluster1
com.polarion.clusterLabel=Main Cluster
com.polarion.clusterDescription=Description of Main Cluster
com.polarion.loadBalancer=http://cluster.yourdomain.com/balancer-manager
# Modified properties
#repoSystem=…
svn.access.file=$[com.polarion.shared]/data/svn/access
svn.passwd.file=$[com.polarion.shared]/data/svn/passwd
polarion.build.default.deploy.repository.url=file://$[com.polarion.shared]/data/shared-maven-repo
# List of properties from original file
repo=…
etc..
Configuring the cluster's nodes
Configuration steps
The following steps must be performed for each Node in the Cluster.
1. Stop the Polarion server.
2. Make a backup of the original polarion.properties file.
3. Replace polarion.properties using the example template file provided for nodes in the[INSTALL]/polarion/install folder: polarion.properties.template.node
4. Make sure that the shared folder is mounted on this machine on the recommended path:
• Shared folder on Linux should be in /opt/polarion/shared .
• Shared folder onWindows is accessed directly as \\<shared_services_host>\Polarion.
5. Make changes in the template file following the comments provided:
• Set com.polarion.shared to point to the mounted shared folder:
On Linux it should be /opt/polarion/shared.
On Windows it should be \\\\<shared_services_host>\\Polarion.
• Set the same value for ajp13-port as in the original polarion.properties file.
• Set the same value for controlPort as in the original polarion.properties file.
5-8 Polarion Enterprise Setup POL005 18
Chapter 5: Installation use cases

Installation use cases
• Set the controlHostname value to node1.yourdomain.com or node2.yourdomain.com.(Depending on which node you are configuring.)
• Set the value for com.polarion.loadBalancer.workerUrl to the specific node in cluster so thatthe load balancer knows the URL of the node.
• Set a value in the calc.base.url property to a specific node in the Cluster. It must point to thespecific node, otherwise calculation will fail. It is the same as workerUrl.
(For example, calc.base.url=http://node1.yourdomain.com)
• Add the com.polarion.platform.internalPG property with a value from the cluster's sharedservices where it is commented out
6. (Optional) To disable the unused SVN repositories on the nodes, remove the polarionSVN.conffile from the Apache configuration directory and restart Apache.
• The Apache configuration directory on Linux should be /etc/httpd/conf.d/.
• The Apache configuration directory on Windows should beC:\Polarion\bundled\apache\conf\extra
7. (Windows only) Make sure that the Polarion service is started using credentials of a domain usercreated for Polarion. The same user should be used for all Polarion instances.
8. Start Polarion.
The following is the configured polarion.properties file for Node1. (It will be the same for second orthird Nodes, except that the URLs must be changed accordingly.)
# Shared folder between the machines that make up the cluster
# default Linux: com.polarion.shared=/opt/polarion/shared
#default Windows: com.polarion.shared=\\\\<shared_services_host>\\Polarion
com.polarion.shared=/opt/polarion/shared
com.polarion.nodeId=node1
TomcatService.ajp13-port=8889
#Url of node in load balancer
com.polarion.loadBalancer.workerUrl=http://node1.yourdomain.com
# Control port and host name for shutdown requests
controlPort=8887
controlHostname=node1.yourdomain.com
#Node-specific url of the node.
#It is used in calculations to access Polarion via web services
#calc.base.url=http://example-node
calc.base.url= http://node1.yourdomain.com
POL005 18 Polarion Enterprise Setup 5-9
Installation use cases

Chapter 5: Installation use cases
#Postgres database connection
com.polarion.platform.internalPG=polarion:passwordForDatabase@localhost:5433
Even if you plan on using the Resource Traceability feature, add the following property tothe shared polarion.properties file:
com.siemens.polarion.rt.startRtServer=false
Once the cluster is setup, but before setting up a Standalone Resource Traceability Server,remove the property from the polarion.properties file.
You have now configured an entire cluster for a clean installation of Polarion.
Your cluster is accessible on: http://cluster.yourdomain.com
Server Monitoring is accessible on: http://coordinator.yourdomain.com/polarion/monitoring
The Apache Load Balancer Manager is accessible on:http://cluster.yourdomain.com/balancer-manager
Synchronizing time on cluster nodes
Time must be synchronized on each node in the cluster on the OS level by a systemadministrator. Ideally this should be an automated sync via NTP. If the time is notsynchronized, users will see different times on each node, scheduled jobs may appear tostart off schedule and the Monitor will incorrectly order jobs by time.
Configuring the cluster's activation application
Beginning with version 2015, Polarion includes an activation application that makes it possibleto install or update a license, while the Polarion server is running, without the need to copy thelicense file manually to the target machine. Access to this application is NOT initially protected by auser name and password. For production use, it is highly recommended to secure access to thisapplication directly in the Apache configuration. It is only necessary to perform this configuration onthe coordinator server.
In version 2015 installations there is a template Apache configuration file in the Polarion installationfolder:
/polarion/polarion/install/polarion.activation.conf.template
To ensure that a user name and password is requested when accessing the activation application
(/polarion/activate/online and /polarion/activate/offline), copy this file to the Apacheconfiguration folder.
On Linux usually /etc/httpd/conf.d/ .
On Windows, usually C:\Polarion\bundled\apache\conf\extra\.
After copying the file, rename it to remove the .template extension. Then open the file in any texteditor and modify it according to the instruction comments provided.
5-10 Polarion Enterprise Setup POL005 18
Chapter 5: Installation use cases

Installation use cases
The template configuration is prepared for both user file authentication (like Polarion uses forSubversion by default, with user passwords data in a file) and for authentication against an LDAPserver.
Multiple stand-alone instances setup
Using the coordinator for license management.
You can set up the multiple stand-alone instances configuration using the coordinator for licensemanagement.
Three machines (virtual or psychical) are required for this setup:
1. Coordinator (http://coordinator.yourdomain.com)
2. Stand-alone Instance1 (http://instance1.yourdomain.com)
3. Stand-alone Instance2 (http://instance2.yourdomain.com)
POL005 18 Polarion Enterprise Setup 5-11
Installation use cases

Chapter 5: Installation use cases
Deployment diagram for multiple stand-alone instances:
Start by installing the same version of Polarion on each of the 3 machines: Coordinator, Instance1,and Instance2. The following different third-party software is required on the individual machines.
• On the instances - Java, Apache HTTP Server, Subversion, and PostgreSQL
• On the coordinator - Java, and Apache HTTP Server
The easiest way is to use the standard installation procedure to install all dependencies then uninstallthe software that is not needed if you need to save storage space. All third-party software, exceptJava, is bundled in Polarion distributions for Windows. They are already present on most Linuxinstallations. Refer to Windows Installation and Linux Installation. (The PDFs are also bundledwith Polarion distributions.)
The next sections assume that Polarion is successfully installed using the standard installation andrunning on each machine.
There are specific next steps that need to be performed on each machine.
5-12 Polarion Enterprise Setup POL005 18
Chapter 5: Installation use cases
Installation use cases
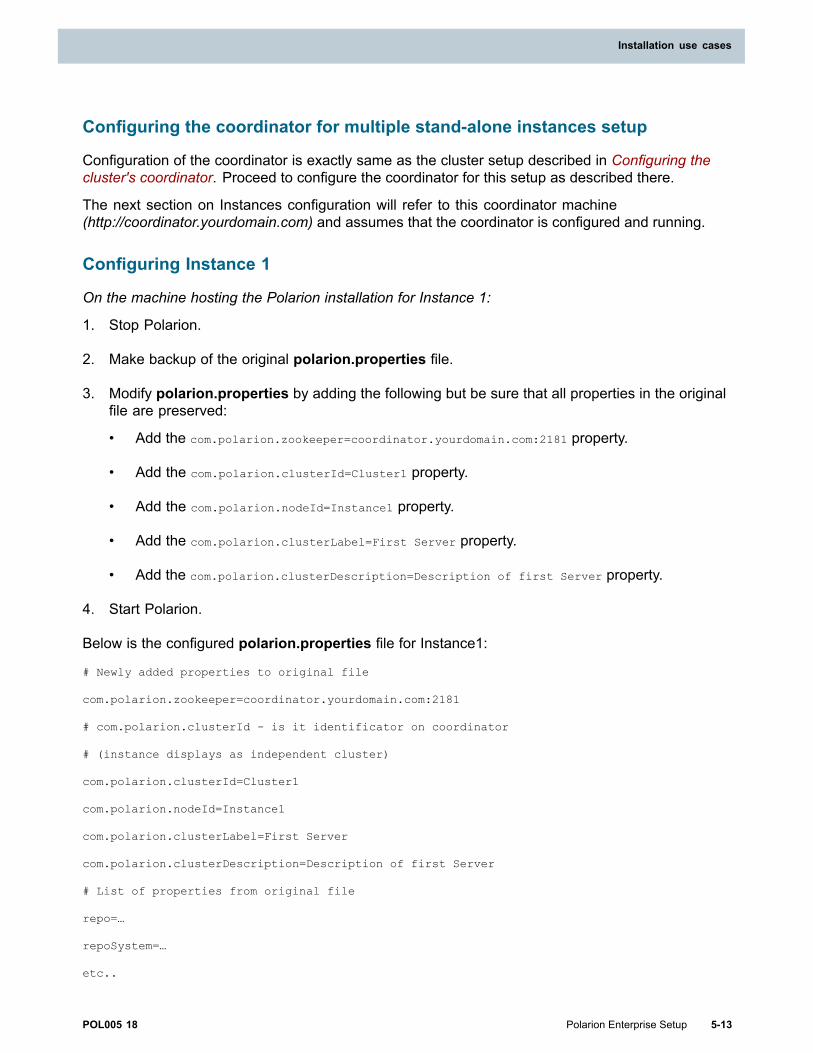
Configuring the coordinator for multiple stand-alone instances setup
Configuration of the coordinator is exactly same as the cluster setup described in Configuring thecluster's coordinator. Proceed to configure the coordinator for this setup as described there.
The next section on Instances configuration will refer to this coordinator machine(http://coordinator.yourdomain.com) and assumes that the coordinator is configured and running.
Configuring Instance 1
On the machine hosting the Polarion installation for Instance 1:
1. Stop Polarion.
2. Make backup of the original polarion.properties file.
3. Modify polarion.properties by adding the following but be sure that all properties in the originalfile are preserved:
• Add the com.polarion.zookeeper=coordinator.yourdomain.com:2181 property.
• Add the com.polarion.clusterId=Cluster1 property.
• Add the com.polarion.nodeId=Instance1 property.
• Add the com.polarion.clusterLabel=First Server property.
• Add the com.polarion.clusterDescription=Description of first Server property.
4. Start Polarion.
Below is the configured polarion.properties file for Instance1:
# Newly added properties to original file
com.polarion.zookeeper=coordinator.yourdomain.com:2181
# com.polarion.clusterId - is it identificator on coordinator
# (instance displays as independent cluster)
com.polarion.clusterId=Cluster1
com.polarion.nodeId=Instance1
com.polarion.clusterLabel=First Server
com.polarion.clusterDescription=Description of first Server
# List of properties from original file
repo=…
repoSystem=…
etc..
POL005 18 Polarion Enterprise Setup 5-13
Installation use cases

Chapter 5: Installation use cases
Configuring Instance 2
On the machine hosting the Polarion installation for Instance2:
1. Stop Polarion.
2. Make a backup of the original polarion.properties file.
3. Modify polarion.properties by adding the following but be sure that all properties in the originalfile are preserved:
• Add the com.polarion.zookeeper=coordinator.yourdomain.com:2181 property.
• Add the com.polarion.clusterId=Cluster2 property.
• Add the com.polarion.nodeId=Instance2 property.
• Add the com.polarion.clusterLabel=Second Server property.
• Add the com.polarion.clusterDescription=Description of second Server property.
4. Start Polarion.
Below is the configured polarion.properties file for instance2:
# Newly added properties to original file
com.polarion.zookeeper=coordinator.yourdomain.com:2181
# com.polarion.clusterId - is it identificator on coordinator
# (instance displays as independent cluster) com.polarion.clusterId=Cluster2
com.polarion.nodeId=Instance2 com.polarion.clusterLabel=Second Server
com.polarion.clusterDescription=Description of second Server
# List of properties from original file
repo=…
repoSystem=…
etc..
The configuration is quite similar to the cluster setup. The difference is that there is no load balanceror shared services. Each instance is autonomous, a stand-alone Polarion installation with its ownSVN repository. Individual instances have nothing to do with other instances in a Multiple Stand-aloneInstances setup. However, users can easily switch between the instances by accessing the entry pointon the coordinator. You can also monitor the availability of each Instance using server monitoring.
The Polarion user interface (UI) and end-user documentation use the term server whenreferring to what we term instance for administrators. For example, the UI provides endusers the possibility to Change Server. In administration terms, work on a differentInstance.
5-14 Polarion Enterprise Setup POL005 18
Chapter 5: Installation use cases

Installation use cases
Access URLs for multiple stand-alone instances
Entry Point (all Instances): http://coordinator.yourdomain.com/polarion
Server Monitoring: http://coordinator.yourdomain.com/polarion/monitoring
Instance1 direct access: http://instance1.yourdomain.com/polarion
Instance2 direct access: http://instance2.yourdomain.com/polarion
Migrating From a Pre-2014 multi-instance installation
Differences between the new and old multiple stand-alone instances" setups
Several versions prior to version 2014 supported a topography of multiple Polarion instances that wastermed a "Multi-Instance" setup. Instance clustering was not supported. Although existing customerinstallations of this setup have still been usable with versions 2014 - 2016, the setup was documentedin this guide as deprecated in favor of the many improvements delivered beginning with version 2014.
Beginning with version 17, the pre-2014 multi-instance setup with local instances is nolonger supported. If you are using this type of setup, in order to use version 17 (andsubsequent versions), you must migrate your system to a multiple stand-alone instancessetup as described here. (Review Multiple stand-alone instances setup to familiarizeyourself with this setup). Customers with a current support and maintenance package mayconsult technical support for assistance with this migration.
The new Multiple Stand-alone Instances setup differs from old Multi-Instance setup in the followingways:
• The master is replaced by the coordinator, which manages a license for all instances.
• Local instances are not compatible with the new Multiple stand-alone instances setup. Ifyou have local Instances configured and wish to update to 2017 (or later) multiple stand-aloneinstances, these local instances must be moved to separate machines and then configured lateras part of a multiple stand-alone instances setup. (See Moving local instances for the 2014multi-Instance setup for more information.)
• Each remote instance will become a non-clustered Instance connected to the coordinator.
• The coordinator does not start up the instances. They must be started individually.
In order to do the migration, you need to update Polarion on the old master and remote instancesto the same version. Then you need to modify the configuration files so that they reflect the newconfiguration properties.
For example, a pre-2014 setup with one Master application and two Remote Instances will become amultiple stand-alone instances setup with one coordinator and two non-clustered instances. Eachinstance hosts a stand-alone installation of Polarion, complete with third-party software and arepository.
POL005 18 Polarion Enterprise Setup 5-15
Installation use cases

Chapter 5: Installation use cases
Configuring the coordinator
To replace the pre-2014 multi-Instance setup you need to configure the coordinator. The coordinatorstill runs on the machine where the master and local instances ran.
Follow the steps described in Configuring the cluster's coordinator, and also use the informationfrom the _controller.properties file if needed. For example, controlPort and controlHostname canbe taken from the _controller.properties file.
From this point on, it is assumed that you have the coordinator configured, running and accessiblethrough following URL: http://coordinator.yourdomain.com/polarion.
Migrating a remote instance to a non-clustered stand-alone instance
1. Stop the instance and update it to the latest Polarion version (2017 or later).
2. Make a backup of the original polarion.properties file.
3. Add the following properties to the polarion.properties file but make sure all its originalproperties are preserved:
Add the com.polarion.zookeeper=coordinator.yourdomain.com:2181 property.
Add the com.polarion.clusterId=OldRemoteInstanceId property.
Add the com.polarion.nodeId=OldRemoteInstanceId-node1 property.
Add the com.polarion.clusterLabel=Old Remote Instance Label property.
Add the com.polarion.clusterDescription=Description of the old remote instance property.
4. If you have any properties configured in instanceid.properties, they should be moved intopolarion.properties, otherwise they will be ignored.
5. Start Polarion.
Below is an example of a polarion.properties file for a migrated remote instance. (The instanceID is instance1.)
# Newly added properties to original file
com.polarion.zookeeper=coordinator.yourdomain.com:2181
com.polarion.clusterId=instance1 com.polarion.nodeId=node1
com.polarion.clusterLabel=Remote instance - Instance1
com.polarion.clusterDescription=Description of the remote instance
# List of properties from original file
repo=…
repoSystem=…
etc..
5-16 Polarion Enterprise Setup POL005 18
Chapter 5: Installation use cases

Installation use cases
Checking the migration
To check that the migration was successful, go to http://coordinator.yourdomain.com/polarion andconnect to the instances.
• Entry point URL: http://coordinator.yourdomain.com/polarion
• Server monitoring URL: http://coordinator.yourdomain.com/polarion/monitoring
Each Instance can be still directly accessed through its URL: For example,http://instance1.yourdomain.com/polarion
The old configuration files for the pre-2014 Multi-Instance setup from[polarion_installation]/configuration/multi-instance/* will become obsolete.
Moving local instances for the multiple stand-alone instances setup
Moving a Local Instance refers to moving the existing repository and the configuration files to a newPolarion installation.
This step is only required if some of the Instances are configured as Cluster. If no Cluster is needed,the Local Instances will still work as they did before in the old Multi-instance setup with the sameconfiguration.
Linux paths:
• The polarion.properties file: opt/polarion/etc.
• The repository folder: /opt/polarion/data/svn or/opt/polarion/data/multi-instance/instanceId/svn.
Windows paths:
• The polarion.properties file: C:\Polarion\polarion\configuration.
• The repository folder: C:\Polarion\data\svn or C:\Polarion\data\multi-instance\instanceId\svn
To move a local instance to a new machine:
1. Install Polarion on the new machine. Make sure it can be started correctly, then stop it andkeep it stopped for the next steps.
2. In the new installation location, make a backup of the repository folder. This copy willsubsequently be referred to as svn_backup.
3. In the new installation location: make a backup of the polarion.properties file. This copy willsubsequently be referred to as polarion.properties_backup.
4. Perform an SVN dump on the existing repository.
($ svnadmin dump /var/svn/repos > full.dump. See svnbook.red-bean.com for details.)
5. Then Perform an SVNadmin load on the new repository.
($ svnadmin load /var/svn/restored < repos-backup. See svnbook.red-bean.com for details.)
POL005 18 Polarion Enterprise Setup 5-17
Installation use cases

Chapter 5: Installation use cases
6. Copy the access and passwd files to the new repository.
7. Copy the polarion.properties file from the old instance to the same location on the new machine.(See path references above.)
8. Start Polarion. You should have all the data from the old instance.
9. After a successful startup, you can delete svn_backup and polarion.properties_backup files.
At this point you have a clean installation of the latest Polarion version holding the data andconfiguration of the old instance. You can configure this instance as part of a multi-instance setupfollowing the steps described in Setting up a cluster from new installations.
Updating a multiple stand-alone instance or cluster setupWhen updating either setup, you can use the update distribution to update the machines in thesetup (see steps below). To limit the downtime for the update of a cluster, it is recommended thatyou start with updating of one of the cluster instances up-front to minimize the downtime for theduration of the coordinator update.
Logging on to an instance, that has a different version of Polarion installed than thecoordinator that it is connected to, is not supported. However, it is possible to run thereindex procedure on such a machine.
Update steps for a cluster:
1. Stop the Polarion service on one of the cluster instances.
2. Check that there are no running PhantomJS and Variants server processes on the instanceand if so, kill them.
3. Install the update on the target cluster instance.
4. Start the cluster instance in reindex mode and wait for the reindex to finish.
5. Stop the Polarion service on all cluster instances, including the one that has already beenupdated. (Stop the Polarion service on the coordinator once it has been done on all the instances.)
6. Check that there are no running PhantomJS and Variants server processes on any of theinstances and if there are, then kill them.
7. Install the update on the coordinator machine and start Polarion in reindex mode.
8. Start the cluster instance that was updated in step 3. Once it starts, your users can log onto your cluster.
9. Install the update and start each of the remaining cluster instances in reindex mode.
5-18 Polarion Enterprise Setup POL005 18
Chapter 5: Installation use cases

Installation use cases
Ensure that the update of the SVN repository is only done once, either by updating one ofthe nodes up-front, or by updating the Cluster nodes in sequence.
Updating the shared services machine is only required to update the bundled Apacheand Subversion for Windows environments.
To update multiple stand-alone instances, all instances and the coordinator must be shutdown and updated at once.
Running the reindex procedure and the DB History Creator job in parallel on multiple nodesputs a substantial load on the shared services machine and will prolong the reindex andDB History Creator run.
POL005 18 Polarion Enterprise Setup 5-19
Installation use cases


Chapter 6: Configure shared data
Shared data configuration steps for both Windows and LinuxThe following details how to configure shared data on Linux and Windows machines and thedifferences between the two.
Prerequisites (4 machines, all on same domain):
1. Coordinator (coordinator.yourdomain.com)
2. Node1 (node1.yourdomain.com)
3. Node2 (node2.yourdomain.com)
4. Shared Services (cluster.yourdomain.com)
The shared folder has same structure as standard Polarion installation folder, so it is possible touse a Polarion installer to create it
1. Install Polarion.
2. Uninstall the Polarion service and delete the folders that are not needed. Only two folders in thePolarion installation are needed for shared data:
- Linux: /opt/polarion/etc and /opt/polarion/data.
- Windows: C:/Polarion/polarion/configuration and C:/Polarion/data.
The deletion of the other, unnecessary, folders is optional. You can also leave theinstallation folder as it is after installation.
The root of the Shared Services is the polarion folder.
POL005 18 Polarion Enterprise Setup 6-1
Chapter 6: Configure shared data
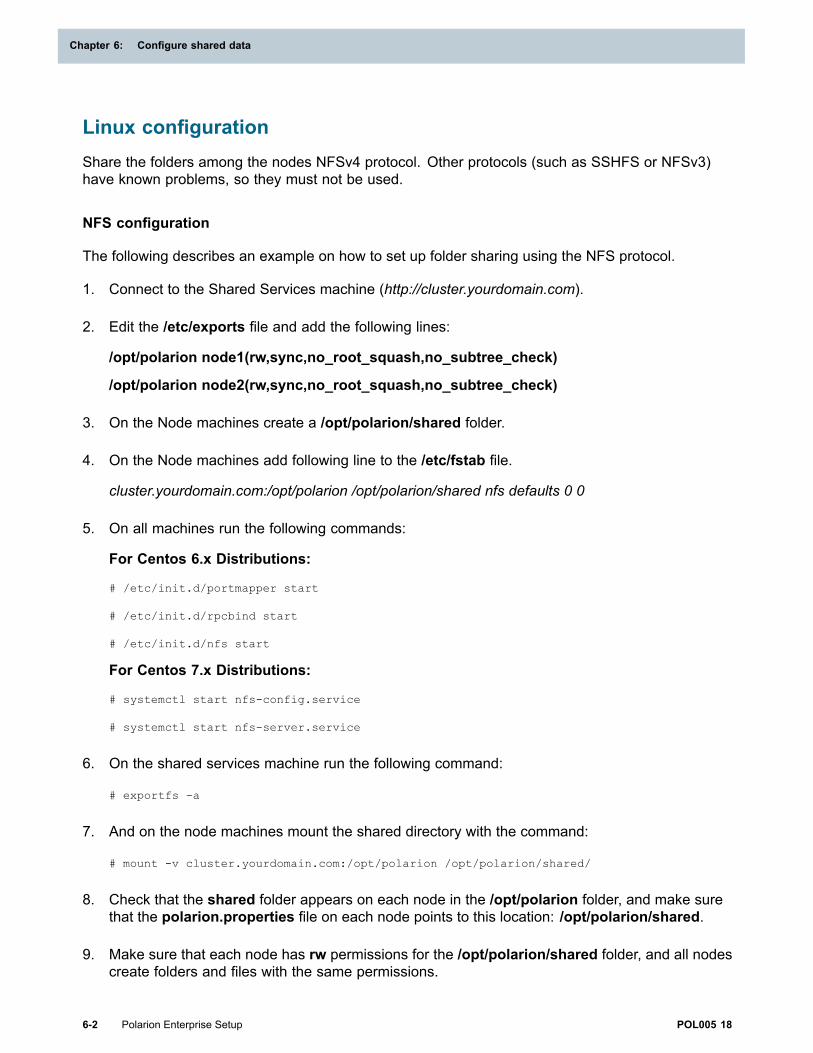
Linux configurationShare the folders among the nodes NFSv4 protocol. Other protocols (such as SSHFS or NFSv3)have known problems, so they must not be used.
NFS configuration
The following describes an example on how to set up folder sharing using the NFS protocol.
1. Connect to the Shared Services machine (http://cluster.yourdomain.com).
2. Edit the /etc/exports file and add the following lines:
/opt/polarion node1(rw,sync,no_root_squash,no_subtree_check)
/opt/polarion node2(rw,sync,no_root_squash,no_subtree_check)
3. On the Node machines create a /opt/polarion/shared folder.
4. On the Node machines add following line to the /etc/fstab file.
cluster.yourdomain.com:/opt/polarion /opt/polarion/shared nfs defaults 0 0
5. On all machines run the following commands:
For Centos 6.x Distributions:
# /etc/init.d/portmapper start
# /etc/init.d/rpcbind start
# /etc/init.d/nfs start
For Centos 7.x Distributions:
# systemctl start nfs-config.service
# systemctl start nfs-server.service
6. On the shared services machine run the following command:
# exportfs -a
7. And on the node machines mount the shared directory with the command:
# mount -v cluster.yourdomain.com:/opt/polarion /opt/polarion/shared/
8. Check that the shared folder appears on each node in the /opt/polarion folder, and make surethat the polarion.properties file on each node points to this location: /opt/polarion/shared.
9. Make sure that each node has rw permissions for the /opt/polarion/shared folder, and all nodescreate folders and files with the same permissions.
6-2 Polarion Enterprise Setup POL005 18
Chapter 6: Configure shared data

Configure shared data
Windows configurationWe recommend using standard Windows sharing on this platform.
CIFS / Samba share configuration
You need to configure sharing on the shared services machine, and all Node machines, starting withthe shared services machine.
Shared services machine
A simple example on how to create the shared folder using CIFS/Samba.
1. Connect to the shared services machine (http://cluster.yourdomain.com).
2. Open File Explorer.
3. Right-click on the C:/Polarion folder.
4. Select Properties.
5. Select the Sharing tab .
6. Click Share... .
7. Set shared user as the same domain user for all polarion installations in the cluster. The userneeds full permissions for the folder.
8. After you have configured the sharing options, click on Share, and then Done.
Node machines
1. Connect to each Node (http://node1.yourdomain.com and http://node2.yourdomain.com)
2. Open File Explorer.
3. In the left panel, right-click on Computer.
4. Map a network drive. Using the credentials of the polarion domain user.
• The folder should be: \\cluster.yourdomain.com\polarion
5. Edit the polarion.properties file accordingly and specify the path to the shared folder.
• The com.polarion.shared property must point to this mapped drive.
POL005 18 Polarion Enterprise Setup 6-3
Configure shared data


Chapter 7: Security options
Recommended setupThe recommended setup is to use encrypted communication between the outside world and theinternal network with servers of the Multiple stand-alone instances setup (as shown in the figurebelow). This is also optimal from a performance point of view. Communication inside the localnetwork can optionally be encrypted as well (except for the folders shared using NFS). See Advancedsecurity options for more details.
POL005 18 Polarion Enterprise Setup 7-1

Chapter 7: Security options
HTTPS access should be set up in an Apache server. See some hints and referenceson how to do this in the Administrator's Guide → Configuring SSL Support sectionin Polarion's Help.
Recommended security options
Service Security Settings
Entry point
(Coordinator)
The entry point, where users can select the Polarion server, shouldbe configured for HTTPS access in Apache so that end users willaccess, for example, https://coordinator.mycompany.com/polarion.
Additional steps:
Remember to update the base.url in the polarion.properties file.
Server monitoring
(Coordinator)
The same as above for the server monitoring page, for example,https://coordinator.mycompany.com/polarion/monitoring.
This will be usually done by the same configuration as the entrypoint.
Stand-alone instance
Polarion
Standard HTTPS setup like is done for a simple stand-aloneinstallation, so that the instance can be accessed as, for example,https://instance1.mycompany.com/polarion. If the Subversionrepository is accessed by end users, it should be configured forHTTPS access as well.
Additional steps:
Remember to update the base.url in the polarion.properties file.
Clustered instance
Polarion
Standard HTTPS setup in Apache for the load balancer sothat the clustered instance can be accessed as, for example,https://instance2.mycompany.com/polarion. If the subversionrepository is accessed by end users, it should be configured forHTTPS access as well.
1. Set the wikiProtocolSchema=https Polarionproperty in the shared cluster properties file(/opt/polarion/etc/polarion.properties) on the sharedservices machine.)
2. Remember to update the base.url in the shared clusterproperties.
7-2 Polarion Enterprise Setup POL005 18
Chapter 7: Security options

Security options
Advanced security optionsIf desired, the internal network communication among the servers comprising the multiple stand-aloneinstances setup can be encrypted as well.
Service Security Settings
Load balancing Load balancing communication between the load balancer and theworkers (clustered instances) can be done via HTTPS. HTTPSaccess must be set up on the coordinator and all cluster unstances,as it is for simple a installation, and then configure the load balancerto use the HTTPS worker URLs. You can use the same wildcardcertificate on all servers.
Additional steps:
1. It is necessary to switch on the SSL proxy engine usingSSLProxyEngine on in the Apache configuration.
2. The wikiProtocolSchema=https property mustbe set in the shared cluster properties file(/opt/polarion/etc/polarion.properties), on the sharedservices machine.
3. Remember to update the base.url in shared cluster properties.
By default, Apache does not verify the certificate of theworkers. To switch it on, set SSLProxyVerify=requireproperty and you might also need to set theSSLProxyCACertificatePath property or other directives.See Apache's mod ssl documentation documentation formore details.
Load balancermanagement
By default, the coordinator manages the load balancer. Forexample, it switches off the worker if a Polarion cluster nodedisconnects from the cluster. This management is done using theHTTP/HTTPS URL provided by the com.polarion.loadBalancer
shared cluster property. The load balancer manager is a webapplication provided by Apache, and it can be configured for HTTPSaccess on shared services.
Additional steps:
1. Remember to update the com.polarion.loadBalancer Polarionproperty the in shared cluster properties.
2. It might be necessary to install a trusted certificate authority tothe Java trust store, especially if a self-signed certificate is used.
POL005 18 Polarion Enterprise Setup 7-3
Security options

Chapter 7: Security options
Service Security Settings
Subversion repository For the best performance, cluster nodes should access theshared repository by the system user using the SVN protocol(repoSystem=svn://...). To do so, svnserve running on theshared services machine, must be open to remote access. Thiscommunication is not encrypted.
To enhance security you may want to consider establishing a securechannel using, for example, Stunnel .
The idea is that instead of...
repoSystem=svn://SHARED_SERVICES_HOST/opt/polarion/data/svn/repo
Use...
repoSystem=svn://localhost/opt/polarion/data/svn/repo
On the cluster node and connectlocalhost:3690 to SHARED_SERVICES_HOST:3690 by a securedchannel.
Cluster coordination Instances and nodes in the multiple stand-alone instances setupcommunicate with the coordinator machine. This communicationis not encrypted. It can be secured using, for example, Stunnelin a very similar way to that described above. Cluster instancesalso communicate directly with other cluster instances using aTCP socket on the controPort. This communication is encryptedinternally.
7-4 Polarion Enterprise Setup POL005 18
Chapter 7: Security options
Security options
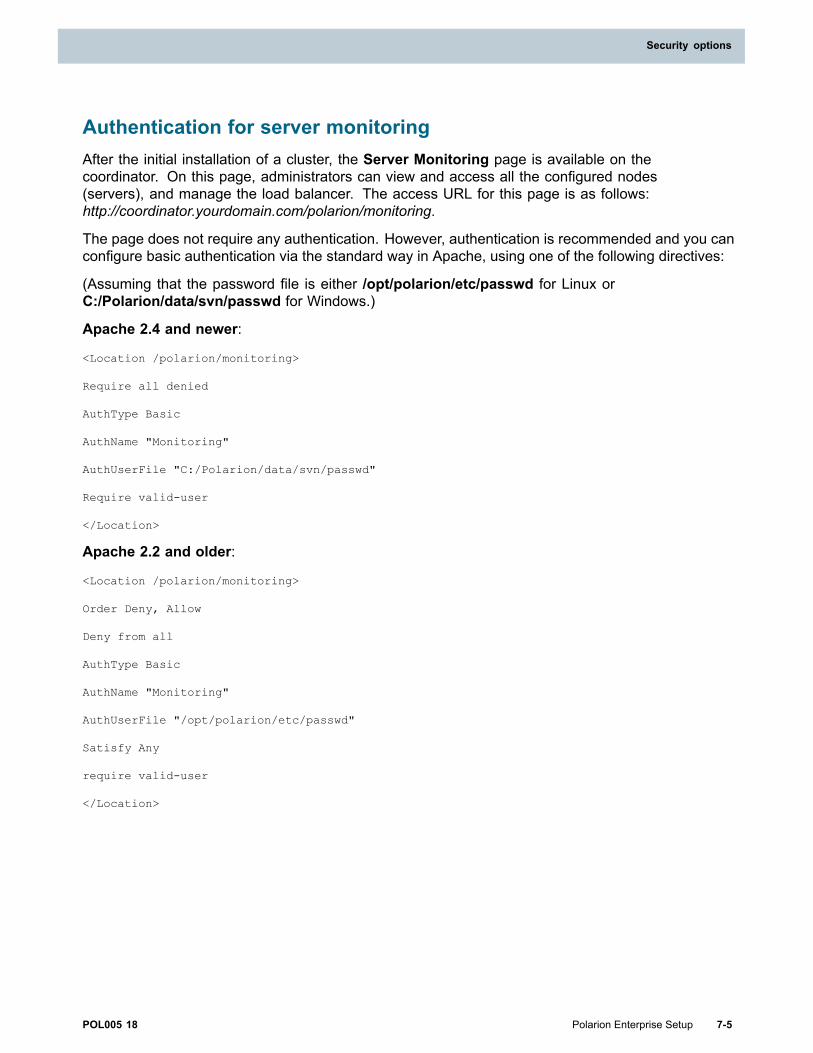
Authentication for server monitoringAfter the initial installation of a cluster, the Server Monitoring page is available on thecoordinator. On this page, administrators can view and access all the configured nodes(servers), and manage the load balancer. The access URL for this page is as follows:http://coordinator.yourdomain.com/polarion/monitoring.
The page does not require any authentication. However, authentication is recommended and you canconfigure basic authentication via the standard way in Apache, using one of the following directives:
(Assuming that the password file is either /opt/polarion/etc/passwd for Linux orC:/Polarion/data/svn/passwd for Windows.)
Apache 2.4 and newer:
<Location /polarion/monitoring>
Require all denied
AuthType Basic
AuthName "Monitoring"
AuthUserFile "C:/Polarion/data/svn/passwd"
Require valid-user
</Location>
Apache 2.2 and older:
<Location /polarion/monitoring>
Order Deny, Allow
Deny from all
AuthType Basic
AuthName "Monitoring"
AuthUserFile "/opt/polarion/etc/passwd"
Satisfy Any
require valid-user
</Location>
POL005 18 Polarion Enterprise Setup 7-5
Security options


Chapter 8: Using Resource Traceability in a cluster
Before setting up Resource Traceability
To ensure that a cluster setup installs correctly, thecom.siemens.polarion.rt.startRtServer=false property was added to the sharedpolarion.property file.
This property should be removed before setting up a Resource Traceability server.
Standalone Resource Traceability serverTo configure a cluster or standalone Resource Traceability installation connected to a Polarion cluster:
This configuration is recommended to ensure the high-availability of the ResourceTraceability server.
If the Resource Traceability node goes down, it can be quickly restarted without having torestart the Polarion application itself.
Adjust database
1. Shutdown Polarion and PostgreSQL.
2. Go to the [POLARION_DATA]/postgres-data folder.
3. For Windows or Linux installations, open the postgreql.conf file and comment out the followingproperties and uncomment the entry for the same property exactly below them:
• max_connections
• shared_buffers
• work_mem
• maintenance_work_mem
• fsync
• synchronous_commit
• full_page_writes
• wal_buffers
POL005 18 Polarion Enterprise Setup 8-1

Chapter 8: Using Resource Traceability in a cluster
• checkpoint_segments
• effective_cache_size
• max_locks_per_transaction
4. Restart PostgreSQL.
To create a database on a new location - to have it on shared storage - please contact Polarionsupport.
To connect a Resource Traceability Server to an external database, the following shouldbe used:
com.siemens.polarion.rt.db.jdbcUrl=jdbc:postgresql://<databaseLocation>:5433/polarion
com.siemens.polarion.rt.db.username=<username> (e.g polarion)
com.siemens.polarion.rt.db.password=<password>
Adjust the resource traceability server's polarion.properties file
When connecting the Resource Traceability server to a Polarion Cluster.
1. Mount the shared storage to the Resource Traceability node. (Required to share thepolarion.properties file.)
2. Make a copy of your polarion.properties file for Resource Traceability.
3. After making the copy, replace its content with the content below and adjust the propertiesif needed:
com.siemens.polarion.rt.polarionUrl=http://polarion-cluster
com.polarion.application=polarion.rt
#Shared folder between the machines that make up the cluster
#default Linux: com.polarion.shared=/opt/polarion/shared
#default Windows: com.polarion.shared=\<shared_services_host>\\Polarion
com.polarion.shared=/opt/polarion/shared
TomcatService.ajp13-port=8889
base.url=http://rt-hostname
# Control port and host name for shutdown requests
controlPort=8887
controlHostname=rt-hostname
com.polarion.platform.internalPG=polarion:polarion@localhost:5433
8-2 Polarion Enterprise Setup POL005 18
Chapter 8: Using Resource Traceability in a cluster

Using Resource Traceability in a cluster
The com.siemens.polarion.rt.polarion URL should point to the cluster address that goesthrough the load balancer.
HTTPS setup is done like any other Polarion instance. Certificates must also be imported into thetruststores of both the Polarion and Resource Traceability servers.
Adjust the virtual memory settings
1. Adjust the Virtual Memory properties so that they fall into the -Xms500m -Xmx2g range.
These values will vary depending on the number of external repositories, their size andscheduling.
• For Windows: In the [POLARION_HOME]/polarion.ini file.
• For Linux: In the [POLARION_HOME]/etc/config.sh file.
2. Restart Polarion.
Adjust the Polarion server
Adjust the Polarion server to work with the Standalone Resource Traceability server.
When connecting a Polarion cluster to a Standalone Resource Traceability Server, add the followingproperties to each node:
com.siemens.polarion.rt.startRtServer=false
com.siemens.polarion.rt.url=http://rt-hostname
com.siemens.polarion.rt.url should point to the base.url of the standalone ResourceTraceability server. (For both cluster and single installations.)
HTTPS setup is done like for any other polarion instance. Additionally, import the certificates intothe truststores of both Polarion and Resource Traceability server.
POL005 18 Polarion Enterprise Setup 8-3
Using Resource Traceability in a cluster

Chapter 8: Using Resource Traceability in a cluster
Embedded Resource Traceability server in cluster nodesTo ensure a high-availability setup, use the Standalone resource traceability setup.
To ensure that a cluster setup installs correctly, thecom.siemens.polarion.rt.startRtServer=false property was added to the sharedpolarion.property file. It should be removed before setting up a Resource Traceabilityserver.
To correctly configure a Resource Traceability cluster, setup Reader and Writer nodes.• Reader Node: Can only return links that are stored in the Resource Traceability database for a
specifiedWork Item. There is no limit to the number of Reader nodes located in the cluster.
• Writer Node: Enables configuration updates, collects information from the repositories andstores data, files, configurations and links in the database. Only a single Writer node is allowed inthe cluster.
Writer node settings can be left as is because a Polarion instance starts the ResourceTraceability sever by default as a Writer instance.
Configure reader nodes
Customize the following Properties to use a different PostgreSQL instance for storing links:
A database on a different node acts like a separate PostgreSQL instance and the properties belowshould also be provided on the node or instance pointing to the database.
com.siemens.polarion.rt.db.jdbcUrl=jdbc:postgresql://someurl
(e.g. node2):5433/polarion where the URL points to a different server.
By default com.polarion.platform.internalPG is used to fetch database properties.
com.siemens.polarion.rt.db.jdbcUrl
com.siemens.polarion.rt.db.username
com.siemens.polarion.rt.db.password
All Reader nodes should be configured to send different write requests to the Writer node.
They should also all be marked as Reader nodes by setting thecom.siemens.polarion.rt.dataCollectingEnabled=false property to false.com.siemens.polarion.rt.writerNodeUrl= should be linked to the Writer node's base URL.
Define the same database properties in the following properties for every Reader node. They shouldbe linked to the Database that is used by the Writer node. This enables the Polarion located on aReader node to send a request to fetch Work Item links for its local RT Server instance along will allother requests, for example, configuration changes to the Writer node.
com.siemens.polarion.rt.db.jdbcUrl
com.siemens.polarion.rt.db.username
com.siemens.polarion.rt.db.password
8-4 Polarion Enterprise Setup POL005 18
Chapter 8: Using Resource Traceability in a cluster

Chapter 9: Notes
• Web Services: With the 17.1 release, Polarion’s web service client supports load balancing ina cluster. (External applications that connect to Polarion via web services should use the loadbalancer’s URL as the entry point to Polarion.)
• Extensions are not shared among the nodes in a cluster. Each node has its own independentextensions folder (e.g. /opt/polarion/polarion/extensions). Therefore, an extension can beinstalled on some specific node(s) in a cluster. However, in most cases you will want to installextensions on all Nodes. Only in the case of some special kind of extension would you notinstall it on all nodes.
• Scheduled jobs should be reviewed for a cluster, and convenient node selectors (i.e. thenode attribute of <job> elements) should be specified depending on the nature of the job. Thefollowing default jobs should have node="*" specified: Index Checker, Suspend DB HistoryCreator, Resume DB History Creator.
• Diagnostics: Polarion comes with a self-diagnostic utility Polarion Diagnostic Tool (PDT),which can run comprehensive diagnostic tests and communicate the results to Polarion'stechnical support team. PDT checks if Polarion is running in a cluster and gathers configurationsfrom shared folders. The utility is located in the diagtool folder under the root of any installedPolarion instance, that also contains documentation for its use.
POL005 18 Polarion Enterprise Setup 9-1


Chapter 10: Troubleshooting
• Linux: It is recommended to disable SELinux, if it is used.
• Windows: Disabling the firewall on enterprise editions of Windows also disables crucial networkservices.
• After encountering problems with activities, for example,org.apache.lucene.index.IndexNotFoundException: no segments * file found inMMapDirectory@/opt/polarion/shared/data/workspace/polarion-data/index/Activities,the index of activities must be manually deleted from the shared folder and anode restarted so that an empty index is created. By default:it is found in the/opt/polarion/shared/data/workspace/polarion-data/index/Activities directory.
POL005 18 Polarion Enterprise Setup 10-1


Chapter 11: Appendix: Polarion instance architecture
POL005 18 Polarion Enterprise Setup 11-1

© 2018 Polarion AG
This software and related documentation are proprietary to Siemens Product Lifecycle Management
Software Inc.
© 2018 Polarion AG.
Polarion is a registered trademark of Polarion AG. Polarion ALM, Polarion REQUIREMENTS, Polarion QA
and Polarion VARIANTS are trademarks or registered trademarks of Polarion AG.
Siemens and the Siemens logo are registered trademarks of Siemens AG. NX, Solid Edge, and
Teamcenter are trademarks or registered trademarks of Siemens Product Lifecycle Management
Software Inc. or their subsidiaries in the United States and in other countries. All other trademarks,
registered trademarks, or service marks belong to their respective holders.


