65
Power It Up A High-Voltage Introduction to Circuitry and Soldering

Power It UpA High-Voltage Introduction
to Circuitry and Soldering
Power It UpA High-Voltage Introduction
to Circuitry and Soldering


Power It UpA High-Voltage Introduction
to Circuitry and Soldering

© 2013 TechbridgeAll rights reserved. No part of this publication may be reproduced or transmitted in any form or by any means, electronic or mechanical, including photocopying, recording, or by any information storage and
retrieval without the written permission of Techbridge.
We thank the leadership at the Noyce Foundation and the Gordon and Betty Moore Foundation for recognizing Techbridge’s potential to impact girls beyond those in our local community. These Foundations’ generous support of this project made the partnership with Girl
Scout Councils possible.
We would like to acknowledge our partners who reviewed the lessons, piloted the activities, and provided feedback. We thank Cary Sneider, Lisa Regalla and Kathryn Rivers for their thoughtful reads of our lessons and suggestions for making the science content
accurate and accessible for Girl Scouts and the adults who work with them. Our advisory team including Faith Brown, Jean Fahy, Randy Freedman, Melissa Koch, Diane Matt, and Karen Peterson offered guidance to support our training for leaders.
The Techbridge staff demonstrated tireless creativity and flexibility while developing and testing these programs. Thanks to Maria Anaya, Megan Davis, Jennifer Diaz, Jennifer Joyce, Linda Kekelis, Molly Larkin, Lulu McCourt, Martha Pena, and Jennifer Wei, with the
assistance of Eli Leonardo, Jennifer Tai and Vicki Tu.
Our friends at the Girl Scout councils of Northern California (especially Brenda Gabel and troops 60021, 60656, and 60688), Central Texas, West Central Florida and Central Maryland, piloted early versions of the activities and offered suggestions that helped improve the
program boxes. Our partnership with Girl Scout councils embodies the best in collaboration. We have shared resources and learned so much from teaming up on this project. Together we worked to inspire girls to change the world through engineering and science.

Power It Up: Suggested Schedule .................................................................................................... 2
Power It Up: Alternative Schedules ................................................................................................... 3
Power It Up: Introduction ..................................................................................................................... 4
Background Information ...................................................................................................................... 6
Girl Scout Leadership Experience ....................................................................................................... 8
Leader Tips.................................................................................................................................................. 9
Parent Resource Handout ..................................................................................................................12
Planning a Role Model Visit ................................................................................................................13
Power It Up: Materials .........................................................................................................................14
Break the Chain ......................................................................................................................................17
Snap Circuits® ...........................................................................................................................................23
Conductors vs. Insulators ....................................................................................................................26
Tilt Lantern ................................................................................................................................................28
Gradvertisement .....................................................................................................................................32
Practice Soldering ...................................................................................................................................36
Electric Game Board (soldering) .......................................................................................................41
Electric Game Board (non-soldering) ............................................................................................46
Your Career Card ....................................................................................................................................50
Career Step Up ........................................................................................................................................52
Power It UpTable of Contents


About Techbridge
“Boring, nerdy, and only for boys.” Some girls may think of engineering in those terms, but not the girls participating in Techbridge. They say, “I learned that this science thing is very fun and educational at the same time. I LOVE IT!” and “I learned that engineering is not just for men.”
Techbridge is a leader in providing girls with firsthand experience working as engineers—from designing toys and building turbines, to meeting professional engineers who help make the world a better place.
Techbridge brings together best practices and lessons learned for partners and offers curriculum that builds on girls’ interests and expands their career options. We have seen first-hand the impact that role model visits and field trips can have. We offer training and resources to youth-serving adults to create positive experiences for girls.
The Techbridge program reaches out to girls in under-served communities and offers after-school and summer programs with hands-on projects and career exploration. Techbridge has served over 3,000 girls in elementary, middle, and high schools in Oakland, California and surrounding communities since its start in 2000. The program has been shown to increase girls’ confidence, build skills, and promote interest in careers in engineering, science, and technology.
In order to bring a Techbridge experience to girls across the country, we are partnering with Girl Scout councils. The Techbridge team has developed programs-in-a-box that include all the activities and materials you will need to introduce girls to the wonders of engineering and science. The Girls Go Techbridge program-in-a-box includes the leader guide you have in your hands, and the box of materials in front of you, ready for a group of ten girls to dive in and enjoy.
We invite you to partner with us to bring engineering and science to girls in your community. Together we can inspire a girl to change the world.
For more information, visit www.techbridgegirls.org.
- 1 - Power It Up
- 2 - Power It Up
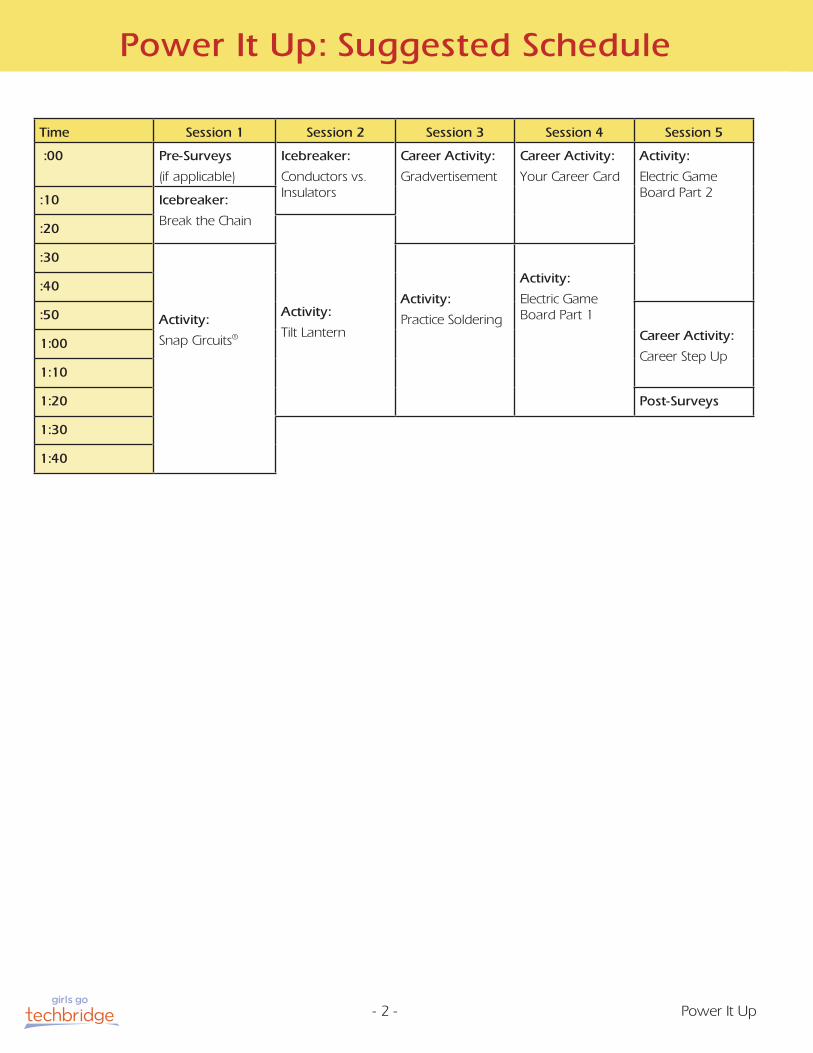
Time Session 1 Session 2 Session 3 Session 4 Session 5
:00 Pre-Surveys
(if applicable)
Icebreaker:
Conductors vs. Insulators
Career Activity:
Gradvertisement
Career Activity:
Your Career Card
Activity:
Electric Game Board Part 2:10 Icebreaker:
Break the Chain:20
Activity:
Tilt Lantern
:30
Activity:
Snap Circuits®
Activity:
Practice Soldering
Activity:
Electric Game Board Part 1
:40
:50
Career Activity:
Career Step Up1:00
1:10
1:20 Post-Surveys
1:30
1:40
Power It Up: Suggested Schedule
- 3 - Power It Up
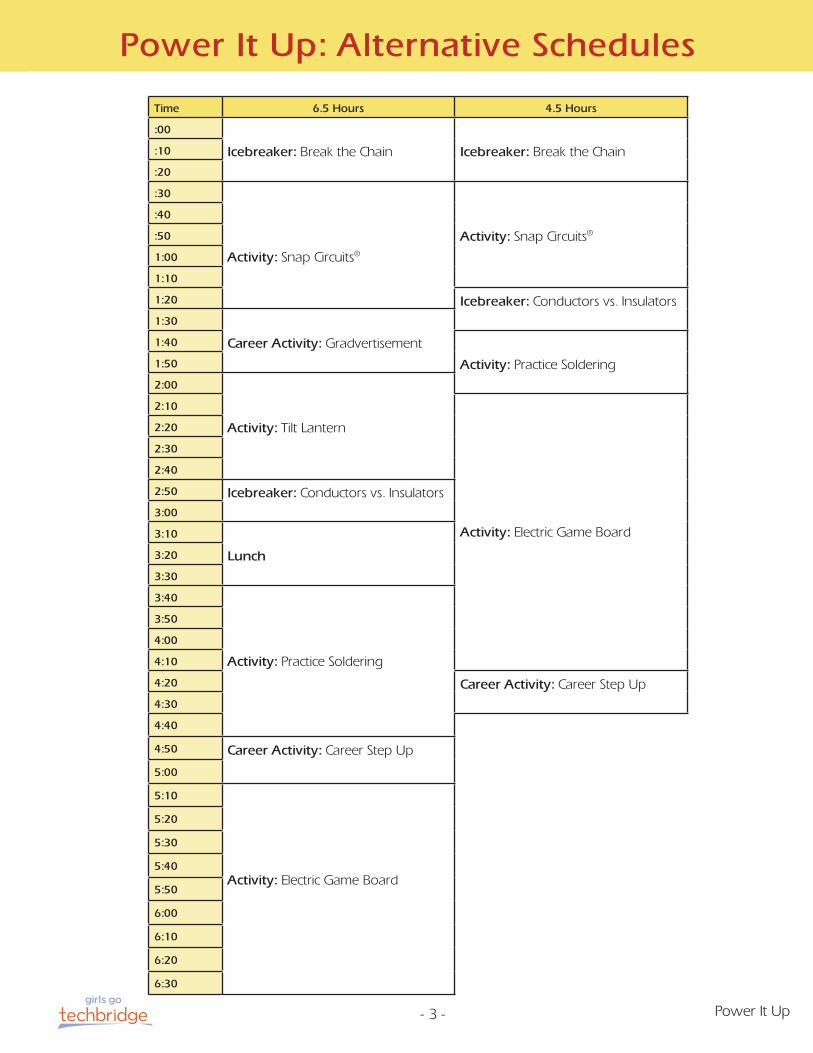
Power It Up: Alternative Schedules
Time 6.5 Hours 4.5 Hours
:00
Icebreaker: Break the Chain Icebreaker: Break the Chain:10
:20
:30
Activity: Snap Circuits®
Activity: Snap Circuits®
:40
:50
1:00
1:10
1:20 Icebreaker: Conductors vs. Insulators 1:30
Career Activity: Gradvertisement1:40
Activity: Practice Soldering 1:50
2:00
Activity: Tilt Lantern
2:10
Activity: Electric Game Board
2:20
2:30
2:40
2:50 Icebreaker: Conductors vs. Insulators3:00
3:10
Lunch3:20
3:30
3:40
Activity: Practice Soldering
3:50
4:00
4:10
4:20 Career Activity: Career Step Up4:30
4:40
4:50 Career Activity: Career Step Up
5:00
5:10
Activity: Electric Game Board
5:20
5:30
5:40
5:50
6:00
6:10
6:20
6:30

- 4 - Power It Up
Snap Circuits®: Girls use a fun kit to build and explore circuits, polarity, and electricity.
Tilt Lantern: The girls use their understanding of circuits to create a lantern that turns on when it is tipped upside down.
Practice Soldering: Girls use soldering irons and practice safety skills.
Electric Game Board: The final project has the girls put all their knowledge to use to create an interactive game. Girls will solder components to a circuit board or, in the non-soldering version, secure circuit connections, and design a game that shows how changing the circuit, by touching the tweezers to the aluminum cup, is like closing a switch so electric current can flow and turn on the light in the LED.
There are three parts in most of the five approximately ninety minute sessions:
• Icebreakers help the girls grasp the concepts behind circuitry and expand their vocabulary with technical terminology. They learn about energy flow, polarity, and the characteristics of electrical components. Each icebreaker lasts ten to twenty minutes.
• Career exploration activities give girls the opportunity to explore careers in Electrical Engineering and other science and technology fields.
• Activities provide the girls hands-on experience building circuits and soldering.
We encourage you to take the girls on field trips and have role models visit your program. These can enhance your girls’ interest and curiosity in careers they may never have considered before. Information on how to plan a role model visit can be found on page 13.
Circuitry and electronics are prevalent in everyday life but are tricky concepts to understand. This project demystifies these topics and allows girls to develop confidence in their knowledge of electronics.The Power It Up program-in-a-box will help educate girls on the concept of electricity, the different electrical components used in circuits, and the process of creating their own electronic circuit. The hands-on activities are designed to introduce concepts as well as provide the girls with new soldering skill s.
Power It Up: Introduction
4-5 Suggested Sessionsapproximately 1 hour and 30 minutes each
Skills:• Designing circuits and soldering
• Problem solving
Recommendations:Throughout this project emphasize safety and the importance electricity plays in our daily lives.
- 5 - Power It Up
Power It Up: Introduction
Engineering Design ProcessThe Techbridge Engineering Design Process is a never-ending cycle of creativity. With each of the hands-on activities in this guide, we encourage you to lead girls to identify and talk about where they are in the design cycle. Growing awareness of the design process helps girls strengthen their outcomes, whether it be a hand-made product or a presentation in front of a group.
The design process encourages girls to both “try, try again” and recognize that “two heads are better than one.” Engineers, and everyone from kids to professionals, use these steps to reach their desired result. We knew this was an effective tool when one Girl Scout remarked that she used the Engineering Design Process when writing and revising a paper for English class, and to persuade her parents to get a later curfew!
As the leader, you’ll have to know when it’s time to stop, but the more opportunities you allow girls to reflect, redesign, and repeat the design process steps, the better the experience for all.
Engineering Design Process
Identify
Brainstorm
Choose
DesignTest
Show
Redesign
- 6 - Power It Up
Background Information
Introduction:
This program-in-a-box will explore various concepts relating to electricity and circuits. The most basic circuit, a simple circuit, is created with a power source (a battery), a component (an LED or a motor) and sometimes a switch. The power source supplies electrons, tiny charged particles which travel through the circuit and excite any components they pass through. Electrons flow through a circuit continuously until it is “off.” Electrons are negatively charged, and they travel from the negative side of the battery, through the circuit, and back to the positive side. All the concepts described here will be introduced to the girls with the Snap Circuits® activity.
Closed versus Open Circuits:The circuit must make a closed circle in order to be “on.” If the circle is broken, the electrons cannot flow through it and it will be “off.” Switches, like the light switches on your wall, are really opening and closing circuits.
Polarity:Some components have polarity, meaning they have a positive and negative side. Batteries, LEDs and motors are a few examples. LEDs will only turn on if the electrons flow through them from negative to positive. Other polar components, like certain motors, will turn a different direction depending on which way they are installed.
Series vs. Parallel Circuits:Circuits with more than one component can be built either in series or in parallel. A series circuit means that each component is connected to the circuit one after another. They are all on the same “circle.” A circuit in parallel means that each component has its own path to the battery; there are actually two or more circuits being built from the same power source.
A series circuit means that the components must share the power supplied by the battery. It's possible the battery might not have enough power to supply all of the components with the power each needs to operate. In a parallel circuit, each component has its own current path to the battery and receives the full amount of power. This also means that the battery will die faster.
Resistors and Capacitors:These are two components commonly found in electric circuits. A resistor limits the amount of power going through a circuit. This is useful if the power source provides too much power for a component, like an LED. Resistors come in different strengths indicated by the colored stripes on them.
Capacitors store power to be used later. For example, they can be used in solar-powered products, where they store the power generated from the solar panel for later use even if the sun is no longer shining.
- 7 - Power It Up
Background Information
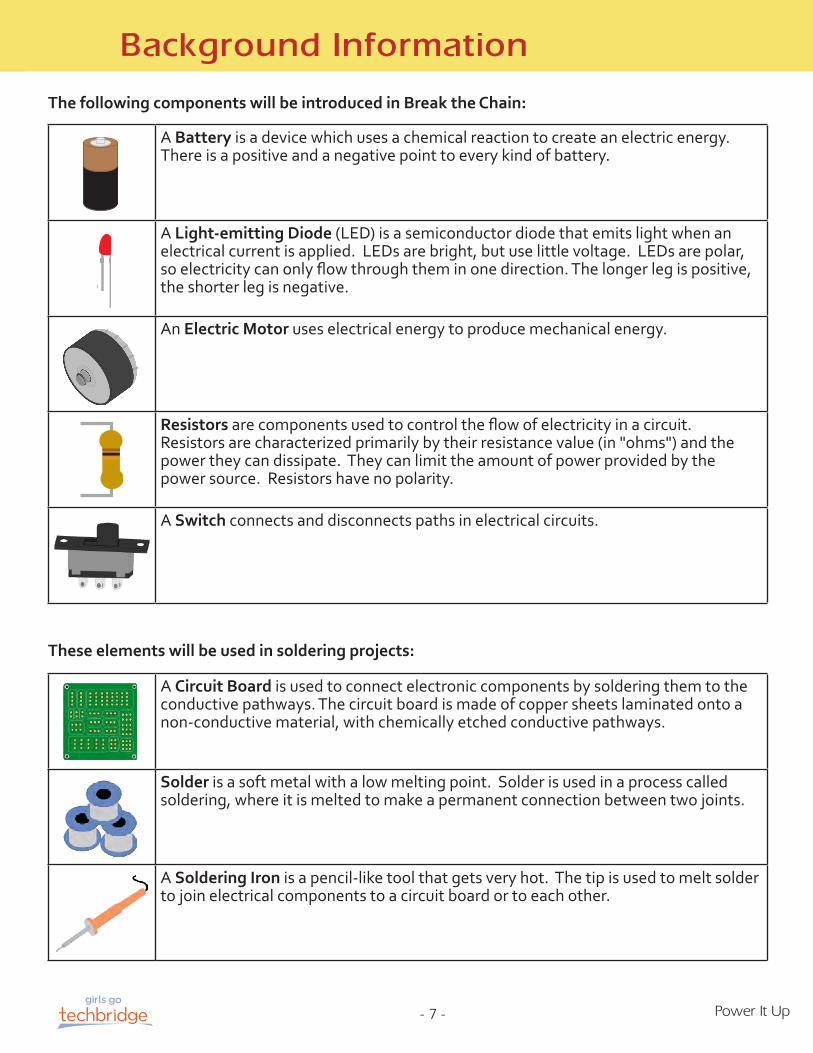
The following components will be introduced in Break the Chain:
A Battery is a device which uses a chemical reaction to create an electric energy. There is a positive and a negative point to every kind of battery.
A Light-emitting Diode (LED) is a semiconductor diode that emits light when an electrical current is applied. LEDs are bright, but use little voltage. LEDs are polar, so electricity can only flow through them in one direction. The longer leg is positive, the shorter leg is negative.
An Electric Motor uses electrical energy to produce mechanical energy.
Resistors are components used to control the flow of electricity in a circuit. Resistors are characterized primarily by their resistance value (in "ohms") and the power they can dissipate. They can limit the amount of power provided by the power source. Resistors have no polarity.
A Switch connects and disconnects paths in electrical circuits.
+_
A Circuit Board is used to connect electronic components by soldering them to the conductive pathways. The circuit board is made of copper sheets laminated onto a non-conductive material, with chemically etched conductive pathways.
Solder is a soft metal with a low melting point. Solder is used in a process called soldering, where it is melted to make a permanent connection between two joints.
A Soldering Iron is a pencil-like tool that gets very hot. The tip is used to melt solder to join electrical components to a circuit board or to each other.
These elements will be used in soldering projects:

- 8 - Power It Up
Girl Scout Leadership Experience
In 2008, Girl Scouts of the USA introduced fifteen Leadership Outcomes to help leaders create and recognize a successful Girl Scouting experience. You know your girls are enjoying a quality Girl Scout activity when an out-of-school experience is girl-led, experiential, and cooperative. You see that your girls are leaders when they:
Discover…• Girls develop a strong sense of self• Girls develop positive values• Girls gain practical life skills• Girls seek challenges in the world• Girls develop critical thinking
Connect…• Girls develop healthy relationships• Girls promote cooperation and team building• Girls can resolve conflicts• Girls advance diversity in a multicultural world• Girls feel connected to their communities, locally and globally
Take Action…• Girls can identify community needs• Girls are resourceful problem solvers• Girls advocate for themselves and others, locally and globally• Girls educate and inspire others to act• Girls feel empowered to make a difference in the world
We are proud that Techbridge’s hands-on activities meet many of the Girl Scout Leadership Experience (GSLE) outcomes. Girls gain practical life skills and develop critical thinking abilities as they work through design challenges in our programs-in-a-box. By testing and redesigning their products, working through the Engineering Design Process, girls thrive on challenges, conquer doubts, and gain confidence and new perspective.
Girls develop healthy relationships, learn to cooperate, and resolve conflicts as they share, brainstorm, and negotiate in teams and pairs during Girls Go Techbridge activities. To build connectedness with your community, we encourage you to invite role models in engineering to interact with your girls. Remind your guest engineers to share that they are members of the very same community as your girls, and that together we can all be problem-solvers for the issues facing our world.
We hope, through the reflection and active questioning built into the Girls Go Techbridge activities, you will lead your girls to identify community needs, educate and inspire others, and feel empowered to make a difference in the world. While our hands-on-activities are presented in the context of having fun in an informal learning environment, there are real-world applications. With the skills and concepts learned by working through this program-in-a-box, girls gain the tools to make the world a better place.
Our mission at Techbridge is to inspire a girl to change the world. Thank you for sparking the fire for change.

- 9 - Power It Up
Leader Tips
Tips on GroupingThroughout the Activities and Icebreakers girls are often asked to work in groups. Below are a few tips to help you get started.
• Before breaking the girls into groups, consider having the girls brainstorm rules or norms for their behavior. They can refer to the Girl Scout Promise and Laws for ideas.
• Consider the relationships between the girls. How well do they know each other? Do they get along? Are some more familiar with the material or topic? This will help you create groups that are well balanced.
• Groups or teams larger than four can present problems for participation and interaction. Suggested group sizes are noted with each activity.
• To give everyone the opportunity to participate, consider assigning roles to each girl within the group. Possible roles include: group leader, reporter, recorder, set-up, clean-up, facilitator, manager. When assigning roles, make sure each girl is aware of the role’s responsibilities. If possible across the activities, change it up so that girls are able to experience more than one role.
• Avoid rushing to rescue when a group is stuck, or providing “the answer.” Let them discuss and come to their own conclusions. If you are talking, the girls have less time to talk and work together.
• Get involved when the group is hopelessly off task, when the group does not seem to understand enough to get started, when the group is experiencing serious personal conflict, or if the group can’t organize themselves.
• To know if your groups are working, as you observe, check to see if the girls are: asking questions, listening to each other, helping each other, and explaining by telling how and why.
Tips on Facilitating DiscussionsDiscussions are an opportunity for girls to process and extend the different ideas they encounter throughout the activities. Below are a few tips to consider before beginning a discussion.
• Consider the physical set-up in your room. Can the girls see each other?• Review and enforce the behavioral “norms” or rules established by the group.• Listen well. Validate questions by either expanding on them or challenging them, and
encourage girls to challenge each other in a productive and positive way. • Allow for wait time when you ask a question. Give girls time to respond. To formulate
thorough responses, they need time to process the question.• Offer different options for participation. Letting girls turn in written responses often helps
shyer girls.• Pause. Give the girls a few minutes to put together a response. Let girls discuss in small
groups and then present their thoughts to everyone.• Prompt girls with a variety of questions that require different levels of thinking.
* Some questions ask for basic knowledge and comprehension of the activity. For example, What differences exist between...? or Can you name the...?
* Some questions ask girls to apply or analyze the relationship between different ideas. For example, What factors would you change if...? or What are some of the problems of...?
- 10 - Power It Up
* Some require girls to synthesize or evaluate concepts to new or different situations. For example, Can you see a possible solution to...? or How effective are...?
• To know if your discussions are working, check to see if the girls are asking for others’ opinions, listening, thinking or reflecting on what has been said, giving reasons for their responses, and allowing everyone to contribute.
Keeping Girls EngagedPrograms-in-a-box are designed to be girl centered. Keeping your activity on track and the girls engaged is critical to the success of the activity and will help with learning, retention, and enthusiasm for the other activities. Down time during an activity can lead to girls getting off track. To keep girls engaged, try the following techniques:
• Mental warm up. In addition to using an icebreaker in the program, take a few moments to do a yoga move, a song, or group rhythm using clapping or stomping, etc.
• Know your girls! Who works well together? Who doesn’t? Who will struggle with some of the content and who will approach it enthusiastically? Thinking about these different ideas for a few minutes before you begin can help you avoid problems getting started and keeping girls motivated. One of our goals is to promote cooperation and team building.
• Quieting girls down. Have the girls do a quick write, think-pair-share, journal, or draw for a minute. You could also use the Girl Scout tradition of raising your hand and standing silently to get attention. The next person does the same, and it continues until silence spreads throughout the group. The last person not paying attention is soon the only one talking.
• Know your activities. It is vital that you closely read over the activity. When you know what you have to do, there is little confusion and less down time for the girls.
• Ask three then me. This means that the girls ask three peers before coming to you for help. The result is that the girls are more likely to work though a particular problem on their own. They are the ones doing the work—make them accountable.
• Assign girls tasks. Let the girls read the introduction while you set up. Keeping the girls busy and involved in the task allows them to maintain interest and ownership in the activity.
• Heads up! When engaging hesitant or shy girls consider your grouping and let them know a little ahead of time that they will be asked to do something. We want to encourage participation through success!
Leader Tips

- 11 - Power It Up
Tips on BrainstormingMany girls are familiar with the brainstorming process, but have difficulty getting started or will want to move ahead with the first idea they think of. To encourage girls to generate as many ideas as they can, consider the following tips before you begin.
Begin with the T.E.C.H. guidelines for Brainstorming.
T – Think of many ideas. Write down all ideas, no matter how wild. The more ideas, the better!
E – Everyone’s ideas are good. Work as a team and respect every idea. Everyone should participate. Keep the tone positive!
C – Creativity. Be creative and spontaneous. There are no wrong answers and lots of possible solutions.
H – Have an open mind. Consider your own ideas and the ideas of others.
To get their brainstorming going: • Use a visual. Have the girls examine the materials they’ll be using.• Sketch. Suggest they do rough sketches.• Think/pair/share. When brainstorming in pairs, have the girls think individually about the topic
for a minute, pair with their partner to consider all ideas, and finally share with the group.• Free writing. Some girls are more comfortable writing their ideas down in a list. • Clustering/mapping/webbing. This technique focuses on the relationship between different
characteristics or traits of the topic. * Begin by writing the topic in the middle of a page. From the concept word, write as many
related concepts or terms as you can associate with the central topic. If you run out of similar concepts, write down opposites, but try to keep writing and associating. As you jot down ideas, connect them with lines to show how they relate to each other.
Leader Tips
TECH Brainstorming
TECH
Think of many ideas
Everyone’s ideas are good
Creativity
Have an open mind
This card is helpful to set guidelines for the brainstorming process with your girls. You may want to refer to this card during Gradvertisement or any activity where pairs or groups think aloud and work together.

- 12 - Power It Up
Parent Resource Handout
This handout is designed to give parents some tips on how to support and encourage their daughters outside of the program boxes. Please send copies of this Parent Resource Handout home.
You can make a diff erence in a girl’s future! If you’re looking for an activity to do with your daughter, try one that encourages the skills needed in technology, science, and engineering careers. Here are some ideas that build upon the activities in Power It Up. They’ll give you a chance to have fun and may also help spark her interest in becoming an engineer or computer scientist.
1. Snap Circuits® are a simple and safe introduction to how circuits work. You can build simple circuits to make a motor spin or more advanced circuits that make a doorbell ring. This kit, which is girl-tested, includes everything you need: speakers, snap wires, LEDs, lamp sockets, and motors. Snap Circuit® kits are available from www.elenco.com.
2. Learn about the appliances in your home. We all know that a fridge keeps your food cold but can your daughter explain why? Identify fi ve diff erent appliances in your home and discuss how you think electricity plays a role in how each of them work. Then, visit www.howstuff works.com to learn more about out how your appliances works.
3. Solder something new. Soldering kits come in a variety of shapes, sizes, and skill levels. Once a girl masters the technique of soldering she will enjoy putting together a variety of kits. A good soldering iron and stand and safety goggles are required for all soldering activities. Check out Chaney Electronics for electronic kits and robots at www.chaneyelectronics.com.
4. Make your own mechanical animal! You bet. With step-by-step picture directions, your daughter will be able to make a robotic animal that walks, runs, or jumps. These kits are available from Tamiya at www.tamiya.com.
5. Conserve electricity. Think about all the ways that you used electricity today. Come up with ways that your family can conserve electricity from line drying laundry to unplugging chargers to not preheating the oven. There are lots of things that you can do to save resources and money.
6. Building projects and science kits aren’t just for boys. Look for projects that your daughter can work on at home and best yet, work on them with her. For example, you can make your own fl ashlight and learn about circuits. PBS’s ZOOM has lots of fun and easy projects. Invite your daughter’s friends over to work on a science experiment or plan a slumber party that includes time to tinker. Check out pbskids.org/zoom/activities/
7. Give a girl a biography of a female role model in engineering or technology. Check out Totally Amazing Careers in Engineering in the Sally Ride Science career series. You can read about NASA Jet Propulsion Lab engineer, Ayanna Howard, who builds robots to cooperate with people. www.SallyRideScience.com
8. Plan a family visit to a science or technology museum. With their hands-on activities, science and technology museums are a great resource for family fun. Look for an exhibit that features electronics and new technologies and their applications. Be mindful of giving your daughter her fair share of attention when you off er explanations of exhibits. Research fi nds that parents are much more likely to explain science to boys than to girls while using interactive science exhibits in a museum.
9. Check out Design Squad on your local PBS TV station. After your daughter sees their interesting projects she’ll want to design some of her own. Design Squad’s website provides lots of ideas to learn about science like building a hidden alarm. With batteries, tin foil, electric wires and other simple supplies she’ll be able to make an alarm that’s certain to surprise your family. She’ll also learn about switching circuits on and off . For more information visit http://pbskids.org/designsquad.
10. Help your daughter explore her dream job. You might not be able to fi nd an electrical engineer or computer scientist to introduce to your daughter but she can meet engineers who love what they do at Engineer Your Life and Engineer Girl. These websites were designed with girls in mind and off er information and practical tips about exciting jobs in engineering. www.engineeryourlife.org and www.engineergirl.org.
friend Girls Go Techbridge on facebookwww.techbridgegirls.org
[email protected] Edgewater Drive, Suite 519, Oakland, CA 94621 ~ 510.777.9170
Encouraging Girls in Science and Engineering

- 13 - Power It Up
Parent Resource Handout
Hands-on projects can spark an interest in science, technology, or engineering, but on their own they may not lead to a career interest in these fields. Role models can inspire girls and help them make informed decisions about their future. Interactions with role models require the right combination of career guidance and social engagement. The key is for role models to be personal and passionate while communicating how their work matters. A hands-on activity that offers a snapshot of their work will engage and inspire your girls.
Planning a Role Model Visit
Sample Schedule15 minutes Welcome and Icebreaker
10 minutes Introduction by Role Model
50 minutes Hands-on Activity
15 minutes Wrap-up and Q&A
Suggested Activities:
Snap Circuits® are an easy way for role models to work with the girls to explain basic parts of a simple circuit. The Snap Circuits® kit provides many different activities that a role model can choose from when presenting to girls.
Tilt Lantern is an engaging hands-on activity. Role models can lead step-by-step instructions of how to create the circuit needed to light up the LED and interact with the girls as they decorate their containers.
Practice Soldering enables role models to teach girls a new skill. Girls will be able to use this skill when soldering their own Electric Game Board.
Finding Role Models:• Contact your local Girl Scouts STEM
(Science, Technology, Engineering, and Math) coordinator for role model contacts. They may have contacts at organizations such as the Society of Women Engineers who can provide role models in your area.
• Ask your friends and contacts for leads.
• Check with science teachers who may have contacts.
• Is there an Expanding Your Horizons program in your community? You will find great role models there.
• Recruit role models from local businesses or universities.
• Recruit a diverse group of role models (especially individuals that reflect the diversity of your girls).
Tips:1. Share our role model resource guide
Get Involved…Make a Difference and toolkit with suggested activities, questions, and other resources. http://
www.techbridgegirls.org/rolemodels.aspx2. Help your role model start with an icebreaker. We recommend using Put Yourself on the Line
from our online toolkit so the role model can introduce it and then complete the worksheet using her current workspace.
3. Encourage role models to start with a personal story to help them connect with your girls. 4. Invite role models to share their passion for what they do. When they get excited, your girls will,
too.5. Encourage role models to explain why their work is important and how it helps the world.6. Encourage role models to talk about more than just their job. Invite them to talk about hobbies,
family, and friends which will help dispel stereotypes.7. Role models can help by offering guidance, such as the importance of taking advanced math
and science classes, finding summer classes or internships, and getting good grades.8. Make sure your girls send thank-you notes to role models.

- 14 - Power It Up
Power It Up: Materials
Sessions Quantity Consumable Materials Non-Consumable Materials1: Break the Chain 10 Circuitry role cards
1: Snap Circuits5 Snap Circuits® kits (Snap Circuit
instruction manual in each kit)
10 AA batteries
2: Conductors vs. Insulators
5 pre-made open circuits
5 sets of testing materials
2: Tilt Lantern
10 plastic containers with lids
10 rolling ball tilt switches
10 LEDs
10 lithium coin batteries with legs
1 bag of sequins
18" aluminum tape
3 needle nose pliers
10 Tilt Lantern Reference Sheet
1 bottle of craft glue
3: Gradvertisement
10 sheets of poster board
magazines/advertisements (optional, not provided)
10 Electrical Engineer career cards
5 TECH Brainstorm cards
2 sets of markers
5 scissors
5 glue sticks
3: Practice Soldering
1 roll of solder
10 circuit boards
50 resistors
1 roll of masking tape
5 soldering irons
5 soldering iron stands
5 sponges
5 side cutters
1 roll of de-soldering braid
3 extension cords
11 safety goggles
5 Practice Soldering reference sheets

- 15 - Power It Up
Power It Up: Materials
Sessions Quantity Consumable Materials Non-Consumable Materials
4: Electric Game Board (soldering)
10 cardboard pizza boxes
10 LEDs
10 metal tweezers
1 roll of 22 gauge wire
10 battery holders with snap-on wires
20 AA batteries
10 circuit boards
30 small aluminum cups
10 110 OHM resistors
1 roll of solder
50 plastic pony beads
10 Electric Game Board (soldering) reference sheet
10 pencils and 1 pencil sharpener
1 roll of electrical tape
5 utility knives
2 wire cutters and strippers
1 roll of masking tape
2 sets of markers
11 safety goggles
5 soldering irons
5 soldering iron stands
5 sponges
3 extension cords
1 roll of de-soldering braid
4: Electric Game Board (non-soldering)
10 cardboard pizza boxes
10 LEDs
10 metal tweezers
10 battery holders
20 AA batteries
30 aluminum cups
18" aluminum tape
10 plastic wire twist connectors
50 plastic pony beads
1 roll of 22 gauge wire
- 16 - Power It Up
Power It Up: Materials
Sessions Quantity Consumable Materials Non-Consumable Materials
4: Electric Game Board (non-soldering) continued
10 Electric Game Board (non-soldering) reference sheet
1 roll of electrical tape
5 utility knives
2 wire cutters and strippers
1 roll of masking tape
2 sets of markers
10 pencils and 1 pencil sharpener
4: Your Career Card 10 blank career cards
10 pencils
2 sets of five role model career cards
2 sets of markers
5. Career Step Up 2 sets of five role model career cards
Safety Reminder
The activities in the Power It Up box are designed to spark girls’ interest in circuitry and soldering. While we want them to be excited to learn more about electricity, it is important that girls understand that electrical current and components need to be treated with caution. The electrical current used in this kit, low voltage direct current (DC), may cause wires to get hot or burn, but will not cause harm to the girls.
However, the electrical current in household plugs, alternating current (AC), can be much more dangerous. Girls should be reminded not to explore electrical circuits or tinker with appliances (even if they are unplugged or broken) without adult supervision. Make sure they understand NEVER to work on any electrical component that is attached to a wall plug; this could cause serious injury.
- 17 - Power It Up
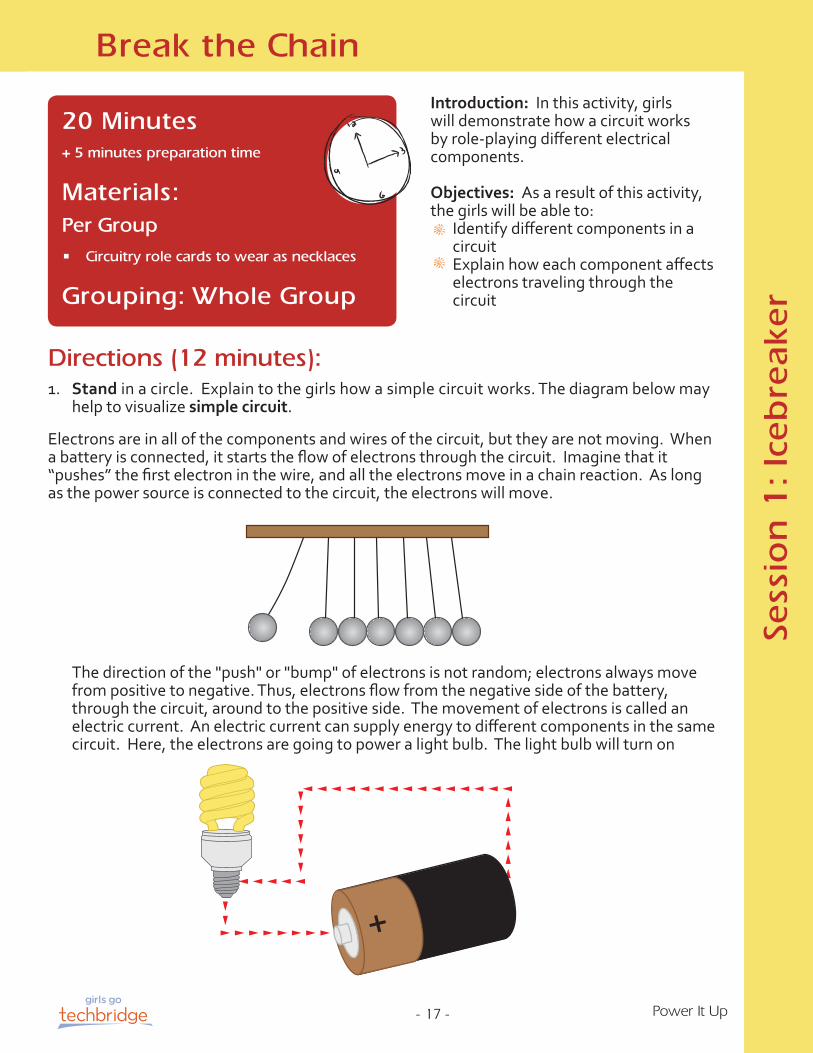
Directions (12 minutes):1. Stand in a circle. Explain to the girls how a simple circuit works. The diagram below may
help to visualize simple circuit.
Electrons are in all of the components and wires of the circuit, but they are not moving. When a battery is connected, it starts the flow of electrons through the circuit. Imagine that it “pushes” the first electron in the wire, and all the electrons move in a chain reaction. As long as the power source is connected to the circuit, the electrons will move.
The direction of the "push" or "bump" of electrons is not random; electrons always move from positive to negative. Thus, electrons flow from the negative side of the battery, through the circuit, around to the positive side. The movement of electrons is called an electric current. An electric current can supply energy to different components in the same circuit. Here, the electrons are going to power a light bulb. The light bulb will turn on
Introduction: In this activity, girls will demonstrate how a circuit works by role-playing different electrical components.
Objectives: As a result of this activity, the girls will be able to:
Identify different components in a circuitExplain how each component affects electrons traveling through the circuit
Break the Chain
Sess
ion
1: I
ceb
reak
er
20 Minutes+ 5 minutes preparation time
Materials:Per Group• Circuitry role cards to wear as necklaces
Grouping: Whole Group

- 18 - Power It Up
Break the Chain
whenever electrons are going through it, in other words whenever the circuit is on (closed).
2. Attach strings to cards, if not already done. Give each girl a Circuitry role card with the name of a circuit component on it, and have her wear it around her neck.
3. Review the roles with the girls by having them read their role card. Stand in a circle. For the first time around, ask everyone to act as a wire, except for the power source.
4. Start the electron flow by having all the girls put their hands out to the side, palms together with the girls on either side of them. Have the girl who is the Power Source start the "push" of the electrons by more firmly pressing the hand of the girl next to her, and then relax the intensity of the push.
5. Explain that the circuit is a complete circuit and the power source pushes electrons all the way around the circle and back towards the battery. Each girl, or section of wire, conveys electrons and, in turn, should exaggerate her touch or "push" their right hands in turn as their electrons are “pushed” through the circuit. Each girl should be touching continuously as long as the power source is connected, to signify electrons constantly flowing through a complete circuit.
6. Activate the Switch role, which turns the circuit on and off. The switch is “on” when that girl is touching hands on both sides. Have the Power Source again “push” the electrons to start the electron flow around the circuit. At one point, have the Switch conspicuously drop hands with one person to turn “off.” Everyone should be watching the Switch so they can stop “pushing” when the circuit is broken.
7. Add the other roles into the role play.
8. Optional. While still holding hands, have the girls change the shape of the circle to a square or a figure-eight and have the power source send the wave again. Tell them that a circuit doesn’t have to be in a “circle,” it just has to have the connections between all the parts.
Reflection (8 minutes):1. What does it mean when you have an open and closed circuit? (An open circuit is when a
component is not connected (i.e., the chain is broken). A closed circuit is when all the components are connected.)
2. Which component controls the flow of electrons? (The switch. The battery provides the energy for electrons to flow, but if the circuit is open no electrons will flow.)
3. What does it mean when a component has polarity? (A component has polarity when electrons can only move through the component in one direction. A battery, for example, has a positive and negative end. Note that polarity will be discussed later in Snap Circuits and Tilt Lantern.)
4. Based on what you know now, where do you see circuits work in your everyday life?
5. Who could you show these circuit roles to at home?

- 19 - Power It Up
Circuitry Role Cards
You are the source of the electrons. You will start the wave (a gentle push against your neighbor’s hand) to your right to start the electricity. When you receive the wave back, you know the electron traveled through the complete circuit.
Power Source (Battery)
I am the battery. The battery is the source of electrons. My job is to start the electricity by starting the wave with the hand of the girl to my right.
Read Aloud!
You turn the circuit on and off . To turn the circuit off , stop touching your neighbor’s hand (to the right) before
the wave reaches you. To turn the circuit on again, touch the hand of the person (on your right) again to let the wave pass through you.
I am the switch. The switch turns the circuit on and off. When I stop touching a hand, the electrons can no longer travel through the circuit. To turn the circuit back on, I touch the hand again and the electrons can pass through.
Read Aloud!
Switch
- 20 - Power It Up
Circuitry Role Cards
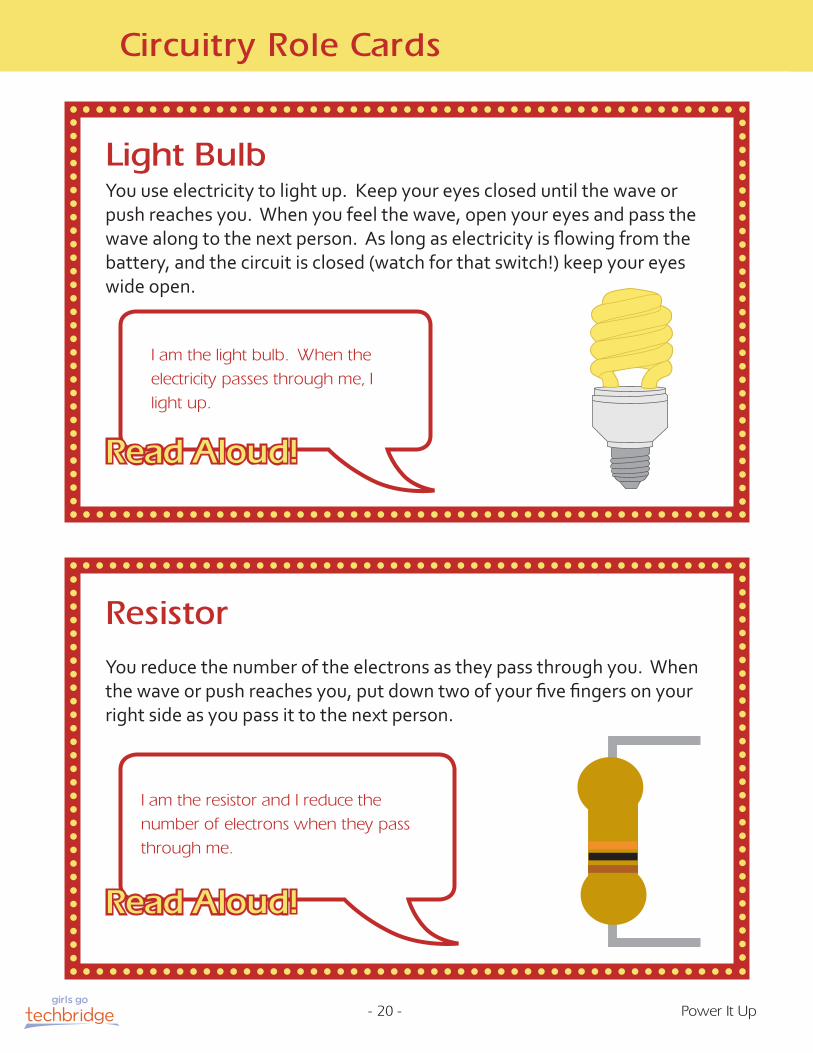
You use electricity to light up. Keep your eyes closed until the wave or push reaches you. When you feel the wave, open your eyes and pass the wave along to the next person. As long as electricity is fl owing from the battery, and the circuit is closed (watch for that switch!) keep your eyes wide open.
Light Bulb
ResistorYou reduce the number of the electrons as they pass through you. When the wave or push reaches you, put down two of your fi ve fi ngers on your right side as you pass it to the next person.
I am the light bulb. When the electricity passes through me, I light up.
Read Aloud!
I am the resistor and I reduce the number of electrons when they pass through me.
Read Aloud!
- 21 - Power It Up
Circuitry Role Cards
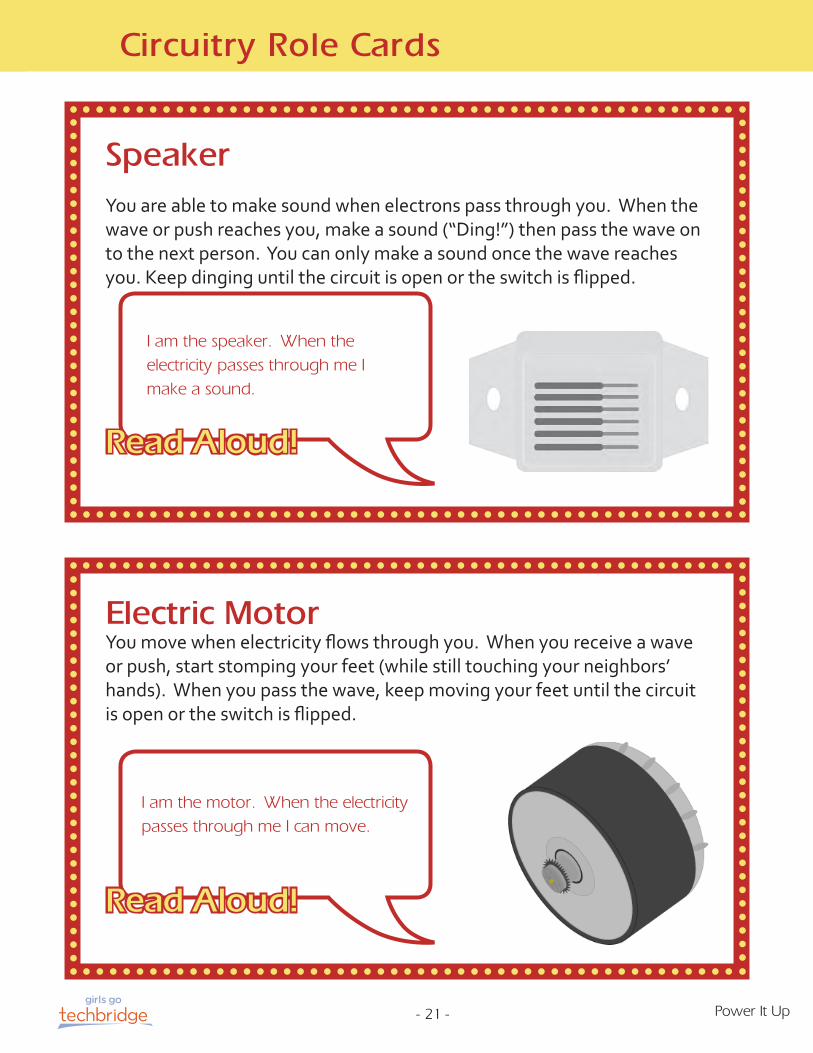
You are able to make sound when electrons pass through you. When the wave or push reaches you, make a sound (“Ding!”) then pass the wave on to the next person. You can only make a sound once the wave reaches you. Keep dinging until the circuit is open or the switch is fl ipped.
Speaker
Electric MotorYou move when electricity fl ows through you. When you receive a wave or push, start stomping your feet (while still touching your neighbors’ hands). When you pass the wave, keep moving your feet until the circuit is open or the switch is fl ipped.
I am the speaker. When the electricity passes through me I make a sound.
Read Aloud!
I am the motor. When the electricity passes through me I can move.
Read Aloud!
- 22 - Power It Up
Circuitry Role Cards
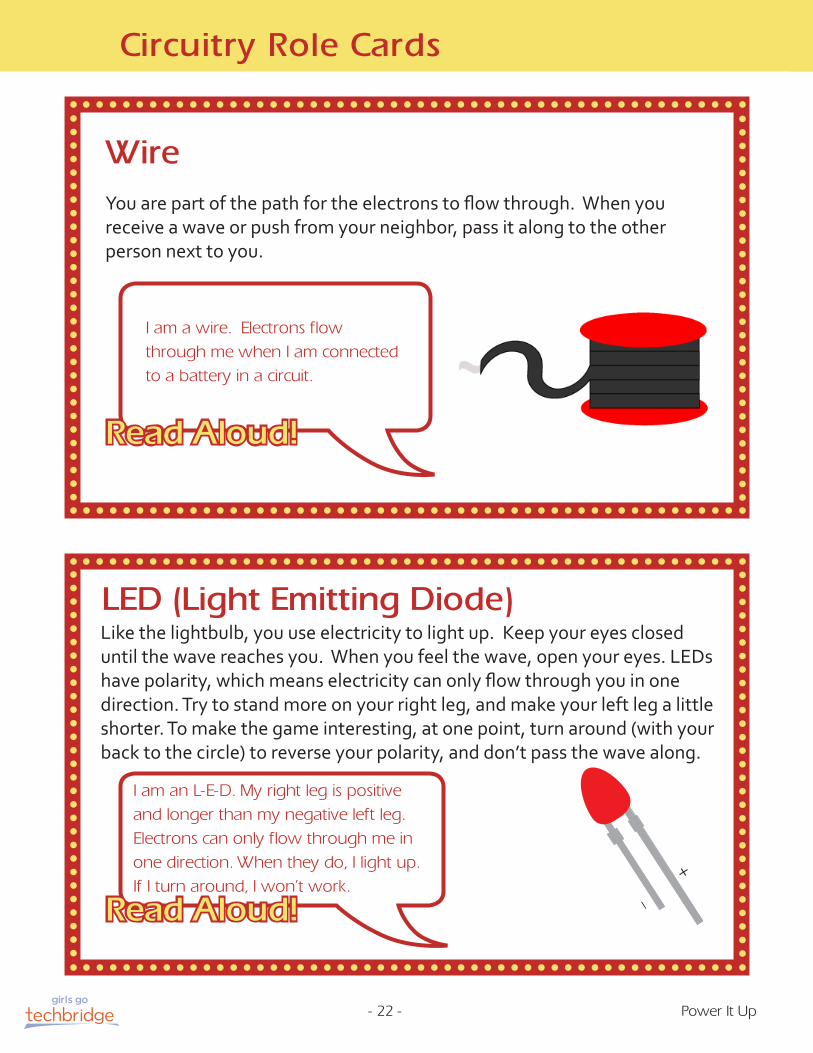
You are part of the path for the electrons to fl ow through. When you receive a wave or push from your neighbor, pass it along to the other person next to you.
Wire
LED (Light Emitting Diode)Like the lightbulb, you use electricity to light up. Keep your eyes closed until the wave reaches you. When you feel the wave, open your eyes. LEDs have polarity, which means electricity can only fl ow through you in one direction. Try to stand more on your right leg, and make your left leg a little shorter. To make the game interesting, at one point, turn around (with your back to the circle) to reverse your polarity, and don’t pass the wave along.
I am a wire. Electrons flow through me when I am connected to a battery in a circuit.
Read Aloud!
I am an L-E-D. My right leg is positive and longer than my negative left leg. Electrons can only flow through me in one direction. When they do, I light up. If I turn around, I won’t work.
Read Aloud!
+
_

- 23 - Power It Up
Introduction: In this activity, girls will build a variety of electrical circuits using a Snap Circuits® kit.
Objectives: As a result of this activity, the girls will be able to:
Explain how a resistor and switch work in a circuitCreate circuits in series and in parallelIdentify polar components
Preparation: Review all warning labels and parts list. Read the “How To Use It” section on page three of the Snap Circuits® Instruction Manual, and try the projects in advance.
Snap Circuits®
Sess
ion
1: A
ctiv
ity
80 Minutes
Materials:Per Pair• Elenco Electronic Snap Circuits® kit
• 2 AA batteries
• Snap Circuits® Instruction Manual (booklet provided in boxed Snap Circuit kit)
Grouping: Pairs
Directions:1. Distribute one Electronic Snap Circuits® kit to each pair.
2. Explain that each piece is numbered and lettered. Instruct girls to follow the diagrams in the Snap Circuits® instruction manual. Ensure that each girl understands how to use the kit.
3. Build. Have each pair work through the projects in the Snap Circuits® Instruction Manual, as listed below. As girls build, circulate and ask what they have observed. Suggested discussion questions are provided here.
4. Help. If one pair completes their projects early have them assist other girls who might be having problems.
5. Review each project with the girls and make sure they understand what is happening in the circuit they built. It may be challenging to ask girls to stop using the Snap Circuits every twenty minutes and come together to discuss, but reflecting on what they have just witnessed is important for mastering the concepts of each activity grouping.

- 24 - Power It Up
Electrical vs. Mechanical Energy20 minutes, pages 8 and 13 in the Snap Circuit Instruction Manual
Project #1 illustrates a simple circuit. A simple circuit is one that includes a power source (battery), a component (like an LED) and may include a switch. This circuit illustrates how a current flows from the battery, through the switch, to the light bulb and back to the battery to complete a simple circuit.
Project #2 illustrates how the same simple circuit in project #1 can be used to convert electrical power into mechanical power by using a motor instead of a light. Make sure the girls pay attention to the polarity of the motor (the positive side is shown in the picture).
Project #11 shows what happens when you reverse the polarity of the motor. When you reverse the polarity of a motor, the motor spins in the opposite direction. The way the fan blades are oriented on the motor causes the fan to catch the air and lift off of the motor when the switch is turned off.
Reflection (5 minutes): � How does the switch turn the light on and off in
Project #1? (When the switch is “on” it completes, or closes, the circuit. When the switch is “off” the circuit is broken and the electrons cannot travel through.)
� Why did the fan fly in Project #11? (Project #11 has you change the polarity of the motor which causes the fan to spin in the opposite direction.)
� Which other component have you used that has polarity? (The battery)
Series and Parallel Circuits20 minutes, page 10 in the Snap Circuit Instruction Manual
Project #5 arranges the lamp and the motor in a series circuit. Both components are running off the same current. Part of the voltage is used by the light and the rest goes to the motor. The motor may need a little push to get going because it is receiving so little voltage. Have the girls note the brightness of the light.
Project #6 illustrates the lamp and the motor in a parallel circuit. Each component is running off of a separate current. The motor and lamp are both receiving the full 3 volts from the battery. Have them note the speed of the fan and the brightness of the lamp. This is an important concept that will come up in later circuitry activities.
Reflection (5 minutes): � Was the fan spinning at the same speed both times? (The
fan spun faster in Project #6. NOTE: Sometimes the fan won’t spin at all in Project #5.)
Snap Circuits®

- 25 - Power It Up
� Why did the fan spin faster in Project #6? Why was it able to receive the full 3 volts? (In Project #6 the fan and light bulb are in a parallel circuit, which means that they both receive the full 3 volts of energy. In Project #5 the fan and light bulb are in series, so they share the 3 volts of energy. In the series circuit, the light bulb uses up most of the energy so very few electrons make it through to power the fan.)
� What do you think happens to the battery?
Resistors and Polarity20 minutes, pages 9 and 11 in the Snap Circuit Instruction Manual
Project #4 shows girls how a resistor limits the amount of current that travels through the circuit. As a result, the volume of the sound decreases.
Project #7 illustrates how a resistor and an LED are wired to emit light. Make sure they notice the polarity of the LED (it has a positive sign on one side). Explain that a resistor is necessary since two AA batteries would provide too much current to one LED.
Project #8 illustrates how electricity can only flow in one direction, from negative to positive. It is important that electrical components with polarity are placed correctly in the circuit in order for it to work. This is different from the polarity of the motor, which will spin in a different direction depending on the orientation. The LED will only turn on when it is in the correct position.
Reflection (10 minutes): � Does the LED have polarity? (Yes.) � What happens when the LED polarity is switched? (The LED will not light up because
the polarity is wrong. If the LED is wired in the wrong direction, the circuit is not complete because electrons are not flowing correctly in one direction.)
� In which direction does electricity flow? (The electricity will always flow in one direction, from negative to positive.)
� Why is a resistor necessary? (A resistor reduces the amount of current in the circuit. The current provided by two AA batteries may be too much for one LED, so we reduce it with a resistor.)
Activity Extensions:1. Challenge girls to build their own circuit. Give them the following scenarios and ask them to use
the Snap Circuit pieces to build an appropriate circuit:
• You have a light over your stairs. You want to build a circuit where you can turn the light on and off from the top or the bottom of the stairs. The circuit should include two switches (Snap Circuits® includes a slide switch and a button switch, among others.)
• Build an appliance that is sound-activated.(Start with project 3 on page 9) • Experiment with piece WC. It is a type of switch. How does it work? What kind of circuit could
you use this in? (See page 4 of the Instruction Manual for an explanation of the whistle chip.)
Snap Circuits®

- 26 - Power It Up
Sess
ion
2: I
ceb
reak
er
Introduction: In this activity, girls will predict if materials are conductors (and allow electricity to pass through) or insulators (and do not allow electricity to pass through). They will test their predictions using a simple circuit.
Objectives: As a result of this activity, the girls will be able to:
Identify what makes a material conductiveExplain the difference between conductors and insulators
Science Behind It:Metal products are conductors because of their atomic structure. Most metals have a large number of electrons in their outer shell that can move relatively freely. These electrons can carry the current through the metal.
Conductors vs. Insulators
20 Minutes+ 25 minutes preparation time
Materials:Per pair• 1 pre-made open circuit with battery, wire,
and bulb
Testing materials:• aluminum foil
• wood
• rubber
• wire
• pennies
• styrofoam
• paper clips
• glass
Grouping: Pairs
Other materials, like plastic and wood, do not have the extra electrons in their outer shells, so the current cannot pass through them. They are insulators.
Preparation:• Check that each simple circuit works by touching the open ends together. The bulb
should light up. You may need to screw the bulb into the open socket.
• Remove the white plastic tab at the end of the battery to complete the circuit. Replace the tab (either end will work) after the experiment is complete, to keep the battery from draining. Replace the battery in the battery case if the bulb does not light up.
• Check that the wires are securely clipped and the bulb is touching metal so the circuit is complete.
Directions (12 minutes):1. Distribute a simple circuit to each pair. Have them test the circuit so they can observe
how the bulb turns on when the circuit is closed. Practice including the third (loose) piece of wire provided in the bag to complete and close the circuit.

- 27 - Power It Up
2. Present the girls with the different materials to test. Have them make two prediction piles (or two lists) with the materials—one prediction pile for materials that they think will allow the electricity to pass through (conductors) and light up the bulb, and another for the materials that they think will not allow electricity to pass through (insulators).
3. Explain the definitions of conductor and insulator and have them use those terms to label their two prediction piles or lists.
4. Test the electrical conductivity of different materials by inserting the objects into the circuit. The loose piece of wire provided in the circuit bag can be clipped into the circuit and used to reach the object. See illustration below.
5. Record the results.
6. Extend. If time permits, encourage girls to test other materials they find around the room.
Reflection (8 minutes):7. Why is wire commonly used to create a circuit? (Wire is commonly used to create a circuit
because it is made of metals that conduct.)
8. What are the qualities that make materials conductive or insulating? (Metal materials make for good conductors. Non-metal materials are insulating.)
9. Why do you think wire has a coating? (Wires have a plastic coating to protect the conductive metal inside. The plastic coating is an insulator.)
10. Have you seen something at home that had insulation to protect against electrical conduction (to keep it from shocking you)?
Conductors Insulators
Aluminum Foil Wood
Wire Rubber
Pennies Styrofoam
Paper Clips Glass
Conductors vs. Insulators
Answer KeyAnswer KeyStep 4
- 28 - Power It Up
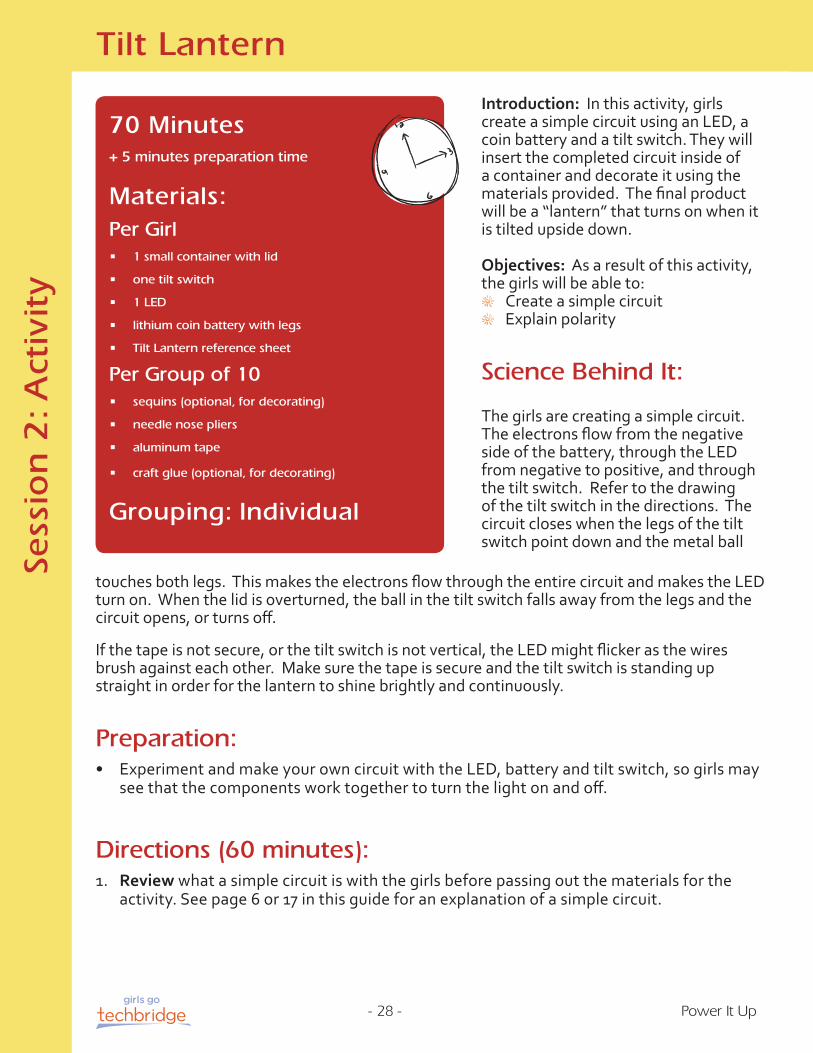
Introduction: In this activity, girls create a simple circuit using an LED, a coin battery and a tilt switch. They will insert the completed circuit inside of a container and decorate it using the materials provided. The final product will be a “lantern” that turns on when it is tilted upside down.
Objectives: As a result of this activity, the girls will be able to:
Create a simple circuitExplain polarity
Science Behind It:
The girls are creating a simple circuit. The electrons flow from the negative side of the battery, through the LED from negative to positive, and through the tilt switch. Refer to the drawing of the tilt switch in the directions. The circuit closes when the legs of the tilt switch point down and the metal ball
Tilt LanternSe
ssio
n 2
: Act
ivit
y
70 Minutes+ 5 minutes preparation time
Materials:Per Girl• 1 small container with lid
• one tilt switch
• 1 LED
• lithium coin battery with legs
• Tilt Lantern reference sheet
Per Group of 10• sequins (optional, for decorating)
• needle nose pliers
• aluminum tape
• craft glue (optional, for decorating)
Grouping: Individual
touches both legs. This makes the electrons flow through the entire circuit and makes the LED turn on. When the lid is overturned, the ball in the tilt switch falls away from the legs and the circuit opens, or turns off.
If the tape is not secure, or the tilt switch is not vertical, the LED might flicker as the wires brush against each other. Make sure the tape is secure and the tilt switch is standing up straight in order for the lantern to shine brightly and continuously.
Preparation:• Experiment and make your own circuit with the LED, battery and tilt switch, so girls may
see that the components work together to turn the light on and off.
Directions (60 minutes):1. Review what a simple circuit is with the girls before passing out the materials for the
activity. See page 6 or 17 in this guide for an explanation of a simple circuit.

- 29 - Power It Up
2. Explain to the girls they will be building a simple circuit using three components: a coin battery, a tilt switch and an LED. Review with the girls how a tilt switch works.
A tilt switch is made up of two electrical wires and a metal ball positioned inside a contained cylinder. When the cylinder tilts one way, the ball shifts so that it comes into contact with both wires, closing the circuit. When the cylinder tilts the other way, the ball rolls away from
the wires, opening the circuit.
3. Show the girls the tilt switch and call attention to the two legs of the switch. Have the girls tip the switch back and forth and listen for the rolling ball inside. Be sure they all understand that when the legs are pointing down and the ball has rolled down to touch the two legs, the switch is on.
4. Encourage girls to play with the components until they are able to get the circuit to work. You may want to begin by experimenting with just the battery and LED. Give the girls the following hint if needed: the long leg is positive. Start by touching the positive leg of the LED to the one side of the battery. If the LED lights up, you've found the positive side of the battery. Then try adding in the tilt switch component into the circuit.
5. Demonstrate how to hook the legs of the LED and tilt switch to the battery tabs, which have tiny holes to use as places to connect. You may want to use the needle nose pliers to bend the components legs into U-shapes. Girls can hook the legs of the LED and switch through the battery's holes and twist to secure. Be careful with the tilt switch. The legs are delicate and can break easily, but can be soldered back on. The finished circuit should look like the following:
Closed:On
Open:Off
Tilt Lantern
Note: Your battery may not be labeled with positive and negative sides.If girls are struggling, pass out the Tilt Lantern Handout and allow them to use the picture as a reference.
Tape this connection
- 30 - Power It Up
Tilt Lantern
6. Wrap a small piece of aluminum tape around the connections to the battery tabs once the girls have hooked their components together. One leg of the LED and one leg of the tilt switch should be securely taped to the battery.
7. Connect the LED-tilt switch legs to each other (use the needle nose pliers if needed to twist) and wrap in a piece of aluminum tape.
8. Tape the battery down on to the inside of the lid once the circuit is secured. The circuit should be closed (on).
9. Test. Once the circuit is securely taped to the lid, have the girls experiment by turning the lid over. The LED should turn off. If it doesn’t, they will have to adjust the angle of their tilt switch so it rolls into the off position when the lid is inverted.
10. Decorate the containers with sequins, if desired. Dot craft glue on the back of the sequins and apply.
11. Place the container lid on and tilt the lantern upside down to see it turn on. The girls may need to adjust the angle of the tilt switch again so that it will be on when upright and off when upside down.
Reflection (10 minutes):1. What is a simple circuit? (A simple circuit is an electrical circuit with a power source and one
electrical component, and sometimes a switch.)
2. How does a tilt switch work? (When the metal ball has rolled down to touch the two legs, the switch is on because the connection is complete. When the ball does not touch the two legs, the connection is broken and the circuit is incomplete.)
3. What are some other possible uses of a tilt switch? (A children’s toy that makes noise if you shake it or tip it over; a safety feature of a car that deploys airbags when the car flips; a security system on a vending machine that sounds an alarm if you try to tip it to get the candy out.)
Note:This activity was adapted from an issue of Make magazine. www.makezine.com

- 31 - Power It Up
Tilt Lantern Reference Sheet
1. Make sure your connections are very secure! Bend the legs of each component into a U shape. Hook the legs together for each connection, then twist them gently. You can use the aluminum tape to secure the connections so they don’t fall apart. Remember the components must be touching to complete the circuit.
2. Once your circuit is working, tape the battery down on the lid so the LED and tilt switch are sticking up, with the LED on.
3. When you fi nish, the LED should be on when the lid is upside down, and off when it is right-side up. If the LED is fl ickering, tape the connections more tightly and make sure the tilt switch is standing straight up.
Power It Up
Tilt Lantern Reference Sheet
You will use the three components above to make a circuit that looks like this picture:
–
+
1 2 3+ +
=• The LED and battery
have polarity! Pay attention to the positive and negative legs.
• Make sure your tilt switch is tilted with the legs pointing down so the circuit is closed (on).
Remember:
How does this circuit work?
Which way are the electrons fl owing?
? Questions:
Closed:On
Open:Off

- 32 - Power It Up
Sess
ion
3: C
aree
r A
ctiv
ity
Introduction: In this activity, girls will create a poster advertisement for the Electrical Engineering major at a college, attracting students with information about projects and future jobs available for students with this degree.
Objectives: As a result of this activity, the girls will be able to:
Describe the career of an Electrical EngineerBrainstorm different projects an Electrical Engineer might work on
Preparation:• Familiarize yourself with the
Electrical Engineer career card.
• Read over the background information for Electrical Engineering on page 34 of this leader guide.
Gradvertisement
30 Minutes+ 10 minutes preparation time
Materials:Per Girl• 1 piece of poster board
• Electrical Engineer career card
Per Group• TECH Brainstorm cards for reference
• set of markers
• scissors
• glue sticks
Not Included• magazines with advertisements for
everyday items
Grouping: Individual or
Pairs
Directions (20 minutes):1. Distribute a career card to each girl and give them a few minutes to read.
2. Explain to the girls that they have just been hired by the marketing department of a local college. The college doesn’t have as many female Electrical Engineering students as they would like, so they need help attracting more girls to the major.
3. Create a promotional poster. Encourage the girls to make their poster fun, creative, and exciting. The poster should advertise the Electrical Engineering major and try to convince female students to choose this as their major. Suggest that their posters include the following:
• The name of the major• What Electrical Engineers do• Companies that might hire Electrical Engineers• Types of products that Electrical Engineers work on

- 33 - Power It Up
Gradvertisement
• The expected salary of an Electrical Engineer
4. Divide the girls into small groups for brainstorming. Pass out the TECH Brainstorm cards and review the guidelines for brainstorming.
5. Allot the girls five minutes to brainstorm together to come up with other products and companies. Tell the girls that each girl in the small group must have a different product on her poster. Have the girls use the magazines for ideas, and to make collages if they wish.
6. Encourage the girls to ask questions. Use the background information sheet if needed. Invite them to think of products they use every day that use electricity, and help them come up with the company or brand that makes these products.
7. Create the posters in pairs or individually. Allow the girls time to create their poster using words, images they draw or cut from the magazines, and designs.
8. Present the posters to the whole group or within a smaller group.
Reflection (10 minutes):1. What did you learn about Electrical Engineering?
2. Do any aspects of this career seem exciting to you? Is this a career you could see yourself in? Why?
3. What products did you feature on your poster? Why?
4. Do you know an Electrical Engineer? What do they say about their work? If we don’t know any Electrical Engineers, how do you think we could find some?
5. Why do you imagine there are currently fewer women than men studying Electrical Engineering in college? What can be done about that?
6. Is there a place we can display your work, or a way we can try to encourage more girls to consider Electrical Engineering as a career?
TECH Brainstorming
TECH
Think of many ideas
Everyone’s ideas are good
Creativity
Have an open mind

- 34 - Power It Up
Gradvertisement
Background Information for Leaders
Electrical Engineers design parts for anything that uses electricity. They think about how to power everything from very small products like computer chips, to very large systems like a factory. In addition to designing new products, they also construct and maintain electrical equipment. Electrical Engineers work with other types of engineers to create products and systems. They often work closely with Computer Scientists on computer systems and electronics like cell phones, iPods, and laptops.
An Electrical Engineer might design parts for a digital camera, a battery for an electric car, or the power grid for a city. Electrical Engineers can work on communications equipment like satellites, and things like special effects for the movies. They are also very involved in developing computer systems and other computer products.
Electrical Engineers are needed at a large variety of companies. Any company that sells products using electricity will employ Electrical Engineers, as will companies in the communication, aerospace, computer, and automotive industries.
• Computers: Companies like Microsoft and Apple use Electrical Engineers to develop new products and improve existing ones, like netbooks and mp3 players. Networking companies like Cisco Systems use Electrical Engineers to develop wireless technology products.
• Automotive: Car manufacturers around the world need Electrical Engineers to design all the computerized systems in cars and car batteries.
• Toys: LeapFrog and other toy companies use Electrical Engineers to create interactive toys and video games.
• Appliances: Refrigerators, dishwashers, and dryers use electricity and need Electrical Engineers to make them more energy efficient—think EnergyStar!
• Construction: Electrical Engineers are needed to design and build wiring systems for new buildings.
• Television and Movies: Electrical Engineers help develop new 3D cameras, wireless microphones, and computers that run special effects software.
- 35 - Power It Up
Gradvertisement
Electrical Engineer
Electrical Engineers design parts for anything that uses electricity. They think about how to power everything from very small products, like computer chips, to very large products, like airplanes.
Projects that you might work on
Design a new iPod
Develop a new video game
Improve a computer chip to make it
work faster
Design the electrical supply
to a clothing factory
Build a new tiny camera that doctors use in surgery
Starting Salary:$60,000 to $70,000 a year!
Electrical Engineers work in teams with lots of other types of engineers to design new products and improve existing ones.
Toy Designer
Toy Designers develop and build new toys and games. They may be good at graphic design and computers to help design their invention, or mechanics to build a moving toy.
Toy Designers are very creative and there is a large variety of special projects that they can work on.
Starting Salary:$62,000 to $74,000 a year!
Projects that you might work on
Develop the idea for a new video game that appeals to girls
Design an educational toy that helps kids
learn to read
Build a better controller for your video game system
Design a mechanical animal kit children get
to build themselves
Electrical Engineer
Toy Designer
As a Electrical Engineer, you might design parts for the next digital camera or MP3 player. You could also design on a large scale, developing batteries for an electric car or designing power grids for cities. The average annual salary is about $60,000, which is about $29 per hour.
Maria’s Biography:
I lived most of my life in Oakland and I attend the University of California, Davis where I am majoring in Electrical Engineering. I chose Electrical Engineering because I want to make smaller and better radio collars for endangered species and create green electronics.
I like hobbies where I can relax and be creative. My hobbies include reading, listening to music, hanging out, and taking photos with my camera.
How to do it:
To become a Electrical Engineer, be sure to take advanced math or science classes like trigonometry and calculus.
If you like learning about how things work, get your parent’s permission and try taking apart things in your house like old hair dryers, coffee machines, or a lawn mower. Be sure to cut off the power cord first!
Find information about your local engineering society and learn about opportunities like internships, camps, or clubs like Odyssey of the Mind.
Maria AlvaradoDegree in Electrical Engineering
Toy Designers are creative people who use their imagination to create new entertainment products for kids and adults. They don’t let challenges keep them from working on their ideas, so they tinker and try until they succeed. They protect their ideas by getting a patent for their invention.
As a Toy Designer you might make an interactive toy to entertain your dog or a portable video game that’s inexpensive so that every kid can have one. The average annual salary is about $61,400 which is about $29.50 per hour.
Janese’s Biography:
As a child I had a knack for fixing broken appliances and tinkering with electronics. I wasn’t encouraged in science or technology as a girl, and had jobs in modeling, teaching, and sales. Eventually I found my true calling and founded my own company, Girl Tech, which makes toys that encourage girls to use technology. Today, I teach technology to children and teachers.
How to do it:
To become a Toy Designer like Janese, be sure you take advanced math and science classes like trigonometry and physics at your school. Classes in design or drafting are helpful too. Consider taking computer science, psychology and child development classes in college.
Colleges and universities want to see your commitment to extracurricular activities too. Try working with kids as a summer camp instructor, baby-sitter, tutor, or at a retail toy store.
Janese SwansonDegree in Computer Science

- 36 - Power It Up
Introduction: In this activity, girls practice soldering on the side of the circuit board they will use in the Electric Game Board (soldering) activity.
Objectives: As a result of this activity, the girls will be able to:
Safely hold and use a soldering ironSolder components onto a circuit board
Preparation:• Complete the “safety check” on the
Leader Reference Sheet.
• Review soldering safety tips before you begin soldering.
• Tape down soldering stands and power cords for stability and safety.
Directions (50 minutes):1. Review the Soldering Safety
information with the girls.
2. Practice. Soldering is a skill that takes practice. We recommend
Practice SolderingSe
ssio
n 3
: Act
ivit
y
1 Hour+ 20 minutes preparation time
Materials:Per group of 10• solder
• 10 circuit boards (1 per girl)
• 50 resistors (5 per girl)
• 1 roll of masking tape
• 5 soldering irons
• 5 stands for soldering irons
• 5 sponges to clean the soldering iron
• 2 wire cutters and strippers
• desoldering braid
• 3 extension cords
• 11 goggles (1 for each girl and leader)
• 5 Practice Soldering reference sheets
Grouping: Individualsoldering two electrical components as a group to help your girls learn and practice how to solder.
3. Give each pair of girls a Practice Soldering handout and give them a moment to review it.
4. Distribute one circuit board, one resistor and one pair of safety goggles to each girl.
5. Practice soldering the resistor in the side holes on the circuit board. The leader should lead the class with step-by-step instructions on how to solder. Remember that the components must be soldered onto the copper side of the circuit board. No girl should move on until the entire group feels comfortable soldering.
6. Circulate the room and check to make sure each girl is soldering correctly. Look at their joints to make sure they are not using too little or too much solder. It should look like a tiny Hershey's kiss®.
7. Give each girl four additional resistors to practice with on the remaining holes on the circuit board.
8. Teach girls about proper maintenance of the soldering iron's tip and allow them to clean and pack up the materials. Remember the old saying: “Girl Scouts always leave a place cleaner than they found it.”

- 37 - Power It Up
Practice SolderingUsing the Soldering Iron and Stand the First Time:To assemble a new stand, use the wing nut and screw on the underside to secure through the loop on the base of the metal neck that will hold the heated iron (see top photo on Practice Soldering Reference Sheet). You should "tin" a new soldering iron by allowing it to heat, then apply a thin coat of solder to the tip. Leave the solder on the iron as it cools. Then, the iron is ready to use with your girls.
Maintaining the Soldering Iron:The iron requires some basic maintenance to make sure it is working properly. The soldering iron should warm up to operating temperature after five minutes. Do not leave the iron plugged in and unused for long periods. After heating up, you should wipe the iron on the sponge before you solder, not after. Keeping a small amount of solder (just a coating) on the tip keeps it from oxidizing and rusting. Unplug the iron as soon as you finish soldering.
If there is a buildup on the tip and it is not heating up properly, wipe it firmly on the sponge while hot. You can also try melting solder directly onto the tip and then wiping it. Repeat this several times. The clumps should come off and the whole tip should heat up evenly again.
If the iron is still not working, you need to clean it more thoroughly. Radio Shack sells a small silver pot of Tip Tinner and Cleaner compound that eats away the oxidation. Or use a fine grit sandpaper to gently sand off any buildup on the tip. Alternatively, insert the heated iron into a pot of brass shavings or a copper pot scrubber several times, like sharpening a knife, to remove oxidized build-up. After any of these cleaning methods, you should immediately re-tin the tip of the iron by applying solder. Remember to leave a coat of solder on the tip as you stow the iron away.
If the buildup won't come off and the tip still does not heat up, you may need to replace the tip. Let the iron cool completely before replacing it. Soldering iron tips can be found at your local electronics or hardware store. Be sure to screw in the new tip tightly so it does not come loose while you are using it.
Reflection (10 minutes):1. How did it feel to solder for the first time? Was it scary? (Encourage the girls to talk about
overcoming their fears and feeling confident as they learn this new skill.)2. Were you able to make good solder connections between your board and the components?
How did you make good solder connections? (To make a good solder joint, touch the soldering iron to the component lead and the pad of the circuit board. Then touch the solder between the soldering iron tip and the joint until the solder covers the pad and the component lead. Once it is covered, remove the solder, then the soldering iron.)
Note:Always wear safety goggles or glasses when soldering to protect your eyes. There can be a tiny air pocket or impurity in the solder that could pop when heated and send bits of solder flying. This tip is taken from Electronic Projects for Dummies Cheat Sheet. www.dummies.com/how-to/content/safe-soldering-checklist.html
Note:Desoldering braid is provided in case you want to remove solder from a joint and try again. Desoldering braid is copper strand that absorbs and wicks away the solder. Simply unroll a piece of braid, apply it to the solder, and touch the iron to the braid for a few seconds. Use care as the braid will conduct heat. Lift iron and braid to check that all solder is removed. Repeat if needed.

- 38 - Power It Up
Leader Reference Sheet: Soldering SafetyComplete each safety check before you begin any soldering activity:1. Check each soldering iron to ensure that the iron’s replaceable tip is
securely fastened before plugging it in.
2. Check the power cord for any melted spots or exposed wire. If you see melted spots or exposed wires, tag the soldering iron and do not use it. Let the Girl Scout headquarters know so they can replace it.
3. Make sure you have one soldering stand for every soldering iron.
4. Moisten each sponge and place it near the soldering stand.
5. Tape extension cords to each table top. Plug in two soldering irons per extension cord.
6. Make sure you have enough safety goggles for each girl.
7. Avoid soldering on a paper tablecloth. Solder on a surface that can withstand heat should a hot iron touch it. Old cutting boards that are no longer used to prepare food would work well.
Safety tips while soldering:1. Soldering irons are hot (typically 626°F to 662°F)! Do not touch
the soldering iron tip. This also means that any part of the wire your soldering iron touches (that is not insulated) will be the same temperature!
2. Make sure that girls don’t melt the power cord and expose the inner wires.
3. Girls should never hand each other their soldering irons. They should return the iron to the stand before the next girl uses it.
4. Girls must wear safety goggles and tie their hair back.
5. Rosin solder releases fumes. These fumes are smelly and contact with eyes should be avoided.
6. Never eat or drink while soldering.
7. Wash hands after soldering.
8. Remind girls to ask for a new piece of solder when theirs gets too small (less than 2 inches).
Replacement Tip
Turn clockwise to secure replacement tip.
Power Cord
Soldering Iron
Wet Sponge
Soldering Iron Stand
Practice Soldering

- 39 - Power It Up
Power Cord
Soldering Iron
Power It Up
Practice Soldering Reference Sheet
What is soldering?Soldering is the most fundamental skill needed to assemble any electronic project. It takes some practice to make the perfect solder joint, but once learned it is a skill that is never forgotten.
The idea is simple: to join electrical parts together to form an electrical connection, melt a tin mixture called solder on the joint where the two metal components meet. To do this, you use what is called a soldering iron.
Most soldering takes place on a “circuit board.”
For this activity, you will be using a circuit board without copper strips, but plenty of copper pads.
• Read the back of this sheet to learn how to solder.
• Put on your safety goggles!
• Practice with one resistor. It can be inserted into any of the “Soldering Practice” holes on the side of the circuit board.
• Note: components are inserted from the top so their legs come out the copper side of a circuit board.
• Once you feel comfortable soldering, add four more resistors to your circuit board to master your soldering skills.
• Each joint should look like a tiny Hershey’s kiss®, and one soldering joint should not touch a neighboring solder joint.
On some circuit boards you can see small copper strips (which act like wire) and solder pads with holes in the middle. The legs of components (like LEDs) are stuck through the hole so that they stick out on the copper side. The base of the leg is soldered to the copper pad which connects the component to the circuit.
Soldering Iron
Wet Sponge
Soldering Iron StandCircuit Board
Copper Strips
Copper Pads
Practice Soldering

- 40 - Power It Up
Power It Up
Practice Soldering Reference Sheet
Circuit Board Soldering
Step #1 - Pick up and hold the soldering iron like it is a pencil. Clean the soldering iron tip using a wet sponge. Apply a very small amount of solder to the tip of the iron, and then wipe off the excess on the sponge.
Step #2 - Make sure your component and circuit board are clean. Insert the component through the proper holes on the top of the circuit board so the legs are sticking out on the back side of the circuit board (copper side).
Step #3 - Lay the iron tip so that it rests against both the component lead and the pad of your board. Normally, it takes about three seconds to heat the component/board enough to solder.
Step #4 - Once the component lead and copper pad are heated up, apply solder. Touch the tip of the strand of solder to the component lead and copper pad. The solder should fl ow freely around the lead and pad. Once the surface of the pad is completely coated, stop adding solder. It should take no more than a few seconds.
Step #5 - Remove the solder, then the iron. Place the soldering iron back in the stand. Don’t move the joint for a few seconds to allow the solder to cool.
Step #6 - Examine your joint. A well-soldered joint should look shiny and shaped like a Hershey’s kiss®. Snip the excess wire with wire cutters.
Practice Soldering

- 41 -
Sess
ion
4: A
ctiv
ity
Introduction: In this activity, girls will design and create their own version of the Operation® Game Board.
Objectives: As a result of this activity, the girls will be able to:
Design a circuit diagram for a gameCreate a fun and interactive game
Preparation:• Review concepts that came up
during Snap Circuits®, especially polarity. Review the purpose of a resistor. A resistor limits the current. Two AA batteries can overload one LED. A resistor is used to limit the current so the LED does not get too much power.
• Complete the “safety check” on the Leader Reference Sheet from Practice Soldering.
• Tape down soldering stands and power cords for stability and safety.
Directions (170 minutes):1. Review the Soldering Safety
information on page 38 with the girls. Have them look at their
Electric Game Board (soldering)
180 Minutes+ 5 minutes preparation time
Materials:Per Girl Per Group• cardboard pizza box
• 1 LED
• 1 pair of metal tweezers
• 1 AA battery holder with snap-on wires
• 2 AA batteries
• 1 circuit board
• 3 small aluminum cups
• 1 resistor
• pencil
• safety goggles
• Electric Game Board (soldering) reference
sheet
• wire
• solder
• plastic pony beads
• electrical tape
• utility knives
• wire cutters and strippers
• masking tape
• markers
• soldering irons
• stands & sponges
• extension cords
• de-soldering braid
Grouping: Individual
practice soldering holes and pick a perfect soldering joint.
2. Tell the girls they can use their new soldering skills to create their own game board. The object of the game is to have steady hands as you lift the small beads out of the aluminum cups. If the tweezers touch the aluminum (remember, aluminum is a conductor), the circuit is complete and the LED will light up.
3. Give each girl the Electric Game Board (soldering) handout and have the girls follow each step as a group. Each girl will be responsible for her own game board. You may need to break this into two sessions as time permits.
Recommendation:You may want to make a small hole in the box lid for the tweezer wire,
Power It Up

- 42 - Power It Up
Electric Game Board (soldering)
Note:This activity is adapted from:http://www.instructables.com/id/Your-own-Operation-Board-Game/
Reflection (10 minutes):4. How does the circuit work? Follow it through the entire game. (The electrons from the negative
side of the battery travel along the copper path on the circuit board to the LED, to the resistor, to the tweezers, to the aluminum, to the positive side of the battery to complete the circuit. Therefore the LED lights up.)
5. What are the different components in your circuit? (The tweezers, LED, the resistor, the circuit board, the aluminum cups, wire, and the battery case.)
6. What part did you find most challenging? How did you overcome this challenge?
7. Where is soldering used in the world around us? (In radios, televisions, jewelry-making, etc.)
8. Where would soldering something be easier and last longer than other methods of attaching things, like tape or glue?
9. Would you like to design games or solder as part of your career?

- 43 - Power It Up
Electric Game Board (soldering)
Power It Up
Assemble your pizza box. Sketch a design on the lid of the pizza box for your board game. Also draw three project holes. Each hole should be about the same size as the bottom of one of the cups. Make sure the holes are big enough so you can fi t the tweezers in them, but small enough to make the game interesting and challenging.
Carefully cut out the holes through the box lid using a utility knife.
Electric Game Board Handout (soldering)
You will be using tweezers to grab beads out of the holes. Make it attractive!
Remember:
In this activity, you will be making a game. The game board has three holes with small game pieces (beads) inside of aluminum cups. The object of the game is to pull the beads out using the tweezers, without touching any part of the aluminum cups. If you touch the aluminum, the circuit closes, the LED lights up, and you have to start again! You need a steady hand and concentration to win this game.
Box Lid
1
2
For your game, you will be making three simple circuits. The components in the circuit are the tweezers, circuit board, LED, resistor, the aluminum cups, wire, and the battery case. The resistor limits the amount of power to the LED since the batteries would supply too much power for one LED. If you close all three circuits at the same time, you will have a parallel circuit.
LEDResistor Circuit Board
–
+ LED
TweezerWire
Battery
1 2 3
Resistor
+
+

- 44 - Power It Up
Electric Game Board (soldering)
Power It Up
Decide where you want your LED to come out on your design. Poke a small hole through the lid using a pencil. Push the LED through the hole so the light is on the design side and the legs that are soldered to the circuit board are on the inside of the box.
Tape the circuit board to the inside of the lid.
Wrap the loose end of the tweezer wire around the tweezers. Use electrical tape to secure the tweezers to the wire. Make sure the tweezers are touching the stripped part of the wire, otherwise the circuit won’t work!
Put on your safety goggles. Solder the components onto your circuit board. Remember to solder on the metal side of your board, not the side with words printed on it.
4
1 2 3
+
+
Bend the legs of the resistor against the board so it stays in place. Solder over the holes around each leg, bend the legs back up and clip them off, if desired.
Snap the battery leads to the battery case. When soldering the battery leads in place, remember that the red wire is positive (+) and the black wire is negative (-).
Cut a 16-inch wire with 1 inch stripped from both ends, and solder one end to circuit board. Wrap other end around tweezers and secure with electrical tape.
The long leg of the LED is positive (+) and the short leg is negative (-). Don’t push the LED all the way down onto the circuit board. Make sure the bulb sticks up far enough to poke through the foam board. Solder both legs.
Cut three 8-inch wires with 1 inch stripped from both ends. Solder one end into the numbered holes.
Resistor
LEDBattery
Tweezer Wire
Hole Wires
5
6
3

- 45 - Power It Up
Electric Game Board (soldering)
Power It Up
Touch the ends of the three wires from holes (1), (2) and (3) to the aluminum cups for each of the project holes. Be sure that the stripped part of each wire touches the foil. You could bend back the edge of the aluminum cup and tuck the wire underneath, or use electrical tape to secure the wires to the aluminum cups.
Insert batteries into the battery case and tape it to the lid.
Use masking tape to attach the cups to the inside of the lid behind the project holes. The cups will hold the game pieces (beads) inside the game board.
Choose your beads to act as game pieces. These pieces are what you grab from out of the project holes. Congratulations! You’ve completed the steps to make your game, and now can challenge your friends to play.
10
89
LED
Tweezer Wire
Battery
1 2 3
Resistor
+
+
Tape
Your solder joints should be on the side of the board without words. This picture is only meant to show the correct connection joints.
Remember:
Your completed circuit should be connected like this:
Test your circuit by touching the tweezers to each of the aluminum cups. The LED should light up. If it doesn’t try the following:
• Check your solder joints. Are they completely soldered?
• Check the polar components (the LED and battery case). Are the positive and negative legs in correctly?
• Make sure the stripped parts of the wires from holes (1), (2), and (3) are touching the aluminum cups, and that they are taped down securely.
• Make sure the tweezers are touching the stripped part of the wire and are taped securely.
7

- 46 - Power It Up
Introduction: In this activity, girls will design and create their own version of the Operation® Game Board.
Objectives: As a result of this activity, the girls will be able to: Design a circuit diagram for a gameCreate a fun and interactive game
Directions (170 minutes):1. Give each girl the Electric Game Board (non-soldering) handout. Each girl will be responsible for her own game board. The object of the game is to have steady hands as you lift the small beads out of the metal cups. If the tweezers touch the metal, the circuit is complete and the LED will light up.
2. Review the concepts of polarity and circuits the girls learned from the Circuitry role cards and Snap Circuits®.
Sess
ion
4: A
ctiv
ity
Electric Game Board (non-soldering)
Note:This activity is adapted from:http://www.instructables.com/id/Your-own-Operation-Board-Game/
3. Ask for volunteers to read the steps aloud on the handout, or work as a group throughout each step. You may need to break this activity into two sessions as time permits.
Reflection (10 minutes):4. How does the circuit work? Follow it through the entire game. (The electrons from the
negative side of the battery travel through the circuit, from the LED, to the tweezers to the foil, to the positive side of the battery to complete the circuit. Thus the LED lights up.)
5. What are the different components in your circuit? (The tweezers, LED, the aluminum cups, wire, and the battery case.)
6. What part did you find most challenging? How did you overcome this challenge?
180 Minutes
Materials:Per Girl Per Group• cardboard box
• 1 LED
• 1 pair of metal tweezers
• 1 AA battery holder with snap-on wires
• 2 AA batteries
• 3 aluminum cups
• aluminum tape
• 1 plastic twist connector
• Electric Game Board (non-soldering)
reference sheet
• beads
• electrical tape
• wire
• utility knives
• wire cutters and strippers
• masking tape
• markers
• pencils
Grouping: Individual
Recommendation:You may want to make a small hole in the box lid for the tweezer wire,

- 47 - Power It Up
Electric Game Board (non-soldering)
Power It Up
Assemble your pizza box. Sketch a design on the lid of the pizza box for your board game. Also draw three holes. Each hole should be about the same size as the bottom of one of the cups. Carefully cut out the holes through the box lid using a utility knife.
Decide where you want your LED light to be on your game board. Poke a small hole with a pencil through the lid. Push the LED through the hole so the light is on the design side and the legs are sticking out on the inside of the box.
Tape the battery case to the inside of the lid near the LED’s legs.
Electric Game Board Reference Sheet (non-soldering)
You will be using tweezers to grab beads out of the holes.
Make it attractive!
Remember:
In this activity, you will be making a game. The game board has three holes with small game pieces (beads) inside the aluminum cups resting underneath the holes. The object of the game is to pull the beads out with the tweezers without touching any part of the aluminum cups. If you touch the aluminum, the circuit closes, the LED (light emitting diode) goes on, and you have to start again! You need a steady hand and concentration to win this game.
Box Lid
1
2
For your game, you will be making three simple circuits. In a simple circuit each component receives the total amount of voltage from the power source. The components in the circuit are the tweezers, LED, the aluminum cups, wire, and the battery. If you close all three circuits at the same time, you will have a parallel circuit.
LEDBattery Twist Wire Cap
–
+
+
-
- 48 - Power It Up
Power It Up
Snap the battery holder pack to the red and black wires cap provided. Strip the ends of both wires of the battery case so there is about 1 inch of exposed wire.
Measure a wire for each hole so that it is long enough to reach from the hole to the positive (red) wire of the battery case. Add two more inches of length to your measured wire before you cut. You should have three wires total.
Strip 1 inch of plastic insulation from both ends of each wire. (That’s why you added two more inches!)
Twist one end of all three wires and the positive battery wire together. Insert them into a plastic twist wire cap. Twist the cap down tightly until the wires are secure.
Find the negative (short) leg of the LED and the negative (black) wire of the battery case. Make sure these two touch, and wrap the connection with aluminum or electrical tape.
Cut an approximately 16 inch piece of wire. You could wrap the wire around the width of your box to measure it. Strip 1 inch of plastic insulation off both ends of the wire.
Touch the end of the positive (long) leg of the LED to one stripped end of the 16 inch wire. Use the aluminum or electrical tape to wrap this connection securely.
Wrap the other end of the 16 inch wire around the tweezers. Use tape to secure the tweezers to the wire. Make sure the tweezers are touching the stripped part of the wire!
Connect the ends of the three shorter stripped wires to the aluminum cups. You could peel back the edge of the cup and tuck the wire in, or use aluminum or electrical tape to secure the wire to the aluminum cups.
4
5
6
7
8
9
10
11
3
Electric Game Board (non-soldering)

- 49 - Power It Up
Electric Game Board (non-soldering) Electric Game Board (non-soldering)
Power It Up
Use masking tape to attach the cups to the inside of the lid behind the holes you cut. The aluminum cups will hold the game pieces (the beads) inside the game board.
Add batteries to the battery case and your game should be ready to play!
12
13Your completed circuit should look like this:
Test your circuit by touching the tweezers to each of the aluminum cups. The LED should light up. If it doesn’t, try the following:
• Twist the wire cap down more tightly.
• Check the polar components (the LED and battery case). Are the positive and negative legs touching correctly?
• Make sure the stripped parts of the wires for each hole are touching the aluminum cup, and that they are taped down securely.
• Make sure the tweezers are touching the stripped part of the wire and are taped securely.
LED
Tweezers
Battery
+
+Foil cup holes
Wire Cap
Tape these connections

- 50 - Power It Up
Introduction: In this activity, girls will think about their futures and create a role model career card about themselves.
Objectives: As a result of this activity, the girls will be able to:
Illustrate future career plansConsider career options
Preparation:• Optional. Take and print headshot
photos of your girls ahead of time and attach them to the cards.
Your Career CardSe
ssio
n 4
: Car
eer
Act
ivit
y
20 Minutes
Materials:Per Girl• 1 blank career card
• 1 pencil
Per Group of 10• 2 sets of five role model career cards
• 2 boxes of permanent markers
Grouping: Individual
Directions (20 minutes):1. Pass around the role model career cards from this box and give the girls a chance to
become familiar with them. Discuss some of the projects they have done so far and what careers on the cards might work on similar projects.
� What kind of career designs computer games?
� What does a Mechanical Engineer do?
2. Explain that they will be making their own career cards today. Girls will need to choose a career from the career cards.
3. Ask them to think about what college they might attend for this career and what degree they might have. Would they like to have a family? Where do they see themselves living?
4. Give the girls ten minutes to make cards for themselves modeled after the role model cards in your box. If any girl is having trouble choosing a career, ask her to think back on what activity she liked the best or what career she thought was most interesting.
5. Present these career cards to the group. Discuss why girls chose a specific career.
� Why did you choose this career for yourself?
� What other things do you hope to accomplish in your future?
� Explain why science and engineering are good careers for women.

- 51 - Power It Up
Your Career Card
Name:
Occupation:
Degree in:
Biography:
Interesting Facts:
At my job, I work on...
Picture
Your Career Card
Name:
Occupation:
Degree in:
At my job, I work on...
Picture
Your Career Card
Biography:
Interesting Facts:

- 52 - Power It Up
Sess
ion
5: C
aree
r A
ctiv
ity
Introduction: In this activity, girls will learn about how different careers work together to create a product.
Objectives: As a result of this activity, the girls will be able to:
Explain different engineering careersExplain how different careers work together
Preparation:• Familiarize yourself with the career
cards and questions on the next page.
Career Step Up
20 Minutes+ 5 minutes preparation time
Materials:Per Group• 2 sets of five role model career cards
Grouping: 2 Teams
Directions (20 minutes):1. Arrange the girls into two teams.
2. Give each team one set of career cards. Each girl should have one or two cards depending on the numbers on each team. Give the girls time to read over the cards. Encourage questions or comments on the cards so they understand the content.
3. Name a product and allow each team to huddle and talk amongst themselves to decide which careers would have been involved in making that product. Remind the girls to think about the entire product. If the girls are stuck, read a question prompt for that product to help them.
4. Decide. Once the teams have an answer, the girls holding the career cards representing a career they think was involved should stand. For each correct answer, the team gets a point. (If two careers were involved and both of those girls stood, the team gets two points).
5. Ask all the girls holding a particular career card to suggest one aspect of the product they worked on. For example, you might ask all the Software Engineers what aspect of a cell phone they helped build.
6. Consider. If a girl suggests a career that does not seem to be related to a product, encourage her to explain why she thinks that career might be involved in the product. If you think it is a valid explanation, give her a point. For example, a girl might suggest that a Material Science Engineer would be involved in making the plastic in Snap Circuits®. Certainly, a Material Science Engineer could have been involved in making durable plastic for a toy that needs to last a long time.
7. Win. The team with the most points at the end wins the game.

- 53 - Power It Up
Career Step Up Career Step Up
Careers Involved:
Product: Cell Phone Careers Involved: Software Engineer, Electrical Engineer, Materials Science Engineer
1. What does a cell phone do? How does it know to do that? How do you get to all the different applications on your phone? (Software Engineer)
2. Does a phone need a battery? (Electrical Engineer)
3. Does your phone shatter when you drop it? How is the plastic or metal so strong yet lightweight? (Materials Science Engineer)
Product: Video Game Controller Careers Involved: Software Engineer, Mechanical Engineer, Electrical Engineer, Toy Designer
1. How does the controller tell the game what to do? How does the game know what is going on? (Software Engineer)
2. If the power went out, would the controller work? (Electrical Engineer)
3. A controller doesn’t work by itself. It is part of a system. Who designed the system? (Toy Designer)
4. Many controllers have joysticks. Who designed them to move a certain way? (Mechanical Engineer)
Product: Hair DryerCareers Involved: Mechanical Engineer, Electrical Engineer, Material Science Engineer
1. What do you think is inside the hair dryer pushing the air out? Is it something that is moving? (Mechanical Engineer)
2. How does the power get to all the parts? How do the switches and buttons make the hair dryer turn on or slow down? (Electrical Engineer)
3. Why do you think the handle stays cool even though the nozzle can become hot? (Material Science Engineer)
Product: Elevator Careers Involved: Mechanical Engineer, Electrical Engineer, Software Engineer
1. What makes the elevator move up and down? How does it move? (Mechanical Engineer)
2. How do you know what floor you are on? Who made it so that the buttons light up or the screen shows a floor? How does the elevator know what to do when you push the button for the third floor? (Software Engineer or Electrical Engineer)

- 54 - Power It Up
Career Step Up
Product: Hybrid Car Careers Involved: Mechanical Engineer, Material Science Engineer, Electrical Engineer
1. What type of person would design a new car engine with all its moving parts? (Mechanical Engineer)
2. What does a hybrid car run on? Who would help build an engine that runs on two different power sources? (Electrical Engineer)
3. Hybrid cars are powered by both a battery and fuel. Who would help design engine parts that can process two very different substances? (Material Science Engineer)
Product: Snap Circuits® Careers Involved: Electrical Engineer, Toy Designer
1. What is Snap Circuits® trying to teach you? Who would help figure out what should be taught? (Electrical Engineer)
2. What type of product is Snap Circuits®? (Toy Designer)
Note:Salary information is from the National Bureau of Labor Statistics, Occupational Employment and Wage Estimates as of May 2009.

- 55 - Power It Up
Career Cards
Electrical Engineer
Electrical Engineers design parts for anything that uses electricity. They think about how to power everything from very small products, like computer chips, to very large products, like airplanes.
Projects that you might work on
Design a new iPod
Develop a new video game
Improve a computer chip to make it
work faster
Design the electrical supply
to a clothing factory
Build a new tiny camera that doctors use in surgery
Starting Salary:$60,000 to $70,000 a year!
Electrical Engineers work in teams with lots of other types of engineers to design new products and improve existing ones.
Toy Designer
Toy Designers develop and build new toys and games. They may be good at graphic design and computers to help design their invention, or mechanics to build a moving toy.
Toy Designers are very creative and there is a large variety of special projects that they can work on.
Starting Salary:$62,000 to $74,000 a year!
Projects that you might work on
Develop the idea for a new video game that appeals to girls
Design an educational toy that helps kids
learn to read
Build a better controller for your video game system
Design a mechanical animal kit children get
to build themselves
Electrical Engineer
Toy Designer
As a Electrical Engineer, you might design parts for the next digital camera or MP3 player. You could also design on a large scale, developing batteries for an electric car or designing power grids for cities. The average annual salary is about $60,000, which is about $29 per hour.
Maria’s Biography:
I lived most of my life in Oakland and I attend the University of California, Davis where I am majoring in Electrical Engineering. I chose Electrical Engineering because I want to make smaller and better radio collars for endangered species and create green electronics.
I like hobbies where I can relax and be creative. My hobbies include reading, listening to music, hanging out, and taking photos with my camera.
How to do it:
To become a Electrical Engineer, be sure to take advanced math or science classes like trigonometry and calculus.
If you like learning about how things work, get your parent’s permission and try taking apart things in your house like old hair dryers, coffee machines, or a lawn mower. Be sure to cut off the power cord first!
Find information about your local engineering society and learn about opportunities like internships, camps, or clubs like Odyssey of the Mind.
Maria AlvaradoDegree in Electrical Engineering
Toy Designers are creative people who use their imagination to create new entertainment products for kids and adults. They don’t let challenges keep them from working on their ideas, so they tinker and try until they succeed. They protect their ideas by getting a patent for their invention.
As a Toy Designer you might make an interactive toy to entertain your dog or a portable video game that’s inexpensive so that every kid can have one. The average annual salary is about $61,400 which is about $29.50 per hour.
Janese’s Biography:
As a child I had a knack for fixing broken appliances and tinkering with electronics. I wasn’t encouraged in science or technology as a girl, and had jobs in modeling, teaching, and sales. Eventually I found my true calling and founded my own company, Girl Tech, which makes toys that encourage girls to use technology. Today, I teach technology to children and teachers.
How to do it:
To become a Toy Designer like Janese, be sure you take advanced math and science classes like trigonometry and physics at your school. Classes in design or drafting are helpful too. Consider taking computer science, psychology and child development classes in college.
Colleges and universities want to see your commitment to extracurricular activities too. Try working with kids as a summer camp instructor, baby-sitter, tutor, or at a retail toy store.
Janese SwansonDegree in Computer Science

- 56 - Power It Up
Career Cards
Electrical Engineer
Electrical Engineers design parts for anything that uses electricity. They think about how to power everything from very small products, like computer chips, to very large products, like airplanes.
Projects that you might work on
Design a new iPod
Develop a new video game
Improve a computer chip to make it
work faster
Design the electrical supply
to a clothing factory
Build a new tiny camera that doctors use in surgery
Starting Salary:$60,000 to $70,000 a year!
Electrical Engineers work in teams with lots of other types of engineers to design new products and improve existing ones.
Toy Designer
Toy Designers develop and build new toys and games. They may be good at graphic design and computers to help design their invention, or mechanics to build a moving toy.
Toy Designers are very creative and there is a large variety of special projects that they can work on.
Starting Salary:$62,000 to $74,000 a year!
Projects that you might work on
Develop the idea for a new video game that appeals to girls
Design an educational toy that helps kids
learn to read
Build a better controller for your video game system
Design a mechanical animal kit children get
to build themselves
Electrical Engineer
Toy Designer
As a Electrical Engineer, you might design parts for the next digital camera or MP3 player. You could also design on a large scale, developing batteries for an electric car or designing power grids for cities. The average annual salary is about $60,000, which is about $29 per hour.
Maria’s Biography:
I lived most of my life in Oakland and I attend the University of California, Davis where I am majoring in Electrical Engineering. I chose Electrical Engineering because I want to make smaller and better radio collars for endangered species and create green electronics.
I like hobbies where I can relax and be creative. My hobbies include reading, listening to music, hanging out, and taking photos with my camera.
How to do it:
To become a Electrical Engineer, be sure to take advanced math or science classes like trigonometry and calculus.
If you like learning about how things work, get your parent’s permission and try taking apart things in your house like old hair dryers, coffee machines, or a lawn mower. Be sure to cut off the power cord first!
Find information about your local engineering society and learn about opportunities like internships, camps, or clubs like Odyssey of the Mind.
Maria AlvaradoDegree in Electrical Engineering
Toy Designers are creative people who use their imagination to create new entertainment products for kids and adults. They don’t let challenges keep them from working on their ideas, so they tinker and try until they succeed. They protect their ideas by getting a patent for their invention.
As a Toy Designer you might make an interactive toy to entertain your dog or a portable video game that’s inexpensive so that every kid can have one. The average annual salary is about $61,400 which is about $29.50 per hour.
Janese’s Biography:
As a child I had a knack for fixing broken appliances and tinkering with electronics. I wasn’t encouraged in science or technology as a girl, and had jobs in modeling, teaching, and sales. Eventually I found my true calling and founded my own company, Girl Tech, which makes toys that encourage girls to use technology. Today, I teach technology to children and teachers.
How to do it:
To become a Toy Designer like Janese, be sure you take advanced math and science classes like trigonometry and physics at your school. Classes in design or drafting are helpful too. Consider taking computer science, psychology and child development classes in college.
Colleges and universities want to see your commitment to extracurricular activities too. Try working with kids as a summer camp instructor, baby-sitter, tutor, or at a retail toy store.
Janese SwansonDegree in Computer Science

- 57 - Power It Up
Career Cards
Software Engineer
Software Engineers write computer programs that are the instructions to the computer. Software Engineers write code for everything from internet search engines to the settings on a digital camera or iPod®.
Projects that you might work on
Develop an interactive computer game
Improve an internet search engine so it finds the right websites faster
Create applications for a mobile phone
Write a program that translates letters so girls can have pen pals
around the world
Develop new ways
to connect to friends on social media websites
Starting Salary:$50,000 to $63,000 a year!
Software Engineers pay close attention to details because one mistake means the computer could do the wrong thing.
Mechanical Engineer
A Mechanical Engineer designs and tests all kinds of machines. They build products with moving parts that help get a job done. Mechanical Engineers work on everything from tools like can openers to complicated factory machines.
Starting Salary:$55,000 to $65,000 a year!
Mechanical Engineers build models of projects they are working on to see what works the best. They experiment with lots of diff erent ideas before they fi nd one that works.
Projects that you might work on
Build a bike that is easy to pedal
up hills
Design a game with moving parts for blind children
Create prosthetic hands that can type and write
Build a wheelchair for a dog
Design a space rover to collect
data about Mars
Software Engineer
Mechanical Engineer
Software Engineers combine engineering, programming and trouble-shooting all into one career. As a Software Engineer, you work on many diff erent projects and you can work in many diff erent industries. Perseverance is very important. You can’t be discouraged when something doesn’t work correctly the fi rst time. You use your creativity and problem solving skills to try, try again!
As a Software Engineer, you might write a new code sequence and test it for bugs or errors. The average annual salary is about $51,391 which is about $24.70 per hour.
Patty’s Biography:
My interest for computers was sparked in elementary school when I was introduced to the computer game, Oregon Trail. I began to wonder how it had been created and what was inside the computer that made it work. I enjoyed taking old computers apart and loved the challenge of math. I went on to study computer science at Mills College and now I am a Software Engineer at Google.
My favorite hobby is spending time with my daughters.
How to do it:
To become a Software Engineer like Patty, volunteer in the audio/visual or computer lab at your school to become familiar with computers and equipment. Take a variety of classes in college (I recommend Human-Computer Interaction, software engineering, graphic design, psychology, math and statistics, technical writing, and speech communication) to learn all of the different skills needed to design computer software. Look for opportunities to job shadow (that’s networking!) someone in the field.
Patty LegaspiDegree in Computer Science
Think of all the machines you use everyday like appliances at home and automobiles. They are designed by Mechanical Engineers who fi nd out what we need and how to make them so they’re safe and functional.
As a Mechanical Engineer, you could design and build the machinery that makes toys, an aircraft carrier, a sailboat —anything that moves! The average annual salary is $55,000 which is about $26.50 per hour.
Cecily’s Biography:
I loved math and took drafting classes in high school that started me on my path to becoming an engineer. Before that, I thought I wanted to be a lawyer, a construction worker, or a teacher. My engineering degree is from Tennessee State University
I enjoy working with children, so I seek out opportunities to mentor students. I also volunteer as a Girl Scout troop leader, and I cut and style hair as a creative outlet.
How to do it:
To become a Mechanical Engineer, be sure to take advanced math or science, and technical drawing classes. You’ll learn statistics, strength of materials, design, and physics.
See if there are summer or night classes at your local community college that aren't available at your school. Find out about opportunities like robotics, math or technology clubs.
Cecily WisemanDegree in Engineering

- 58 - Power It Up
Software Engineer
Software Engineers write computer programs that are the instructions to the computer. Software Engineers write code for everything from internet search engines to the settings on a digital camera or iPod®.
Projects that you might work on
Develop an interactive computer game
Improve an internet search engine so it finds the right websites faster
Create applications for a mobile phone
Write a program that translates letters so girls can have pen pals
around the world
Develop new ways
to connect to friends on social media websites
Starting Salary:$50,000 to $63,000 a year!
Software Engineers pay close attention to details because one mistake means the computer could do the wrong thing.
Mechanical Engineer
A Mechanical Engineer designs and tests all kinds of machines. They build products with moving parts that help get a job done. Mechanical Engineers work on everything from tools like can openers to complicated factory machines.
Starting Salary:$55,000 to $65,000 a year!
Mechanical Engineers build models of projects they are working on to see what works the best. They experiment with lots of diff erent ideas before they fi nd one that works.
Projects that you might work on
Build a bike that is easy to pedal
up hills
Design a game with moving parts for blind children
Create prosthetic hands that can type and write
Build a wheelchair for a dog
Design a space rover to collect
data about Mars
Software Engineer
Mechanical Engineer
Software Engineers combine engineering, programming and trouble-shooting all into one career. As a Software Engineer, you work on many diff erent projects and you can work in many diff erent industries. Perseverance is very important. You can’t be discouraged when something doesn’t work correctly the fi rst time. You use your creativity and problem solving skills to try, try again!
As a Software Engineer, you might write a new code sequence and test it for bugs or errors. The average annual salary is about $51,391 which is about $24.70 per hour.
Patty’s Biography:
My interest for computers was sparked in elementary school when I was introduced to the computer game, Oregon Trail. I began to wonder how it had been created and what was inside the computer that made it work. I enjoyed taking old computers apart and loved the challenge of math. I went on to study computer science at Mills College and now I am a Software Engineer at Google.
My favorite hobby is spending time with my daughters.
How to do it:
To become a Software Engineer like Patty, volunteer in the audio/visual or computer lab at your school to become familiar with computers and equipment. Take a variety of classes in college (I recommend Human-Computer Interaction, software engineering, graphic design, psychology, math and statistics, technical writing, and speech communication) to learn all of the different skills needed to design computer software. Look for opportunities to job shadow (that’s networking!) someone in the field.
Patty LegaspiDegree in Computer Science
Think of all the machines you use everyday like appliances at home and automobiles. They are designed by Mechanical Engineers who fi nd out what we need and how to make them so they’re safe and functional.
As a Mechanical Engineer, you could design and build the machinery that makes toys, an aircraft carrier, a sailboat —anything that moves! The average annual salary is $55,000 which is about $26.50 per hour.
Cecily’s Biography:
I loved math and took drafting classes in high school that started me on my path to becoming an engineer. Before that, I thought I wanted to be a lawyer, a construction worker, or a teacher. My engineering degree is from Tennessee State University
I enjoy working with children, so I seek out opportunities to mentor students. I also volunteer as a Girl Scout troop leader, and I cut and style hair as a creative outlet.
How to do it:
To become a Mechanical Engineer, be sure to take advanced math or science, and technical drawing classes. You’ll learn statistics, strength of materials, design, and physics.
See if there are summer or night classes at your local community college that aren't available at your school. Find out about opportunities like robotics, math or technology clubs.
Cecily WisemanDegree in Engineering
Career Cards

- 59 - Power It Up
Career Cards
Materials Science Engineer
Materials Science Engineers develop new and improved materials to use for diff erent products. They might develop a plastic that is easier to recycle, or create synthetic materials that act like a bone to help accident victims heal.
Starting Salary:$50,000 to $62,000 a year!
Materials Science Engineers also try to improve existing materials so products work better or are less expensive.
Projects that you might work on
Invent a clothing that
repels mosquitoes
Create a type of plastic that is biodegradable
Create a new coating for medicine to make
it taste good
Design a new magnetic material that helps
computer chips run faster
Materials Science Engineer
Materials Science Engineers develop new and improved materials to use for diff erent products. They might develop a plastic that is easier to recycle, or create synthetic materials that act like a bone to help accident victims heal.
As a Materials Science Engineer, your job might be to create disposable utensils that dissolve in water, or produce a sun block that protects against skin cancer. You might also design materials to make computers run faster. The average annual salary is about $50,000, which is about $24 per hour.
Joanna’s Biography:
I always loved math and science as I was growing up. The first time I heard of Materials Science was at Brown University. I like engineering because we use physics to develop creative new uses for materials. Now I am in graduate school at the University of California, Berkeley working towards my Ph.D. in Materials Science. I study magnetic materials that might be used in your computer in about ten years!
My hobbies include hiking and playing with my cats, Bonsai and Jasper.
How to do it:
To become a Materials Science Engineer, be sure to take advanced math or science classes like trigonometry and calculus. Biology and chemistry classes can help if you want to specialize in forensic engineering or making medical materials such as dental or cardiovascular biomaterials.
Check out www.biomaterials.org or Alpha Sigma Mu, the honor society for Materials Science and engineering.Joanna Bettinger
Degree in Engineering


