Application Note Please read the Important Notice and Warnings at the end of this document <Revision 1.6> www.infineon.com <2016-19-02> AN-0035 PowIRCenter Installation and User Guide About this document Scope and purpose The purpose of this document is to provide a comprehensive and easy to follow guide of the PowIRCenter software. The scope applies to all the aspects of the software from Installation to troubleshooting. Intended audience DC/DC power supply designers using the PowIRCenter software to program International Rectifier digital IC’s Table of Contents 1 PowIRCenter Features .........................................................................................................3 2 System Requirements......................................................................................................... 4 3 Download IR PowIRCenter ...................................................................................................5 3.1. POL PowIRCenter (no license) ............................................................................................................ 5 3.2. Full PowIRCenter (license required) .................................................................................................... 5 4 Install IR PowIRCenter .........................................................................................................7 5 UnInstall IR PowIRCenter ................................................................................................... 11 6 Hardware Setup ................................................................................................................ 12 6.1 Firmware Update.............................................................................................................................. 12 7 Getting Started ................................................................................................................. 13 7.1 Automatic Updates for “Full” PowIRCenter ...................................................................................... 13 7.2 Launching the GUI - for POL devices only ......................................................................................... 14 7.3 Launching the GUI - for POL and Multi-Phase Devices ..................................................................... 14 8 Main Screen Interface ........................................................................................................ 15 9 Device Manager ................................................................................................................ 16 9.1 Tree View Structure .......................................................................................................................... 16 9.2 Dot Colors ........................................................................................................................................ 16 9.3 Add/Delete Devices .......................................................................................................................... 17 9.4 Move Device Up/Down ..................................................................................................................... 17 9.5 Editing Tree View Text and I2C/PMBus Address ............................................................................... 17 9.6 Expand/Collapse Device Manager Tree View .................................................................................... 18 10 New/Open/Save Board Designs .......................................................................................... 19 11 System Status................................................................................................................... 20 12 Clear Faults ....................................................................................................................... 21 13 Auto Populate Devices ....................................................................................................... 22 14 Read Registers from Devices .............................................................................................. 23 15 Device Level - Register Map (in “Full” PowIRCenter only) ...................................................... 24 16 Device Level – Design Tools ................................................................................................ 25 17 Device Level – Utilities ....................................................................................................... 26
Transcript
Application Note Please read the Important Notice and Warnings at the end of this document <Revision 1.6>
www.infineon.com <2016-19-02>
AN-0035
PowIRCenter Installation and User Guide
About this document
Scope and purpose
The purpose of this document is to provide a comprehensive and easy to follow guide of the PowIRCenter software. The scope applies to all the aspects of the software from Installation to troubleshooting.
Intended audience
DC/DC power supply designers using the PowIRCenter software to program International Rectifier digital IC’s
Table of Contents
1 PowIRCenter Features .........................................................................................................3
2 System Requirements......................................................................................................... 4
3 Download IR PowIRCenter ...................................................................................................5 3.1. POL PowIRCenter (no license) ............................................................................................................ 5 3.2. Full PowIRCenter (license required) .................................................................................................... 5
4 Install IR PowIRCenter .........................................................................................................7
5 UnInstall IR PowIRCenter ................................................................................................... 11
7 Getting Started ................................................................................................................. 13 7.1 Automatic Updates for “Full” PowIRCenter ...................................................................................... 13 7.2 Launching the GUI - for POL devices only ......................................................................................... 14 7.3 Launching the GUI - for POL and Multi-Phase Devices ..................................................................... 14
8 Main Screen Interface ........................................................................................................ 15
9 Device Manager ................................................................................................................ 16 9.1 Tree View Structure .......................................................................................................................... 16 9.2 Dot Colors ........................................................................................................................................ 16 9.3 Add/Delete Devices .......................................................................................................................... 17 9.4 Move Device Up/Down ..................................................................................................................... 17 9.5 Editing Tree View Text and I2C/PMBus Address ............................................................................... 17 9.6 Expand/Collapse Device Manager Tree View .................................................................................... 18
26 Troubleshooting ................................................................................................................ 40 26.1 Error Message: “The application failed to initialize properly (0xc0000135).” ..................................... 40 26.2 Error Message: “(.NET) Unable to find a version of the runtime to run this application.” .................. 40 26.3 Issue: Cannot Update GUI ................................................................................................................. 41 26.4 Issue: Cannot Communicate with the Chip (I2C / PMBus) ................................................................. 42 26.5 Issue: Text is misaligned or “floats” .................................................................................................. 47 26.6 Issue: PowIRCenter is extremely slow with the dongle plugged in. ................................................... 49 26.7 Issue: GUI cannot detect devices on the bus, or Autopopulate feature does not work ...................... 49 26.8 Issue: Unable to download updates due to proxy servers requirement ............................................. 50
Application Note 3 <Revision 1.6> <2016-19-02>
PowIRCenter Installation and User Guide
1 PowIRCenter Features
Control and monitor up to 20 devices.
Supports Acadia, Baxter, Comanche, Lucas, Katahdin, Manhattan, Rocky, and Salem family devices.
Automatic dongle firmware update.
Dedicated screens for
o PMBus commands and summary
o System status : Vin, Iin, Vout, Iout, Vcc, Temperature
o Register Map
o Group Vout Control: Margin High, Margin Low, and On/Off
o Sequencing : On/Off delay, rise time, fall time
o Multiple-device programmer
o Design Wizards
Application Note 4 <Revision 1.6> <2016-19-02>
PowIRCenter Installation and User Guide
2 System Requirements
Ensure that you are connected to the internet.
Microsoft .NET Framework 4.0 must be installed. This can be downloaded here (if the link does not work,
paste “http://www.microsoft.com/en-us/download/details.aspx?id=17718” without the quotes into
your internet browser). After Click on Download, the following window shows,
Please uncheck all the recommends, and click on No thanks and continue.
o You can check which version of .NET you have by following the instructions here (if the link does
not work, paste “http://support.microsoft.com/kb/318785” without the quotes into your
internet browser).
Windows 7 or 8
o If you’re using Windows 7 or 8, you may be prompted with a security warning whenever you run a
program. For this setup, allow these programs to run.
3 Download IR PowIRCenter There are 2 versions of the GUI. The majority of users should only download and use the “POL” version which does not require a license. For some advanced applications and products, your IR/Infineon representative will provide a license file in which case the user should download the “Full” version.
POL PowIRCenter Full PowIRCenter
Software location www.infineon.com FTP site
Easy self-install Yes No
License file required No Yes
Auto-update capability No Yes
Advanced & non-released products
No Yes
3.1. POL PowIRCenter (no license)
Designed for ease of use, this single file download is self-extracting and self-installing and contains all necessary files and drivers (USBXpress & SiLabs). Download from: http://www.infineon.com/cms/en/product/promopages/power-center-software/
After installation, proceed to the “Hardware Setup” section on page 9 of this guide.
3.2. Full PowIRCenter (license required)
Caution: only download this version if you have been provided with a license for access to advanced and non-released products.
1. Create a folder in C drive as C:\IR_PowIRCenter
2. Copy and paste “ftp://irdpdc_ro:[email protected]/” (Without the quotes) to Windows Explorer.
Some users may see a dialog box asking for Authentication.
If you see this prompt, type in the following credentials:
3. Click the folder labeled IR PowIRCenter in the FTP server.
4. Right click on IR PowIRCenter Installation Package.exe and select Copy to Folder… When the dialog box pops up, navigate to Desktop. Click Ok.
Application Note 7 <Revision 1.6> <2016-19-02>
PowIRCenter Installation and User Guide
4 Install IR PowIRCenter 1. Administrator Access / Administrator Privilege: If you are not logged into an Administrator account
or your IT policy requires you to request Administrator privilege, you must gain Administrator privilege before continuing the installation process. This process is specific to your company. Contact your IT representative if you are unsure how to gain Administrator privilege.
2. Go to Desktop, right-click the file IR PowIRCenter Installation Package.exe, and select Run as administrator.
a. You may also receive a prompt asking you to input your credentials and/or to allow the program to run. Input your credentials if necessary and click Yes.
Application Note 8 <Revision 1.6> <2016-19-02>
PowIRCenter Installation and User Guide
3. Click Install when prompted to do so. This will extract the GUI files to C:\IR_PowIRCenter.
Application Note 9 <Revision 1.6> <2016-19-02>
PowIRCenter Installation and User Guide
4. The Installation File will launch the USBXpress Driver v4.0 Install. Click Next.
Application Note 10 <Revision 1.6> <2016-19-02>
PowIRCenter Installation and User Guide
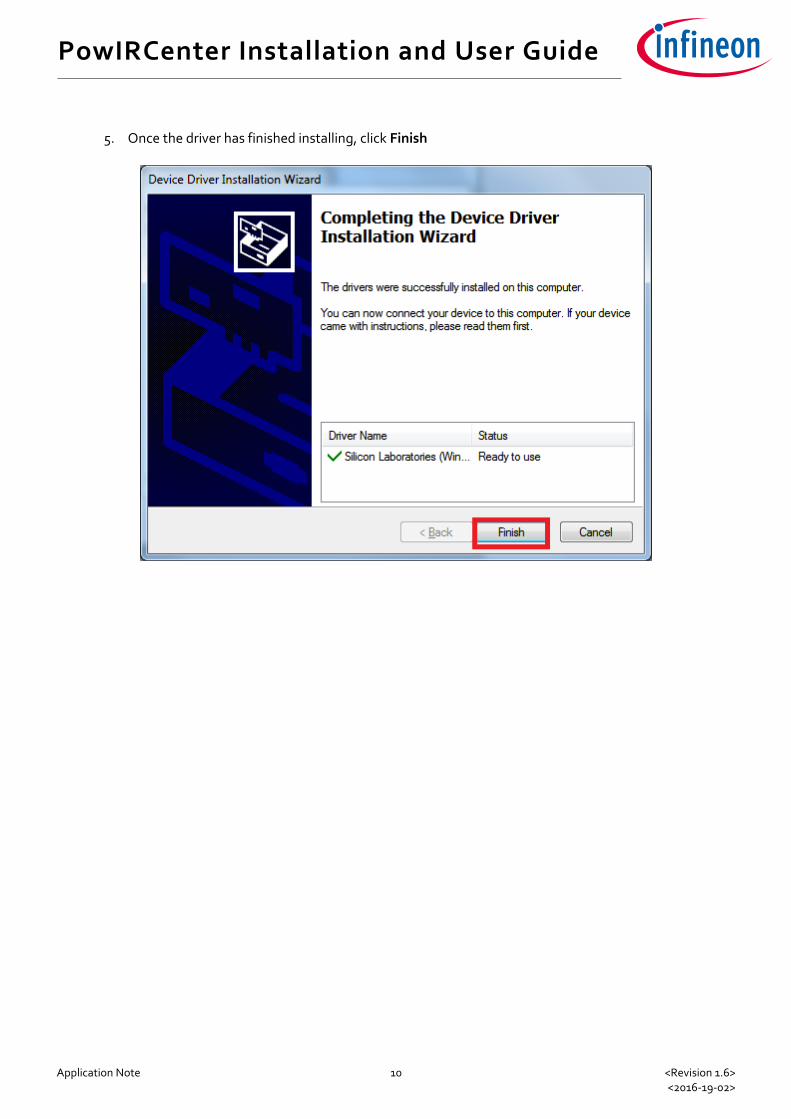
5. Once the driver has finished installing, click Finish
Application Note 11 <Revision 1.6> <2016-19-02>
PowIRCenter Installation and User Guide
5 UnInstall IR PowIRCenter Please note the IR PowIRCenter is not deployed through setup.exe. Therefore, there is no need to add/remove the IR PowIRCenter GUI from Control Panel -> Add Remove Program. Just delete the C:\IR_PowIRCenter folder or files if the user doesn’t want to keep them.
Application Note 12 <Revision 1.6> <2016-19-02>
PowIRCenter Installation and User Guide
6 Hardware Setup The typical setups are shown below. The USB005 dongle has two layers of firmware, the resident bootloader layer which will not be modified is responsible for updating and flashing the application firmware. The GUI will prompt the user to update the application firmware if the GUI detects the current version is out-of-date. CAUTION: the dongle firmware for the PowIRCenter GUI is not backward-compatible with older GUIs such as IR DPDC GUI.
System Board
USB005I2c CableUSB Cable
6.1 Firmware Update
The GUI will prompt the user to update the firmware if there is a newer firmware available. The user has the option not to update, but updating is recommended.
Click Exit after the update.
Application Note 13 <Revision 1.6> <2016-19-02>
PowIRCenter Installation and User Guide
7 Getting Started There are three ways to launch the “Full” PowIRCenter GUI.
IR PowIRCenter Update.exe – check and download updates if there are newer files in the server.
IR PowIRCenter.exe – Launch the GUI directly without checking for updates.
IR PowIRCenter – Shortcut located on your Desktop.
7.1 Automatic Updates for “Full” PowIRCenter
1. Make sure your computer is connected to the Internet, then launch the GUI by double-clicking
C:\IR_PowIRCenter\IR PowIRCenter Update.exe or the shortcut named IR PowIRCenter located
on your desktop.
2. If there are any updates available from the IR Server, this screen will appear. Click Update Now to
start downloading or click Skip Updates to download later.
Application Note 14 <Revision 1.6> <2016-19-02>
PowIRCenter Installation and User Guide
3. After download is complete, click the Exit button and restart IR PowIRCenter.
Please note if there are no updates, the IR PowIRCenter GUI will start immediately after checking.
7.2 Launching the GUI - for POL devices only
POL devices and related information are generally available on the Infineon website. 1. Double-click IR PowIRCenter.exe from C:\IR_PowIRCenter or the shortcut named IR PowIRCenter
located on your desktop. 2. If there is no IR DPDC License.txt license file in the C:\IR_PowIRCenter folder. The GUI will run in
POL mode. Only the following devices are available for use.
Manhattan Family : IR38060, IR38061, IR36062, IR38063, IR38064
Comanche Family : IR36021
Rocky Family : IRPS5401
7.3 Launching the GUI - for POL and Multi-Phase Devices
Multi-phase devices, due to their proprietary technology, are generally restricted and require authorization from Infineon to access information and use the devices.
1. Ask an IFX/IR FAE for IR DPDC License.txt file. Copy and paste the file to C:\IR_PowIRCenter folder.
2. Double-click IR PowIRCenter.exe from C:\IR_PowIRCenter or the shortcut named IR PowIRCenter located on your desktop.
3. All IR digital controller devices in Acadia, Baxter, Comanche, Lucas, Katahdin, Manhattan, Rocky,
and Salem will be available for usage.
Application Note 15 <Revision 1.6> <2016-19-02>
PowIRCenter Installation and User Guide
8 Main Screen Interface
1
2
3 4
5 6 7 8 9 10 11
1. Menu
2. Board level commands and utilities
3. Device manager
4. Common area for system status, register map, PMBus command and summary
5. USB connection status.
6. Dongle hardware part number
7. Dongle firmware version
8. I2C/PMBus speed
9. License expiration days left
10. PMBus Online/Offline Mode
a. Only adjustable in when using PMBus in Acadia, Manhattan, and Rocky.
11. GUI status and message
Application Note 16 <Revision 1.6> <2016-19-02>
PowIRCenter Installation and User Guide
9 Device Manager
9.1 Tree View Structure
Device manager is a three level tree view structure - board level, device level, and loop level. The board level is the root or board design, it cannot be deleted. When you add a new device, it will be attached under the board. Depending on the number of loops and PMBus capability, the loop level will be automatically created under the device. In the example below, selecting Manhattan IR38063 adds 1 loop and Rocky IRPS5401 adds 5 loops.
Board Level
Device Level
Loop Level
9.2 Dot Colors
The colored dot in the device manager has different meaning.
Board Level: System faults or alarms
No faults or alarms
Device Level: i2c bus good
Device ID mismatch
No i2c device detected at the address
Loop Level:
No PMBus device detected at the address
PMBus good
Device ID mismatch
Application Note 17 <Revision 1.6> <2016-19-02>
PowIRCenter Installation and User Guide
9.3 Add/Delete Devices
To add a device, right-click the Device Manager and select a device under Add Device. To delete a device, right-click the device in the Device Manager and select Delete Device.
9.4 Move Device Up/Down
1. Click the device to be reordered 2. Right click on Device Manager then click Move Device Up or Move Device Down
9.5 Editing Tree View Text and I2C/PMBus Address
1. Click the device or loop to be edited 2. Right click on Device Manager then click Edit Text/Address
Application Note 18 <Revision 1.6> <2016-19-02>
PowIRCenter Installation and User Guide
9.6 Expand/Collapse Device Manager Tree View
A button in the Menu Bar controls this function:
Click it once to collapse the Device Tree. Click it again to expand the Device Tree.
Application Note 19 <Revision 1.6> <2016-19-02>
PowIRCenter Installation and User Guide
10 New/Open/Save Board Designs A Board Design File contains all the information for a board design, such has the number of devices, the family of each device, its load model and its configuration file information. The GUI requires this information to accurately model the device’s behavior.
Click this icon to start a new board design. This will clear all devices from the Device Tree. Click this icon to open an existing board design from a file.
Click this icon to save the current board design to a file.
Application Note 20 <Revision 1.6> <2016-19-02>
PowIRCenter Installation and User Guide
11 System Status Clicking the board level in the device manager will show all devices vital data in a series of “status meters”. Here is an explanation of a status meter’s display: All data displayed here is read from the controller.
1
2
3
4
5
6
7
8
9
1. Device title text copied from the tree view
2. Loop title text copied from the tree view – Green = Normal; Orange = PMBus Alert; Red = Fault
3. Vin – input voltage
4. Iin – input current (where applicable. Not all devices measure Iin.)
5. Vcc – IC bias supply (typically 3.3V)
6. Vout
7. Iout total current
8. Temperature
9. Loop Power on/off indicator – Green = loop on; Grey = loop off
If the loop has faults, move the mouse cursor to the loop title area to make the fault details appear.
Application Note 21 <Revision 1.6> <2016-19-02>
PowIRCenter Installation and User Guide
12 Clear Faults Clicking the clear faults icon will clear all alarms or fault registers if the faults conditions are corrected.
Application Note 22 <Revision 1.6> <2016-19-02>
PowIRCenter Installation and User Guide
13 Auto Populate Devices This utility scans the PMBus and populates the GUI with all devices found.
Application Note 23 <Revision 1.6> <2016-19-02>
PowIRCenter Installation and User Guide
14 Read Registers from Devices This utility reads all registers of all devices and updates the GUI. The user should perform the read registers operation after adding devices or auto populating devices.
Application Note 24 <Revision 1.6> <2016-19-02>
PowIRCenter Installation and User Guide
15 Device Level - Register Map (in “Full” PowIRCenter only) Click a device in the device manager to bring up the register map of the device. You can load/save the configuration file or read/write registers.
Map ViewTree View
6
7
8 9
4
10
11 12 13 14
15
16
17
18
19
20
5
1 2 3
1. Register Map tab
2. Design Tools tab – Contains tools to configure control registers
3. Utilities tab – Contains tools to assist system or board design
4. Tree view. Click to select a register. 5 – 9 are associated with tree view.
5. Tree view register description 6. Tree view register value (for reading or writing) 7. Tree view register value decoded. 8. Read the tree view register 9. Write the tree view register
10. Map view. Click to select a register. 11 – 14 are associated with map view.
11. Map view register address 12. Map view register data 13. Write the map view register 14. Read the map view register
15. Read all registers and update register map in area 10
16. Write all registers in area 10 to the device
17. Load a configuration file
18. Save user and manufacture section to a configuration file
19. Load a standard (preset) configuration file from the provided list.
20. Register Map Status
Application Note 25 <Revision 1.6> <2016-19-02>
PowIRCenter Installation and User Guide
16 Device Level – Design Tools
Application Note 26 <Revision 1.6> <2016-19-02>
PowIRCenter Installation and User Guide
17 Device Level – Utilities
Application Note 27 <Revision 1.6> <2016-19-02>
PowIRCenter Installation and User Guide
18 Loop Level - PMBus interface Clicking a loop in the device manager will bring up the PMBus interface of the loop. You can read/write individual PMBus command and monitor all PMBus command values.
18.1 Command and Summary
1
3
4
5 6
9
7 8
2
1. Select a PMBus command to read or write from the drop-down list.
2. Sort the PMBus command list by Command Code. Click again to sort by Command Name. Default is
sort by Command Name.
3. Set a new value of the command – this area changes based upon the selected command
4. Description of the command
5. Read the selected PMBus command
6. Write the selected PMBus command with a new value
7. Toggle to enable or disable Continuous PMBus Command Updates. If enabled, PMBus values will
update every second.
8. Update PMBus Command once. If Continuous PMBus Command Updates is enabled, this button is
disabled.
9. PMBus commands summary. Clicking any entry in the summary table will change the command in the
drop-down list.
Application Note 28 <Revision 1.6> <2016-19-02>
PowIRCenter Installation and User Guide
18.2 PMBus Status
PMBus status is updated every second.
Red – alarm or fault
Black - normal
Gray – not supported
Application Note 29 <Revision 1.6> <2016-19-02>
PowIRCenter Installation and User Guide
18.3 Display Basic PMBus Commands (only for Acadia, Manhattan, and Rocky)
These 3 devices have an option to filter the command list down to a few basic controls. This is selected by ticking the “Basic Commands” option at the bottom of the PMBus Page. To view the full list of PMBus commands, tick the “All Commands” option.
Application Note 30 <Revision 1.6> <2016-19-02>
PowIRCenter Installation and User Guide
19 Floating Status Window When a device or loop is selected, a floating status meter will appear to show all vital data of the device. The floating status meter can be placed anywhere on the screen so the status can be monitored as device changes or PMBus commands are sent. Click button 10 to minimize the floating meter to the lower left corner:
Double clicking will bring it back:
1
2
3
4
5
6
7
8
9
10
1. Device title text (set in the tree view)
2. Loop title text (set in the tree view)
- Green = Normal;
- Orange = Fault related to PMBus;
- Red = Fault related to Fail code
3. Vin – input voltage
4. Iin – input current (where applicable. Not all devices measure Iin.)
5. Vcc – device bias voltage e.g. 3.3V
6. Vout
7. Iout total current
8. Temperature
9. Loop on/off indicator – Green = loop on; Black = loop off
10. Minimize the status meter
Application Note 31 <Revision 1.6> <2016-19-02>
PowIRCenter Installation and User Guide
20 Group Vout Control This interface facilitates using the PMBus GROUP command to turn on/off all devices at the same time.
10
1 2
3
9
4 5 6 7 8
11
12
13
14
15
1. Select or deselect all loops
2. Assign colors to all loops automatically
3. List of all loops for Vout control
4. Device title text
5. Loop title text
6. Vout voltage setting
7. Margin high setting & percentage above Vout
8. Margin low setting & percentage below Vout
9. Real time voltage display. Updated every second
10. Set Vout voltage using VOUT_COMMAND
11. Turn on selected devices using OPERATION group command
12. Immediate Turn off selected device using OPERATION group command
13. Soft Turn off selected devices using OPERATION group command
14. Margin voltage high on selected devices
15. Margin voltage low on selected devices
Application Note 32 <Revision 1.6> <2016-19-02>
PowIRCenter Installation and User Guide
21 Group Sequencing Control Sequencing control allows the user to edit TON_DELAY, TON_RISE, TOFF_DELAY, and TOFF_FALL of all loops at once and visualize their relationship graphically.
101 2
3
5 6 7 8 9
11 12 13 14
15
4
1. Select or deselect all loops
2. Assign random colors to all loops
automatically
3. Select or deselect individual loop
4. Set color to each Vout trace
5. Device title text copied from device
manager tree view.
6. Loop title text copied from device manager
tree view.
7. TON_DELAY setting
8. TON_RISE setting
9. TOFF_DELAY setting
10. TOFF_FALL setting
11. TON_DELAY in graphic
12. TON_RISE in graphic
13. TOFF_DELAY in graphic
14. TOFF_FALL in graphic
15. Write settings to all the devices on the
selected bus.
Application Note 33 <Revision 1.6> <2016-19-02>
PowIRCenter Installation and User Guide
22 Multi-Device Programmer
22.1 Important Note
During programming, all devices must be disabled. If the programmer detects that any device is
regulating, the programmer won’t start.
22.2 User Interface
1 2 3 4
6
5
7
17 18 19
8 910
11
16
13
14 1512
20 21
1. Device title text copied from device manager tree view
2. I2C address copied from device manager tree view. These are chip addresses before programming.
3. Click to load a configuration file
4. Select/deselect programming the user section or select/deselect individual device
5. Select/deselect programming the MFR section or select/deselect individual device
6. Trim section MTP left
7. Trim section programming result pass (green) or fail (red). Only used in special applications.
8. Trim section verification result pass (green) or fail (red). Only used in special applications.
9. User section MTP left
10. User section programming result pass (green) or fail (red)
11. User section verification result pass (green) or fail (red)
12. MFR section MTP left
13. MFR section programming result pass (green) or fail (red)
14. MFR section verification result pass (green) or fail (red)
15. CRC flags of trim, user, and MFR section after executing Check MTP Left or Verify operation. 0 =
Pass; 1 = CRC error
16. Programming log area
17. Load a production file
18. Save selected configuration files to a single production file.
19. Check MTP remaining then update box 6 and 9
20. Verify selected devices and update box 8 and 11
21. Program and verify button
Application Note 34 <Revision 1.6> <2016-19-02>
PowIRCenter Installation and User Guide
22.3 Programming Procedure
1. Click and load individual configuration file of each device or load a production file
2. Make sure all device i2c communications are good (blue color). If there are any i2c issues, it should be
resolved before programming unless these devices are excluded from programming.
3. Click Check MTP Left to make sure there are MTP left.
4. Check user and MFR section of each device that you wish to configure.
5. Click Program & Verify
6. Review programming log if there are any failures.
22.4 Verify Only
1. Cycle board power
2. Load board design file
3. Make sure all i2c communications are good
4. Click multi-device programmer icon
5. Click Verify Only button
Application Note 35 <Revision 1.6> <2016-19-02>
PowIRCenter Installation and User Guide
23 I2C/PMBus Utility
‘Scan i2c’ sends slave addresses from 0x08 to 0x77 (skipping 0x0C because it’s the ARA address) and
checks if the address is ACKed.
‘Scan PMBus’ sends MFR_ID command from address 1 to 127 and check if any IR controllers respond.
Most IR controllers can operate at 400 KHz by default. Some devices can operate at 1MHz, but 1MHz
operation register has to be enabled.
Application Note 36 <Revision 1.6> <2016-19-02>
PowIRCenter Installation and User Guide
24 Linear Calculator Utility The Linear calculator is used to convert between PMBus linear format byte data and real numbers. The calculator has two separate conversion interfaces. The top calculator is for two bytes linear format data: Exponent = High Byte [7:3] Mantissa = High Byte [2:0] + Low byte [7:0] Value = Mantissa * (2 ^ Exponent)
Application Note 37 <Revision 1.6> <2016-19-02>
PowIRCenter Installation and User Guide
The bottom calculator is for output voltage related parameters that use VOUT_MODE [4:0] for exponent in linear format.
11
1
2
5
6
7
8
9
12
13 14 15
34
10
1. Real value to be converted
2. Convert real value to mantissa and exponent. Exponent can be preset and will not change during
conversion.
3. Convert mantissa and exponent to real value
4. Mantissa
5. Exponent
6. Convert mantissa and exponent format to high byte and low byte
7. Convert high byte and low byte data to mantissa and exponent format
8. High byte
9. Low Byte
10. VOUT_MODE exponent value of the linear format
11. VOUT_COMMAND high byte
12. VOUT_COMMAND low byte
13. Vout voltage
14. Convert VOUT_COMMAND high/low byte to Vout voltage based on VOUT_MODE exponent
15. Convert Vout voltage to VOUT_COMMAND high/low byte based on VOUT_MODE exponent
Application Note 38 <Revision 1.6> <2016-19-02>
PowIRCenter Installation and User Guide
25 File Format
25.1 Configuration File
Each device can have its own configuration file, which contains the information required to program the device. It can come in 3 formats: 3-Column Configuration File, ATE Configuration File (AKA CRC32 Configuration File), and Intel Hex Format. The user can save the configuration file by clicking the Device Level of a device, selecting the Register Map tab, and then clicking the “Save Config File” button. In the new dialog box, the user can select the configuration file format, set the name of the file, and select the location to save the file to. To load a configuration file, click the Device Level of a device, select the Register Map tab, then click the “Load Config File” button. Find the targeted configuration file and click “Open”. 3-Column Configuration File (recommended for most users)
This file format uses 3 columns separated by white space, like 00 55 FF. The first part is the register address, the second part is the data, and the third part is the mask. Because some register bits like password cannot be verified after programming, the mask is used to indicate if the corresponding register bit needs to be verified (mask bit = 1) or ignored (mask bit = 0). ATE Configuration File This file format is most commonly used by ATE engineers. The GUI generates data in 3 columns separated by white space (similar to the 3-Column Configuration File format), but the data is formatted with hex notation and contains a CRC32 for verification purposes. Intel Hex Format This file format was created by Intel as a standard for programming devices, such as microcontrollers. Each line contains the following information:
1. Start Code – Signified by a “:” character
2. Byte Count – 2 Hex digits, indicating the number of bytes in the data field. We use 10h (16d).
3. Starting Address – Register Address from which to start programming the data.
4. Data Type – Data type of the Data Field. We use Hex Data Type, which is represented by “00h”.
5. Data – The Register Data. Contains 16 2-byte pairs.
6. Checksum – Checksum calculated across all previous bytes in that line. It’s calculated by summing all
previous bytes together, taking the LSB, and performing a 2’s complement on that value.
Application Note 39 <Revision 1.6> <2016-19-02>
PowIRCenter Installation and User Guide
25.2 Board Design File
The board design file contains the complete board design information of all devices.
1. Register values of all devices
2. User interface settings
3. Board design components like inductors, capacitors, resistors, and power stages.
Some examples of the saved data are:
Load Model (Capacitors, Inductors, DCR, MOSFETs, Loadline)
Register Map (Configuration File)
Application Note 40 <Revision 1.6> <2016-19-02>
PowIRCenter Installation and User Guide
26 Troubleshooting
26.1 Error Message: “The application failed to initialize properly (0xc0000135).”
USBXpress Driver was not installed correctly.
1. Go to your PowIRCenter Installation folder (default: “C:\IR_PowIRCenter”)
2. Double-click the folder “SiLabsDriver”
3 . Double-click the file “install.cmd”.
26.2 Error Message: “(.NET) Unable to find a version of the runtime to run this application.”
A version of .NET was not installed, or was installed incorrectly.
1. Go to StartControl PanelAdd/Remove Programs. Check that you have both of the following
entries: Microsoft .NET Framework 2.0 & Microsoft .NET Framework 4.0. The Service Pack number
does not matter.
2. If one or both are not installed, Framework 2.0 can be found here and Framework 4.0 can be found
here. Download and install the missing files, then retry running the program.
3. If they are installed, remove both, then download the install files using the links above. Afterwards,
reinstall Framework 2.0 first, then Framework 4.0.
Windows XP/7 1. Check that you are connected to the Internet. Updates require internet connectivity.
2. Check that instances of IR DPDC or PowIRCenter are not currently running.
a. Open the Task Manager by either pressing CTRL+ALT+DEL and selecting Task Manager or
pressing CTRL+SHIFT+ESC.
b. Click the Processes tab.
c. Click Image Name (left-most column) to arrange processes by name.
d. Scroll down until you find a process called by “IR PowIRCenter.exe.”
e. Select this process and then click End Process.
f. Repeat until all instances are gone, then try running IR PowIRCenter again.
Application Note 42 <Revision 1.6> <2016-19-02>
PowIRCenter Installation and User Guide
Windows 7 “Run As Administrator” Once:
1. Because of increased security measure on Windows 7, it will occasionally prevent the automatic
update from happening. Because of this, always be sure to run IR PowIRCenter as Administrator by
right-clicking the icon on your Desktop and selecting the option “Run as administrator”.
OR
Set “Run As Administrator” Permanently:
1. Right-click the icon on your Desktop and select Properties.
2. Select Compatibility and check the option “Run this program as an administrator.”
Now it will run it as an Administrator without your needing to right-click the shortcut and select the option.
26.4 Issue: Cannot Communicate with the Chip (I2C / PMBus)
Check that the GUI can connect to the USB005 dongle. In the bottom left of the GUI, there are three status boxes.
Application Note 43 <Revision 1.6> <2016-19-02>
PowIRCenter Installation and User Guide
If the left-most cell is red, that means that the GUI and USB005 are not connected. Continue to step 1.
If the left-most cell is green, but the middle cell reads “HW: USBxxxX” and the right cell reads “FW: 0.0”, this means the USBXpress Driver has installed correctly, but you do not have the right driver version in your IR PowIRCenter folder. Continue to step 3.
If the left-most cell is green, the middle cell reads “HW: USB005A”, and right cell does not read “FW: 0.0”, continue to step 4.
1. Check that the USB is connected to a port in the back of the computer/laptop or to an externally
powered USB hub. The reason for this is that in many computers and laptops, the side and front USB
ports have a reduced power supply. This can cause communication problems in our USB005 dongle.
2. Check that the USBXpress Driver is correctly installed.
a. Connect the board to the computer.
b. Open the Device Manager by clicking Start, right-clicking Computer, selecting Properties,
and clicking Device Manager.
Application Note 44 <Revision 1.6> <2016-19-02>
PowIRCenter Installation and User Guide
c. Expand the section titled Universal Serial Bus controllers. There should be an entry named
USBXpress Device.
If you have the USBXpress Device, go to Step 3. If there is not, you will need to reinstall the USBXpress driver. d. Navigate to your installation directory (default: “C:\IR PowIRCenter”).
e. Double-click the folder called SiLabsDriver.
f. Double-click the file called “install.cmd”. This will attempt to install the driver again.
3. The next step is to verify that the SiUSBXp.dll is the correct version.
Note: If you installed the driver through the IR PowIRCenter Installation Package.exe, you should be
able to detect the dongle by this point. If you are still having issues, contact an IR/Infineon
representative who will be able to assist you.
a. Navigate to your IR PowIRCenter installation directory (default: “C:\IR PowIRCenter”).
b. Find the file named SiUSBXp.dll in the directory.
c. Rename it to “SiUSBXp.dll_backup”.
d. Open a Windows Explorer window and navigate to “C:\SiLabs\MCU”.
e. Double-click the folder named “USBXpress_SDK”
i. If this folder does not exist, double-click the folder named “USBXpress” instead.
f. Double-click the folder “Examples”
g. Double-click the folder “CP210x”
h. Double-click the folder “Windows”
Application Note 45 <Revision 1.6> <2016-19-02>
PowIRCenter Installation and User Guide
i. There should be a file named “SiUSBXp.dll” in this folder. Copy it to your IR PowIRCenter installation directory.
j. Relaunch the GUI and check if the left-most cell is green, the middle cell reads “HW: USB005A”, and right cell does not read “FW: 0.0”:
If it looks like the above picture, continue to step 4.
If it does not, contact an IR FAE who can help you.
4. Click the Auto Populate Device button in the top left.
This will scan the bus for any IR parts. If they are detected, they will automatically appear in the left hand column.
If nothing appears, continue with the steps below to debug the issue.
a. Check that 3.3V power to the IR controller is connected properly and that the supply is on.
b. Check for proper SDA, SCL, & GND connections between the USB005A and the I2C Header
on the Board under Test.
c. Check that the address is correct. To scan for the address of the device under test, click the
I2C Bus button.
Application Note 46 <Revision 1.6> <2016-19-02>
PowIRCenter Installation and User Guide
In the window that appears, click the “Scan I2C/PMBus Address” button.
This will scan the bus for any IR parts (skipping over any reserved addresses such as 0x0A). If any parts are detected, they will appear in the window above:
If the part number is not correct, it will appear as an unknown device:
5. The I2C cable between the USBI2C Board and the I2C Header on the Board under Test should be
short (i.e., 20cm or less) and the SDA, SCL, & GND lines twisted together.
Application Note 47 <Revision 1.6> <2016-19-02>
PowIRCenter Installation and User Guide
26.5 Issue: Text is misaligned or “floats”
This issue is caused by how Windows handles Text Magnification at Medium (125%). This can be fixed by switching to Smaller (100%) or Larger (150%).
Application Note 48 <Revision 1.6> <2016-19-02>
PowIRCenter Installation and User Guide
1. Right-click your desktop and select “Personalize”
2. In the bottom-left corner, click “Display”
Application Note 49 <Revision 1.6> <2016-19-02>
PowIRCenter Installation and User Guide
3. You should see 3 options: Smaller – 100%; Medium – 125% (default) ; Larger – 150%
4. Select either Smaller or Larger, then click “Apply”. This will resize everything on your display.
26.6 Issue: PowIRCenter is extremely slow with the dongle plugged in.
This issue is most likely caused by plugging the dongle into a USB 3.0 port (blue socket). The problem is a bug in the USBXpress Driver and can only be resolved by plugging the dongle into a USB 2.0 port (non-blue socket).
26.7 Issue: GUI cannot detect devices on the bus, or Autopopulate feature does not work
There are a few possibilities for this issue:
The USB005 dongle is plugged into a USB3.0 port.
1. Unplug the USB005 dongle if it is plugged in.
2. Check that dongle connector is not blue. If the port is blue, this indicates that it is a USB3.0 port.
3. Plug the dongle into a non-blue, USB2.0 port (these are often white or yellow).
The device or devices are not powered.
1. Check that each device is receiving 3.3V on the Vcc pin.
Application Note 50 <Revision 1.6> <2016-19-02>
PowIRCenter Installation and User Guide
26.8 Issue: Unable to download updates due to proxy servers requirement
If your company computers require proxy servers for internet access, it will cause the failure of downloading updates. This issue can be solved by the following steps:
1. Copy and paste “ftp://irdpdc_ro:[email protected]/” without the quotes Windows Explorer
2. Some users may see a dialog box asking for Authentication.
If you see this prompt, type in the following credentials: User Name: irdpdc_ro Password: mem2011
3. Click the folder labeled Proxy Server in the FTP server.
4. Select the two config files IR PowIRCenter Update.exe.config and WebUpdateClient.exe.config, right click and Copy to folder…, after the dialoague pops up, navigate to your C:\IR_PowIRCenter, and Click Ok.
5. Go to C:\IR_PowIRCenter, Open IR PowIRCenter Update.exe.config with Notepad. Find the line
IMPORTANT NOTICE The information contained in this application note is given as a hint for the implementation of the product only and shall in no event be regarded as a description or warranty of a certain functionality, condition or quality of the product. Before implementation of the product, the recipient of this application note must verify any function and other technical information given herein in the real application. Infineon Technologies hereby disclaims any and all warranties and liabilities of any kind (including without limitation warranties of non-infringement of intellectual property rights of any third party) with respect to any and all information given in this application note. The data contained in this document is exclusively intended for technically trained staff. It is the responsibility of customer’s technical departments to evaluate the suitability of the product for the intended application and the completeness of the product information given in this document with respect to such application.
For further information on the product, technology, delivery terms and conditions and prices please contact your nearest Infineon Technologies office (www.infineon.com).
WARNINGS Due to technical requirements products may contain dangerous substances. For information on the types in question please contact your nearest Infineon Technologies office. Except as otherwise explicitly approved by Infineon Technologies in a written document signed by authorized representatives of Infineon Technologies, Infineon Technologies’ products may not be used in any applications where a failure of the product or any consequences of the use thereof can reasonably be expected to result in personal injury.