110
Cyber Train Version 1.2 Implementation Workbook Page 1 of 110 Procedure Guide / Workbook Cyber Train Version 1.2 January 2008
Cyber Train Version 1.2 Implementation Workbook Page 1 of 110
Procedure Guide / Workbook Cyber Train Version 1.2
January 2008

Cyber Train Version 1.2 Implementation Workbook Page 2 of 110
NOTES Necessary Setup for Lessons – vary based on the lesson Internet connection – Internet Explorer Ability to access emailing system Ability to open MS Excel or similar spreadsheet program Cyber Train Session Security Permissions Depending on your organization, you may or may not have the security permissions to complete all of the exercises listed within this workbook. Please discuss your options with your Cyber Train Administrator. Purpose This document is intended to assist clients in setting up the Cyber Train system. The left-hand (even numbered) pages will include explanatory information related to the system, setup and exercises. Whenever possible, exercises should used as a starting point to continue setting up the system based on your own needs. Setup Order Cyber Train should be set up in the following order. In the following pages, the exercises are designed to get you into the system and viewing the appropriate pages and starting to make decisions about your system.
1. System Setup 2. Company Structure
a. Company b. Org Levels c. Job Codes
3. Course Defaults a. Course Type b. Grade Type c. Grades d. Misc e. Notes f. Attachments g. Training Admin
4. Curriculum a. Courses b. Programs c. Certifications
5. Requirements a. Job Codes b. Organization
6. Student Defaults a. Student Types b. Employment Types c. Course Needed Priority d. Enrollment Status e. Misc. f. Notes g. Attachments
7. Students / Managers a. Update / Add other Users Accounts
8. Class Defaults a. Locations b. Notes c. Attachments d. Cost Items
9. Classes 10. Additional “Optional” Settings
a. Certification Requests b. Tuition Assistance c. External Classes
Cyber Train Version 1.2 Implementation Workbook Page 3 of 110
Table of Contents
ADMINISTRATIVE SETUP...........................................................................................................................7
LESSON 1: Global Settings ........................................................................................................................7 System Setup ............................................................................................................................................7
LESSON 2: Company Structure .................................................................................................................9 Establishing Companies............................................................................................................................9 Defining Organizational Structure ...........................................................................................................11 Creating Job Codes ................................................................................................................................13 Mass Importing Codes ............................................................................................................................13
LESSON 3: Defaults for Course Drop-downs.........................................................................................15 Course Types ..........................................................................................................................................15 Grade Types............................................................................................................................................15 Grades.....................................................................................................................................................15 Misc. Codes.............................................................................................................................................17 Notes Types ............................................................................................................................................17 Attachment Types ...................................................................................................................................17 Training Admin User Accounts................................................................................................................19 Modifying a Security Group.....................................................................................................................23
LESSON 4: Building Curriculum..............................................................................................................25 Constructing the Courses........................................................................................................................25 Recording Course Equivalency...............................................................................................................27 Building Programs...................................................................................................................................27 Setting Certifications ...............................................................................................................................29
LESSON 5: Setting Requirements ...........................................................................................................31 Requirements Based on Job...................................................................................................................31 Requirements Based on Organizational Level........................................................................................31 Mass Adding Requirements ....................................................................................................................33
ADMINISTRATIVE VIEWS / FUNCTIONS .................................................................................................35
LESSON 6: Defaults for Student Records...............................................................................................35 Student Types .........................................................................................................................................35 Employment Types .................................................................................................................................35 Course Needed Priority...........................................................................................................................37 Misc. Codes.............................................................................................................................................37 Notes Types ............................................................................................................................................37 Attachment Types ...................................................................................................................................37
LESSON 7: Adding/Managing Students and Managers ........................................................................39 Adding Records.......................................................................................................................................39 Importing Records...................................................................................................................................39 Managing Students/Managers ................................................................................................................41
LESSON 8: Defaults for Classes..............................................................................................................43 Locations .................................................................................................................................................43 Notes Types ............................................................................................................................................43 Class Cost Items .....................................................................................................................................43 Attachment Types ...................................................................................................................................43
Cyber Train Version 1.2 Implementation Workbook Page 4 of 110
LESSON 9: Building a Class Calendar ....................................................................................................45 Scheduling a Class .................................................................................................................................45 Managing a Class ...................................................................................................................................45 Closing a Class .......................................................................................................................................47
LESSON 10: “Optional” Features Setup .................................................................................................49 Certifications............................................................................................................................................49 Tuition Assistance ...................................................................................................................................49 External Classes .....................................................................................................................................51
LESSON 11: Training Admin Home Page ...............................................................................................53 Home Page Defaults ...............................................................................................................................53 Custom Links...........................................................................................................................................53 Home Page Actions ................................................................................................................................53
Closing a Class ...................................................................................................................................53
OTHER VIEWS & PROCESSES ................................................................................................................55
LESSON 12: Student Views and Actions ................................................................................................55 Student Home Page................................................................................................................................55 Student Actions .......................................................................................................................................57
Enrolling in a Required Class .............................................................................................................57 Enrolling in a non-Required Class ......................................................................................................59 Requesting an Opt-Out .......................................................................................................................59 Requesting Course Credit ..................................................................................................................61 Requesting Certification Record .........................................................................................................63 Requesting Approval for External Classes .........................................................................................64 Completing an External Classes.........................................................................................................64 Requesting Approval for Tuition Assistance.......................................................................................66 Submitting Grades for Tuition Assistance ..........................................................................................66
LESSON 13: Manager Views and Actions...............................................................................................68 Manager Home Page ..............................................................................................................................68 Manager Actions .....................................................................................................................................70
Enrolling in a Required Class .............................................................................................................70 Adding Additional Requirements ........................................................................................................72
LESSON 14: Instructor Views and Actions.............................................................................................74 Instructor Home Page .............................................................................................................................74 Instructor Actions ....................................................................................................................................74
Recording Grades...............................................................................................................................74
LESSON 15: Reports .................................................................................................................................76 Standard Reports ....................................................................................................................................76
Running Reports .................................................................................................................................76 Quick Changes ...................................................................................................................................77
Modifying Reports ...................................................................................................................................79 Navigation ...............................................................................................................................................83
Tabs ....................................................................................................................................................83 Reports ...............................................................................................................................................83 Data Sources ......................................................................................................................................83 Fields ..................................................................................................................................................85 Filters ..................................................................................................................................................87 Summary.............................................................................................................................................89 Chart ...................................................................................................................................................91

Cyber Train Version 1.2 Implementation Workbook Page 5 of 110
Misc.....................................................................................................................................................93 Style ....................................................................................................................................................95 Preview ...............................................................................................................................................97 Icons ...................................................................................................................................................97 Actions ................................................................................................................................................97
Creating a New Report............................................................................................................................99 Designing a Report .............................................................................................................................99 Building a Report ..............................................................................................................................101
ANSWER KEY ..........................................................................................................................................102
Cyber Train Version 1.2 Implementation Workbook Page 6 of 110
NOTES
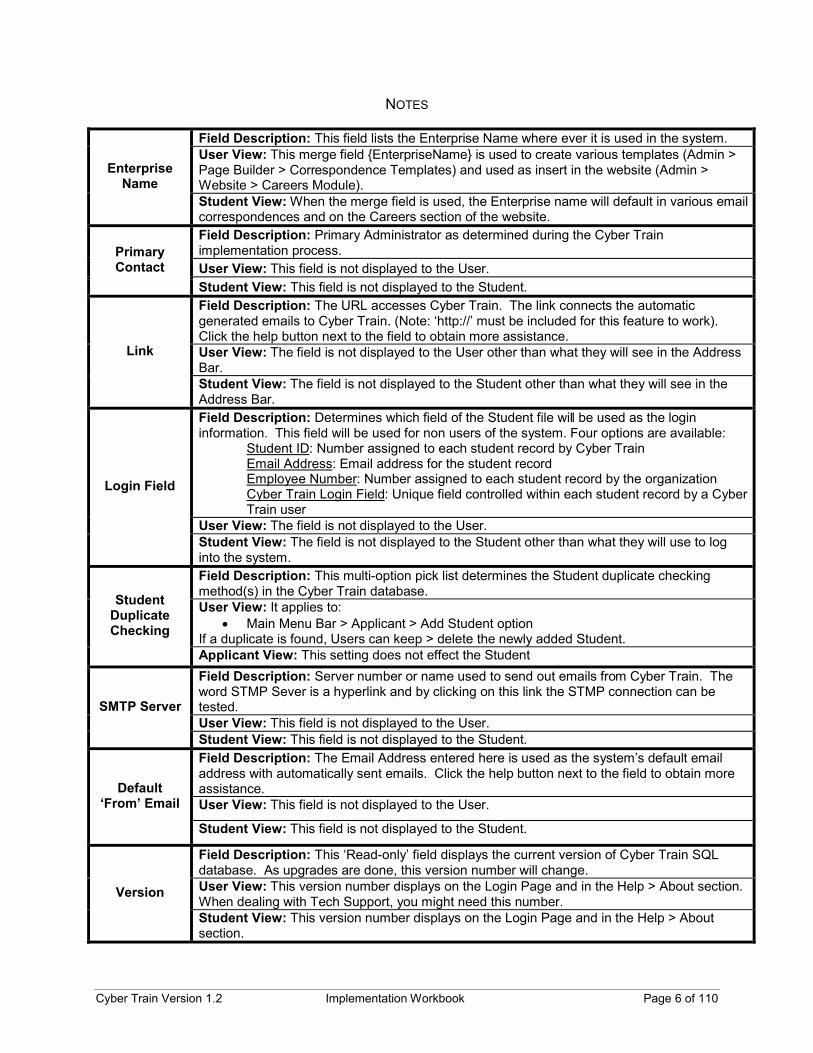
Field Description: This field lists the Enterprise Name where ever it is used in the system. User View: This merge field {EnterpriseName} is used to create various templates (Admin > Page Builder > Correspondence Templates) and used as insert in the website (Admin > Website > Careers Module).
Enterprise Name
Student View: When the merge field is used, the Enterprise name will default in various email correspondences and on the Careers section of the website. Field Description: Primary Administrator as determined during the Cyber Train implementation process. User View: This field is not displayed to the User.
Primary Contact
Student View: This field is not displayed to the Student. Field Description: The URL accesses Cyber Train. The link connects the automatic generated emails to Cyber Train. (Note: ‘http://’ must be included for this feature to work). Click the help button next to the field to obtain more assistance. User View: The field is not displayed to the User other than what they will see in the Address Bar.
Link
Student View: The field is not displayed to the Student other than what they will see in the Address Bar. Field Description: Determines which field of the Student file will be used as the login information. This field will be used for non users of the system. Four options are available:
Student ID: Number assigned to each student record by Cyber Train Email Address: Email address for the student record Employee Number: Number assigned to each student record by the organization Cyber Train Login Field: Unique field controlled within each student record by a Cyber Train user
User View: The field is not displayed to the User.
Login Field
Student View: The field is not displayed to the Student other than what they will use to log into the system. Field Description: This multi-option pick list determines the Student duplicate checking method(s) in the Cyber Train database. User View: It applies to:
Main Menu Bar > Applicant > Add Student option If a duplicate is found, Users can keep > delete the newly added Student.
Student Duplicate Checking
Applicant View: This setting does not effect the Student Field Description: Server number or name used to send out emails from Cyber Train. The word STMP Sever is a hyperlink and by clicking on this link the STMP connection can be tested. User View: This field is not displayed to the User.
SMTP Server
Student View: This field is not displayed to the Student. Field Description: The Email Address entered here is used as the system’s default email address with automatically sent emails. Click the help button next to the field to obtain more assistance. User View: This field is not displayed to the User.
Default ‘From’ Email
Student View: This field is not displayed to the Student.
Field Description: This ‘Read-only’ field displays the current version of Cyber Train SQL database. As upgrades are done, this version number will change. User View: This version number displays on the Login Page and in the Help > About section. When dealing with Tech Support, you might need this number.
Version
Student View: This version number displays on the Login Page and in the Help > About section.

Cyber Train Version 1.2 Implementation Workbook Page 7 of 110
Administrative Setup LESSON 1: Global Settings
This lesson will walk you through understanding your basic system settings.
System Setup 1) Navigate to the System Setup page. Using the following grid, verify your system settings and make changes where necessary. Field Value Note
Enterprise Name
Primary Contact
Link
Login Field
Duplicate Checking
SMTP Server
Default From Address

Cyber Train Version 1.2 Implementation Workbook Page 8 of 110
NOTES
Basic Structure: Each system will have at least one company. Each company will have organizational levels assigned. Each organizational level can be independent from the preceding level or dependant on the level.
In Company setup, specify the Organizational levels.
Field Description: These fields correspond to levels of the organization. Typically these levels will match levels in a shared HR system to keep consistency with employee records. After the titles are entered in the Company setup, code tables for each become available in Admin > Organization. User View : Levels have a high profile in Cyber Train:
Specifying availability of curriculum Adding Students Setting Requirements Reporting
Org Level Fields
Student View: The student does not see these levels but they affect access to class enrollment. Field Description: The checkmark boxes available will make each level dependent on the one above. For example, if only two departments (IT and HR) are in Alexandria and the rest of the departments are in Reston, a company can make department dependent on location (designated by using Location as Org 1 and Department as Org 2 and placing a checkmark next to Org 2). For each location chosen a different department list will appear. Additional setup is needed to link the organizational levels together under Admin > Organization User View: Users will see this connection on the Student > Add Student Process and on the Student File > Job Info Page.
Depends On
Student View: Students will not be aware of this connection
Enterprise (Admin > System Setup)
Company 1 (Admin > Codes > Company)
Company 2 (Admin > Codes > Company)
Company 3 (Admin > Codes > Company)
Level 1 (Admin > Organization)
Level 2 (Admin > Organization)
Level 1 (Admin > Organization)
Level 2 (Admin > Organization)
Level 1 (Admin > Organization)
Level 2 (Admin > Organization)
Cyber Train Version 1.2 Implementation Workbook Page 9 of 110
LESSON 2: Company Structure This lesson covers setting up the company and organizational structure which will be used in the system
in relation to students and curriculum. Copy this page multiple times if you have multiple companies.
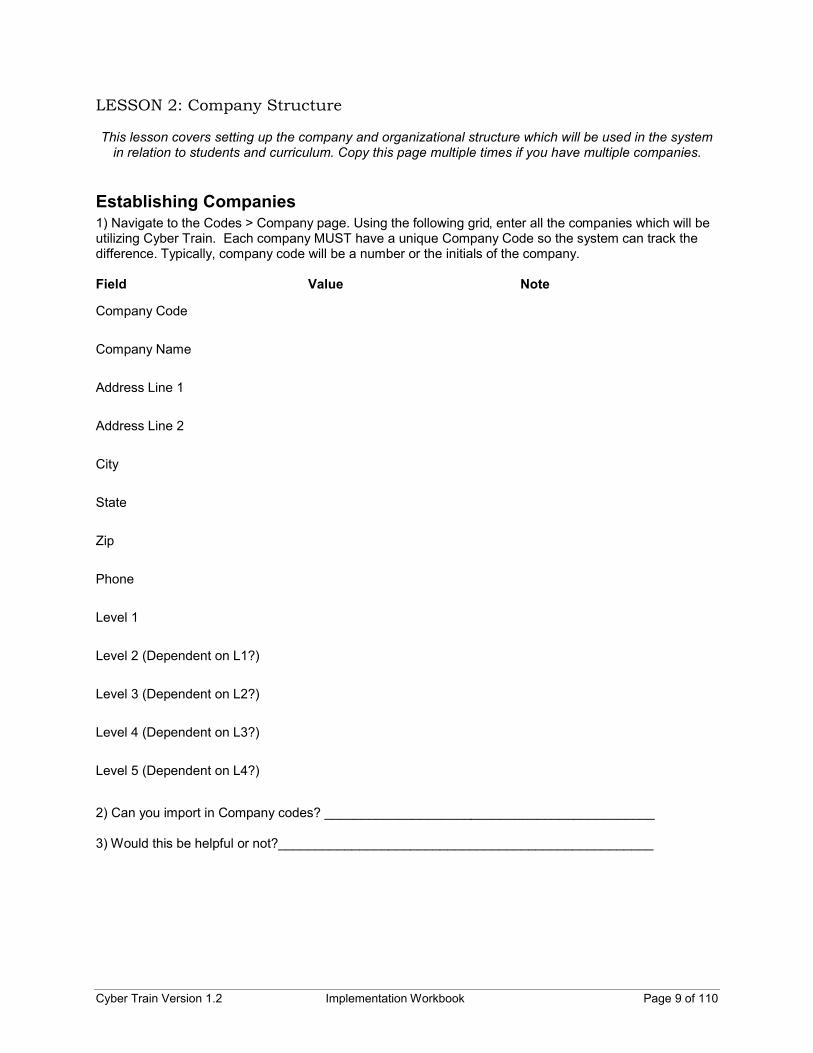
Establishing Companies 1) Navigate to the Codes > Company page. Using the following grid, enter all the companies which will be utilizing Cyber Train. Each company MUST have a unique Company Code so the system can track the difference. Typically, company code will be a number or the initials of the company. Field Value Note
Company Code
Company Name
Address Line 1
Address Line 2
City
State
Zip
Phone
Level 1
Level 2 (Dependent on L1?)
Level 3 (Dependent on L2?)
Level 4 (Dependent on L3?)
Level 5 (Dependent on L4?)
2) Can you import in Company codes? _____________________________________________ 3) Would this be helpful or not?___________________________________________________

Cyber Train Version 1.2 Implementation Workbook Page 10 of 110
NOTES
Why do you need Organizational Codes? Organizational codes are used in the system to organize information for the students, for reporting purposes and to build requirements based on where a student works. With this feature, for example, someone working in North Carolina can have a different set of requirements than someone working in California. Building Requirements Within each organizational level, courses and programs can be assigned so that when a student record is updated with a particular organizational code, requirements will be added to the student’s “Courses Needed” page. Each course or program can have a specified number of days after the addition which will default a ‘due date’ in the student’s requirement page.

Cyber Train Version 1.2 Implementation Workbook Page 11 of 110
Defining Organizational Structure 4) Navigate to the Organization. Using the following grid, enter all the organization level details for each of the specified levels of the company. Remember that you can set up one company and copy codes to each company if they will be the same. Field Value Note
Company
Level
Code
Dependent On?
Required Courses?
Required Programs?
NOTE: Make a on this sheet to remind you if there are requirements to add later in the process to this organizational level / code. 5) Can you import in Organizational codes? _____________________________________________ 6) Why or Why not? ________________________________________________________________
Cyber Train Version 1.2 Implementation Workbook Page 12 of 110
NOTES
Why do you need Job Codes? Job codes are used in the system to organize information for the students and to build requirements based on the job a student performs. With this feature, for example, someone working as an Administrative Assistant can have a different set of requirements than someone working in as a Payroll Manager. Building Requirements Within each job codes, courses and programs can be assigned so that when a student record is updated with a particular organizational code, requirements will be added to the student’s “Courses Needed” page. Each course or program can have a specified number of days after the addition which will default a ‘due date’ in the student’s requirement page.

Cyber Train Version 1.2 Implementation Workbook Page 13 of 110
Creating Job Codes 7) Navigate to the Codes > Job Codes page. Using the following grid, enter all the jobs which each company will be utilizing in Cyber Train. Remember that you can set up one company and copy codes to each company if they will be the same. Field Value Note
Company Name
Job Code
Job Title
Required Courses?
Required Programs?
NOTE: Make a on this sheet to remind you if there are requirements to add later in the process to this organizational level / code. 8) Can you import in Job codes? _______________________________________________________ 9) What does the format of the file need to be? ____________________________________________
Mass Importing Codes 10) Where is the Import Code Table option? ________________________________________ 11) What file type must be used to import the code table? ____________________________
Cyber Train Version 1.2 Implementation Workbook Page 14 of 110
NOTES
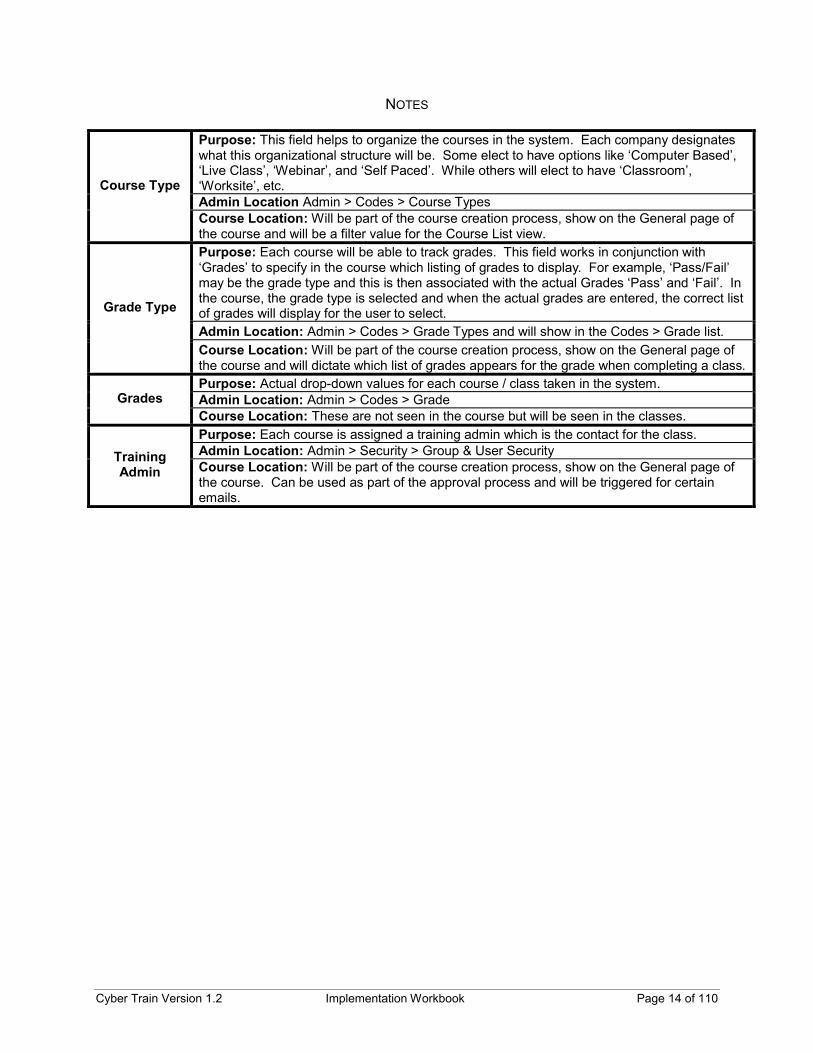
Purpose: This field helps to organize the courses in the system. Each company designates what this organizational structure will be. Some elect to have options like ‘Computer Based’, ‘Live Class’, ‘Webinar’, and ‘Self Paced’. While others will elect to have ‘Classroom’, ‘Worksite’, etc. Admin Location Admin > Codes > Course Types
Course Type
Course Location: Will be part of the course creation process, show on the General page of the course and will be a filter value for the Course List view. Purpose: Each course will be able to track grades. This field works in conjunction with ‘Grades’ to specify in the course which listing of grades to display. For example, ‘Pass/Fail’ may be the grade type and this is then associated with the actual Grades ‘Pass’ and ‘Fail’. In the course, the grade type is selected and when the actual grades are entered, the correct list of grades will display for the user to select. Admin Location: Admin > Codes > Grade Types and will show in the Codes > Grade list.
Grade Type
Course Location: Will be part of the course creation process, show on the General page of the course and will dictate which list of grades appears for the grade when completing a class. Purpose: Actual drop-down values for each course / class taken in the system. Admin Location: Admin > Codes > Grade Grades Course Location: These are not seen in the course but will be seen in the classes. Purpose: Each course is assigned a training admin which is the contact for the class. Admin Location: Admin > Security > Group & User Security Training
Admin Course Location: Will be part of the course creation process, show on the General page of the course. Can be used as part of the approval process and will be triggered for certain emails.
Cyber Train Version 1.2 Implementation Workbook Page 15 of 110
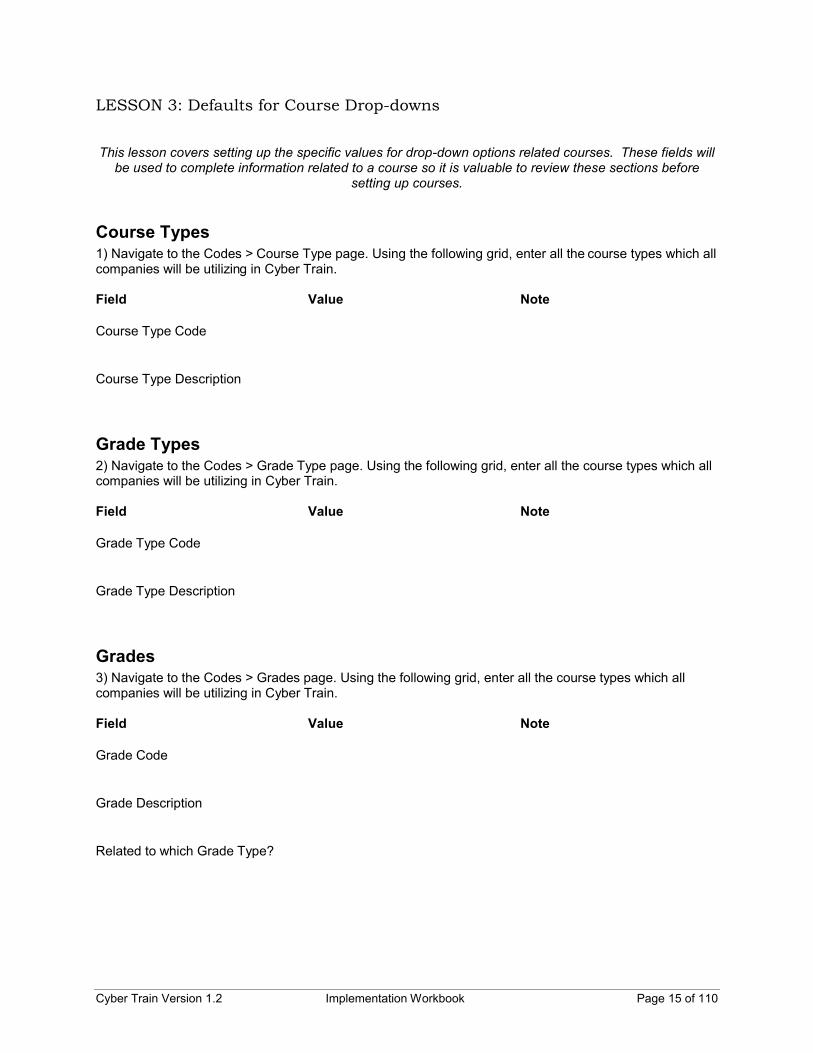
LESSON 3: Defaults for Course Drop-downs This lesson covers setting up the specific values for drop-down options related courses. These fields will
be used to complete information related to a course so it is valuable to review these sections before setting up courses.
Course Types 1) Navigate to the Codes > Course Type page. Using the following grid, enter all the course types which all companies will be utilizing in Cyber Train. Field Value Note
Course Type Code
Course Type Description
Grade Types 2) Navigate to the Codes > Grade Type page. Using the following grid, enter all the course types which all companies will be utilizing in Cyber Train. Field Value Note
Grade Type Code
Grade Type Description
Grades 3) Navigate to the Codes > Grades page. Using the following grid, enter all the course types which all companies will be utilizing in Cyber Train. Field Value Note
Grade Code
Grade Description
Related to which Grade Type?
Cyber Train Version 1.2 Implementation Workbook Page 16 of 110
NOTES
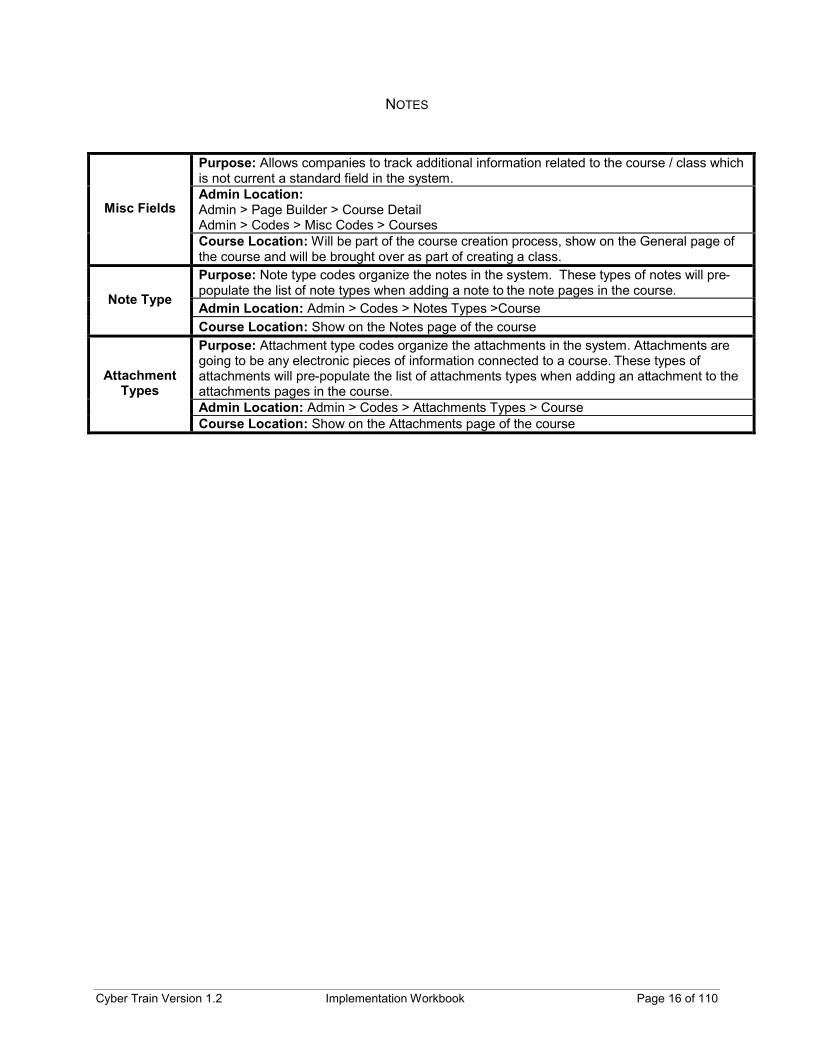
Purpose: Allows companies to track additional information related to the course / class which is not current a standard field in the system. Admin Location: Admin > Page Builder > Course Detail Admin > Codes > Misc Codes > Courses
Misc Fields
Course Location: Will be part of the course creation process, show on the General page of the course and will be brought over as part of creating a class. Purpose: Note type codes organize the notes in the system. These types of notes will pre-populate the list of note types when adding a note to the note pages in the course. Admin Location: Admin > Codes > Notes Types >Course
Note Type
Course Location: Show on the Notes page of the course Purpose: Attachment type codes organize the attachments in the system. Attachments are going to be any electronic pieces of information connected to a course. These types of attachments will pre-populate the list of attachments types when adding an attachment to the attachments pages in the course. Admin Location: Admin > Codes > Attachments Types > Course
Attachment Types
Course Location: Show on the Attachments page of the course

Cyber Train Version 1.2 Implementation Workbook Page 17 of 110
Misc. Codes 4) The names for the misc fields are controlled by Admin > Page Builder > ________________________ 5) How do you make the misc fields dependant on a drop-down value? ___________________________ 6) Where do you go to add in values for misc fields? __________________________________________
Notes Types 7) Navigate to the Codes > Note Type section and select Courses. Using the following grid, enter all the note types which all companies will be utilizing in Cyber Train to track information in the course details. Field Value Note
Note Type Code
Note Type Description
Attachment Types 8) Navigate to the Codes > Attachment Type section and select Courses. Using the following grid, enter all the attachment types which all companies will be utilizing in Cyber Train to track information in the course details. Field Value Note
Attachment Type Code
Attachment Type Description

Cyber Train Version 1.2 Implementation Workbook Page 18 of 110
NOTES Security is broken down into two sections.
1) User Security – controls the login information, role of the user, connection to the student account, and which students are available for viewing
2) Group Security – controls what can be seen and done by users upon logging in. User Security Details
Field Description: This field contains the actual Cyber Train login ID (Read-Only) for each User. Each User ID must be unique. If the ID needs to be changed, click on the User ID hyperlink and make the necessary changes. User ID User View: This field will be displayed throughout Cyber Train that uses the ID to track actions. Field Description: This field identifies the User’s full name and populates various User drop-down lists in the Cyber Train system. The company needs to decide how the naming convention should display (First Name and Last Name; Last Name, First Name; etc…) because the way it is entered here is the way it will be displayed.
Username User View: The User name defaults in many places throughout Cyber Train: Welcome Banner Course > Training Admin field Class > Instructor field Correspondence
Field Description: User’s Email address. This field is mandatory in order for Cyber Train to send out automatically generated emails to Users. Email User View: The User will see his > her email as it is made available through the use of merge fields in emails. Field Description: The password used by this User ID to login to Cyber Train. A blank password is not permitted. Passwords can contain letters or numbers and are not case-sensitive and if any password rules are set in Admin > Security > Password Rules - When the User changes the password, the Password Rules will go into effect. The field will always look blank in here to protect the password.
Password > Confirm
Password
User View: The User will see the Password field at the Login stage of Cyber Train. Field Description: This drop-down list contains all the available Security Groups as set up in Admin > Security > Groups. This field assigns the User to a particular Group. Thus field is necessary for Users to log into Cyber Train. NOTE: if a Security Group is deleted and > or not assigned to the User, the User will not be able to log into Cyber Train.
Security Group
User View: This field is not displayed to the User. Field Description: This checkbox indicates that the User must change his > her password the next time the User logs into Cyber Train. If any password rules are set in Admin > Security > Password Rules - When the User changes the password, the Password Rules will go into effect.
User must change
password User View: The User will enter Cyber Train with the Login information provided, this field is selected and the User will be prompted to enter a new password before logging into Cyber Train. Field Description: This checkbox disables User accounts in Cyber Train. It will remove the User’s name from the following locations in the system.
Course > Training Admin field Class > Instructor field
Account Disabled
User View: This field is not displayed to the User.

Cyber Train Version 1.2 Implementation Workbook Page 19 of 110
Training Admin User Accounts Add the Training Administrators to the User list for Cyber Train. This group of users has been set up to have full access to the system but cannot delete students. 9) Where do you go to add Users to the Cyber Train? _________________________________ 10) Using the following grid, designated which people need to have a user account in Cyber Recruiter
Type of User User Account Needed?
Will be an instructor of some classes
Needs to run reports from the system
Manager, but only needs to see his own employee’s information (which classes needed / taken, etc.)
President, needs to approve all external class requests
Students, just need to see their own record
Class / Course contact (Training Admin)
11) Make a new user
Find a User who has ‘Adminstrator’ as the Security Group and Copy that User Profile. On the Copy User Page enter the following information:
New User ID: First initial of first name and full last name (Example: JSMITH) User Name: Full Name (Example: John Smith) Initials: All initials (Example: JS) Email: Use an email address that you can access during training Password: 1234 Confirm Password: 1234 Checkbox: To have your password changed at next login
Cyber Train Version 1.2 Implementation Workbook Page 20 of 110
NOTES
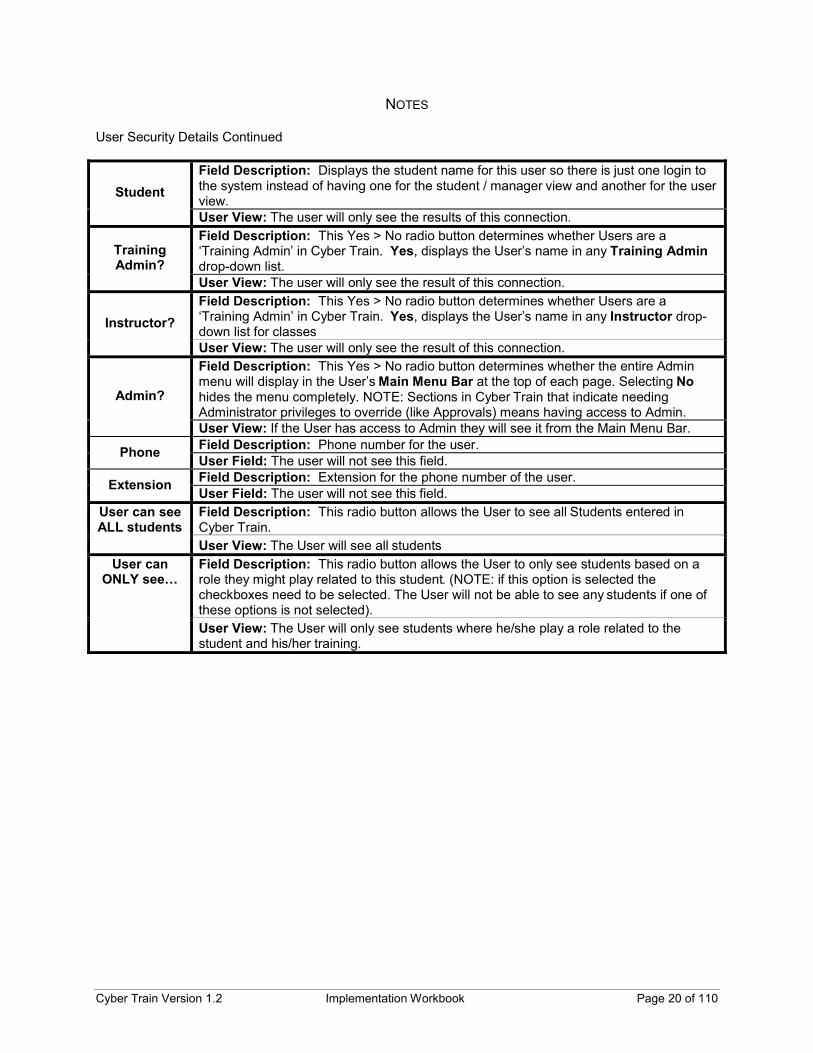
User Security Details Continued
Field Description: Displays the student name for this user so there is just one login to the system instead of having one for the student / manager view and another for the user view.
Student
User View: The user will only see the results of this connection. Field Description: This Yes > No radio button determines whether Users are a ‘Training Admin’ in Cyber Train. Yes, displays the User’s name in any Training Admin drop-down list.
Training Admin?
User View: The user will only see the result of this connection. Field Description: This Yes > No radio button determines whether Users are a ‘Training Admin’ in Cyber Train. Yes, displays the User’s name in any Instructor drop-down list for classes Instructor?
User View: The user will only see the result of this connection. Field Description: This Yes > No radio button determines whether the entire Admin menu will display in the User’s Main Menu Bar at the top of each page. Selecting No hides the menu completely. NOTE: Sections in Cyber Train that indicate needing Administrator privileges to override (like Approvals) means having access to Admin.
Admin?
User View: If the User has access to Admin they will see it from the Main Menu Bar. Field Description: Phone number for the user. Phone User Field: The user will not see this field. Field Description: Extension for the phone number of the user. Extension User Field: The user will not see this field. Field Description: This radio button allows the User to see all Students entered in Cyber Train.
User can see ALL students
User View: The User will see all students Field Description: This radio button allows the User to only see students based on a role they might play related to this student. (NOTE: if this option is selected the checkboxes need to be selected. The User will not be able to see any students if one of these options is not selected).
User can ONLY see…
User View: The User will only see students where he/she play a role related to the student and his/her training.

Cyber Train Version 1.2 Implementation Workbook Page 21 of 110
12) Modify the user profile
Enter your User profile. Based on the descriptions on the previous page, what will be the values of each of the fields for the rest of the security settings?
Field Value Student
Training Admin
Instructor
Admin
Phone Number
Extension
Student Access
Make the adjustments to this profile. Log out of Cyber Train and log back in using your new User Profile. This will be your User ID and Password.
13) Did the system prompt you to change the password? _________________

Cyber Train Version 1.2 Implementation Workbook Page 22 of 110
NOTES Security Group Details There are multiple sections to the Security Group permissions. On each, you will see the following choices:
Yes: Can see view or perform action No: Cannot see view or perform action None: Users are not be able to see this page at all View-Only: Users are able to see the page but will not be able to change anything Updated: Users are able to see and change the page Add Only: Acts like View-Only status but allows Users to only add information to the page
Tab/Menu Field Note Options General Class List Class List Link Yes/No General Report Writer Report Writer Menu Option Yes/No General Help Help Menu Option Yes/No Curriculum Main Course Info Course List None, View, Update Curriculum Course Pre-reqs None, View, Update Curriculum Course Notes None, View, Add Only, Update Curriculum Course Attachments None, View, Add Only, Update Curriculum Course Approvers None, View, Add Only, Update Curriculum Main Program Info Program List None, View, Update Curriculum Main Certification Info Certification List None, View, Update Students Home Contact Info None, View, Update Students Work Contact Info None, View, Update Students Job Info None, View, Update Students Notes None, View, Update Students History None, View, Update Students Correspondence None, View, Add Only, Update Students External Classes None, View, Update Students Opt Out Requests None, View, Update Students Courses Needed None, View, Add Only, Update Students Courses Taken None, View, Add Only, Update Students Programs None, View, Add Only, Update Students Certifications None, View, Add Only, Update Students Class Enrollments None, View, Add Only, Update Students Miscellaneous None, View, Update Students Attachments None, View, Add Only, Update Students Tuition Assistance None, View, Add Only, Update Students Formal Education None, View, Add Only, Update Students Can Add Student? Yes/No Students Can Delete Student? Yes/No Classes Main Class Info None, View, Update Classes Class Description None, View, Update Classes Enrollees None, View, Add Only, Update Classes Costs None, View, Add Only, Update Classes Notes None, View, Add Only, Update Classes Miscellaneous None, View, Update Classes Attachments None, View, Add Only, Update Classes History None, View, Update Classes Can Add Class? Yes/No Classes Can Close Class? Yes/No Classes Can Delete Class? Yes/No Report Writer View Reports Yes/No Report Writer Design Reports Yes/No
Cyber Train Version 1.2 Implementation Workbook Page 23 of 110
Modifying a Security Group 14) What is the difference between Group Security and User Security? _________________________________________________________________________ _________________________________________________________________________ 15) What is a quick way to make a new Security Group with the same permissions of as an existing one? _________________________________________________________________________ Add a new security group for ‘Instructors’. 16) How do you access the Security Group you just created? __________________________ 17) Review the settings, using the details on the previous page, and make adjustments to this security group to only allow what instructors should be able to see and do.
18) When would you use the Add Only option verse the Update option? __________________ _________________________________________________________________________
Cyber Train Version 1.2 Implementation Workbook Page 24 of 110
NOTES
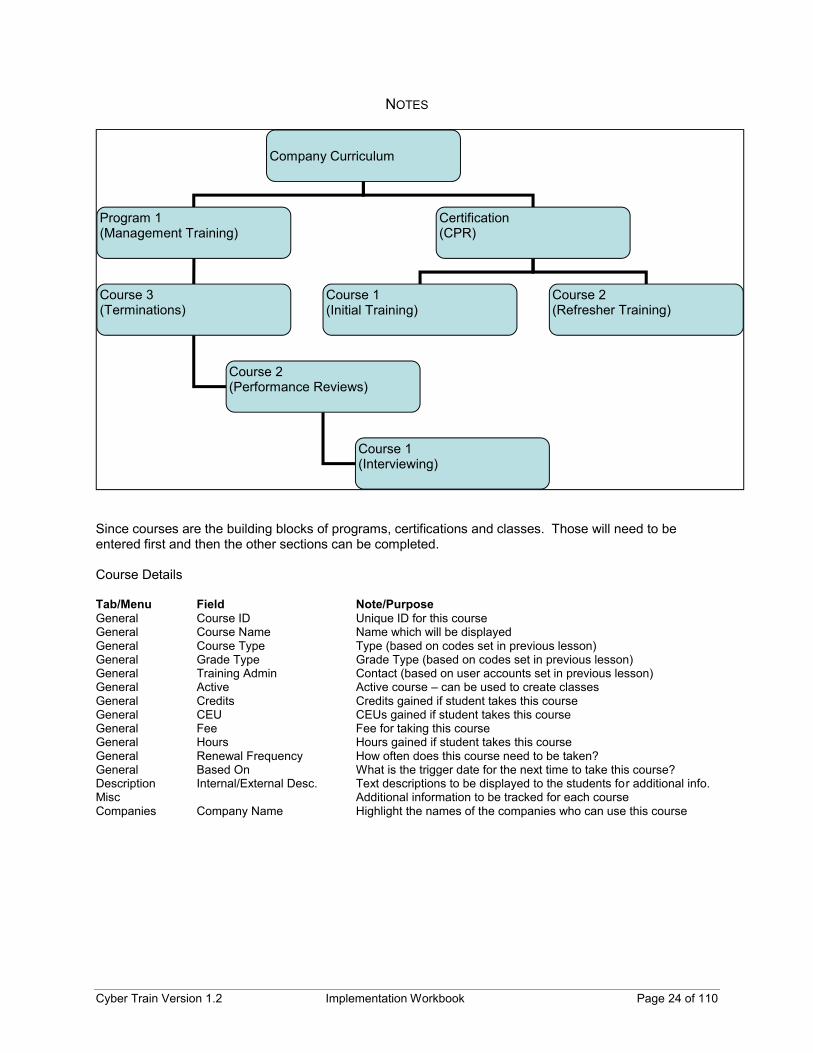
Since courses are the building blocks of programs, certifications and classes. Those will need to be entered first and then the other sections can be completed. Course Details Tab/Menu Field Note/Purpose General Course ID Unique ID for this course General Course Name Name which will be displayed General Course Type Type (based on codes set in previous lesson) General Grade Type Grade Type (based on codes set in previous lesson) General Training Admin Contact (based on user accounts set in previous lesson) General Active Active course – can be used to create classes General Credits Credits gained if student takes this course General CEU CEUs gained if student takes this course General Fee Fee for taking this course General Hours Hours gained if student takes this course General Renewal Frequency How often does this course need to be taken? General Based On What is the trigger date for the next time to take this course? Description Internal/External Desc. Text descriptions to be displayed to the students for additional info. Misc Additional information to be tracked for each course Companies Company Name Highlight the names of the companies who can use this course
Company Curriculum
Program 1 (Management Training)
Certification (CPR)
Course 3 (Terminations)
Course 2 (Performance Reviews)
Course 1 (Initial Training)
Course 1 (Interviewing)
Course 2 (Refresher Training)

Cyber Train Version 1.2 Implementation Workbook Page 25 of 110
LESSON 4: Building Curriculum
This lesson covers building courses, programs and certifications which can then be used to set up requirements for students and to conduct classes.
Constructing the Courses Each item which will be connected to a program, class, certification or requirement must be entered in as a course first. Navigate to the Curriculum menu option and select Courses from the drop-down list. 1) What pieces of information do you have about each course listed on this view?
_______________________________________________________________________ _______________________________________________________________________
2) This view can be altered under Admin > Page Builder > _______________________________ 3) Click the Add Button to add a course to the system – copy this section multiple times if you feel it is helpful to have a grid to complete as well. Tab/Menu Field Note/Purpose General Course ID
General Course Name
General Course Type
General Grade Type
General Training Admin
General Active
General Credits
General CEU
General Fee
General Hours
General Renewal Frequency
General Based On
Description Internal/External Desc.
Misc
Companies Company Name

Cyber Train Version 1.2 Implementation Workbook Page 26 of 110
NOTES

Cyber Train Version 1.2 Implementation Workbook Page 27 of 110
4) How do you edit the course which was just created? ______________________________________ 5) Does this course have any pre-requisites? _______________
If yes, navigate to the pre-requisite page and highlight the class which should be taken prior to this course
If yes, and the course is not already in the system, repeat #3 above for the pre-requisite and then return to this question.
If no, skip to #7. NOTE: if an approver should be a specific person who is not currently on the list, make a note here to add that person to the User list and then go back to this section to complete the approval tree.
6) When enrolling or requesting Opt-Out of this course requirement, should it go through an approval process? _______________ Should someone be notified, even if he/she does not need to approve? ________________
If approver needed, navigate to the approvals page and add in the individuals (specific user or manager) who should be an approver.
If notification is needed instead of an approval, check-mark the ‘Notification Only’ box. If no, continue on with setting up programs.
Recording Course Equivalency If courses have been added to the system (history built, etc.) and courses are combined or re-named, a special process has been built into Cyber Train to handle this process. 7) To allow update old courses with the new values/names, use the following process
(1) Add new course to Curriculum >__________________ (2) Go to Admin > Processes > ___________________
(3) Select the old course name and the new course name from the drop-down options
(4) Go back to the Course List and inactivate the old course.
Building Programs Programs are groups of courses which are grouped together and build to a common purpose. The most frequently used are ‘New Hire Training’ and ‘Management Training’. If you are not using programs, skip this section. 8) Add in a new program – copy this section multiple times if you feel it is helpful to have a grid to complete as well. Field Note/Purpose Program ID
Program Name
Renewal Frequency
Based On
Description

Cyber Train Version 1.2 Implementation Workbook Page 28 of 110
NOTES
Cyber Train Version 1.2 Implementation Workbook Page 29 of 110
Press SAVE CHANGES 8b) Specify the companies this program is to be used for. 8c) Specify the courses which make up this program.
Setting Certifications Certifications refer to the confirmation of certain knowledge of a person. This confirmation is often, but not always, provided by some form of external review, education, or assessment. One of the most common types of certification are professional certification, where a person is certified as being able to competently complete a job or task, usually by the passing of an examination. Cyber Train allows for each of these certifications to be tracked by person and alerted when the expiration of this certification is within a certain date range. 9) Add in a new certification – copy this section multiple times if you feel it is helpful to have a grid to complete as well. Field Note/Purpose Code
Certification Name
Issued By
Renewal Frequency
Based On
Renewal Cost
Expiration Reminder
Description
Press SAVE CHANGES 9b) Specify the companies this certification will be used for. 9c) Specify the courses or program which will automatically add this certification to the student’s record.

Cyber Train Version 1.2 Implementation Workbook Page 30 of 110
NOTES

Cyber Train Version 1.2 Implementation Workbook Page 31 of 110
LESSON 5: Setting Requirements
This lesson covers building default requirements based on the job and organizational levels in the company structure. Once the requirements are built, new students or changes to an existing student
record will be updated with the requirements.
Requirements Based on Job Programs and courses can be defaulted to each job for each company. Adding requirements to a job will allow for the system to populate the Courses Needed page based on these settings when a job is updated. Navigate to the Admin > Codes > Job Codes menu option. 1) From Lesson 2, which jobs need to have requirements assigned? _____________________________
Select the first job.
2) Should courses or programs be assigned to this job? ______________________________________
Press the appropriate link (Edit Courses / Edit Programs)
3) Move the items from the left-hand column to the right-hand column which should be requirements for this job.
Press SAVE CHANGES
4) Enter the Number of Days grace period which this job will have to complete this courses listed. This will be based on the Job Start Date entered in the student record.
Press SAVE CHANGES
NOTE: If a program is added as a requirement, selecting the individual courses which are part of the program is not needed.
Requirements Based on Organizational Level Programs and courses can be defaulted to each organizational level for each company. Adding requirements to an organizational level will allow for the system to populate the Courses Needed page based on these settings when a level is updated. Navigate to the Admin > Organization menu option. 5) From Lesson 2, which level values need to have requirements assigned? _______________________
Select the first company / level.
6) Should courses or programs be assigned to this level value? _________________________________
Press the appropriate link (Edit Courses / Edit Programs)
7) Move the items from the left-hand column to the right-hand column which should be requirements for this level value.
Press SAVE CHANGES

Cyber Train Version 1.2 Implementation Workbook Page 32 of 110
NOTES

Cyber Train Version 1.2 Implementation Workbook Page 33 of 110
8) Enter the Number of Days grace period which this person will have to complete this courses listed. This will be based on the Job Start Date entered in the student record.
Press SAVE CHANGES
NOTE: If a program is added as a requirement, selecting the individual courses which are part of the program is not needed.
Mass Adding Requirements Occasionally it may be necessary to add requirement to records which are not based on the person’s job or organizational level or which should not be updated with a change to either of these. There are two ways to add requirements en masse. 9) What are the two areas where requirements can be added en masse? _____________________________________ ___________________________________________ 10) How are they similar / different? ____________________________________________________________________________________________________________________________________________________________________________________________________________________________________________________________ 11) Why would you use this feature? ____________________________________________________________________________________________________________________________________________________________________________________________________________________________________________________________

Cyber Train Version 1.2 Implementation Workbook Page 34 of 110
NOTES
Purpose: This field helps to organize the students in the system. Each company designates what this organizational structure will be. Some elect to have options like ‘Employee’, ‘Manager’, and ‘VP’. While others will elect to have ‘Classroom’, ‘Worksite’, etc. At least one categorization is required. Admin Location Admin > Codes > Student Types
Student Type
Student Location: Will be part of the Add Student process and will be seen on the Job Info page of the Student File. Purpose: Typically this field will come over from an HR system and will organize student information by the type of employment – ‘Full Time’, ‘Part Time’, etc. Admin Location: Admin > Codes > Employment Types.
Employment Type
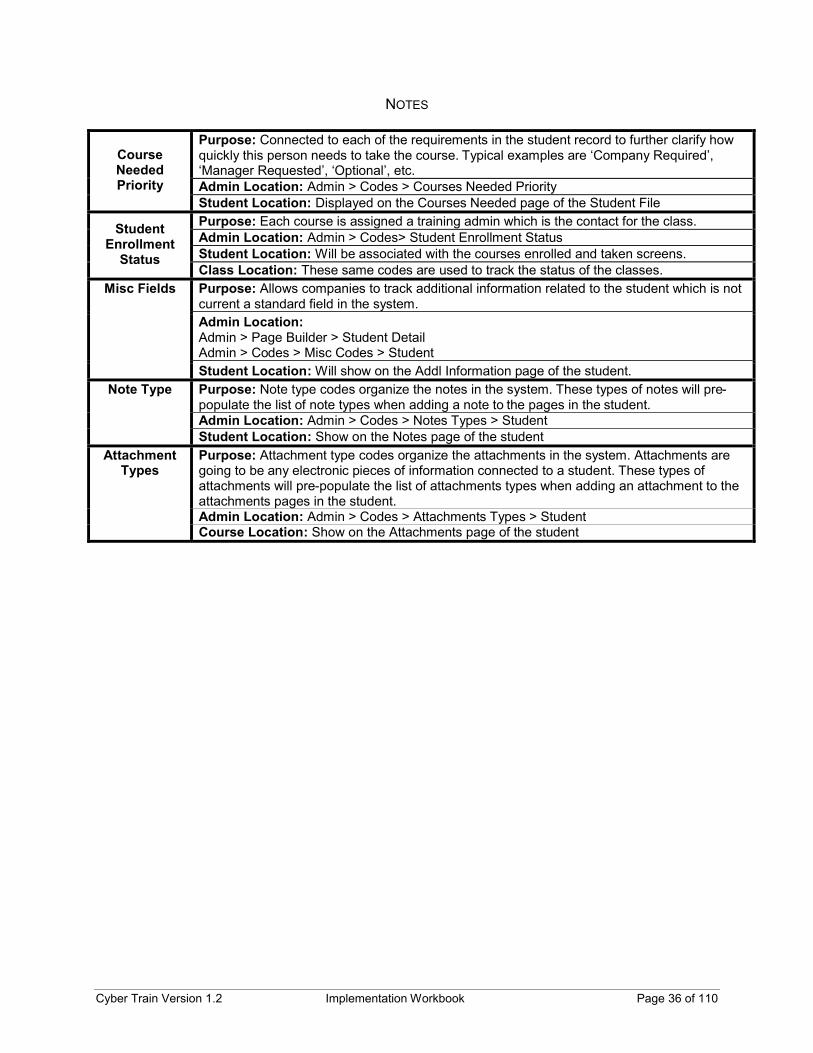
Student Location: Seen on the Job Info page of the Student File Purpose: Connected to each of the requirements in the student record to further clarify how quickly this person needs to take the course. Typical examples are ‘Company Required’, ‘Manager Requested’, ‘Optional’, etc. Admin Location: Admin > Codes > Courses Needed Priority
Course Needed Priority
Student Location: Displayed on the Courses Needed page of the Student File Purpose: Each course is assigned a training admin which is the contact for the class. Admin Location: Admin > Codes> Student Enrollment Status Student Location: Will be associated with the courses enrolled and taken screens.
Student Enrollment
Status Class Location: These same codes are used to track the status of the classes.

Cyber Train Version 1.2 Implementation Workbook Page 35 of 110
Administrative Views / Functions LESSON 6: Defaults for Student Records
This lesson covers setting up the specific values for drop-down options related students. These fields will
be used to complete information related to a student so it is valuable to review these sections before setting up students.
Student Types 1) Navigate to the Codes > Student Type page. Using the following grid, enter all the student types which each company will be utilizing in Cyber Train. Field Value Note
Should this company use codes from another value?
Student Type Code
Student Type Description
Employment Types 2) Navigate to the Codes > Employment Type page. Using the following grid, enter all the course types which each company will be utilizing in Cyber Train. Field Value Note
Should this company use codes from another value?
Employment Type Code
Employment Type Description
Cyber Train Version 1.2 Implementation Workbook Page 36 of 110
NOTES
Purpose: Connected to each of the requirements in the student record to further clarify how quickly this person needs to take the course. Typical examples are ‘Company Required’, ‘Manager Requested’, ‘Optional’, etc. Admin Location: Admin > Codes > Courses Needed Priority
Course Needed Priority
Student Location: Displayed on the Courses Needed page of the Student File Purpose: Each course is assigned a training admin which is the contact for the class. Admin Location: Admin > Codes> Student Enrollment Status Student Location: Will be associated with the courses enrolled and taken screens.
Student Enrollment
Status Class Location: These same codes are used to track the status of the classes. Purpose: Allows companies to track additional information related to the student which is not current a standard field in the system. Admin Location: Admin > Page Builder > Student Detail Admin > Codes > Misc Codes > Student
Misc Fields
Student Location: Will show on the Addl Information page of the student. Purpose: Note type codes organize the notes in the system. These types of notes will pre-populate the list of note types when adding a note to the pages in the student. Admin Location: Admin > Codes > Notes Types > Student
Note Type
Student Location: Show on the Notes page of the student Purpose: Attachment type codes organize the attachments in the system. Attachments are going to be any electronic pieces of information connected to a student. These types of attachments will pre-populate the list of attachments types when adding an attachment to the attachments pages in the student. Admin Location: Admin > Codes > Attachments Types > Student
Attachment Types
Course Location: Show on the Attachments page of the student
Cyber Train Version 1.2 Implementation Workbook Page 37 of 110
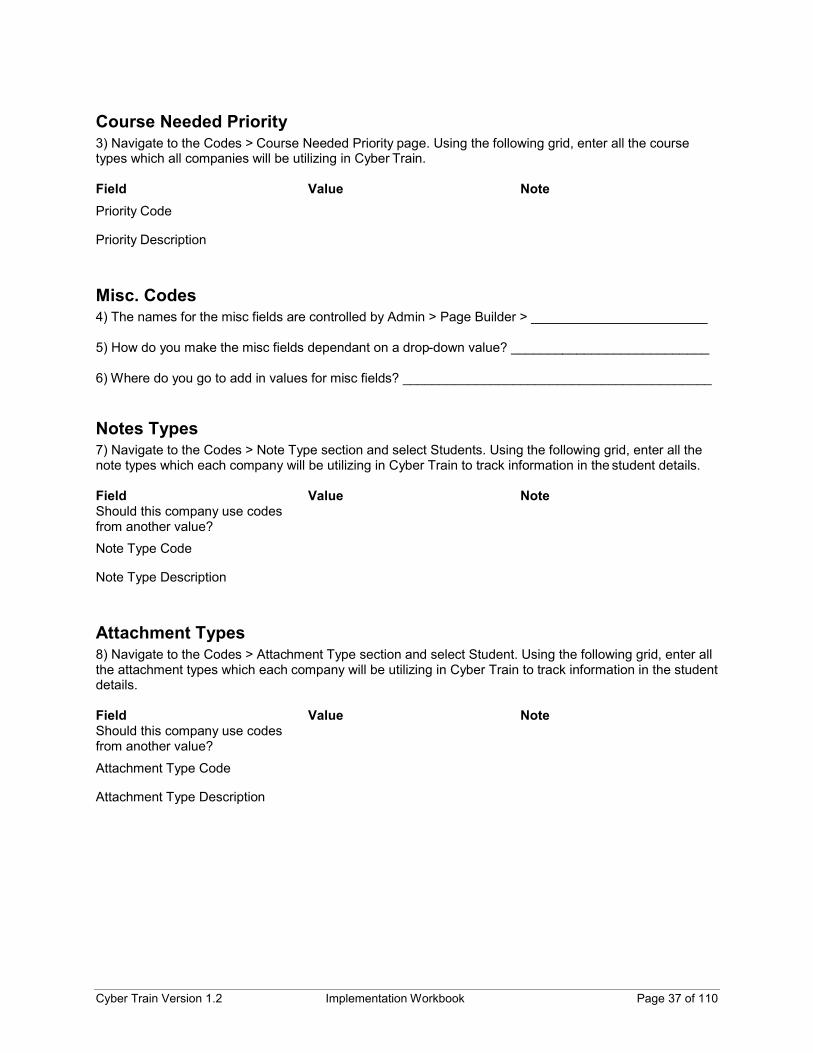
Course Needed Priority 3) Navigate to the Codes > Course Needed Priority page. Using the following grid, enter all the course types which all companies will be utilizing in Cyber Train. Field Value Note Priority Code
Priority Description
Misc. Codes 4) The names for the misc fields are controlled by Admin > Page Builder > ________________________ 5) How do you make the misc fields dependant on a drop-down value? ___________________________ 6) Where do you go to add in values for misc fields? __________________________________________
Notes Types 7) Navigate to the Codes > Note Type section and select Students. Using the following grid, enter all the note types which each company will be utilizing in Cyber Train to track information in the student details. Field Value Note Should this company use codes from another value?
Note Type Code
Note Type Description
Attachment Types 8) Navigate to the Codes > Attachment Type section and select Student. Using the following grid, enter all the attachment types which each company will be utilizing in Cyber Train to track information in the student details. Field Value Note Should this company use codes from another value?
Attachment Type Code
Attachment Type Description

Cyber Train Version 1.2 Implementation Workbook Page 38 of 110
NOTES Purpose of ‘Students’ ‘Students’ in the system can be students, employees, managers, etc. Each record will store information related to an individual’s training requirements and history. Flagging the record as an ‘employee’ will ensure he/she sees his/her specific information when logging into the system. Flagging the record as a ‘supervisor’ will allow a connection back to another student record which will allow the manager to see training information related to his/her subordinates. Students can also be users (in each user account there is a ‘student’ drop-down which will connect a student record to a user account so the user does not have to log in separately to see personal or subordinate information. Recommendations for using the ‘Add Student’ process
o Work you way down the hierarchy (start with the president and then do his subordinates, and then theirs, etc.)
o Ensure you have the following information regarding the student records o Email Address o Employee Number o Job Start Date o Hire Date o Job Title o Organizational Structure
Recommendation for using the ‘Import Student’ process
o Ensure the file is saved into an excel document and the spreadsheet is called Sheet 1 o Bring as much information as possible about the student o Ensure anything related to a drop-down is CAPITALIZED and using the code shown under
Admin > Codes or Admin > Organization Notes on Abra Import Clients who use Abra and have Cyber Train installed on the same network can turn on a ‘link’ between the two products. This connection is set under Admin > Links > Pre-Defined Links and a separate program must be loaded on to the server which contains Abra. This program can be scheduled to run so the two systems stay in sync.

Cyber Train Version 1.2 Implementation Workbook Page 39 of 110
LESSON 7: Adding/Managing Students and Managers
This lesson covers adding students and mangers to the system.
1) What are the two ways to add student / manager records into the system?
_________________________ ______________________________
Adding Records 2) What are the required fields when adding in a student manually?
_________________________ _______________________________ _________________________
3) Add yourself in as a ‘student’ of the system. How do you ensure that you will have a ‘student’ section on the Home page which will display your training information when you log in? _____________________________________________________________________________ Since you are also a user of the system, find your user account and connect this new student record to your user account. 4) Log out and back into the system. What changed on your Home page? _____________________________________________________________________________
Importing Records Create a basic spreadsheet of employee information where each row contains the following information:
Company Employee Number First Name Last Name Is Employee (Y/N) Is Supervisor (Y/N) Supervisor’s Employee ID Number Date Added
5) Using this file, navigate to Students > Import Students. Make the fields to import (right-hand column) match the spreadsheet columns. Press NEXT. Import your file. 6) Look up a record. Note what was brought over and what should be brought in for future imports. __________________________________________________________________________________ 7) When bringing in a new file is the old information overwritten or is a new file created? __________________________________________________________________________________ 8) For any users which have account set under Admin > Security, connect the student accounts to these users.

Cyber Train Version 1.2 Implementation Workbook Page 40 of 110
NOTES

Cyber Train Version 1.2 Implementation Workbook Page 41 of 110
Managing Students/Managers 9) Which page would you find the following information?
Looking For: Located On Which Page:
Work phone number
Name of Supervisor
Outstanding Requirements
Expiration of a Certification
Where this Student went to school
Login ID for Cyber Train
Current Tuition Assistance balance
Classes taken outside of standard curriculum
Emails or letters set to the student
10) If the student changes jobs or organizational levels, what steps are needed to record the change and update the requirements? ___________________________________________________________________________________ ___________________________________________________________________________________ ___________________________________________________________________________________ 11) True / False: Is it possible to mass add courses taken and certifications to multiple student records at the same time.
Cyber Train Version 1.2 Implementation Workbook Page 42 of 110
NOTES
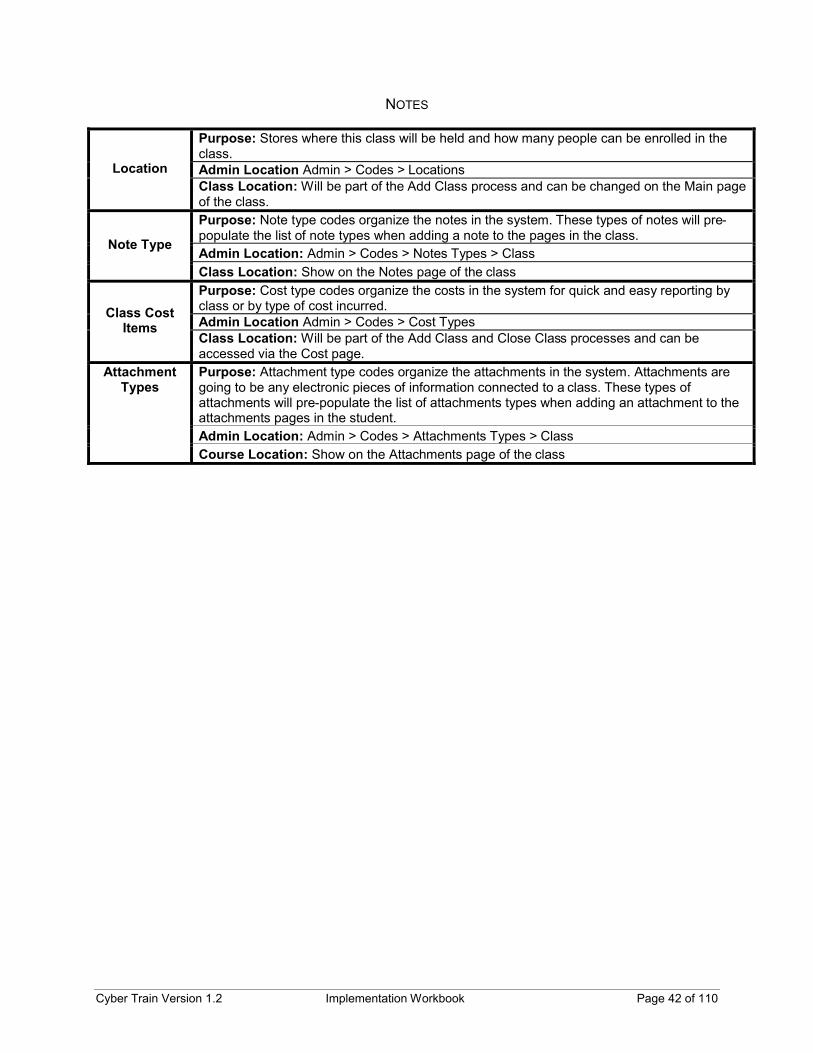
Purpose: Stores where this class will be held and how many people can be enrolled in the class. Admin Location Admin > Codes > Locations Location Class Location: Will be part of the Add Class process and can be changed on the Main page of the class. Purpose: Note type codes organize the notes in the system. These types of notes will pre-populate the list of note types when adding a note to the pages in the class. Admin Location: Admin > Codes > Notes Types > Class
Note Type
Class Location: Show on the Notes page of the class Purpose: Cost type codes organize the costs in the system for quick and easy reporting by class or by type of cost incurred. Admin Location Admin > Codes > Cost Types
Class Cost Items
Class Location: Will be part of the Add Class and Close Class processes and can be accessed via the Cost page. Purpose: Attachment type codes organize the attachments in the system. Attachments are going to be any electronic pieces of information connected to a class. These types of attachments will pre-populate the list of attachments types when adding an attachment to the attachments pages in the student. Admin Location: Admin > Codes > Attachments Types > Class
Attachment Types
Course Location: Show on the Attachments page of the class

Cyber Train Version 1.2 Implementation Workbook Page 43 of 110
LESSON 8: Defaults for Classes
This lesson covers setting up the specific values for drop-down options related classes. These fields will be used to complete information related to a classes so it is valuable to review these sections before
setting up students.
Locations 1) Navigate to the Codes > Locations page. Using the following grid, enter all the locations which all companies will be utilizing in Cyber Train. Field Value Note Location Code
Location Description
Capacity for this location
Notes Types 2) Navigate to the Codes > Note Type section and select Classes. Using the following grid, enter all the note types which all companies will be utilizing in Cyber Train to track information in the class details. Field Value Note Note Type Code
Note Type Description
Class Cost Items 3) Navigate to the Codes > Class Cost Item page. Using the following grid, enter all the Class Cost Items which all companies will be utilizing in Cyber Train. Field Value Note Class Cost Item Code
Class Cost Item Description
Attachment Types 4) Navigate to the Codes > Attachment Type section and select Courses. Using the following grid, enter all the attachment types which all companies will be utilizing in Cyber Train to track information in the course details. Field Value Note Attachment Type Code
Attachment Type Description
Cyber Train Version 1.2 Implementation Workbook Page 44 of 110
NOTES
Purpose of ‘Classes’ Scheduling ‘Classes’ in the system allow for tracking of multiple students all attending the same training at a given date and time. With this connection, Training Administrators can review rosters and record attendance and grades quicker than adding in training history one completion at a time. Generally, a class schedule will be built prior to student’s enrolling in training and then the class will be held and closed. Class Details Tab/Menu Field Note/Purpose General Course Name Name which will be displayed General Status Where is this class in the process? General Grade Type Grade Type (based on codes set in previous lesson) General Training Admin Contact (based on user accounts set in previous lesson) General Instructor Trainer (based on user accounts set in previous lessons) General Hours Hours gained if student takes this class General Location Where will this class be held General Location Details Additional information about the location General Credits Credits gained if the student takes this class General CEU CEUs gained if student takes this class General Fee Fee for taking this class General Conference ID If a conference call is needed, what is the number General Web Meeting ID If a web conference is scheduled, what is the number General Meeting Connection If a web meeting is scheduled, what is the information Schedule Start Date What date will the class start Schedule End Date What date will the class end Schedule Enrollment Ends What date does enrollment end Schedule Capacity Based on the Location, the number will default Schedule Start Time What time will the class start Schedule End Time What time will the class end Schedule Time Zone What time zone is this class in Approvers Name Who is an approver Approvers Number What order should this person be notified when someone enrolls Approvers Notification Should this approver only be notified?
Cyber Train Version 1.2 Implementation Workbook Page 45 of 110
LESSON 9: Building a Class Calendar
This lesson covers building a class calendar based on the courses set in the curriculum section for students to enroll in.
Scheduling a Class 1) What are the two ways to add a class into the system?
______________________________ _________________________________ 2) The ‘Class List’ view can be updated under Admin > Page Builder > _________________________ 3) True / False: Although the system prompts to select a company when creating a class, it is not restricted to enrollments of students who work only at this company. Using one of the method above (question 1), add a class to the system. 4) Which fields were populated from the course? ____________________________________________ 5) What is the purpose of the ‘Enroll Students’ page? ________________________________________ 6) If there is a student who should be enrolled but is not listed on the ‘Enroll Students’ page, how do you enroll this person? ___________________________________________________________________ 7) True / False: The emails trigger to students and approvers regarding enrollment into a class can be modified via the Admin > Page Builder > Correspondence section of Cyber Train.
Managing a Class 8) Who will be able to add students into classes?
Students can enroll themselves Yes / No Managers can enroll students Yes / No Users with access to update to the Class > Roster page Yes / No
9) True / False: When adding students to a class, if the addition is above the capacity the system will notify the user 10) How do you send reminder emails out prior to a class? ____________________________________ 11) True / False: Reminder can be sent to students, instructors and managers? 12) True / False: The emails for reminders to a class can be modified via the Admin > Page Builder > Correspondence section of Cyber Train.

Cyber Train Version 1.2 Implementation Workbook Page 46 of 110
NOTES

Cyber Train Version 1.2 Implementation Workbook Page 47 of 110
Closing a Class 13) Where do you go to close a class? _____________________________________________________ 14) How do you update the whole list of students with a set grade or status? ____________________________________________________________________________________ 15) True / False: Sending a class completion email to the student is required.

Cyber Train Version 1.2 Implementation Workbook Page 48 of 110
NOTES What is the Home Page? This specialized view is designed to quickly display information which needs attention. There are two sections to the home page (1) Left-Hand Navigation (2) Right-Hand Information. Each person logging into the system will be presented with a Home Page view and depending on whom the person is, what role the person plays and actions the person is responsible for the view will change. Left-Hand Navigation:
Training Admin - Will only show if the person logging in has (1) a user account and (2) that user is listed as a ‘Training Admin’. Information listed will be related to all classes, courses and students in the system. Student - Will only show if the person logging in has a student record created. If the person logging in is also a user, the student record MUST be connected to the user account in Admin > Security > User Security. Information listed will be related to the individual person. Manger - Will only show if the person logging in has been flagged as a ‘supervisor’ in his/her student account. Information listed will be related to students this person is managing. Instructor - Will only show if (1) a user account has been created (2) that user is listed as an ‘Instructor’. Information listed will be related to class this user is teaching. Approvals – Will show for everyone Change Password – Will show for everyone Preferences – Shows as part of the Training Admin settings
Right-Hand Information / Action: Training Admin – Certifications expiring, course requirements past due, classes pending payment, etc. Student – Upon selecting an area, information will display giving history, allowing the student to enroll in classes, opting out of requirements, etc. Manger – Upon selecting a student and area, information will display related to the given topic (courses needed for a student, for example) Instructor – Upon selecting a class, roster information or information related to the class will be displayed. Approvals – Lists all the items requiring this person’s attention. Items can be responded to via email or from the Approvals section. Change Password – Allows the person to change his/her password Preferences – Allows the person to set preferences for view, settings, etc.
What are Custom Links? The Custom Links menu item of Admin > Links allows the ability to embed shortcut links (to other pages in Cyber Train), websites, and or documents as necessary. For example, perhaps it would be helpful to have access to add a new class from the Home Page instead of from the Class List or Curriculum List. Creating a custom link allows this flexibility in the system.

Cyber Train Version 1.2 Implementation Workbook Page 49 of 110
LESSON 10: “Optional” Features Setup
There are three features in Cyber Train which are viewed as “optional features” and each organization will determine if the feature will be turned on or off.
Certifications The certification process in Cyber Train is designed to allow students to track their progress for certifications when they are not triggered by taking courses as part of the curriculum. Student are able to request for a certification to be added to his/her record and this process can have an approval process so records are not just automatically added into history. 1) To allow students to add certifications to their records, set up this feature in the following order.
(1) Add Codes to __________________ under the Admin > _______________ section (2) Go to Admin > Page Builder > ___________________ to continue the setup
(3) Turn on access to this feature in the Admin > Page Builder > ________________ Page on the
________________ Tab for the _________________ View. 2) The Initial Status is used to track _______________________________________ 3) The Decline Status is used to track _____________________________________ 4) Where do the Request Instructions show where? __________________________________________
Tuition Assistance The Tuition Assistance process in Cyber Train is designed to allow students to request enrollment in a class and eventually reimbursement for the cost of the class. This section allows for eligibility, amounts and an approval process to be set by each company. 5) True / False: The amount a student is eligible to receive can be overwritten in his/her record. 6) The reimbursement year can be based on _____________________, __________________ or ______________________________. 7) Approvers for this request can be emailed the request. Where can you edit this email in the system? 8) True / False: If the eligibility text box is used, and a student is not eligible, this option will not show for the student’s view and the student will not be able to submit a request.

Cyber Train Version 1.2 Implementation Workbook Page 50 of 110
NOTES

Cyber Train Version 1.2 Implementation Workbook Page 51 of 110
External Classes The External Classes option in Cyber Train is designed to allow students to request enrollment in a class which is external to the curriculum setup and typically held external from the company. 9) True / False: Each company can have instructions posted to request a class and when completing a class. 10) True / False: Individuals do not have to be ‘approvers’ but can be set up only to be notified of a request.

Cyber Train Version 1.2 Implementation Workbook Page 52 of 110
NOTES

Cyber Train Version 1.2 Implementation Workbook Page 53 of 110
LESSON 11: Training Admin Home Page
This lesson discusses modifying the Home Page view for the Administrator.
Home Page Defaults 1) Since the Home Page is a ‘page’ in Cyber Train, which section of Admin controls what is shown? _____________________________________________________________________________ 2) If it is decided that students will not be able to ‘opt out’ of requirements, which settings on the Home Page view should be turned off? _____________________________________________________________________________ _____________________________________________________________________________
Custom Links 3) Where is the setup for Custom Links located? ____________________________________________ 4) Set up a link which will allow you to create a new class from the Home Page view.
a) Go to the page to normally do this action - Make note of the URL (http://www.visibilitysoftware.com/xxx/thispage.aspx - The link will be to the /thispage.aspx page
b) Go to Custom Links and click the Add button c) Link Name: Create New Class d) Location: Home Page (Training Admin) e) New Window: No f) Link: thispage.aspx (from step ‘a’ above) g) Users: Highlight all users who should see this link Click the Save Changes button when done.
5) Where is the Custom Link available now? _______________________________________
Home Page Actions
Closing a Class 6) Classes show in this view and are available to close for _____________ after the class end date. 7) True / False: This process is the same process as performed via Class List > Close Class

Cyber Train Version 1.2 Implementation Workbook Page 54 of 110
NOTES Home Page: Student View This section of the Home Page is designed to give students immediate access to information pertaining to their personal training record. Based on the settings in the Admin section, students will be able to take action and play an active role in maintaining their training records.
Controlled By Admin > Page Builder > Home Page View Requirements View Classes View Courses Taken View Certifications View Programs Request Tuition Assistance Request attendance in externally held class Request credit for a course previously taken Request a certification be added to his/her record Request waiver for a course requirement
Controlled by Admin > Page Builder > Certification Request Statuses Messages / Instructions Approval Process
Controlled by Admin > Page Builder > Tuition Assistance
Eligibility Default Amount Messages / Instructions Approval Process Misc. Fields
Controlled by Admin > Page Builder > External Classes
Messages / Instructions Approval Process Misc. Fields

Cyber Train Version 1.2 Implementation Workbook Page 55 of 110
Other Views & Processes LESSON 12: Student Views and Actions
This lesson discusses the view of the system the student sees and what actions are available to the student.
Student Home Page 1) What information is shown in the ‘class calendar’ view for students? _____________________________________________________________________________ 2) True / False: Students have the ability to view previous taken courses? 3) What is the difference between completed classes, courses taken, and external courses? _____________________________________________________________________________ 4) True / False: Students will have a reminder 30 days prior to a certification expiring? Why or Why Not: _______________________________________________________________ 5) Students can elect to enroll in course not on their requirement list by clicking on the __________________ link in the ___________________ section. 6) Students can send an email / question to the instructor of the class by clicking on the _______________________ link.

Cyber Train Version 1.2 Implementation Workbook Page 56 of 110
NOTES

Cyber Train Version 1.2 Implementation Workbook Page 57 of 110
Student Actions
Enrolling in a Required Class The flow-chart below show the actions Cyber Train takes when a student wants to enroll into a class which is on his/her required courses list.
7) Clicking on the class name displays a summary of the class which is stored in ___________________________________________________________________ 8) Select a class for a student to be enrolled in to see the flow and emails in the system.
Navigate to Classes > Classes Needed
Click ‘Enroll’ next to requirement
System checks if class is available
If not available, no classes will show
If available, class list will appear
Student clicks ‘Register’ next to the date/time for the class
Sent through approval process via email / action on home page
If no room in class, student wait listed
If room, student is enrolled

Cyber Train Version 1.2 Implementation Workbook Page 58 of 110
NOTES

Cyber Train Version 1.2 Implementation Workbook Page 59 of 110
Enrolling in a non-Required Class The flow-chart below show the actions Cyber Train takes when a student wants to enroll into a class which is on outside of his/her requirements list.
9) The class list displays by date by default. To change this, simply press the ______________________ 10) True / False: Only classes available for the student’s company will display for the student to enroll in.
Requesting an Opt-Out Cyber Train has an option to allow for student’s to request an ‘opt-out’ from a requirement previously added to his/her record.
11) As a user of the system, where would you look up the status of this request? _______________________________________________________________________________ 12) True / False: As a student, I cannot see the flow of this information from my home page view.
Navigate to Classes > Classes Needed
Click ‘Opt Out’ next to requirement
Sent through approval process via email / action
on home page
Student emailed result
If approved, requirement removed
Navigate to Classes > Browse Classes
Click ‘Register’ next to class
Sent through approval process via email / action on home page
If no room in class, student wait listed
If room, student is enrolled

Cyber Train Version 1.2 Implementation Workbook Page 60 of 110
NOTES

Cyber Train Version 1.2 Implementation Workbook Page 61 of 110
Requesting Course Credit Students have the ability to request credit for courses previously taken which are not currently in their record.
13) True / False: This is an optional action which is controlled in the Page Builder setup. 14) True / False: A student can request credit for a course which is not in the drop-down list.
Navigate to Classes > Classes Taken
Click ‘Add’ link below the list of classes
Select course, enter date and note
Sent through approval process via email / action on
home page
Student emailed result
If approved, requirement removed

Cyber Train Version 1.2 Implementation Workbook Page 62 of 110
NOTES

Cyber Train Version 1.2 Implementation Workbook Page 63 of 110
Requesting Certification Record Students have the ability to request certifications they have or are in the process of obtaining be added to their record in Cyber Train.
15) From the user view, this information is stored in the ______________________ file in the ______________________________ page on the ___________________________tab.
Navigate Certifications
Click ‘Add’ link below the list of certifications
Select certification, enter dates and note
Sent through approval process via email / action on
home page
Student emailed result
If approved, certification added
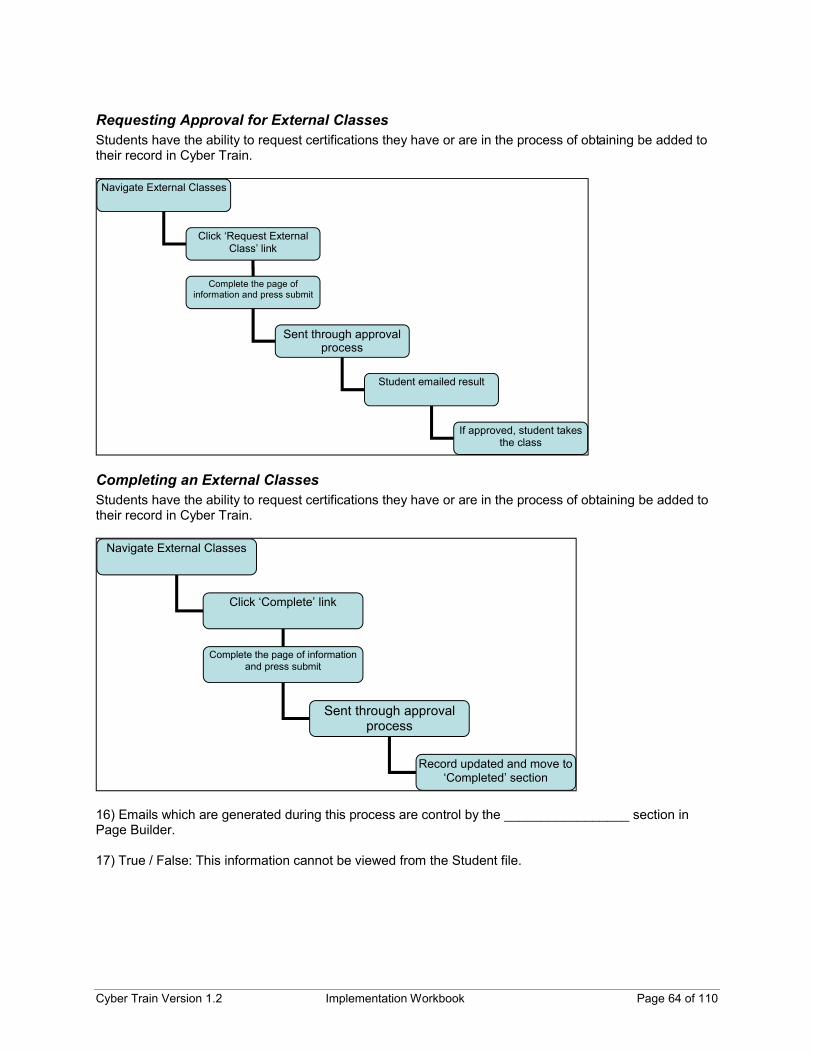
Cyber Train Version 1.2 Implementation Workbook Page 64 of 110
Requesting Approval for External Classes Students have the ability to request certifications they have or are in the process of obtaining be added to their record in Cyber Train.
Completing an External Classes Students have the ability to request certifications they have or are in the process of obtaining be added to their record in Cyber Train.
16) Emails which are generated during this process are control by the _________________ section in Page Builder. 17) True / False: This information cannot be viewed from the Student file.
Navigate External Classes
Click ‘Complete’ link
Complete the page of information and press submit
Sent through approval process
Record updated and move to ‘Completed’ section
Navigate External Classes
Click ‘Request External Class’ link
Complete the page of information and press submit
Sent through approval process
Student emailed result
If approved, student takes the class

Cyber Train Version 1.2 Implementation Workbook Page 65 of 110
NOTES
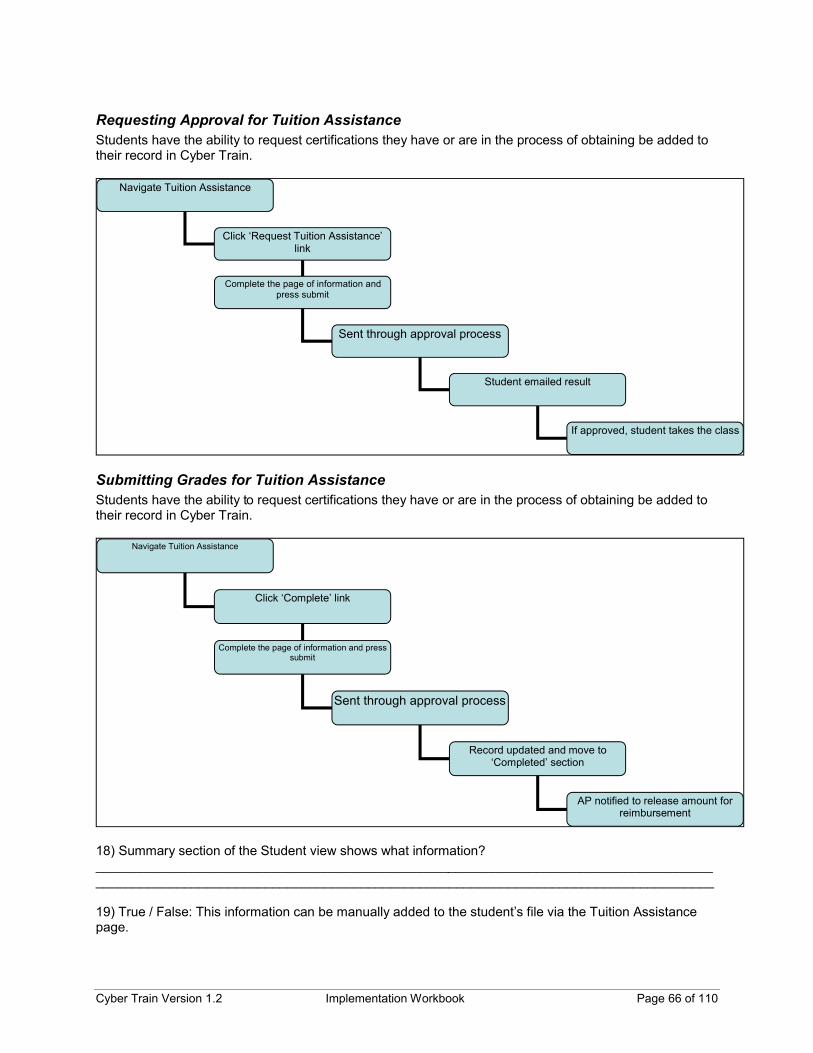
Cyber Train Version 1.2 Implementation Workbook Page 66 of 110
Requesting Approval for Tuition Assistance Students have the ability to request certifications they have or are in the process of obtaining be added to their record in Cyber Train.
Submitting Grades for Tuition Assistance Students have the ability to request certifications they have or are in the process of obtaining be added to their record in Cyber Train.
18) Summary section of the Student view shows what information? ________________________________________________________________________________________________________________________________________________________________________ 19) True / False: This information can be manually added to the student’s file via the Tuition Assistance page.
Navigate Tuition Assistance
Click ‘Complete’ link
Complete the page of information and press submit
Sent through approval process
Record updated and move to ‘Completed’ section
AP notified to release amount for reimbursement
Navigate Tuition Assistance
Click ‘Request Tuition Assistance’ link
Complete the page of information and press submit
Sent through approval process
Student emailed result
If approved, student takes the class

Cyber Train Version 1.2 Implementation Workbook Page 67 of 110
NOTES
Home Page: Manager View This section of the Home Page is designed to give managers access to information pertaining to their employee’s training record. Based on the settings in the Admin section, manager will be able to take action and play an active role in maintaining their employee’s training records.
Controlled By Admin > Page Builder > Home Page View Requirements View Courses Taken View Certifications View Programs
Cyber Train Version 1.2 Implementation Workbook Page 68 of 110
LESSON 13: Manager Views and Actions
This lesson discusses the view of the system the manager sees and what actions are available to the manager.
Manager Home Page 1) What information is shown in the ‘class calendar’ view for managers? _____________________________________________________________________________ 2) Managers can add courses to their employee’s requirements page via the _______________ page under the student record. 3) True / False: Managers can respond via email to items requiring their attention. 4) Submitting a request to add a new course to the drop-down list sends and email to whom? _____________________________________________________________________________ 5) True / False: Managers can see only their direct reports (not indirect reports) 6) If a Manager wants to quickly see which courses his employees are past due for taking, what view should he/she look at? _______________________________________________________________

Cyber Train Version 1.2 Implementation Workbook Page 69 of 110
NOTES
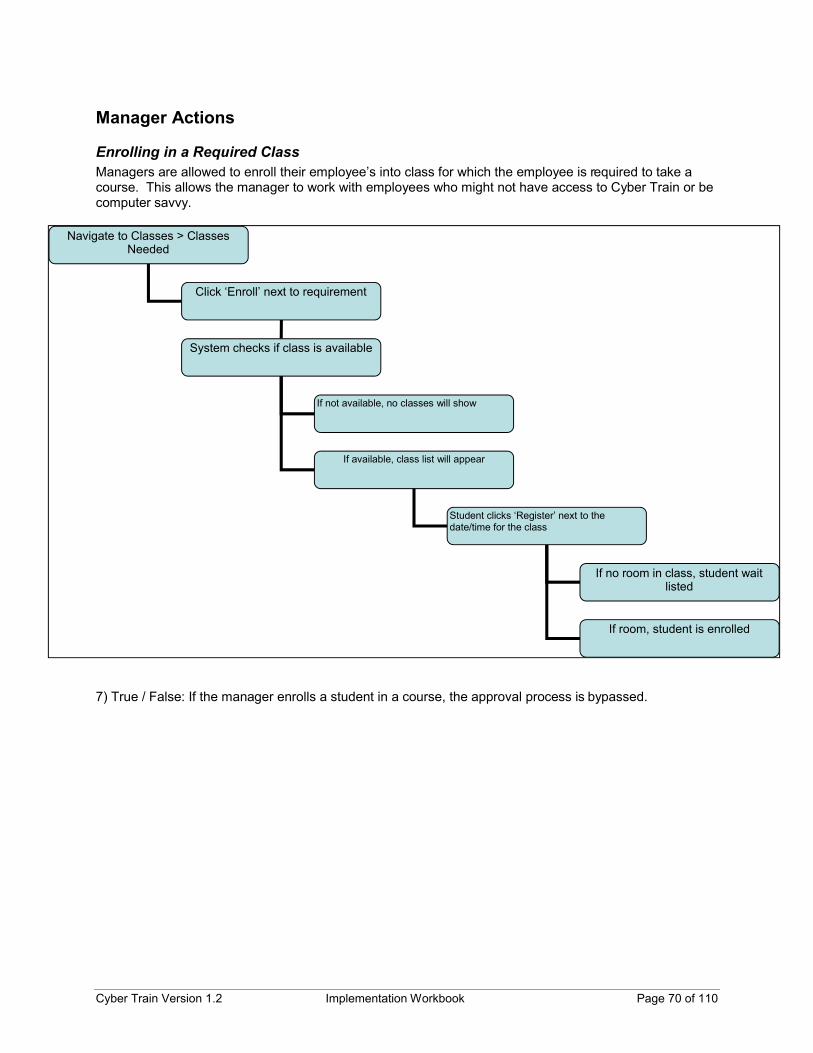
Cyber Train Version 1.2 Implementation Workbook Page 70 of 110
Manager Actions
Enrolling in a Required Class Managers are allowed to enroll their employee’s into class for which the employee is required to take a course. This allows the manager to work with employees who might not have access to Cyber Train or be computer savvy.
7) True / False: If the manager enrolls a student in a course, the approval process is bypassed.
Navigate to Classes > Classes Needed
Click ‘Enroll’ next to requirement
System checks if class is available
If not available, no classes will show
If available, class list will appear
Student clicks ‘Register’ next to the date/time for the class
If no room in class, student wait listed
If room, student is enrolled

Cyber Train Version 1.2 Implementation Workbook Page 71 of 110
NOTES
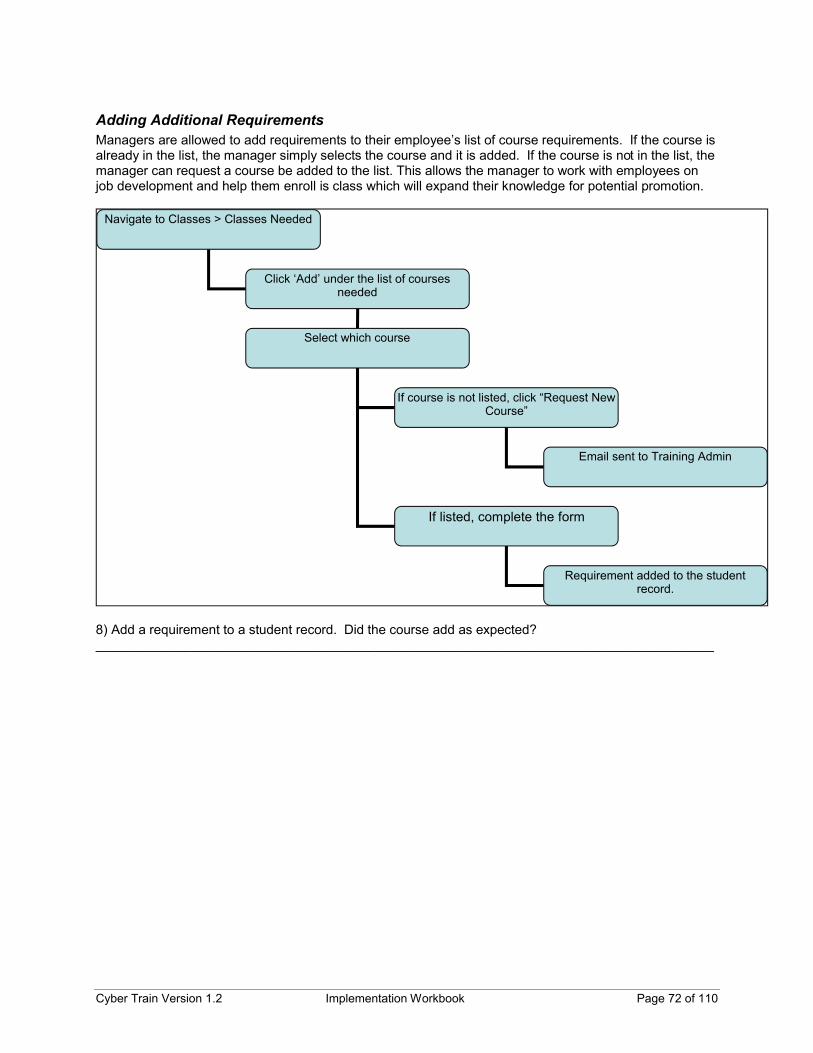
Cyber Train Version 1.2 Implementation Workbook Page 72 of 110
Adding Additional Requirements Managers are allowed to add requirements to their employee’s list of course requirements. If the course is already in the list, the manager simply selects the course and it is added. If the course is not in the list, the manager can request a course be added to the list. This allows the manager to work with employees on job development and help them enroll is class which will expand their knowledge for potential promotion.
8) Add a requirement to a student record. Did the course add as expected? ____________________________________________________________________________________
Navigate to Classes > Classes Needed
Click ‘Add’ under the list of courses needed
Select which course
If course is not listed, click “Request New Course”
If listed, complete the form
Requirement added to the student record.
Email sent to Training Admin
Cyber Train Version 1.2 Implementation Workbook Page 73 of 110
NOTES Home Page: Instructor View This section of the Home Page is designed to give instructors access to information pertaining to the classes which they are listed as the instructor. Based on the settings in the Admin section, instructor will be able to view class information quickly from this view.
Controlled By Admin > Page Builder > Home Page View Upcoming Classes View In Progress Classes View Completed Classes

Cyber Train Version 1.2 Implementation Workbook Page 74 of 110
LESSON 14: Instructor Views and Actions
This lesson discusses the view of the system the instructor sees and what actions are available to the instructor.
Instructor Home Page 1) What is the difference between Upcoming Classes, In-Progress Classes and Completed Classes? _____________________________________________________________________________ 2) What information is shown in the ‘class calendar’ view for instructor? _____________________________________________________________________________ 3) When clicking on the class name, what appears in the right-hand section of the Home Page? _____________________________________________________________________________ 4) True / False: Instructors can email a student or group of students.
Instructor Actions
Recording Grades After a class is complete, the instructor can record the grades on his/her Home Page view. This information is stored with the class information and available to the Training Admin when closing a class.
5) What is a quick way to make the grades for multiple students in the class the same? ____________________________________________________________________________________
Navigate to In Progress Classes
Select the class and press ‘Enter Grades’
Enter grades – press Submit
Student Record Updated
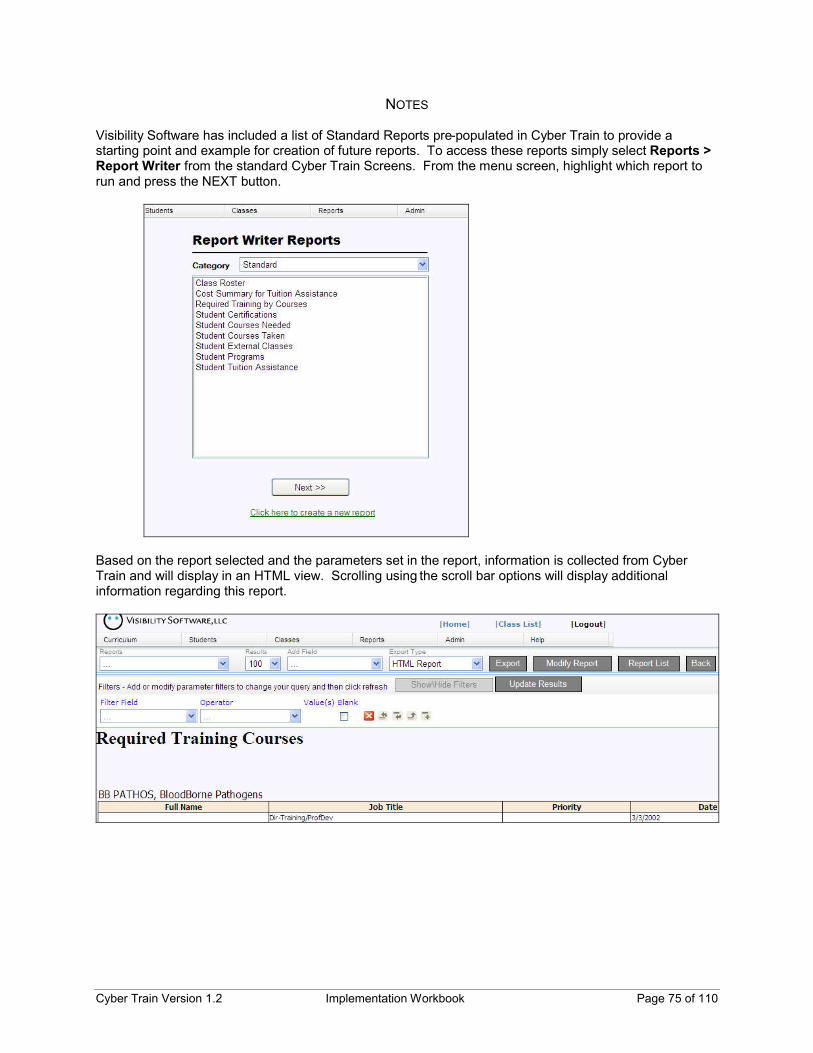
Cyber Train Version 1.2 Implementation Workbook Page 75 of 110
NOTES Visibility Software has included a list of Standard Reports pre-populated in Cyber Train to provide a starting point and example for creation of future reports. To access these reports simply select Reports > Report Writer from the standard Cyber Train Screens. From the menu screen, highlight which report to run and press the NEXT button.
Based on the report selected and the parameters set in the report, information is collected from Cyber Train and will display in an HTML view. Scrolling using the scroll bar options will display additional information regarding this report.
Cyber Train Version 1.2 Implementation Workbook Page 76 of 110
LESSON 15: Reports Because Cyber Train has very few standard, hard-coded reports, this section is designed to be part workbook and part detailed explanation of the Report Writer tool to get you familiar with the tools at your disposal.
Standard Reports
Running Reports Navigate to the Report Writer and select a report to preview. 1) Do you have multiple categories to select from? _____________________________ Why or why Not? ________________________________________________________ 2) Does your view look like the screen print on the previous page? _________________ Why or why Not? ________________________________________________________ 3) What part of Admin controls the view on this summary page? ____________________
Cyber Train Version 1.2 Implementation Workbook Page 77 of 110
NOTES
Quick Changes Some items can be quickly adjusted on the Display Page as needed but changes to the report via the Display Page are not saved with the original report. If changes should be permanently made to a report, the report will need to be modified – see Modifying Reports section below. With each release and upgrade to Cyber Train, the standard reports will use the defaults that they came with overriding any changes made by Users.
Item Purpose ‘Report’ Drop-down References the other reports available and changes the report based on
the selection without the need to go back to the first menu page ‘Results’ Drop-down Defaults to 100 records but can be expanded to show additional records
on the screen. ‘Add Field’ Drop-down Quickly add another field from the list of available fields without having to
go back and modify the whole report. ‘Export Type’ Drop-down Defaults to HTML so the report will print in the web browser being used.
Use the drop-down options to select another method for displaying the information (excel, word, etc.)
‘Export’ Button After selecting another method for viewing the information, press the Export button to move the data to that new source (excel, word, etc.)
‘Report List’ Button Returns the user to the reports list to choose another report ‘Back’ Button Moves the User back one page in the browser. ‘Update Results’ Button If allowed in the setup of the report, the parameters may be updated by the
user when viewing the report. This button works in conjunction with the table listed below the button to update the records displayed based o the new or updated parameters
Filters Table This is a list of fields and comparisons which the report is using to restrict the number of records being displayed

Cyber Train Version 1.2 Implementation Workbook Page 78 of 110
4) From the preview screen, add a new field to this report. Where does it appear? ____________________________________________________________________________________ 5) How do you export this report out to excel? ____________________________________________________________________________________ 6) How do you make additional records appear – go to the next page, etc? ____________________________________________________________________________________
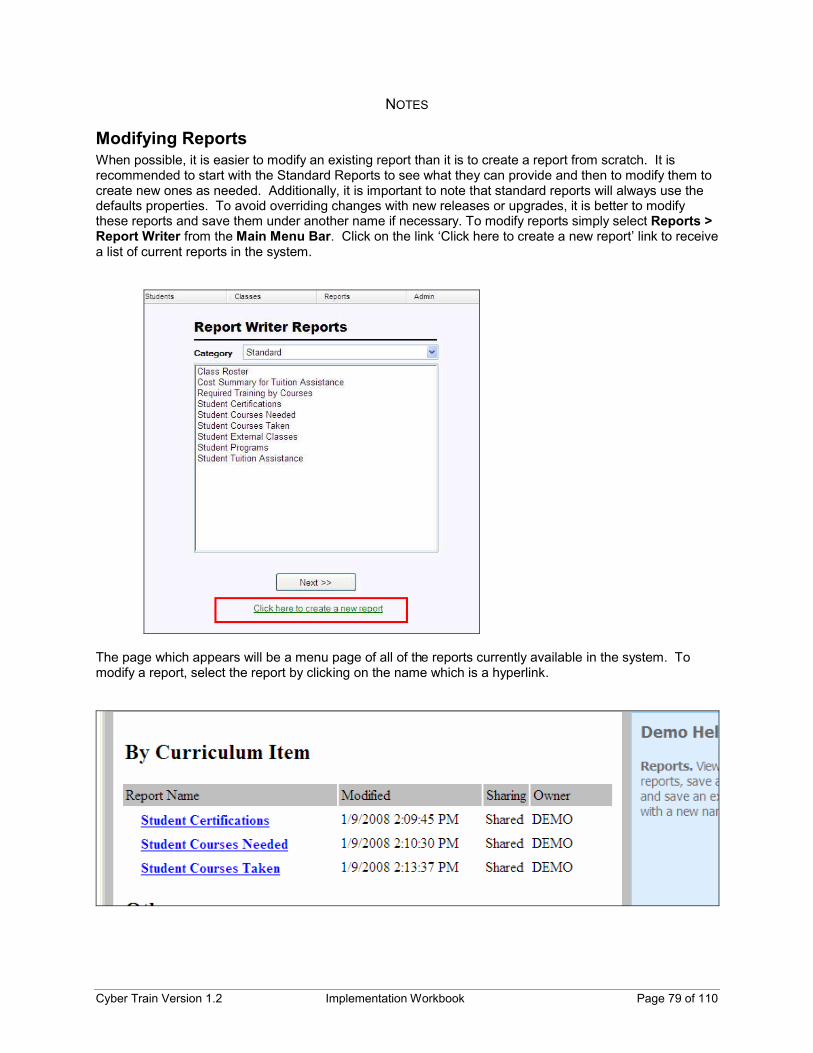
Cyber Train Version 1.2 Implementation Workbook Page 79 of 110
NOTES
Modifying Reports When possible, it is easier to modify an existing report than it is to create a report from scratch. It is recommended to start with the Standard Reports to see what they can provide and then to modify them to create new ones as needed. Additionally, it is important to note that standard reports will always use the defaults properties. To avoid overriding changes with new releases or upgrades, it is better to modify these reports and save them under another name if necessary. To modify reports simply select Reports > Report Writer from the Main Menu Bar. Click on the link ‘Click here to create a new report’ link to receive a list of current reports in the system.
The page which appears will be a menu page of all of the reports currently available in the system. To modify a report, select the report by clicking on the name which is a hyperlink.

Cyber Train Version 1.2 Implementation Workbook Page 80 of 110
7) Hover over the link for the class, what icon appears? What does this do? ___________________________________________________________________________________ 8) To modify a report, what is the next step? ____________________________________________________________________________________ 9) When modifying a report, what is the first thing you should do after selecting the report? ____________________________________________________________________________________

Cyber Train Version 1.2 Implementation Workbook Page 81 of 110
NOTES Once the report is open, press the ‘Save As’ button
And enter a new name for the report. Remember that is the report is saved in a new category, additional security changes may be necessary in the Admin > Security > Group Security setting.

Cyber Train Version 1.2 Implementation Workbook Page 82 of 110
10) Select a report to modify for the following exercises. Once the report is saved, log out of Cyber Train and back in. Do you see the report? ___________________________________________________________________________________ If not, why? ____________________________________________________________________________________
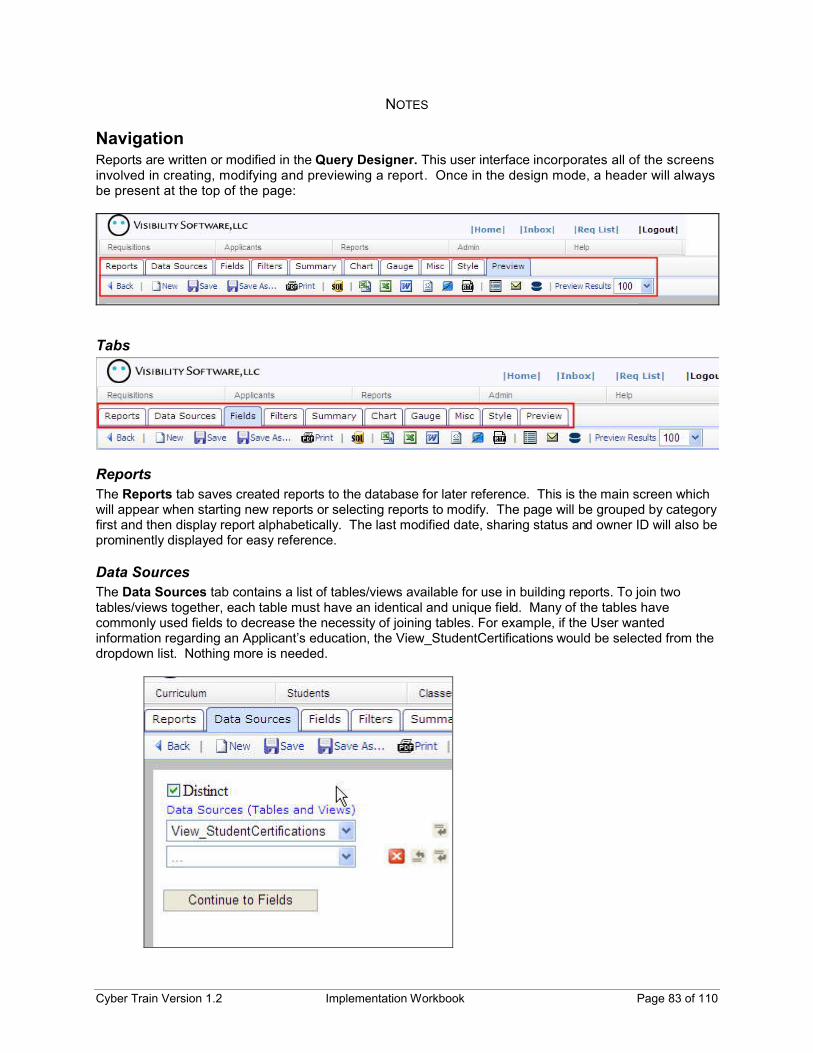
Cyber Train Version 1.2 Implementation Workbook Page 83 of 110
NOTES
Navigation Reports are written or modified in the Query Designer. This user interface incorporates all of the screens involved in creating, modifying and previewing a report. Once in the design mode, a header will always be present at the top of the page:
Tabs
Reports The Reports tab saves created reports to the database for later reference. This is the main screen which will appear when starting new reports or selecting reports to modify. The page will be grouped by category first and then display report alphabetically. The last modified date, sharing status and owner ID will also be prominently displayed for easy reference.
Data Sources The Data Sources tab contains a list of tables/views available for use in building reports. To join two tables/views together, each table must have an identical and unique field. Many of the tables have commonly used fields to decrease the necessity of joining tables. For example, if the User wanted information regarding an Applicant’s education, the View_StudentCertifications would be selected from the dropdown list. Nothing more is needed.

Cyber Train Version 1.2 Implementation Workbook Page 84 of 110
11) Using the drop-down list, identify where the following views will pull information from
Source Name Information from which Screen/Area View_ClassRoster
View_Student
View_StudentCertifications
View_StudentCoursesNeeded
View_StudentCoursesTaken
View_StudentExternalClasses
View_StudentPrograms
View_StudentTuitionAssistance

Cyber Train Version 1.2 Implementation Workbook Page 85 of 110
NOTES
Fields The Fields tab, allows the user to select which field of the table/view in the Data Sources tab to display, as well as what format is desired.

Cyber Train Version 1.2 Implementation Workbook Page 86 of 110
12) Using the items on the Fields page, identify what the different option control. Hint: click on the Preview tab to see what changes you have made to the report.
Item Purpose ‘Field’ Drop-down
Description
Sort (a-z)
Sort (z-a)
VG
A
‘Function’ Drop-down
‘Format’ Drop-down

Cyber Train Version 1.2 Implementation Workbook Page 87 of 110
NOTES
Filters In the Filters tab, the selected fields of the table/view can be filtered so that only pertinent entries appear in the table. For example, if the User is searching for Students who have a Certification in First Aid expiring within the next 30 days or has just expired, the filters tab is where those conditions are set.
Item Purpose ‘Filter’ Drop-down Select which field should be used as a comparison in the filter. Operator Select what to make the filter do. For example, should the field used for
the filter be equal to something or not equal to something? Should it be in a range of something, or greater than something?
Value(s) Enter the comparison to use. What should the system look to as a match or range or value for the filter? Use commas between values to specify more than one possibility.
Blank Same as selecting ‘Blank’ as the operator. Will look for records where this field is blank.
Param Should this filter be changeable in the Display View (discussed previously)? Checking the box will allow this value to be changed. Checking next to the blank box will allow filters to be added to the Display View.
Items in the Filter are used like a mathematic expression. The field selected as the Field is use as a comparison to the Value based on the Operator. Depending on the operator used, the result of the comparison will be different. For example Certification “Equal To” CPR would generate a totally different result than DateExpires “Between” 1/1/2007 and 12/31/2007.

Cyber Train Version 1.2 Implementation Workbook Page 88 of 110
13) Using the items on the Filter page, identify what the different operators control related to the data. Hint: click on the Preview tab to see what changes you have made to the report.
Operator Purpose Equal To
Equal To (Drop-down)
In Time Period
Like
Begins With
Ends With
Is Less Than
Is Greater Than
Between
Blank
Doesn’t Equal
Doesn’t Equal (Select)
Isn’t Like
Isn’t Less Than
Isn’t Greater Than
Isn’t Between
Isn’t Blank
Use Previous OR
True
False

Cyber Train Version 1.2 Implementation Workbook Page 89 of 110
NOTES
Summary In the Summary tab, a table can be created that summarizes the chosen fields using different functions (for example, Average, Count, Maximum, and so on). Make a group of fields by choosing Group option from the Function dropdown menu.
Item Purpose ‘Field’ Drop-down Select which field should be used in the summary. If grouping, the first
field select should be the grouping field and the second could be the field to count.
Description The description will default automatically based on the field selected but can be changed by the user.
Sort (a-z) Sort this column of information alphabetically starting with A. Sort (z-a) Sort this column of information alphabetically starting with Z. Function Specify what should be done. In the example above, the degree will be
the group and the report will count each person (only once) which has that specific degree. Then, the next row will be a new degree with a new number of people with that specific degree.
Format The Format dropdown menu is a list of formats for the entries of the field selected in the Field dropdown menu directly to the left to appear in.
Add Grand Totals Adds a total count to the bottom of the summary section. Generally this page will have two rows of information. The first row will be the information to group (degrees in this example). Set this first row to group. The second row will be the information to summarize. In this screen it will be ‘Count’ or ‘Count Distinct’. Count will count each record regardless to if there are multiples and Count Distinct will only count the record once. For this example, Count would total up the number of degrees. So, if the person had two of the same degree, the result would be 2. Count Distinct would total up the number of people. So, regardless of how many degrees the applicant has, the fact that he/she has a bachelor’s degree would only count once. This same structure can be used on the Chart tab as well.

Cyber Train Version 1.2 Implementation Workbook Page 90 of 110
14) To capture totals based on two fields (certifications issued each year), what would the summary screen look like? ____________________________________________________________________________________ 15) True / False: It is possible to re-order items on the page. 16) What is the difference between ‘count’ and ‘distinct count’? __________________________________ 17) What does ‘group(year)’ do? __________________________________________________________

Cyber Train Version 1.2 Implementation Workbook Page 91 of 110
NOTES
Chart
In the Chart tab, a chart can be created using the data in the table/view selected on the Data Sources tab. Choose the Chart Type first. Based on the type of chart the options below will change. Four types of charts are available:
Trend: Select the Date and its corresponding function and the Value and its corresponding function. Click Sort to indicate which one to sort by.
Pie: Select the Label and its corresponding function and the Value and its corresponding function. Click Sort to indicate which one to sort by. Show as a 3D graphic, explode the largest slice, and select between a pie or a doughnut.
Plot: Select the X and Y values and click Sort to indicate which one to sort by.
Bar chart: Select the Label and its corresponding function and the Value and its corresponding function. Click Sort A to indicate which one to sort by
Sample Preview: Based on Attributes from Chart Examples

Cyber Train Version 1.2 Implementation Workbook Page 92 of 110
18) When would you use a trend chart? ____________________________________________________________________________________ 19) If you wanted to see which years certain certifications were issued, how would you set up the trend chart? _______________________________________________________________________________ 20) Now change the type of chart from ‘Trend’ to ‘Bar’. How are the two similar / different? ____________________________________________________________________________________ 21) If you wanted to produce a chart to see everyone who had CPR divided by the division (org 1) which he/she worked for, what would the settings look like? Hint, something needs to be adjusted on another tab as well. ___________________ __________________________________________________________
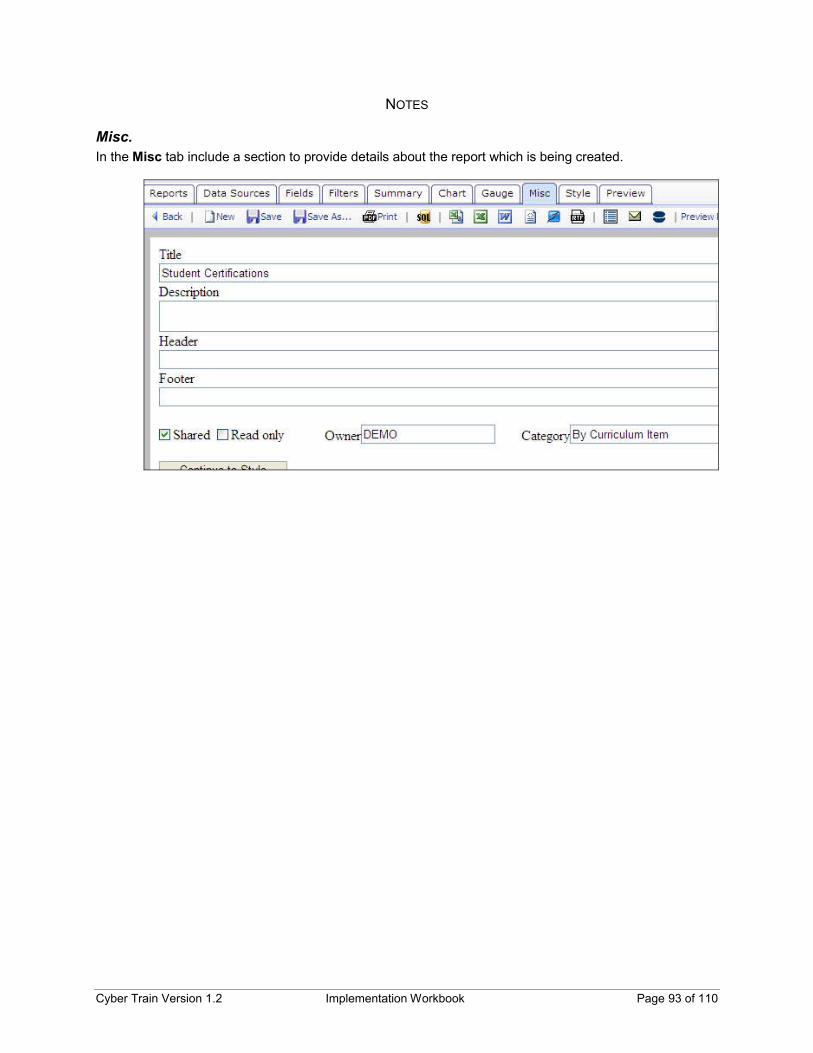
Cyber Train Version 1.2 Implementation Workbook Page 93 of 110
NOTES
Misc. In the Misc tab include a section to provide details about the report which is being created.
Cyber Train Version 1.2 Implementation Workbook Page 94 of 110
22) Using the items on the Misc. page, identify what the different sections control related to the final report. Hint: click on the Preview tab to see what changes you have made to the report.
Item Purpose Title
Description
Header
Footer
Shared
Read Only
Owner
Category
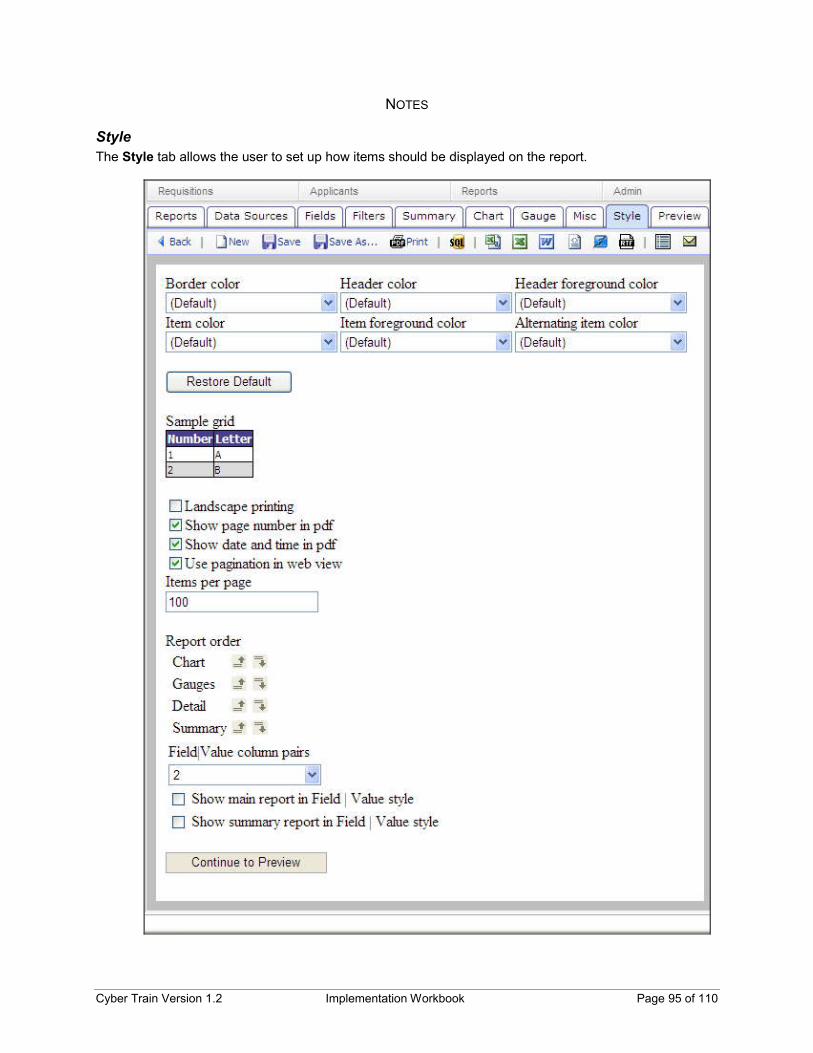
Cyber Train Version 1.2 Implementation Workbook Page 95 of 110
NOTES
Style The Style tab allows the user to set up how items should be displayed on the report.

Cyber Train Version 1.2 Implementation Workbook Page 96 of 110
23) Using the items on the Style page, identify what the different sections control related to the final report. Hint: click on the Preview tab to see what changes you have made to the report.
Item Purpose Border Color
Header Color
Header Foreground Color
Item Color
Item Foreground Color
Alternating Color
Restore Defaults
Landscape Printing
Show Page Number in PDF
Show Date/Time in PDF
Use pagination in web review
Items Per Page
Report Order
Field | Value column pairs
Show Main Report In Field | Value style
Show Summary Report In Field | Value style.
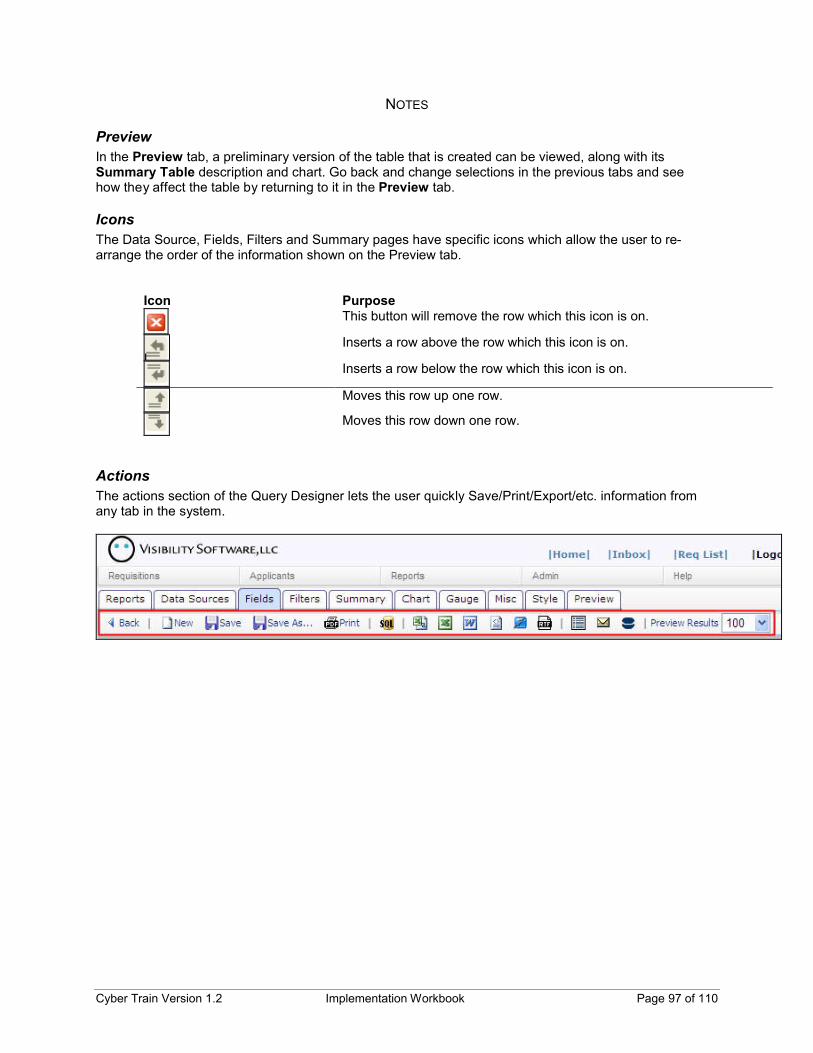
Cyber Train Version 1.2 Implementation Workbook Page 97 of 110
NOTES
Preview In the Preview tab, a preliminary version of the table that is created can be viewed, along with its Summary Table description and chart. Go back and change selections in the previous tabs and see how they affect the table by returning to it in the Preview tab.
Icons The Data Source, Fields, Filters and Summary pages have specific icons which allow the user to re-arrange the order of the information shown on the Preview tab.
Icon Purpose
This button will remove the row which this icon is on.
Inserts a row above the row which this icon is on.
Inserts a row below the row which this icon is on.
Moves this row up one row.
Moves this row down one row.
Actions The actions section of the Query Designer lets the user quickly Save/Print/Export/etc. information from any tab in the system.

Cyber Train Version 1.2 Implementation Workbook Page 98 of 110
24) Using the items on the Action bar, identify what the different sections control related to the final report.
Item Purpose Back
New
Save
Save As
Print (PDF)
SQL
Excel (CSV)
Excel (XLS)
Word
RTF
Grid (Report List)
Envelope (Email)
Blue Circles
Preview Results

Cyber Train Version 1.2 Implementation Workbook Page 99 of 110
NOTES
Creating a New Report There is more to creating a new report than simply pulling from Cyber Train and placing them in the Report Writer. Taking the time to design a report on paper will help speed the process for creating a new report. Once the report is designed, it is then a matter of using the report writer to get just the information needed.
Designing a Report There are a few important questions to ask when designing a report which will ensure a successful creation and deployment. Without asking these important questions, much time can be spent re-doing reports once additional information is gathered.
Question Example Why What type of information? Name & certification Determines which Data Source to use. Which fields of information? Name, certification, issue
date, expiration date Determines which Fields to use.
Should anything be excluded? Only certifications expiring in 2008
Determines which Filters to use.
For analysis or just records? Sums/Averages/Graphs Determines which other tabs need to be used. – Summary, Chart.
Analysis of what? Number of people with which certification
Determines how Summary and/or Chart should be used.
Preferred Title/Details? Certifications Expiring, etc. If writing for someone else, might as well get the items set at the beginning
Specific Style? Column vs. Field | Value If writing for someone else, might as well get the items set at the beginning
End Goal? Export to Excel for Manager Can add a filter in to split out managers, for example. Or this report might be named in to a category which managers can access.

Cyber Train Version 1.2 Implementation Workbook Page 100 of 110
25) Using the table below, determine what information is needed for your report.
Question What type of information?
Which fields of information?
Should anything be excluded?
For analysis or just records?
Analysis of what?
Preferred Title/Details?
Specific Style?
End Goal?

Cyber Train Version 1.2 Implementation Workbook Page 101 of 110
NOTES
Building a Report Once all of the items are decided about the structure of the report, building the report in the Report Writer is a snap.
1. Go to Reports > Report Writer 2. Click on the link to Create a new report 3. Click on New button 4. Select the Data Source 5. Click on the Continue to Field button 6. Select the fields to include on the report using the drop-down options
a. Rename the field titles if desired b. Select how to sort the information c. Select to group (VG) if desired d. Select Functions if desired e. Select Format if desired
7. Click on the Continue to Filters button 8. Select any fields which should be used as filters 9. Click on the Continue to Summary button 10. Build a summary table to capture summary information if desired 11. Click on the Continue to Chart button 12. Build a chart to graphically represent information from the report if desired 13. Click on the Continue to Misc button 14. Enter in the details behind this report which will be automatically printed on the report. 15. Click on the Continue to Style button 16. Change any style or formatting attributes if desired 17. Click on the Continue to Preview button 18. Click on the Save button 19. Name the Report and enter a Category 20. If the Category is New, be sure to go to Admin > Security > Group Security and grant additional
access to the necessary groups to see this report.
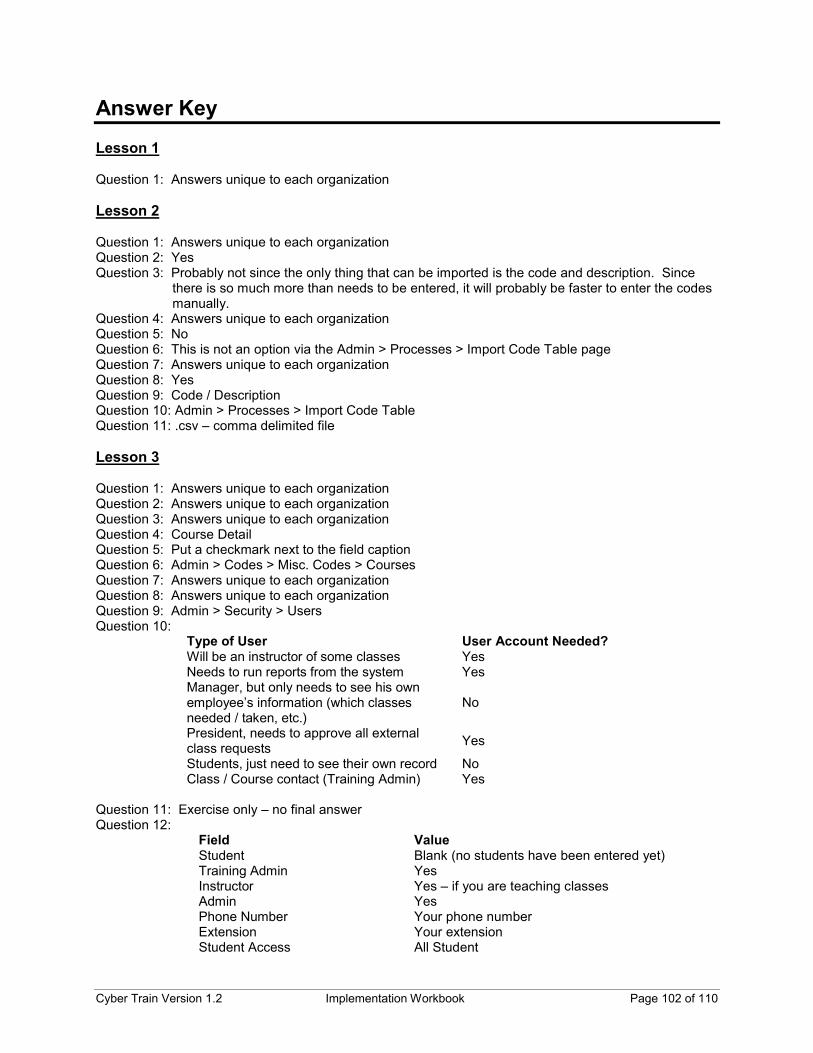
Cyber Train Version 1.2 Implementation Workbook Page 102 of 110
Answer Key Lesson 1 Question 1: Answers unique to each organization Lesson 2 Question 1: Answers unique to each organization Question 2: Yes Question 3: Probably not since the only thing that can be imported is the code and description. Since
there is so much more than needs to be entered, it will probably be faster to enter the codes manually.
Question 4: Answers unique to each organization Question 5: No Question 6: This is not an option via the Admin > Processes > Import Code Table page Question 7: Answers unique to each organization Question 8: Yes Question 9: Code / Description Question 10: Admin > Processes > Import Code Table Question 11: .csv – comma delimited file Lesson 3 Question 1: Answers unique to each organization Question 2: Answers unique to each organization Question 3: Answers unique to each organization Question 4: Course Detail Question 5: Put a checkmark next to the field caption Question 6: Admin > Codes > Misc. Codes > Courses Question 7: Answers unique to each organization Question 8: Answers unique to each organization Question 9: Admin > Security > Users Question 10:
Type of User User Account Needed? Will be an instructor of some classes Yes Needs to run reports from the system Yes Manager, but only needs to see his own employee’s information (which classes needed / taken, etc.)
No
President, needs to approve all external class requests Yes
Students, just need to see their own record No Class / Course contact (Training Admin) Yes
Question 11: Exercise only – no final answer Question 12:
Field Value Student Blank (no students have been entered yet) Training Admin Yes Instructor Yes – if you are teaching classes Admin Yes Phone Number Your phone number Extension Your extension Student Access All Student

Cyber Train Version 1.2 Implementation Workbook Page 103 of 110
Question 13: If you check-marked to change your password it should have prompted you. Question 14: Group security controls the actions that can be taken and screens which can be viewed.
The User security controls login information, connection to the student records and which students can be seen.
Question 15: Use the copy link Question 16: Press the ‘E’ button Question 17: Answers unique to each organization Question 18: If you want the user to add records to the system but not be able to remove or change the
record once it has been added. Lesson 4 Question 1: Course code, course name, type, who need the course, who has taken the course and link to
create a class (but this can be changed for each organization) Question 2: Course List Question 3: Answers unique to each organization Question 4: Click on the link for the course code Question 5: Answers unique to each organization Question 6: Answers unique to each organization Question 7: (1) Course List (2) Process Course Equivalency Question 8: Answers unique to each organization Question 9: Answers unique to each organization Lesson 5 Question 1-8: Answers unique to each organization Question 9: (1) When doing the student find, if the company is selected there will be an option to add in
requirements using the drop-down list above the names (2) Admin > Process > Mass Add Requirements
Question 10: (1) Via Process, you can filter based on the Hired Date and Job Date – not available via the Find Student view (2) Courses & Programs can be added from the same page via the Processes page but is a two step process via the Find Student view (3) Find Student view allows the user to enter a priority level.
Question 11: You would use this when you are building in requirements for the first time or if you are adding requirements which are not based specifically and on-going on a student’s organizational level or job code.
Lesson 6 Question 1-3: Answers unique to each organization Question 4: Student Detail Question 5: Checkmark next to the caption name Question 6: Admin > Codes > Misc Codes > Students Question 7: Answers unique to each organization Question 8: Answers unique to each organization Lesson 7 Question 1: Students > Add Student, Students > Import Students Question 2: Student Type, First Name, Last Name Question 3: Checkmark the box for ‘employee’ Question 4: Should have a section for ‘Student’ on the home page Question 5: Exercise only – no answer Question 6: Answers unique to each organization

Cyber Train Version 1.2 Implementation Workbook Page 104 of 110
Question 7: Old information s overwritten based on the company and employee ID Question 8: Answers unique to each organization Question 9:
Looking For: Located On Which Page: Work phone number Contact Info Name of Supervisor Job Info Outstanding Requirements Courses > Courses Needed Expiration of a Certification Courses > Certifications Where this Student went to school Formal Education Login ID for Cyber Train Job Info Current Tuition Assistance balance Tuition Assistance Classes taken outside of standard curriculum External Classes Emails or letters set to the student Correspondence
Question 10: (1) Find the student (2) Go to the Job Info page (3) Remove the old information – answer
question as to if you want the system to remove any outstanding old requirements (4) Add the new information.
Question 11: Yes, this is done via the Find Student result page. Lesson 8 Question 1-4: Answers unique to each organization Lesson 9 Question 1: (1) Curriculum > Courses > Course List > Create Class Link (2) Class List > Add Question 2: Class List Question 3: True Question 4: Course Name, Grade Type, Training Admin, Hours, CEU, Credits, Fee, and Misc fields. Question 5: Any students who have this requirement on their courses needed page will show on this
page and be able to be quickly enrolled in the class upon creation. Question 6: Once the class is created, go to the Roster page of the class and add the student to the
class. Question 7: True Question 8: Yes to all Question 9: Yes Question 10: Class List > Click the Reminders link Question 11: False. Reminders are not sent to managers Question 12: True Question 13: Class List > Close link Question 14: Check-mark next to the name, and then use the drop-down list to select the status or grade
and press ‘set’ Question 15: False Lesson 10 Question 1: (1) Certification Statuses, Codes (2) Certification Requests (3) Home Page, Options, Student Question 2: When the student requests a certification be added, this will be the status assigned. Question 3: If the request is denied, this is the status assigned. Question 4: When the student requests the credit on the Home page, this message will show above the
brief form they will need to complete. Question 5: True Question 6: Fiscal, Calendar or Anniversary Question 7: Admin > Page Builder > Correspondence Templates > Standard Templates Question 8: True

Cyber Train Version 1.2 Implementation Workbook Page 105 of 110
Question 9: True Question 10: True Lesson 11 Question 1: Page Builder Question 2: (1) Options > Training Admin > Course Opt Outs (2) Options > Student > Opt Out Request
(3) Options > Manager > Course Opt Out (4) Security > Course Opt Out Question 3: Admin > Links > Custom Links Question 4: Exercise only – no answer Question 5: Upon logging in, it will show in the Training Admin section of the Home Page Question 6: Up to 14 days Question 7: True Lesson 12 Question 1: Classes that this student is enrolled in Question 2: True (based on setup of the Admin > Page Builder > Home Page settings) Question 3: Completed classes will have a connection to a record in the classes section of the system
(dates/times/instructor evaluations, etc.). Classes taken can be any record stored in the curriculum section, it might have a class associated it with but it might not. External Classes will be classes the student has taken which don’t tie back to anything else in Cyber Train.
Question 4: False. This is not a consistent reminder in the system but is based on the setting for each of the certifications set in the Curriculum section.
Question 5: Register, Browse Classes Question 6: Ask Question Question 7: Curriculum > Course > Course Detail > Public Description text box. Question 8: Exercise only – no answer Question 9: Column header Question 10: True Question 11: Student File > Opt Out Requests Question 12: False. Question 13: True Question 14: False Question 15: Student, Courses, Certifications Question 16: Correspondence Templates Question 17: False Question 18: Max for the year, reimbursed for the year, balance for the year, when the yea stars over. Question 19: True Lesson 13 Question 1: Classes which their employee’s are enrolled in Question 2: Courses Needed Question 3: True Question 4: Training Admin Question 5: False Question 6: Click on the word ‘Manager’ Question 7: True Question 8: Should have Lesson 14 Question 1: Upcoming classes are ‘non-closed’ classes where the date is still in the future, In-Progress
classes are ‘non-closed’ classes where the date is today or in the past and Closed classes are classes with the status of ‘closed’.

Cyber Train Version 1.2 Implementation Workbook Page 106 of 110
Question 2: The list of classes which this instructor is teaching Question 3: The roster of the class Question 4: True Question 5: Checkmark next to the name and then use the drop-down list to select the grade and press
‘set’. Lesson 15 Question 1: Might or might not depending on the security settings and which categories have been set
previously Question 2: It might or might not be depending on security settings and the ability to design report, which
categories are available. Question 3: Security > Group Security Question 4: In a new column on the right-hand side of the report Question 5: Select excel from the drop-down list and press ‘Export’ Question 6: Change the drop-down from the default view of 100 records to show 1000 or all records Question 7: White X in a Red square. This will delete the report from the system. Question 8: Click on the link for the report Question 9: Press Save Changes and save this report under a new name Question 10: If you gave the report a new category, you would need to update security in or der to see
the report. Question 11:
Source Name Information from which Screen/Area View_ClassRoster Class Details View_Student Student Information (contact, basic job info, etc.) View_StudentCertifications Student File > Courses > Certifications View_StudentCoursesNeeded Student File > Courses > Courses Needed View_StudentCoursesTaken Student File > Courses > Courses Taken View_StudentExternalClasses Student File > External Classes View_StudentPrograms Student File > Courses > Programs View_StudentTuitionAssistance Student File > Tuition Assistance
Question 12:
Item Purpose ‘Field’ Drop-down Selecting an item from the drop-down menu maps this piece of information
from the Cyber Recruiter screens onto the report. Description The description will default automatically based on the field selected but
can be changed by the user. Sort (a-z) Sort this column of information alphabetically starting with A. Sort (z-a) Sort this column of information alphabetically starting with Z. VG Make this field a group and have all other information show under it. For
example, if a report was needed of everyone with a Bachelors Degree, VG would be checked next to Degree. However, if a report was needed for every employee and a detail of his/her education, VG would be checked next to Full Name.
A Will add, subtract, multiply, or divide by the selection in the row above. Instead of 2 numeric columns, there is only 1 and the numbers are added together, or they could be multiplied, divided or subtracted. For example if a report was needed to find out what percentage of routings for each person also result in an interview. Check mark A until the divide sign appears and the number of interviews will be divided by the number of routings.
‘Function’ Drop-down The Function means that instead of just showing the field chosen, it will perform that function and show that. Typically, the Group function is used for a high level and then the count or sum function is used to sum some

Cyber Train Version 1.2 Implementation Workbook Page 107 of 110
field within each group. ‘Format’ Drop-down The Format dropdown menu is a list of formats for the entries of the field
selected in the Field dropdown menu directly to the left to appear in. Question 13:
Operator Purpose Equal To Finds data equal to what is specified in the Value(s) box. Use commas to
separate values and look for more than one possibility. Answers must be typed into the Value box.
Equal To (Drop-down)
Finds data equal to what is specified in the Value drop-down box. Only one answer is allowed and must be selected from the Value drop-down.
In Time Period Find data which is in the time period specified in the drop-down menu. This item only appears for date fields.
Like Finds data which is in the value is similar to a value in the system. The value must be off-set by a % sign. For example, Z% would find everything starting with a Z while %street% would find everything with street in the value.
Begins With Finds data beginning with the value specified. TH or 19 for example. Ends With Finds data ending with the value specified. Dr or Science for example. Is Less Than Finds data which is less than the item in the Value box. Is Greater Than Finds data which is greater than the item in the Value box. Between Finds data which is between two values (generally between two dates). Blank Finds data where the field value is blank. Doesn’t Equal Finds data NOT equal to what is specified in the Value(s) box. Use
commas to separate values and look for more than one possibility. Answers must be typed into the Value box.
Doesn’t Equal (Select)
Finds data NOT equal to what is specified in the Value drop-down box. Only one answer is allowed and must be selected from the Value drop-down.
Isn’t Like Isn’t Less Than Finds data which is NOT less than the item in the Value box. Isn’t Greater Than Finds data which is NOT greater than the item in the Value box. Isn’t Between Finds data which is NOT between two values (generally outside the range
of two dates). Isn’t Blank Finds data where the field value is NOT blank. Use Previous OR Finds data where the previous line or the current line has a value. For
example, all people who applied in a certain range OR have a bachelor’s degree.
True Finds true statements. Cyber Recruiter does not use True/False statements so this will not be used.
False Finds false statements. Cyber Recruiter does not use True/False statements so this will not be used.

Cyber Train Version 1.2 Implementation Workbook Page 108 of 110
Question 14:
Question 15: True Question 16: Count will count each record and distinct count will only count the record once. For
example, when trying to get a count of how many employees have taken a certain class, you would want to use ‘distinct count’ because you only want to count the person one. However, if you want to know how many people have attended the classes you would want to use count so that the student is counted each time he/she takes the class.
Question 17: It makes the summary based on the year of the date chosen. Question 18: Typically you would use this in relation to dates so you can see peaks in the data. Question 19:
Question 20: Observation question, no hard answer Question 21:
But, the filter needs to be set only to find the certification for CPR
Question 22:
Item Purpose Title The name of the report. This title will show at the top of the report in the

Cyber Train Version 1.2 Implementation Workbook Page 109 of 110
Display view. Description Describes the purpose of this report. This information will show at the top
of the report directly under the Title but before the data is displayed. Header Displays a text at the top of the report above the Title. Footer Displays a text at the bottom of the report below all of the date. Shared If check marked, other users can run this report Read Only If check marked, only the owner can edit this report Owner Owner ID for this report – matches back to the Admin > User list Category Category for this report – matches back to the Admin > Group security
Question 23:
Item Purpose Border Color Color displayed around the grid. Header Color Background color for the first row of the grid. Header Foreground Color Color for the lettering for the first row of the grid. Item Color Background color for the main lines of the grid. Item Foreground Color Color for the lettering for the details of the grid. Alternating Color Background color for the alternating lines of the grid Restore Defaults Undo all the styles and go back to the default. Landscape Printing Print in Landscape is checked, and portrait if unchecked Show Page Number in PDF
Shows the page number if checked
Show Date/Time in PDF Shows the date and time printed if checked Use pagination in web review
Will paginate the information in the web view if checked
Items Per Page Default for the items to display on the page Report Order Use the icons to re-arrange the items on the page. For example, if the
chart should show at the bottom of the report, move it down the list until it is listed at the bottom.
Field | Value column pairs Field | Value changes the display of the information from a column/row spreadsheet type report to listing the field used and then the value from the data. If using this view, how many columns should be allowed?
Show Main Report In Field | Value style
Will turn on the Field | Value view for the main report.
Show Summary Report In Field | Value style.
Will turn on the Field | Value view for the Summary section of the report.
Question 24:
Item Purpose Back Moves the user back to the Reports > Report Writer Menu New Starts a new report. Moves the user to the Data Source tab Save Saves the current report replacing the previous report. Save As Save the current report under a new name and/or category. Print (PDF) Prints the report into a PDF format for easy printing and distribution. SQL Allows an advanced user to view the SQL statements used to create the
report. Excel (CSV) Exports the data to Excel in a .csv format. Excel (XLS) Exports the data to Excel in a .xls format. Word Exports the data to Word in a .doc format. XML Exports the data to an XML format. OpenOffice Exports the data to an OpenOffice format. RTF Exports the data to Word in a .rtf format. Grid (Report List) Moves the user to the Reports List Envelope (Email) Opens the user’s email system to generate an email. The report is a link
Cyber Train Version 1.2 Implementation Workbook Page 110 of 110
inside the email. Blue Circles Administrative Settings set by Cyber Train. Users will not need to
modify this screen. Preview Results Number of records to show in the preview.
Question 25: Each will be different.


