For more information about E-learning opportunities, resources and support offered by the Department of Training and Workforce Development go to http://westone.wa.gov.au/pd 1 Prospect Place WEST PERTH WA 6005 | Phone: (08) 9229 5200 | Email: [email protected]Professional Learning Workshops Advanced BB9 Participant’s Guide
For more information about E-learning opportunities, resources and support offered by the Department of Training and Workforce Development go to http://westone.wa.gov.au/pd
1 Prospect Place WEST PERTH WA 6005 | Phone: (08) 9229 5200 | Email: [email protected]
I n t r od u ct i on a n d p r er eq u i si t es The Advanced Blackboard 9 workshop is intended to continue from the “Extending Bb9” workshop. Having familiarised yourself with the Bb9 User Interface and build tools, tests, and assignments, it is time to move on to some of the more powerful grading tools and other functions of Bb9. Delegates for this workshop should have already done the Bb9 Introduction and Extended workshops and be able to create items and quizzes without instruction.
Gr oup s The Groups tool allows Instructors to organise Students into Groups of any size. Instructors can provide communication and collaboration tools that only Group members can access. Groups can be created one at a time or in sets. Groups can be designated as Self-Enrol, allowing students to add themselves to a Group, or Manual Enrol, allowing the Instructor assign students to a Group. To create groups within your course in Bb9, ensure that Edit Mode is turned on, and then proceed with the following steps:
1) Scroll down to the Control Panel area on the left hand side and click “Users and Groups” and then “Groups”.
2) On the resulting screen click “Create Single Group”
You will see two choices. “Self-Enrol” creates a group and allows students to enrol themselves. “Manual Enrol” creates a group but does not allow students to self enrol. Instead, the instructor must allocate students to groups.
3) For this example please click “Manual Enrol”. 4) Give the group a name and description. You can use this
space to let the student know what will be expected of them within that group.
5) Select the tools that you intend the group to use under “Tools Availability”. For example, I have told my students to visit a public place, photograph OHS hazards, fill in a report, discuss in the forums with their piers, and work together on a write-up of their findings. Therefore I will give them access to the Discussion Board (to communicate openly in the group), File Exchange (for the photos and reports), Tasks (to allocate jobs), and Wikis (for their final write-up).
6) Under “Module Personalisation Setting” you can tick “Allow Personalisation” if you wish to let students tailor the look and feel of their group space.
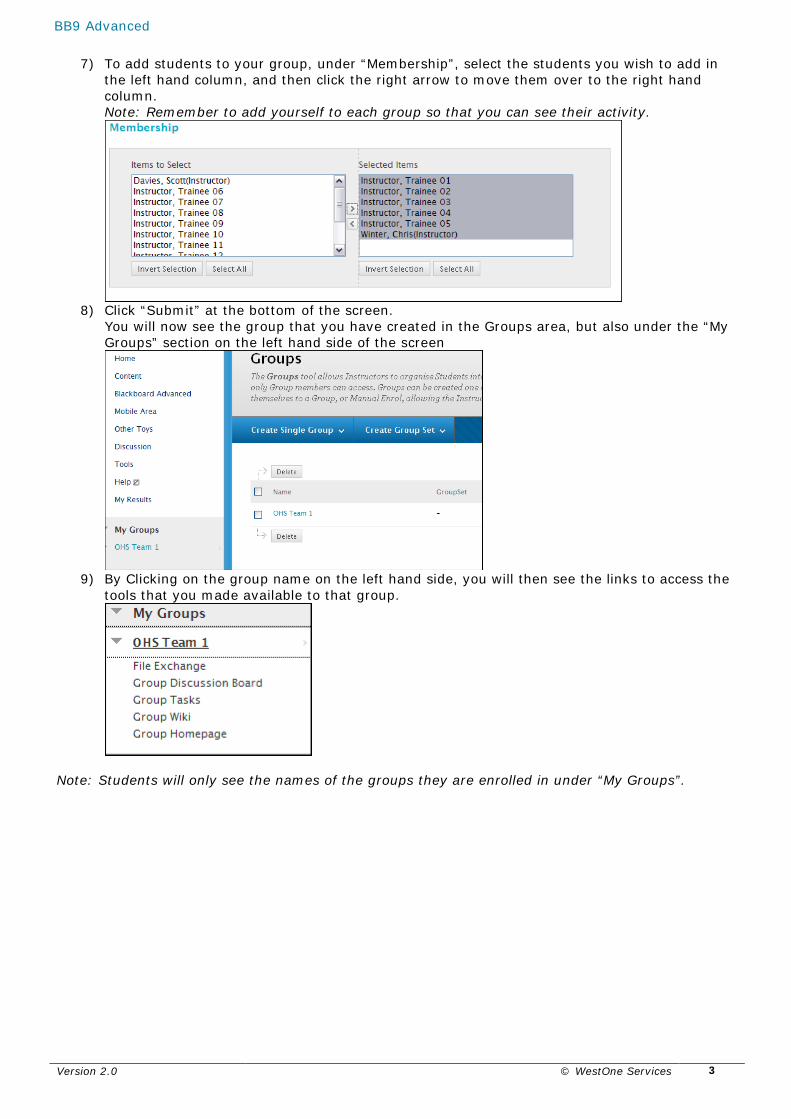
7) To add students to your group, under “Membership”, select the students you wish to add in the left hand column, and then click the right arrow to move them over to the right hand column. Note: Remember to add yourself to each group so that you can see their activity.
8) Click “Submit” at the bottom of the screen.
You will now see the group that you have created in the Groups area, but also under the “My Groups” section on the left hand side of the screen
9) By Clicking on the group name on the left hand side, you will then see the links to access the
tools that you made available to that group.
Note: Students will only see the names of the groups they are enrolled in under “My Groups”.
Ad va n ced Gr a d i n g Op t i on s While the grading centre can seem straight forward, it’s advanced options and tools will allow things to run much more smoothly in your course. Many of these tools are key to helping grade with competency based results rather than points based scores. Grading Schema Grading schemas take the actual points scored from a graded item and compare it to the total points possible for that item to derive a percentage. This percentage is mapped to a range of scores to display a grade. The Grade Centre includes a copy of a default grading schema as well as a “Competency Based” schema designed by WestOne for use in the VET sector. Using a grading schema, you can take the points generated by an automatically marked quiz, and return the values of “S” for “Satisfactory” or “NYS” for “Not Yet Satisfactory” to the student. A Competency Based schema has been provided by WestOne, or you can create your own. The Competency Based Schema created requires a mark of 100% to return the “S” result. Anything less will be marked as “NYS”. Applying a Schema to a Grade Centre Column To apply the Competency Based schema to a gradable item within your course, proceed with the following steps:
1) Under the Control Panel area on the left hand side, click on “Grade Centre” and then “Full Grade Centre”. This will open the Grade Centre in the main view.
2) Locate the column for a gradable item and click on the options icon next to the title of that column.
3) Click “Edit Column Information” in the resulting menu. 4) On the resulting options screen, scroll down to
“Primary Display”. This will be set to “Score” or “Percentage” depending on the options you selected when creating that item.
5) Click the drop down next to “Primary Display” and change it to “Competency Based” (Or the name of a schema you have created).
6) Scroll down and click “Submit”.
With the competency based schema set for that item, any score generated will be returned to the student as “S” if 100% or “NYS” if less than 100%. Also you can manually type in “S” or “NYS” against a student in that column if manually grading. If you had not applied the schema, Bb would insist on only numeric values.
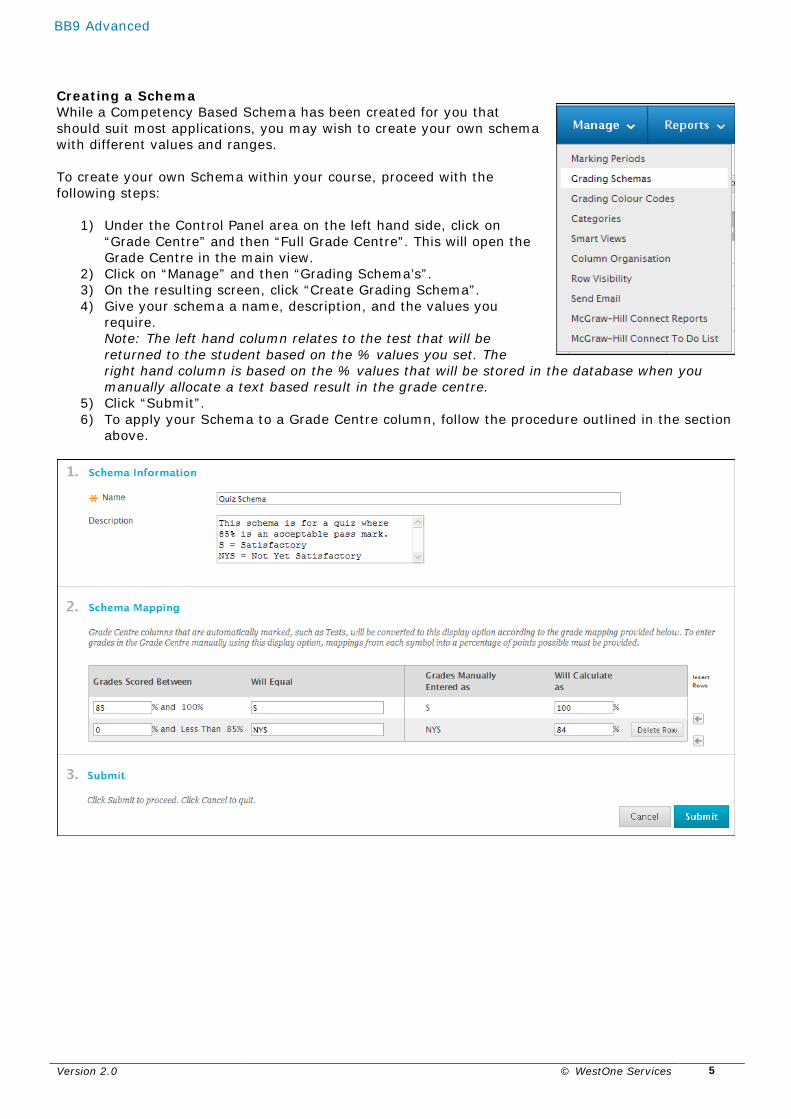
Creating a Schema While a Competency Based Schema has been created for you that should suit most applications, you may wish to create your own schema with different values and ranges. To create your own Schema within your course, proceed with the following steps:
1) Under the Control Panel area on the left hand side, click on “Grade Centre” and then “Full Grade Centre”. This will open the Grade Centre in the main view.
2) Click on “Manage” and then “Grading Schema’s”. 3) On the resulting screen, click “Create Grading Schema”. 4) Give your schema a name, description, and the values you
require. Note: The left hand column relates to the test that will be returned to the student based on the % values you set. The right hand column is based on the % values that will be stored in the database when you manually allocate a text based result in the grade centre.
5) Click “Submit”. 6) To apply your Schema to a Grade Centre column, follow the procedure outlined in the section
Rubrics (Marking Keys) A Rubric is a tool that lists evaluation criteria for an assignment. Rubrics can help students organise their efforts to meet the requirements of an assignment. Instructors can use Rubrics to explain their evaluations to students. In VET, you can use the Rubrics tool to create an electronic marking key for Assignments, Oral Assessments, and Direct Observation Check Lists as well as other assessment tools. When grading with a Rubric, a points or percentage based score will be generated. Therefore you can combine use of the rubric and a grading schema (see section above) to return a competency based result automatically. Creating a Rubric To create a rubric within your course, proceed with the following steps:
1) Scroll down to the “Control Panel” area on the left hand side and click “Course Tools” and then “Rubrics”
2) On the resulting screen, click “Create Rubric” 3) Give your Rubric a title and description. 4) Set the “Rubric Type” to “Points”. 5) Lay out your rubric as required. Remember that you can make your rubric reflect a marking
key. All Row and Column titles are editable, and you can add and delete rows as required. In the example given below, we have reduced the columns down to 2, and titled them “No” (0 points) and “Yes” (1 point). The rows have been renamed to reflect the required skills and knowledge that we are trying to assess.
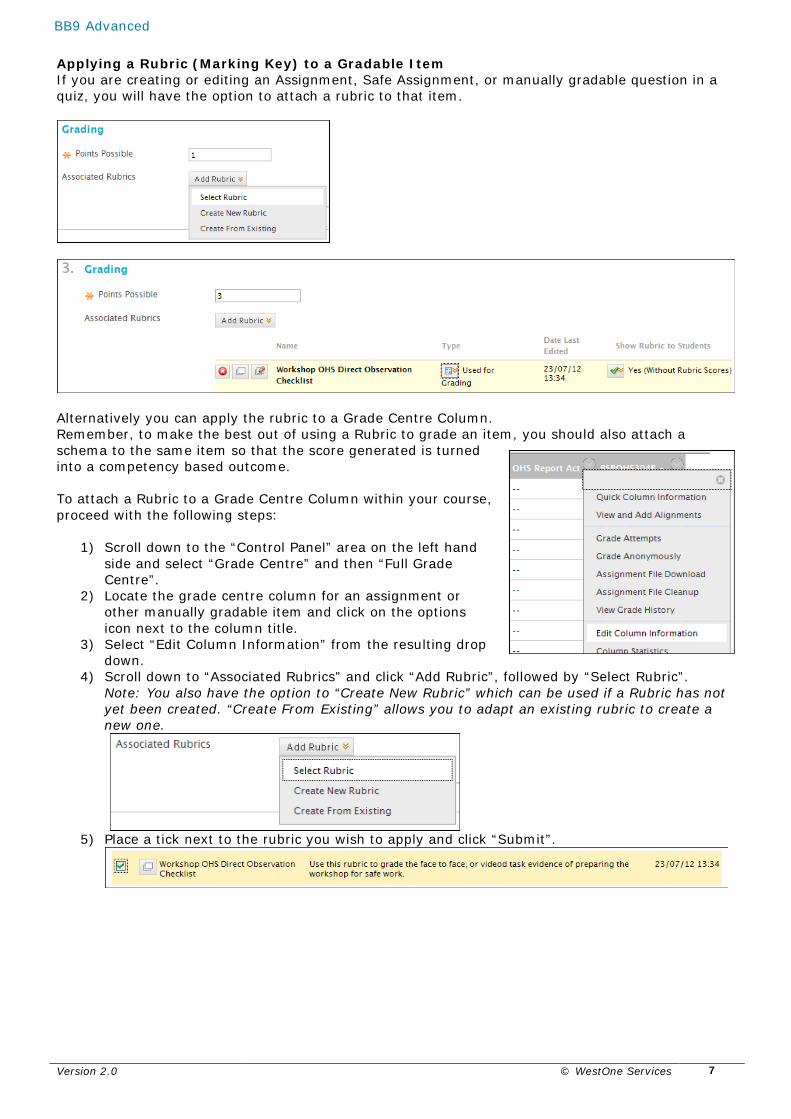
Applying a Rubric (Marking Key) to a Gradable Item If you are creating or editing an Assignment, Safe Assignment, or manually gradable question in a quiz, you will have the option to attach a rubric to that item.
Alternatively you can apply the rubric to a Grade Centre Column. Remember, to make the best out of using a Rubric to grade an item, you should also attach a schema to the same item so that the score generated is turned into a competency based outcome. To attach a Rubric to a Grade Centre Column within your course, proceed with the following steps:
1) Scroll down to the “Control Panel” area on the left hand side and select “Grade Centre” and then “Full Grade Centre”.
2) Locate the grade centre column for an assignment or other manually gradable item and click on the options icon next to the column title.
3) Select “Edit Column Information” from the resulting drop down.
4) Scroll down to “Associated Rubrics” and click “Add Rubric”, followed by “Select Rubric”. Note: You also have the option to “Create New Rubric” which can be used if a Rubric has not yet been created. “Create From Existing” allows you to adapt an existing rubric to create a new one.
5) Place a tick next to the rubric you wish to apply and click “Submit”.
6) If prompted, click “OK” to ensure that points possible for the item match the points that will be generated by the rubric.
7) Lastly you can let the students see the rubric you will be using to grade them so that they
are aware of what is required to be achieved for that item. To allow this, click the icon under “Show Rubrics to Students” and set this to “Yes (Without Rubric Scores)”.
8) Remember to also assign a grading schema if required (recommended) and then click
“Submit”. Grading schemas are covered in another section of this document. Assessing using a Rubric Once you have created a rubric and attached it to a manually gradable item, you will be able to mark student submissions using the rubric as your marking key or assessment check list.
1) To assess a submission using the rubric, go to the full grade centre within your course and locate a new submission.
2) Click the options icon next to the student submission in the relevant column and select the
attempt from the drop down.
3) When viewing the attempt (often as an attached file) scroll down to “Grade Current Attempt”
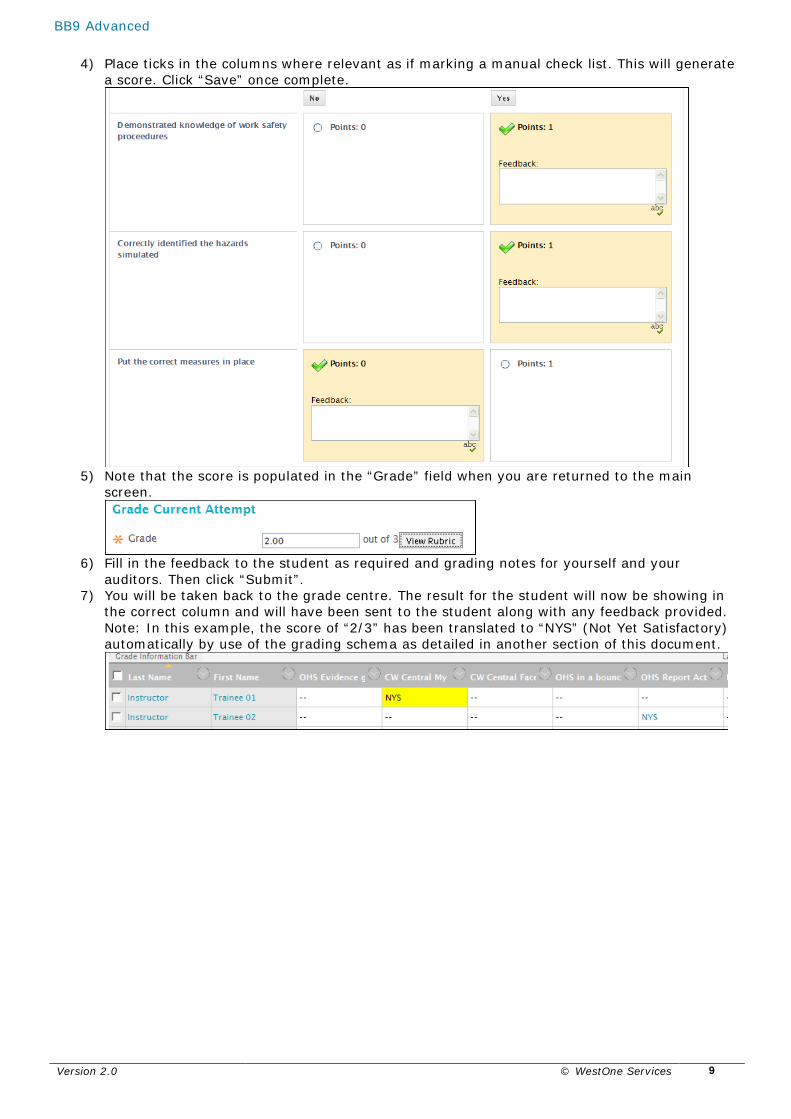
4) Place ticks in the columns where relevant as if marking a manual check list. This will generate a score. Click “Save” once complete.
5) Note that the score is populated in the “Grade” field when you are returned to the main
screen.
6) Fill in the feedback to the student as required and grading notes for yourself and your
auditors. Then click “Submit”. 7) You will be taken back to the grade centre. The result for the student will now be showing in
the correct column and will have been sent to the student along with any feedback provided. Note: In this example, the score of “2/3” has been translated to “NYS” (Not Yet Satisfactory) automatically by use of the grading schema as detailed in another section of this document.
Smart Views If you have created quite a few gradable items in your course, the full grade centre view can become crowded and difficult to navigate or assess at a glance. By using smart views, you can filter the information presented to you. For example, I may want to be able to just see the “blogs” that require me to grade new posts. For this example, ensure you have created a gradable blog in your course. The proceed with the following steps:
1) Scroll down to the “Control Panel” area on the left hand side and select “Grade Centre” and then “Full Grade Centre”.
2) From within the Grade Centre view, click “Manage” and then “Smart Views”.
3) Click “Create Smart View” 4) Give your smart view a name e.g. “Just Blogs” and a description. 5) Ensure you tick “Add as Favourite” as this will make your smart view into a link in the “Grade
Centre” area on the left. 6) Under “Selection Criteria” select “Category and Status”. 7) Set “Categories” to “Blog” and “Users” to “All Users”. 8) Set “filter Results” to “Needs Marking”. 9) Click “Submit”.
Once complete, you will be able to find your filter with ease in the control panel area.
Ad a p t i ve Re l ea se Adaptive release can be used to trigger when hidden content is revealed. Items can be released to students automatically based on group membership, assessable item score, or content review. For the example, we’ll set an adaptive release rule that will hide a content item until the student has first reviewed another piece of material. To do this within your course, navigate to a content area with several items in place, ensure edit mode is “on” and proceed with the following steps:
1) Click the options icon next to the item that you wish to hide and select “Adaptive Release”.
2) Clear any date based criteria, scroll down to “Review Status” and click “Browse”. 3) The resulting window will allow you to browse the front end content of your course. Select
the item that you want the students to review in order to reveal the hidden item.
4) Check that your selection has been reflected in the “Review Status” window and click
“Submit”.
5) Click “OK” when prompted to turn on Review for the selected item. This is required for the
6) Turn edit mode “Off” to test. You will find that the item you applied adaptive release to is now hidden from view. However the item you selected to be reviewed will have a tick box beneath it. To “Review” the item, place a tick in the box to mark it as read, and the hidden item will be revealed.
V i r t ua l Cl a ssr oom s (Bl a ck b oa r d Co l l a b o r a te ) Virtual Classrooms are more than just a chat room or webcam tool. They are designed to allow you to perform many of your face to face delivery methods in the online environment. This includes but is not limited to:
• Presenting a slide show. • Linking to video resources and websites. • Live audio chat for you deliver and for your students to respond back through. • Web Cam facilities for demonstrations. • Text Chat window. • Participant list. • Interactive Whiteboard on which your students can also type, draw, or drag objects around. • Application sharing. • Polling tools. • Recording functions. • Break out rooms.
For hands on tutorials on how to use Blackboard Collaborate, book into one of our sessions through the PD Calendar at www.westone.wa.gov.au/pd or contact our team. To create a Blackboard Collaborate Virtual Classroom link in your course, ensure you are in a content area, turn edit mode “on” and proceed with the following steps:
1) Click “Tools” from the buttons at the top of your content area, and select “Blackboard Collaborate”.
2) In the resulting screen, click “Create Session”. Note: There are 4 tabs to be reviewed when creating a Collaborate room and link.
3) In the Information Tab a. Give the Virtual Room a name b. Choose your session type.
Public – Anyone with access to Blackboard at your STP could attend, from any course. Course – Anyone enrolled in your course can attend. Shared – Anyone enrolled in any course that you have Instructor access to can attend. For this example, choose “Course”.
c. Set your class schedule options by setting the dates and times the room will be
available. Keep in mind that you can not create a room that begins in the past, and this includes the “Early Session Entry” option.
d. Set your optional “Session Attributes”.
Each option is described on the screen. e. If you wish to grade attendance in your virtual classroom sessions, place a tick in the
“Enable Grade Center Integration” option. f. DO NOT CLICK SUBMIT. Move on to the next tab.
4) Under “Participation” you can select which participants from your course you wish to grant entry and assign roles. Remember to invite your students as “Participants” not “Moderators”. By default, all students will be invited as participants. You can also invite guests via email address. DO NOT CLICK SUBMIT. Move on to the next tab.
5) Under “Sharing” you can pre load files that you wish your students to download and review in the session and also add trainer notes. DO NOT CLICK SUBMIT. Move on to the final tab.
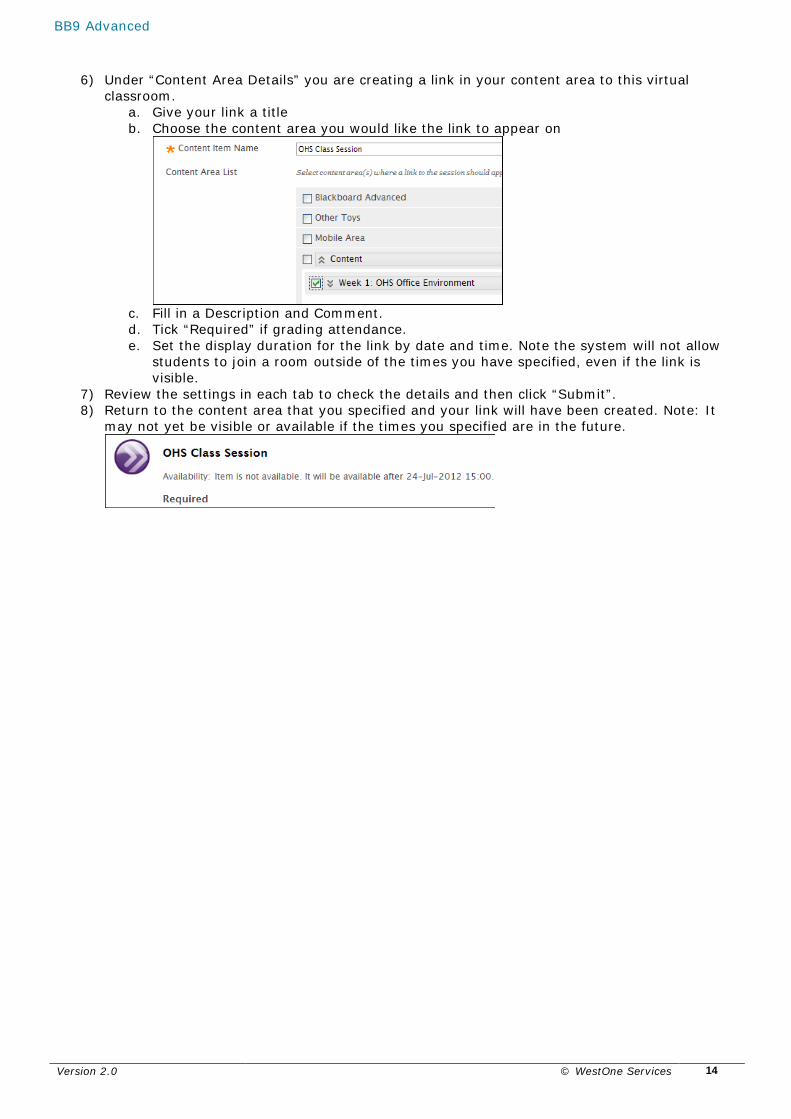
6) Under “Content Area Details” you are creating a link in your content area to this virtual
classroom. a. Give your link a title b. Choose the content area you would like the link to appear on
c. Fill in a Description and Comment. d. Tick “Required” if grading attendance. e. Set the display duration for the link by date and time. Note the system will not allow
students to join a room outside of the times you have specified, even if the link is visible.
7) Review the settings in each tab to check the details and then click “Submit”. 8) Return to the content area that you specified and your link will have been created. Note: It
may not yet be visible or available if the times you specified are in the future.
Pl a g i a r i sm Ch eck er (Sa fe Assi g n ) Blackboard 9 has a built in plagiarism checker called “SafeAssign”. This tool can be used by you to check the credibility of a students work, or by the student to help them up-skill in correct referencing techniques. SafeAssign will check internal submissions against others, before then checking external sources including websites. Checking an existing submission: You can use SafeAssign to check existing work that you may already have on file. You can also use this same function to create your own database of existing student submissions to speed up future plagiarism checks.
1) Under Control Panel, select “Course Tools” and then “SafeAssign”
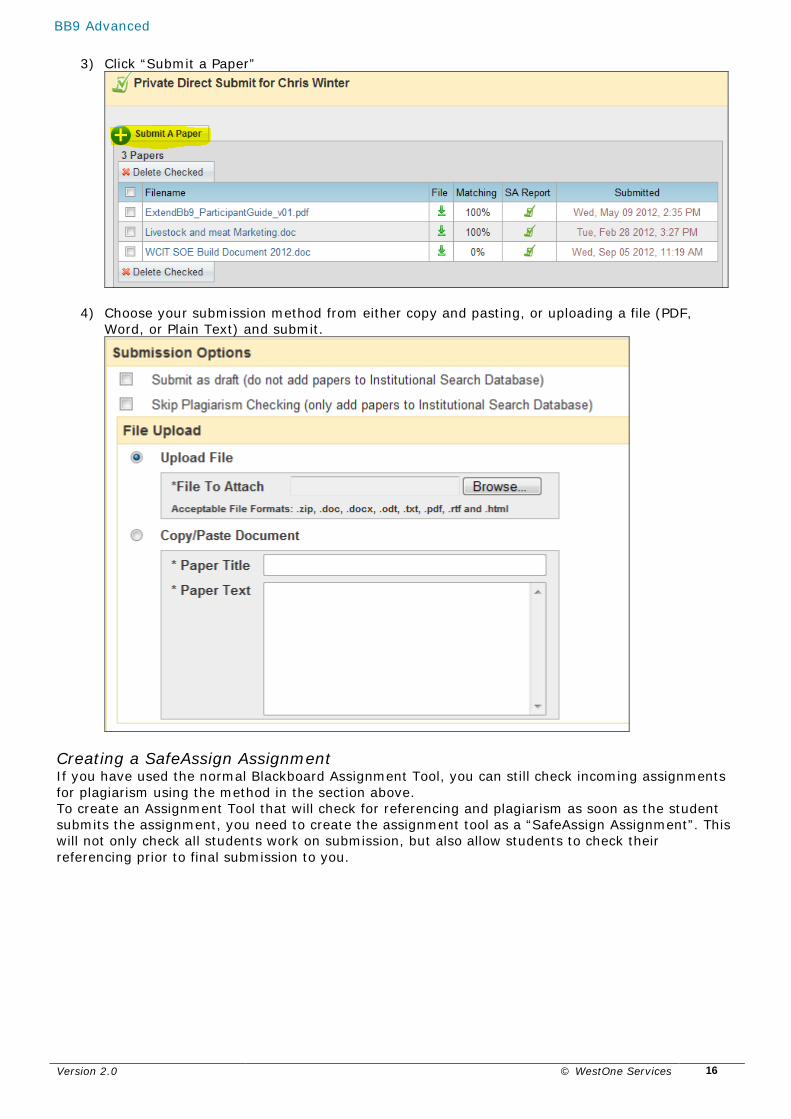
4) Choose your submission method from either copy and pasting, or uploading a file (PDF, Word, or Plain Text) and submit.
Creating a SafeAssign Assignment If you have used the normal Blackboard Assignment Tool, you can still check incoming assignments for plagiarism using the method in the section above. To create an Assignment Tool that will check for referencing and plagiarism as soon as the student submits the assignment, you need to create the assignment tool as a “SafeAssign Assignment”. This will not only check all students work on submission, but also allow students to check their referencing prior to final submission to you.
1) In a content area in your course, select “Assessments” and then “SafeAssign”
2) Fill out the details and instructions in the same way as you would with the normal assignment tool.
Note that there is no where for you to upload assignment templates usiung this tool Any templates required for your students would have to be supplied via links in the same content area as the SafeAssign tool.
3) Ensure you tick “Draft” to enable students to check their own referencing prior to submission.
3) Select the drop down icon next to the Assignment name and select “View Submissions”
4) On the resulting screen you can view the students submissions as well as the SafeAssign report by clicking on the corresponding icons. In the example shown, we can see that the students submission matches another source 100%.
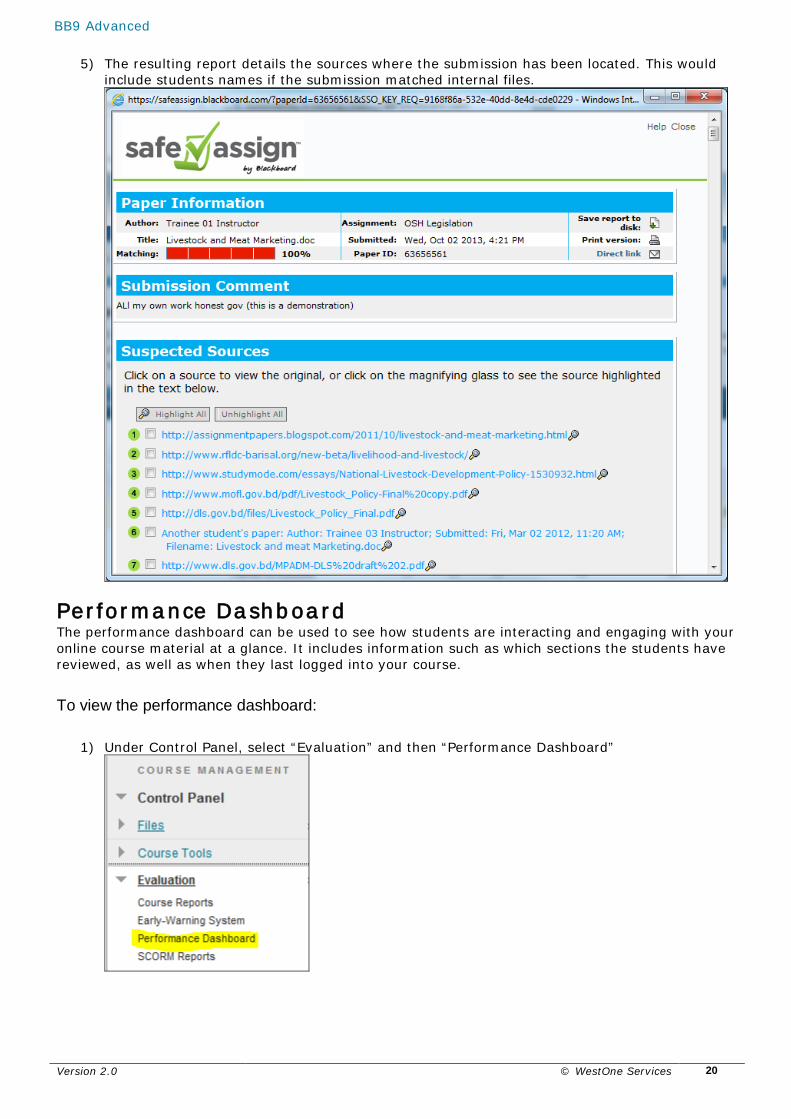
5) The resulting report details the sources where the submission has been located. This would include students names if the submission matched internal files.
Per fo r m a n ce Da sh b oa r d The performance dashboard can be used to see how students are interacting and engaging with your online course material at a glance. It includes information such as which sections the students have reviewed, as well as when they last logged into your course.
To view the performance dashboard:
1) Under Control Panel, select “Evaluation” and then “Performance Dashboard”
2) Review the details presented by clicking on the items presented where applicable
3) For example, click on a number under review status for a given student, to see which sections of the course material that student has ticked off as being read/completed
Fu r th er i n f o r m a t i on WestOne also offers an Advanced Bb9 workshop. For latest sessions please visit: http://westone.wa.gov.au/pd For tutorials in how to further customise your course please visit: http://ondemand.blackboard.com/