Written by Neil Rickus. Licensed under CC BY-NC-SA 4.0 Programming with Scratch A step-by-step guide, linked to the English National Curriculum, for primary school teachers Written by Neil Rickus (Computing Champions) http://computingchampions.co.uk @computingchamps
Transcript
Written by Neil Rickus. Licensed under CC BY-NC-SA 4.0
Programming with Scratch
A step-by-step guide, linked to the English National Curriculum, for primary school teachers
Written by Neil Rickus (Computing Champions)
http://computingchampions.co.uk
@computingchamps
Written by Neil Rickus. Licensed under CC BY-NC-SA 4.0 2
Activity 3 – Maze Game ............................................................................................................................... 12
Activity 4 – Moving sprite game ................................................................................................................... 17 Activity 5 – Platform game ........................................................................................................................... 24 License This work is licensed under the Creative Commons Attribution-NonCommercial-ShareAlike 4.0 International (CC BY-NC-SA 4.0) license. The license can be viewed at: http://creativecommons.org/licenses/by-nc-sa/4.0/ Acknowledgements Parts of this work build on the Scratch Planning examples provided by Phil Bagge at http://code-it.co.uk/ in accordance with the Creative Commons Attribution-NonCommercial 3.0 Unported (CC BY-NC 3.0) license. The license can be viewed at: http://creativecommons.org/licenses/by-nc/3.0/
Written by Neil Rickus. Licensed under CC BY-NC-SA 4.0 3
Programming with Scratch
Activity 1 – Scratch Conversations
Computing National Curriculum areas covered (all Key Stage 2):
• design, write and debug programs that accomplish specific goals, including controlling or simulating physical systems; solve problems by decomposing them into smaller parts
• use sequence, selection, and repetition in programs; work with variables and various forms of input and output
• use logical reasoning to explain how some simple algorithms work and to detect and correct errors in algorithms and programs
Task overview:
• Familiarisation with the Scratch interface • Create a conversation between two characters using Say blocks
Possible cross-curricular links:
• Literacy – speaking and listening; drama; speech punctuation; feelings and emotions of characters • History – interviewing historical figures • Geography – conversation between two people from contrasting environments • PSHCE – discussing feelings towards an issue, such as bullying • Science – highlighting misconceptions about a particular topic
Written by Neil Rickus. Licensed under CC BY-NC-SA 4.0 4
Activity 1 – Scratch Conversations
The Scratch website can be accessed at: http://scratch.mit.edu/ Click on Create to load the coding environment.
The Scratch environment has four screen sections:
• Script Area – contains your program’s code • Block Palette – contains sections of code (called Blocks), which can be dragged into the Script Area • Stage – where your program’s actions take place • Sprites Area – contains details of the characters (called Sprites) in your program
Written by Neil Rickus. Licensed under CC BY-NC-SA 4.0 5
Our first task is to create a conversation between two characters. Before working at the computer, you may wish to get the children to think about what their characters will say. In class, it is useful to model the first few instructions on an Interactive Whiteboard at the same time as the children.
Task explanation
Required steps Screenshots
Firstly, delete the cat sprite so we can use something more interesting
Click with the right mouse button on the cat in the Sprites Area and select Delete
Next, we’re going to choose our characters You can move the characters around the screen so they’re where you want them
Click on the Choose new sprite from library button at the top of the Sprites Area Select a sprite from either the Animals, Fantasy or People sections and press OK Repeat to add a second Sprite
We now need a more exciting background Make sure you select a background to make the Sprites stand out
Click on the Stage (left-hand side of the Sprites Area) Click on the Choose backdrop from library button Select a suitable background
It’s now time for our sprites to have a conversation. To do this, we need a Green flag to start the program (Script) and a number of instructions in order
Click on your first Sprite in the Sprites Area. Click on Scripts at the top of the Block Pallet if the Script Area is not visible At the top of the Block Pallet, click on Events and drag a when Green Flag clicked block into the Script Area (on the right of the screen) Drag two Say blocks from Looks into the Script Area and attach them to the when Green Flag clicked block Enter some text for the sprite to say Click on your other Sprite and repeat the above
Sprite 1
Sprite 2
Written by Neil Rickus. Licensed under CC BY-NC-SA 4.0 6
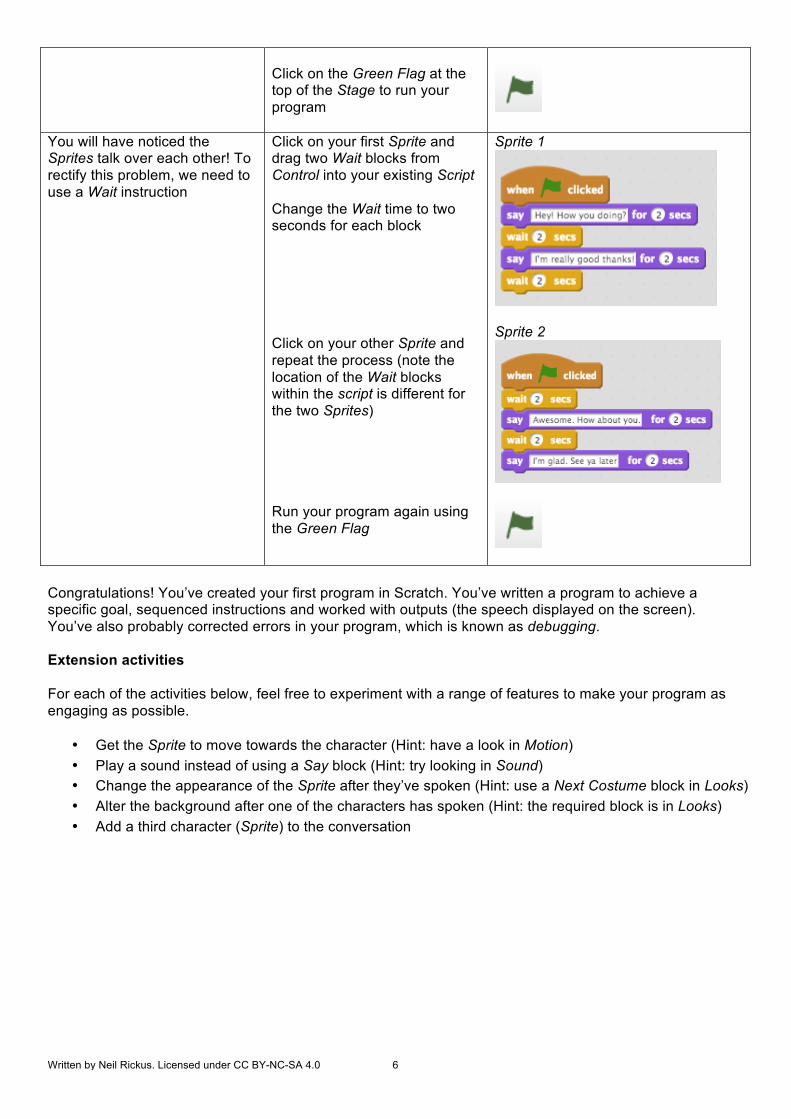
Click on the Green Flag at the top of the Stage to run your program
You will have noticed the Sprites talk over each other! To rectify this problem, we need to use a Wait instruction
Click on your first Sprite and drag two Wait blocks from Control into your existing Script Change the Wait time to two seconds for each block Click on your other Sprite and repeat the process (note the location of the Wait blocks within the script is different for the two Sprites) Run your program again using the Green Flag
Sprite 1
Sprite 2
Congratulations! You’ve created your first program in Scratch. You’ve written a program to achieve a specific goal, sequenced instructions and worked with outputs (the speech displayed on the screen). You’ve also probably corrected errors in your program, which is known as debugging. Extension activities For each of the activities below, feel free to experiment with a range of features to make your program as engaging as possible.
• Get the Sprite to move towards the character (Hint: have a look in Motion) • Play a sound instead of using a Say block (Hint: try looking in Sound) • Change the appearance of the Sprite after they’ve spoken (Hint: use a Next Costume block in Looks) • Alter the background after one of the characters has spoken (Hint: the required block is in Looks) • Add a third character (Sprite) to the conversation
Written by Neil Rickus. Licensed under CC BY-NC-SA 4.0 7
Programming with Scratch
Optional activity – Broadcast messages
In Activity 1, Wait blocks were used to ensure the characters spoke in turn. Using Wait blocks in this way is quite inefficient and creates lots of extra work if we want to add additional events, such as movement, sound or further speech. We’re now going to alter each Sprite’s script to use Broadcast messages, which pass a message to a Sprite to ensure it only undertakes an action when it receives a specified command (rather than relying on a certain period of time). When working with children, this can be effectively demonstrated by whispering to a few pupils that when they hear a specified code word, such as “Dave”, they have to get up and do five star jumps. “Dave” is then shouted out (i.e. Broadcast) to the class, but only the children given the code word know to act upon it. We need to modify our program from Activity 1 to remove the Wait blocks and use Broadcast messages instead
For each of your Sprites, delete your existing Script by clicking with the right mouse button and selecting Delete Click on your first Sprite and drag a Broadcast block from Events, along with a Say block and a when Green Flag clicked block Click on your second Sprite and drag a When I receive block from Events, followed by a Say block Continue the conversation, by adding a Broadcast block to your second Sprite’s script (you’ll need to create a new message with a suitable name, such as message2)… followed by adding a separate When I receive block to your first Sprite and another Say block Continue the conversation by repeating the process
Sprite 1
Sprite 2
Sprite 1
Written by Neil Rickus. Licensed under CC BY-NC-SA 4.0 8
Programming with Scratch
Activity 2 – Maths Quiz
Computing National Curriculum areas covered (all Key Stage 2):
• design, write and debug programs that accomplish specific goals, including controlling or simulating physical systems; solve problems by decomposing them into smaller parts
• use sequence, selection, and repetition in programs; work with variables and various forms of input and output
• use logical reasoning to explain how some simple algorithms work and to detect and correct errors in algorithms and programs
Task overview:
• Create a Maths game containing a range of multiplication questions • Add a score to the game using a variable
Possible cross-curricular links:
• All subjects – assessment activities (formative and summative; peer assessment) • Science – predicting outcomes of experiments
Written by Neil Rickus. Licensed under CC BY-NC-SA 4.0 9
Activity 2 – Maths Quiz
Initially, we need to ask the user a question and allow them to Input the answer. Although quizzes can be produced for any topic, it’s best to initially only ask questions with numerical answers, which minimises errors relating to spelling or typing.
Task explanation
Required steps Screenshots
As with the first task, delete the cat Sprite so we can use something else
Click with the right mouse button on the cat in the Sprites Area and select Delete
Next, we’re going to choose our character (you only need one!)
Click on the Choose new sprite from library button at the top of the Sprites Area Select a sprite from either the Animals, Fantasy or People sections and press OK Feel free to also change the background
We need our character to introduce the game when the program starts
Drag a when Green Flag clicked block and a Say block into the Script Area (if you can’t see the Script Area, click on the Scripts tab at the top of the window) Change the text to introduce your game
Our quiz needs a question to ask the user
Drag an Ask block from Sensing and attach it to your Script Change the text to ask a multiplication question
The program has to display a different message depending on whether the answer is correct or incorrect. We do this using Selection
Drag an if, then, else block from Control and attach it to your Script
Written by Neil Rickus. Licensed under CC BY-NC-SA 4.0 10
Following this, we need to check the Input and use Selection to choose the route through our program, which is: If the answer is correct (2x5=10), then display a “well done” message, else display an “unlucky” message
Drag an equals block from Operators into the top of the if, then, else block Place Answer from Sensing in one side of the equals block, followed by the correct answer on the other side Drag a Say block into the first half of the if, then, else block. Change the text to “Well done” Drag another Say block into the second half of the if, then, else block. Change the text to “Unlucky” Run your program using the Green Flag (you enter your answer in the box that appears at the bottom of the Stage)
Add some additional questions using the same process
Add further Ask and if, then, else blocks to your Script containing different questions and answers Run your program and check it behaves as expected
Well done! You’ve made another program in Scratch. This time you’ve also used selection and worked with both inputs and outputs. We’re now going to add a score to our game using a variable. A variable is similar to a box. It can contain anything the computer can store, such as numbers or text. Its contents can be changed, or varied (hence the name variable), and we can find out the contents of the box at any time. We first need to create a variable to store the score
Click on Data at the top of the Block Palette and select Make a Variable Give the variable a name, such as “Score” and click OK
Written by Neil Rickus. Licensed under CC BY-NC-SA 4.0 11
If the tick box next to the variable name is selected in the Block Palette, the variable is shown in the corner of the Stage
When the quiz starts, we have to ensure the score starts at zero, rather than continuing from the previous game
Drag the Set, to block from Data to immediately below the when Green Flag clicked block in your script (this ensures it’s the first instruction run)
Every time the user gets an answer correct, we need to increase the score by one
Drag a Change, by block from Data into the first half of your if, then, else blocks. Place it before the “Well done” message Repeat the process for the other if, then, else blocks in your Script Run your program and check the score starts at zero and it increases by one when a question is answered correctly
Good work! You’ve now used a variable to record the score. You have also output the variable to the screen for the user to see. Extension activities For each of the activities below, feel free to experiment with a range of features to make your program as engaging as possible.
• Adjust the score to decrease when the user gets a question wrong (Hint: change the score by -1) • Make the character move or dance when an answer is correct (Hint: look in Motion) • Get the character to include the user’s answer when they speak – e.g. “Well done. The answer was
10” (Hint: you’ll need to use a Join block from Operators) • Change the background when the score reaches ten (Hint: add an if, then block to check the score
and perform an action if Score = 10)
Written by Neil Rickus. Licensed under CC BY-NC-SA 4.0 12
Programming with Scratch
Activity 3 – Maze Game
Computing National Curriculum areas covered (all Key Stage 2):
• design, write and debug programs that accomplish specific goals, including controlling or simulating physical systems; solve problems by decomposing them into smaller parts
• use sequence, selection, and repetition in programs; work with variables and various forms of input and output
• use logical reasoning to explain how some simple algorithms work and to detect and correct errors in algorithms and programs
Task overview:
• Guide a character around a maze without bumping into the sides
Possible cross-curricular links:
• Maths – angles and lines of symmetry (within the maze design) • Art – sprite and maze design • History / Literacy – famous mazes (e.g. Hampton Court); Myths and Legends (e.g. Theseus and the
Minotaur)
Written by Neil Rickus. Licensed under CC BY-NC-SA 4.0 13
Activity 3 – Maze Game
Our first task is to make our character look like they’re moving as they travel around the maze. We also need to control the character using the keyboard.
Task explanation
Required steps Screenshots
We need to choose a sprite with more than one look / appearance, or Costume. This allows us to make the sprite appear as if it’s moving
Delete the Cat sprite. Click on the Choose new sprite from library button at the top of the Sprites Area Select a sprite from Animals containing more than one costume (possible Sprites include Crab, Butterfly1, Dinosaur1, Elephant, Monkey1) and press OK Leave the background white
To give the impression of movement, we need to use repetition to constantly switch between costumes. We do this using a forever loop
Drag a when Green Flag clicked block into the Script Area. Attach a forever block from Control Place a Wait block from Control and a next costume block from Looks inside your forever loop Run your program using the Green Flag. Alter the number of seconds in the wait block so it looks like your sprite is moving
During the maze game, our sprite is going to constantly move forward. We also use repetition through a forever loop to achieve this
Drag a second when Green Flag clicked block and a forever block into the Script Area Insert a Move block from Motion into the forever loop Run your program. You can alter the number of steps in the Move block if your sprite is moving too fast
Written by Neil Rickus. Licensed under CC BY-NC-SA 4.0 14
Next, we need to move the character when certain keys are pressed. We use both repetition and selection to check for keyboard input
Drag a further when Green Flag clicked block and a forever block into the Script Area Place the forever loop after the when Green Flag clicked block, followed by an if, then block inside the loop Put a key pressed block from Sensing in the top of the if, then block and change the key to the right arrow Put a turn right block within the if, then block Repeat this process to make the left arrow turn the sprite left when pressed Run your program using the Green Flag and experiment with the key presses. You can adjust the amount of turn in the turn degrees block if required
You’ve produced yet another program in Scratch. Within the program, you’ve used repetition to make the character move across the screen. Repetition has been combined with selection to enable keyboard input, which alters the location of the sprite output to the screen. The next stage in producing our game is to create the maze. We also need to program our sprite to perform a sequence of instructions if it touches the maze wall. Firstly, we need to draw our maze Click on the Stage icon to the left
of the Sprites Area Select the Backdrops tab at the top of the Blocks Palette Choose either the Paintbrush or Straight line tool from the icons on the left of the window Select a colour and make the line width thicker by dragging the bar at the bottom of the screen
Written by Neil Rickus. Licensed under CC BY-NC-SA 4.0 15
Draw your maze by clicking and dragging with the left mouse button on the white backdrop (don’t worry if your sprite is too big at this stage) Ensure your maze has a coloured border all the way around the edge
Your Sprite is probably too large to move around the maze, so we need to make it smaller
Click on the Shrink icon above the Block Palette Click on your Sprite a number of times until it can comfortably navigate around your maze
We now need to modify the game so the Sprite cannot go through the maze’s walls. We can again use repetition and selection to check whether the Sprite is touching the wall: If the Sprite is touching the wall, then we want it to say “Ahhh” for a period of time, followed by ending the game
Once again, drag a when Green Flag clicked block Place a forever loop after the when Green Flag clicked block, followed by an if, then block inside the loop Drag a touching color block from Sensing into the top of the if, then block Click on the colour within the touching color, followed by clicking on your maze outline on the Stage (this will alter the touching color to be the same as your maze) Place a Say block within the if, then block and modify the block to say “Ahhhhh” for 0.2 seconds Add a Stop block from Control into the if, then block (this will end the game) Run your program using the Green Flag. You may wish to adjust some of the game’s sections, such as the Sprite’s speed, size or the layout of the maze
Written by Neil Rickus. Licensed under CC BY-NC-SA 4.0 16
The Sprite currently remains in the same position when we restart the game. Each time the game starts, we ideally want the sprite to return to a specific starting position and point upwards
Drag your Sprite to your preferred starting position on the Stage Add a go to x, y block from Motion to the start of your last script, which now contains the starting point’s co-ordinates (the co-ordinates are also displayed at the bottom right of the Stage) You should also add a Point in direction block from Motion Run your program using the Green Flag. Debug your program as appropriate
Brilliant! You’ve created a game involving a Sprite interacting with the background, that responds to a number of inputs (the keyboard and touching a colour). Repetition and selection have again been used, along with instructions in sequence. You’ll be beginning to see how programs can be built by decomposing them into smaller parts. Extension activities For each of the activities below, feel free to experiment with a range of features to make your program as engaging as possible.
• Include sound effects when the character moves / hits the wall (Hint: look in Sound) • Change the Sprite to a ghost if it touches the wall (Hint: you’ll need to add a new Costume) • Add a score that increases for every second the character avoids touching the side (Hint: combine a
variable for the score with a Wait block) • Instead of ending the game when the character touches the wall, get it to automatically change
direction (Hint: remove the Stop block and look in Motion) • Add objects, such as coins, for the character to collect (Hint: add some extra Sprites and Hide them
when touched) • Include a second level (Hint: you’ll need an end point, of a different colour, in your first maze, which,
when touched, should change to your second maze background)
Written by Neil Rickus. Licensed under CC BY-NC-SA 4.0 17
Programming with Scratch
Activity 4 – Moving sprite game
Computing National Curriculum areas covered (all Key Stage 2):
• design, write and debug programs that accomplish specific goals, including controlling or simulating physical systems; solve problems by decomposing them into smaller parts
• use sequence, selection, and repetition in programs; work with variables and various forms of input and output
• use logical reasoning to explain how some simple algorithms work and to detect and correct errors in algorithms and programs
Task overview:
A leading game manufacturer wants to see how well you can program.
They have asked you to design a game that involves moving a character around obstacles or away from enemies.
Your game can be for one or two players.
Written by Neil Rickus. Licensed under CC BY-NC-SA 4.0 18
Activity 4 – Moving sprite game
If you wish, you can plan your moving sprite game and start programming immediately. Alternatively, you can use the example game specification below, or the more detailed instructions overleaf, which break down the necessary steps for each requirement.
Within school, pupils should be given a planning template and asked to solve the programming challenge by splitting it into smaller parts. This is known as decomposing. This would typically involve specifying the required steps, or script, to complete each section of the program.
Example game specification
Basic: A frog has to move across the road from his pond. The frog is controlled using the keyboard. Butterflies automatically move along the road. If the frog collides with a butterfly, he becomes injured and the game ends. The frog should always start from his pond at the bottom of the screen.
Intermediate: The frog starts with a score of 100, which should decrease by 5 for every second it takes to cross the road. The frog starts with three lives. Every time the frog collides with a butterfly, he loses a life. Once the frog has lost all his lives, the game ends. A "game over" message or screen should be displayed, along with an appropriate sound.
Advanced: Each butterfly’s speed should increase as the game progresses. Once the frog crosses the road and reaches a certain point on the other side, he should progress to the next level. He should also get an extra 100 points.
Written by Neil Rickus. Licensed under CC BY-NC-SA 4.0 19
Detailed instructions
For each sentence of the Basic example game specification, the required steps are outlined below, although a similar result can often be achieved using other blocks or scripts
Task explanation
Required steps Screenshots
Text: A frog has to move across the road from his pond Required steps: We need a frog sprite, in addition to a suitable background
Delete the Cat sprite Click on the Choose new sprite from library button at the top of the Sprites Area Select the Frog sprite from Animals and click OK Click on the Stage (left-hand side of the Sprites Area) Click on the Upload backdrop from file button Select the file containing the game’s background and click Open
Text: The frog is controlled using the keyboard Required steps: Our sprite is going to constantly move forward using a forever loop. We also need to move the character when certain keys are pressed
Drag a when Green Flag clicked block and a forever block into the Script Area Insert a Move block from Motion into the forever loop Drag a further when Green Flag clicked block into the Script Area Place a forever loop after the when Green Flag clicked block, followed by an if, then block inside the loop Put a key pressed block from Sensing in the top of the if, then block and change the key to the right arrow Put a turn right block within the if, then block
Written by Neil Rickus. Licensed under CC BY-NC-SA 4.0 20
Repeat this process to make the left arrow turn the sprite left when pressed Run your program using the Green Flag and experiment with the key presses. You can adjust the amount of turn in the turn degrees block. You also can alter the number of steps in the Move block if your sprite is moving too fast
Text: Butterflies automatically move along the road Required steps: We need to add some additional butterfly sprites to move horizontally across the screen. When they reach the edge of the screen, they should turn around and continue moving
Click on the Choose new sprite from library button at the top of the Sprites Area Select the Butterfly1 sprite from Animals and click OK Drag a when Green Flag clicked block and a forever block into the Script Area Insert a Move block from Motion into the forever loop, in addition to a wait block from Control Add an if on edge, bounce block from Motion to your forever loop Finally, add a set rotation style block from Motion before your forever loop (this stops our butterfly turning upside down when it touches the stage edge) Run your program using the Green Flag and ensure your butterfly moves automatically. Experiment with altering the value of the move and wait blocks Additional butterfly sprites can be added by repeating the process above
Written by Neil Rickus. Licensed under CC BY-NC-SA 4.0 21
Text: If the frog collides with a butterfly, he becomes injured and the game ends Required steps: We need to detect if the frog is touching a butterfly using repetition and selection: If the frog sprite is touching the butterfly sprite, then we want the frog to say “Owwww” for a period of time, followed by ending the game
Click on the Butterfly1 sprite in the Sprites Area and click on the Scripts tab at the top of the Block Palette Drag a when Green Flag clicked block into the Script Area Place a forever loop after the when Green Flag clicked block, followed by an if, then block inside the loop Put a touching block from Sensing in the top of the if, then block and change the sprite to Frog Put a Say block from Looks into your if, then block and alter the block to say “Owwww” for 0.5 seconds Add a Stop block from Control into the if, then block (this will end the game) Run your program using the Green Flag and ensure your script works as expected Repeat this process for your other butterfly sprites
Text: The frog should always start from his pond at the bottom of the screen Required steps: The frog Sprite currently remains in the same position when we restart the game. Each time the game starts, we ideally want the sprite to return to a specific starting position and point upwards
Drag your frog Sprite to your preferred starting position on the Stage (in the pond) Place a when Green Flag clicked block into the Script Area Add a go to x, y block from Motion below the when Green Flag clicked block. You should also add a Point in direction block from Motion You may wish to also set the starting position for your butterfly sprites
Written by Neil Rickus. Licensed under CC BY-NC-SA 4.0 22
Brilliant! You now have a moving sprite game, which has been produced by decomposing the program specification into smaller tasks. A child undertaking a task such as this independently has met the coding requirements of the Key Stage Two Computing National Curriculum. For the Intermediate and Advanced example game specification, step-by-step instructions are not provided. However, guidance for how to complete each part of the specification is outlined below. As with the Basic guidance, similar results can often be achieved in a number of ways. Intermediate example game specification Text Required steps The frog starts with a score of 100, which should decrease by 5 for every second it takes to cross the road
• Create a variable for the score • Set the variable to 100 when the game starts • Use a forever loop to change the score by -5
and wait one second
The frog starts with three lives. Every time the frog collides with a butterfly, he loses a life
• Create a variable for the lives • Set the variable to 3 when the game starts • When the frog touches a butterfly, change the
score by -1
Once the frog has lost all his lives, the game ends • If the lives variable is zero, stop the game
A "game over" message or screen should be displayed
When the lives variable reaches zero, either:
• Say a specific message • Change the backdrop to a special “game over”
screen
Along with an appropriate sound • Play a sound when the lives variable reaches zero
Advanced example game specification Text Required steps Each butterfly’s speed should increase as the game progresses
• Create a variable for the speed for each butterfly sprite
• Set the variable to 0 when the game starts • Use a forever loop to change the move speed by
a certain amount after a specific period of time, such as every few seconds
Once the frog crosses the road and reaches a certain point on the other side, he should progress to the next level
• Create a sprite or coloured area at the top of the screen
• When the frog touches the area or sprite, the backdrop should change
• The starting position of both the frog and butterflies may also need to be altered
He should also get an extra 100 points • When changing the backdrop, change the score variable by 100
Written by Neil Rickus. Licensed under CC BY-NC-SA 4.0 23
Extension activities For each of the activities below, feel free to experiment with a range of features to make your program as engaging as possible.
• Include sound effects when the character moves / hits the enemies (Hint: look in Sound) • Change the Sprite to something different if it touches a butterfly (Hint: you’ll need to add a new
Costume) • Get the butterflies to change direction (Hint: use a turn block) • Make the frog bounce across the stage if he touches the side (Hint: look in Motion) • Add objects, such as food, for the character to collect (Hint: add some extra Sprites and Hide them
when touched) • Have different enemies, such as dogs or dinosaurs, on each level (Hint: only show certain sprites
when a certain backdrop is selected) • Rather than your frog automatically moving forward, program the up and down arrows to move the
sprite forwards and backwards respectively • Include additional levels
Written by Neil Rickus. Licensed under CC BY-NC-SA 4.0 24
Programming with Scratch
Activity 5 – Platform Game
Computing National Curriculum areas covered (all Key Stage 3):
• use two or more programming languages, at least one of which is textual, to solve a variety of computational problems
• design and develop modular programs that use procedures or functions • understand simple Boolean logic [for example, AND, OR and NOT] and some of its uses in circuits
and programming
Task overview:
A leading game manufacturer was impressed with your moving sprite game. They now want you to produce a platform game.
They have asked you to make a one-player game, which involves moving a sprite along various platforms. The sprite is likely to have to jump over gaps between platforms, in addition to avoiding obstacles and enemies.
Written by Neil Rickus. Licensed under CC BY-NC-SA 4.0 25
Activity 5 – Platform game
If you wish, you can plan your platform game and start programming immediately. Alternatively, you can use the example game specification below, or the more detailed instructions overleaf, which break down the necessary steps for each requirement.
Within school, pupils should be given a planning template and asked to solve the programming challenge by splitting it into smaller parts. This is known as decomposing. This would typically involve specifying the required steps, or script, to complete each section of the program. They should also identify sections of code that can be reused and included within a procedure.
Example game specification
Basic: A sprite has to move along the ground or on platforms. The sprite is controlled using the keyboard. The sprite should fall to the ground if not on a platform. The sprite should be able to jump onto platforms and be able to jump a range of different heights. The sprite should start on the left hand side of the screen and move right along the ground / platforms. The code should be implemented using procedures where possible.
Intermediate: The sprite should move realistically, including when jumping or falling. The sprite starts with three lives. The sprite should have to avoid enemies and lose a life if he collides with an enemy. Once the sprite has lost all his lives, the game ends. A "game over" message or screen should be displayed, along with an appropriate sound.
Advanced: Once the sprite reaches a certain point on the right hand side of the screen, a "congratulations" message must appear and he should progress to the next level. The sprite has a set amount of time to complete the level. Levels should scroll over more than one screen where possible.
Written by Neil Rickus. Licensed under CC BY-NC-SA 4.0 26
Detailed instructions
For each sentence of the Basic example game specification, the required steps / blocks are outlined below, although a similar result can often be achieved using other blocks or scripts
Task explanation
Required steps Screenshots
Text: A sprite has to move along the ground or on platforms Required steps: We need a suitable sprite to control and also a sprite to act as our ground / platforms. The background should be kept to a single colour
Delete the Cat sprite Click on the Choose new sprite from library button at the top of the Sprites Area Select the sprite click OK Click on the Paint new sprite from library button at the top of the Sprites Area Draw a simple sprite containing a flat ground and a number of coloured obstacles. The sprite should fill the whole screen Rename the sprite appropriately, such as "ground"
Text: The sprite is controlled using the keyboard Required steps: Our program is going to constantly check for when certain keys are pressed Unlike previous programs, we're going to manually alter the X co-ordinates, rather than using move To move the sprite left and right, we can use the following code. Note the use of both not and and operators in the final if statement
Text: The sprite should fall to the ground if not on a platform Required steps: We need to create and set a variable for the "gravity". We also need an extra if statement in the forever loop to check if the sprite is on the ground and reduce the Y co-ordinate appropriately if not
Written by Neil Rickus. Licensed under CC BY-NC-SA 4.0 27
Text: The sprite should be able to jump onto platforms and be able to jump a range of different heights. The code should be implemented using procedures where possible Required steps: We can create a block, or procedure (in More Blocks) named "jump" to reuse the same code for different height jumps We can assign different key presses to pass different values to the procedure
Text: The sprite should start on the left hand side of the screen and move right along the ground / platforms Required steps: We can define the sprite's starting position at the beginning of our program using goto x y The final code is shown right
Well done! You now have a platform game, which includes the use of procedures and Boolean operators. A child undertaking a task such as this independently has met some of the coding requirements of the Key Stage Three Computing National Curriculum. For the Intermediate and Advanced example game specification, blocks of code are not provided. However, guidance for how to complete each part of the specification is outlined below. As with the Basic guidance, similar results can often be achieved in a number of ways.
Written by Neil Rickus. Licensed under CC BY-NC-SA 4.0 28
Intermediate example game specification Text Required steps The sprite should move realistically, including when jumping or falling
• Give the impression of movement using next costume
• Slowly increase and decrease the value of the Y co-ordinates during the jump
The sprite starts with three lives. The sprite should have to avoid enemies and lose a life if he collides with an enemy. Once the sprite has lost all his lives, the game ends
• Create a variable for the lives • Set the variable to 3 when the game starts • When the sprite touches an enemy, change the
score by -1
Once the sprite has lost all his lives, the game ends • If the lives variable is zero, stop the game
A "game over" message or screen should be displayed
When the lives variable reaches zero, either:
• Say a specific message • Change the backdrop to a special “game over”
screen
Along with an appropriate sound • Play a sound when the lives variable reaches zero
Advanced example game specification Text Required steps Once the sprite reaches a certain point on the right hand side of the screen, a "congratulations" message must appear and he should progress to the next level
• Create a sprite or coloured area at the right hand side of the screen
• When the main sprite touches the area, the message sprite should be displayed, followed by changing the ground / platforms sprite
The sprite has a set amount of time to complete the level
• Create a variable for the time and reduce it by one every second
• When the variable reaches zero, display the "game over" message / screen
Levels should scroll over more than one screen where possible
• Create the adjoining part of the level sprite and hide it when the game starts
• As the sprite moves right, move both the background sprite left at the same rate as the sprite
Written by Neil Rickus. Licensed under CC BY-NC-SA 4.0 29
Extension activities For each of the activities below, feel free to experiment with a range of features to make your program as engaging as possible.
• Include sound effects when the character moves / hits the enemies (Hint: look in Sound) • Change the Sprite to something different if it touches an enemy (Hint: you’ll need to add a new
Costume) • Allow the player to select their Sprite at the start of the game (Hint: you could use a range of
Costumes or independent sprites) • Get the enemies to move at random (Hint: look in Operators) • Add objects, such as food, for the character to collect (Hint: add some extra Sprites and Hide them
when touched) • Have an end of level boss to get past (Hint: only show certain sprites when certain co-ordinates are
reached) • Give the sprite ability to fire custard pies or a similar, non-threatening, weapon at enemies (Hint:
add an additional sprite, which moves from the main sprite when a certain key is pressed) • Include additional levels