PROFITABLE INVENTORY CONTROL SYSTEMS, INC. Quick Reference Guide Profitable Inventory Control Systems, Inc. 205 Cleveland Road Suite A Bogart, GA. 30622 (706) 369-7427 Fax (706) 369-7420 Website www.picsnet.com
Transcript
PROFITABLE INVENTORY CONTROL SYSTEMS, INC.
Quick Reference Guide
Profitable Inventory Control Systems, Inc. 205 Cleveland Road Suite A
Bogart, GA. 30622
(706) 369-7427
Fax (706) 369-7420
Website www.picsnet.com
1
Table of Contents: Installation of FundTracker SQL ………………………. 02 Creating your Database ………………………. 02 FT SQL Install and database setup guide ……… 06 Enter Data to your Database ………………………. 07 School Master Setup ………………………. 10 How to Enter Orders ………………………. 16 How to Pick Orders ………………………. 18 How to Pack Orders ………………………. 19 Invoice ………………………. 20 List of Pick Ticket forms and descriptions ……… 21
2
Installation of FundTracker SQL and Creating the Database for FundTracker SQL
Installation of FundTracker SQL
Unless requested, it is assumed you are downloading the software from our website www.fundtrackersql.com/downloads.aspx
**FundTracker SQL needs to be installed on every computer that will access the database**
1) Click on FundTracker “Current.exe” or the most up to date version available for download.
2) You will be prompted to either run or save the install set. Click run if you want to run the install set immediately
from the website, save if you want to save the install set to a portable storage device to install on multiple
computers at will.
3) Wait until setup prompt comes up automatically, click on ‘Install FundTracker SQL’.
4) The setup wizard will begin and will ask to continue or to cancel, click ‘Next’ to continue.
5) After reading the database warning, click ‘Next’ to continue
6) In the Customer information window, PICS Support suggests to keep the defaulted information as they are, but
you can choose otherwise. The selection for the using of the application is important. If prompted, PICS Support
recommends that you select multiple users to be able to use FundTracker SQL. You may choose to have only the
current user privileges to FundTracker SQL. Click ‘Next’ to continue.
7) PICS Support suggests that you click ‘Next’ to install FundTracker SQL into the default folder, but you have the
option to change the location of the program files for FundTracker SQL. If you use a different location, please
note this location for future reference.
8) FundTracker SQL setup will now begin installing the program onto your computer.
9) When installation is completed, click ‘Finish’.
Creating Your New Database
1) Go to Start Menu/programs/MicrosoftSQLSever 2008-2014 / SQL Server Management Studio Express. To connect to
the SQL server, select the server name (computer name that the databases are or will be residing’\SQLEXPRESS),
select for SQL authentication, put in “sa” as the user name, “What you created for the sa account” as the password,
2) (a) Right click on the Databases folder and click New Database, in order to start a new database.
4
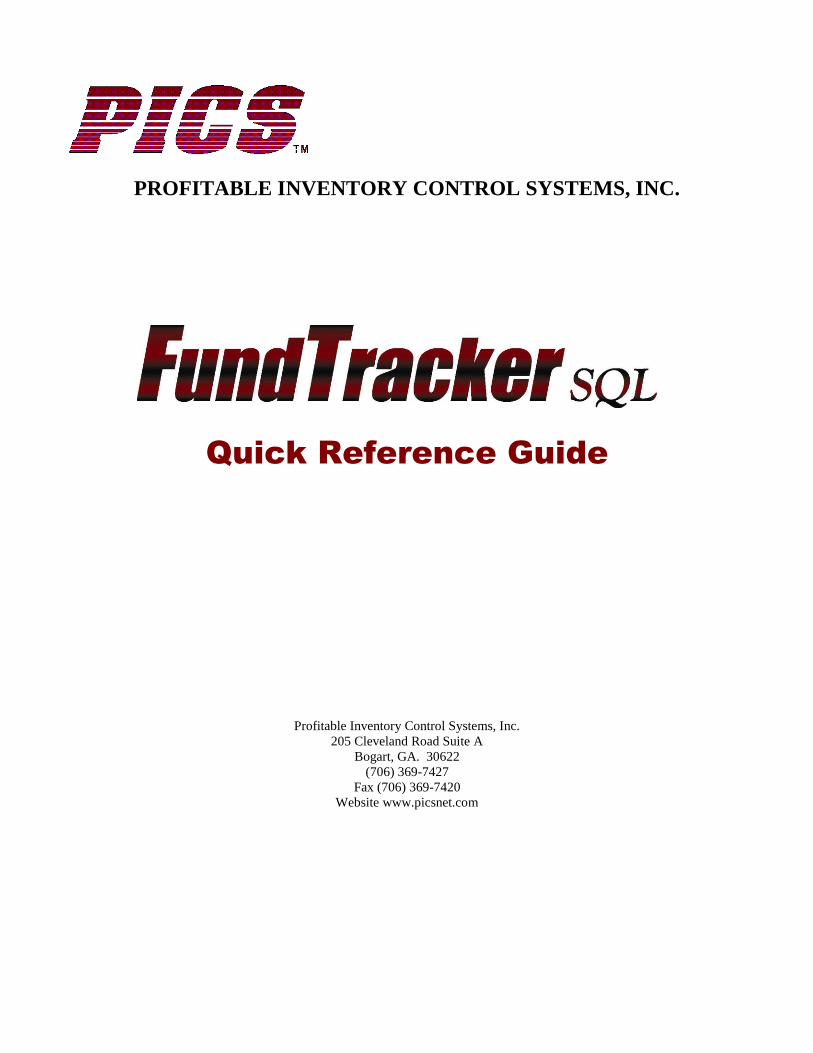
(b) Enter in the New Database name and then click OK. Do not click Add.
Example of the Database name: “fall2015v18.4.8”
3) Now the new database needs to be tailored to be used by FundTracker SQL. Click File/Open/File… to search for the
FT_SQL_DB_Script“Newest Version”.sql script to be run. Navigate to the location of the database scripts (which by
default is /program files/FundTracker SQL “Newest Version”/ if using a 32-bit machine or /program
files(x86)/FundTracker SQL “Newest Version” if using a 64-bit machine). Select FT_SQL_DB_Script_“Newest Version”
and click Open.
5
4) If the Computer prompts you to enter in the login information again, repeat the same steps from before. In the Upper left
hand corner of the Studio Express window, there is a drop down of databases to select from. The default is master. Click on
that drop down to select your database. “Whatever the name of the new database is”
5) Click the Execute command that is right next to the database drop down. A frame should open up in the lower half of the
screen and momentarily notify you if there was an error or if the Command(s) was completed successfully.
** If you received errors or were not able to complete the setup, please contact PICS support for assistance. **
6
Assuming you have already installed your sql manager from a previous version of FundTracker SQL. If not, please reference
the SQL Express Setup guide from http://fundtrackersql.com/Downloads.aspx
Initializing your new database
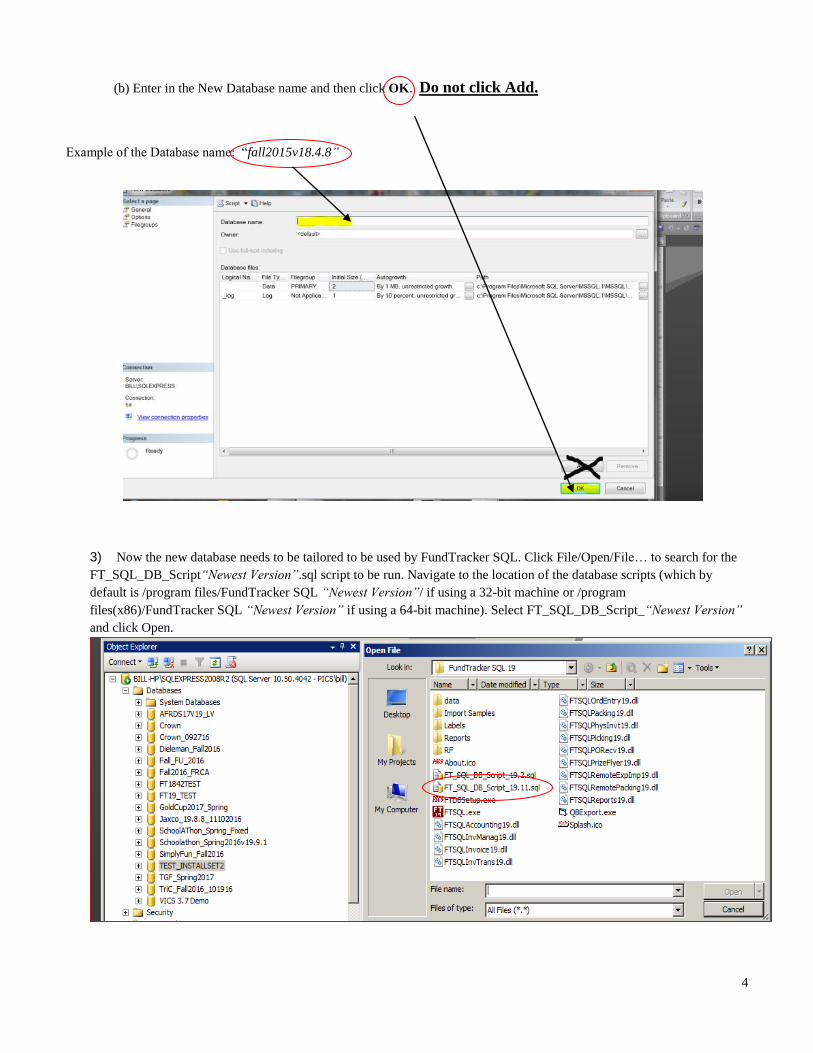
1) Start FundTracker SQL
2) For Server, please select the computer that contains the database you intend to work on from the drop down menu.
If it doesn’t list the specific computer with your database, manually type in the computer name
3) Make sure that SQL Server is selected. If you are using MSDE for SQL, type in sa for the user, and the password
that was created for the sa account. If you are using SQL 2005 Express or greater, type in sa for the user, and the
password that was created for the sa account.
4) Unless notified, leave the SQL version at 2000. If you have SQL 2005 or 2008, contact PICS for those
advantages.
5) Click ‘List’ to generate the names of databases
6) Select from the drop down menu your database
7) Click ‘Connect’ to connect to your database
8) If you want to setup your database manually with a clean slate, skip to page 4. If you would like to import master
setup data from a previous database (which we recommend) please read the following:
(Option A- You have a previous database and you want to import data from a previous database or season) Master File records such as Products, Inventory, Tax Jurisdictions, School Information, Discounts, Suppliers, Pricing
Structures, System Setup flag setups, and your License agreement will be imported. 1) From the top menu, select System -> Import Data from an Old Database…
2) Select the database you want to import as you would Opening a New Database…
3) If the word Importing comes up in the lower left of your screen, it is importing
4) A new function has been added to give you the ability to import previous school masters, products, and/or brochure
names as well as an option for importing specific school Master tabs or not.
5) Data imported from an old Database DOES NOT INCLUDE: Purchase Orders, Student Orders, and Invoices.
(Option B- You are importing product data from an Excel Spreadsheet)
1) Please download the latest product import tutorial from the fundtrackersql.com/downloads website or look in the
folder that you installed FTSQL and look in the import samples folder.
2) Complete your Excel Spreadsheet and save. FundTracker SQL can only import a EXCEL 97-2000 .xls format. So, if
you have a later version, you may need to save your sheet specifically in this format.
3) From the top menu, select System -> Import Products…-> Import…
4) Type in the location of the Excel file or browse and click ‘OPEN’.
If you do not use the import data from a previous database function, you must register each new database, as each new database
defaults to a demo database. This is done by referencing your license agreement and entering your company license into the
License Tab of your System setup, which can be found by going to System>System Setup.
Enter Data to your Database
After your database, has been created, you will want to follow these instructions listed below to complete your setup and configuration of FundTracker SQL. These are quick help assists to using the functions of
FundTracker SQL.
There are several methods to preparing your database for operations. The most popular and convenient method of
preparing your database is using the import from an old database function to copy over the different master records, system setups, and license agreements. If you want to manually setup your master files, you will have the
best results with FundTracker SQL if you enter data in the correct sequence. This document is designed for a quick
start procedure for installation. Please refer to the documentation manual and tutorials at http://www.fundtrackersql.com/Downloads.aspx for additional information.
1. *System Setup – In your top tool bar, go to “System”. In the dropdown menu, select” System Setup”. Paths to
follow in the tool bar will be referenced in the following format for the remainder of the directions: System/System Setup. Enter your license information and change any system flags as appropriate. There
are new system flags for FTSQL so please go through the system setup and change as required.
2. *Security (System/Security)– If you plan to use FundTracker SQL’s security features, first setup security levels,
then setup the users and/or user groups to control access to the database. If using report security, select the user level and modify report access. Groups could include Order Entry or Packing for example. You can select
from the list of standard reports to only select the reports that you will need and want to run. Deselect the
reports that your do not want to appear in the list of Standard Reports. Security is also used to track user activity.
3. *Warehouses (Inventory/Warehouse)– Enter the warehouses needed for your company. Warehouses are
usually set up for freezers that would contain frozen products, remotely located warehouses, dry product
warehouses, and prize warehouses. Having multiple warehouses allows pick tickets to be separated by warehouse and allows the picker to pick products in different areas. Examples of warehouses could include
Frozen, Remote, Prize, and Dry. When picking student orders, the warehouse designated as the default warehouse will be used to track the inventory. Warehouses can be set for auto-pack so specific items that will
not be packing during Pack Verify can be automatically packed when the order is picked. Warehouses are also setup for Prepacking and special fulfillments. Include products you do not carry or you will process for someone
else in a designated warehouse so you do not have to be concerned with processing products you do not carry.
4. *Bins (Inventory/Bin)– Enter the bins within your warehouses. If you pick by bin location instead of by product
number, assign a bin location for each item. Ideally, each product should be stored in only one warehouse and only one bin. This makes tracking and taking inventory easier. Each item must have a default bin location.
How you organize your bins also gives you control on how your products are listed on each pick ticket.
Companies sometime setup a bin for each brochure, some setup a bin for each supplier, some setup only one bin for all products, and some set up one bin for each product. When pick tickets are printed they can be
ordered by bin location within warehouse or by product number.
5. *Company Locations (Inventory/Company Locations)– If you plan to create purchase orders, create at least one company location to be used for a ship to address and one for a billing address. Setup one location if the ship
to and the bill to are the same. Select Systems, Purchase Orders, Default Bill to and enter the Company your
setup as the Bill to Company. Select Systems, Purchase Orders, Default Ship to and enter the Company your setup as the Ship to Company. If you pack for other companies setup a Company Location for each company
6. Brochures (Inventory/Brochures)– Enter the brochures you will use for the season. Prize brochures do not have to be setup.
7. *Product Types (Inventory/Product Type)– Enter the product types you will use. If you sell to schools in states
that allow tax-exempt products such as some food items, set up a product type for these. Examples of Product types would include Food, Frozen, Dry, Pizza, and Cookie Dough.
8. *Product Group (Inventory/Product Group)– Enter the product groups you will use. Product Groups are not required, but can be used to group products. Product groups can be used to help manage the school discount.
Product Group discount is a level of discounting that overrides School discounts and Brochure discounts. Product Groups can be a group of items inside of a brochure such as Gift Wrap, Chocolate, Candy, ETC.
9. *Product Pricing (Inventory/Product Pricing)– Enter at least one product pricing (for instance, “PIECE”). This is used to assign the brochure (Retail) price of the item, purchasing cost of the item, and quantity multiplier.
Product pricing can be used to designate a price difference of an item that appears on more than one brochure with a different price on each brochure. It is suggested also that you setup product pricing for CASE. This
allows for being able to order product by the case, round by the case, and sell by the case. With the addition of UOM conversion, inventory can be purchased by the case or piece, and/or sold by the case or piece. If needed,
you should also setup a “PALLET” pricing structure for calculating Pallet count and Pallet shipping weight.
10. *Payment Terms (Schools/Payment Terms)– Enter the payment terms you will use when creating purchase
orders. Examples are EOM, Net 30, and Net 60.
11. *Trucking Companies (Schools/Trucking Co)– Enter the trucking companies you will use for shipping your
orders. This would include your truck, UPS, UPSP, and FedEx.
12. *Suppliers (Inventory/Supplier)– If you plan to create purchase orders, enter the suppliers you will order from. This also allows you to enter the supplier information for contacts, payment, phone numbers, and shipping
methods. Many of the standard reports prompt for Supplier and reports are sorted by supplier.
13. *Accounts (Schools/Accounts)– If you are using our accounting interface, enter the accounting account number
or name here. The names would be the account names from the chart of accounts in your accounting system. Products must have a Sales Income account number. Examples are Candy Sales or Cookie Dough Sales or just
Sales. Schools must have an Accounts Receivable account number. Examples are A/R or 5000. These account names must match exactly to the accounts in your accounting package.
14. Products (Inventory/Product Master)– Products can be entered by keying each item or by using our Product Import Template and our Product Import tutorial.
The General Tab is used to enter the product number, description, and UPC number of each product. The designator number field is used to link one item number to the same product that may have a different item
number on another brochure. Brochure performance, inventory, and order forecasting reports have been
written to list information by the designator number. The Sort number is how you would like the item to appear on a brochure. If the item was sort number 1 it would be listed first on the brochure order entry. Each item can
be assigned a Product Group and a Product Type. Product Groups and types allow items to be grouped by these fields. If the product based on the Product Type is tax exempt, enter the product type for the product.
The Sort Products By Drop down menu allows the items to be sorted in several different ways. Once a Sort by products is selected the next and previous button lists the product in that order. The UPC number field is used
to record the unique UPC number of the product. This barcode is used to receive or pack items. Case UPC
number field is designed to be used to scan the case UPC number when receiving or packing by the case. FundTracker SQL will recognize both barcodes. The substitute button is used to define items that can be used
as substitutes for this item. Substitutes can be used in packing to pack a substitute item. One or more products can now be substituted for another item while packing. Pack Verify will recognize the item on the order or the
substituted item. The UOM and Case Rounding fields will be used in a later release on FundTracker. An image of the product can be recorded in the image field. This same image is used in our Web Order Entry program.
Prizes are set up just like brochure products but must be designated as a Prize in the Prize dropdown menu.
Some companies allow for a product to count more than just one unit when credit is given to a student when calculating the prize level reached. If the product is worth more than one prize credit enter the number in the
Prize multiplier field. If you use the accounting interface, enter the sales account for the income account and the Cost of Goods account for your expense account that is in your accounting program for this item. If Web
Order entry is used, select if this product can be used or not. If you have a product that is used for fundraising but is not a brochure product and you want to keep tract of the inventory of the product, select it as a Non-
inventory item. Examples of Non-inventory items would include order forms, brochures, 4 label pick tickets, gift
wrap swatches, ETC. Select oversized item if shipping cost are more because this item is designated as an oversized item. If the product is a component part of another product select the product as kitted. You can
mark a Product ID as a kit or a sum of other products of inventory you carry if you have the Manufacturing Module. A Bill of Materials can then be setup listing the items and quantities needed to create the kitted item.
The notes field is used to record additional information about the product that could not be included in the
description field. Notes are also displayed when a larger view is selected in Web Order Entry. The additional notes are then displayed for the product.
The Supplier Tab is used to record the supplier or suppliers that are used to order the product from. The supplier ID, supplier item number, supplier UPC number, and the supplier case UPC number are entered for
each supplier that you buy this product from. An unlimited number of suppliers can be entered for each product. A primary supplier can be selected. This will be the first supplier that is displayed. The check box
Supplier Sells This Item is used to confirm that a Purchase Order can be created for the supper for the item. If
the Supplier does not sell the item, a Purchase order cannot be created for the supplier and item. When Purchase Orders are created make sure that each product has a supplier product number entered if different
from the brochure product number. Both numbers can be printed on your Purchase Order. The manufacturer and manufacturer Item number can be entered. The Shipping Weight field should be entered for each item if
Web Order Entry is used. The Shipping Weight is used to calculate the shipping charges.
The Receiving Tab is used to record the default Warehouse and Default Bin location for each product. The Packing Bin is the bin location that is displayed on pick tickets. Each product must have a default warehouse
and bin location entered. These are required fields and are used as the assigned warehouse and bin location when doing order entry, purchasing, picking, and invoicing items. Reorder Points and Reorder Quantities can be
recorded for each warehouse if the Manufacturing Module is used. The Pricing Tab is used to assign one or more prices to an item. Multiple prices for one item can be entered
by selecting and Product Pricing, enter the quantity, cost, and sales price of the product. It is suggested that
each product have a Default Cost and Sales Price selected. The price structure cost value is used when creating a Purchase Order to the supplier. The Sales Price is used when a student’s order is entered in Order entry. The
quantity is used to indicate the number of units contained in the price structure. Piece would be 1, case would be then number of items that make up a case like 12 or 24. The field Web Order Entry Flat Shipping Cost is
used in Web Order entry to define the Flat Shipping Cost. There is also a check box used to indicate to Charge
a Handling on Web Order entry orders. The Inventory Tab is used primarily to display information about the product like the number of units in
stock, units allocated, units on order, units sold, units picked, units packed, and units to pack. These units are divided into 2 columns. The column on the left shows Totals. The column on the right allows a Warehouse to
be selected and then the units for that warehouse are displayed. There are buttons that give Inventory Details
and Purchase Order Details. An item can be check marked if the item is backordered. A resupply date can be entered showing the expected date the product will be back in stock. This information can be printed on pick
tickets to inform the student the items are backorder and to give the student an idea of when the item will be delivered. There is also a check box to indicate if a voucher can be given in place of the item during packing.
An item can also be marked as a backordered item with an expected ship date and printed on the pick ticket. The user can include a reorder point and reorder quantity to help keep from having items in backorder. If you
know the item is backordered, you can set the item as backordered with a resupply date and Pick tickets can
notify the customer of the backorder. The Brochure Tab is used to assign each product to each brochure the product is listed on. A product can be
assigned to an unlimited number of brochures.
15. *Bill of lading Master (Inventory/Bill of Materials)- For manufacturers, create Bill of Materials by selecting the
Item as a Kit in Product master. Setup the bill of materials master by entering each component item that
10
creates the kitted item. Then when ready to issue, click print to list all of the items needed to create the kitted item.
16. *Brochure Product Ratios (Inventory/Brochure Product Ratios)- enter in the projected ratios of items that will
be sold on each brochure as another way to calculate brochure performance and/or order forecasting. Enter an estimated ratio for each item on the brochure. The total must equal 100%. The report Order Forecast with
Inventory 10 Brochures Ratio is the report that was created to print the forecast based on the ratios entered.
17. *School Groups (Schools/School Group)– Enter any school groups you wish to use. School group is not a
required field and only used to group schools. Examples include Soccer, Track, DECA, and Chorus.
18. *School Types (Schools/School Type)– Enter any school types you wish to use. School type is not a required
field. Examples of School Types include Elementary, High, Internet, and JR High. Tax can also be managed per school type.
19. *Salesperson (Schools/Salesperson)– Enter the salespersons that will receive credit for the school sale. Each
school should be assigned a salesperson. If a school is not assigned to a salesperson create a generic salesperson such as Staff. Also, add a salesperson called All Sales Reps for reports that can be run for one or
all salespersons. Description is used to enter the salesperson’s full name. Address, contact information, and
sales rep notes can also be entered. Enter in your brochure costs and goals for sales reps for the Program Launch Module.
20. *Tax Jurisdictions (Schools/Tax Jurisdictions)– Set up the tax jurisdictions that you will need for sales tax
computation in the jurisdictions in which you sell. Enter the Sales Tax Rate as a decimal, not a percentage.
Examples would include .05, .075, and .08. A tax jurisdiction is a required field for setting up a school even if the school is not taxed. If a school is not taxed it is suggested that you create a Tax jurisdiction called None or
Exempt, or NA and assign the tax jurisdiction to the school. Also, you will need to associate this tax jurisdiction to a sales tax payable account in your accounting program if FundTracker is interfacing with it.
21. Processes (Schools/Processes)– Used with the Status Module. Set up the processes or steps that are used to
track the status of a school. These processes help customer service, management, and processing managers
track the status of each school during the season. For example, a process could be the date a reservation was received, when the orders were entered, if pick tickets have been printed. You can create any process you
want and track that process for each of your schools. 22. Issues (Schools/Service Service/Issue Codes)- Used with the Customer Service Module. Set up the issue codes
needed to help note, track, and resolve issues that come up during and after the season for customer service.
You are able to add any issue codes needed and set priorities. Some examples of issues are M-Missing from
box-order enter correct, D-damaged/defective-customer not satisfied with quality, W-Wrong item sent, A-Additional item-missing from order entry, needs to be billed to school, R-Refund, or C-Complaint, general
message to owner/manager.
23. Event Types (Schools/Event types)- add event types such as prize party, big bounce, pizza party, ETC to
identify the events that you can setup in the School Master Special Events Button on the Delivery Tab.
School Master Setup Enter the schools that you have signed to do their fund raising. Enter the schools one at a time using the School Data Master or import the schools from an Excel spreadsheet provided in the FundTracker 18 install folder under the import samples folder. Whether you use FundTracker to enter your schools or the Excel spreadsheet, we recommend that you first setup items 1-8 listed below before you enter your school data. 1) School Groups (Schools/School Group) 2) School Types (Schools/School Type)
11
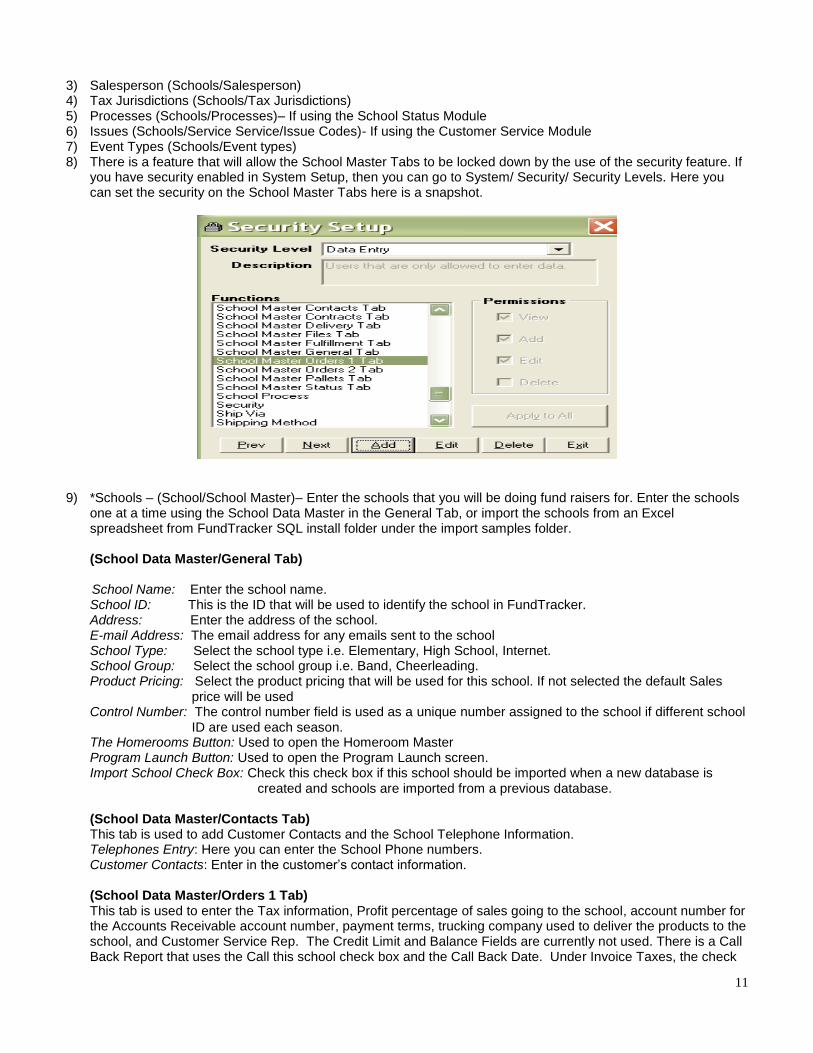
3) Salesperson (Schools/Salesperson) 4) Tax Jurisdictions (Schools/Tax Jurisdictions) 5) Processes (Schools/Processes)– If using the School Status Module 6) Issues (Schools/Service Service/Issue Codes)- If using the Customer Service Module 7) Event Types (Schools/Event types) 8) There is a feature that will allow the School Master Tabs to be locked down by the use of the security feature. If
you have security enabled in System Setup, then you can go to System/ Security/ Security Levels. Here you can set the security on the School Master Tabs here is a snapshot.
9) *Schools – (School/School Master)– Enter the schools that you will be doing fund raisers for. Enter the schools
one at a time using the School Data Master in the General Tab, or import the schools from an Excel spreadsheet from FundTracker SQL install folder under the import samples folder.
(School Data Master/General Tab)
School Name: Enter the school name. School ID: This is the ID that will be used to identify the school in FundTracker. Address: Enter the address of the school. E-mail Address: The email address for any emails sent to the school School Type: Select the school type i.e. Elementary, High School, Internet. School Group: Select the school group i.e. Band, Cheerleading. Product Pricing: Select the product pricing that will be used for this school. If not selected the default Sales
price will be used Control Number: The control number field is used as a unique number assigned to the school if different school
ID are used each season. The Homerooms Button: Used to open the Homeroom Master Program Launch Button: Used to open the Program Launch screen. Import School Check Box: Check this check box if this school should be imported when a new database is created and schools are imported from a previous database. (School Data Master/Contacts Tab) This tab is used to add Customer Contacts and the School Telephone Information. Telephones Entry: Here you can enter the School Phone numbers. Customer Contacts: Enter in the customer’s contact information. (School Data Master/Orders 1 Tab) This tab is used to enter the Tax information, Profit percentage of sales going to the school, account number for the Accounts Receivable account number, payment terms, trucking company used to deliver the products to the school, and Customer Service Rep. The Credit Limit and Balance Fields are currently not used. There is a Call Back Report that uses the Call this school check box and the Call Back Date. Under Invoice Taxes, the check
12
Box for No Order Cards Due Email is used for sending an automatic email. Under Orders the check boxes for Allow Credit, Allow Backorders, Allow Partial Shipments, Allow Substituted Items, and Allow Packing are not used at this time. The Notes field is used to record information about the school. The label file is used to assign the label to be used for the packing label. Tax ID Number: Enter the School’s Tax Exemption Id if known Tax Jurisdiction: Each school must have a Tax Jurisdiction assigned even if the school is not taxed. Tax Exempt Box: Check this box if the school is Tax Exempt. A/R Account: If you use the accounting interface enter the accounts receivable name from your accounting
system. Invoice Taxes: Select Tax at Wholesale if Sales Tax is not to be printed on reports. Select Tax at Retail select
Tax at Retail if Sales tax is to be calculated on reports. Discount: The percentage of profit the school will be making for sales. Label file: Enter the Packing label used for printing student labels with a thermal printer. (School Data Master/Orders 2 Tab) This tab is used to enter the program coordinator, salesperson enrollment and setting up picking reports and labels. The Remote Order Entry Exported and Imported fields are used to document Remote Order Entry functions. Pick ticket messages to be printed on the school’s Pick Ticket can be entered here. The type of school, Regular, Internet, Helpline, Home Delivery, Buying Group, or Misc School is entered here.
Program Coordinator: Enter the Program Coordinator or Sponsor. This field is used in many of the standard reports.
Salesperson: Enter the salesperson from the salesperson dropdown menu. Every school should have a salesperson assigned to the school.
Web Reporting Button: This button is used to open an entry screen for the information needed to use the Web Reporting Module. Press the button to enter user ID, password, and email address of the person that will be using Web Reporting for the school. The user ID must be a unique user ID for all companies using Web Reporting. It is suggested that the user ID start with your company’s name for example if your company name is Seaboard Springs you want to start each user ID with SS. Enter the Internet School ID and select the report you want this school’s program coordinator to use when viewing reports from Web Reporting. The Import this School Check box should be checked so that this information can be used to update the Web Reporting site. FundTracker will fill in the Import date and Import Failure Message.
Enrollment: Enter the school’s enrollment. This field is used in the participation calculation of the school. Brochure Quantity: Enter the number of brochures that will be sent to this school. Checks Payable: This field is used to record the name that should appear on the checks sent from the school
to the distributor. Remote Order Entry Exported: This field is automatically updated when the Remote Order Entry file is created. Remote Orders Imported: This field is automatically updated when the Remote Order Entry file is imported to
FundTracker. Type of School: This field is used to enter the type of school. Enter Regular, Internet, Helpline, Home Delivery, Buying Group, or Misc School. Pallets Button: This button is used to create Pallets and assign then to the school. Frozen or Dry pallets can be
created. Pick Ticket Message: Enter the message that you would like to appear on each student’s pick ticket for this
school. Picking Warehouse: Enter the warehouse orders will be picked from if different from the products default
warehouse. Pick Ticket Report: Enter the pick ticket that will be used for this school. This pick ticket will override the pick
ticket selected on the Pick Ticket Screen. (School Data Master/Contracts) This tab is used to enter the Contract number, the start and ending dates of the fund raiser. The Start Date is the date the fundraiser starts. The End date is the date the fundraiser ends. These dates are used in Web Order Entry to identity the dates Web Orders can be entered. The Web Ending Date is used to override the End Date
13
if the fund raiser is extended and left open to a later date. The Web Ending date is also updated to the date pick tickets are created for the school. This is usually the last day the fund raiser is allowed to accept orders. (School Data Master/Brochures Tab) Brochures that the school will use are entered here. An unlimited number of brochures can be entered. The Sells check box is used to indicate that the school will be selling the products listed on the brochure. The Brochure Priority is used to assign brochures by priority. Products will be assigned to the brochure with the highest priority if the product appears on more than one brochure. If a product is assigned to more than one brochure, the product will be listed on the brochure with the highest priority. Do not enter more brochures than what the school will actually sell. The brochure discount is used to assign the profit the school will receive for selling products on this brochure. Brochure Pricing is used to assign a product pricing structure for products on this brochure. Brochure Commission is used to assign the commission the sales rep will receive for products sold on this brochure. Magazine Insert check box is used to indicate if a magazine is to be inserted into this brochure. The Swatch check box is used to indicate if the brochure has swatches that need to be attached to the brochure. The Brochure Projected units field is used to record the estimated number of units that the school will sell on this brochure. This estimated number of units is used on some of the forecast reports. The Brochure Creation User and Brochure Creation Date fields will be automatically filled in when the brochure is added to the School Master. The Brochure Last Modified User and Brochure Last Modified Date will be automatically filled in when the brochure is changed in the School Master. The FRM Brochure ID is used to record FRM’s Brochure ID. (School Data Master/Delivery Tab) The delivery tab is used to enter delivery information for the school. Many of the Standard Reports use the delivery dates for reports. Enter the Driver that will make the delivery, the Stop Number, and the Truck Number. The Packed by Date is the date all Orders must be packed by. The DC Departure Date is used to denote the date the truck has to depart the DC in order to make the delivery on time. The Departure Date is used to denote the date the truck has to depart in order to make the delivery on time. The delivery date is the actual date orders are to be delivered to the school. This date is used in many of the Delivery Reports. The Start Shift is the time the shift starts. The leave time is the time the driver has to leave to make the delivery date. The Arrival Start is the start of the time window the driver will arrive at the school. The Arrival End is the end of the time window the driver will arrive at the school. The DC Start is the start of the time window the driver will arrive at the Distribution Center. The DC End is the end of the time window the driver will arrive at the Distribution Center. Exit Time is the time the driver will leave the school. The Driver Return is the time the driver will return. Frozen Pallets are the number of Frozen Pallets that will be delivered to the school. Dry Pallets are the number of Dry Pallets that will be delivered to the school. The Delivery Type is the type of delivery that will be made. Examples are Truck, UPS, USPS, and FedEx. Any Delivery Type can be setup by selecting Schools, Delivery Types. Zones can be used to divide the schools by Zones. Any zone can be setup by selecting, Schools, Zones. Cards Received check box is used to enter a check mark if the school’s orders have been received. Process Complete is used to enter a check mark if Orders have been processed (Entered). Prizes Separate is used if prizes are to be packed separately from products. The Large Prize Separate check box is used if only large prizes are to be packed separately. The Frozen Check box is used if frozen products are to be delivered to the school The Dry Check box is used if dry products are to be delivered to the school. The Prizes in Frozen check box is used if the prizes are to be packed with the frozen products. The Prizes in Dry check box is used if the prizes are to be packed with the dry products. The Redelivery date is used to record a second delivery date if all of the product was not picked up on the first delivery date or if a second delivery date is scheduled as a result of late orders or back orders. The Packed by dropdown window is used to record how the order is packed, By Homeroom, Bulk, or By Seller. The Loading Dock check box is used to indicate if the school has a loading dock that can be used for deliveries. The Distribution Center is used to record what Distribution Center this school will be delivered from. The driving instructions notes field is used to record the driving instructions of how to get to the school.
(School Data Master/Fulfillment Tab) This tab is used to record customized fulfillment information. If you will be doing fulfillment for another company, enter the company’s name in the Company Name Field. This company name will then appear on reports that will be sent to the school for this company. The shipping information field is used to send information to the fulfillment company. The other fields and check boxes are used for orders fulfilled by Pine Valley, FRM, or OSI.
14
(School Data Master/Files Tab) The Files tab allows you to hot link any scanned or PDF files for easy access from the School Master. Examples of this could be the scanned copy of the contract with the school or a PDF of one of the School Summary reports. (School Data Master/Status Tab) The Status tab gives you the ability to track the status of a school’s list of items to be done and to record the completion date for each activity. Each of these processes can be setup by selecting Schools, Processes. A process can be defined and setup for an automatic email to be sent when a completion date is entered. When a process is added the email body, subject line, and who to send the email to can be setup. (School Data Master/Commission Tab) The tab is used to enter the commission the sales rep will receive for this school. Also, any deductions from the sales reps commission can be entered on this tab. (School Data Master/Prizes Tab) This tab is used to enter the Prize programs the school will use. Two automatic prize programs and one pick a prize program can be setup. If a pick a prize program is setup, the user will be asked to pick the prize the student has selected from a list of prizes that the student is eligible to pick from. The student’s Internet orders and brochure orders will be combined in the calculation of the level the student reached.
10) *Homeroom (Schools/Homeroom)– For each school, enter the homerooms that are in the school. If you do not get a list of homerooms before the student orders arrive, homerooms can be entered during order entry. You may also import your homerooms with our Excel import format. If this school is a home delivery or Internet school, the homeroom is used to record the ship to information. In this case place the homeroom teacher in the reference field in order entry. Many of the reports use homeroom as a sorting order field. PICS suggest that you use a number to help designate the homeroom to ensure proper alpha-numerical order. Examples include 00K-Kelly, 01-Jones, 05-Williams, and 06-Johnston. Homerooms can also be imported using an Excel worksheet.
11) Brochure, Product Group, and Product Discounts (Schools/Brochure Discounts, Product Group Discounts)–
Enter any brochure and product level discounts for your schools. This is used if the school has one discount for one brochure and another discount for another brochure. If products have been assigned to a product group, you can control certain products’ discount by groups. If a single product’s discount is different than the rest that are sold to a school or brochure, each product can be assigned a discount using the Product Discount. This is also where you put in commission percentages (Product Group and Brochure). A brochure discount can also be entered on the school master brochure tab.
12) Copy Product Discounts (Schools/Copy Product Discounts)– Use this feature if you offer the same product
discounts to more than one school. 13) *Product Type Tax (Inventory/Product Type Tax– Assign a Tax Jurisdiction and sales tax rate to product types.
This allows a product type to be assigned to a Tax Jurisdiction so that a tax can be assigned to a product. This is useful for nonfood items that are taxed and food items that are non-taxed.
14) Prize Flyer Header (Orders/Prizes/Prize Flyer Header)– Set up the prize flyers (programs) you will use for
awarding prizes to your schools. Prize Flyers can be used for cumulative, non-cumulative, and pick a prize
programs. Enter the Prize Flyer Name, Flyer Type, Cumulative or not, and how you will compare for levels.
15) Prize Flyer Levels (Orders/Prizes/Prize Flyer Levels)- To setup the requirements for each level and their reward, find the Flyer to setup and input levels for the criteria to meet. The number can be alpha or numeric. The level
should start with 1 or A. The flyer can be based on units sold or dollars sold. The prize is the item designated
in the product master with a Prize Flag of Prize. The PRIZE is awarded when the student reaches the dollar or unit amount recorded for that level prize. The prize quantity is the number of prizes the student is awarded.
Enter the level, criteria (dollars or units), and prize for each level listed in the prize flyer. If it is a pick a prize program, enter the choices for each level. A default prize for students that did not pick a prize can be setup and
15
an automatic prize program and when automatic prizes are awarded, choose the option Only Orders without Prizes.
16) *Product Type Tax (Inventory/Product Type Tax– Assign a Tax Jurisdiction and sales tax rate to product types. This allows a product type to be assigned to a Tax Jurisdiction so that a tax can be assigned to a product. This
is useful for nonfood items that are taxed and food items that are non-taxed.
17) *Export Account (Schools/ Export Accounts)- Assign the accounting account name to the FundTracker SQL
field. Fields in FundTracker SQL must be assigned account names that exist in the chart of accounts in your accounting system. Examples of these accounts are Freight, Packing Charges, Sales Tax Payable, and Out of
State Tax. The examples are FundTracker SQL field names that have to be mapped to your accounting system’s chart of accounts.
* - Denotes steps that can be skipped if you are importing an old database to the new FundTracker SQL database.
All of the master files have now been setup and you are now ready to enter student orders.
16
How Do I Enter Student Orders
Follow the instructions below when entering student orders into FundTracker SQL manually in the full version of FundTracker
SQL.
BEFORE ENTERING ORDERS
For each product that will be used on the orders:
Make sure the product has the correct Default Warehouse and Default Bin locations. This is used as the default warehouse
and bin when entering student orders. The system will attempt to pick the product from this warehouse during picking and
will increase on hand inventory to the default receiving location when receiving purchase orders. If you set up multiple
warehouses, picking will only pick items from the warehouse entered from the default warehouse and bin entered as the
default bin location. If the default warehouse and bin locations were incorrect at the time of order entry, select Global
update to correct it. Frozen products should be placed in a frozen warehouse; dry products should be placed in a dry
warehouse. If you pick Prizes in a separate area, place the prizes in a prize warehouse.
Make sure the product has a selected sale price either by checking the default checkbox in the product master or by
entering the price structure in the school master general tab.
Make sure the product is on the correct brochure or brochures for the student’s school.
For products that are prizes, make sure the prize flag is set to PRIZE.
Global updates are able fix things like warehouse locations, prices, discounts, student numbering order, etc. after the orders
have been entered.
INVENTORY
You do not need to have products in stock before entering orders. Inventory is allocated when the school is picked. It is
relieved from inventory when the school is packed. Inventory is considered On hand after receiving against a purchase order
until it is relieved when the order is packed. When you receive, product will be added to the default warehouse bin or whatever
is selected from the inventory transaction screen. When you pack, inventory will be removed from the default warehouse and
bin selected from the product master or from the picking warehouse selection from the school master. There are several reports
that help with inventory, forecasting, and planning.
ENTERING ORDERS
Select Orders / Order Entry. Type in or use the small binoculars to search for your School ID you plan on tallying. Click Add.
The preset info such as prices, discount, salesperson, etc. will auto populate. There are hotkeys which are listed with an
underscore for the different commands in Order entry and you can ENTER and TAB through the fields to navigate order entry.
For the Order Header Screen, you will need to at least provide the Students Name and Student Homeroom. The other fields are
there if needed. When in the Order Detail, you will only need to enter each product number, press the ENTER key, enter the
quantity ordered, then press the ENTER key a second time to add the line item to the order. The discount and unit price fields
will be filled in automatically. The quantity ordered will automatically be used for the quantity to ship. Use Brochure Order
Entry when there are 50 items or less on the brochure. Press the Brochure Tab and select a brochure. If there are 50 items or
less on the brochure all of the items contained on the brochure will be displayed by Sort Order from the Product Master on the
Order Entry Detail Screen. The user only has to enter the quantities needed for each item. The items and item quantities will
then be listed in the detail order entry grid as if it had been entered in the standard way of order entry. The system uses the
quantity to ship when picking, so be sure that you enter the correct quantity for that field if you do not use quick entry. To edit a
line item, click on the line item in the grid on the Order Detail screen. Make any corrections to the line item then click Add To
Order to update the grid. To delete a line item, first select the line item by clicking on it in the grid on the Order Detail screen.
The line will change color to indicate it is selected. Then press the Delete key on your keyboard to delete the line. When done
click save or hit ALT-S to save and the cursor will bring you back to the student’s name under the Order Header to begin the
next order. Saving an order does 2 things, it saves the order and it automatically puts Order Entry back into the Add mode so
that the next student’s order can be entered with the press of just the save button.
When you are finished adding and editing line items for a student, click Save. The expected units field is used to enter the total
number of units the student declared sold. The expected dollars field is used to enter the total dollar amount that was collected
from the student. The total units and dollars appear at the bottom of the order detail screen. This can be visually checked to
make sure no order entry mistake was made. There are also Order Variance Reports that can be printed to show any
discrepancies between the expected dollars and units and the student’s actual order that was entered. Order entry is where most
problems are found and from where most problems are fixed. Many reports reference order entry for the data that are used on
the reports. Global updates can be done to correct incorrect data that was entered into FundTracker prior to Order Entry.
17
For importing orders from your website please refer to the web order import tutorial provided from
http://www.fundtrackersql.com/Downloads.aspx
For Importing orders from Fundtracker SQL’s Remote Fundtracker, please refer to the remote order entry tutorial provided
http://www.fundtrackersql.com/Downloads.aspx
For importing scanned orders, select order, Import Scanned Orders. You will then see a browse screen to use to select the file
containing the scanned records and images of the scanned records. Press Import to import the orders.
DISCOUNTS
Discounts are used when calculating the price displayed on the invoice and many Profit Reports. If the discount for a line item
is 40 and the unit price is 10.00, the invoice will show a unit price of 6.00. Discounts are the same as the profit to the school.
When you enter a school id on the Order Header screen, the system will look up the school’s discount. This value will be
entered in the Order Header discount field. You can change the value if it is incorrect, during Order Entry or change it with
Global Updates.
When you enter a product number, the system will check if there is a brochure, product group, or product level discount for that
product number for the school. If there is a product level discount, that will become the line item’s discount. If there is no
product level discount, the product group discount will be used, if no product group discount, the brochure discount will be
used. If there is no brochure discount, the discount from School Master screen will be used.
For prizes, the discount always defaults to 100. The 100% discount level is the default discount for all prizes. If the discount
shown in Order Entry is not correct, review your school discount, your brochure discounts, product group discounts, and your
product discounts, make adjustments, and then run a Global update for your school for discounts.
PRIZES
If you set a product’s prize flag to “PRIZE,” the system will automatically enter a 100 discount when you enter the product
number on the Order Detail screen. Prizes will also show the 100% discount if automatic prizes is selected.
Prize units and dollars are not included in the summary information on the Order Detail screen. You can select whether to
include prizes on the Program Coordinator Worksheet, Teacher Collection Worksheet, the Sales Ranking reports, the School
Ranking reports, the Prize Level Winner reports, and invoices.
If you select a pick ticket that includes prizes they will be picked like any other product. You can pack prizes with other
products or place them in a separate warehouse.
There are two ways to add prizes to orders. The Automatic Prizes tool will automatically add prize items to each order for a
school, after the school orders have been entered, by going to Orders/Prizes/Automatic Prizes. You can select one product for
each prize level. If students have the option of picking a prize or selecting more than one product for a prize level, you can set
up the prize level options by going to Orders/Prizes/Prize flyer header, next filling out the prize flyer level options
Orders/Prizes/ Prize flyer levels, then making sure the prize flyer has been selected in the school master. You will then need to
manually add the prize items to each individual order or use Automatic Prizes to assign a default prize to students that did not
pick a prize.
When selecting Automatic Prizes, you can select the school id of the normal brochure school and the school id of the Internet
school. Prizes will be awarded for the combined total of both school ids as long as either the order codes or the student name
and homerooms match between the corresponding orders. There is a global update setting to help match internet orders with
brochure orders by order code.
When selecting Pick a Prize programs, when you save each student’s order and all the settings have been set up correctly, you
will be prompted with a screen to click on which ever prizes the student chose, which will be added to the order before moving
to the next student’s order. Only the prize level earned by the student for the combined Internet and Brochure Orders will be
PickTixstudentno.rpt Pick Ticket report showing Student number. Also shows backordered items when show backordered items is selected from picking screen.
Product # A#
PickTixbasic4labelsstuno.rpt
Pick Ticket report showing Student number. Also shows backordered items when show backordered items is selected from picking screen. Includes 4 packing labels.
Used with the Pallet tracking run from school master. Used with a USB printer. Label with student number showing School ID, Homeroom, Student Name, and Amount totals. Used with a USB printer Packing Label with Student Number showing School ID, Homeroom, and Student Name. Used with a USB printer. Packing label showing School ID, Homeroom, Student Name, and Amount Totals. Used with a USB printer.
Packing Label showing School ID, Homeroom, Student Name, Amount Totals, and quantity of labels. Used with a non USB printer. Prize label showing the School ID, Homeroom Students name, Prizes earned. Includes Student Number. Order Label showing the School ID, School Description, Homeroom, and Student Name.
22
Orderstuno2.625X1.rpt School4x1.333.rpt
Order Label showing the School ID, School Description, Homeroom, Student Name, and Student Number. Label Showing School ID and School Description.
Site2.625x1.rpt Label showing the Warehouse and the corresponding UPC code of said warehouse.
Purchase Order Reports
Description
PurOrder.rpt PurOrdercase.rpt
Showing Brochure Item Number, quantity ordered, unit price, and totals Showing Brochure Item Number, Case quantity ordered, case price, and totals
Legend:
Product #: Lists the products on each pick ticket in order of
Product Number BIN: First lists the products on each pick ticket in order of
bin location, then by product number.
A#: Sorts the order of pick tickets alpha-numerically by Homeroom, then by student’s name
OE: Sorts the order of pick tickets alphanumerically by
Homeroom, then by the order at which it was entered in order entry.
WARE: Separates each student’s order into the different
Warehouse locations first, then sorts accordingly.
NOHR: The Pick Tickets are either sorted by Alpha-Numeric
order by student’s name or by the order at which it was


![SQL Exercises [Part-1] - Concordia Universityusers.encs.concordia.ca/.../Tutorials/1.SQL_Exercises_Part_I.pdf · SQL Exercises [Part-1] 2 ... Solution #2 - 2 Q-1: Find all the stars](https://static.documents.pub/doc/80x56/5abd2d2a7f8b9a567c8ea5ea/sql-exercises-part-1-concordia-exercises-part-1-2-solution-2-2-q-1.jpg)


