Quick Start Title Avaya Communication Manager SIP Quick start guide Document QS000003 Last update 2011-03-23 DuVoice Versions 5.00 Table of Contents 1. Overview ....................................................................................... 1 2. PBX Configuration .......................................................................... 1 Capacity Verification ....................................................................... 1 IP Codec ....................................................................................... 2 Configure IP Network Region ......................................................... 3 Configure IP Node Name ................................................................. 4 Configure SIP Signaling ................................................................... 4 Configure SIP Trunk........................................................................ 4 Configure Avaya SIP Enabledment Services........................................ 6 3. DuVoice Configuration ................................................................... 8 Channel SIP Configuration ............................................................. 12 Administer Hospitality ................................................................... 13 Overview This document will guide you through the configuration needed to connect the DuVoice SIP system to an Avaya Communication manager and SIP Enablement Services. This guide does not include installation instructions. For message waiting indicators the DuVoice uses the standard dial codes. The default settings are *41 for on and *42 for off. PBX Configuration Capacity Verification Enter the display system-parameters customer-option command. Verify the number of OPS stations for the voicemail system. You will need one for each line on the DuVoice system. Copyright 2011 DuVoice Corporation
Transcript
Quick Start
Title Avaya Communication Manager SIP Quick start guide
Document QS000003
Last update 2011-03-23
DuVoice Versions 5.00
Table of Contents1. Overview ....................................................................................... 12. PBX Configuration.......................................................................... 1
This document will guide you through the configuration needed to connect the DuVoiceSIP system to an Avaya Communication manager and SIP Enablement Services. Thisguide does not include installation instructions.
For message waiting indicators the DuVoice uses the standard dial codes. The defaultsettings are *41 for on and *42 for off.
PBX Configuration
Capacity Verification
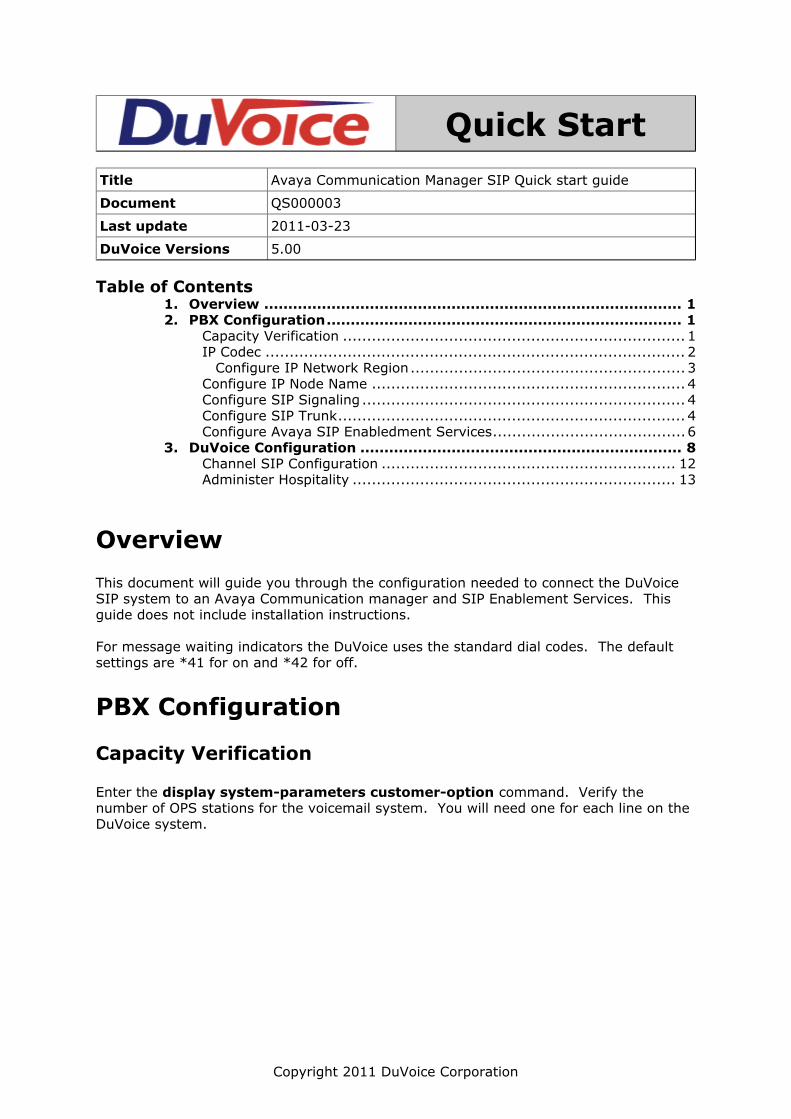
Enter the display system-parameters customer-option command. Verify thenumber of OPS stations for the voicemail system. You will need one for each line on theDuVoice system.
Copyright 2011 DuVoice Corporation
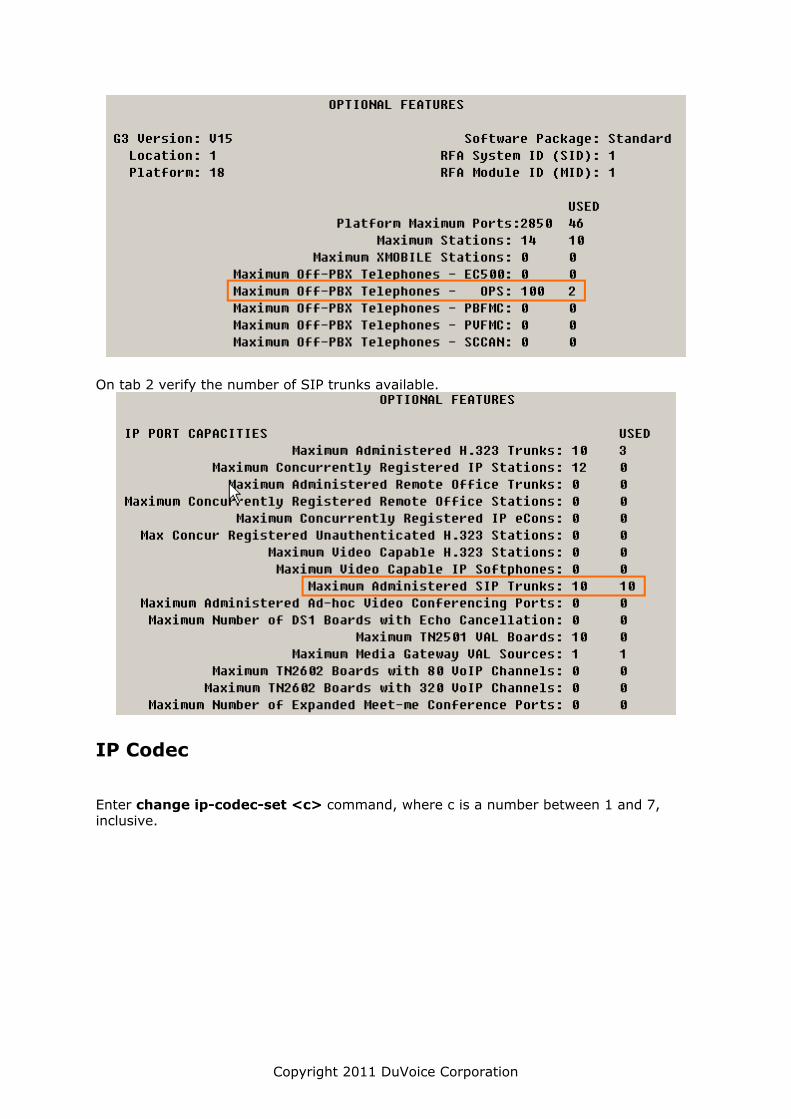
On tab 2 verify the number of SIP trunks available.
IP Codec
Enter change ip-codec-set <c> command, where c is a number between 1 and 7,inclusive.
Copyright 2011 DuVoice Corporation
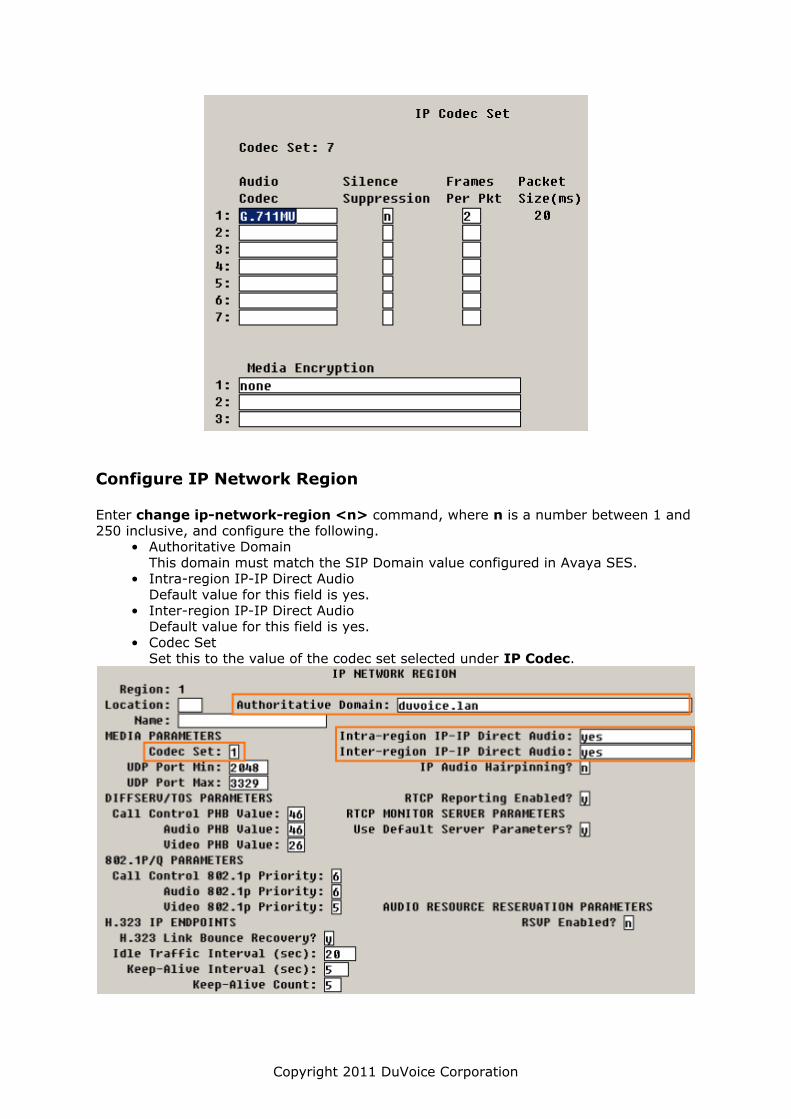
Configure IP Network Region
Enter change ip-network-region <n> command, where n is a number between 1 and250 inclusive, and configure the following.
• Authoritative DomainThis domain must match the SIP Domain value configured in Avaya SES.
• Intra-region IP-IP Direct AudioDefault value for this field is yes.
• Inter-region IP-IP Direct AudioDefault value for this field is yes.
• Codec SetSet this to the value of the codec set selected under IP Codec.
Copyright 2011 DuVoice Corporation
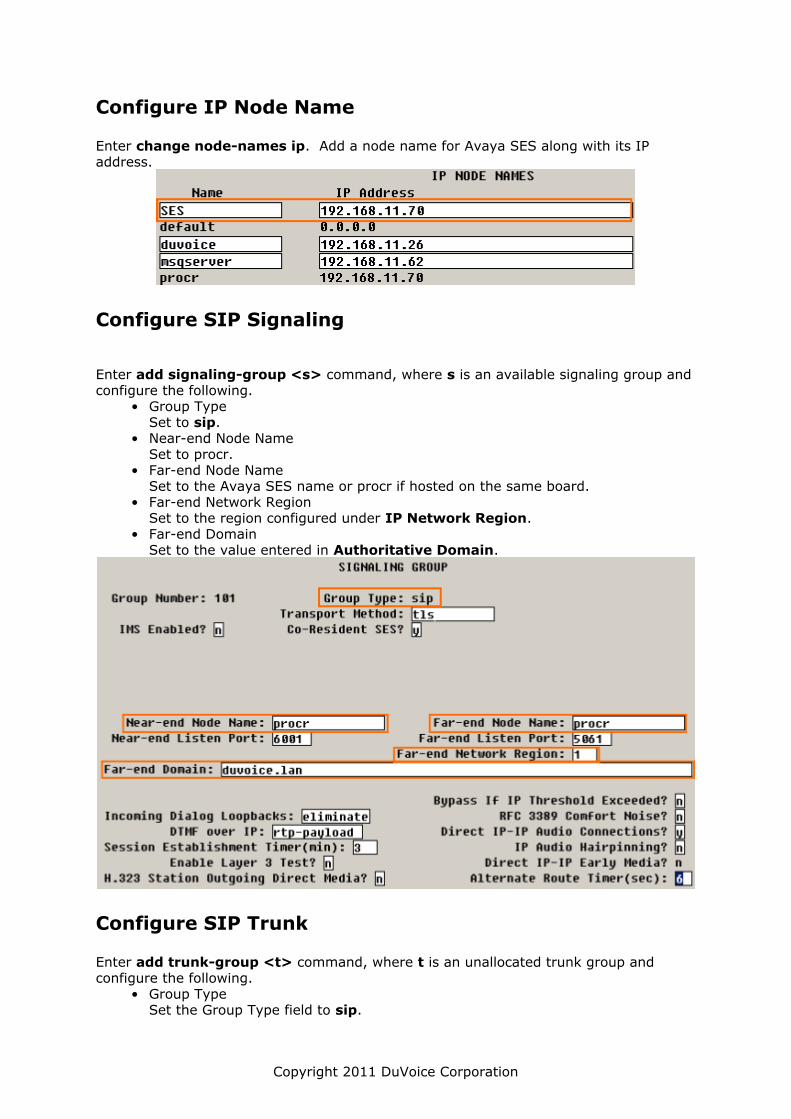
Configure IP Node Name
Enter change node-names ip. Add a node name for Avaya SES along with its IPaddress.
Configure SIP Signaling
Enter add signaling-group <s> command, where s is an available signaling group andconfigure the following.
• Group TypeSet to sip.
• Near-end Node NameSet to procr.
• Far-end Node NameSet to the Avaya SES name or procr if hosted on the same board.
• Far-end Network RegionSet to the region configured under IP Network Region.
• Far-end DomainSet to the value entered in Authoritative Domain.
Configure SIP Trunk
Enter add trunk-group <t> command, where t is an unallocated trunk group andconfigure the following.
• Group TypeSet the Group Type field to sip.
Copyright 2011 DuVoice Corporation
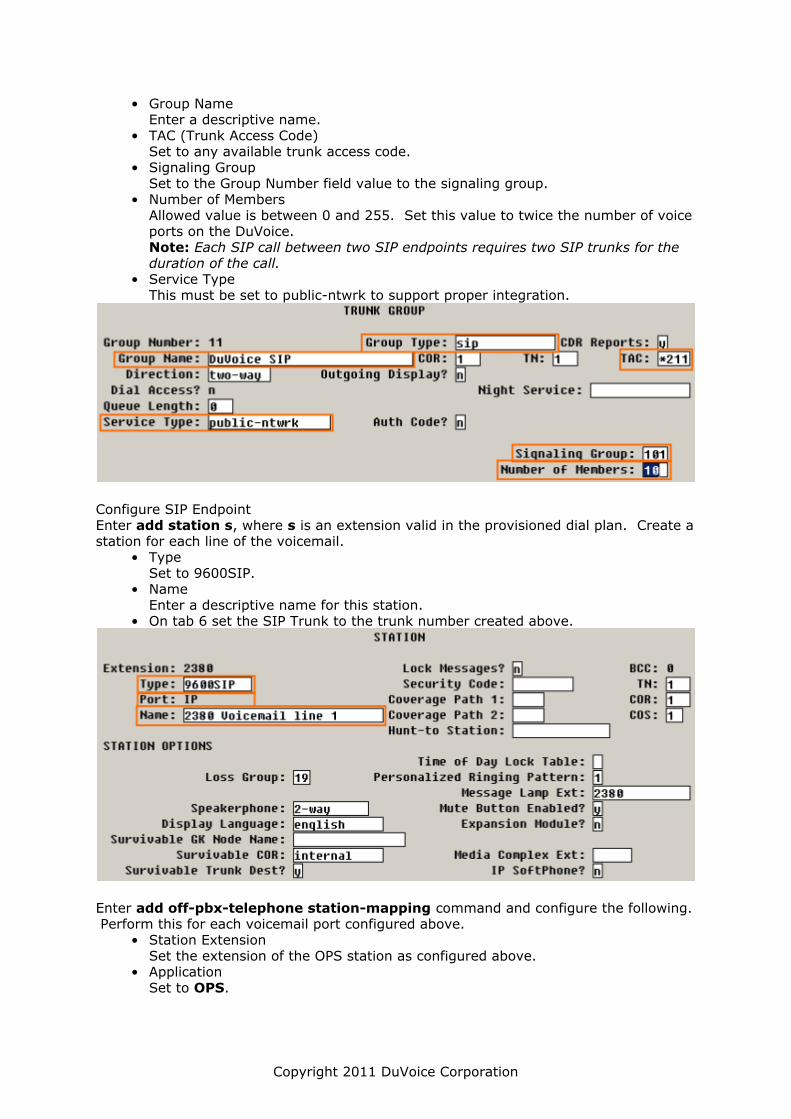
• Group NameEnter a descriptive name.
• TAC (Trunk Access Code)Set to any available trunk access code.
• Signaling GroupSet to the Group Number field value to the signaling group.
• Number of MembersAllowed value is between 0 and 255. Set this value to twice the number of voiceports on the DuVoice.Note: Each SIP call between two SIP endpoints requires two SIP trunks for theduration of the call.
• Service TypeThis must be set to public-ntwrk to support proper integration.
Configure SIP EndpointEnter add station s, where s is an extension valid in the provisioned dial plan. Create astation for each line of the voicemail.
• TypeSet to 9600SIP.
• NameEnter a descriptive name for this station.
• On tab 6 set the SIP Trunk to the trunk number created above.
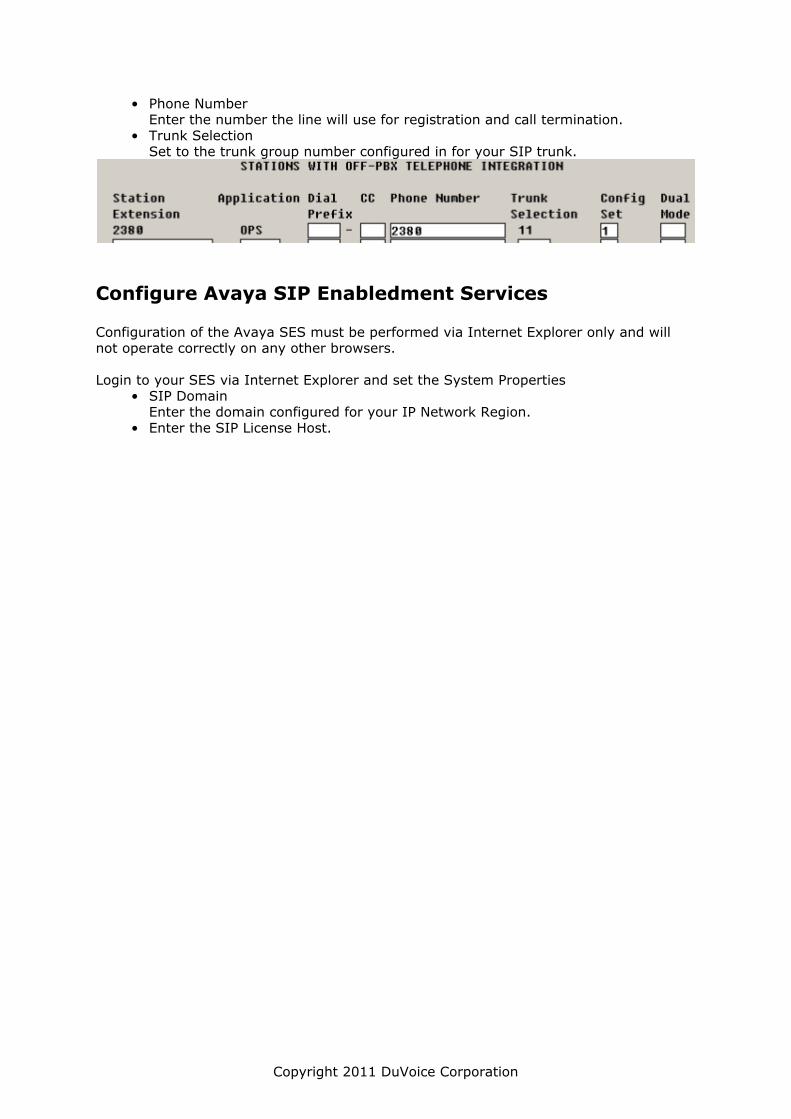
Enter add off-pbx-telephone station-mapping command and configure the following.Perform this for each voicemail port configured above.
• Station ExtensionSet the extension of the OPS station as configured above.
• ApplicationSet to OPS.
Copyright 2011 DuVoice Corporation
• Phone NumberEnter the number the line will use for registration and call termination.
• Trunk SelectionSet to the trunk group number configured in for your SIP trunk.
Configure Avaya SIP Enabledment Services
Configuration of the Avaya SES must be performed via Internet Explorer only and willnot operate correctly on any other browsers.
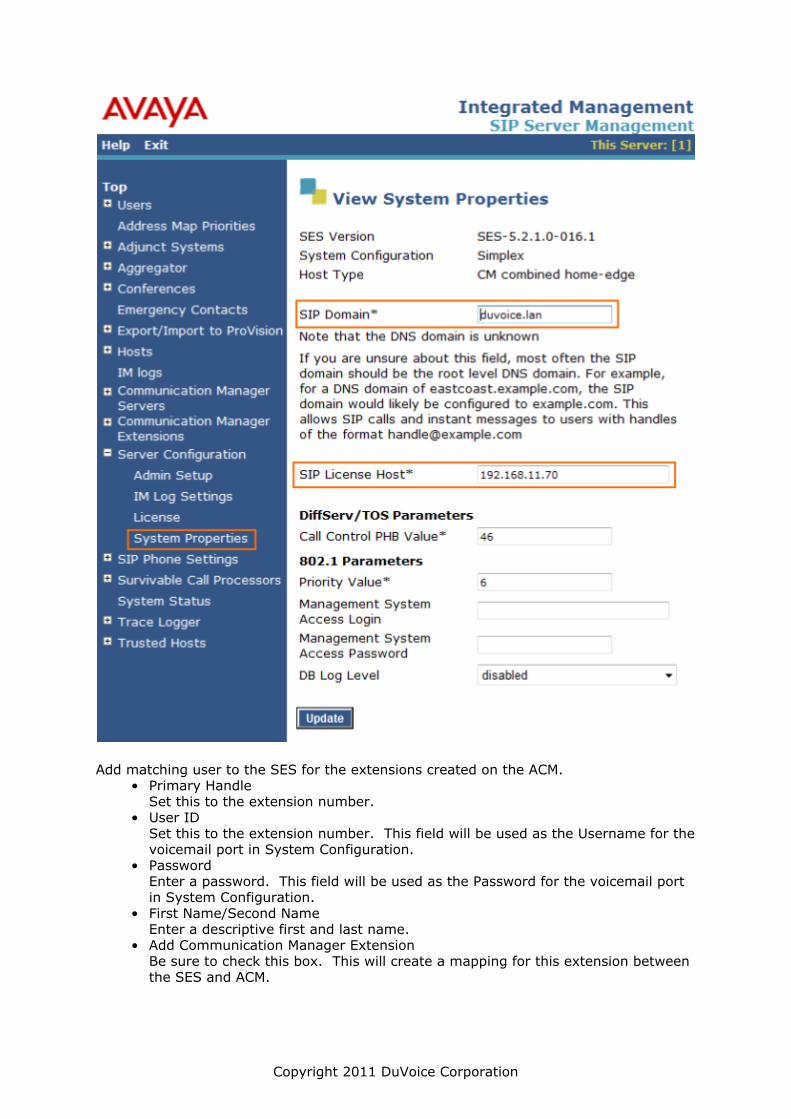
Login to your SES via Internet Explorer and set the System Properties• SIP Domain
Enter the domain configured for your IP Network Region.• Enter the SIP License Host.
Copyright 2011 DuVoice Corporation
Add matching user to the SES for the extensions created on the ACM.• Primary Handle
Set this to the extension number.• User ID
Set this to the extension number. This field will be used as the Username for thevoicemail port in System Configuration.
• PasswordEnter a password. This field will be used as the Password for the voicemail portin System Configuration.
• First Name/Second NameEnter a descriptive first and last name.
• Add Communication Manager ExtensionBe sure to check this box. This will create a mapping for this extension betweenthe SES and ACM.
Copyright 2011 DuVoice Corporation
When the Add button is pressed enter the extension number and confirm theCommunication Manager Server field is correct and click Add.
DuVoice Configuration
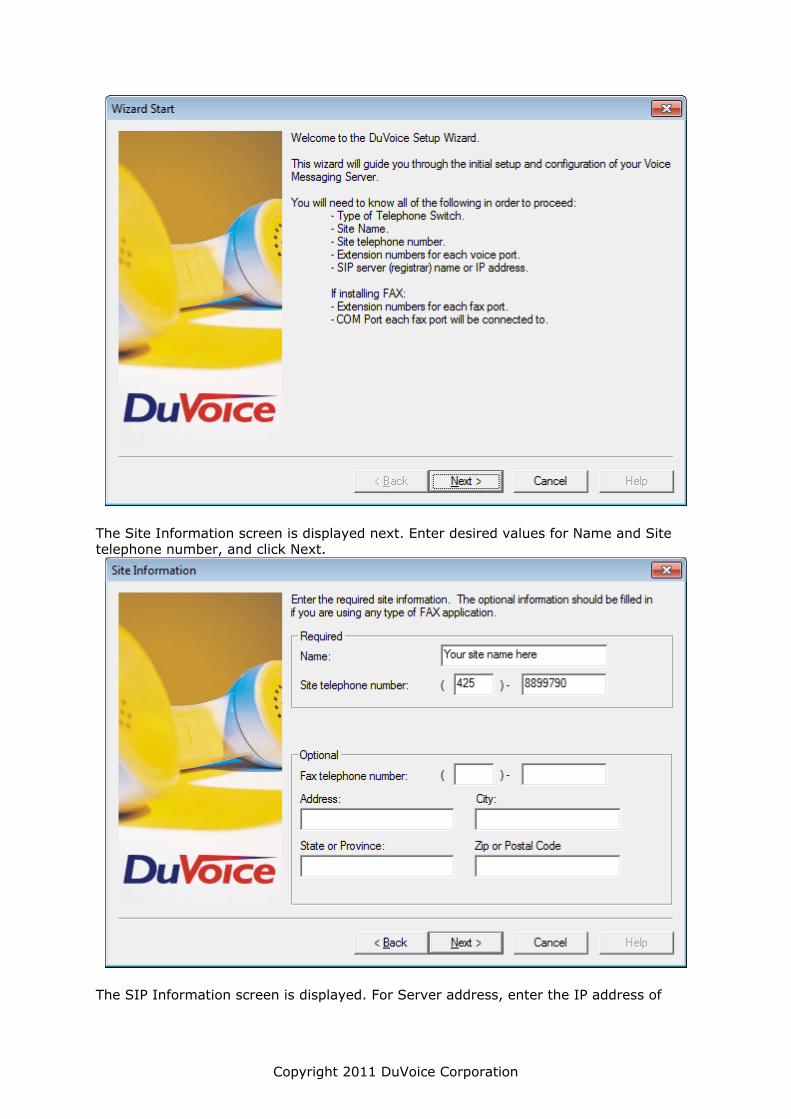
Setup wizardSetup wizard will run automatically when the system is restarted until it hascompleted successfully. It will also be run automatically if it has not been completed byrunning either Mailbox Administration or System Configuration.
Copyright 2011 DuVoice Corporation
The Site Information screen is displayed next. Enter desired values for Name and Sitetelephone number, and click Next.
The SIP Information screen is displayed. For Server address, enter the IP address of
Copyright 2011 DuVoice Corporation
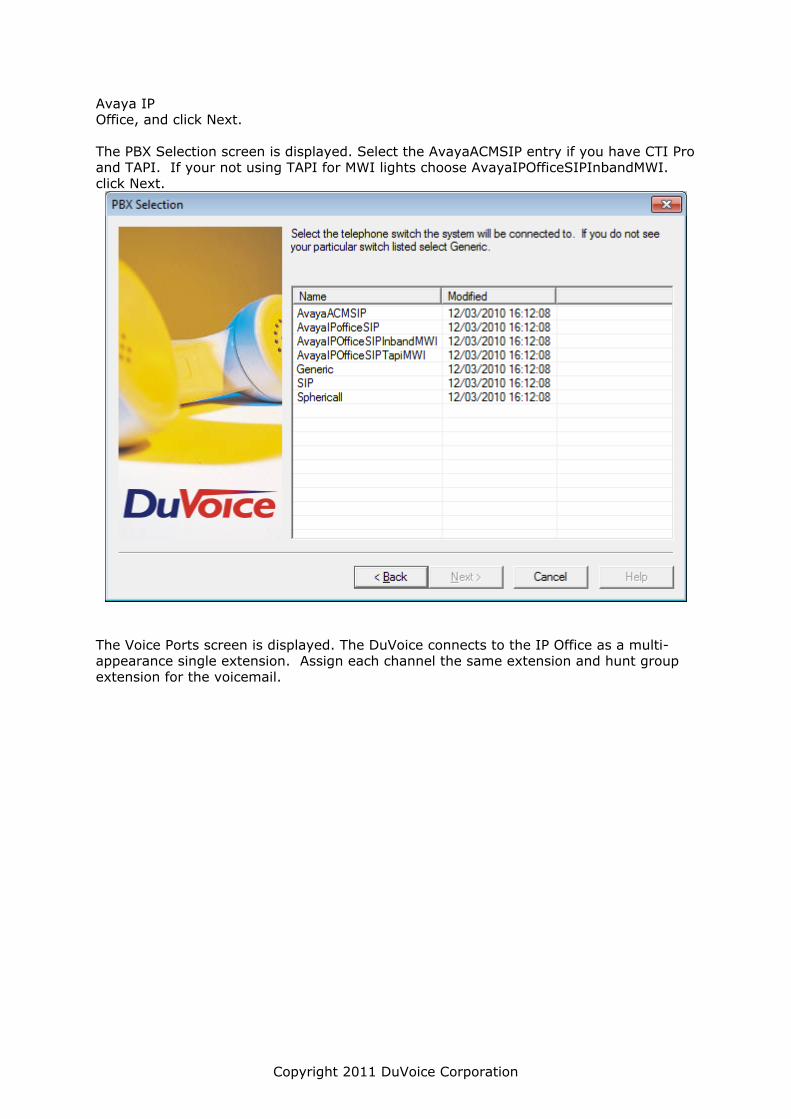
Avaya IPOffice, and click Next.
The PBX Selection screen is displayed. Select the AvayaACMSIP entry if you have CTI Proand TAPI. If your not using TAPI for MWI lights choose AvayaIPOfficeSIPInbandMWI.click Next.
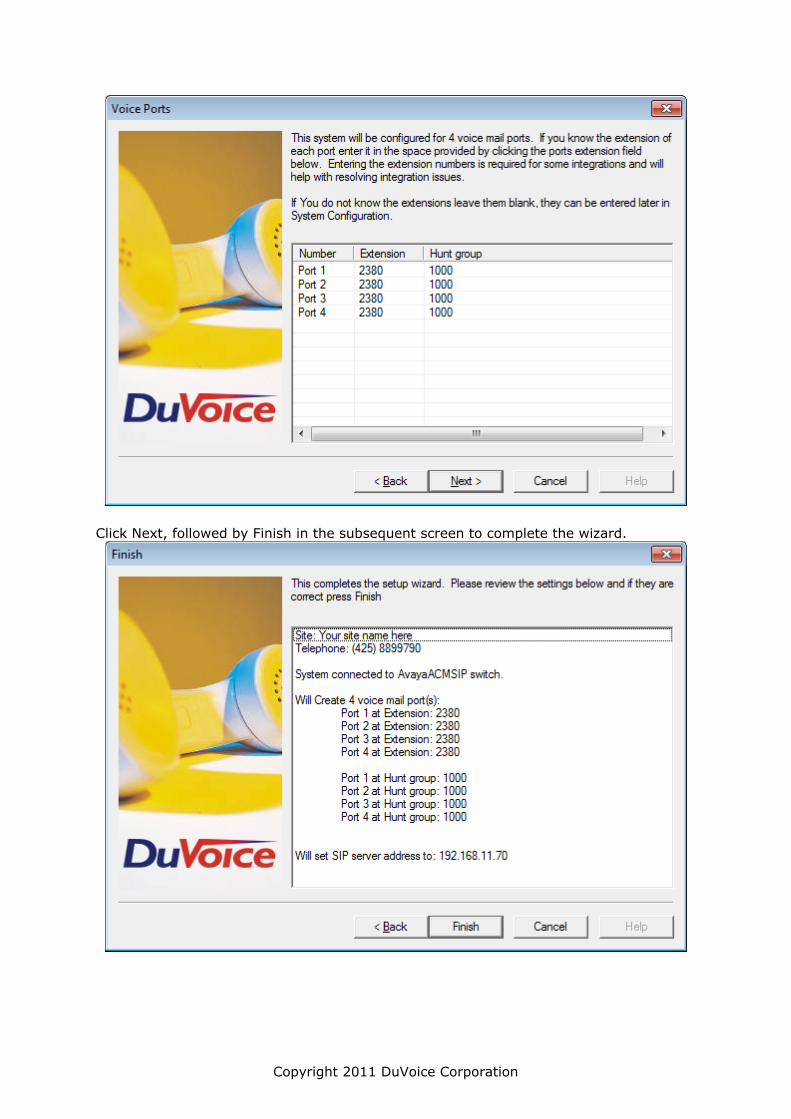
The Voice Ports screen is displayed. The DuVoice connects to the IP Office as a multi-appearance single extension. Assign each channel the same extension and hunt groupextension for the voicemail.
Copyright 2011 DuVoice Corporation
Click Next, followed by Finish in the subsequent screen to complete the wizard.
Copyright 2011 DuVoice Corporation
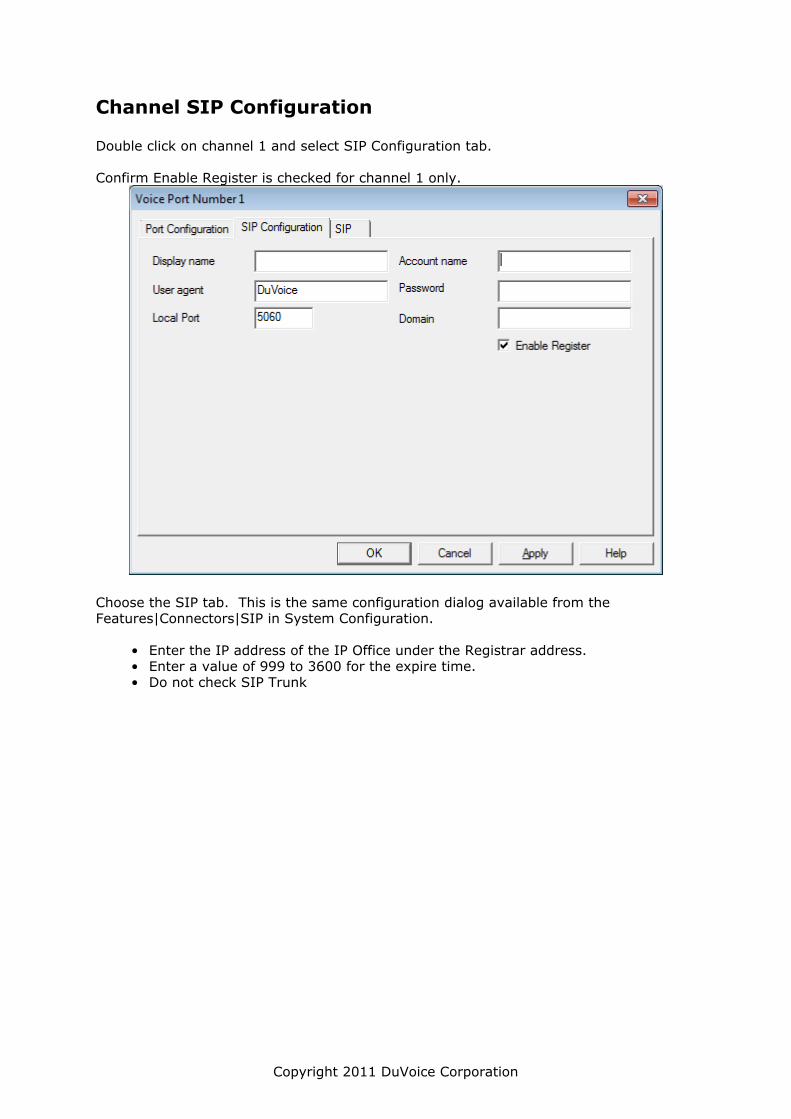
Channel SIP Configuration
Double click on channel 1 and select SIP Configuration tab.
Confirm Enable Register is checked for channel 1 only.
Choose the SIP tab. This is the same configuration dialog available from theFeatures|Connectors|SIP in System Configuration.
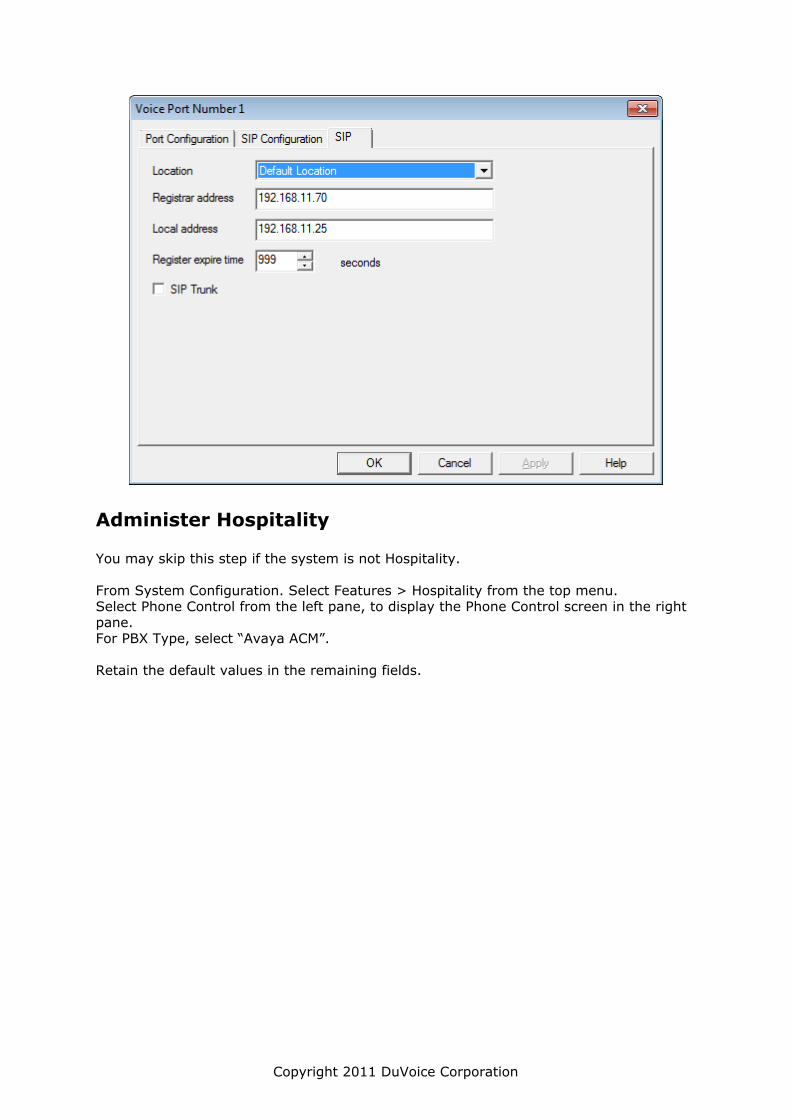
• Enter the IP address of the IP Office under the Registrar address.• Enter a value of 999 to 3600 for the expire time.• Do not check SIP Trunk
Copyright 2011 DuVoice Corporation
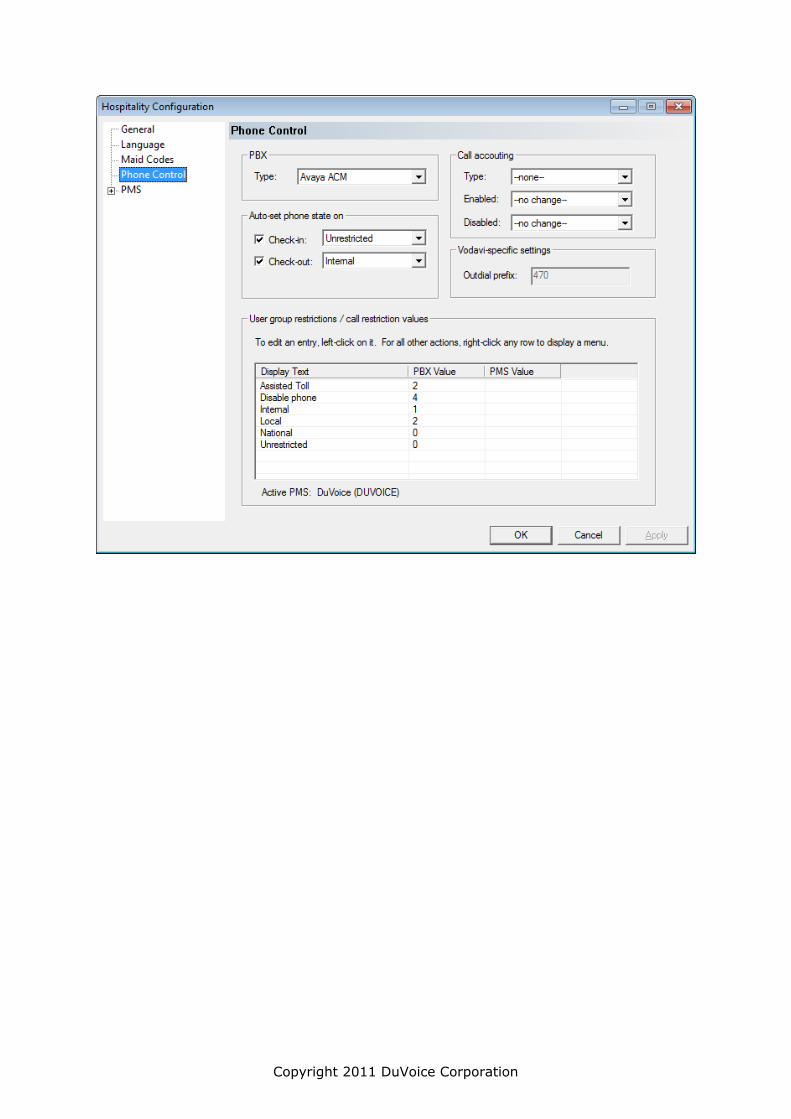
Administer Hospitality
You may skip this step if the system is not Hospitality.
From System Configuration. Select Features > Hospitality from the top menu.Select Phone Control from the left pane, to display the Phone Control screen in the rightpane.For PBX Type, select “Avaya ACM”.
Retain the default values in the remaining fields.