43
Administration Guide September 2017 1022410 Rev. A

Administration Guide
September 20171022410 Rev. A

rdxLOCK Administration Guide
©2017 Overland Storage, Inc. All rights reserved.
Overland®, Overland Storage®, ARCvault®, DynamicRAID®, GuardianOS®, NEO®, NEO Series®, PowerLoader®, Protection OS®, RAINcloud®, REO®, REO 4000®, REO Series®, Snap Appliance®, Snap Care® (EU only), SnapSAN®, SnapScale®, SnapScale X2®, SnapServer®, StorAssure®, Ultamus®, VR2®, and XchangeNOW® are registered trademarks of Overland Storage, Inc.
Tandberg Data®, AccuGuard®, AccuVault®, DPS1000 Series®, DPS1100®, DPS1200®, DPS2000®, Magnum®, QuikStation®, QuikStor®, RDX®, RDXPRO®, StorageLibrary®, StorageLoader®, Tandberg SecureService®, Tandberg StorageLibrary®, and VXA® are registered trademarks of Tandberg Data, Inc.
Desktop Cloud Orchestrator® and V3® are registered trademarks of Sphere 3D Corp.Campus Cluster™, NEO Agility™, RapidRebuild™, Snap ECR™, Snap Encrypted Continuous Replication™, SnapExpansion XSR™, SnapScale X4™, SnapServer DX Series™, SnapServer XSD Series™, SnapServer XSD40™, SnapServer XSR Series™, SnapServer XSR40™, SnapServer XSR120™, SnapServer Manager™, SnapStorage Manager™, and SnapSync™ are trademarks of Overland Storage, Inc.BizNAS™, QuadPak™, and RDX+™ are trademarks of Tandberg Data, Inc.G-Series™, Glassware 2.0™, and SnapCLOUD™ are trademarks of Sphere 3D Corp.All other brand names or trademarks are the property of their respective owners.
The names of companies and individuals used in examples are fictitious and intended to illustrate the use of the software. Any resemblance to actual companies or individuals, whether past or present, is coincidental.
PROPRIETARY NOTICEAll information contained in or disclosed by this document is considered proprietary by Sphere 3D Corp. By accepting this material the recipient agrees that this material and the information contained therein are held in confidence and in trust and will not be used, reproduced in whole or in part, nor its contents revealed to others, except to meet the purpose for which it was delivered. It is understood that no right is conveyed to reproduce or have reproduced any item herein disclosed without express permission from Sphere 3D Corp.Sphere 3D Corp. provides this manual as is, without warranty of any kind, either expressed or implied, including, but not limited to, the implied warranties of merchantability and fitness for a particular purpose. Sphere 3D Corp. may make improvements or changes in the product(s) or programs described in this manual at any time. These changes will be incorporated in new editions of this publication.Sphere 3D Corp. assumes no responsibility for the accuracy, completeness, sufficiency, or usefulness of this manual, nor for any problem that might arise from the use of the information in this manual.
FW 2.3.2.208
REVISION HISTORY
Revision Date Description
A September 2017 Initial release
1022410 Rev. A ©2017 Overland Storage, Inc. 2
Overland Storage/Tandberg Data9112 Spectrum Center BoulevardSan Diego, CA 92123 USA
TEL 1.800.729.8725 (toll free)1.858.571.5555FAX 1.858.571.3664
www.overlandstorage.comwww.tandbergdata.com

Contents
Chapter 1: Product InformationOverview ....................................................................................................................................................................... 5Key Features ................................................................................................................................................................. 5
Protection Policies .................................................................................................................................................. 6Enhanced Security Mode (ESM) ........................................................................................................................... 6Verified Retention Clock (VRC) ............................................................................................................................ 6RansomBlock .......................................................................................................................................................... 7Restrictions .............................................................................................................................................................. 7
rdxLOCK Manager ....................................................................................................................................................... 8
Chapter 2: InstallationInstall rdxLOCK ............................................................................................................................................................ 10
Installation Preparation ....................................................................................................................................... 10Silent Mode ........................................................................................................................................................... 10Install rdxLOCK Procedure .................................................................................................................................. 11
Post-Installation Actions ............................................................................................................................................. 14System Clock Verification ................................................................................................................................... 14Existing WORM Volumes Upgrade ...................................................................................................................... 15
Uninstall rdxLOCK ....................................................................................................................................................... 15
Chapter 3: ConfigurationTimeSync Key .............................................................................................................................................................. 18WORM Volume Setup ................................................................................................................................................ 19RansomBlock Volume Setup .................................................................................................................................... 21Protection Policies and Retention Periods .............................................................................................................. 23License Keys ................................................................................................................................................................ 27
Permanent License Reuse ................................................................................................................................... 30
Chapter 4: Best PracticesAuthorization in RansomBlock .................................................................................................................................. 33Whitelist/Blacklist Viewer ........................................................................................................................................... 35
Whitelist/Blacklist Manually ................................................................................................................................. 36Whitelist Automatically ........................................................................................................................................ 36
Appendix A: TroubleshootingReporting a Problem ................................................................................................................................................. 39rdxLOCK Tab Not Available on MS Explorer’s Property Page ............................................................................... 39Application Event Log Message: “Invalid license” ................................................................................................ 40
Appendix B: CompatibilityFilter Compatibility ..................................................................................................................................................... 41
1022410 Rev. A ©2017 Overland Storage, Inc. 3

1022410 Rev. A ©2017 Overland Storage, Inc. 4

1Product Information
rdxLOCK is a hardware-independent software product, which provides infinite or fixed (by date or period) WORM (Write Once, Read Many) protection for data on standard hard disk systems.
Topics in Product Information:
• Overview • Key Features • rdxLOCK Manager
OverviewApplications can write data locally, via CIFS, FTP, or NFS, directly to a rdxLOCK protected file system, but are not allowed to make any modification after the data has been locked. The locking mechanism is completely controlled by rdxLOCK on a directory- or file-level basis and ensures that a file object is changed to WORM based on the selected protection policy. A special API is not necessary for this.rdxLOCK’s protection policies ensure that files can’t be modified, renamed, moved, or overwritten in any way, preserving data in a non-rewritable, non-erasable manner for an infinite period of time. Additionally, rdxLOCK prevents the alteration of file attributes. A special feature, RansomBlock (see page 7), also prevents unauthorized modification. Special permission must be granted either manually or automatically for any changes.To meet regulatory compliance requirements, rdxLOCK allows the deletion of data after a pre-defined retention period, but still prevents the user from modifying expired data.
As rdxLOCK is able to use the existing server and disk storage infrastructure, an audit- compliant archive can be implemented in a cost-effective manner. Even existing file systems can be converted to WORM file systems by rdxLOCK.rdxLOCK supports NTFS volumes on 32-bit and 64-bit Windows architectures.
Key FeaturesNOTE: Starting with version 2.3.0, the availability of some functions and features depends on
the installed license. This administration guide documents the full function and feature set.
1022410 Rev. A ©2017 Overland Storage, Inc. 5

rdxLOCK Administration Guide 1 - Product Information
Protection PoliciesProtection policies can be configured on the root level. The following protection policies are supported:
• DLR – Directory-Level RetentionThe DLR policy is based on directory level. The advantage of this policy is the option, to prolong the retention period of a data pool by changing only one single figure.
• SFR – Single File Retention (SnapLock interface)The SFR policy allows an individual retention period for every individual file. It provides compatibility with the NetApp SnapLock interface.
Enhanced Security Mode (ESM)rdxLOCK protected volumes can be managed on operating system level mostly like any volume. In particular, you can move them from one disk system to another one, and you can mount them on any computer, even if there is no rdxLOCK software installed.Enhanced Security Mode is an additional security level to encrypt the volume in a way that no content of the real volume is visible, if rdxLOCK is not installed. Instead of the real content of the NTFS volume, you can see a small FAT – volume with warning information. It also inhibits the deletion of files on rdxLOCK protected volumes in the following cases:
• The rdxLOCK file system filter has been stopped.• rdxLOCK has been uninstalled from the system.• A rdxLOCK WORM volume has been moved to a server system, which does not have
rdxLOCK installed.Since rdxLOCK 2.3.0, ESM V5 has been used. This version supports encryption with AES-256. ESM V4 volumes are still supported and can optionally be set to V5. New created volumes will only be created as V5 with a FAST encryption. The internal ESM number is increased to prevent older rdxLOCK version mounting this volume. V4 and V5 volumes can be converted to V5 AES-256.
NOTE: Please run a backup of the WORM volume before changing the encryption method.
Since rdxLOCK 2.3.1 all productively used volumes need to be set to ESM. Only test volumes work without ESM and expire after 60 days.
Verified Retention Clock (VRC)A compliant data storage system needs a secure tamper-proof time base to measure retention periods and ensure WORM integrity.rdxLOCK provides a secure and compliant retention time management, called Verified Retention Clock (VRC). This facility has to be synchronized directly after setting up the software by entering a special TimeSync key. (See TimeSync Key on page 18.)This key contains a trusted timestamp for verifying that the system clock is in a certain range compared to UTC (Coordinated Universal Time). Only if the verification succeeds, WORM volumes can be initialized, configured, and controlled. As long as the verification has not been implemented, the system can not be used for managing WORM volumes.All WORM volumes created by a rdxLOCK application with a non-verified system clock are marked as “TEST WORM VOLUMES” and can only be converted to valid, productive WORM volumes on systems with a verified system clock and as long as their temporary license is still valid.
1022410 Rev. A ©2017 Overland Storage, Inc. 6
rdxLOCK Administration Guide 1 - Product Information
After a successful system clock verification, VRC closely monitors the system clock and ensures that system clock manipulations cannot be used to delete files before they expire. Such manipulations can end in temporary prolongation of retention periods when the system clock is set in the future or to access restrictions when it is set in the past.Small changes in the system clock are manageable, but when the clock is adjusted over large ranges, or the system is switched off or rebooted for any reasons, this does result in a prolongation of retention periods. To mitigate such artificially extended retention time periods, VRC allows a drifting of the retention time offset (RTT-Offset) up to a week per year to make up for downtimes due to system maintenance and other housekeeping events. Any longer periods of downtime will need to be handled via a TimeSync key, if the RTT-Offset is beyond an acceptable value (out of bounds). In most cases, a new TimeSync key will need to be installed.VRC is designed to support removable WORM media as well. Taking a WORM volume offline for an extended time period does not end up in a temporary prolongation of retention periods registered in a volume.
RansomBlockRansomBlock protects data on Windows file systems from unauthorized modification. New data can be written by any application locally to a RansomBlock protected file system. However, when a file is closed, no applications (not even the owner) is allowed to modify, rename, move, or overwrite the file (except if the change request is approved by a system administrator or an authorized user account). The approval can be issued specifically (such as for a certain process on a certain file object) or generally (such as for the lifetime of a process on any file object).Applications can be blocked from modifying files by adding them to a banned list of applications (blacklisted) or can be granted write access to all local files by adding them to a trusted list of applications (whitelisted). The integrity of a whitelisted application is ensured by its SHA1 hash value. Therefore unwanted modifications on a trusted application can be detected and reported to the user.Also existing file systems can be converted to RansomBlock file systems. RansomBlock supports NTFS volumes on 32-bit and 64-bit Windows architectures.
Restrictions• rdxLOCK Version 2.3.2 is designed for NTFS formatted volumes on primary
partitions of basic disks with MBR (master boot record) and GPT (GUID Partition Table) partitioning scheme. If rdxLOCK is configured for a volume residing on a dynamic disk, the Enhanced Security Mode will not be supported on that volume.
• rdxLOCK may not be installed on systems which do have any version of TrueCrypt installed.
• rdxLOCK supports certified removable media and certified removable devices such as RDX media and docks.
• Other file systems than NTFS are not supported.• System volumes and cluster quorum disks are excluded by the configuration
procedure.• Appending data to rdxLOCK protected files is not supported.• Files having Extended Attributes or reparse points attached can’t be set to WORM.
1022410 Rev. A ©2017 Overland Storage, Inc. 7

rdxLOCK Administration Guide 1 - Product Information
• The Recycle Bin functionality can not be used on WORM volumes, since rdxLOCK denies the move operation to the recycle bin when an expired WORM file is selected for deletion. Therefore it is recommended to deactivate the Recycle Bin for the individual WORM volumes to make the deletion of expired WORM files possible.Please note that Microsoft has redesigned the Recycle Bin behavior in Windows VISTA, Windows 2008 Server, and Windows 7. The properties of the Recycle Bin are now tied to user profiles rather than the actual disk. Therefore each user must explicitly switch off the Recycle Bin of the corresponding WORM volumes when accessing them locally for deleting expired WORM files.
• Upgrades are only supported from rdxLOCK version 2.1.0 Build 29 and higher.Previous versions need special support, so please contact your service provider.
• Read-only volumes are not supported.• Volumes mounted inside a WORM volume are not WORM protected.• Shrinking an ESM protected volume is not supported.• Adding a mirror to an ESM protected volume is not supported.• Volumes marked as 'active' can not be used in ESM mode.• Backing up an image of a single, ESM encrypted partition on a GPT disk is not
supported. In this case an image backup of the entire GPT disk must be created including the backup of unused sectors.
• The replication service user account needs administrative rights including the backup, restore, and take ownership privilege. When replicating to a remote share, the appropriate share permissions and NTFS security rights must be granted to the service user account accordingly.
rdxLOCK ManagerManagement is handled primarily through the rdxLOCK Manager GUI.
1022410 Rev. A ©2017 Overland Storage, Inc. 8

rdxLOCK Administration Guide 1 - Product Information
1022410 Rev. A ©2017 Overland Storage, Inc. 9

2Installation
This section covers the installation of the rdxLOCK software.
NOTE: Administrative rights are required to install, configure, license, update, and set policies and retention times for rdxLOCK. When installing rdxLOCK on Windows 7 or Windows 2008 Server (or higher), you need to be logged in as Administrator or to run the installation program using the Run as administrator context menu option.
Topics in Installation:
• Install rdxLOCK • Post-Installation Actions • Uninstall rdxLOCK
Install rdxLOCKWhen installing rdxLOCK, you can use either a “silent” mode or the normal Windows process.
Installation Preparation1. Close all applications running on the system.2. Copy the rdxLOCK executable program (rdxLocksetup_<version>.exe) to your
Windows system and note its location.
Silent ModeYou can run rdxLOCK setup in a “silent” mode. This applies to new installations and updates. In “silent” mode the rdxLOCK setup runs with default settings (with installing ESM) automatically and, if wanted, in the background. If it is not deselected, a reboot is performed after setup.The “silent” setup is started in CMD with following parameters:
Example:rdxLocksetup_<version>.exe /SILENT /NORESTART
/SILENT automatically, status dialogs are still displayed
/VERYSILENT automatically, completely in the background
/NORESTART the reboot is deselected (only with a “silent” mode)
1022410 Rev. A ©2017 Overland Storage, Inc. 10

rdxLOCK Administration Guide 2 - Installation
Install rdxLOCK ProcedureTo install rdxLOCK using the wizard:
1. Run the rdxLOCK program to start the installation wizard.
2. Check the I have read this box and click Next for the License Agreement.You must agree to the license contract to continue with the rdxLOCK installation.
1022410 Rev. A ©2017 Overland Storage, Inc. 11

rdxLOCK Administration Guide 2 - Installation
3. Select I accept the agreement and click Next. A dialog information box is displayed regarding administrator rights.
4. At the Select Destination Location screen, either accept the default location or, using the Browse button, select the folder where you want to install rdxLOCK.
1022410 Rev. A ©2017 Overland Storage, Inc. 12

rdxLOCK Administration Guide 2 - Installation
5. At the Select Additional Tasks window, choose the tasks you want.
• Create a desktop icon (recommended).• Create a Quick Launch icon (recommended).• View the README file.
6. At the Ready to Install screen, verify the settings and click Install.
1022410 Rev. A ©2017 Overland Storage, Inc. 13

rdxLOCK Administration Guide 2 - Installation
rdxLOCK will be installed to the selected destination folder.
7. At the final Wizard screen, click Finish to reboot the computer.
Post-Installation ActionsOnce the rdxLOCK is up and running, perform the following actions.
System Clock VerificationAfter a new installation or an upgrade from versions prior to 2.2.6, the system clock needs to be verified by a TimeSync key (see TimeSync Key on page 18).As long as the system clock is not verified by TimeSync, the following restrictions exist:
• New volumes cannot be initialized.• WORM volumes created by rdxLOCK version 2.2.5 or previous are put into READ-
ONLY mode and are not switched to the regular WORM mode until the TimeSync verification has succeeded.
1022410 Rev. A ©2017 Overland Storage, Inc. 14

rdxLOCK Administration Guide 2 - Installation
Existing WORM Volumes UpgradeAfter an upgrade from versions prior to 2.3.1 all WORM volumes need to be upgraded.
1. Start the rdxLOCK Manager and select WORM Volumes.
2. Right-click a WORM volume and click Upgrade.
NOTE: Upgraded Volumes can no longer be read by prior versions.
Uninstall rdxLOCK
NOTE: You must exit rdxLOCK before it can be uninstalled.
You can uninstall rdxLOCK using the Windows Software Manager:1. Click Start > Control Panel > (Add or Remove) Programs.2. From the list of programs, select the rdxLOCK product and click Uninstall (or
Remove).
1022410 Rev. A ©2017 Overland Storage, Inc. 15

rdxLOCK Administration Guide 2 - Installation
3. At the first conformation screen, click Yes.
4. At the second conformation screen, click Yes again.
During uninstall, a status screen shows the progress.5. Due to the Enhanced Security Mode, a reboot is required to completely remove
rdxLOCK from your system; click YES.
IMPORTANT: If you remove the rdxLOCK product from your system, you will not be able to access WORM-committed files anymore.
In addition, due to the Enhanced Security Mode applied to a WORM volume, the WORM NTFS file system is hidden and inaccessible after uninstalling the rdxLOCK product.
1022410 Rev. A ©2017 Overland Storage, Inc. 16

rdxLOCK Administration Guide 2 - Installation
1022410 Rev. A ©2017 Overland Storage, Inc. 17

3Configuration
This section focuses on the setup and configuration of newly installed rdxLOCK software.
Topics in Configuration:
• TimeSync Key • WORM Volume Setup • RansomBlock Volume Setup • Protection Policies and Retention Periods • License Keys
TimeSync KeyA TimeSync key is used to verify that the system clock is in a certain range compared to UTC and therefore ensures that file retention times are managed in a safe and secure fashion.Once the TimeSync key verification process succeeds, the system is ready for handling WORM volumes. Every additional TimeSync operation resets the internal “corrective retention time offset” parameter (RTT-Offset). rdxLOCK maintains this RTT-Offset to manage the time offset between the system clock and the Verified Retention Clock (VRC). These offsets occur due to normal situations like the system being powered down or potentially abnormal situations where the system clock is changed or potentially rolled back.To apply a TimeSync key, take the following steps:
1. Start the rdxLOCK GUI application.2. Select the menu item Configuration > Apply TimeSync.
1022410 Rev. A ©2017 Overland Storage, Inc. 18

rdxLOCK Administration Guide 3 - Configuration
3. Click the click here link.
4. Copy the TimeSync key string from the web page directly to the corresponding dialog's input field and press Apply.Alternatively, you can save the key to a file first and then select that file for applying the TimeSync key using Browse.
NOTE: This can take up to 2 minutes (until the system clock gets verified). VRC information is displayed in the output panel view called “VRC” of the rdxLOCK Manager application.
WORM Volume SetupFor converting an NTFS volume to a WORM volume, use rdxLOCK Manager to open the Properties page of the appropriate volume. Alternatively, you can use MS Explorer or Disk Management.
NOTE: This approach can only be used if you are logged in as the local administrator or as a domain administrator with special security options.
1. Run the rdxLOCK Manager program, right-click the appropriate volume, and select Properties.If you are logged in as a standard user, who is not a member of the local administrator group, you will get an UAC prompt for entering the administrator's password to run the program with full elevated rights and privileges as an administrator.
1022410 Rev. A ©2017 Overland Storage, Inc. 19

rdxLOCK Administration Guide 3 - Configuration
2. Select the rdxLOCK tab.3. Select WORM MODE.
CAUTION: Switching the volume to WORM mode is irreversible!
The Policy Level Setup is automatically set to root level and Enhanced Security Mode (ESM) is activated.
IMPORTANT: Under Enhanced Security Mode, data on the volume will be encrypted after confirmation. This process can take a very long time (days or even weeks) depending on the amount of used data blocks on the volume and your hardware. It is highly recommended that only empty RDX Media be converted and used with WORM.
4. Click OK to save the settings.5. At the Confirmation screen, type WORM (all caps) and click OK.
NOTE: Enhanced Security Mode encryption can be activated on a WORM volume at any time, but cannot be switched off after its activation.
1022410 Rev. A ©2017 Overland Storage, Inc. 20

rdxLOCK Administration Guide 3 - Configuration
The tab information changes to policy options once the volume is converted to a WORM state:
RansomBlock Volume SetupFor converting an NTFS volume to a RansomBlock volume, use rdxLOCK Manager to open the Properties page of the appropriate volume. Alternatively, you can use MS Explorer or Disk Management.
NOTE: This approach can only be used if you are logged in as the local administrator or as a domain administrator with special security options.
1. Run the rdxLOCK Manager program, right-click the appropriate volume, and select Properties.If you are logged in as a standard user, who is not a member of the local administrator group, you will get an UAC prompt for entering the administrator's password to run the program with full elevated rights and privileges as an administrator.
2. Select the rdxLOCK tab.
1022410 Rev. A ©2017 Overland Storage, Inc. 21

rdxLOCK Administration Guide 3 - Configuration
3. Select RANSOMBLOCK.
The Policy-Level Setup should show “root-level.”4. Click OK to make this volume’s mode RansomBlock.5. At the Confirmation screen, type “WORM” (all caps) and click OK.
After confirming, the whole volume is ready for monitoring and controlling file system access using RansomBlock.
1022410 Rev. A ©2017 Overland Storage, Inc. 22

rdxLOCK Administration Guide 3 - Configuration
6. Open the Properties page of the appropriate volume again, select the rdxLOCK tab, and verify that the ENABLE RANSOMBLOCK box is checked.
Enhanced Security Mode is automatically checked.
Protection Policies and Retention PeriodsAfter a volume has been configured for WORM, protection policies should be defined on the root directory. WORM policies must be configured as they are required for WORM to function. All subdirectories created under the configured root directory inherit the same configured policies.Definition of terms:
• Directory-Level Retention (DLR) – Retention periods are related to directories, not to single files. All files in a certain directory and all sub-directories are treated the same way.
• Single File Retention (SFR) – Retention periods are related to individual files.• Auto-Commit Mode – Files written into a certain location are committed to be
WORM after a defined period of time (AUTOCOMMIT DELAY) by rdxLOCK software. (No application activity is needed.)
• Application-Commit Mode – Files written into a certain location are NOT committed to be WORM without application activities. To set files to WORM status, the application has to follow the SnapLock procedure and set the read-only flag for the file or directory.
• Event-Based Retention – Files written into a certain location can be committed via Auto-commit (no application activity is needed) or by setting the read-only flag. The files have now an Infinite retention time.
Depending on the WORM mode, retention periods are handled differently. rdxLOCK distinguishes between directory-level (DLR) and single file (SFR) retention periods.
1022410 Rev. A ©2017 Overland Storage, Inc. 23

rdxLOCK Administration Guide 3 - Configuration
Directory-Level Retention (DLR)
The rdxLOCK DLR policy determines the expiration date of a WORM file by adding the retention period to the WORM-commit timestamp of that file. The expiration date is configured on a directory level and inherited to all its subdirectories.The DLR policy always uses the Auto-commit mode which means all files are set to WORM after the Auto-commit delay period. No file stays as a non-WORM status in such folders.
Single File Retention (SFR)
The rdxLOCK SFR policy allows for association of file retention periods and WORM status at the granularity of individual files.By setting the read-only attribute of the file, the WORM-commit operation is either triggered automatically by rdxLOCK (Auto-commit mode) or a third-party application (Application-commit mode).The Auto-commit mode of the SFR policy is similar to the Auto-commit mode of the DLR policy, but when retention periods have to be prolonged, auto-committed WORM files have to be set individually.When Application-commit mode is active, files MUST be set read-only to get WORM protection. If the file’s read-only attribute is not set in Application-commit mode, the file remains unprotected.
NOTE: The retention period for an RDX WORM volume is set to Infinite for both DLR and SFR.
rdxLOCK Directory-Level Retention Policy
The rdxLOCK DLR policy allows the configuration of an infinite retention period on the root directory or on any folder of the first- and second-directory level of a WORM volume.The rdxLOCK DLR policy automatically commits files to WORM after their creation, however the WORM trigger can be delayed by a value that is configured for the “AUTOCOMMIT DELAY” parameter. This value can be set between 0 and 100000 seconds (~ 27.7 hours). The value can be modified at any time (increase/decrease) to fit to your needs.
1022410 Rev. A ©2017 Overland Storage, Inc. 24

rdxLOCK Administration Guide 3 - Configuration
The following configuration screen can be modified by right-clicking the appropriate folder using MS Explorer and selecting Properties (or Configure when using rdxLOCK Manager).
These rules apply to WORM files covered by a rdxLOCK DLR policy:• WORM files cannot be modified, overwritten, renamed, or deleted.• WORM files cannot be changed back to non-WORM files.• Security settings (ACL) on WORM files can not be changed any more. Therefore, we
recommend to always using security groups in order to be able to change security for single users by adding or removing them from the assigned group.
The following rules apply to expired WORM files covered by a rdxLOCK DLR policy:• Expired files can only be deleted. Renaming or modifying an expired WORM file is
not allowed.• Increasing the retention period of a DLR policy will also be reflected on expired
WORM files, which means that an expired WORM file can be WORM protected again depending on the length of the new retention period.
rdxLOCK Single File Retention Policy
The rdxLOCK SFR policy provides compatibility with applications using the SnapLock interface to write data to a NetApp filer or similar systems.
1022410 Rev. A ©2017 Overland Storage, Inc. 25
rdxLOCK Administration Guide 3 - Configuration
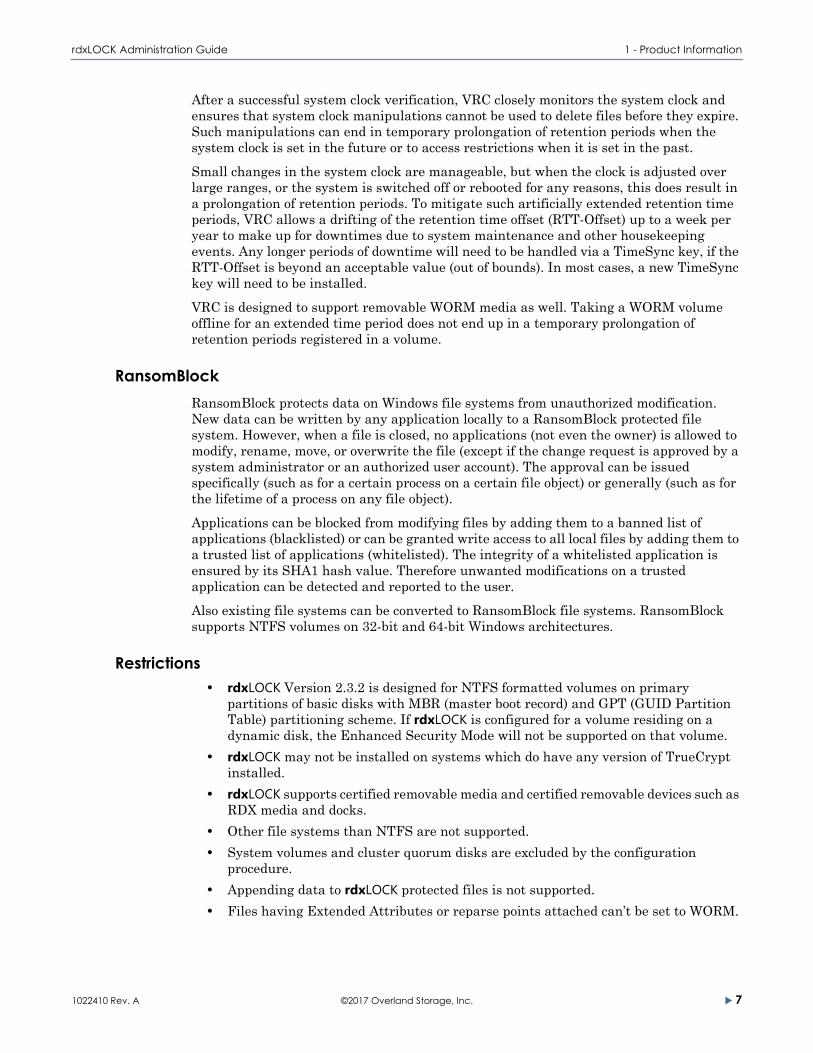
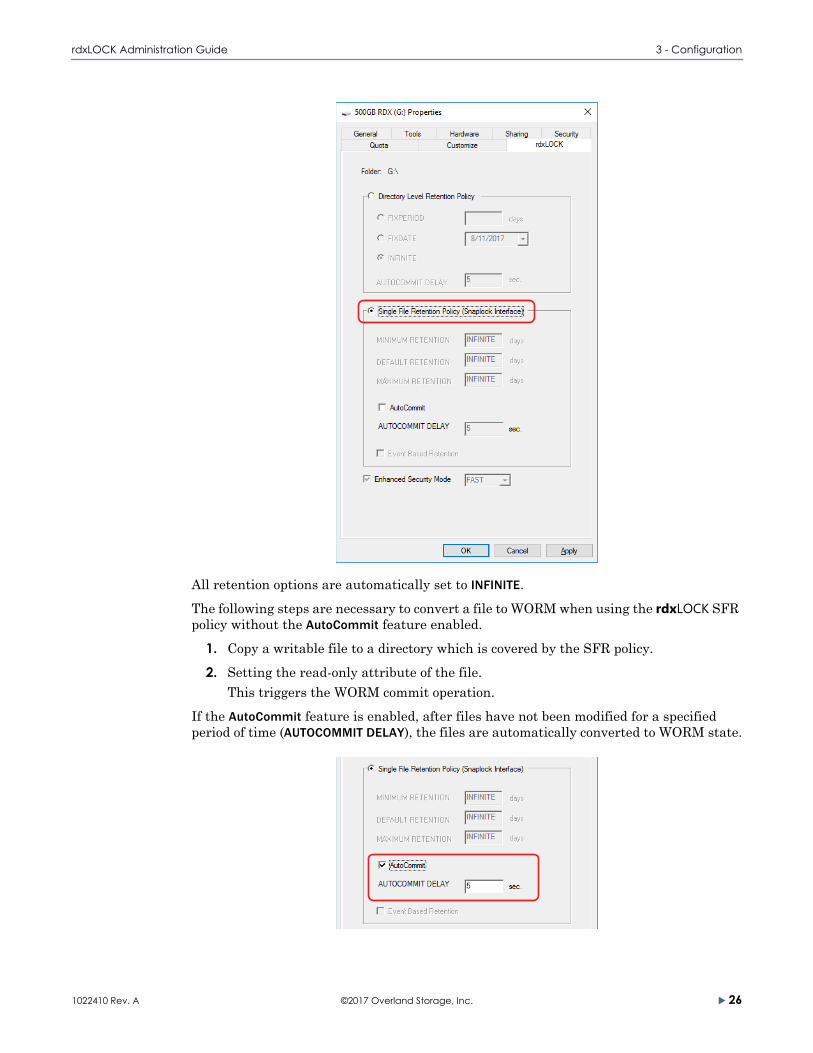
All retention options are automatically set to INFINITE.The following steps are necessary to convert a file to WORM when using the rdxLOCK SFR policy without the AutoCommit feature enabled.
1. Copy a writable file to a directory which is covered by the SFR policy.2. Setting the read-only attribute of the file.
This triggers the WORM commit operation.If the AutoCommit feature is enabled, after files have not been modified for a specified period of time (AUTOCOMMIT DELAY), the files are automatically converted to WORM state.
1022410 Rev. A ©2017 Overland Storage, Inc. 26

rdxLOCK Administration Guide 3 - Configuration
These rules apply to WORM files covered by a rdxLOCK SFR policy:• WORM files can not be modified, overwritten, renamed or deleted.• WORM files can not be changed back to non-WORM files.• The retention period for an RDX WORM volume is set to Infinite.• Since the expiration date of a WORM file is stored in its last-access timestamp
attributes, the last-access timestamp is not updated on a read access as on a standard NTFS file system.
• Security settings (ACL) on WORM files can not be changed any more.We recommend to always using security groups in order to be able to change security for single users by adding or removing them from the assigned group.
The following rules apply to both RDX WORM policies:• RDX WORM policies are configured on the root level.• When configuring protection policies on the directory level, it is not mandatory to
assign a WORM policy to each folder in this hierarchy.• Directories containing WORM files cannot be renamed.• New created directories can be renamed within the “AUTOCOMMIT-DELAY” time
period after their creation (or within 60 seconds if the Auto-commit feature is disabled).
License KeysNOTE: A permanent license key can only be requested on an system with a Verified Retention
Clock installed. See Verified Retention Clock (VRC) on page 6.
rdxLOCK includes a trial license that allows each volume to be used for 60 days after they are configured as either WORM or RansomBlock. While the trial license does not have a capacity limit and is not limited to a specific number of volumes, you must register those volumes to obtain a permanent license if you want to use them past the 60-day trial period.
NOTE: Access to all WORM volumes on a system with an expired trial license will be denied.
To obtain a permanent license key, each WORM volume must be registered separately using both the Capacity ID provided with the RDX media and the media’s serial number. The license key you receive is then used to generate the permanent license for that specific media’s capacity and is linked to that media’s serial number.To obtain and install a permanent license:
1. In the Windows Start menu, select Programs > rdxLOCK > rdxLOCK Manager.2. From the WORM Volumes list, right-click the specific WORM volume drive letter
for which you want to request a permanent license.
1022410 Rev. A ©2017 Overland Storage, Inc. 27

rdxLOCK Administration Guide 3 - Configuration
3. From the volume’s context menu, select Request License.
4. At the Request License screen, enter the Capacity ID which was provided with your RDX media.
Characters are automatically converted to uppercase letters if lowercase letters are entered.
5. Click OK to generate the WORM Volume License Request Information.6. Send the request to the licensing service using either the online WEB-PORTAL
option (recommended) or via email.
1022410 Rev. A ©2017 Overland Storage, Inc. 28

rdxLOCK Administration Guide 3 - Configuration
• WEB-PORTAL Option:
NOTE: When using the WEB- PORTAL option, your server MUST be connected to the internet.
Use the drop-down menu item WEB-PORTAL to launch your browser and access the WEB-PORTAL. Log into the WEB-PORTAL and follow the steps online to acquire the license key file. If you do not yet have login access, you need to register and provide a valid email address. The licensing service then responds back to you using that email address.
• Email Option:Use the drop-down menu item MAIL to launch your email client and automatically generate an email with the necessary information. Copy the WORM Volume License Request Information to a text file and send it as an email attachment to [email protected].
7. After receiving the email with the permanent license key file, save the file to an easy-to-access location.
8. In the rdxLOCK Manager, right-click the volume letter and select Install License from the context menu.
9. Browse to the permanent license key file and click Open to activate the license.Alternatively, select the rdxLOCK Manager menu item Configuration > Install License Key(s) which automatically assigns license keys to the corresponding WORM volumes based on their serial numbers.
10. At the successful installation message, click OK.
1022410 Rev. A ©2017 Overland Storage, Inc. 29

rdxLOCK Administration Guide 3 - Configuration
11. Check the license type and status on the right-side pane of the rdxLOCK Manager.It can take up to four (4) minutes before the license status is updated.
After you have installed a permanent license, you can still add additional WORM capacity to a WORM volume with add-on licenses. Add-on license keys are also installed using the Install License option in volume’s context menu.rdxLOCK monitors the capacity on each WORM volume and displays a warning message in the rdxLOCK event log when a WORM volume nears its capacity limit. If the capacity limit is exceeded, write operations on the volume are denied until additional WORM capacity is licensed for the volume.Volume Properties in the rdxLOCK Manager provides an overview of the installed license types, statuses, and used/free WORM capacities.
Permanent License ReuseOnce you obtain a permanent WORM license to use on a specific RDX cartridge, that license is stored on the RDX media itself. If you delete the license by either erasing, reformatting, repartitioning, or, in any other way, changing the cartridge and its metadata, the license is deleted. However, the license can be regenerated and reused on that same cartridge by just re-registering the RDX media using the same Capacity ID and serial number to get a new key.To reuse your existing license:
1. On a system that does NOT have rdxLOCK installed, reformat or clean the RDX cartridge using Windows.You can use your existing system only if rdxLOCK has been completely uninstalled including the removal of the Enhance Security Module (ESM). When you are done reformatting the media, reinstall rdxLOCK.
2. On an rdxLOCK system, use the normal licensing procedure to request a permanent license key for the media.Use the same Capacity ID and serial number to generate the WORM Volume License Request Information. Refer to License Keys on page 27.
3. Send the request via WEB-PORTAL or email.4. Install the new permanent license key you receive.
The cartridge is now ready to reuse on your rdxLOCK system.
1022410 Rev. A ©2017 Overland Storage, Inc. 30

rdxLOCK Administration Guide 3 - Configuration
1022410 Rev. A ©2017 Overland Storage, Inc. 31

rdxLOCK Administration Guide 3 - Configuration
1022410 Rev. A ©2017 Overland Storage, Inc. 32

4Best Practices
rdxLOCK is a software solution that enables RDX WORM Media to be used as a storage device for regulatory compliance archiving via WORM protection mode where data must not be deleted or overwritten. Also included is RansomBlock mode which protects data on Windows file systems from unauthorized modification.rdxLOCK software is downloadable for free and provides an infinite period of WORM data retention.RDX WORM media includes a 60-day software license linked to the RDX Media and its capacity.RDX WORM media should be used with Enterprise Content Management (ECM) systems, Document Management Systems (DMS), Finance Data, Data Logging, Patient Files (such as PACS), Documentation, and Video and Voice recordings since it helps you meet compliance requirements for electronically stored data.If you plan to use rdxLOCK with a Backup application, we recommend using the RansomBlock feature and convert your RDX Media volume into a RansomBlock volume. After conversion, backup software can use RDX media for its automated backup jobs and all backup data on the RDX media is protected from unauthorized manipulation by viruses, ransomware, and other malicious malware.It is important to note that data on a RansomBlock volume can be deleted or modified if data access is granted because it doesn’t have the compliance WORM protection like a configured WORM volume.
Topics in Best Practices:
• Authorization in RansomBlock • Whitelist/Blacklist Viewer
Authorization in RansomBlockThe following options are available to control volume access under RansomBlock configuration:
• GRANT – Access is granted for one action.• DENY – Access is denied.• AUTHORIZE PID – Access is granted for the lifetime of a process.
1022410 Rev. A ©2017 Overland Storage, Inc. 33
rdxLOCK Administration Guide 4 - Best Practices
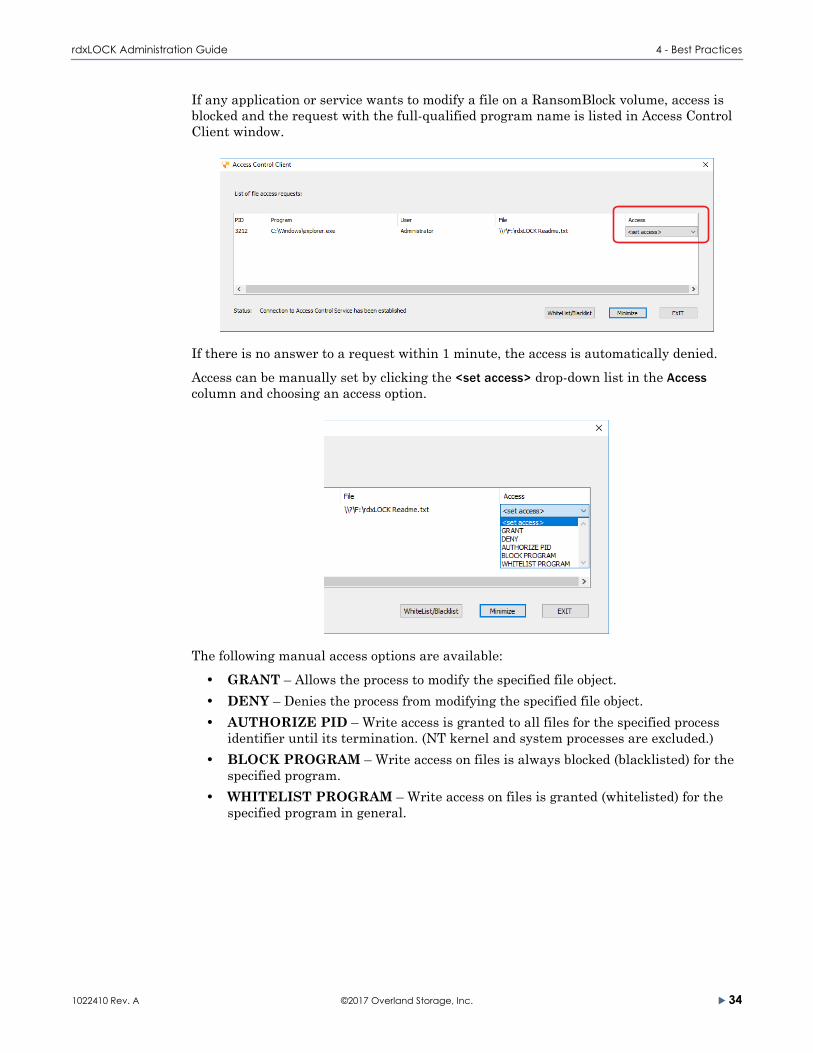
If any application or service wants to modify a file on a RansomBlock volume, access is blocked and the request with the full-qualified program name is listed in Access Control Client window.
If there is no answer to a request within 1 minute, the access is automatically denied.Access can be manually set by clicking the <set access> drop-down list in the Access column and choosing an access option.
The following manual access options are available:• GRANT – Allows the process to modify the specified file object.• DENY – Denies the process from modifying the specified file object.• AUTHORIZE PID – Write access is granted to all files for the specified process
identifier until its termination. (NT kernel and system processes are excluded.)• BLOCK PROGRAM – Write access on files is always blocked (blacklisted) for the
specified program.• WHITELIST PROGRAM – Write access on files is granted (whitelisted) for the
specified program in general.
1022410 Rev. A ©2017 Overland Storage, Inc. 34

rdxLOCK Administration Guide 4 - Best Practices
In exceptional cases, it may be necessary to switch off the RansomBlock function. Open the Properties page of the appropriate volume again, select the rdxLOCK tab, uncheck the ENABLE RANSOMBLOCK box, and click OK.
Whitelist/Blacklist ViewerWhitelisted and blacklisted applications can be viewed by clicking Whitelist/Blacklist in the Access Control Client.
1022410 Rev. A ©2017 Overland Storage, Inc. 35

rdxLOCK Administration Guide 4 - Best Practices
Whitelist/Blacklist ManuallyTo manually whitelist or blacklist a program, click either WHITELIST PROGRAM or BLACKLIST PROGRAM, browse to select the item in the new explorer screen that opens, and click Open. The program appears on the appropriate list:
To remove an entry from a list, right-click the item and click Delete <list_type> Entry.
Whitelist AutomaticallyThe Automatic Whitelisting feature can be accessed by right-clicking the Access Control symbol in the system tray.
1. Right-click the system tray Access Control symbol ( ).2. In the context menu, click the Automatic Whitelisting On option.
1022410 Rev. A ©2017 Overland Storage, Inc. 36

rdxLOCK Administration Guide 4 - Best Practices
3. At the Automatic Whitelisting Time Limit dialog, use the drop-down list choose between 1 and 24 hours.
4. Click OK to activate the timer.After the countdown has ended, automatic whitelisting is turned off automatically.
CAUTION: When using Automatic Whitelisting, ALL programs/processes requests are granted and they are added to the Whitelist. This can be dangerous as this does NOT protect against Viruses, Worms, Ransomware, or human error.
1022410 Rev. A ©2017 Overland Storage, Inc. 37

rdxLOCK Administration Guide 4 - Best Practices
1022410 Rev. A ©2017 Overland Storage, Inc. 38

ATroubleshooting
This appendix provides information on error codes and some basic troubleshooting questions and solutions.
Topics in Troubleshooting:
• Reporting a Problem • rdxLOCK Tab Not Available on MS Explorer’s Property Page • Application Event Log Message: “Invalid license”
Reporting a ProblemFor technical assistance with a registered version of rdxLOCK, email your inquiries to [email protected] the following information in your email when you report a rdxLOCK issue:
• Issue description• Provide symptoms of the issue.• When did the issue occur?• Which activities have caused the issue?• Which file objects are affected by the issue?
• rdxLOCK Service Report.The rdxLOCK Manager automatically generates a Service Report by selecting Diagnostics > Generate Service Report. All service information is stored in the file FL_Diag.zip, which is located in the directory:
<rdxLOCK installation directory>\Diagnostics.• List of third-party-applications installed on your system, including antivirus
scanners and backup management applications.
rdxLOCK Tab Not Available on MS Explorer’s Property PageThe rdxLOCK tab on the MS Explorer’s property page is only available for local or domain administrators.If rdxLOCK is running on Windows 7, Windows 2008 Server, or Windows 2012 Server, set up the User Account Control accordingly:
• If the built-in domain administrator account is used for configuring rdxLOCK, the local security policy User Account Control: Admin Approval Mode for the Built-in Administrator Account must be disabled.
1022410 Rev. A ©2017 Overland Storage, Inc. 39

rdxLOCK Administration Guide A - Troubleshooting
• If another domain admin account than the built-in domain administrator is used for configuration, the local security policy User Account Control: Run all administrators in Admin Approval Mode must be disabled.
Application Event Log Message: “Invalid license”An invalid license may result from the following conditions:
• Temporary license has expired.• License information can’t be read on the WORM volume. Check if the rdxLOCK
service is running.• WORM volume has been restored. In this case, a new, permanent license must be
requested.
1022410 Rev. A ©2017 Overland Storage, Inc. 40

1022410 Rev. A ©2017 Overland Storage, Inc. 41
BCompatibility
Filter CompatibilityrdxLOCK was successfully tested in combination with the following third-party applications:
• Symantec Antivirus Version 12• McAfee VirusScan Enterprise 8.7• TrendMicro ServerProtect 5.58
NOTE: Third-party replication tools were not tested with rdxLOCK version 2.2.
For last-minute information regarding any limitations and known problems, read the ReadMe.txt file.

Index
AAccess Control Client 35access options 34add-on license 30Application-commit mode 24approved third-party applications 41AUTHORIZE PID option 33Auto-commit mode 24
Bbest practices 33blacklist 34, 35
CCapacity ID 28corrective retention time offset 18
DDirectory-Level Retention (DLR)
definition 23policy 24
EEnhanced Security Mode 6, 16, 20existing WORM volumes upgrade 15
Iinstallation
overview 10post-install actions 14preparation 10procedure 11silent mode 10
invalid license issue 40
Kkey features 5
LLicense Keys 27
Capacity ID 28permanent license 27trial 60-day license 27
MMS Explorer’s property page 39
PPolicy Level Setup 20policy rules
both DLR and SFR 27DLR 25expired WORM files 25SFR 27
protection policies 6, 23
RRansomBlock
authorization 33overview 7volume setup 21
rdxLOCKoverview 5uninstall 15
rdxLOCK Manager 8, 19, 21restrictions 7retention time offset 7Revision History 2RTT-Offset 7, 18
1022410 Rev. A ©2017 Overland Storage, Inc. 42

rdxLOCK Administration Guide Index
Ssecure time base 6silent mode installation 10Single File Retention (SFR)
definition 23policy 25
SnapLock 6, 23, 25steps for installing rdxLOCK 11system clock verification 14
Ttechnical assistance 39TEST WORM VOLUMES label 6TimeSync key 6, 14, 18troubleshooting 39
Uuninstall rdxLOCK 15upgrading existing WORM volumes 15
VVerified Retention Clock (VRC) 6, 18
Wwhitelist 34, 35WORM volume setup 19WORM-committed file access 16
1022410 Rev. A ©2017 Overland Storage, Inc. 43


