92
Jared Morgan Aakanksha Singh Red Hat JBoss Portal 6.2 User Guide For use with Red Hat JBoss Portal 6.2.
Jared Morgan Aakanksha Singh
Red Hat JBoss Portal 6.2User Guide
For use with Red Hat JBoss Portal 6.2.


Red Hat JBoss Portal 6.2 User Guide
For use with Red Hat JBoss Portal 6.2.
Jared MorganRed Hat, Ltd. Customer Content Services
Aakanksha SinghRed Hat, Ltd. Customer Content Services

Legal Notice
Copyright © 2015 Red Hat.
This document is licensed by Red Hat under the Creative Commons Attribution-ShareAlike 3.0Unported License. If you distribute this document, o r a modified version o f it, you must provideattribution to Red Hat, Inc. and provide a link to the original. If the document is modified, all RedHat trademarks must be removed.
Red Hat, as the licensor o f this document, waives the right to enforce, and agrees not to assert,Section 4d o f CC-BY-SA to the fullest extent permitted by applicable law.
Red Hat, Red Hat Enterprise Linux, the Shadowman logo, JBoss, MetaMatrix, Fedora, the InfinityLogo, and RHCE are trademarks o f Red Hat, Inc., registered in the United States and o thercountries.
Linux ® is the registered trademark o f Linus Torvalds in the United States and o ther countries.
Java ® is a registered trademark o f Oracle and/or its affiliates.
XFS ® is a trademark o f Silicon Graphics International Corp. or its subsidiaries in the UnitedStates and/or o ther countries.
MySQL ® is a registered trademark o f MySQL AB in the United States, the European Union andother countries.
Node.js ® is an o fficial trademark o f Joyent. Red Hat Software Collections is not fo rmallyrelated to or endorsed by the o fficial Joyent Node.js open source or commercial pro ject.
The OpenStack ® Word Mark and OpenStack Logo are either registered trademarks/servicemarks or trademarks/service marks o f the OpenStack Foundation, in the United States and o thercountries and are used with the OpenStack Foundation's permission. We are not affiliated with,endorsed or sponsored by the OpenStack Foundation, or the OpenStack community.
All o ther trademarks are the property o f their respective owners.
AbstractThis document provides an easy to fo llow guide to the functions and options available in RedHat JBoss Portal. It is intended to be accessible and useful to both experienced and noviceportal users.
. . . . . . . . . . . . . . . . . . . . . . . . . . . . . . . . . . . . . . . . . . . . . . . . . . . . . . . . . . . . . . . . . . . . . . . . . . . . . . . . . . . . . . . . . . . . . . . . . . . . . . . . . . . . . . . . . . . . . . . . . . . . . . . . . . . . . . . . . . . . . . . . . . . . . . . . . . . . . . . . . . . . . . . . . . . . . . . . . . . . . . . . . . . . . . . . . . . . . . . . . . . . . . . . . . . . . . . . . . . . . . . . . . . . . . . . . . . . . . . . . . . . . . . . . . . . . . . . . . . . . . . . . . . . . . . . . . . . . . . .
. . . . . . . . . . . . . . . . . . . . . . . . . . . . . . . . . . . . . . . . . . . . . . . . . . . . . . . . . . . . . . . . . . . . . . . . . . . . . . . . . . . . . . . . . . . . . . . . . . . . . . . . . . . . . . . . . . . . . . . . . . . . . . . . . . . . . . . . . . . . . . . . . . . . . . . . . . . . . . . . . . . . . . . . . . . . . . . . . . . . . . . . . . . . . . . . . . . . . . . . . . . . . . . . . . . . . . . . . . . . . . . . . . . . . . . . . . . . . . . . . . . . . . . . . . . . . . . . . . . . . . . . . . . . . . . . . . . . . . . .
. . . . . . . . . . . . . . . . . . . . . . . . . . . . . . . . . . . . . . . . . . . . . . . . . . . . . . . . . . . . . . . . . . . . . . . . . . . . . . . . . . . . . . . . . . . . . . . . . . . . . . . . . . . . . . . . . . . . . . . . . . . . . . . . . . . . . . . . . . . . . . . . . . . . . . . . . . . . . . . . . . . . . . . . . . . . . . . . . . . . . . . . . . . . . . . . . . . . . . . . . . . . . . . . . . . . . . . . . . . . . . . . . . . . . . . . . . . . . . . . . . . . . . . . . . . . . . . . . . . . . . . . . . . . . . . . . . . . . . . .
. . . . . . . . . . . . . . . . . . . . . . . . . . . . . . . . . . . . . . . . . . . . . . . . . . . . . . . . . . . . . . . . . . . . . . . . . . . . . . . . . . . . . . . . . . . . . . . . . . . . . . . . . . . . . . . . . . . . . . . . . . . . . . . . . . . . . . . . . . . . . . . . . . . . . . . . . . . . . . . . . . . . . . . . . . . . . . . . . . . . . . . . . . . . . . . . . . . . . . . . . . . . . . . . . . . . . . . . . . . . . . . . . . . . . . . . . . . . . . . . . . . . . . . . . . . . . . . . . . . . . . . . . . . . . . . . . . . . . . . .
. . . . . . . . . . . . . . . . . . . . . . . . . . . . . . . . . . . . . . . . . . . . . . . . . . . . . . . . . . . . . . . . . . . . . . . . . . . . . . . . . . . . . . . . . . . . . . . . . . . . . . . . . . . . . . . . . . . . . . . . . . . . . . . . . . . . . . . . . . . . . . . . . . . . . . . . . . . . . . . . . . . . . . . . . . . . . . . . . . . . . . . . . . . . . . . . . . . . . . . . . . . . . . . . . . . . . . . . . . . . . . . . . . . . . . . . . . . . . . . . . . . . . . . . . . . . . . . . . . . . . . . . . . . . . . . . . . . . . . . .
. . . . . . . . . . . . . . . . . . . . . . . . . . . . . . . . . . . . . . . . . . . . . . . . . . . . . . . . . . . . . . . . . . . . . . . . . . . . . . . . . . . . . . . . . . . . . . . . . . . . . . . . . . . . . . . . . . . . . . . . . . . . . . . . . . . . . . . . . . . . . . . . . . . . . . . . . . . . . . . . . . . . . . . . . . . . . . . . . . . . . . . . . . . . . . . . . . . . . . . . . . . . . . . . . . . . . . . . . . . . . . . . . . . . . . . . . . . . . . . . . . . . . . . . . . . . . . . . . . . . . . . . . . . . . . . . . . . . . . . .
. . . . . . . . . . . . . . . . . . . . . . . . . . . . . . . . . . . . . . . . . . . . . . . . . . . . . . . . . . . . . . . . . . . . . . . . . . . . . . . . . . . . . . . . . . . . . . . . . . . . . . . . . . . . . . . . . . . . . . . . . . . . . . . . . . . . . . . . . . . . . . . . . . . . . . . . . . . . . . . . . . . . . . . . . . . . . . . . . . . . . . . . . . . . . . . . . . . . . . . . . . . . . . . . . . . . . . . . . . . . . . . . . . . . . . . . . . . . . . . . . . . . . . . . . . . . . . . . . . . . . . . . . . . . . . . . . . . . . . . .
. . . . . . . . . . . . . . . . . . . . . . . . . . . . . . . . . . . . . . . . . . . . . . . . . . . . . . . . . . . . . . . . . . . . . . . . . . . . . . . . . . . . . . . . . . . . . . . . . . . . . . . . . . . . . . . . . . . . . . . . . . . . . . . . . . . . . . . . . . . . . . . . . . . . . . . . . . . . . . . . . . . . . . . . . . . . . . . . . . . . . . . . . . . . . . . . . . . . . . . . . . . . . . . . . . . . . . . . . . . . . . . . . . . . . . . . . . . . . . . . . . . . . . . . . . . . . . . . . . . . . . . . . . . . . . . . . . . . . . . .
Table of Contents
Preface1. Do cument Co nventio ns1.1. Typ o g rap hic Co nventio ns1.2. Pull-q uo te Co nventio ns1.3. No tes and Warning s
2. Getting Help and G iving Feed b ack2.1. Do Yo u Need Help ?2.2. We Need Feed b ack
Part I. Int roduct ion
Chapt er 1 . About t he Port al1.1. Related Links1.2. Pro d uct Do cumentatio n1.3. Sup p o rted Bro wsers1.4. Accessib il i ty Statement
Chapt er 2 . T erminology2.1. What is a Po rtal2.2. What is a Po rtlet2.3. What is a Po rtlet Co ntainer2.4. What is the To o lb ar2.5. What are Gad g ets2.6 . Ab o ut Navig atio ns2.7. Ab o ut Mo d es2.8 . Ab o ut Permissio ns2.8 .1. Access Permissio ns2.8 .2. Ed it Permissio ns2.8 .3. Mo ve Ap p s and Mo ve Co ntainers Permissio ns2.8 .4. Mo ve Ap p s Permissio n2.8 .5. Mo ve Co ntainers Permissio n
Chapt er 3. Element s of t he Port al3.1. Functio nal Po rtlets3.2. Interface Po rtlets3.3. The Dashb o ard3.4. Using the Dashb o ard Wo rksp ace3.5. Ad d Gad g ets
Chapt er 4 . T oolbar4.1. What is the To o lb ar4.2. User Actio ns in the To o lb ar4.3. Ad ministratio n Actio ns in the To o lb ar
Part II. Port al Administ rat ion
Chapt er 5. Port als5.1. Create a New Po rtal5.2. Access a Po rtal5.3. Ed it Po rtal Layo ut5.4. Ed it Po rtal Navig atio n5.5. Ed it Po rtal Pro p erties5.6 . Delete a Po rtal5.7. Chang e Po rtal Skins
55567778
9
1 010101111
1 313131313131415151516161617
1 81819202124
2 6262627
2 8
2 929303032323232
T able of Cont ent s
1

. . . . . . . . . . . . . . . . . . . . . . . . . . . . . . . . . . . . . . . . . . . . . . . . . . . . . . . . . . . . . . . . . . . . . . . . . . . . . . . . . . . . . . . . . . . . . . . . . . . . . . . . . . . . . . . . . . . . . . . . . . . . . . . . . . . . . . . . . . . . . . . . . . . . . . . . . . . . . . . . . . . . . . . . . . . . . . . . . . . . . . . . . . . . . . . . . . . . . . . . . . . . . . . . . . . . . . . . . . . . . . . . . . . . . . . . . . . . . . . . . . . . . . . . . . . . . . . . . . . . . . . . . . . . . . . . . . . . . . . .
. . . . . . . . . . . . . . . . . . . . . . . . . . . . . . . . . . . . . . . . . . . . . . . . . . . . . . . . . . . . . . . . . . . . . . . . . . . . . . . . . . . . . . . . . . . . . . . . . . . . . . . . . . . . . . . . . . . . . . . . . . . . . . . . . . . . . . . . . . . . . . . . . . . . . . . . . . . . . . . . . . . . . . . . . . . . . . . . . . . . . . . . . . . . . . . . . . . . . . . . . . . . . . . . . . . . . . . . . . . . . . . . . . . . . . . . . . . . . . . . . . . . . . . . . . . . . . . . . . . . . . . . . . . . . . . . . . . . . . . .
. . . . . . . . . . . . . . . . . . . . . . . . . . . . . . . . . . . . . . . . . . . . . . . . . . . . . . . . . . . . . . . . . . . . . . . . . . . . . . . . . . . . . . . . . . . . . . . . . . . . . . . . . . . . . . . . . . . . . . . . . . . . . . . . . . . . . . . . . . . . . . . . . . . . . . . . . . . . . . . . . . . . . . . . . . . . . . . . . . . . . . . . . . . . . . . . . . . . . . . . . . . . . . . . . . . . . . . . . . . . . . . . . . . . . . . . . . . . . . . . . . . . . . . . . . . . . . . . . . . . . . . . . . . . . . . . . . . . . . . .
. . . . . . . . . . . . . . . . . . . . . . . . . . . . . . . . . . . . . . . . . . . . . . . . . . . . . . . . . . . . . . . . . . . . . . . . . . . . . . . . . . . . . . . . . . . . . . . . . . . . . . . . . . . . . . . . . . . . . . . . . . . . . . . . . . . . . . . . . . . . . . . . . . . . . . . . . . . . . . . . . . . . . . . . . . . . . . . . . . . . . . . . . . . . . . . . . . . . . . . . . . . . . . . . . . . . . . . . . . . . . . . . . . . . . . . . . . . . . . . . . . . . . . . . . . . . . . . . . . . . . . . . . . . . . . . . . . . . . . . .
. . . . . . . . . . . . . . . . . . . . . . . . . . . . . . . . . . . . . . . . . . . . . . . . . . . . . . . . . . . . . . . . . . . . . . . . . . . . . . . . . . . . . . . . . . . . . . . . . . . . . . . . . . . . . . . . . . . . . . . . . . . . . . . . . . . . . . . . . . . . . . . . . . . . . . . . . . . . . . . . . . . . . . . . . . . . . . . . . . . . . . . . . . . . . . . . . . . . . . . . . . . . . . . . . . . . . . . . . . . . . . . . . . . . . . . . . . . . . . . . . . . . . . . . . . . . . . . . . . . . . . . . . . . . . . . . . . . . . . . .
. . . . . . . . . . . . . . . . . . . . . . . . . . . . . . . . . . . . . . . . . . . . . . . . . . . . . . . . . . . . . . . . . . . . . . . . . . . . . . . . . . . . . . . . . . . . . . . . . . . . . . . . . . . . . . . . . . . . . . . . . . . . . . . . . . . . . . . . . . . . . . . . . . . . . . . . . . . . . . . . . . . . . . . . . . . . . . . . . . . . . . . . . . . . . . . . . . . . . . . . . . . . . . . . . . . . . . . . . . . . . . . . . . . . . . . . . . . . . . . . . . . . . . . . . . . . . . . . . . . . . . . . . . . . . . . . . . . . . . . .
. . . . . . . . . . . . . . . . . . . . . . . . . . . . . . . . . . . . . . . . . . . . . . . . . . . . . . . . . . . . . . . . . . . . . . . . . . . . . . . . . . . . . . . . . . . . . . . . . . . . . . . . . . . . . . . . . . . . . . . . . . . . . . . . . . . . . . . . . . . . . . . . . . . . . . . . . . . . . . . . . . . . . . . . . . . . . . . . . . . . . . . . . . . . . . . . . . . . . . . . . . . . . . . . . . . . . . . . . . . . . . . . . . . . . . . . . . . . . . . . . . . . . . . . . . . . . . . . . . . . . . . . . . . . . . . . . . . . . . . .
5.7. Chang e Po rtal Skins5.8 . Switch Between Po rtals5.9 . Manag e Services
Chapt er 6 . Port let s and Gadget s6 .1. Imp o rt Po rtlets and Gad g ets6 .2. Manag e Po rtlets and Gad g ets6 .3. Disp lay Gad g ets6 .4. Ad d a new Categ o ry6 .5. Ed it a Categ o ry6 .6 . Delete a Categ o ry6 .7. Ad d Ap p licatio ns to a Categ o ry6 .8 . Set Access Permissio n o n Po rtlets6 .9 . View/Ed it p o rtlet/g ad g et info rmatio n6 .10 . Ad d a Gad g et6 .11. Manag e Gad g ets6 .12. Ed it a Gad g et
Chapt er 7 . Gadget s in Port al
Chapt er 8 . Navigat ion Nodes8 .1. Manag e Navig atio n No d es8 .2. Ad d a new no d e8 .3. Ed it a no d e8 .4. Co p y a no d e8 .5. Clo ne no d es8 .6 . Cut a no d e8 .7. Delete a no d e8 .8 . Chang e No d e Ord er
Chapt er 9 . Pages9 .1. Ad d a New Pag e using the Pag e Creatio n Wizard9 .2. Ad d a New Pag e using Pag e Manag ement9 .3. Ed it a Pag e9 .4. Delete a Pag e9 .5. Drag and Dro p the Pag e Bo d y
Part III. Sit e Administ rat ion
Chapt er 1 0 . Language10 .1. Chang e Interface Lang uag e10 .2. Lang uag e fo r a user10 .3. Set lang uag e fo r a user10 .4. Rig ht To Left Sup p o rt10 .5. Multi-Lang uag e Navig atio n No d es10 .6 . Key Fo rmat10 .7. Creating Keys10 .8 . Creating Keys using Create Pag e Wizard10 .9 . Creating Keys using Navig atio n Manag ement10 .10 . Pro vid ing translatio n
Chapt er 1 1 . Permissions11.1. Manag e Permissio ns11.2. Set Site Permissio ns11.3. Set Access Permissio ns o n a Site11.4. Set Ed it Permissio ns o n a Site
323333
35353535363637373838383939
4 1
4 24242444545454546
4 74749505151
52
5353535454555555555656
5757575758
Red Hat JBoss Port al 6 .2 User Guide
2
. . . . . . . . . . . . . . . . . . . . . . . . . . . . . . . . . . . . . . . . . . . . . . . . . . . . . . . . . . . . . . . . . . . . . . . . . . . . . . . . . . . . . . . . . . . . . . . . . . . . . . . . . . . . . . . . . . . . . . . . . . . . . . . . . . . . . . . . . . . . . . . . . . . . . . . . . . . . . . . . . . . . . . . . . . . . . . . . . . . . . . . . . . . . . . . . . . . . . . . . . . . . . . . . . . . . . . . . . . . . . . . . . . . . . . . . . . . . . . . . . . . . . . . . . . . . . . . . . . . . . . . . . . . . . . . . . . . . . . . .
. . . . . . . . . . . . . . . . . . . . . . . . . . . . . . . . . . . . . . . . . . . . . . . . . . . . . . . . . . . . . . . . . . . . . . . . . . . . . . . . . . . . . . . . . . . . . . . . . . . . . . . . . . . . . . . . . . . . . . . . . . . . . . . . . . . . . . . . . . . . . . . . . . . . . . . . . . . . . . . . . . . . . . . . . . . . . . . . . . . . . . . . . . . . . . . . . . . . . . . . . . . . . . . . . . . . . . . . . . . . . . . . . . . . . . . . . . . . . . . . . . . . . . . . . . . . . . . . . . . . . . . . . . . . . . . . . . . . . . . .
. . . . . . . . . . . . . . . . . . . . . . . . . . . . . . . . . . . . . . . . . . . . . . . . . . . . . . . . . . . . . . . . . . . . . . . . . . . . . . . . . . . . . . . . . . . . . . . . . . . . . . . . . . . . . . . . . . . . . . . . . . . . . . . . . . . . . . . . . . . . . . . . . . . . . . . . . . . . . . . . . . . . . . . . . . . . . . . . . . . . . . . . . . . . . . . . . . . . . . . . . . . . . . . . . . . . . . . . . . . . . . . . . . . . . . . . . . . . . . . . . . . . . . . . . . . . . . . . . . . . . . . . . . . . . . . . . . . . . . . .
. . . . . . . . . . . . . . . . . . . . . . . . . . . . . . . . . . . . . . . . . . . . . . . . . . . . . . . . . . . . . . . . . . . . . . . . . . . . . . . . . . . . . . . . . . . . . . . . . . . . . . . . . . . . . . . . . . . . . . . . . . . . . . . . . . . . . . . . . . . . . . . . . . . . . . . . . . . . . . . . . . . . . . . . . . . . . . . . . . . . . . . . . . . . . . . . . . . . . . . . . . . . . . . . . . . . . . . . . . . . . . . . . . . . . . . . . . . . . . . . . . . . . . . . . . . . . . . . . . . . . . . . . . . . . . . . . . . . . . . .
. . . . . . . . . . . . . . . . . . . . . . . . . . . . . . . . . . . . . . . . . . . . . . . . . . . . . . . . . . . . . . . . . . . . . . . . . . . . . . . . . . . . . . . . . . . . . . . . . . . . . . . . . . . . . . . . . . . . . . . . . . . . . . . . . . . . . . . . . . . . . . . . . . . . . . . . . . . . . . . . . . . . . . . . . . . . . . . . . . . . . . . . . . . . . . . . . . . . . . . . . . . . . . . . . . . . . . . . . . . . . . . . . . . . . . . . . . . . . . . . . . . . . . . . . . . . . . . . . . . . . . . . . . . . . . . . . . . . . . . .
. . . . . . . . . . . . . . . . . . . . . . . . . . . . . . . . . . . . . . . . . . . . . . . . . . . . . . . . . . . . . . . . . . . . . . . . . . . . . . . . . . . . . . . . . . . . . . . . . . . . . . . . . . . . . . . . . . . . . . . . . . . . . . . . . . . . . . . . . . . . . . . . . . . . . . . . . . . . . . . . . . . . . . . . . . . . . . . . . . . . . . . . . . . . . . . . . . . . . . . . . . . . . . . . . . . . . . . . . . . . . . . . . . . . . . . . . . . . . . . . . . . . . . . . . . . . . . . . . . . . . . . . . . . . . . . . . . . . . . . .
. . . . . . . . . . . . . . . . . . . . . . . . . . . . . . . . . . . . . . . . . . . . . . . . . . . . . . . . . . . . . . . . . . . . . . . . . . . . . . . . . . . . . . . . . . . . . . . . . . . . . . . . . . . . . . . . . . . . . . . . . . . . . . . . . . . . . . . . . . . . . . . . . . . . . . . . . . . . . . . . . . . . . . . . . . . . . . . . . . . . . . . . . . . . . . . . . . . . . . . . . . . . . . . . . . . . . . . . . . . . . . . . . . . . . . . . . . . . . . . . . . . . . . . . . . . . . . . . . . . . . . . . . . . . . . . . . . . . . . . .
11.4. Set Ed it Permissio ns o n a Site11.5. Set Pag e Permissio n11.6 . Set Access Permissio ns o n a Pag e11.7. Set Ed it Permissio ns o n a Pag e11.8 . Set Access Permissio n o n a Categ o ry11.9 . Set Access Permissio n o n a Po rtlet
Chapt er 1 2 . Sit e Redirect ion12.1. Site Red irectio n12.2. Ab o ut Site Red irectio n12.3. Manag e Site Red irectio ns
Chapt er 1 3. Mobile and Responsive Port al Sit e13.1. Creating a Resp o nsive Site13.2. Po rtal Skin13.3. Viewp o rt13.4. Mo b ile Temp late13.5. Resp o nsive Po rtlets13.6 . Po rtlet Layo ut13.7. Creating Resp o nsive Po rtlets13.8 . Manually Remo ving the Mo b ile Site13.9 . Deleting the Mo b ile Site and Co nfig uratio n
Part IV. Account s, Memberships, Groups, and Users
Chapt er 1 4 . Account s14.1. Reg ister New Acco unts14.2. Cap tcha Behavio r14.3. Sig n In and Sig n Out14.4. Sig n In14.5. Sig n Out14.6 . Rememb er User Acco unt14.7. Chang e Acco unt Setting s14.8 . Acco unt and Passwo rd Retrieval
Chapt er 1 5. Memberships15.1. Manag e memb ership s15.2. Ad d a new memb ership typ e15.3. Ed it a memb ership typ e15.4. Delete a memb ership typ e
Chapt er 1 6 . Groups16 .1. Manag e g ro up s16 .2. Ad d a New Gro up16 .3. Ed it a g ro up16 .4. Ad d a new user to a g ro up16 .5. Ed it the user memb ership in a g ro up16 .6 . Delete a g ro up
Chapt er 1 7 . Users17.1. Manag e Users and Gro up s17.2. Ro les17.3. Manag e users17.4. Ad d a user17.5. Search fo r users17.6 . Ed it a user17.7. Delete a user
585959596 06 0
6 26 26 26 2
6 66 66 66 66 76 86 86 97070
7 1
7 27273747475757677
7 97979798 0
8 18 18 18 28 28 38 3
8 48 48 48 58 68 68 78 7
T able of Cont ent s
3
. . . . . . . . . . . . . . . . . . . . . . . . . . . . . . . . . . . . . . . . . . . . . . . . . . . . . . . . . . . . . . . . . . . . . . . . . . . . . . . . . . . . . . . . . . . . . . . . . . . . . . . . . . . . . . . . . . . . . . . . . . . . . . . . . . . . . . . . . . . . . . . . . . . . . . . . . . . . . . . . . . . . . . . . . . . . . . . . . . . . . . . . . . . . . . . . . . . . . . . . . . . . . . . . . . . . . . . . . . . . . . . . . . . . . . . . . . . . . . . . . . . . . . . . . . . . . . . . . . . . . . . . . . . . . . . . . . . . . . . .
17.7. Delete a user
Revision Hist ory
8 7
8 8
Red Hat JBoss Port al 6 .2 User Guide
4

Preface
1. Document Convent ions
This manual uses several conventions to highlight certain words and phrases and draw attention tospecific pieces of information.
1.1. T ypographic Convent ions
Four typographic conventions are used to call attention to specific words and phrases. Theseconventions, and the circumstances they apply to, are as follows.
Mono-spaced Bold
Used to highlight system input, including shell commands, file names and paths. Also used tohighlight keys and key combinations. For example:
To see the contents of the file my_next_bestselling_novel in your currentworking directory, enter the cat my_next_bestselling_novel command at theshell prompt and press Enter to execute the command.
The above includes a file name, a shell command and a key, all presented in mono-spaced bold andall distinguishable thanks to context.
Key combinations can be distinguished from an individual key by the plus sign that connects eachpart of a key combination. For example:
Press Enter to execute the command.
Press Ctrl+Alt+F2 to switch to a virtual terminal.
The first example highlights a particular key to press. The second example highlights a keycombination: a set of three keys pressed simultaneously.
If source code is discussed, class names, methods, functions, variable names and returned valuesmentioned within a paragraph will be presented as above, in mono-spaced bold . For example:
File-related classes include filesystem for file systems, file for files, and dir fordirectories. Each class has its own associated set of permissions.
Proport ional Bold
This denotes words or phrases encountered on a system, including application names; dialog-boxtext; labeled buttons; check-box and radio-button labels; menu titles and submenu titles. Forexample:
Choose System → Preferences → Mouse from the main menu bar to launchMouse Preferences . In the Buttons tab, select the Left-handed mouse checkbox and click Close to switch the primary mouse button from the left to the right(making the mouse suitable for use in the left hand).
To insert a special character into a gedit file, choose Applicat ions →Accessories → Character Map from the main menu bar. Next, choose Search →Find… from the Character Map menu bar, type the name of the character in the Search field and click Next. The character you sought will be highlighted in the
Preface
5
Character Table. Double-click this highlighted character to place it in the Text to copy field and then click the Copy button. Now switch back to your documentand choose Edit → Paste from the gedit menu bar.
The above text includes application names; system-wide menu names and items; application-specificmenu names; and buttons and text found within a GUI interface, all presented in proportional boldand all distinguishable by context.
Mono-spaced Bold Italic or Proportional Bold Italic
Whether mono-spaced bold or proportional bold, the addition of italics indicates replaceable orvariable text. Italics denotes text you do not input literally or displayed text that changes dependingon circumstance. For example:
To connect to a remote machine using ssh, type ssh [email protected] at ashell prompt. If the remote machine is example.com and your username on thatmachine is john, type ssh [email protected].
The mount -o remount file-system command remounts the named file system.For example, to remount the /home file system, the command is mount -o remount /home.
To see the version of a currently installed package, use the rpm -q packagecommand. It will return a result as follows: package-version-release.
Note the words in bold italics above: username, domain.name, file-system, package, version andrelease. Each word is a placeholder, either for text you enter when issuing a command or for textdisplayed by the system.
Aside from standard usage for presenting the title of a work, italics denotes the first use of a new andimportant term. For example:
Publican is a DocBook publishing system.
1.2. Pull-quote Convent ions
Terminal output and source code listings are set off visually from the surrounding text.
Output sent to a terminal is set in mono-spaced roman and presented thus:
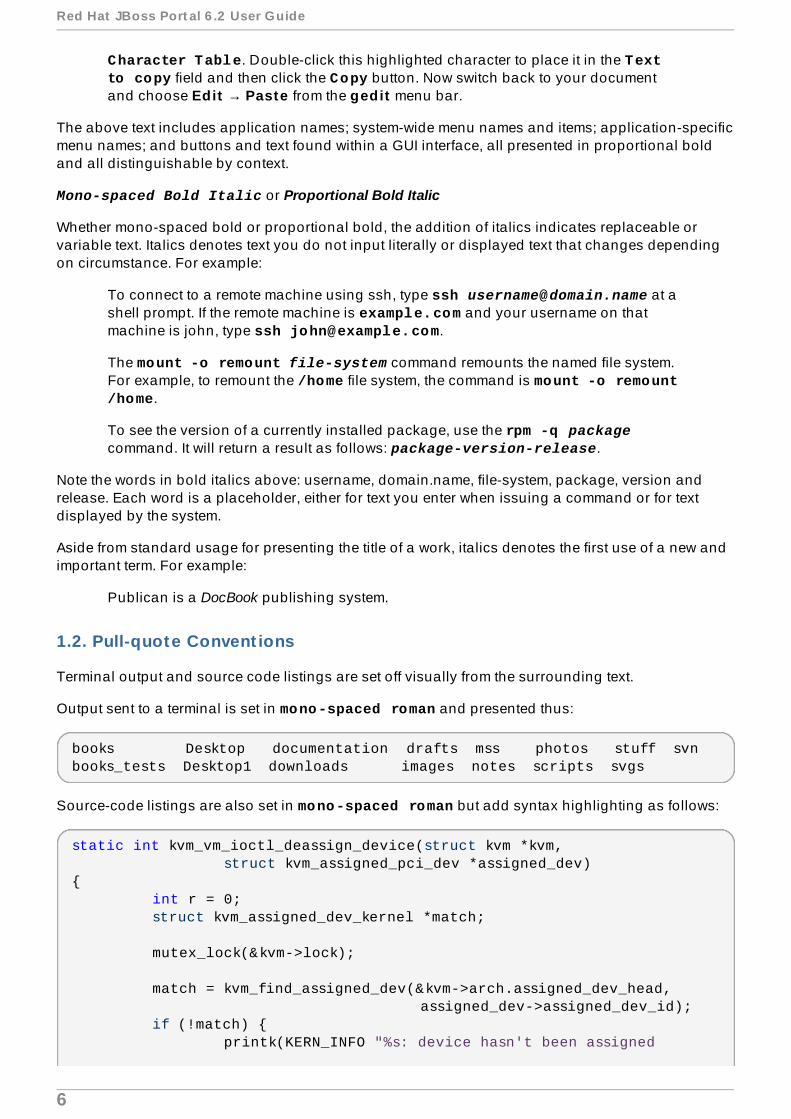
books Desktop documentation drafts mss photos stuff svnbooks_tests Desktop1 downloads images notes scripts svgs
Source-code listings are also set in mono-spaced roman but add syntax highlighting as follows:
static int kvm_vm_ioctl_deassign_device(struct kvm *kvm, struct kvm_assigned_pci_dev *assigned_dev){ int r = 0; struct kvm_assigned_dev_kernel *match;
mutex_lock(&kvm->lock);
match = kvm_find_assigned_dev(&kvm->arch.assigned_dev_head, assigned_dev->assigned_dev_id); if (!match) { printk(KERN_INFO "%s: device hasn't been assigned
Red Hat JBoss Port al 6 .2 User Guide
6
before, " "so cannot be deassigned\n", __func__); r = -EINVAL; goto out; }
kvm_deassign_device(kvm, match);
kvm_free_assigned_device(kvm, match);
out: mutex_unlock(&kvm->lock); return r;}
1.3. Notes and Warnings
Finally, we use three visual styles to draw attention to information that might otherwise be overlooked.
Note
Notes are tips, shortcuts or alternative approaches to the task at hand. Ignoring a note shouldhave no negative consequences, but you might miss out on a trick that makes your life easier.
Important
Important boxes detail things that are easily missed: configuration changes that only apply tothe current session, or services that need restarting before an update will apply. Ignoring abox labeled “ Important” will not cause data loss but may cause irritation and frustration.
Warning
Warnings should not be ignored. Ignoring warnings will most likely cause data loss.
2. Get t ing Help and Giving Feedback
2.1. Do You Need Help?
If you experience difficulty with a procedure described in this documentation, visit the Red HatCustomer Portal at http://access.redhat.com. From the Customer Portal, you can:
Search or browse through a knowledge base of technical support articles about Red Hatproducts.
Submit a support case to Red Hat Global Support Services (GSS).
Access other product documentation.
Preface
7

Red Hat also hosts a large number of electronic mailing lists for discussion of Red Hat software andtechnology. You can find a list of publicly available mailing lists athttps://www.redhat.com/mailman/listinfo. Click the name of any mailing list to subscribe to that list orto access the list archives.
2.2. We Need Feedback
If you find a typographical error in this manual, or if you have thought of a way to make this manualbetter, we would love to hear from you. Please submit a report in Bugzilla: http://bugzilla.redhat.com/against the product Red Hat JBoss Portal.
When submitting a bug report, be sure to mention the manual's identifier: User_Guide
If you have a suggestion for improving the documentation, try to be as specific as possible whendescribing it. If you have found an error, please include the section number and some of thesurrounding text so we can find it easily.
Red Hat JBoss Port al 6 .2 User Guide
8

Part I. Introduction
Part I. Int roduct ion
9
Chapter 1. About the Portal
The Red Hat JBoss Portal is the result of two mature Java projects: JBoss Portal and eXo Portal. Thiscommunity project takes the best of both offerings and incorporates them into a single J2EEdeployment archive. The aim is to provide an intuitive user-friendly portal and a framework toaddress the requirements of today's Web 2.0 applications.
This book introduces and provides detailed information about most features and capabilities of theportal, such as user and group management and access permissions, using portlets, and changingbasic interface objects such as skins, language and page orientation.
Report a bug
1.1. Related Links
Technical documentat ion
Other technical documentation, including an Installation Guide, a Development Guide, and anAdministration and Configuration Guide can be found athttps://access.redhat.com/site/documentation/JBoss_Portal_Platform/
Non- technical documentat ion
Links to non-technical documents are included on the front page of the portal:
Report a bug
1.2. Product Documentat ion
The full suite of product documentation is available from the Customer Portal, which is located athttp://access.redhat.com/site/documentation/JBoss_Portal_Platform/.
Portal Administrators will find the Installation Guide and the Administration and Configuration Guide to beinvaluable resources for setting up and configuring the portal platform.
Portal, and Web Developers will find the Development Guide to be a useful reference document in theirday to day development tasks.
Red Hat JBoss Port al 6 .2 User Guide
10

Report a bug
1.3. Supported Browsers
For a list of supported browsers, see the Supported Configurations page on the Customer Portal,which is located at https://access.redhat.com/knowledge/articles/119833.
Report a bug
1.4 . Accessibilit y Statement
Red Hat JBoss Portal (JBoss Portal) has improved its design to make sites created with the platformaccessible to a wider audience, and to ensure a better experience for all users and technologies.
JBoss Portal 6.1 is a Middleware platform that allows portal developers to deploy and run portalapplications. The common and management areas of the portal are modified to be compliant withSection 508 Accessibility guidelines. The enhancements are described in this section.
Developers must ensure portlet applications comply with accessibility guidelines in order for portletsdeployed using JBoss Portal to meet Accessibility requirements.
Accessib ility Features
Text equivalents
All decorative images have been brought into styles sheets. All images that are part of theHTML code with semantic meaning have text equivalents. Tool tips feature on actions, links,and buttons.
Color
Color is used as a decorative element. Semantic meaning of elements is defined using textdescriptions.
Readability
All elements have explicit legends to avoid creating ambiguous semantics. Dynamicelements such as administration menus are modified to be compatible with screen readersoftware.
Client -side Image Maps
All image maps have suitable alternative text descriptions.
Data Table Headers and Associat ions
All tables elements have a table summary and column header descriptions to avoidambiguity for screen readers when interpreting rows and columns.
If rame Elements
All iframe elements have names and descriptions to avoid ambiguity for screen readerswhen interpreting content inside the element.
Keyboard Navigat ion
Dynamic elements such as administration menus have been modified to be keyboardcompatible. All buttons and links can be accessed using TAB and ENTER keys.
Chapt er 1 . About t he Port al
11

Elect ronic Forms
Form elements have label elements attached with semantic descriptions.
Skip Navigat ion
For users with alternative input interface requirements, skip navigation is available. Skipnavigation allows alternative input interface devices to bypass repetitive navigation links,such as administration menu links or page menu links, enabling users to navigate andinteract to page content easier.
Time Delay
Authenticated users can configure the session time expiration, to reduce the need forrepeated authentication actions.
Report a bug
Red Hat JBoss Port al 6 .2 User Guide
12

Chapter 2. Terminology
2.1. What is a Portal
An enterprise portal is a Web application that provides means to aggregate and personalizeinformation through application-specific portlets.
Users and administrators are able to integrate information, people and processes acrossorganizational boundaries through a web-based user interface.
The framework enables aggregation of enterprise content and business applications with flexiblemanagement and personalization options.
Report a bug
2.2. What is a Port let
A portlet is a small, self-contained web application. Portlets are managed and displayed within aPortal. Typically, a portal page is displayed as a collection of non-overlapping portlet windows, witheach portlet window displaying a different portlet. Hence a portlet (or collection of portlets) resemblesa web-based application hosted in a portal.
Portlets can be configured with differing content. The Red Hat JBoss Portal has a number of defaultportlets that can be used in any portal built in the application.
Report a bug
2.3. What is a Port let Container
A portlet container supplies the runtime environment in which portlets are started, run and ended.While portlet containers can allow portlets to inherit data from the main portal they also provide anenvironment in which portlets can be independently managed. APIs dictate both how a portalinteracts with portlet containers and how portlet containers interact with individual portlets.
Report a bug
2.4 . What is the Toolbar
The Toolbar spans the top of the portal application and provides links to user and administrativeactions.
The Toolbar also contains the portal Navigations, the Menu button (on the far left of the toolbar), andthe name of the current user (on the far right).
See Also:
Section 2.6, “About Navigations”
Report a bug
2.5. What are Gadgets
A gadget is a customizable mini web application that portal users can add to their web pages.
Chapt er 2 . T erminology
13

See Also:
Section 3.4, “Using the Dashboard Workspace”
Report a bug
2.6. About Navigat ions
Portal navigations are menus that contain links to other parts of a Portal. Navigations can helpusers to visualize the structure of a site. The default navigation menus are located in the Toolbar.
Portal Navigat ion Types
Site
This navigation links to separate sites of the parent Portal. Each site has only onenavigation and it is automatically generated when the site is created.
This functionality allows different sites to administer some Portal aspects (such as portlets)individually while maintaining other content standardized with the parent Portal.
Group
The content of this navigation differs depending on the type of account logged in.
If a user account is active, this navigation holds personal links set up by that user.
When using a management account, this navigation contains links to pages forregistered users as well as administrative tasks and personal links.
In an administrator account the navigation adds further management abilities, such ascommunity and application management.
Dashboard
Each user has their own navigation Dashboard that contains links and portlets (orgadgets) that the user has selected. A user's navigation is created automatically when useris registered. This navigation only can be deleted when the user is deleted.
Dashboard Editor
The Dashboard Editor navigation appears when a user is on their dashboard page.
The user can add multiple dashboard in new tabs and then edit the layout and content ofthose dashboards.
When logged in as an Administrator, a fourth navigation appears in the Toolbar:
Site/Group Editor
This navigation appears as either Site Editor or Group Editor depending on theadministrator's location within the portal.
When in areas of the portal displaying content, the navigation shows as Site Editor and inareas pertaining to users the navigation shows as Group Editor.
This navigation contains links to add a new pages to the portal, to edit a page or to changethe portal's layout. Administrators can use these links to manage the portal.
Red Hat JBoss Port al 6 .2 User Guide
14
See Also:
Section 2.4, “What is the Toolbar”
Report a bug
2.7. About Modes
Public
This mode is for guest users who are not registered with the Portal. It does not require a login and restricts the visitor to the public pages in the portal. Visitors can register an accountto gain access to the restricted pages. After being registered, they can use the Private modebut must still contact the Portal administrator to get more rights or a group manager tobecome a member and gain access to a group.
Private
This mode is for registered users only. Users set a user name and password duringregistration which they can then use to sign in. This mode offers users more site privileges.Registered users can manage private resources (creating, editing or deleting privatepages), "borrow" pages from other users by creating links, and change the site language tosuit their individual preference.
Report a bug
2.8. About Permissions
Permission settings control what operations users can perform within the portal, and are set by portaladministrators. Depending on these permissions assigned by an administrator, users gain access tovarious components and actions such as edit portals, pages or portlets.
There are four types of permissions.
Access Permissions
Edit Permissions
Move Apps Permissions
Move Containers Permissions
See Also:
Section 11.1, “Manage Permissions”
Section 9.1, “Add a New Page using the Page Creation Wizard”
Report a bug
2.8.1. Access Permissions
Access Permissions allow users to view portal objects through the User Interface. This permissioncan be granted to multiple user groups.
Report a bug
Chapt er 2 . T erminology
15
2.8.2. Edit Permissions
Edit Permissions allow users to change properties of objects in the portal. For example, users canchange the title or name of a page, select a default skin or locale for a site, or change the visuallayout of the portal object using the Page or Site Composer.
The ability to edit portal object parameters is governed by the Edit permission on the object itself. Forexample, if the Edit permission of a page is set to the /organization/management/executive-board group, any members of the Executive Board can change the Access and Edit permission ofthe given page.
Note
Only one group can have edit permissions for an object at a time.
Report a bug
2.8.3. Move Apps and Move Containers Permissions
Red Hat JBoss Portal 6.1 allows to set user permissions to modify the child objects of a Site, Page orContainer. The term Container refers to a box in the user Interface that allows rendering child objectsas per rows, columns, tabs, and so on.
There are separate permissions for Applications and Containers.
Example 2.1. Use of Move Apps and Move Containers Permission
Move Apps and Move Containers Permissions are useful when a portal owner wants to minimizethe risk of breaking the page layout while users modify Pages. To mitigate this risk, the Portaladministrator can create a Page template with containers and restrict the user permissions asfollows:
Set Move Containers Permissions on the Page and all the Containers in the page to a group.For example, group is /organization/marketing/content-strategy.
Set Move Apps Permissions on the Page and all the Containers in to page to Nobody.
Browse to the folder designated for adding applications in the Container hierarchy and setMove Apps Permissions to the group /organization/marketing/content
The members of /organization/marketing/content group can create pages with thepredefined layout and add Applications to the locations designated by the template creator.
See Also:
Section 9.1, “Add a New Page using the Page Creation Wizard”
Report a bug
2.8.4 . Move Apps Permission
Move Apps Permissions allows users to perform the following operations with child Applications, ofthe given Site, Page or Container in Page or Site editors.
Red Hat JBoss Port al 6 .2 User Guide
16

Add an Application as a child to the given Site, Page, or Container.
Reorder child Applications of the given Site, Page, or Container.
Remove a child Application from the given Site, Page, or Container.
Report a bug
2.8.5. Move Containers Permission
Move Containers Permissions allow users to perform the following operations with child Containersof the given Site, Page or Container in Page or Site editors.
Add a Container as a child to the given Site, Page, or Container.
Reorder child Containers of the given Site, Page, or Container.
Remove a child Container from the given Site, Page, or Container.
Report a bug
Chapt er 2 . T erminology
17

Chapter 3. Elements of the Portal
3.1. Funct ional Port lets
Portlets are pluggable user interface components that are managed and displayed within a portal.Functional Portlets support all functions of a Portal. They are built into the portal and are accessedvia toolbar links as required when undertaking portal tasks.
Default Port lets
Account Port let
The Account Portlet allows users to register a new account and choose a preferredlanguage for the Portal interface.
Organiz at ion Port let
The Organization Portlet is used to manage user information, groups of users andgroups memberships.
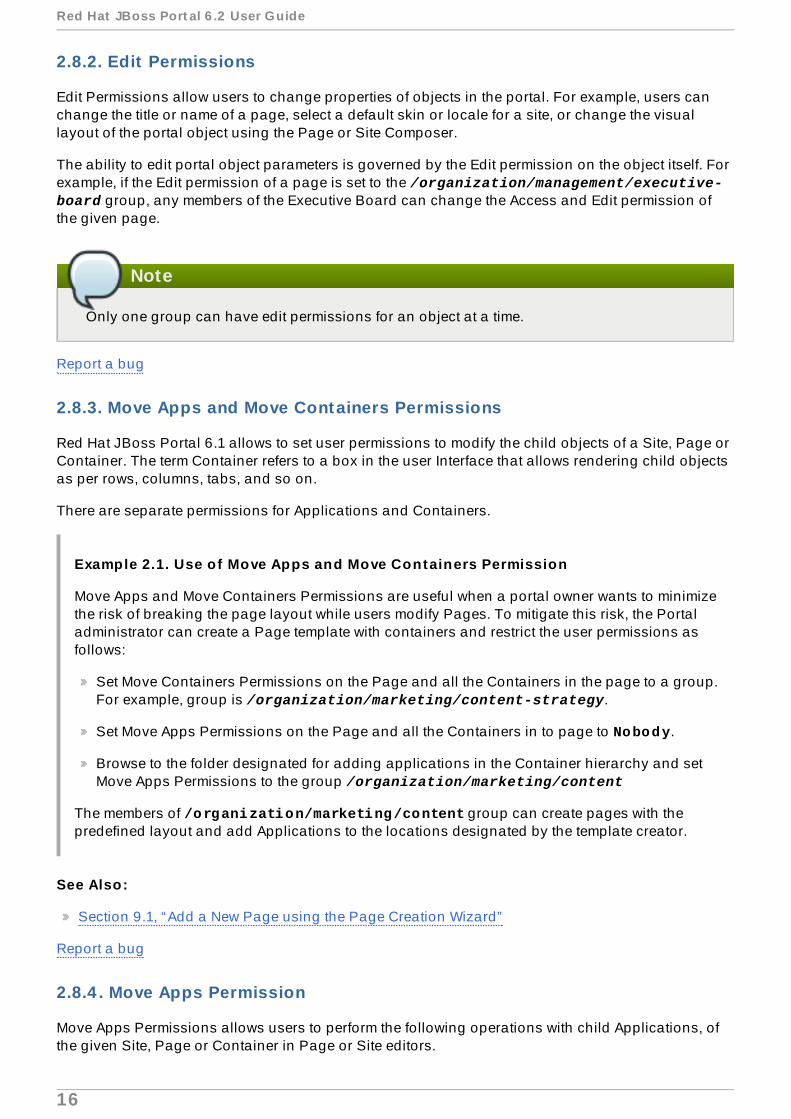
Applicat ion Regist ry Port let
The Application Registry Portlet is used to manage different applicationcategories. You can add, edit, set permissions and delete a category and its applications.
Red Hat JBoss Port al 6 .2 User Guide
18
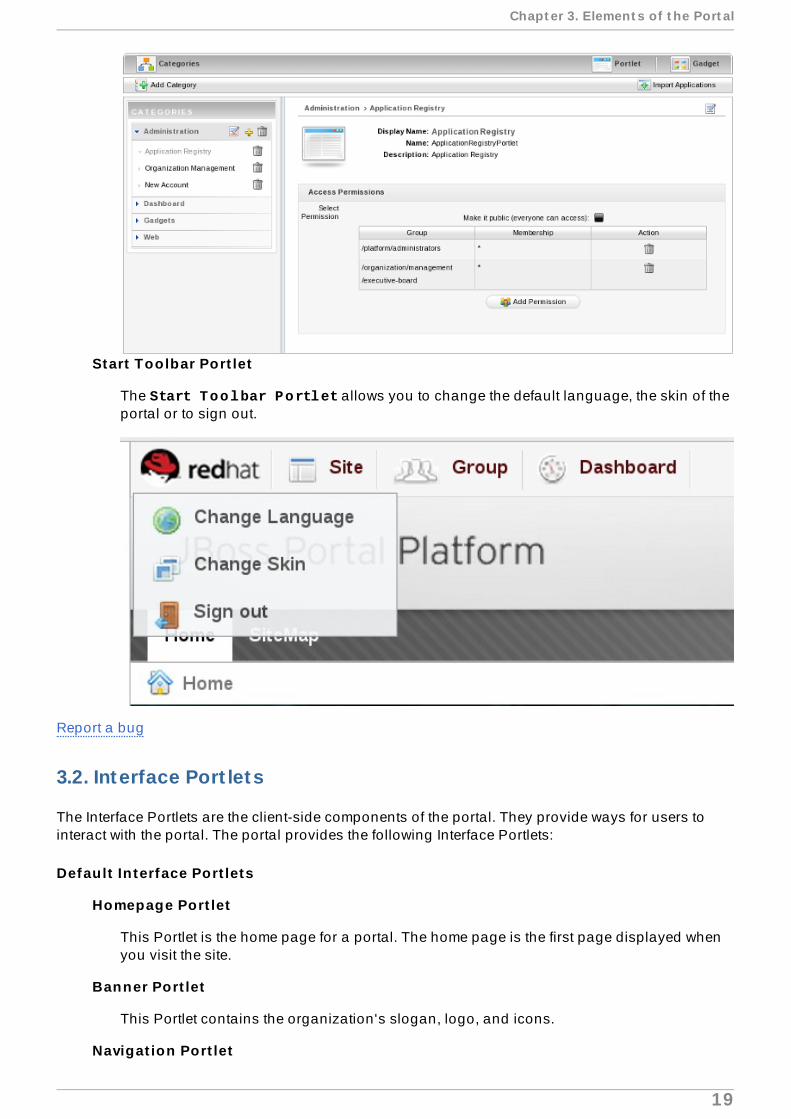
Start Toolbar Port let
The Start Toolbar Portlet allows you to change the default language, the skin of theportal or to sign out.
Report a bug
3.2. Interface Port lets
The Interface Portlets are the client-side components of the portal. They provide ways for users tointeract with the portal. The portal provides the following Interface Portlets:
Default In terface Port lets
Homepage Port let
This Portlet is the home page for a portal. The home page is the first page displayed whenyou visit the site.
Banner Port let
This Portlet contains the organization's slogan, logo, and icons.
Navigat ion Port let
Chapt er 3. Element s of t he Port al
19
This Portlet provides a navigation bar. A navigation bar is a menu that helps users tovisualize the structure of a site and provide links to quickly move from page to page.
Sitemap Port let
This Portlet displays a site map page of a web site. It lists pages on a website, typicallyorganized in hierarchical fashion.
Breadcrumbs Port let
This Portlet displays the navigation path the user has taken from the home page to arrive atthe current page.
Dashboard Port let
This portlet is used for hosting small applications known as gadgets. The dashboard usesa variety of graphical effects for displaying, opening, and using gadgets.
IFrame Port let
This Portlet is used to create in-line frames (IFrame) elements for a site. An IFrame is anHTML element which can embed another document into a parent HTML document. By usingIFrames, embedded data is displayed inside a window within the browser window.
Gadget Wrapper Port let
This Portlet allows users to view a gadget in canvas mode.
Footer Port let
This Portlet provides the footer for a site. This footer provides information or links about thesite's author/institutional sponsor, the date of the last revision made to the site, copyrightinformation, comments form, and navigational links.
See Also:
Section 3.3, “The Dashboard”
Section 6.1, “ Import Portlets and Gadgets”
Report a bug
3.3. The Dashboard
The Dashboard is used for hosting small applications known as gadgets. The Dashboard uses avariety of graphical effects for displaying, opening and using gadgets.
The active Dashboard can be individually named by double clicking on the default name ("Click andType Page Name" ) and entering a new name:
Red Hat JBoss Port al 6 .2 User Guide
20

The Dashboard can also be tabbed to create multiple spaces. Open a new tab by clicking the +button beside the Dashboard name.
New tabs can also be individually named and managed.
Gadgets within the Dashboard can be moved and rearranged. New gadgets can be created andunnecessary ones deleted. More than one instance of the same gadget can be opened at the sametime and each instance of the same gadget can have different settings. The gadgets instances arecompletely independent.
Report a bug
3.4 . Using the Dashboard Workspace
1. Click Dashboard in the toolbar to access the Dashboard.
2. Click Add Gadgets to open the Dashboard Workspace.
The Dashboard Workspace lists all available gadgets. The following gadgets are provided bydefault.
Default Gadgets
Calendar
The calendar gadget helps track and plan your events and activities.
Chapt er 3. Element s of t he Port al
21
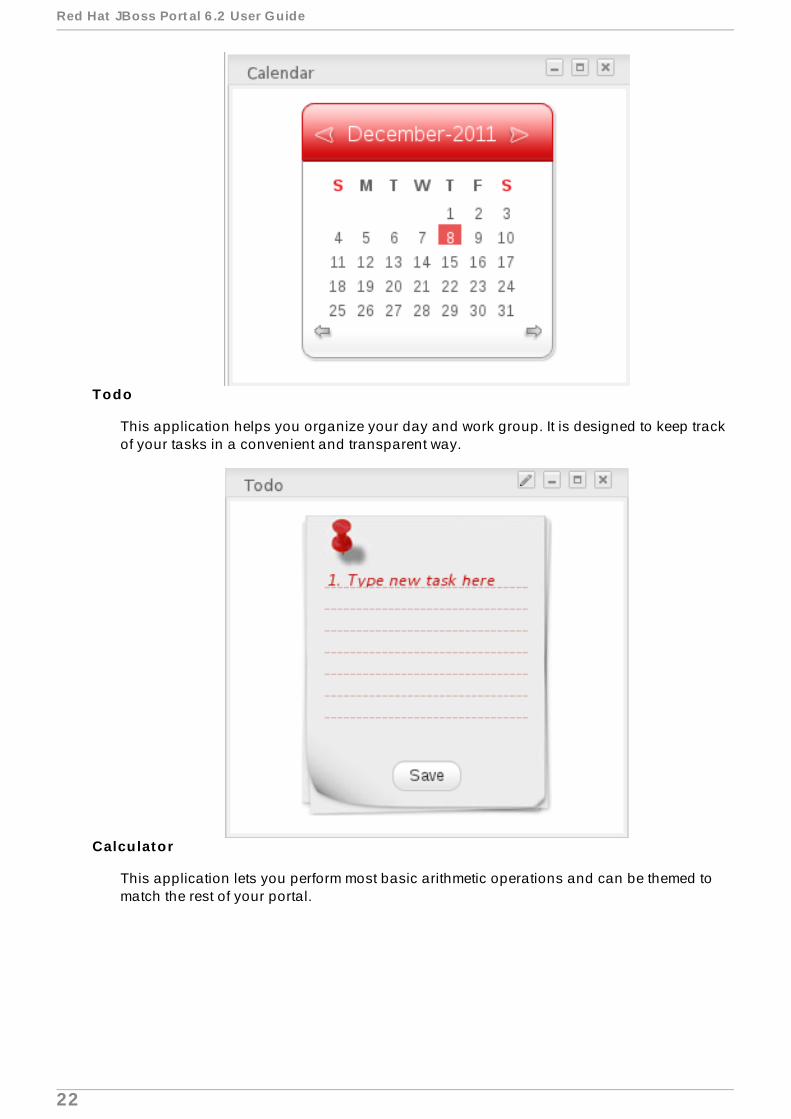
Todo
This application helps you organize your day and work group. It is designed to keep trackof your tasks in a convenient and transparent way.
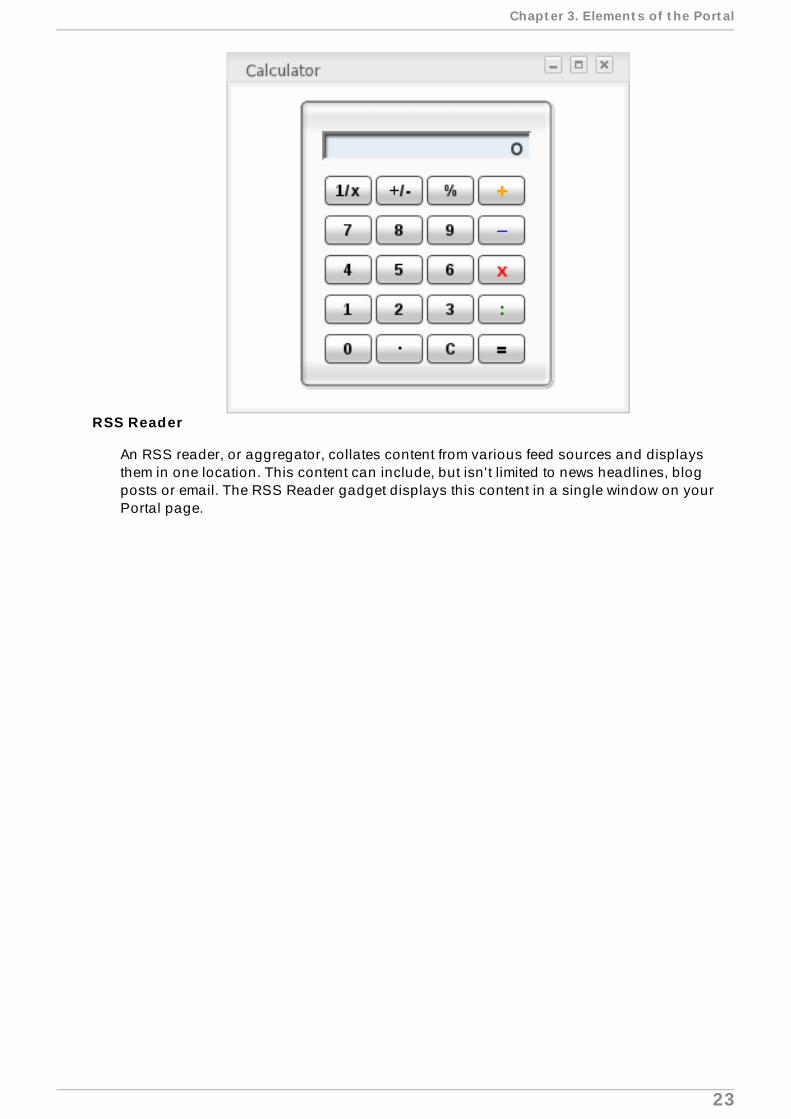
Calculator
This application lets you perform most basic arithmetic operations and can be themed tomatch the rest of your portal.
Red Hat JBoss Port al 6 .2 User Guide
22
RSS Reader
An RSS reader, or aggregator, collates content from various feed sources and displaysthem in one location. This content can include, but isn't limited to news headlines, blogposts or email. The RSS Reader gadget displays this content in a single window on yourPortal page.
Chapt er 3. Element s of t he Port al
23

To use one of the default gadgets, drag it from the Dashboard Workspace onto your Dashboard.
Report a bug
3.5. Add Gadgets
Many more gadgets can be found at the Google Gadgets homepage, located athttp://www.google.com/ig/directory?synd=open. Many of the gadgets available from this resource arecompatible with the portal.
Important
Only gadgets that have been added to the whitelist by the administrator can be used. Toconfigure the whitelist, see the Gadget Proxy Configuration Chapter of the Installation Guide.
Procedure 3.1. Add Gadgets f rom External Sources
1. Obtain the URL (.xml or .rss) of the gadget you wish to add from the gadget source.
Red Hat JBoss Port al 6 .2 User Guide
24
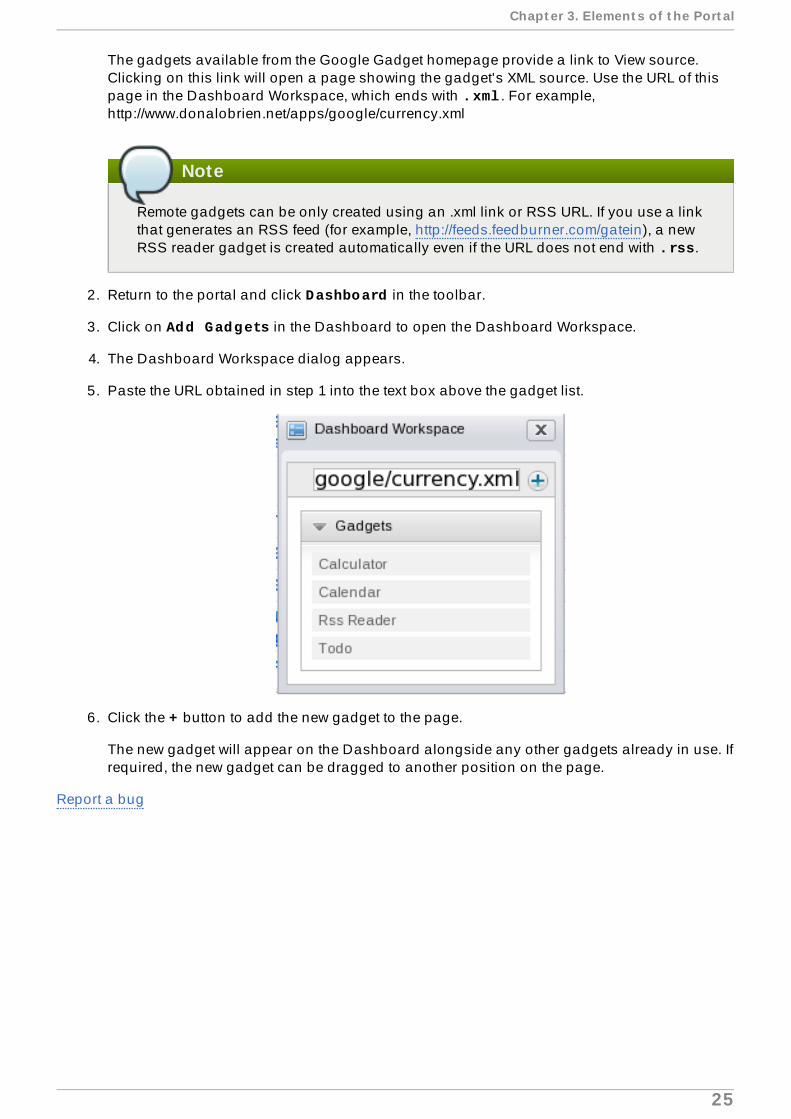
The gadgets available from the Google Gadget homepage provide a link to View source.Clicking on this link will open a page showing the gadget's XML source. Use the URL of thispage in the Dashboard Workspace, which ends with .xml . For example,http://www.donalobrien.net/apps/google/currency.xml
Note
Remote gadgets can be only created using an .xml link or RSS URL. If you use a linkthat generates an RSS feed (for example, http://feeds.feedburner.com/gatein), a newRSS reader gadget is created automatically even if the URL does not end with .rss.
2. Return to the portal and click Dashboard in the toolbar.
3. Click on Add Gadgets in the Dashboard to open the Dashboard Workspace.
4. The Dashboard Workspace dialog appears.
5. Paste the URL obtained in step 1 into the text box above the gadget list.
6. Click the + button to add the new gadget to the page.
The new gadget will appear on the Dashboard alongside any other gadgets already in use. Ifrequired, the new gadget can be dragged to another position on the page.
Report a bug
Chapt er 3. Element s of t he Port al
25

Chapter 4. Toolbar
4.1. What is the Toolbar
The Toolbar offers a convenient way for users and administrators to execute tasks within the portalquickly and easily.
Report a bug
4.2. User Act ions in the Toolbar
User Menu
You can use the main menu (located under the product icon) to change the language orskin used in the portal or to sign out.
Site
The Site navigation function shows the different sites available in this Portal and allowsusers to directly edit the navigation tree.
Group
Using the Group navigation function users can easily see and access pages in the Portal.
Dashboard
You can use the Dashboard to create your own pages of gadgets.
Red Hat JBoss Port al 6 .2 User Guide
26

The name shown in the image above is the default and can easily be changed when theDashboard is open.
Report a bug
4.3. Administ rat ion Act ions in the Toolbar
Editor
Portal Administrators have access to another navigation that allows them to:
Add a new page to the current portal.
Edit a particular page's properties.
Change a page's layout.
This navigation appears next to the Dashboard navigation in the Toolbar and is namedbased on context. It will appear as either Site Editor, Dashboard Editor or GroupEditor depending on the user's location within the portal.
Report a bug
Chapt er 4 . T oolbar
27
Part II. Portal Administration
Red Hat JBoss Port al 6 .2 User Guide
28
Chapter 5. Portals
5.1. Create a New Portal
Creating a new portal requires you to have a special permission that only an administrator can giveyou (if you are not an administrator).
1. Click on Site in the toolbar, then click the Add New Portal button.
2. This opens the Create New Portal window. Initially, the Portal Set t ing tab will be selected.On this tab, specify the following properties of the portal:
Portal Name
Enter the name of the new portal. This field is required and the value must beunique. The name must be between 3 and 30 characters and must begin with analphabetical character or an underscore. Only alphabetical, numerical, dash andunderscore characters are allowed.
Label
Enter a Label for the new portal. This field is optional.
Descript ion
Enter a description of the portal. This field is optional.
Locale
Select the default display language for the portal.
Skin
Select a skin for a portal.
3. Switch to the Propert ies tab and choose values of the following properties:Keep session alive
This property determines session timeout behavior. Choose one of the followingvalues:
Never - The session will never timeout, even if an application requests it.
On-demand - The session will timeout if an application requests it.
Always - The session will time out after a set period.
Show info bar by default
If checked, portlets added to a page will show an information bar containing theirname, a help drop-down menu and minimize/maximize buttons.
4. Switch to the Permission Set t ing tab and set the permissions for the portal. Two types ofpermissions need to be set for a new portal; Access Permission and Edit Permission.
Access Permission can be set to allow global access by checking the Make it Public box.Alternatively, specific permission for groups can be added by clicking Add Permission ,then selecting a group in the left pane of the box and then a membership level in the rightpane.
Chapt er 5. Port als
29

Edit Permission requires specific permissions to be set. Click on Select Permission andchoose a group and level as above.
5. To use a template for your portal, switch to the Portal Templates tab. This tab lets youchoose a template for the new portal from templates that are saved in the installation.
6. Click Save to create the portal.
See Also:
Section 17.1, “Manage Users and Groups”
Section 11.1, “Manage Permissions”
Section 5.2, “Access a Portal”
Section 5.6, “Delete a Portal”
Report a bug
5.2. Access a Portal
An administrator can access numerous portals running in the portal instance.
To access a portal, click Site on the Toolbar. The Site Management page opens, which shows a listof portals and possible actions:
Report a bug
5.3. Edit Portal Layout
To edit the layout of a portal, click the Edit Layout button beside the active portal:
New applications, containers or gadgets can be dragged from the Edit In line Composer window(inset on the right of the screen) onto the main portal body.
Red Hat JBoss Port al 6 .2 User Guide
30

Elements already in place in the portal body can be rearranged or removed as required. Use therelevant button in the overlay that appears when you mouse over each element:
Click the Finish or Abort buttons in the Edit Inline Composer window to save or discard yourchanges.
Chapt er 5. Port als
31

Note
For more information about creating and developing portlets see the following resources:
Red Hat JBoss Developer Studio JBoss Portlet Tools User Guide.Red Hat JBoss Portal Development Guide (Portlet Development part).
Report a bug
5.4 . Edit Portal Navigat ion
Click Site in the Toolbar and select the Edit Navigation link next to the portal to open theNavigation Management window.
The Navigation Management window allows the portal administrator to add new nodes or edit, copy,move, delete or clone existing nodes.
Report a bug
5.5. Edit Portal Propert ies
Portal properties such as language, skin and permissions can be set by clicking on Site in theToolbar and selecting the Edit Portal's Conf ig link for the portal you wish to edit:
The various tabs available in the edit properties window give access to the properties that can beedited for the chosen portal:
Click on Save or Cancel to either set or discard any changes you have made in the portal.
Report a bug
5.6. Delete a Portal
1. To delete a portal click on the Delete icon beside the portal you no longer require.
The confirmation message will appear:
2. Click OK
Report a bug
5.7. Change Portal Skins
Skins are graphic styles used to provide an attractive user interface. Each skin has its owncharacteristics with different backgrounds, icons, and other visual elements.
There are two ways to change the portal skin, each offering differing effects on the user experience.
When you set skin using method one change is applied to this portal, and every user that accessesthis portal will see it in the chosen skin.
Red Hat JBoss Port al 6 .2 User Guide
32
When you change skin using method two , the skin is set for the logged in user and all portalswithin the domain will be shown with the chosen skin.
Portal skins set via method two have a higher priority when the portal is rendered.
Method One
1. Click on Site , then Edit Portal's Conf ig .
2. In the Portal Set t ing tab, select another skin Skin list
3. Click Save to Fin ish .
Method Two
1. Mouse over the Start menu and click on Change Skin .
2. Select a new skin from the Skin list. By clicking on the skin name a picture willappear in the preview pane.
3. Click Apply to apply to the portal.
More information about adding skins to a portal can be found in the Reference Guide for Portal.
Report a bug
5.8. Switch Between Portals
Mouse over Site on the Toolbar for a list all portals in which you have at least access rights:
Users switch between portals by clicking on the desired portal. Please wait a few seconds for thechange to take effect.
Report a bug
5.9. Manage Services
Users with administrator privileges can run service methods and properties directly from the portalinterface, using the controls provided in the Group+Administ rat ion+Services Managementinterface.
Services Management presents methods and properties organized by the service class name.Controls in the interface allow users to pass parameters and run commands to call the methods andproperties.
Follow Task: Call a Method in the Services Management Interface. and Task: Call a Property in theServices Management Interface. to learn how to call methods and properties related to the org.exoplatform.portal.application.PortalStatistic classname. Adapt theprocedures in these tasks to interact with other methods and properties for other portal classesavailable in the Services Management interface.
Task: Call a Method in the Services Management In terface.
Complete this task to call a method using the Services Management interface, which shows theaverage portal execution time in seconds.
Chapt er 5. Port als
33
Prerequisites
The portal is running.
You are authenticated with administrator privileges.
1. Click Group+Administ rat ion+Services Management
2. In the Services drop-down, select portalstat ist ic to display the available methods,including getMaxTime.
3. In the Parameters column, type the name of the portal to query. For example, to perform thequery using the default portal, type classic .
4. In the Action column, click Run to display the execution time in the value group, underneaththe Method table.
Task: Call a Property in the Services Management In terface.
Complete this task to call a property using the Services Management interface, which returns theidentifiers of all known portals.
Prerequisites
The portal is running.
You are authenticated with administrator privileges.
1. Click Group+Administ rat ion+Services Management
2. In the Services drop-down, select portalstat ist ic to display the available methods on theMethods tab.
3. Click the Properties tab to display all available properties for the portalstat ist ic service.
4. In the Action column, click Run to display the name of all known portals, underneath theProperties table.
Report a bug
Red Hat JBoss Port al 6 .2 User Guide
34
Chapter 6. Portlets and Gadgets
6.1. Import Port lets and Gadgets
This feature imports portlets/gadgets found in web applications on your server
Note
The Application Registry looks in all webapps of your application server for a file located atWEB-INF/portlet.xml and registers the portlets found there. When the user clicks on "AutoImport" the portlets of all webapps are imported. If there is a portlet.xml file in a webapp a newcategory is created whose name is the webapp war name (or the webapp folder name). All theportlets that are configured in the portlet.xml file are added to the new category.
1. In the Group menu, select Administ rat ion then Applicat ion Regist ry:
2. Click Import Applicat ions on the right hand side. A confirmation message will appear.
3. Click OK to accept.
Report a bug
6.2. Manage Port lets and Gadgets
Portlets and gadgets are organized in different categories. Each category contains one or severalportlets or gadgets. You can also mix portlets and gadgets into one category. By default all gadgetsare placed in the Gadgets category.
Important
Ensure gadgets are added to the Dashboard only.
Preferences and user data will not persist between sessions if gadgets are added to otherportal pages.
This limitation will be corrected in a later version of the product.
Report a bug
6.3. Display Gadgets
You can change the number of columns available in the Dashboard.
1. Go to the Dashboard (by clicking Dashboard in the Toolbar)
2. Hover over Dashboard Editor and click Edit Page in the drop-down menu.
3. The Page editor will appear.
4. Hover over the Dashboard Port let and click on the Edit icon (the 'pencil').
Chapt er 6 . Port let s and Gadget s
35

5. Change the number of columns in the Number of co lumns field. The maximum number ofcolumns is four (4).
6. Click the Save button to accept the change.
7. Click Close and then click Fin ish .
Report a bug
6.4 . Add a new Category
You easily add a new category by following this guide:
1. Hover over the Group menu, then Administ rat ion and click on Applicat ion Regist ry.
2. Click the Add Category button on the action bar:
The Category Set t ing tab: includes common information about a category.
Category name
The name of the category. This field is required and its length must be between 3and 30 characters. Only alpha, digit, dash and underscore characters are allowed.
Display name
The display name of the category and its length must be between 3 and 30characters.
Descript ion
A brief description of the category. Any length from 0 to 255 characters is allowed.
The Permission Set t ing tab provides access to the Permission manager.
The permission criteria are used whenever a user creates or modifies a page. In that case theuser can only see and use portlets in those categories on which he or she has access to (asdefined by groups and memberships).
Report a bug
6.5. Edit a Category
Red Hat JBoss Port al 6 .2 User Guide
36
6.5. Edit a Category
1. Click the Edit icon located next to the title bar.
2. Update the category information.
3. Click the Save button to apply changes.
Report a bug
6.6. Delete a Category
1. Click the Trash can icon located next to the title bar.
2. Accept the deletion by clicking OK
Report a bug
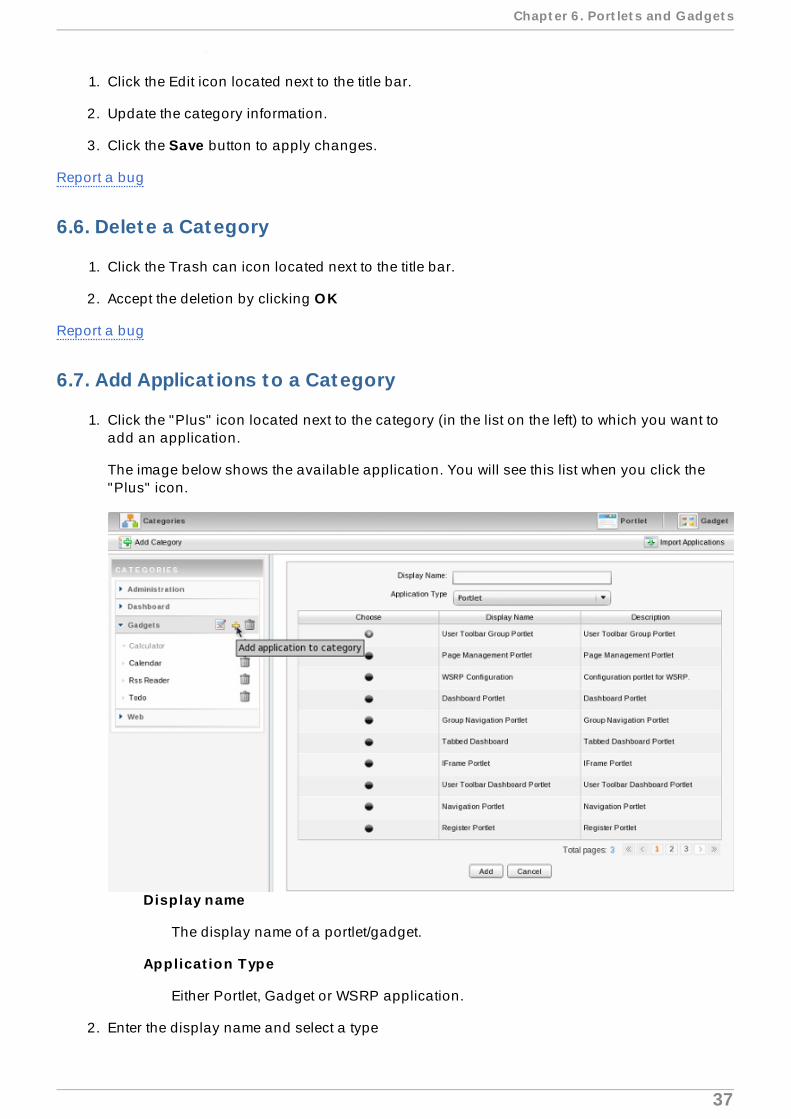
6.7. Add Applicat ions to a Category
1. Click the "Plus" icon located next to the category (in the list on the left) to which you want toadd an application.
The image below shows the available application. You will see this list when you click the"Plus" icon.
Display name
The display name of a portlet/gadget.
Applicat ion Type
Either Portlet, Gadget or WSRP application.
2. Enter the display name and select a type
Chapt er 6 . Port let s and Gadget s
37

3. Select an application by checking the radio button. Note that there several pages of Portletapplications to choose from and that the content of the list changes when you select adifferent type of application from the Applicat ion Type drop-down menu.
4. Click the Save button to add the selected application to the category.
Report a bug
6.8. Set Access Permission on Port lets
1. In the Group menu, select Administ rat ion and then Applicat ion Regist ry.
2. Select a category in the Category pane that includes the portlet you want to set permissionson. All portlets of that category will be listed underneath.
3. To set permission for a portlet:
Click the Add Permission button to add access permissions to more groups.
Or check Make it public to allow everyone to access.
Whenever the user creates or modifies a page, he or she can only see and usegadgets/portlets that fulfill two conditions: the portlet is in a category which the user hasaccess permission too and the user has access permission on the port let
Report a bug
6.9. View/Edit port let /gadget informat ion
In the Group menu, select Administ rat ion then Applicat ion Regist ry.
Lef t pane
All portlets and gadgets grouped by categories
Right pane
shows detail information about a portlet: Name, Display name, Description and Portletpreferences.
To see the details of any portlet select it from the list on the left.
To edit a portlet, click the edit button to the right of the portlet's name:
Report a bug
6.10. Add a Gadget
In the Group menu, select Administ rat ion then Applicat ion Regist ry. Click on the Gadgeticon.
You may add a remote gadget using its URL or create a new gadget.
Procedure 6 .1. Add a Remote Gadget
1. Click on Add a remote gadget :
Red Hat JBoss Port al 6 .2 User Guide
38

2. Enter the url of the remote gadget in the URL field.
3. Click Add . The new remote gadget is visible in gadget list on the left pane.
Procedure 6 .2. Create a new Gadget
1. Click on Create a new gadget :
2. Enter the xml code of the new gadget in the Source field.
Report a bug
6.11. Manage Gadgets
You can edit or refresh a gadget using the icons in the top right of the Gadget Details pane.
You can delete a local gadget using the trashcan icon to the right of the appropriate gadget in thegadget list.
Report a bug
6.12. Edit a Gadget
Click the Edit Gadget icon located in the header of the Gadget Details page to display thefollowing window:
Chapt er 6 . Port let s and Gadget s
39

Report a bug
Red Hat JBoss Port al 6 .2 User Guide
4 0

Chapter 7. Gadgets in Portal
The portal consist of inbuilt gadgets such as Calender,ToDo, Calculator, and RSS Reader.
Default Gadgets
Calender
The calendar gadget allows you to switch between daily, monthly and yearly views. Youcan customize the gadget to match your portal theme.
ToDo
ToDo helps you to organize your day and work group. It is designed to keep track of yourtasks in a convenient and transparent way. Tasks can be highlighted using different colors.
Calculator
Calculator lets you perform basic arithmetic operations and can be customized to matchyour portal theme.
RSS Reader
RSS Reader collects content from various user feed sources and displays them in onelocation. This content includes, news headlines, blog posts or email. The RSS Readergadget displays the content in a window on your portal page.
Note
To obtain more gadgets, see http://www.google.com/ig/directory?synd=open site. Red HatJBoss Portal is compatible with most of these gadgets .
Report a bug
Chapt er 7 . Gadget s in Port al
4 1

Chapter 8. Navigation Nodes
8.1. Manage Navigat ion Nodes
If you are the portal administrator (or the administrator has granted you the appropriate permissionprivileges) you can execute all actions related to portal nodes. These actions include adding newnodes or editing, copying, moving, deleting or cloning existing nodes.
Report a bug
8.2. Add a new node
1. Click on Site then click on Edit Navigat ion of the portal to modify.
2. Select a node from list (to create a new node like sub-node of the selected node) or click theUp icon to create a new node at the root level of the portal.
3. Right-click on the selected navigation or node and select Add Node option. The ADD/EDIT PAGE NODE form appears:
The Page Node Set t ing tab includes:
Uri
An identification of the node. The Uri is automatically created after adding a newnode
Node name
The name of the node. This field is required and must be unique. Only alpha, digit,dash and underscore characters are allowed for this field and it must be between 3and 30 characters.
Extended label mode
This is a new feature which allows Administrators to add labels to nodes in multiplesupported languages. When the language of the site is changed, the nodes willdisplay the appropriate localized label.
Language
Set the language for the node.
Label
The display name of the node on the screen. This field is not required and may bechanged. This field must have a length between 3 and 120 characters.
Visib le
This check box allows administrators to hide (and show) the page and its node atthe navigation bar, the page navigation and the site map
Publicat ion date & t ime
This option allows publishing this node for a period of time. Start Publication Dateand End Publication Date only appear when this option is selected.
Red Hat JBoss Port al 6 .2 User Guide
4 2

Start Publicat ion Date
The start date and time to publish the node.
End Publicat ion Date
The end date and time to publish the node.
In the Page Selector tab, you can select a page or not for this node.
Page Id
The identification string of the page.
Name
The selected page's name.
Tit le
The selected page's title.
You do not have to enter values in these fields. They are automatically populated afterselecting an existing page by clicking the Search and Select Page button.
The Select Page form appears:
This window lists all existing pages of Portal or Group with basic information for eachpage.
To select a page for creating a node, select a page from the list or search for a specific pageas follows:
a. Enter your page title into the Tit le field to do search to Title;
Or, enter the site name into the Site Name field to do search to the page's site name;
Or, enter values into both fields to further limit your search results by both Tit le andSite Name .
b. Select the area in which you wish to search into the Type field.
c. Click to perform your search. All pages matching your search criteria will belisted.
Chapt er 8 . Navigat ion Nodes
4 3

d. Click on the row of the page you wish to select.
After selecting a page, the details of this page will be displayed in the Page Selector form.
After configuring the page node settings, the page selector and the node's icon, click the Save buttonto accept or the Cancel button to quit without creating a new node.
Report a bug
8.3. Edit a node
1. Click Site+Edit Navigat ion .
2. Right-click on the selected node and select the optionEdit this Node.It displays the PageNode Setting tab.
3. In the Page Node Setting tab you can change the value of these fields:
Extended label node
Language
Label
Visible
Publication Date & time
Red Hat JBoss Port al 6 .2 User Guide
4 4

4. After making the desired changes, click Save to accept changes or Cancel to exit withoutsaving.
5. In the Page Selector tab you can search and select another page for this node by clickingthe Search and Select Page button.
After completing the edits required for this node, click Save to accept the changes or Cancelto exit without saving.
See Also:
Section 8.2, “Add a new node”
Report a bug
8.4 . Copy a node
1. Click on Site then click on Edit Navigat ion of the portal you want to modify.
2. Right-click on the selected node and select Copy node option.
3. Select the position that you want to paste this node and select Paste Node option.
Report a bug
8.5. Clone nodes
The Clone node function allows you to copy a node.
The differences between clone node and copy node is that the clone node has its own page andwhich has the same content as the selected node.
Therefore there will be a new page that has the same name as the cloned node's page shown in thepage list when you access Manage Pages .
1. Click on Site then click on Edit Navigat ion of the portal you want to modify.
2. Right-click on selected node and select Clone node option.
3. Select the position that you want to paste this node and select Paste Node option.
Report a bug
8.6. Cut a node
1. Click on Site then click on Edit Navigat ion of the portal you want to modify.
2. Right-click on the selected node and select Cut node option.
3. Select the position that you want to paste this node and select Paste Node option. markicon to Save .
Report a bug
8.7. Delete a node
Chapt er 8 . Navigat ion Nodes
4 5
1. Click on Site then click on Edit Navigat ion of the portal you want to modify.
2. Right-click on the selected node and select Delete node option.
It will display an alert message confirming the removal of the node. Click the OK button toaccept the deletion or Cancel button to quit without deleting the node.
Report a bug
8.8. Change Node Order
You can easily change the position of nodes in the navigation bar following these steps:
1. Click on Site then click on Edit Navigat ion of the portal you want to modify.
2. Select the node that you want to move. Right click on the selected node and then click onMove up or Move down
3. The selected node will be moved up or down within the list.
Report a bug
Red Hat JBoss Port al 6 .2 User Guide
4 6

Chapter 9. Pages
9.1. Add a New Page using the Page Creat ion Wizard
A page creation wizard is available to administrators in order to create and publish portal pagesquickly and easily.
The wizard window is divided into two sections: the left pane contains the existing page/nodehierarchy and the right pane displays the Page Editor.
In the left pane, you can navigate up and down the node/page structure.
In the right pane are the available parameters for a new page.
1. Mouse over Site Editor then select Add New Page .
2. Complete the fields in the right pane, using Page Parameter Definitions as a guide.
3. Click Next or number '2' of the wizard steps to proceed to the next step.
4. Select Empty Layout for a blank page.
Alternatively, click the drop down arrow at the top of the right pane to see more templates toselect.
5. Click Next or number '3' of the wizard step to proceed to the next step.
6. Drag and drop portlets from the pop-up panel into the main pane to create the content for thepage.
Applicat ions
Lists all existing portlets
Containers
Lists all existing containers
View Page propert ies
Chapt er 9 . Pages
4 7

Shows various page settings (title, Page ID and more) and/or pagepermissions, which can be changed to suit the page.
Note
While in this view, click the Switch View mode button to view the content of this pageas you design it.
Switch between viewing the page by layout (showing containers and portlets) orpreviewing how the page will look when live. The contents of the page can be edited ineither mode.
7. Once page configuration is complete, use the icons located in the top right corner of thePage Editor window to navigate as required:
Click Back (the small left-facing arrow) to return the previous step.
Click Save to create the page.
Click Abort to quit the page creation wizard, without saving any changes.
Page Parameter Def in it ions
Current Selected Page Node
The path of the selected node to add a new sub page
Node Name
The node name of the added page. It is required field. This field must start with a characterand must have a length between 3 and 30 characters.
Extended label mode
This is a new feature which allows Administrators to add labels to pages in multiplesupported languages. When the language of the site is changed, the pages will display theappropriate localized label.
Language
Set the language for the page.
Display Name
The display name of the node which contains the added page and must have a lengthbetween 3 and 30 characters.
Visib le
This check box toggles the global visibility of this page.
If checked, the page or the page node appears on the navigation bar, the page navigationand the site map. Page visibility depends on the "publication date & time" attribute.
If unchecked, the page is not shown in the site map or navigation bar.
Red Hat JBoss Port al 6 .2 User Guide
4 8

Important
The Visible check box must not be used as a security measure, as non-visiblepages will still be accessible using a direct URL, such ashttp://localhost:8080/portal/private/classic/pagename.
Instead, use the Hide page when outside publishing window option toprevent direct URL access to a page.
Publicat ion date & t ime
This option allows publishing the page for a period of time. If this option is checked thevisibility of the page depends on the publication period start and end date.
Important
The Publication Date & Time functionality must not be used as a securitymeasure, as pages configured for time-specific publication will always be accessibleusing a direct URL regardless of publication dates.
Start Publicat ion Date
The start date and time to publish the page. This field is only visible if the Publication date & time box is checked.
End Publicat ion Date
The end date and time to publish the page. This f ield is only visib le if the Publicationdate & time box is checked .
Note
You can set date and time by clicking the Start Publicat ion Date field and EndPublicat ion Date field and select a date in the calendar pop up.
Hide page when outside publish ing window
If a user accesses this page directly through a URL either before the Start Publication Dateor after the End Publication Date, the user is redirected to the parent node. Additionally, aninformation message is displayed indicating the page is not available yet, or has expired.
Report a bug
9.2. Add a New Page using Page Management
1. Mouse over Group in the Toolbar, highlight Administ rat ion then select PageManagement .
2. Click on Add New Page .
Chapt er 9 . Pages
4 9

3. The fields in this window are:
Page Id
A string that identifies the page. It is automatically generated when you finishcreating the page.
Owner type
If the page Owner type is set to portal the page is created with shared ownershipportal. Therefore users who have edit permissions on the portal level can edit thispage type.
If the page Owner type is group the page is created for a group. Therefore userswho have manager permissions for that group can edit this page type.
Owner Id
The name of the current portal is automatically selected for Owner id ensuring theedit permissions are assigned to users who can edit the current portal.
When the owner type is set to group, a list of groups will allow you to select one useras the 'owner'.
Page Name
The name of the page. This is a required field and must be unique. Onlyalphabetical, numerical, dash and underscore characters are allowed to be usedfor this field and the name must be at least 3 and no more than 30 characters inlength.
Page t it le
The title of the page. This is an optional field. If you choose to add a title to the pageit must be at least 3 and no more than 120 characters in length.
Show Max Window
The option allows users to choose whether the page is shown at maximum size ornot.
4. Click Save .
Report a bug
9.3. Edit a Page
1. Click Group+Administ rat ion+Page Management .
2. Click the edit icon on the row of page to edit in the existing page list.
Click View Page properties icon to show a form to edit page properties.
3. The properties presented in the Page Properties window are Page ID , Owner type, Owner Id and so on.
Permission Set t ing
Permission on each page is set in two levels: Access right and Edit right.
Red Hat JBoss Port al 6 .2 User Guide
50

Access right
Access right can be set to specific user groups or set to everyone (this includesunregistered users).
Current access permissions on page are listed in Access Permission Settingtab and you can remove permissions (by clicking the delete icon) or add furtherpermission (by clicking the Add Permission button).
Populating the Make it public check box will allow all users (registered orunregistered) to access the page.
Edit right
The Edit right allows users to change information on a page. Edit right is set for agroup of users only.
Edit right can be set for one specific membership type within a particular group (*allows every membership type in a group).To reassign this right to another group,click Select Permission in the Edit Permission Setting tab to chooseanother one.
See Also:
Section 9.2, “Add a New Page using Page Management”
Report a bug
9.4 . Delete a Page
1. Mouse over Group in the Toolbar. Highlight Administ rat ion and then click on PageManagement . You will be presented with a list of all existing pages.
2. Click the trash can icon in the row of the page you want to delete. It will display theconfirmation message.
3. Click the OK button to complete the deletion or Cancel button to quit without deleting thepage.
Report a bug
9.5. Drag and Drop the Page Body
It is possible for Administrators to reorganize and customize the appearance of a portal page bydragging and dropping elements.
1. From the toolbar, click Site Editor → Edit Layout .
2. Click on the Portal Page , and drag and drop content as required.
Report a bug
Chapt er 9 . Pages
51

Part III. Site Administration
Red Hat JBoss Port al 6 .2 User Guide
52
Chapter 10. Language
10.1. Change Interface Language
The priority of the interface language setting follows this hierarchy:
1. User's language
2. Browser's language
3. Portal's language
Be aware of this hierarchical order to change the language type appropriately.
See Also:
Section 10.2, “Language for a user”
Section 10.3, “Set language for a user”
Report a bug
10.2. Language for a user
You may set the interface language for your account alone and not for the entire Portal as follows:
1. Open up the Start menu and click on Change Language :
2. The In terface Language Set t ing window lists all available languages installed in thePortal:
3. Click on the desired language. The associated native word is highlighted.
Chapt er 1 0 . Language
53
4. Click Apply to save your change. The site refreshes and displays its attributes in the selectedlanguage.
Report a bug
10.3. Set language for a user
There are two modes to set the interface language for a specific user.
Public Mode
The interface language is dictated by the language setting of the web browser.
If the language is set to one that the portal does not support, the language displayed is thelanguage set at the Portal level (see above).
Private Mode
The interface language is set when registering each user.
See Also:
Section 14.1, “Register New Accounts”
Report a bug
10.4 . Right To Left Support
Right to Left (RTL) languages are supported in the portal.
Report a bug
Red Hat JBoss Port al 6 .2 User Guide
54
10.5. Mult i-Language Navigat ion Nodes
The portal supports a multi-language environment, which allows any menu entry on the navigationto be internationalized.
Because the navigation bar is composed of nodes, the node display name must be modified toenable multi-language support. Instead of entering the display name of the node in a definedlanguage (English, for example) a language-neutral 'resource key' is required.
This resource key is used to define the label that is shown for that node on the navigation bar, themenu and the breadcrumb.
Note
A localization feature called Extended Label Mode is available, which allows siteadministrators to add labels to nodes and pages in multiple supported languages. When thelanguage of the site is changed, the nodes display the appropriate localized label.
Report a bug
10.6. Key Format
The resource key format is: #{key}
The resource key can contain any text that you consider appropriate to satisfy your business needs.It should, however, be human-readable and must not contain spaces.
Report a bug
10.7. Creat ing Keys
There are two ways to create a key for a node:
Use the method described in Section 10.8, “Creating Keys using Create Page Wizard”
Use the methods described in Section 10.9, “Creating Keys using Navigation Management”
Report a bug
10.8. Creat ing Keys using Create Page Wizard
1. Open the Site Editor menu and pick Add New Page .
2. Enter a name for this new page
3. Enter a resource key in the Display Name field.
Chapt er 1 0 . Language
55
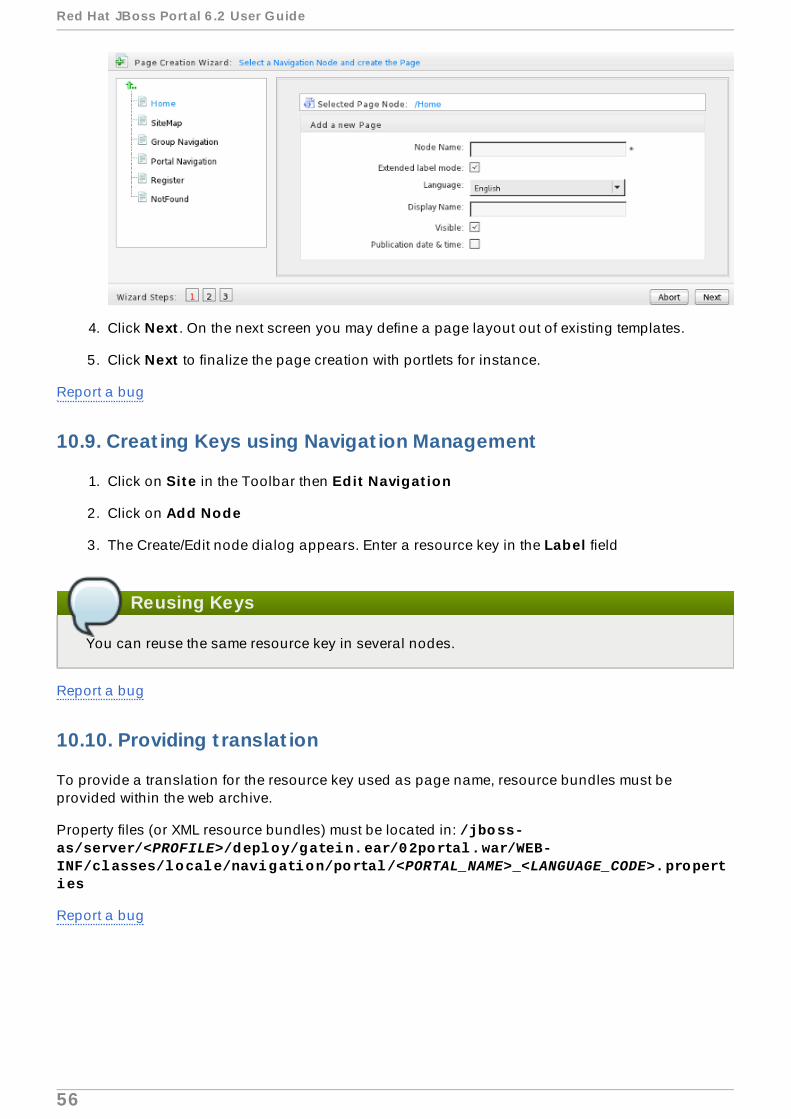
4. Click Next . On the next screen you may define a page layout out of existing templates.
5. Click Next to finalize the page creation with portlets for instance.
Report a bug
10.9. Creat ing Keys using Navigat ion Management
1. Click on Site in the Toolbar then Edit Navigat ion
2. Click on Add Node
3. The Create/Edit node dialog appears. Enter a resource key in the Label field
Reusing Keys
You can reuse the same resource key in several nodes.
Report a bug
10.10. Providing t ranslat ion
To provide a translation for the resource key used as page name, resource bundles must beprovided within the web archive.
Property files (or XML resource bundles) must be located in: /jboss-as/server/<PROFILE>/deploy/gatein.ear/02portal.war/WEB-INF/classes/locale/navigation/portal/<PORTAL_NAME>_<LANGUAGE_CODE>.properties
Report a bug
Red Hat JBoss Port al 6 .2 User Guide
56

Chapter 11. Permissions
11.1. Manage Permissions
Permissions play an important part in accessing and performing actions in the Portal. Depending onthese permissions assigned by an administrator, users gain access to various components andactions such as edit portals, pages or portlets.
This section describes how to access permission settings using the Portal User Interface. The sectioncovers setting Permissions for Sites. The Permission settings for Pages, Applications andApplication categories are similar to Sites settings.
See Also:
Section 2.8, “About Permissions”
Report a bug
11.2. Set Site Permissions
There are two ways to access the Permissions panel for Sites.
New Site
Click on Site on the Toolbar , then click on Add New Portal → Permissions tab.
Exist ing Site
Click on Site on the Toolbar, then click on Edit Portal's Propert ies → Permissionstab.
Report a bug
11.3. Set Access Permissions on a Site
To allow a site to be publicly accessible, ensure the Everyone check box is checked.
If Everyone is clear, you need to add permissions by user group.
1. Click Add Permission.
2. On the Select Permission dialogue box, choose the appropriate group and membership
Chapt er 1 1 . Permissions
57

options.
3. After selecting a membership type, the selected permission is displayed in the accesspermission list.
At a given time, you can select one group with one membership type. To add multiple groups andmembers, repeat the above steps.
Similarly the Move Apps Permissions and Move Containers Permissions can be set.
Report a bug
11.4 . Set Edit Permissions on a Site
Only members of the Editor group can edit that portal. Access rights can be given to several groupsbut edit rights can be given only to a group with a membership type. To assign an edit permission toa user, you must add the user to the editor group of the respective portal.
1. Click Edit tab.
2. Click Select Permission to choose a group.
3. Select a group and a membership type from the left and right panes, respectively, of theSelect Permission dialog box.
Note
You can select * to assign all available membership types to the selected group.
Red Hat JBoss Port al 6 .2 User Guide
58
Report a bug
11.5. Set Page Permission
User
If the owner type of a page is user then only the creator of the Page has Access or EditPermissions.
Group
If the owner type of a page is group, initial permissions on page are:
Access permission: everyone in that group.
Edit permission: the manager of that group.
Portal
If the owner type of a page is portal, initial permissions are:
Access permission: users who can access that portal.
Edit permission: users who can edit that portal.
Report a bug
11.6. Set Access Permissions on a Page
1. Open the Page. Select Site Editor on the Toolbar and select Edit Page .
2. Click View Page Propert ies in the Page Editor dialog box.
3. Click the Permissions tab.
Report a bug
11.7. Set Edit Permissions on a Page
The Permissions tab can be accessed in two ways:
Procedure 11.1. Edit Page
1. Mouse over Site Editor on the Toolbar and select Edit Page .
2. Click on View Page Propert ies in the Page Editor.
3. Click the Permissions tab.
Procedure 11.2. Page Management
1. Mouse over Group on the Toolbar, highlight Administ rat ion and click on PageManagement .
2. Using the Page Id column, locate the page to be edited, then click the edit icon (next to thetrash icon). The Page Editor dialog box opens.
Chapt er 1 1 . Permissions
59

3. Click on View Page Propert ies in the Page Editor.
4. Click on the Permissions tab to edit all types of permissions.
Note
Page Editor is also a part of Page Creation Wizard so you can edit all types of Permissions fora newly created page through the Page Creation Wizard.
Report a bug
11.8. Set Access Permission on a Category
Setting access permission on a category controls which categories are listed in Page Editor dialogwhen editing a Page or Site.
1. Mouse over Group on the Toolbar, highlight Administ rat ion then click on Applicat ionRegist ry.
2. In the list of categories available in the left pane, click the edit icon, then choose thePermission Set t ing tab.
Report a bug
11.9. Set Access Permission on a Port let
1. Select Group on the Toolbar. Highlight the Administ rat ion entry and click onApplicat ion Regist ry.
Red Hat JBoss Port al 6 .2 User Guide
60

2. Select a category on the left pane that includes the portlet to set rights for. The Access Permissions panel opens.
Report a bug
Chapt er 1 1 . Permissions
61
Chapter 12. Site Redirection
12.1. Sit e Redirect ion
JBoss Portal includes a mechanism to redirect user to a different site within the portal based on thecharacteristics of their browser. This is especially useful for redirecting users to a mobile optimizedsite when detected they are accessing the portal from a mobile device.
Report a bug
12.2. About Site Redirect ion
Redirections can be based on various criteria, specified as conditions:
The user agent string of the browser accessing the site
Any property which can be determined via javascript. This can include things like screen size,pixel density and if the device supports touch or not.
Mapping nodes between original and redirect site when performing the redirect is also available,allowing greater control over what page within the site a user will end up on when a redirect isperformed.
The following sections will briefly explain how to configure and setup the site redirection serviceusing the administration user interface.
For details on how to configure site redirects using xml configuration files, see the Administration andConfiguration guide chapter Site Redirection
Report a bug
12.3. Manage Site Redirect ions
To manage site redirection follow these steps:
Procedure 12.1. Manage Site Redirect ion
1. Navigate to Group → Administ rat ion → Site Redirects and Import Export .
Red Hat JBoss Port al 6 .2 User Guide
62
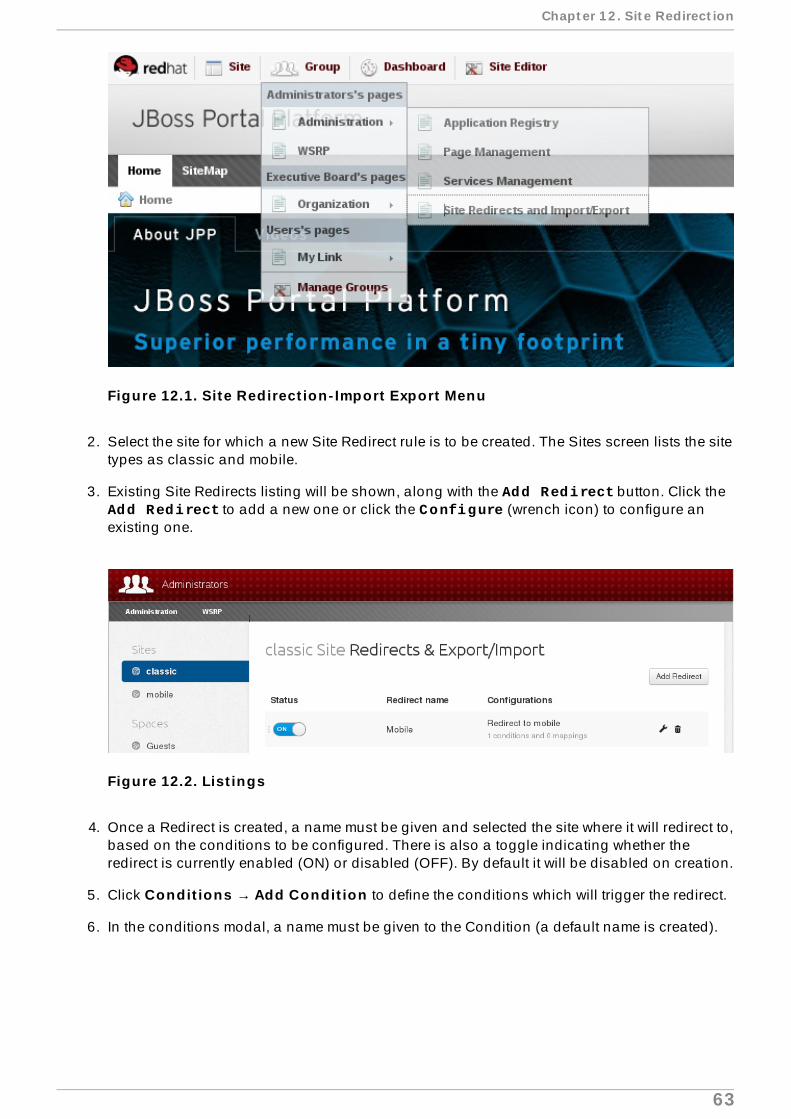
Figure 12.1. Site Redirect ion- Import Export Menu
2. Select the site for which a new Site Redirect rule is to be created. The Sites screen lists the sitetypes as classic and mobile.
3. Existing Site Redirects listing will be shown, along with the Add Redirect button. Click the Add Redirect to add a new one or click the Configure (wrench icon) to configure anexisting one.
Figure 12.2. List ings
4. Once a Redirect is created, a name must be given and selected the site where it will redirect to,based on the conditions to be configured. There is also a toggle indicating whether theredirect is currently enabled (ON) or disabled (OFF). By default it will be disabled on creation.
5. Click Condit ions → Add Condit ion to define the conditions which will trigger the redirect.
6. In the conditions modal, a name must be given to the Condition (a default name is created).
Chapt er 1 2 . Sit e Redirect ion
63

Figure 12.3. Add Condit ion
7. In the User Agent String section valid Java regular expressions must be used in the Containsand Does not contain entries, which will be evaluated against the browser User Agent string.New conditions can be added (which will be overwritten with existing ones) by clicking the Add button (plus sign icon) and existing ones may be removed by clicking the Deletebutton (trash icon).
Figure 12.4 . Condit ion Property
8. Predefined properties can be added to assist on condition matching, by clicking the Add Properties button. Different operators are available for defining these properties.
Red Hat JBoss Port al 6 .2 User Guide
64
9. Click Save Changes to create or update the condition or Cancel to revert the creation orchanges.
10. Conditions can be sorted (for performance reasons, having the less expensive ones on top,for instance) by dragging the condition row and dropping in the desired position.
11. Configure Node Mappings maps landing site nodes to redirected site nodes. By default thisfunctionality is enabled, to change select Use node name matching .
12. Click Add Mapping to add a new node mapping. Existing Node Mappings can be deletedby clicking the Delete Node Mapping .
13. Nodes can be selected by clicking the View Node List both for the Origin and for theRedirect sites.
14. Select a default action for unresolved nodes from the drop-down menu.
15. Click Save Changes to create (or update) the Site Redirect or Cancel button to cancel allthe changes.
16. Redirects can be sorted (for fine-graining purposes, such as having a mobile and a touchsite redirect, for instance) by dragging and dropping in the desired position.
17. Redirects can be deleted by clicking the Delete Redirect button (icon trash) andconfirming or canceling in the confirmation modal, as desired.
Administrator Credentials Required
Creating, editing and deleting a portal redirect requires access credentials that only anadministrator may set up.
Report a bug
Chapt er 1 2 . Sit e Redirect ion
65

Chapter 13. Mobile and Responsive Portal Site
13.1. Creat ing a Responsive Site
To create a responsive site, it is important to configure some important options. These options ensurethat the site works properly:
Report a bug
13.2. Portal Skin
The portal skin does not have a fixed width. If the skin uses a fixed width, like the classic skin, it willnot adapt to the browser size. The 'Responsive Skin' included in JBoss Portal uses a fluid width andadapts to the portal. This skin also includes updated css to various portal components responsive. Itis recommended to use this skin or to base a custom skin off of the 'Responsive Skin'.
Figure 13.1. Portal Set t ings
Report a bug
13.3. Viewport
The viewport settings specify how the site is loaded in a mobile browser. It specifies things like thesite's width,height, initial zoom level, and what zoom levels are permitted. By not specifying theviewport, the site may be rendered at a fixed width instead of adapting to the screen size. The defaultvalue used in the 'Mobile' site is ' initial-scale=1.0' which specifies that the page is rendered to itsscreen size while still allowing the user to zoom into the page if needed.
Red Hat JBoss Port al 6 .2 User Guide
66
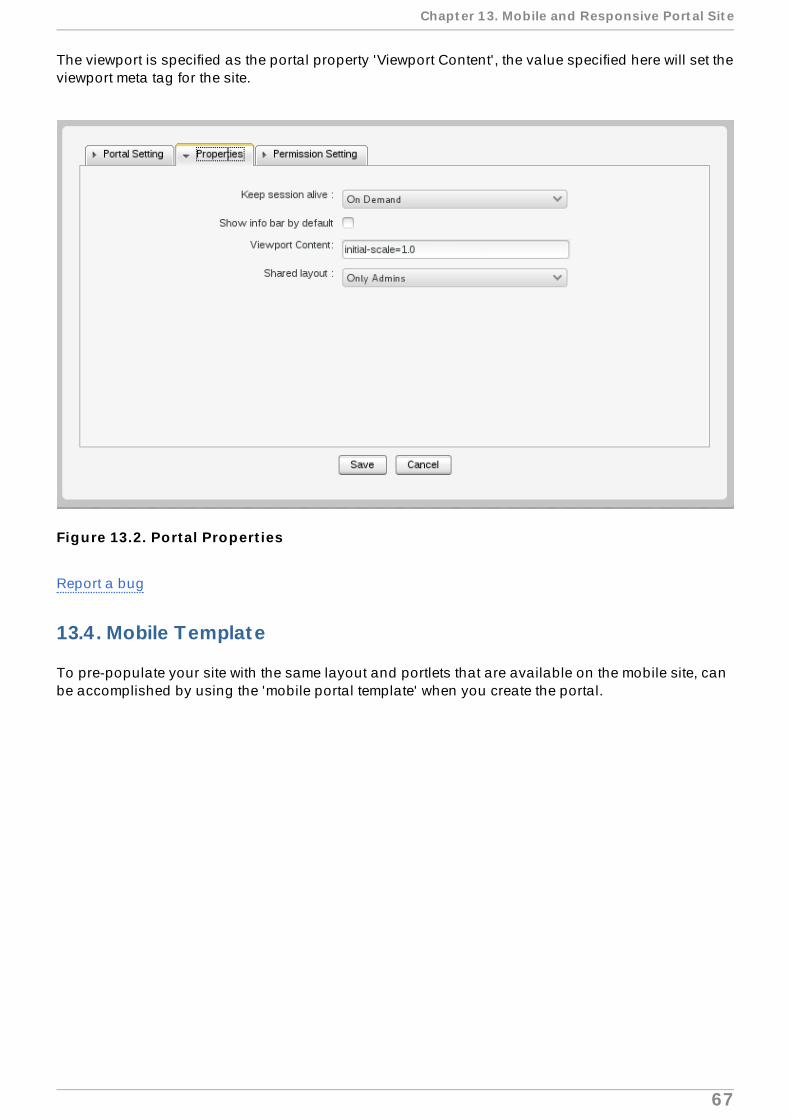
The viewport is specified as the portal property 'Viewport Content', the value specified here will set theviewport meta tag for the site.
Figure 13.2. Portal Propert ies
Report a bug
13.4 . Mobile Template
To pre-populate your site with the same layout and portlets that are available on the mobile site, canbe accomplished by using the 'mobile portal template' when you create the portal.
Chapt er 1 3. Mobile and Responsive Port al Sit e
67

Figure 13.3. Mobile Templates
Report a bug
13.5. Responsive Port lets
To create a responsive site, your site has to use responsive portlets. This includes using theresponsive portlets which are included with JBoss Portal and ensuring that any custom or third partyportlets are also responsive and will work with a variable width layout.
See Also:
Section 13.1, “Creating a Responsive Site”
Report a bug
13.6. Port let Layout
The containers which work with responsive portlets are the row layouts. This allows one portlet perline and the portlet can easily adapt to the width of the browser.
Red Hat JBoss Port al 6 .2 User Guide
68

Figure 13.4 . Row Layout
Report a bug
13.7. Creat ing Responsive Port lets
The biggest change to having responsive portlets is that the site is no longer set at a fixed width. Thewidth of the page will adapt to the size of the screen used to display the page. As such portlets whichhave been designed to fill a specific fixed space may not render correctly when the screen widthdiffers from what it expects. This includes things like overflowing content, contents being clipped,content flowing into a new line, etc.
Responsive portlets must be written in a more fluid manner where the layout changes based on thewidth of the page. This is done in the same manner as creating any normal responsive html page, bymostly using CSS3 media queries. There is nothing inherently different about this approach withportlets and there are no special apis or other data which must be gathered from the portal itself.
As already mentioned in the limitation section and creating a responsive site section, the site shouldbe done in a row layout. With each portlet stacked one on top of another and taking up more or lessthe actual width of the page, it makes it easier to configure the portlet's css to be responsive.
Chapt er 1 3. Mobile and Responsive Port al Sit e
69

Figure 13.5. Row Layout
It is up to the admin and portlet developer to make sure that the portlets are responsive and arerendered correctly when the screen size changes. It is possible to set the width of the containerholding the portlet to a specific width, but this will overflow outside of the normal page size if thebrowsers width is narrowed beyond this.
Report a bug
13.8. Manually Removing the Mobile Site
To mobile site can also be manually removed by deleting the mobile site and removing the classicsite's mobile redirect configuration.
Report a bug
13.9. Delet ing the Mobile Site and Configurat ion
The mobile site is packaged as a portal extension. All the portlets and portal configuration arecontained within this extension and it is this extension which creates the mobile site and configuresthe redirection service for this site. If you do not wish to have the mobile site, the extension can beremoved before starting the server.
The extension to remove is located at :
jboss/gatein/extensions/gatein-mobile-integration.ear
Report a bug
Red Hat JBoss Port al 6 .2 User Guide
70

Part IV. Accounts, Memberships, Groups, and Users
Part IV. Account s, Memberships, Groups, and Users
71

Chapter 14. Accounts
14.1. Register New Accounts
Unregistered users visiting a portal in public mode are limited in the content they can see.
Users who need access to deeper content or who need to perform actions within the portal mustregister themselves and then contact the portal administrator to have appropriate accesspermissions granted to their account.
Procedure 14 .1. Registering a New User Account
1. Click Register on the Navigation bar to open the Register New Account page.
Complete the form with the required information:
User Name
The name used to log in. This user name must be between 3 and 30 characterslong, start with a lowercase letter and end with a lowercase letter or digit. Onlylowercase letters, numbers, periods, and underscore characters are allowed in auser name. Click the magnifying glass icon beside the user name to verify whetherthe user name is available.
Password
The password must be between 6 and 30 characters and can contain spaces.
Conf irm Password
Re-type the password above. The Password and Confirm Password fields must bethe same.
First Name
The user's first name. This name must be between 1 and 45 characters long.
Last Name
The user's last name. This name must also be between 1 and 45 characters long.
Display Name
The user's name displayed in portal screens when the user is logged in. The field isoptional and if no value is entered, a value in the [First Name] [Last Name] format isused automatically.
Email Address
The user's email address. This must be in the appropriate format. For example, [email protected].
2. Enter the text displayed at Text Validation into the empty field below it.
Red Hat JBoss Port al 6 .2 User Guide
72
Note
This field can be disabled by an administrator. See Section 14.2, “Captcha Behavior”for more information.
3. Click Subscribe to register a new account or Reset to remove entered values. The followingfield validation checks will prevent you from creating an account:
The chosen user name already exists or is invalid.
The user name contains less than 3 characters or more than 30 characters.
The password contains less than 6 characters or more than 30 characters.
The Password and Confirm Password fields do not contain identical values.
The Email Address format is invalid.
The text verification text entered does not match the sample.
Fields marked as "required" are left unpopulated.
After adding a new account, contact the administrator to set appropriate permissions on youraccount.
Note
Be sure you enter the chosen email address carefully. This email address is used for username or password recovery.
Report a bug
14.2. Captcha Behavior
You can set whether Captcha is used to verify whether an account creation event has been initiatedby an actual person. The Captcha behavior is enabled by default in the Register Account portlet.
Task: Disable "Register New Account" Captcha Behavior
Complete this task to control how Captcha behaves when a user registers an account.
Prerequisites
You are logged into the portal using an account with Administrator privileges.
1. Click Group+Administ rat ion+Page Management .
2. Click the Edit Page icon in the Action column for the portal::classic::register Page ID.
Chapt er 1 4 . Account s
73
3. Click on the Register Account portlet, and then click the Edit Portal icon (pencil icon) to openportlet properties.
Note
Click the Switch View mode button in the Page Editor control to switch betweenWYSIWYG and Object mode.
4. Click the Edit Mode tab (if not already selected), and clear the Use captcha box to disableCaptcha verification for new users.
5. Click Save, and then click Close to commit the changes.
6. In the Page Editor control, click Switch View mode to refresh the portlet.
7. The Register New Account portlet will no longer display the Captcha field.
Report a bug
14.3. Sign In and Sign Out
To enter the portal in private mode, use the previously registered account.
To sign in to a portal, complete the Sign in form. The form contains the following fields and elements:
User name
The registered user name.
Password
The registered password.
Remember My Login
Click this box to authenticate automatically each time.
Forgot your User Name/Password?
Initiates the process to retrieve a forgotten user name or password.
Sign in
Sign into the portal with a user name and password.
Discard
Close the Sign In form without logging in.
See Also:
Section 14.8, “Account and Password Retrieval”
Report a bug
14.4 . Sign In
Red Hat JBoss Port al 6 .2 User Guide
74

1. Open the portal by entering the URL into the browser address bar. For example, http://localhost:8080/portal .
2. Click the Sign in link at the top right of the page if you are current in the Classic portal. TheSign In form appears.
3. Type a valid user name and password into the correct fields.
4. Select the Remember My Login check box to automatically return to the portal without signingin again.
5. Click the Sign in button to submit the form or Discard to escape.
If the user name does not exist or the user name and/or password is invalid you will be redirected tothe Sign In form. Enter a correct user name and password.
After signing in, you will be redirected to the homepage and welcomed with your full name in the topright corner of the page.
See Also:
Section 14.6, “Remember User Account”
Report a bug
14.5. Sign Out
This feature ends the authenticated session and returns the user to the anonymous portal.
1. In the upper left corner of the screen, hover your cursor over the Red Hat logo. A drop downmenu will appear.
2. Click Sign out .
Report a bug
14.6. Remember User Account
Users who return to the portal regularly can authenticate automatically to avoid performing anexplicit authentication each time they access the portal.
Chapt er 1 4 . Account s
75

1. Input your registered user name and password.
2. Select the Remember My Login check box when logging into the portal at the first time.
3. Click the Sign in button to sign in the portal.
Do not sign out when you leave the portal and you will be automatically authenticated upon yournext visit.
Report a bug
14.7. Change Account Set t ings
To change your account information, click on the account name in the top navigation bar:
The Account Prof iles form will appear:
Red Hat JBoss Port al 6 .2 User Guide
76

To change your Account Profile information:
1. Select the Account Prof iles tab.
2. Your User Name cannot be changed. You can change your: First Name , Last Name ,Display Name and Email .
3. Once the desired changes have been made, click the Save button to submit them.
To change your Password :
1. Select the Change Password tab, it will display the following form.
2. Input your current password to identify that you are the owner of this account.
3. Input your new password, it must have at least 6 characters
4. Reenter your password in the Conf irm New Password field.
5. Click the Save button to accept changes.
Report a bug
14.8. Account and Password Ret rieval
You can recover your user name or password if you forget them by following these steps:
1. Click the link 'Forgot your User Name/Password?'
2. The next screen offers two options:
Forgot my password .
Forgot my username .
Chapt er 1 4 . Account s
77
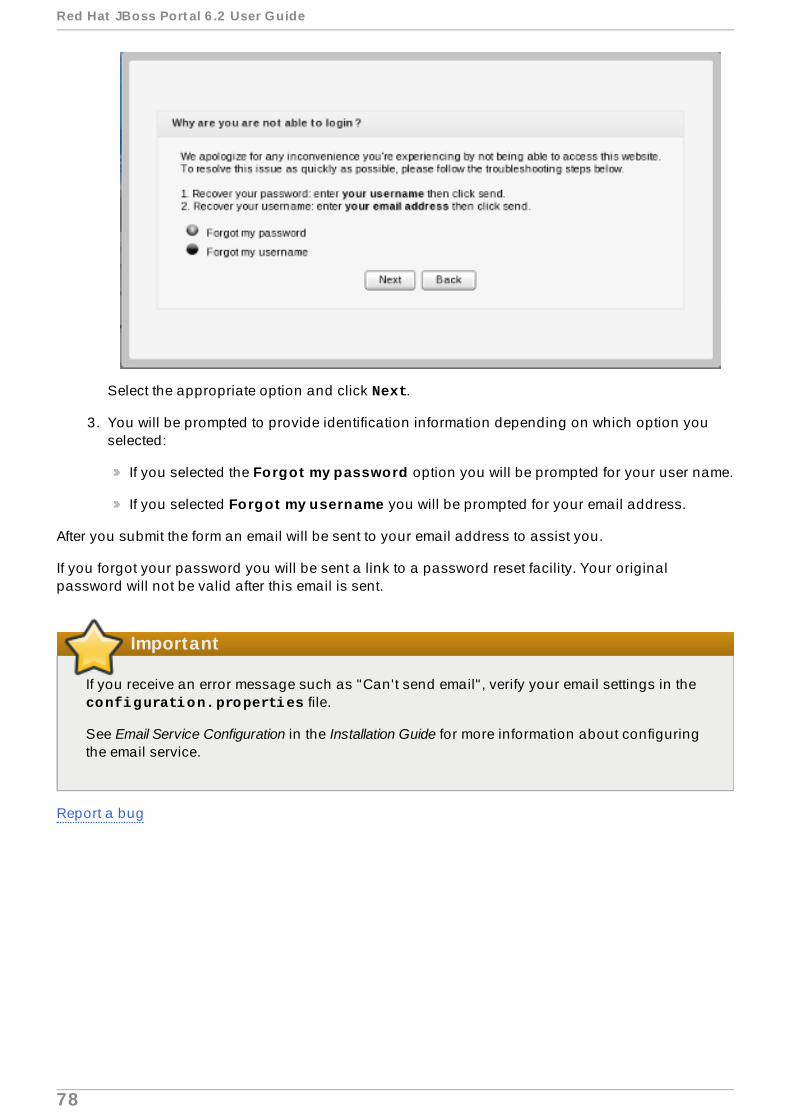
Select the appropriate option and click Next.
3. You will be prompted to provide identification information depending on which option youselected:
If you selected the Forgot my password option you will be prompted for your user name.
If you selected Forgot my username you will be prompted for your email address.
After you submit the form an email will be sent to your email address to assist you.
If you forgot your password you will be sent a link to a password reset facility. Your originalpassword will not be valid after this email is sent.
Important
If you receive an error message such as "Can't send email" , verify your email settings in the configuration.properties file.
See Email Service Configuration in the Installation Guide for more information about configuringthe email service.
Report a bug
Red Hat JBoss Port al 6 .2 User Guide
78
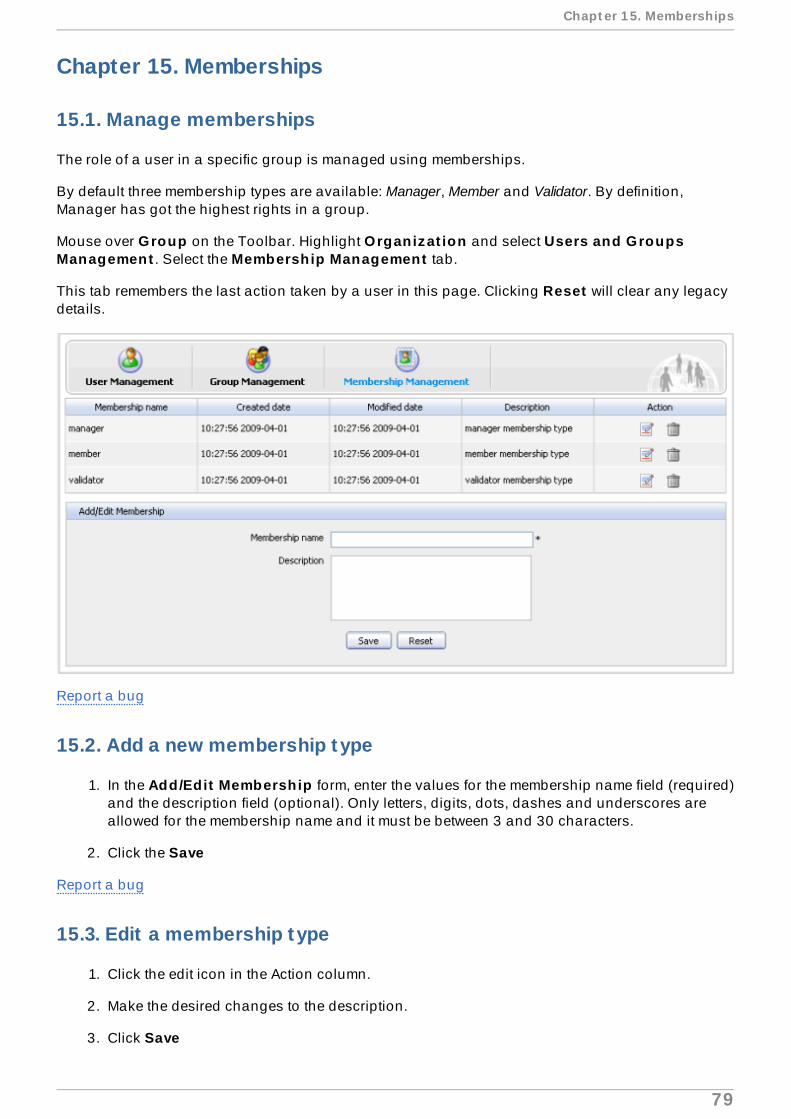
Chapter 15. Memberships
15.1. Manage memberships
The role of a user in a specific group is managed using memberships.
By default three membership types are available: Manager, Member and Validator. By definition,Manager has got the highest rights in a group.
Mouse over Group on the Toolbar. Highlight Organiz at ion and select Users and GroupsManagement . Select the Membership Management tab.
This tab remembers the last action taken by a user in this page. Clicking Reset will clear any legacydetails.
Report a bug
15.2. Add a new membership type
1. In the Add/Edit Membership form, enter the values for the membership name field (required)and the description field (optional). Only letters, digits, dots, dashes and underscores areallowed for the membership name and it must be between 3 and 30 characters.
2. Click the Save
Report a bug
15.3. Edit a membership type
1. Click the edit icon in the Action column.
2. Make the desired changes to the description.
3. Click Save
Chapt er 1 5. Memberships
79

Report a bug
15.4 . Delete a membership type
1. Click the trash icon in the Action column.
2. Click OK
Report a bug
Red Hat JBoss Port al 6 .2 User Guide
80

Chapter 16. Groups
16.1. Manage groups
Mouse over Group on the Toolbar. Highlight Organiz at ion and select Users and GroupsManagement
Select the tab Group Management
By default, all existing groups will be displayed on the left pane. This tab is used to add new, edit ordelete a group. The right pane shows information about the selected group including informationabout the members in the specific group along with a small form to add a new user to a group.
Report a bug
16.2. Add a New Group
1. First choose where in the existing group structure you want the new group to be created. Youmay navigate up the tree by clicking on the green vertical little arrow at the top of the tree. Thecurrent path is displayed in the path bar.
2. Click Add New Group .
Group Name
The name of the new group. This field is required and any length from 3 to 30characters is allowed. Once saved this name cannot be edited.
Label
The display name of the group. Any length from 3 to 30 characters is allowed.
Descript ion
Chapt er 1 6 . Groups
81
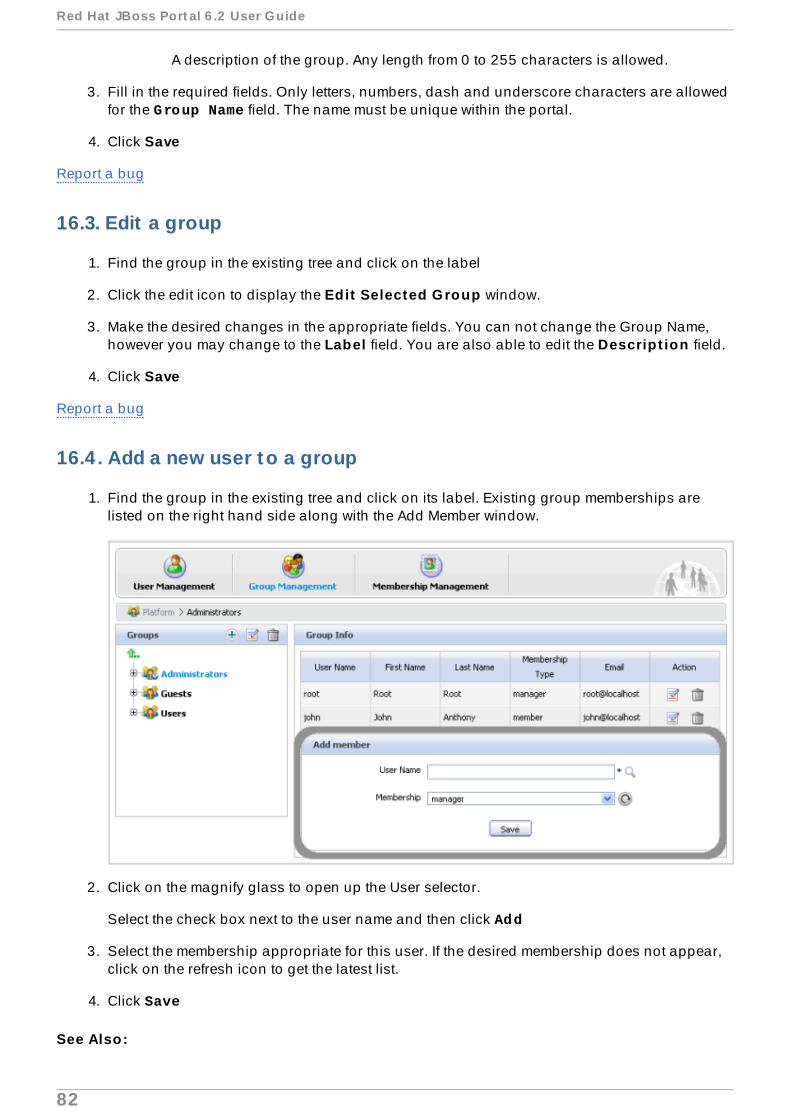
A description of the group. Any length from 0 to 255 characters is allowed.
3. Fill in the required fields. Only letters, numbers, dash and underscore characters are allowedfor the Group Name field. The name must be unique within the portal.
4. Click Save
Report a bug
16.3. Edit a group
1. Find the group in the existing tree and click on the label
2. Click the edit icon to display the Edit Selected Group window.
3. Make the desired changes in the appropriate fields. You can not change the Group Name,however you may change to the Label field. You are also able to edit the Descript ion field.
4. Click Save
Report a bug
16.4 . Add a new user to a group
1. Find the group in the existing tree and click on its label. Existing group memberships arelisted on the right hand side along with the Add Member window.
2. Click on the magnify glass to open up the User selector.
Select the check box next to the user name and then click Add
3. Select the membership appropriate for this user. If the desired membership does not appear,click on the refresh icon to get the latest list.
4. Click Save
See Also:
Red Hat JBoss Port al 6 .2 User Guide
82

Section 17.5, “Search for users”
Report a bug
16.5. Edit the user membership in a group
1. Click the edit icon in the Action column.
2. Select another membership.
3. Click Save .
Report a bug
16.6. Delete a group
1. Find the group in the tree
2. Click the trash icon.
3. Click OK .
Report a bug
Chapt er 1 6 . Groups
83

Chapter 17. Users
17.1. Manage Users and Groups
Several tools are offered to assist Administrators manage users, groups and memberships easily andeffectively.
Report a bug
17.2. Roles
Effective user management relies on understanding the rights and responsibilities of the various userroles available.
Core Portal Memberships
Member
Manager
Validator
Table 17.1. Role At t ributes of Example Users
User Rolesroot manager:/platform/administrators,member:/platfo
rm/users,member:/organization/management/executive-board
john member:/platform/administrators,member:/platform/users,manager:/organization/management/executive-board
mary member:/platform/usersdemo member:/platform/guests,member:/platform/users
Roles
manager:/p lat form/administ rators
This role is for users to have access and edit administrators pages. Examples are the NewAccount, Community Management, Registry, Page Management, New Staff, OrganizationManagement and WSRP Admin pages.
member:/p lat form/administ rators
This role is similar to the manager role above. The main difference is that it does not haveaccess to the administrators pages, but can access and edit everything that falls under the *:/platform/administrators pages.
*:/p lat form/administ rators
This role has edit permissions for everything. This includes; the Home Page, GroupNavigation, Portal Navigation, Register and Site Map (in the classic portal). Thismembership also has permission to create and manage portals and has full permissionwith group navigation.
Red Hat JBoss Port al 6 .2 User Guide
84

member:/p lat form/users
This role allows standard users to log in.
*:/p lat form/users
This role has access to portal toolbars, dashboard, default gadgets (todo, rss, calculatorand calendar) and basic portlets (sitemap and iframe). In general it can access but cannotedit these areas.
member:/organiz at ion/management /execut ive-board
This role can edit New Staff and Organization Management pages.
member:/p lat form/guests
Members of this role can access the Register and Site Map pages.
*:/p lat form/web-contributors
This role can edit the Contact Us page, has taxonomies permission to read, add nodes, setand remove properties in acme, classic and events and is the newsletter marketingmoderator, general moderator and subscription redactor. They have access to the ManageDrivePlugin for Collaboration and Events. This role also has access totoolbars.
*:/p lat form/administ rators
This role grants access to the edit mode drop-down in toolbar visible(WCMAdminToolbarPortlet)
validator:*
This role is not used. It can be removed if it is present in your instance.
Mandatory groups (groups that can not be deleted)
/platform/administrators
/platform/users
/platform/guests
Mandatory membership types (Membership type that can not be deleted)
member
Report a bug
17.3. Manage users
Mouse over Group in the Toolbar. Highlight Organiz at ion and select Users and GroupsManagement
Chapt er 1 7 . Users
85
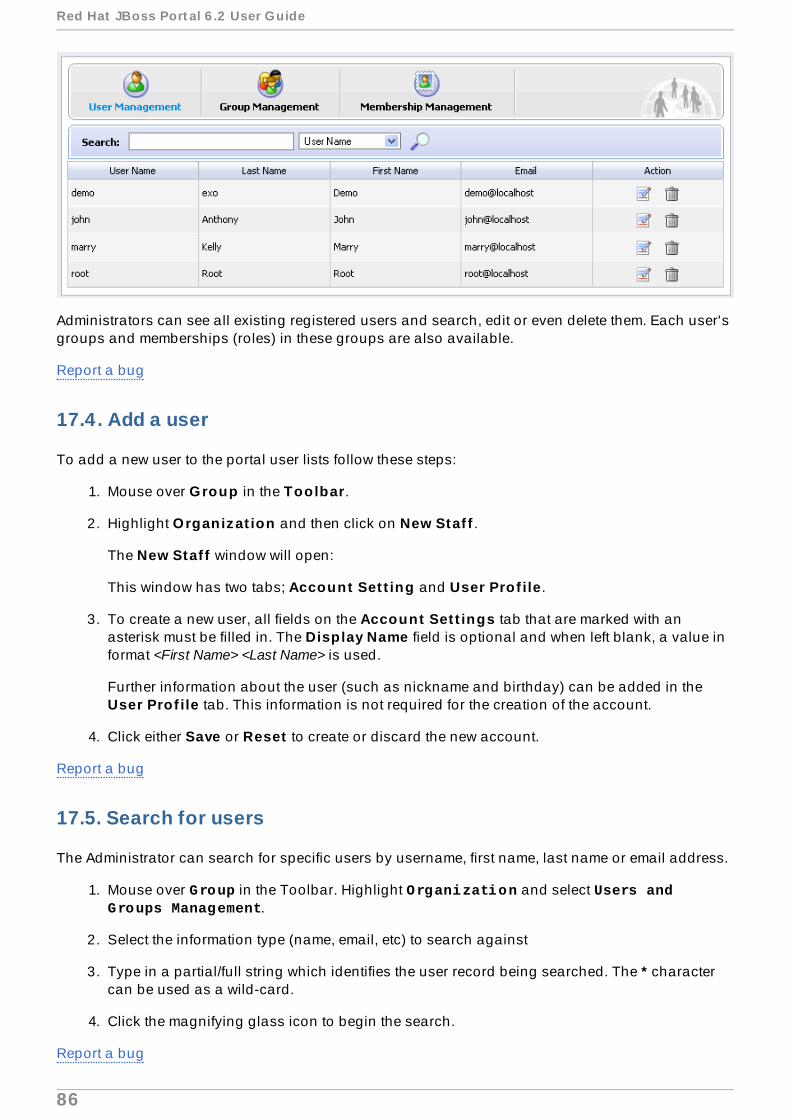
Administrators can see all existing registered users and search, edit or even delete them. Each user'sgroups and memberships (roles) in these groups are also available.
Report a bug
17.4 . Add a user
To add a new user to the portal user lists follow these steps:
1. Mouse over Group in the Toolbar.
2. Highlight Organiz at ion and then click on New Staf f .
The New Staf f window will open:
This window has two tabs; Account Set t ing and User Prof ile .
3. To create a new user, all fields on the Account Set t ings tab that are marked with anasterisk must be filled in. The Display Name field is optional and when left blank, a value informat <First Name> <Last Name> is used.
Further information about the user (such as nickname and birthday) can be added in theUser Prof ile tab. This information is not required for the creation of the account.
4. Click either Save or Reset to create or discard the new account.
Report a bug
17.5. Search for users
The Administrator can search for specific users by username, first name, last name or email address.
1. Mouse over Group in the Toolbar. Highlight Organization and select Users and Groups Management.
2. Select the information type (name, email, etc) to search against
3. Type in a partial/full string which identifies the user record being searched. The * charactercan be used as a wild-card.
4. Click the magnifying glass icon to begin the search.
Report a bug
Red Hat JBoss Port al 6 .2 User Guide
86

17.6. Edit a user
1. Locate the user you wish to edit.
2. Click the edit icon (next to the trash icon).
3. Select the Account In fo tab to edit the main user information set including first name, lastname or email address.
User Name
The User Name field cannot be changed. Other fields — First Name , Last Name ,Display Name and Email Address — can be changed.
Change Password
The Change Password option allows an administrator to set a new password fora user. When the Change Password option is unchecked, New Password andConf irm Password are hidden. Passwords must contain between 6 and 30characters.
4. Select the User Prof ile tab to edit additional information about the user's profile such as thebirthdate or the job title as well as some home and business metadata. You may also switchthe default display language for that user.
5. Select the User Membership tab to see a user's group membership information.
User Membership
The User Membership tab displays which group(s) the selected user belongs to.In the above figure, the user "demo" is a member of two groups: "guests" and"users" . The parent group of both is "platform".
To remove the user from a group, click the trash can icon.
6. Click the Save .
Report a bug
17.7. Delete a user
1. Locate the user you wish to delete
Click the trash icon in the Action column
2. Click OK to confirm.
Report a bug
Chapt er 1 7 . Users
87

Revision History
Revision 6 .2.0-3 Mon May 11 2015 Aakanksha SinghPrepared guide for 6.2.0 GA.
Red Hat JBoss Port al 6 .2 User Guide
88


