16
ES Manuales de usuario 1 PhotoFrame 7FF2FPA Register your product and get support at www.philips.com/welcome

ES Manuales de usuario 1
PhotoFrame7FF2FPA
Register your product and get support at
www.philips.com/welcome


1Contenido
Contenido
1. Contenidodelacaja
2. Conexión2.1 Cómo colocar el soporte2.2 Conexión del adaptador de alimentación
3. Configuración3.1 Encendido del PhotoFrame3.2 Selección de idioma
4. Diversión4.1 Visualización de fotos almacenadas previamente4.2 Visualización de fotos de una tarjeta de memoria4.3 Cómo copiar algunas o todas las fotos de la tarjeta de memoria4.4 Cómo eliminar algunas o todas las fotos de la tarjeta de memoria4.5 Cómo copiar o eliminar fotos mediante la conexión a un ordenador4.6 Funciones de ajuste de hora y fecha4.7 Funciones de ajuste del temporizador de encendido/apagado automático
5. Preguntasmásfrecuentes
6. Atenciónalclienteygarantía
2
3 33
344
44
5
5
6
6
78
9
9
ESPA
ÑO
L

1. Contenidodelacaja
Digital PhotoFrame Adaptador de alimentación Cable USB
Quick start guide
Digital photo display 7FFI series
Connect
2 Setup
3 Enjoy
1
Guía de configuración rápida Manuales de usuario Soporte del marco
Otros elementos necesarios
AC
Toma de alimentación Fotos digitales en una tarjeta de memoria o en un ordenador
� Contenidodelacaja

�Conexión/Configuración
�. Configuración
UbicacióndelosbotonesdecontrolLos botones de control se encuentran en la parte posterior del marco, y los iconos de función correspondientes de la parte frontal de la pantalla LCD le permiten navegar por los menús y personalizar los ajustes.
Nota:No aparecerán todos los iconos en pantalla al mismo tiempo.
�. Conexión
2.1 Cómocolocarelsoporte
• Coloque el cabezal del soporte en el hueco.• Gírelo en sentido contrario al de las agujas
del reloj hasta que encaje en su sitio.
Precaución:Para evitar daños, no sujete el marco por el soporte. Sostenga el marco con firmeza entre las dos manos.
2.2 Conexióndeladaptadorde alimentación
• Conecte el adaptador de alimentación suministrado al PhotoFrame y luego enchúfelo a una toma de corriente.
Volver/Izquierda Arriba
Modo de miniaturas
IntroSiguiente/Derecha Abajo
Menú principalModo de diapositivas
Modo de exploración
Menú de fotosMostrar/Ocultar menúAñadir/Cancelar foto
VolverReloj
ESPA
ÑO
L

� Configuración/Diversión
3.1 Encendido del PhotoFrame
• Mantenga pulsado el botón de encendido/ apagado de la parte posterior del marco durante unos 2 segundos.
PhotoFrame (front)
Startup screen
PhotoFrame (back)
Power button
3.2 Selección de idioma
Los botones del menú se encuentran en la parte posterior del PhotoFrame. Los iconos indicanla ubicación de los botones situados en la parte posterior del panel.• Pulse los botones y para seleccionar SETTINGS (Ajustes). Pulse el botón para acceder.• Pulse los botones y para seleccionar Language settings (Ajustes de idioma). Pulse el botón para acceder. • Pulse los botones y para seleccionar
Pulse el botón para establecer el idioma deseado.
• Utilice el botón para volver y salir del menú de ajustes.
PhotoFrame (back)PhotoFrame (front) Language Setting
MainMenu OK Up Down Right Left
�. Diversión
4.1 Visualización de fotos almacenadas previamente
Puede elegir entre tres modos de visualización:Modo de exploración: visualización manual de las fotos una a una.
Modo de miniaturas: lista de todas las fotos.
Modo de diapositivas: visualización de las fotos de forma automática y secuencial.
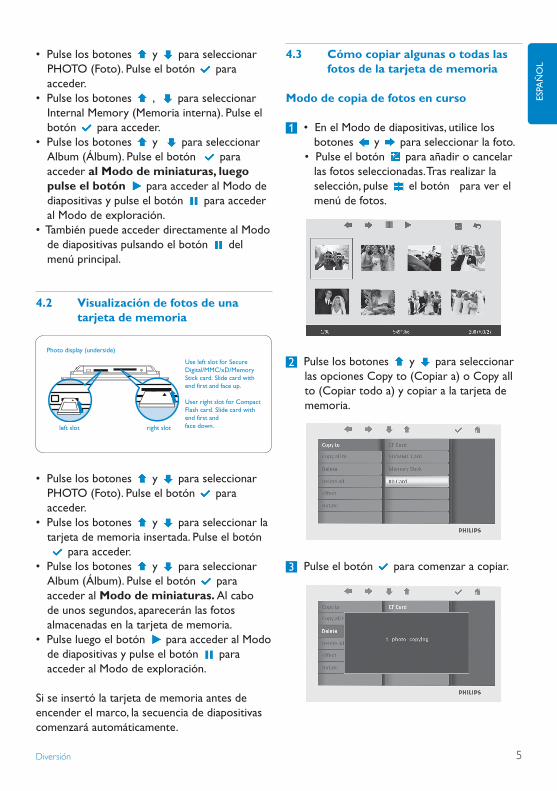
4.3 Cómocopiaralgunasotodaslas fotosdelatarjetadememoria
Mododecopiadefotosencurso
1 • En el Modo de diapositivas, utilice los botones y para seleccionar la foto.
• Pulse el botón para añadir o cancelar las fotos seleccionadas. Tras realizar la selección, pulse el botón para ver el menú de fotos.
2 Pulse los botones y para seleccionar las opciones Copy to (Copiar a) o Copy all to (Copiar todo a) y copiar a la tarjeta de memoria.
3 Pulse el botón para comenzar a copiar.
• Pulse los botones y para seleccionarPHOTO (Foto). Pulse el botón para acceder.
• Pulse los botones , para seleccionarInternal Memory (Memoria interna). Pulse el botón para acceder.
• Pulse los botones y para seleccionarAlbum (Álbum). Pulse el botón para acceder alMododeminiaturas,luegopulseelbotón para acceder al Modo de diapositivas y pulse el botón para acceder al Modo de exploración.
• También puede acceder directamente al Modo de diapositivas pulsando el botón del menú principal.
4.2 Visualizacióndefotosdeuna tarjetadememoria
Use left slot for Secure Digital/MMC/xD/Memory Stick card. Slide card with end first and face up.
User right slot for Compact Flash card. Slide card with end first andface down.
Photo display (underside)
left slot right slot
• Pulse los botones y para seleccionar PHOTO (Foto). Pulse el botón para acceder.
• Pulse los botones y para seleccionar la tarjeta de memoria insertada. Pulse el botón
para acceder.• Pulse los botones y para seleccionar
Album (Álbum). Pulse el botón para acceder al Mododeminiaturas.Al cabo de unos segundos, aparecerán las fotos almacenadas en la tarjeta de memoria.
• Pulse luego el botón para acceder al Modo de diapositivas y pulse el botón para acceder al Modo de exploración.
Si se insertó la tarjeta de memoria antes de encender el marco, la secuencia de diapositivascomenzará automáticamente.
�Diversión
ESPA
ÑO
L

El PhotoFrame conservará una copia de la foto con el tamaño modificado hasta que la memoria interna se llene (se mostrará un mensaje).
4.4 Cómoeliminaralgunasotodaslas fotosdelatarjetadememoria
Mododeeliminacióndefotos
1 • En el Modo de diapositivas, utilice los botones y para seleccionar la foto.
• Pulse el botón para añadir o cancelar las fotos seleccionadas. Tras realizar la selección, pulse el botón para ver el menú de fotos.
2 Pulse los botones y para seleccionar las opciones Delete (Eliminar) o Delete all (Eliminar todo) y eliminar fotos de la tarjeta de memoria.
3 Pulse el botón para eliminar las fotos.
4.5 Cómocopiaroeliminarfotos mediantelaconexiónaun ordenador
Puede copiar, eliminar y mover fotos conectando el PhotoFrame al ordenador a través del cable USB proporcionado.
USB port
• Encienda el PhotoFrame y luego conecte el extremo más pequeño del cable USB al puerto USB situado en la parte inferior del PhotoFrame.• Conecte el otro extremo del cable USB al puerto USB del ordenador.
� Diversión

4.6 Funcionesdeajustedehoray fecha
Funcionesdeajustedehora
• Pulse los botones y para seleccionar SETTINGS (Ajustes). Pulse el botón para acceder.
• Pulse los botones y para seleccionar Time and Date (Hora y fecha). Pulse el botón
para acceder.• Pulse los botones y para seleccionar la
hora que desea ajustar. Pulse el botón para ajustar las horas y los minutos.
Pulse el botón para volver al menú principal y salir del menú de ajustes.
Funcionesdeajustedefecha
• Pulse los botones y para seleccionar SETTINGS (Ajustes). Pulse el botón para acceder.
• Pulse los botones y para seleccionar Time and Date (Hora y fecha). Pulse el botón
para acceder.• Pulse los botones y para seleccionar la
fecha que desea ajustar. Pulse el botónpara ajustar el año, el mes y el día.
Pulse el botón kpara volver al menú principal y salir del menú de ajustes.
Precaución:Los ajustes de hora y fecha se borrarán si se desenchufa el PhotoFrame.
�Diversión
ESPA
ÑO
L

4.7 Funcionesdeajustedel temporizadordeencendido/ apagadoautomático
La pantalla del marco se puede configurar para que se encienda y se apague a horas determinadas del día previamente establecidas.
1 • Pulse los botones y para seleccionar SETTINGS (Ajustes). Pulse el botón para acceder.
• Pulse los botones y para seleccionar Auto On/Off (Encendido/apagado automático). Pulse el botónpara acceder.
2 Pulse los botones y para alternar entre la opción On (Encendido) y Off (Apagado). Pulse el botón kpara seleccionar On (Encendido) u Off (Apagado), y luego pulse Intro.
3 Pulse los botones y para ajustar la hora de encendido o apagado automático.
Pulse el botón para volver al menú principal y salir del menú de ajustes.
Precaución:Los ajustes del encendido/apagado automático se borran si se desenchufa el PhotoFrame.
� Diversión
�. Preguntasmásfrecuentes
¿LapantallaLCDestáctil?La pantalla LCD no es táctil. Utilice los botones de la parte posterior del marco para controlar la pantalla fotográfica digital.
Despuésdecopiarlasfotos,¿cómopuedocomprobarsilasfotosyaestánguardadas?Las fotos se han copiado una vez que aparece elmensaje de finalización “Finished” en la pantalla. En ese momento ya podrá visualizar las fotos en la memoria interna.
¿Puedoalternarentrediferentessecuenciasdediapositivasutilizandodiferentestarjetasdememoria?Sí, el PhotoFrame™ mostrará la secuencia de diapositivas de la tarjeta insertada en ese momento.
¿PuedoutilizarelPhotoFrame™paraborrarfotografíasalmacenadasenunatarjetadememoria?Sí, este dispositivo es compatible con las operaciones que permiten borrar fotografías
¿Puedoimprimirfotosdesdelapantallafotográficadigital?No, las fotos no se pueden imprimir directamente.
¿Necesitaayuda?support web siteAyuda en línea: www.philips.com/welcome
�. Atenciónalclientey
garantía
RecyclingInformationforCustomersPhilips establishes technically and economically viable objectives to optimize the environmental performance of the organization’s product, service and activities.
From the planning, design and production stages, Philips emphasizes the important of making products that can easily be recycled. At Philips, end-of-life management primarily entails participation in national take-back initiatives and recycling programs whenever possible, preferably in cooperation with competitors.
There is currently a system of recycling up and running in the European countries, such as The Netherlands, Belgium, Norway, Sweden and Denmark.
In U.S.A., Philips Consumer Electronics North America has contributed funds for the Electronic Industries Alliance (EIA) Electronics Recycling Project and state recycling initiatives for end-of-life electronics products from household sources. In addition, the Northeast Recycling Council (NERC) - a multi-state non-profit organization focused on promoting recycling market development - plans to implement a recycling program.
In Asia Pacific, Taiwan, the products can be taken back by Environment Protection Administration (EPA) to follow the IT product recycling management process, detail can be found in web site www.epa.gov.tw
�Preguntasmásfrecuentes/Atenciónalclienteygarantía
ESPA
ÑO
L

For help and service, please read the section of Service and Warranty or the following team of Environmental specialist can help.Mr. Job Chiu - Environment managerPhilips Electronics Industries (Taiwan) Ltd, Monitor Business UnitE-mail: [email protected]: +886 (0) 3 454 9839
Mr. Maarten ten Houten - Senior Environmental ConsultantPhilips Consumer ElectronicsE-mail: [email protected]: +31 (0) 40 27 33402
Ms. Delmer F. TeglasPhilips Electronics North AmericaE-mail: [email protected]: +1 865 521 4322
BannedSubstanceDeclarationThis product comply with RoHs and Philips BSD (AR17-G04-5010-010) requirements
CEDeclarationofConformityPhilips Consumer Electronics declare under our responsibility that the product is in conformity with the following standards• EN60950:2000 (Safety requirement of Information Technology Equipment)• EN55022:1998 (Radio Disturbance requirement of Information Technology Equipment)• EN55024:1998 (Immunity requirement of Information Technology Equipment)• EN61000-3-2:2000 (Limits for Harmonic Current Emission)• EN61000-3-3:1995 (Limitation of Voltage Fluctuation and Flicker) following provisions of directives applicable• 73/23/EEC (Low Voltage Directive)• 89/336/EEC (EMC Directive)• 93/68/EEC (Amendment of EMC and Low Voltage Directive) and is produced by a manufacturing organization on ISO9000 level.
FederalCommunicationsCommission(FCC)Notice(U.S.Only)
Note:This equipment has been tested and found to comply with the limits for a Class B digital device, pursuant to Part 15 of the FCC Rules. These limits are designed to provide reasonable protection against harmful interference in a residential installation. This equipment generates, uses and can radiate radio frequency energy and, if not installed and used in accordance with the instructions, may cause harmful interference to radio communications. However, there is no guarantee that interference will not occur in a particular installation. If this equipment does cause harmful interference to radio or television reception, which can be determined by turning the equipment off and on, the user is encouraged to try to correct the interference by one or more of the following measures:• Reorient or relocate the receiving antenna.• Increase the separation between the equipment and receiver.• Connect the equipment into an outlet on a circuit different from that to which the receiver is connected.• Consult the dealer or an experienced radio/ TV technician for help.
Caution:Changes or modifications not expressly approved by the party responsible for compliance could void the user’s authority to operate the equipment.
Connections to this device must be made with shielded cables with metallic RFI/EMI connector hoods to maintain compliance with FCC Rules and Regulations.
To prevent damage which may result in fire or shock hazard, do not expose this appliance to rain or excessive moisture.
10 Atenciónalclienteygarantía

THIS CLASS B DIGITAL APPARATUS MEETS ALL REQUIREMENTS OF THE CANADIAN INTERFERENCE-CAUSING EQUIPMENT REGULATIONS.
FCCDeclarationofConformityModel Number: FF2Trade Name: PhilipsResponsible Party: Philips Consumer Electronics North America P.O. Box 671539 Marietta, GA 30006-0026 1-888-PHILIPS (744-5477)
DeclarationofConformityforProductsMarkedwithFCCLogo,UnitedStatesOnly
This device complies with Part 15 of the FCC Rules. Operation is subject to the following two conditions: (1) this device may not cause harmful interference, and (2) this device must accept any interference received, including interference that may cause undesired operation.
CommissionFederaledelaCommunication(FCCDeclaration)
Note:Cet équipement a été testé et déclaré conforme auxlimites des appareils numériques de class B,aux termes de l’article 15 Des règles de la FCC. Ces limites sont conçues de façon à fourir une protection raisonnable contre les interférences nuisibles dans le cadre d’une installation résidentielle. CET appareil produit, utilise et peut émettre des hyperfréquences qui, si l’appareil n’est pas installé et utilisé selon les consignes données, peuvent causer des interférences nuisibles aux communications radio. Cependant, rien ne peut garantir l’absence d’interférences dans le cadre d’une installation particulière. Si cet appareil est la cause d’interférences nuisibles pour la réception des signaux de radio ou de télévision, ce qui peut être décelé en fermant l’équipement, puis en le remettant en fonction, l’utilisateur pourrait essayer de corriger la situation en prenant les mesures suivantes:• Réorienter ou déplacer l’antenne de réception.• Augmenter la distance entre l’équipement et le récepteur.• Brancher l’équipement sur un autre circuit que celui utilisé par le récepteur.• Demander l’aide du marchand ou d’un technicien chevronné en radio/télévision.
Caution:Toutes modifications n’ayant pas reçu l’approbation des services compétents en matière de conformité est susceptible d’interdire à l’utilisateur l’usage du présent équipement.
Les raccordements à cet appareil doivent être réalisés avec des câbles blindés à protections métalliques pour les connecteurs RFI/EMI afin de maintenir la conformité avec les Règlements et la Législation du FCC.
11Atenciónalclienteygarantía
ESPA
ÑO
L

CET APPAREIL NUMERIQUE DE LA CLASSE B RESPECTE TOUTES LES EXIGENCES DU REGLEMENT SUR LE MATERIEL BROUILLEUR DU CANADA.
EN55022Compliance(CzechRepublicOnly)
VCCINotice(JapanOnly)
This is a Class B product based on the standard of the Voluntary Control Council for Interference (VCCI) for Information technology equipment. If this equipment is used near a radio or television receiver in a domestic environment, it may cause radio Interference. Install and use the equipment according to the instruction manual.
PolishCenterforTestingandCertificationNotice
• The equipment should draw power from a socket with an attached protection circuit(a three-prong socket). All equipment that works together (computer, monitor, printer, and so on) should have the same power supply source.• The phasing conductor of the room’s electrical installation should have a reserve short-circuit protection device in the form of a fuse with a nominal value no larger than 16 amperes (A).• To completely switch off the equipment, the power supply cable must be removed from the power supply socket, which should be located near the equipment and easily accessible.• A protection mark “B” confirms that the equipment is in compliance with the protection usage requirements of standards PN-93/T-42107 and PN-89/E-06251.
NorthEuropeInformation(NordicCountries)
VARNING:FÖRSÄKRA DIG OM ATT HUVUDBRYTARE OCH UTTAG ÄR LÄTÅTKOMLIGA, NÄR DU STÄLLER DIN UTRUSTNING PÅPLATS.Placering/Ventilation
1� Atenciónalclienteygarantía
ADVARSEL:SØRG VED PLACERINGEN FOR, AT NETLEDNINGENS STIK OG STIKKONTAKT ER NEMT TILGÆNGELIGE.Paikka/Ilmankierto
VAROITUS:SIJOITA LAITE SITEN, ETTÄ VERKKOJOHTO VOIDAAN TARVITTAESSA HELPOSTI IRROTTAA PISTORASIASTA.Plassering/Ventilasjon
ADVARSEL:NÅR DETTE UTSTYRET PLASSERES, MÅ DU PASSE PÅ AT KONTAKTENE FOR STØMTILFØRSEL ER LETTE Å NÅ.
BSMINotice(TaiwanOnly)
End-of-LifeDisposal• Your new product contains materials that can be recycled and reused. Specialized companies can recycle your product to increase the amount of reusable materials and to minimize the amount to be disposed of.• Please find out about the local regulations on how to dispose of your old monitor from your local Philips dealer.• (For customers in Canada and U.S.A.) Dispose of in accordance to local-state and federal regulations.
For additional information on recycling contact www.eia.org (Consumer Education Initiative)
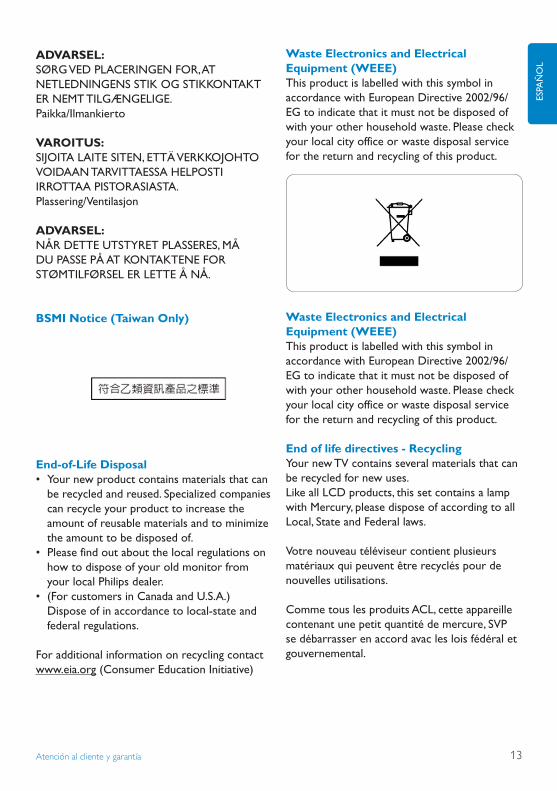
WasteElectronicsandElectricalEquipment(WEEE)This product is labelled with this symbol in accordance with European Directive 2002/96/EG to indicate that it must not be disposed of with your other household waste. Please check your local city office or waste disposal service for the return and recycling of this product.
WasteElectronicsandElectricalEquipment(WEEE)This product is labelled with this symbol in accordance with European Directive 2002/96/EG to indicate that it must not be disposed of with your other household waste. Please check your local city office or waste disposal service for the return and recycling of this product.
Endoflifedirectives-RecyclingYour new TV contains several materials that can be recycled for new uses.Like all LCD products, this set contains a lamp with Mercury, please dispose of according to all Local, State and Federal laws.
Votre nouveau téléviseur contient plusieurs matériaux qui peuvent être recyclés pour de nouvelles utilisations.
Comme tous les produits ACL, cette appareille contenant une petit quantité de mercure, SVP se débarrasser en accord avac les lois fédéral et gouvernemental.
1�Atenciónalclienteygarantía
ESPA
ÑO
L

©2007 Koninklijke Philips N.V.
All rights reserved.


