Page 1
R.J.W. LTD. Motorised CNB 19-2-18
USER MANUAL
PLEASE VIEW OUR WEBSITE www.blackscharpy.com for consumables & spare parts
© R.J.W. LTD. 2018 ALL RIGHTS RESERVED 1 SUBJECT TO CHANGE WITHOUT PRIOR NOTICE
NOTCH BROACH
TYPE
BROACH BROACH
KEEP
2mm ‘V’ C CNB30-027A2 X
1mm ‘V’ M CNB30-028A2 X 2mm ‘U’ P CNB30-006A2 Y 3mm ‘U’ N CNB30-005A2 Y
5mm ‘U’
(2 Cuts)
JS CNB30-004A2 Y
0.13”/3.3mm “V” H CNB30-002A2 X
3.5mm “V” T CNB30-035A2 X
2mm ‘V’ Sub-size
(5-2.5mm) see 10H
C CNB30-027A2 W
2-5mm ‘U’ Sub-size
(5-2.5mm) see 10H
JS,N,P CNB30-004A2 CNB30-005A2 CNB30-006A2
U
Check Type of Broach Keep Fitted Use Table 1 to ensure the correct broach keep is fitted, for the broach being used
10. Safe Operation Procedure for cutting Charpy/Izod Notch
10mm Specimen with 2mm V Notch
Table: 1
Caution notes a) DO NOT STALL THE MACHINE! ATTEMPTING TO CUT A MATERIAL
WHICH IS TOO HARD OR USING A BROACH WHICH IS NOT SHARP, CAN STALL THE MACHINE AND CAUSE DAMAGE. STOP THE MACHINE IMMEDIATELY WITH THE STOP BUTTON. RELEASE AND REMOVE THE SPECIMEN. SELECT THE 'UP' STROKE DIRECTION.
b) It is essential that the component is properly clamped before the broaching stroke commences.
c) It is essential that a component, once cut, be removed from the clamp before the 'Up' stroke switch is operated.
Page 2
R.J.W. LTD. Motorised CNB 19-2-18
USER MANUAL
PLEASE VIEW OUR WEBSITE www.blackscharpy.com for consumables & spare parts
© R.J.W. LTD. 2018 ALL RIGHTS RESERVED 2 SUBJECT TO CHANGE WITHOUT PRIOR NOTICE
Remove clamp assembly
10 A. How to change Broach Keep
Remove clamping screws
Clamp assembly removed Remove broach keep
clamping screws
Remove broach keep Fit the broach keep required
1 2
3 4
5 6
Page 3
R.J.W. LTD. Motorised CNB 19-2-18
USER MANUAL
PLEASE VIEW OUR WEBSITE www.blackscharpy.com for consumables & spare parts
© R.J.W. LTD. 2018 ALL RIGHTS RESERVED 3 SUBJECT TO CHANGE WITHOUT PRIOR NOTICE
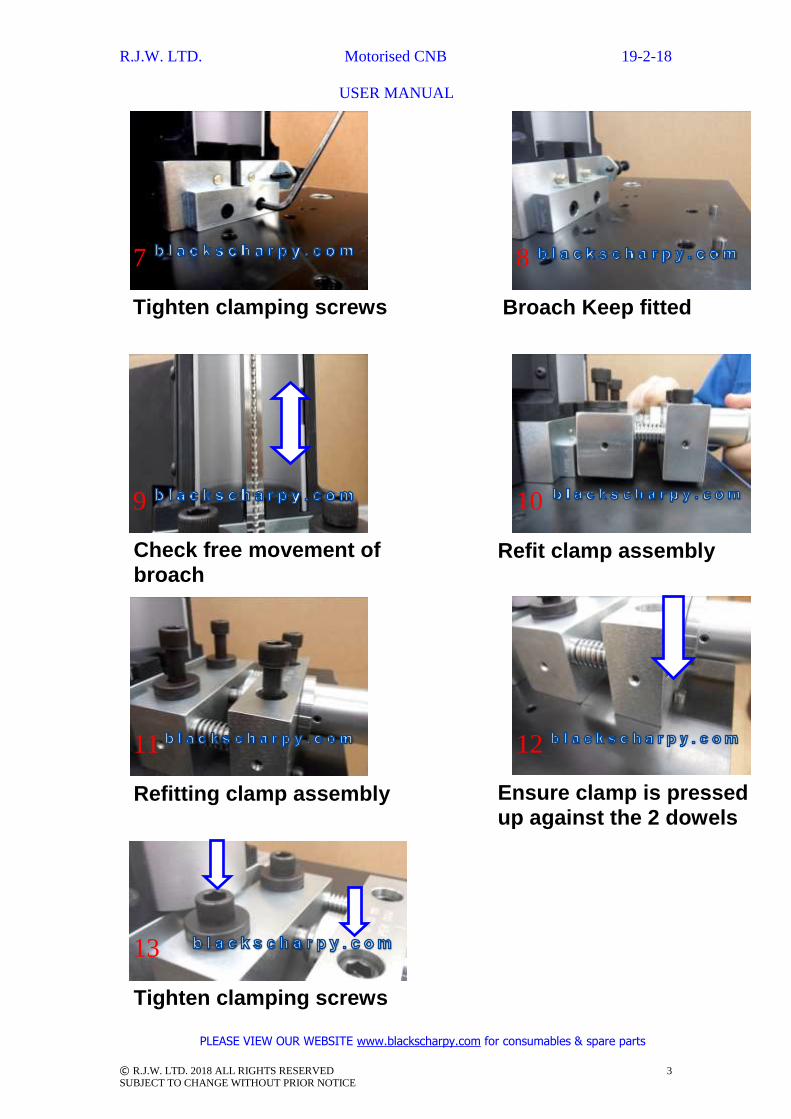
Tighten clamping screws
Check free movement of
broach
Broach Keep fitted
Refitting clamp assembly
Tighten clamping screws
Refit clamp assembly
Ensure clamp is pressed
up against the 2 dowels
7 8
10 9
12 11
13
Page 4
R.J.W. LTD. Motorised CNB 19-2-18
USER MANUAL
PLEASE VIEW OUR WEBSITE www.blackscharpy.com for consumables & spare parts
© R.J.W. LTD. 2018 ALL RIGHTS RESERVED 4 SUBJECT TO CHANGE WITHOUT PRIOR NOTICE
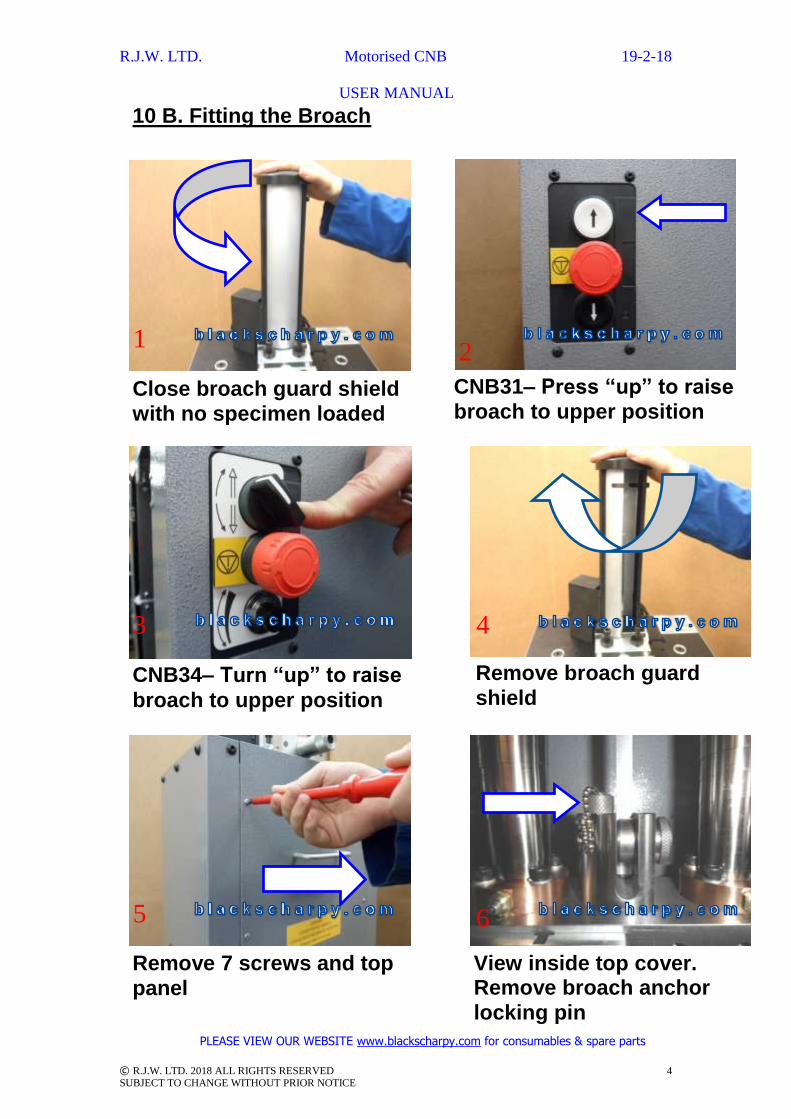
CNB31– Press “up” to raise
broach to upper position
10 B. Fitting the Broach
Close broach guard shield
with no specimen loaded
CNB34– Turn “up” to raise
broach to upper position
Remove broach guard
shield
Remove 7 screws and top
panel
View inside top cover. Remove broach anchor
locking pin
1
3 4
5 6
2
Page 5
R.J.W. LTD. Motorised CNB 19-2-18
USER MANUAL
PLEASE VIEW OUR WEBSITE www.blackscharpy.com for consumables & spare parts
© R.J.W. LTD. 2018 ALL RIGHTS RESERVED 5 SUBJECT TO CHANGE WITHOUT PRIOR NOTICE
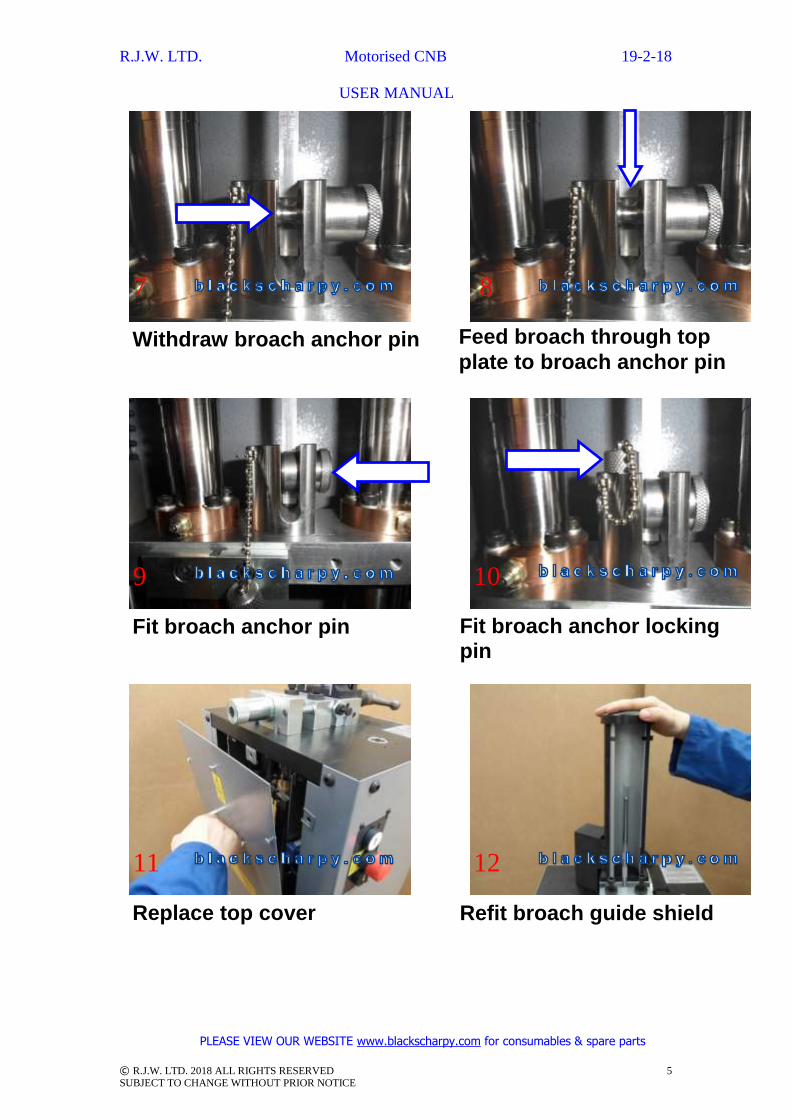
Withdraw broach anchor pin Feed broach through top
plate to broach anchor pin
Fit broach anchor pin Fit broach anchor locking
pin
Replace top cover Refit broach guide shield
7 8
9 10
11 12
Page 6
R.J.W. LTD. Motorised CNB 19-2-18
USER MANUAL
PLEASE VIEW OUR WEBSITE www.blackscharpy.com for consumables & spare parts
© R.J.W. LTD. 2018 ALL RIGHTS RESERVED 6 SUBJECT TO CHANGE WITHOUT PRIOR NOTICE
10 C. Setting specimen Axial Position
Load 10mm specimen into clamp assembly so that the specimen is contacting the
axial adjusting screw
Check axial position &
broach a specimen
Check axial position and re-adjust position if
required
Tighten the locking nut, so securing the adjusting
screw position
1 2
3 4
Page 7
R.J.W. LTD. Motorised CNB 19-2-18
USER MANUAL
PLEASE VIEW OUR WEBSITE www.blackscharpy.com for consumables & spare parts
© R.J.W. LTD. 2018 ALL RIGHTS RESERVED 7 SUBJECT TO CHANGE WITHOUT PRIOR NOTICE
CUSTOMER TO CHECK AXIAL POSITION, WITH THEIR OWN EQUIPMENT Notch to left of specimen centre line, by say 0.010”
Notch to right of specimen centre line, by say 0.010”
Adjusting screw 1. Initial notch position
Feeler gauge
2. Unclamp specimen 3. Move specimen using 0.010” feeler gauge 4. Clamp specimen
Adjusting screw
Feeler gauge
5. Reposition adjusting screw
1. Initial notch position
2. Reposition adjusting screw using 0.010” feeler gauge
3. Unclamp specimen 4. Move specimen 5. Clamp specimen
Page 8
R.J.W. LTD. Motorised CNB 19-2-18
USER MANUAL
PLEASE VIEW OUR WEBSITE www.blackscharpy.com for consumables & spare parts
© R.J.W. LTD. 2018 ALL RIGHTS RESERVED 8 SUBJECT TO CHANGE WITHOUT PRIOR NOTICE
10 D. Setting Broach Depth
CNB31– Press “up” to raise broach to upper position,
with no specimen loaded
CNB34– Turn “up” to raise broach to upper position,
with no specimen loaded
Open broach guard shield and determine feeler gauge thickness for broach type
being used, from Table 2
Release two clamping screws of the adjustable
clamp jaw
SPECIMEN
FEELER GAUGE
BROACH PILOT
BROACH
2
3 4
1
Page 9
R.J.W. LTD. Motorised CNB 19-2-18
USER MANUAL
PLEASE VIEW OUR WEBSITE www.blackscharpy.com for consumables & spare parts
© R.J.W. LTD. 2018 ALL RIGHTS RESERVED 9 SUBJECT TO CHANGE WITHOUT PRIOR NOTICE
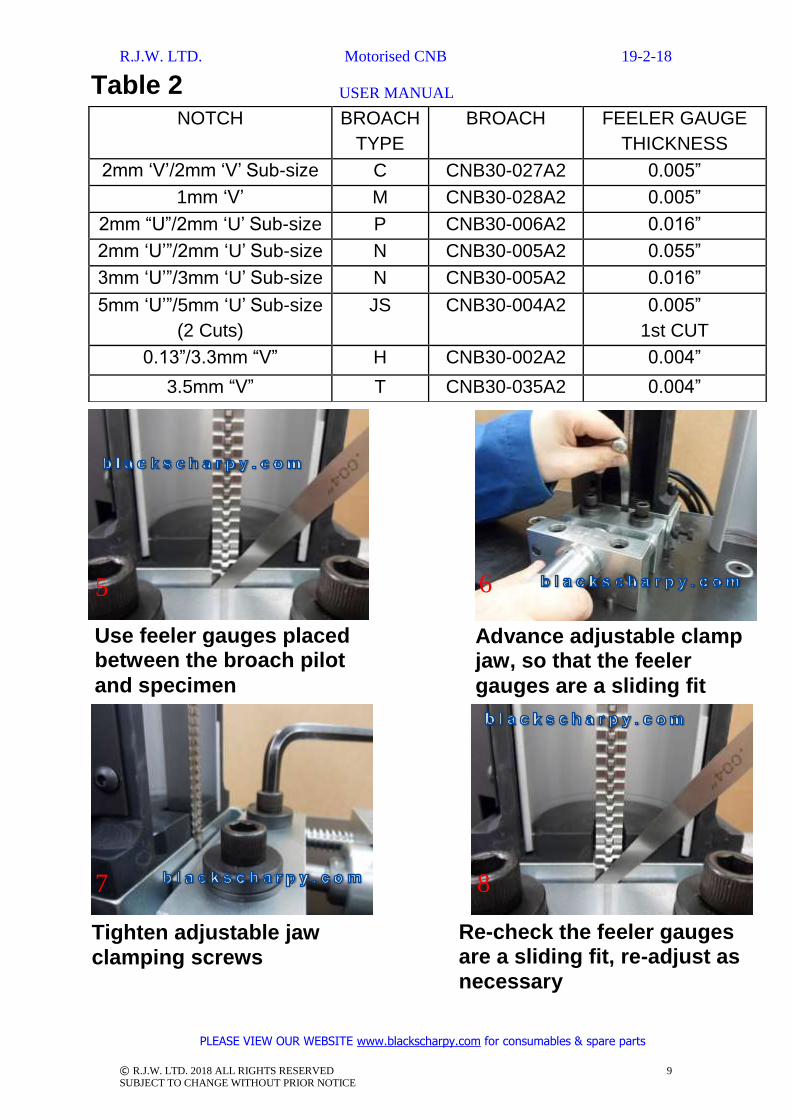
NOTCH BROACH
TYPE
BROACH FEELER GAUGE
THICKNESS
2mm ‘V’/2mm ‘V’ Sub-size C CNB30-027A2 0.005”
1mm ‘V’ M CNB30-028A2 0.005”
2mm “U”/2mm ‘U’ Sub-size P CNB30-006A2 0.016”
2mm ‘U’”/2mm ‘U’ Sub-size N CNB30-005A2 0.055”
3mm ‘U’”/3mm ‘U’ Sub-size N CNB30-005A2 0.016”
5mm ‘U’”/5mm ‘U’ Sub-size
(2 Cuts)
JS CNB30-004A2 0.005”
1st CUT
0.13”/3.3mm “V” H CNB30-002A2 0.004”
3.5mm “V” T CNB30-035A2 0.004”
Use feeler gauges placed between the broach pilot
and specimen
Advance adjustable clamp jaw, so that the feeler
gauges are a sliding fit
Tighten adjustable jaw
clamping screws
Re-check the feeler gauges are a sliding fit, re-adjust as
necessary
5 6
7 8
Table 2
Page 10
R.J.W. LTD. Motorised CNB 19-2-18
USER MANUAL
PLEASE VIEW OUR WEBSITE www.blackscharpy.com for consumables & spare parts
© R.J.W. LTD. 2018 ALL RIGHTS RESERVED 10 SUBJECT TO CHANGE WITHOUT PRIOR NOTICE
10 E. Broaching Specimen
Push specimen up against axial screw
face
Clamp specimen using
handle
Clamping pins
securing specimen
Apply cutting oil to the broach teeth, using brush supplied
with machine.
Close broach guard
shield
We recommend RTD metal cutting liquid
Load specimen
1 2
3 4
5 6
Page 11
R.J.W. LTD. Motorised CNB 19-2-18
USER MANUAL
PLEASE VIEW OUR WEBSITE www.blackscharpy.com for consumables & spare parts
© R.J.W. LTD. 2018 ALL RIGHTS RESERVED 11 SUBJECT TO CHANGE WITHOUT PRIOR NOTICE
CNB34 Only– Select broach
speed
CNB34 Only The optimum speed has to be determined by tests. If in doubt, start at a slower broach speed. Typical settings: Low carbon steels 7
Stainless steel 2
CNB34– Turn “down” to
broach the Specimen
Open broach guard shield Release the clamp handle
CNB31– Press “down” to
broach the Specimen
Note: To prevent damage to broach teeth always remove specimen
BEFORE raising the broach
7
9
10 11
8
Page 12
R.J.W. LTD. Motorised CNB 19-2-18
USER MANUAL
PLEASE VIEW OUR WEBSITE www.blackscharpy.com for consumables & spare parts
© R.J.W. LTD. 2018 ALL RIGHTS RESERVED 12 SUBJECT TO CHANGE WITHOUT PRIOR NOTICE
Remove the specimen Specimen broached
Close broach guard shield
Open broach guard shield Clean broach teeth using wire brush supplied with machine, ensuring cuttings are removed from teeth
gulley’s
Thoroughly clean clamping area and area inside broach guard shield, using brush supplied. The machine is now ready to cut
next notch
Raise the broach
12 13
14 15
16 17
18
Page 13
R.J.W. LTD. Motorised CNB 19-2-18
USER MANUAL
PLEASE VIEW OUR WEBSITE www.blackscharpy.com for consumables & spare parts
© R.J.W. LTD. 2018 ALL RIGHTS RESERVED 13 SUBJECT TO CHANGE WITHOUT PRIOR NOTICE
10 F. Adjusting Depth of Cut
Mark position of index
head with a marker
Release adjustable jaw
clamping screws
Tighten adjustable jaw clamping
screws
Note: The index head has graduations. 1 division will alter broach depth by 0.05mm. Increases the notch depth
Decreases the notch depth
Adjust index head, by the change in notch depth
required.
Note: Index head adjustment has backlash. Always adjust from one direction.
1
2 3
4
Page 14
R.J.W. LTD. Motorised CNB 19-2-18
USER MANUAL
PLEASE VIEW OUR WEBSITE www.blackscharpy.com for consumables & spare parts
© R.J.W. LTD. 2018 ALL RIGHTS RESERVED 14 SUBJECT TO CHANGE WITHOUT PRIOR NOTICE
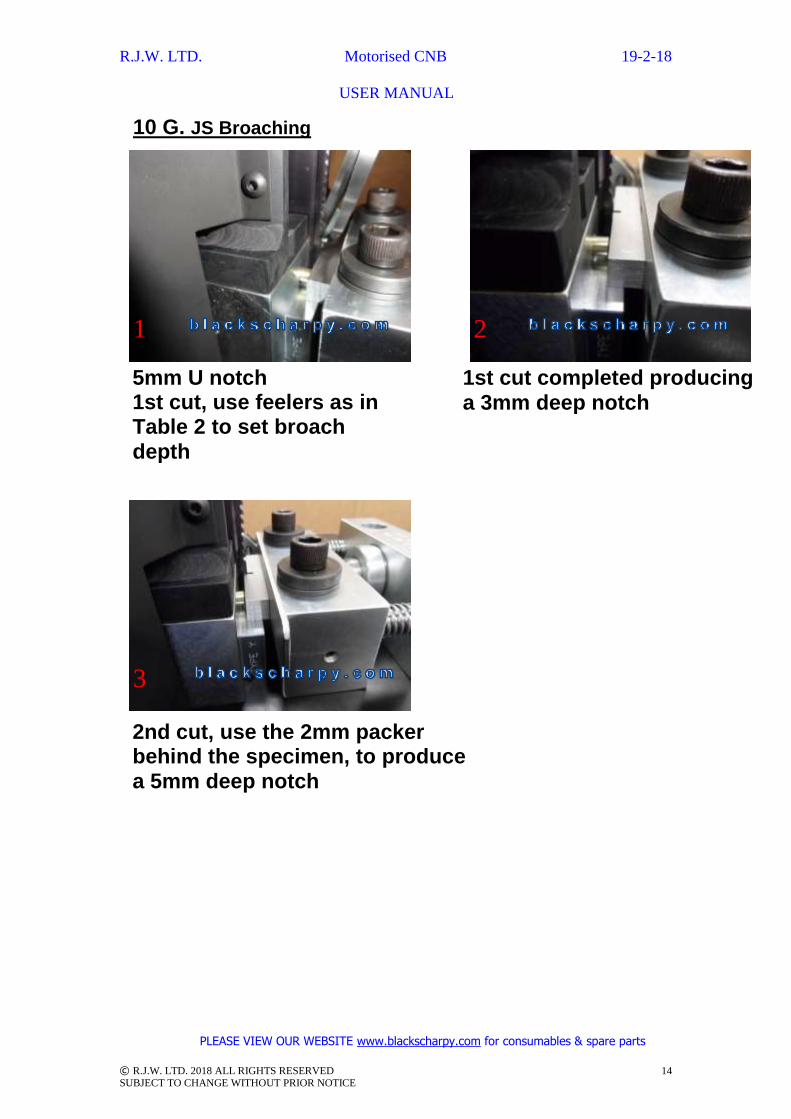
10 G. JS Broaching
5mm U notch 1st cut, use feelers as in Table 2 to set broach
depth
2nd cut, use the 2mm packer behind the specimen, to produce
a 5mm deep notch
1st cut completed producing
a 3mm deep notch
1 2
3
Page 15
R.J.W. LTD. Motorised CNB 19-2-18
USER MANUAL
PLEASE VIEW OUR WEBSITE www.blackscharpy.com for consumables & spare parts
© R.J.W. LTD. 2018 ALL RIGHTS RESERVED 15 SUBJECT TO CHANGE WITHOUT PRIOR NOTICE
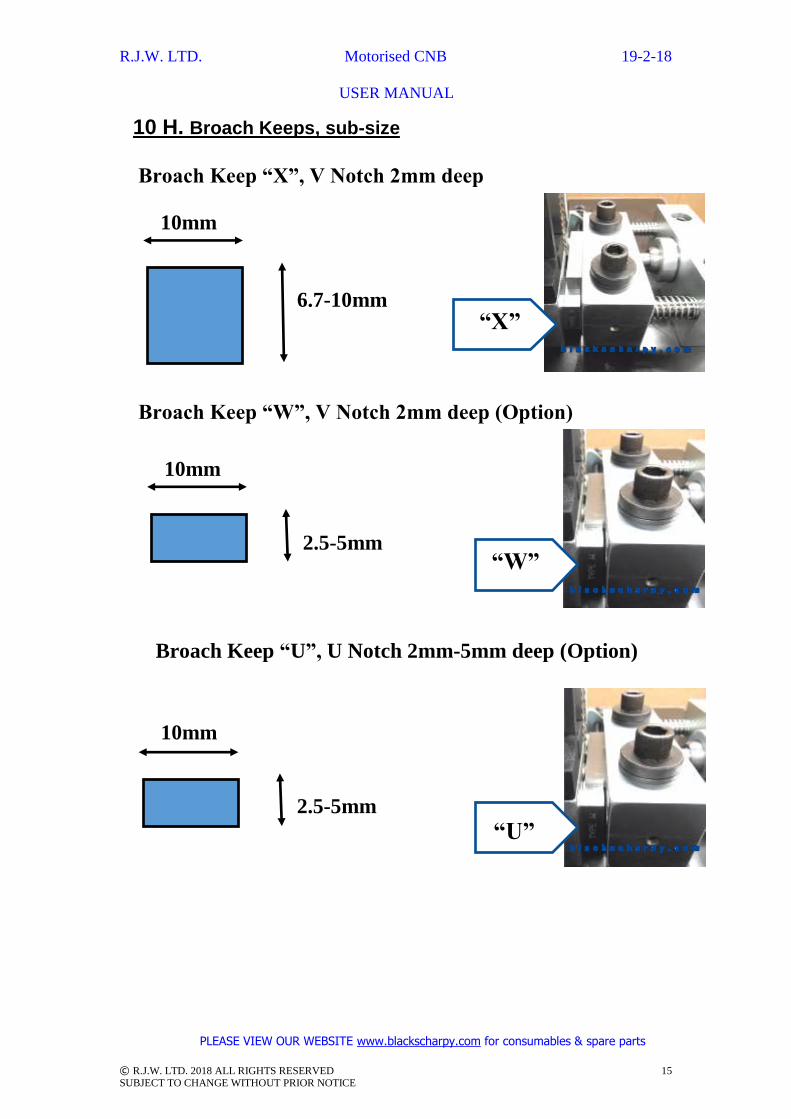
10 H. Broach Keeps, sub-size
10mm
6.7-10mm
Broach Keep “X”, V Notch 2mm deep
10mm
“X”
“W”
Broach Keep “W”, V Notch 2mm deep (Option)
Broach Keep “U”, U Notch 2mm-5mm deep (Option)
10mm
“U”
2.5-5mm
2.5-5mm
Page 16
R.J.W. LTD. Motorised CNB 19-2-18
USER MANUAL
PLEASE VIEW OUR WEBSITE www.blackscharpy.com for consumables & spare parts
© R.J.W. LTD. 2018 ALL RIGHTS RESERVED 16 SUBJECT TO CHANGE WITHOUT PRIOR NOTICE
10 I. Multi Notch(options)
10mm Multi notch specimen Broach keep type A fitted,
with the setting up block
accurately positioning the
broach keep
Broaching 10mm Square Multi Notch
Broaching 1st notch Broaching 2nd notch
Broaching 3rd notch
1 2
3
Page 17
R.J.W. LTD. Motorised CNB 19-2-18
USER MANUAL
PLEASE VIEW OUR WEBSITE www.blackscharpy.com for consumables & spare parts
© R.J.W. LTD. 2018 ALL RIGHTS RESERVED 17 SUBJECT TO CHANGE WITHOUT PRIOR NOTICE
Broaching 0.45”/11.4mm Round Multi Notch, with “H” broach
Broaching round multi-notch
specimens, showing the holding
block, which radially positions
the notches
Clamping round specimen,
with a clamp block which has
tapered flats
Broaching 1st notch Broaching 2nd notch
Note: Up to 3 notches can be produced in square or round specimens, at a
28mm pitch
1 2
3 4