Journal of ASTM International, September, 2012, Vol. X No. X Paper ID: XXXXX Available online at www.astm.org Christina Y. Piña Arpin 1 and Joel Stoltzfus 2 Rudimentary Cleaning Compared to Level 300A ABSTRACT: A study was done to characterize the cleanliness level achievable when using a rudimentary cleaning process, and results were compared to JPR 5322.1G Level 300A. While it is not ideal to clean in a shop environment, some situations (e.g., field combat operations) require oxygen system hardware to be maintained and cleaned to prevent a fire hazard, even though it cannot be sent back to a precision cleaning facility. This study measured the effectiveness of basic shop cleaning. Initially, three items representing parts of an oxygen system were contaminated: a metal plate, valve body, and metal oxygen bottle. The contaminants chosen were those most likely to be introduced to the system during normal use: oil, lubricant, metal shavings/powder, sand, fingerprints, tape, lip balm, and hand lotion. The cleaning process used hot water, soap, various brushes, gaseous nitrogen, water nozzle, plastic trays, scouring pads, and a controlled shop environment. Test subjects were classified into three groups: technical professionals having an appreciation for oxygen hazards; professional precision cleaners; and a group with no previous professional knowledge of oxygen or precision cleaning. Three test subjects were in each group, and each was provided with standard cleaning equipment, a cleaning procedure, and one of each of the three test items to clean. The results indicated that the achievable cleanliness level was independent of the technical knowledge or proficiency of the personnel cleaning the items. Results also showed that achieving a Level 300 particle count was more difficult than achieving a Level A nonvolatile residue amount. KEYWORDS: Precision cleaning, rudimentary cleaning, Level 300, oxygen systems, hardware cleaning procedures, process, non-cleanroom 1 Component Services Project Engineer, Technical Services Office, NASA Johnson Space Center White Sands Test Facility, Las Cruces, New Mexico. 2 Oxygen Group Project Manager, Materials and Components Laboratories Office, NASA Johnson Space Center White Sands Test Facility, Las Cruces, New Mexico. https://ntrs.nasa.gov/search.jsp?R=20120003024 2018-05-29T04:05:27+00:00Z
Transcript
Journal of ASTM International, September, 2012, Vol. X No. X Paper ID: XXXXX
Available online at www.astm.org Christina Y. Piña Arpin1 and Joel Stoltzfus2 Rudimentary Cleaning Compared to Level 300A
ABSTRACT: A study was done to characterize the cleanliness level achievable when using a
rudimentary cleaning process, and results were compared to JPR 5322.1G Level 300A. While it is
not ideal to clean in a shop environment, some situations (e.g., field combat operations) require
oxygen system hardware to be maintained and cleaned to prevent a fire hazard, even though it
cannot be sent back to a precision cleaning facility. This study measured the effectiveness of basic
shop cleaning. Initially, three items representing parts of an oxygen system were contaminated: a
metal plate, valve body, and metal oxygen bottle. The contaminants chosen were those most likely
to be introduced to the system during normal use: oil, lubricant, metal shavings/powder, sand,
fingerprints, tape, lip balm, and hand lotion. The cleaning process used hot water, soap, various
brushes, gaseous nitrogen, water nozzle, plastic trays, scouring pads, and a controlled shop
environment. Test subjects were classified into three groups: technical professionals having an
appreciation for oxygen hazards; professional precision cleaners; and a group with no previous
professional knowledge of oxygen or precision cleaning. Three test subjects were in each group,
and each was provided with standard cleaning equipment, a cleaning procedure, and one of each
of the three test items to clean. The results indicated that the achievable cleanliness level was
independent of the technical knowledge or proficiency of the personnel cleaning the items. Results
also showed that achieving a Level 300 particle count was more difficult than achieving a Level A
Contamination in oxygen enriched environments can act as both a fuel and/or an ignition
source. Contamination control is necessary to mitigate risk associated with oxygen systems. One
form of contamination control is precision cleaning, in which a value for the level of cleanliness
is assigned to specific hardware. In aerospace use, a risk assessment is typically performed to
determine the level of cleanliness required to operate a system or hardware safely. Aerospace,
unlike other consumers/users of oxygen enriched environments, is typically able to clean and
assemble in a certified clean room. The need arose in which equipment used in combat would
need to be maintained and cleaned but could not be sent to a precision cleaning facility. While
developing cleaning procedures that could be used in the field, two important questions came up:
What effect does the personnel cleaning the equipment have on the hardware’s end cleanliness
level, and what level of cleanliness could be realistically achieved? This study compares three
groups of people using rudimentary cleaning techniques to find out what level of cleanliness can
be reasonably achieved in a controlled shop environment (an access controlled room with high
air flow and sticky mats at each entrance). This study does not compare how different
environments will affect the outcome.
Precision Cleaning
Precision cleaning, as typically performed by NASA White Sands Test Facility (WSTF)
in compliance with both ASTM G93 [1] and NASA JPR5322.1G [2], is a three part process. The
first part of the process is pre-cleaning, followed by visual inspection, and ending with
cleanliness verification. Pre-cleaning is a detailed cleaning performed in a controlled shop
environment and utilizes a series of ultrasonic baths which creates implosions that agitate
contaminants while the hardware is immersed. Each bath contains either a surfactant, mild
3 JOURNAL OF ASTM INTERNATIONAL
alkaline, or caustic acid solution. The type of solution used depends on its compatibility with the
hardware. Between baths, a technician manually agitates the contaminants on the hardware.
Once the hardware is cleaned, rinsed, and dried using a nitrogen purged oven, it is passed on to
another individual for visual inspection. The hardware in the visual inspection area is kept under
a downflow unit to maintain its cleanliness. A third party, trained to detect any hardware
anomalies, verifies the cleanliness of the hardware using an otoscope and a magnifying
fluorescent inspection lamp with a 5-diopter lens. To pass visual inspection, no particles or fibers
can be visible, no signs of previous contamination can be detected, and no signs of rust,
discoloration or water spots can be seen.
Once the hardware passes visual inspection, it is sent to the ISO (International
Organization for Standardization) class 5 clean room for final cleaning and cleanliness
verification. This area requires full clean room garments, consisting of coveralls, hood head
cover, boot covers, and gloves, to be worn over street clothes at all times. Final cleaning is
performed by rinsing the hardware with a solvent. To verify cleanliness of the hardware, a
measured amount of the rinse solvent is captured for analysis per ASTM G93-03 solvent
extraction test; the rinse solvent is then passed through a membrane filter, which is used to
perform the particle count. The solvent is then evaporated, and the remaining nonvolatile residue
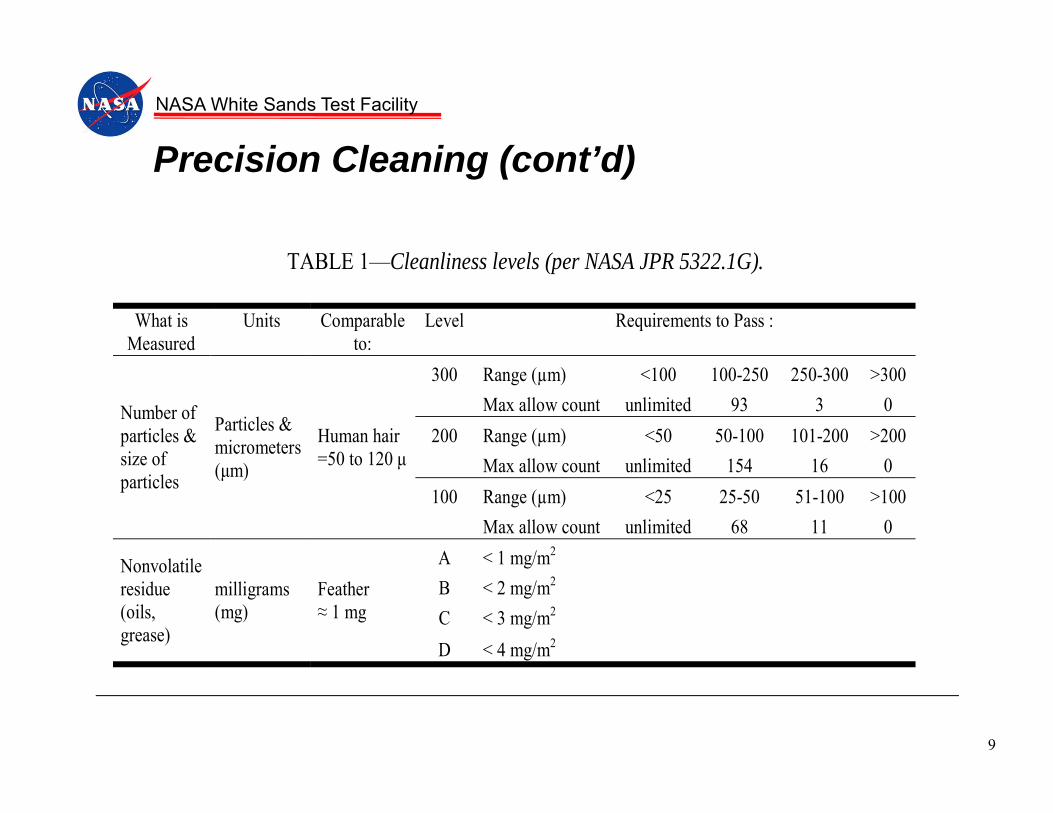
(NVR) is gravimetrically measured. Precision cleanliness levels are a quantitative measurement,
where the count and size of particles are indicated by a number (the smaller the number the
cleaner the part) and the amount of NVR per square meter of hardware is indicated by a letter
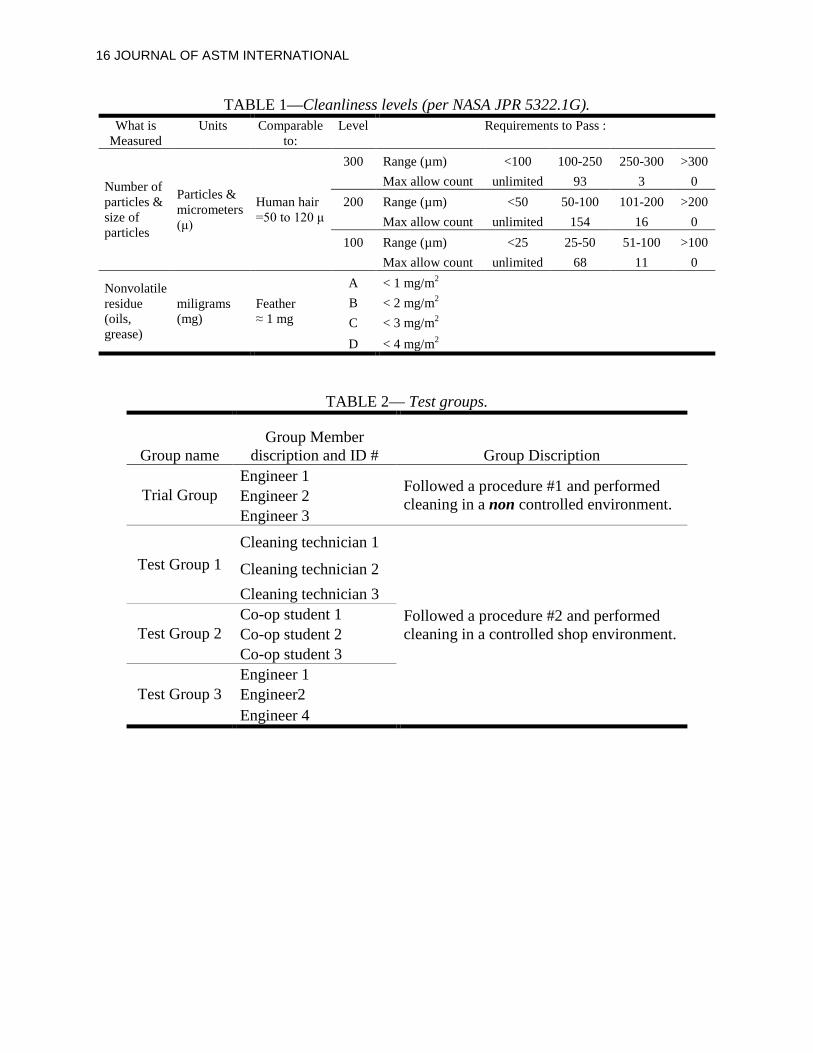
(e.g., “A” is cleaner than “B). The chart in Table 1 describes the cleanliness levels.
4 JOURNAL OF ASTM INTERNATIONAL
Methodology
Test Articles
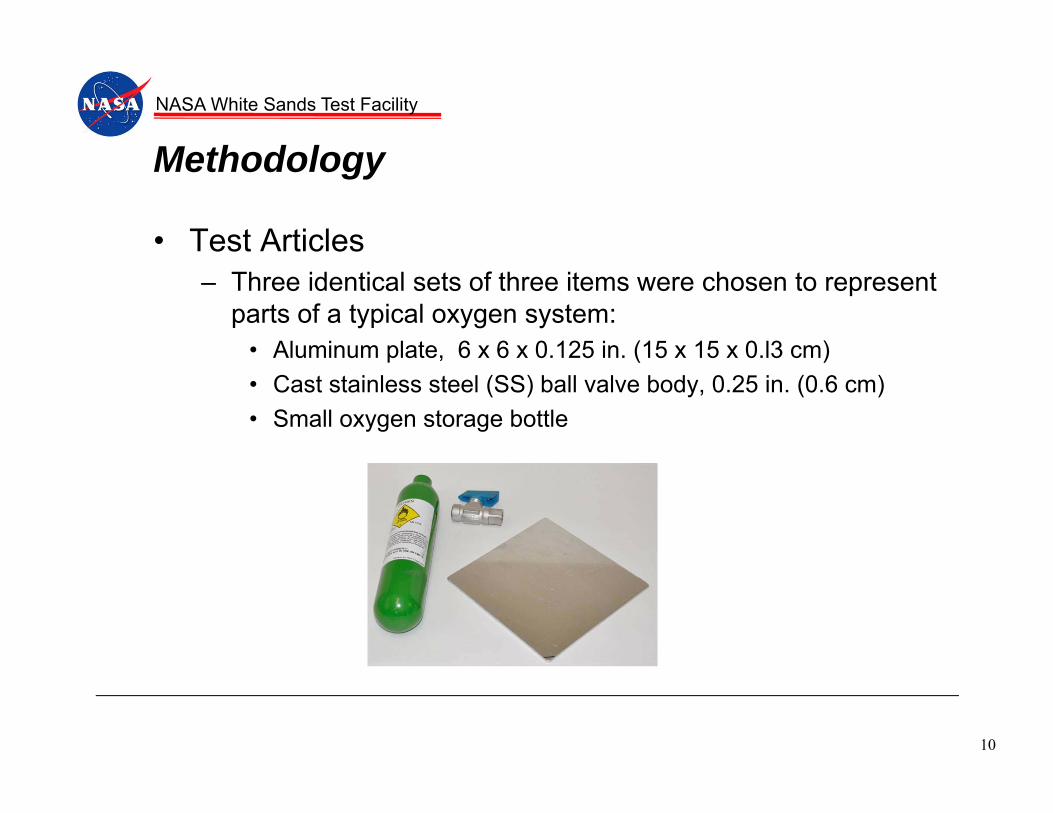
Three identical sets of hardware were assembled, each containing three items chosen to
represent parts of a typical oxygen system: an aluminum plate 6 x 6 x 0.125 in. (15 x 15 x 0.3
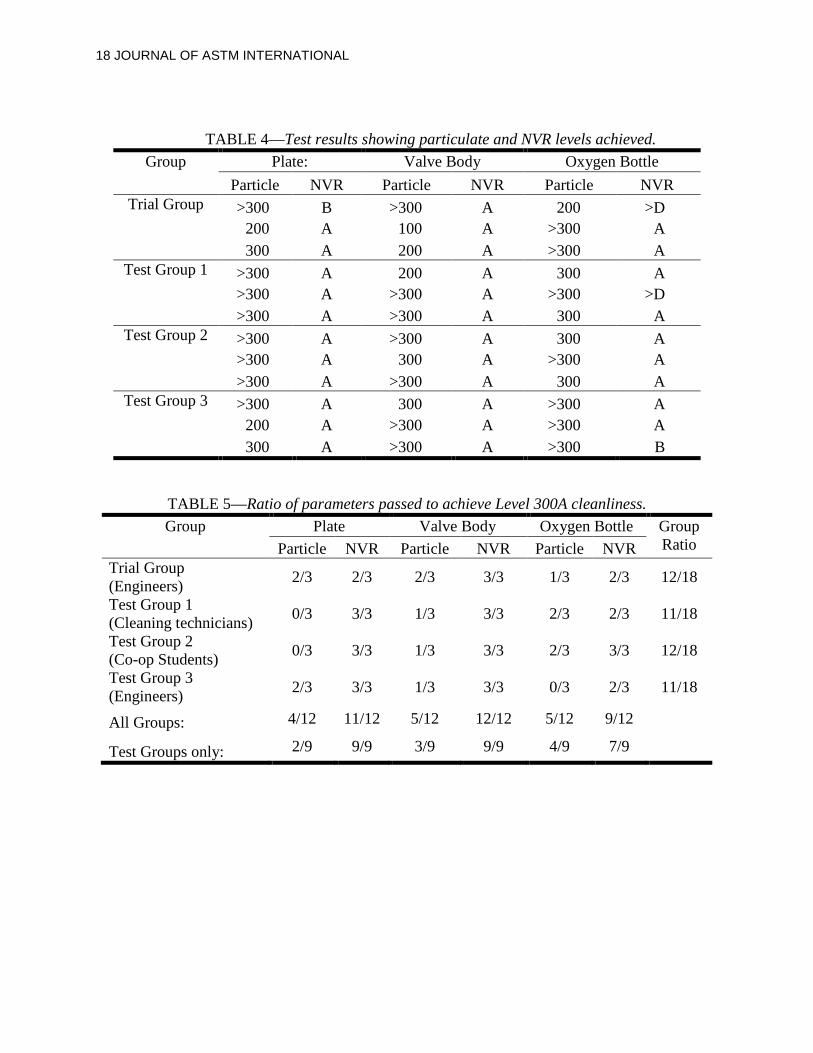
cm), a 0.25-in. (0.6-cm) Hoke1 valve body, and a small oxygen storage bottle (Fig. 1).
Contaminants
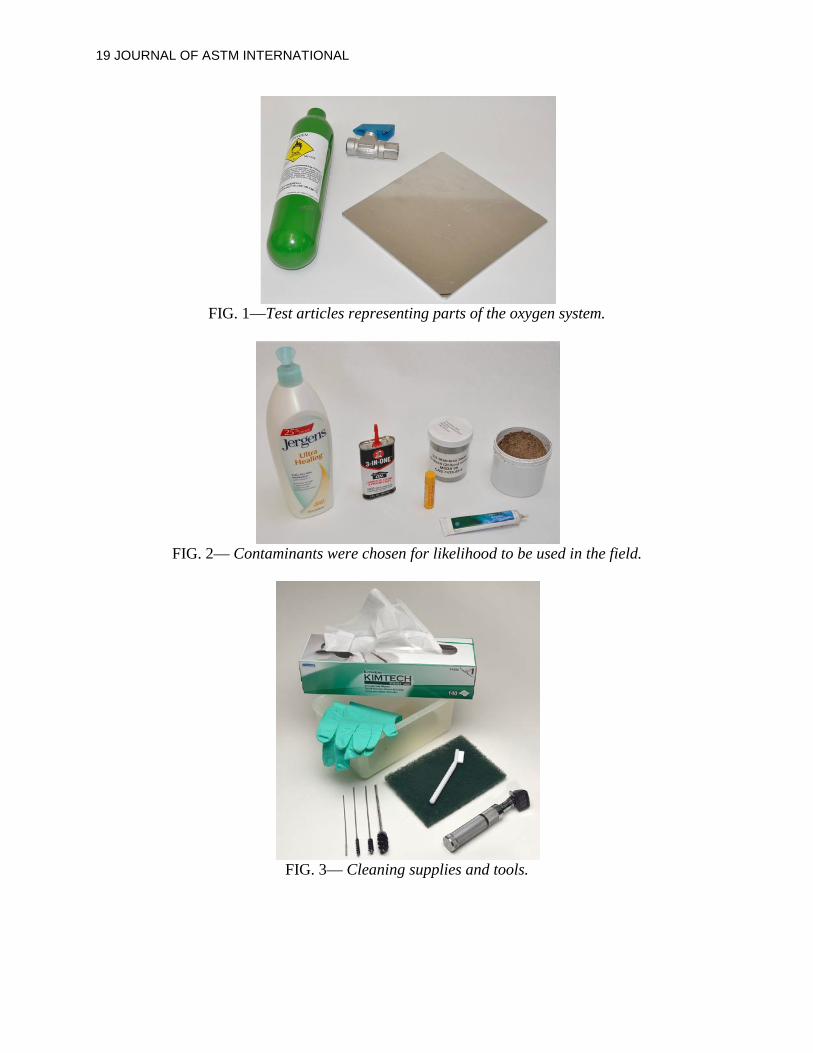
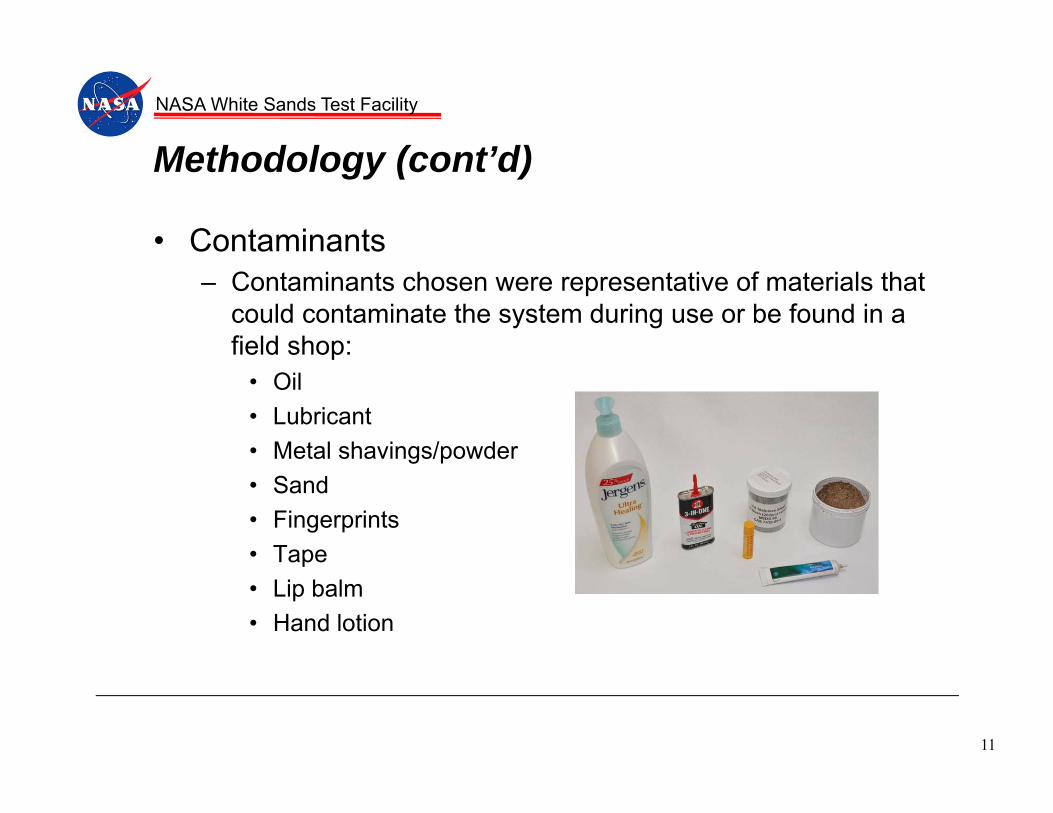
The contaminants chosen were those likely to be introduced to the system during use or
be found in a field oxygen shop: oil, lubricant, metal shavings/powder, sand, fingerprints, tape,
lip balm, and hand lotion (Fig. 2).
Test Groups
This study grouped people into one trial group and three test groups of three people each,
assembled on a basis of their knowledge and experience of oxygen and contamination control
(Table 2). The Trial Group was comprised of three engineers from the WSTF Oxygen Team. For
discussion throughout this paper, the Trial Group is not considered one of the test groups, due to
changes in the written procedure and changes in test location.
The three test groups represented three sets of knowledge that were of importance in this
study. Group 1 was comprised of three clean room technicians with significant experience doing
precision cleaning on hardware intended for various applications including oxygen service.
Group 2 was comprised of three co-op students who had recently graduated high school; two of
them worked as assistants in the WSTF Administrative Department. Group 2 had no prior
knowledge of the importance of cleaning hardware for use in oxygen systems. Group 3 was
comprised of three engineers from the WSTF Oxygen Team with detailed technical knowledge
of the importance of cleaning hardware for oxygen service. Two of the three engineers in this 1 Hoke is a registered trademark of Hoke Incorporated, Spartanburg, SC.
5 JOURNAL OF ASTM INTERNATIONAL
group performed the cleaning process twice, because they had also participated in the Trial
Group.
Prior to their cleaning effort, each group was briefed in the procedure and the importance
of cleaning hardware for oxygen service. The briefing was similar to that provided to field
personnel who would be handling the equipment in question. Each group received a briefing on
the cleaning procedure they would be performing.
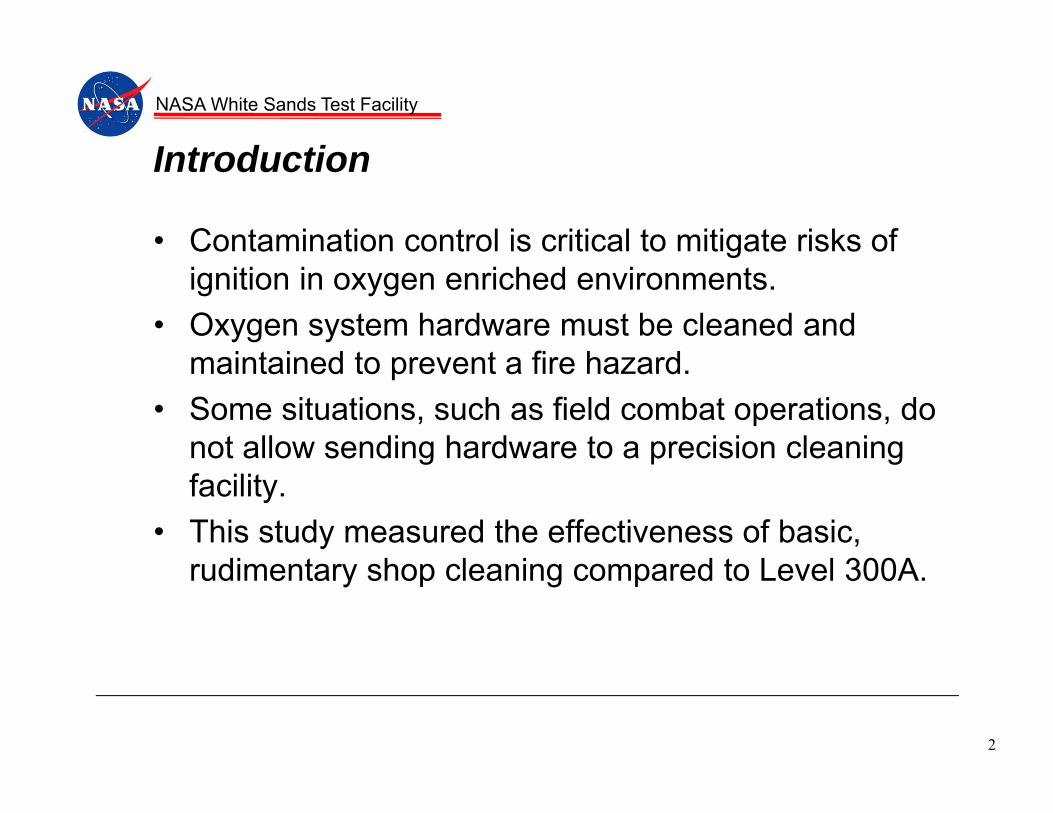
Equipment
One important requirement that determined what equipment/tools would be used in the
rudimentary cleaning process was the common availability of such equipment to an oxygen field
shop. Another consideration was that use of the tools should require minimum training.
Groups 1 - 3were supplied with standard cleaning equipment consisting of the following: a set of
written procedures; various sizes (diameters of 0.75, 0.5, and 0.375 in. (1.9, 1.3, and 1.0 cm)) of
stiff black nylon-bristle stainless-steel handle cleaning brushes; a 3-row nylon-bristle Delrin1
handle cleaning brush; scouring pads; Nitrilite2 gloves; Kimwipes3; an otoscope; a fluorescent
inspection lamp with a 5-diopter lens; a spray nozzle for 125 °F (52 °C) hot deionized (DI)
water; filtered gaseous nitrogen (GN2) at 65 psig (0.45 mPa); and three plastic basins filled with
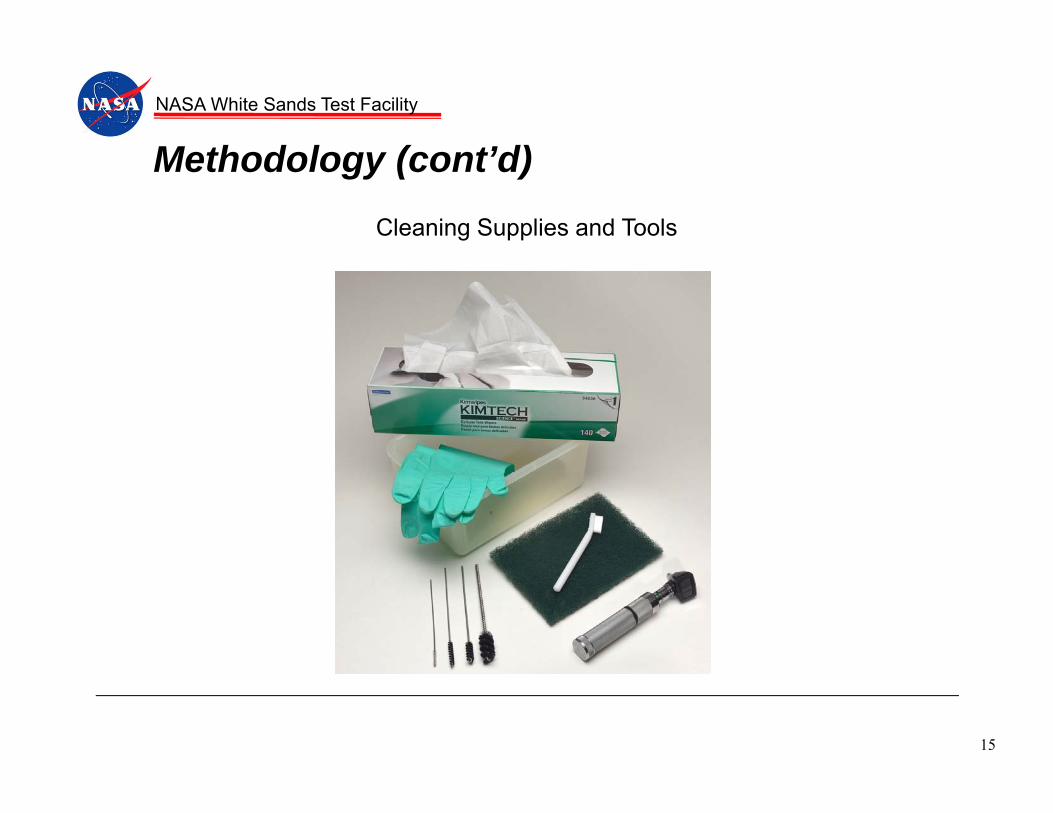
Simple Green4, water solution, and rinse water. Fig. 3 (cleaning supplies) represents some of
the equipment supplied to the groups. The Trial Group had a similar set of supplies with a few
substitutions that included tap water in place of DI water, canned air instead of GN2, and a
magnifying glass and a flashlight in place of the visual examination tools. HFE 7100 was used in
1 Delrin is a registered trademark of E. I. du Pont de Nemours and company, Wilmington, DE. 2 Nitrilite is a registered trademark of Ansell Limited, Richmond, Australia. 3 Kimwipes is a registered trademark of Kimberly-Clark Corporation, Neenah, WI. 4 Simple Green is a registered trademark of Sunshine Makers, Incorporated, Huntington Beach, CA.
6 JOURNAL OF ASTM INTERNATIONAL
all cases as the verification solvent to determine the level of cleanliness achieved on the
hardware using the rudimentary process.
Environment
The Trial Group used a preliminary version of the procedure for which they set up their
own cleaning process in a room equipped only with a stainless steel sink, domestic hot water,
and a table-top surface on which to work. For the actual testing, Groups 1 through 3 were set up
on a stainless steel work top in the WSTF pre-clean room, which is a controlled shop
environment with a higher than normal exchange of air and sticky mats at each entrance; only a
smock is worn over street clothes in this area.
Test article contamination
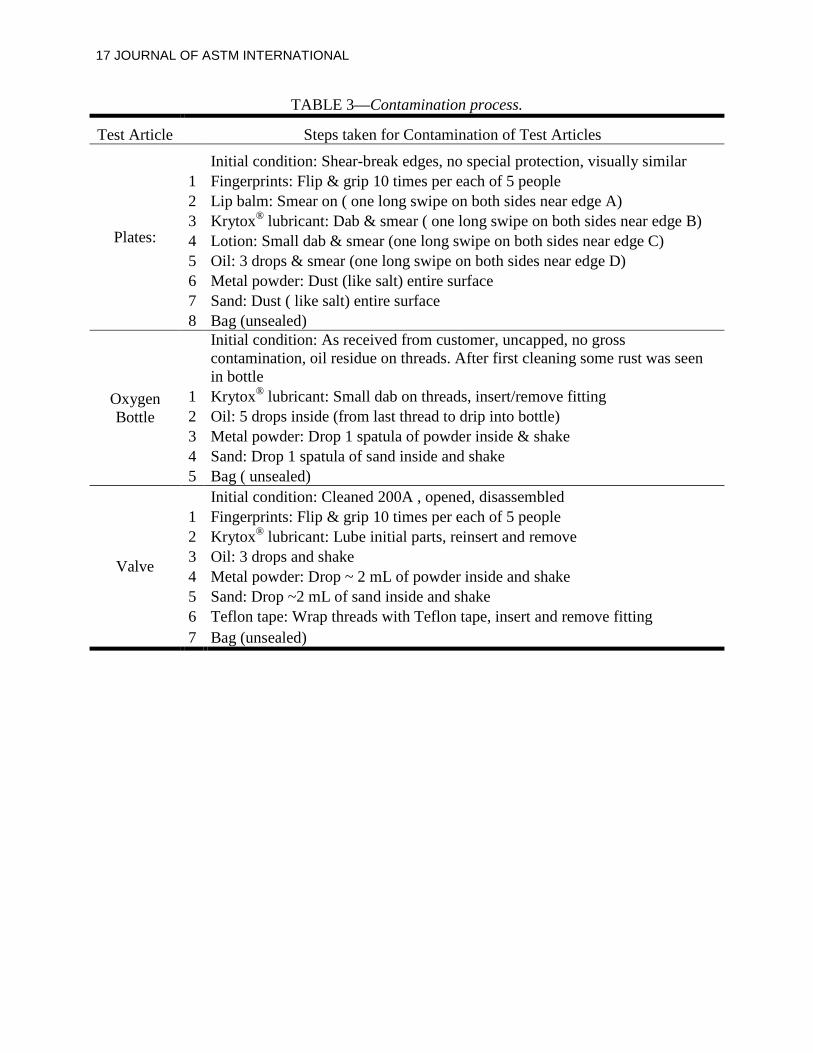
Before the study began, each type of test article was uniformly contaminated following
the procedures detailed in Table 3.
Recommended Rudimentary Procedures
Identical recommended procedures, presented as follows, were supplied to the three test
groups. (Note that any mention of inspection is not an official visual inspection by a third party.)
7 JOURNAL OF ASTM INTERNATIONAL
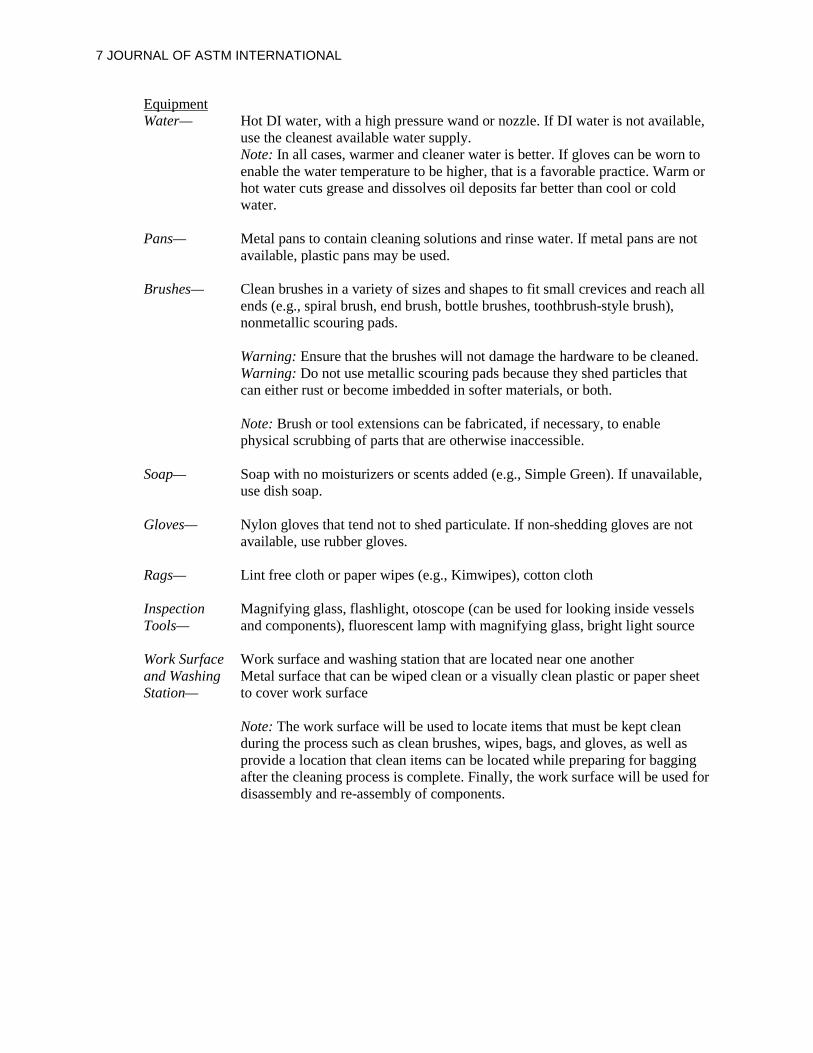
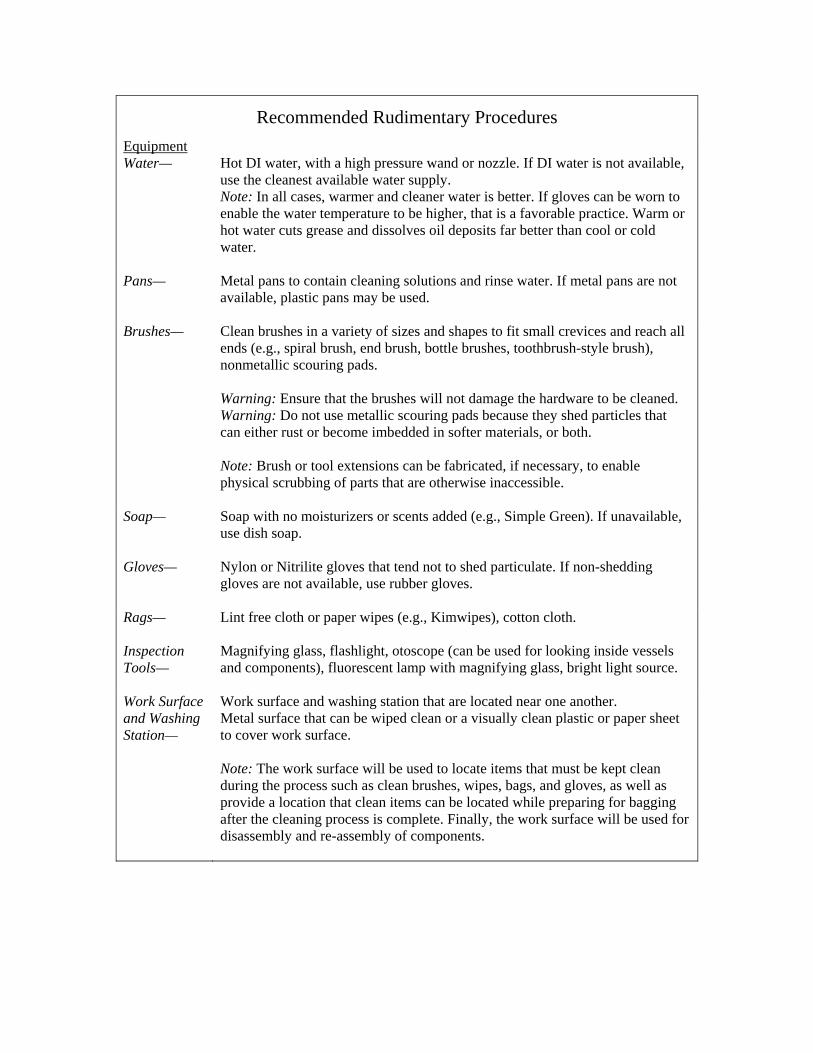
Equipment Water— Hot DI water, with a high pressure wand or nozzle. If DI water is not available,
use the cleanest available water supply. Note: In all cases, warmer and cleaner water is better. If gloves can be worn to enable the water temperature to be higher, that is a favorable practice. Warm or hot water cuts grease and dissolves oil deposits far better than cool or cold water.
Pans— Metal pans to contain cleaning solutions and rinse water. If metal pans are not available, plastic pans may be used.
Brushes— Clean brushes in a variety of sizes and shapes to fit small crevices and reach all ends (e.g., spiral brush, end brush, bottle brushes, toothbrush-style brush), nonmetallic scouring pads. Warning: Ensure that the brushes will not damage the hardware to be cleaned. Warning: Do not use metallic scouring pads because they shed particles that can either rust or become imbedded in softer materials, or both. Note: Brush or tool extensions can be fabricated, if necessary, to enable physical scrubbing of parts that are otherwise inaccessible.
Soap— Soap with no moisturizers or scents added (e.g., Simple Green). If unavailable, use dish soap.
Gloves— Nylon gloves that tend not to shed particulate. If non-shedding gloves are not available, use rubber gloves.
Rags— Lint free cloth or paper wipes (e.g., Kimwipes), cotton cloth
Inspection Tools—
Magnifying glass, flashlight, otoscope (can be used for looking inside vessels and components), fluorescent lamp with magnifying glass, bright light source
Work Surface and Washing Station—
Work surface and washing station that are located near one another Metal surface that can be wiped clean or a visually clean plastic or paper sheet to cover work surface Note: The work surface will be used to locate items that must be kept clean during the process such as clean brushes, wipes, bags, and gloves, as well as provide a location that clean items can be located while preparing for bagging after the cleaning process is complete. Finally, the work surface will be used for disassembly and re-assembly of components.
8 JOURNAL OF ASTM INTERNATIONAL
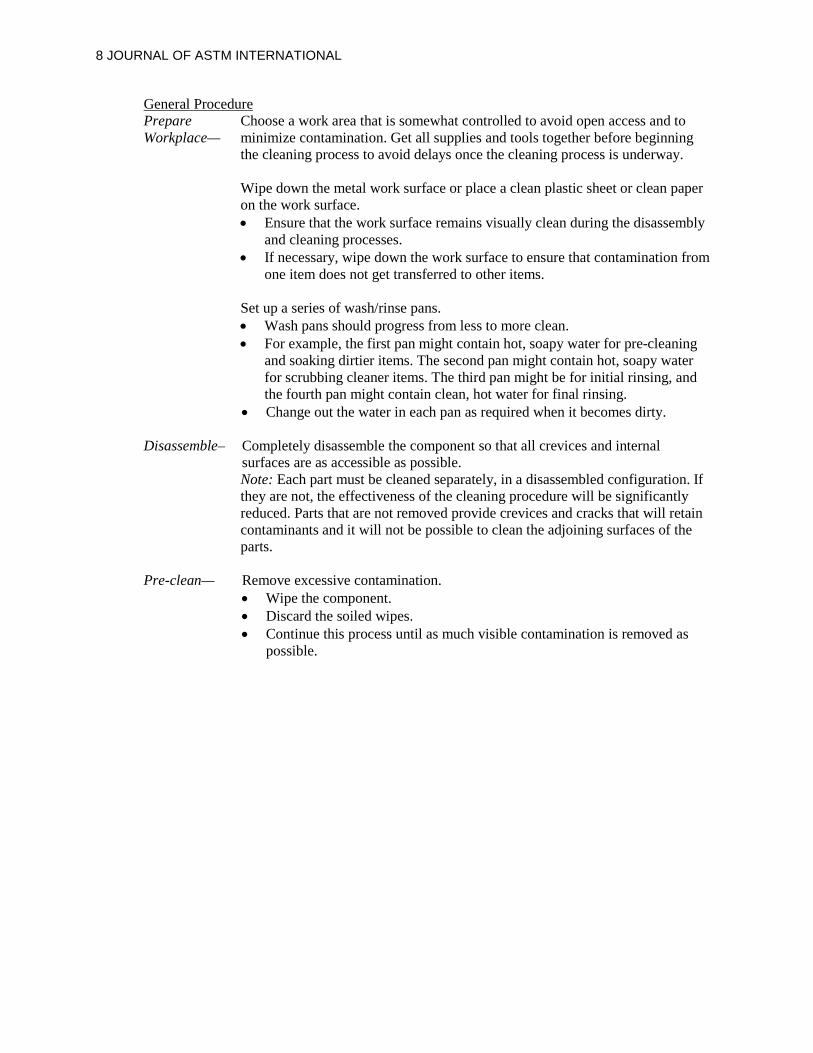
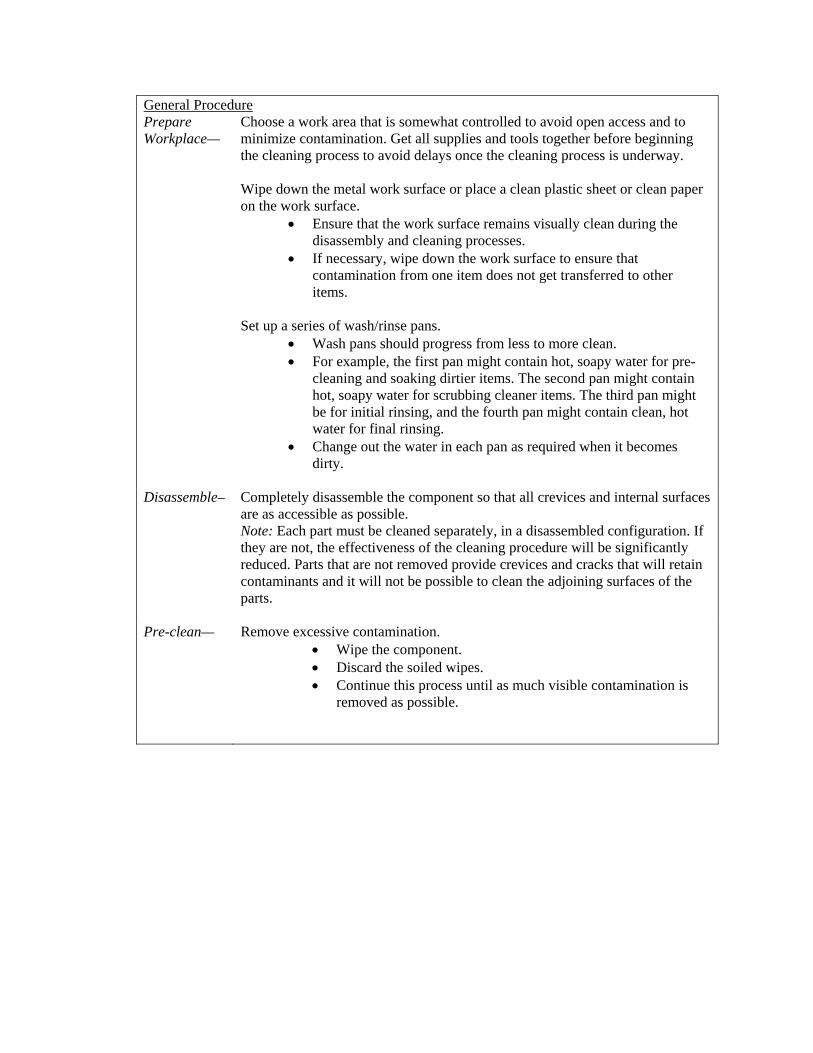
General Procedure Prepare Workplace—
Choose a work area that is somewhat controlled to avoid open access and to minimize contamination. Get all supplies and tools together before beginning the cleaning process to avoid delays once the cleaning process is underway. Wipe down the metal work surface or place a clean plastic sheet or clean paper on the work surface. • Ensure that the work surface remains visually clean during the disassembly
and cleaning processes. • If necessary, wipe down the work surface to ensure that contamination from
one item does not get transferred to other items. Set up a series of wash/rinse pans. • Wash pans should progress from less to more clean. • For example, the first pan might contain hot, soapy water for pre-cleaning
and soaking dirtier items. The second pan might contain hot, soapy water for scrubbing cleaner items. The third pan might be for initial rinsing, and the fourth pan might contain clean, hot water for final rinsing.
• Change out the water in each pan as required when it becomes dirty.
Disassemble– Completely disassemble the component so that all crevices and internal surfaces are as accessible as possible. Note: Each part must be cleaned separately, in a disassembled configuration. If they are not, the effectiveness of the cleaning procedure will be significantly reduced. Parts that are not removed provide crevices and cracks that will retain contaminants and it will not be possible to clean the adjoining surfaces of the parts.
Pre-clean— Remove excessive contamination. • Wipe the component. • Discard the soiled wipes. • Continue this process until as much visible contamination is removed as
possible.
9 JOURNAL OF ASTM INTERNATIONAL
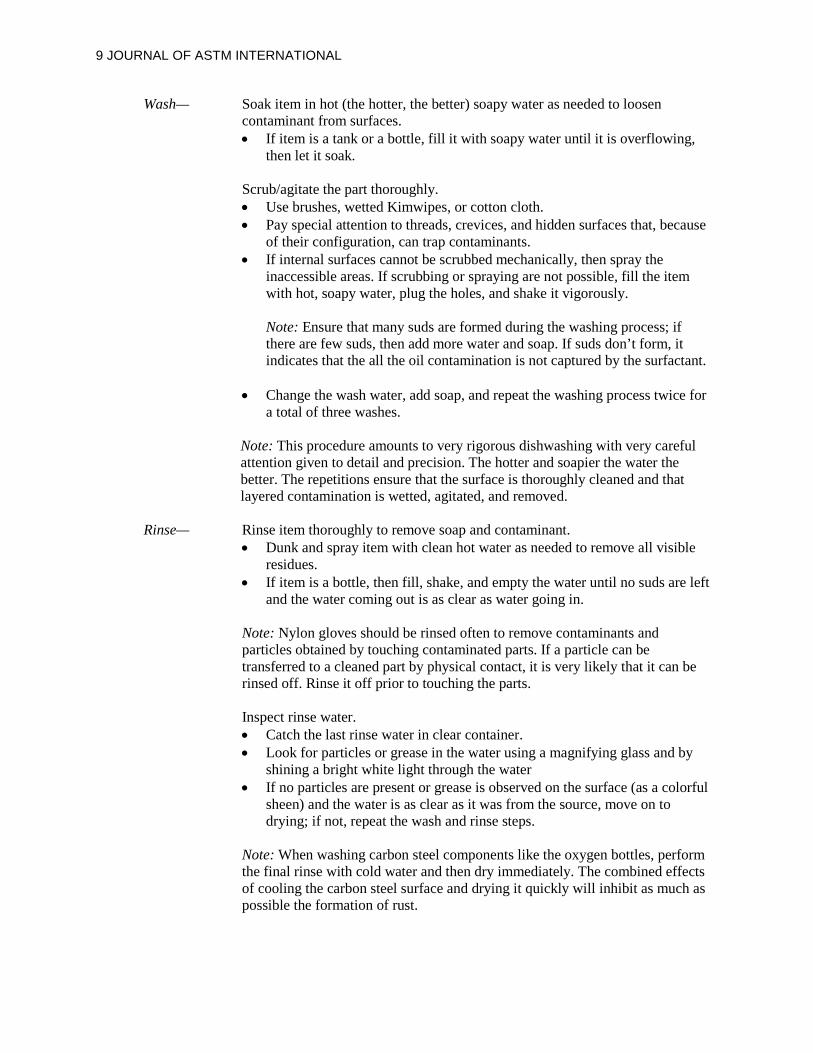
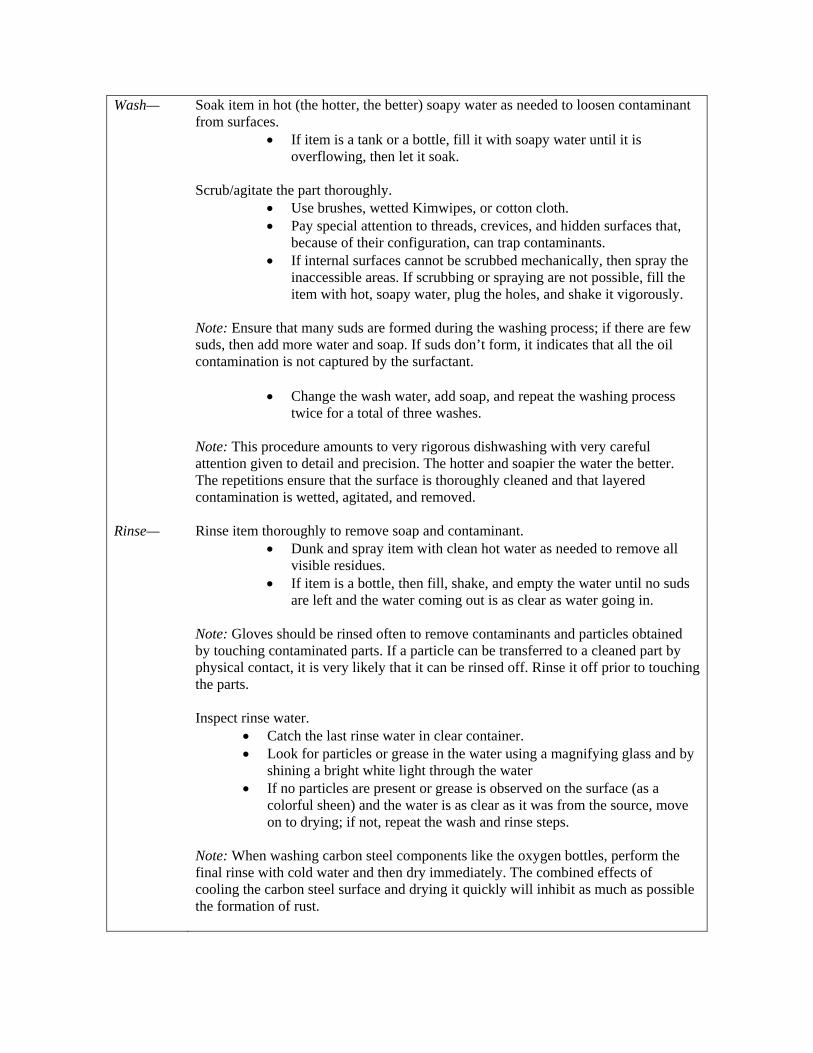
Wash— Soak item in hot (the hotter, the better) soapy water as needed to loosen contaminant from surfaces. • If item is a tank or a bottle, fill it with soapy water until it is overflowing,
then let it soak. Scrub/agitate the part thoroughly. • Use brushes, wetted Kimwipes, or cotton cloth. • Pay special attention to threads, crevices, and hidden surfaces that, because
of their configuration, can trap contaminants. • If internal surfaces cannot be scrubbed mechanically, then spray the
inaccessible areas. If scrubbing or spraying are not possible, fill the item with hot, soapy water, plug the holes, and shake it vigorously. Note: Ensure that many suds are formed during the washing process; if there are few suds, then add more water and soap. If suds don’t form, it indicates that the all the oil contamination is not captured by the surfactant.
• Change the wash water, add soap, and repeat the washing process twice for a total of three washes.
Note: This procedure amounts to very rigorous dishwashing with very careful attention given to detail and precision. The hotter and soapier the water the better. The repetitions ensure that the surface is thoroughly cleaned and that layered contamination is wetted, agitated, and removed.
Rinse— Rinse item thoroughly to remove soap and contaminant. • Dunk and spray item with clean hot water as needed to remove all visible
residues. • If item is a bottle, then fill, shake, and empty the water until no suds are left
and the water coming out is as clear as water going in. Note: Nylon gloves should be rinsed often to remove contaminants and particles obtained by touching contaminated parts. If a particle can be transferred to a cleaned part by physical contact, it is very likely that it can be rinsed off. Rinse it off prior to touching the parts. Inspect rinse water. • Catch the last rinse water in clear container. • Look for particles or grease in the water using a magnifying glass and by
shining a bright white light through the water • If no particles are present or grease is observed on the surface (as a colorful
sheen) and the water is as clear as it was from the source, move on to drying; if not, repeat the wash and rinse steps.
Note: When washing carbon steel components like the oxygen bottles, perform the final rinse with cold water and then dry immediately. The combined effects of cooling the carbon steel surface and drying it quickly will inhibit as much as possible the formation of rust.
10 JOURNAL OF ASTM INTERNATIONAL
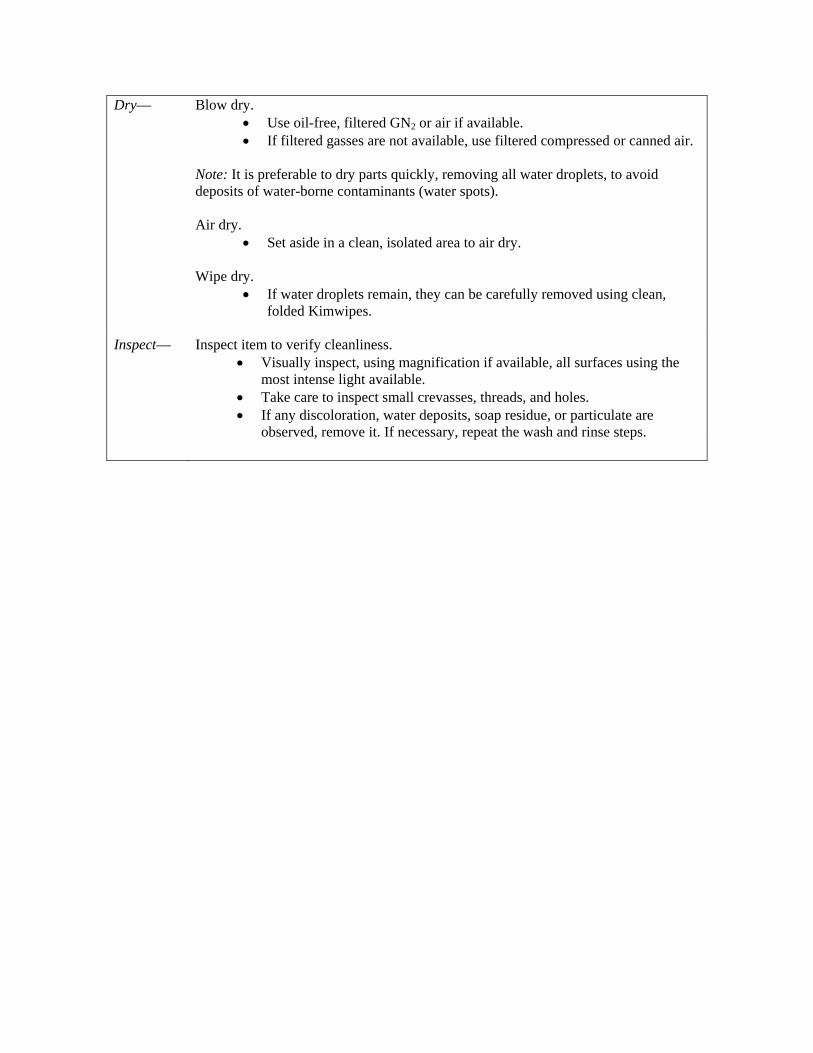
Dry— Blow dry. • Use oil-free, filtered GN2 or air if available. • If filtered gasses are not available, use filtered compressed or canned air.
Note: It is preferable to dry parts quickly, removing all water droplets, to avoid deposits of water-borne contaminants (water spots). Air dry. • Set aside in a clean, isolated area to air dry. Wipe dry. • If water droplets remain, they can be carefully removed using clean, folded
Kimwipes
Inspect— Inspect item to verify cleanliness. • Visually inspect, using magnification if available, all surfaces using the
most intense light available. • Take care to inspect small crevasses, threads, and holes. • If any discoloration, water deposits, soap residue, or particulate are
observed, remove it. If necessary, repeat the wash and rinse steps. Experimental Procedure
Once the test articles and contaminants were selected, the test articles were visually
examined to ensure they were at a similar level of cleanliness and to note the initial condition of
the test articles. (This visual examination should not be confused as an official visual inspection
as identified earlier in the precision cleaning area of this paper.) The test articles were then
contaminated. Each piece from the three hardware sets were contaminated using the process
outlined in Table 3, so that each test group started with hardware that was similarly soiled when
they began the cleaning process.
The three individuals in each test group were provided with a set of identical cleaning
supplies and a set of contaminated test articles. Each individual cleaned their three items
following the recommended cleaning process and using only the supplied set of tools. Once the
individual declared their test articles to be cleaned, the test articles were sampled using
HFE 7100 by a WSTF clean room technician (not in a test group) to measure the amount of
particulate and NVR. This process was repeated for each individual in the three test groups.
11 JOURNAL OF ASTM INTERNATIONAL
Sample Collection
To determine the cleanliness level of the hardware, a verification process similar to what
is performed in the precision cleaning process was performed in the WSTF pre-clean room using
a 40- to 60-psig (0.3- to 0.4-mPa) rated pressure vessel. The pre-clean room location was chosen
due to concerns about contaminating the WSTF ISO class 5 clean room by taking in hardware
that had only gone through a rudimentary cleaning process. A clean room technician flushed
each test article with 100 mL of HFE 7100, which was collected and filtered through a 0.45-µm
membrane filter. The membrane and the remaining HFE 7100 sample were sent to the WSTF
chemistry lab for particle count and NVR analysis.
Analysis of Data
The results were compared to the cleanliness requirements for Level 300A as defined by
NASA JPR 5322.1G. As described in Table 1, Level 300 is defined as 0 particles > 300 µm,
3 particles from 250 to 300 µm, 93 particles from 100 to 250 µm, and no limit on particles
< 100 µm; no silting is allowed. NVR Level A is defined as 1.0 mg/m2 or less. Both of these
cleanliness parameters are adequate to reduce the fire hazards in the subject oxygen system. To
further simplify and unify analysis of the data, each part of the cleanliness level (the particle
count and the NVR) was seen as a parameter to be met. The parameters were met on pass/fail
criteria, so if the cleanliness level of hardware was measured to be a 200A, for example, that
meant it passed the two parameters for that test article. If, however, the verification resulted in a
300B or >300A, both cases would only have passed one of the two parameters: the level 300B
would have passed the particle count parameter, but failed the NVR parameter; and the level
> 300A would have failed the particle count parameter, but passed the NVR parameter.
12 JOURNAL OF ASTM INTERNATIONAL
Due to the complexity of measuring and comparing cleanliness of hardware, this study
mainly focused on the quantitative analysis of cleanliness. The visual inspection pass/fail
parameters normal for precision cleaning were not considered in this study. Additionally the ratio
of test parameters met/needed to be met in order for the hardware to pass a Level 300A was used
to compare the performance of the three test groups. For example, Group 1 had three people,
each person had three test articles, and two cleanliness parameters needed to be met on each test
article. This means that Group 1 had 18 cleanliness parameters to meet. However, if the group
only reached a Level 300 or better three times and a level A eight times, that means they met
11/18 of the parameters (referred to as the ratio of parameters passed).
Results and Discussion:
Table 4 shows the level of cleanliness reached by each individual in each of the groups.
Each of the groups met nearly identical numbers of the Level 300A cleanliness parameters (see
Table 5). This suggests that the results obtained are not dependent upon the age, experience,
technical training, or prior knowledge of oxygen hazards. The results indicate that the
instructions are adequate to produce a very consistent result, and special training does not
produce improved cleaning results.
It is also apparent that the NVR levels were met much more frequently than the
particulate levels. The ratio of parameters met for the plate, valve body, and bottle NVR levels
were 9/9, 9/9, and 7/9 respectively, whereas the ratio of parameters met for the particle levels
were 2/9, 3/9, and 4/9 respectively. Only ~ 33 percent of the particulate samples passed
Level 300 compared to nearly 93 percent of the NVR samples. This implies that it is much easier
to remove the NVR (which includes substances like oil, lip balm, Krytox1 lubricant, and
1 Krytox is a registered trademark of E. I. du Pont de Nemours and Company, Wilmington, DE.
13 JOURNAL OF ASTM INTERNATIONAL
fingerprints) than it is to remove and control the particulate contaminant (which includes items
like particles and fibers).
The tendency to meet the NVR requirement but not meet the particulate requirement was
very consistent between groups, suggesting that the efficacy of the procedure is relatively
independent of increased prior knowledge of oxygen hazards, cleaning experience, and advanced
education of the person doing the cleaning.
Due to their availability, the brushes used for cleaning were clean room brushes. These
brushes are specially designed to shed few particles and bristles, and it is not known what the
effect of other (non clean room) brushes would be on the recommended rudimentary field
procedure.
The oxygen bottle was the most difficult item from which to remove the NVR. Compared
to the plate and the valve body, for which 11/12 and 12/12 parameters passed the Level A
specification, the vessel passed less frequently (i.e., 9/12 times). This leads to the conclusion that
special training emphasis should be placed on how to clean the inside of the bottle. The vessel
also showed signs of rust after the Trial Group cleaned it, and the other groups as well. This was
not a surprise, since water was used to clean the vessel and water would cause flash rusting.
However, it does lead to concerns as to whether or not the vessel can be considered to have
passed the 300A level cleanliness parameters, because even if it met the analytical parameters,
the vessel did not meet a visual inspection—which is a precursor to any analytical verification of
cleanliness. If this vessel had gone through the standard precision cleaning process, the rust in
the vessel would have needed to be mitigated before any verification sample was collected. It is
worth noting that the solvent used to verify cleanliness was HFE 7100, which is not a very
aggressive solvent and not normally used to validate a cleaning processes. HFE 7100 is typically
14 JOURNAL OF ASTM INTERNATIONAL
used as part of a cleaning process to verify the cleanliness of the parts once the process as a
whole has been validated. A more aggressive solvent such as AK225 is recommended to validate
a cleaning process. However, HFE 7100 was chosen due to its accessibility and the equipment
configurations that were available.
The possible lack of control of the particulate contaminant and the presence of rust
increase the possibility of a particle impact ignition mechanism being present in such an oxygen
system. An evaluation of the possibility of particle impact ignition in the subject oxygen system
was recommended to ensure that a credible fire hazard did not exist. If particles too few or too
small exist after the cleaning process to produce a credible particle impact ignition source, the
cleaning process tested in this paper could be used to maintain this oxygen system. The cleaning
process tested in this paper could be used to maintain oxygen systems if it were determined that
this process produced particles too few or too small to create a credible particle impact ignition
source.
Conclusion
With proper cleaning procedures that incorporate contamination control principles, a
cleanliness level of 300A is possible to quantitatively achieve in a field shop environment.
However, the consistency of cleanliness parameters met cannot compare to those achieved in a
production precision cleaning facility. With the joint understanding of oxygen and contamination
control, one can determine if such field cleaning can meet the requirements to maintain a safe
oxygen system.
15 JOURNAL OF ASTM INTERNATIONAL
References
[1] ASTM G93. Standard Practice for Cleaning Methods and Cleanliness Levels for Material
and Equipment Used in Oxygen-Enriched Environments. American Society for Testing and
Materials, West Conshohocken, PA, 2003.
[2] NASA JPR5322.1G. Contamination Control Requirements Manual. NASA Johnson Space
Center Procedural Requirements. Houston, TX, 2009.
16 JOURNAL OF ASTM INTERNATIONAL
TABLE 1—Cleanliness levels (per NASA JPR 5322.1G). What is
Measured Units Comparable
to: Level Requirements to Pass :
Number of particles & size of particles
Particles & micrometers (μ)
Human hair =50 to 120 μ
300 Range (µm) <100 100-250 250-300 >300 Max allow count unlimited 93 3 0
200 Range (µm) <50 50-100 101-200 >200 Max allow count unlimited 154 16 0
100 Range (µm) <25 25-50 51-100 >100 Max allow count unlimited 68 11 0
Nonvolatile residue (oils, grease)
miligrams (mg)
Feather ≈ 1 mg
A < 1 mg/m2 B < 2 mg/m2 C < 3 mg/m2 D < 4 mg/m2
TABLE 2— Test groups.
Group name Group Member
discription and ID # Group Discription
Trial Group Engineer 1 Followed a procedure #1 and performed
cleaning in a non controlled environment. Engineer 2 Engineer 3
Test Group 1 Cleaning technician 1
Followed a procedure #2 and performed cleaning in a controlled shop environment.
Cleaning technician 2 Cleaning technician 3
Test Group 2 Co-op student 1 Co-op student 2 Co-op student 3
Test Group 3 Engineer 1 Engineer2 Engineer 4
17 JOURNAL OF ASTM INTERNATIONAL
TABLE 3—Contamination process.
Test Article Steps taken for Contamination of Test Articles
Plates:
Initial condition: Shear-break edges, no special protection, visually similar 1 Fingerprints: Flip & grip 10 times per each of 5 people 2 Lip balm: Smear on ( one long swipe on both sides near edge A) 3 Krytox® lubricant: Dab & smear ( one long swipe on both sides near edge B) 4 Lotion: Small dab & smear (one long swipe on both sides near edge C) 5 Oil: 3 drops & smear (one long swipe on both sides near edge D) 6 Metal powder: Dust (like salt) entire surface 7 Sand: Dust ( like salt) entire surface 8 Bag (unsealed)
Oxygen Bottle
Initial condition: As received from customer, uncapped, no gross contamination, oil residue on threads. After first cleaning some rust was seen in bottle
1 Krytox® lubricant: Small dab on threads, insert/remove fitting 2 Oil: 5 drops inside (from last thread to drip into bottle) 3 Metal powder: Drop 1 spatula of powder inside & shake 4 Sand: Drop 1 spatula of sand inside and shake 5 Bag ( unsealed)
Valve
Initial condition: Cleaned 200A , opened, disassembled 1 Fingerprints: Flip & grip 10 times per each of 5 people 2 Krytox® lubricant: Lube initial parts, reinsert and remove 3 Oil: 3 drops and shake 4 Metal powder: Drop ~ 2 mL of powder inside and shake 5 Sand: Drop ~2 mL of sand inside and shake 6 Teflon tape: Wrap threads with Teflon tape, insert and remove fitting 7 Bag (unsealed)
18 JOURNAL OF ASTM INTERNATIONAL
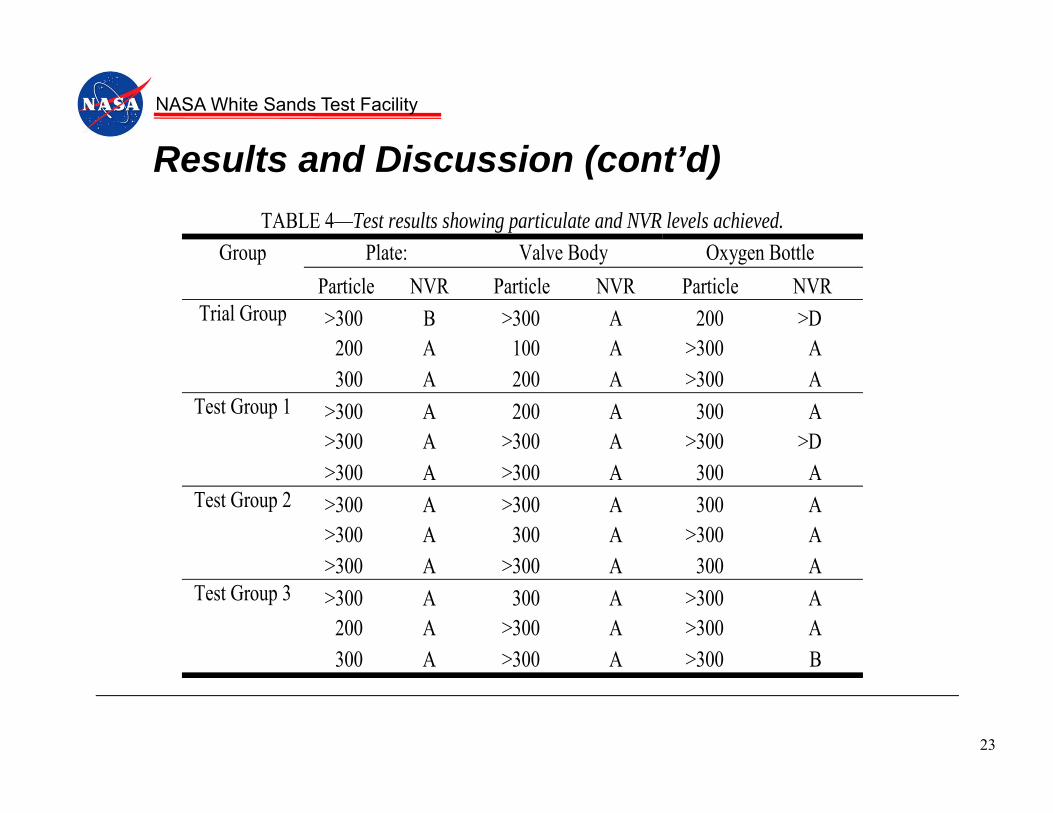
TABLE 4—Test results showing particulate and NVR levels achieved. Group Plate: Valve Body Oxygen Bottle
Particle NVR Particle NVR Particle NVR
Trial Group >300 B >300 A 200 >D 200 A 100 A >300 A 300 A 200 A >300 A
Test Group 1 >300 A 200 A 300 A >300 A >300 A >300 >D >300 A >300 A 300 A
Test Group 2 >300 A >300 A 300 A >300 A 300 A >300 A >300 A >300 A 300 A
Test Group 3 >300 A 300 A >300 A 200 A >300 A >300 A 300 A >300 A >300 B
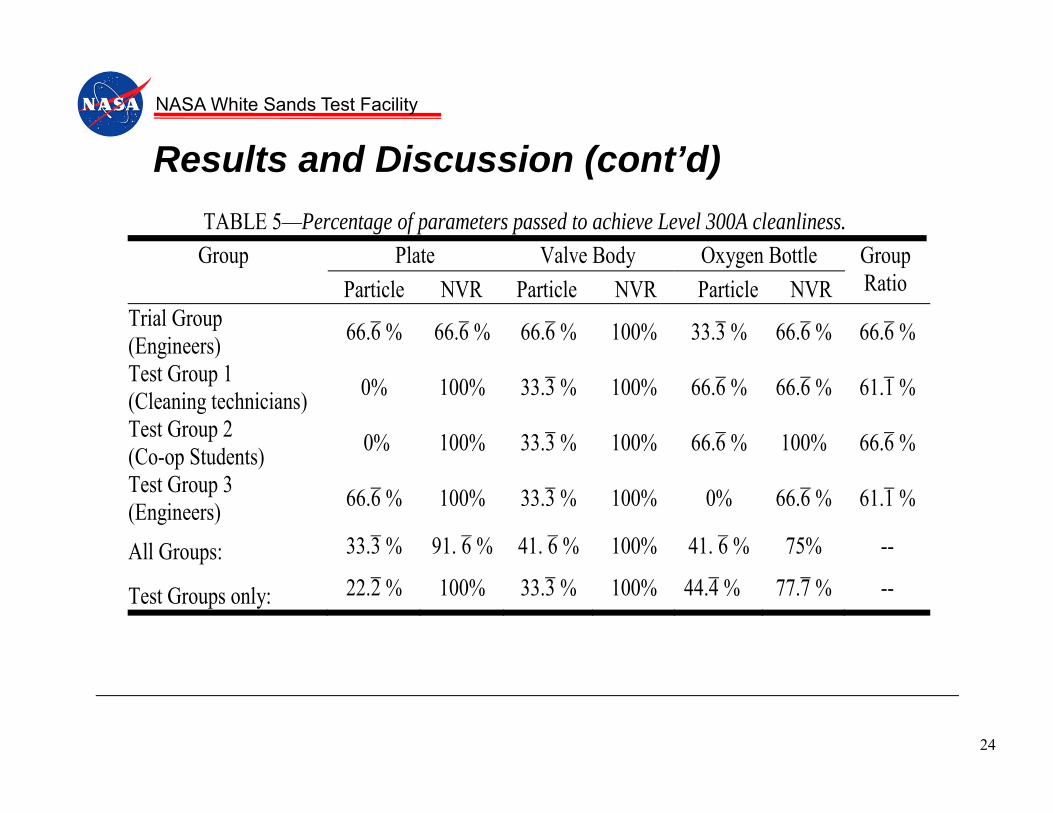
TABLE 5—Ratio of parameters passed to achieve Level 300A cleanliness. Group Plate Valve Body Oxygen Bottle Group
Ratio Particle NVR Particle NVR Particle NVR Trial Group (Engineers) 2/3 2/3 2/3 3/3 1/3 2/3 12/18
Test Group 1 (Cleaning technicians) 0/3 3/3 1/3 3/3 2/3 2/3 11/18
Test Group 2 (Co-op Students) 0/3 3/3 1/3 3/3 2/3 3/3 12/18
Test Group 3 (Engineers) 2/3 3/3 1/3 3/3 0/3 2/3 11/18
All Groups: 4/12 11/12 5/12 12/12 5/12 9/12 Test Groups only: 2/9 9/9 3/9 9/9 4/9 7/9
19 JOURNAL OF ASTM INTERNATIONAL
FIG. 1—Test articles representing parts of the oxygen system.
FIG. 2— Contaminants were chosen for likelihood to be used in the field.
FIG. 3— Cleaning supplies and tools.
1
NASA White Sands Test Facility
Rudimentary Cleaning Compared to Level 300A
Christina Y. Piña Arpin and Joel StoltzfusNASA Johnson Space Center
White Sands Test Facility
NASA White Sands Test Facility
2
Introduction
• Contamination control is critical to mitigate risks of ignition in oxygen enriched environments.
• Oxygen system hardware must be cleaned and maintained to prevent a fire hazard.
• Some situations, such as field combat operations, do not allow sending hardware to a precision cleaning facility.
• This study measured the effectiveness of basic, rudimentary shop cleaning compared to Level 300A.
NASA White Sands Test Facility
3
Introduction (cont’d)
• While developing cleaning procedures that could be used in the field, two important questions came up: – What effect does the personnel cleaning the equipment have
on the hardware’s end cleanliness level?– What level of cleanliness could be realistically achieved?
• This study compares three groups of people using rudimentary cleaning techniques to find out what level of cleanliness can be reasonably achieved in a controlled shop environment (an access controlled room with high air flow and sticky mats at each entrance).– Environmental conditions were not considered in this study.
NASA White Sands Test Facility
4
Precision Cleaning
• Precision cleaning, as typically performed by NASA White Sands Test Facility (WSTF) in compliance with both ASTM G93 and NASA JPR5322.1G, is a three part process: – Pre-cleaning– Visual inspection – Cleanliness verification
NASA White Sands Test Facility
5
Precision Cleaning (cont’d)
• Pre-cleaning– Detailed cleaning is performed in a controlled shop
environment.– A series of ultrasonic baths create implosions to agitate
contaminants on immersed hardware.– Hardware-compatible solutions used are either surfactant,
mild alkaline, or caustic acid.– Hardware contaminants are manually agitated between
baths.– Hardware is dried using a nitrogen-purged oven.– Hardware is passed on to another individual for visual
inspection.
NASA White Sands Test Facility
6
Precision Cleaning (cont’d)
• Visual Inspection– Hardware is kept under a downflow unit to maintain its
cleanliness.
• Cleanliness Verification– A third person, trained to detect hardware anomalies, verifies
the hardware cleanliness.– Inspection uses an otoscope and magnifying fluorescent
inspection lamp with 5-diopter lens.– No particles/fibers can be visible, nor signs of rust,
discoloration, or water spots. – After passing visual inspection, hardware is sent to ISO
Class 5 clean room for final cleaning and cleanliness verification.
NASA White Sands Test Facility
7
Precision Cleaning (cont’d)
• Class 5 Clean Room – Full clean-room garments (coveralls, head hood and boot
covers, gloves) are used.– Final cleaning is with a solvent rinse.– Cleanliness verification
• Rinse solvent is captured for analysis per ASTM G93-03.• Rinse solvent is strained through membrane filter for particle
count (ASTM F312-08).• Solvent is evaporated, and the remaining nonvolatile residue
• The count and size of particles are given a number (the smaller the number the cleaner the part).
• The amount of NVR per square meter of hardware is given a letter (e.g., “A” is cleaner than “B”).
• Assignment of particle size/count numbers and NVR letters is specified by NASA JPR 5322.1G, as shown in Table 1.
NASA White Sands Test Facility
9
Precision Cleaning (cont’d)
TABLE 1—Cleanliness levels (per NASA JPR 5322.1G).
What is Measured
Units Comparable to:
Level Requirements to Pass :
Number of particles & size of particles
Particles & micrometers (μm)
Human hair =50 to 120 μ
300 Range (µm) <100 100-250 250-300 >300 Max allow count unlimited 93 3 0
200 Range (µm) <50 50-100 101-200 >200 Max allow count unlimited 154 16 0
100 Range (µm) <25 25-50 51-100 >100 Max allow count unlimited 68 11 0
Nonvolatile residue (oils, grease)
milligrams (mg)
Feather ≈ 1 mg
A < 1 mg/m2 B < 2 mg/m2 C < 3 mg/m2 D < 4 mg/m2
NASA White Sands Test Facility
10
Methodology
• Test Articles– Three identical sets of three items were chosen to represent
parts of a typical oxygen system:• Aluminum plate, 6 x 6 x 0.125 in. (15 x 15 x 0.l3 cm)• Cast stainless steel (SS) ball valve body, 0.25 in. (0.6 cm)• Small oxygen storage bottle
NASA White Sands Test Facility
11
Methodology (cont’d)
• Contaminants– Contaminants chosen were representative of materials that
could contaminate the system during use or be found in a field shop:
• Oil• Lubricant• Metal shavings/powder• Sand• Fingerprints• Tape• Lip balm• Hand lotion
NASA White Sands Test Facility
12
Methodology (cont’d)
• Test Groups of 3 people each (see Table 2)– Trial group: Engineers from the WSTF Oxygen Team
• The Trial Group is not considered one of the test groups due to changes in the written procedure and test location.
– Three test groups: Represented three sets of knowledge• Group 1 – Clean room technicians• Group 2 – Co-op students, no prior knowledge of cleaning
oxygen system hardware • Group 3 – WSTF Oxygen Team engineers with detailed
technical knowledge of the importance of cleaning hardware for oxygen service (Two of these three had also participated in the Trial Group.)
‒ Each group received a briefing on the cleaning procedure, similar to that for field personnel.
NASA White Sands Test Facility
13
Methodology (cont’d)
TABLE 2—Test groups.
Group name Group Member
description and ID # Group Description
Trial Group Engineer 1 Followed a procedure #1 and performed
cleaning in a non-controlled environment. Engineer 2 Engineer 3
Test Group 1 Cleaning technician 1
Followed a procedure #2 and performed cleaning in a controlled shop environment.
Cleaning technician 2 Cleaning technician 3
Test Group 2 Co-op student 1 Co-op student 2 Co-op student 3
Test Group 3 Engineer 1 Engineer2 Engineer 4
NASA White Sands Test Facility
14
Methodology (cont’d)
• Equipment– Items are those commonly available in an oxygen field shop.– Use of items requires minimum training.– Test Groups 1 – 3 were supplied with the following:
• Set of written procedures• Stiff black nylon-bristle SS-handle cleaning brushes, various sizes
(diameters 0.75, 0.5, and 0.375 in. (1.9, 1.3, and 1.0 cm)• A 3-row nylon bristle Delrin handle cleaning brush• Scouring pads, Nitrilite gloves, and lint free wipes (Kimwipes)• Otoscope• Fluorescent inspection lamp with 5-diopter lens• Spray nozzle for 125 °F (52 °C) hot deionized (DI) water• Filtered gaseous nitrogen at 65 psig (0.45 mPa)• Three plastic basins filled with aqueous degreaser (Simple Green)
NASA White Sands Test Facility
15
Methodology (cont’d)Cleaning Supplies and Tools
NASA White Sands Test Facility
16
Methodology (cont’d)
• Environment– Trial Group: SS sink, domestic hot water, table-top surface.– Groups 1 – 3: SS work top in WSTF pre-clean room, which
is a controlled shop environment with higher-than-normal air exchange, sticky mats at each entrance; smock is worn over street clothes.
• Each type of test article was uniformly contaminated.• Identical recommended cleaning procedures were
given to the three test groups.
NASA White Sands Test Facility
17
Experimental Procedure
• Test articles were verified to be at a similar level of cleanliness, and initial condition was noted.
• Test articles were contaminated according to a process (Table 3) so that they were all similarly soiled.
• The three individuals in each test group were provided with a set of identical cleaning supplies and a set of contaminated test articles.
NASA White Sands Test Facility
18
TABLE 3—Contamination process.
Test Article Steps taken for Contamination of Test Articles
Plates:
Initial condition: Shear-break edges, no special protection, visually similar 1 Fingerprints: Flip & grip 10 times per each of 5 people 2 Lip balm: Smear on ( one long swipe on both sides near edge A) 3 Krytox® lubricant: Dab & smear ( one long swipe on both sides near edge B) 4 Lotion: Small dab & smear (one long swipe on both sides near edge C) 5 Oil: 3 drops & smear (one long swipe on both sides near edge D) 6 Metal powder: Dust (like salt) entire surface 7 Sand: Dust ( like salt) entire surface 8 Bag (unsealed)
Oxygen Bottle
Initial condition: As received from customer, uncapped, no gross contamination, oil residue on threads. After first cleaning some rust was seen in bottle
1 Krytox® lubricant: Small dab on threads, insert/remove fitting 2 Oil: 5 drops inside (from last thread to drip into bottle) 3 Metal powder: Drop 1 spatula of powder inside & shake 4 Sand: Drop 1 spatula of sand inside and shake 5 Bag (unsealed)
Valve
Initial condition: Cleaned 200A , opened, disassembled 1 Fingerprints: Flip & grip 10 times per each of 5 people 2 Krytox® lubricant: Lube initial parts, reinsert and remove 3 Oil: 3 drops and shake 4 Metal powder: Drop ~ 2 mL of powder inside and shake 5 Sand: Drop ~2 mL of sand inside and shake 6 Teflon® tape: Wrap threads with Teflon® tape, insert and remove fitting 7 Bag (unsealed)
NASA White Sands Test Facility
19
Experimental Procedure (cont’d)
• Each person cleaned their three items following the recommended cleaning process and using only the supplied set of tools.
• Each individual’s cleaned test articles were sampled using HFE 7100 by a WSTF clean room technician (not in a test group) to measure the amount of particulate and NVR.
NASA White Sands Test Facility
20
Experimental Procedure (cont’d)
• Sample Collection– The verification process was performed in the WSTF pre-
clean room using a 40 – 60 psig (0.3 – 0.4 mPa) rated pressure vessel with attached spray wand to rinse the components.
– A clean room technician rinsed each test article with 100 mLof HFE 7100, which was then collected and filtered through a 0.45-µm membrane filter.
– The membrane and the remaining HFE 7100 sample were sent to the WSTF Chem Lab for particle count and NVR analysis.
NASA White Sands Test Facility
21
Experimental Procedure (cont’d)
• Analysis of Data– Each cleaned component was evaluated on a pass/fail basis
for particulate cleanliness and NVR cleanliness, and compared against the target 300A criteria (JPR 5322.1G; Table 1).
• Both of these cleanliness parameters are adequate to reduce fire hazards in the subject oxygen system.
– Focus was on the quantitative analysis of cleanliness. The normal visual inspection pass/fail parameters for precision cleaning were not considered in this study.
– Performance of a test group was ranked by the rate of passing results (x parts of 9 per group).
• Passing = achieving Level 300
NASA White Sands Test Facility
22
Results and Discussion
• Table 4 shows the level of cleanliness reached by each individual in each of the groups.
• Each of the groups achieved similar success rates (see Table 5).
• Outcome suggests that results are not dependent upon age, experience, technical training, or prior knowledge of oxygen hazards.
• Results indicate that the instructions were adequate to produce consistent results, and special training does not produce improved cleaning results.
NASA White Sands Test Facility
23
Results and Discussion (cont’d)TABLE 4—Test results showing particulate and NVR levels achieved.
Group Plate: Valve Body Oxygen Bottle Particle NVR Particle NVR Particle NVR
Trial Group >300 B >300 A 200 >D 200 A 100 A >300 A 300 A 200 A >300 A
Test Group 1 >300 A 200 A 300 A >300 A >300 A >300 >D >300 A >300 A 300 A
Test Group 2 >300 A >300 A 300 A >300 A 300 A >300 A >300 A >300 A 300 A
Test Group 3 >300 A 300 A >300 A 200 A >300 A >300 A 300 A >300 A >300 B
NASA White Sands Test Facility
24
Results and Discussion (cont’d)TABLE 5—Percentage of parameters passed to achieve Level 300A cleanliness.
Group Plate Valve Body Oxygen Bottle Group Ratio Particle NVR Particle NVR Particle NVR
Test Groups only: 22.2̄ % 100% 33.3̄ % 100% 44.4̄ % 77.7̄ % --
NASA White Sands Test Facility
25
Results and Discussion (cont’d)
• NVR levels were met much more frequently than particulate levels.– 93% NVR samples passed Level 300, vs. 33% particulate
samples.– Consistency between the test groups indicates that efficacy
of the procedure is relatively independent of prior knowledge of oxygen hazards, cleaning experience, and education.
– The implication is that it is much easier to remove the NVR (e.g., oil, lip balm, lubricant, fingerprints) than to remove particulate contaminant (e.g., particles and fibers).
NASA White Sands Test Facility
26
Results and Discussion (cont’d)
• The oxygen bottle was the most difficult item from which to remove the NVR.– Special training emphasis should be placed on how to clean
the inside of the bottle.– Vessels showed signs of rust after cleaning by all test
groups (including the Trial Group). The rust would have been mitigated in a standard precision cleaning process in order to pass visual inspection.
– Used because of its availability, HFE 7100 is not as aggressive as AK225®, normally used to validate a cleaning process.
NASA White Sands Test Facility
27
Results and Discussion (cont’d)
• The possible lack of control of particulate contamination and the presence of rust increase the possibility of a particle impact ignition mechanism being present.– An evaluation of the possibility of particle impact ignition in
the subject oxygen system was recommended.– The rudimentary cleaning process tested could be used to
maintain oxygen systems if it were determined that the particles were too few or too small to create a credible fire hazard.
NASA White Sands Test Facility
28
Conclusion
• With proper cleaning procedures that incorporate contamination control principles, a cleanliness level of 300A is possible to quantitatively achieve in a field shop environment.
• The consistency of cleanliness parameters met cannot compare to those achieved in a precision cleaning facility,
• With the joint understanding of oxygen and contamination control, one can determine if such field cleaning can meet the requirements to maintain a safe oxygen system.
NASA White Sands Test Facility
29
References
– ASTM G93. Standard Practice for Cleaning Methods and Cleanliness Levels for Material and Equipment Used in Oxygen-Enriched Environments. ASTM International, West Conshohocken, PA, 2003.
– NASA JPR5322.1G. Contamination Control Requirements Manual.NASA Johnson Space Center Procedural Requirements. Houston, TX, 2009.
– ASTM F312. Standard Test Methods for Microscopical Sizing and Counting Particles from Aerospace Fluids on Membrane Filters. ASTM International, West Conshohocken, PA, 2008.
– ASTM F331. Standard Test Method for Nonvolatile Residue of Solvent Extract from Aerospace Components (Using Flash Evaporator). ASTM International, West Conshohocken, PA, 2005.
Recommended Rudimentary Procedures
Equipment Water— Hot DI water, with a high pressure wand or nozzle. If DI water is not available,
use the cleanest available water supply. Note: In all cases, warmer and cleaner water is better. If gloves can be worn to enable the water temperature to be higher, that is a favorable practice. Warm or hot water cuts grease and dissolves oil deposits far better than cool or cold water.
Pans— Metal pans to contain cleaning solutions and rinse water. If metal pans are not available, plastic pans may be used.
Brushes— Clean brushes in a variety of sizes and shapes to fit small crevices and reach all ends (e.g., spiral brush, end brush, bottle brushes, toothbrush-style brush), nonmetallic scouring pads. Warning: Ensure that the brushes will not damage the hardware to be cleaned. Warning: Do not use metallic scouring pads because they shed particles that can either rust or become imbedded in softer materials, or both. Note: Brush or tool extensions can be fabricated, if necessary, to enable physical scrubbing of parts that are otherwise inaccessible.
Soap— Soap with no moisturizers or scents added (e.g., Simple Green). If unavailable, use dish soap.
Gloves— Nylon or Nitrilite gloves that tend not to shed particulate. If non-shedding gloves are not available, use rubber gloves.
Rags— Lint free cloth or paper wipes (e.g., Kimwipes), cotton cloth.
Inspection Tools—
Magnifying glass, flashlight, otoscope (can be used for looking inside vessels and components), fluorescent lamp with magnifying glass, bright light source.
Work Surface and Washing Station—
Work surface and washing station that are located near one another. Metal surface that can be wiped clean or a visually clean plastic or paper sheet to cover work surface. Note: The work surface will be used to locate items that must be kept clean during the process such as clean brushes, wipes, bags, and gloves, as well as provide a location that clean items can be located while preparing for bagging after the cleaning process is complete. Finally, the work surface will be used for disassembly and re-assembly of components.
General Procedure Prepare Workplace—
Choose a work area that is somewhat controlled to avoid open access and to minimize contamination. Get all supplies and tools together before beginning the cleaning process to avoid delays once the cleaning process is underway. Wipe down the metal work surface or place a clean plastic sheet or clean paper on the work surface.
Ensure that the work surface remains visually clean during the disassembly and cleaning processes.
If necessary, wipe down the work surface to ensure that contamination from one item does not get transferred to other items.
Set up a series of wash/rinse pans.
Wash pans should progress from less to more clean. For example, the first pan might contain hot, soapy water for pre-
cleaning and soaking dirtier items. The second pan might contain hot, soapy water for scrubbing cleaner items. The third pan might be for initial rinsing, and the fourth pan might contain clean, hot water for final rinsing.
Change out the water in each pan as required when it becomes dirty.
Disassemble– Completely disassemble the component so that all crevices and internal surfaces
are as accessible as possible. Note: Each part must be cleaned separately, in a disassembled configuration. If they are not, the effectiveness of the cleaning procedure will be significantly reduced. Parts that are not removed provide crevices and cracks that will retain contaminants and it will not be possible to clean the adjoining surfaces of the parts.
Pre-clean— Remove excessive contamination. Wipe the component. Discard the soiled wipes. Continue this process until as much visible contamination is
removed as possible.
Wash— Soak item in hot (the hotter, the better) soapy water as needed to loosen contaminant from surfaces.
If item is a tank or a bottle, fill it with soapy water until it is overflowing, then let it soak.
Scrub/agitate the part thoroughly.
Use brushes, wetted Kimwipes, or cotton cloth. Pay special attention to threads, crevices, and hidden surfaces that,
because of their configuration, can trap contaminants. If internal surfaces cannot be scrubbed mechanically, then spray the
inaccessible areas. If scrubbing or spraying are not possible, fill the item with hot, soapy water, plug the holes, and shake it vigorously.
Note: Ensure that many suds are formed during the washing process; if there are few suds, then add more water and soap. If suds don’t form, it indicates that all the oil contamination is not captured by the surfactant.
Change the wash water, add soap, and repeat the washing process twice for a total of three washes.
Note: This procedure amounts to very rigorous dishwashing with very careful attention given to detail and precision. The hotter and soapier the water the better. The repetitions ensure that the surface is thoroughly cleaned and that layered contamination is wetted, agitated, and removed.
Rinse— Rinse item thoroughly to remove soap and contaminant. Dunk and spray item with clean hot water as needed to remove all
visible residues. If item is a bottle, then fill, shake, and empty the water until no suds
are left and the water coming out is as clear as water going in. Note: Gloves should be rinsed often to remove contaminants and particles obtained by touching contaminated parts. If a particle can be transferred to a cleaned part by physical contact, it is very likely that it can be rinsed off. Rinse it off prior to touching the parts. Inspect rinse water.
Catch the last rinse water in clear container. Look for particles or grease in the water using a magnifying glass and by
shining a bright white light through the water If no particles are present or grease is observed on the surface (as a
colorful sheen) and the water is as clear as it was from the source, move on to drying; if not, repeat the wash and rinse steps.
Note: When washing carbon steel components like the oxygen bottles, perform the final rinse with cold water and then dry immediately. The combined effects of cooling the carbon steel surface and drying it quickly will inhibit as much as possible the formation of rust.
Dry— Blow dry. Use oil-free, filtered GN2 or air if available. If filtered gasses are not available, use filtered compressed or canned air.
Note: It is preferable to dry parts quickly, removing all water droplets, to avoid deposits of water-borne contaminants (water spots). Air dry.
Set aside in a clean, isolated area to air dry. Wipe dry.
If water droplets remain, they can be carefully removed using clean, folded Kimwipes.
Inspect— Inspect item to verify cleanliness.
Visually inspect, using magnification if available, all surfaces using the most intense light available.
Take care to inspect small crevasses, threads, and holes. If any discoloration, water deposits, soap residue, or particulate are
observed, remove it. If necessary, repeat the wash and rinse steps.


![Rudimentary Beth Models and Conditionally …kosta/Dosen radovi/[P][27] Rudimentary Beth...Rudimentary Beth Models and Conditionally Rudimentary Kripke Models for the Heyting Propositional](https://static.documents.pub/doc/80x56/5b23d1ea7f8b9a3e2c8b7f44/rudimentary-beth-models-and-conditionally-kostadosen-radovip27-rudimentary.jpg)


