RYAN’S BASING AND PAINTING TECHNIQUES Hello everyone. Over the years I have collected various ideas from different people and used some of my own to come up with this basing and painting technique. I find the results to be visually pleasing and provides a very strong, solid and practical way of basing. So I am sharing with you my way of doing things and perhaps you’ll combine it with your own innovations to customize your troops the way you need it done. I call this Ryan’s basing and painting techniques because they are the ones I use, not because I invented them all. Unfortunately, I don’t remember the sources of all my ideas over the years, but I’d like to thank those that shared and, in turn, share what I know with you. (Fig. 1) Here, 1mm or .032” brass is cut to size with a jeweller’s saw. I find one can get a much more accurate cut than with a hack saw. Jeweller’s saws can be used for wood and plastic as well to cut very fine and intricate patterns. A tutorial on cutting with a jeweller’s saw can be seen at this Youtube link: http://www.youtube.com/watch?v=iDI6PJBB3VM. It is important that you follow the technique or you will break many blades and likely use various colourful adjectives to express your frustration. Jeweller’s saws and blades can be purchased in jeweller’s supplies stores. In Canada you can buy one online at Lacey and Co. in Toronto (or go to the store on Queen Street if you are in the area). In the States you can buy one online at Grobe’s. Number 2 blades should be adequate. Sorry everyone in Europe and Asia, I don’t know the companies that sell jeweller’s supplies, but a quick internet search should yield the results you want. If you are in Germany and near the city of Pforzheim, they have a few excellent jewellery supply stores. For those of you who don’t have much experience filing metal, I was actually unable to find a good Youtube video where people were filing correctly. File in one direction, the direction in which the file’s tooth cuts the metal. Don’t go back-and-fourth as if you were sanding, you’ll just make your file go dull more quickly. You can go back-and-fourth if you put no pressure on the back stroke, but I find you have a more controlled stroke going one direction.
Transcript
RYAN’S BASING AND PAINTING TECHNIQUES
Hello everyone. Over the years I have collected various ideas from different people and used some of my own to come up with this basing and painting technique. I fi nd the results to be visually pleasing and provides a very strong, solid and practical way of basing. So I am sharing with you my way of doing things and perhaps you’ll combine it with your own innovations to customize your troops the way you need it done. I call this Ryan’s basing and painting techniques because they are the ones I use, not because I invented them all. Unfortunately, I don’t remember the sources of all my ideas over the years, but I’d like to thank those that shared and, in turn, share what I know with you.
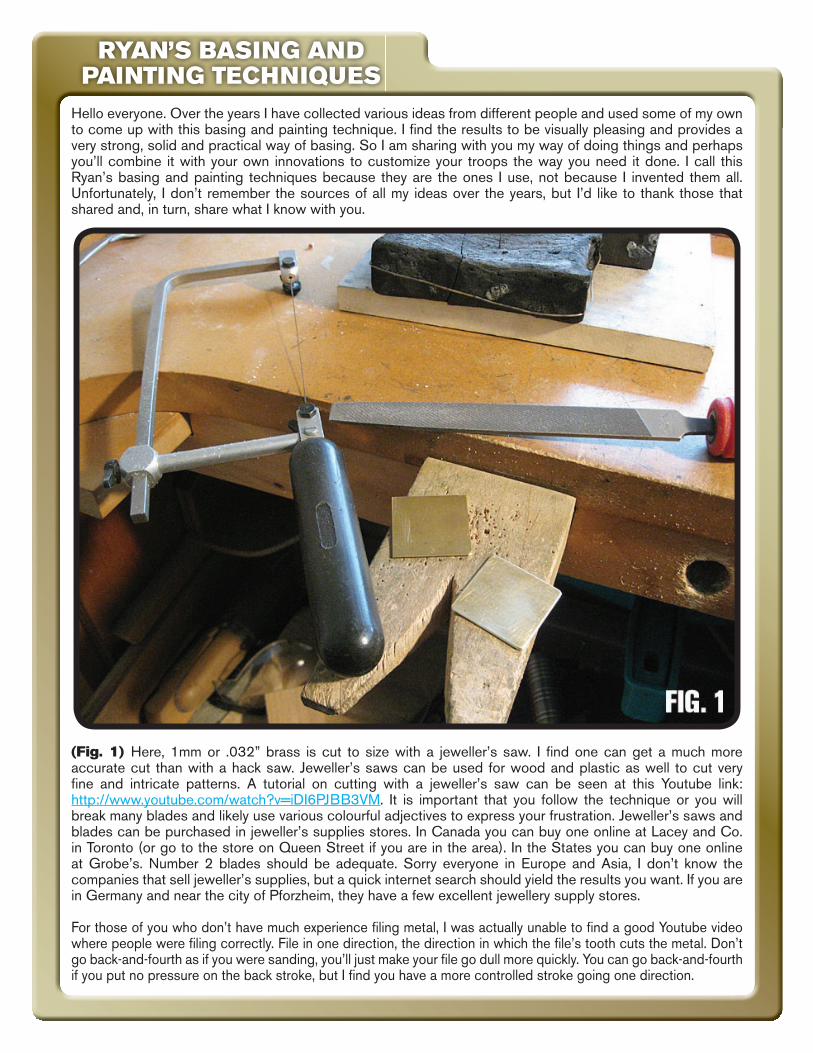
(Fig. 1) Here, 1mm or .032” brass is cut to size with a jeweller’s saw. I fi nd one can get a much more accurate cut than with a hack saw. Jeweller’s saws can be used for wood and plastic as well to cut very fi ne and intricate patterns. A tutorial on cutting with a jeweller’s saw can be seen at this Youtube link: http://www.youtube.com/watch?v=iDI6PJBB3VM. It is important that you follow the technique or you will break many blades and likely use various colourful adjectives to express your frustration. Jeweller’s saws and blades can be purchased in jeweller’s supplies stores. In Canada you can buy one online at Lacey and Co. in Toronto (or go to the store on Queen Street if you are in the area). In the States you can buy one online at Grobe’s. Number 2 blades should be adequate. Sorry everyone in Europe and Asia, I don’t know the companies that sell jeweller’s supplies, but a quick internet search should yield the results you want. If you are in Germany and near the city of Pforzheim, they have a few excellent jewellery supply stores.
For those of you who don’t have much experience fi ling metal, I was actually unable to fi nd a good Youtube video where people were fi ling correctly. File in one direction, the direction in which the fi le’s tooth cuts the metal. Don’t go back-and-fourth as if you were sanding, you’ll just make your fi le go dull more quickly. You can go back-and-fourth if you put no pressure on the back stroke, but I fi nd you have a more controlled stroke going one direction.
Brass can be purchased at a hobby store or one can get off-cuts, sometimes for free, at a sheet metal supply store. Cut it to the size and shape you want your base. With the jeweller’s saw all shapes can be easily achieved. File the edges nice and smooth. If you have a square-shaped base, like mine, round the corners with the fi le (unless you are a poor sport and want to use your sharp cornered troop bases to exact revenge). Then, holding the fi le at 45 degrees or thereabouts, bevel the edge to reduce the sharpness. It is more visually pleasing as well.
In fi g.1 you can see an example of a jeweller’s saw. The youtube video demonstrates how to install the blades. You can see on the base closest to you how I rounded the corners and bevelled the edges with the fi le. Behind it is a freshly cut base. I have made the edges nice and straight and have begun rounding the corners. It’s a very fast process with some practice.
(Fig. 2) This is a close-up of the bases once fi led and bevelled. Roughen the surface with emery cloth to prepare it for a primer coat.
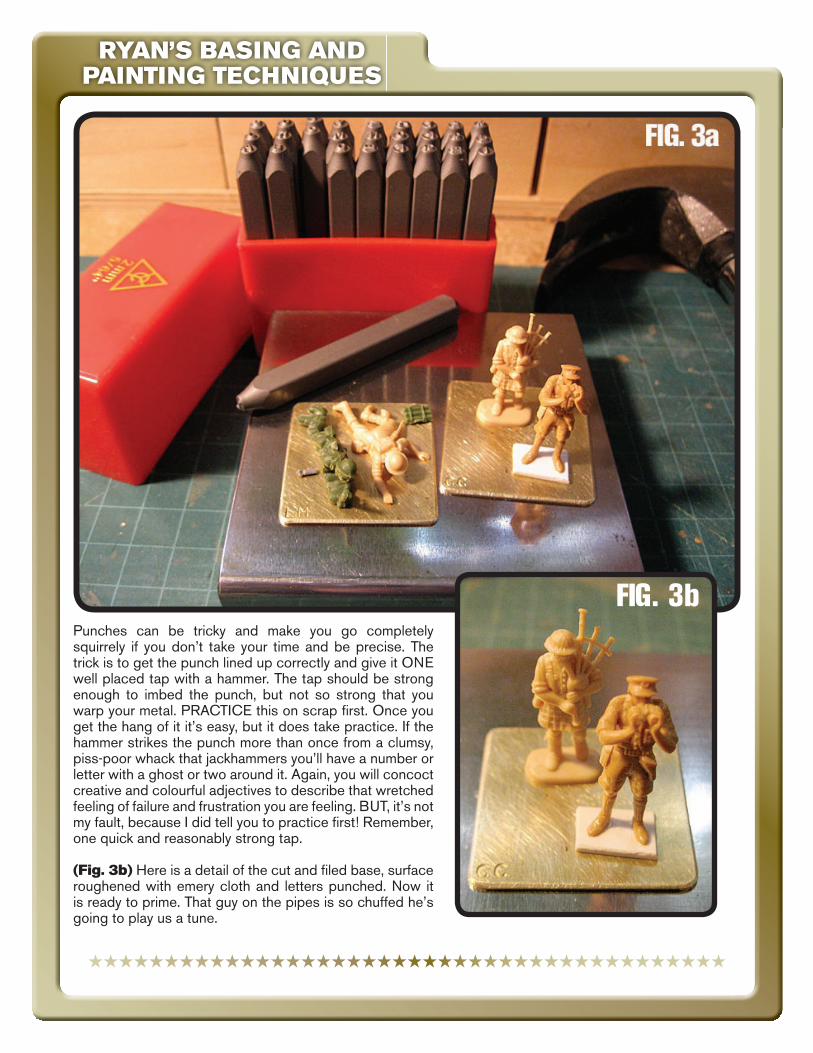
(Fig. 3a) To mark my bases, I use metal punches. These can be bought where jeweller’s supplies are available or at a wood working store. I got mine at Lee Valley. There are letters, numbers and shapes available, which give you a diverse choice on how to mark your bases. I use both letters and numbers to base for Crossfi re. Numbers for platoon and section, colours for company, and letters for company commanders, platoon commanders, machine gun sections, light mortars and forward observers. Here we have a light mortar (easier and more space effi cient than punching “2 in mortar”) and company commander.
RYAN’S BASING AND PAINTING TECHNIQUES
★★★★★★★★★★★★★★★★★★★★★★★★★★★★★★★★★★★★★★★★★★
★★★★★★★★★★★★★★★★★★★★★★★★★★★★★★★★★★★★★★★★★★
Punches can be tricky and make you go completely squirrely if you don’t take your time and be precise. The trick is to get the punch lined up correctly and give it ONE well placed tap with a hammer. The tap should be strong enough to imbed the punch, but not so strong that you warp your metal. PRACTICE this on scrap fi rst. Once you get the hang of it it’s easy, but it does take practice. If the hammer strikes the punch more than once from a clumsy, piss-poor whack that jackhammers you’ll have a number or letter with a ghost or two around it. Again, you will concoct creative and colourful adjectives to describe that wretched feeling of failure and frustration you are feeling. BUT, it’s not my fault, because I did tell you to practice fi rst! Remember, one quick and reasonably strong tap.
(Fig. 3b) Here is a detail of the cut and fi led base, surface roughened with emery cloth and letters punched. Now it is ready to prime. That guy on the pipes is so chuffed he’s going to play us a tune.
RYAN’S BASING AND PAINTING TECHNIQUES
★★★★★★★★★★★★★★★★★★★★★★★★★★★★★★★★★★★★★★★★★★
FIG. 3b
(Fig. 4a) For the next step, I give the base a coat of white spray primer on one side. Grey can be used too, it’s all personal preference. I’m not fussy about the primer either, whatever is cheapest and good for metal works. The primer provides a better surface for the ground work which will go on later. Also, I fi nd the chemicals in some acrylic products I use brings out the green copper oxide in the brass. This coat prevents that from happening. On the other side, I stick adhesive magnet. I forget where I got this idea, if it was yours, thanks! With a magnetized bottom, fi gures can be stored in metal cookie tins or any metal box, for that matter. This is such a safe and excellent way for protecting and storing your troops, tanks and guns.
(Fig. 4b) A company of Italian Bersaglieri safely stored in a metal box. The magnetic bottom prevents them from sliding around and colliding with one-another. I base tanks and artillery in the same way. Aside from the magnets, the weight of the brass bases makes it likely that in the event of a drop, the soldiers or vehicles will land on base-down as opposed to upside down and smashed to bits. I dropped 3 M13-40 tanks with the only damage being a commander knocked loose.
The little puffs of smoke are used as pin and hit markers for Crossfi re. This was an idea I took from John Moher. They represent small arms and light explosive impacts. They are based in the same way except on round brass discs. I didn’t bevel the edges on them as I am not that masochistic and/or OCD. You can compare the edge on the discs to the edge on the fi gure stands to see if beveling the edge is even an important step to you.
RYAN’S BASING AND PAINTING TECHNIQUES
★★★★★★★★★★
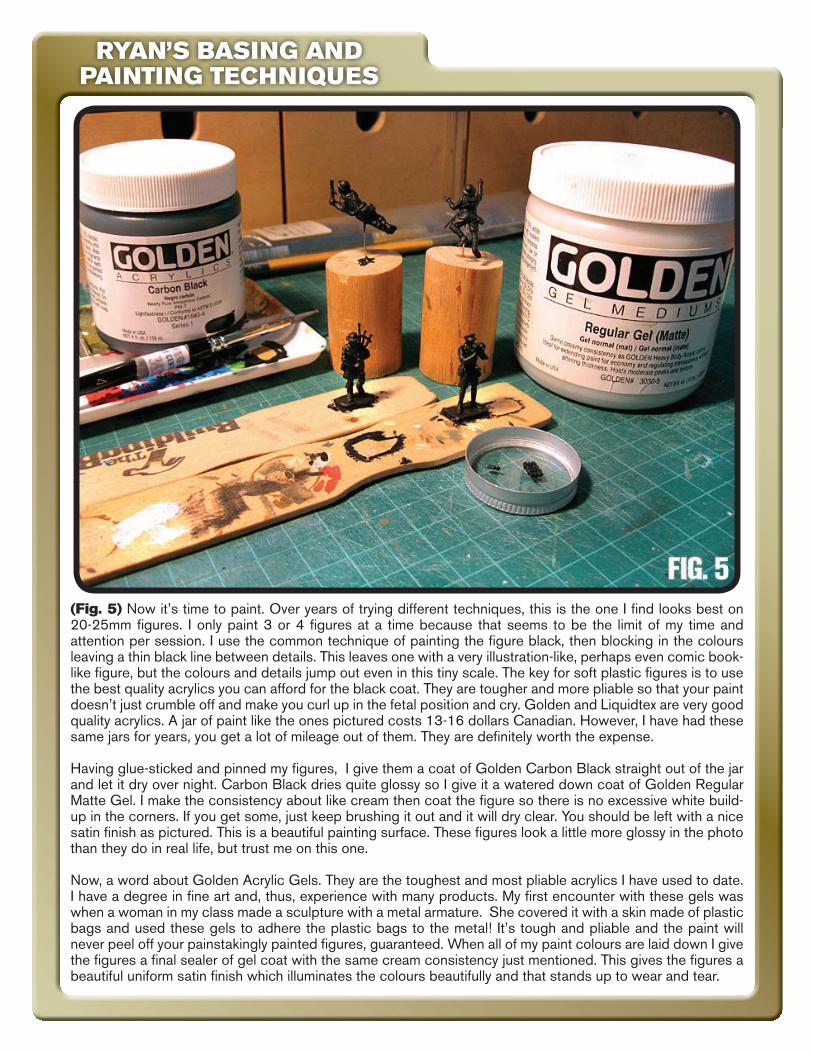
(Fig. 5) Now it’s time to paint. Over years of trying different techniques, this is the one I fi nd looks best on 20-25mm fi gures. I only paint 3 or 4 fi gures at a time because that seems to be the limit of my time and attention per session. I use the common technique of painting the fi gure black, then blocking in the colours leaving a thin black line between details. This leaves one with a very illustration-like, perhaps even comic book-like fi gure, but the colours and details jump out even in this tiny scale. The key for soft plastic fi gures is to use the best quality acrylics you can afford for the black coat. They are tougher and more pliable so that your paint doesn’t just crumble off and make you curl up in the fetal position and cry. Golden and Liquidtex are very good quality acrylics. A jar of paint like the ones pictured costs 13-16 dollars Canadian. However, I have had these same jars for years, you get a lot of mileage out of them. They are defi nitely worth the expense.
Having glue-sticked and pinned my fi gures, I give them a coat of Golden Carbon Black straight out of the jar and let it dry over night. Carbon Black dries quite glossy so I give it a watered down coat of Golden Regular Matte Gel. I make the consistency about like cream then coat the fi gure so there is no excessive white build-up in the corners. If you get some, just keep brushing it out and it will dry clear. You should be left with a nice satin fi nish as pictured. This is a beautiful painting surface. These fi gures look a little more glossy in the photo than they do in real life, but trust me on this one.
Now, a word about Golden Acrylic Gels. They are the toughest and most pliable acrylics I have used to date. I have a degree in fi ne art and, thus, experience with many products. My fi rst encounter with these gels was when a woman in my class made a sculpture with a metal armature. She covered it with a skin made of plastic bags and used these gels to adhere the plastic bags to the metal! It’s tough and pliable and the paint will never peel off your painstakingly painted fi gures, guaranteed. When all of my paint colours are laid down I give the fi gures a fi nal sealer of gel coat with the same cream consistency just mentioned. This gives the fi gures a beautiful uniform satin fi nish which illuminates the colours beautifully and that stands up to wear and tear.
RYAN’S BASING AND PAINTING TECHNIQUES
(Fig. 6) The base colours are blocked in. I use Model Master and Humbrol enamels because I fi nd the paint goes on smoother than with acrylic model paints. Vallejo acrylics are an exception and cover beautifully if you have access to them. Tamiya and Model Master acrylics are great for the airbrush, but I fi nd they are purely wretched for brush painting unless you like a gooey, streaky mess of a fi nish. With the gel undercoat and overcoat the enamels will seal nicely. I know the rule is not to cover enamel with acrylic, but I do it all the time with no issues. Just allow the enamels a good 24 hours to dry before sealing them.
(Fig. 7) Highlights and some shading added where necessary. Use your own judgement as to what looks most pleasing to you. For light colours like faded khaki drills and tans, I paint an undercoat of Humbrol Khaki Drill with a highlight of Model Master Sand, or for tan, Humbrol Desert Yellow with Model Master Radome Tan highlight. It’s easier to lay the darker tone over the black base and highlight then to paint a light colour on black, then shade. For medium and dark tones, I just paint the colour straight on and highlight or
shade by mixing the colour with black or white. Blacks, I just highlight with medium grays. For fl esh I use Model Master dark, medium and light skin tones going from dark to light. I dry-brush the details like the socks and helmet scrim using the base colour mixed with white. The end result is very contrasty in a close-up photo, but from regular viewing distance it looks great.
RYAN’S BASING AND PAINTING TECHNIQUES
★★★★★★★★
★★★★★★★★★★★★★★★★★★
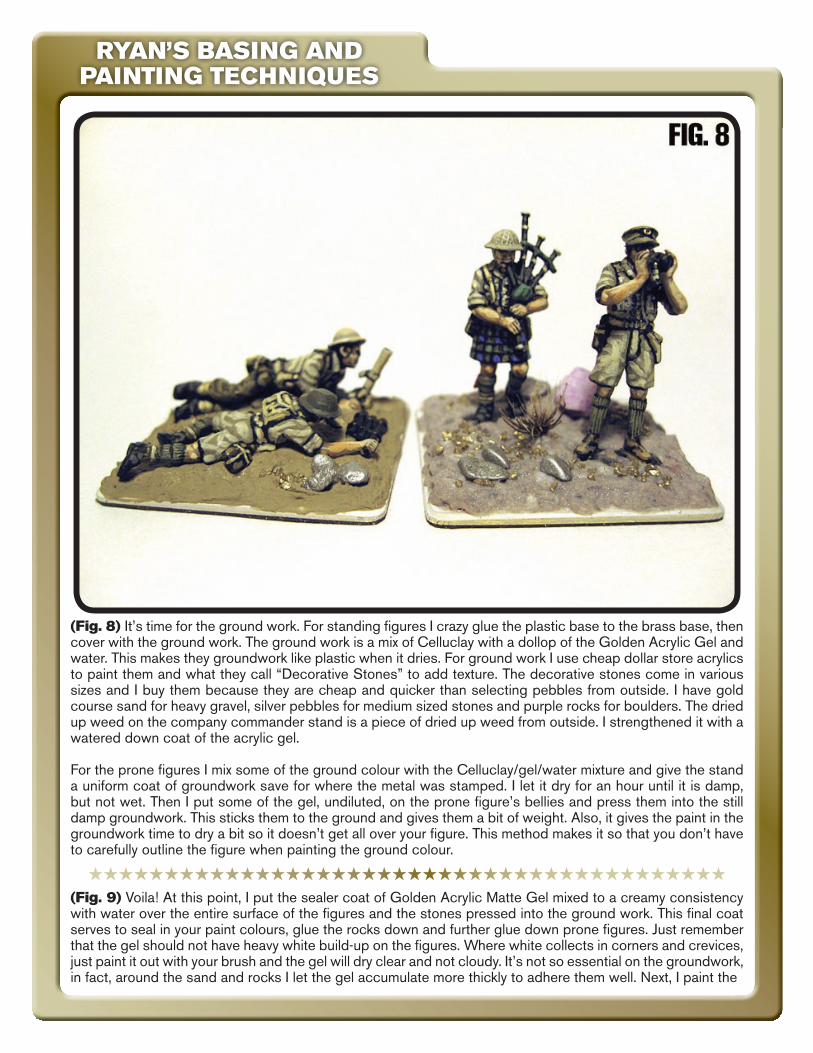
(Fig. 8) It’s time for the ground work. For standing fi gures I crazy glue the plastic base to the brass base, then cover with the ground work. The ground work is a mix of Celluclay with a dollop of the Golden Acrylic Gel and water. This makes they groundwork like plastic when it dries. For ground work I use cheap dollar store acrylics to paint them and what they call “Decorative Stones” to add texture. The decorative stones come in various sizes and I buy them because they are cheap and quicker than selecting pebbles from outside. I have gold course sand for heavy gravel, silver pebbles for medium sized stones and purple rocks for boulders. The dried up weed on the company commander stand is a piece of dried up weed from outside. I strengthened it with a watered down coat of the acrylic gel.
For the prone fi gures I mix some of the ground colour with the Celluclay/gel/water mixture and give the stand a uniform coat of groundwork save for where the metal was stamped. I let it dry for an hour until it is damp, but not wet. Then I put some of the gel, undiluted, on the prone fi gure’s bellies and press them into the still damp groundwork. This sticks them to the ground and gives them a bit of weight. Also, it gives the paint in the groundwork time to dry a bit so it doesn’t get all over your fi gure. This method makes it so that you don’t have to carefully outline the fi gure when painting the ground colour.
(Fig. 9) Voila! At this point, I put the sealer coat of Golden Acrylic Matte Gel mixed to a creamy consistency with water over the entire surface of the fi gures and the stones pressed into the ground work. This fi nal coat serves to seal in your paint colours, glue the rocks down and further glue down prone fi gures. Just remember that the gel should not have heavy white build-up on the fi gures. Where white collects in corners and crevices, just paint it out with your brush and the gel will dry clear and not cloudy. It’s not so essential on the groundwork, in fact, around the sand and rocks I let the gel accumulate more thickly to adhere them well. Next, I paint the
RYAN’S BASING AND PAINTING TECHNIQUES
★★★★★★★★★★★★★★★★★★★★★★★★★★★★★★★★★★★★★★★★★★
ground colour on the company commander stand and just the rocks on the light mortar stand as the ground colour was mixed into the groundwork. Where I stamped numbers or letters I paint whatever colour I designate for that particular company, in this case blue. When the base ground colour is on I use the gel straight from the jar and paint the edges of the base where it is likely to be handled. This puts a protective coat between fi ngers and the paint on the base. The fi nal step is to dry brush the ground work with lighter shades and you are done!
(Fig. 10) A close up of the company commander stand. I glued some model railroad grass down in patches with the Golden Gel for fun. The tartan on the piper has simplifi ed Black Watch tartan of the 51st Highland Division. I apologize for my lacking photography skills!
(Fig. 11) Finished 2 in. mortar stand simply designated “LM” for light mortar to save space.
That’s how I make a bloody strong base for my soldiers. Sorry that process seems so long-winded, but it is pretty fast once you get the steps down. It takes me a couple of days to complete 4 troops, but most of that is waiting for things to dry. If you paint 10 fi gures at a time, I don’t think this process will slow you down too much. I hope this method or parts of this helps!