16
S2 USER MANUAL Page 1 of 16 AL-Manual-110ES-WL-S2-En-102

S2 USER MANUAL
Page 1 of 16 AL-Manual-110ES-WL-S2-En-102

TABLE OF CONTENT 1 Introduction………………………………………………………………………3 1.1 Standard Features ...………………………………………………………..3 1.2 Specifications…………………………………………………………………..4 1.3 Display…………………………………………………………………………..4 1.4 Keyboard …………………………………………………………………….....5 1.5 Battery …………………………………………………………………………..6
2 General Configuration………………………………………………………….6 2.1 Print Setting………………………………………………………………..6 2.2 Zero Setting …………………………………………………………………….8 2.3 Filter Setting…………………………………………………………………….8 2.4 Other Setting……………………………………………………………………9
3 System Configuration ………………………………………………………….9 3.1 Calibration………………………………………………………………………9 3.2 Calibration Parameter ……………………………………..………………..10 3.3 Calibration Password…………………………………………………….....10 3.4 Power saving mode Configuration…………………………………….….10 3.5 Printing test Configuration ……………………………………………......11 3.6 Stability Setting……………………………………………………………..11
4 Weighing Data Processing…………………………………………………..11 4.1 Statistics……………………………………………………………………….11 4.2 Search…………………………………………………………………………12 4.3 Clear…………………………………………………………………………...13 4.4 Peak Holding …………………………………………………………………13
5 Operation………………………………………………………………….13 5.1 Installation of the scale……………………………………………………13 5.2 Installation of the indicator………………………………………………..13 5.3 Recharge Battery………………………………………………………..14
6 Maintenance of the Printer………………………………………………...15 6.1 Maintenance…………………………………………………………………..15 6.2 Refilling paper ……………………………………………………………...15
Page 2 of 16 AL-Manual-110ES-WL-S2-En-102

About This Manual This manual is intended for use by service technicians responsible for installing and servicing 110ES-WL wireless scale and S2 weighing indicator.
CAUTION 1. Don’t make lifts beyond rated capacity of the scale 2. The scale must be checked for operation routinely. Don’t operate if hook, shackle, sling, cable, etc show any sign of defects or excessive wear. 3. Avoid bump, keep the scale and the indicator away from corrosive liquid or environment. 4. If the scale is not going to be operated for a long time, please turn
off the scale and indicator, recharging the battery every two months to preserve the life-span of the battery and recharge it before operation 5. When indicator displays low battery, recharge the battery first before turn on the scale. 6. Most procedures described in this manual are to be performed by qualified service personnel only.
1. Introduction 110ES-WL02 consists of 110ES load cell, shackles, wireless communication device on the load cell body, and S2 wireless portable weighing indicator. The load cell body housed in an IP67-rated 316 stainless steel enclosure. The indicator front panel consists of a LCD display, printer and keyboard, the indicator comes up with a substantial and durable ABS indicator suitcase.
1.1 Standard Features ◆∑-Δ A/D conversion technology. ◆Keyboard calibration, simple operation. ◆Weighing data save protection in case of power off. ◆Battery charger with several protection modes to extend life of rechargeable battery. ◆Standard RS232 communication interface (optional). ◆Portable design, packed in portable box, easy to operate outdoor.
◆LCD display with dot character with backlight ◆Gathering data records up to 2000 weighing, records can be classified, searched and printed. ◆Standard parallel print interface (EPSON printer). ◆Indicator with rechargeable 7.2V/2.8AH batter, scale body with 4*RCR123A batteries ◆ Power saving mode, indicator will turn off automatically after 30minutes without operation
Page 3 of 16 AL-Manual-110ES-WL-S2-En-102

1.2 Specifications A/D conversion method Σ-Δ Input signal range -3mV~15mV Load cell excitation DC 5V Max. Verified counts 2000 Max. external counts 15000 Division 1/2/5/10/20/50 optional Display LCD display with backlight Wireless Communication frequency
S2-01: 433MHz S2-02: 915MHz
Wireless transmission distance 30meters (in wide place)
Clock real clock without effect on power off
Option RS232 communication interface Max internal code 1,000,000 A/D transfer speed 50 times/second Power on zero range 20% Cap Display 192x64 matrix LCD(with backlight) Tare range 100% Cap Zero range by manual 4% Cap Operation Temperature range Scale -10~50°C, Indicator 0~40°C
1.3 Display
The S2 indicator uses a set of annunciators to provide additional information about the value being displayed. • SN: 00000: For classifying different goods, can input 5 numbers • CN: 00: For classifying different goods owner, can input 2 numbers. • Item: 000: The total times of weighing • The current battery volume
: full volume
: 50% volume remain
: 20% volume remain
: empty volume, low battery
Page 4 of 16 AL-Manual-110ES-WL-S2-En-102

•A: Auto/Manual indication, A means auto state. It will auto save the weighing data and print them when weighing is stable. The default is Manual, display shows nothing in this position. •kg/ton: Current unit. • : Wireless signal indicator: shows whether the signal is normal. The is on means the communications is working normally • 02: Display division • G/N: Gross or net • Stb: “Stable” indicator: means the weighing is stable right now • ZERO: Zero indicator.
1.4 Keyboard
Keyboard Function: • SN: to classify different goods. • CN: to classify different goods owner.
• SEARCH: Search memory.
• : Backlight •1/CLEAR: Digit 1 and clear function. • 2/TIME: Digit 2 and time function. • 3/DATE: Digit 3 and data function. • 4/L.F: Digit 4 and paper scrolling function. • 5/AUTO: Digit 5 and auto function. • 6/STAT: Digit 6 and static function
• 7/F1: Digit 7 and F1 function (PEAK Holding) • 8/G/NET: Digit 8 and gross/net function. • 9/R.P: Digit 9 and recall the value of accumulation • 0/F2: Digit 0 and F2 function
•PRETARE: Set tare weight in advance.
• : Parameter setting or back. •ENTER: Confirm input. To save the changed configuration or edited number by pressing the ENTER key.
•SAVE/PRINT: Save and print current weighing data. • TARE: Tare • ZERO: Zero • ON: Turn on the indicator • OFF: Turn off the indicator
Page 5 of 16 AL-Manual-110ES-WL-S2-En-102

1.5 Battery Scale Indicator Battery Type 4*RCR123A batteries 7.2V 2800mAH Ni-H
battery Charger: 16340 digital battery charger NC1056 charger Charge Time (Approximately)
3 hours 4 hours
Work Time 8 hours 40 hours (without backlight) Charger Power supply
100~240VAC 50/60Hz 100~240VAC 50/60Hz
2. General Configuration
Press to enter setting mode, it shows as follows:
In this chapter, this manual will guide you how to configure the COLO-680DT indicator about Print, ZERO, Filter, and other setting.
2.1 Print Setting
Press into weighing status, it shows as follows:
Press 1/CLEAR to enter Print Setting
Page 6 of 16 AL-Manual-110ES-WL-S2-En-102

• 1.Based on SN & CN: If you need SN and CN to be shown, press 1 to choose this item, when the weighing is stable, press SAVE/PRINT, the printer will print the weighing data.
• 2.Not based on SN & CN: If you do not need SN and CN to be shown, press 2 to choose this item, when the weighing is stable, press SAVE/PRINT, the printer will print the weighing data.
In Based on SN & CN and Not based on SN & CN, user can choose Save & Print or Save ! Print. If Save & Print is selected, when pressing SAVE/PRINT, the indicator will save the item No., the item No. will add one, and the printer will print the current weighing data; If Save ! Print is selected, when pressing SAVE/PRINT, the indicator will only save the item No., the printer will not print the current weighing data. • 3.Auto save & print: In Print Setting, press 3 to select this item, if there is a tick in the end, the Auto save & print is enabled. In normal weighing mode, press 5/AUTO, the indicator will enter “Auto save & print” mode, “A” will be shown in the screen, when the weighing is stable, indicator will print and save the weighing data automatically. The default setting of this item is disabled. •4. Print Sig: In Print Setting, press 4/L.F to select this item, if there is a tick in the end, the Print Sig is enabled. In normal weighing mode, press SAVE/PRINT, the printer will print the weighing data in a format as shown below, it will print all the information about the weighing data. List --------------- Date: xxxx-xx-xx SN: xxxxx CN: xx No.: xxx N.W. : xxxx.xx kg
e.g. List ---------------------
Date:2012-10-12 SN:00123 CB:02 N.W:4000 kg No. 004
If the Print Sig is disabled, press SAVE/PRINT, the printer will print the weighing data in a format as shown below, it will simply print 3 key parts of the weighing data. xxx xx:xx xxxx.xx xxx: the number of the item; xx:xx: the time you print the weighing data; xxxx.xx: the weighing data. e.g. 001 09:30 10000 means the weighing item is No. 001, the time of printing is 09:30, 10000kg,
Page 7 of 16 AL-Manual-110ES-WL-S2-En-102

• 5.Stat List: In Print Setting,press 5/AUTO to select this item, if there is a tick in the end, the Stat List is enabled. When the indicator is in the counting mode, press SAVE/PRINT, the printer will print the total weighing data instead of single weighing data. • 6.Print: 6.1. Separates, Lower limit, Scroll Set is suggested to be set to default setting.
2.2 ZERO SETTING
In the setting mode, press 3/DATE to Enter Zero setting.
• 1.Power-on zero: In Zero setting, press 1/CLEAR to enter Power-on zero setting, when the item is selected, there will be an underline under the number, it means the number is now editable. Press Search to switch the number, user can choose one of these 5 numbers, to selects the range within which the scale can be zeroed after powering on the indicator.
• 2.Manually ZERO: In Zero setting, press 2/TIME to enter Manually ZERO setting, when the item is selected, there will be an underline under the number, it means the number is now editable. Press Search to switch the number, user can choose one of these 5 numbers, to selects the range within which the scale can be zeroed when the indicator is manually operated in the weighing mode.
2.3 Filter Setting In the setting mode, press 5/DATE to Enter Filter setting.
Page 8 of 16 AL-Manual-110ES-WL-S2-En-102

• Filter Level:User can edit the number from 0~7 to selects the digital filtering rate. The higher the value, the lower is the effect acting upon the indicator due to noise and mechanical vibration and hence having a more accurate display. However, it slows down the settling rate of the indicator. It is recommended to be set to 1~4.
2.4 Other Setting 1. Default: Set all the parameter to default. 2. Battery: Monitor the battery voltage 3. Precis: Precision setting, when it’s enabled, press 0/F2 in the weighing mode, the division will change circlely. 4.Peak: Peak holding function. In
Other setting,press 4/L.F to select this item, if there is a tick in the end, the Peak holding is enabled. In normal weighing mode, press 7/F1 to activate Peak Holding, there will be a “P” on the screen. Press 7/F1 again, the Peak Holding function will be turned off, “P” will disappear.
3. System Configuration
In the setting mode, press 2/TIME to Enter SYSTEM setting. Before starting system configuration, user must input the password to enter the setting interface, the default password is 111111, press Enter after inputting 6 digits. In this chapter, this manual will guide you how to calibrate the indicator, set the password, and configure other parameters setting.
3.1 Calibration In system setting, press 1/Clear to enter calibration. • Divisi : Division, Display division. Specifies the display divisions,
1,2,5,10,20,50 are available for division setting. • Decimal: Decimal point. Specifies the decimal position, 0, 1, 2, 3, 4 are
Page 9 of 16 AL-Manual-110ES-WL-S2-En-102

available for decimal point setting. • Cap: Capacity,Specifies the full scale of the indictor, press Enter to save
the capacity after inputting numbers. Capacity=Full Scale Value/Display Division.
e.g. The full scale value is 5000kg, the decimal point is 1, Division is 1, so the Capacity=5000/0.1*1=50000.
• Zero pos: Calibrate the zero position of the scale. • Calibr: Calibrate the full scale of the scale, there is a instantaneous
value on the right side, when the weighing is stable, there will be a [Stb.]
The calibration of S2 consists of the following steps: Zero calibration Enter the Full Scale Value Capacity calibration 3.1.1 ZERO Calibration STEP1.Remove all load from the scale platform. If the scale require hooks or
chains (tare weight), place the hooks or chains onto the scale for zero calibration. STEP2.Press 4/L.F to calibrate zero, the screen shows “completed!” 5.Calibr will show 0[Stb.] on the right side. 3.1.2 Enter the full scale weight value Press 5/AUTO, the 5 digits number will turn to 00000, now the value is editable, input the full scale value. 3.1.3 Capacity calibration Place full load onto the scale. When [Stb.] is shown, press Enter to complete the capacity calibration.
3.2 Calibration Parameter • ZERO pos: Display zero calibration A/D count, not editable. • Parameter: Display capacity calibration A/D count, not editable.
3.3 Password Change the password by inputting 6 digits, press Enter to save.
3.4 Power saving mode Press 4/L.F to select this item, if there is a tick in the end, the power saving mode is enabled. In power saving mode, the indicator will be shut down automatically if no
Page 10 of 16 AL-Manual-110ES-WL-S2-En-102

operation in 15min.
3.5 Print testing Press 5/AUTO to select this item, if there is a tick in the end, the print test is enabled. Enabling Print testing function can help user to test the printer without connecting to the scale.
3.6 Stability The default setting is 03, it’s not recommended to change this value.
4.Weighing Data Processing 4.1 Statistics SN and CN numbers can be used to classify goods, COLO-680DT can easily set the SN and CN numbers of the goods, and calculate the total weight and print the statistics data. • Input SN. In normal weighing mode, press SN, the digits will be editable , press ENTER to confirm after input SN numbers. • Input CN In normal weighing mode, press CN, the digits will be editable , press ENTER to confirm after input CN numbers. 4.1.1 Save & Print the statistics weighing data Refer to Chapter2 General Setting-Print setting, COLO-680DT has two ways to save and print the weighing data, If Save & Print is enabled, in the normal weighing mode, single weighing data will be printed by pressing the SAVE/PRINT, the item number will add one. After Save & Print several single weighing data, COLO-680DT can print the total weighing, count number, and print the all the single data details for checking. e.g. Input the SN=12345 CN=12 the item No. will be set to 000. Put 5 test weights on the scale one at a time, press Save/Print after the weighing is stable. After printing each of its own weighing data, as shown below,
List ------------------ Data: 2012-10-15 SN:12345 CN:12 No.: 001 N.W: 5kg
Page 11 of 16 AL-Manual-110ES-WL-S2-En-102
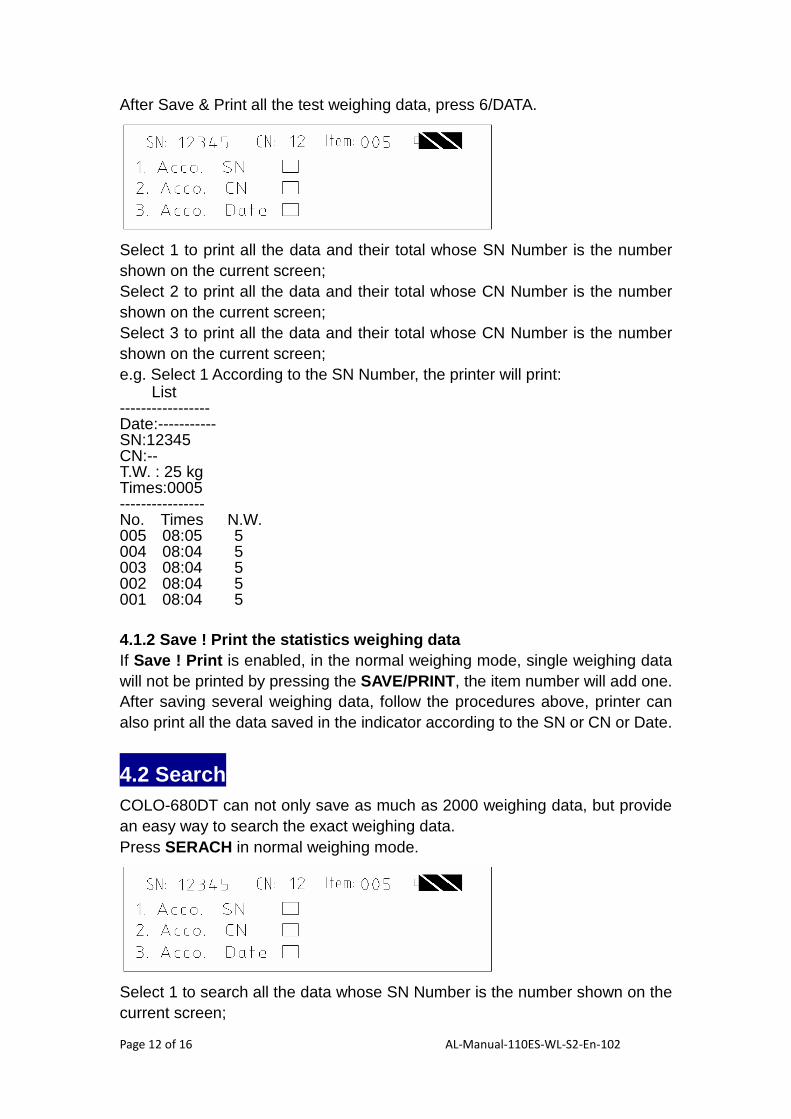
After Save & Print all the test weighing data, press 6/DATA.
Select 1 to print all the data and their total whose SN Number is the number shown on the current screen; Select 2 to print all the data and their total whose CN Number is the number shown on the current screen; Select 3 to print all the data and their total whose CN Number is the number shown on the current screen; e.g. Select 1 According to the SN Number, the printer will print: List ----------------- Date:----------- SN:12345 CN:-- T.W. : 25 kg Times:0005 ---------------- No. Times N.W. 005 08:05 5 004 08:04 5 003 08:04 5 002 08:04 5 001 08:04 5 4.1.2 Save ! Print the statistics weighing data If Save ! Print is enabled, in the normal weighing mode, single weighing data will not be printed by pressing the SAVE/PRINT, the item number will add one. After saving several weighing data, follow the procedures above, printer can also print all the data saved in the indicator according to the SN or CN or Date.
4.2 Search COLO-680DT can not only save as much as 2000 weighing data, but provide an easy way to search the exact weighing data. Press SERACH in normal weighing mode.
Select 1 to search all the data whose SN Number is the number shown on the current screen;
Page 12 of 16 AL-Manual-110ES-WL-S2-En-102

Select 2 to search all the data whose CN Number is the number shown on the current screen; Select 3 to search all the data whose CN Number is the number shown on the current screen; e.g. Select 1 The screen will show: SN: 12345 CN:11 Date: 12-10-15 ALL: 25kg Mem: 0005/2000 005 08:05 5 004 08:04 5 003 08:04 5 002 08:04 5 001 08:04 5 Notes: Mem: 0005/2000 means the indicator has already saved 5 weighing data,
which can save 2000 weighing data in total. Press “SEARCH” to rank all the data according to SN Numbers. The memory of the indicator has limit, please clear the memory in time. Press 1/Clear to delete all the current search weighing data.
4.3 Clear In normal weighing mode, press 1/CLEAR, screen shows
User can select deleting the weighing data one by one or deleting all the data.
4.4 Peak holding In Other setting,press 4/L.F to select this item, if there is a tick in the end, the Peak holding is enabled. In normal weighing mode, press 7/F1 to activate Peak Holding, there will be a “P” on the screen. Press 7/F1 again, the Peak Holding function will be turned off, “P” will disappear.
5.Operation\ 5.1 Installation of the scale Unscrew the battery cap, replace the flat batteries with the fresh ones, make sure the batteries are installed properly, then tighten the battery cap. The scale body will turn off after one hour without operation if you want to use
Page 13 of 16 AL-Manual-110ES-WL-S2-En-102

again, please turn it off, then turn it on again.
5.2 Installation of the indicator Install the antenna on the indicator, Press ON key, (if no display, check the button on the indicator left side to check if it is turn on) after several seconds,
the signal will be shown on the screen, it means communication is normal.
After the operation, turn off the scale first, then turn off the indicator. The indicator will turn off after 30minutes if no signal or without operation automatically.
5.3 Recharge battery
5.3.1 Low battery
When indicator displays , it means the battery needs to be recharged soon, and the indicator will turn off automatically after one minute to save the battery. In weighing mode, if it displays “Low battery”, it means that scale body batteries are low, you need to recharge, otherwise it will turn off automatically 30 minutes later.
5.3.2 Charger The indicator charger NC1056 has 3 statuses: when it’s connected to 220V power, the light is green; when recharging, it becomes red; if recharging is finished, it becomes green. Note: Generally recharging of the indicator needs 5-7 hours, if finished, the current will become small to protect battery, you’d better to plug out to protect the battery
5.3.3 Recharge the batteries of the scale body. The scale body powers by 4 RCR123A batteries, when the indicator shows “AD battery low”, the scale body will be shut down automatically. To recharge the batteries, unscrew the battery cap and pull out the batteries carefully, push the flat batteries into the 16340 digital battery charger, connect the charger to 100~240VAC, if the LED light of the charger becomes red, the batteries is in the process of charging. When the LED light of the charger becomes green, the recharging is finished, put the batteries back in the battery cap. Please notice the place of anode and cathode when pit in the batteries. All the cathode of RCR123A battery is
Page 14 of 16 AL-Manual-110ES-WL-S2-En-102

facing the battery cap. Tighten the battery caps.
6.USE AND MAINTANANCE OF PRINTER 6.1 Maintenance When printing, do not draw or tear the paper in case damage the printer. When indicator is on, the printer will turn off automatically to save the power, and the light is off. If need print, it will turn on automatically, if no print operation for three minutes, it will turn off again. When the printer powers off, press 4/L.F to turn on the printer and the paper will rotate one line.
6.2 Refilling paper Turn on the indicator, press 4/L.F, the printer light is on. Open the front cover of the printer, press the button on the right side of the green LED light In printer to turn off the light, then press 4/L.F several seconds to let the paper go out, do not pull the paper out in case damage the printer. Take out the axis, put the new paper roll on it and put the axis back again, make sure that the paper can rotate properly.
Cut the paper as the shape , it’s easy to fill the paper into the printer,
after the paper is ready, press 4/L.F to stop, then press the button on the right side of the green LED light to turn the light on, now it’s ready. Note: when changing the paper, you do not need to take the board out, only take it out when you plan to change the ribbon.
6.3 Ribbon Installation. The ribbon cassette has already been installed well at ex-factory, but after using for a period of time, the ribbon cassette needs to be changed. You may follow these steps to change: Step1: Pull out the part in the position 1;
Page 15 of 16 AL-Manual-110ES-WL-S2-En-102

Step2: Fasten the part in the position 2 and open up the front panel;
Step3: Take out the used ribbon which is on the head of the printer (Note: lift up the left end of the ribbon cassette first, then lift up the right end, take off the ribbon cassette.
Step4: Install the new ribbon cassette, first put down the right end of the ribbon cassette carefully on the gear wheel which is on the right end of the printer head, then lift up the left end a little. If you find the right end of the ribbon cassette has not been put down to the bottom, please hold down the knob of the ribbon cassette with your finger, rotate slightly clockwise, until the ribbon cassette has been put down to the bottom, then put down the left end. Please double check whether the ribbon is drawn to be straight. Step5: Push the printer back in the slot to their original position.
Page 16 of 16 AL-Manual-110ES-WL-S2-En-102


