Safety at Street Works and Road Works A Code of Practice issued by the Secretary of State for Transport, Local Government and the Regions, The Scottish Executive and the National Assembly for Wales under sections 65 and 124 of the New Roads and Street Works Act 1991, and by the Department for Regional Development (Northern Ireland) under article 25 of the Street Works (Northern Ireland) Order 1995 i
Transcript
Safety at Street Worksand Road Works
A Code of Practice issued by the Secretary of State
for Transport, Local Government and the Regions,
The Scottish Executive and the National Assembly for Wales
under sections 65 and 124 of the New Roads and Street Works
Act 1991, and by the Department for Regional Development
(Northern Ireland) under article 25 of the Street Works
(Northern Ireland) Order 1995
i
Published for the Department for Transport, Local Government and the Regions under licencefrom the Controller of Her Majesty’s Stationery Office.
Copyright in the typographical arrangement and design is vested in the Crown.
Applications to reproduce the material in this publication should be addressed to Her Majesty’s Stationery Office,St Clements House, 2-16 Colegate, Norwich NR3 1BQ. Fax: 01603 723000 or email [email protected]
First Published 2001
First Edition Crown Copyright 1992
ISBN 0 11 551958 0
Printed in Great Britain on material containing 75% post-consumer waste and 25% ECF pulp.
The Stationery Office TJ C1000 03/01
Acknowledgements
The Department for Transport, Local Government and the Regions is grateful to the following for their help in preparingthis Code of Practice:
Department for Regional Development (Northern Ireland)National Assembly for WalesThe Scottish ExecutiveHighway Authorities and Utilities CommitteeLocal Government AssociationNational Joint Utilities GroupAssociation of Chief Police OfficersHealth & Safety Executiveand many other organisations and individuals who provided comments and contributions.
ii
ForewordToday’s roads are full of fast, heavy traffic. Drivers have to keep a constant look-out for changing roadconditions. Whilst this code is primarily directed at you the operative, supervisors and managers have animportant responsibility to make sure that all street and road works and operatives are safe. Road usersshould not be put at risk, and should be informed well in advance about the size and nature of anyobstruction. This applies to vulnerable users – including pedestrians, cyclists, motorcyclists and horse riders– as well as drivers.
You must also pay particular attention to the needs of blind and disabled people, children, elderly peopleand people with prams.
This Code of Practice will help you to safely carry out signing, lighting and guarding of street works androad works on most roads (see page 1).
With effect from 1st January 2002 this code has statutory backing for street works in England, Wales andNorthern Ireland, and for road works in Scotland, as a Code of Practice under the New Roads and StreetWorks Act 1991 and the Street Works (Northern Ireland) Order 1995. Failure to comply may lead tocriminal prosecution in addition to any civil proceedings.
Department for Transport, Local Government and the RegionsThe Scottish ExecutiveThe National Assembly for WalesDepartment for Regional Development (Northern Ireland)
iii
APPLICATION
This Code of Practice is issued by the Secretary of State for Transport, Local Government and the Regions,the Scottish Executive and the National Assembly for Wales under sections 65 and 124 of the New Roads andStreet Works Act 1991, and by the Department for Regional Development (Northern Ireland) under article25 of the Street Works (Northern Ireland) Order 1995. The legislation requires an undertaker, and thoseworking on its behalf, carrying out work under the Act or the Order to do so in a safe manner as regards thesigning, lighting and guarding of works. Failure to comply with this requirement is a criminal offence.Compliance with the Code will be taken as compliance with the legal requirements to which it relates.
Highway authorities in England and Wales and roads authorities in Scotland should comply with thisCode for their own works, as recommended by the respective national administrations. The NorthernIreland road authority is legally required to comply with the Code. In the application of this Code toScotland, all references in the text to ‘highway authorities’ are to be read as references to ‘roadsauthorities’.
Everyone on site has a personal responsibility to behave safely, to the best of their ability. Under theHealth and Safety at Work etc Act 1974, employers have duties to protect their employees from dangers totheir health and safety, and to protect others who might be affected by the work activity (e.g. passingpedestrians and motorists). These include proper arrangements for design (including planning and riskassessment) and management (including supervision) of the works. Supervisors qualified under the NewRoads and Street Works Act or the Order will know what to do in most situations about which they haveto be consulted, and will be able to find out quickly what to do about the others. It is the employer’sresponsibility to ensure that these arrangements are properly carried out.
This Code applies to all highways and roads except motorways and dual carriageways with hard shoulders.More detailed advice, and advice on some situations not covered by this Code, can be found in Chapter 8of the Traffic Signs Manual published by the Department for Transport, Local Government and theRegions in conjunction with the Scottish, Welsh and Northern Ireland administrations. This gives
iv
authoritative advice, but it does not have the status of a Code of Practice under the Act. In NorthernIreland the use of Chapter 8 is mandatory for undertakers’ works on motorways or dual carriageways withhard shoulders, and elsewhere in the United Kingdom undertakers should comply with Chapter 8 whencarrying out such works. On all other roads they meet their obligations under section 65 or 174 of the Act,or under article 25 of the Northern Ireland Order, if they comply with this Code, even though furtherrelevant advice may be available in Chapter 8 and other relevant documents.
THE ILLUSTRATIONSThe illustrations show typical layouts, equipment and methods of working. They are not necessarily theonly ones which are acceptable. For example, where a vehicle is used on site it may sometimes need to beplaced on the other side of the working area, or facing the other direction from that illustrated. Check thetext to see what is mandatory and what is optional.
EQUIPMENTTraffic signs (including cones, cylinders and red and white barrier planks) and other apparatus used for thecontrol of traffic must conform to the Traffic Signs Regulations and General Directions, or in NorthernIreland, the Traffic Signs Regulations (NI) in force at the time. In respect of other equipment, complianceis achieved by conformity with appropriate European or British Standards where they exist or,alternatively, to a standard or code of practice of a national standards body or equivalent body of anyMember State of the European Economic Area, to a relevant international standard recognised for use inany Member State, or to a specification recognised by a competent public authority of any Member State,provided that in-use equivalent levels of safety, suitability and fitness for purpose are met. Equipment of aninnovative or traditional nature that does not conform to a recognised standard or specification but whichfulfils the purpose provided by the appropriate standards is equally acceptable if, in use, it is safe, suitableand fit for purpose. In judging the suitability of any equipment offered as equivalent, account must betaken of the need on safety grounds to present consistent visual information to users of the highway.Equipment other than traffic signs does not have to match that shown in the illustrations, provided theseconditions are met.
v
Key Question
Ask yourself this question :
“Will someone coming along the road or footwayfrom any direction understand exactly what ishappening and what is expected of them?”
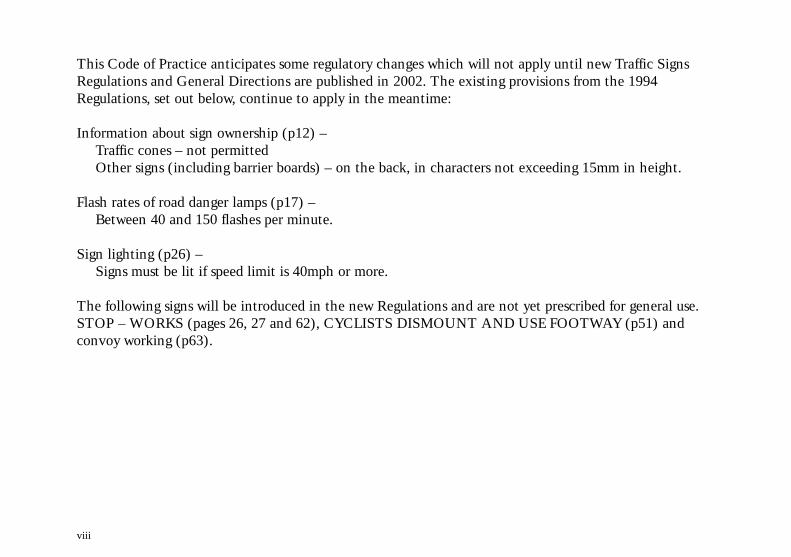
This Code of Practice anticipates some regulatory changes which will not apply until new Traffic SignsRegulations and General Directions are published in 2002. The existing provisions from the 1994Regulations, set out below, continue to apply in the meantime:
Information about sign ownership (p12) –Traffic cones – not permittedOther signs (including barrier boards) – on the back, in characters not exceeding 15mm in height.
Flash rates of road danger lamps (p17) –Between 40 and 150 flashes per minute.
Sign lighting (p26) –Signs must be lit if speed limit is 40mph or more.
The following signs will be introduced in the new Regulations and are not yet prescribed for general use.STOP – WORKS (pages 26, 27 and 62), CYCLISTS DISMOUNT AND USE FOOTWAY (p51) andconvoy working (p63).
viii
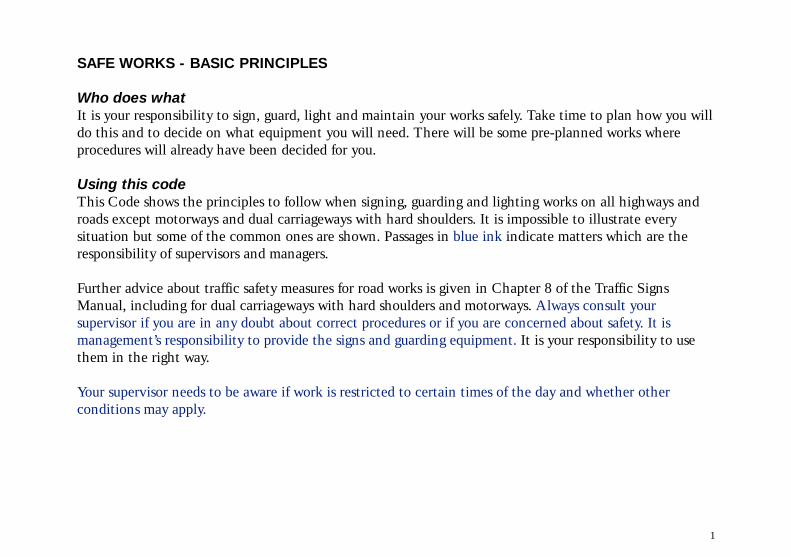
SAFE WORKS - BASIC PRINCIPLES
Who does whatIt is your responsibility to sign, guard, light and maintain your works safely. Take time to plan how you willdo this and to decide on what equipment you will need. There will be some pre-planned works whereprocedures will already have been decided for you.
Using this codeThis Code shows the principles to follow when signing, guarding and lighting works on all highways androads except motorways and dual carriageways with hard shoulders. It is impossible to illustrate everysituation but some of the common ones are shown. Passages in blue ink indicate matters which are theresponsibility of supervisors and managers.
Further advice about traffic safety measures for road works is given in Chapter 8 of the Traffic SignsManual, including for dual carriageways with hard shoulders and motorways. Always consult yoursupervisor if you are in any doubt about correct procedures or if you are concerned about safety. It ismanagement’s responsibility to provide the signs and guarding equipment. It is your responsibility to usethem in the right way.
Your supervisor needs to be aware if work is restricted to certain times of the day and whether otherconditions may apply.
1
On-site risk assessmentTo comply with Health and Safety legislation you must carry out an on-site risk assessment to ensure that asafe system of working in respect of signing, lighting and guarding is in place at all times.
Be seenWhether on site or visiting, all personnel must wear a high visibility jacket or waistcoat, as appropriate(see page 15). You may also need other protective clothing or equipment for your personal safety.
Fix signs properlySigns, lights and guarding equipment must be secured against being blown over or out of position by thewind or by passing traffic. Use sacks at low level containing fine granular material. Alternatively, useequipment having ballasting as part of its construction. Do not use barrels, kerbstones or similar objects forthis purpose - they could be dangerous if hit by traffic. Do not use road pins under any circumstances.
Place the first sign far enough from the works to give adequate warning of the hazard (see table inside backcover). Where signs have to be placed on a footway, they should be positioned so as to minimiseinconvenience or hazard to pedestrians.
Check regularly that signs have not been moved or damaged or become dirty, including when the site isleft unattended for a period of time. Consult your supervisor if the works will make it impossible for driversto follow a permanent traffic sign. If it needs to be covered, your supervisor will need to notify the highwayauthority.
2
Don’t forget the visibility of signsSigns must be reflectorised unless otherwise indicated (see page 27). Consult your supervisor at timesof poor visibility or bad weather conditions as you may need to provide additional signs or to suspend thework. Keep signs clean.
Traffic on two-way roadsOn a two-way road, signs should be set out for traffic approaching from both directions.
Traffic at junctionsSigns should be set out for traffic approaching from all directions.
Site layoutYou must include the works area, working space and safety zone in the area to be marked off with cones,and lamps placed where necessary. Never use a safety zone as a work area or for storing plant or materials.See inside back cover for the minimum dimensions for the safety zone.
Additional areas to be signedIf there are any temporary footways in the carriageway, or obstructions such as spoil or plant, which are notalready within the working space, sign and guard them separately to the same standard.
3
Additional requirementsSometimes you may have to duplicate the warning signs on both sides of the road. An example of thiswould be where signs on the left hand side become obscured by heavy traffic. On dual carriageway roads,the warning signs need to be duplicated on the central reservation.
The road width and volume of traffic at the works site may make traffic control necessary. See page 52 fordetails of which type of control is appropriate.
Drivers visiting the works must switch on their roof-mounted amber beacons, if they have them, beforesignalling to enter the works. This will help to make sure that other drivers will not be misled intoentering the coned-off area as well. Hazard warning lights confuse other road users so don’t use them whenentering or leaving a site.
Maintenance of siteAlways keep the site safe with signs, cones, lights and barriers clean and correctly placed. When no one ison site, make sure that the site is regularly inspected. Damaged or displaced equipment must be replacedpromptly. Emergencies should be dealt with without delay.
Changing traffic conditionsWhere site or traffic conditions change, appropriate adjustments should be made to signing, lightingand guarding.
Clearing upOn completion of the works, ensure that all plant, equipment and surplus materials are removed promptlyfrom the site. All signs, lighting or guarding equipment should be removed immediately.
4
SITE LAYOUT (See diagrams on pages 8 to 14)
What is the works area ?The works area is the excavation, chamber opening, etc, at which you will be working.
What is the working space ?The working space is the space around the works area where you will need to store tools, excavatedmaterial, equipment and plant, etc. It is also the space that you need to move around in to do the job.
You must leave enough working space to make sure that the movement and operation of the plant(e.g. swinging of jibs and excavator arms) is clear of passing traffic and is not encroaching into the safetyzone, or adjacent footway or cycle track.
What is the Safety Zone ?The safety zone is the zone provided to protect you from traffic and to protect the traffic from you.You must not enter the safety zone in the normal course of work. Materials and equipment must not beplaced in the zone. You will need to enter the zone only to maintain cones and other road signs.
The Safety Zone is made up of :• The length of the lead-in taper of cones (T)
This will vary with the speed limit and the width of the works.
• The longways clearance (L)This is the length between the end of the lead-in taper of cones (T) and the working space.It will vary with the speed limit.
5
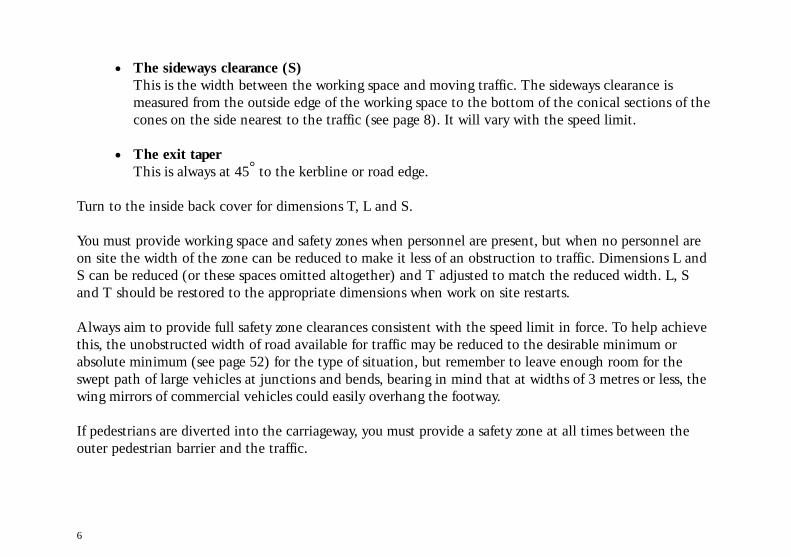
• The sideways clearance (S)This is the width between the working space and moving traffic. The sideways clearance ismeasured from the outside edge of the working space to the bottom of the conical sections of thecones on the side nearest to the traffic (see page 8). It will vary with the speed limit.
• The exit taperThis is always at 45° to the kerbline or road edge.
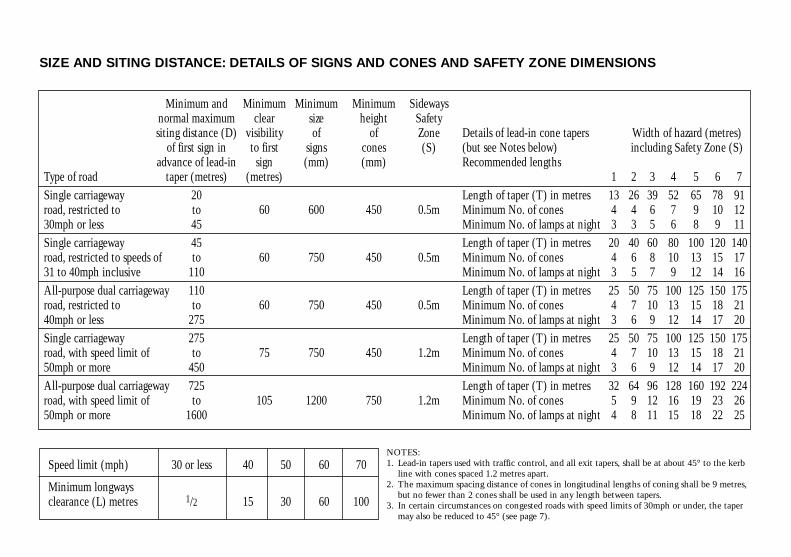
Turn to the inside back cover for dimensions T, L and S.
You must provide working space and safety zones when personnel are present, but when no personnel areon site the width of the zone can be reduced to make it less of an obstruction to traffic. Dimensions L andS can be reduced (or these spaces omitted altogether) and T adjusted to match the reduced width. L, Sand T should be restored to the appropriate dimensions when work on site restarts.
Always aim to provide full safety zone clearances consistent with the speed limit in force. To help achievethis, the unobstructed width of road available for traffic may be reduced to the desirable minimum orabsolute minimum (see page 52) for the type of situation, but remember to leave enough room for theswept path of large vehicles at junctions and bends, bearing in mind that at widths of 3 metres or less, thewing mirrors of commercial vehicles could easily overhang the footway.
If pedestrians are diverted into the carriageway, you must provide a safety zone at all times between theouter pedestrian barrier and the traffic.
6
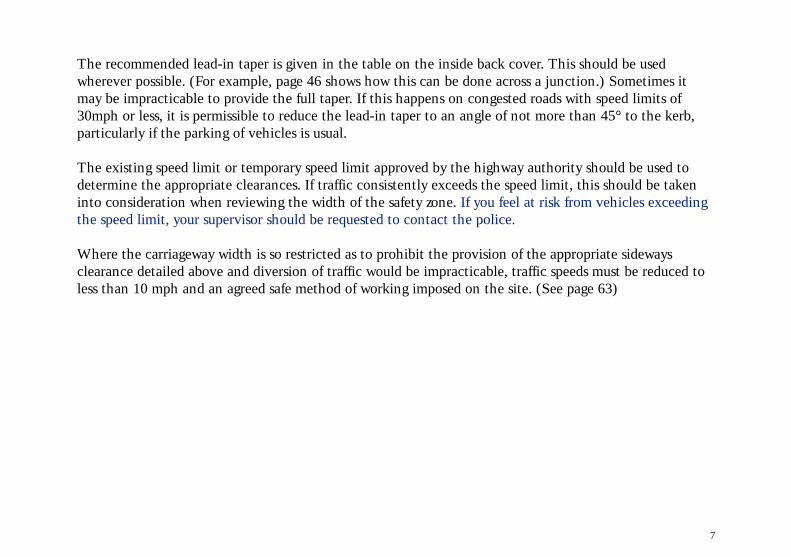
The recommended lead-in taper is given in the table on the inside back cover. This should be usedwherever possible. (For example, page 46 shows how this can be done across a junction.) Sometimes itmay be impracticable to provide the full taper. If this happens on congested roads with speed limits of30mph or less, it is permissible to reduce the lead-in taper to an angle of not more than 45° to the kerb,particularly if the parking of vehicles is usual.
The existing speed limit or temporary speed limit approved by the highway authority should be used todetermine the appropriate clearances. If traffic consistently exceeds the speed limit, this should be takeninto consideration when reviewing the width of the safety zone. If you feel at risk from vehicles exceedingthe speed limit, your supervisor should be requested to contact the police.
Where the carriageway width is so restricted as to prohibit the provision of the appropriate sidewaysclearance detailed above and diversion of traffic would be impracticable, traffic speeds must be reduced toless than 10 mph and an agreed safe method of working imposed on the site. (See page 63)
7
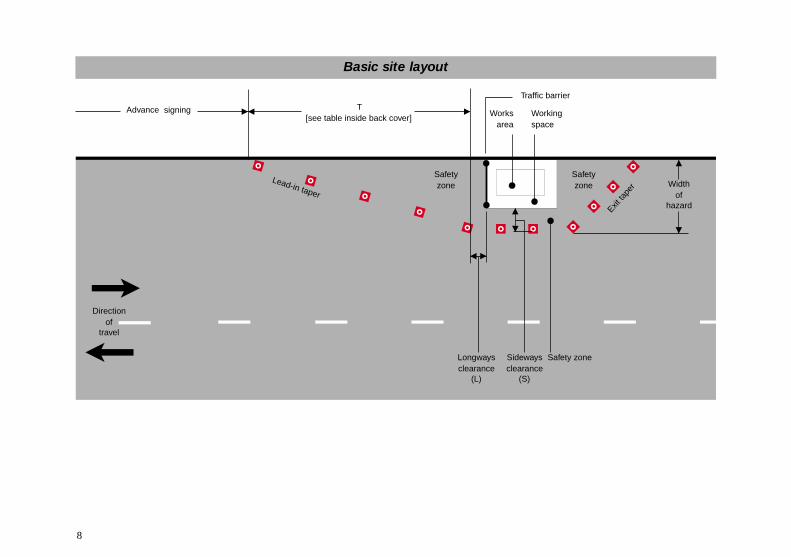
8
Widthof
hazardExit ta
per
Workingspace
Safetyzone
Safetyzone
Worksarea
T[see table inside back cover]
Lead-in taper
Safety zone
Directionof
travel
Longwaysclearance
(L)
Sidewaysclearance
(S)
Advance signing
Traffic barrier
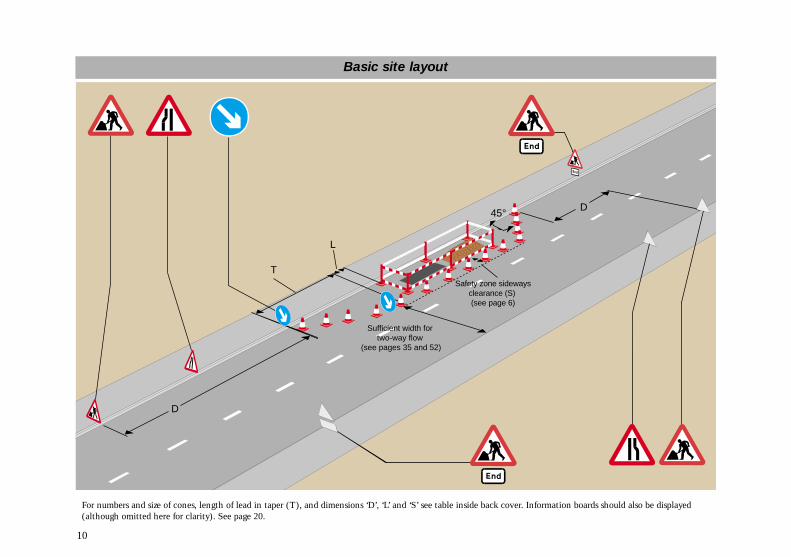
Basic site layout
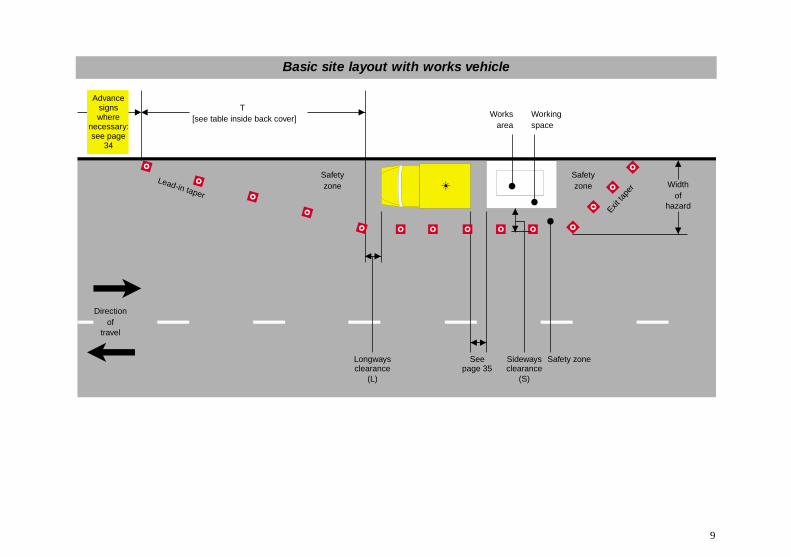
9
Widthof
hazardExit ta
per
Workingspace
Safetyzone
Safetyzone
Worksarea
T[see table inside back cover]
Lead-in taper
See page 35
Safety zone
Directionof
travel
Longwaysclearance
(L)
Sidewaysclearance
(S)
Advancesignswhere
necessary:see page
34
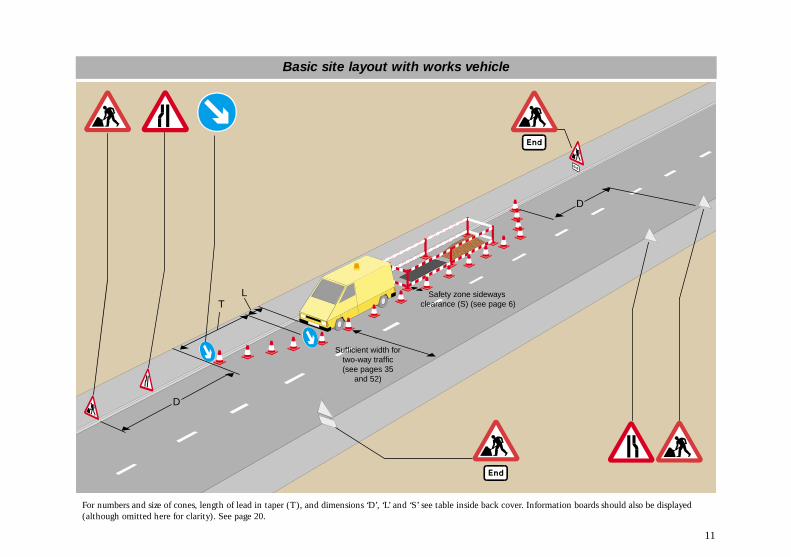
Basic site layout with works vehicle
10
D
T
D
L
45°
Safety zone sidewaysclearance (S) (see page 6)
Sufficient width for two-way flow
(see pages 35 and 52)
For numbers and size of cones, length of lead in taper (T), and dimensions ‘D’, ‘L’ and ‘S’ see table inside back cover. Information boards should also be displayed(although omitted here for clarity). See page 20.
Basic site layout
11
D
T
D
L
Sufficient width fortwo-way traffic(see pages 35
and 52)
Safety zone sideways clearance (S) (see page 6)
For numbers and size of cones, length of lead in taper (T), and dimensions ‘D’, ‘L’ and ‘S’ see table inside back cover. Information boards should also be displayed(although omitted here for clarity). See page 20.
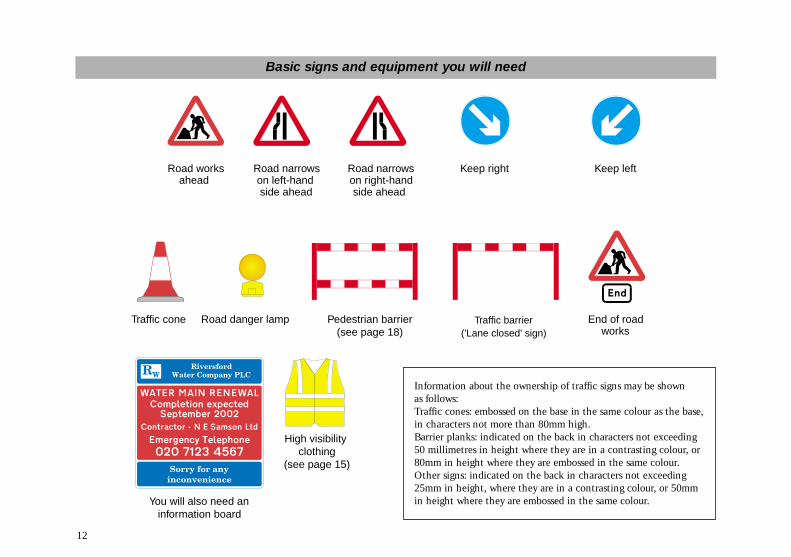
Information about the ownership of traffic signs may be shownas follows:Traffic cones: embossed on the base in the same colour as the base,in characters not more than 80mm high.Barrier planks: indicated on the back in characters not exceeding50 millimetres in height where they are in a contrasting colour, or80mm in height where they are embossed in the same colour.Other signs: indicated on the back in characters not exceeding25mm in height, where they are in a contrasting colour, or 50mmin height where they are embossed in the same colour.
Basic signs and equipment you will need
13
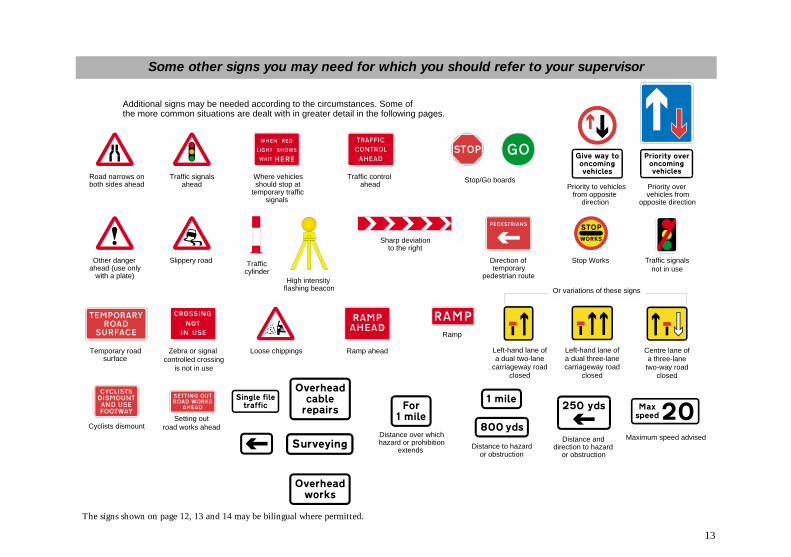
Additional signs may be needed according to the circumstances. Some ofthe more common situations are dealt with in greater detail in the following pages.
Road narrows onboth sides ahead
Traffic signalsahead
Traffic controlahead
Stop/Go boardsPriority to vehicles
from oppositedirection
Priority overvehicles from
opposite direction
Other dangerahead (use only
with a plate)
Slippery road Trafficcylinder
Sharp deviationto the right
Where vehiclesshould stop at
temporary trafficsignals
Direction oftemporary
pedestrian route
Stop Works
High intensityflashing beacon
Temporary roadsurface
Zebra or signal controlled crossing
is not in use
Loose chippings Ramp ahead
Ramp
Distance to hazardor obstruction
Distance anddirection to hazard
or obstruction
Or variations of these signs
Distance over whichhazard or prohibition
extends
Cyclists dismountSetting out
road works aheadMaximum speed advised
Traffic signalsnot in use
Left-hand lane ofa dual two-lane
carriageway roadclosed
Left-hand lane ofa dual three-lanecarriageway road
closed
Centre lane ofa three-lane
two-way roadclosed
The signs shown on page 12, 13 and 14 may be bilingual where permitted.
Some other signs you may need for which you should refer to your supervisor
14
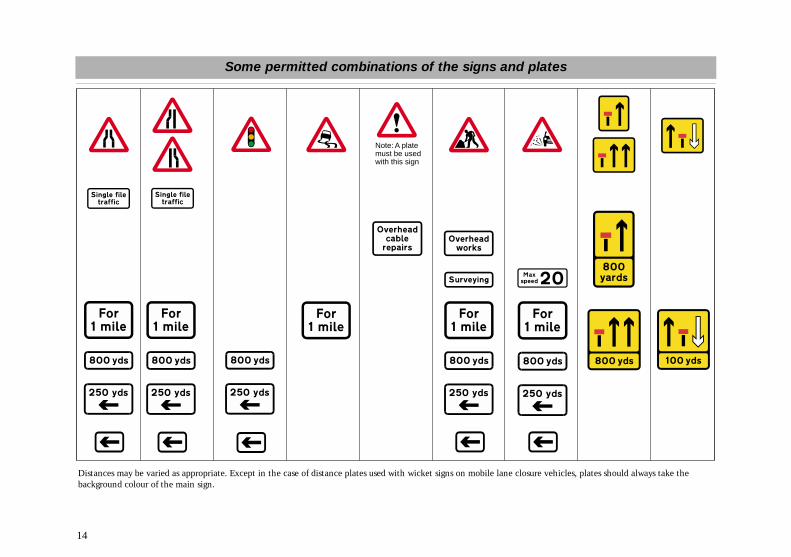
Some permitted combinations of the signs and plates
Note: A platemust be usedwith this sign
Distances may be varied as appropriate. Except in the case of distance plates used with wicket signs on mobile lane closure vehicles, plates should always take thebackground colour of the main sign.
WHAT YOU WILL NEEDIt doesn’t matter whether the works are small or large, on the ground or overhead, all street works requirewarning and information: for the basic layout see page 5. In emergencies as much warning must be given asthe circumstances permit, and full signing must be provided as quickly as possible.
High visibility clothingYou will have been provided with High Visibility Clothing conforming to BS EN471:1994, Table 1,Class 2 or 3, which must be worn at all times. It will comply with the requirements of Clause 4.2.3(b)in all cases.
Jackets with sleeves in accordance with Clause 4.2.4 and to Class 3 must be worn on dual carriagewayroads with a speed limit of 50 mph or above, unless operatives stay within the working space at all times.The colour of the background material should normally be fluorescent yellow from table 2 ofBS EN471:1994, and the retroreflective material should comply with Table 5.High Visibility Clothing to BS6629:1985 may continue in use until 30th September 2002.
Advance signsThese should be placed where they will be clearly seen, and cause minimum inconvenience to drivers,cyclists, pedestrians and other road users alike, and where there is a minimum risk of their being hit orknocked over by traffic. Where there is a grass verge the signs should normally be placed there;the placing of signs in the footway is permitted but in no circumstances must the footway width bereduced below 1 metre.
If there are already vehicles parked in the carriageway, place the advance signs so that they arenot obscured.
15
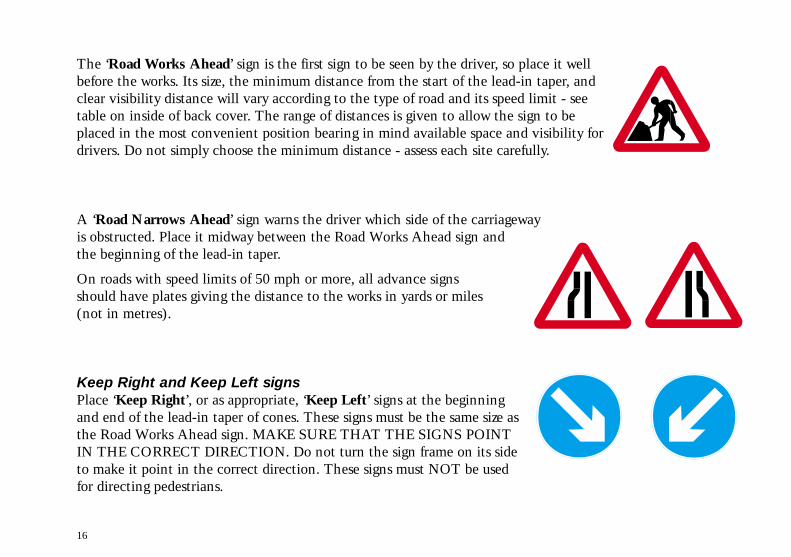
The ‘Road Works Ahead’ sign is the first sign to be seen by the driver, so place it wellbefore the works. Its size, the minimum distance from the start of the lead-in taper, andclear visibility distance will vary according to the type of road and its speed limit - seetable on inside of back cover. The range of distances is given to allow the sign to beplaced in the most convenient position bearing in mind available space and visibility fordrivers. Do not simply choose the minimum distance - assess each site carefully.
A ‘Road Narrows Ahead’ sign warns the driver which side of the carriagewayis obstructed. Place it midway between the Road Works Ahead sign andthe beginning of the lead-in taper.
On roads with speed limits of 50 mph or more, all advance signsshould have plates giving the distance to the works in yards or miles(not in metres).
Keep Right and Keep Left signsPlace ‘Keep Right’, or as appropriate, ‘Keep Left’ signs at the beginningand end of the lead-in taper of cones. These signs must be the same size asthe Road Works Ahead sign. MAKE SURE THAT THE SIGNS POINTIN THE CORRECT DIRECTION. Do not turn the sign frame on its sideto make it point in the correct direction. These signs must NOT be usedfor directing pedestrians.
16
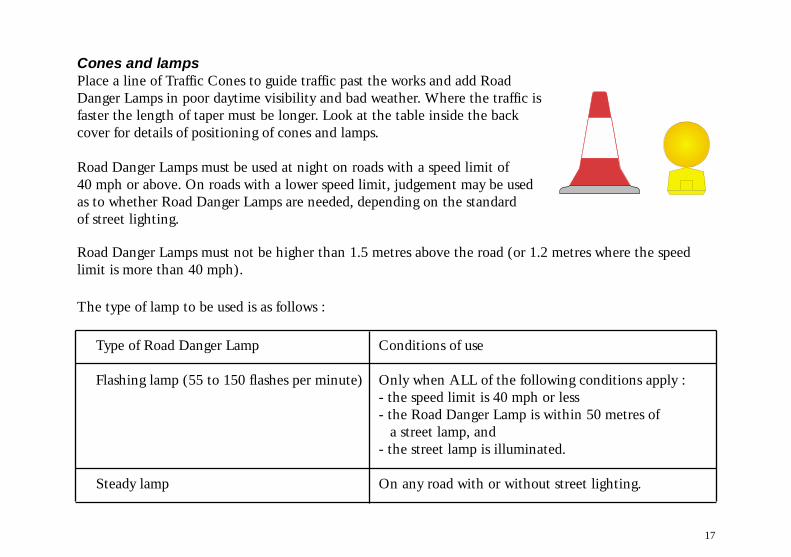
Cones and lampsPlace a line of Traffic Cones to guide traffic past the works and add RoadDanger Lamps in poor daytime visibility and bad weather. Where the traffic isfaster the length of taper must be longer. Look at the table inside the backcover for details of positioning of cones and lamps.
Road Danger Lamps must be used at night on roads with a speed limit of40 mph or above. On roads with a lower speed limit, judgement may be usedas to whether Road Danger Lamps are needed, depending on the standardof street lighting.
Road Danger Lamps must not be higher than 1.5 metres above the road (or 1.2 metres where the speedlimit is more than 40 mph).
The type of lamp to be used is as follows :
Type of Road Danger Lamp Conditions of use
Flashing lamp (55 to 150 flashes per minute) Only when ALL of the following conditions apply :- the speed limit is 40 mph or less- the Road Danger Lamp is within 50 metres of
a street lamp, and- the street lamp is illuminated.
Steady lamp On any road with or without street lighting.
17
Barriers
Barriers may comprise separate portable post and plank systems, ‘gate frames’ linked together, or semi-permanent constructions built to enclose the site.
There are several different requirements for the barrier planks associated with post and plank systems. Thefollowing explains the requirements and how they may be met using barrier planks which are red andwhite and manufactured in fully retroreflective materials. (Note: ‘Retroreflective’ means that at night thematerial reflects light back to the light source).
Barrier planks are required to carry out three functions :-1. As a TRAFFIC BARRIER. When a traffic lane is closed for works to take place, the regulations
require this to be done with a retroreflective red and white barrier plank placed across the lane.This is illustrated on page 12 as a Traffic Barrier (‘Lane Closed’ sign).
2. As a PEDESTRIAN BARRIER. Pedestrians must be separated from the works by barrierswhich are conspicuous and mounted as part of a portable fencing system. Pedestrian barrierplanks may be of several different contrasting colours; yellow, white or orange colours are bestdetected by partially sighted people, but red and white is one of the acceptable combinations.
3. As a TAPPING RAIL for blind and partially sighted people. Tapping rails are placed as thebottom rail in a pedestrian fencing system. A red and white barrier plank may be used.
All barriers facing vehicular traffic should be of the fully retroreflective red and white form. Red and whitebarrier planks do not have to be used for pedestrian barriers or tapping rails but, if they are, they must beretroreflective. Other planks used for these purposes do not need to be retroreflective.
18
There are other points to note about the use of barrier planks in portable fencing systems:a) The TRAFFIC BARRIER (‘Lane Closed’ sign) is not needed if the works are protected by a
conspicuous vehicle.b) Pedestrian barrier systems must be rigid enough to guard pedestrians from traffic, excavations,
plant or materials. They must be placed with sufficient clearance to prevent pedestrians fallinginto the excavation and, when placed to create a temporary footway in the carriageway parallelto the traffic stream, must be protected by a row of traffic cones between the barrier and thetraffic stream. Consult your supervisor if the excavation is deep, or positioned close topedestrians, as stronger barriers may be needed and/or other safety measures may be requirede.g. covering or temporarily refilling the excavation.
c) Where a work site may be approached by pedestrians crossing the road from the opposite side,you should place barriers, including tapping rails, all around the excavation, even whenpedestrians are not diverted into the carriageway.
d) Where long excavations are sited in situations where pedestrians are not expected to cross fromthe opposite side, barriers on the traffic stream side of the works area do not need the tappingrail. In these circumstances, on an unrestricted road, the barrier on the traffic stream side can bereplaced with an additional row of cones. These cones should be linked with a suitably supportedtraffic tape to attract attention to the boundary of the safety zone.
Use pedestrian barriers to mark out any temporary footway. You must always use a rigid barrier to protectpedestrians from traffic, excavations, plant or materials. Place road danger lamps at the ends of the barriersat night so that they may be clearly seen by pedestrians.
19
PORTABLE PEDESTRIAN BARRIERS, which may include mesh, should be reasonably rigid, designedto resist being blown over by the wind or passing traffic, and have:
• a handrail fixed at between 1 metre and 1.2 metres above ground level, which should bereasonably smooth and rigid to guide pedestrians and give them some measure of support; and avisibility panel of at least 150mm deep which may be integral with the handrail or, if separate,must be fixed so that its upper edge is a minimum of 0.9 metres above ground level.
• a tapping rail (or equivalent reasonably rigid area if the barrier is a vertically continuous one) ofminimum depth of 150mm with a lower edge at ground level or set at up to 200 mm aboveground level.
Information boardAn information board must be displayed at every site, except for mobileworks and minor works which do not include excavation, involving useof a vehicle (see page 66). This board should be placed so that it does notobstruct footways or carriageways but can be read mainly by pedestrians,and possibly by drivers who have stopped. (The boards are too detailed tobe read easily by passing traffic.)
The board must give the name of the organisation for which the worksare being carried out, and a telephone number which can be contacted inemergencies. It may also contain other information that will be helpful inexplaining to the public why the work is being done, who is doing it andhow long it will take. Such additional information is to be encouraged where practical and could includesome or all of the following: a brief description of the works, the name of the contractor and a messageapologising for inconvenience or delays. A completion date should normally be included if the works areexpected to continue for more than a month.
20
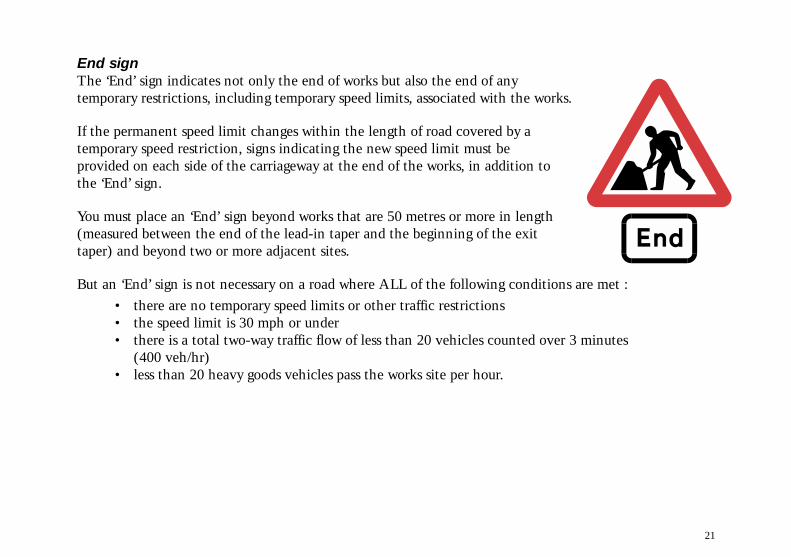
End signThe ‘End’ sign indicates not only the end of works but also the end of anytemporary restrictions, including temporary speed limits, associated with the works.
If the permanent speed limit changes within the length of road covered by atemporary speed restriction, signs indicating the new speed limit must beprovided on each side of the carriageway at the end of the works, in addition tothe ‘End’ sign.
You must place an ‘End’ sign beyond works that are 50 metres or more in length(measured between the end of the lead-in taper and the beginning of the exittaper) and beyond two or more adjacent sites.
But an ‘End’ sign is not necessary on a road where ALL of the following conditions are met :• there are no temporary speed limits or other traffic restrictions• the speed limit is 30 mph or under• there is a total two-way traffic flow of less than 20 vehicles counted over 3 minutes
(400 veh/hr)• less than 20 heavy goods vehicles pass the works site per hour.
21
SETTING OUT SIGNSParkingYou must park your vehicle safely before you unload or set up signs. If you can’t park it off the road makesure the vehicle can be seen clearly by other drivers. Turn on your roof-mounted amber beacon(s). Do notobstruct a footway or cycle track when parking off the road.
Precautionary measuresIf at all possible place signs so that they do not obstruct vehicles, cyclists, pedestrians or other road users.Where there is no street lighting, place a Road Danger Lamp alongside signs which are on, or partly on afootway to warn pedestrians at night.
Advance signingIt is important that the distances, including the safety zone dimensions, are determined before starting toset the signs out. From the table inside the back cover select the distance for the advance signs. If there islimited visibility on the approach to the proposed works site, e.g. on a bend, on a dip in the road or on thebrow of a hill, you must provide extra advance signs. These extra signs will need to be placed first.
Access to works siteYou may need to allow for vehicles entering and leaving the site.
22
SEQUENCE FOR SETTING OUT SIGNS
Setting out advance signing where necessaryWhen the Road Works Ahead sign is more than 1/4 mile from the works, or when extra advance signs areneeded because visibility is limited :
1. Stop the vehicle in a safe place, switching on your roof-mounted amber beacon(s)2. Ensure you are wearing your high visibility clothing3. Set up the signs you need before moving on to the works site and setting out the rest
of the layout.
Setting out basic signingYou are at greatest risk when setting out the signing and guarding, so great care is needed to ensure thatyou can see the traffic and the traffic can see you.
Wear your high visibility clothing, putting it on before leaving the vehicle. It may be safer to get out of thevehicle on the passenger side, rather than stepping into the traffic stream.
Make sure the roof-mounted amber beacon(s) are switched on and operating.
Face the traffic when setting out signs, taking particular care when you are crossing the road toplace signs.
Follow the sequence on pages 24 and 25.
23
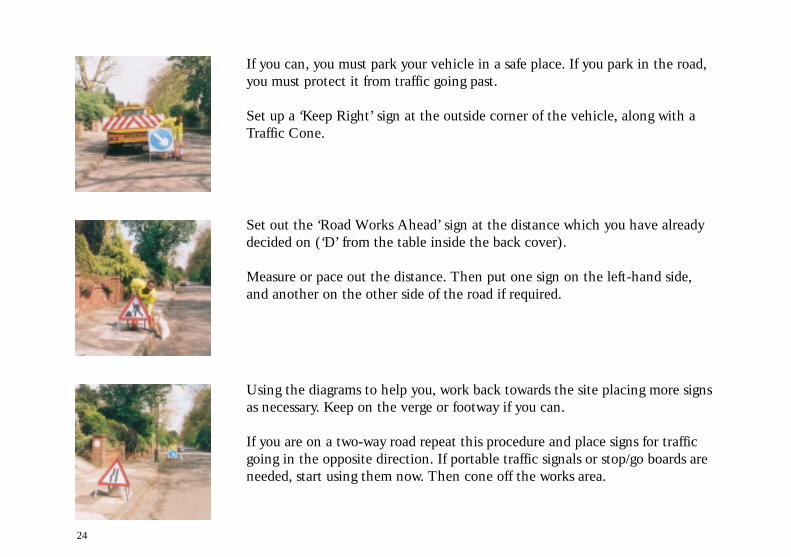
If you can, you must park your vehicle in a safe place. If you park in the road,you must protect it from traffic going past.
Set up a ‘Keep Right’ sign at the outside corner of the vehicle, along with aTraffic Cone.
Set out the ‘Road Works Ahead’ sign at the distance which you have alreadydecided on (‘D’ from the table inside the back cover).
Measure or pace out the distance. Then put one sign on the left-hand side,and another on the other side of the road if required.
Using the diagrams to help you, work back towards the site placing more signsas necessary. Keep on the verge or footway if you can.
If you are on a two-way road repeat this procedure and place signs for trafficgoing in the opposite direction. If portable traffic signals or stop/go boards areneeded, start using them now. Then cone off the works area.
24
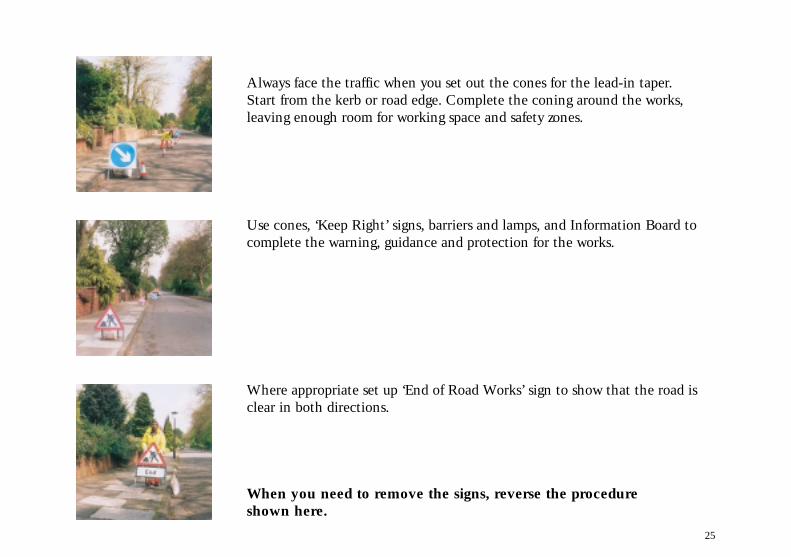
Always face the traffic when you set out the cones for the lead-in taper.Start from the kerb or road edge. Complete the coning around the works,leaving enough room for working space and safety zones.
Use cones, ‘Keep Right’ signs, barriers and lamps, and Information Board tocomplete the warning, guidance and protection for the works.
Where appropriate set up ‘End of Road Works’ sign to show that the road isclear in both directions.
When you need to remove the signs, reverse the procedureshown here.
25
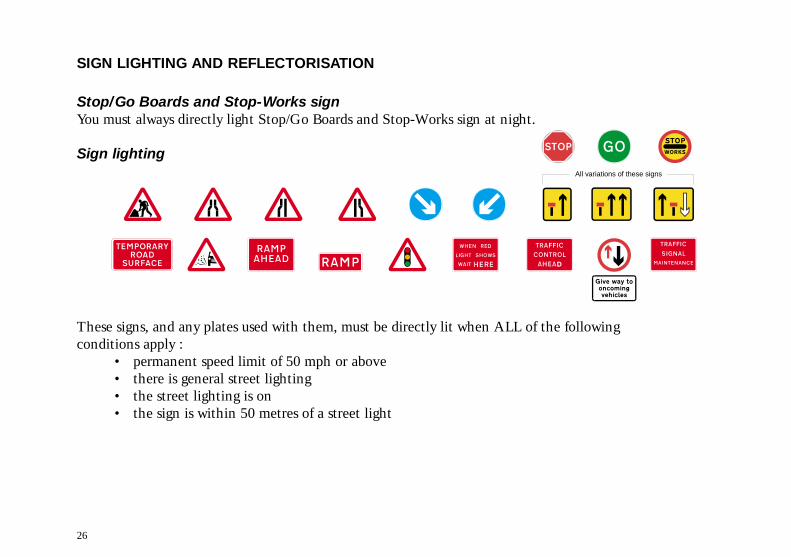
SIGN LIGHTING AND REFLECTORISATION
Stop/Go Boards and Stop-Works signYou must always directly light Stop/Go Boards and Stop-Works sign at night.
Sign lighting
These signs, and any plates used with them, must be directly lit when ALL of the followingconditions apply :
• permanent speed limit of 50 mph or above• there is general street lighting• the street lighting is on• the sign is within 50 metres of a street light
26
All variations of these signs
ReflectorisationAll signs (including traffic cones, cylinders and red and white barrier planks), except the ‘Direction ofTemporary Pedestrian Route’ sign, ‘Crossing not in use’ sign, the ‘Pedestrians look left’ sign and theInformation Board, must be reflectorised to BS873 : Part 6 : 1983 Class 1 or Class 2 or BS873 : Part 8 :1985 designation 1 or 2, or the equivalent standard of a European Economic Area State. It is unlawful toreflectorise only part of the sign face; where signs are required to be reflectorised, this applies to the wholesurface except for any part coloured black. Non-reflectorised elements of a sign face appear black at night;this not only reduces the sign’s visibility, but may well make its message unrecognisable.
The ‘STOP-WORKS’ sign must be reflectorised. The part coloured yellow must also be fluorescent and thepart coloured red may be fluorescent.
27
WORKS ON FOOTWAYS - LOOK AFTER PEDESTRIANS
Pedestrian safety It is your responsibility to make sure that pedestrians are safe during the works. This means protectingthem from both the works and passing traffic.
You must take into account the needs of children, elderly people and people with disabilities, havingparticular regard for visually impaired people. In order to do this you must provide a suitable barrier system(see page 18) which safely separates pedestrians from hazards and provides sufficient access for people usingwheelchairs and those with prams or pushchairs.
Safe routes for pedestriansIf you have to close a footway or part of a footway, you must provide a safe route for pedestrians whichshould include access to adjacent buildings, properties and public areas.
Safe routes should always provide a minimum unobstructed width of 1 metre, increased wherever possibleto 1.5 metres or more.
However, a balanced assessment must be made to provide pedestrians with the safest option. For example,a route of 1 metre unobstructed width which uses the existing footway is potentially safer than a widertemporary route placed in the carriageway.
When temporary pedestrian routes have to be placed in the carriageway, make sure the signing andguarding barriers are put into place before the footway is blocked. Make sure the sideways clearance (S) ofthe safety zone is on the traffic side of the barriers. Where necessary, provide ramps, or a raised footway orboards which are fit for the purpose (see page 32).
28
The use of the other footway may be acceptable in some quiet roads, but if you select this option you mustensure that the alternative route is safe to use, and you must take account of the needs of children andpeople with disabilities.
Pedestrian crossings and pedestrianised areasIf the works are on or near pedestrian crossings turn to page 42 for advice. In pedestrianised areasthe working space, including vehicles, plant or materials, must be enclosed with pedestrian barriers.
Safety zone for operativesWhen working in a footway remember you must provide a safety zone in the carriageway if the workingspace is closer to the edge of the carriageway than the width of the sideways clearance (S). If cones areplaced in the road, signing and guarding of the safety zone must be carried out.These same principles apply when working in a verge adjacent to the carriageway.
ScaffoldingAny scaffolding erected in the highway must be licensed by the highway authority.
29
30
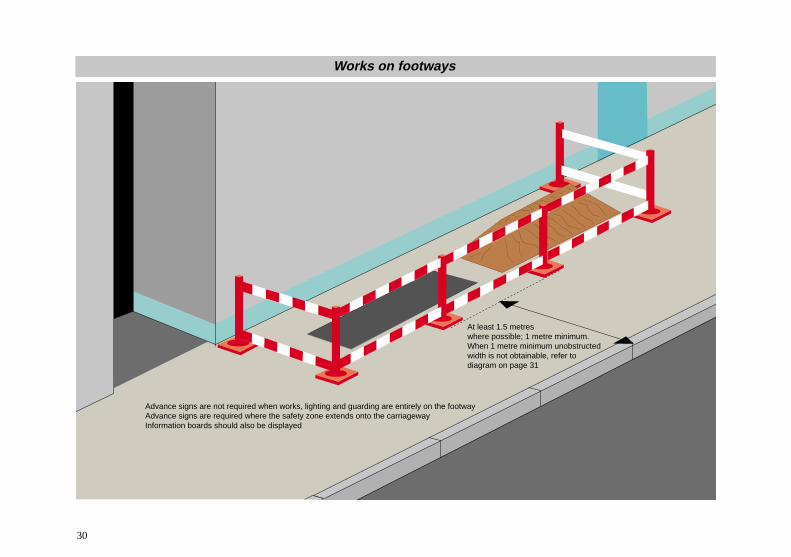
At least 1.5 metreswhere possible; 1 metre minimum.When 1 metre minimum unobstructed width is not obtainable, refer to diagram on page 31
Advance signs are not required when works, lighting and guarding are entirely on the footwayAdvance signs are required where the safety zone extends onto the carriageway Information boards should also be displayed
Works on footways
31
D
D
T
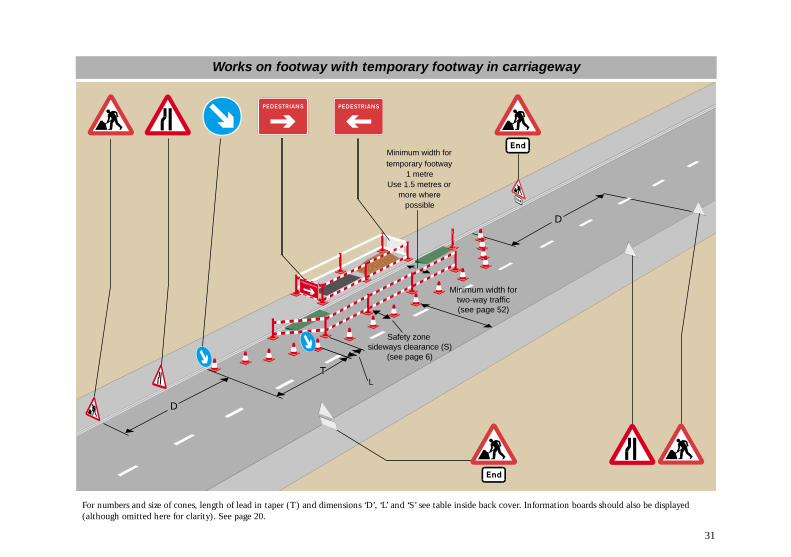
Minimum width fortemporary footway
1 metreUse 1.5 metres or
more wherepossible
L
Safety zone sideways clearance (S)
(see page 6)
Minimum width fortwo-way traffic(see page 52)
For numbers and size of cones, length of lead in taper (T) and dimensions ‘D’, ‘L’ and ‘S’ see table inside back cover. Information boards should also be displayed(although omitted here for clarity). See page 20.
Works on footway with temporary footway in carriageway
FOOTWAY RAMPS, FOOTWAY BOARDS AND ROAD PLATES
Footway RampsWhen pedestrians are diverted to temporary footways in the carriageway, suitable ramps must be providedto enable people using wheelchairs or pushchairs to negotiate kerbs safely.
Ramps should cover the full width of the temporary footway (minimum of 1 metre), and should beconstructed from materials strong enough to support pedestrians, preferably with edging to preventwheelchairs slipping over the edge. They may be made on site, eg. from wood or bitumastic materials, orprefabricated. Ramps should slope gently enough to enable wheelchair users and pushchairs to reach thekerb without undue difficulty. Ideally, the layout should include a platform at kerb level which would allowwheelchair users to turn through 90° before descending the ramp in a line that is parallel to the kerb.Ramps must be fixed in position, allow for rain water to run along the gutter, and should have a slipresistant surface.
Footway BoardsFootway Boards should only be used on footways to maintain foot and light vehicle access to premisesduring excavation works.
Footway Boards used for bridging excavations must provide at least 1 metre width for pedestrians, butpreferably 1.5 metres, must be strong enough to support pedestrians, and must be made from material whichis unlikely to become distorted. Where used for light vehicles the boards must be capable of supporting theadded load and, where used on a vehicle crossover the whole width of the crossover must be boarded.
The edges of footway boards must be chamfered to prevent tripping and should have a slip resistantsurface. The sides of the excavation should be stable or suitably supported under the board, and the boardshould be rigidly fixed with sufficient length beyond the excavation to provide the necessary support.The edges of the footway boards adjacent to the excavation should be fenced to prevent falls.
32
Road PlatesRoad Plates may be required to bridge excavations in order to open the carriageway to traffic, e.g. duringtraffic sensitive periods, at night or at weekends. Their use must always be authorised by your supervisorwho will decide on the size and thickness of the plate to be used. The thickness will depend on the widthof excavation to be spanned and the type of traffic expected to use them.
Road Plates must be made of suitable material with an appropriate skid resistant surface. Their installationmust not present a hazard to cyclists or motorcyclists.
The sides of the excavations must be suitably supported beneath the road plates, and they must be rigidlysecured to the road surface. Road Plates must be either sunk into the surface or suitable bitumastic materialused to provide a ramp to the plate level. Where ramps are used, appropriate Ramp Warning signs shouldbe used when there is a significant change in the road level.The edges of the Road Plates adjacent to the excavation should be fenced to prevent falls.
33
WORKS ON TWO-LANE SINGLE CARRIAGEWAY ROADS
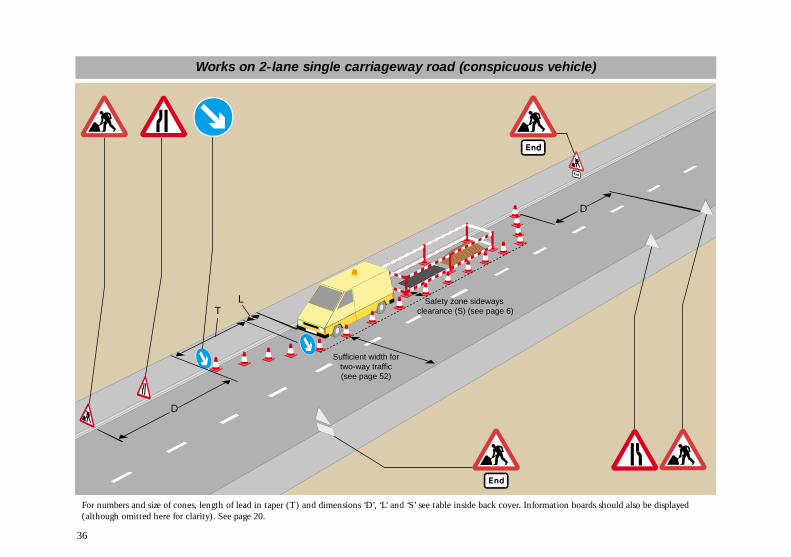
Use the basic layout on pages 8-11 for the approach signing and guarding.You may omit the traffic barrier if the works are protected by a conspicuous vehicle.
Exceptions are allowed in either one of cases (a) and (b) below, provided that ALL the followingconditions are met :
• the speed limit is 30 mph or under• there is a total two-way traffic flow of less than 20 vehicles counted over 3 minutes (400 veh/hr)• less than 20 heavy goods vehicles and buses pass the works site per hour.
(a) Where there is a works vehicle with a roof-mounted beacon in continuous useSo long as drivers can see the beacon clearly from at least 50 metres in either direction, you do notneed to use the ‘Road Works Ahead’ and ‘Road Narrows’ signs in advance of the works. However,you must still use the lead-in taper of traffic cones and the ‘Keep Right/Left’ sign. You will also needto use a Traffic Barrier unless your works vehicle is conspicuously coloured.
(b) On roads where the parking of vehicles is usual and parked vehicles other than worksvehicles are likely to be present for the duration of the worksWorks which take place in the space between parked vehicles need no advance warning, providedthat the whole works, including the safety zone, do not extend into the carriageway beyond the lineof vehicles. There should be a line of cones in place at all times on the road side of the works.Provision must be made for the possibility that the parked vehicles will be moved. Should thishappen, it will be necessary to revert to the basic layout.
34
Works vehicleIf you want to park a works vehicle in front of the works to give some physical protection, or to work fromit, keep a distance between the vehicle and the works of :
Speed limit of 30 mph or under - 2 metresSpeed limit of 40 mph or above - 5 metres
The existing or approved temporary speed limit should be used for the above (but see also page 7).Measure the longways clearance (L) from the end of the lead-in taper to the part of the vehicle whichfaces the traffic. If you are working from the back of the vehicle, park it so that its back is facing the works.
Road widthsTurn to page 52 for the minimum road width required for two-way working. If there is not enough spacefor two-way traffic, it may be possible to use traffic control. Your supervisor will decide for you inconsultation with the highway authority.
Setting outTurn to the inside back cover for dimensions D, T, L and S. Then turn to page 22 for the settingout procedure.
35
36
D
T
D
L
Sufficient width fortwo-way traffic(see page 52)
Safety zone sideways clearance (S) (see page 6)
For numbers and size of cones, length of lead in taper (T) and dimensions ‘D’, ‘L’ and ‘S’ see table inside back cover. Information boards should also be displayed(although omitted here for clarity). See page 20.
Works on 2-lane single carriageway road (conspicuous vehicle)
37
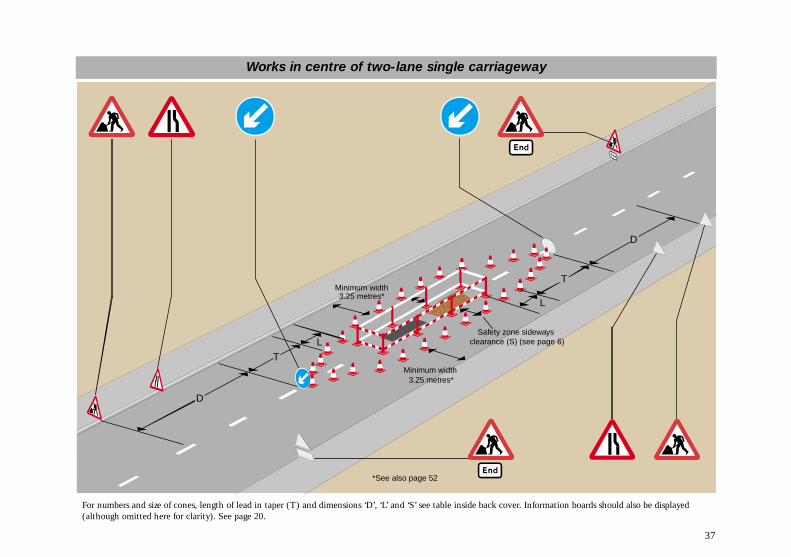
D
T
D
TMinimum width3.25 metres*
Minimum width3.25 metres*
L
L
*See also page 52
Safety zone sideways clearance (S) (see page 6)
For numbers and size of cones, length of lead in taper (T) and dimensions ‘D’, ‘L’ and ‘S’ see table inside back cover. Information boards should also be displayed(although omitted here for clarity). See page 20.
Works in centre of two-lane single carriageway
WORKS ON DUAL CARRIAGEWAY ROADS WITHOUT HARD SHOULDERSConsult your supervisor about what to do. Further advice is available in the Traffic Signs Manual Chapter8. If the work involves closing the right-hand lane, or closing a left hand lane on a three-lane dualcarriageway with the national speed limit, you will need to liaise with the highway authority. Speedrestrictions may be necessary for which you will also need to refer to the highway authority.
Right lane closureThis is shown on page 40.
Left lane closureIf the left lane is closed, you should normally merge traffic into the left lane by using a guide island,and then divert the traffic into the right lane(s). This is shown on page 41. If two or more lanes areto be diverted to the right, you must change the road markings to make sure that the traffic lanesare continuous.
Where conditions permit you may want to merge traffic to the right at a left lane closure - for examplefrom lane 1 into lane 2. You can do this when :
• lane 1 of a three-lane dual carriageway is being closed, or• there will be no more than about 60 vehicles per 3 minutes (1200 veh/hr) on each traffic lane
which remains open.
38
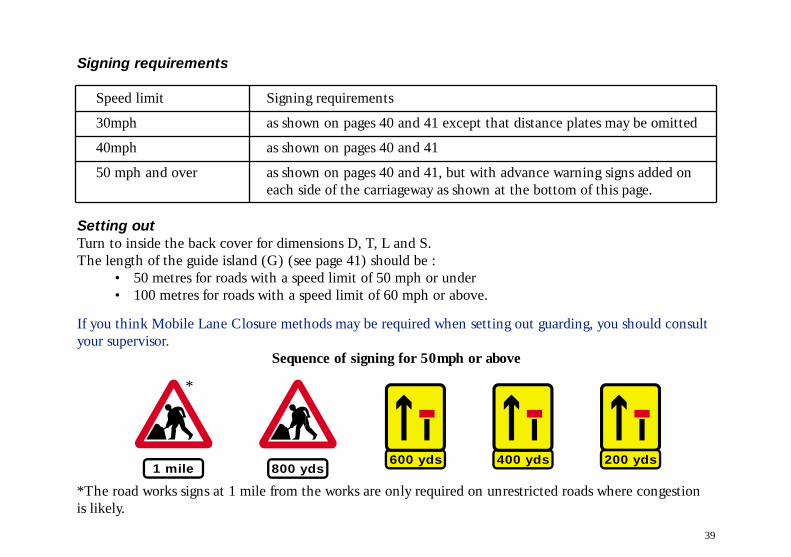
Signing requirements
Speed limit Signing requirements
30mph as shown on pages 40 and 41 except that distance plates may be omitted
40mph as shown on pages 40 and 41
50 mph and over as shown on pages 40 and 41, but with advance warning signs added on each side of the carriageway as shown at the bottom of this page.
Setting outTurn to inside the back cover for dimensions D, T, L and S.The length of the guide island (G) (see page 41) should be :
• 50 metres for roads with a speed limit of 50 mph or under• 100 metres for roads with a speed limit of 60 mph or above.
If you think Mobile Lane Closure methods may be required when setting out guarding, you should consultyour supervisor.
Sequence of signing for 50mph or above
39
800 yds200 yds400 yds600 yds
1 mile
*The road works signs at 1 mile from the works are only required on unrestricted roads where congestion is likely.
*
40
T
D
L
300 yds
Safety zone sidewaysclearance (S) (see page 6)
300 yds
For numbers and size of cones, length of lead in taper (T) and dimensions ‘D’, ‘L’ and ‘S’ see table inside back cover. Information boards should also be displayed(although omitted here for clarity). See page 20.
Works on 40 mph dual carriageway road - right hand lane closed to traffic
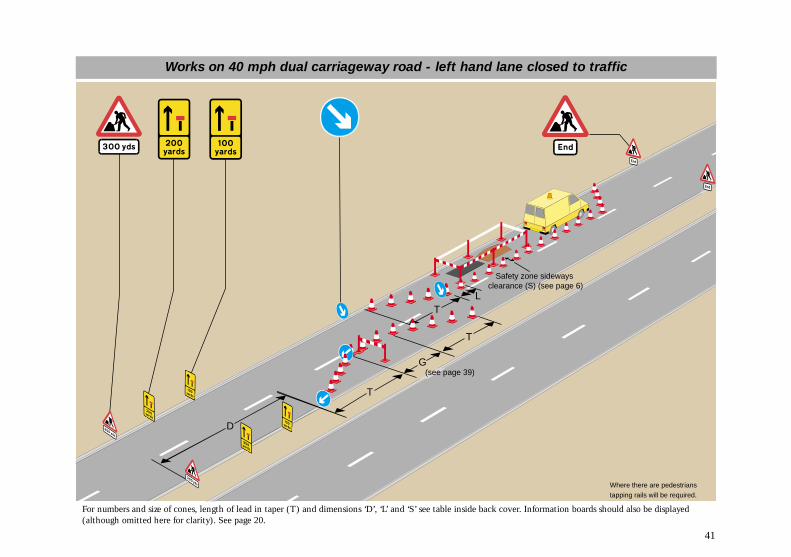
41
T
(see page 39)
L
Where there are pedestrianstapping rails will be required.
D
T
G
T
Safety zone sideways clearance (S) (see page 6)
For numbers and size of cones, length of lead in taper (T) and dimensions ‘D’, ‘L’ and ‘S’ see table inside back cover. Information boards should also be displayed(although omitted here for clarity). See page 20.
Works on 40 mph dual carriageway road - left hand lane closed to traffic
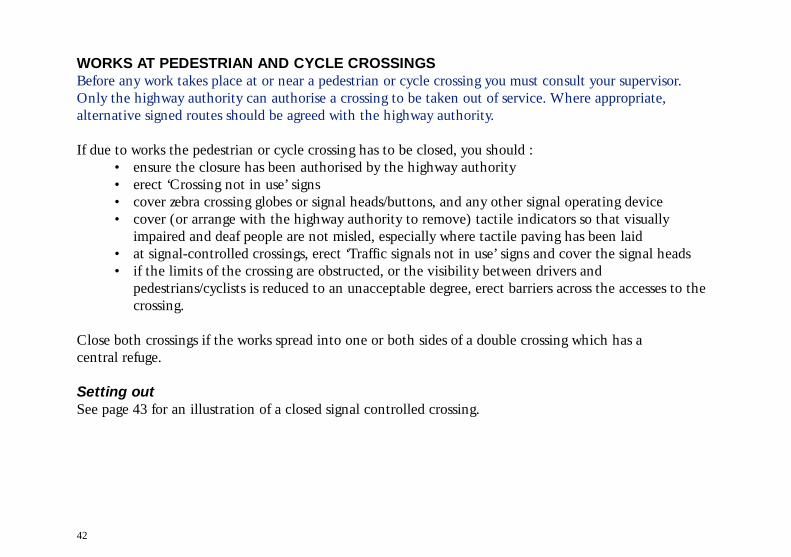
WORKS AT PEDESTRIAN AND CYCLE CROSSINGSBefore any work takes place at or near a pedestrian or cycle crossing you must consult your supervisor.Only the highway authority can authorise a crossing to be taken out of service. Where appropriate,alternative signed routes should be agreed with the highway authority.
If due to works the pedestrian or cycle crossing has to be closed, you should :• ensure the closure has been authorised by the highway authority• erect ‘Crossing not in use’ signs• cover zebra crossing globes or signal heads/buttons, and any other signal operating device• cover (or arrange with the highway authority to remove) tactile indicators so that visually
impaired and deaf people are not misled, especially where tactile paving has been laid• at signal-controlled crossings, erect ‘Traffic signals not in use’ signs and cover the signal heads• if the limits of the crossing are obstructed, or the visibility between drivers and
pedestrians/cyclists is reduced to an unacceptable degree, erect barriers across the accesses to thecrossing.
Close both crossings if the works spread into one or both sides of a double crossing which has acentral refuge.
Setting outSee page 43 for an illustration of a closed signal controlled crossing.
42
43
D
D
T
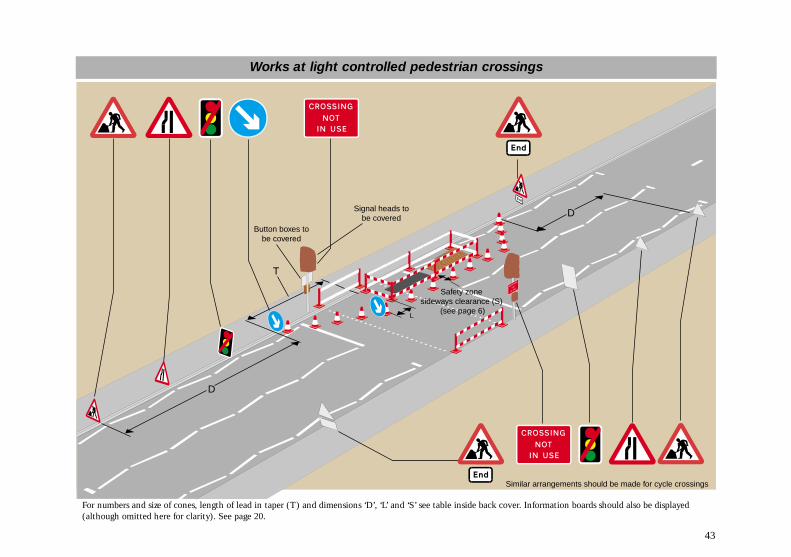
Similar arrangements should be made for cycle crossings
Safety zone sideways clearance (S)
(see page 6)
Signal heads tobe covered
Button boxes tobe covered
L
For numbers and size of cones, length of lead in taper (T) and dimensions ‘D’, ‘L’ and ‘S’ see table inside back cover. Information boards should also be displayed(although omitted here for clarity). See page 20.
Works at light controlled pedestrian crossings
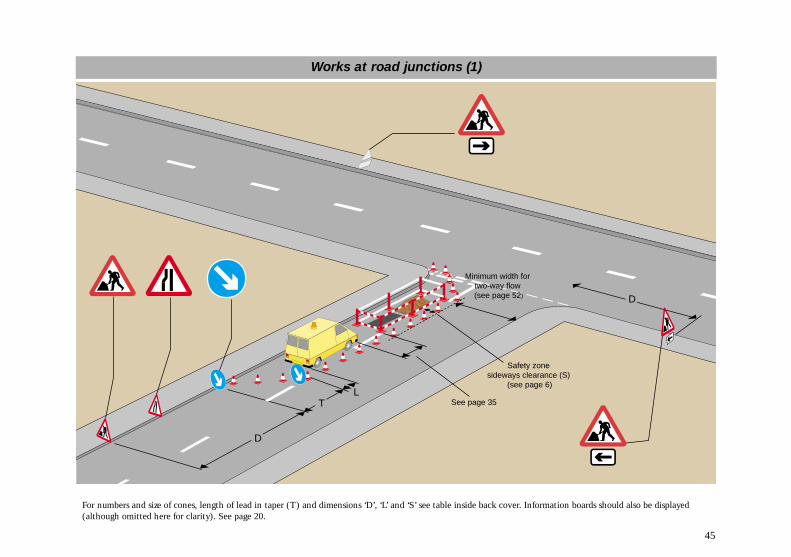
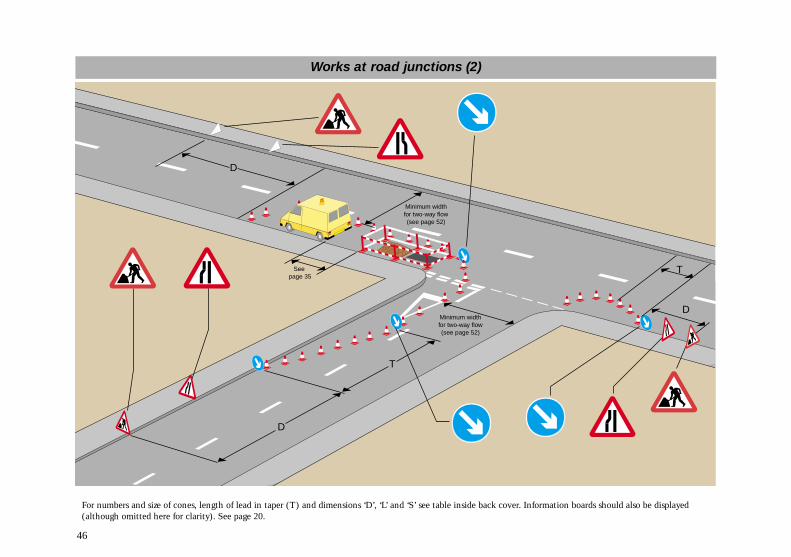
WORKS AT ROAD JUNCTIONSKeep the two-way traffic flowing past the works if possible. If you can’t, traffic control or a diversion maybe required.
Put up ‘Road Works Ahead’ signs with arrow plates on the main route if the works are in a side road. Turnto page 45 for details.
The illustration on page 46 shows the works on or near the far side of a junction. At works like these, takethe taper of cones up to the approach side of the junction. Make sure that any cones near the junctionhelp drivers turn left smoothly.
44
45
See page 35L
D
T
D
Safety zone sideways clearance (S)
(see page 6)
Minimum width for two-way flow (see page 52)
For numbers and size of cones, length of lead in taper (T) and dimensions ‘D’, ‘L’ and ‘S’ see table inside back cover. Information boards should also be displayed(although omitted here for clarity). See page 20.
Works at road junctions (1)
46
Minimum widthfor two-way flow(see page 52)
D
T
T
D
D
Minimum widthfor two-way flow(see page 52)
See page 35
For numbers and size of cones, length of lead in taper (T) and dimensions ‘D’, ‘L’ and ‘S’ see table inside back cover. Information boards should also be displayed(although omitted here for clarity). See page 20.
Works at road junctions (2)
WORKS AT ROAD JUNCTIONS CONTROLLED BY PERMANENT TRAFFIC SIGNALS
Approaches to junctionsA works site on the approach to a traffic signalled junction can cause significant disruption to the trafficflow at the junction. An adjustment of the traffic signals may be required, so consult your supervisor, whowill then consult the highway authority.
At junctionsIf traffic signals are not working, put up ‘Traffic signals ahead not in use’ signs on all approaches.Permanent traffic signals are often replaced by temporary or portable traffic signals for the duration of theworks. Both will need approval by the highway authority.
If pedestrian lights at a junction are affected by the works, they should be treated in a similar manner topedestrian crossings (see page 42). This must be discussed with the highway authority.
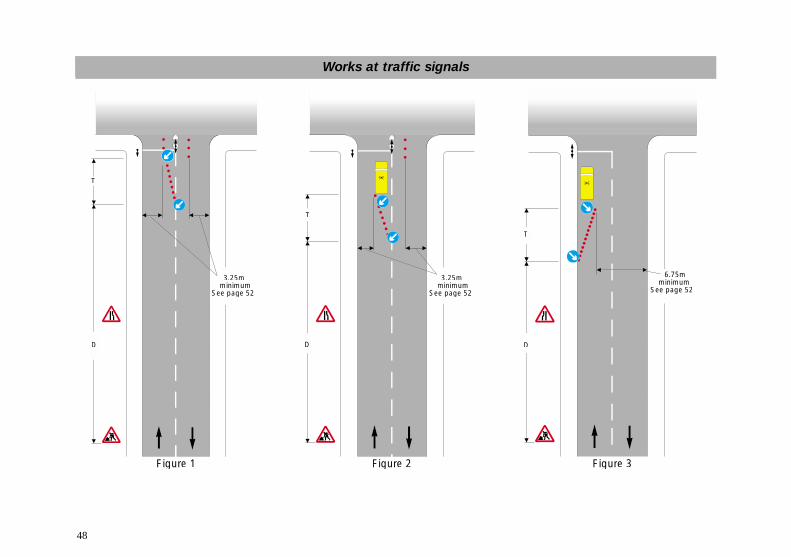
Figures 1, 2 and 3 on page 48 show guarding and signing for works where signals are on single carriagewayurban roads with a speed limit of 30 mph or under :
• Figure 1 : Work at an island signal when there is no works vehicle present.• Figure 2 : Work at an island signal when a works vehicle is present, and its operating roof-
mounted amber beacon can be seen clearly.• Figure 3 : Work at a kerbside signal when a works vehicle and its operating roof-mounted amber
beacon can be seen clearly.Appropriate advance warning signs should be placed on the cross arms of the junction.
Consult your supervisor where the road has a speed limit of 40 mph or above.
47
48
25m3.minimummin
See page 52e p
Figure 1
3.25m3.minimummin
See page 52e p
Figuru e 2
T
Figure 3
.75m6minimummin
See page 52e p
T
T
D D D
Works at traffic signalsWorks at traffic signals
WORKS AT ROUNDABOUTS
Works at the entrance to or exit from a roundaboutUse advance signs to warn traffic on all approaches that there are works at or near the roundabout.Use ‘Keep Right/Left’ signs to guide traffic around the coned-off works site.
Try to keep two-way traffic flowing if possible, but remember the width restrictions (see page 52).However, if the works site makes the road too narrow to allow two-way traffic to pass, restrict the road to‘Exit only’ from the roundabout. The traffic usually entering the roundabout on this road will then needto be diverted. This requires permission of the highway authority and needs to be pre-planned as adequatenotice has to be given. Consult your supervisor.
Extra cones will be needed to restrict traffic to one lane going towards this exit and additional advancewarning using ‘Road Narrows’ signs provided on all approaches. Use ‘Keep Right/Left’ signs to guide trafficpast coned areas.
Works in the circulatory area of a roundaboutMovement of traffic should be maintained if possible. Guard and cone the works and provide advance‘Road Narrows’ signs on all approaches. Use ‘Keep Right/Left’ signs to guide the traffic past theworks site.
Where works will completely obstruct the circulatory area of a roundabout, consult your supervisor whowill then consult the highway authority.
49
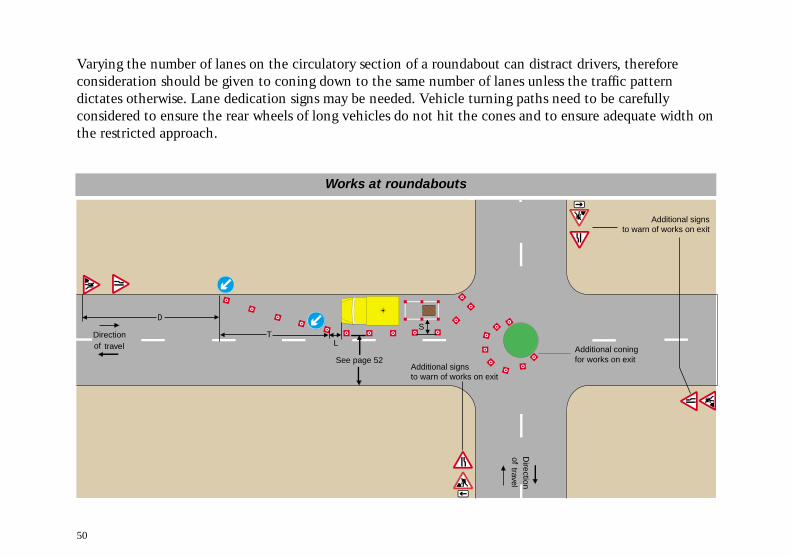
Varying the number of lanes on the circulatory section of a roundabout can distract drivers, thereforeconsideration should be given to coning down to the same number of lanes unless the traffic patterndictates otherwise. Lane dedication signs may be needed. Vehicle turning paths need to be carefullyconsidered to ensure the rear wheels of long vehicles do not hit the cones and to ensure adequate width onthe restricted approach.
50
TDirectionof travel
Direction
oftravel
L
S
Additional signsto warn of works on exit
See page 52
Additional signsto warn of works on exit
Additional coningfor works on exit
D
Works at roundabouts
CYCLE LANES AND CYCLE TRACKSWhere cycle lanes, cycle tracks and cycle routes are affected by street works and road works you should useyour best endeavours to ensure the safety of cyclists passing or crossing by the works.
Cycle lanes marked with a solid white line have been created by means of Traffic Regulation Orders.Where one of these is affected by planned works, your supervisor will need to discuss the situation with thehighway authority well before the work starts. It may be necessary to obtain a Temporary Notice or TrafficRegulation Order to suspend the cycle lane. Temporary Notices and Temporary Traffic Regulation Ordersare not required for emergency works.
Cyclists may have to use the remainder of the carriageway, use an alternative route or, if an alternativeroute is not available, will have to dismount while passing the works. Your supervisor may need to discussthese alternatives with the highway authority.
When portable traffic signals are used, bear in mind when adjusting the timings that cyclists take longer toclear the controlled section than motor vehicles.
Where the carriageway is closed off but the footway remains open, cyclists should be advised to dismountby using a ‘Cyclists Dismount and Use Footway’ white on red temporary sign.
Wherever possible, a minimum lane width of 3.25 metres should be provided to allow a car to overtake acyclist, more where lorries or buses will be present (see page 52).
51
TRAFFIC CONTROL
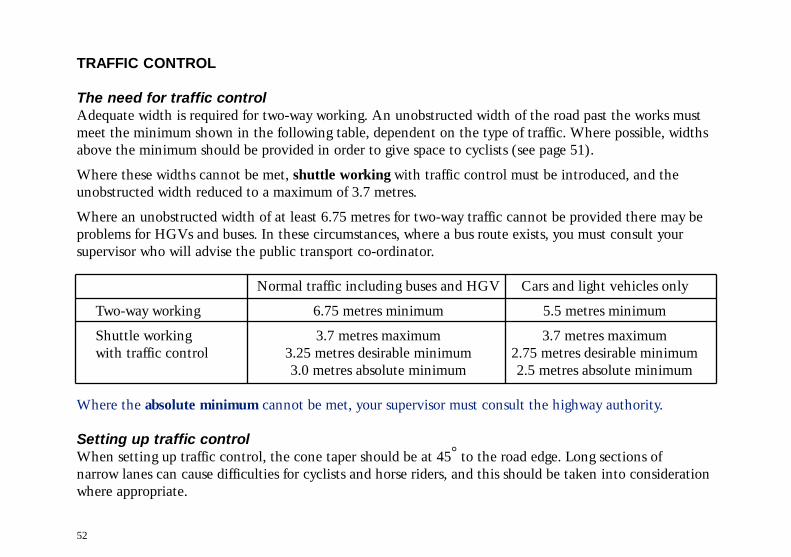
The need for traffic controlAdequate width is required for two-way working. An unobstructed width of the road past the works mustmeet the minimum shown in the following table, dependent on the type of traffic. Where possible, widthsabove the minimum should be provided in order to give space to cyclists (see page 51).
Where these widths cannot be met, shuttle working with traffic control must be introduced, and theunobstructed width reduced to a maximum of 3.7 metres.
Where an unobstructed width of at least 6.75 metres for two-way traffic cannot be provided there may beproblems for HGVs and buses. In these circumstances, where a bus route exists, you must consult yoursupervisor who will advise the public transport co-ordinator.
Normal traffic including buses and HGV Cars and light vehicles only
Two-way working 6.75 metres minimum 5.5 metres minimum
Shuttle working 3.7 metres maximum 3.7 metres maximumwith traffic control 3.25 metres desirable minimum 2.75 metres desirable minimum
Where the absolute minimum cannot be met, your supervisor must consult the highway authority.
Setting up traffic controlWhen setting up traffic control, the cone taper should be at 45° to the road edge. Long sections ofnarrow lanes can cause difficulties for cyclists and horse riders, and this should be taken into considerationwhere appropriate.
52
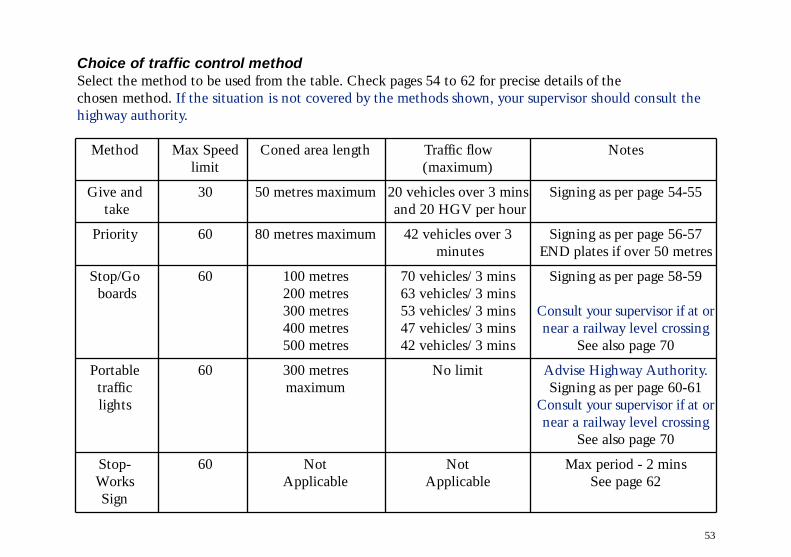
Choice of traffic control methodSelect the method to be used from the table. Check pages 54 to 62 for precise details of thechosen method. If the situation is not covered by the methods shown, your supervisor should consult thehighway authority.
Method Max Speed Coned area length Traffic flow Noteslimit (maximum)
Give and 30 50 metres maximum 20 vehicles over 3 mins Signing as per page 54-55take and 20 HGV per hour
Priority 60 80 metres maximum 42 vehicles over 3 Signing as per page 56-57minutes END plates if over 50 metres
Stop/Go 60 100 metres 70 vehicles/ 3 mins Signing as per page 58-59boards 200 metres 63 vehicles/ 3 mins
300 metres 53 vehicles/ 3 mins Consult your supervisor if at or400 metres 47 vehicles/ 3 mins near a railway level crossing500 metres 42 vehicles/ 3 mins See also page 70
Portable 60 300 metres No limit Advise Highway Authority.traffic maximum Signing as per page 60-61lights Consult your supervisor if at or
near a railway level crossingSee also page 70
Stop- 60 Not Not Max period - 2 mins Works Applicable Applicable See page 62Sign
53
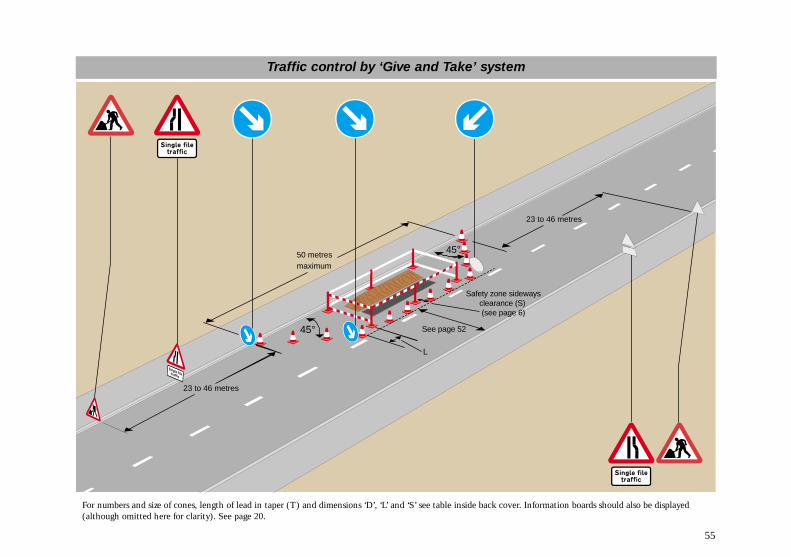
Traffic control by ‘Give and Take’ systemOnly use ‘Give and Take’ when ALL of the following apply :
• the speed limit is 30 mph or under• the length of the works from the start of the lead-in taper to the end of the exit taper is
50 metres or less• drivers approaching from either direction can see 50 metres beyond the end of the works• two-way traffic flow is less than 20 vehicles counted over 3 minutes (400 veh/hr)• less than 20 heavy goods vehicles pass the works per hour
The signing you will need is shown on page 55.
54
55
45°
45°50 metresmaximum
23 to 46 metres
23 to 46 metres
L
See page 52
Safety zone sidewaysclearance (S) (see page 6)
For numbers and size of cones, length of lead in taper (T) and dimensions ‘D’, ‘L’ and ‘S’ see table inside back cover. Information boards should also be displayed(although omitted here for clarity). See page 20.
Traffic control by ‘Give and Take’ system
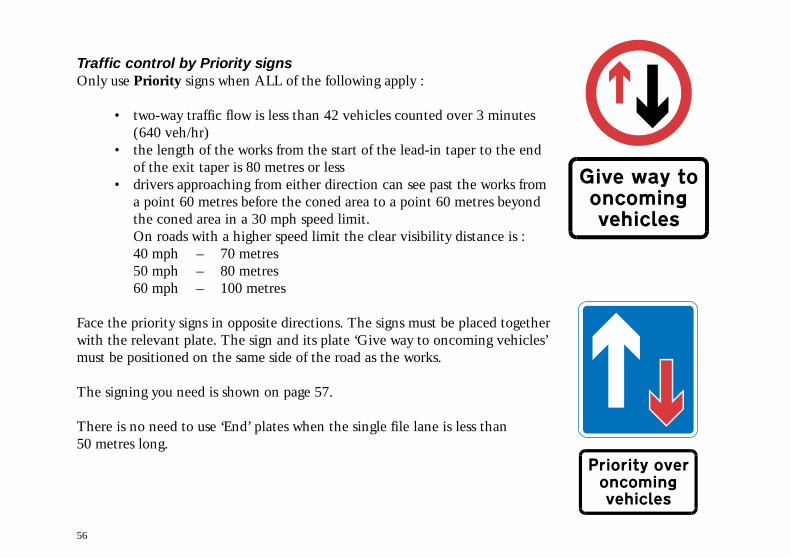
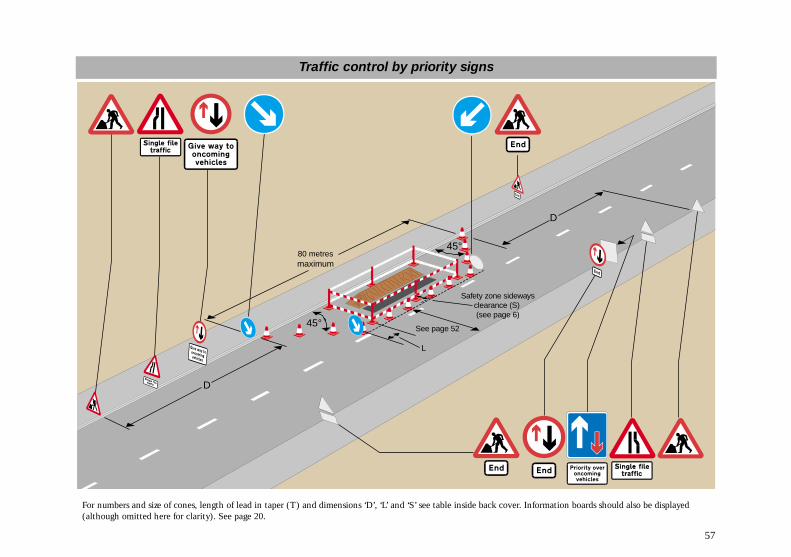
Traffic control by Priority signsOnly use Priority signs when ALL of the following apply :
• two-way traffic flow is less than 42 vehicles counted over 3 minutes(640 veh/hr)
• the length of the works from the start of the lead-in taper to the endof the exit taper is 80 metres or less
• drivers approaching from either direction can see past the works froma point 60 metres before the coned area to a point 60 metres beyondthe coned area in a 30 mph speed limit.On roads with a higher speed limit the clear visibility distance is :40 mph – 70 metres50 mph – 80 metres60 mph – 100 metres
Face the priority signs in opposite directions. The signs must be placed togetherwith the relevant plate. The sign and its plate ‘Give way to oncoming vehicles’must be positioned on the same side of the road as the works.
The signing you need is shown on page 57.
There is no need to use ‘End’ plates when the single file lane is less than50 metres long.
56
57
D
D
45°
45°80 metresmaximum
L
See page 52
Safety zone sidewaysclearance (S) (see page 6)
For numbers and size of cones, length of lead in taper (T) and dimensions ‘D’, ‘L’ and ‘S’ see table inside back cover. Information boards should also be displayed(although omitted here for clarity). See page 20.
Traffic control by priority signs
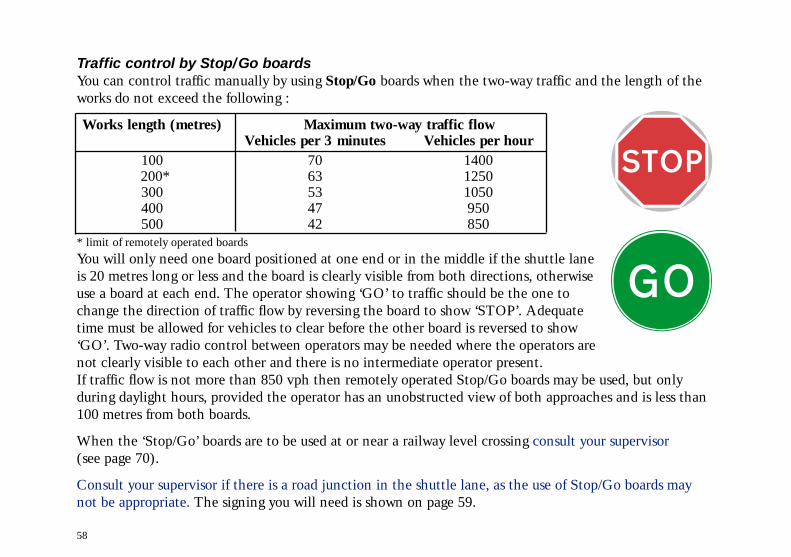
Traffic control by Stop/Go boardsYou can control traffic manually by using Stop/Go boards when the two-way traffic and the length of theworks do not exceed the following :
Works length (metres) Maximum two-way traffic flowVehicles per 3 minutes Vehicles per hour
* limit of remotely operated boardsYou will only need one board positioned at one end or in the middle if the shuttle laneis 20 metres long or less and the board is clearly visible from both directions, otherwiseuse a board at each end. The operator showing ‘GO’ to traffic should be the one tochange the direction of traffic flow by reversing the board to show ‘STOP’. Adequatetime must be allowed for vehicles to clear before the other board is reversed to show‘GO’. Two-way radio control between operators may be needed where the operators arenot clearly visible to each other and there is no intermediate operator present.If traffic flow is not more than 850 vph then remotely operated Stop/Go boards may be used, but onlyduring daylight hours, provided the operator has an unobstructed view of both approaches and is less than100 metres from both boards.
When the ‘Stop/Go’ boards are to be used at or near a railway level crossing consult your supervisor(see page 70).
Consult your supervisor if there is a road junction in the shuttle lane, as the use of Stop/Go boards maynot be appropriate. The signing you will need is shown on page 59.
58
59
D
D
45°
45°
LSee page 52
Safety zone sidewaysclearance (S) (see page 6)
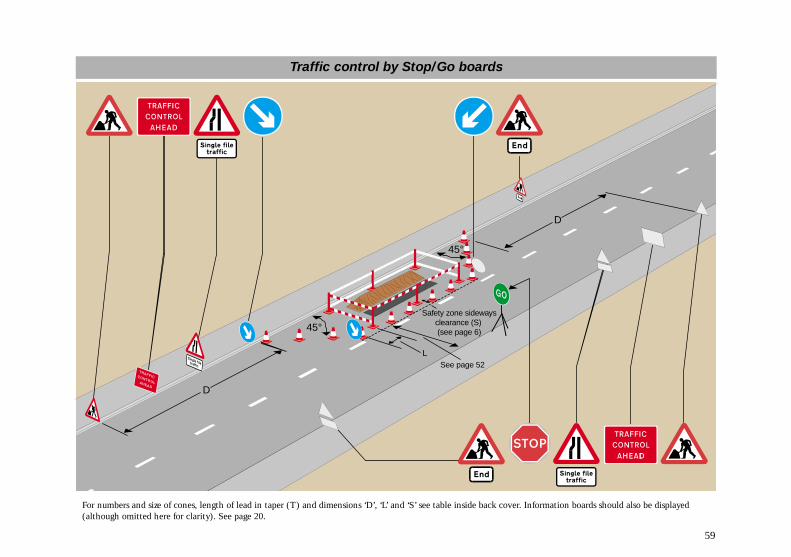
For numbers and size of cones, length of lead in taper (T) and dimensions ‘D’, ‘L’ and ‘S’ see table inside back cover. Information boards should also be displayed(although omitted here for clarity). See page 20.
Traffic control by Stop/Go boards
60
Traffic control by portable traffic signalsYou can use portable traffic signals at most sites up to 300 metres long. Type Approved equipment must beused and should always be vehicle actuated except where otherwise instructed in writing by the highwayauthority. Your supervisor must tell the highway authority when portable traffic signals are to be used.Approval in writing will be needed when the shuttle section includes a road junction.
Make sure that the exit from the shuttle section does not become blocked by tailbacks. Also ensure thattailbacks from the signals will not block back to a railway level crossing (see page 70). Under nocircumstances should portable traffic signals be used at works which straddle a railway level crossing, nor tocontrol road traffic within 50 metres of a level crossing equipped with twin red light traffic signals.
Consider using two traffic signals on each approach, especially where traffic approaches at high speed. Insome circumstances this may not be physically possible or necessary. In such cases the normally preferredposition for a single traffic signal is at the nearside of the carriageway.
However, there may be good reasons for placing it in the carriageway adjacent tothe works. Ensure that there is clear visibility, of at least one signal head, forapproaching vehicles. Where power cables cross the carriageway, ‘Ramp’ signsshould be used where the cable protector exceeds 15mm in height.See the ‘The use of vehicle actuated portable traffic signals’ (the ‘Pink Book’) forsetting up and adjusting the timings of portable traffic signals. Remember to allowfor cyclists and horse riders who travel slower than motor vehicles.
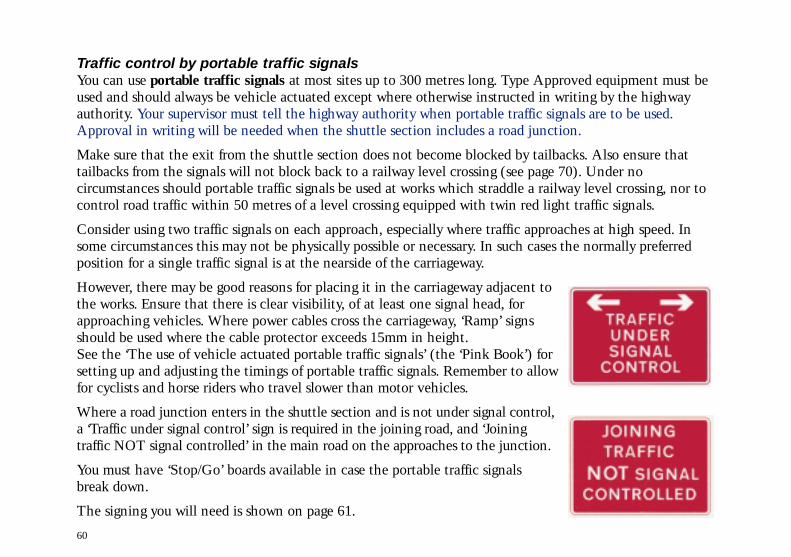
Where a road junction enters in the shuttle section and is not under signal control,a ‘Traffic under signal control’ sign is required in the joining road, and ‘Joiningtraffic NOT signal controlled’ in the main road on the approaches to the junction.
You must have ‘Stop/Go’ boards available in case the portable traffic signalsbreak down.
The signing you will need is shown on page 61.
61
D
D
45°
45°
L
See page 52
For number and position of traffic signals
(see page 60)
Safety zone sidewaysclearance (S) (see page 6)
For number and position of traffic signals
(see page 60)
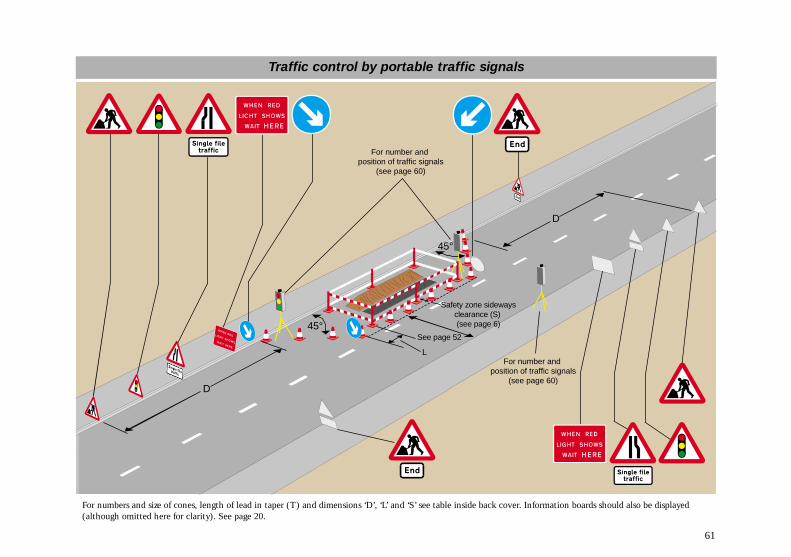
For numbers and size of cones, length of lead in taper (T) and dimensions ‘D’, ‘L’ and ‘S’ see table inside back cover. Information boards should also be displayed(although omitted here for clarity). See page 20.
Traffic control by portable traffic signals
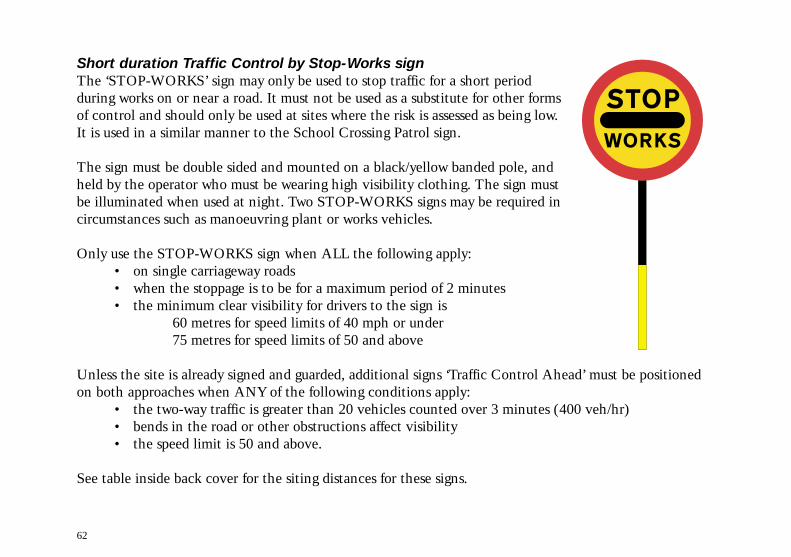
Short duration Traffic Control by Stop-Works signThe ‘STOP-WORKS’ sign may only be used to stop traffic for a short periodduring works on or near a road. It must not be used as a substitute for other formsof control and should only be used at sites where the risk is assessed as being low.It is used in a similar manner to the School Crossing Patrol sign.
The sign must be double sided and mounted on a black/yellow banded pole, andheld by the operator who must be wearing high visibility clothing. The sign mustbe illuminated when used at night. Two STOP-WORKS signs may be required incircumstances such as manoeuvring plant or works vehicles.
Only use the STOP-WORKS sign when ALL the following apply:• on single carriageway roads• when the stoppage is to be for a maximum period of 2 minutes• the minimum clear visibility for drivers to the sign is
60 metres for speed limits of 40 mph or under75 metres for speed limits of 50 and above
Unless the site is already signed and guarded, additional signs ‘Traffic Control Ahead’ must be positionedon both approaches when ANY of the following conditions apply:
• the two-way traffic is greater than 20 vehicles counted over 3 minutes (400 veh/hr)• bends in the road or other obstructions affect visibility• the speed limit is 50 and above.
See table inside back cover for the siting distances for these signs.
62
SPEED CONTROLThe use of speed control as a traffic management option will need to be considered as part of the worksplanning, as it may not be reasonably practicable to provide full safety zone clearances to suit existingspeed limits of 50 or 60 mph. In such cases it may be possible to provide the safety zone clearancesapplicable to a reduced speed limit of 30 or 40 mph.
To proceed with this option, at the earliest opportunity your supervisor must consult the highway authoritywho will if necessary impose a temporary mandatory speed limit. This is essential if delays are to beavoided and the order is to be effective. Advice of its existence is given by displaying the appropriate speedlimit and ‘reduced speed limit ahead’ signs as part of the normal signing.
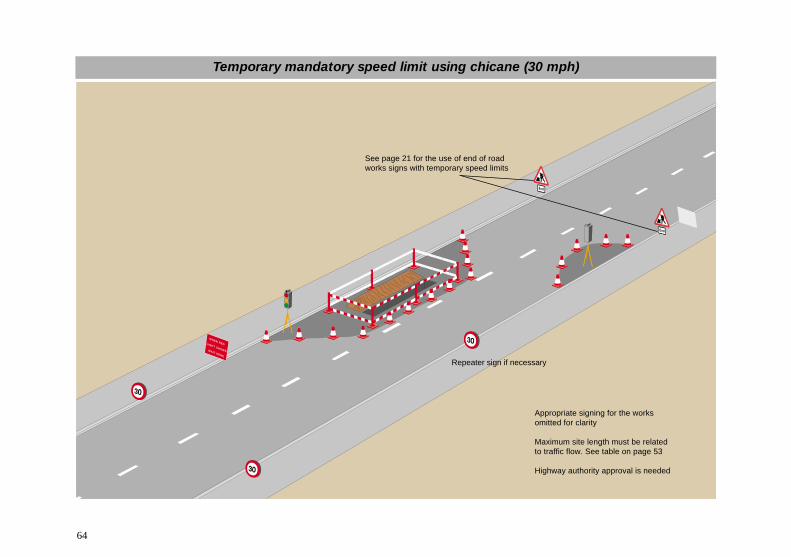
For a standard two-way road with shuttle working as shown on page 64, the length of road covered by thetemporary mandatory speed limit should include at least one chicane, and only positive types of trafficcontrol shall be allowed, i.e. Stop/Go boards or portable traffic signals.
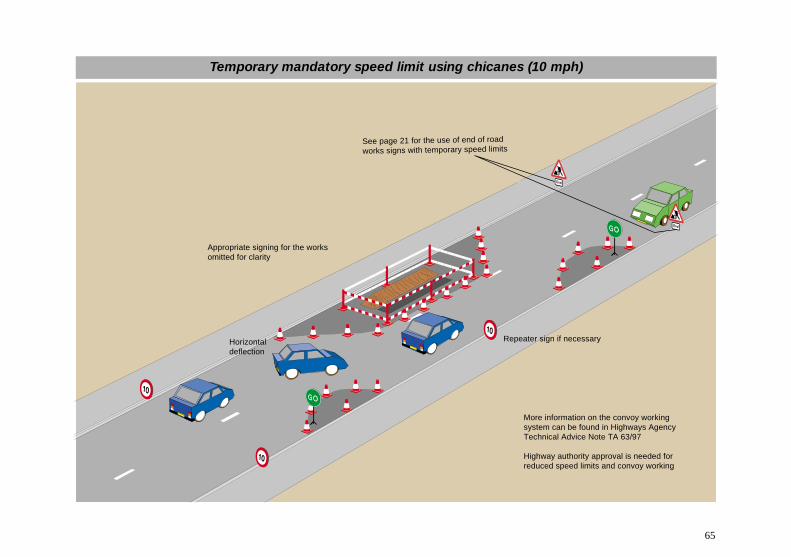
In exceptional circumstances where the road width prevents the provision of the appropriate sidewaysclearance, and diversion of traffic would be impracticable, traffic speeds must be reduced to less than 10mph and a safe method of working imposed. This must be agreed with the highway authority. At least twochicanes are required, of the minimum size to allow a large vehicle to pass through slowly. Traffic must firstbe brought to a halt by positive traffic control and then released in small batches by careful use of Stop/Goboards or manually controlled portable traffic signals. This may have the effect of reducing speeds to 10mph over short lengths of shuttle working. See page 65. For longer lengths or problem sites a convoysystem will be necessary, i.e. where a suitable works vehicle leads traffic through at 10 mph. This is theonly way of ensuring traffic complies with a 10 mph traffic order. Display ‘Convoy system in operation’signs at each end. If convoy working is used your supervisor will need to consult the highway authority andfollow the advice set out in the Highways Agency’s Advice Note TA63/97.
63
64
Repeater sign if necessary
Appropriate signing for the works omitted for clarity
Maximum site length must be relatedto traffic flow. See table on page 53
Highway authority approval is needed
See page 21 for the use of end of road works signs with temporary speed limits
Temporary mandatory speed limit using chicane (30 mph)
65
Appropriate signing for the works omitted for clarity
Repeater sign if necessary
More information on the convoy working system can be found in Highways AgencyTechnical Advice Note TA 63/97
Highway authority approval is needed for reduced speed limits and convoy working
Horizontal deflection
See page 21 for the use of end of road
works signs with temporary speed limits
Temporary mandatory speed limit using chicanes (10 mph)
MOBILE WORKS AND MINOR WORKS CARRIED OUT FROM A VEHICLE
These include continuous mobile operations, as well as those which involve movement with periodic stopsand short duration static works. They also include minor works which do not include excavations,involving the use of a single vehicle or a small number of vehicles.
Works in this category may omit the use of cones and a traffic barrier (lane closed sign) provided that safeworking methods are used.
Single vehicle works must not be carried out on dual carriageways to which the national speed limitapplies, unless they can be done at prevailing traffic speeds.
Using a single mobile vehicle or minor works with one or more vehiclesCarry out the work when there is good visibility and during periods of low risk. Consult your supervisor ifwork is to take place in the centre of the carriageway with traffic passing on both sides.
Basic requirements :• the vehicle must be conspicuously coloured• the vehicle must have one or more roof mounted beacons operating• a ‘Keep Right/Left’ sign must be displayed for drivers approaching on the same side of the
carriageway, showing which side to pass. Vehicle mounted ‘Keep Right/Left’ signs must becovered when the vehicle is travelling to and from the site. Do NOT simply turn the sign topoint up or down.
66
Additional static signswill be required when ANY of the following conditions apply :
• the works vehicle cannot be seen clearly because of hills, bends in the road, etc.• stationary traffic may tail back• there is not enough space for two-way traffic to pass the works vehicle• the vehicle is slow moving or is required to make periodic stops
In these cases place ‘Road Works Ahead’ signs with appropriate plates for drivers approaching ineach direction.
Where appropriate, you must also display ‘Road Narrows’ signs with ‘Single file traffic’ plates.
A ‘Road Works Ahead’ sign should be displayed to drivers approaching on a side road if work is takingplace near a junction.
Mobile works should not be carried out more than 1 mile from these signs.
If any of these basic requirements are not met, you must use full standard signing and guarding.
Mobile lane closure on high speed dual carriagewaysWhen the works cannot be carried out at normal speeds on high speed dual carriageways a mobile laneclosure technique may be appropriate. Consult your supervisor if you need to use this technique.
67
WORK NEAR TRAMWAYSSpecial safety precautions must be taken when works are to be carried out near a tramway. A summary ofthe main safety points is given below. Detailed advice must be obtained by your supervisor from therelevant track or transport authority prior to starting work and given to those carrying out the works.
Risk of collision with the tramcarUnlike other traffic a tramcar cannot swerve to avoid a person or obstruction. Tramcars are wider than thetracks on which they run. The path of a tramcar which must be left unobstructed is known as the ‘sweptpath’. In some cases this is indicated by a line of yellow discs, a painted line or a raised kerb.
It is essential that signing and guarding equipment, operatives, vehicles and pedestrians are kept out of theswept path. Where the works cause the footway to be diverted into the carriageway, the barrier betweenthe pedestrians and the tramway must be kept at least 0.5 metres away from the edge of the swept path.
Where the safety zone sideways clearance would intrude on the swept path, your supervisor should consultthe transport authority. The safety zone may be reduced to 300mm and the transport authority may imposea speed restriction on tramcars, and/or provide a lookout.
Risk of electrocutionTramway electrical cables consist of overhead lines and underground cables that may be placed outside theswept path.
Your supervisor should liaise with the track or transport authority before working close to overhead lines.
No equipment, plant, vehicles, etc. should be brought within 2 metres of the overhead lines.
Underground cables should be dealt with using standard safe digging practices.
Tramway crossingsWhere a tramway runs on a reserved track but crosses the road at certain places, such crossings should betreated as railway level crossings. See page 70.
68
69
45°
D
T
L
D
RAIL
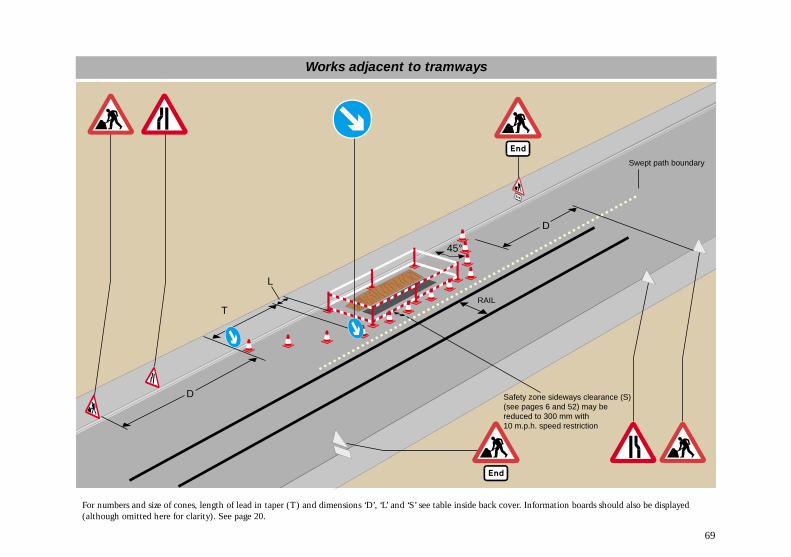
Safety zone sideways clearance (S) (see pages 6 and 52) may be reduced to 300 mm with 10 m.p.h. speed restriction
Swept path boundary
For numbers and size of cones, length of lead in taper (T) and dimensions ‘D’, ‘L’ and ‘S’ see table inside back cover. Information boards should also be displayed(although omitted here for clarity). See page 20.
Works adjacent to tramways
WORKS AT OR NEAR RAILWAY LEVEL CROSSINGSExtreme care must be taken to avoid stationary traffic tailing back across a railway level crossing whenstreet works or road works are being carried out at or near the crossing. Particular attention must be paid tosituations where works, even though they may be a considerable distance from the crossing, may causetraffic to tail back over the crossing as a result of long traffic delays. Road traffic must NEVER be stoppedon a level crossing. Your supervisor must contact the railway owner when works are to take place at or neara level crossing, or where traffic queues could affect a level crossing.
Detailed advice on carrying out works on or near railway level crossings is given in Appendix F of theCode of Practice for the Co-ordination of Street Works and Works for Road Purposes and Related Matters.1
This must be given to, and understood by, everyone proposing to carry out works at or near to a railwaylevel crossing.
70
1ISBN 0 11 552310 3 £14 At the time of going to press, this code is applicable to England only.
71
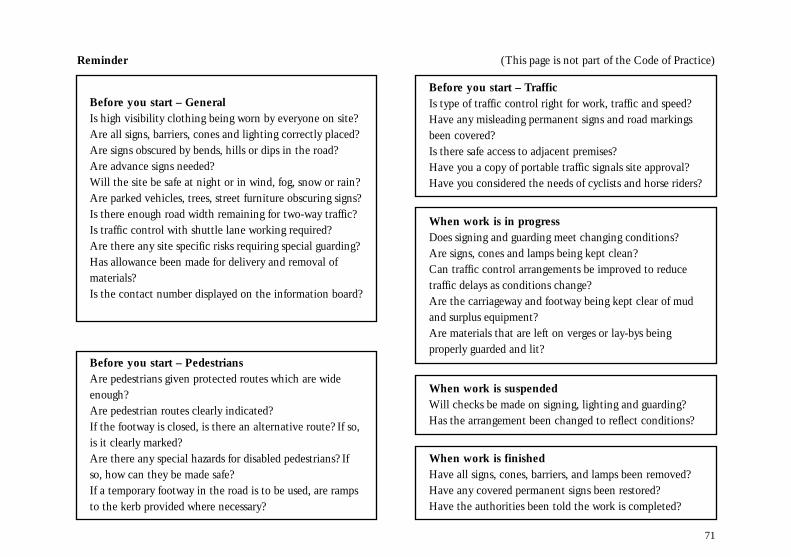
Before you start – GeneralIs high visibility clothing being worn by everyone on site?Are all signs, barriers, cones and lighting correctly placed?Are signs obscured by bends, hills or dips in the road?Are advance signs needed?Will the site be safe at night or in wind, fog, snow or rain?Are parked vehicles, trees, street furniture obscuring signs?Is there enough road width remaining for two-way traffic?Is traffic control with shuttle lane working required?Are there any site specific risks requiring special guarding?Has allowance been made for delivery and removal ofmaterials?Is the contact number displayed on the information board?
Before you start – PedestriansAre pedestrians given protected routes which are wideenough?Are pedestrian routes clearly indicated?If the footway is closed, is there an alternative route? If so,is it clearly marked?Are there any special hazards for disabled pedestrians? Ifso, how can they be made safe?If a temporary footway in the road is to be used, are rampsto the kerb provided where necessary?
Before you start – TrafficIs type of traffic control right for work, traffic and speed?Have any misleading permanent signs and road markingsbeen covered?Is there safe access to adjacent premises?Have you a copy of portable traffic signals site approval?Have you considered the needs of cyclists and horse riders?
When work is in progressDoes signing and guarding meet changing conditions?Are signs, cones and lamps being kept clean?Can traffic control arrangements be improved to reducetraffic delays as conditions change?Are the carriageway and footway being kept clear of mudand surplus equipment?Are materials that are left on verges or lay-bys beingproperly guarded and lit?
When work is suspendedWill checks be made on signing, lighting and guarding?Has the arrangement been changed to reflect conditions?
When work is finishedHave all signs, cones, barriers, and lamps been removed?Have any covered permanent signs been restored?Have the authorities been told the work is completed?
Reminder (This page is not part of the Code of Practice)
19, 28, 31pedestrianised areas 29plates used with signs 14, 16, 56portable traffic signals 60priority signs 56protective clothing 2railway level crossing 58, 60, 70ramps 32, 33, 60reflectorisation 3, 18, 26, 27risk assessment iv, 2road narrows sign 16road plates 33road widths 6, 35, 52road works ahead sign 16roundabouts 49
safety zone 5, 6, 29, 63, ibcscaffolding 29securing signs 2setting out signs 22–25shuttle lane working 52, 60, 63sideways clearance 6, 7, 29, ibcsign lighting 26signs-duplicates 4single carriageway 34speed control 63speed limit, temporary 7, 63speeding 7stop-works sign 26, 27, 62stop/go boards 26, 58, 60street lighting 17, 26tapping rail 18, 20traffic barriers 18, 19, 34, 36traffic control 52traffic signals, permanent 47traffic signals, portable 60traffic signs, permanent 2tramways 68, 69two-way roads 3, 34two-way working 52unobstructed width 52weather, bad 2, 3, 17work site access 22working space 5, 29works area 5works vehicle 22, 34, 35
72
INDEX
ibc = inside back cover
Minimum and Minimum Minimum Minimum Sidewaysnormal maximum clear size height Safetysiting distance (D) visibility of of Zone Details of lead-in cone tapers Width of hazard (metres)
of first sign in to first signs cones (S) (but see Notes below) including Safety Zone (S)advance of lead-in sign (mm) (mm) Recommended lengths
Type of road taper (metres) (metres) 1 2 3 4 5 6 7Single carriageway 20 Length of taper (T) in metres 13 26 39 52 65 78 91road, restricted to to 60 600 450 0.5m Minimum No. of cones 4 4 6 7 9 10 1230mph or less 45 Minimum No. of lamps at night 3 3 5 6 8 9 11Single carriageway 45 Length of taper (T) in metres 20 40 60 80 100 120 140road, restricted to speeds of to 60 750 450 0.5m Minimum No. of cones 4 6 8 10 13 15 1731 to 40mph inclusive 110 Minimum No. of lamps at night 3 5 7 9 12 14 16All-purpose dual carriageway 110 Length of taper (T) in metres 25 50 75 100 125 150 175road, restricted to to 60 750 450 0.5m Minimum No. of cones 4 7 10 13 15 18 2140mph or less 275 Minimum No. of lamps at night 3 6 9 12 14 17 20Single carriageway 275 Length of taper (T) in metres 25 50 75 100 125 150 175road, with speed limit of to 75 750 450 1.2m Minimum No. of cones 4 7 10 13 15 18 2150mph or more 450 Minimum No. of lamps at night 3 6 9 12 14 17 20All-purpose dual carriageway 725 Length of taper (T) in metres 32 64 96 128 160 192 224road, with speed limit of to 105 1200 750 1.2m Minimum No. of cones 5 9 12 16 19 23 2650mph or more 1600 Minimum No. of lamps at night 4 8 11 15 18 22 25
SIZE AND SITING DISTANCE: DETAILS OF SIGNS AND CONES AND SAFETY ZONE DIMENSIONS
NOTES:1. Lead-in tapers used with traffic control, and all exit tapers, shall be at about 45° to the kerb
line with cones spaced 1.2 metres apart.2. The maximum spacing distance of cones in longitudinal lengths of coning shall be 9 metres,
but no fewer than 2 cones shall be used in any length between tapers.3. In certain circumstances on congested roads with speed limits of 30mph or under, the taper