www.signostics.com.au Email: [email protected]1 COMPONENTS, SCREEN and CONTROLS 2 INITIAL SET UP Connecting Cable Probe Transducer Power On Set Date > Time > Locale > OK Insert SD card Select Yes Enter details Password optional Select OK On / Off (Hold for 1 sec) Touch Screen Scan Back Navigation: scroll and click Scroll Wheel or Touch Screen A revolution improving the quality of care at the point of care Quick Start Guide SEE MORE. DO MORE. NOW. The Signos Real-Time Personal Ultrasound is the world’s smallest real-time ultrasound device, answering the need for accurate, affordable, accessible diagnostic technology. ® Federal (USA) law restricts this device to sale by or on the order of a physician. Refer to user manual before use.
Insert SD card Select Yes Enter detailsPassword optional Select OK
On / Off(Hold for 1 sec)
TouchScreen
Scan
Back
Navigation: scroll and click Scroll Wheel or Touch Screen
A revolution improving the quality of care at the point of care
Quick Start Guide
SEE MORE. DO MORE. NOW.
The Signos Real-Time Personal Ultrasound is the world’s smallest real-time ultrasounddevice, answering the need for accurate, affordable, accessible diagnostic technology.
®
Federal (USA) law restricts this deviceto sale by or on the order of a physician.
Refer to user manual before use.
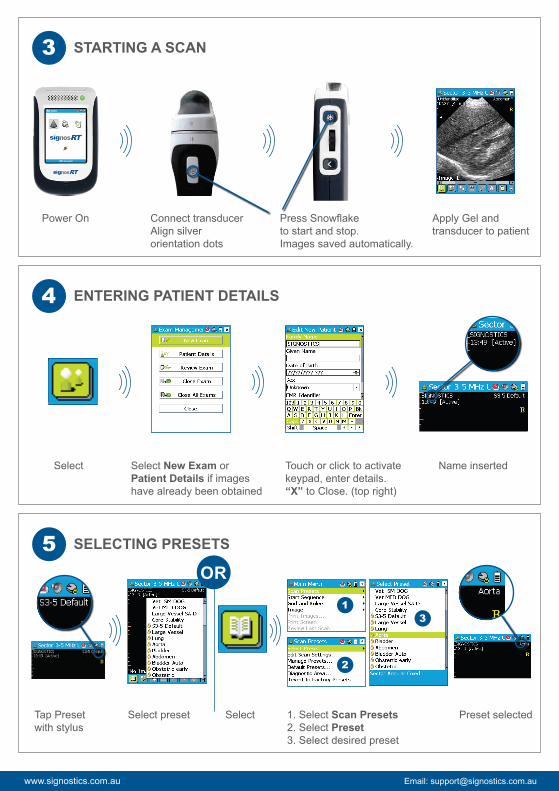
3 STARTING A SCAN
4 ENTERING PATIENT DETAILS
5 SELECTING PRESETS
Power On Connect transducerAlign silver orientation dots
Name insertedTouch or click to activatekeypad, enter details.“X” to Close. (top right)
Select New Exam orPatient Details if imageshave already been obtained