16
SIMPLY PERFECT GARDEN WATERING. With these step-by-step instructions, you can quickly and easily plan your customised Kärcher Rain System®.
| Date post: | 26-Apr-2018 |
| Category: |
Documents |
| Upload: | nguyenphuc |
| View: | 219 times |
| Download: | 3 times |

1
Simply perfect garden watering.With these step-by-step instructions, you can quickly and easily plan your customised Kärcher Rain System®.
2
get your perfect watering SyStem in five StepS.
Every garden is different. And for this reason, every garden should be watered according to its needs. On the following pages, we will show you step-by-step how you can easily assemble your perfect Kärcher Rain System®. These instructions will help you to choose the perfect products for your garden and make any subsequent installation a breeze.
Simply use our example as a guide and lay out your plan on the graph paper provided on the last page. To get started, you just need a couple of pens – and of course your own garden!
Your five steps to success:
1. Sketch your garden
2. Plan the water distribution
3. Determine the infrastructure
4. Include a watering control system
5. Draw in the watering elements
Kärcher watering system
3
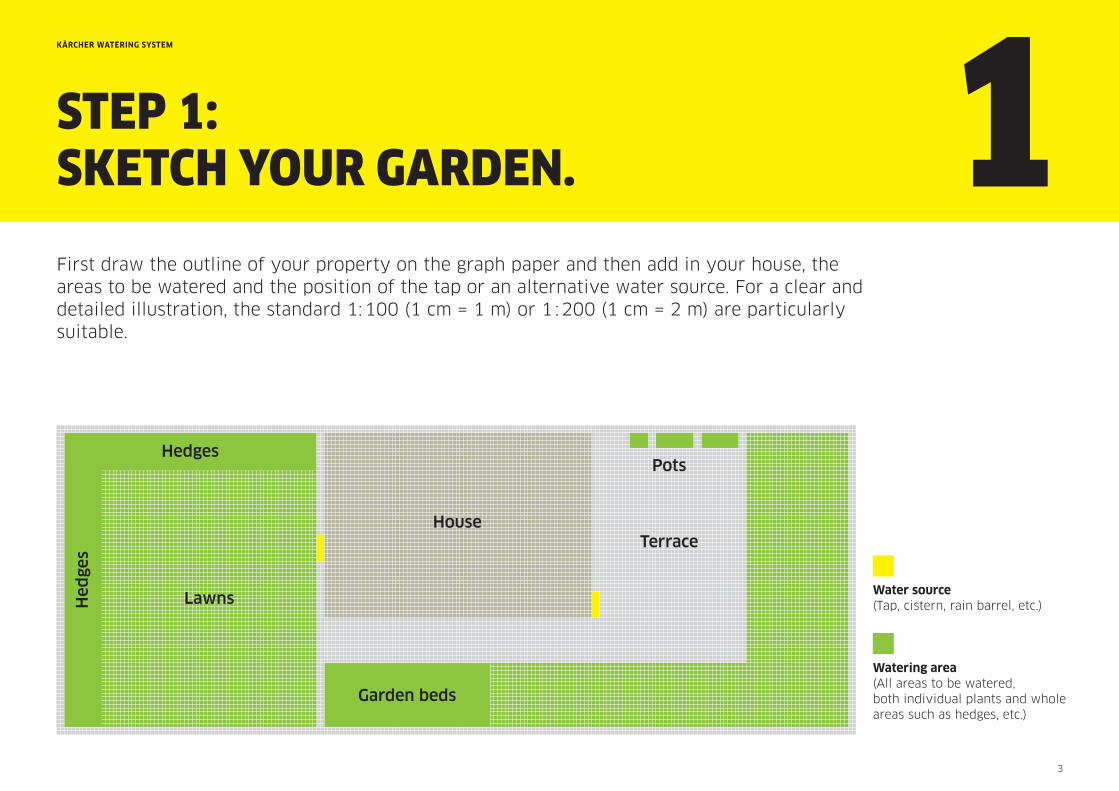
Step 1: Sketch your garden.
First draw the outline of your property on the graph paper and then add in your house, the areas to be watered and the position of the tap or an alternative water source. For a clear and detailed illustration, the standard 1: 100 (1 cm = 1 m) or 1 : 200 (1 cm = 2 m) are particularly suitable.
Kärcher watering system
1
Water source (Tap, cistern, rain barrel, etc.)
Watering area(All areas to be watered, both individual plants and whole areas such as hedges, etc.)
Hedges
Lawns
House
Garden beds
Hed
ges
Pots
Terrace

4
Step 2: water diStribution.a) Drip irrigation
Kärcher watering system
2For drip irrigation, the water is distributed precisely and close to the roots. This pro-motes plant growth and also saves water. Thanks to the uniform pressure distribution, the water is evenly distributed at a length of up to 50 m.
Depending on requirements, drip irrigation can be installed in the Kärcher Rain System® in two different ways: either with the sepa-rate and extendable trickle hose or with individual drip nozzles, which can be indi-vidually connected to the Kärcher Rain System® hose.
drip irrigation for Single plantS and plant rowS.
Trickle hoseTwo-layer hose with core and textile coating for reliable watering along rows of plants and hedges. The trickle hose is available in the lengths 10 m and 25 m, can be shortened as required or extended to 50 m and very easily combined with the Kärcher Rain System®. For optimal water distribution, use the hose with a pressure of 2 bar.
Drip nozzleSleeve with water flow regulation of 0 to 10 l/h for targeted watering directly at the plants. The drip nozzle is perfect for rows of plants, for example in vegetable patches, and can be individually connected to the Kärcher Rain System® hose.
5
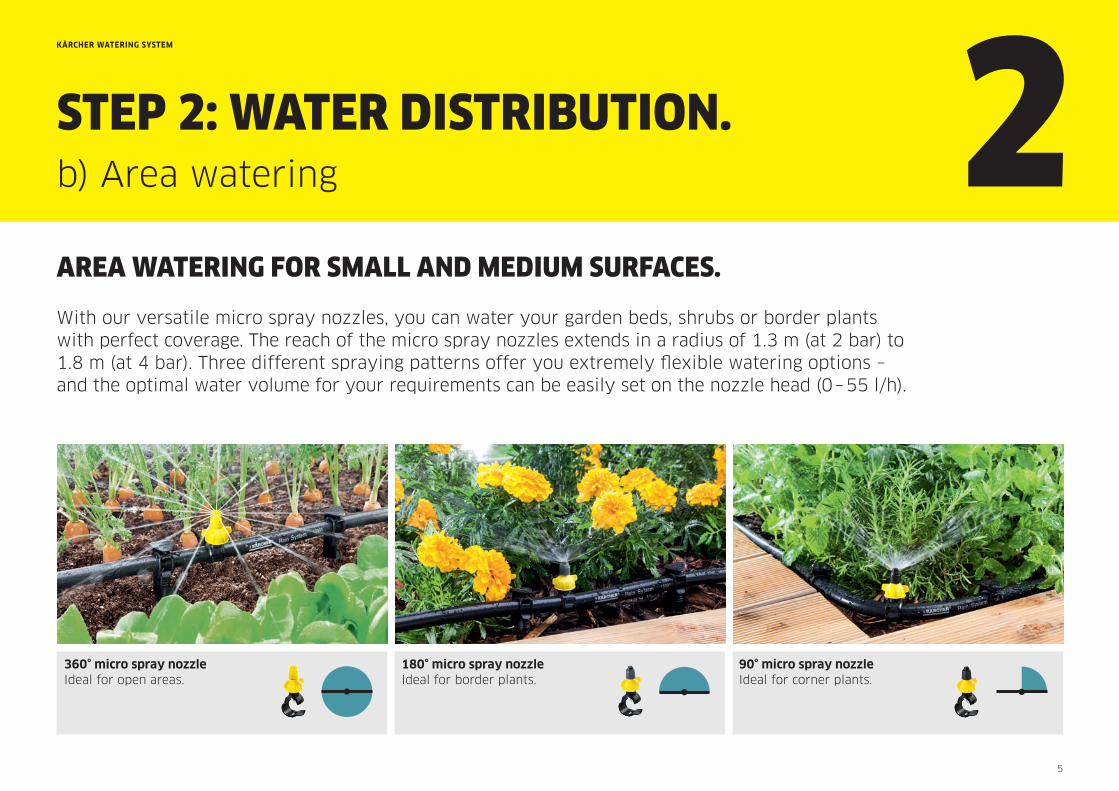
Step 2: water diStribution. b) Area watering
Kärcher watering system
2With our versatile micro spray nozzles, you can water your garden beds, shrubs or border plants with perfect coverage. The reach of the micro spray nozzles extends in a radius of 1.3 m (at 2 bar) to 1.8 m (at 4 bar). Three different spraying patterns offer you extremely flexible watering options – and the optimal water volume for your requirements can be easily set on the nozzle head (0 – 55 l/h).
area watering for Small and medium SurfaceS.
360° micro spray nozzle Ideal for open areas.
180° micro spray nozzleIdeal for border plants.
90° micro spray nozzleIdeal for corner plants.

6
Step 2: water diStribution. c) Pot watering
Kärcher watering system
2
Connection hose, 4 mmUsing sleeves, the water is fed from the supply hose into the thin connection hoses and into your pots and boxes.
Droppers and T-connectorsDepending on requirements, the water is applied via the total of 15 droppers contained in the set. These droppers can be regulated between 0 and 10 l/h and can be distributed as needed in your flower boxes using special connection pieces, the T-connectors.
Hose spikes and hose stopsWith the hose spikes, the thin connection hoses can be mounted and fixed in place very close to the plants. Hose stops seal the ends of the hose.
The pot watering set is the ideal basic equipment for your terrace or balcony. The 4-mm-thin connecting hoses feed the water from the Kärcher Rain System® hose directly into your flower pots and flower boxes. And with the practical droppers, T-connectors and hose spikes, you can further customise watering of your terrace and balcony plants.
pot watering for terrace and balcony plantS.

7
Step 3: determine the infraStructure.
Kärcher watering system
3
Garden hoseWith a standard garden hose, you can connect the tap with the Kärcher Rain System® hose to the watering area. The Kärcher PrimoFlex® hoses are perfect for this.
Kärcher Rain System® hoseThe Kärcher Rain System® hose also serves as a supply hose for the entire water distribution and is laid along the watering area. It is available in length units of 10 m and can be shortened as required and combined with the trickle hose. Drip and micro spray nozzles and sealing collars can be fitted to it easily.
Particle filter and pressure reducer with filterTo protect the Kärcher Rain System® against small dirt particles, we recommend slotting in a filter. The pressure reducer already has an integrated filter. In the case of high line pressure, the pressure reducer also allows you to reduce the input pressure to 4 bar output pressure.
Supply hoSeS and filterS.
How long does a hose need to be for the water to reach your plants? Which connection pieces do you need to join several parts together? To make the laying of your chosen watering system as simple as possible, you should also start to consider the required infrastructure at an early stage.

8
Step 3: determine the infraStructure.
Kärcher watering system
3I-connectorYou can use the I-connector to connect the Kärcher Rain System® hoses to each other or to the trickle hose.
T-connectorThe T-connector with side outlet and water flow regulation connects Kärcher Rain System® hoses to the trickle hose. This means you can lay two independent hose lines.
Hose stopYou can seal your Kärcher Rain System® hose with the hose stop and keep the water in the system circuit.
lay the infraStructure aS required.
Hose spikeHose spikes are used to fix Kärcher Rain System® hoses in place and are also ideal as marker aids to ensure optimal depth.

9
Step 4: include a watering control SyStem.
Kärcher watering system
4watering with time control.
To make your garden watering more convenient, our versatile water timers can be very easily integrated into your individual watering system. The water timers from Kärcher regulate your garden watering precisely according to plan – for targeted and need-based watering.
Water timer WT 2The WT 2 combines the advantages of a three-way tap adaptor and a water timer in a single product. The two outer water outlets can be infinitely adjusted. On the third water outlet with clock, you can adjust the watering duration.
Water timer WT 4The WT 4 enables regular and time-controlled watering. Thanks to the removable display, the water timer is easy to operate and can be programmed conveniently.
Water timer WT 5The WT 5 can be programmed precisely for each day of the week and the start of watering can be programmed to the minute. This means it is also suit-able for use in regions with watering restrictions. The removable display and the intuitive menu make it easy to operate.
10
Kärcher watering system
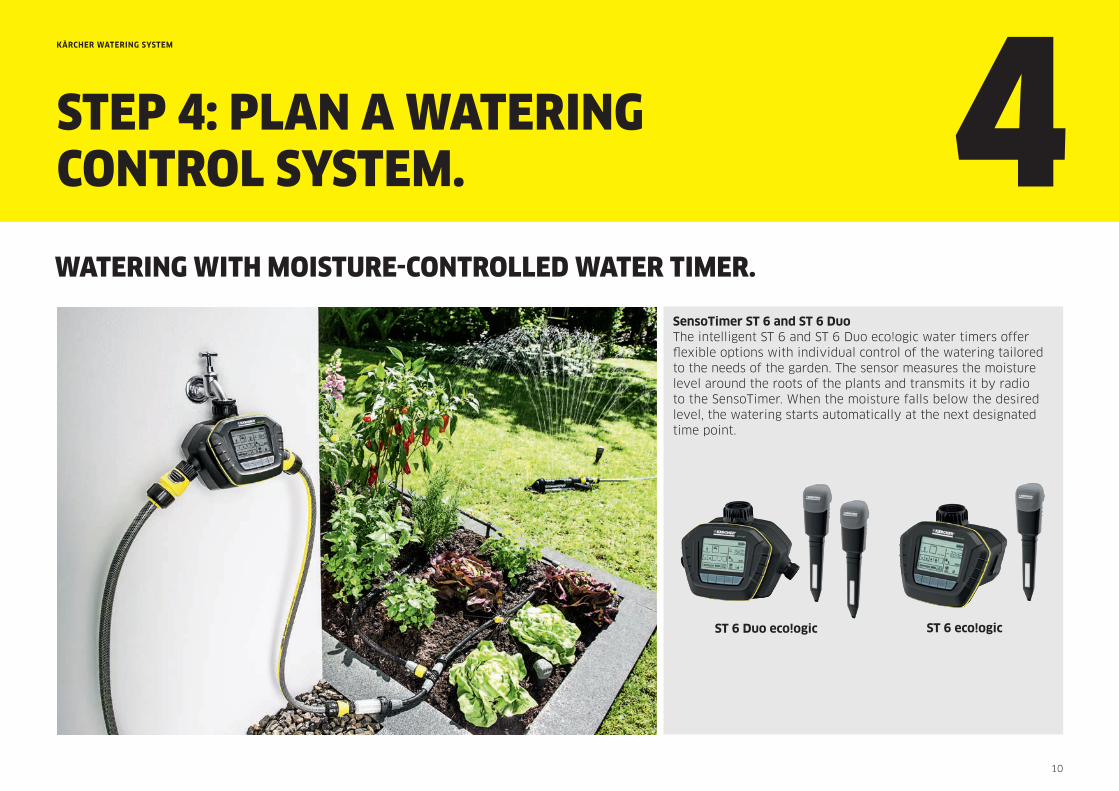
SensoTimer ST 6 and ST 6 DuoThe intelligent ST 6 and ST 6 Duo eco!ogic water timers offer flexible options with individual control of the watering tailored to the needs of the garden. The sensor measures the moisture level around the roots of the plants and transmits it by radio to the SensoTimer. When the moisture falls below the desired level, the watering starts automatically at the next designated time point.
watering with moiSture-controlled water timer.
Step 4: plan a watering control SyStem. 4
ST 6 Duo eco!ogic ST 6 eco!ogic
11
Step 5: draw in the watering elementS.
Kärcher watering system
5When you have decided on the right infrastructure, the optimal water distribution and the perfect watering control system, you only need to draw the individual elements into your plan. For guidance, you can refer to our helpful sample sketch on the next page.
Start with the watering control system on the tap and then draw in the garden hose which leads to the watering area. Arriving at the watering area, now draw in all infrastructural elements that you want – from the Kärcher Rain System® hose or trickle hose to the filters, connection pieces and hose stops. Then decide how many drip nozzles and micro spray nozzles are needed for the area and also add these to the plan. Now you can measure out the required hose lengths and simply calculate how many parts you will need. Once you have fully sketched your individual watering system, you are ready for purchase and installation. If you still require assistance, you can find clear and helpful assembly instructions on www.kaercher.com.
We hope you enjoy your Kärcher Rain System®!
12
Step 5: draw in watering elementS.
Kärcher watering system
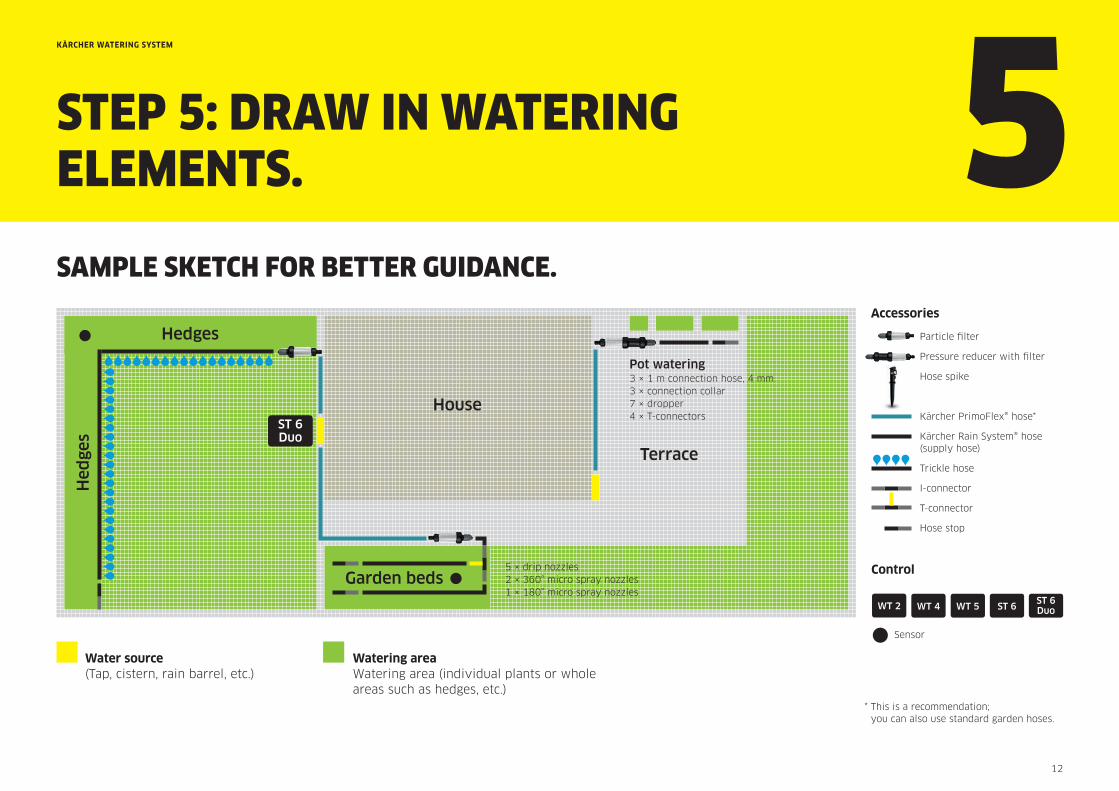
5Sample Sketch for better guidance.
* This is a recommendation; you can also use standard garden hoses.
Water source (Tap, cistern, rain barrel, etc.)
Watering areaWatering area (individual plants or whole areas such as hedges, etc.)
Accessories
Particle filter
Pressure reducer with filter
Hose spike
Kärcher PrimoFlex® hose*
Kärcher Rain System® hose (supply hose)
Trickle hose
I-connector
T-connector
Hose stop
Control
WT 2 WT 4 WT 5 ST 6 ST 6 Duo
Sensor
House
Garden beds
Hed
ges
Terrace
Pot watering3 × 1 m connection hose, 4 mm3 × connection collar 7 × dropper4 × T-connectors
5 × drip nozzles2 × 360° micro spray nozzles1 × 180° micro spray nozzles
ST 6 Duo
Hedges
13
create a Shopping liSt.
Kärcher watering system
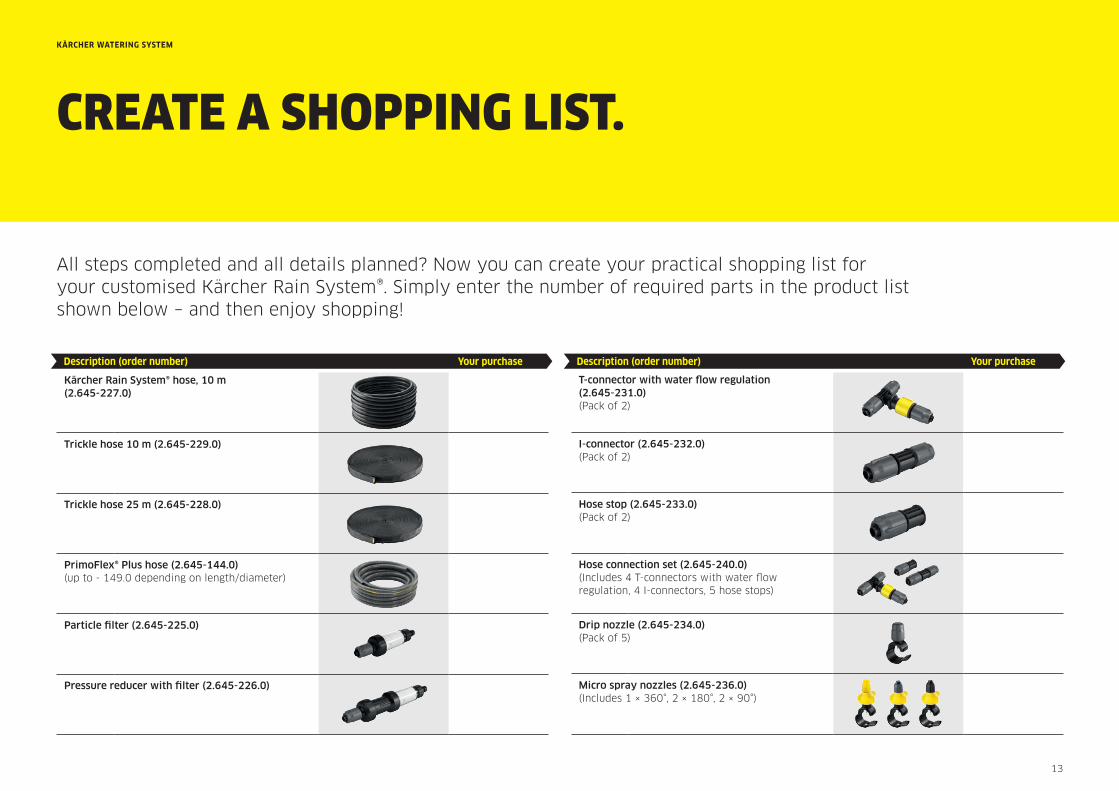
All steps completed and all details planned? Now you can create your practical shopping list for your customised Kärcher Rain System®. Simply enter the number of required parts in the product list shown below – and then enjoy shopping!
Kärcher Rain System® hose, 10 m (2.645-227.0)
Trickle hose 10 m (2.645-229.0)
Trickle hose 25 m (2.645-228.0)
PrimoFlex® Plus hose (2.645-144.0) (up to - 149.0 depending on length/diameter)
Particle filter (2.645-225.0)
Pressure reducer with filter (2.645-226.0)
Description (order number) your purchase
T-connector with water flow regulation (2.645-231.0)(Pack of 2)
I-connector (2.645-232.0)(Pack of 2)
Hose stop (2.645-233.0)(Pack of 2)
Hose connection set (2.645-240.0)(Includes 4 T-connectors with water flow regulation, 4 I-connectors, 5 hose stops)
Drip nozzle (2.645-234.0)(Pack of 5)
Micro spray nozzles (2.645-236.0)(Includes 1 × 360°, 2 × 180°, 2 × 90°)
Description (order number) your purchase
14
create a Shopping liSt.
Kärcher watering system
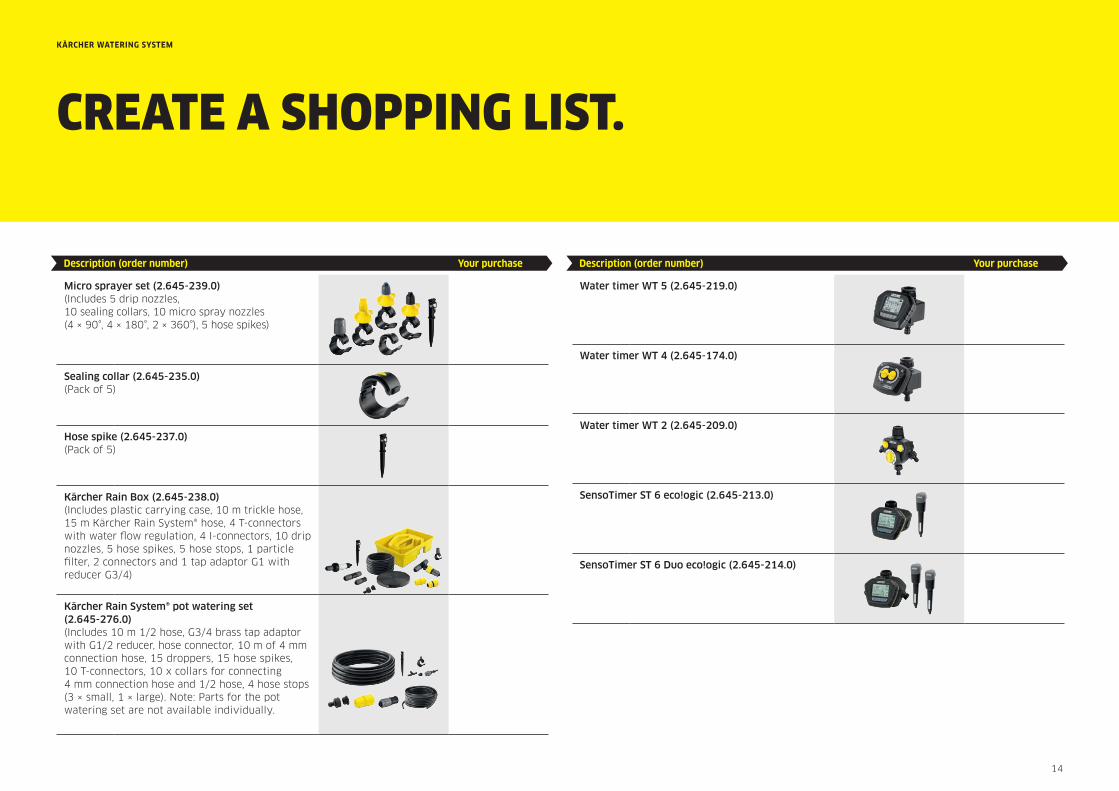
Micro sprayer set (2.645-239.0)(Includes 5 drip nozzles, 10 sealing collars, 10 micro spray nozzles (4 × 90°, 4 × 180°, 2 × 360°), 5 hose spikes)
Sealing collar (2.645-235.0)(Pack of 5)
Hose spike (2.645-237.0)(Pack of 5)
Kärcher Rain Box (2.645-238.0)(Includes plastic carrying case, 10 m trickle hose, 15 m Kärcher Rain System® hose, 4 T-connectors with water flow regulation, 4 I-connectors, 10 drip nozzles, 5 hose spikes, 5 hose stops, 1 particle filter, 2 connectors and 1 tap adaptor G1 with reducer G3/4)
Kärcher Rain System® pot watering set (2.645-276.0)(Includes 10 m 1/2 hose, G3/4 brass tap adaptor with G1/2 reducer, hose connector, 10 m of 4 mm connection hose, 15 droppers, 15 hose spikes, 10 T-connectors, 10 x collars for connecting 4 mm connection hose and 1/2 hose, 4 hose stops (3 × small, 1 × large). Note: Parts for the pot watering set are not available individually.
Description (order number) your purchase
Water timer WT 5 (2.645-219.0)
Water timer WT 4 (2.645-174.0)
Water timer WT 2 (2.645-209.0)
SensoTimer ST 6 eco!ogic (2.645-213.0)
SensoTimer ST 6 Duo eco!ogic (2.645-214.0)
Description (order number) your purchase

Sollten hier noch ein paar Worte
zum Abschluss stehen?Sonst hört
die Anleitung einfach so auf…
Questions? We’re always happy to help:
Alfred Kärcher GmbH & Co. KG Alfred-Kärcher-Straße 28-40 71364 Winnenden, Germany
Tel. +49 71 95 14-0 Fax +49 71 95 14-2212
www.kaercher.com


