20
Smart Forms 2011
| Date post: | 29-Dec-2015 |
| Category: |
Documents |
| Upload: | james-dawson |
| View: | 224 times |
| Download: | 2 times |

Smart Forms
2011

Overview of Smart Form Process FlowPrint the FormFill in the FormScan and Upload the FormAdsystech’s Smart Form TechnologyRegistration ProcessSmart Form Process FlowUnderstanding Initial ProceduresScan, Process, and View InformationSearch and Edit FieldsSmart Form Management PageQuestions & Answers
Smart Forms
Session Outline:

Overview
Fun Fact:Smart forms are documents that can be generated from the Management Reports section, filled out quickly and easily by hand, and then scanned into the system, cutting down on the amount of time needed for data input. These forms will enable your organization to accurately enter client information into Enginuity without touching the keyboard.

Smart Form Flow

Generate and Print the Form
• Intake and SRAS forms are currently available
• Head Start forms are coming….
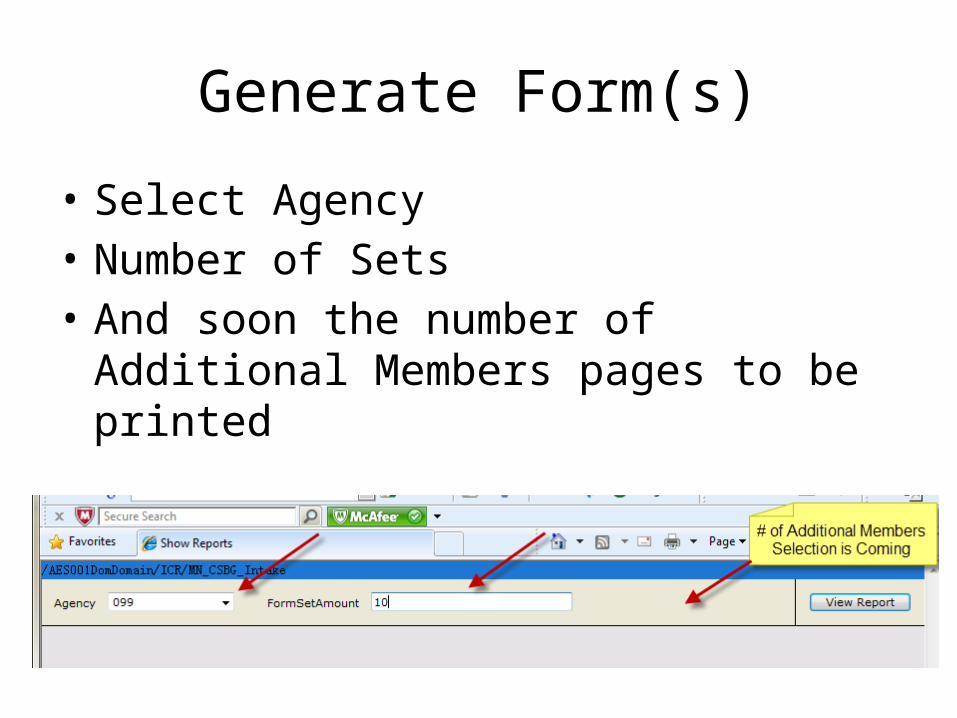
Generate Form(s)
• Select Agency• Number of Sets• And soon the number of Additional Members
pages to be printed

Export to PDF

IMPORTANT: Print with NO Page Scaling

Fill in the Form and Scan
• Each page must be a separate file• File format = TIFF• Size =300 x 300 dots per inch • File size should be around 100 Kb or smaller• Document Scanners work well• Picture Scanners create files about 10 times
larger and this just slows down the process

Smaller is Better

• The Smart Form Service is configured so it links a particular Folder with a particular Form
• In my case:c:\SmartFormScans\CSBG SmartForms= Intake c:\SmartFormScans\SRAS SmartForms = SRAS
Recap• Each form set needs to have its own Form Set
Numbers so the only thing you can copy is the Additional Member page for extra members in the HH.
• The forms need to be printed in the exact size(Page Scaling = NONE – eliminates differences with printable margins)
• Place TIFF file in proper folder so the Smart Form Service can find the file and send it to the proper place

Scan, Process, and View Forms
Scan1. Upon scanning,
place form image in the “Specified” folder for your Agency or Agency Location1
Process and View
2. Files will automatically be transferred to the system for searching and deleted from the “Specified” Folder
2
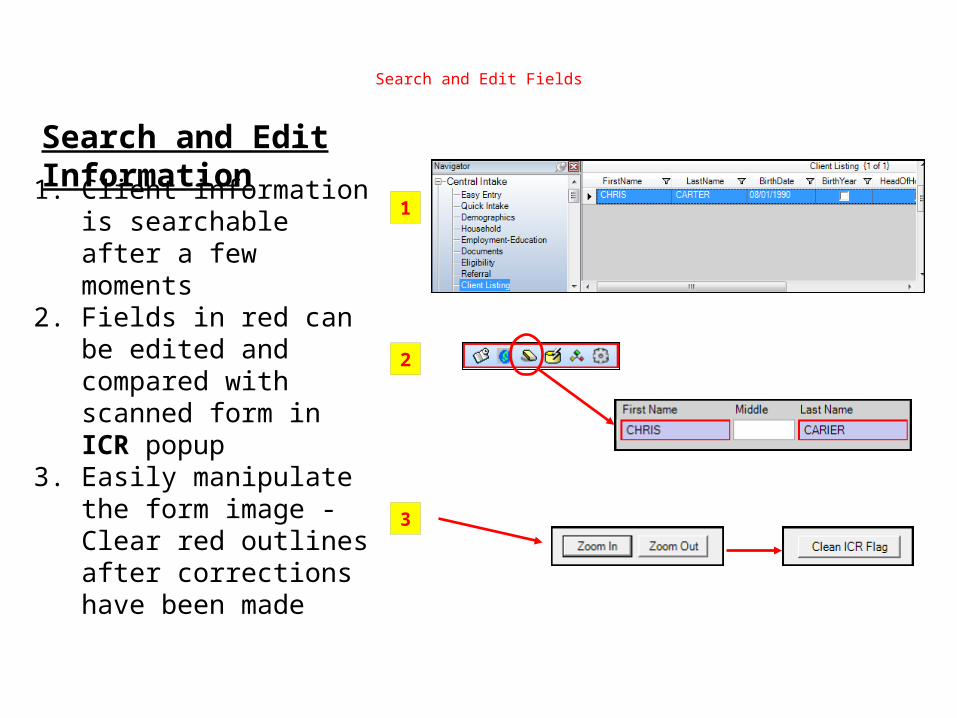
Search and Edit Fields
Search and Edit Information1. Client information is
searchable after a few moments
2. Fields in red can be edited and compared with scanned form in ICR popup
3. Easily manipulate the form image - Clear red outlines after corrections have been made
1
2
3

Smart Form Management Page
1. Easy Searching of particular Form Sets
2. Ability to Verify and “Reprocess” forms
3. View Full Image and Field Specific Image
4. Quickly Correct and Save fields on forms
Correct Multiple Form Sets1
2
3 4

RegistrationEnsure Reference Keys are aligned
Verify Adsystech Smart Form Service has been
started
Choose appropriate file path for scanned forms
using your scanner software
Place file in ICRFile folder for transfer
Print and Fill Out Registration Form
Tech Support will verify the form is received and a
template match is confirmed on Adsystech’s
ICR server
*Please note that this process will occur when a meeting is scheduled . This will allow for the process to run as smoothly as possible with minimal issues.*

Smart Form Process FlowEnsure Reference Keys are aligned
Verify Adsystech ICRClient Service has
been started
Choose appropriate file path for scanned
forms
Search name in Client Listing Page
Place file in specified folder for
transmission
Check Demographics page for fields outlined in red
See Smart Form Management page in Data Conversion
Application role corrections
Use controls on the popup page to clear red outline
on fields
*If fields in red, use
“ICR” control
*If no fields in red, successful
scan
YES
NO
Print and Fill Out Forms

Understanding Initial Procedures
1. Forms must be exported to PDF format2. Scanned images must be saved as a .TIF3. Transfer service must be started for successful form
processing
Setup Features
1
2
3

Smart Form Service Setup
Connects your Folder to the Form Type via
the FormSourceID

Questions & Answers


![Smart Scan! - Panasonic · 2016. 9. 21. · Various Documents Scan for Your Needs High-Volume Scan with Durability Smooth Scan with Reliable Feeding 65 ppm / 130 ipm [KV-SL1066] 45](https://static.documents.pub/doc/80x56/60427324ed62481e30003d6c/smart-scan-2016-9-21-various-documents-scan-for-your-needs-high-volume-scan.jpg)


