V V OL III, Nr. 5 $7.00 F F all 2014 SPECIAL ISSUE: TACTICS What We See and Don't See When We Look at a Game. The Series Continues • • Napoleon Against Russia • Napoleon’s Last Gamble • Peninsular War II
Transcript
VVOL III , Nr. 5 $7.00 FFall 2014
SPECIAL ISSUE: TACTICS
What We See and Don't See When We Look at a Game.
The Series Continues •• Napoleon Against Rus sia • Napo leon’ s Last Gamble • Peninsular War II
O P E R A T I O N A L S T U D I E S G R O U P PO Box 50207 Baltimore, MD 21211 U.S.A.
http://www.NapoleonGames.com
W A R G A M E D E S I G N • C • O • N • T • E • N • T • S •
Editorial 72 Amateur Talk About Tactics, Kevin Zucker 73 The New Ways of War, Richard K. Riehn 74
The Closed Watch Case, Kevin Zucker 75
Survey Results 82
TLNB Update 84
The Uncertainty Principle, Tim Carne 85
The Influence of Tactics, Derek Lang 86
History in TLNB, Part I Cezary Domalski 92 Challenges in Wargame Design, John Theissen 96 EDITORIAL
What is “Tactics”? I have always left the field of tactics to others, keeping my focus at the operational and grand tactical level, where individual regiments and their doings are invisible. Who knows how "Napoleonic tactics" really looks after being filtered through the lens of the hex-grid? Tactics was not a static thing but a moving target, ever-evolving from battle to battle. What worked well in 1806 did not work at all the next year. From Keegan to Rory Muir and Riehn, all the king’s authors and all the king’s men blindly claim the tail, the tusk, or the trunk defines the true nature of that mythical beast.
This special issue of WDM explores the question of tactics and how they should or should not manifest at the brigade level.
The Thin Red Line—as discussed in WDM Nr. 3—is an entrenched myth that is part of the larger myth of "Napoleonic Tactics." This myth has been reinforced in our minds through decades of gaming rules and movies that promulgate it. It is said that TLNB tactics are opposite to "real" Napoleonic Tactics... Good!
Battles almost always focused on strong-points such as villages and bridges, and the whole picture we have of long lines of troops firing away is a hold-over from the 18th-century regulation books. The last vestiges of the linear way of making war were blown away at Jena—with one important exception...
Fall 2014 Wargame Design 73
Amateurs Talk About Tactics ... Professionals Talk About Logistics. Kevin Zucker Right at the start of this game system, when the first Leader counters joined their brigades on the NLB sketch map of 40 years ago, we made a decision that simplicity would best serve our design intent. We had a basic combat results table that had been tried and tested and it worked. Its very simplicity was and remains its virtue. At a time when other designers were finding ways to increase complexity, we decided to move in the opposite direction.
Of course, this fundamental decision would not please everyone, but it pleased me, and it allowed us to explore other aspects of warfare, which happen to be the areas that Napoleon excelled at and where he won all his battles—the areas of leadership, command, and logistics. The Emperor was not a leader like Wellington, riding from one threatened square to another. Napoleon himself didn't get involved in tactics, except when it came to the employment of artillery. He had begun his career in the artillery and he held this branch to be of prime importance among the three arms.
As a game designer, I made a trade-off. In order to make room in the game for the rules on leadership and command, I decided to forego all the bells and whistles in the combat arena. The result was a highly popular game that many people played until all the print was worn down on the Napoleon counter and the map was in tatters.
That original combat system, which has continued to evolve over the years, still gives me the kind of back-and-forth shifts in the battlefield that I want, even though our best theoreticians will tell you that the "combat model" of this game system isn't accurate at all.
How can that be? How can a combat system that isn't accurate still produce proper outcomes? For the answer, we need to remember the gap that always exists between theory and practice.
Look at the field of music. Don't listen to compositions of the theory teachers, unless you like your music dry as dust. There is a saying in music departments: "Those who can, play. Those who can't, teach." There is something in the orderly outlook of a theoretician that actually
prevents all creativity. There is no better example of this than the marvelous film Amadeus. The hard-working guy who plays by the rules is nowhere in comparison to the iconoclast who loves music and breaks the rules.
In Napoleonic history, there were a number of pedants like Salieri, who put their theories into action with disastrous results. Just to mention two—the "unhappy" General Mack at Ulm, and the Tsar's favorite, Phull, of the camp at Drissa. Napoleon himself disavowed theory: "I have no system of operations."
Our combat system, as it has evolved over the years, works for me. It doesn't please the pedants, but that is their loss. They, like Salieri, keep trying to design a game according to theory.
I don't give the same weight to "cumulative attrition" that hobby theoreticians do. I weight it differently. If "cumulative attrition" was the sine qua non, then the U.S. would have won in Vietnam. Napoleon stated that morale was more important than numbers. "You see that two armies are two bodies which meet and endeavor to frighten each other; a moment of panic occurs, and that moment must be turned to advantage." I agree with Frederick, that "his sacred majesty chance" rules the battlefield. Chance, the roll of the die, is the most historically accurate element of any wargame.
"There is plenty of documentation of Napoleon's view that battle losses would be equal until the point that one side retreated. Generally that side would have to leave behind their wounded, guns and baggage..." —from "The Thin Red Line" (in Wargame Design Nr. 3).
It is usually during the pursuit that losses become unbalanced. If you pay attention to battle narratives, you will see this. Digby Smith doesn't break out pursuit losses. Casualties on the battlefield are not the determining factor.
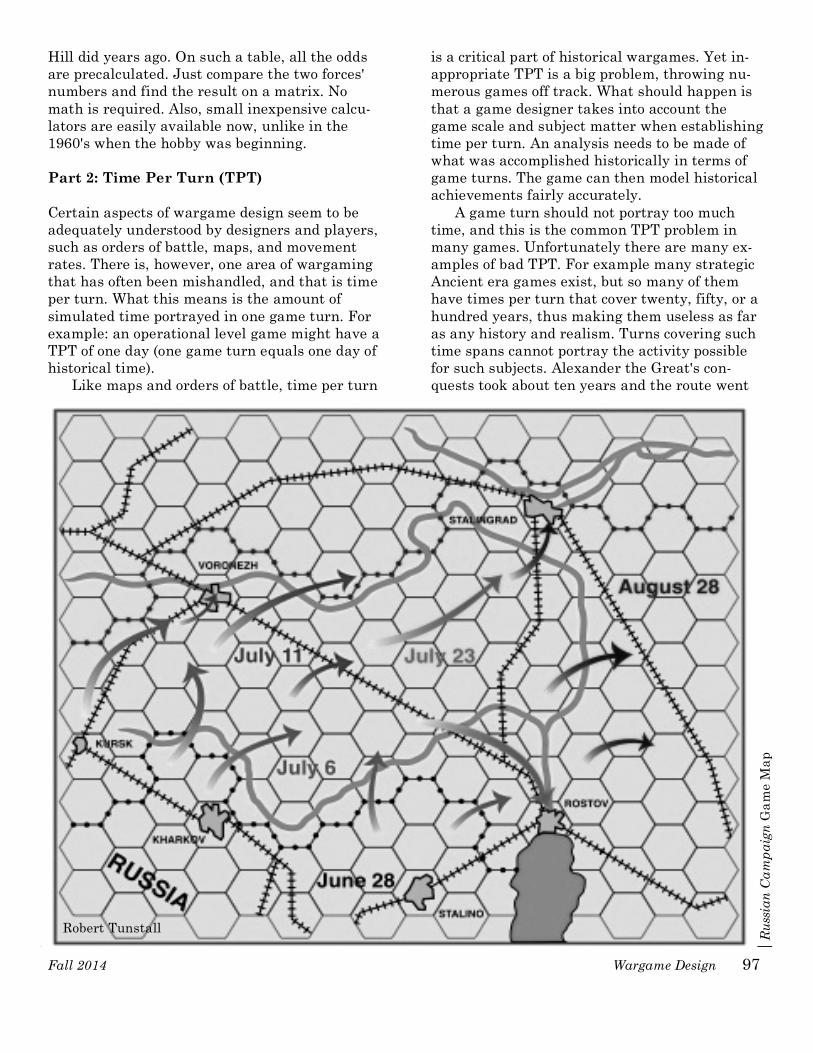
Loss numbers are mostly guesswork. The Austrians never released their loss figures for the Battle of Dresden, as one example, and generals always lie about them. On the other hand, if we read that Maloyaroslavets changed hands 6 times in one day, isn't that historical data? I would argue that we have plenty of
Fall 2014 Wargame Design 74
The New Ways of War ... Richard K. Riehn
The image of the commander in chief, stand-ing atop a hill in magnificent isolation, manipulating the army at his feet like so many puppets on strings, is overwhelming. But it is also largely a mirage.
It appears sheer heresy to say that even Na-poleon, the great master of the battlefield, did not exercise nearly as much tactical control over his battles as cultists and romantics would have us believe.
The commander in chief might set the tasks for his corps and division commanders, but it was left to the brigadiers to actually carry them out up front. They were the men who made the final dispositions of their combat elements and who decided in precisely what fashion a given objec-tive was to be attained. And it was the success or failure of their endeavors that would eventually ripple up the chain of command.
The commanders, in their turn, could order measures to exploit, redress, or counter, but the fate of their orders would also be determined by the men up front. No matter how brilliant an op-erational or major tactical concept was, it would achieve nothing if the attacker (or defender) failed to impose his will upon the enemy on the firing line. Thus, it would probably be accurate to say that while a commander in chief could win or lose campaigns, his direct influence could not nearly so often win or lose battles.
The commander in chief was responsible for the condition of the army, its morale and state of training, its organization and its channels of command. He could direct its movements, con-centrate his forces in the right place at the right time, institute strategic or operational moves, and determine how many reserves to hold back and how to use them when the opportunity or need presented itself. All of this was no mean task. But it could do no more than give victory a better-than-even chance. After all was said and done, it was up front, on the firing line, where success or failure was determined, and it was there that chance played its strongest hand.1
1 Richard K. Riehn, 1812: Napoleon’s Russian Campaign (1990), p. 95
(continued from page 73) historical data besides the body count. We have parade states, which are often cited as the army strength going in to the battle, when in fact his-torians forget the attrition suffered by the armies in the run-up to battles. To show the importance that OSG places on getting these numbers right, look at the unit spreadsheet for Napoleon Against Russia (below).
The OSG criterion is this: Can the game pro-duce an historical outcome? The combat system is only one element—and not the most important one—in achieving this goal.
My view is that if we get the map right, and we get the unit strengths right, then the outcome of the battle will be right. That is because we know that the other parts of the system work. To those who actually play these battles, the histori-cal outcome is always a possibility. Everything in the game is designed to produce accurate out-comes at the corps level, or at the level of the battle as a whole.
Fall 2014 Wargame Design 75
The Closed Watch Case Kevin Zucker There is no hexgrid on an actual Napoleonic bat-tlefield. So why are we trying to make the hex-grid do something it cannot do—to fit tactical formations into a shape that never was? The at-tempt to shoehorn Napoleonic tactical arrange-ments into the hexgrid is barking up the wrong tree.
The alternative approach is to work the other way around. That means that the hexgrid is seen not as confining the units, but as a convenient coordinate system. For the player, it still works the way everyone thinks, but as designers, we know that the hex is only an approximation, not a fenced-in location.
By analogy with the turn scale, I suppose you would not be shocked if I tell you that 60 min-utes is only the average time elapsed per turn and that if we wanted to be absolutely correct, some turns might represent two relatively quiet hours on the battlefield and some turns might be only 40 minutes duration. This accordion princi-ple applies to the map as well.
To take an example from the Campaigns of Napoleon, we have force markers on the map representing the head of the column of maneuver and showing only the point of assembly. But the game doesn’t depict the dispersal of forces in road march, because it isn’t important. What matters is the manpower of the force when it is concentrated. The gamer may think that the marker represents the location of all 30,000 men in that force. He doesn't need to know that, his-torically, that 30,000-man column is stretched-out 20 to 30 miles back along the road.
Now let's take that to the Grand Tactical
scale.... A unit doesn't really occupy a single hex. In
reality, the men in one brigade may be stretching back over two or three road hexes, if in Road March; and if deployed on the battlefield—in the broad arrow formation for example—the unit might be in parts of a forward hex (or two) and perhaps further to the rear. A stack of five units would potentially spread out even more to the rear of the first unit—although there is techni-cally room for 43 battalions or squadrons in one hex, leaving plenty of room for maneuver (see WDM Vol. II, Nr. 9, p. 13). But the cutting edge
is at the front and the rest of the units are in re-serve—providing defense in depth over a large and indeterminate zone.
How come those reserve units are not simply deployed in hexes further back to begin with? That is the common-sense view. And secondly: how come the owner of that stack gets to count all those troops into his combat strength when a lot of them aren't even up front where it counts?
The answer is: "Tactics." Tactics are going on inside the "closed watch case" throughout the game where you cannot see them. Reserve movements that take place in 5, or 10, or 15 min-utes, within a space of 100, 200, or 300 yards, cannot be shown graphically: we have to use our imagination to get a feel for what we cannot see.
Units can filter back and forth from the front line to the reserve within an hour's time. Also, just by being there, those troops provide flank support and give a firm base for the front line to stand on.
The presence of forces in reserve is felt by friends and enemies alike, and the knowledge that those reserves are behind them give their friends the courage to take risks. Should these undertakings fail, there will be supports to shore
Fall 2014 Wargame Design 76
up the line and prevent a collapse. The above diagram illustrates a "stack" from
Vandamme's Division at Austerlitz. While the light infantry and the second brigade are de-ployed, the third brigade remains in reserve.1
The total manpower of a unit was gradually committed to battle, not all at once. Vandamme only put two of his 3 brigades into the forward half of the hex: the action commenced with only the first brigade (comprising the 24th Light In-fantry regiment) engaged. As the battle wore on, more units came up to relieve the front line. Therefore, al-though casualties are taking place more or less through-out the battle, the man-power in contact remains constant (or changes gradu-ally) for an extended period.
A striking feature of Na-poleonic battles is the ping-pong effect of individual regiments bashing each other out of town, or across the bridge, only to be pushed back by a fresh enemy regi-ment in their turn. That is an attrition-type battle, but attrition doesn't have any effect on combat power en-gaged until all the reserves are committed. After that the unit becomes very brittle, and either one side or the other will break first. Once the unit has used up its re-serves, if the pressure of 'shock' is applied, it cannot continue to sustain losses and occupy its ground.
1 Nosworthy, With Musket, Cannon, and Sword.
That is why we keep an aggregate tally of combat strength lost per corps. Demoralization comes when you might say all the reserves in that corps are committed to battle.2
Or take the example of the Battle of Pultusk: Marshal Lannes had two divisions facing odds of over 2:1 against them. But Lannes was an excel-lent tactician. What he did was to leave one en-tire division in reserve throughout the battle. He benefited from the strength of the reserve divi-sion, just by keeping it "in being." This prevented Bennigsen in turn from committing all his troops to battle. Lannes lucked-out when one of Da-vout's divisions showed up toward nightfall.
The attempt to fit a brigade inside a hex and to represent the tactics of the era in a hexgrid is entirely misguided and unnecessary. It is a straightforward and flat-footed attempt to do something that cannot be done, no matter how hard you try and no matter how many rules you pile on. That way is a dead end.
I would encourage you to look at TLNB with your imagination's eye turned on. The hexgrid is
merely a necessary abstraction to make the game playable. The design team never forgets that we have pushed brigades this way and that to make them sit within the grid. We never forget that in
2 The above paragraphs are from the update sheet to Four Lost Battles (2005).
Fall 2014 Wargame Design 77
The Paradox of the Empty Hex People have discussed this effect of hexgrid geometry at least as far back as MOVES magazine. The points made above imply, of course, that the hex is only empty to the extent that it's a hex at all. The hex and the unit counter in it are both abstractions. Yes, what happens a level below the echelon of the unit counter goes on in a closed watch case. The sister point is that at the unit-counter level, we're still looking at a picture very dissimilar to the footprint of the brigade. The every-other-hex de-fense makes a strange picture because it looks like it's full of holes, big gaps where the soldiers aren't standing shoulder to shoulder. But that imagery is a consequence of literalism. A literalist reading of counters on a map makes sense only in tactical-level games like GMT's Great Battles of History or, for tercios only, Musket and Pike where the square or rectangular counter on the map comes close to representing a dense, square or rectangular formation covering a patch of ground.
Those of us who followed the evolution of design ideas at SPI were subtly trained to think liter-ally and to apply literalist imagery (the "common-sense view") too broadly. For example, in Terrible Swift Sword, Wellington's Victory, and Highway to the Reich, a unit's firepower is directly propor-tional to its strength in steps, and combat is a matter of chipping steps off enemy units till they ei-ther die incrementally or blow a morale roll and run for it.* The subtext is that manpower correlates directly to rate of fire (or rate of bayonet thrust), conditioned by rules to represent frontages by capping the amount of strength a stack can contribute to a combat resolution. Therefore, the think-ing goes, a six-step unit that takes one-step loss is now 5/6ths as combat-effective. That's the as-sumption that underlies the addition of a step-loss mechanic in Mark Hinkle's NLB-derived games, Napoleon on the Danube and Dresden 1813. I'm not evaluating these rules' realism or effectiveness in their native habitats. I'm saying that the literalist thinking they encourage colors players' assess-ments of systems, like TLNB, that don't use literalist models. It's like criticizing quantum physics for not being strictly Newtonian.
A similar conceptual error can make players say "Whoa, that looks weird" when the stacking and ZOC rules create a picture where what looks like a hole in the line functions like a flank buttress. Well, that is weird, seen in isolation and statically. But the rules make more sense when we think about how they affect the up-front strength and the flexibility or brittleness of a position. Yes, adja-cent units are vulnerable to the attack-retreat-surround technique. But they also require the attacker to bring more combat strength per hex of frontage to make the technique work. And that means the attacker will have more units committed to ZOCs on a narrower front than he might otherwise. Meanwhile the defender might be strong but rigid with adjacent defending units, or more attackable but less vulnerable to catastrophic losses with the venerable every-other-hex layout (as nearly as the terrain allows). SPI’s head designer Dunnigan was right out in front with alternatives to the strictly linear correla-tion of headcount to combat effectiveness. In NATO Division Commander and the Central Front games, battalions and regiments maintained their printed combat strength even as they got chewed up in various ways: losses, fatigue, friction. So long as a unit was functional, it could maintain its firepower at the pointy end. What it lost in combat was its staying power, its ability to put off being shattered. TLNB uses different mechanisms to implement pretty much the same idea on both the unit and formation levels. —Dave Demko
* In all three SPI games mentioned, the CRTs map firepower onto casualties inflicted in a pretty linear way. But I think they all limit the number of steps that can fire at the same time, to reflect unit frontages. The ZOC-based games including NES's two, NLB, NAW, and TLNB don't do that...
Fall 2014 Wargame Design 78
reality those brigades, on the real battlefield, are flowing into a multiplicity of shapes far more freely than our die-cut components can depict. We don't forget that the actual shape of the bri-gade unit is not 400 yards square.
Look at the graphic on page 6. The blue out-line shows the square cardboard playing piece in relation to the triangular arrangement of the actual battalions. As long as you are looking at that square unit and trying to make it act like a Napoleonic brigade, you are doomed to continual frustration. You have to abandon the equivalence in your mind that a unit counter is the same thing as the unit it represents.
As in Napoleon at Bay, the unit counter is marking the front of a position, the "business end" of a unit that is virtual and can actually be spread out over several adjoining hexes.
The whole debate comes down to this question: “Why is a unit more secure having empty hexes at the flanks than having other friendly units?”
For example, three consecutive hexes in a straight line are occupied like this:
STACK 1 - UNIT 2 - STACK 3
In this case, a successful attack against the weak hex in the middle, followed by an advance into the hex, creates a threat to the flanks of both adjacent stacks. At the same time, “Unit 2” di-verts onto itself the entire attack strength of one hex, reducing what might have been a 2:1 attack on either stack, with approximately equal forces across the front, down to 1:1 odds.
On the other hand, with the middle hex un-defended, like this:
STACK 1 - EMPTY 2 - STACK 3 - EMPTY 4
it is now possible to mass two attacking stacks against each of the defenders, and achieve better results. However, it would be impossible for an attacking unit to enter the empty hexes.
According to the rules, while a unit may not move from one EZOC to another in the Move-ment Phase, it may advance after combat from one EZOC to another during the Combat Phase. Is that just an arbitrary rule, or does it reflect something actually taking place on the battle-field? Why should an attacking unit be able to do something against a defended hex that it cannot
accomplish where there is only an empty hex? Of course even a small band of defenders may repulse the attacker, as well as diverting the at-tacker’s strength away from adjacent stacks.
Having a weak unit in the line still remains s hazard. During combat (inside the closed watch-case), troops of both sides become intermixed. The attacking infantry must, at some point, ap-proach within the same hex as the enemy, as the defending troops remain to receive the attackers at short range and even in hand-to-hand combat, with attackers and defenders becoming inter-mixed if the defenders withdraw. In this case under cover of the weak enemy unit, the attack-ers advance, and troops of both sides are swept along in the general press. Thereafter, generally the victorious troops would be exposed to a coun-terattack in their turn.
But why should a moving force be prohibited from entering Empty Hex 2, when there is no unit there to repel an attack? The moving force may be still in march mode, not having formed into attack formation. There isn’t as much smoke of combat, no confusion of friend and foe, and the attackers are not intermixed with the enemy. They would be exposing their own flank as they approach, making them vulnerable to the undivided enfilade fire of artillery, small arms, and skirmishers. They couldn’t just skip through an EZOC without getting fired on.
Fall 2014 Wargame Design 79
On page 8 is a picture of Grawert’s Prussian division about to move up in front of Vierzehn-heiligen and then deploy for the attack at the Battle of Jena:
“The fatal method of that epoch,’ says von der Goltz, ‘was to halt and form [a firing line] within the zone of the enemy’s effective fire.’ Harassed by a galling fire from the swarms of skirmishers in and on either side of Vierzehnheiligen and unable to return it, the Prussian infantry was already shaken and demoralized before it was ready to begin volley firing.”3
A continuous line with troops in every hex is
more vulnerable to attack once it is broken. It is at once strong and brittle. It has more firepower in the front line, but is more rigid and lacks flexibility. The weak hex doesn't allow for failure because there are no reserves.
In case one brigade should be pushed back the whole line breaks. All it takes is one breach in the line to destroy the integrity of the entire position.
A stack (defense in depth) is better because if one part fails there is support to fall back on. Look at the checkerboard arrangement that most armies used. (See Wargame Design Vol. III, Nr.1, Summer 2013, p. 14 ff.)
Actual tactics cannot be fully shown to the naked eye at the brigade level. “Grand Tactics” implies that we are leaving out everything that happened at the regimental level. To make the player take account of tactical evolutions would be contrary to the design intent. We just assume these things are being taken care of by the bri-gade general. The player’s proper role as overall commander is to assemble the various parts of the army on the battlefield at the proper time. Making the player go down to deal with things that can happen in a few minutes time, deep in-side the hex, would require markers, tracks, pencils, and lots of additional rules. That is not necessary or desirable. Still, we take account of tactical happenings as designers, but only in the deep structure of the design that is invisible to the player. I don't believe in forcing the player to deal with everything that is part of the deep structure. The goal is to make the game accessi- 3 F.L. Petre, Napoleon’s Conquest of Prussia p. 137
ble to as many people as possible. I don't like games that are so complex that nobody can play them. That is why the game appears simpler than it really is. It actually works; the effects are right, even if you don’t like some of the details.
Unfortunately, we all come to this topic through the battle of Waterloo, where Welling-ton used an outmoded form of defense, a throw-back to the Frederickian era. To make matters worse, Napoleon’s assault on the ridge was faulty because there were no supports in case of catastrophic failure. If the assault had been properly supported, one gap in the line would have been enough to crack the position open.
Wellington’s deployment was an all or noth-ing gamble that didn’t allow for any "tactics"—or any failure anywhere along the line. That is why his constant presence was necessary, shoring up morale, filling in gaps. No maneuvers were pos-sible. Once the troops were in position the line couldn’t move; once broken at any point the en-tire line would have been compromised. The po-sition was only as strong as the weakest hex.
The French mode of deployment was more flexible and wasn’t all-or-nothing. It had evolved over years of fighting Prussians, Austrians, and Russians.
Should we change the rules to reduce the ZOC of advancing units, for example, that would guarantee the dominance of Wellington’s rigid line over all comers. That would prevent the game from simulating any battle except for Wa-terloo (and only as British victory).
The Flanking Effect When you think of troops being "surrounded," that might conjure-up images of the Germans at Stalingrad in 1943. In contrast, in TLNB, the “surrounded” unit really isn’t fully surrounded. Sometimes all it took was a threat to the flanks. The meaning of “surrounded” was discussed in Wargame Design Nr. 3. The ZOC rules define very simply when a unit has been outflanked. You don’t have to get bogged down defining the unit’s front or its flanks, but the result is right. When we say a unit is “surrounded” in the ZOC rules, an enemy would have to be on one (or both) flanks. Perhaps there would be less confusion if we called this the “Flanking Effect.”
Fall 2014 Wargame Design 80
Because of the distortions in the hex grid, what would be a more-or-less straight line of en-emy units (X-X-X) looks curved. For the gamer, seeing it as curved is normal. For the designer, X-X-X is a straight line—we are just assigning the nearest locations in the coordinate space so that it looks curved. In the historical situation we are attempting to reproduce, no unit has yet be-gun to "flank" the friendly unit until either hex "F" is reached. Once either (or both) "F" hexes are entered, the unit is said to be “surrounded” (in game terms). In either case, it isn't really surrounded, because there is an open hex (or two) at the back, where individual troops could get out. But the design doesn't allow the unit to pass through.
Why not? Is that because there is a physical barrier to their escape? No, the space is open. Is it because the troops have to run the gauntlet in passing through the ZOC of the units in hex(es) "F"? Maybe, in part.
Rather, the “surrounded” unit begins to lose its cohesion the moment either hex "F" is en-tered. If those enemy units are not kicked out of hex “F” immediately, then the unit will lose its formational integrity, and even though men may escape through the open hex(es) at the rear, the unit is disordered and no longer usable.
On the third day of the battle of Arcole, in 1796, a detachment of 25 horsemen with 4 trum-peters crossed the Adige and sounded the charge in the Austrian rear. This noisy “Hex F” demon-stration created panic among the Austrians, who promptly fled from the battlefield.
To address the lethality of the “ZOC Sur-round” we recently made an important rules change to make units that have their retreat cut by an EZOC available for reorganization (UAR). That is in the current rules version 6.63 (12.34) and shows that the “surrounded” men aren't all captured while exiting to the rear.
Once again we need to revisit our “literalist” friend who thinks that combat is like putting meat in a meat grinder, and that when all the men have been ground up, then the unit is eliminated.
In my view it doesn't go that way at all. I have cited the figure of 41% as the greatest level of losses that the very finest unit could endure (Gudin’s division from Davout’s Corps in 1806), and still remain coherent. A unit can take losses for a long time while bringing more troops up from the reserve, keeping its frontline strength steady. Then suddenly it will collapse.
When we say a unit is eliminated, it means the unit has become disordered; it has lost the ability to perform tasks. Hence, it is eliminated from play. Many of the men are still there, they just cannot be used. However, they can be reor-ganized. They will eventually rally to their regi-ments, if conditions allow: a cadre of officers re-mains, and a general is present.
That is why I am opposed to the incremental loss model of Combat Results. In my view, it doesn't take very many losses among officers and cadre before unit coherence is lost; in fact, the key question isn't even the number of men remaining in the unit. Unit coherence is deter-mined as much by this question of the flank threat as it is by the meat grinder.
Why is the flank threat such an important consideration? A psychological advantage is ob-tained on troops inordinately sensitive to the ap-pearance of any enemy troops to their rear, threatening their lines of retreat, and in addition there was the tactical advantage against the “hinge,” or the unit flanked, which could be enfi-laded from two sides.
Guarding the flanks was always the diffi-culty, and the objective of Napoleonic tactics was either to threaten to turn the enemy flank or to breach the line (turning the inward flank of units on either side). At Eylau, because of the weakness of the French Army, Bennigsen was able to maintain his line even with a sharp angle in it; very unusual for an army in such a posi-tion.
As Napoleon was fond of saying, it really only took a slight morale boost to tip the scales of vic-tory. In TLNB victory doesn't automatically go to the side that has killed the greatest number of enemy troops. It is just one factor among many.
Fall 2014 Wargame Design 81
What Does a ZOC Represent? Does the ZOC represent anything tangible? Does it represent light troops, vedettes, skirmishers, fields of fire, or anything else? Or is it merely a description of a relationship in the hexgrid?
As you might suspect, I see the ZOC as more of a morale effect than any physical impact. I do not dis-count the physical aspect, but the morale effect is primary in the situation where an advancing unit moves onto the enemy flank. On the other hand, a ZOC can be more of a physical presence if a unit has been in position long enough to send forward skir-mishers, etc.
A ZOC need not be capable of causing casualties in adjacent hexes, or projecting a significant amount of its combat potential into those hexes. All it need do is project a threat.
The ZOC in that situation is not yet causing any casualties, but by its mere presence, on the flank of the enemy units, it is causing the units to disorder. The ZOC is just a handy way of defining when a unit has a tangible threat to the flanks. It is this threat that is causing the temporary loss of unit effective-ness. An ineffective unit gets taken out of the game—it cannot be used until reorganized.
How much could troops see going on around them? A hex is 525 yards across. In the heat of battle, with smoke reducing visibility, would troops really be aware of what was going on 500 yards away?
In the U.S. the major highways have mile-post markers placed every one-tenth of a mile. Each hex is almost exactly 0.3 mile. When there aren't too many other vehicles around and you are on a gradual down-hill slope, try counting ahead three of those posts. That will show you how easily you can see from one side of a hex to the other. Now if the units are firing, they won't be able to see that far. If enemy forces are advancing onto one flank, some troops will become aware of what is going on, and that information can spread down the line in minutes, like the old game of "telephone."
"The flight crowd is created by a threat. Everyone flees; everyone is drawn along. The danger which threatens is the same for all... They feel the same ex-citement and the energy of some increases the energy of others ... So long as they keep together they feel that the danger is distributed ..." Then Keegan com-ments, "Inside every army is a crowd struggling to get out, and the strongest fear with which every com-mander lives — is that of his army reverting to a crowd through some error of his making."4
4 John Keegan, Face of Battle, page 173, quoting Canetti.
Letters... Cedric Dugardin: If I may, I would like to make one small ama-teurs' comment about the counters of your last creation. I particularly appreciated the counters of Leipzig and La Patrie. Their visual effect is perfect and they are really elegant
Looking at the playtest version of the NAR counters, I noticed that the quality boxes are col-oured and I find this hinders a bit the visual co-herence of the counters. Moreover, as the sorting out of the counters between battles is not that complicated, this colour coding is not a "must have." I find that what hampers the visual per-fection of the playtest counters is the number of different colours in the quality boxes (Black, red, yellow, no colour).
Just to support my point and be honest (as much as a Frenchman can be), I sometimes mix the different countermixes to create my own games; this is why I like this idea of visual ho-mogeneity between games.
After looking at the Leipzig and La Patrie counters, I think that the thin white line around the quality box was missing in the Last Success counters to make them perfect.
The opposition between light and dark blue with the thin white line around the quality box could make a “good” visual effect.
I agree with you about gamers grumbling around sorting out counters…but we are few left, so why should we need to make concessions about elegance and design? Sometimes I regret that one must sacrifice design to ease of sort-ing…the biggest part of the pleasure in this hobby is before the fight…
[Ed note: We suggested changing the black boxes dark blue. Finally we made this change.]
In The Last Success I found the choice of the two “blues” to be fine but the contrast seemed a bit too visible.
Whatever you decide would be fine for me, I think your games are just brilliant, simple and elegant, and this is the first time in 32 years of wargaming that I give some design advice.
My gamer’s advice would be “keep it pure and simple, brilliant and elegant OSG design.” How-ever, as the boss of a big company, I would also recommend you do exactly what you think is best for the success of your game!
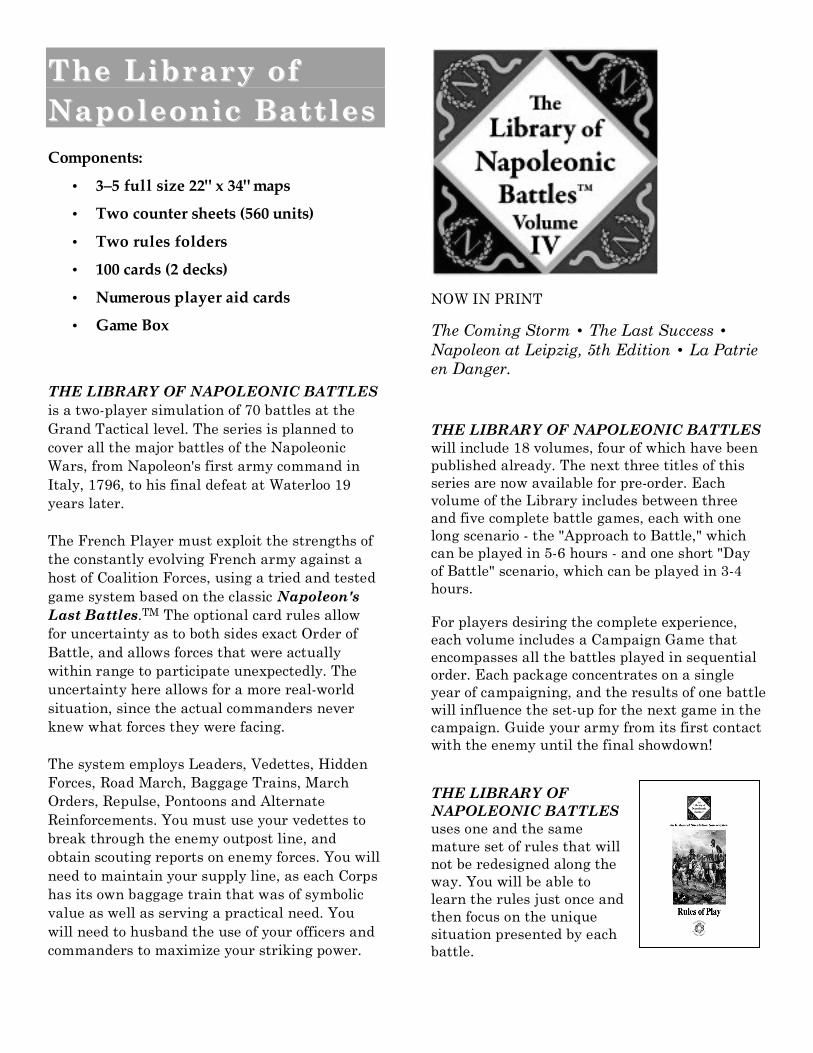
The Library of The Library of Napoleonic Battles Napoleonic Battles Components:
• 3–5 full size 22" x 34" maps
• Two counter sheets (560 units)
• Two rules folders
• 100 cards (2 decks)
• Numerous player aid cards
• Game Box
THE LIBRARY OF NAPOLEONIC BATTLES is a two-player simulation of 70 battles at the Grand Tactical level. The series is planned to cover all the major battles of the Napoleonic Wars, from Napoleon's first army command in Italy, 1796, to his final defeat at Waterloo 19 years later.
The French Player must exploit the strengths of the constantly evolving French army against a host of Coalition Forces, using a tried and tested game system based on the classic Napoleon's Last Battles.TM The optional card rules allow for uncertainty as to both sides exact Order of Battle, and allows forces that were actually within range to participate unexpectedly. The uncertainty here allows for a more real-world situation, since the actual commanders never knew what forces they were facing.
The system employs Leaders, Vedettes, Hidden Forces, Road March, Baggage Trains, March Orders, Repulse, Pontoons and Alternate Reinforcements. You must use your vedettes to break through the enemy outpost line, and obtain scouting reports on enemy forces. You will need to maintain your supply line, as each Corps has its own baggage train that was of symbolic value as well as serving a practical need. You will need to husband the use of your officers and commanders to maximize your striking power.
NOW IN PRINT
The Coming Storm • The Last Success • Napoleon at Leipzig, 5th Edition • La Patrie en Danger.
THE LIBRARY OF NAPOLEONIC BATTLES will include 18 volumes, four of which have been published already. The next three titles of this series are now available for pre-order. Each volume of the Library includes between three and five complete battle games, each with one long scenario - the "Approach to Battle," which can be played in 5-6 hours - and one short "Day of Battle" scenario, which can be played in 3-4 hours.
For players desiring the complete experience, each volume includes a Campaign Game that encompasses all the battles played in sequential order. Each package concentrates on a single year of campaigning, and the results of one battle will influence the set-up for the next game in the campaign. Guide your army from its first contact with the enemy until the final showdown!
THE LIBRARY OF NAPOLEONIC BATTLES uses one and the same mature set of rules that will not be redesigned along the way. You will be able to learn the rules just once and then focus on the unique situation presented by each battle.
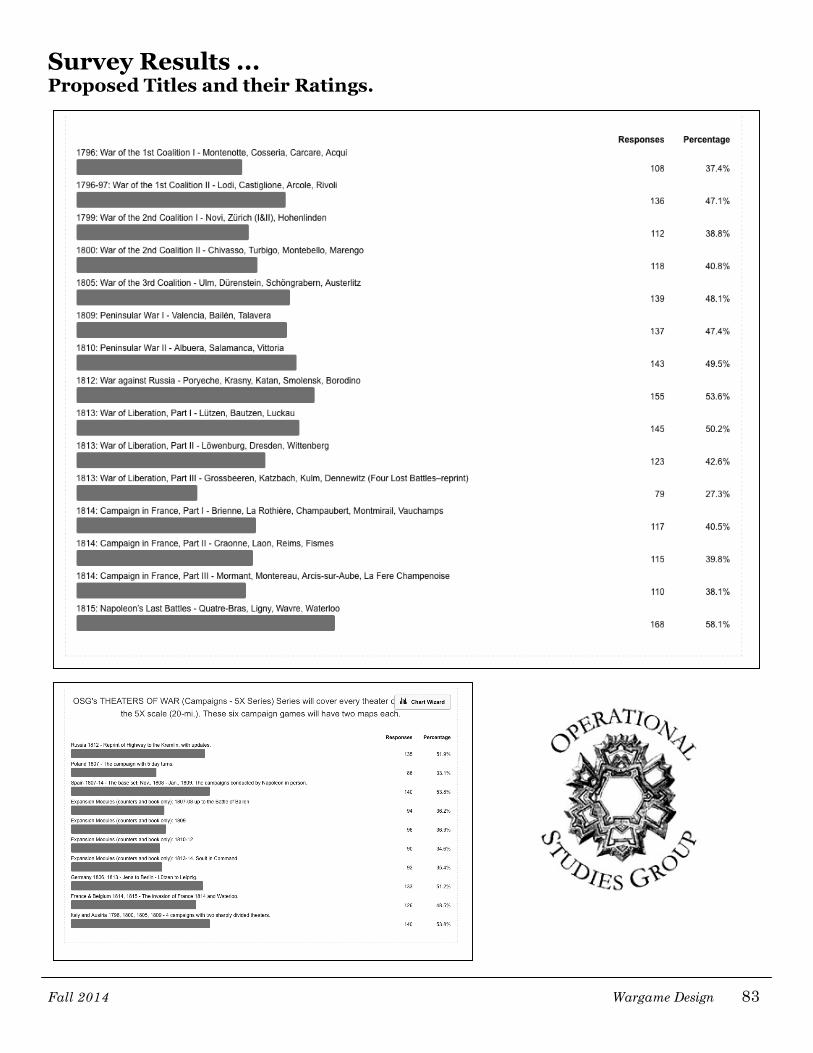
Fall 2014 Wargame Design 83
Survey Results ... Proposed Titles and their Ratings.
Fall 2014 Wargame Design 84
Rules of Play UPDATE TLNB Rules v. 6.63-6.64 31 October 2014 6.2 Effects of Command (add): "Combat Units do not have to be in Command to attack (10.0), Bombard (13.0), or Charge (14.0)." 7.61 Crossing a Span (add at end): "Leaders and Vedettes do not have to be in Road March." 8.43 Blocking Hexsides: LOS along a hexside congruent to Blocking Hexes is blocked. 10.11 LOS Step: Perform the LOS step even if there are no combats to be resolved. 12.2 Shock Table, Shock Note E: With a 1R result, the owner must reduce either the strongest or the best initiative of his units involved. 14.1: Change the second sentence to read: A hex being charged must also be subjected to a bombardment and/or an attack by friendly infantry and/or artillery during the same Combat Phase. 14.2 Charge Procedure (addition): Cavalry Charge Movement is subject to all Movement Rules (7.0), except those specifically mentioned in the Charge Rules. 14.22 Restrictions (add): A Cavalry Charge may not be conducted: • Through an enemy ZOC, except for the EZOC of its
target hex. • Through friendly units. 14.23 Charge Results: Replace the first paragraph with the following: • On an Ae result, the charging units are eliminated. • On a Pr Result, all phasing cavalry retreat to starting
hex and reduce 1 or 2 units. The target has some Movement costs doubled in the following Movement Phase (see table).
15.14, second bullet: Units in Chateaux implement retreat results from the Shock Table normally. 18.14: If one end of a deployed pontoon is occupied by a unit friendly to the pontoon, a roll of 1 to 3 is considered no effect. 21.2 Demoralization Effects (change): Reorganization: The Phasing Player must roll for each Demoralized Combat Unit (22.23-3). 21.2 EXCEPTION (change): The French player's Demoralized minor ally troops must instead pass a normal Initiative check. If this fails the unit is PEU (also 20.51-4). French minor allies include all French player nationalities except French and Poles.
24.32 Second Turn Bonus Cards On the second game-turn (only) both players draw during the first player's Card Segment. 24.52 Mode Card Effect If a scenario (such as 28.0 or 31.0 in Napoleon at Leipzig) starts with a night turn that has no Card Phase, play the mode cards on the first daylight turn. 25.24 Pontoon Trains and Baggage Trains (add): • If the formation's existing non-divisional artillery does not arrive, its baggage train does not arrive either. Glossary (add) Column: If a corps has "non-divisional artillery" that is not present in a scenario, the baggage train is also not present. Surrounded: A unit is surrounded and may not retreat if all adjacent hexes contain enemy units, EZOCs not occupied by friendly combat units, or prohibited terrain. CHARTS AND TABLES Reconnaissance Table (change): The table has been revised as shown below. NOTE: A force whose only cavalry is heavy cavalry (HC) is "no cavalry" on the Recce Table.
Charge CRT (change)
Probability Ratio (Odds) Attacker:Defender
Die Roll
1:1 1:2 1:3 1:4
1 OR OR OR OR 2 OR OR OR Pr1 3 OR Pr Pr1 Pr2 4 Pr Pr1 Pr2 Ae 5 Pr1 Pr2 Ae Ae 6 Ae Ae Ae Ae
KEY: OR = Overrun; Ae = Attacker Elim; Pr = Phasing return. Odds over 1:1, treat as 1:1. Worse than 1:4 not allowed. Storm or Snow: +1 to die roll. No charges during mud. On a Pr, Pr1 or Pr2 result the charging units are returned to their starting hex (reducing the number of steps indicated) and the target unit(s) have their Movement costs doubled in the following Movement Phase. Place the 'square marker' on the target unit(s) to denote increased movement costs. Units in square may move their full MA, doubling terrain costs for all terrain other than road, trail and clear.
Fall 2014 Wargame Design 85
The “Uncertainty Principle” in Wargaming Tim Carne
What you see is not always what you get. What you see at the end of a player phase does not necessarily represent the situation of lines, col-umns and squares at a precise moment.
It is useful to consider how a division general might use one battalion as the marker for the division’s advance, with the general regulating the pace and alignment of the division by closely controlling this regulating battalion. The reali-sation of this has made its appearance in minia-ture gaming generating a lot of heat at times as it provides a historically relevant mechanism to prevent divisions fragmenting into a cluster of zippy little battalions.
The player has a role of Commander in Chief yet at the same time executes the movement of the counters and resolves the combat. This mi-cro-management falls below the level a com-mander should be executing but we accept this compromise, not usually having a team of sub-commanders available to fulfil this role. The fo-cus remains at the “player-commander-level” with a number of “black-box” mechanisms han-dling the lower level activities.
A lot may happen in an hour’s time before the other player can respond in his turn. To me this means that the position of the stacks needs to be seen as approximations rather than the absolute position of the troops. The Heisenberg uncer- tainty principle states that if you attempt to fix the position of a sub-atomic particle then you lose information about the momentum and vice-versa. As we fix the time element by the turn structure then it is reasonable to accept that the position of the counters becomes an approximation.
As an experiment I tried one of the smaller battles from La Patrie en Danger (the Battle of Brienne) with a smaller time interval for a player turn. The mechanism for movement is first, cav-alry one hex (to represent the effect of speed the cavalry movement) then infantry and artillery one hex and finally cavalry one extra hex. No ZOC so if there is a gap you can get through it. Obviously the game takes a lot longer to play and terrain effects need to be considered which adds complexity. It was a reasonably similar to a game with regular one-hour turns but I could not see this being practical for one of the major bat-tles.
When you consider that the game mechanics allow for this element of uncertainty then other mechanisms may be re-interpreted. We are sometimes frustrated as players when an oppor-tunity is missed by a bad die roll for initiative. As Commander in Chief we should not expect perfect knowledge of the actions (or inaction) of subordinates. A De or Ex result can seem abrupt when compared to gradual reduction in strength but as high level commanders we should not have the information as to how weak the units in combat actually are.
To counter the uncertainty in battle a com-mander should hold a reserve in a known loca-tion. The reserve officer should remain within the command span of the Commander in Chief so as to allow the timely commitment the reserves.
Fall 2014 Wargame Design 86
Contemporary Tactics in Perspective
Napoleonic Infantry Combat Derek Lang
Circumstances alone will decide what you do. The principles of tactics are well known, but the art of making use of them is the real test of a great commander – Archduke Charles
Introduction
The manoeuvres of smaller sized combat units – battalions, regiments, or brigades (where the latter operated as co-ordinated units) – are generally referred to as tactical. The manoeuvres of larger sized formations – divisions and corps – are generally referred to as operational. While The Library of Napoleonic Battles may be a brigade level game, it is not a tactical level game: it uses brigades as its basic units of manoeuvre, but its focus is on the operational decisions that occur at corps level. Essentially, it is an operational simulation.
The Napoleonic corps commander obviously had an understanding of tactical matters, but he did not normally concern himself with what was going on below brigade level – his focus was at a higher (operational) level. Thus, tactical level considerations are, to an extent, abstractly represented within The Library of Napoleonic Battles combat system. Tactics can be considered as taking place within the individual hex (the manoeuvring of sub-units within each brigade) and, as such, are largely invisible to the player.
Nevertheless, tactics are important, even in an operational simulation; because tactical considerations can exert an influence on operational outcomes. A fundamental relationship and interaction exists between the two. The adoption of new tactical systems by the French, while their opponents continued to employ linear-style methods, was a major factor in Napoleon’s uninterrupted series of victories up until 1809. According to Brent Nosworthy in Battle Tactics of Napoleon and his Enemies:
“The French army under Napoleon ..... were able to defeat their enemy using a repertoire of powerful grand tactical[operational]innovations ..... all of these grand tactical capabilities were dependent upon tactical
innovations that had been developing in the background.”
Clearly, French innovation at the tactical level yielded benefits at the operational level. Napoleon’s operational system of Corps and Divisions did not suddenly just appear out of nowhere – it developed from a tactical system that had been evolving since 1796, if not before. So, what did combat at a tactical level look like?
Infantry Tactics Examined
The following analysis is inspired by a series of articles written by Jean Lochet which originally appeared in Empires, Eagles & Lions; a Napoleonic history publication that may be familiar to some readers.
It is a commonly held misconception that Napoleonic infantry combat often resulted in close-quarter fighting. In fact, this was rarely the case: hand-to-hand (or bayonet) combat was actually very rare. So how did an infantry attack drive off the enemy? In other words, how was a defender (or attacker for that matter) defeated – what did the mechanics of infantry combat actually look like? Possibly the most famous contemporary description of an infantry attack was General Chambray’s account of the Battle of Talavera, which is quoted here:
“The French advanced with shouldered arms, as was their custom. When they arrived at short range, and the British line remained motionless, some hesitation was seen in the ranks. The officers shouted at the soldiers “Forward march! Don’t fire!” The forward movement was thus resumed, but it was not until extremely close range of the British line that the latter commenced a two-rank fire, which produced some disorder and brought the attack to a halt. The officers again shouted to the soldiers “Forward! Don’t open fire”, although firing set in nevertheless, the British suddenly stopped
Fall 2014 Wargame Design 87
their own fire and charged with the bayonet. Everything was favourable to them; orderliness, impetus, and the resolution to fight. Among the French, on the other hand, there was no longer any impetus, but disorder and surprise caused by the enemy’s resolve: flight was inevitable.”
Chambray’s account is perhaps the best surviving summary of what probably happened in most actions between French and British infantry. It shows the French objective was not to open fire, but to press on with the bayonet. The fact that muskets were shouldered is even noted as normal practice. Clearly, if the attacker started firing he stopped moving, and the momentum of the attack was lost. Furthermore, in an attack against a steady opponent, it was often difficult to get the troops moving forward again, and a firefight (exchange of musketry) would likely ensue. Possibly the most extreme application of this principal was seen at the Battle of Montmirail in 1814, when Marshal Ney ordered the Young Guard to attack with fixed bayonets, after first shaking the priming powder out of their muskets so that they could not be fired!
What is particularly interesting about Chambray’s account is that the British fire does not appear to have been the decisive factor which determined the outcome. Although it stalled the attack, it is said to have caused nothing more than “some disorder” whereas the really decisive factor which routed the French was undoubtedly the sudden bayonet attack. On the whole, firefights seem to have been more common among continental opponents than in the Peninsula, where lengthy exchanges of musketry rarely took place. On the other hand, there are numerous examples of firefights in continental battles, where infantry combat had a more protracted back-and-forth nature.
A Case Study
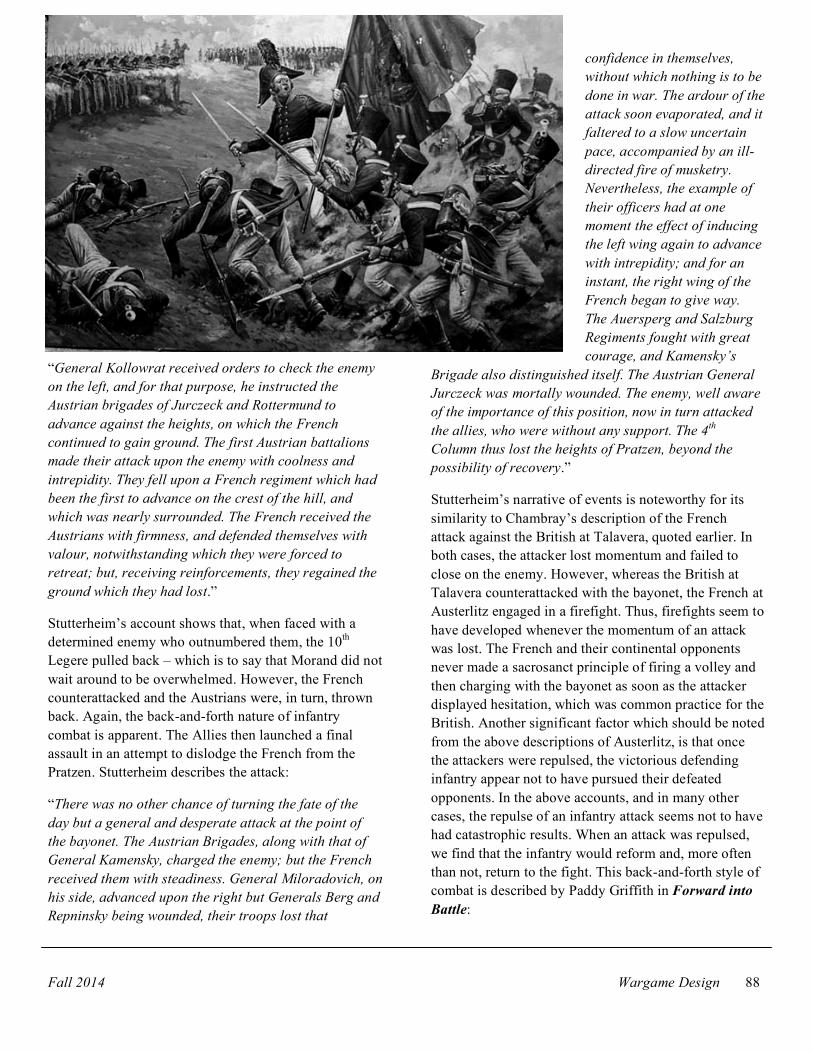
What follows is an examination of the struggle for the Pratzen during the Battle of Austerlitz; between St. Hilaire’s Division of Soult’s IV Corps (Brigades Morand and Thiebault), and the Russo-Austrian 4th Column of the Allied Army, commanded by Miloradovich and Kollowrat. This engagement encompasses several interesting examples of firefights, bayonet attacks, and so on. Christopher Duffy describes the initial French advance in his book Austerlitz:
“Thiebault had been told that he could expect to encounter no more than a chain of allied outposts, but he had the foresight to keep his brigade in line of columns, ready to support Morand as necessary. Only the first battalion of the 14th Ligne was detached under Colonel Mazas for the purpose of sweeping Pratze village. The Russians actually got the better of the first clash of arms. On their right the first Novgorod battalion at Pratze stood up at the instant when Colonel Mazas came to a halt at the stream, and poured in a destructive volley at point-blank range. The main body of the Russian line came into action at almost the same time, and the Apsheron and Little Russia Grenadiers, attacking with the bayonet, overran two French guns. Thiebault was soon at hand to restore order. He pointed the 36th Ligne at the village, with the second battalion of the 14th Ligne to its left, and ordered the three battalions to attack without more ado. The French deployed at the run, and they swept across the stream and through the village with such elan that the Novgorod battalion gave way and carried the Apsheron Grenadiers with them in their flight.”
This account is very interesting. We see a volley at close range, and a bayonet attack, the French retreat, abandoning two guns, then Thiebault counterattacks and routs the Russians. The back-and-forth nature of the combat is apparent; first one side has the upper hand, then the other. This type of ebb and flow is highly characteristic of Napoleonic infantry combat. Significantly, Duffy makes no mention of any close-quarter (hand-to-hand) fighting.
Morand’s Brigade, which comprised the 10th Legere (2 battalions), had not participated in the earlier action, and it now moved forward on to the Pratzen. However, the Austrian infantry of the 4th Column, having also been ordered to advance onto the Pratzen, moved towards them. Morand soon found himself isolated and attacked by a much larger force. The attack on the 10th Legere is described in A Detailed Account of the Battle of Austerlitz by the Austrian General Karl von Stutterheim, published in 1807. Stutterheim was himself present on the field at Austerlitz, commanding a brigade in Kienmayer’s Advance Guard, and his account contains several interesting details:
Fall 2014 Wargame Design 88
“General Kollowrat received orders to check the enemy on the left, and for that purpose, he instructed the Austrian brigades of Jurczeck and Rottermund to advance against the heights, on which the French continued to gain ground. The first Austrian battalions made their attack upon the enemy with coolness and intrepidity. They fell upon a French regiment which had been the first to advance on the crest of the hill, and which was nearly surrounded. The French received the Austrians with firmness, and defended themselves with valour, notwithstanding which they were forced to retreat; but, receiving reinforcements, they regained the ground which they had lost.”
Stutterheim’s account shows that, when faced with a determined enemy who outnumbered them, the 10th Legere pulled back – which is to say that Morand did not wait around to be overwhelmed. However, the French counterattacked and the Austrians were, in turn, thrown back. Again, the back-and-forth nature of infantry combat is apparent. The Allies then launched a final assault in an attempt to dislodge the French from the Pratzen. Stutterheim describes the attack:
“There was no other chance of turning the fate of the day but a general and desperate attack at the point of the bayonet. The Austrian Brigades, along with that of General Kamensky, charged the enemy; but the French received them with steadiness. General Miloradovich, on his side, advanced upon the right but Generals Berg and Repninsky being wounded, their troops lost that
confidence in themselves, without which nothing is to be done in war. The ardour of the attack soon evaporated, and it faltered to a slow uncertain pace, accompanied by an ill-directed fire of musketry. Nevertheless, the example of their officers had at one moment the effect of inducing the left wing again to advance with intrepidity; and for an instant, the right wing of the French began to give way. The Auersperg and Salzburg Regiments fought with great courage, and Kamensky’s
Brigade also distinguished itself. The Austrian General Jurczeck was mortally wounded. The enemy, well aware of the importance of this position, now in turn attacked the allies, who were without any support. The 4th Column thus lost the heights of Pratzen, beyond the possibility of recovery.”
Stutterheim’s narrative of events is noteworthy for its similarity to Chambray’s description of the French attack against the British at Talavera, quoted earlier. In both cases, the attacker lost momentum and failed to close on the enemy. However, whereas the British at Talavera counterattacked with the bayonet, the French at Austerlitz engaged in a firefight. Thus, firefights seem to have developed whenever the momentum of an attack was lost. The French and their continental opponents never made a sacrosanct principle of firing a volley and then charging with the bayonet as soon as the attacker displayed hesitation, which was common practice for the British. Another significant factor which should be noted from the above descriptions of Austerlitz, is that once the attackers were repulsed, the victorious defending infantry appear not to have pursued their defeated opponents. In the above accounts, and in many other cases, the repulse of an infantry attack seems not to have had catastrophic results. When an attack was repulsed, we find that the infantry would reform and, more often than not, return to the fight. This back-and-forth style of combat is described by Paddy Griffith in Forward into Battle:
Fall 2014 Wargame Design 89
“The superiority enjoyed by the French in their continental battles may have led them to regard infantry attacks as being somewhat expendable. They would normally begin by softening up the enemy with artillery and skirmishers, before sending in a first wave of infantry. If this attack failed it would not usually be routed, as it would have been by a British counter-charge. A second wave of infantry would then be sent in, while the first rallied. Even if that second wave also failed, it would withdraw and the re-formed first wave would then attack again, and so on.”
Thus, for the French and their continental opponents, the defeat of an infantry attack was seen as a temporary setback, rather than a major reverse; and therefore no serious thought was given as to what exactly had caused it. When defeated rather more comprehensively by the British in the Peninsula, the French fell back on the same line of reasoning and attributed their misfortune to a variety of factors other than their tactics. In fact, contemporary French accounts of Peninsular battles are remarkable for their complacency. However, the specific nature of British tactics and how they differed from those of continental armies will be examined in the second half of this article.
Continental Infantry Combat
Although it would appear that normally the French used columns to deliver most attacks; some attacks were occasionally conducted in line. During an attack, if things were not going as intended, then the columns would sometimes deploy into line, but there were no set rules. It is even difficult to know if some column deployments were spontaneous or had been planned in advance. The mid-nineteenth century French military theorist Ardant du Picq commented that: “The cavalry has definite tactics, essentially it knows how it fights; the infantry does not.” Ironically, the absence of any formal rules may actually have been a factor in French success, as their ability to improvise and adapt at a tactical level gave them an advantage over their less flexible continental opponents.
One interesting point which emerges from the accounts of the fighting at Austerlitz is the relationship between casualties and morale. An analysis of losses would suggest that casualties were not always the decisive factor in taking or holding a position. As we have seen,
it was not casualties that caused the 14th Ligne to recoil under the attack of the Russians and abandon two guns during the first action at Pratze village. Nor did the Russians suffer heavy casualties when they were subsequently repulsed from the village by Thiebault’s attack. Neither was it casualties that caused the 10th Legere to retreat when attacked by superior Austrian forces on the Pratzen. The evidence suggests that there are other factors besides casualties which could make troops retreat (or even rout) and the importance of morale should not be forgotten.
In summary then, the above analysis allows us to draw several conclusions. Firstly, close-quarter fighting was extremely rare, and certainly was not the decisive factor in most tactical engagements. It would appear that most attacks, whether in column or line, lost momentum and faltered when the defender stood firm and delivered effective musketry. Attacks which were halted had a tendency to develop into firefights, at least between continental opponents. Finally, firepower was not as decisive as is often believed – morale played an equally important role.
British Infantry Tactics
During the Napoleonic period, British infantry had a relatively unique style of fighting, which was quite different from that practiced by continental armies. Most British battles were defensive in nature; the infantry awaited the enemy in a well-chosen position (intended to neutralise the effectiveness of enemy artillery), fired one or two volleys and then counter-charged with the bayonet. At that point, the enemy usually turned and fled. The importance of neutralising the more numerous French artillery, although it was a decisive factor in British success, has not been appreciated by many English language historians. The influence of the “firepower school” has, for a long time, been pervasive; hence an over-emphasis is often placed on British infantry firepower, instead of looking at their tactical system as a whole.
Protracted firefights rarely took place in any of the battles fought in the Peninsula, or even at Waterloo. The popular image of British infantry firing volley after volley (the “five rounds per minute” myth) is simply not supported by reliable eyewitness accounts. Only one lengthy firefight ever occurred in the Peninsula. That
Fall 2014 Wargame Design 90
was at Albuera, where Maitland’s Brigade could not achieve a quick decision with the bayonet, because there was a gully to the front of their position which prevented a counter-charge from taking place. Nevertheless, British musketry was highly effective and attackers were sometimes defeated by firepower alone, without the need for a bayonet charge. However, such cases were the exception, rather than the rule. Wellington and his generals knew that the decisive factor was not the number of casualties inflicted in a lengthy firefight; but rather the number of casualties inflicted in a short space of time, and the effect this had on enemy morale Thus, the volley delivered at short range, by fresh troops who had been sheltered from enemy artillery fire, was a fundamental principle of British infantry tactics of the period.
Indeed, the real secret of British success was not that their musketry was delivered with particular alacrity (as is often supposed) but rather that it was delivered at such close range. Having delivered a volley, it would have taken tremendous discipline not to reload, but to launch immediately into a bayonet attack. Paradoxically, therefore, it was actually their ability not to fire, rather than their skill in musketry, which was the key to British success.
British and Continental Infantry Tactics
Clearly, British tactics were very successful, as the long list of French defeats in the Peninsula shows. However, in the continental campaigns it was a different story. The long list of French victories during the Wars of the Revolution and Empire, from 1792 until at least 1809, show that something quite different was happening in continental battles. So, what was the difference between combat in the Peninsula and that between continental armies?
In the Peninsula, as already mentioned, the attacking French infantry always contacted a fresh British defensive line, carefully sheltered from the disorganising effect of artillery fire. The British achieved this by employing one or more of the following three principles:
1) Deploying their troops on reverse slopes. 2) Having their infantry lie down.
3) Using a skirmish screen to protect their main battle-line.
For the most part, this was possible because the British generally fought defensive battles, both in the Peninsula and at Waterloo. In continental battles, we find that the tactical circumstances were usually very different from those of the Peninsula, even though (in the majority of cases) the French were also on the offensive. Although troops were sometimes sheltered behind natural obstacles, none of the continental armies systematically employed the three principles which were central to British strategy.
The only exception to this was the Austrian Army’s use of reverse slopes, which actually pre-dates its use by the British. This tactic is mentioned by Archduke Charles both in his Principles of the Art of War, written in 1806, and also in his Order of the Day for the Battle of Wagram in 1809, the relevant part of which is reproduced here:
“Should a formation be too exposed to enemy artillery fire, I leave it to the judgement of the Brigadiers to either form into line, when nothing is to be feared of enemy cavalry, or to move slightly to utilise some fold in the ground, not too far out of the line of battle, to avoid hostile cannon fire.”
This is very significant, because it is the only contemporary evidence of such tactics being officially authorised in any army besides the British. Indeed, some modern Austrian historians like Manfred Rauchensteiner have argued that Wellington’s subsequent use of reverse slopes may, in fact, have been influenced by the ideas of Archduke Charles. However, unlike in the British Army, the use of reverse slopes was never a fundamental part of Austrian infantry tactics, which is perhaps why Charles felt the need to mention it specifically in his Order of the Day. Charles also mentions forming into line to reduce casualties, a practice often used by the French as well, but which was seldom used by the Prussians and almost never by the Russians – British infantry would normally have fought in line most of the time in any case.
In continental armies, troops were almost always deployed in the open. Furthermore, as a matter of principle, the infantry did not lie down. Consequently, continental battles were fought in a different manner
Fall 2014 Wargame Design 91
than in the Peninsula, and artillery could usually be employed to full effect. Before the Battle of Ligny, Wellington paid a visit to Blucher’s headquarters, and his observations on the Prussian deployment are reported by Jac Weller in Wellington at Waterloo:
“Wellington’s famous criticism of the Prussian Army for fighting the Battle of Ligny exposed in columns, on the forward slope and within range of French artillery, sticks in one’s mind. But as the Duke himself remarked, “Everyone knows his own army best”..... Probably the Duke saw some columns in the open and instinctively wanted to order them to form into line and lie down.”
This clearly illustrates the tactical differences between British and continental armies. British infantry would have been deployed in line on the reverse slope; whereas the Prussians were formed in column in the open. Furthermore, as we have seen, the British practice of avoiding firefights was not followed in continental armies, and they were usually much more willing to engage in lengthy exchanges of musketry. This difference is of paramount importance, because as Brent Nosworthy points out in Battle Tactics of Napoleon and his Enemies:
“The result of a single volley at close range could be equal or greater to the sum of numerous volleys delivered during a prolonged firefight at longer ranges.”
Thus, British infantry did not just deploy in a manner that was different from their continental counterparts, they fought in a manner that was different as well. Furthermore, continental battles normally involved much larger forces than in the Peninsula. For continental armies, the important thing was to manoeuvre large formations (much larger than the British, who did not even use the Corps System until 1815) which meant that continental generals were usually thinking of tactics on a larger scale than the British. It should also be remembered that continental armies possessed far more artillery than the British, and this also had an influence on tactics.
Conclusions
We have seen how infantry combat between continental opponents normally took the form of a firefight, sometimes of extended duration, and was generally
characterised by a shifting of impetus back-and-forth as one side or other gained the upper hand. By contrast, combat involving British infantry was usually much more decisive in nature, the delivery of one or two volleys at short range (with or without a subsequent bayonet attack) normally being enough to decide the outcome.
The Wars of the French Revolution and Empire lasted for more than twenty years, and the tactics of the period are both dynamic and complex, with far greater depth than has been explored here. To gain a deeper understanding of the infantry tactics that were used in the Napoleonic era, it is really necessary to study the infantry tactics in use during the second half of the eighteenth century – in particular the two competing doctrines of firepower and shock, as their influence lasted into the Napoleonic period and beyond.
Fall 2014 Wargame Design 92
HISTORY IN TLNB, PART I
The Battle of La Rothière Cezary Domalski
I am honored to begin with this issue of Wargame De-sign a series of articles about The Library of Napoleonic Battles. The first part is a complete AAR from the battle of La Rothière. This is a Day of Battle scenario from the recently issued game in the series, La Patrie en Danger that portrays five battles of the 1814 Campaign in France. Turn by turn descriptions of game actions and photos will be interleaved with some historical and game commentary from both sides, in italics (F for The French Player, C for The Coalition Player). To allow readers to understand both the nature of the Napoleonic battlefield and some crucial game elements, all units will be unhid-den. All the rest of the series rules apply.
Starting positions and plans. This scenario has two crucial points, which are La Rothière (10 VP’s) and Dienville (5 VP’s) towns. Both fortified by a French. Additionally, two Improved Posi-tions was located in straight line east of La Rothière.
C: Not too much time, much to do. Gyulai III Corps will be attacking La Rothière, VI and XI Russian Corps will capture two IP’s. Russian Cavalry and Kronprinz Württemberg Corps (with pre-programmed March Or-der) will try to take French from the flank and pin Mar-mont. Olsufiev Corps (IX) will stay in general reserve.
F:French plans are simple – maintain position up to the sunset, which allows to disengage and successful withdraw from difficult situation. But forces at my dis-posal are much weaker as to the Coalition strength. Then I decide to fill up the gaps with Guard Cavalry and immediately call up Young Guard and Ney (which has pre-programmed March Order to exit the map). VI Corps (Marmont) with I Cavalry Corps (Doumerc) will be delaying Austrians and Bavarians on the east. Diffi-cult terrain there (marches and streams) will help ac-complish this secondary task.
First turn (1 PM). Weather: Rain The Coalition Player draws two Mode Cards (which could change game start settings): Early Arrival and Late Start. Lucky for him! All units will be In Command this turn. Coalition units advance, with most artillery staying behind because of rain. C: Rain hampers artillery, but raw strength gives Coali-tion the advantage. Big push and straight blow will open a hole in the French line. It is important to force The French Player to use all his reserves and then pound him with IX Corps.
The French Player draws one Mode Card: Early Ar-rival! So all forces may move! Cavalry is deployed for-ward, so is Marmont’s Corps. Ney’s Young Guard is marching to the frontline.
F: Thin blue line must be strengthened. Leaving the east flank open (covered only by Doumerc’s Cavalry) is risky, but the main line of defense must be maintained. Cavalry will use the Retreat Before Combat option that
Fall 2014 Wargame Design 93
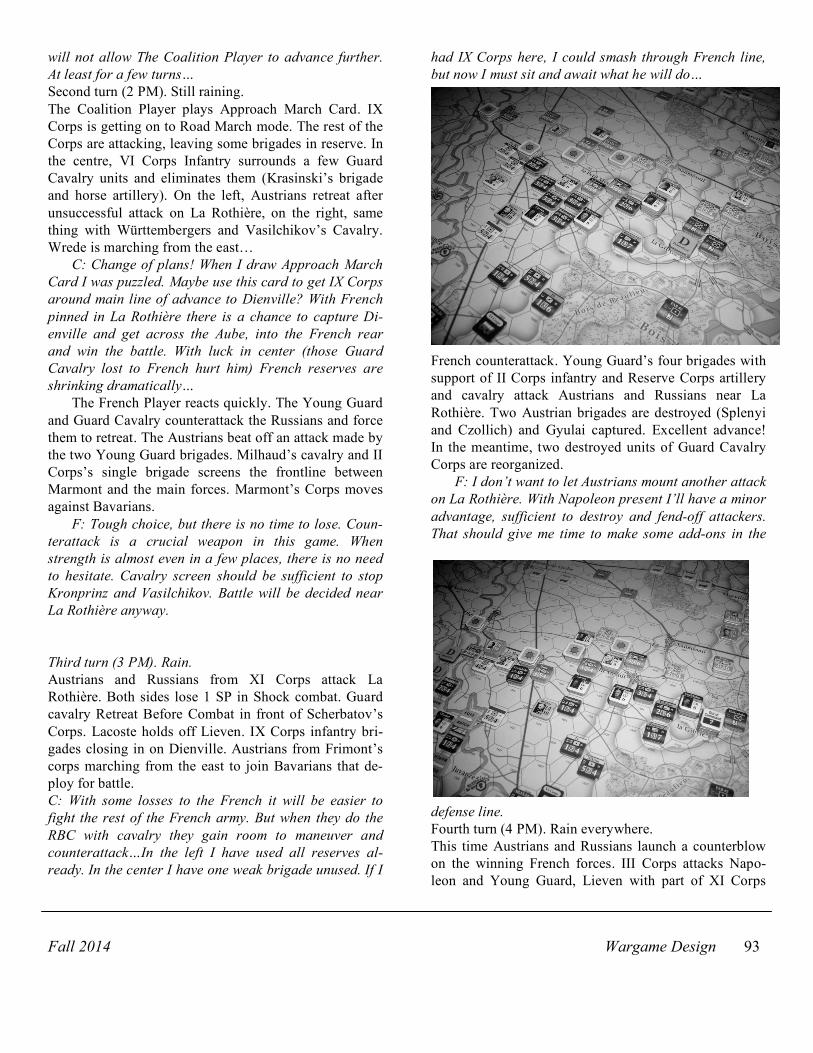
will not allow The Coalition Player to advance further. At least for a few turns… Second turn (2 PM). Still raining. The Coalition Player plays Approach March Card. IX Corps is getting on to Road March mode. The rest of the Corps are attacking, leaving some brigades in reserve. In the centre, VI Corps Infantry surrounds a few Guard Cavalry units and eliminates them (Krasinski’s brigade and horse artillery). On the left, Austrians retreat after unsuccessful attack on La Rothière, on the right, same thing with Württembergers and Vasilchikov’s Cavalry. Wrede is marching from the east…
C: Change of plans! When I draw Approach March Card I was puzzled. Maybe use this card to get IX Corps around main line of advance to Dienville? With French pinned in La Rothière there is a chance to capture Di-enville and get across the Aube, into the French rear and win the battle. With luck in center (those Guard Cavalry lost to French hurt him) French reserves are shrinking dramatically…
The French Player reacts quickly. The Young Guard and Guard Cavalry counterattack the Russians and force them to retreat. The Austrians beat off an attack made by the two Young Guard brigades. Milhaud’s cavalry and II Corps’s single brigade screens the frontline between Marmont and the main forces. Marmont’s Corps moves against Bavarians.
F: Tough choice, but there is no time to lose. Coun-terattack is a crucial weapon in this game. When strength is almost even in a few places, there is no need to hesitate. Cavalry screen should be sufficient to stop Kronprinz and Vasilchikov. Battle will be decided near La Rothière anyway. Third turn (3 PM). Rain. Austrians and Russians from XI Corps attack La Rothière. Both sides lose 1 SP in Shock combat. Guard cavalry Retreat Before Combat in front of Scherbatov’s Corps. Lacoste holds off Lieven. IX Corps infantry bri-gades closing in on Dienville. Austrians from Frimont’s corps marching from the east to join Bavarians that de-ploy for battle. C: With some losses to the French it will be easier to fight the rest of the French army. But when they do the RBC with cavalry they gain room to maneuver and counterattack…In the left I have used all reserves al-ready. In the center I have one weak brigade unused. If I
had IX Corps here, I could smash through French line, but now I must sit and await what he will do…
French counterattack. Young Guard’s four brigades with support of II Corps infantry and Reserve Corps artillery and cavalry attack Austrians and Russians near La Rothière. Two Austrian brigades are destroyed (Splenyi and Czollich) and Gyulai captured. Excellent advance! In the meantime, two destroyed units of Guard Cavalry Corps are reorganized.
F: I don’t want to let Austrians mount another attack on La Rothière. With Napoleon present I’ll have a minor advantage, sufficient to destroy and fend-off attackers. That should give me time to make some add-ons in the
defense line. Fourth turn (4 PM). Rain everywhere. This time Austrians and Russians launch a counterblow on the winning French forces. III Corps attacks Napo-leon and Young Guard, Lieven with part of XI Corps
Fall 2014 Wargame Design 94
pins another two brigades of YG and the rest of XI Corps destroys two brigades of II Corps. VI Corps pushes YG on right flank in two attacks (Another Chance Card played). In the east, Bavarians made minor progress, but lost artillery in exchange combat with French light cavalry from I Cavalry Corps.
C: Successful French attack gives me a chance to destroy extended French units. But with shrinking re-serves I may not have enough strength to dislodge French defenders. Bavarians and Austrians on the east did not occupy the French forces there in an efficient way. Next turn, IX Corps will be able to mount an attack on Dienville, now defended by a weak French unit. That gives me some opportunities…
The French Player plays Mobile Defense Card. He disengages the Guard Cavalry and moves it near La Rothière, attacks Lieven’s units, eliminates one of them and captures XI Corps Commander. YG units deploy in I.P.’s and in the east Marmont pushes Bavarians beyond the stream. F: Another counterattack, this time using card and my mobile cavalry units. Perfect use of mobile reserves gives me another success. Coalition forces are still stronger, but my position is stable. Besides I always have a couple of units behind the line to counterattack, which is crucial to liquidate any breaches in the line.
Fifth turn (5 PM). I’m singing in the rain… IX Corps attacks Dienville. After a brief shock combat the Russians capture the centre of town, forcing a French brigade to retreat. In the center VI Corps attacks, pushes YG units but not advancing. Minor clashes in Bavarian sector with back and forth moves by both sides.
C: At last! Plan works and Olsufiev captures Dienville. Now on to the French! Scherbatov did his job, but be-cause he was not supported from any flank, advance with him could be risky. Exhaustion of reserves is now significant. French Player has few of them, but he must attack now… French reaction: Napoleon and Young Guard attack Dienville, push Russians and capture Olsufiev. In center all French units create line of defense, and Nansouty brings reorganized brigades on map. That was a near run thing! Olsufiev’s move could de-stroy my plan to win this battle, but Napoleon and his young conscripts do the job and fend off Russians. Now victory looks secured and Coalition has probably ex-hausted all his reserves…
Sixth turn (6 PM). Guess what? The Coalition Player attacks with Kronprinz and pushes Voirol’s brigade, but the rest of the forces in centre did not attack. Replacement officer for Olsufiev tries another attack on Dienville, but he has a small chance to win the combat. Fight is slowly dying in the frontline. C: With loss of Dienville I bury my chances to change the course of battle. I have forces to mount minor at-tacks, but the French stand fast everywhere and they have won the battle already… The French Player makes minor changes without attack. F: I’m satisfied with situation. Solid frontline, all VP’s secured and morale of The Coalition Player is low. All his attacks failed… Last turn (Night PM).
Fall 2014 Wargame Design 95
Both players agree to end the game. Now on to stats.
Summary. Loss ratio: French lose 8 SP’s, Coalition 9 SP’s. No Corps was demoralized, no Supply Source or Train cap-tured. VP’s for Cards played: French -2, Coalition -1. VP for controlled hexes: 15 VP’s to French, 0 VP’s to Coalition. So 13 : -1 which gives The French Player a Strategic Victory. Congratulations!
After the game we discussed possibly the biggest mistake was sending IX Corps to Dienville. This reserve was not present in the centre when some holes were made. Then further French attacks and counterattacks exhausted Coalition reserves. Temporary capture of Dienville could change the course of battle, but French have more reserves at hand there, and lack of them in Coalition forces same time, allows French to recapture Dienville and secure victory. East flank did not influence main frontline and did not soak off French reserves as the Coalition Player planned.
The French Player did an excellent job in handling reserves, mounting concerted counterattacks and keep-ing fresh forces near by. Even temporary setbacks did not force Napoleon to alter his plans and he was more determined to win. End notes Historically, the La Rothière battle was won by the Coa-lition with similar losses, but with significant artillery losses by the French.
Letters (cont'd)
Cezary Domalski: Re: Shevardino and chef de bataillon Maciej Rybiński's unit. Here is what I've found:
Those 14 companies of voltigeurs were drawn from battalions of both division of 5th Corps. It is impossible to check from which battalions those companies was drawn (5th Corps has together 18 battalions). As to the conditions of campaign, those unit was more than regular (Initiative 4, even 5 IMO in terms of TNLB series).
As to the strength: sources given us strengths as to the August 23rd review and we must count stragglers/march attrition. Much of stragglers join 5th Corps after Shevardino and before Borodino battle. OoB strengths gives us about 1500 men on regiment, about 500 on battalion, which gives us about 83 men in companies. But that was regulations strengths. Max strength will be then at most 1162 men but when we include stragglers and march attrition it will be no more than 1000 men. I think that this number is close to the real fighting strength.
I attach strengths of 5th Corps as to the August 23rd review.
I've check more sources and send you info about unit strengths in your table later next week. I think, that most of your data are correct. I think that you are one of a few designer, for which correct OrBat and unit strengths is very important thing. That is what I like personally. Now as to the Shevardino and Polish losses. Almost all sources states, that losses at Shevardino was about 2000 men (killed and wounded), most from infantry engaged in fighting. Maybe it helps you some way. Before Shevardino (September 2nd) 5th Corps has in general: 8430 infantry and foot artillery, 1638 cavalry and horse artillery.
Fall 2014 Wargame Design 96
Challenges in Wargame Design Problems and Solutions John Thiessen
Many aspects of wargames have become second nature to both players and designers, such as hexes, calculating combat odds, zones of control, movement phases, etc. From time to time efforts emerge to tinker with or modify these standard elements, successful and otherwise. Variations in combat calculations have brought forth an alter-native procedure termed the Differential Combat Results Table. Perhaps it was a try at making the math easier, as the differential CRT uses subtraction rather than division. Unfortunately this was one of those tinkerings that is a failure.
The standard way of determining combat, us-ing an odds ratio, makes sense because the op-posing forces are compared. A ratio can reflect the degree of strength preponderance one side has compared to the other.
Differential calculations, however, do not compare the forces involved in combat. This is a major flaw since it is important to know the rela-tive size of the attacker and defender. A differen-tial only shows a surplus or deficit after one force’s strength is subtracted from another. The differential does not consider the relative strengths of the forces involved. Example: 12 men attack 2 men, and also 10,012 men attack 10,002. In the first case an overwhelming odds is presented whereas in the second case the two forces are almost equal. Yet a differential CRT presents these combats as identical, that is, a +10 differential, because a differential only shows the surplus or deficit, not a comparison of forces involved. Then again, say you have 6 strength points attacking 2, and in another com-bat you have 12 attacking 4. Both are 3:1 at-tacks, yet a differential CRT portrays them as completely different: the first at +4 and the sec-ond at +8.
Napoleonic era battles are presented in the Napoleonic 20 series by VPG. Here we can see, with the unfortunate use of a differential Combat Results Table, 3 infantry strength points attack-ing 1 strength point, and nearby 7 attacking 5. A
good three to one attack develops in the first case, but about even odds exist in the second case. Yet the differential calculation treats them exactly the same, both situations must use the +2 column on the CRT. Not a good reflection of the combat situations, though an old fashioned odds based table would do that well. OSG's Na-poleonic “Days” Series has a similar one mile per hex scale, and that series uses an odds based CRT to good effect.
In the game DMZ, a hypothetical scenario in-volving North Korea invading South Korea, a pair of attacks, while both at two to one odds, are treated distinctly differently. For instance, a North Korean corps with a strength of 4 attack 2 strength points, and nearby 20 strength points attack 10. The first combat is placed at +4 col-umn while the second at +10. Both attacks take place at two times the defender strength, yet they are placed at wildly different columns on the combat table.
The distortions made by differential CRTs ex-ist in all games that use it, so the above exam-ples show the same problems that reoccur in any other game using this method.
So, a differential CRT doesn't do what some designers and players think it's doing. Forces are not being compared, only a differential is being presented. The fundamental mistake is believing that a differential is just another way of compar-ing forces and calculating odds.
Perhaps a differential is thought of as easier to calculate. This may be true, but is also irrele-vant in a wargame setting, as combat is an im-portant aspect of historical gaming. Odds calcu-lation was part of wargames from the early days of Avalon Hill and SPI, when games were mass marketed to a wider audience. Calculating odds was accepted then, even when wargames were a new entity.
The solution to the inherently flawed differ-ential CRT? Stop using differential CRTs. If eas-ier math is desired, a game can include a pre-printed odds ratio table, similar to what Avalon
Fall 2014 Wargame Design 97
Hill did years ago. On such a table, all the odds are precalculated. Just compare the two forces' numbers and find the result on a matrix. No math is required. Also, small inexpensive calcu-lators are easily available now, unlike in the 1960's when the hobby was beginning.
Part 2: Time Per Turn (TPT)
Certain aspects of wargame design seem to be adequately understood by designers and players, such as orders of battle, maps, and movement rates. There is, however, one area of wargaming that has often been mishandled, and that is time per turn. What this means is the amount of simulated time portrayed in one game turn. For example: an operational level game might have a TPT of one day (one game turn equals one day of historical time).
Like maps and orders of battle, time per turn
is a critical part of historical wargames. Yet in-appropriate TPT is a big problem, throwing nu-merous games off track. What should happen is that a game designer takes into account the game scale and subject matter when establishing time per turn. An analysis needs to be made of what was accomplished historically in terms of game turns. The game can then model historical achievements fairly accurately.
A game turn should not portray too much time, and this is the common TPT problem in many games. Unfortunately there are many ex-amples of bad TPT. For example many strategic Ancient era games exist, but so many of them have times per turn that cover twenty, fifty, or a hundred years, thus making them useless as far as any history and realism. Turns covering such time spans cannot portray the activity possible for such subjects. Alexander the Great's con-quests took about ten years and the route went
Robert Tunstall
Rus
sian
Ca
mp
aign
Ga
me
Map
Fall 2014 Wargame Design 98
from Macedon, to Egypt, to India, and beyond. Such events need turns of about a year, or even more than one turn per year, given the hex or area scales of many ancient games. Ancient Con-quest II deals with this period, but at about 20 years per turn. Alexander would not be pleased to be reduced to one battle in all that time. Se-verely restricted movement and combat does not do justice to the historical situation.
Ancient Conquest I spans 60 years in a turn, even though the hexes are about 20 miles. At this scale even one year per turn would be pushing it, more than one turn per year may be better. A good deal could happen in even one year, but cramming 60 years in a turn makes the game historically meaningless. Ramses' Egyptian force moved from the lower Nile to near Kadesh in the Syria region, where the famous battle was fought, then moved back to Egypt, all in less than a year. To be clear, the problem in Ancient Conquest is its TPT, not the welcome simplicity and playability of the game.
Or take another example of poor TPT, a World War Two eastern front game at 16 miles per hex. Fire in the East is such a game, and has an incredible TPT of only two turns per month. The scale and subject require around four to eight turns per month. Having only a couple turns per month cannot possibly recreate histori-cal activity. Infantry can only attack twice a month in this case, and that is woefully inade-quate. Narratives and maps of operations dealing with this front show that the scope of movement, attacks, and advances in a half month could be more than game turns allow in this title.
SPI's World War I has a map of about 55 miles per hex and is a strategic look at WWI, but features an inadequate 6 months per turn. As any player of the game finds out, the movements and counter-movements that happened histori-cally in 1914, in the Balkans, and on the eastern front, are not possible in this game. Yes, the turns in WWI allow three combats per turn per side, so that helps, but maneuver still remains hopelessly chopped off at the knees.
The Russian Campaign by Avalon Hill is con-sidered a classic presumably for reasons of nos-talgia and the popularity of eastern front WWII games, but game play provides little historical value, mostly due to the bizarre time allotted per turn. At about 34 miles per hex this situation re-
quires two or three turns per month. Yet the games shoves two months’ time into one turn. Although two impulses (functioning somewhat like turns) are provided within each turn, they do not allow for the amount of ground that was gained in reality in two months of time. The hexes represented could be advanced over even by infantry units in about two weeks if success-ful, arguing for a turn representing about a half month. And then there is the question of re-sponse by the other side. Waiting two full months before a response by the opponent is too long a time for this scale of operations.
The importance of time allotted to a game turn is shown in the Avalon Hill classic Third Reich. Change the turns of this game to one month of historic time, rather than three months as published (keeping Strategic Warfare quar-terly), and realistic campaigns are now possible. This game has 60-mile hexes, a scale well-suited for one month turns. The events of France 1940, Norway, France 1944 and the eastern front can be simulated. Infantry type units can move into the Netherlands, Belgium, and France in 1940, counter-move, and have combats on a monthly basis, rather than only once per quarter year. This greatly improves realism and models events much better.
Having a correct time per turn does not in-crease complexity. If the previously mentioned games had been published with a good TPT, the different turn times would not add an atom of more rules and not a bit of complexity. This is a case of where having accurate numerical values, as in movement rates, combat strengths, and time per turn, gives good realism without adding complex rules and procedures.
An example of good time per turn is the Na-poleonic brigade series by OSG. This has one hour per turn at a scale of about 525 yards per hex. This allows a good amount of movement and combat for the scale and subject, depicting the flow of historic action well.
In fact, incorrect time per turn is one of the most common game killers, breaking some of them and rendering others hopelessly unrealis-tic. The solution to this problem is for designers to choose a time per turn that allows for move-ment and combat that adequately reflects the historical situation.
Napoleon at Leipzig 5th Edition Exclusive Rules UPDATE 14 August 2014 25.24 If a formation's non-divisional artillery does not arrive, its baggage train does not arrive either. The above applies to all games in the series. 25.77 (add): An artillery unit in a Leipzig hex cannot bombard but may engage in adjacent combat. 26.1 If playing a multi-day campaign, calculate victory point awards at the end of each individual battle. 26.15 Control of Enemy Supply Sources If a player begins the game in occupation of an enemy Supply Source, no VPs are scored for that. VPs are not scored for occupying mapedge enemy supply hexes by Reinforcements that enter there. 27.5 Two-Map Scenario for Liebertwolkwitz Do not count the North map victory locations. 28.16 Pontoon Trains (change): Coalition, 1 with Schwarzenberg (only). 29.16 Pontoon Trains (change): Coalition, 2. 31.13 (add): Score VPs and reshuffle the decks with the discards on the 6AM turn of each day. Reconstitute the decks as for that day’s scenario, adding back in or removing cards as listed. The mode cards are used only during the initial setup, not at the start of each day. 31.3 (add): If the 17th is skipped according to this rule, set up Reynier and the units of the VII Corps at the start of the 18th in their locations for the 18th. If those locations are not available, scatter VII Corps according to Card No. 6. 31.31 Bonus Cards for the 16th and 18th (change): Minimum of three per player. 31.31 (add) Each victory in prior battles will allow the winning player to draw “Bonus Cards” from his card deck in the Wachau/Möckern and Leipzig battle games. • Each Strategic Victory: 3 Bonus Cards per battle • Each Tactical Victory: 2 Bonus Cards per battle • Each Marginal Victory: 1 Bonus Card per battle • Minimum: 3 Bonus Cards per player EXAMPLE: The Coalition Player wins a Marginal Victory at Liebertwolkwitz and a Strategic Victory at Wachau/Möckern. He would draw four Bonus Cards on turn two of the Leipzig battle game. French Set-Up Cards 18-Oct. Column • Ney (army leader): Change 4026N to 4227N. • Stockhorn (XI): Change 3526S to 4903S. • Personne (II YG): Change 3425N to 3428N. • Hochberg (LO): Change 3223N to 3828N. • Quinette (LO): Change 3828N to 3229N. 29-Oct. Column (Hanau AtB Scenario) • ALL French units (including ALT reinforcements) start at
reduced strength, except the Young Guard units and those units which are marked on the Setup as Full strength.
• Grouvel (XI) is not reduced for Oct 29.
30-Oct. Column (Hanau DoB Scenario) • Napoleon sets up in 1021H on top of Fressinet. • All French reinforcements except the YG units are reduced. • Arrighi (LO) sets up with LO Quinette at 0215H. • XI Corps, Zucchi counter is reduced, not eliminated, & sets up
with Aubrey-a in 0920. Coalition Set-Up Cards • The first date column on pages 2 and 3 should read 14-Oct. • Unit Puttitz (page 3, IV Corps) should read Hirschfeld. The unit
commander was formerly Puttitz. • 16-Oct Column, Wittgenstein’s Corps: The 5, 13, 27 artillery
unit can’t start in 4923S as that hex contains a chateau. Displacethe unit one hex in any direction desired.
French Casualty Track • Add GC Corps to space No. 9. • In the Leipzig column, remove the entry for VIII Corps in the 7
row. The entry in the 10 row is correct. Coalition Turn Record Track • The 14 October scenario starting time is actually at 10AM. • The 16 October scenario TRC says Gyulai enters 9AM on 16
Oct., but that should be 3AM. • 17 October, 6 PM (add): Pontoon train arrives at 1013N. • 18 October, 10AM: Winzingerode should have (6) not (8) units.
This applies to the Oct. 18 scenario only. In the Campaign Game all 8 units enter with Winzingerode.
Hanau Turn Record Track DOWNLOAD Updated TRT for Hanau—http://talk.consimworld.com/WebX?233@@.ee6f7cc!enclosure=.1dda61a8 • The 29 October 5PM entry for “Arrighi, LO” is Arrighi and unit
Quinette only. The LO unit “d’Isle” is ALT only. • Under 29 October, the French V Corps enters at 6PM, while
Lauriston arrives at 3AM. This is correct. • Marmont, VI, came earlier and should arrive at 3PM. • Mortier should be an alternate reinf. #3. Add one more Alt.
Reinf. card into the French deck. • Bertrand (IV) arrived after Oudinot (I YG), so they should
switch places on the TRC (4-5 PM 30 Oct). Weather Effects • Remove the “No” from the Deploy Pontoon column and add the
following note to the bottom of the table: Rivers and Lakes are never frozen in this game.
Counters • Bavarian leader Wrede is a Commander-Officer. • Square markers, back: -1 MP should be 1 MP. Cards • Card 5 (Early Arrival) cancels the effects of Card 2 (Late Start).• Card No. 6 Formation Scattered (clarification): If the game
map is covered by Plexiglas drop from 6" and not 12". • Card No. 16 Baggage Train (addition): Give the Coalition
Player a third pontoon train when he plays this card. In addition,the trains arrive immediately as reinforcements; no die roll is required.
• Card No. 26 Reinforcements Take Another Route (clarification): Mark this card has having an Enduring Effect.
• Card No. 28 Forced March (change): “Once an enemy unit has started attacking....”
La Patrie en Danger Exclusive Rules UPDATE 19 August 2014 25.21 Initial Set-up: The French player sets up first. EXCEPTION: La Rothière DoB. 25.71 Night Combat: The Night PM Movement Allowance is 2/3 (inf/cav), like any other night turn. 26.15 VP Hexes: If there are no instructions in the scenario Victory Conditions for what VP hexes are counted, count all of them that have been occupied by a combat unit in supply. 28.5 La Rothière AtB Scenario (add): Colbert (GC) and the whole French IC Corps should also be listed as exceptions as they enter on the 1st. 29.2 Champaubert ALT Reinforcements: Normally the units in groups #2 and #3 arrive at 1 PM on 10 Feb.; they can arrive earlier as ALT Reinforcements. 30.2 French (change): Charrière, Marguet, 0131W 31.12 No Mode Cards on First Turn: Just start with normal movement on the first turn and do bonus cards on the second turn as usual. 32.3 Undeclared Truce Days: should include both January 30th (draw two bonus cards) and the 31st. 33.53 March Orders at Start (change): The Coalition Player has only one pre-programmed order (not 2) for Sacken's entire column to march to Haute Epine (1125W). Parallel Roads/Trails: In any case where a hex contains two parallel roads or trails, ignore the second one. It is not possible to have units in road march on both roads within a given hex simultaneously. La Grande Armée Set-Up Card Obv. Column • YG units: The initiative of all YG units is (3) as
shown on the counters. 14-Feb. Column • XI Macdonald's 4 units: Change to “exited.”
Army of Bohemia Set-Up Card 29-Jan Column • IV Corps (Kronprinz): Units of the IV Corps arrive
at 9 AM on the 30th, which is after the end of the Brienne DoB and AtB. You would only be using information in the 30th column if you are playing the Mini-campaign (32.0). The Turn Record is correct although the Bohemian Army Initial set-up card seems to indicate the units arrive at 9 AM on the 29th.
Army of Silesia Set-Up Card 11-Feb and 14 Feb Columns • Give the Russian IX Corps a replacement officer
since Olsulfief has been eliminated. Turn Record Tracks La Rothière: • In the 8 AM box for Feb. 1, the unit quantity may be
either 3 or 5, since Thierry and Laville are ALT reinforcements, and may already be on the map in the campaign game.
Champaubert: • Yorck enters at W3913 not W3919. Montmirail: • Blücher, Kleist and Kapsevich appear twice, once on
the Mortmirail card and once on the Vauchamps card. The entries shown for 12 February at 1 PM and 2 PM should be ignored.
• The YG baggage train enters the Feb. 11, 9 AM turn at 1954W.
Coalition Casualty Record Track • In the Brienne column, add “AG” in box 4. • In the Montmi/Champ column, add IX RU in box 6. Remove Cards From Deck Chart • There is only one Coalition card No. 27; change the
entry in the 27.0 Brienne column to “x1 in AtB.” Counters • The formation color on the YG baggage train should
be dark gray, not black. • The Laferriere cavalry unit was Young Guard but
part of the GC. The unit has the correct designations: GC = Guard Cavalry (the Corps to which it belongs), YG = Young Guard (the brigade is comprised of Young Guard Cavalry Regiments).
TLS Update 12 August 2014
Set-up cards have been back-printed with a revision date. Use the revised information. If yours are not back-printed you can download the updated cards at http://napoleongames.com/drupal2/TLS.html Game Maps: Players should ignore little slivers of land along the Danube. Hexes such as 1611 or 1710 on the Eckmühl map cannot be entered. Roads & trails crossing streams count as trestle even if there's no trestle symbol printed on the map. Abensberg Map: Hex 4009 should have a blue French entry arrow. Eckmühl Map: • Hex 0009 should have a French supply symbol for use
when playing on just the Eckmühl map. • Hex 3131 is a Chateau. Hexes 2340 and 2443 contain
a square dot indicating a "location" for historical reference only (no effect).
19.31 Distinguishing the Wagram mix • The French VIII Corps unit 5/6 Rheinbund should not
have a dark box around its Initiative rating. Initial Set-up cards: The first three cards are for Abensberg, Eckmühl, and Aspern-Essling—each battle has an ATB and DOB column. Cards 4, 5 (and 6 if any) are for Wagram only. The columns headed “Regiments” and “Notes” are for historical interest. “Changes to Order of Battle” shows detachments (-) and attachments (+) at the battle of Aspern-Essling. Further Revised Set-Up Cards Here are some further revisions to the French set-up—these new changes are included on the pdfs at http://napoleongames.com/drupal2/TLS.html • French, C Corps units in the IV Corps section, rows
for all three units, Eckmühl DOB column: Change R7P to R5P.
• French, C Corps units in the VIII Corps section (p.3), rows for all four units, Abensberg ATB column: Change R11A to R2P.
• French, III Corps, Demont row, Wagram columns (p.1): Remove from both columns.
• French, IX Corps, Hartitzsch, Zeschau, Arty (Saxon 1st Division) rows, Wagram DOB column: Change their setup hexes to 2608.
• French, IV Corps, Wagram ATB column: For three units, change 3234 to 3233 and for another four units change 3034 to 3033.
• French, VIII Corps, Eckmühl DOB column: VANDAMME, Hügel, Röder, and Stettner start in 1448*; change St. Germain to R11A.
Card Deck: Card 28, Forced March, change: “Once an enemy unit has started combat, you have to wait until the advance after combat before you can play a forced march.” Turn Record Track, Abensberg: AtB change Start 6AM (not 10AM) Defrance, Doumerc, St. G., HArt.—2PM on the 19th at A0111. Schustekh, Mesko—9PM on the 19th at A0127. DoB change NAPOLEON, LANNES—10AM (not 11AM). VIII/Arty.—8 PM at A0111. Schustekh: Place at start in 0924 & remove from TRC at 12PM. Teugen-Hausen change Start 12N. Turn Record Track (Revised), Eckmühl: 22 April, 9 AM—Add C/Defrance, Doumerc, and HArt. 22 April, 7 PM—Remove all three units in the box. They are correctly listed at 5PM. Study Folder: 19.51: The example refers to Abensberg, not Eckmühl. 19.7: Austrian artillery units from different corps cannot combine in a bombardment of the same target. 20.31 VP Award The exiting player receives 4 VP for each baggage train exited. EXAMPLE: If you have eliminated between 5-9 enemy VPs, you may only receive 1 VP for Exit. The Battle of Abensberg 21.13 and 21.14: Remove both sides’ Cards No. 2. 21.14: Remove just one card No. 28. 21.2 Alternate Reinforcements: AUSTRIAN #1. “Arty” includes both artillery units. #2. LIECHTENSTEIN, 4031 (not 4009). #3. CHARLES, III Corps units A. Liechtenstein, Bieber, Arty 8-3-4 and 3-3-4, ROSENBERG, all of IV Corps, and HOHENZOLLERN, 4031 21.31 Group #1 is also under the March Order. 21.51 Duration: 19 April, 6 AM (not 10 AM)—20 April, 8 PM 21.52: The Austrians start with just 3 Mode Cards. The Battle of Eckmühl 22.2 Alternate Reinforcements: FRENCH #3 (change) IV Corps units Fririon, Arty., and Valory are Alternate Reinforcements only. AUSTRIAN change #1. II Corps, 3901, accelerated from 4 AM on the 22nd. Instead of arriving at its scheduled time, the II Corps will arrive according to the card instructions. #2. I Corps, 3901. Adjust Card Deck: remove 2x Card No. 29, Alt. Reinf. (not 4x).
The Battle of Aspern-Essling 23.12: The French start with just 1 Mode Card. 23.13: Remove No. 6 (Formation Scattered) from the French deck 23.2 Alternate Reinforcements: AUSTRIAN #1: Remove REUSS-PLAUEN. Add Archduke Ludwig. The Battle of Wagram 24.2 Alternate Reinforcements: AUSTRIAN #1: Add REUSS-PLAUEN. The Battle of Teugen-Hausen 26.11 Duration: 19 April, 12N (not 10 AM)—8 PM 26.14: Remove only 2 cards No. 29 (not 4) 26.21 French Set-up Teugen-Hausen III/2 7th Line, 2025 should read III/3 7th Light, 2025. Gilly, Gautier, Grandeau should read III/2 (not III/1). Guyon should read 2701 (not 0111). 26.23 Reinf. (add) 1PM—I Res Corps Arty. and HArt., Baggage. 26.24 Alternate Reinforcements: FRENCH (change) Add Bde Petit to the French Set-up in hex E0013. This brigade will not move unless placed under direct command by Davout. If this doesn’t happen it will be allowed to arrive with Alternate Reinforcements Group #2 as printed. HISTORICAL NOTE: Brigade Petit was actually about to exit the East map when Marshal Davout rode over from Teugen around Noon and ordered the brigade to turn return to Teugen. Colonel Petit was personally with the 7th Light during this day. 26.31 March Orders, FRENCH: The French units that start on map have a pre-programmed March Order to exit at E0013-14, or E0009. 26.32 St. Hilaire’s Division (II/3): Treat the units of Lorencez, 57th Line, Destabenrath and the 2-4-4 Arty as part of III Corps under Davout in this scenario. 26.33 Supply: The Austrians use E0033 as their (only) supply source. Treat this scenario as an Approach to Battle scenario for purposes of section 17.3 (Automatic Supply). That means all units on-map at start are automatically in supply until the next Weather/ Recovery Turn. HOUSE RULE: REMOVE FROM DECK Aaron Tobul
In a 4-day game, with three reshuffles, you're almost guaranteed to get all of your Alternate Reinforcements and cancel one or two enemy formations—particularly for the mini-campaign (and any other scenarios longer than two days), but also in the approach to battle games.
18.74. Only Played Once: For approach to battle and longer scenarios Alternate Reinforcement and Cancel Reinforcement cards are removed from the deck after being played (and scored) once.
27.0 MINI-CAMPAIGN The following entirely replaces section 27.0 on pages 11-12 of the Study Folder. 27.1 Four Days in April Use the Abensberg and Eckmühl maps side-by-side, with Eckmühl to the right and Abensberg to the left. Row 40 on Abensberg overlaps row 00 on Eckmühl. 27.11 Duration: 19 April, 6 AM—22 Apr, 8 PM 27.12 Mode Cards at Start: French 2, Austrian 3 27.13 Card Deck, French–Remove from Deck: No. 4, No. 23 (x1), No. 24. No. 29 (x 4) EXCEPTION: Do not remove Card No. 29 during 21 and 22 April. NOTE: Because the mini-campaign is a combination of two scenarios, the number of Alt. Reinf. card No. 29 has to vary over that time period. 27.14 Card Deck, Coalition–Remove from Deck: No. 29 (x1), No. 28 (x1). 27.14 Bonus Cards: French 2, Austrian 2. 27.15 Pontoon Trains: Austrian 1; French 0. 27.2 Initial Set-up Using all set-ups for the Abensberg ATB (see 21.5), set up units shown under the Abensberg ATB with these additions: 27.21 French Set-up (add): These units set-up as follows on the Eckmühl map: • III/3 (less 7th Lt.) followed by III/2 in a road column between Wolkering (3020) and Burgweinting (3912). • III/1 followed by DAVOUT and II/3 in a road column between Seedorf (2515) and Ober Isling (3409). • Baggage, Schmidfeld 3004. • 65th Line, Regensburg (3902) • C Clément, Guiton, HArt., Abach 1713 • III/Pajol, III/Pire, III/3 7th Light, 3729 • III/Guyon, 2701 • III/Jacquinot, 3409 27.22 Austrian Set-up (add): • IV/Vecsey in hex E3435. 27.23 Reinforcements: Use the Abensberg TRC for April 19 and 20, and use the Eckmühl TRC for April 21 and 22. Ignore reinforcements that are just crossing from one map to the other since they are already in play. Reinforcement Changes for the Mini-Campaign only: • II Corps units Conroux, Albert, Jarry, etc. arrive at Neustadt (Abensberg map, hex 0111), at 8 PM on the 20th instead of being ALT Reinforcements for the 21st or arriving at E1154 at 6 PM on the 22nd. • Oudinot and IV Corps units Fririon, Valory, and Arty. arrive at Neustadt at 5 AM on the 21st instead of being ALT Reinforcements.
27.3 Special Rules 27.31 Improved Positions at Start: E2036 27.32 Destroyed Bridges at Start: A0325. 27.33 Archduke Charles: Each Weather/Recovery Turn, the Austrian Player must roll 2 d6. On a result of “2,” Charles suffers a seizure. Charles may have only one seizure. Roll one d6 to determine duration of debilitating effects (n=number of turns). During the seizure, Charles may not provide command, reorganize units, participate in advance after combat, or issue a March Order. He may move. This effect begins with the Austrian Command Phase of the Recovery Turn and lasts through n complete turns. 27.34 Victory Conditions: In addition to 20.1, the player who controls any VP hex at the end of the game receives the number of Victory Points shown in the hex. 27.35 Regensburg: Each hex of Regensburg (E3701, E3801, E3802 or E3903) is treated as a chateau. Enemy units may not enter Regensburg (except by advance after combat) as long as
The Regensburg garrison must check for surrender during any friendly Command Phase in which at least one friendly unit occupies any hex thereof. To avoid surrender the garrison must pass an initiative roll (use the best unit). Initiative failure results in surrender (the garrison is immediately PEU).
The Steinerne Brücke at E3901 cannot be destroyed. French units may not enter hex E3901. 27.36 General Retreat: Austrian Forces that declare a General Retreat (see 20.3) may exit at A0554, A1754, A3201, E3901 and/or E3904. A General Retreat only applies to friendly units on one map section, and either player may declare one per map section.
If Austrian units exit from the Abensberg map, the following French units must also exit from the same hexes, starting with Group #1. REQUIREMENT: Exit at least the same amount of French SPs as the Austrians exit, but not more than the total of Groups #1 and #2:
#1. The Bavarian 2nd Div. (5 units), VII Corps Arty., VIII/Franqumnt, VIII/Schrfnstein, 2nd HC Div. (3 units), and 1st HC/Doumerc. These do not return to play.
#2. Seven units of III Corps, VII/Vieregg cav., plus LANNES and NAPOLEON, will return as reinforce-ments on 22 April as shown (see Eckmühl TRC).
If any units listed above have been eliminated then the French Player must exit unit(s) in their place up to the total SP requirement (including leaders). If he fails to do this at once, he loses 1 VP at the end of each following French Player Turn the requirement is unmet. 27.37 Alternate Reinforcements: AUSTRIAN #1. VI/Nor AG, HArt., Drag No 1, Chev No 6, Hohenfeld, Hohen. Arty., Vienna Vol., A0152 #2. KOLOWRAT, II Corps (all), E3901 Regular Reinf. accelerated from 11AM on the 21st. #3. BELLEGARDE, I Corps (all), E3901
FRENCH #1. VIII/I Franquemont, Scharffenstein, 0033. #2. MASSENA, IV Corps. Regular reinf. accelerated from 1PM, 4PM and 5PM on the 22nd. On the turn of card play, Marulaz enters, on the following turn the 4 PM group arrives, the turn after that the 5PM group arrives, and then the turn after that the three units marked only as ALT arrive. #3. OUDINOT, II Corps. Reinf. accelerated from 3 PM and 6PM on the 22nd. The 3PM group arrives on the turn of card play and the 6PM group follows three turns later. #4. Rheinbund Regiments: 2nd, 4th, and 5/6th Regiments (making up the Division Rouyer), 0033. 27.38 Do NOT use the Abensberg Special Rules: Ignore the Transiting Corps rule (see 21.31)—they move without March Orders. They are not Alternate Reinforcements for the Mini-Campaign. 27.39 March Orders at Start: The French Player may issue March Orders to up to 4 on-map Friendly Forces, and the Austrian Player may issue 2. 27.40 St. Hilaire’s Division (II/3): Treat these units as III Corps units under Davout in this scenario. 27.41 Supply: Treat this scenario as an Approach to Battle scenario for purposes of section 17.3 (as numbered in the most recent series rulebook). HOUSE RULE: ARTILLERY Christopher Moeller • In the original TCS rules glossary, artillery is defined as being treated "like trains, moving at cavalry costs." • In the updated glossary, artillery is no longer defined as a train. It moves like infantry (for foot artillery) and cavalry (for horse artillery). • Streams only affect baggage trains.
One of the joys of exploring The Coming Storm has been seeing artillery getting some of that love. They have WHEELS! They're pulled by HORSES!
Something as simple as defining them as trains is full of implications. Many times, as I've thrown my formation forward, I've suddenly realized that my guns were going to have to leave the group to head upstream to a nearby bridge, delaying their deployment for a turn or two. Or when beating an orderly retreat, finding all of my artillery suddenly in jeopardy because a stream blocks their path. I suddenly understand why maybe so many guns were captured! All those slopes, marshes and streams suddenly mean something!
The Muhlen Fluss at Friedland is nothing with the updated rules. Using the original TCS artillery rule, you experience the fault in Bennigsen’s position, split in two by the Millstream.
TTThhheee LLLiiibbbrrraaarrryyy ooofff NNNaaapppooollleeeooonnniiiccc BBBaaattttttllleeesss CCCOOOMMMBBBAAATTT TTTAAABBBLLLEEESSS (see Notes overleaf)
BOMBARDMENT TABLE
Bombardment Strength:
Die Roll 8+ 6-7 4-5 2-3 1 -1, 0 • • • • • 1 Dr • • • • 2 Dr Dr • • • 3 Dr Dr • • • 4 Dr Dr Dr • • 5 1R Dr Dr Dr • 6 1R 1R Dr Dr Dr 7, 8 1R 1R 1R Dr Dr KEY: 1R = Reduce one Combat unit (attacker’s choice); may retreat. • = no effect MODIFIERS: (See the Notes to Combat Tables.)
COMBAT RESULTS TABLE (CRT) Die Probability Ratio (Odds) Attacker:Defender Die Roll 1:5+ 1:4 1:3 1:2 1:1.5 1:1 1.5:1 2:1 3:1 4:1 5:1 6+:1 Roll
1 Ar* Ar Dr Dr Dr Dr2 Dr2 Dr2 Dr3 De De De 1 2 Ar2 Ar* Ar Dr Dr Dr Dr Dr2 Dr2 Dr4 De De 2 3 Ae Ar2 Ar* Sk Ar Dr Dr Dr Dr2 Dr3 Dr3 De 3 4 Ae Ar3 Ar2 Ar* Sk Sk Dr Dr Dr Dr2 Dr2 Dr2 4 5 Ae Ae Ar3 Ar2 Ar* Ar* Sk Sk Dr Dr Ex Ex 5 6 Ae Ae Ae Ar3 Ar2 Ar2 Ar* Ar* Sk Ex Ex Ex 6 Attacks at greater than 6:1 are treated as 6:1; Attacks at worse than 1:5 are treated as 1:5. “Ar*" may be Shock (Sk). If you obtain a Shock Result, proceed to compare the Initiative Ratings of the best units on either side on the Shock Combat Table, and apply the Combat Result.