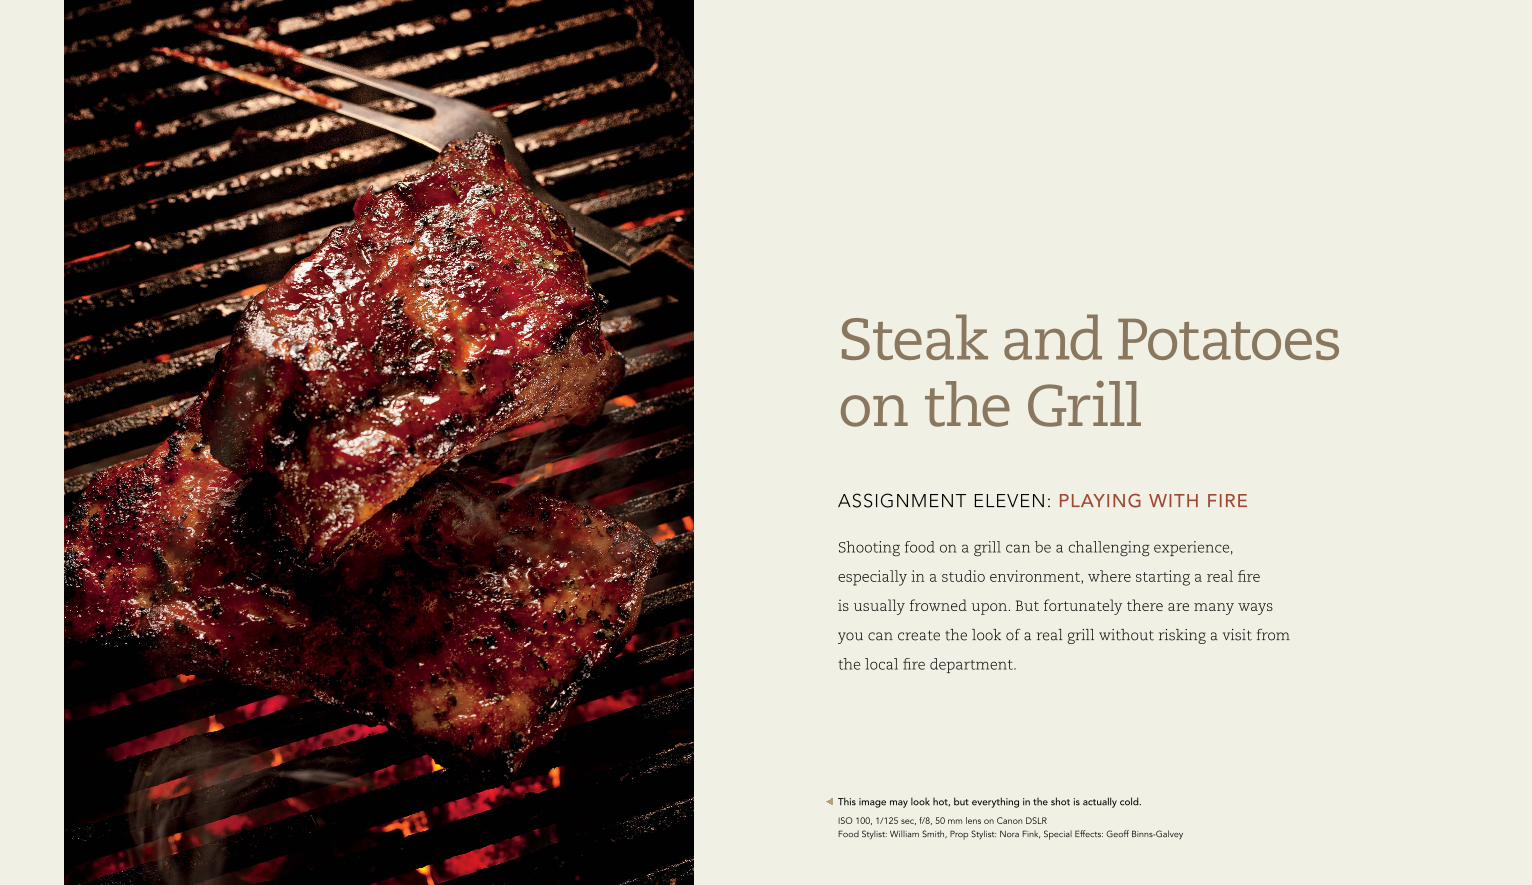
Steak and Potatoes on the Grill ASSIGNMENT ELEVEN: PLAYING WITH FIRE Shooting food on a grill can be a challenging experience, especially in a studio environment, where starting a real fire is usually frowned upon. But fortunately there are many ways you can create the look of a real grill without risking a visit from the local fire department. This image may look hot, but everything in the shot is actually cold. ISO 100, 1/125 sec, f/8, 50 mm lens on Canon DSLR Food Stylist: William Smith, Prop Stylist: Nora Fink, Special Effects: Geoff Binns-Galvey
Transcript
Steak and Potatoes on the GrillAssignment eleven: Playing with Fire
Shooting food on a grill can be a challenging experience,
especially in a studio environment, where starting a real fire
is usually frowned upon. But fortunately there are many ways
you can create the look of a real grill without risking a visit from
the local fire department.
this image may look hot, but everything in the shot is actually cold.
ISO 100, 1/125 sec, f/8, 50 mm lens on Canon DSLR Food Stylist: William Smith, Prop Stylist: Nora Fink, Special Effects: Geoff Binns-Galvey
StEak aND POtatOES ON thE GRILL 54 Food PhotograPhy & Lighting
Even if the food is only supposed to look like it was cooked on a grill, it will need
to have grill marks on the meat. how will you do that? here’s another reason to
have a gas cooktop instead of an electric one. Food stylists we work with often
use metal skewers heated by the flame of a gas cooktop turned up high to sear
the meat and give the impression that it just came off the grill. here are a few
assignments we completed for our clients involving fire or a grilled look.
Steak for the Traveler It’s very rare for a client to give you total creative freedom. Most come armed with
a detailed shot list, a style guide, and years of ingrained business practices that
can stifle a photographer’s ability to do something unique and different.
Clients that allow you to express yourself creatively empower you to shoot using
techniques that may not be a part of your usual repertoire. they encourage you
to experiment and allow ample time for you to work through the details of each
shot. they are unusual clients indeed, but exactly the type you need for a com-
plex steak image.
Weeks before the shoot I had asked the client to collect a few images that he
felt represented their brand. they didn’t have to have food in them, but they did
need to be inspirational. When we began looking at the images, there was one
that both of us noticed and liked immediately. It was rather dark and had a blue
cast over the entire image. that shot became the inspiration for our shoot.
We also developed a narrative for this image to help us choose props and a lighting
style. the story behind this one was “a weary traveler stopping to eat a delicious
meal.” We started with a well-worn tin table and a suitcase. We looked at placing
the suitcase on a chair near the table but decided that setting it on the table was not
only unexpected but created mystery. I purposely allowed the front of the suitcase to
fall into shadow to keep the hardware from distracting from the meal.
LightingI wanted the light to fall off quickly and create strong shadows, so I placed a 3' x 3'
diffusion screen in close to the set, with the bottom of it nearly touching the
salad and the top leaned over the set another 2 feet. Behind it I placed a Fresnel the blue cast was created in adobe Camera raw and enhanced even more using Photoshop.
ISO 100, 1/125 sec, f/8, 50mm lens on Canon DSLR Food Stylist: Jacqueline Buckner, Prop Stylist: Nora Fink
Camera Raw
I prefer to process my images using Adobe Camera Raw, mostly because that
is what I am used to. There are certainly other options available, but I would
suggest capturing your image as a raw file rather than a jpeg. The reason is
that a raw file allows you to adjust settings that are normally decided at the
moment of exposure, things like white balance, exposure, and sharpness.
Raw images provide maximum flexibility for editing your images and mak-
ing changes later.
StEak aND POtatOES ON thE GRILL 76 Food PhotograPhy & Lighting
spotlight to keep the light concentrated on the screen. the effect was almost
like having a diffused light bulb about a foot in diameter right above the set. It
reflected in the table and the knife, creating some very cool highlights. Because
it was virtually above the knife, it threw a shadow to the right side of the salad
and to the left side of the meat.
the light fell off quickly, as planned, so that the drink to the left of the set was
barely even noticeable. a small mirror on the left side of the set bounced just
enough light back into the suitcase so that it would not be completely lost to the
shadow. to light the chair that was pushed up against the table, I aimed another
light directly at the ground. that way, none of that light spilled over onto the table.
Image Post-ProductionI processed the image using adobe Camera Raw immediately after capture, adjust-
ing the raw file to get the overall blue tone we wanted. I kept the Fill Light slider at
zero, but I increased clarity and contrast to make the image “grittier.” then I opened
the file in Photoshop to enhance the blue color even more on everything but the
food and the chair. I did this using an adjustment layer with a mask.
Black, White, and Silverthe most challenging aspect of the next assignment, to create a “real” grill shot
for the manufacturer of the aluminum foil, wasn’t the flames or the food (in this
case potatoes), but getting the right exposure for the foil.
trying to get detail in both extremes of your image (highlights and shadows) is
difficult, and when they are black and silver and not just black and white, it’s virtu-
ally impossible. But with this client, it became a necessity.
the Fresnel spot is the main illumination for the image, while the other light is used to light the chair.
light straightdown
8”
3x3 diffusionscreen
fresnelspot
A
B
mirror
camera
here is the lighting diagram.
Power settings (watts per second): a=188, B=163
the fire, the food, and the foil make for a very complicated exposure.
ISO 100, 15 sec, f/11, 50mm lens on Canon DSLR Food Stylist: Lisa Marie DeVille
StEak aND POtatOES ON thE GRILL 98 Food PhotograPhy & Lighting
You can’t just let the highlight blow out and call it artistic, or explain to your client
that it’s nearly impossible to get detail in something so bright. Because the alumi-
num foil reflects your lighting like a mirror, it is almost always overexposed when
everything else looks right.
Flame TechniqueFlames under a grill can be done several different ways. One example is the metal
shovel filled with charcoal briquettes under the food (see assignment 9, “Shooting
Food for Packaging”); another is to hire a special-effects rigger/designer to set up
a highly controllable “flame bar” rig to create just the right amount of flames.
Lightingthis image was going to be shot on a grill in the studio, so I needed to make
sure that my camera was locked down tight and that I had the correct aperture
for exposing the fire. then I set up a 3' x 3' diffusion screen to the left side of the
set as my main light, and to the right of the set I placed a large piece of foamcore
to act as a fill light. On the left side of the camera, for additional fill light, was a
2' x 3' piece of foamcore.
Once I know the correct exposure for the fire (by reviewing the images on my
computer monitor tethered to the camera), I will adjust the power on my pack up
or down so that I can expose the food at the same f-stop as the fire. I then turn off
the modeling lights on the strobes (to keep the room relatively dark) and begin
my exposure by firing the flash and then exposing for the fire. I will do several
captures to get variations of the flames.
Image Post-ProductionOnce I have all the images ready to assemble, I look through the flames shots and
decide which one to use (or which ones to combine). But chances are if the foil
pouch is properly exposed, the food is too dark. to correct that problem we sim-
ply reprocess the raw file and increase the exposure. By placing the new, lighter
file on its own layer, we are able to blend the two images so that the food looks
great, the foil has detail, and the flames are dancing in all the right places.
Propane gas travels through valves and copper tubing to specially designed gas burners.
Close-up view of gas burners.
3x3 diffusion screen
A
camera
8”
2x3 foam core
bent foamcore
here is the lighting diagram for the foil image.
Power settings (watts per second): a=530
10 Food PhotograPhy & Lighting
Grilling OutShooting meat on a charcoal grill is something that almost all food photographers
will experience at some point during their career. and if your shot is looking down
in such a way that you can see the coals underneath, you’ll be forced to consider
how to make them look real. actual hot coals are not practical unless you are
shooting outside, and if the coals are not hot then they just look gray and lifeless.
I guess you could shoot hot coals and then strip them into the shot, but that’s a
lot of work, and you don’t get the benefit of any reflected light that might happen
when everything is lit from below. here’s an approach we used for a client.
TechniqueWe had a special-effects rigger/designer working with us on this job, so he took
care of the coals and made sure they were positioned correctly. he also created
the smoke that you see wafting up from the bottom area of the grill.
If you don’t have access to or the budget for a special-effects rigger/designer, you
can rent the acrylic charcoal briquettes from www.trengove.com and do it your-
self, but the smoke is much harder to do alone.
Shooting Fireworks
Shooting fire is a lot like shooting fireworks. Your f-stop is the most impor-
tant setting in obtaining a correct exposure, and your shutter speed just
determines how long the tails are on the fireworks. Shoot at too small an
f-stop and the fireworks will be too dark—shoot at too large an f-stop and
you will wash out the color. One advantage of shooting fire is that you can
keep the flame in one spot for a longer period of time to build up your ex-
posure as needed, like when you have to shoot at a very small aperture. Just
like fireworks, fire is generally best exposed between f/8 and f/11 in a dark
room with the shutter left open.
Far right this is a very simple image, but it took a lot of individuals doing their jobs well to make the end result look so good.
ISO 100, 1/125 sec, f/8, 50 mm lens on Canon DSLR Food Stylist: William Smith, Prop Stylist: Nora Fink Special Effects: Geoff Binns-Galvey
the special-effects rigger placing briquettes in the grill.
StEak aND POtatOES ON thE GRILL 1312 Food PhotograPhy & Lighting
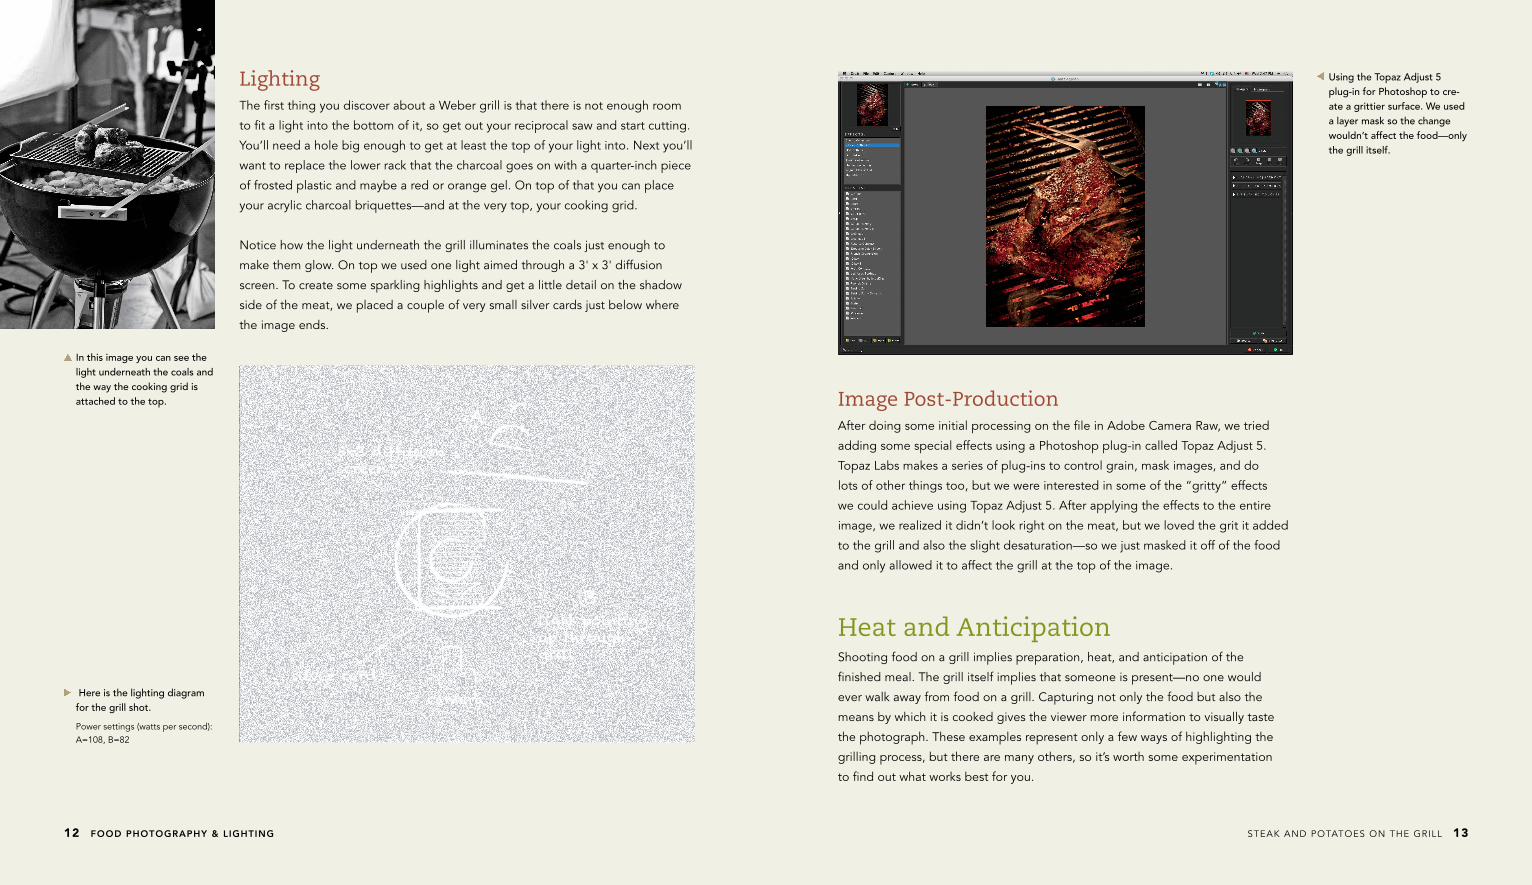
Lightingthe first thing you discover about a Weber grill is that there is not enough room
to fit a light into the bottom of it, so get out your reciprocal saw and start cutting.
You’ll need a hole big enough to get at least the top of your light into. Next you’ll
want to replace the lower rack that the charcoal goes on with a quarter-inch piece
of frosted plastic and maybe a red or orange gel. On top of that you can place
your acrylic charcoal briquettes—and at the very top, your cooking grid.
Notice how the light underneath the grill illuminates the coals just enough to
make them glow. On top we used one light aimed through a 3' x 3' diffusion
screen. to create some sparkling highlights and get a little detail on the shadow
side of the meat, we placed a couple of very small silver cards just below where
the image ends.
Image Post-Productionafter doing some initial processing on the file in adobe Camera Raw, we tried
adding some special effects using a Photoshop plug-in called topaz adjust 5.
topaz Labs makes a series of plug-ins to control grain, mask images, and do
lots of other things too, but we were interested in some of the “gritty” effects
we could achieve using topaz adjust 5. after applying the effects to the entire
image, we realized it didn’t look right on the meat, but we loved the grit it added
to the grill and also the slight desaturation—so we just masked it off of the food
and only allowed it to affect the grill at the top of the image.
Heat and Anticipation Shooting food on a grill implies preparation, heat, and anticipation of the
finished meal. the grill itself implies that someone is present—no one would
ever walk away from food on a grill. Capturing not only the food but also the
means by which it is cooked gives the viewer more information to visually taste
the photograph. these examples represent only a few ways of highlighting the
grilling process, but there are many others, so it’s worth some experimentation
to find out what works best for you.
3x3 diffusion screen
A
light pointingup throughgrill
silver cardscamera
8”
B
here is the lighting diagram for the grill shot.
Power settings (watts per second): a=108, B=82
in this image you can see the light underneath the coals and the way the cooking grid is attached to the top.
Using the topaz adjust 5 plug-in for Photoshop to cre-ate a grittier surface. we used a layer mask so the change wouldn’t affect the food—only the grill itself.