45
Surveon Training Program NVR5000 Installation Guide Sales & Marketing Department Surveon Technology Version 1.0
| Date post: | 19-Jul-2015 |
| Category: |
Technology |
| Upload: | surveon-technology |
| View: | 139 times |
| Download: | 2 times |
Surveon Training Program
NVR5000 Installation Guide
Sales & Marketing Department
Surveon Technology
Version 1.0

Surveon NVR5000 Training
Training Materials
1 NVR5000 Deployment Guide
2 NVR5000 Installation Guide
3 NVR5000 Operation Guide
4 NVR5000 Troubleshooting Guide
2
The Objective
This installation guide is here to help you go through the
NVR5000 installation.
For other themes that are not covered here, please
refer to the NVR5000 user manual.
3
Click to read the user manual.

4
● Before You Start
● Configure NVR5000 via the Installation Wizard
● Confirmations
● Necessary Setups
● Appendix
The Contents

5
In this section, you will learn:
The Checklist
IP Address Configuration
Important Operations You Should Consider
Before You Start
6
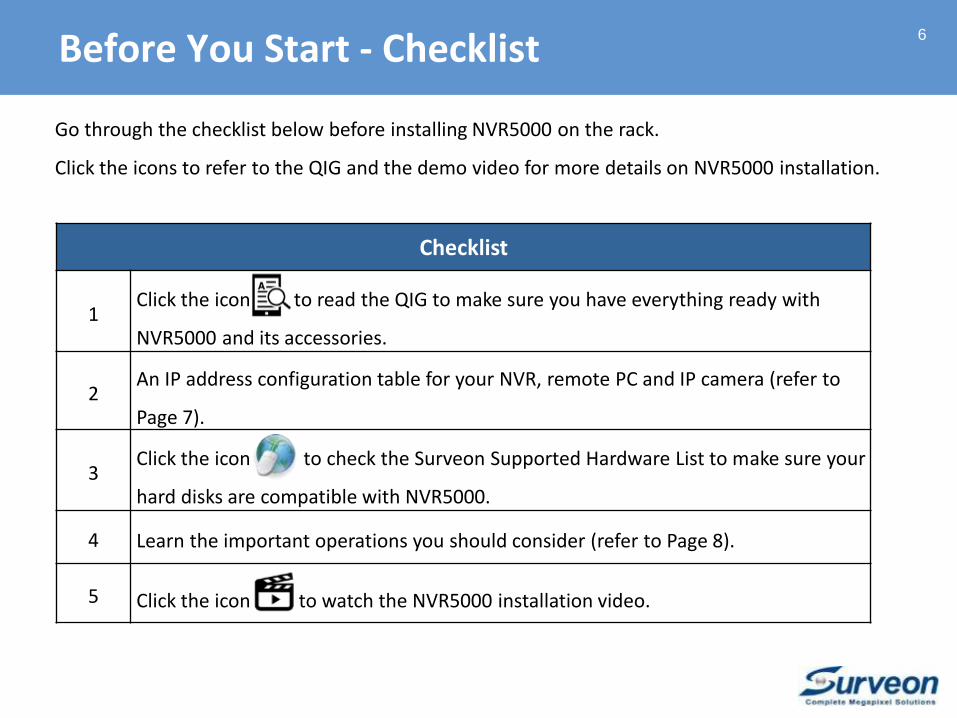
Checklist
1Click the icon to read the QIG to make sure you have everything ready with
NVR5000 and its accessories.
2An IP address configuration table for your NVR, remote PC and IP camera (refer to
Page 7).
3Click the icon to check the Surveon Supported Hardware List to make sure your
hard disks are compatible with NVR5000.
4 Learn the important operations you should consider (refer to Page 8).
5 Click the icon to watch the NVR5000 installation video.
Go through the checklist below before installing NVR5000 on the rack.
Click the icons to refer to the QIG and the demo video for more details on NVR5000 installation.
Before You Start - Checklist
7
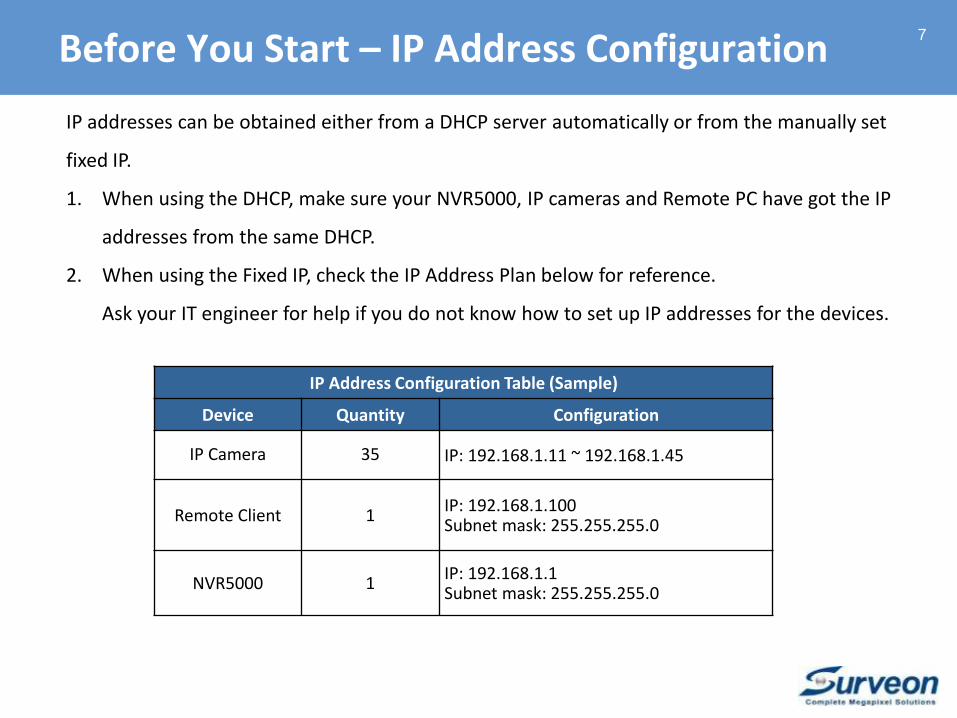
IP addresses can be obtained either from a DHCP server automatically or from the manually set
fixed IP.
1. When using the DHCP, make sure your NVR5000, IP cameras and Remote PC have got the IP
addresses from the same DHCP.
2. When using the Fixed IP, check the IP Address Plan below for reference.
Ask your IT engineer for help if you do not know how to set up IP addresses for the devices.
IP Address Configuration Table (Sample)
Device Quantity Configuration
IP Camera 35 IP: 192.168.1.11 ~ 192.168.1.45
Remote Client 1 IP: 192.168.1.100Subnet mask: 255.255.255.0
NVR5000 1 IP: 192.168.1.1Subnet mask: 255.255.255.0
Before You Start – IP Address Configuration

8
• Recording• RAID Type : Use RAID 6 (default) unless you have other concerns. • Bit Rate: Use default bit rate unless you have other concerns.• Retention Day: This depends on RAID type, bit rate and disk size. refer to
Retention Days in the Appendix.
• Local Live View• FPS: Use default FPS. If you use 3rd party cameras, refer to FPS Configurations in
the Appendix.• Enable/Disable Local Live View: If you do not need to monitor the live view locally,
it is recommended to logout NVR5000 local live view to save CPU resources.
• Network Bandwidth• Recommended to use Gbps network. • If you find the network loading is over 500Mbps, use dual LAN ports.
• Video Intelligent (VI)• Activate only the necessary VI on the cameras since VI will heavily increase the
NVR loading.
Before You Start – What You Should Consider
9
In this section, you will learn:
How to configure NVR5000 via the Wizard
Language Selection Disk Confirmation Recording Plan Time Basic Settings Network Camera Addition
Configure NVR5000 via Installation Wizard
10
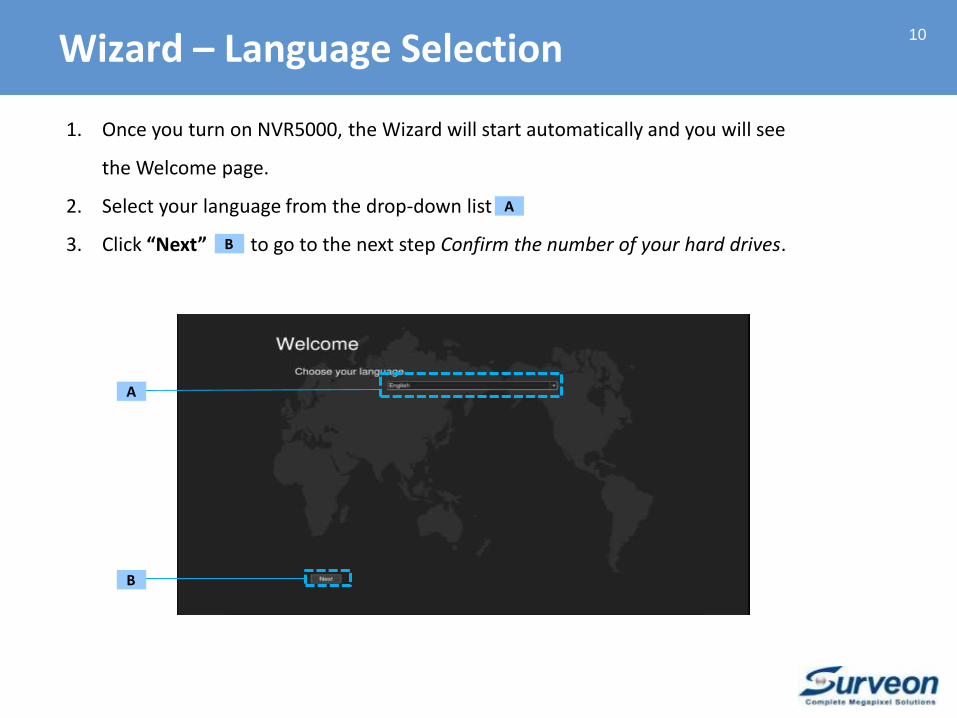
1. Once you turn on NVR5000, the Wizard will start automatically and you will see
the Welcome page.
2. Select your language from the drop-down list
3. Click “Next” to go to the next step Confirm the number of your hard drives.
A
B
A
B
Wizard – Language Selection

11
1. The system will automatically check your hard drives and show the result
2. You can see your actual disk placement here
3. If the detected disk number is correct, click “Yes and proceed”
4. If the detected disk number is incorrect, click “No and shutdown”
5. After shutdown, check if you have installed your disks properly, and start NVR5000 again.
6. After confirming the disk number, click “Next” to go to the next step Recording Plan.
A
B
B
C
C
D
D
E
A
A
Wizard – Disk Confirmation
A
E
12
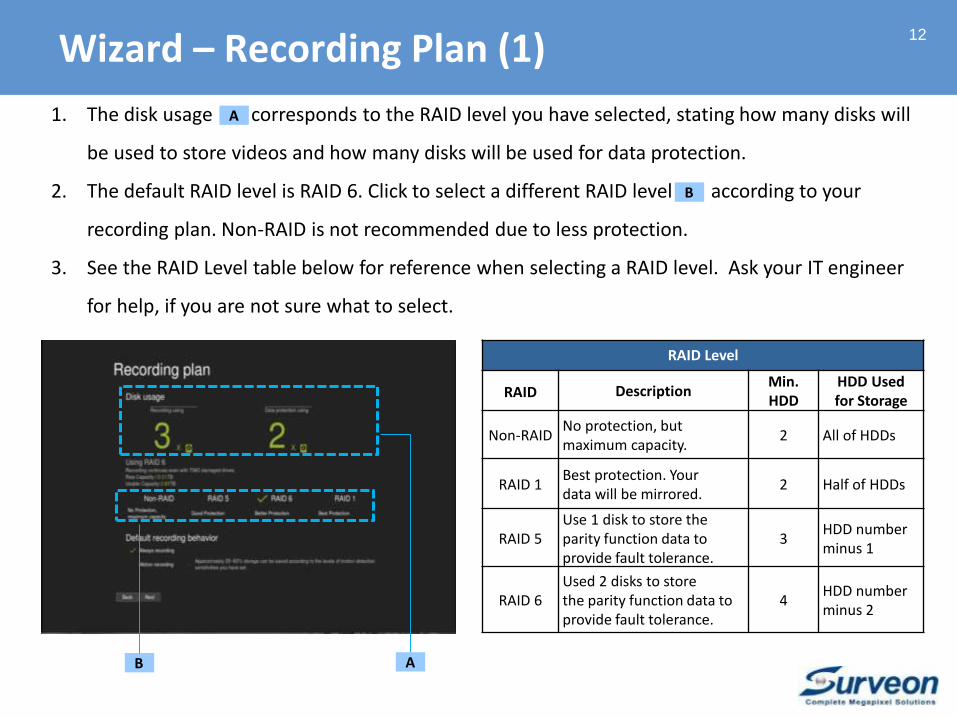
1. The disk usage corresponds to the RAID level you have selected, stating how many disks will
be used to store videos and how many disks will be used for data protection.
2. The default RAID level is RAID 6. Click to select a different RAID level according to your
recording plan. Non-RAID is not recommended due to less protection.
3. See the RAID Level table below for reference when selecting a RAID level. Ask your IT engineer
for help, if you are not sure what to select.
A
RAID Level
RAID DescriptionMin.HDD
HDD Usedfor Storage
Non-RAIDNo protection, but maximum capacity.
2 All of HDDs
RAID 1Best protection. Your data will be mirrored.
2 Half of HDDs
RAID 5Use 1 disk to store the parity function data to provide fault tolerance.
3HDD number minus 1
RAID 6Used 2 disks to store the parity function data to provide fault tolerance.
4HDD number minus 2
B
B
Wizard – Recording Plan (1)
A

13
4. Select the recording method When Always recording is selected, every image will be
recorded. When Motion recording is selected, only motion detected images will be
recorded, and approximately 25%~60% of storage can be saved according to the levels of
motion detection you have set. (Click the icon to read the user manual for more details
on motion detection settings.)
5. Click “Next” to go to the next step Time.
C
C
D
D
Wizard – Recording Plan (2)
14
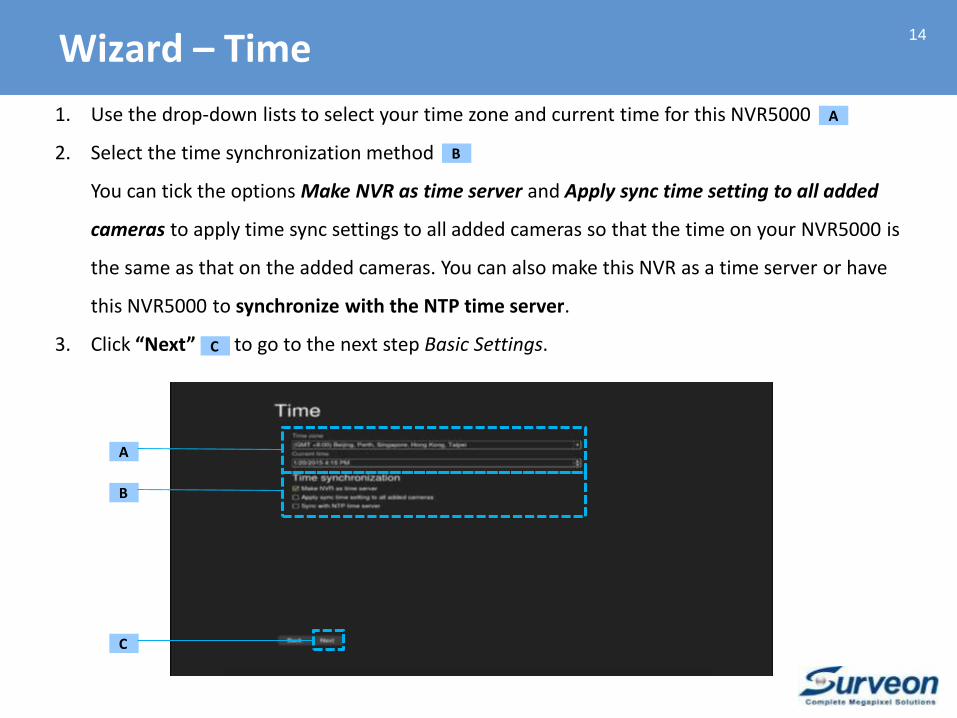
1. Use the drop-down lists to select your time zone and current time for this NVR5000
2. Select the time synchronization method
You can tick the options Make NVR as time server and Apply sync time setting to all added
cameras to apply time sync settings to all added cameras so that the time on your NVR5000 is
the same as that on the added cameras. You can also make this NVR as a time server or have
this NVR5000 to synchronize with the NTP time server.
3. Click “Next” to go to the next step Basic Settings.
B
A
A
B
C
C
Wizard – Time

15
1. You can change the server name here The name change will be activated when you
restart NVR5000.
2. You can use the default account by ticking the option Use default password If you want
to change the password, uncheck this option and input a new password and confirm the new
password.
3. Click “Next” to go to the next step Network.
B
A
C
Wizard – Basic Settings
A
B
C
16
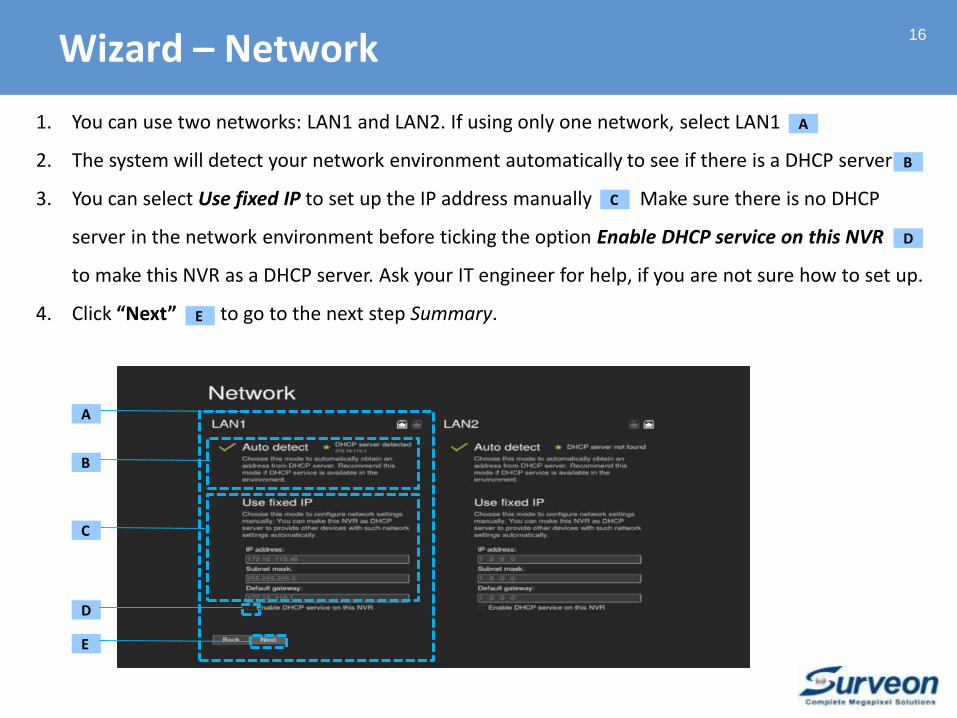
1. You can use two networks: LAN1 and LAN2. If using only one network, select LAN1
2. The system will detect your network environment automatically to see if there is a DHCP server
3. You can select Use fixed IP to set up the IP address manually Make sure there is no DHCP
server in the network environment before ticking the option Enable DHCP service on this NVR
to make this NVR as a DHCP server. Ask your IT engineer for help, if you are not sure how to set up.
4. Click “Next” to go to the next step Summary.
B
A
A
B
D
E
E
C
C
D
Wizard – Network
17
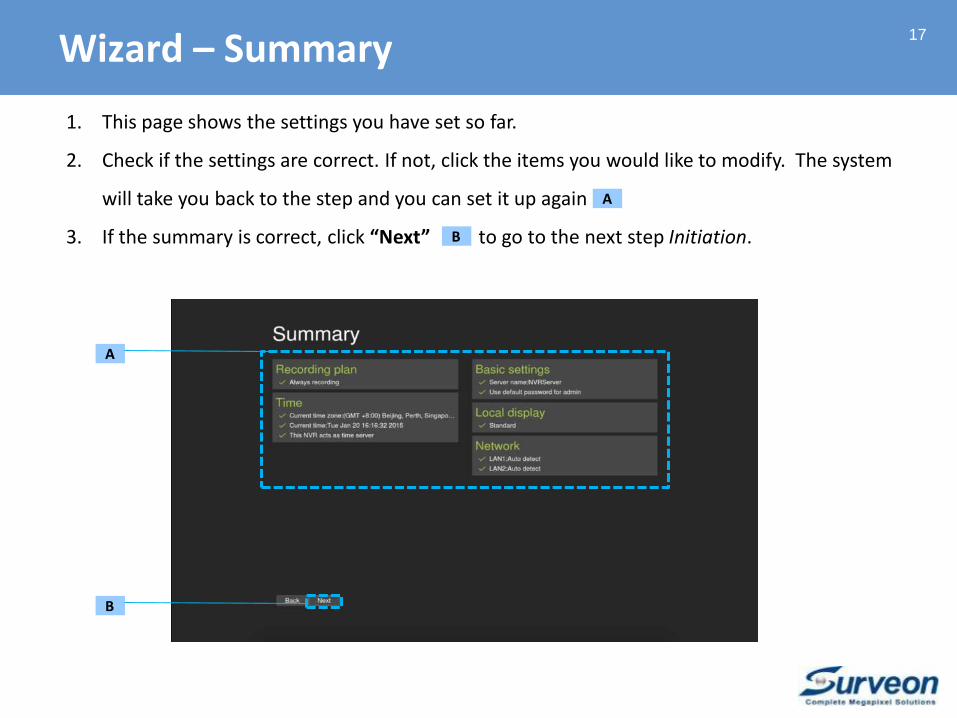
1. This page shows the settings you have set so far.
2. Check if the settings are correct. If not, click the items you would like to modify. The system
will take you back to the step and you can set it up again
3. If the summary is correct, click “Next” to go to the next step Initiation. B
A
A
B
Wizard – Summary

18
1. The wizard will start to initiate. This page shows the progress of the initiation.
2. After the initiation is done, the system will take you to the next step All Complete.
Wizard – Initiation

19
1. You have done the required setup and now you are ready to run NVR5000.
2. The system will detect the cameras automatically. If you would like to add cameras via the
Wizard, click the camera detected result to go to the next step Add Camera.
3. Or click “Finish” to exit the Wizard and run NVR5000. You can add cameras later in the
setup page.
B
A
A
B
Wizard – All Complete

20
1. The detected camera information is shown here You can check the thumbnail and the
details of the detected cameras to see if the results are correct.
2. If the detected results are not correct, click “Rescan” to detect the cameras again.
3. To add cameras, tick to select the cameras you would like to add and click “Add selected”
4. Or click “Finish” to exit the Wizard and run NVR5000. You can add cameras later in the
setup page.
B
A
A
B C
C
D
D
Wizard – Add Camera

21
In this section, you will learn:
How to determine if NVR5000 has been setup
successfully by checking the items:
Camera Connectivity
Live View Status Time Synchronization Recording Status
Confirmations
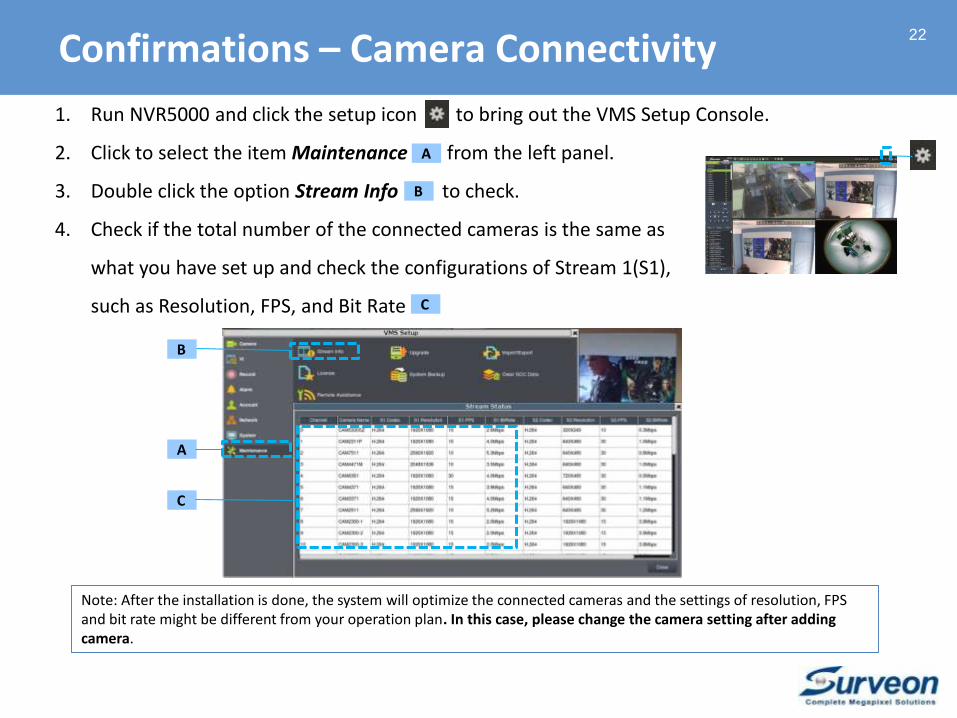
1. Run NVR5000 and click the setup icon to bring out the VMS Setup Console.
2. Click to select the item Maintenance from the left panel.
3. Double click the option Stream Info to check.
4. Check if the total number of the connected cameras is the same as
what you have set up and check the configurations of Stream 1(S1),
such as Resolution, FPS, and Bit Rate
22
Note: After the installation is done, the system will optimize the connected cameras and the settings of resolution, FPS and bit rate might be different from your operation plan. In this case, please change the camera setting after adding camera.
A
B
C
C
A
B
Confirmations – Camera Connectivity
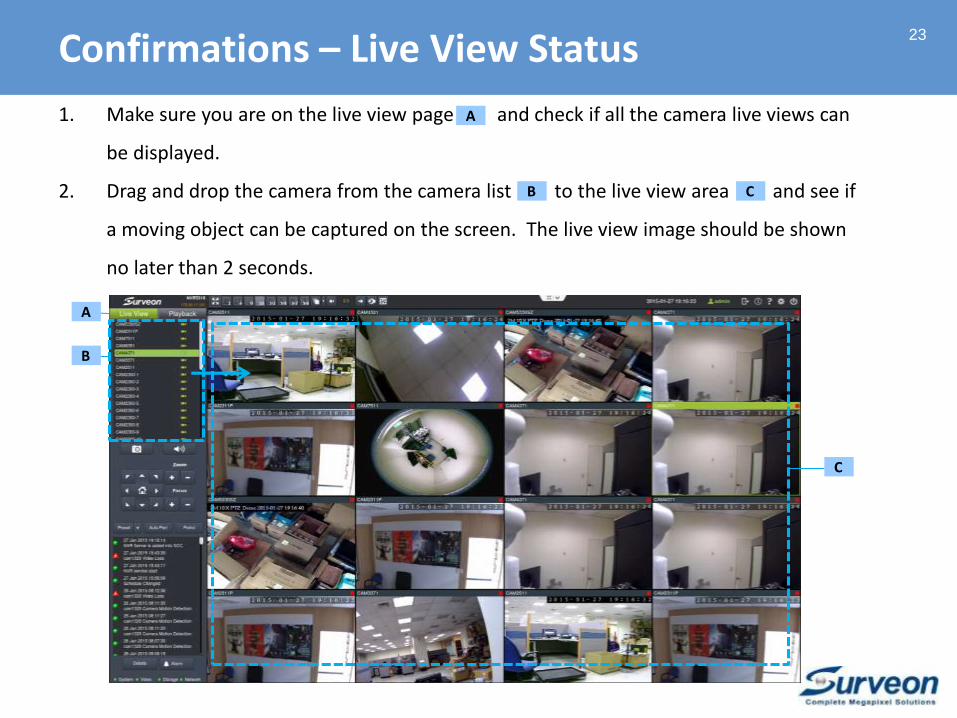
1. Make sure you are on the live view page and check if all the camera live views can
be displayed.
2. Drag and drop the camera from the camera list to the live view area and see if
a moving object can be captured on the screen. The live view image should be shown
no later than 2 seconds.
23
B
A
C
A
C
B
Confirmations – Live View Status

24
1. Make sure you are on the live view page
2. Check if the camera time is the same as the time of NVR5000 The time
difference should be lessen than 40 seconds within one hour.
B
C
B
B C
A
A
C
Confirmations – Time Synchronization

1. Check if the recording icon is shown (Red) on the upper right corner of each live view
window to confirm the image is being recorded.
2. If you are using the motion recording, make sure motions are being detected.
25
Confirmations – Recording Status

26
In this section, you will learn:
Set up the Email Notification
Set up the Rules When your RAID fails.
Export the Configurations
Logout Local Live View (optional)
Necessary Setups

27
4.
1. Click the setup icon to bring out the VMS Setup Console.
2. Click to select the item Alarm from the left panel.
3. Double click the option Email Notification to set up.
4. In the Email Server Settings you can either input the URL or IP
address of the SMTP server to deliver the email notification when an alarm occurs.
5. If your SMTP server uses the SSL protocol, input the SSL port and check the option “Use SSL” to
enable this function Ask your IT engineer for help, if you are not sure how to set up.
A
A
B
B
C
C
D
D
Necessary Setups – Email Notification (1)

28
6. In the Email Address Settings you can input username and password in your mail server.
And input a valid email address in the Reply Address field as a primary address. The system
will send notifications to this address. More email addresses can be added in the Recipient
Field. Separating the addresses with semicolons. And then input the Email Title and Email
Content of the notifications.
7. Click “Test” and see if you can receive the email notification.
E
F
E
F
Necessary Setups – Email Notification (2)
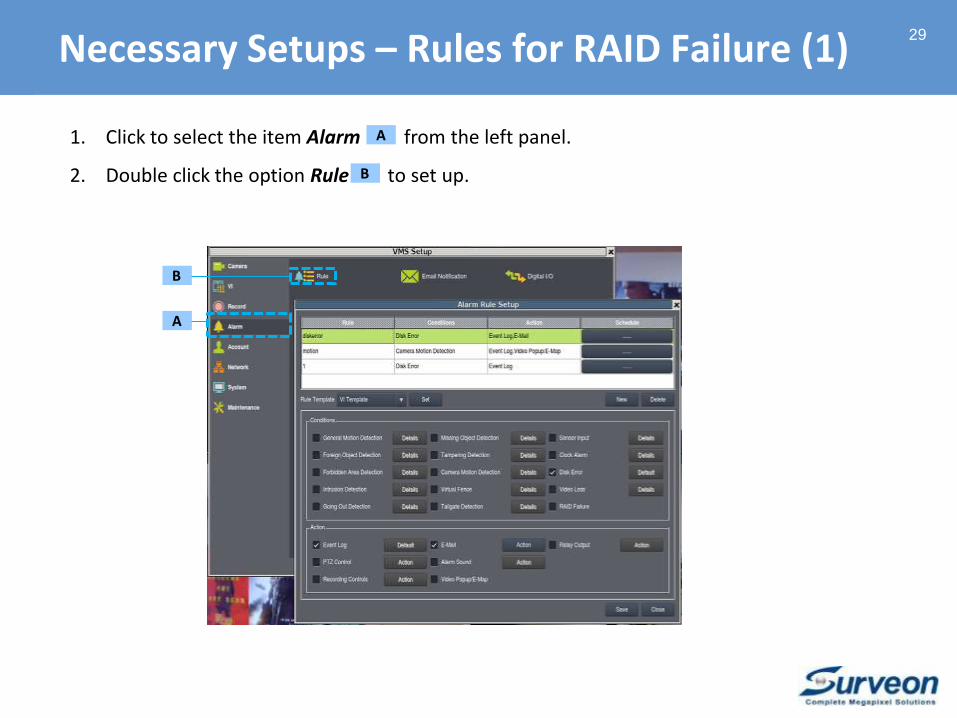
29
1. Click to select the item Alarm from the left panel.
2. Double click the option Rule to set up.
A
B
B
A
Necessary Setups – Rules for RAID Failure (1)

3. Add a New Rule: Click the “New” button The system will ask you to input a Rule Name.
After the rule is set, the rule information will be listed here
4. Conditions : Tick the option Disk Error When the error occurs, you will be notified.
5. Actions : Set the actions for the triggered event. Tick the option Email and you will
receive the email notification when the RAID fails. You can also tick other actions for
notifications.
30
C
D
C
D
E
G
F
E F
G
H
Necessary Setups – Rules for RAID Failure (2)
H

The exported configurations can be very handy when reinstalling the NVR5000.
1. Make sure you have inserted a USB drive into the NVR5000.
2. Click to select the item Maintenance from the left panel.
3. Double click the option Import/Export to set up.
4. Click to select the configuration items
5. Click “Export” to export the selected configuration to the inserted USB drive. It is
recommended to export all the configurations to have the complete information of NVR5000.
31
B
A
C
A
B
C
D
D
Necessary Setups – Export Configurations

32
Congratulations! You have completed all the necessary setups.
1. Click to log out if you do not need to monitor the live view locally to save CPU resources.
2. A dialog box will ask “Are you sure you want to log out from the domain server?”
3. Click “OK” to log out.
4. You can refer to the Appendix - Remote Client (Page 35) for more info if you need to monitor
the live view remotely.
A
A
B
B
Necessary Setups – Logout Local Live View
33
You have learned the following for NVR5000 installation:
● Before You Start
● Configure NVR5000 via the Installation Wizard
● Confirmations
● Necessary Setups
which can help you configure NVR5000 at ease. For more
details, please refer to the NVR5000 user manual.
Click to read the user manual.
To Sum Up

34
In this section, you will learn:
Retention Days
FPS Configurations
Remote Client
Configure the Video Intelligent
Where to Find More Useful Materials
Where to Watch More Demo Videos
Appendix
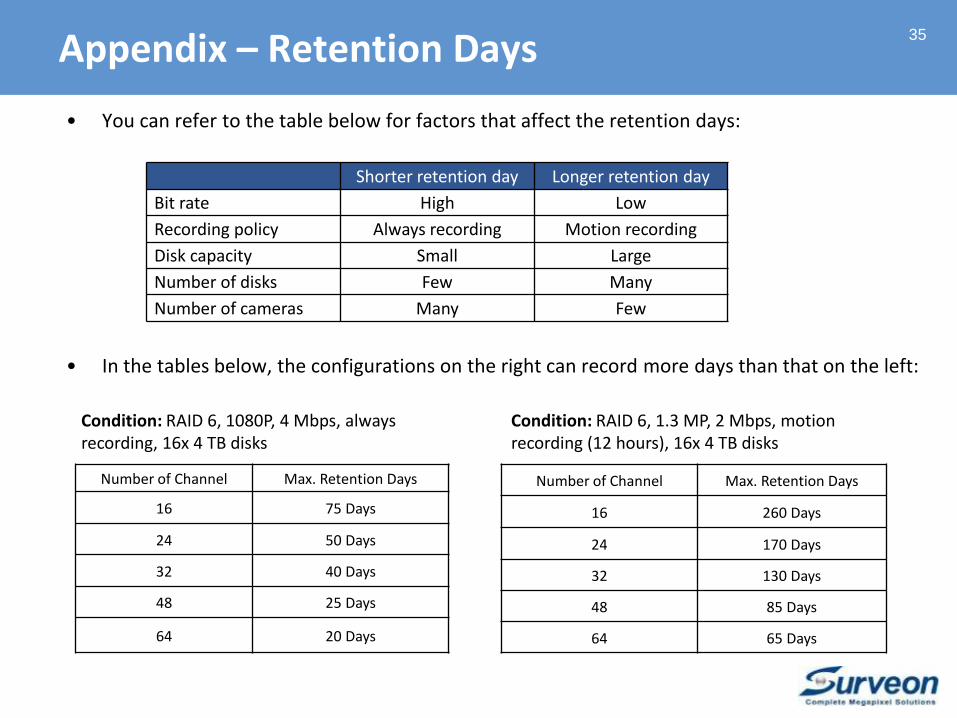
Appendix – Retention Days
• You can refer to the table below for factors that affect the retention days:
• In the tables below, the configurations on the right can record more days than that on the left:
35
Shorter retention day Longer retention day
Bit rate High Low
Recording policy Always recording Motion recording
Disk capacity Small Large
Number of disks Few Many
Number of cameras Many Few
Number of Channel Max. Retention Days
16 75 Days
24 50 Days
32 40 Days
48 25 Days
64 20 Days
Number of Channel Max. Retention Days
16 260 Days
24 170 Days
32 130 Days
48 85 Days
64 65 Days
Condition: RAID 6, 1080P, 4 Mbps, always recording, 16x 4 TB disks
Condition: RAID 6, 1.3 MP, 2 Mbps, motion recording (12 hours), 16x 4 TB disks

Appendix – FPS Configurations
• The live view FPS will impact the local live view performance.
• If you use 3rd party cameras, refer to the table below to setup your camera resolution and FPS.
36
Stream 1 Stream 2
D1 Camera D1 / 30 FPS QVGA / 15 FPS
1.3MP Camera 1.3 MP / 15 FPS QVGA / 15 FPS
2MP Camera 2MP / 15FPS QVGA / 15 FPS
3MP Camera 3MP / 10FPS QVGA / 15 FPS
5MP Camera 5MP / 10FPS QVGA / 15 FPS

1. Click the icon to go to Surveon VMS page. Click the tag Specifications and check the
Hardware Requirements before installing the VMS Remote Client on your remote
Windows PC.
2. Click the icon to go to the Surveon Download Firmware Page. Find the VMS Remote
Client and click to download.
3. For the remote client installation and operation, click the icon to watch the demo
video and the icon to read the user manual.
37
BA
A B
Appendix – Remote Client

38
1. NVR5000 supports different kinds of Video Intelligent (VI) at the same time, including Camera
Motion, General Motion, Tampering, Forbidden Area, Intrusion, Virtual Fence, Missing Object,
Foreign Object, Tailgating, and Go In/Out.
2. Click the setup icon to bring out the VMS Setup Console.
3. Click to select the item VI from the left panel to see various VI
options
4. The VI will use a lot of CPU resources. Select only necessary VI to avoid heavy loading on your
NVR5000. Click the icon to watch the demo video for VI configurations.
B
A
B
A
Appendix – Configure Video Intelligent
39
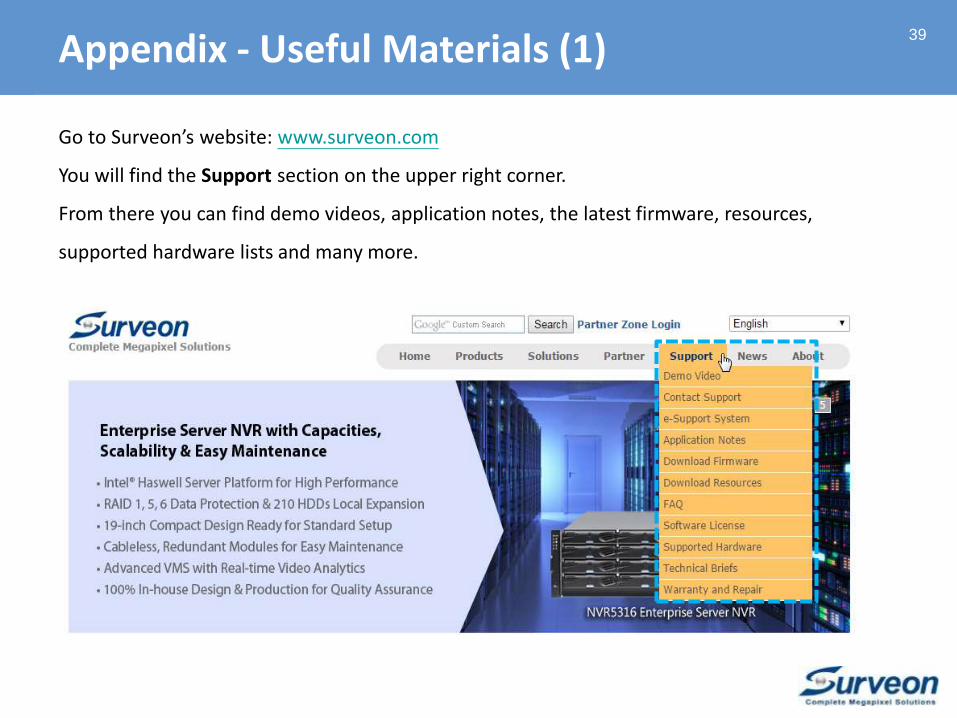
Appendix - Useful Materials (1)
Go to Surveon’s website: www.surveon.com
You will find the Support section on the upper right corner.
From there you can find demo videos, application notes, the latest firmware, resources,
supported hardware lists and many more.

The NVR5000 Training Program includes the comprehensive training materials:
NVR5000 Deployment Guide: learn how to choose NVR5000 for your projects.
NVR5000 Installation Guide: learn how to install NVR5000.
NVR5000 Operation Guide: learn the daily operations of NVR5000.
NVR5000 Troubleshooting Guide: find solutions for some common issues.
Find the training materials here:
http://www.surveon.com/Partner/training-materials.asp
40
Appendix - Useful Materials (2)

Find NVR5000 demo video, FAQ, user manual, datasheet, brochure, AE spec, and more on the product page: http://www.surveon.com/product/NVR5316.asp
41
Appendix - Useful Materials (3)
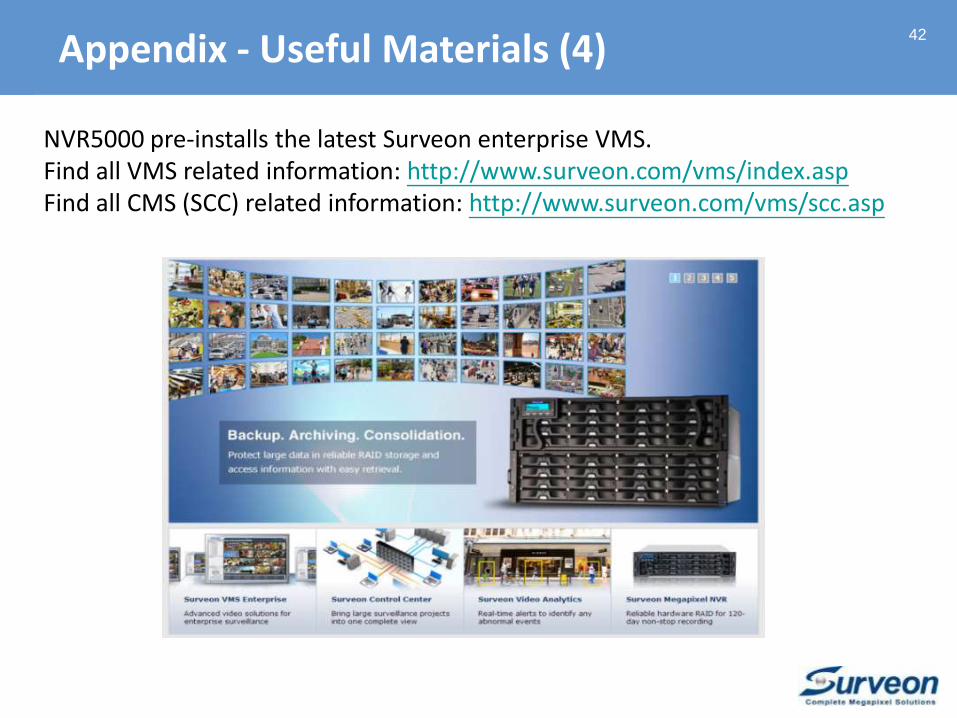
NVR5000 pre-installs the latest Surveon enterprise VMS.Find all VMS related information: http://www.surveon.com/vms/index.aspFind all CMS (SCC) related information: http://www.surveon.com/vms/scc.asp
42
Appendix - Useful Materials (4)
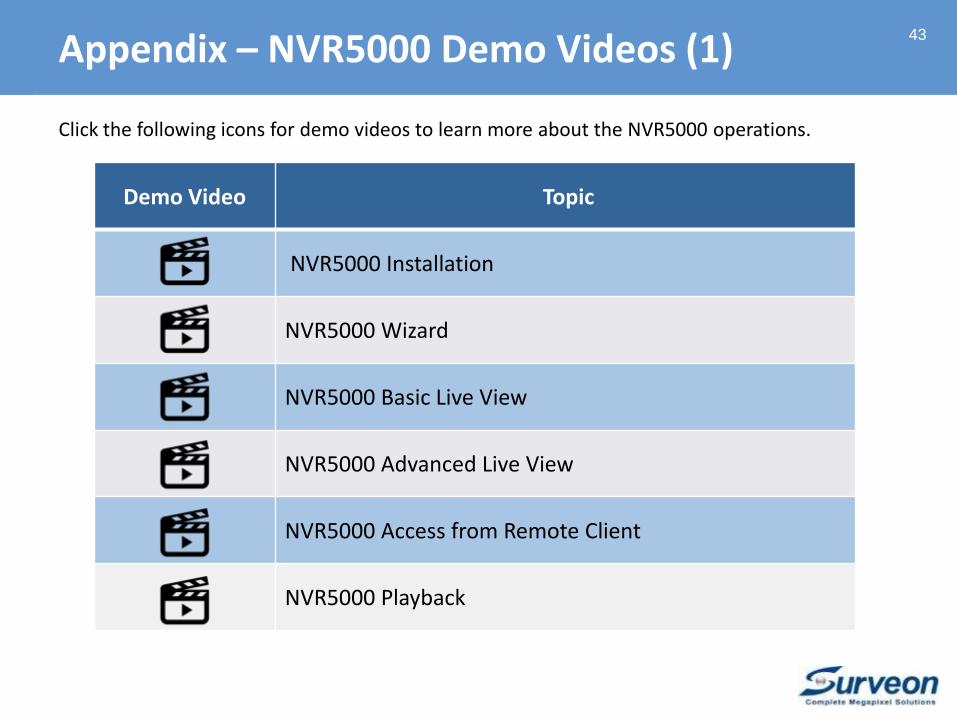
Demo Video Topic
NVR5000 Installation
NVR5000 Wizard
NVR5000 Basic Live View
NVR5000 Advanced Live View
NVR5000 Access from Remote Client
NVR5000 Playback
43
Click the following icons for demo videos to learn more about the NVR5000 operations.
Appendix – NVR5000 Demo Videos (1)
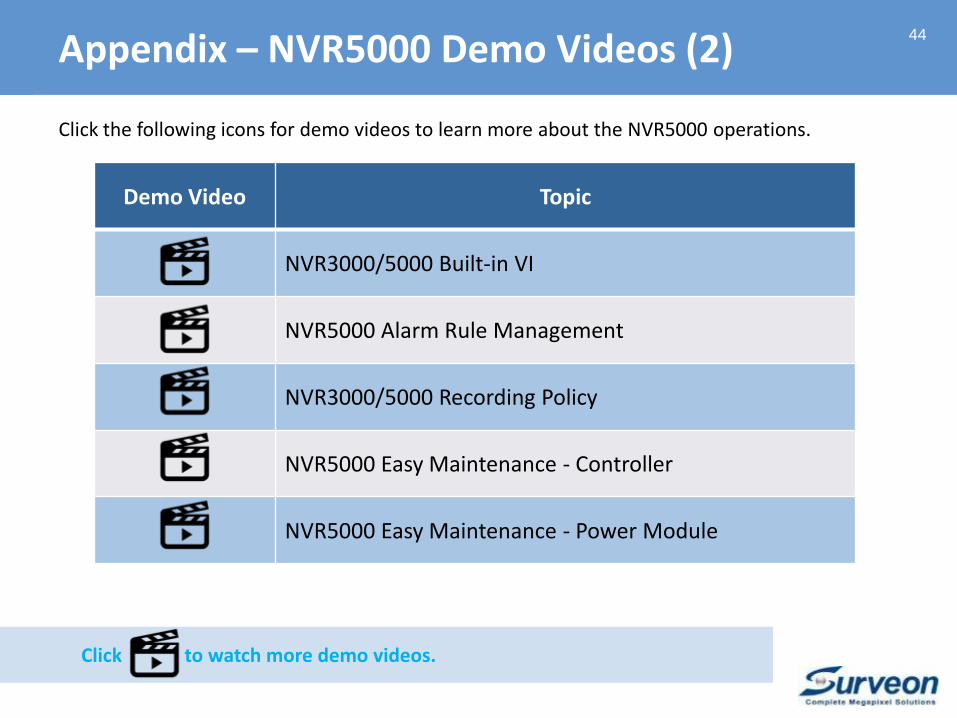
Demo Video Topic
NVR3000/5000 Built-in VI
NVR5000 Alarm Rule Management
NVR3000/5000 Recording Policy
NVR5000 Easy Maintenance - Controller
NVR5000 Easy Maintenance - Power Module
44
Click the following icons for demo videos to learn more about the NVR5000 operations.
Appendix – NVR5000 Demo Videos (2)
Click to watch more demo videos.
45
Surveon Official Website
www.surveon.com
Technical Support
Sales Contact
Contact Surveon


