_________________________________________________________________________________________ Beginning Training Notes: Introduction and Familiarisation Teamboard & Easiteach Introduction and Familiarisation
Beginning Training Notes: Introduction and Familiarisation
Attendees will be able to begin using all the features of their Teamboard and will be able to begin planning and teaching interactive lessons using Easiteach software. This course will cover the Teamboard and Easiteach basics including:
• Calibrating • Pen tools • Annotation mode, • Features of Easiteach, toolbars • Creating interactive lessons • Glass mode • Content packs and help and support
The course outcomes will be: 1. The ability to connect your PC to the TeamBoard 2. The ability to calibrate the TeamBoard in all modes 3. Use Whiteboard Mode 4. Use Interactive Mode 5. Understand how the board can be used using PowerPoint 6. Understand the basic tools in the Easiteach Toolbar 7. Create a basic lesson in Easiteach.
Teamboard & Easiteach Introduction and Familiarisation
Beginning Training Notes: Introduction and Familiarisation
Step 1: Calibrate the Action Bar 1. Use your mouse to click the TeamBoard System Tray Icon which is located in the bottom right corner of your screen.
2. Click on the ‘Calibrate’ option
3. Select ‘Action Bar’
4. Follow the instructions that appear on the screen. Ensure that you are touching the top of the action bar (the strip at the bottom of the board) and not the top of the actual board.
Beginning Training Notes: Introduction and Familiarisation
Step 2 : Calibrate Interactive
1. Use your mouse to double-click the TeamBoard System Tray Icon which is located in the bottom right corner of your screen. This launches the TeamBoard dashboard.
2. Click on the ‘Calibrate’ option
3. Select ‘Interactive
4. Follow the instructions by touching all the points where the lines intersect.
5. The calibration is complete when all nine intersecting lines have been ticked.
Beginning Training Notes: Introduction and Familiarisation
Whiteboard Mode Your TeamBoard Interactive Whiteboard can be used as a standalone whiteboard. We actively encourage you to write with standard whiteboard pens or the whiteboard pens that are provided. You can also capture what you’ve written with the whiteboard pens. This is called Whiteboard Mode. In Whiteboard Mode your computer records any annotations that you make with the white-board pens in a digital format within Teamboard Draw. They can be altered or saved later. The Action Bar (the strip at the bottom of the board) remains active when in Whiteboard Mode. You can change the colour of the pens, erase, insert a new page, copy a page, print and navigate using these controls.
1. Click on the Teamboard Icon>Mode>Whiteboard Mode. Your screen will now become inactive except for Teamboard Draw. Ensure the projector is turned off (or press the ‘no show’ or ‘mute’ button on your remote) and begin writing with whiteboard pens. Whatever you are writing on the whiteboard will be replicated on the computer screen in a digital format. NOTE: For neater annotating ensure the font size is quite small, 2—4 works best. 2. When you’ve finished writing in Whiteboard Mode you will need to click back to Interactive
Mode via your computer.
Exporting Files can be exported using the export feature in TeamBoard Draw. Files can be exported in a variety of formats:
J Peg (jpg) Bitmap (bmp) Portable Network Graphic (png) Html Tagged Image Format (tif) Portable Document Format (pdf)
Emailing Using the Mail to… button under the file menu, Teamboard files can be emailed using your default email provider.
Saving Teamboard files are saved as a *.tmb file. This means that the Teamboard software is required to open the file.
Beginning Training Notes: Introduction and Familiarisation
Interactive Mode Interactive Mode allows you to use your Teamboard as either an interactive whiteboard or as an interactive touch screen to annotate over documents. The Teamboard software allows you to annotate over documents, videos, photos, web pages, PowerPoint presentations or anything else that can be seen on your screen. Your annotations are recorded in Teamboard Draw. Teamboard Draw can also be used to write or type notes or as a teaching tool using its many features.
Open File
Print current page
Undo
Annotation Mode
Clipart Viewer
New Workbook
Save File
Print Preview
Redo
Help
Full Screen
The icons on the second row each have a menu subset that opens when they are selected.
Beginning Training Notes: Introduction and Familiarisation
Teamboard Features—Annotation Options Teamboard is a multi functional program that is great for presentations and annotating documents. To begin annotating:
1. Use your mouse to double-click the TeamBoard System Tray Icon which is located in the bottom right corner of your screen. This launches the TeamBoard dashboard.
2. Click on the Annotation Mode button.
Teamboard Draw
Capture Screen
Back to Teamboard Draw
Virtual Keyboard
Shortcut to other programs
Virtual Mouse
Area annotate
3. A floating taskbar appears. This taskbar will stay on the screen and lets you access the annotation menu features. To begin annotating click on either the Capture Screen or Area Annotate buttons. The Capture Screen button will effectively take a picture of the whole screen for you to annotate over, the Area Annotate button lets you select an area that you’d like to capture.
Beginning Training Notes: Introduction and Familiarisation
4. The Teamboard Draw menu has the above mentioned features. It also has Return to Desktop and Return to Draw buttons. The return to desktop button sends the
image to Teamboard Draw and lets you keep working with your desktop, the return to draw button takes you back to Teamboard Draw.
Return to Draw Return to
desktop
You can now annotate over anything that is on your screen using the pen, eraser, shape and move tools.
Beginning Training Notes: Introduction and Familiarisation
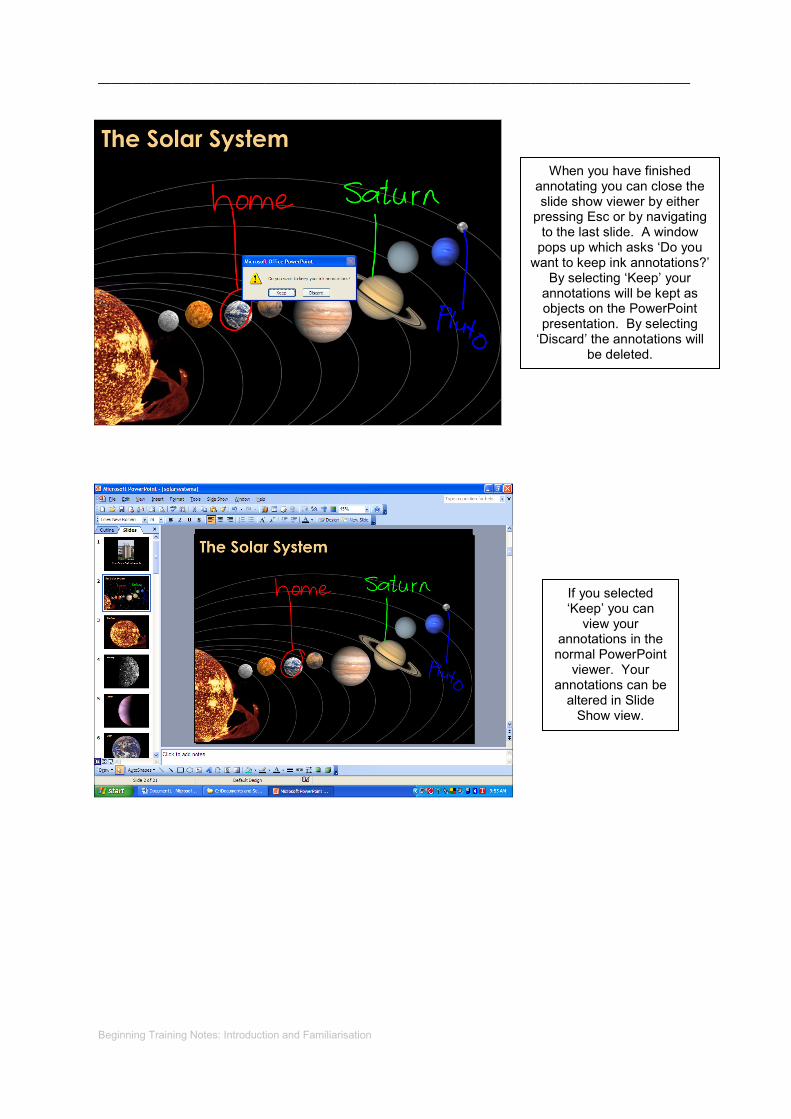
When you have finished annotating you can close the slide show viewer by either pressing Esc or by navigating to the last slide. A window pops up which asks ‘Do you want to keep ink annotations?’ By selecting ‘Keep’ your annotations will be kept as objects on the PowerPoint presentation. By selecting ‘Discard’ the annotations will
Beginning Training Notes: Introduction and Familiarisation
Importing Teamboard has the facility to import from clipart, background and scanner/camera. To access this feature navigate to the File Menu>Import>Clipart, Background or Scanner/camera.