+ All Categories
Home > Documents > The Deltry Paper Airplane (MCC9 ‐ 12.G.SRT.6; MCC9 ‐ 12.G.SRT.7; MCC9 ‐ 12.G.SRT.8) ©2009,...

The Deltry Paper Airplane (MCC9 ‐ 12.G.SRT.6; MCC9 ‐ 12.G.SRT.7; MCC9 ‐ 12.G.SRT.8) ©2009,...

Date post: 16-Dec-2015
Category:
Upload: vincent-oliver
View: 217 times
Download: 1 times
Share this document with a friend
Popular Tags:
24
The Deltry Paper Airplane www.bestpaperairplanes.com (MCC9‐12.G.SRT.6; MCC9‐12.G.SRT.7; MCC9‐12.G.SRT.8) ©2009, Dr. Jennifer L. Bell, LaGrange High School, LaGrange, Georgia Original Lesson from Nancy Powell, Bloomington High School, Bloomington, Indiana
Transcript

The Deltry Paper Airplane

www.bestpaperairplanes.com

(MCC9‐12.G.SRT.6; MCC9‐12.G.SRT.7; MCC9‐12.G.SRT.8)

©2009, Dr. Jennifer L. Bell, LaGrange High School, LaGrange, Georgia Original Lesson from Nancy Powell, Bloomington High School, Bloomington, Indiana

Guidelines

• The plane must be folded from a single piece of 8½ x 11" paper.

• No cutting of the paper is allowed. • No weights may added. • No glue or tape may be used.

©2009, Dr. Jennifer L. Bell, LaGrange High School, LaGrange, Georgia Original Lesson from Nancy Powell, Bloomington High School, Bloomington, Indiana

Rules

• Do not fly the airplanes until instructed.• Follow all school and classroom rules.

©2009, Dr. Jennifer L. Bell, LaGrange High School, LaGrange, Georgia Original Lesson from Nancy Powell, Bloomington High School, Bloomington, Indiana

Step 1:Take an 8½ by 11” sheet of paper, fold it in half

lengthwise, & unfold it. The dashed line

represents the “valley fold,” and the dashed-and-

dotted line represents the "mountain fold.”

©2009, Dr. Jennifer L. Bell, LaGrange High School, LaGrange, Georgia Original Lesson from Nancy Powell, Bloomington High School, Bloomington, Indiana

Step 2:Fold down the top

corners inwardto the center crease.

©2009, Dr. Jennifer L. Bell, LaGrange High School, LaGrange, Georgia Original Lesson from Nancy Powell, Bloomington High School, Bloomington, Indiana

Step 3:Fold down the

large top triangle,made up of the twosmall triangles youcreated in step 2.

©2009, Dr. Jennifer L. Bell, LaGrange High School, LaGrange, Georgia Original Lesson from Nancy Powell, Bloomington High School, Bloomington, Indiana

Step 4: Fold the lower part of the large triangle up again. Leave about 3/8” from the top.It will help the flaps to lock under tightly

& keep the airplane togetherwhen it's finished. ©2009, Dr. Jennifer L. Bell, LaGrange High School, LaGrange, Georgia Original Lesson from Nancy Powell, Bloomington High School,

Bloomington, Indiana

Step 5:Fold and unfold two top triangles,

where the dashed valley foldsare shown. As in step 2, the inner edges of the new triangles should line up with

the center line of the plane. Don't try to fold right up

against the tip you folded up in step 4,since that tip should be a little lower.©2009, Dr. Jennifer L. Bell, LaGrange High School, LaGrange, Georgia Original Lesson from Nancy Powell, Bloomington High School,

Bloomington, Indiana

Step 6:Bisect the new folds that you made in step 5, using the previous creases as a

guide. Fold and then unfold along the two dashed lines.

You back where you started, but you have created two new upper creases. ©2009, Dr. Jennifer L. Bell, LaGrange High School, LaGrange, Georgia Original Lesson from Nancy Powell, Bloomington High School,

Bloomington, Indiana

Step 7:Fold the two large right

angle triangles down again, repeating the first part of

step 5.For the moment, ignore the

two new creasesyou just created in step 5 .

©2009, Dr. Jennifer L. Bell, LaGrange High School, LaGrange, Georgia Original Lesson from Nancy Powell, Bloomington High School, Bloomington, Indiana

Step 8:Fold along the two dotted-and-dashed

"mountain folds“. Tuck the lower triangles well underneath and snugly

lock them in place. (These two triangles of paper go underneath the

tip you folded up in step 4.)©2009, Dr. Jennifer L. Bell, LaGrange High School, LaGrange, Georgia Original Lesson from Nancy Powell, Bloomington High School,

Bloomington, Indiana

Step 9:Make a few partial folds. Be sure to

distinguish the dashed "valley folds" that create a valley from the dashed-and-

dotted "mountain folds" thatcreate slight hills.

©2009, Dr. Jennifer L. Bell, LaGrange High School, LaGrange, Georgia Original Lesson from Nancy Powell, Bloomington High School, Bloomington, Indiana

Front view

Step 10:The Deltry aircraft is a very slow flyer. It is much slower and more graceful than

most paper airplanes. Don't throw it. Release it while your hand is moving

forward slowly.©2009, Dr. Jennifer L. Bell, LaGrange High School, LaGrange, Georgia Original Lesson from Nancy Powell, Bloomington High School,

Bloomington, Indiana

This grip isn't the only way to grip theDeltry paper airplane, but it's the easiest way. This plane soars at a leisurely pace.

You may want to point it's nose a little downwards as you launch it.

©2009, Dr. Jennifer L. Bell, LaGrange High School, LaGrange, Georgia Original Lesson from Nancy Powell, Bloomington High School, Bloomington, Indiana

53.5 in.135.89 cm.

135.89 cm.135.89 cm.135.89 cm.135.89 cm.135.89 cm.135.89 cm.135.89 cm.

350.00 cm.

©2009, Dr. Jennifer L. Bell, LaGrange High School, LaGrange, Georgia Original Lesson from Nancy Powell, Bloomington High School, Bloomington, Indiana

𝜃 = 21.22°

©2009, Dr. Jennifer L. Bell, LaGrange High School, LaGrange, Georgia Original Lesson from Nancy Powell, Bloomington High School, Bloomington, Indiana

Debriefing Questions

1. What is the average angle of depression? __________________________________

2. What types of triangles were created while making the airplane?

______________________________________________________________________________ 3. Is the glide ratio the slope of the line? Explain

why or why not. _______________________________________

©2009, Dr. Jennifer L. Bell, LaGrange High School, LaGrange, Georgia Original Lesson from Nancy Powell, Bloomington High School, Bloomington, Indiana

Other materials

©2009, Dr. Jennifer L. Bell, LaGrange High School, LaGrange, Georgia Original Lesson from Nancy Powell, Bloomington High School, Bloomington, Indiana

1. Have your partner measure the distance from the ground to the top of your shoulder with the tape measure. This distance is your launch height, because you will throw your plane from about shoulder height.

2. Write it on your Flying Things Data Sheet. 3. Give your plane a gentle toss forward. Your

goal is to have it glide smoothly and gently to the ground. To accurately measure your plane’s glide ratio, you have to throw the plane so that it never rises above your shoulder level. Experiment with your throwing technique. Sometimes, a plane will actually fly a shorter distance if you throw it harder. 

Procedure

4. If your plane doesn’t fly well, make a few adjustments. This is known as trimming your plane. Suggestions:

o If the plane dives into the ground, bend up the backs of the wings, but a little bend goes a long way.

o If the nose of the plane rises first and then drops, the plane is stalling. Bend down the backs of the wings.  Keep your adjustments small.

5. When it’s your turn, throw your plane. 6. Record where the nose of your plane lands

(measurement) on your Data Sheet. 7. Test your plane three times. On your Flying

Things Data Sheet, record the distance that your plane flew each time. 

1.For each trial, divide the distance your plane flew by your launch height to get the glide ratio. Round to the nearest tenth. Write the result in the charts.

2.Calculate your average distance. Add the distance from all trials & divide the sum by the number of trials. Calculate your average glide ratio in the same way.

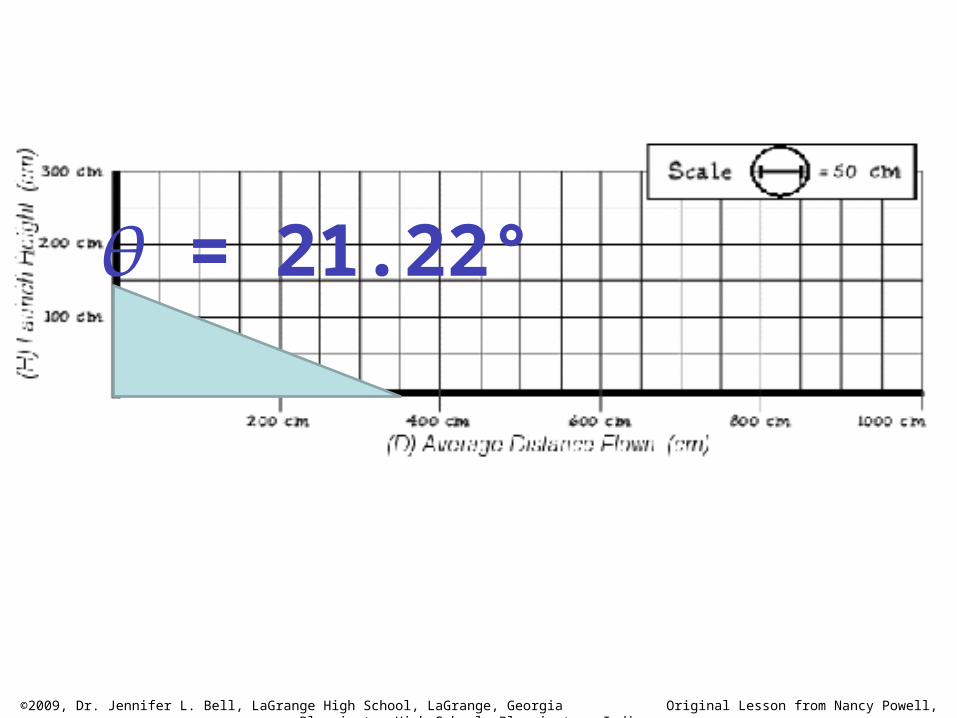
3.The side of each square on the grid represents 50 cm. Draw a mark on the vertical side of the grid to show your launch height. Draw a mark on the horizontal side of your grid to show the average distance your plane flew. Connect these two marks to make a right triangle.

• The height of the triangle is your launch height.• The base of the triangle is the average distance of your plane’s

flight.• The hypotenuse, the longest side of the triangle, shows the

approximate flight path of your plane.

Data Analysis

Debriefing Questions

…individually completed on a piece of notebook paper.

1. How many sets of congruent triangles and parallel lines were created when you folded your airplane?

2. Look at your charts…. What kinds of things affected the distance that your planes flew?  Were you consistently throwing from shoulder height?  Did the amount of push affect the distance?  

3. What does the slope of your graph tell you about the distance that your plane flew? 

4. Is the glide ratio the slope of the line showing you the path of the plane?  Explain why or why not.

5. Which plane would you use for the following competitions?


Recommended