31
by Isaac Caplan Wilson www.designoutofshield.com [email protected] THE GAMECUBE CONTROLLER PAINTING GUIDE
| Date post: | 05-Apr-2016 |
| Category: |
Documents |
| Upload: | design-out-of-shield |
| View: | 239 times |
| Download: | 3 times |
by Isaac Caplan Wilson
www.designoutofshield.com
THE GAMECUBE CONTROLLER PAINTING GUIDE
i
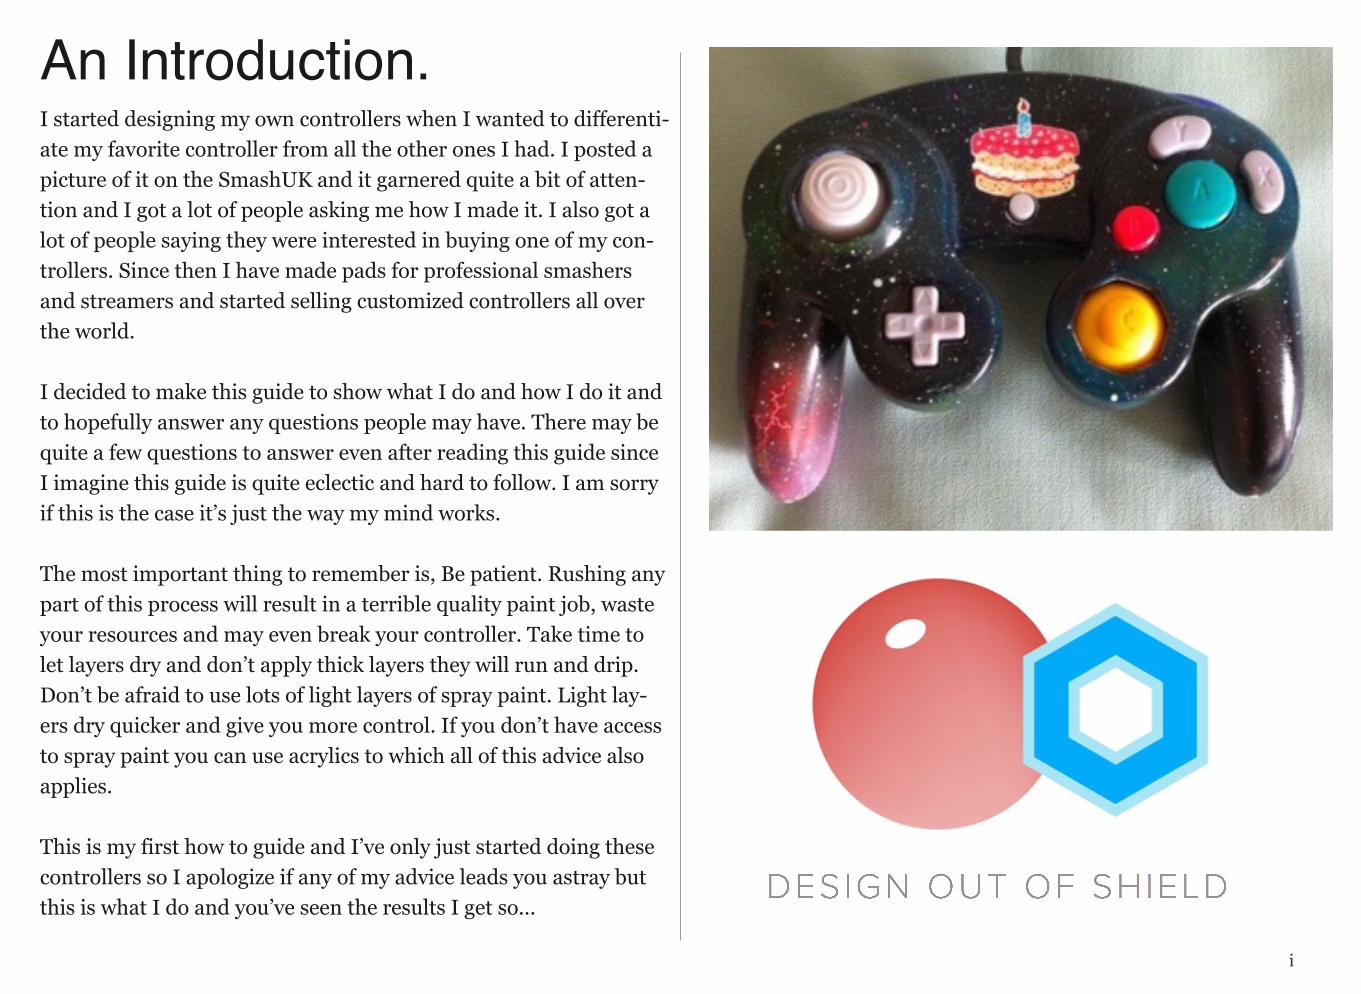
An Introduction.I started designing my own controllers when I wanted to differenti-ate my favorite controller from all the other ones I had. I posted a picture of it on the SmashUK and it garnered quite a bit of atten-tion and I got a lot of people asking me how I made it. I also got a lot of people saying they were interested in buying one of my con-trollers. Since then I have made pads for professional smashers and streamers and started selling customized controllers all over the world.
I decided to make this guide to show what I do and how I do it and to hopefully answer any questions people may have. There may be quite a few questions to answer even after reading this guide since I imagine this guide is quite eclectic and hard to follow. I am sorry if this is the case it’s just the way my mind works.
The most important thing to remember is, Be patient. Rushing any part of this process will result in a terrible quality paint job, waste your resources and may even break your controller. Take time to let layers dry and don’t apply thick layers they will run and drip. Don’t be afraid to use lots of light layers of spray paint. Light lay-ers dry quicker and give you more control. If you don’t have access to spray paint you can use acrylics to which all of this advice also applies.
This is my first how to guide and I’ve only just started doing these controllers so I apologize if any of my advice leads you astray but this is what I do and you’ve seen the results I get so...
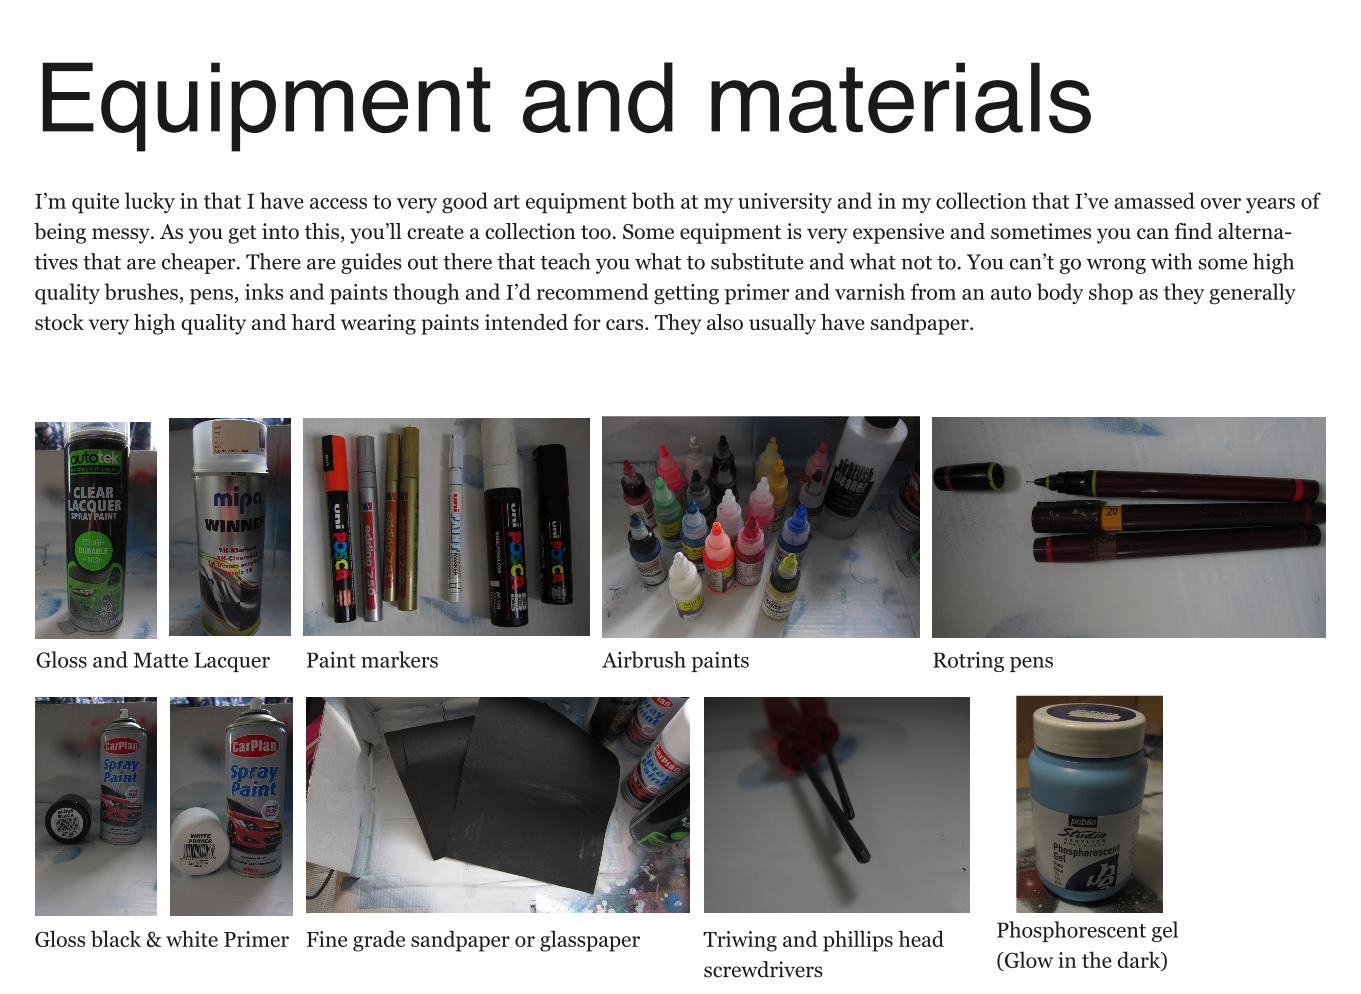
Equipment and materialsI’m quite lucky in that I have access to very good art equipment both at my university and in my collection that I’ve amassed over years of being messy. As you get into this, you’ll create a collection too. Some equipment is very expensive and sometimes you can find alterna-tives that are cheaper. There are guides out there that teach you what to substitute and what not to. You can’t go wrong with some high quality brushes, pens, inks and paints though and I’d recommend getting primer and varnish from an auto body shop as they generally stock very high quality and hard wearing paints intended for cars. They also usually have sandpaper.
Gloss and Matte Lacquer
Gloss black & white Primer Fine grade sandpaper or glasspaper
Paint markers Airbrush paints Rotring pens
Triwing and phillips head screwdrivers
Phosphorescent gel(Glow in the dark)
iii
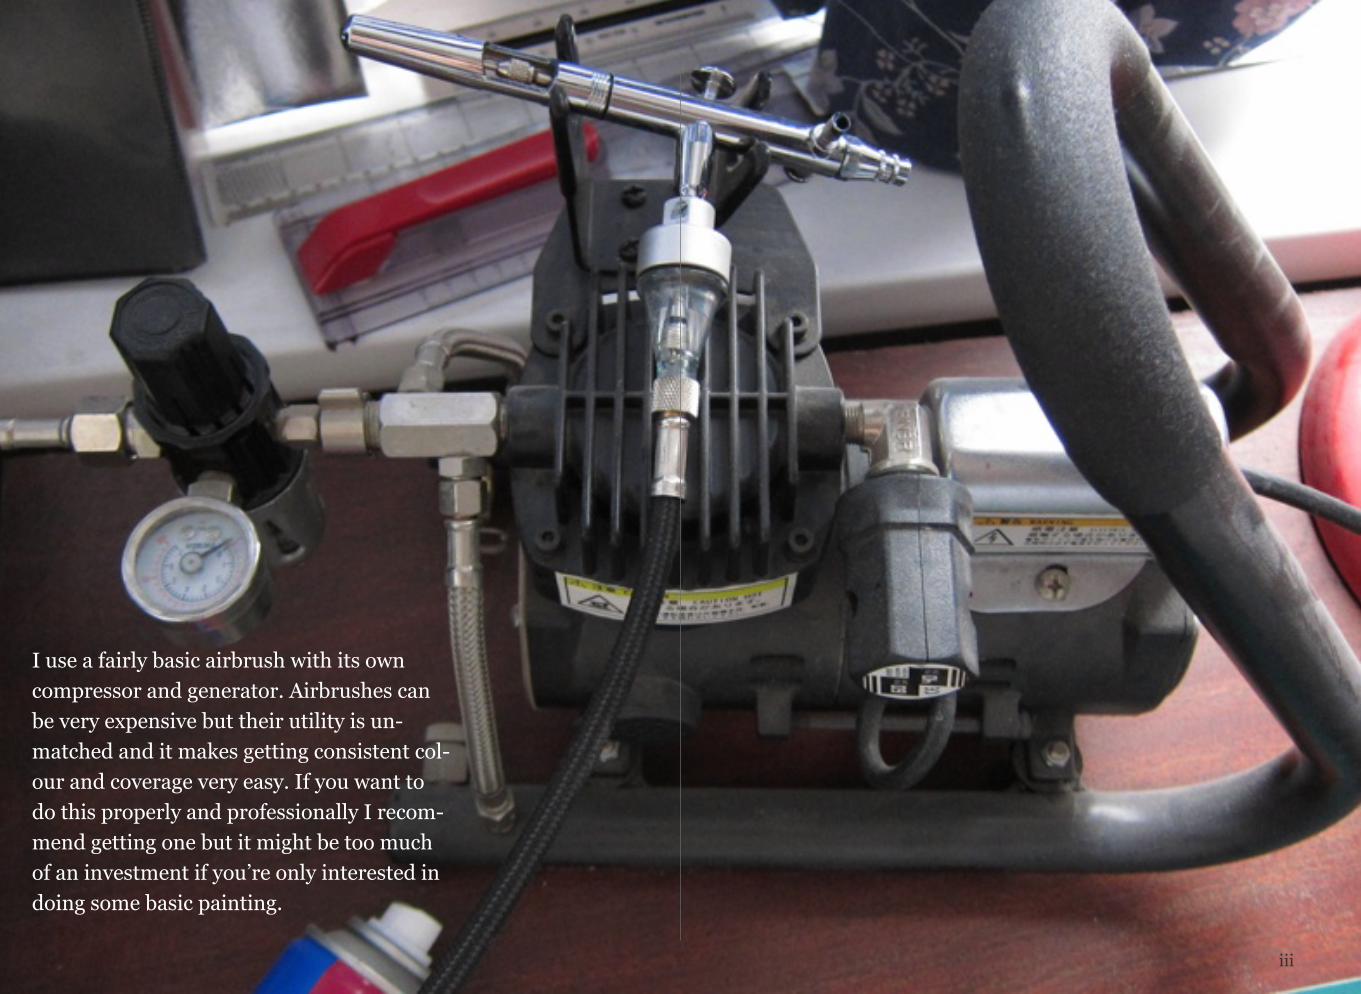
I use a fairly basic airbrush with its own compressor and generator. Airbrushes can be very expensive but their utility is un-matched and it makes getting consistent col-our and coverage very easy. If you want to do this properly and professionally I recom-mend getting one but it might be too much of an investment if you’re only interested in doing some basic painting.
PART 1
Taking your controller apart
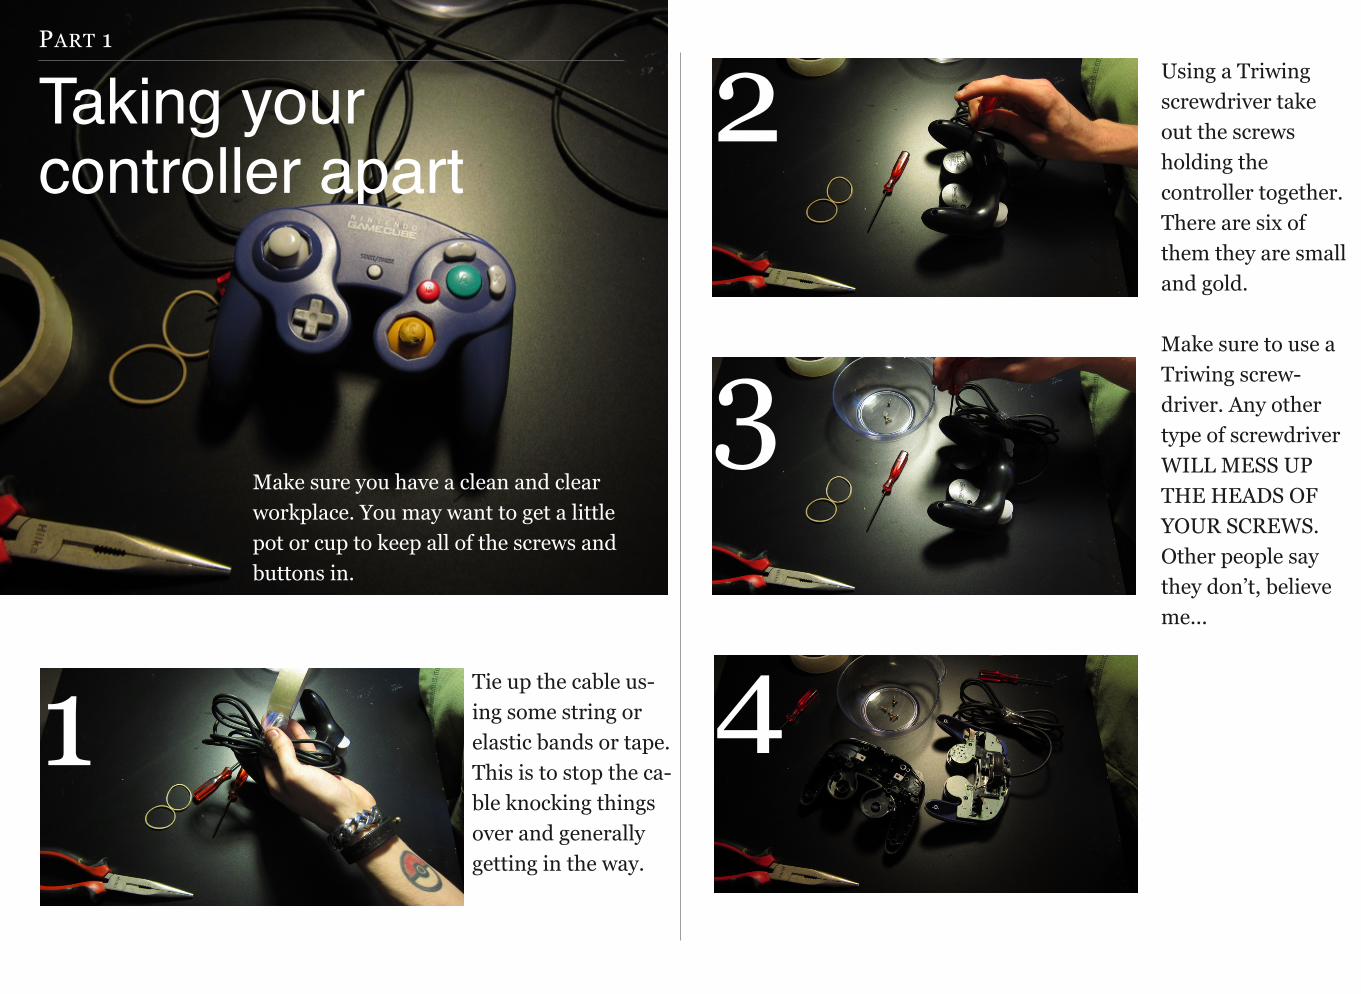
Make sure you have a clean and clear workplace. You may want to get a little pot or cup to keep all of the screws and buttons in.
Tie up the cable us-ing some string or elastic bands or tape. This is to stop the ca-ble knocking things over and generally getting in the way.
Using a Triwing screwdriver take out the screws holding the controller together. There are six of them they are small and gold.
Make sure to use a Triwing screw-driver. Any other type of screwdriver WILL MESS UP THE HEADS OF YOUR SCREWS. Other people say they don’t, believe me...
1
2
3
4
5
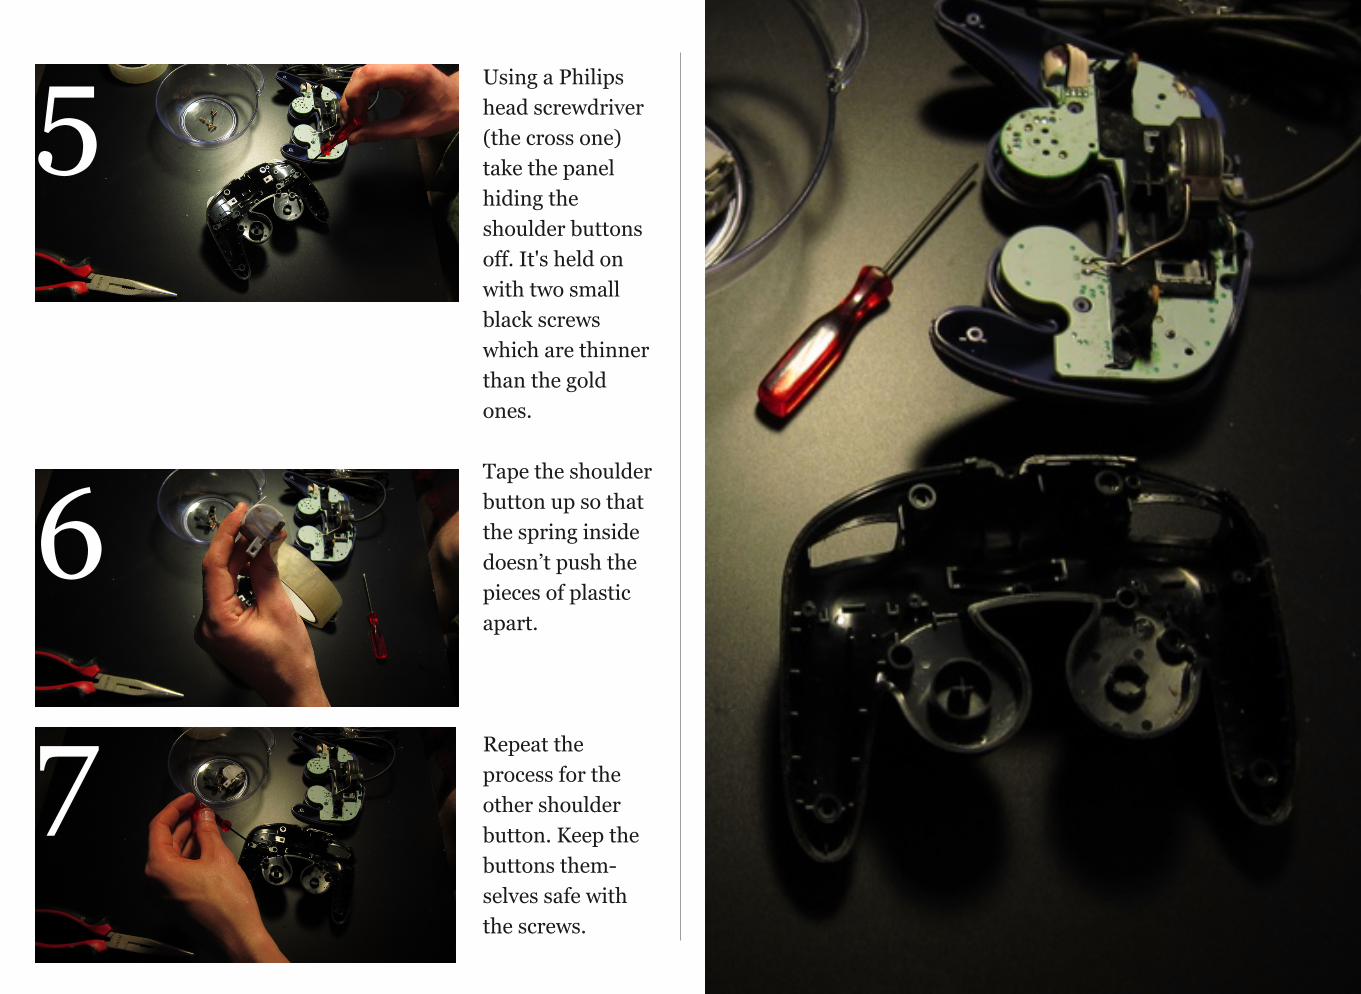
Using a Philips head screwdriver (the cross one) take the panel hiding the shoulder buttons off. It's held on with two small black screws which are thinner than the gold ones.
Tape the shoulder button up so that the spring inside doesn’t push the pieces of plastic apart.
Repeat the process for the other shoulder button. Keep the buttons them-selves safe with the screws.
5
6
7
6
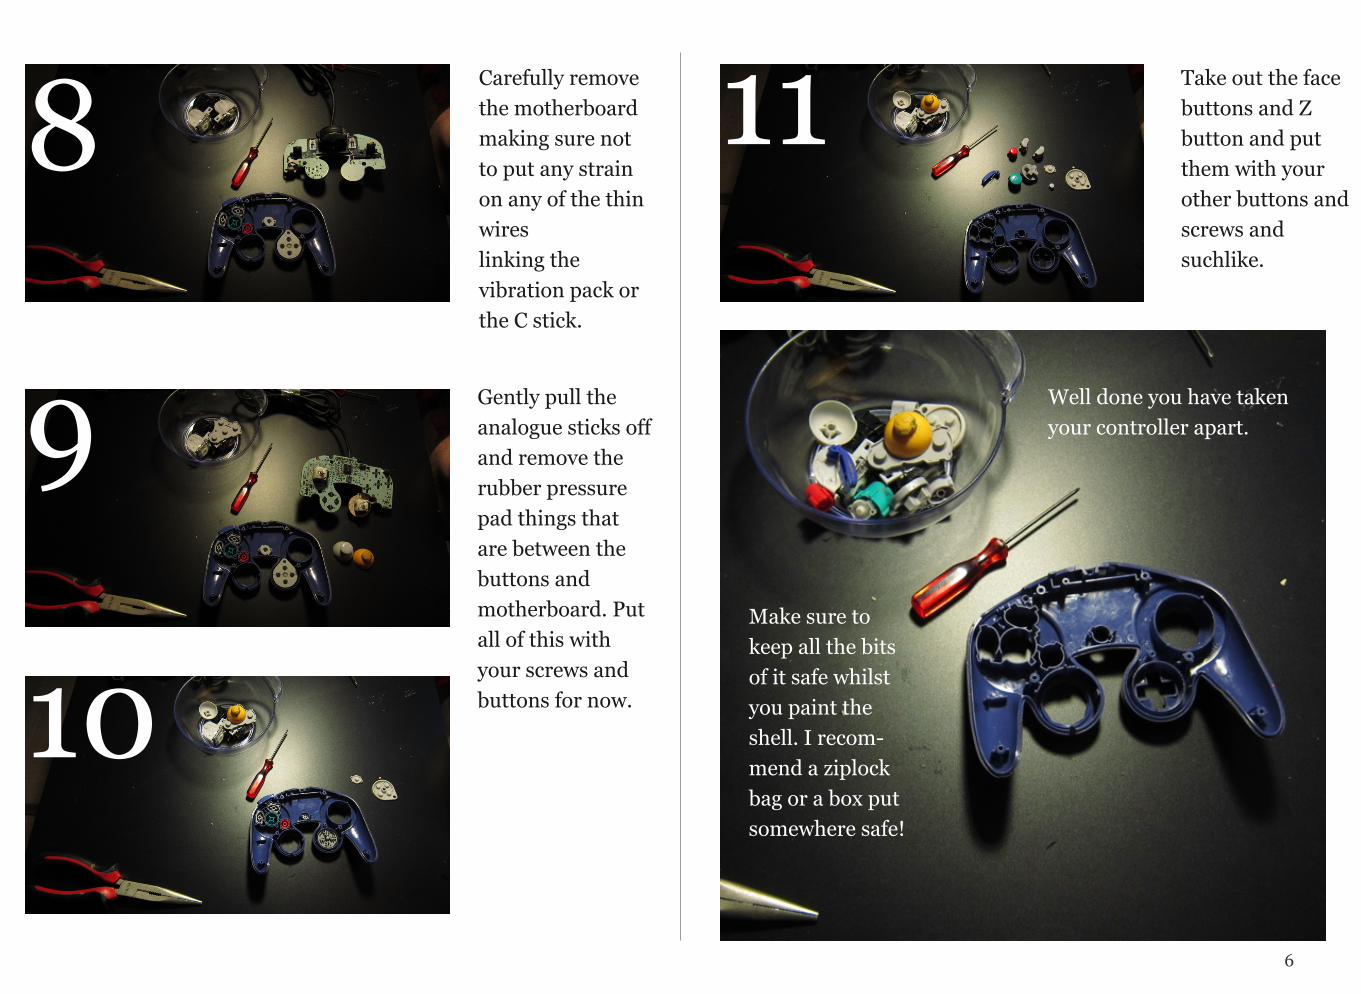
Carefully remove the motherboard making sure not to put any strain on any of the thin wires linking the vibration pack or the C stick.
Gently pull the analogue sticks off and remove the rubber pressure pad things that are between the buttons and motherboard. Put all of this with your screws and buttons for now.
Take out the face buttons and Z button and put them with your other buttons and screws and suchlike.
Make sure to keep all the bits of it safe whilst you paint the shell. I recom-mend a ziplock bag or a box put somewhere safe!
8
9
10
Well done you have taken your controller apart.
11
PART 2
Cleaning: Your controller is rank. Clean that gunk out of it.
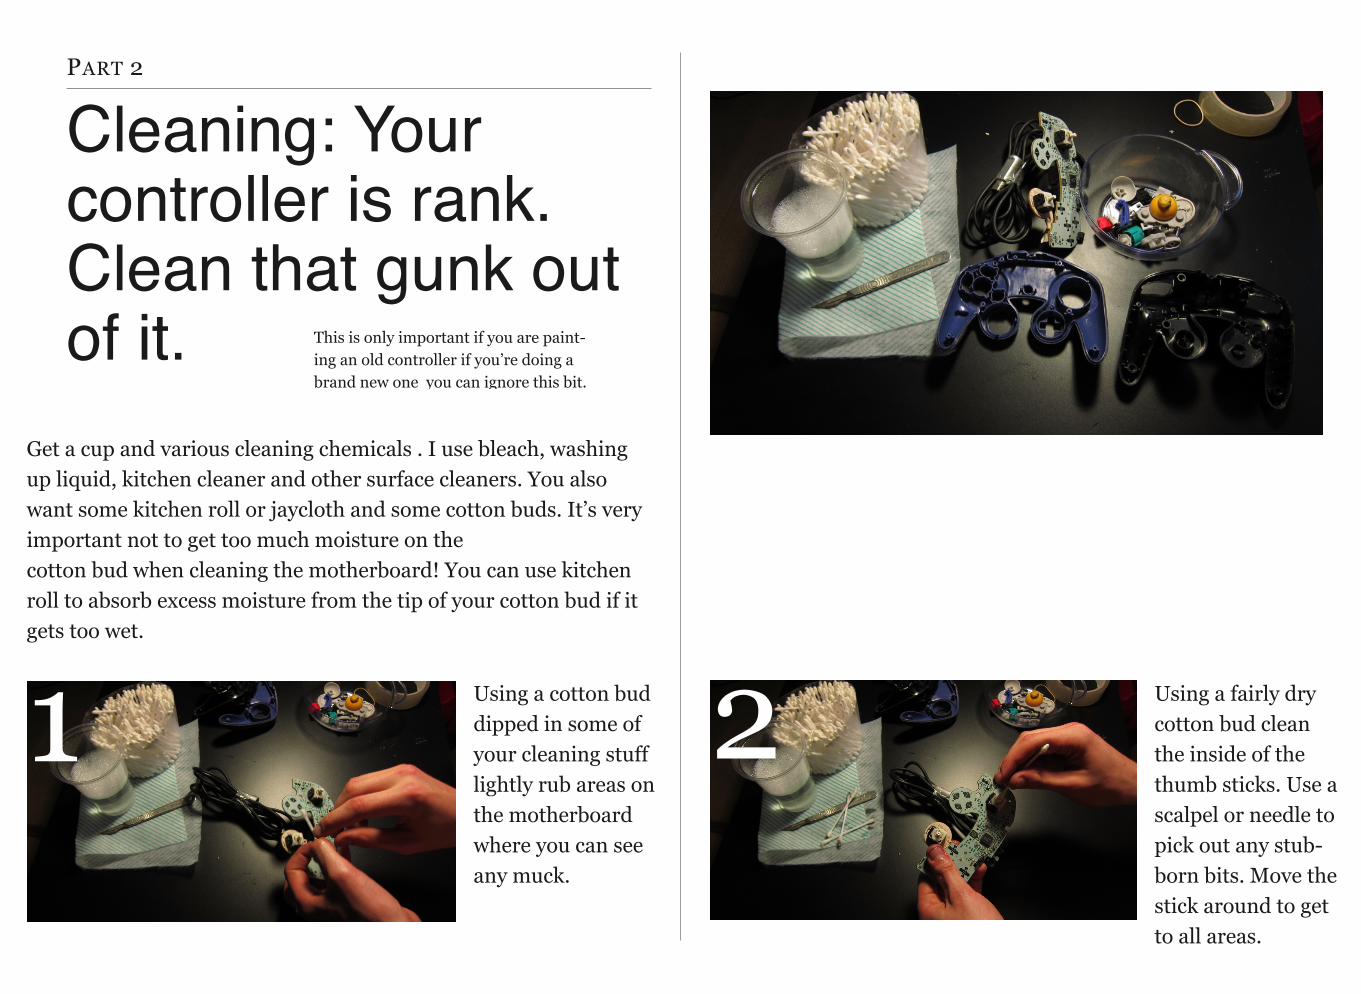
Get a cup and various cleaning chemicals . I use bleach, washing up liquid, kitchen cleaner and other surface cleaners. You also want some kitchen roll or jaycloth and some cotton buds. It’s very important not to get too much moisture on the cotton bud when cleaning the motherboard! You can use kitchen roll to absorb excess moisture from the tip of your cotton bud if it gets too wet.
Using a fairly dry cotton bud clean the inside of the thumb sticks. Use a scalpel or needle to pick out any stub-born bits. Move the stick around to get to all areas.
Using a cotton bud dipped in some of your cleaning stuff lightly rub areas on the motherboard where you can see any muck.
1 2
This is only important if you are paint-ing an old controller if you’re doing a brand new one you can ignore this bit.
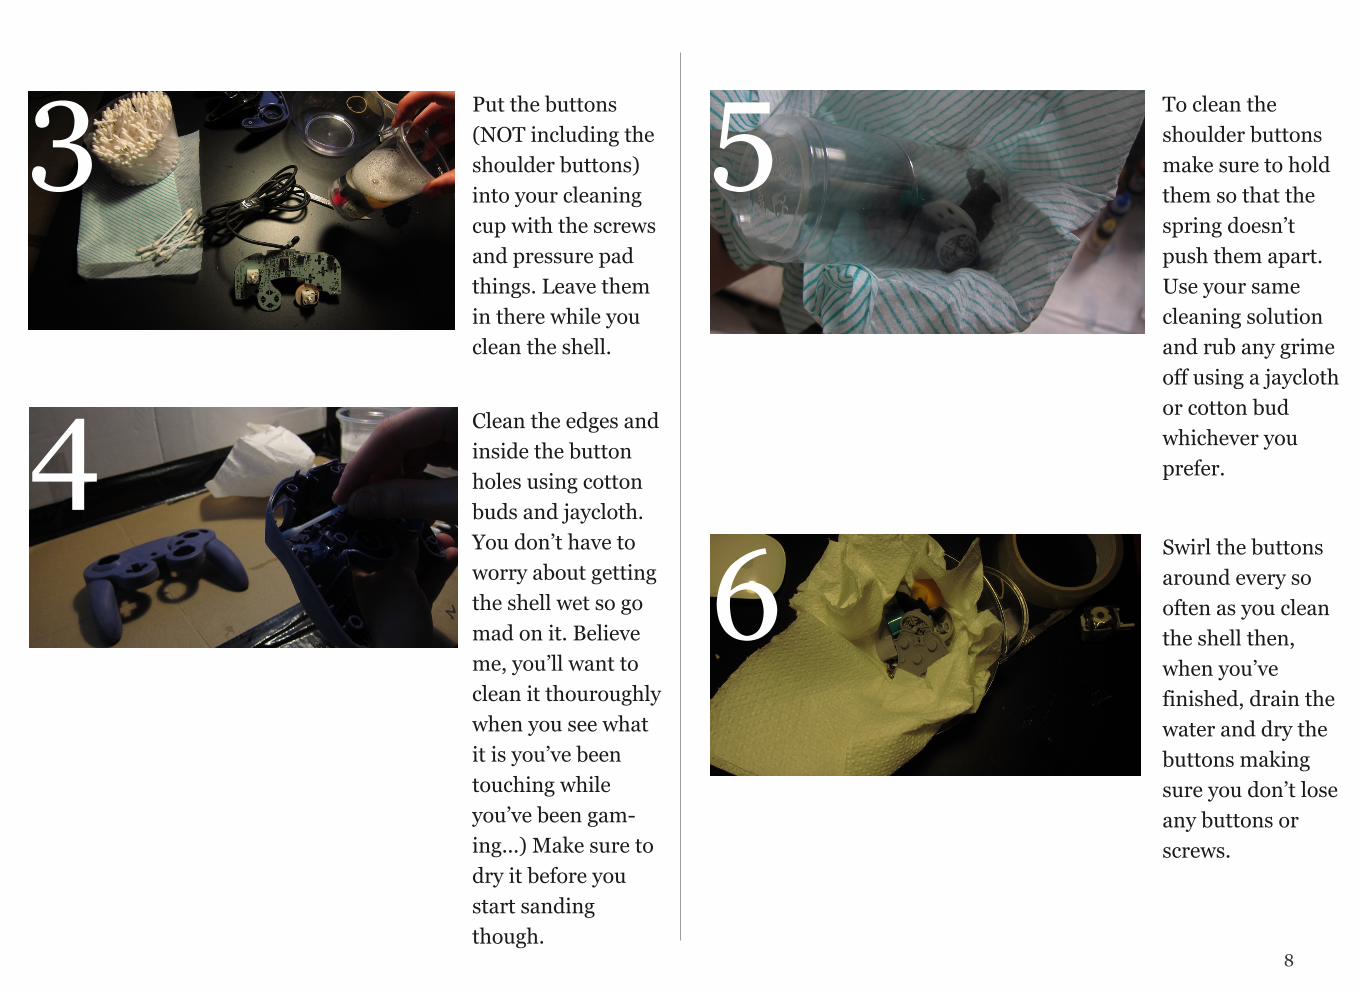
Put the buttons (NOT including the shoulder buttons) into your cleaning cup with the screws and pressure pad things. Leave them in there while you clean the shell.
8
Clean the edges and inside the button holes using cotton buds and jaycloth. You don’t have to worry about getting the shell wet so go mad on it. Believe me, you’ll want to clean it thouroughly when you see what it is you’ve been touching while you’ve been gam-ing...) Make sure to dry it before you start sanding though.
Swirl the buttons around every so often as you clean the shell then, when you’ve finished, drain the water and dry the buttons making sure you don’t lose any buttons or screws.
To clean the shoulder buttons make sure to hold them so that the spring doesn’t push them apart. Use your same cleaning solution and rub any grime off using a jaycloth or cotton bud whichever you prefer.
3
4
5
6
PART 3
Sanding: Smoothing the ground for the creative bit.
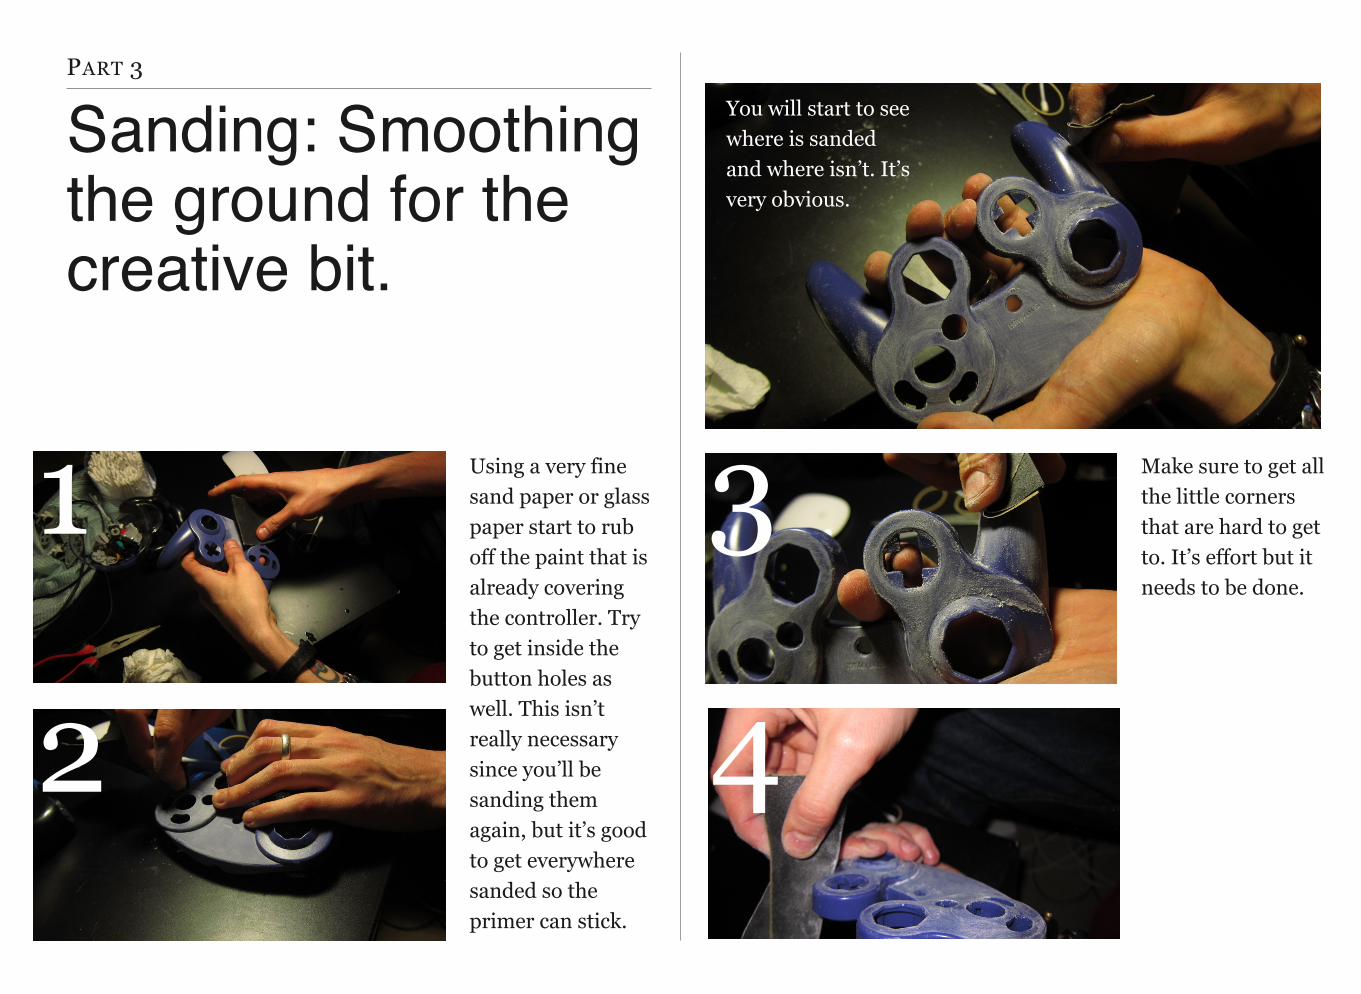
Using a very fine sand paper or glass paper start to rub off the paint that is already covering the controller. Try to get inside the button holes as well. This isn’t really necessary since you’ll be sanding them again, but it’s good to get everywhere sanded so the primer can stick.
You will start to see where is sanded and where isn’t. It’s very obvious.
4
3
2
1 Make sure to get all the little corners that are hard to get to. It’s effort but it needs to be done.
PART 4
Priming: The last step before painting.
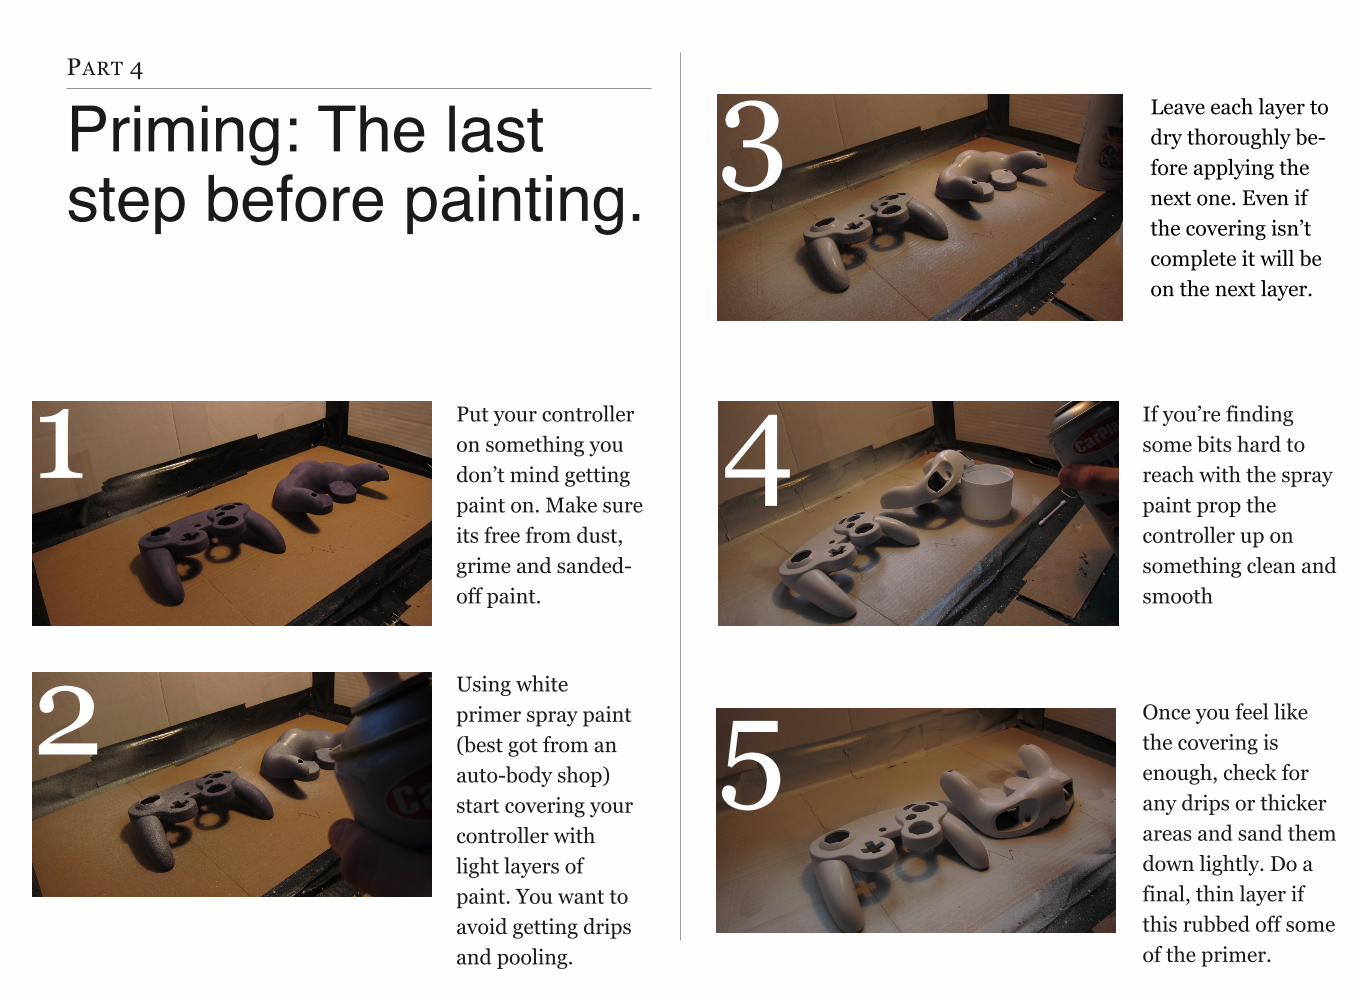
Put your controller on something you don’t mind getting paint on. Make sure its free from dust, grime and sanded-off paint.
Using white primer spray paint (best got from an auto-body shop) start covering your controller with light layers of paint. You want to avoid getting drips and pooling.
Leave each layer to dry thoroughly be-fore applying the next one. Even if the covering isn’t complete it will be on the next layer.
If you’re finding some bits hard to reach with the spray paint prop the controller up on something clean and smooth
Once you feel like the covering is enough, check for any drips or thicker areas and sand them down lightly. Do a final, thin layer if this rubbed off some of the primer.
1
2
3
4
5
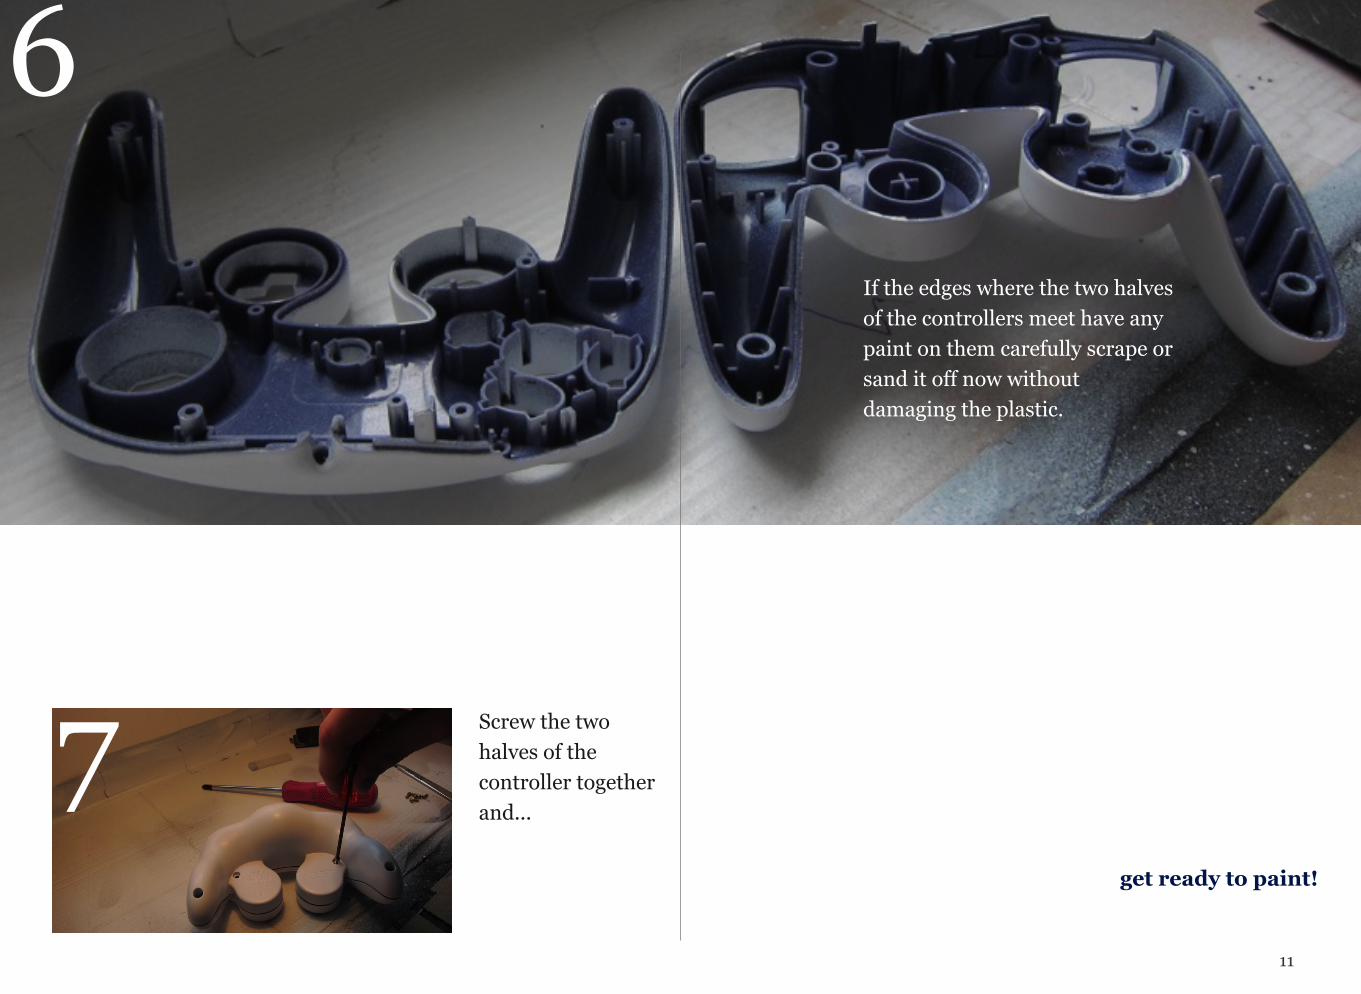
If the edges where the two halves of the controllers meet have any paint on them carefully scrape or sand it off now without damaging the plastic.
11
6
Screw the two halves of the controller together and...
7 get ready to paint!
PART 5
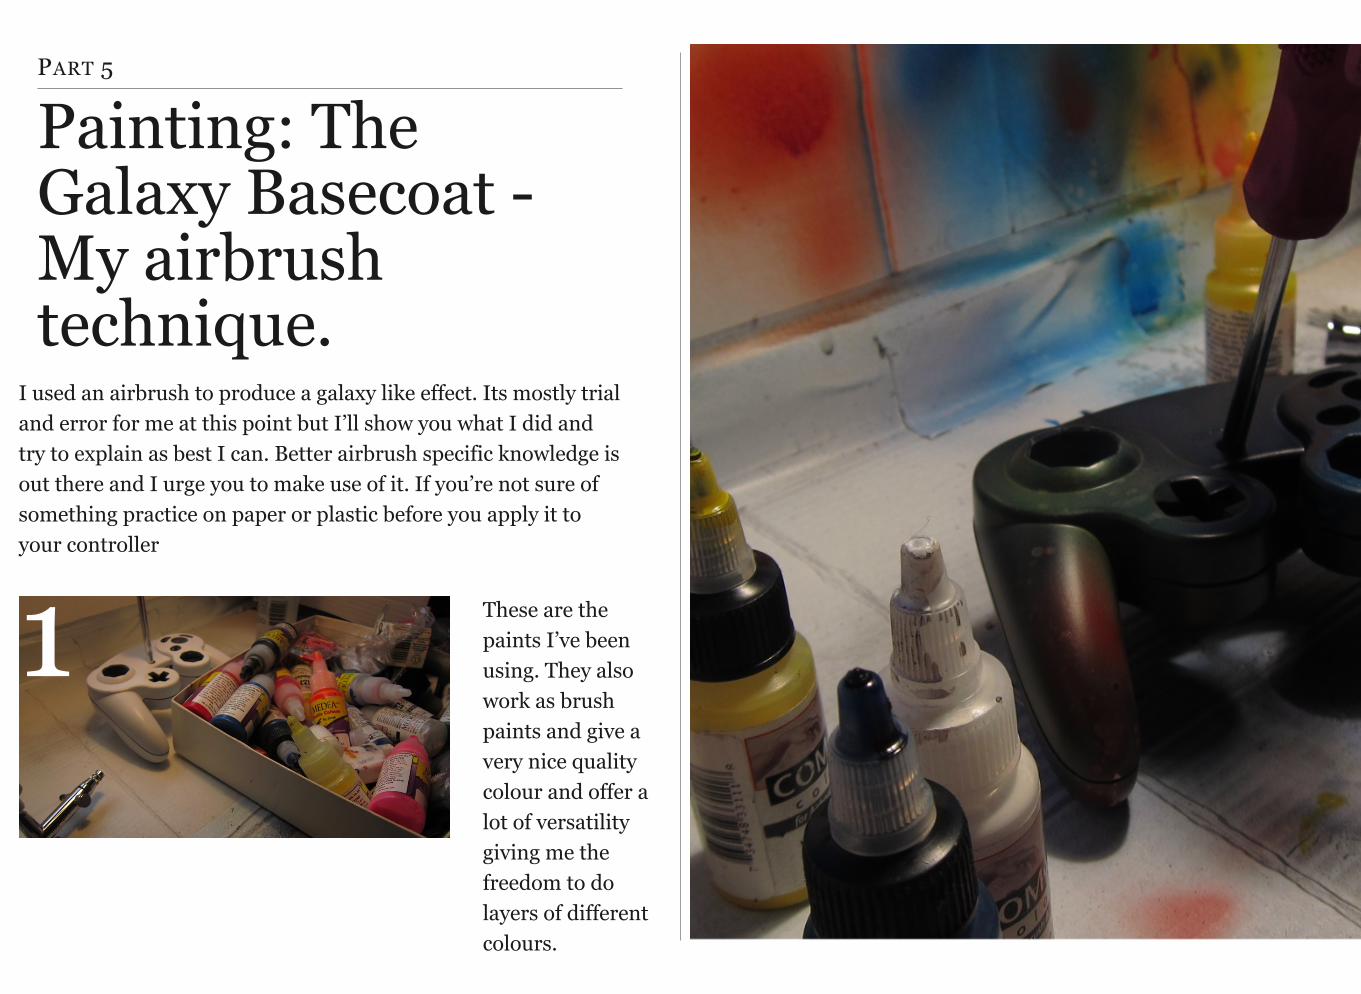
Painting: The Galaxy Basecoat - My airbrush technique.
I used an airbrush to produce a galaxy like effect. Its mostly trial and error for me at this point but I’ll show you what I did and try to explain as best I can. Better airbrush specific knowledge is out there and I urge you to make use of it. If you’re not sure of something practice on paper or plastic before you apply it to your controller
These are the paints I’ve been using. They also work as brush paints and give a very nice quality colour and offer a lot of versatility giving me the freedom to do layers of different colours.
1
13
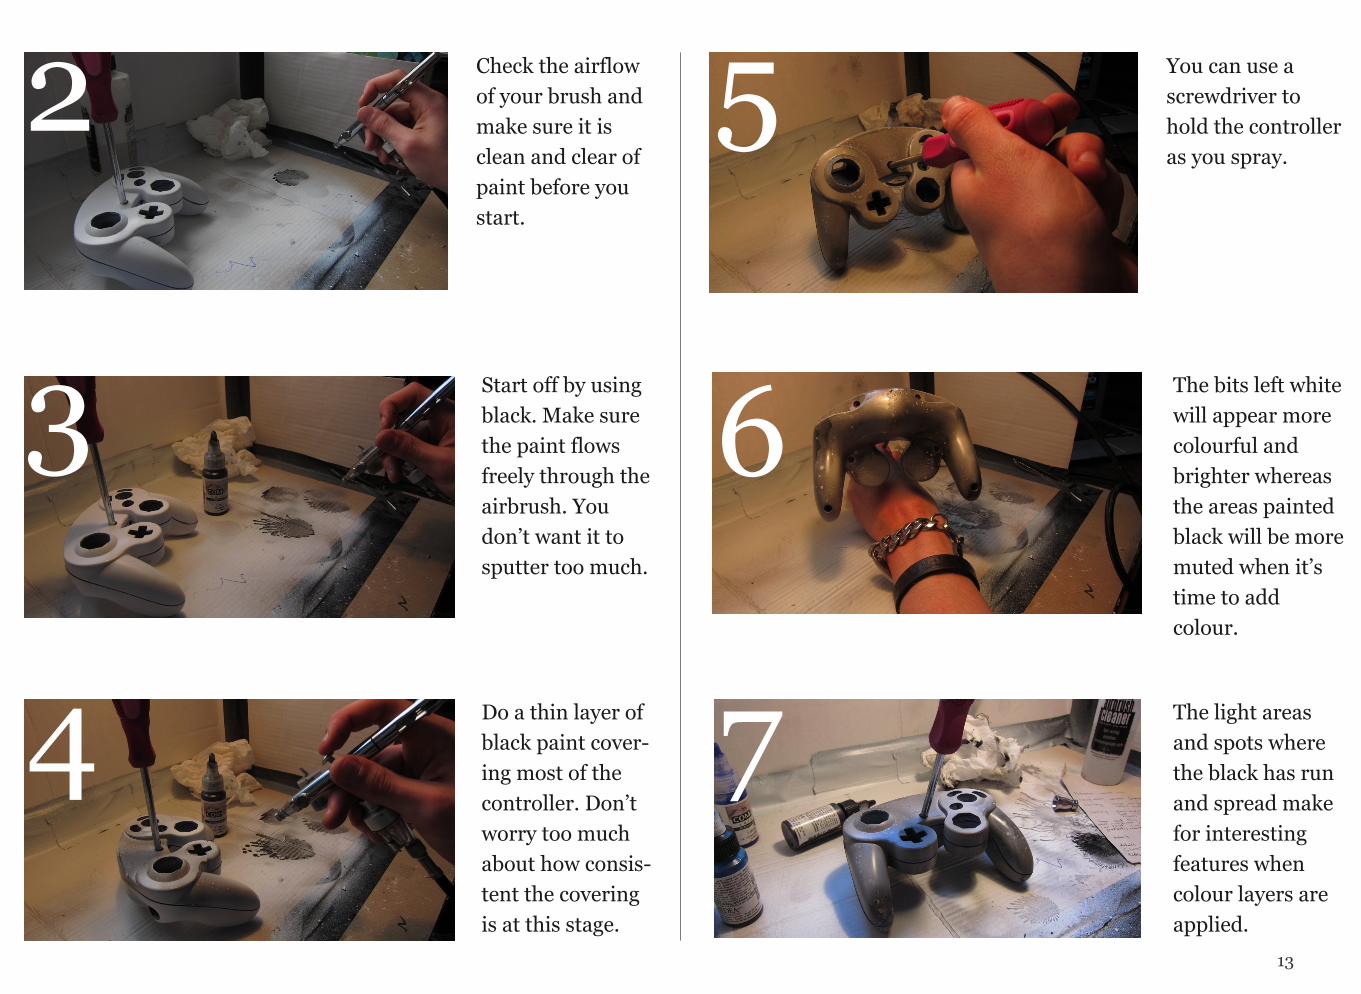
The bits left white will appear more colourful and brighter whereas the areas painted black will be more muted when it’s time to add colour.
Check the airflow of your brush and make sure it is clean and clear of paint before you start.
Start off by using black. Make sure the paint flows freely through the airbrush. You don’t want it to sputter too much.
Do a thin layer of black paint cover-ing most of the controller. Don’t worry too much about how consis-tent the covering is at this stage.
You can use a screwdriver to hold the controller as you spray.
2
3
4
5
The light areas and spots where the black has run and spread make for interesting features when colour layers are applied.
6
7
14
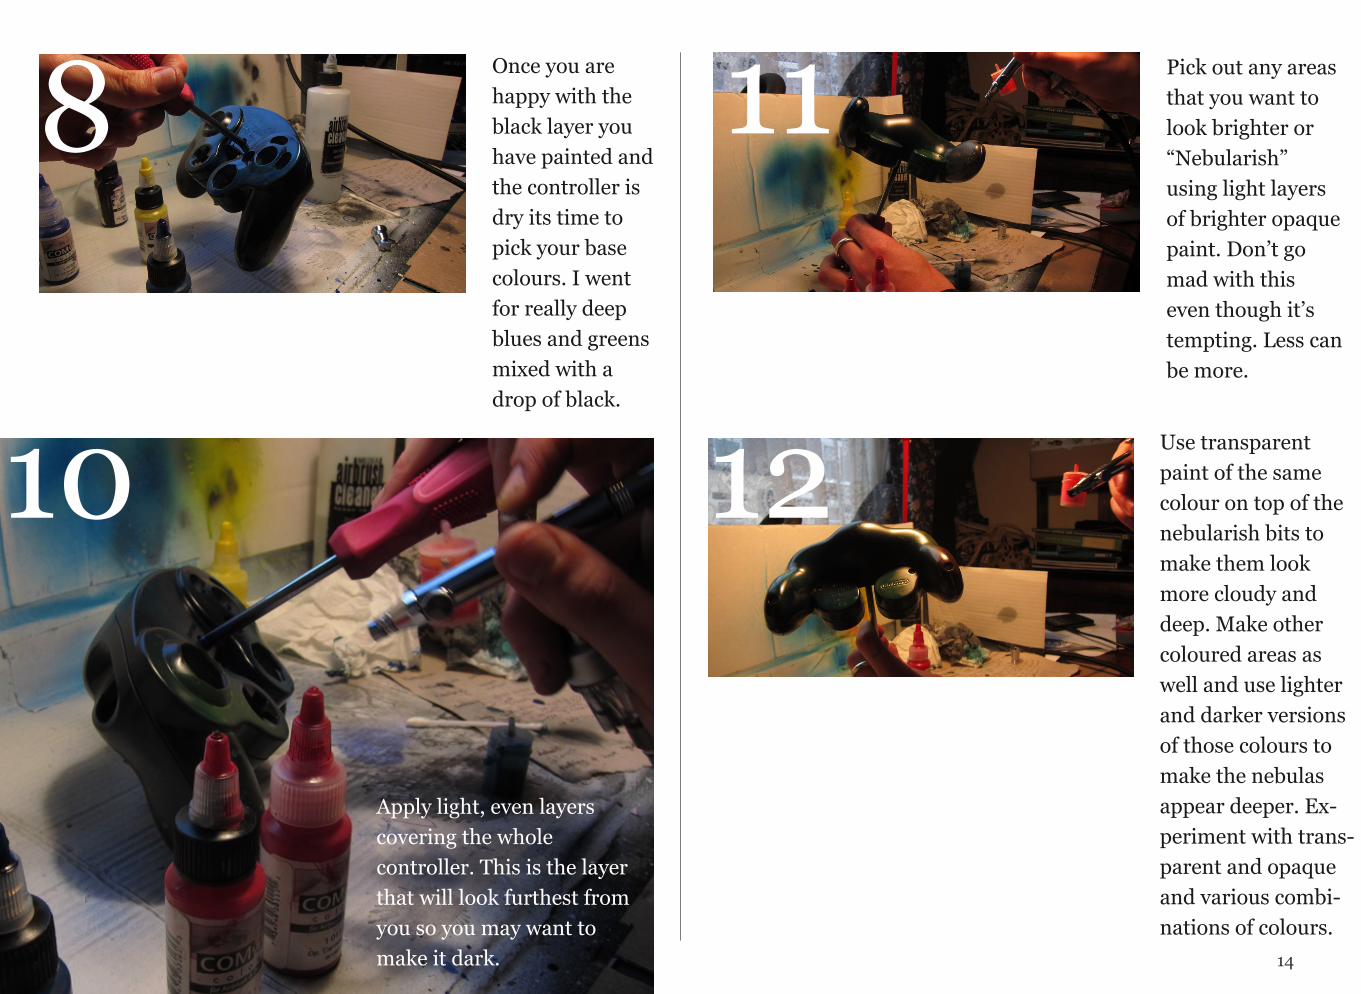
Once you are happy with the black layer you have painted and the controller is dry its time to pick your base colours. I went for really deep blues and greens mixed with a drop of black.
Pick out any areas that you want to look brighter or “Nebularish” using light layers of brighter opaque paint. Don’t go mad with this even though it’s tempting. Less can be more.
Use transparent paint of the same colour on top of the nebularish bits to make them look more cloudy and deep. Make other coloured areas as well and use lighter and darker versions of those colours to make the nebulas appear deeper. Ex-periment with trans-parent and opaque and various combi-nations of colours.
Apply light, even layers covering the whole controller. This is the layer that will look furthest from you so you may want to make it dark.
8
10
11
12

15
The more layers of colour you add the more variety you’ll have in shading and depth. Use the shape of the con-troller to your advantage. If an area is cornery, dark and hard to access, then make it a darker area of the space design and compensate elsewhere.
Remember you’ll be adding highlights later so don’t worry if it looks dull at this stage. We’ll also be varnishing it so don’t EVER worry about shine.
13
14
PART 6
Painting: Splattering some constellations.
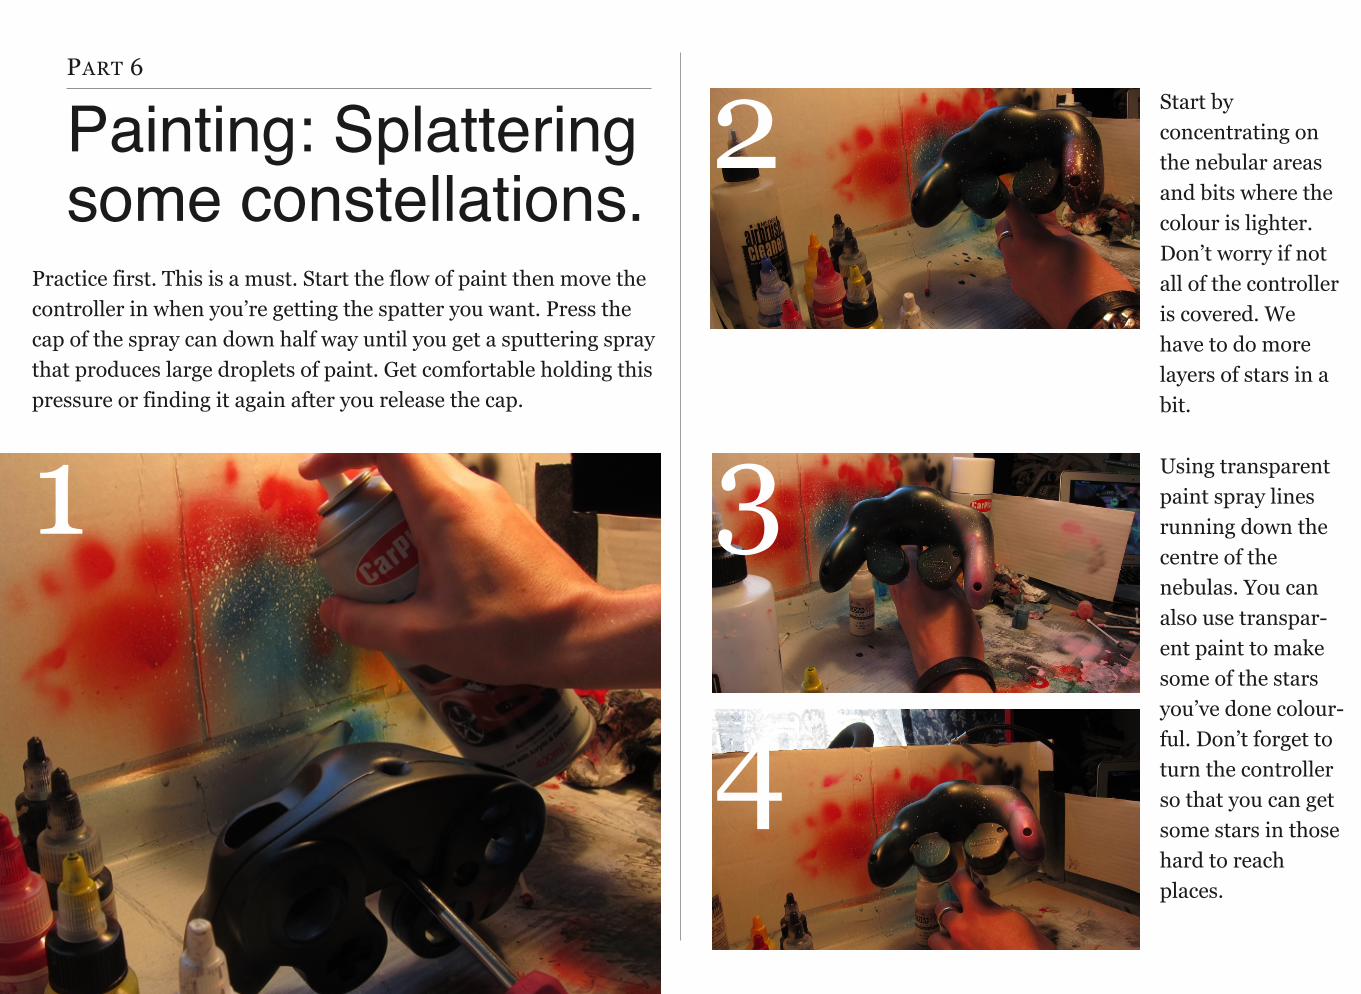
Practice first. This is a must. Start the flow of paint then move the controller in when you’re getting the spatter you want. Press the cap of the spray can down half way until you get a sputtering spray that produces large droplets of paint. Get comfortable holding this pressure or finding it again after you release the cap.
Start by concentrating on the nebular areas and bits where the colour is lighter. Don’t worry if not all of the controller is covered. We have to do more layers of stars in a bit.
Using transparent paint spray lines running down the centre of the nebulas. You can also use transpar-ent paint to make some of the stars you’ve done colour-ful. Don’t forget to turn the controller so that you can get some stars in those hard to reach places.
1
2
3
4
17
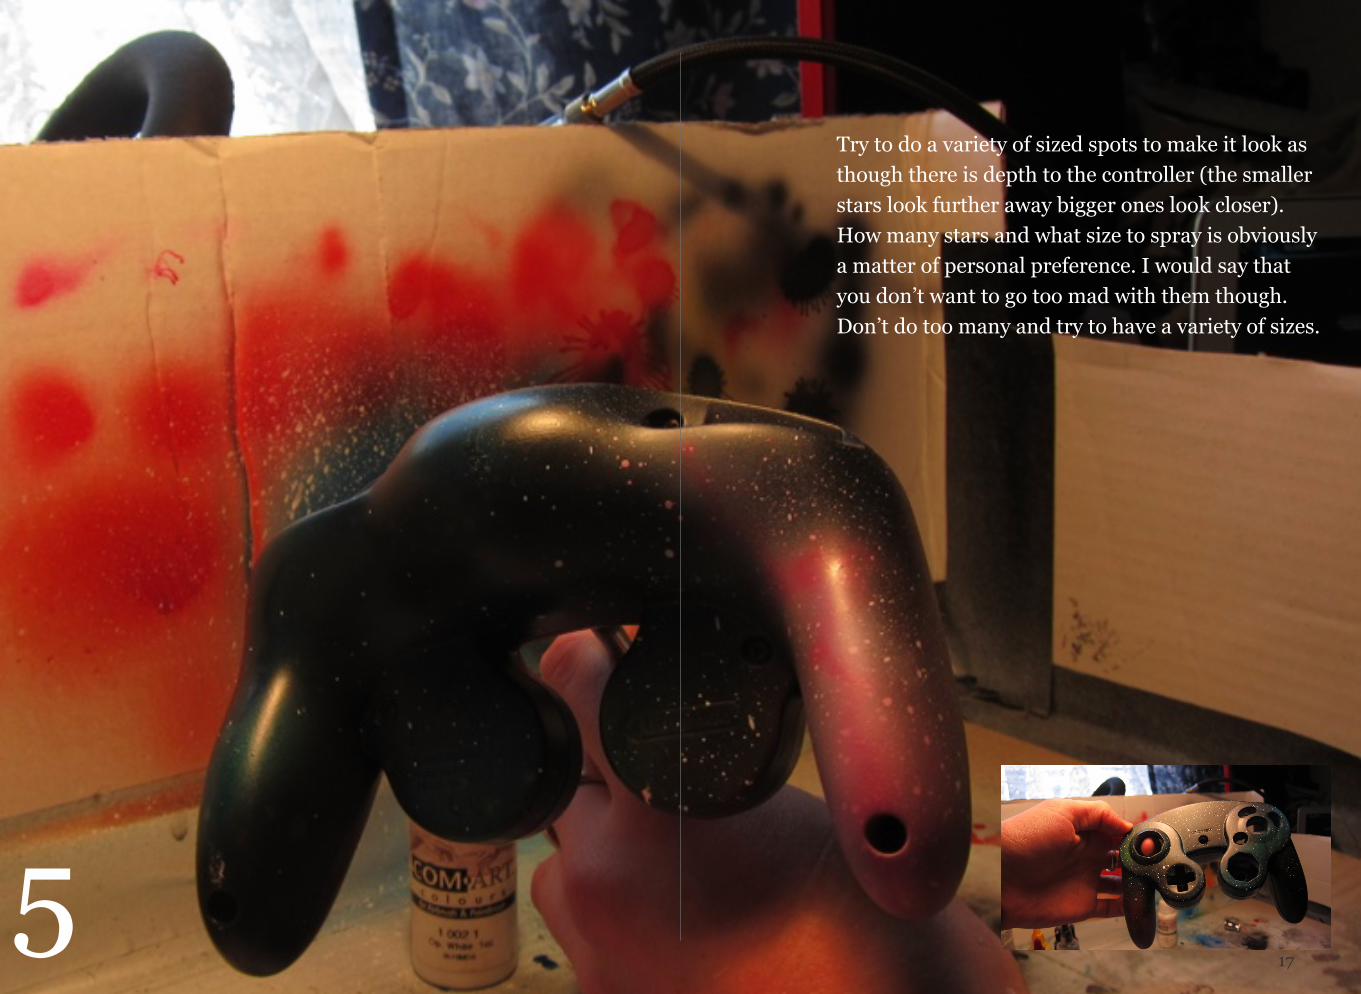
Try to do a variety of sized spots to make it look as though there is depth to the controller (the smaller stars look further away bigger ones look closer). How many stars and what size to spray is obviously a matter of personal preference. I would say that you don’t want to go too mad with them though. Don’t do too many and try to have a variety of sizes.
5
PART 7
Painting: Adding some lightning!
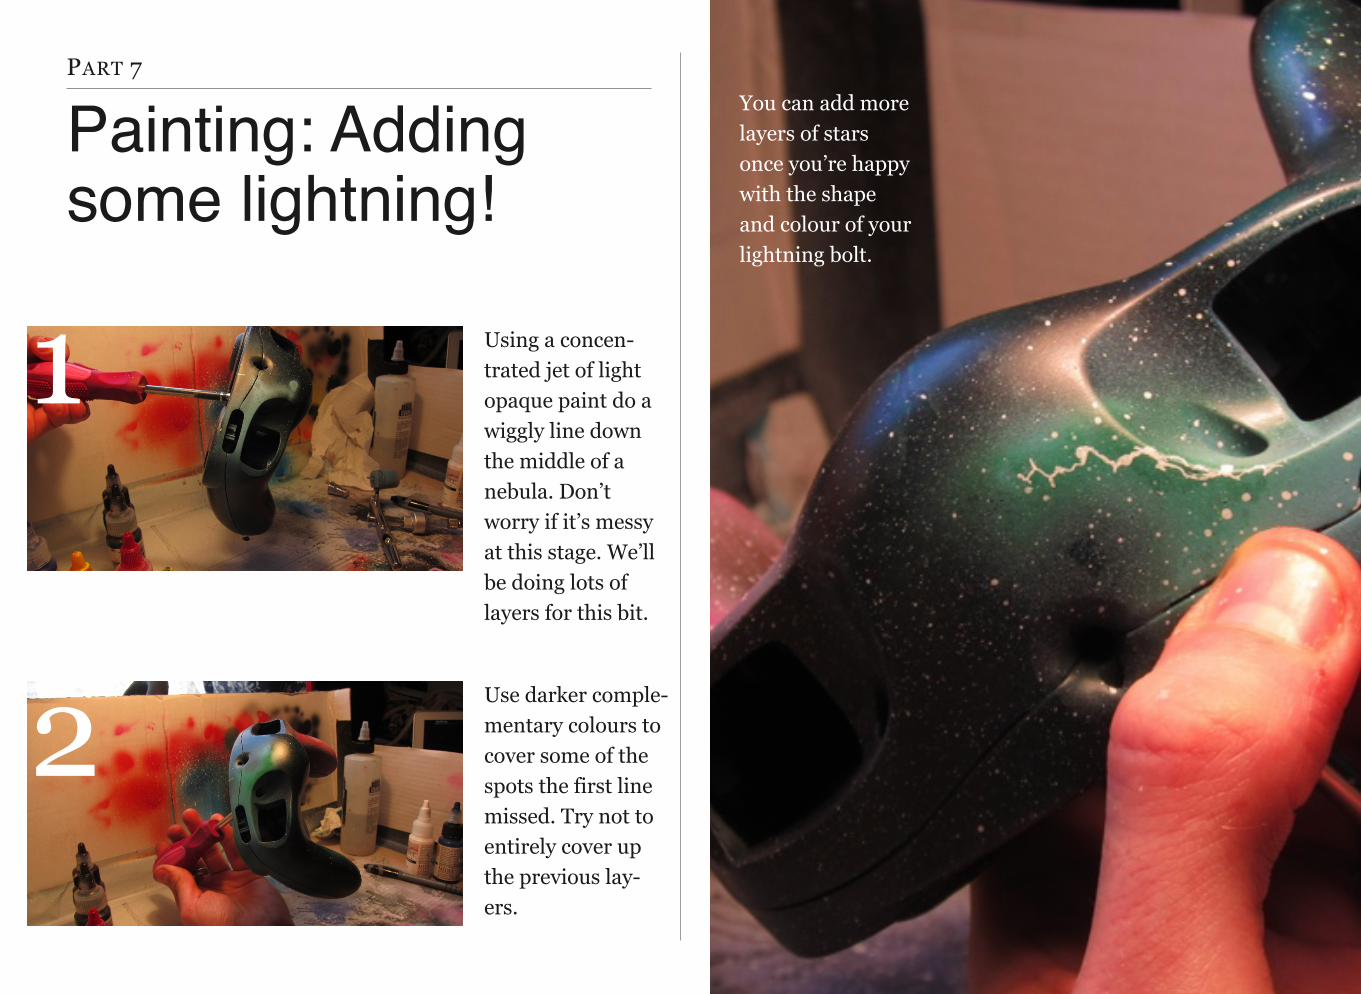
Using a concen-trated jet of light opaque paint do a wiggly line down the middle of a nebula. Don’t worry if it’s messy at this stage. We’ll be doing lots of layers for this bit.
Use darker comple-mentary colours to cover some of the spots the first line missed. Try not to entirely cover up the previous lay-ers.
You can add more layers of stars once you’re happy with the shape and colour of your lightning bolt.
1
2
19
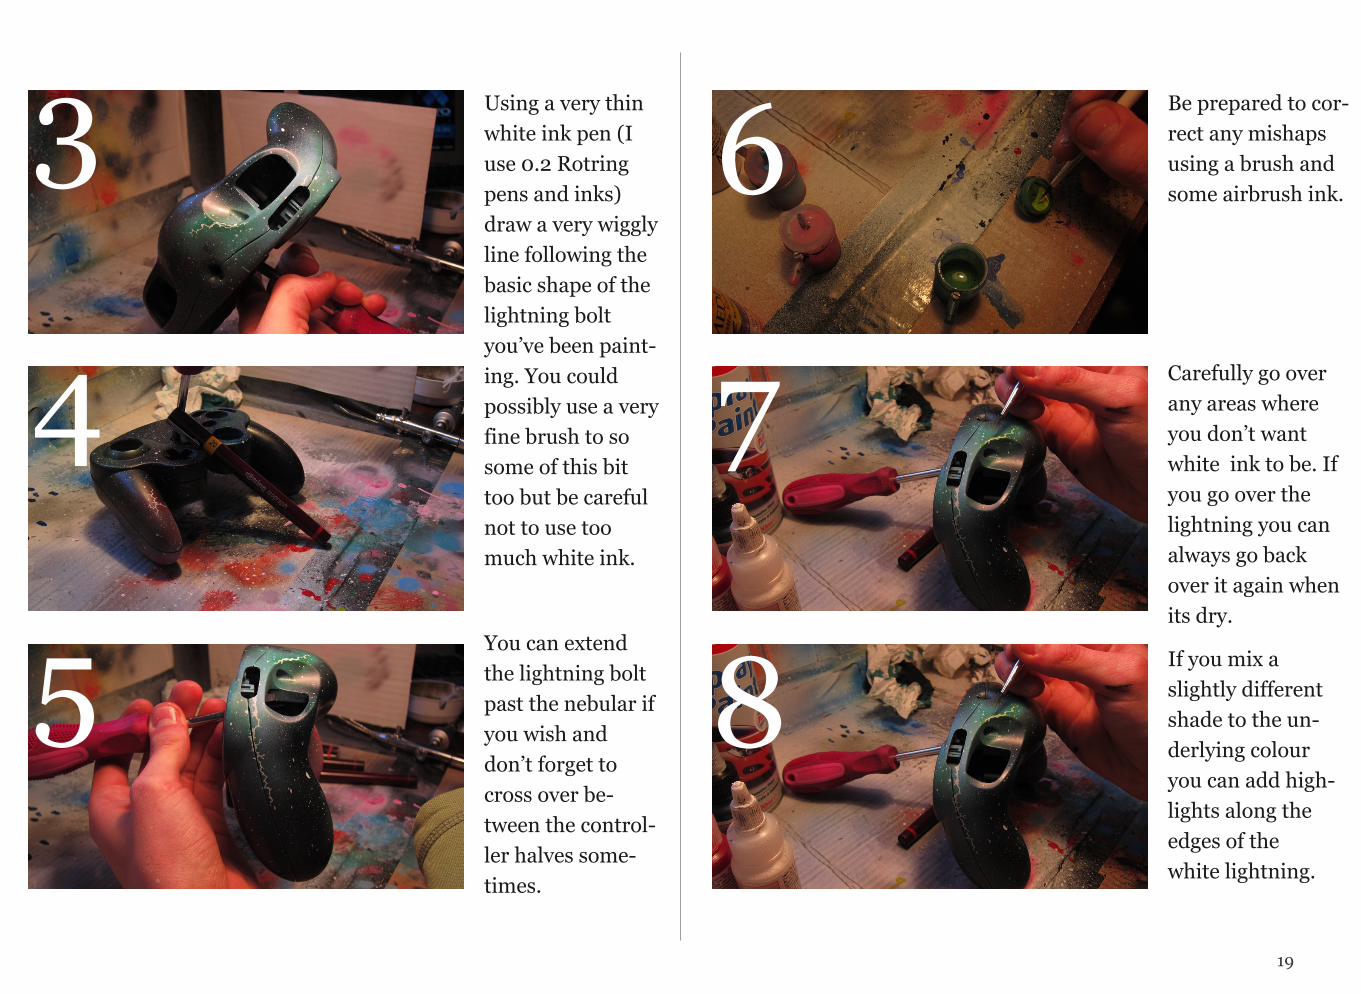
Using a very thin white ink pen (I use 0.2 Rotring pens and inks) draw a very wiggly line following the basic shape of the lightning bolt you’ve been paint-ing. You could possibly use a very fine brush to so some of this bit too but be careful not to use too much white ink.
You can extend the lightning bolt past the nebular if you wish and don’t forget to cross over be-tween the control-ler halves some-times.
Be prepared to cor-rect any mishaps using a brush and some airbrush ink.
If you mix a slightly different shade to the un-derlying colour you can add high-lights along the edges of the white lightning.
Carefully go over any areas where you don’t want white ink to be. If you go over the lightning you can always go back over it again when its dry.
3
4
5
6
7
8
20
You can even take it so far as to make the lightning bolts themselves colourful.
This works best if you use transpar-ent bright ink and paint over the white line you’ve just drawn.
A variety of col-ours will make your controller much more vi-brant.
9
10
11
21
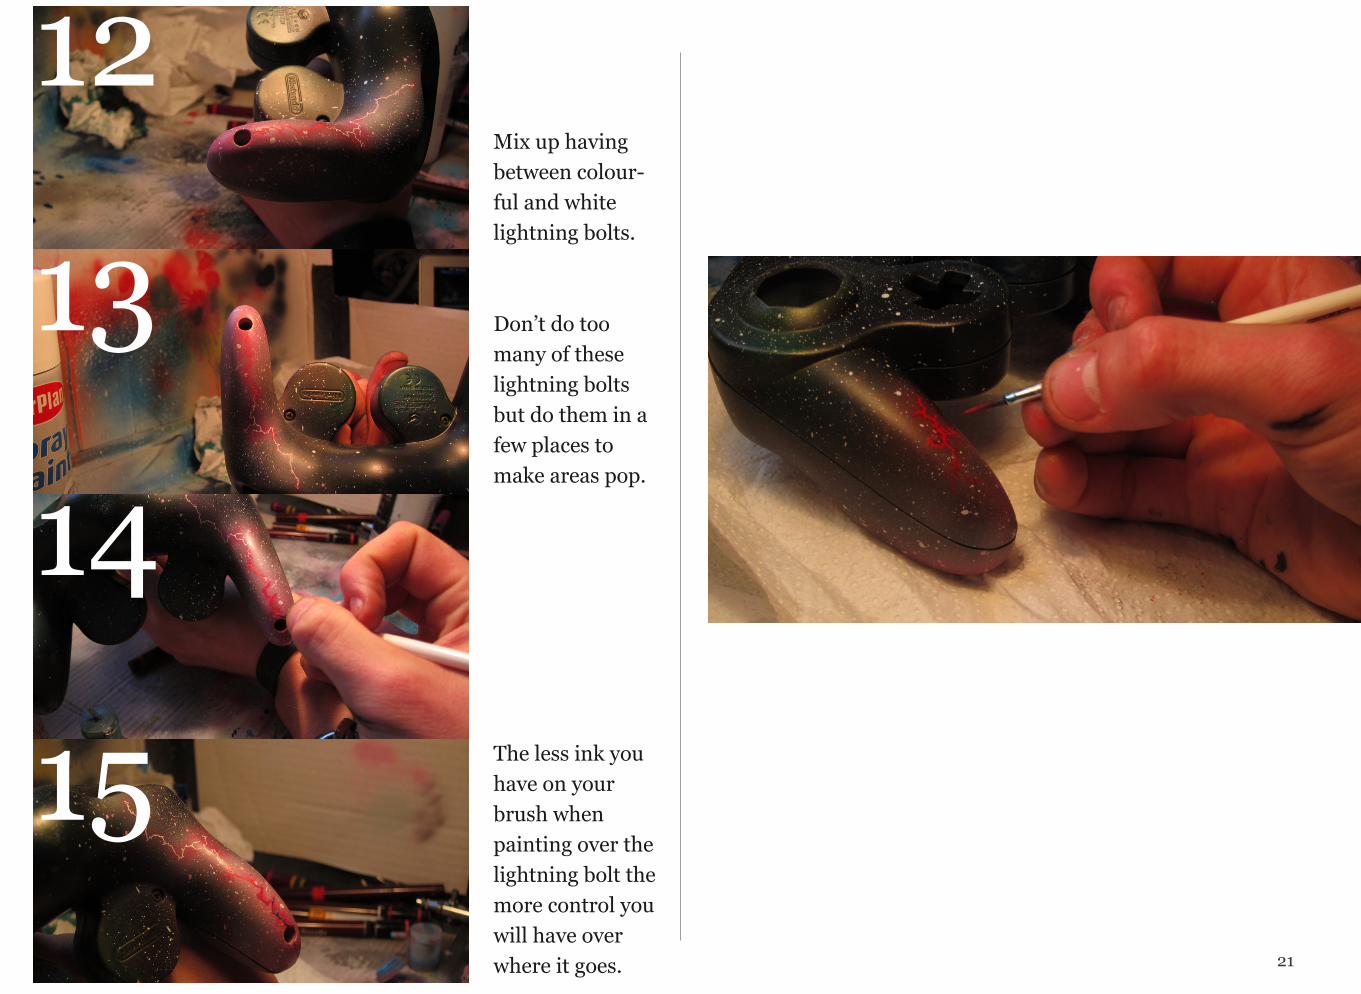
Mix up having between colour-ful and white lightning bolts.
Don’t do too many of these lightning bolts but do them in a few places to make areas pop.
The less ink you have on your brush when painting over the lightning bolt the more control you will have over where it goes.
12
13
14
15
PART 8
Painting: The centreDesign.
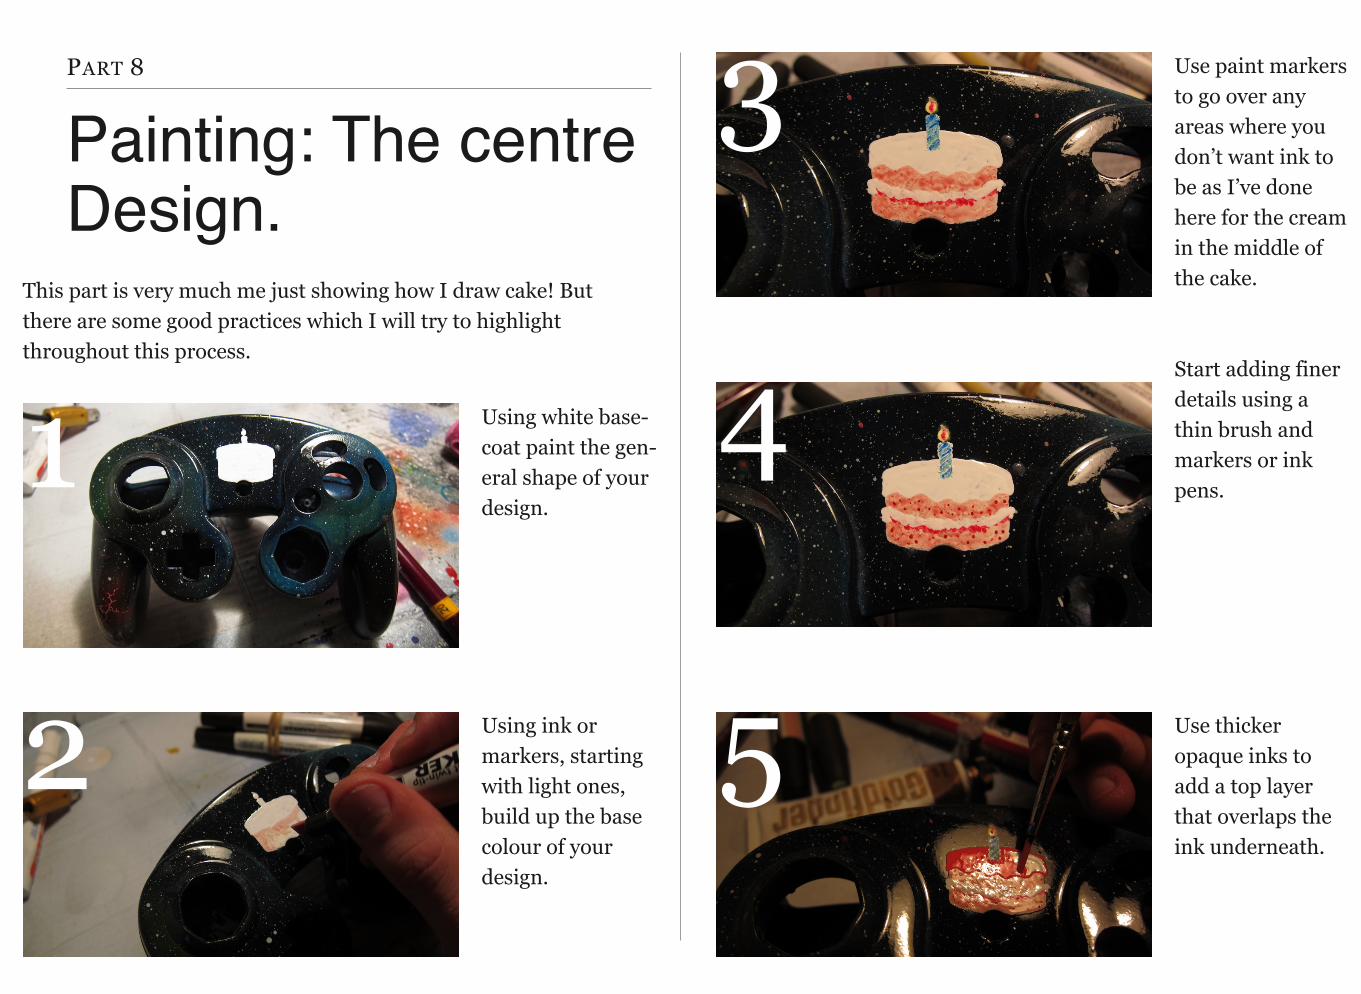
This part is very much me just showing how I draw cake! But there are some good practices which I will try to highlight throughout this process.
Using white base-coat paint the gen-eral shape of your design.
Using ink or markers, starting with light ones, build up the base colour of your design.
Start adding finer details using a thin brush and markers or ink pens.
Use paint markers to go over any areas where you don’t want ink to be as I’ve done here for the cream in the middle of the cake.
Use thicker opaque inks to add a top layer that overlaps the ink underneath.
1
2
3
4
5
23
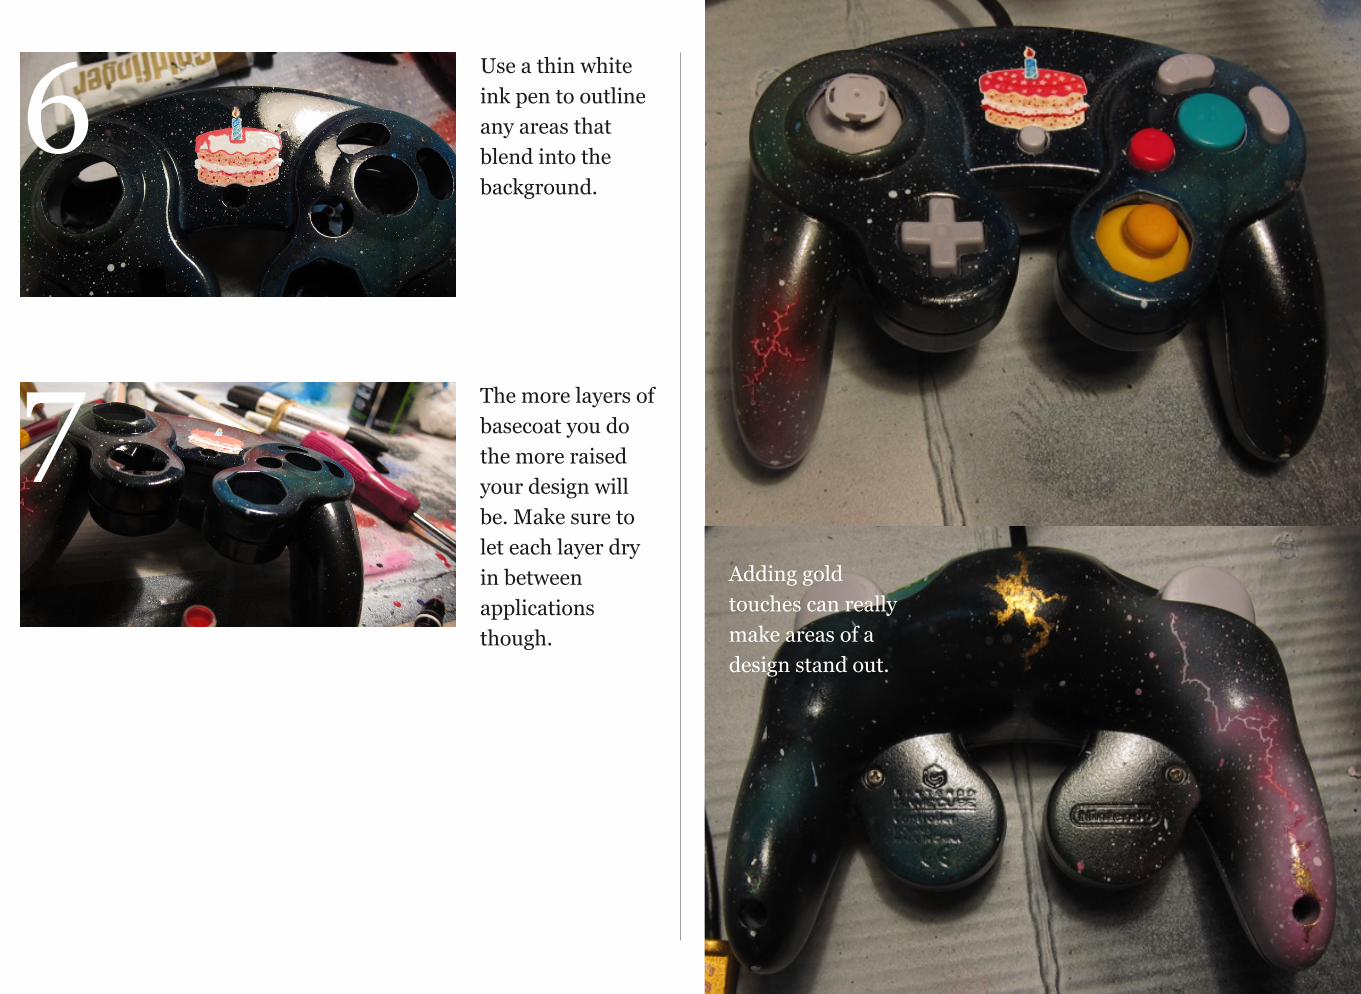
Use a thin white ink pen to outline any areas that blend into the background.
The more layers of basecoat you do the more raised your design will be. Make sure to let each layer dry in between applications though.
Adding gold touches can really make areas of a design stand out.
6
7
PART 9
Fly me to the moon.
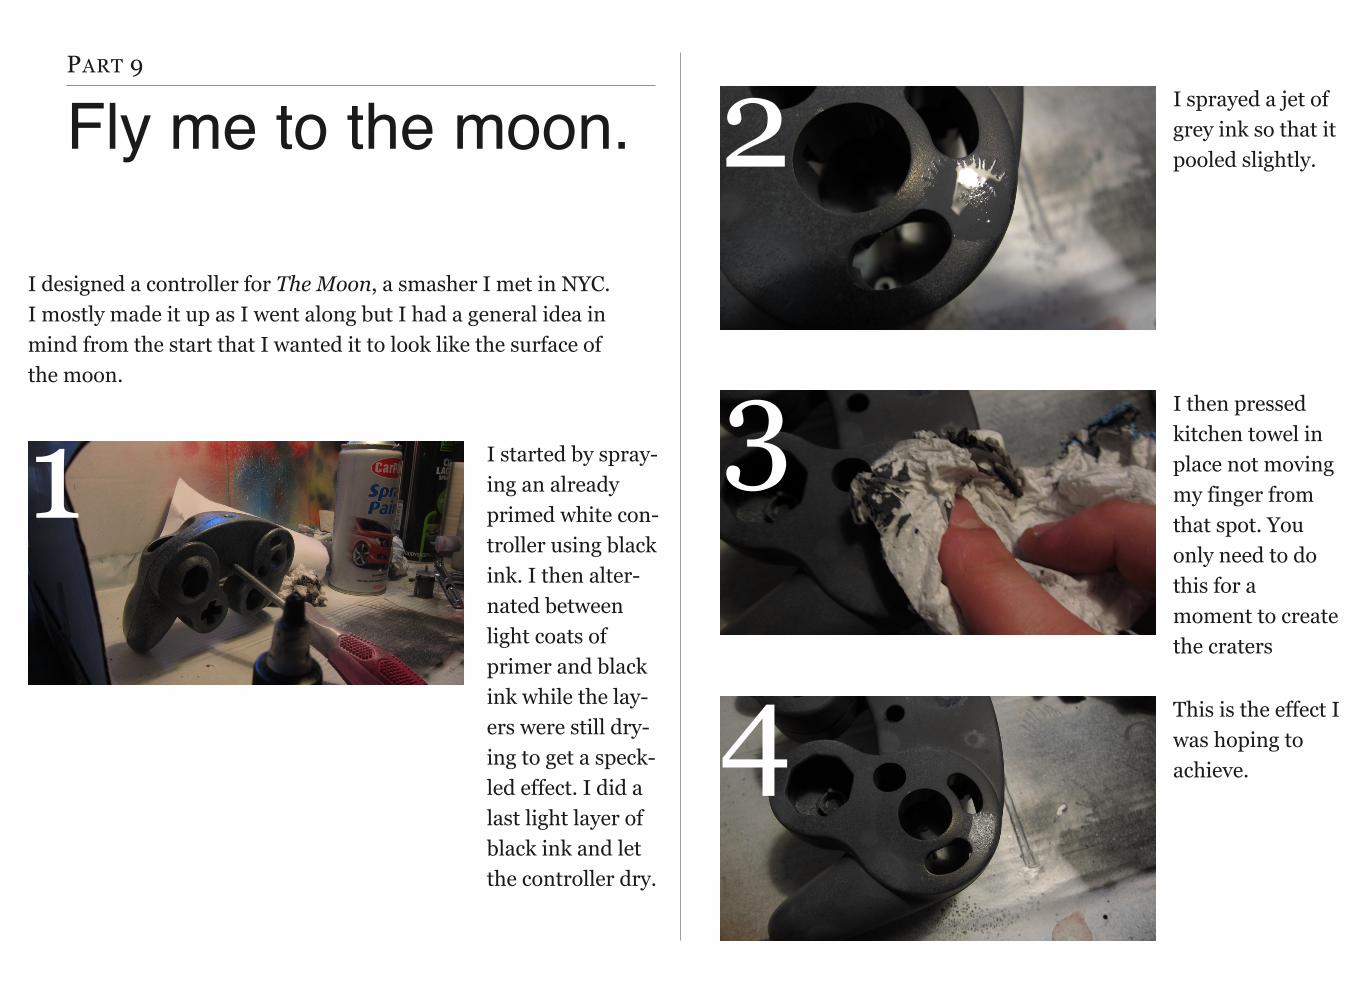
I designed a controller for The Moon, a smasher I met in NYC. I mostly made it up as I went along but I had a general idea in mind from the start that I wanted it to look like the surface of the moon.
I started by spray-ing an already primed white con-troller using black ink. I then alter-nated between light coats of primer and black ink while the lay-ers were still dry-ing to get a speck-led effect. I did a last light layer of black ink and let the controller dry.
I sprayed a jet of grey ink so that it pooled slightly.
I then pressed kitchen towel in place not moving my finger from that spot. You only need to do this for a moment to create the craters
This is the effect I was hoping to achieve.
1
2
3
4
25
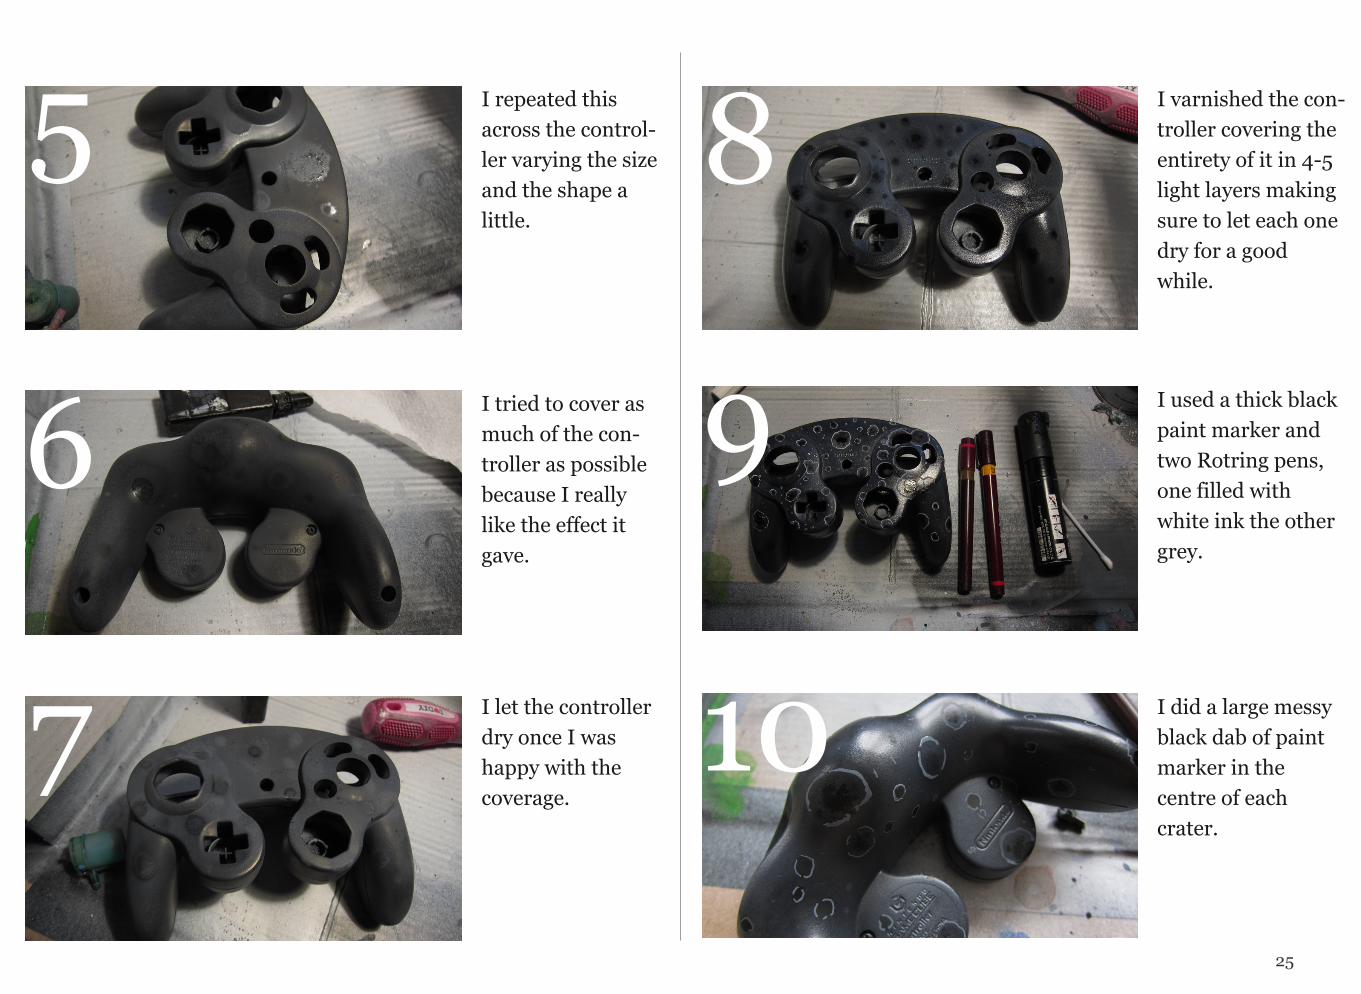
I repeated this across the control-ler varying the size and the shape a little.
I tried to cover as much of the con-troller as possible because I really like the effect it gave.
I let the controller dry once I was happy with the coverage.
I varnished the con-troller covering the entirety of it in 4-5 light layers making sure to let each one dry for a good while.
I used a thick black paint marker and two Rotring pens, one filled with white ink the other grey.
I did a large messy black dab of paint marker in the centre of each crater.
5
6
7
8
9
10
26
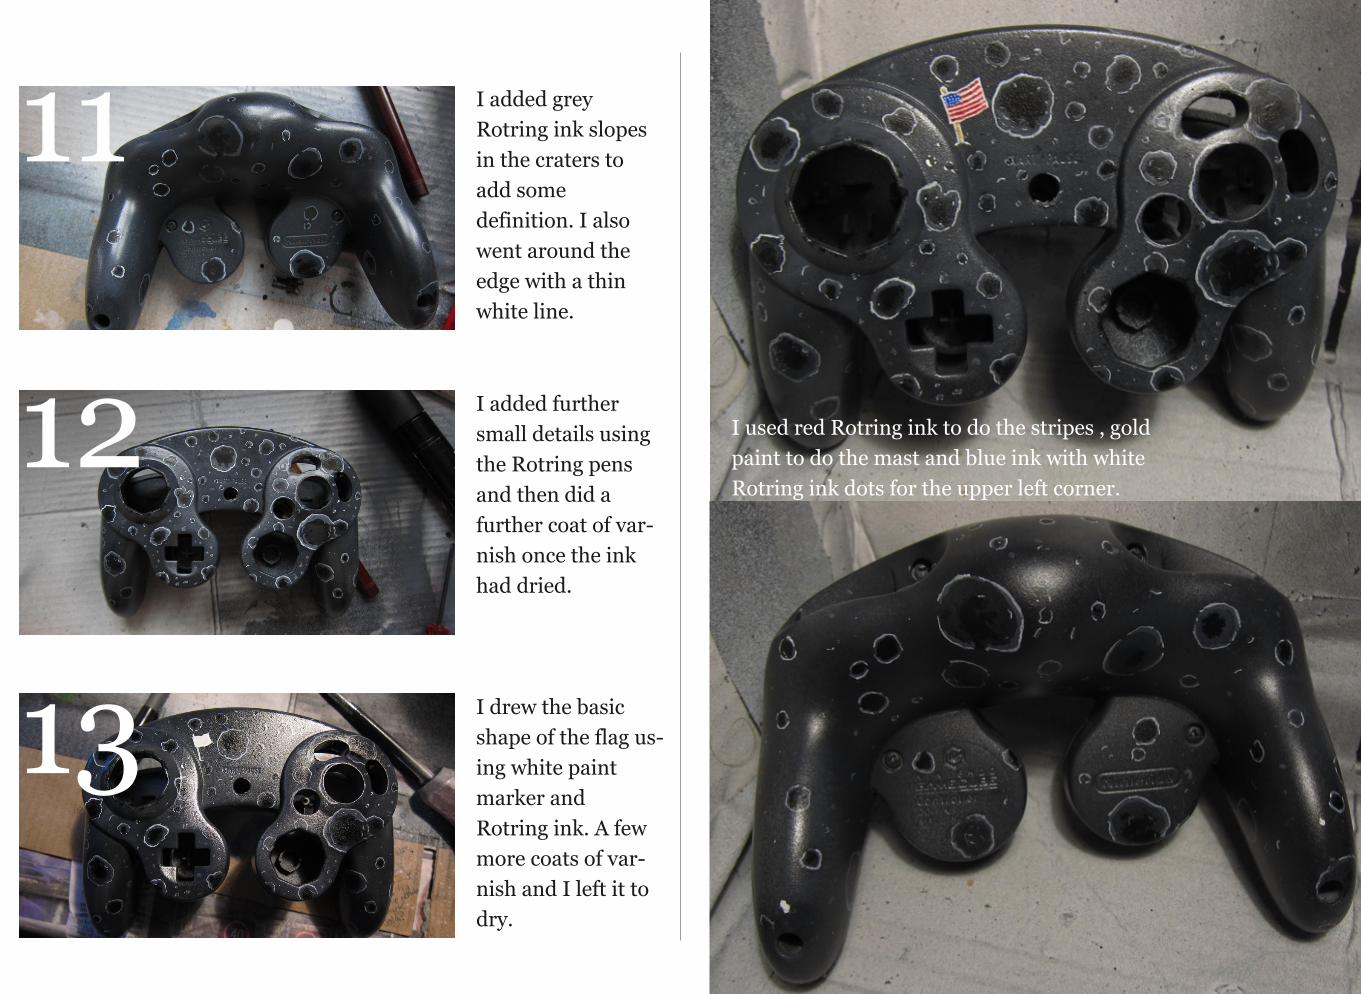
I added grey Rotring ink slopes in the craters to add some definition. I also went around the edge with a thin white line.
I added further small details using the Rotring pens and then did a further coat of var-nish once the ink had dried.
I drew the basic shape of the flag us-ing white paint marker and Rotring ink. A few more coats of var-nish and I left it to dry.
I used red Rotring ink to do the stripes , gold paint to do the mast and blue ink with white Rotring ink dots for the upper left corner.
11
12
13
PART 10
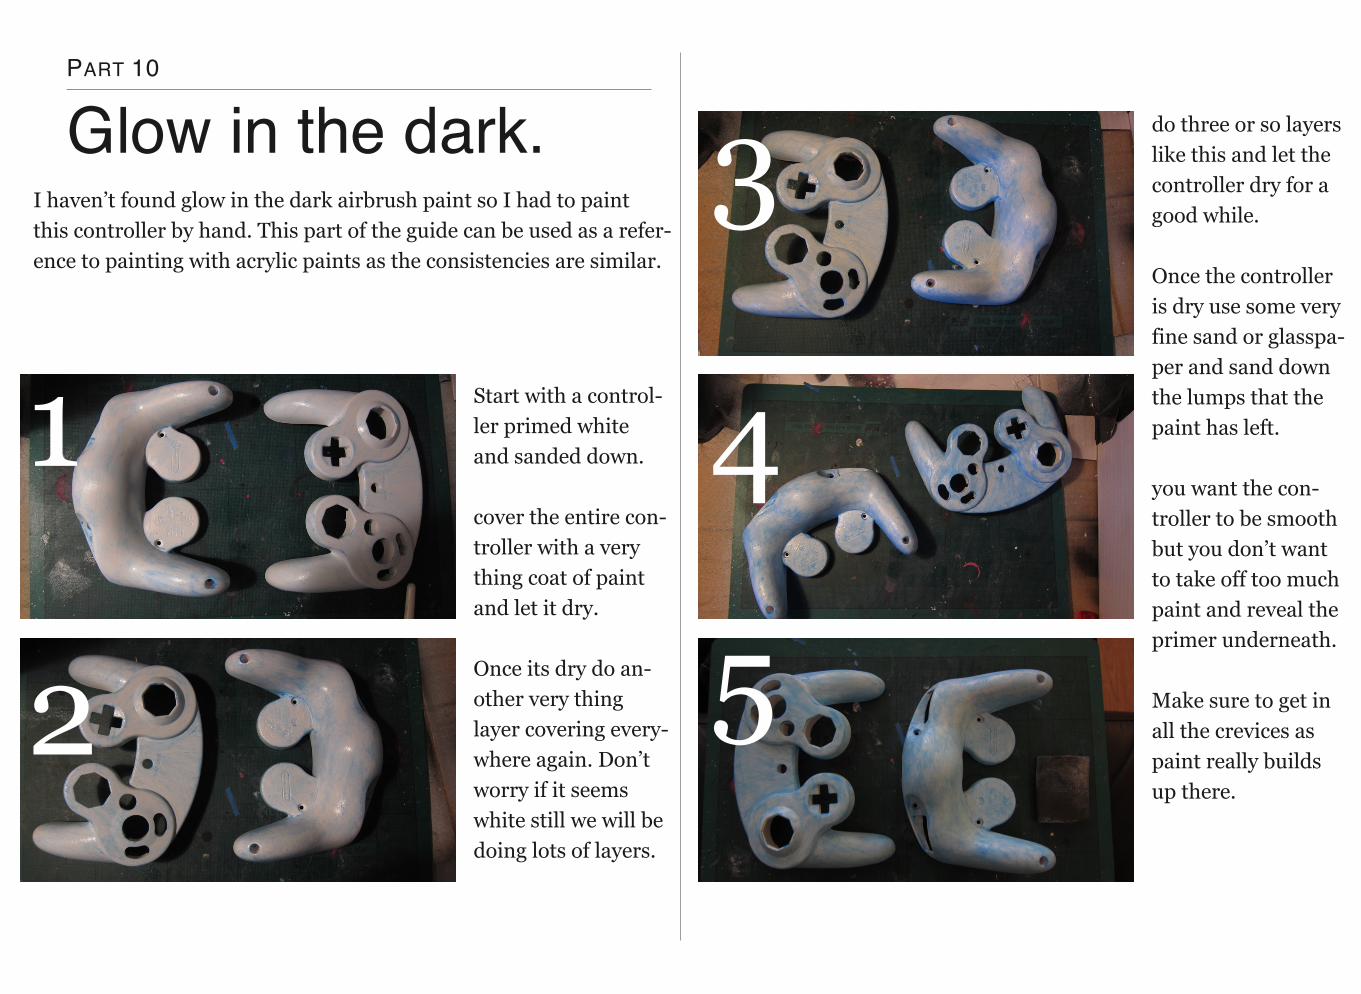
Glow in the dark.I haven’t found glow in the dark airbrush paint so I had to paint this controller by hand. This part of the guide can be used as a refer-ence to painting with acrylic paints as the consistencies are similar.
Start with a control-ler primed white and sanded down.
cover the entire con-troller with a very thing coat of paint and let it dry.
Once its dry do an-other very thing layer covering every-where again. Don’t worry if it seems white still we will be doing lots of layers.
do three or so layers like this and let the controller dry for a good while.
Once the controller is dry use some very fine sand or glasspa-per and sand down the lumps that the paint has left.
you want the con-troller to be smooth but you don’t want to take off too much paint and reveal the primer underneath.
Make sure to get in all the crevices as paint really builds up there.
1
2
3
4
5
28
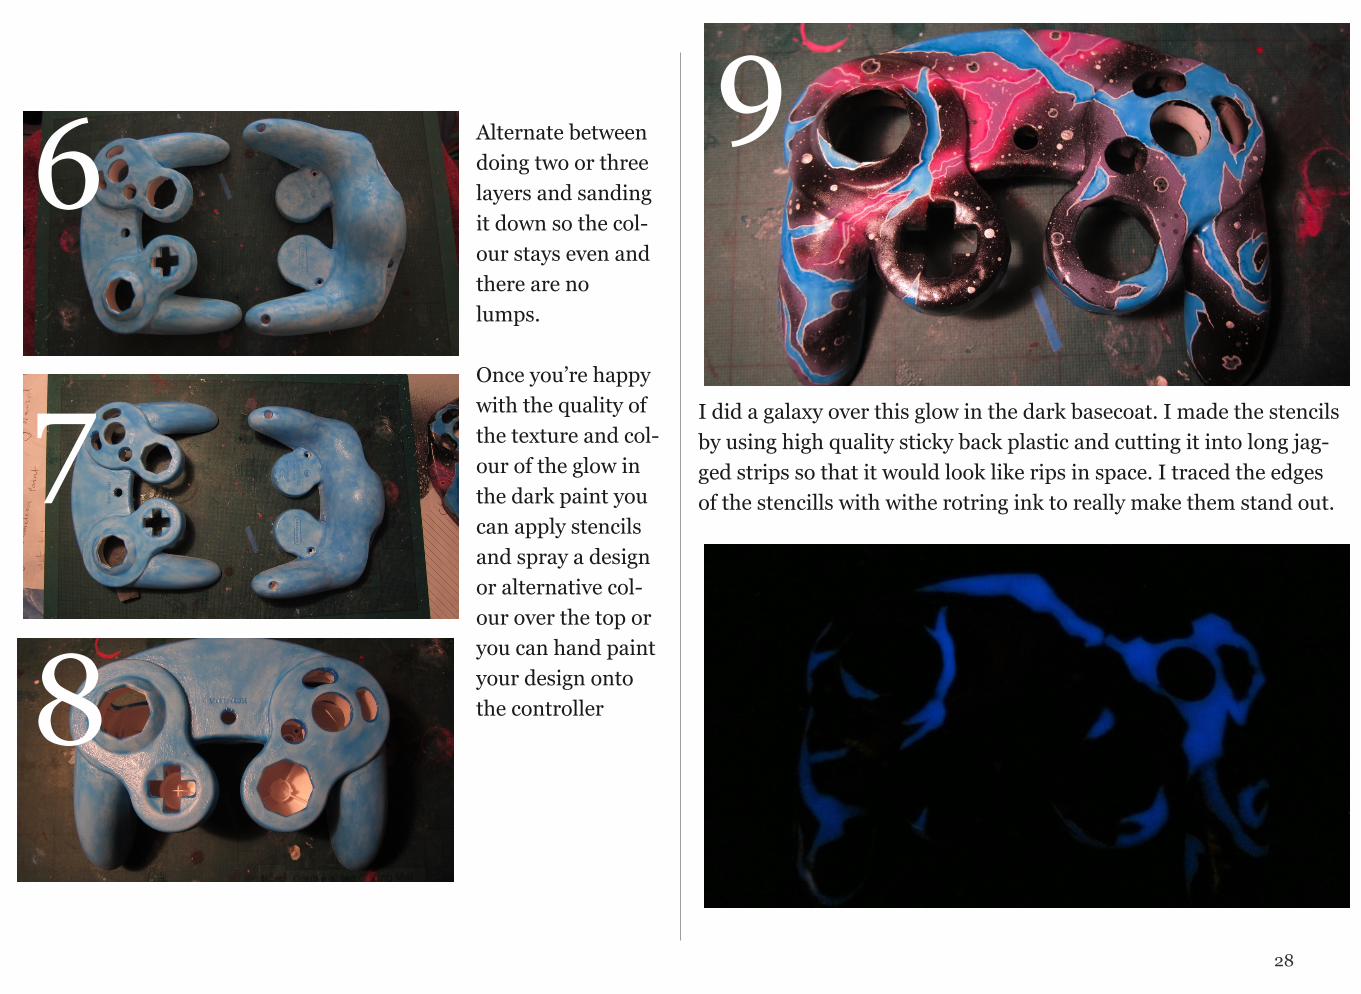
Alternate between doing two or three layers and sanding it down so the col-our stays even and there are no lumps.
Once you’re happy with the quality of the texture and col-our of the glow in the dark paint you can apply stencils and spray a design or alternative col-our over the top or you can hand paint your design onto the controller
I did a galaxy over this glow in the dark basecoat. I made the stencils by using high quality sticky back plastic and cutting it into long jag-ged strips so that it would look like rips in space. I traced the edges of the stencills with withe rotring ink to really make them stand out.
6
7
8
9
PART 10
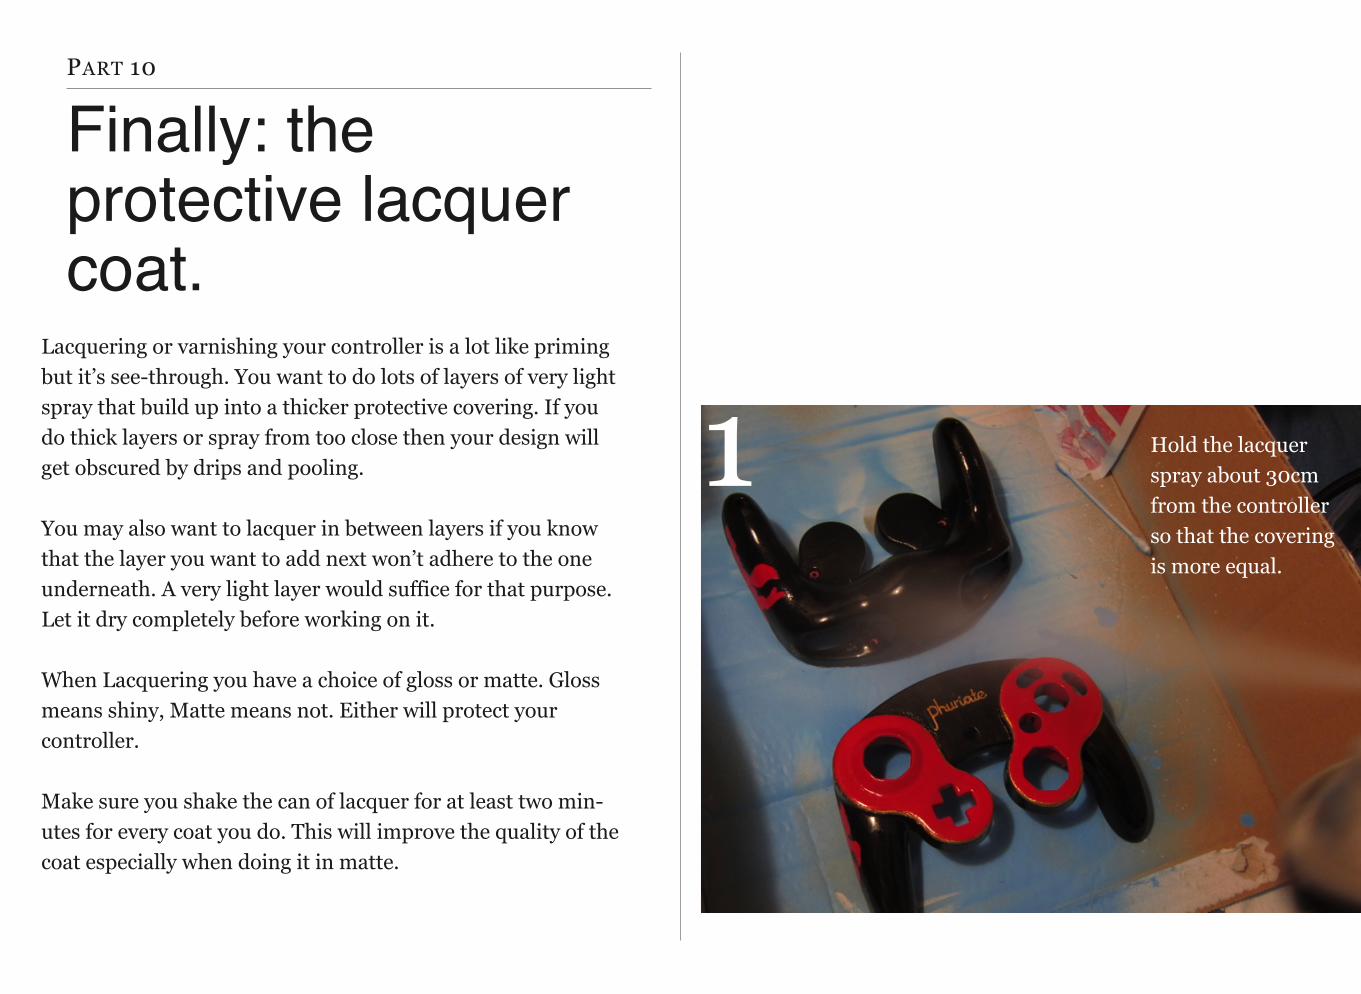
Finally: the protective lacquer coat.
Lacquering or varnishing your controller is a lot like priming but it’s see-through. You want to do lots of layers of very light spray that build up into a thicker protective covering. If you do thick layers or spray from too close then your design will get obscured by drips and pooling.
You may also want to lacquer in between layers if you know that the layer you want to add next won’t adhere to the one underneath. A very light layer would suffice for that purpose. Let it dry completely before working on it.
When Lacquering you have a choice of gloss or matte. Gloss means shiny, Matte means not. Either will protect your controller.
Make sure you shake the can of lacquer for at least two min-utes for every coat you do. This will improve the quality of the coat especially when doing it in matte.
Hold the lacquer spray about 30cm from the controller so that the covering is more equal.
1
30
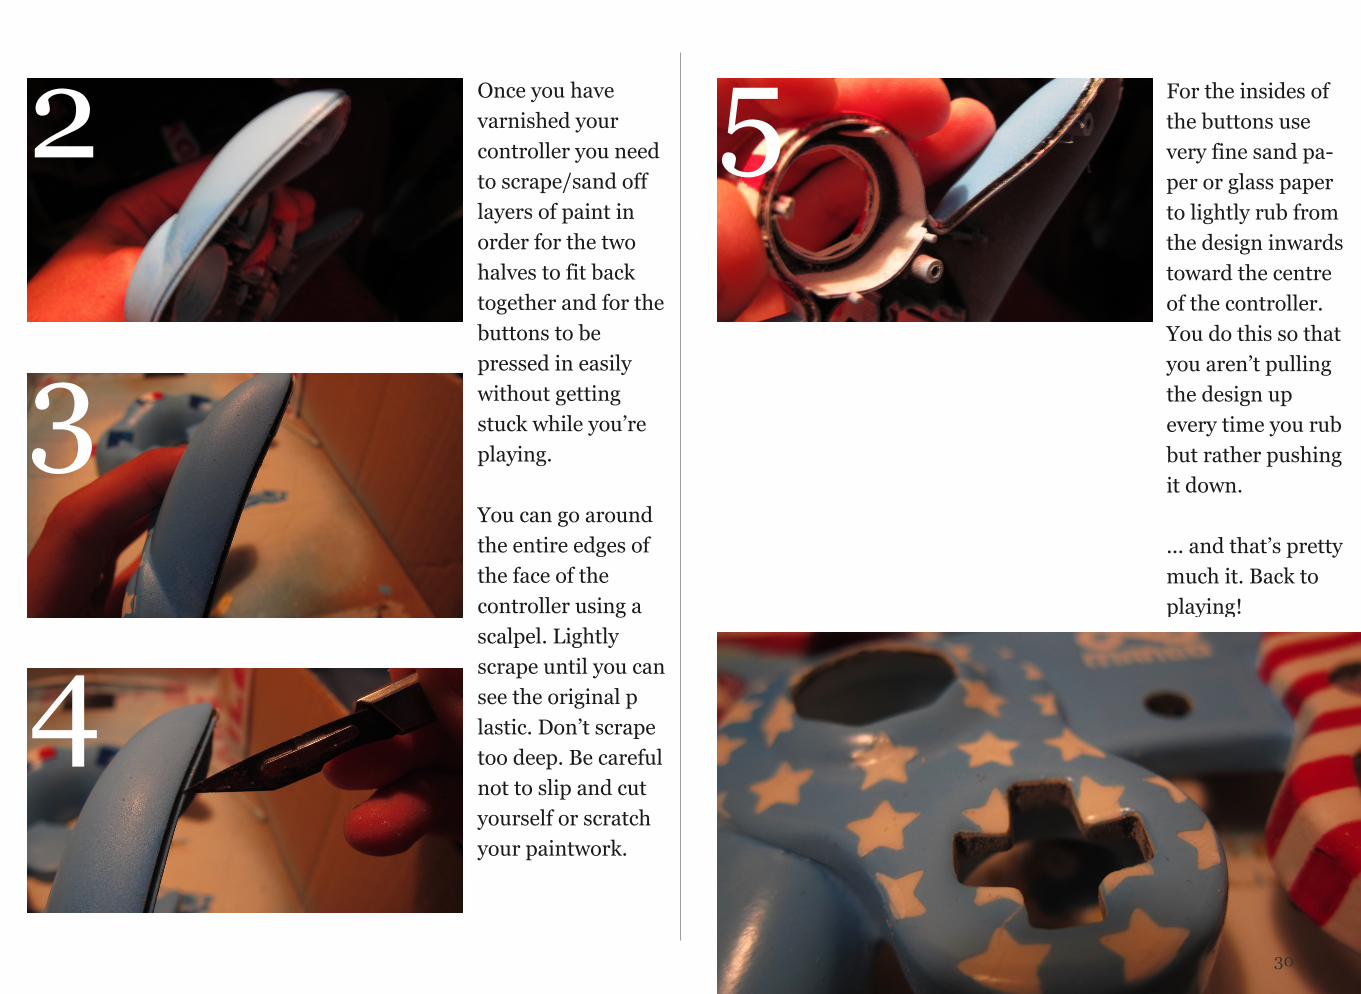
Once you have varnished your controller you need to scrape/sand off layers of paint in order for the two halves to fit back together and for the buttons to be pressed in easily without getting stuck while you’re playing.
You can go around the entire edges of the face of the controller using a scalpel. Lightly scrape until you can see the original plastic. Don’t scrape too deep. Be careful not to slip and cut yourself or scratch your paintwork.
For the insides of the buttons use very fine sand pa-per or glass paper to lightly rub from the design inwards toward the centre of the controller.You do this so that you aren’t pulling the design up every time you rub but rather pushing it down.
... and that’s pretty much it. Back to playing!
2
3
4
5


