THE REPUBLIC OF DJIBOUTI THE MASTER PLAN STUDY FOR SUSTAINABLE IRRIGATION AND FARMING IN SOUTHERN DJIBOUTI TECHNICAL MANUAL FOR ESTABLISHING IRRIGATED FARMLAND JAPAN INTERNATIONAL COOPERATION AGENCY( JICA) THE REPUBLIC OF DJIBOUTI THE MASTER PLAN STUDY FOR SUSTAINABLE IRRIGATION AND FARMING IN SOUTHERN DJIBOUTI T T T E E E C C C H H H N N N I I I C C C A A A L L L M M M A A A N N N U U U A A A L L L F F F O O O R R R E E E S S S T T T A A A B B B L L L I I I S S S H H H I I I N N N G G G I I I R R R R R R I I I G G G A A A T T T E E E D D D F F F A A A R R R M M M L L L A A A N N N D D D DECEMBER 2014 NTC INTERNATIONAL CO., LTD.
Transcript
THE R
EPUB
LIC O
F DJIB
OU
TI THE M
ASTER
PLAN
STUD
Y FO
R SU
STAIN
AB
LE IRR
IGATIO
N A
ND
FAR
MIN
G IN
SOU
THER
N D
JIBO
UTI TEC
HN
ICA
L MA
NU
AL FO
R ESTA
BLISH
ING
IRR
IGATED
FAR
MLA
ND
JAPAN INTERNATIONAL COOPERATION AGENCY(JICA)
THE REPUBLIC OF DJIBOUTI
THE MASTER PLAN STUDY FOR
SUSTAINABLE IRRIGATION AND FARMING IN SOUTHERN DJIBOUTI
THE REPUBLIC OF DJIBOUTI THE MASTER PLAN STUDY FOR SUSTAINABLE IRRIGATION
AND FARMING IN SOUTHERN DJIBOUTI
TECHNICAL MANUAL FOR ESTABLISHING IRRIGATED FARMLAND
Table of Contents
1. Introduction ............................................................................................................................ 1 1.1 Objectives of the manual ................................................................................................. 1 1.2 Flow of establishing the irrigated farmland ..................................................................... 1 2. Investigation ........................................................................................................................... 2 2.1 Investigation of water source .......................................................................................... 2 2.2 Selection of the project site .............................................................................................. 4 2.3 Finalization of the location of the irrigated farmland ...................................................... 5 3. Irrigation plan ........................................................................................................................ 5 3.1 Crop water requirement .................................................................................................. 5 3.2 Irrigation water amount by farming models.................................................................... 7 4 Development of water source facility .................................................................................... 10 4.1 Shallow well ................................................................................................................... 10 4.2 Pond ............................................................................................................................. 12 5. Development of the farmland ................................................................................................ 13 5.1 Land reclamation ............................................................................................................ 13 5.2 Appurtenant facilities ...................................................................................................... 14 6. Development of pump unit and water conveyance & distribution facilities ...................... 15 6.1 Pump unit ........................................................................................................................ 15 6.2 Solar system ................................................................................................................ 16 6.3 Water conveyance & distribution facilities ..................................................................... 19 7. On farm irrigation facilities .................................................................................................. 22 7.1 Hydrant ........................................................................................................................... 22 7.2 On-farm canal ................................................................................................................. 22 7.3 Furrow irrigation ............................................................................................................. 22 7.4 Drip irrigation ................................................................................................................. 23 8. Operation and Maintenance of irrigation facilities ............................................................ 25 8.1 Operation of irrigation facilities ...................................................................................... 25 8.2 Maintenance of irrigation facilities ................................................................................. 26
Annex Outline of irrigation project site (Example) ........................................................................ 27
1
1. Introduction
1.1 Objectives of the manual
In Djibouti, irrigation is absolutely necessary for crop cultivation because annual rainfall is
approximately 100mm. So far irrigation system has been established individually on a small scale at each
farmland in Djibouti. In order to enhance the development of irrigated agriculture officially, appropriate
irrigation system must be established to ensure sustainable irrigation and farming at each project site.
This manual defines general and basic technical contents relating to investigation, planning,
implementation and operation & maintenance in establishing the irrigation system in Djibouti. In this
sense, this manual is expected to be fully utilized as technical guideline by the engineers of Djibouti
government and the donors who have charge of irrigation development project.
1.2 Flow of establishing the irrigated farmland
For the establishment of the irrigated farmland, one needs a set of process which consists of selection of
the targeted area, site investigation, irrigation planning, design of the facilities, construction
implementation and operation and maintenance of the facilities. The flow of the process is described as
Figure 1.2.1.
Selection of the targeted area
Site investigation
Irrigation planning
Design of the facilities
Construction implementation
Operation and maintenance
・ Confirming the site of water source facilities such as shallow well and pond
・ Selecting the candidate site for establishing irrigated farmland
・ Making irrigation plan including crop water requirement, facility capacity, and so forth
・ Determining the irrigation area in accordance with the irrigable area estimated by the capacity of water source
・ Laying out the irrigation facilities for the farmland in consideration of the type and the location of the water source
・ Determining the capacity of the facilities including pump unit, water tank, conveyance and distribution pipeline, and so forth
・ Determining the construction structure and materials which ensure structural stability of the facilities
・ Making the design drawings for the construction ・ Estimating the construction cost and making the construction
schedule ・ Supervising the construction work
・ Establishing the framework for operation and maintenance of the facilities
・ Conducting a daily inspection by the persons in charge ・ Repairing promptly when the failure or incidents are founded
・ Conducting water resource investigation which includes topographic and geological investigation, and estimation of the basin area, to evaluate the potential for developing irrigation water
・ Evaluating the priority of the candidate site for establishing irrigated farmland in consideration of water quality, presence of inhabitants, accessibility, farmland condition, and demand by local community
Figure1.2.1 Flow of establishing the irrigated farmland
2
2. Investigation
2.1 Investigation of water source
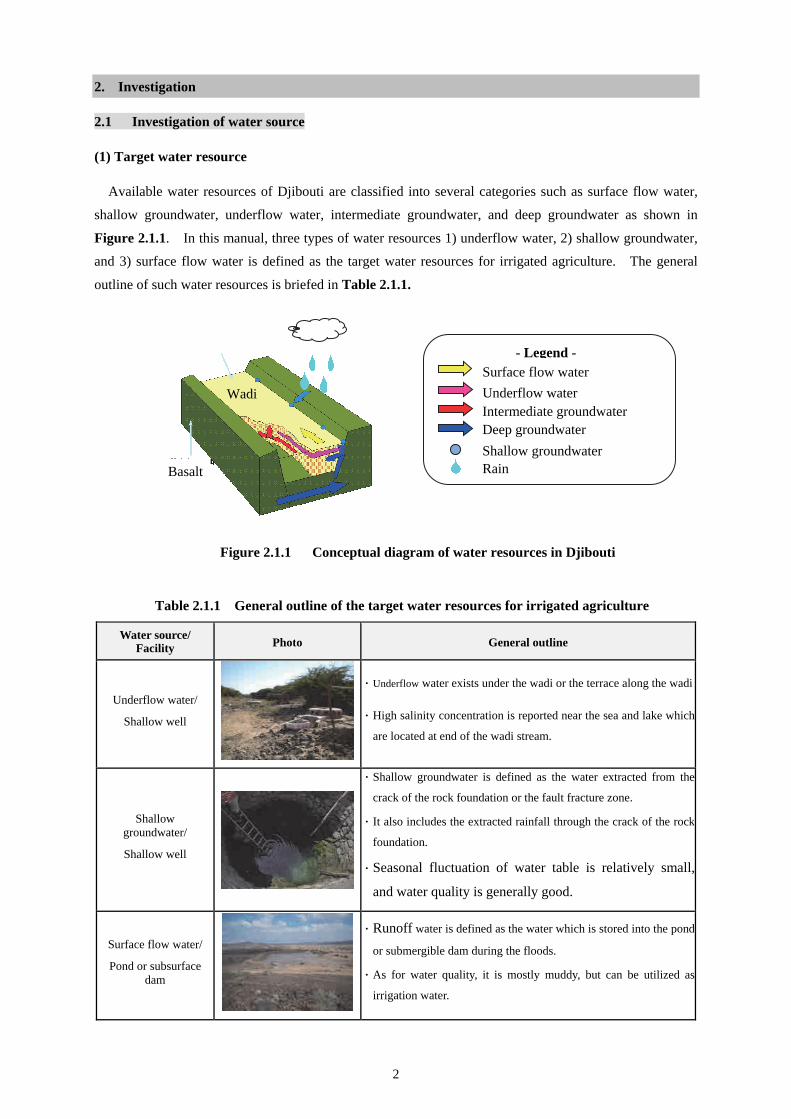
(1) Target water resource
Available water resources of Djibouti are classified into several categories such as surface flow water,
shallow groundwater, underflow water, intermediate groundwater, and deep groundwater as shown in
Figure 2.1.1. In this manual, three types of water resources 1) underflow water, 2) shallow groundwater,
and 3) surface flow water is defined as the target water resources for irrigated agriculture. The general
outline of such water resources is briefed in Table 2.1.1.
Water source/ Facility Photo General outline
Underflow water/
Shallow well
・ Underflow water exists under the wadi or the terrace along the wadi
・ High salinity concentration is reported near the sea and lake which
are located at end of the wadi stream.
Shallow groundwater/
Shallow well
・ Shallow groundwater is defined as the water extracted from the
crack of the rock foundation or the fault fracture zone.
・ It also includes the extracted rainfall through the crack of the rock
foundation.
・ Seasonal fluctuation of water table is relatively small,
and water quality is generally good.
Surface flow water/
Pond or subsurface dam
・ Runoff water is defined as the water which is stored into the pond
or submergible dam during the floods.
・ As for water quality, it is mostly muddy, but can be utilized as
irrigation water.
Figure 2.1.1 Conceptual diagram of water resources in Djibouti
Table 2.1.1 General outline of the target water resources for irrigated agriculture
Wadi
- Legend - Surface flow water Underflow water Intermediate groundwater Deep groundwater Shallow groundwater Rain Basalt
3
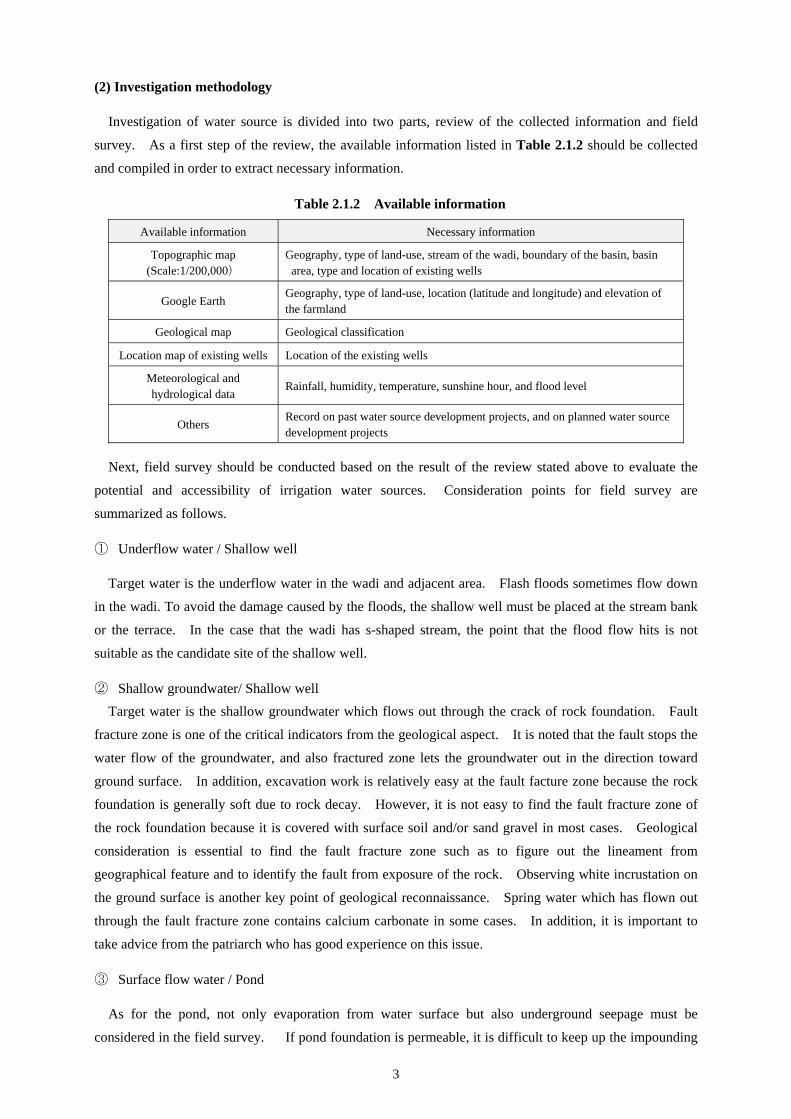
(2) Investigation methodology
Investigation of water source is divided into two parts, review of the collected information and field
survey. As a first step of the review, the available information listed in Table 2.1.2 should be collected
and compiled in order to extract necessary information.
Next, field survey should be conducted based on the result of the review stated above to evaluate the
potential and accessibility of irrigation water sources. Consideration points for field survey are
summarized as follows.
① Underflow water / Shallow well
Target water is the underflow water in the wadi and adjacent area. Flash floods sometimes flow down
in the wadi. To avoid the damage caused by the floods, the shallow well must be placed at the stream bank
or the terrace. In the case that the wadi has s-shaped stream, the point that the flood flow hits is not
suitable as the candidate site of the shallow well.
② Shallow groundwater/ Shallow well Target water is the shallow groundwater which flows out through the crack of rock foundation. Fault
fracture zone is one of the critical indicators from the geological aspect. It is noted that the fault stops the
water flow of the groundwater, and also fractured zone lets the groundwater out in the direction toward
ground surface. In addition, excavation work is relatively easy at the fault facture zone because the rock
foundation is generally soft due to rock decay. However, it is not easy to find the fault fracture zone of
the rock foundation because it is covered with surface soil and/or sand gravel in most cases. Geological
consideration is essential to find the fault fracture zone such as to figure out the lineament from
geographical feature and to identify the fault from exposure of the rock. Observing white incrustation on
the ground surface is another key point of geological reconnaissance. Spring water which has flown out
through the fault fracture zone contains calcium carbonate in some cases. In addition, it is important to
take advice from the patriarch who has good experience on this issue.
③ Surface flow water / Pond
As for the pond, not only evaporation from water surface but also underground seepage must be
considered in the field survey. If pond foundation is permeable, it is difficult to keep up the impounding
Available information Necessary information
Topographic map (Scale:1/200,000)
Geography, type of land-use, stream of the wadi, boundary of the basin, basin area, type and location of existing wells
Google Earth Geography, type of land-use, location (latitude and longitude) and elevation of the farmland
Geological map Geological classification
Location map of existing wells Location of the existing wells
Meteorological and hydrological data
Rainfall, humidity, temperature, sunshine hour, and flood level
Others Record on past water source development projects, and on planned water source development projects
Table 2.1.2 Available information
4
water. In this respect, the places that the pond foundation is coarse sand, gravel ground, or cracked rock
ground, are not acceptable as the candidate site for the pond.
④ Surface flow water / Subsurface dam
Subsurface dam is another construction method to store surface flow water. The water is designed to be
stored into the permeable sand gravel layer under the wadi by shutting off the underwater flow with
impermeable materials. For the construction of subsurface dam, the wadi bed will be excavated partially
or entirely to replace the sand gravel ground to impermeable materials. Meanwhile, it is recommended to
select a site having rock ground at both banks to minimize the seepage from both banks. It is preferable to
find a place where the wadi is narrow in width for the dam axis and also has wide flat area at the upstream
from the viewpoint of water storage efficiency.
2.2 Selection of the project site
The project candidate sites are nominated based on the investigation result of water source. As a next
step, the candidate sites are evaluated in terms of the priority for establishing irrigated farmland in
consideration of the following conditions.
① Water quality As for water quality for irrigation, salinity concentration is essential issue in Djibouti. The level of
salinity concentration can be expressed by Electric Conductivity (EC). FAO indicates the water quality
criteria on EC in the guideline published as “Water Quality for Agriculture” (FAO Irrigation and Drainage
Paper 2). In this guideline, general indicator for irrigation water is shown by EC in Table 2.2.1.
Electric Conductivity(EC) Criteria
0.7 ds/m and less 700 μs/cm and less No restrictions
0.7~3.0 ds/m 700~3,000 μs/cm Some usage restrictions
3.0 ds/m and more 3,000 μs/cm and more Strictly restricted
Source: Water Quality for Agriculture, Table.1 Guideline for Interpretations of Water Quality for Irrigation (FAO Irrigation and Drainage Paper 29 Rev.1, Reprinted 1989, 1994)
② Presence of inhabitants The main target group of the irrigated agriculture development is the semi-settled nomad family.
Therefore, the available number of nomad families for farming is one of the essential elements to ensure
the sustainability of irrigated agriculture. In this respect, the presence of schools is considered as one of
the indicators because schools have been established in the villages where a certain number of inhabitants
live. Another indicator is the presence of drinking water supply facility provided by a donor. Villages
having such drinking water supply facility have a potential of increasing the number of inhabitants in the
future.
③ Accessibility To realize a sustainable farming in the developed irrigated farmland, it is absolutely necessary to get an
income by selling agricultural products. In that context, the accessibility to local markets is considered an
essential issue. Accessibility can be evaluated from the viewpoints of the distance between the irrigated
farmland and the local markets and the road conditions.
Table 2.2.1 Water quality criteria for irrigation(EC)
5
④ Farmland conditions Farmland conditions can be evaluated in terms of farmland area, flatness, and soil conditions. Since
one well is expected to irrigate a farmland of one to two ha, a farmland bigger than that is necessary for
irrigated agriculture development. A land with steep slope and irregularity has a disadvantage because
land levelling is required as the preparation work for farmland development. A land containing big stones
has also a disadvantage for farmland development.
⑤ Demand from local community There are several existing farmlands where the irrigation system is not working due to flood damages.
For such farmlands, the demand for rehabilitation is high from the local community. The first priority
must be given to the rehabilitation of the damaged irrigation system.
2.3 Finalization of the location of the irrigated farmland
After the selection of the project site, the location of the irrigated farmland will be finalized at the site in
consideration of the following points.
The place for the irrigated farmland is recommended;
1) To be an available area from the aspects of land ownership and status of current land use.
2) To have a sufficient elevation, protecting against the inundation during floods
3) To be close to the water source and also not too high in elevation compared with that source in order
to minimize energy cost for pump operation.
4) To be flat and large in area, amounting to at least more than one to two ha
5) To be land having less stones and smaller ones in size.
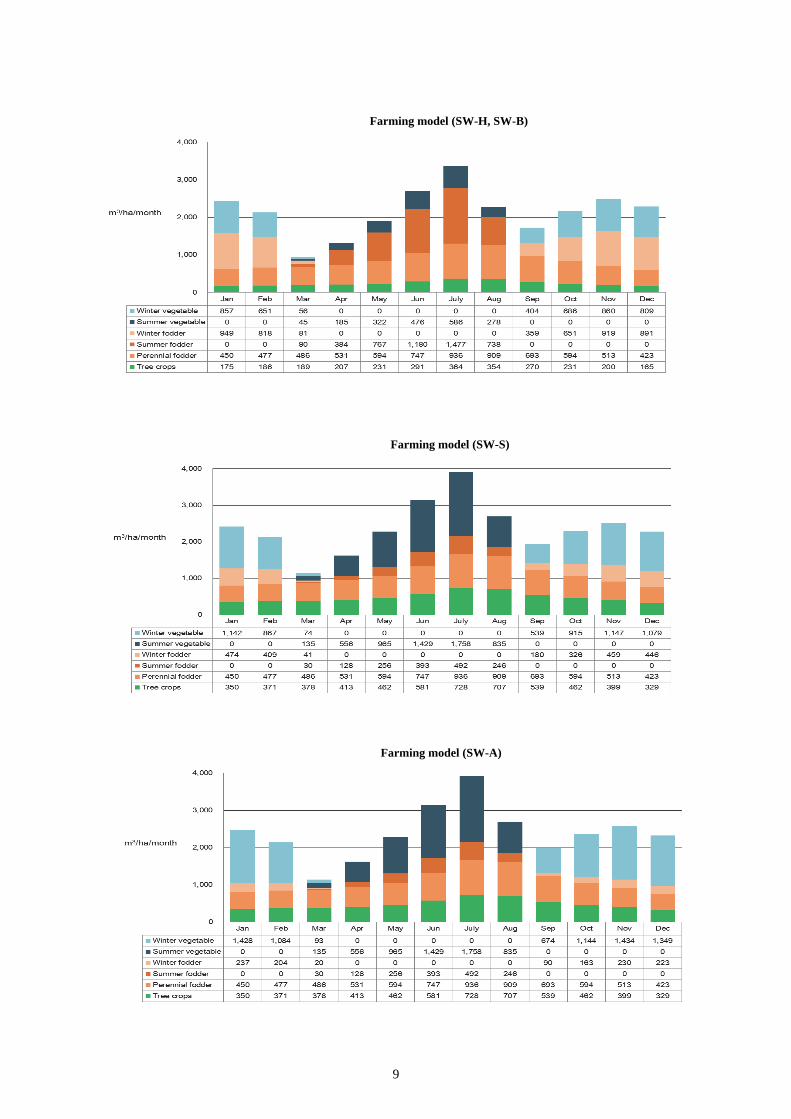
3. Irrigation plan
3.1 Crop water requirement
Evapo-transpiration (ETo) is fundamental element for irrigation plan. ETo value is estimated with FAO
Penman-Monteith equation by using meteorological data and location data. Table 3.1.1 shows ETo value
for Djibouti city.
Crop evapo-transpiration (ETcrop) is computed for each crop by multiplying evapo-transpiration (ETo)
by crop coefficient (Kc).
Item Unit Jan Feb Mar Apr May Jun July Aug Sep Oct Nov Dec
The following considerations shall be taken into account to select the candidate site of the pond.
1) The basin area shall be 30km2 or more.
2) A site with less underground seepage shall be selected from a geological aspect.
3) To maximize the amount of inflow water through a proper arrangement of the dike.
4) To reduce the huge evaporation loss which is assumed to be around 3,000mm a year, the pond bed
must be excavated so as to make a pocket to respond to the situation when the storage water amount
becomes small.
5) To control soil sedimentation of the pond, building a filter zone made of gravels.
6) Closely supervise the works to ensure a proper compaction work of the dike.
7) The location of the spillway should be selected not to affect earth filling of the dike in consideration
of geographical and geological viewpoints.
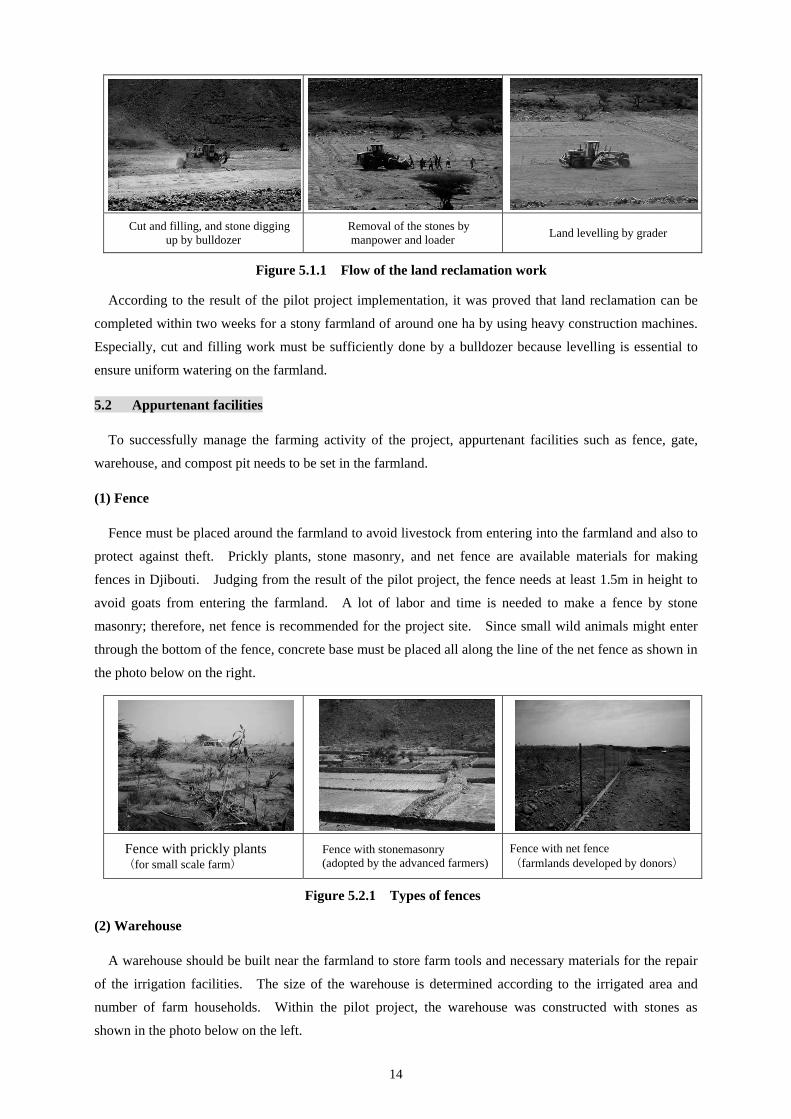
5. Development of the farmland
5.1 Land reclamation
If the selected farmland has less stones and flat, it is not necessary to carry out land reclamation.
However, it is required when the selected farmland is stony or not flat. Heavy construction machines of
the Department of Big Works under the Ministry of Agriculture are recommended to be used effectively to
save the construction cost of the land reclamation. Flow of the land reclamation work is briefed as
follows.
Cut and filling, and stone digging up by bulldozer
Removal of the stones by manpower and loader
Land levelling by grader
Figure 4.2.1 Pond constructed in southern Djibouti
14
Cut and filling, and stone digging up by bulldozer
Removal of the stones by manpower and loader Land levelling by grader
According to the result of the pilot project implementation, it was proved that land reclamation can be
completed within two weeks for a stony farmland of around one ha by using heavy construction machines.
Especially, cut and filling work must be sufficiently done by a bulldozer because levelling is essential to
ensure uniform watering on the farmland.
5.2 Appurtenant facilities
To successfully manage the farming activity of the project, appurtenant facilities such as fence, gate,
warehouse, and compost pit needs to be set in the farmland.
(1) Fence
Fence must be placed around the farmland to avoid livestock from entering into the farmland and also to
protect against theft. Prickly plants, stone masonry, and net fence are available materials for making
fences in Djibouti. Judging from the result of the pilot project, the fence needs at least 1.5m in height to
avoid goats from entering the farmland. A lot of labor and time is needed to make a fence by stone
masonry; therefore, net fence is recommended for the project site. Since small wild animals might enter
through the bottom of the fence, concrete base must be placed all along the line of the net fence as shown in
the photo below on the right.
Fence with prickly plants (for small scale farm)
Fence with stonemasonry (adopted by the advanced farmers)
Fence with net fence (farmlands developed by donors)
(2) Warehouse
A warehouse should be built near the farmland to store farm tools and necessary materials for the repair
of the irrigation facilities. The size of the warehouse is determined according to the irrigated area and
number of farm households. Within the pilot project, the warehouse was constructed with stones as
shown in the photo below on the left.
Figure 5.1.1 Flow of the land reclamation work
Figure 5.2.1 Types of fences
15
(3) Compost pit
A compost pit should be built for the purpose of making organic manure. In the pilot project, two
compost pits having 3 meters square and 1 meter high each were built to be co-managed by the 15 families.
In reality, the co-management was difficult because the collected and consumed amount of livestock
manure were different according to each family. Individual compost pit is recommended to solve the
problem. The size of the compost pit shall be determined depending on each farmland area and the
consumed amount of manure. In the case that small-scale farmers use the compost pit individually, a
simple compost pit as shown in the photo below on the right is useful as well. Table 5.2.1 shows the
standard size of the compost pit.
Farmland area Required amount of manure for one season Size of the compost pit Required number of the
compost pit
0.025 ha 50~100 kg 1 m square and 1 m high 2 pits
0.25 ha 500~1,000 kg 2 m square and 1 m high 2 pits
1 ha 2,000~4,000 kg 3 m square and 1 m high 2 pits
2 ha 4,000~8,000 kg 3 m square and 1 m high 4 pits
Warehouse Compost pit Simple compost pit
6. Development of pump unit and water conveyance & distribution facilities
6.1 Pump unit
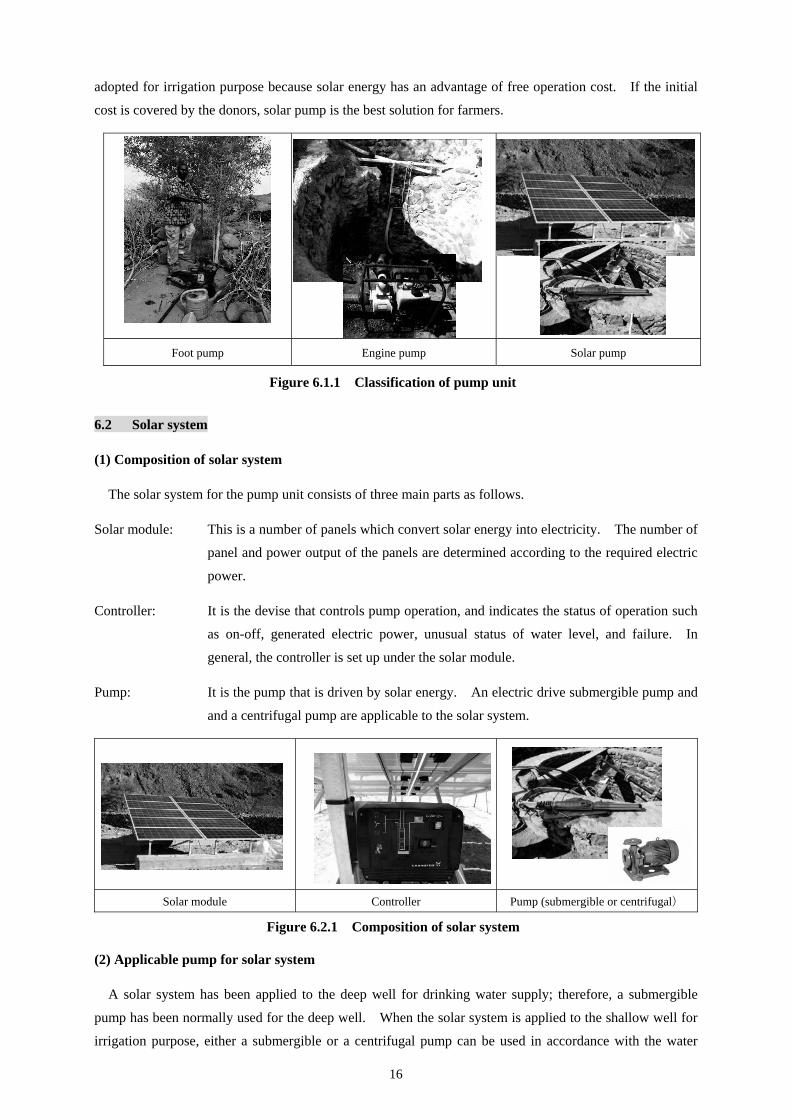
Pump unit is necessary to convey irrigation water from the water source to the farmland. Three types of
pump unit: foot pump, engine pump, and solar pump are available in Djibouti. Foot pump can be used for
small scale farming; however, most farmers use engine pump.
Foot pump is recommendable for small scale farming because purchase price is low and operation cost is
free. Meanwhile, in the case that the farmland area is larger than a few hundred square meters, engine
pump shall be adopted instead of foot pump in term of workability. An engine pump is classified into
gasoline pump and diesel pump based on the type of fuel. Gasoline pump is widely used because
purchase price is cheaper than for diesel pump. In contrast, the price of gasoline is about 300 DJF per
little, which is roughly double of the diesel price 210 DJF per little. In addition to that, gasoline is not
available in the rural market. Therefore, diesel pump is recommended as engine pump in Djibouti.
So far, solar pump has been adopted for drinking water use in Djibouti. In recent years, it has been also
Figure 5.1.3 Example of warehouse and compost pit
Table 5.2.1 Standard size and number of compost pits according to the farmland area
16
adopted for irrigation purpose because solar energy has an advantage of free operation cost. If the initial
cost is covered by the donors, solar pump is the best solution for farmers.
Foot pump Engine pump Solar pump
6.2 Solar system
(1) Composition of solar system
The solar system for the pump unit consists of three main parts as follows.
Solar module: This is a number of panels which convert solar energy into electricity. The number of
panel and power output of the panels are determined according to the required electric
power.
Controller: It is the devise that controls pump operation, and indicates the status of operation such
as on-off, generated electric power, unusual status of water level, and failure. In
general, the controller is set up under the solar module.
Pump: It is the pump that is driven by solar energy. An electric drive submergible pump and
and a centrifugal pump are applicable to the solar system.
Solar module Controller Pump (submergible or centrifugal)
(2) Applicable pump for solar system
A solar system has been applied to the deep well for drinking water supply; therefore, a submergible
pump has been normally used for the deep well. When the solar system is applied to the shallow well for
irrigation purpose, either a submergible or a centrifugal pump can be used in accordance with the water
Figure 6.1.1 Classification of pump unit
Figure 6.2.1 Composition of solar system
17
level condition. If the water level is low, a submergible pump is recommended; instead, if the water level
is high, a centrifugal pump is adoptable. The appropriate type of pump should be selected in consideration
of the features described in Table 6.2.1.
Classification Submergible pump Centrifugal pump Place where
pump is set up Under water On the ground
Current
Direct current (DC) Energy use efficiency is higher than centrifugal pump because it can be used without converting DC to AC.
Alternative current (AC) Energy use efficiency is lower than submergible pump because one needs to convert DC to AC.
Water level condition
Applicable under the condition that water level is low.
(Submerged depth of about 1 m is required.)
Not applicable under the condition that water level is too low
(Suction head must be less than 8 m.)
Initial cost More expensive Cheaper
Repair and replacement
One needs to pull out the pump from the well in the case of repair or replacement. It takes time to replace because the specified pump must be ordered to the manufacture.
It is easy to replace because the pump is placed on the ground. Commercialized pump is available in the market.
Schematic diagram
Table 6.2.1 Comparison of solar pumps
18
(3) Determination of the specification of solar pump
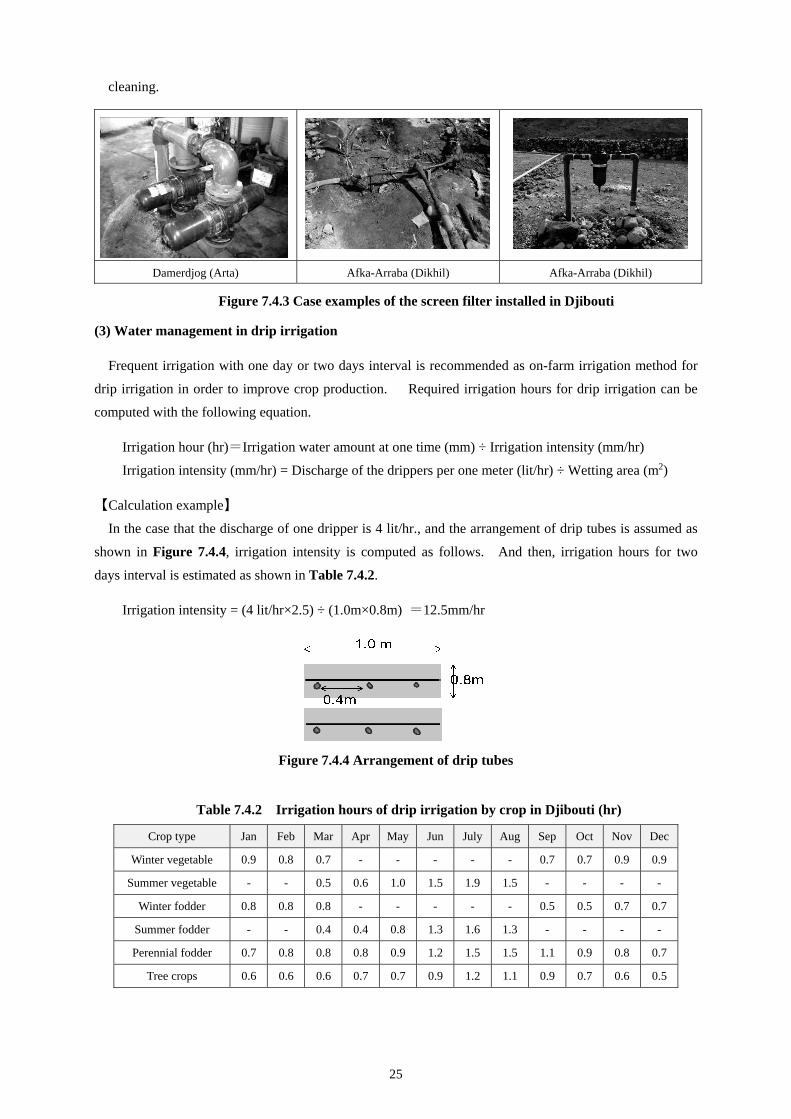
The specification of the solar pump is determined in accordance with the following procedure.
Calculation of irrigation water amount
Required irrigation water amount (m3/day)
= Crop water requirement (mm/day) × Irrigation area (ha) × 10
Table 7.4.2 Irrigation hours of drip irrigation by crop in Djibouti (hr)
Figure 7.4.3 Case examples of the screen filter installed in Djibouti
26
8. Operation and maintenance of irrigation facilities
8.1 Operation of irrigation facilities
(1) Intake from water source
Pump operation must be managed while monitoring the water level. The pump can be driven
intermittently when the intake water level is low. Start and stop of the pump operation must be done
manually by watching the water level of the source. In addition, water level of the tank must be
monitored carefully. When the water level comes close to the top of the tank, the pump must be stopped
immediatelly to avoid overflow from the tank.
On contrast, for the solar pump operation system, the automatic On-Off drive is normally programed in
response to the water levels of the source and tank.
(2) Watering from hydrants
Rotation irrigation shall be applied at farm level; therefore, the opening and closing of the hydrants must
be managed in order. If a number of hydrants are opened at the same time, water pressure in the pipeline
is lost, resulting in the decrease of water discharge from the hydrants. For an irrigation farmland having
several plots, the rotation of irrigation must be applied as follows; three times a week for summer
vegetables cultivation, and twice a week for winter vegetables cultivation.
8.2 Maintenance of irrigation facilities
(1) Maintenance items
The maintenance for the irrigation facilities can be carried out on a daily and occasional basis. In case
that the maintenance is undertaken as a joint work by the beneficiaries, the following rule would be
recomended to be adopted. Daily maintenance work shall be conducted by one or two persons in charge,
who are selected by the beneficiaries. Meanwhile, ocasional maintenance work shall be conducted
collectivelly by the beneficiaries as necessary.
Items Maintenance works
Daily maintenance
・Monitoring water level of the water source ・Monitoring water level of the water tank ・Monitoring operation condition of the pump ・Cleaning the surface of the solar module ・Monitoring the status of the pipeline (operational check, finding water leakage) ・Reading and recording water consumption with flow meter
Occasional maintenance ・Dredging sediment of the well and the pond ・Cleaning the water tank. ・Repairing the defect of the facilities
(2) Troubleshooting
In principle, the beneficiaries must deal with the failure of the irrigation facilities on their own.
However, special defects such as troubles related to the electrical system may be difficult to fix by the
Table 8.2.1 Maintenance irrigation facilities
27
beneficiaries. In such cases, repair must be given over to a professional company.
Items Cause of the troubles Remedy
Damage of the well Flood Repair with stones and cement
Leakage of the water tank Occurrence of holes Chip the leakage point, and then past the mortal on the inside wall
Leakage from the valve Breakage of the valve Replace the valve
Leakage from the pipeline Breakage of the joint Replace the joint
Breakage of the fence Degradation of the materials Repaint the fence or replace the net
Trouble of the engine pump Degradation of the oil Replace oil
Breakage of parts Replace the parts
Trouble of the solar system
Breakage of the module Order the module to the professional company for replacement
Defect of the electric system Contact with the professional company for the repair of the defect
Table 8.2.2 troubleshooting of irrigation facilities
28
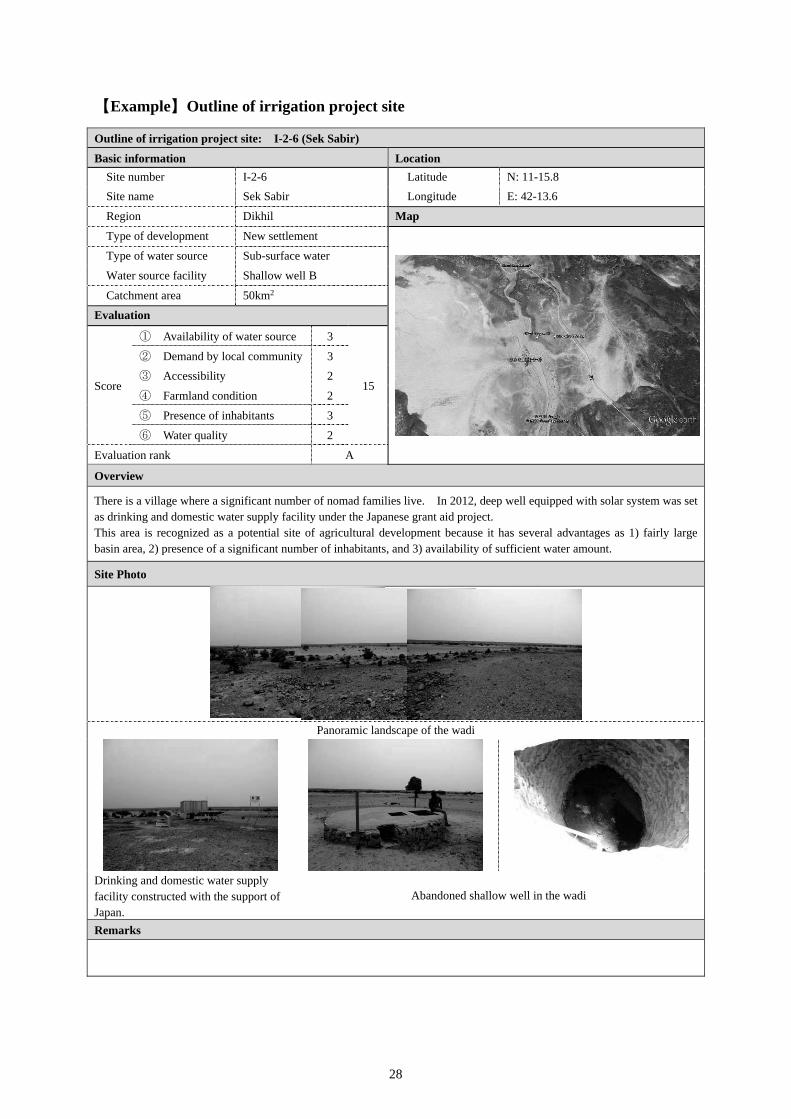
【Example】Outline of irrigation project site
Outline of irrigation project site: I-2-6 (Sek Sabir)
Basic information Location Site number I-2-6 Latitude N: 11-15.8 Site name Sek Sabir Longitude E: 42-13.6
Region Dikhil Map
Type of development New settlement
Type of water source Sub-surface water
Water source facility Shallow well B
Catchment area 50km2
Evaluation
Score
① Availability of water source 3
15
② Demand by local community 3 ③ Accessibility 2
④ Farmland condition 2
⑤ Presence of inhabitants 3
⑥ Water quality 2
Evaluation rank A
Overview
There is a village where a significant number of nomad families live. In 2012, deep well equipped with solar system was set as drinking and domestic water supply facility under the Japanese grant aid project. This area is recognized as a potential site of agricultural development because it has several advantages as 1) fairly large basin area, 2) presence of a significant number of inhabitants, and 3) availability of sufficient water amount.
Site Photo
Panoramic landscape of the wadi
Drinking and domestic water supply facility constructed with the support of Japan.
Abandoned shallow well in the wadi
Remarks
NTC International. Co., Ltd.
For the Farming Training of Nomad people in Djibouti
THE MASTER PLAN STUDY FOR SUSTAINABLE IRRIGATION AND FARMING
IN SOUTHERN DJIBOUTI
December 2014
MAEPE-RH (MINISTRY OF AGRICULTURE, WATER, FISHERIES, LIVESTOCK, AND MARINE RESOURCES)
JICA (JAPAN INTERNATIONAL COOPERATION
AGENCY)
Preface
This manual is an achievement of JICA’s Technical Cooperation Project called “The Master Plan
Study for Sustainable Irrigation and Farming in Southern Djibouti”.
This manual was created for agricultural extension workers and farming instructors who teach how
to cultivate to nomads and former-nomads . It is expected that they will use this manual in On-farm
instructions while consulting on it and/ or showing it to the targets.
Based on these concepts, this manual has many pictures as possible that readers can visually
understand how to cultivate each product. Moreover, given the fact that this manual is created for
agricultural beginners, cultivation techniques that are difficult to understand or unnecessary in
terms of management of subsistence farming by nomad and former-nomad were omitted.
We would appreciate it if this cultivation manual could help Djibouti’s agricultural extension.
1. Necessary Materials Necessary materials in ridge making are scoops, hoes, rakes, and so on. In addition, pickaxes are also needed in many cases of tillage in Djibouti since the soil contains many large rocks. In particular, pickaxes are essential for exploitation of terrace surface of wadi to remove a bunch of buried rocks. Then, unicycles are also necessary to carry the removed rocks. Although every material is purchasable in Djibouti city, we recommend you to prepare stocks in advance since those farming tools will be broken if you use them so frequently.
Ridge making with scoops is possible if a farm is sandy and not including many small rocks.
Pickaxes are essential if a farm soil has a bunch of small rocks.
Rakes are to arrange ridges. In a farm of stiff soil, stocks are needed due to hard use of agricultural implements.
2. Soil Preparation Soil preparation is prior to ridge making. Plow the farm with scoops, hoes, pickaxes, etc. and remove small rocks. If the farm has a slope, it should be leveled as much as possible. This makes leveling of ridges easy.
If a field has a slope, it should be leveled. This is, however, not essential because of the amount of labor needed.
Women can do the soil preparation. Promotion of women’s participation is preferable.
3. Decision on ridge form The way of ridge making should be appropriately adjusted in response to irrigation methods. Although the following figures show examples, you must properly decide it in accordance with the kinds of crops and soil.
In ridge making, the most important work is leveling of the ridges. Incomplete leveling will lead to ununiform growth of crops due to the difference of watering volume. You must be aware that ridge making by manpower will take a long time and huge labor, if a field has lots of small rocks.
2
Case 1. Furrow Irrigation Case 2. Basin Irrigation
In furrow irrigation, ridge width is about 30‐40cm. Whereas width among ridges should be changed according to products, 100‐120cm is preferable for securing working spaces and spaces that can be rooted. The minimum depth of ridges is 30cm, and rocks must be carefully removed from plowed soils. Kinds of Crops: Tomato, Red pepper, Sorghum, Maize, Melon, Watermelon, Okra, etc.
In basin irrigation, the length of a basin is about 100‐120cm. As leveling of basins is more difficult than furrow irrigation, how to level should be instructed in cultivation instructions. It can be appropriate to teach furrow irrigation first to nomad with little experiences in agriculture because the leveling is easier. The minimum depth of ridges is 30cm, and rocks must be carefully removed from plowed soils. Kinds of Crops: Onion
4. How to Make Ridges Make ridges in accordance with the planned ridge from. It is convenient for instructions to prepare wood of a certain length necessary to regularly set ridges. Also, strings make it possible for even nomad to properly make straight ridges.
Even nomad with little agricultural experiences can properly make ridges by using wood of a certain length. With strings, you can make straight ridges.
5. Leveling of Ridges While leveling of ridges is a very important step, nomads with little agricultural experiences tend to undervalue its necessity. So, special attentions must be paid in cultivation instructions. Of several ways of leveling, the easiest one is to see whether ridges are leveled or not by using water poured before seeding. If there is a slope, soils on the higher side of a ridge should be transferred with scoops to the lower side.
Without proper leveling, crops ununiformly grow up.
Before seeding, see whether ridges are leveled by pouring water.
An innovative farmer’s ridges. Properly leveled.
100-120 cm
30-40 cm
30-40 cm
5-10m
30-40 cm
100-120 cm
5-10m
3
1.Necessary Materials
Nomads can gather a certain amount of dung of goats and sheep. But, unicycles or sandbags for gathering and
carrying them to compost pits should also be prepared. In making compost, a hose reaching to watering pots or
water tanks is necessary since it uses a lot of water.
Sandbags enable you to stock livestock dung.
With unicycles, livestock dung and created compost are carried tofarms.
A huge volume of water is necessary for making compost.
2. Necessary Amount of Compost
Before making compost, the amount of compost for certain farming area should be estimated in advance. The
following table shows approximate amount of manures for each area (hectare). As the quantity of livestock dung
a household can gather is about 300-400kg per season, which can cover the minimum necessary amount of
manures for an area of 0.2ha. But, a procurement cost for livestock dung will occur if the cultivation area is more
than that. The following table shows the approximate amount of manures needed for particular farmland area.
Be aware that more compost will be needed depending on the kinds of crops.
3. Period of Making Compost
At least, in Djibouti, 8 weeks is required to gather livestock dung and to actually create and use compost. So,
compost making must be begun at least 2-3 months prior to seeding. In practice, as gathering livestock dung
takes a long time, proper scheduling for compost making is essential.
Cultivation area (ha) Initial amount of compost (kg)
Additional amount of compost (kg)
Total(kg)
0.2 200 200 400
0.5 500 500 1,000
1.0 1,000 1,000 2,000
2.0 2,000 2,000 4,000
In Djibouti, it is unrealistic for nomads to use chemical fertilizers since the obtaining them is quite difficult and expensive. Consequently, compost should be made of organics such as livestock dung like goats and sheeps. Here, a simple way of making compost using livestock’s dung, which nomad tribes can practice.
Minimum necessary quantity of compost (per season) for particular cultivation area
4
4. How to make compost
The procedure of compost making is below:
① Put gathered livestock dung into compost pits ② While watering livestock dung with hoses and watering pots, stir them with shovels so that livestock dung as
a whole get wet. Water volume must not exceed necessary amount for wetting them. Appropriate water amount is the extent that water does not trickle down when you strongly grasp livestock dung.
③ After stirring well livestock dung, they should be covered by blue sheets. Let this be as it is for 4 weeks. ④ Overturn livestock dung. If livestock dung are not fermented due to dryness, water and have them get wet. ⑤ Check ferment heat and smell by touching livestock dung. If they are completely fermented, you recognize
no heat and no smell. If there still are heat and smell, cover it again and wait for the complete ferment. ⑥ Keep covering with blue sheets. Use the compost as necessary.
1. Put gathered livestock dung into compost pits.
2. Stirring while watering them. Do not water too much
3. Cover livestock dung with blue sheets. Wait for 4 weeks.
4. 4 weeks later, overturn livestock dung and wait for further 4 weeks
5. Check ferment heat and smell by touching livestock dung.
6. Use compost as necessary.
5. How to Improve Quality of Compost Although it is possible to make compost from only livestock dung of goats and sheep, effects of compost will be improved by mixing with charcoal and ashes of plants. Particularly, acquisition of ashes of plants is easy from ovens that nomads use. As they contain lots of potassium and calcium, it is recommendable to put them into livestock dung as much as possible. Regarding charcoal, as nomads often create it for the purpose of earning money, acquisition of it is also easy. Charcoal has not only lots of potassium, but many small holes that can increase soil’s moisture and soil’s holding power of nourishment. Proper amount of charcoal and ashes of plants is 2-3kg per 1 ton of livestock dung.
compost
4 weeks later
Compost pits
5
1. Acquisition of Seeds
Acquisition of seeds is relatively easy since Moringas and Lucenas are popularly cultivated in Djibouti. Both often
bear seeds in June and July. If you need a large bag of their seeds, this period is preferable for seed acquisition.
Be aware that you should sow the seeds as soon as possible after acquisition because the germination rate of
October and November are best fit for sowing as temperature goes down in this period. One seed should ideally
be sowed every 50cm on ridges of 30cm width. As the main purpose of Moringa and Lucena cultivation is to avoid
wind, putting them around the ridges for tomatoes and onions, etc. is recommended.
Moringa seeds are on one line on a ridge because their trunks get thick in a year after sowing. Regarding Lucena seeds, they can be on a zigzag line because Lucena’s trunk does not get thick that much.
The above is an examle of Moringa and Lucena cultivation. They should be laid to surround ridges for vegetables. Be aware that you must make a proper cultivation plan, while taking into consideration wind direction around the fields.
Countermeasures against wind are crucial for crop production in Djibouti. Moringa and Lucena surrounding farms can mitigate dryness of fields and damages on crops. Moreover, not only they can be used as forage crops, but also fresh leaves of Moringa are used as human food. Here, how to cultivate Moringas and Lucenas is described.
① Moringa’s Case
② Lucena’s Case
30 cm
30 cm
50 cm
50 cm
Moringa
Lucena, etc
Vegetable
6
3. How to Cultivate
(1) Pretreatment of Seeds
Although sowing of Moringa and Lucena seeds without any processing is acceptable, pretreatment heightens
germination rate and makes seeds sprout at once. Particularly in the case of Lucena, the germination rate of
Lucena seeds dramatically decreases and a long time will be spent until germination without pretreatment.
Kind How to do pretreatment of seeds
Moringa Soak seeds in water in a bucket for half a day or a day.
Lucena Soak seeds in hot water of 70℃ heated in a pot for 10 minutes.
(2) Sowing
Sow seeds after pretreatment while following the above cultivation plan. If there are lots of seeds, it is
recommendable to sow about three seeds per sowing point and thin unnecessary sprouts out. Laying stones of
20cm wide around a sowing point enables sprouts to avoid vaporization of moisture and to protect from wind. The
surrounding stones, however, can be a nest for grasshoppers. If you find the sprouts are bitten off, remove the
stones.
Sowing Moringa seeds. 2-3 seeds per sowing point.
Surrounding a Moringa sprout by stones to avoid sunshine and wind.
Sowing Lucena seeds. Secure proper spaces by a ruler.
(3) Cultivation Management
Pay attention to the following points in Moringa and Lucena cultivation:
[1] Sufficient water pouring is important for sound growth. Sprouts grow up to 2m high in a year with sufficient
water pouring at least every other day.
[2] Compost can promote growth of Moringas and Lucenas. Their seeds themselves have nutrients in them,
which is sufficient to secure their sprouts’ initial growth. So, compost should be put among sprouts, not
under them. In other words, use of compost in response to sprouts’ growth is preferable. Initial amount of
compost is about 200g and add if necessary.
7
Where compost should be put in Moringa cultivation
Cultivating Moringas and Lucenas along irrigation channels for vegetables eases water pouring and helps you secure sufficient amount of water.
Compost should be put among sprouts. Compost of 200g should be buried at the depth of 10-20cm.
[3] In the case of Moringa, it is recommended to cut Moringas back when they grow up to more than 2m high.
Without cutting back, they can topple due to wind, so keeping their height about 2m is better. For this
purpose, you had better cut the trunk off at the height of 1m and arrange the shape of the tree with
branches.
Cut the trunk off at the height of 1m and grow branches.
An innovative farmer’s Moringas. Tree height is about 2m
Moringas after cutting off. Back to trees with leaves in half a year.
Lucenas are hardly damaged by pest and insect. Moringas, in contrast, are vulnerable to damages by larvae of
ticks and mosses, so proper countermeasures are needed. Basically, the most effective way is use of
agrichemicals, but they are so expensive that it is difficult to get. Consequently, use of organic agrichemicals
made of soaps and red peppers can be an option.
A moss larva that eats Moringa leaves. Ticks flock to Moringas Agrichemical perchasable in Djibouti.
Expensive, effective.
Compost points
1m
8
9
1. Acquisition of Seeds
You can get tomato seeds in these three ways in Djibouti:
① Buy them in Djibouti city
② Ask some innovative farmers and tomato farmers to sell and/ or share
seeds
③ Get seeds distributed at Ambouli’s agricultural office.
Regarding ①, one way is to buy seeds at stores in Djibouti city selling
vegetable seeds, and the other way is to ask Al-gamil to import seeds. As
both ways are expensive, only some innovative farmers can use them. ②
and ③ are realistic ways of obtaining seeds for nomads. Regarding ③,
Ambouli’s agricultural office stocks vegetable seeds given by FAO, and staff
of the office distributes them to cooperatives and individual farmers.
2. Cultivation Plan
(1) Cultivation Schedule
The following table is a tomato cultivation schedule. The seedling of tomato grows at the beginning of September
when temperature goes down. The seedlings are transplanted in around October and harvested 2-3 months later.
Tomato cultivation in summer season is very difficult due to too high temperature, suggesting that nomads that
have neither agricultural experiences nor greenhouse facilities have difficulties in doing it. In contrast, as tomato
cultivation in winter is popular, tomatoes’ market price dramatically goes down in February and March, a season
for tomato harvest. If you start tomato cultivation as soon as possible and accelerate a cultivation period, you
can sell tomatoes at a relatively high market price.
Jan Feb Mar Apr May Jun Jul Aug Sep Oct Nov Dec
Raising Sprout
Transplantation
Harvest
Tomato is one of the staple crops in Djibouti. Not just even agricultural beginners can relatively easily cultivate, but nomads highly get interested in it. So, tomato cultivation is indispensable in agricultural development for nomads. Here, the most fundamental points for the cultivation are described.
Cultivation Schedule for tomatoes
10
(2) Decision on Cultivation Area and Preparation of Seed Beds
Although the amount of sowing depends on planting density and ridge width, 60g per 10a is a standard. A seed
bed of about 4m2 is sufficient for 30g of seeds. In addition, mosquito nets to protect sprouts from insects and
covers to avoid sunshine.
3. How to Cultivate
(1) Raising Sprout
Raising sprout is implemented in the following procedures. Be aware that the procedures assume to make a seed
bed of 4m2. The size of seed beds changes in response to cultivation area.
1) Plow the planned site for seed beds to the depth of 30cm, and remove large rocks.
2) Put compost of 6kg on bed soils and stir well.
3) Leveling seed beds with rakes, make gutters for sowing every 10 cm.
4) Put seeds on the gutters. Be careful to sow seeds evenly.
5) Cover seeds with soils, and softly compact them with hands.
6) Pour water, and cover whole seed beds with blue sheets or sandbags until germination which normally take 1-2 weeks.
7) After germination, prevent pest by mosquito nets, and avoid sunshine by date leaves.
8) Frequency of water pouring is once per 2 days. Don’t water too much.
9) When sprouts grow up to 20cm high, transplant them.
11
(2) Transplantation of the seedling is done as follows:
① Location of transplantation: Spaces between seedling is 50cm and seedling should be put on a zigzag line.
Try to secure proper spacing by using rulers.
② After digging holes of 20cm depth and 20-30cm wide at every transportation location, put compost of 200g
and stir them well. If possible, pour water once and leave them for 3 days to adjust compost to soils.
③ Transplantation should be done after 4pm. Dig seedling up without cutting roots by scoops, transplant them
to the farm. After that, compact transplanted parts by hands and feet so that soils adhere to roots.
Secure proper spaces among transplantation locations.
You can secure proper spaces with rulers to decide transplantation locations.
Transplantation is a light work women can do.
(3) Cultivation Management and Harvest
Pay attention to the following points
1) Timing for Additional Compost:When the first calyx appears, add 200g of compost among seedlings.
2) Props Preparation: It is difficult to get the props in Djibouti. Cultivation without them, however, will lead to
damages to fruits and flowers due to wind and rocks, so it is recommended to substitute dead branches and
unnecessary fabrics for connecting props if possible.
3) Irrigation Frequency: You should give water as frequently as possible, because in spite of the fact that it is
winter cultivation in relatively cold atmosphere, Djibouti’s soils tend to dry up soon due to strong sunshine. It is
recommended to water once per 2 days in early morning or evening.
4) Countermeasures against Insects & Pests: As long as you do not use insecticide and pesticide, damages by
biting of insects like larvae of mosses, aphids, and leaf miners are basically happened. If you can cultivate good
seedlings on seed beds, damages from pests do not severely matter, so the initial cultivation is crucial. Regarding
mosses, even organic agrichemicals made of hot peppers and soaps keep them away.
5) Harvest:If it is for self-consumption, harvest timing does not matter, but if it is for sale, you should harvest
soon after you find a little red parts on fruits.
Use branches as attracting props. Tobacco budworm eats tomatoes. If it is for sale, tomatoes with a little
red parts must be harvested.
50cm
Transplantation Location
12
13
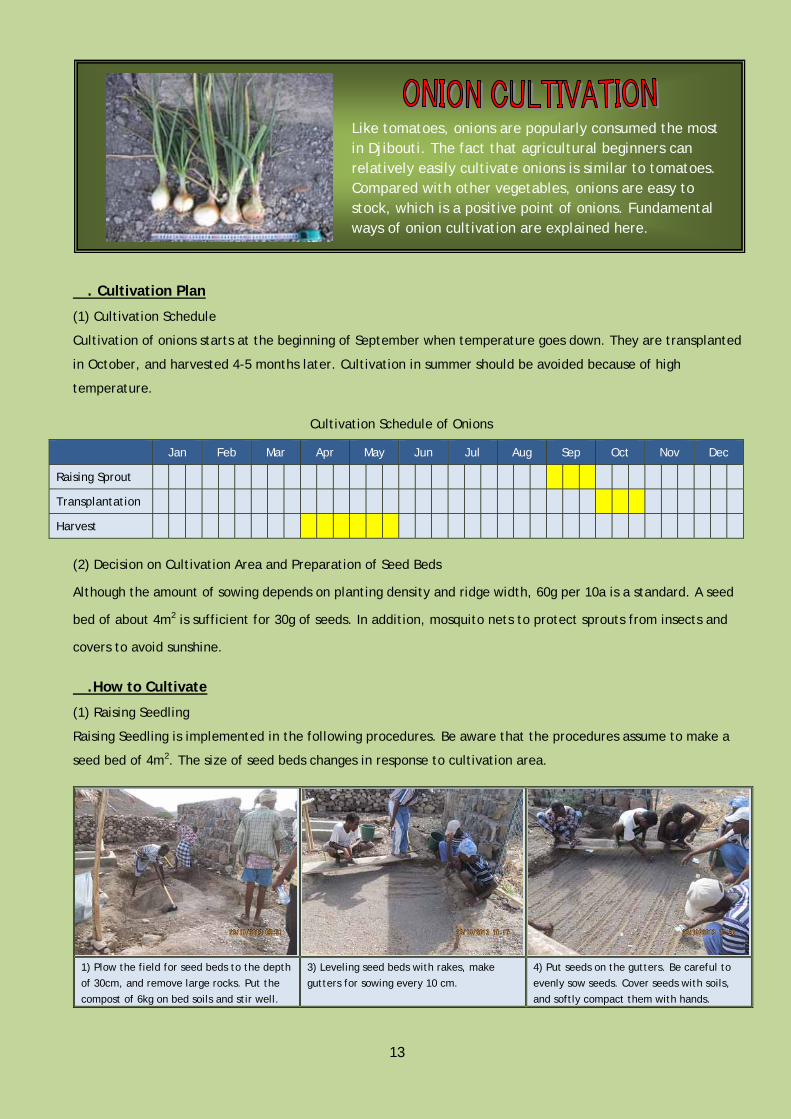
1. Cultivation Plan
(1) Cultivation Schedule
Cultivation of onions starts at the beginning of September when temperature goes down. They are transplanted
in October, and harvested 4-5 months later. Cultivation in summer should be avoided because of high
temperature.
Jan Feb Mar Apr May Jun Jul Aug Sep Oct Nov Dec
Raising Sprout
Transplantation
Harvest
(2) Decision on Cultivation Area and Preparation of Seed Beds
Although the amount of sowing depends on planting density and ridge width, 60g per 10a is a standard. A seed
bed of about 4m2 is sufficient for 30g of seeds. In addition, mosquito nets to protect sprouts from insects and
covers to avoid sunshine.
2.How to Cultivate
(1) Raising Seedling
Raising Seedling is implemented in the following procedures. Be aware that the procedures assume to make a
seed bed of 4m2. The size of seed beds changes in response to cultivation area.
1) Plow the field for seed beds to the depth of 30cm, and remove large rocks. Put the compost of 6kg on bed soils and stir well.
3) Leveling seed beds with rakes, make gutters for sowing every 10 cm.
4) Put seeds on the gutters. Be careful to evenly sow seeds. Cover seeds with soils, and softly compact them with hands.
Like tomatoes, onions are popularly consumed the most in Djibouti. The fact that agricultural beginners can relatively easily cultivate onions is similar to tomatoes. Compared with other vegetables, onions are easy to stock, which is a positive point of onions. Fundamental ways of onion cultivation are explained here.
Cultivation Schedule of Onions
14
(2) Transplantation
1) Form of ridges: Whether furrow irrigation or basin irrigation, the former is suit for agricultural beginners
because leveling of ridges is crucial.
2) Decision on transplantation Location: In the case of furrow irrigation, seedlings should be put on 3 lines with
spaces of 20cm among them like below
3) Initial Compost:Put compost on all layers in proportion of 2t/ha.
4) Transplantation should be done after 4pm. Dig seedlings up without cutting roots by scoops, transplant them
to a field. After that, compact transplanted parts by hands and feet so that soils adhere to roots.
Secure proper spaces among transplantation locations.
After initial compost, dig holes to the depth of 10cm and transplant sprouts.
Transplanting of the onion seedling
(3) Cultivation Management and Harvest
1) Timing for Additional Compost: A month later from planting, scatter the compost of 2t per hectare.
2) Watering Frequency: You should pour water as frequently as possible. It is recommended to pour water at
least once per 2 days in early morning or evening.
3) Harvest:If it is for self-consumption, harvest timing does not matter.
6) Pour water, and cover whole seed beds with blue sheets or sandbags until germination, which will normally take 1-2 weeks.
7) After germination, prevent pest by mosquito nets, and avoid sunshine by date leaves.
When seedlings grow up to 20cm high, transplant them.
20cm
Transplantation Location
15
1.Cultivation Plan
(1) Cultivation Schedule
The monthly average temperature of 20-30℃ is the best for growth, blossom, and bearing fruits of okras. As
Djibouti’s temperature is continuously high through a year, okra cultivation is promising through a year except
for excessively hot seasons. Okras normally bloom in 35-60 days after germination, and you can harvest them
about 1 week after the blossom.
Jan Feb Mar Apr May Jun Jul Aug Sep Oct Nov Dec
Sowing
Harvest
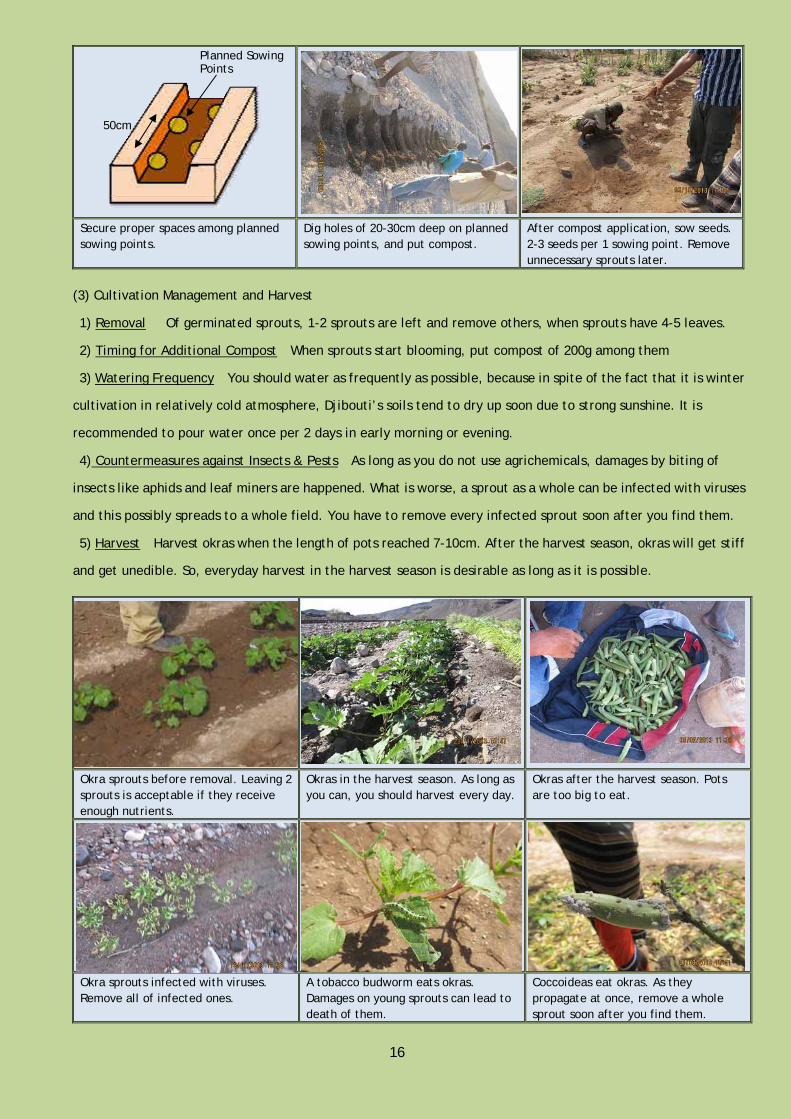
(2) Decision on Cultivation Area and Sowing Quantity
Although sowing quantity of okras depends on planting density and ridge width, 300-600g per 10a is a standard.
2.How to Cultivate
(1) Sowing
Sowing procedures are as follows.
1) Decide sowing points. Spacing among seedling is 50cm, and they should be laid on 1 straight line or 1 zigzag
line. Try to secure proper spacing by using rulers.
2) After digging holes of 20cm depth and 20-30cm wide at every transportation location, put compost of 200g
and stir them well. If possible, pour water once and leave them for 3 days to adjust compost to soils.
3) After compost, dig small holes of 1cm deep with your fingers on every sowing point. 2-3 seeds per hole are
good. By the way, pretreatment for okra seeds (e.g. soaking them into water through a night) will improve okras’
germination rate and help them germinate at once.
Okra is a kind of easily cultivated crops in Djibouti as it is tolerant to heat. Nomads consume okras as ingredients of soups and sell the rest of them. As okra cultivation is easier than other products, okra is suitable for agricultural beginners to try for the first time. Basic procedures of okra cultivation are explained here.
CultivationSchedule of okras
16
Secure proper spaces among planned sowing points.
Dig holes of 20-30cm deep on planned sowing points, and put compost.
After compost application, sow seeds. 2-3 seeds per 1 sowing point. Remove unnecessary sprouts later.
(3) Cultivation Management and Harvest
1) Removal: Of germinated sprouts, 1-2 sprouts are left and remove others, when sprouts have 4-5 leaves.
2) Timing for Additional Compost:When sprouts start blooming, put compost of 200g among them
3) Watering Frequency:You should water as frequently as possible, because in spite of the fact that it is winter
cultivation in relatively cold atmosphere, Djibouti’s soils tend to dry up soon due to strong sunshine. It is
recommended to pour water once per 2 days in early morning or evening.
4) Countermeasures against Insects & Pests:As long as you do not use agrichemicals, damages by biting of
insects like aphids and leaf miners are happened. What is worse, a sprout as a whole can be infected with viruses
and this possibly spreads to a whole field. You have to remove every infected sprout soon after you find them.
5) Harvest:Harvest okras when the length of pots reached 7-10cm. After the harvest season, okras will get stiff
and get unedible. So, everyday harvest in the harvest season is desirable as long as it is possible.
Okra sprouts before removal. Leaving 2 sprouts is acceptable if they receive enough nutrients.
Okras in the harvest season. As long as you can, you should harvest every day.
Okras after the harvest season. Pots are too big to eat.
Okra sprouts infected with viruses. Remove all of infected ones.
A tobacco budworm eats okras. Damages on young sprouts can lead to death of them.
Coccoideas eat okras. As they propagate at once, remove a whole sprout soon after you find them.
50cm
Planned Sowing Points
17
1.Cultivation Plan
(1) Cultivation Schedule
Basically, grass cultivation is possible through a year, but sowing in excessive hot seasons should be avoided.
About 3 months later from sowing, sorghum and maize is harvested as grass. On the contrary, you can harvest
alfalfa and sudan grass 4-6 times per a year. If you cultivate them on a virgin soil, you are expected to positively
cultivate grass and arrange the soil. Besides, cultivation of legume grass that fixes nitrogen allows you to fertilize
soils.
Kinds of Grass Annual/Perennnial Frequency of
Harvest per year
Seed
Acquisition
Notes
Sorghum Annual 3-4 Easy Purchasable at markets
Maize Annual 3-4 Easy Purchasable at markets
Crotalaria Annual 2-3 Difficult Leguminosae
Sudan grass Perennnial 4-6 Difficult Distributed at Ambouli’s agricultural office
Alfalfa Perennnial 4-6 difficult Leguminosae
Distributed at Ambouli’s agricultural office
(2) Decision on Cultivation Area and Sowing Quantity Although sowing quantity depends on planting density and ridge width,
standard quantity of sowing seeds per 10a is shown in the right table. In
the cases of sorghum, maize, and crotalaria, spaces among sprouts are
20cm, and lay on 2-3 lines. Regarding sudan grass and alfalfa, paired-row
seeding and laying seeds on 3 line are assumed.
2.How to Cultivate
The following are an explanation of how to cultivate sorghum and sudan grass respectively. How to cultivate
maize and crotalaria is the same as sorghum, and alfalfa is the same as sudan grass.
(1) Sorghum
In sorghum cultivation, put compost of 200kg per 10a into prepared ridges. After that, mixing it with soils and
leave it for 3 days to adjust compost to soils.
2) After compost, sow sorghum seeds every 20-30cm on 2-3 lines. Seeds should be put on shoulder parts of ridges,
not center of them. The number of seeds per sowing point is 4-5. Pretreatment for sorghum seeds (e.g. soaking
them into water through a night) will improve sorghum’s germination rate and help them germinate at once.
Grass cultivation in fields is important from a view point of securing feed for livestock especially in drought. Regarding sorghum and maize, as their seeds are purchasable in Djibouti’s markets, cultivation of them is very easy. In contrast, it is difficult to get seeds of sudan grass and alfalfa. They just suit for some innovative farmers.
Staple Grass cultivated in Djibouti
Sowing Quantity of each Grass
18
3) You should pour water as frequently as possible, because in spite of the fact that it is winter cultivation in
relatively cold atmosphere, Djibouti’s soils tend to dry up soon due to strong sunshine. It is recommended to pour
water once per 2 days in early morning or evening.
4) When the height of sorghum reached 15-20cm, remove unnecessary grass. Although in the cultivation of
sorghum as grass, removal is not such important, leave only 2-3 sprouts per sowing point. In the case of maize,
however, only 1 sprout is left because you need to harvest maize fruits.
5) When the height reached 40-50cm, check the color of leaves. If their green color is weakened, add compost.
Additional compost of 200kg per 10a should be scattered on ridges.
6) As long as you do not use agrichemicals, sorghum will be affected by aphids and whiteflies. But,
countermeasures against such pests do not matter as long as you cultivate sorghum as grass. If, however, smut
happens, be aware not to feed them to livestock as infected sorghum is poisonous.
How to sow sorghum seeds. Sowing points are shoulder part of ridges.
With rulers, secure proper spacing for sowing
Smut happened in sorghum. Do not feed them to livestock because of poisons.
(2) Sudan grass
1) In cultivation of sudan grass, put compost of 200kg per 10a into prepared ridges. After that, mixing it with
soils and leave it for 3 days to adjust compost to soils.
2) After the application of compost, do the paired-row seeding and lay seeds on 2-3 line on a ridge.
3) You should pour water as frequently as possible, because in spite of the fact that it is winter cultivation in
relatively cold atmosphere, Djibouti’s soils tend to dry up soon due to strong sunshine. It is recommended to pour
water once per 2 days in early morning or evening.
4) When the height of sudan grass reached 1m, cut them at the height of 20cm and harvest them. After harvest,
check the leaves’ color and add compost if green color weakened.
5) As long as you do not use agrichemicals, sudan grass will be affected by aphids and whiteflies. But,
countermeasures against such pests do not matter. If, however, smut happens, be aware not to feed them to
livestock as infected sorghum is poisonous.
Put compost on ridges and stir with soils
Do the paired-row seeding Harvest when the height reached 1m.
20-30cm
Put compost on all of layers
Sowing points are shoulder parts
19
1.Necessary Items
You need to prepare the following items in advance
‐Date roots: The easiest way is division of roots from innovative farmers’ or agri-business companies’ date.
Date has male and female, and both are essential for getting fruits. At least 1 male and 1 female must be
prepared.
‐Sandy soil:Often seen around wadi. The easiest way of finding it is to ask local people appropriate places to
gather sandi soil.
‐Clay:Like sandy soil, ask local people where to gather.
‐Matured compost and immature compost:Prepare them in advance as a lot of them are necessary for
transplantation of a date.
Transplantation of date needs a lot of sand, clay, and compost.
Compost, sand, and clay (from the left)
2.Preparation for Transplantation
(1) Decision on transplantation points
Decide transplantation points. In transplantation of several date,
spacing of at least 10m is necessary. In selecting transportation
locations, be aware of distance from buried irrigator PVC with
the growth of date roots in mind. After selection of
transportation locations, dig a hole of 100cm deep and 75 cm
wide.
Prepare a hole of 100cm deep and 75cm wide.
Date cultivation is possible in even alkali soils which are often seen in dried areas because it is adjusted to Djibouti’s atmosphere and has salinity tolerance. As market price of date fruits is high, it is a promising product. Increment of date production, however, needs high technology such as division of roots. So, in instruction for agricultural beginners, experts’ support is crucial. Here, how to divide date roots is mainly explained.
20
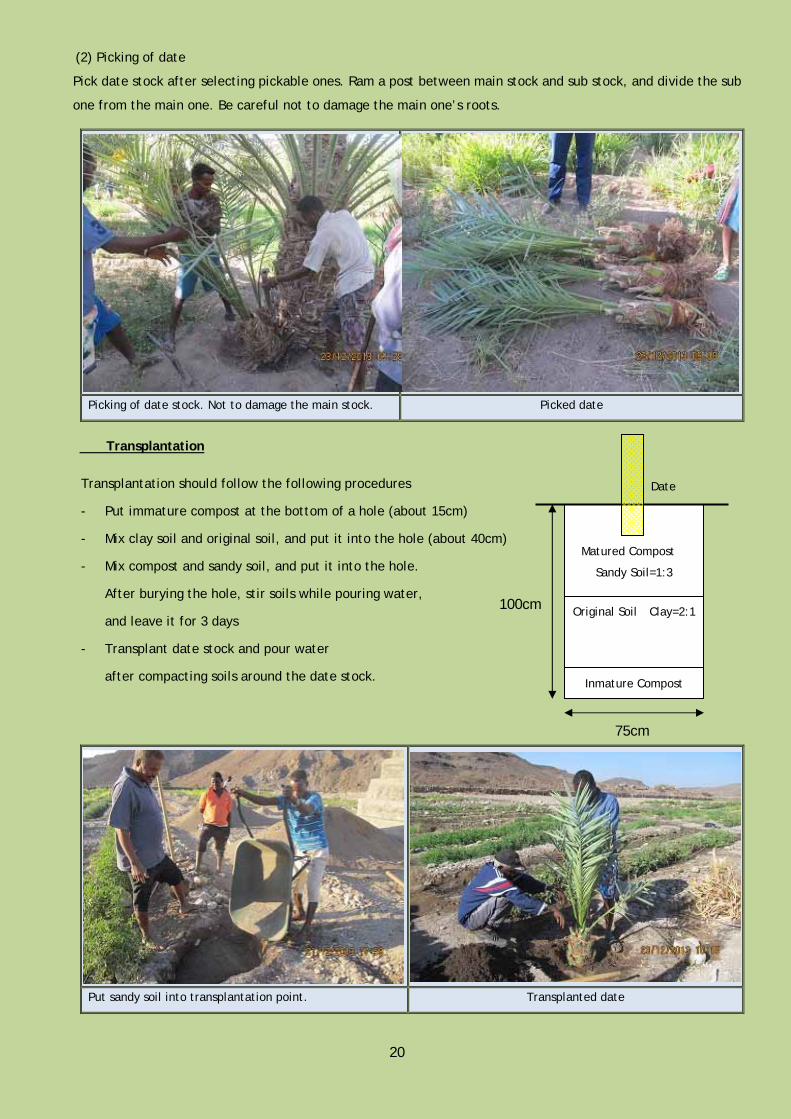
(2) Picking of date
Pick date stock after selecting pickable ones. Ram a post between main stock and sub stock, and divide the sub
one from the main one. Be careful not to damage the main one’s roots.
Picking of date stock. Not to damage the main stock. Picked date
3.Transplantation
Transplantation should follow the following procedures
- Put immature compost at the bottom of a hole (about 15cm)
- Mix clay soil and original soil, and put it into the hole (about 40cm)
- Mix compost and sandy soil, and put it into the hole.
After burying the hole, stir soils while pouring water,
and leave it for 3 days
- Transplant date stock and pour water
after compacting soils around the date stock.
Put sandy soil into transplantation point. Transplanted date