16


2 Thermal Receipt Printer
2
Attention:
Place printer on a stable surface. Choose a firm, level surface that is free from vibration.
Don't use the printer in an environment with high temperature, high humidity or poor
air quality.
Connect the power adapter to a properly grounded receptacle. Avoid using the same
power socket with other high energy consumption devices to avoid power fluctuations.
Keep water and other liquid from going into the printer. If this happens, turn the unit off
immediately.
Attempting to print without a paper roll will seriously damage the print head.
Unplug the printer from the power receptacle if it is not going to be used for a long
time.
Only use approved accessories. Never attempt to disassemble, repair or modify the unit.
Use a standard grounded power adapter.
Use high quality paper to ensure the printing quality and the life of the printer.
Turn off the power to the unit before plugging in or unplugging the cable.
Printer should only be used at altitudes below 5,000 meters.
Applications
POS system
EFT POS system
Gym, retail, civilian aviation
Inquiry service system
Instrument test
Tax and accounting
Packing
User Manual 1 Piece Printer 1 Piece Serial & USB Power cable 1 Piece Power adapter (24 V) 1 Set Paper roll 1 Roll CD with Drivers/Software

3 Thermal Receipt Printer
3
Features
80mm large capacity paper housing
High speed text and graphics printing
Excellent, high-quality print performance
Easy to control printer functions and status with print monitor
Error alerts
Receipt printing alarm and error messages
Supports Linux and high-speed printing modes
Supports black mark and printing error detection
Supports 256kb NV logo download store and printing
USB + Serial + LAN interface
Quality sealed mechanism and printer with long lifespan
Supports Chinese GB18030
Multiple international language options.
Simplified/traditional Chinese language options
Built-in web page allows for printer setup directly with IE port
intelligent cutter design system to avoid cutter jam error
Thermal print head protection system design
USB number fix function
Virtual COM function
Completed SDK & driver available
4 Thermal Receipt Printer
4
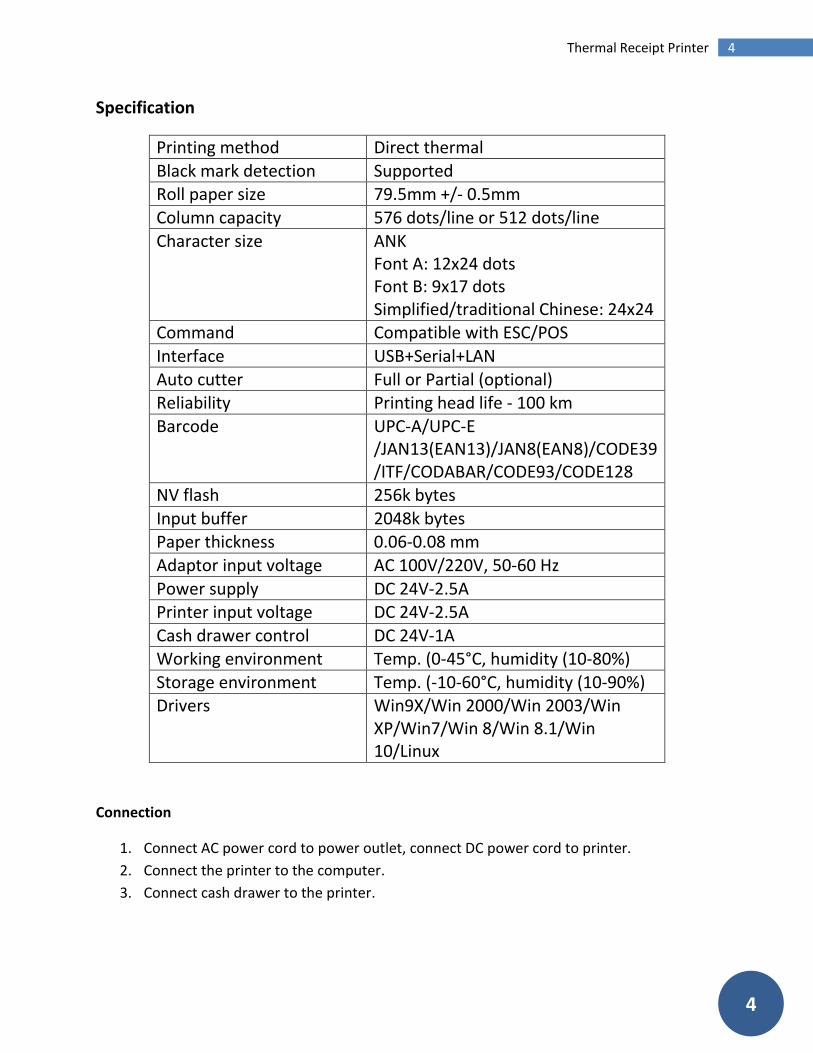
Specification
Printing method Direct thermal
Black mark detection Supported Roll paper size 79.5mm +/- 0.5mm
Column capacity 576 dots/line or 512 dots/line
Character size ANK Font A: 12x24 dots Font B: 9x17 dots Simplified/traditional Chinese: 24x24
Command Compatible with ESC/POS
Interface USB+Serial+LAN
Auto cutter Full or Partial (optional) Reliability Printing head life - 100 km
Barcode UPC-A/UPC-E /JAN13(EAN13)/JAN8(EAN8)/CODE39 /ITF/CODABAR/CODE93/CODE128
NV flash 256k bytes
Input buffer 2048k bytes Paper thickness 0.06-0.08 mm
Adaptor input voltage AC 100V/220V, 50-60 Hz
Power supply DC 24V-2.5A Printer input voltage DC 24V-2.5A
Cash drawer control DC 24V-1A Working environment Temp. (0-45°C, humidity (10-80%)
Storage environment Temp. (-10-60°C, humidity (10-90%) Drivers Win9X/Win 2000/Win 2003/Win
XP/Win7/Win 8/Win 8.1/Win 10/Linux
Connection
1. Connect AC power cord to power outlet, connect DC power cord to printer.
2. Connect the printer to the computer.
3. Connect cash drawer to the printer.

5 Thermal Receipt Printer
5
Paper Roll Loading
80mm thermal paper roll is recommended for 80mm series printers.
Loading paper into the printer:
1. Open top cover
2. Drop paper roll into slot indicated in (b).
3. Pull the paper roll into the paper holder (c).
4. Print one self-test to make sure paper is correctly installed.
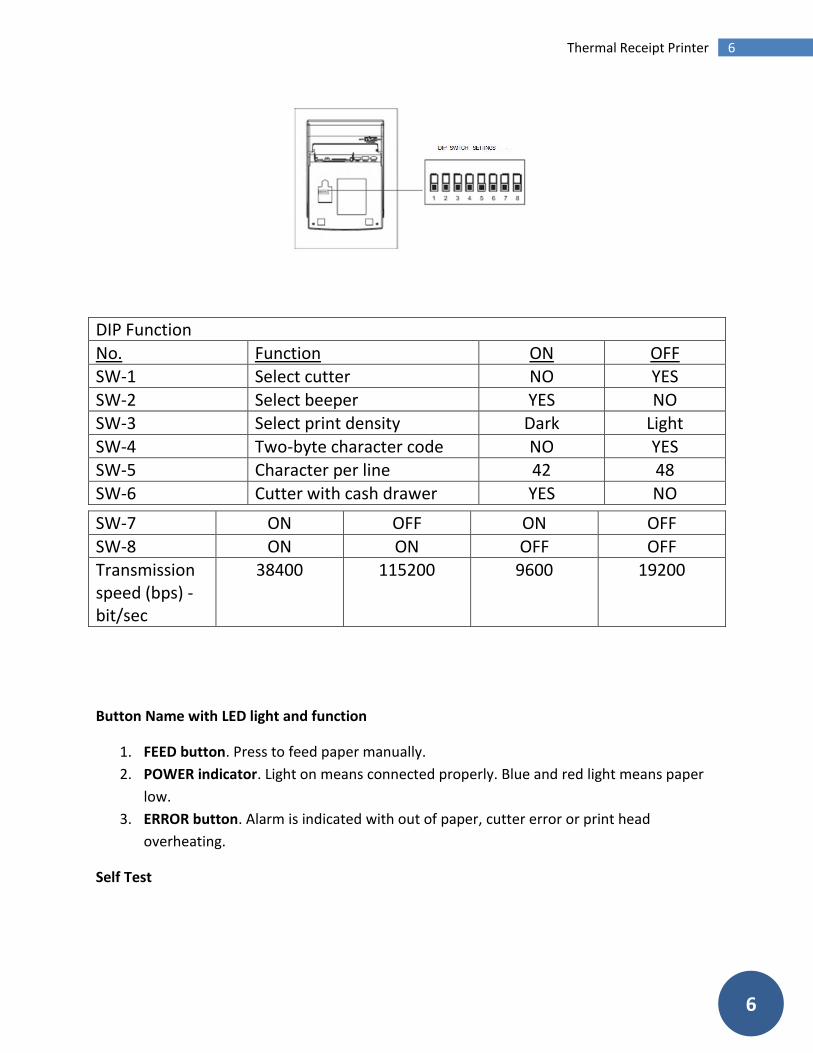
Setting print mode (DIP Switches)
Settings can be changed to different options including: cutter, languages, beeper,
print density, baud rate, etc.
6 Thermal Receipt Printer
6
DIP Function
No. Function ON OFF SW-1 Select cutter NO YES
SW-2 Select beeper YES NO SW-3 Select print density Dark Light
SW-4 Two-byte character code NO YES SW-5 Character per line 42 48
SW-6 Cutter with cash drawer YES NO
Button Name with LED light and function
1. FEED button. Press to feed paper manually.
2. POWER indicator. Light on means connected properly. Blue and red light means paper
low.
3. ERROR button. Alarm is indicated with out of paper, cutter error or print head
overheating.
Self Test
SW-7 ON OFF ON OFF
SW-8 ON ON OFF OFF Transmission speed (bps) - bit/sec
38400 115200 9600 19200

7 Thermal Receipt Printer
7
When printer is turned on, turn it off. Press "FEED" button and turn on the power at the same
time. After two (2) seconds, release the FEED button, and a completed self-test should print out
to show printer settings.
Hexadecimal mode
When printer is turned on, turn it off. Press "FEED" button and turn on the power at the same
time. After ten (10) seconds, release the FEED button to enter hex dump mode. The print out
will show the Hexadecimal Dump.
Reset
When printer is turned on, turn it off. Press "FEED" button and turn on the power at the same
time. After twenty (20) seconds, release the FEED button, reset is successful if a beep is heard.
QR Code Function
1) QR Code: Set Unit Size
[Command Code]
ASCII: GS (0 g n
Decimal 29 40 107 48 103 n Hex ID 28 6B 30 67 n
Function Description: Set the unit size of QR Code into "n"
Parameter Range: 1 ≤ n ≤ 16
Default n = 3
Note: N dot = Unit width = Unit height
The ESC @ command setup failed when printer is powered off and reset.
2) QR Code: Set up error correcting grade
[Command Code]

8 Thermal Receipt Printer
8
ASCII: GS (0 i n
Decimal 29 40 107 48 105 n Hex ID 28 6B 30 69 n
3) Function Description: Set up QR Code error correcting grade
The meaning of parameter "N" is as below:
n Instruction Correct proportion (%)
48 Grade L 7
49 Grade M 15
50 Grade Q 25
51 Grade H 30
Parameter Range : 48 ≤ n ≤ 51
Default: n = 48
Note: QR Code used RS algorithm to generating error correcting Code and the command setting
will be expired when printer was reset and powered off.
4) QR Code: Data transmission to code cache
[Command Code]
ASCII:
Decimal 29 40 107 48 103 n nL nH dl…dk
Hex ID 28 6B 30 69 n nL nH dl…dk
Function Description: Setting QR Code data transmission to code cache
Parameter Range: 4 ≤ (nL + nHx256) ≤ 2710
32 ≤ d ≤ 255
Default: None
Note: After receiving, The data will be kept until reset of next time.
K byte dl... dk be regarded as coded data

9 Thermal Receipt Printer
9
D1 ....dk only can contain below data in the table.
Character sheet Including the below characters in the table
Figure "0"~"9"
Letter and Figure "0"~"9", "A"~"Z", SP, S, %,
Chinese Character GB18030-2000, Shift-JIS, JISX0208 standard
8-bit data 00H-FFH
5) QR Code: Printing QR Code of code cache
[Command Code]
ASCII: GS (0 ?
Decimal 29 40 107 48 129 Hex ID 28 6B 30 81
Function Description: Printing the encoding data of QR Code code cache
Parameter Range: None
Default: None
Note: If the QR code size is beyond printing area, printing will be cancelled.
If the code cache data is empty, Printing will be cancelled.
USB port and Virtual Com Port exchange command set
[Command code]
Decimal 31 27 31 184 19 20 N
Hex IF IB IF B8 13 14 N
Description: Through above command sets could exchange Real USB port and Virtual Com Port
Range: N=0 USB;N=1 Virtual Com Port.
(Must printer connected accordingly) As shown in below picture.

10 Thermal Receipt Printer
10
Cutter stuck maintenance
1) Turn off the power and then restart.
2) Turn the gear on printing head , cutter can be returned to its original position.
A Notice: To avoid the damage of the printing head and automatic paper cutter, please do not open cutter and mechanism.
Driver installation
1) Install driver and print through Win OS.
2) Printing via port directly.
11 Thermal Receipt Printer
11
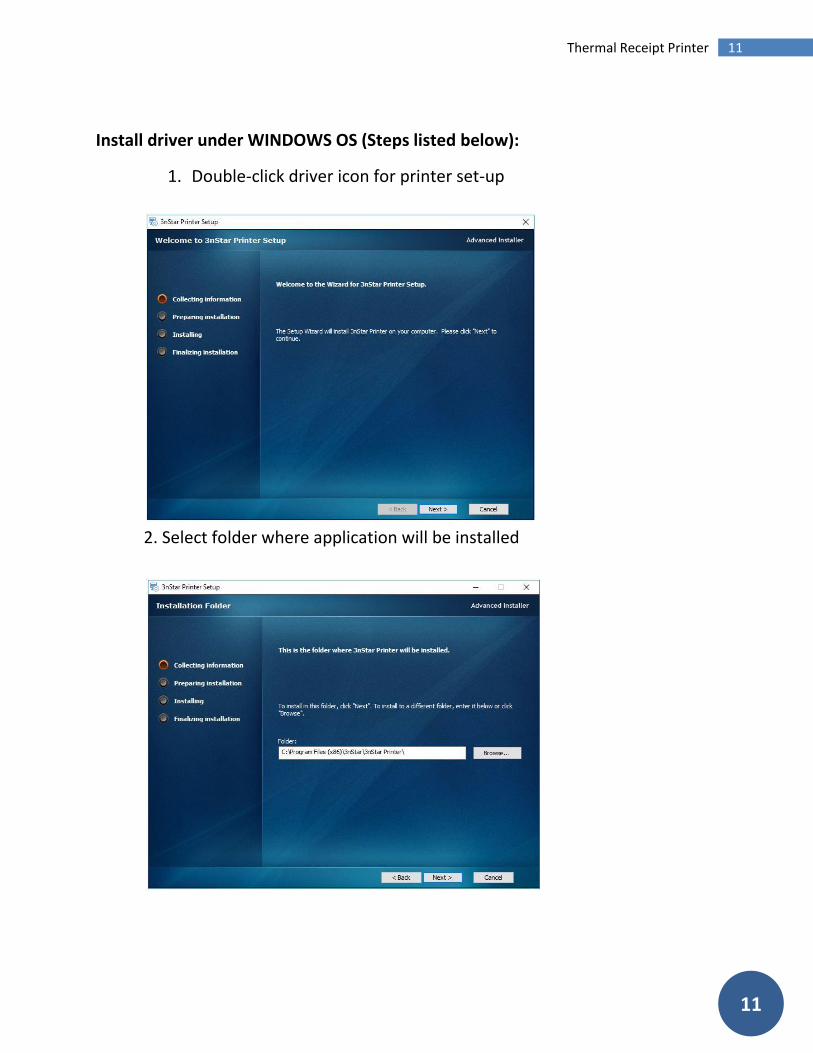
Install driver under WINDOWS OS (Steps listed below):
1. Double-click driver icon for printer set-up
2. Select folder where application will be installed

12 Thermal Receipt Printer
12
3. Click "Install" to begin the installation
4. The installation process will update the status

13 Thermal Receipt Printer
13
5. Click "Finish" to complete the installation
Choose "POS-80C" from the Install Configuration
14 Thermal Receipt Printer
14
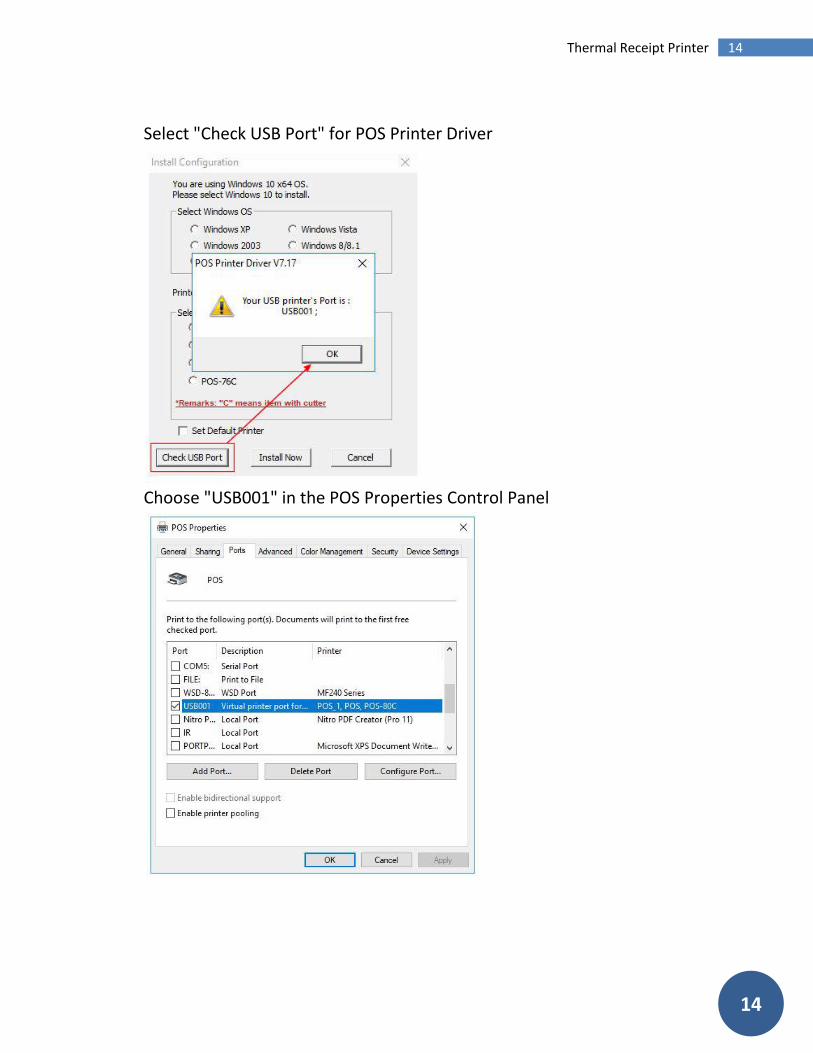
Select "Check USB Port" for POS Printer Driver
Choose "USB001" in the POS Properties Control Panel
15 Thermal Receipt Printer
15
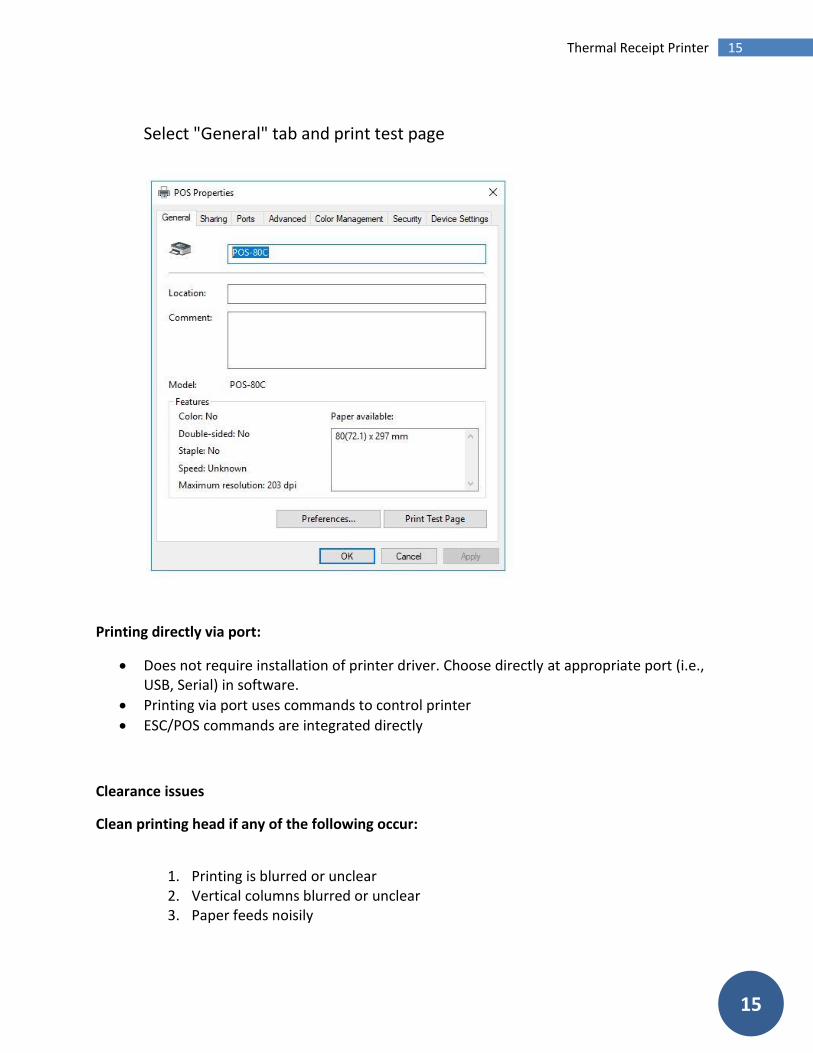
Select "General" tab and print test page
Printing directly via port:
Does not require installation of printer driver. Choose directly at appropriate port (i.e., USB, Serial) in software.
Printing via port uses commands to control printer
ESC/POS commands are integrated directly
Clearance issues
Clean printing head if any of the following occur:
1. Printing is blurred or unclear 2. Vertical columns blurred or unclear 3. Paper feeds noisily

16 Thermal Receipt Printer
16
Printing head cleaning steps:
1. Turn printer off, unplug the power cord. 2. Open top cover, take out paper roll. 3. Wait until printing head has cooled. 4. Clean printing head with swab and alcohol. Do not use water. 5. Close top cover until alcohol evaporates. 6. Reconnect power, turn unit on, print self test. 7. Repeat, if needed.
NOTICE:
Turn power off when cleaning the unit.
Don't touch or scratch printing head surface, roller or sensors.
Avoid gas, acetone or organic solvents.
Before powering unit up and printing self test, wait until alcohol has evaporated after cleaning.
W a r n i n g : No part of this manual can be changed without agreement. The company reserves the rights to modify the technology, components, software and hardware. You may ask your dealer for more product information. No part of chapter in this manual can be copied or transmitted in any format without permission.


