86
TIBCO iProcess™ Client (ASP) User’s Guide Software Release 9.2 September 2009
TIBCO iProcess™ Client (ASP)
User’s GuideSoftware Release 9.2September 2009

Important Information
SOME TIBCO SOFTWARE EMBEDS OR BUNDLES OTHER TIBCO SOFTWARE. USE OF SUCH EMBEDDED OR BUNDLED TIBCO SOFTWARE IS SOLELY TO ENABLE THE FUNCTIONALITY (OR PROVIDE LIMITED ADD-ON FUNCTIONALITY) OF THE LICENSED TIBCO SOFTWARE. THE EMBEDDED OR BUNDLED SOFTWARE IS NOT LICENSED TO BE USED OR ACCESSED BY ANY OTHER TIBCO SOFTWARE OR FOR ANY OTHER PURPOSE.
USE OF TIBCO SOFTWARE AND THIS DOCUMENT IS SUBJECT TO THE TERMS AND CONDITIONS OF A LICENSE AGREEMENT FOUND IN EITHER A SEPARATELY EXECUTED SOFTWARE LICENSE AGREEMENT, OR, IF THERE IS NO SUCH SEPARATE AGREEMENT, THE CLICKWRAP END USER LICENSE AGREEMENT WHICH IS DISPLAYED DURING DOWNLOAD OR INSTALLATION OF THE SOFTWARE (AND WHICH IS DUPLICATED IN THE THE TIBCO IPROCESS CLIENT (ASP) INSTALLATION GUIDE). USE OF THIS DOCUMENT IS SUBJECT TO THOSE TERMS AND CONDITIONS, AND YOUR USE HEREOF SHALL CONSTITUTE ACCEPTANCE OF AND AN AGREEMENT TO BE BOUND BY THE SAME.
This document contains confidential information that is subject to U.S. and international copyright laws and treaties. No part of this document may be reproduced in any form without the written authorization of TIBCO Software Inc.
TIB, TIBCO, TIBCO Software, TIBCO Adapter, Predictive Business, Information Bus, The Power of Now, TIBCO iProcess are either registered trademarks or trademarks of TIBCO Software Inc. in the United States and/or other countries.
EJB, Java EE, J2EE, JMS and all Java-based trademarks and logos are trademarks or registered trademarks of Sun Microsystems, Inc. in the U.S. and other countries.
All other product and company names and marks mentioned in this document are the property of their respective owners and are mentioned for identification purposes only.
This software may be available on multiple operating systems. However, not all operating system platforms for a specific software version are released at the same time. Please see the readme.txt file for the availability of this software version on a specific operating system platform.
THIS DOCUMENT IS PROVIDED “AS IS” WITHOUT WARRANTY OF ANY KIND, EITHER EXPRESS OR IMPLIED, INCLUDING, BUT NOT LIMITED TO, THE IMPLIED WARRANTIES OF MERCHANTABILITY, FITNESS FOR A PARTICULAR PURPOSE, OR NON-INFRINGEMENT.
THIS DOCUMENT COULD INCLUDE TECHNICAL INACCURACIES OR TYPOGRAPHICAL ERRORS. CHANGES ARE PERIODICALLY ADDED TO THE INFORMATION HEREIN; THESE CHANGES WILL BE INCORPORATED IN NEW EDITIONS OF THIS DOCUMENT. TIBCO SOFTWARE INC. MAY MAKE IMPROVEMENTS AND/OR CHANGES IN THE PRODUCT(S) AND/OR THE PROGRAM(S) DESCRIBED IN THIS DOCUMENT AT ANY TIME.
THE CONTENTS OF THIS DOCUMENT MAY BE MODIFIED AND/OR QUALIFIED, DIRECTLY OR INDIRECTLY, BY OTHER DOCUMENTATION WHICH ACCOMPANIES THIS SOFTWARE, INCLUDING BUT NOT LIMITED TO ANY RELEASE NOTES AND "READ ME" FILES.
Copyright © 2000-2009 TIBCO Software Inc. ALL RIGHTS RESERVED.TIBCO Software Inc. Confidential Information
| i
Bac
k to
Lib
rary
Contents
About This Guide . . . . . . . . . . . . . . . . . . . . . . . . . . . . . . . . . . . . . . . . . . . . . . . . . . . . . . . . . . . . . . . v
How to Use this Guide . . . . . . . . . . . . . . . . . . . . . . . . . . . . . . . . . . . . . . . . . . . . . . . . . . . . . . . . . . . . . . . . . . . . . . vi
Target Audience . . . . . . . . . . . . . . . . . . . . . . . . . . . . . . . . . . . . . . . . . . . . . . . . . . . . . . . . . . . . . . . . . . . . . . . . . . . vii
Changes from the Previous Issue . . . . . . . . . . . . . . . . . . . . . . . . . . . . . . . . . . . . . . . . . . . . . . . . . . . . . . . . . . . . viii
Where You Can Find More Information . . . . . . . . . . . . . . . . . . . . . . . . . . . . . . . . . . . . . . . . . . . . . . . . . . . . . . . . . ix
Documentation Conventions . . . . . . . . . . . . . . . . . . . . . . . . . . . . . . . . . . . . . . . . . . . . . . . . . . . . . . . . . . . . . . . . . x
Chapter 1 About the TIBCO iProcess Client (ASP). . . . . . . . . . . . . . . . . . . . . . . . . . . . . . . . . . . . 1
What is the TIBCO iProcess Client (ASP)? . . . . . . . . . . . . . . . . . . . . . . . . . . . . . . . . . . . . . . . . . . . . . . . . . . . . . . 2What is the TIBCO iProcess Suite? . . . . . . . . . . . . . . . . . . . . . . . . . . . . . . . . . . . . . . . . . . . . . . . . . . . . . . . . 2
What can I do with the TIBCO iProcess Client (ASP)? . . . . . . . . . . . . . . . . . . . . . . . . . . . . . . . . . . . . . . . . . . . . . 3
Chapter 2 Getting Started . . . . . . . . . . . . . . . . . . . . . . . . . . . . . . . . . . . . . . . . . . . . . . . . . . . . . . . . 5
Starting the iProcess Client (ASP) from your Browser. . . . . . . . . . . . . . . . . . . . . . . . . . . . . . . . . . . . . . . . . . . . . . 6
Logging in to an iProcess Engine . . . . . . . . . . . . . . . . . . . . . . . . . . . . . . . . . . . . . . . . . . . . . . . . . . . . . . . . . . . . . 7Logging in to Multiple iProcess Engines. . . . . . . . . . . . . . . . . . . . . . . . . . . . . . . . . . . . . . . . . . . . . . . . . . . . . 8
The iProcess Client (ASP) Window . . . . . . . . . . . . . . . . . . . . . . . . . . . . . . . . . . . . . . . . . . . . . . . . . . . . . . . . . . . . 9Configuring Your Default Page View in the TIBCO iProcess Client (ASP) Window . . . . . . . . . . . . . . . . . . . . 9Refreshing your TIBCO iProcess Client (ASP) Window . . . . . . . . . . . . . . . . . . . . . . . . . . . . . . . . . . . . . . . . 10Using Browser Navigation . . . . . . . . . . . . . . . . . . . . . . . . . . . . . . . . . . . . . . . . . . . . . . . . . . . . . . . . . . . . . . 11
Logging Out and Closing the iProcess Client (ASP) . . . . . . . . . . . . . . . . . . . . . . . . . . . . . . . . . . . . . . . . . . . . . . 12
Chapter 3 Using Work Queues . . . . . . . . . . . . . . . . . . . . . . . . . . . . . . . . . . . . . . . . . . . . . . . . . . . 13
Selecting a Work Queue . . . . . . . . . . . . . . . . . . . . . . . . . . . . . . . . . . . . . . . . . . . . . . . . . . . . . . . . . . . . . . . . . . . 14Work Queue Loading Chart, Personal Queues and Group Queues. . . . . . . . . . . . . . . . . . . . . . . . . . . . . . . 15
Using the Work Queue Window. . . . . . . . . . . . . . . . . . . . . . . . . . . . . . . . . . . . . . . . . . . . . . . . . . . . . . . . . . . . . . 16The Status Bar . . . . . . . . . . . . . . . . . . . . . . . . . . . . . . . . . . . . . . . . . . . . . . . . . . . . . . . . . . . . . . . . . . . . . . . 17What is Displayed in Your Work Queue Loading Chart? . . . . . . . . . . . . . . . . . . . . . . . . . . . . . . . . . . . . . . . 17What is Displayed in Your Work Queue? . . . . . . . . . . . . . . . . . . . . . . . . . . . . . . . . . . . . . . . . . . . . . . . . . . . 18Navigating Through Your Work Queue . . . . . . . . . . . . . . . . . . . . . . . . . . . . . . . . . . . . . . . . . . . . . . . . . . . . . 20Sorting Your Work Queue. . . . . . . . . . . . . . . . . . . . . . . . . . . . . . . . . . . . . . . . . . . . . . . . . . . . . . . . . . . . . . . 20
Chapter 4 Processing Work Items . . . . . . . . . . . . . . . . . . . . . . . . . . . . . . . . . . . . . . . . . . . . . . . . 21
Opening Work Items . . . . . . . . . . . . . . . . . . . . . . . . . . . . . . . . . . . . . . . . . . . . . . . . . . . . . . . . . . . . . . . . . . . . . . 22
TIBCO iProcess Client (ASP) User’s Guide
ii | Contents
Bac
k to
Lib
rary
Locked Work Items . . . . . . . . . . . . . . . . . . . . . . . . . . . . . . . . . . . . . . . . . . . . . . . . . . . . . . . . . . . . . . . . . . . . 22
Filling in Forms . . . . . . . . . . . . . . . . . . . . . . . . . . . . . . . . . . . . . . . . . . . . . . . . . . . . . . . . . . . . . . . . . . . . . . . . . . . 24Field Types. . . . . . . . . . . . . . . . . . . . . . . . . . . . . . . . . . . . . . . . . . . . . . . . . . . . . . . . . . . . . . . . . . . . . . . . . . . 24Field Origins. . . . . . . . . . . . . . . . . . . . . . . . . . . . . . . . . . . . . . . . . . . . . . . . . . . . . . . . . . . . . . . . . . . . . . . . . . 25Drop-down Lists . . . . . . . . . . . . . . . . . . . . . . . . . . . . . . . . . . . . . . . . . . . . . . . . . . . . . . . . . . . . . . . . . . . . . . . 25Field Help. . . . . . . . . . . . . . . . . . . . . . . . . . . . . . . . . . . . . . . . . . . . . . . . . . . . . . . . . . . . . . . . . . . . . . . . . . . . 26
Keeping and Releasing Work Items . . . . . . . . . . . . . . . . . . . . . . . . . . . . . . . . . . . . . . . . . . . . . . . . . . . . . . . . . . . 27Keeping a Work Item . . . . . . . . . . . . . . . . . . . . . . . . . . . . . . . . . . . . . . . . . . . . . . . . . . . . . . . . . . . . . . . . . . . 27Releasing a Work Item. . . . . . . . . . . . . . . . . . . . . . . . . . . . . . . . . . . . . . . . . . . . . . . . . . . . . . . . . . . . . . . . . . 27
Forwarding Work Items from a Queue . . . . . . . . . . . . . . . . . . . . . . . . . . . . . . . . . . . . . . . . . . . . . . . . . . . . . . . . . 28
Finding Particular Work Items . . . . . . . . . . . . . . . . . . . . . . . . . . . . . . . . . . . . . . . . . . . . . . . . . . . . . . . . . . . . . . . . 30
Predicting How Long a Case Will Take to Complete. . . . . . . . . . . . . . . . . . . . . . . . . . . . . . . . . . . . . . . . . . . . . . . 31Selecting a Case to Display Case Prediction. . . . . . . . . . . . . . . . . . . . . . . . . . . . . . . . . . . . . . . . . . . . . . . . . 31Understanding the Case Prediction Window . . . . . . . . . . . . . . . . . . . . . . . . . . . . . . . . . . . . . . . . . . . . . . . . . 32Closing the Case Prediction Window. . . . . . . . . . . . . . . . . . . . . . . . . . . . . . . . . . . . . . . . . . . . . . . . . . . . . . . 32
Chapter 5 Starting Cases. . . . . . . . . . . . . . . . . . . . . . . . . . . . . . . . . . . . . . . . . . . . . . . . . . . . . . . . 33
Selecting a Procedure. . . . . . . . . . . . . . . . . . . . . . . . . . . . . . . . . . . . . . . . . . . . . . . . . . . . . . . . . . . . . . . . . . . . . . 34
Entering a Case Description . . . . . . . . . . . . . . . . . . . . . . . . . . . . . . . . . . . . . . . . . . . . . . . . . . . . . . . . . . . . . . . . . 36
Chapter 6 Using Audit Trails . . . . . . . . . . . . . . . . . . . . . . . . . . . . . . . . . . . . . . . . . . . . . . . . . . . . . 39
Selecting a Procedure. . . . . . . . . . . . . . . . . . . . . . . . . . . . . . . . . . . . . . . . . . . . . . . . . . . . . . . . . . . . . . . . . . . . . . 40
Defining an Audit Case List Filter . . . . . . . . . . . . . . . . . . . . . . . . . . . . . . . . . . . . . . . . . . . . . . . . . . . . . . . . . . . . . 42Customizing the Audit Case List Filter Criteria View . . . . . . . . . . . . . . . . . . . . . . . . . . . . . . . . . . . . . . . . . . . 44
Selecting a Case. . . . . . . . . . . . . . . . . . . . . . . . . . . . . . . . . . . . . . . . . . . . . . . . . . . . . . . . . . . . . . . . . . . . . . . . . . 47Sorting Cases . . . . . . . . . . . . . . . . . . . . . . . . . . . . . . . . . . . . . . . . . . . . . . . . . . . . . . . . . . . . . . . . . . . . . . . . 47
Understanding your Audit Trail . . . . . . . . . . . . . . . . . . . . . . . . . . . . . . . . . . . . . . . . . . . . . . . . . . . . . . . . . . . . . . . 48Filtering Audit Trail Entries . . . . . . . . . . . . . . . . . . . . . . . . . . . . . . . . . . . . . . . . . . . . . . . . . . . . . . . . . . . . . . . 49
Chapter 7 Organizing Your Work Items . . . . . . . . . . . . . . . . . . . . . . . . . . . . . . . . . . . . . . . . . . . . 51
Setting Filter, Display and Sort Options . . . . . . . . . . . . . . . . . . . . . . . . . . . . . . . . . . . . . . . . . . . . . . . . . . . . . . . . 52Setting Filter Options . . . . . . . . . . . . . . . . . . . . . . . . . . . . . . . . . . . . . . . . . . . . . . . . . . . . . . . . . . . . . . . . . . . 52Setting Display Options . . . . . . . . . . . . . . . . . . . . . . . . . . . . . . . . . . . . . . . . . . . . . . . . . . . . . . . . . . . . . . . . . 56Setting Sort Options. . . . . . . . . . . . . . . . . . . . . . . . . . . . . . . . . . . . . . . . . . . . . . . . . . . . . . . . . . . . . . . . . . . . 59
Searching for Work Items . . . . . . . . . . . . . . . . . . . . . . . . . . . . . . . . . . . . . . . . . . . . . . . . . . . . . . . . . . . . . . . . . . . 63Changing the Case Priority . . . . . . . . . . . . . . . . . . . . . . . . . . . . . . . . . . . . . . . . . . . . . . . . . . . . . . . . . . . . . . 65
Using Queue-Specific Data to Organize or Search Your Work Items Lists . . . . . . . . . . . . . . . . . . . . . . . . . . . . . . 67
Chapter 8 Managing Participation and Redirection . . . . . . . . . . . . . . . . . . . . . . . . . . . . . . . . . . 69
Adding a Participant Record . . . . . . . . . . . . . . . . . . . . . . . . . . . . . . . . . . . . . . . . . . . . . . . . . . . . . . . . . . . . . . . . . 70
TIBCO iProcess Client (ASP) User’s Guide
Contents | iii
Bac
k to
Lib
rary
Removing a Participant Record . . . . . . . . . . . . . . . . . . . . . . . . . . . . . . . . . . . . . . . . . . . . . . . . . . . . . . . . . . . . . . 72
Redirecting Work Items . . . . . . . . . . . . . . . . . . . . . . . . . . . . . . . . . . . . . . . . . . . . . . . . . . . . . . . . . . . . . . . . . . . . 73
TIBCO iProcess Client (ASP) User’s Guide
iv | Contents
Bac
k to
Lib
rary
TIBCO iProcess Client (ASP) User’s Guide
| v
Bac
k to
Lib
rary
About This Guide
This guide explains how to use the TIBCO iProcess™ Client (ASP).
TIBCO iProcess Client (ASP) User’s Guide
vi | About This Guide
Bac
k to
Lib
rary
How to Use this Guide
Refer to the following chapters for the information you need:
• Chapter 1, About the TIBCO iProcess Client (ASP)
• Chapter 2, Getting Started
• Chapter 3, Using Work Queues
• Chapter 4, Processing Work Items
• Chapter 5, Starting Cases
• Chapter 6, Using Audit Trails
• Chapter 7, Organizing Your Work Items
• Chapter 8, Managing Participation and Redirection
TIBCO iProcess Client (ASP) User’s Guide

Target Audience | vii
Bac
k to
Lib
rary
Target Audience
This guide is aimed at users who are using the TIBCO iProcess Client (ASP) to access their iProcess work queues, start cases of procedures and access audit trails.
This guide assumes that you are familiar with using your web browser. No previous knowledge of iProcess or the TIBCO iProcess Client (ASP) is assumed.
TIBCO iProcess Client (ASP) User’s Guide
viii | About This Guide
Bac
k to
Lib
rary
Changes from the Previous Issue
The following changes have been made from the information presented in the previous issue of this guide:
• Further product re-branding has been carried out in this release, as follows:
— TIBCO Staffware Process Suite™ has been renamed TIBCO iProcess Suite™
— TIBCO iProcess™ Client (Windows) has been renamed TIBCO iProcess™ Workspace (Windows)
— TIBCO iProcess™ Client (Browser) has been renamed TIBCO iProcess™ Workspace (Browser)
— The term Staffware has been replaced by iProcess.
Until this work is complete you may still see references to Staffware and to the old product names within the software and in some documentation.
TIBCO iProcess Client (ASP) User’s Guide
Where You Can Find More Information | ix
Bac
k to
Lib
rary
Where You Can Find More Information
You can find more information related to iProcess and the TIBCO iProcess Client (ASP) from the following sources:
• The TIBCO iProcess Client (ASP) Installation Guide, supplied with the software, explains how to install the software.
• The TIBCO iProcess Client (ASP) Customization Guide gives detailed information about configuring the TIBCO iProcess Client (ASP).
• A Readme file, supplied with the software, provides any last minute and version-specific information that could not be included in the main documentation. Please see the TIBCO iProcess Client (ASP) Installation Guide for more information about this file.
• This guide is available as online help from within the TIBCO iProcess Client (ASP).
• Detailed information about using the TIBCO iProcess Suite™ can be found on the TIBCO iProcess Suite Documentation Library CD.
• There is also a useful resource, http://power.tibco.com, that delivers technical content to the TIBCO user community. This site has been developed to foster an open forum where users of TIBCO products can find valuable information, example projects and resources for those projects, and exchange ideas with other users. Entry to this site requires a username and password. If you do not have a username, you can request one.
• For the latest TIBCO iProcess Suite product information, please refer to the TIBCO Support web site at http://www.tibco.com/services/support.
TIBCO iProcess Client (ASP) User’s Guide
x | About This Guide
Bac
k to
Lib
rary
Documentation Conventions
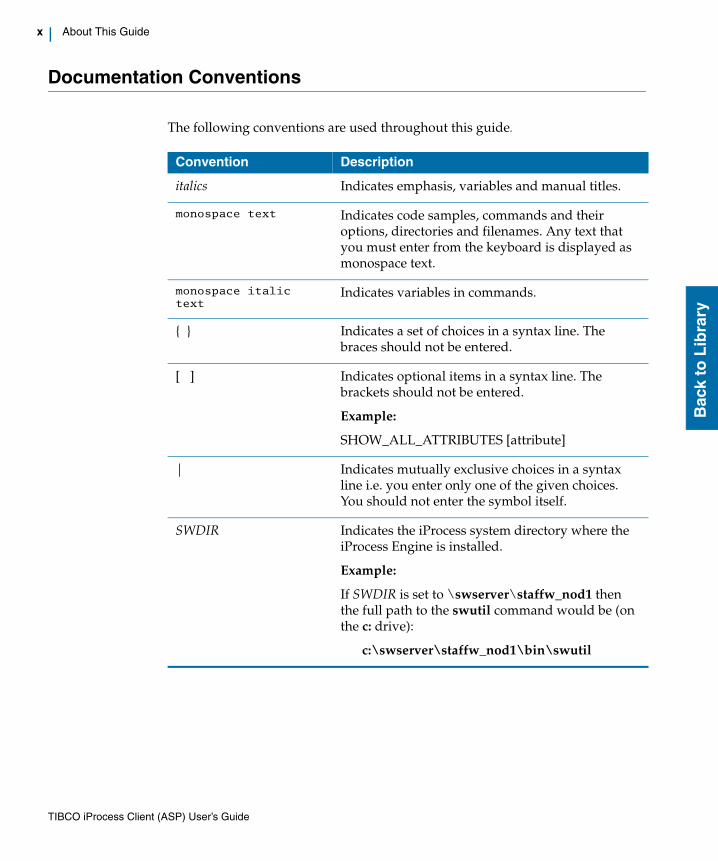
The following conventions are used throughout this guide.
Convention Description
italics Indicates emphasis, variables and manual titles.
monospace text Indicates code samples, commands and their options, directories and filenames. Any text that you must enter from the keyboard is displayed as monospace text.
monospace italic text
Indicates variables in commands.
{ } Indicates a set of choices in a syntax line. The braces should not be entered.
[ ] Indicates optional items in a syntax line. The brackets should not be entered.
Example:
SHOW_ALL_ATTRIBUTES [attribute]
| Indicates mutually exclusive choices in a syntax line i.e. you enter only one of the given choices. You should not enter the symbol itself.
SWDIR Indicates the iProcess system directory where the iProcess Engine is installed.
Example:
If SWDIR is set to \swserver\staffw_nod1 then the full path to the swutil command would be (on the c: drive):
c:\swserver\staffw_nod1\bin\swutil
TIBCO iProcess Client (ASP) User’s Guide

| 1
Bac
k to
Lib
rary
Chapter 1 About the TIBCO iProcess Client (ASP)
This chapter gives you a brief overview of the iProcess Client (ASP) - what it is and what you can do with it.
Topics
• What is the TIBCO iProcess Client (ASP)?
• What is the TIBCO iProcess Suite?
• What can I do with the TIBCO iProcess Client (ASP)?
TIBCO iProcess Client (ASP) User’s Guide
2 | Chapter 1 About the TIBCO iProcess Client (ASP)
Bac
k to
Lib
rary
What is the TIBCO iProcess Client (ASP)?
The iProcess Client (ASP) allows organizations to extend their iProcess Suite over the internet and intranets enabling staff to participate in a procedure irrespective of where they are or what time it is. It enables organizations to integrate their business partners, customers and suppliers directly in their process, streamlining many activities and shortening process times dramatically.
What is the TIBCO iProcess Suite?The iProcess Suite is a Business Process Management application that enables organizations to automate their business processes, or Procedures - from simple leave requests to complex sales order processing applications. By using iProcess to model a procedure and add control mechanisms, an organization can ensure that the right work is done at the right time by the right people.
Any routine business procedure can be implemented using iProcess:
• The procedure is modeled as a flowchart using the TIBCO iProcess™ Modeler. The flowchart defines the different steps which must happen, the order in which they occur and the data and people involved.
• Once a procedure has been defined the iProcess Engine can run it. When somebody starts to use the procedure on a new case, the iProcess Engine processes it according to the procedure rules, passing work items to users’ work queues as required.
• Users use TIBCO iProcess™ Workspace to examine their Work Queues and process the Work Items in them - generally by filling in an electronic form and then releasing the work item back to the iProcess Engine. The iProcess Engine processes the next step in the procedure. Authorized users can start new cases of procedures or use audit trail facilities to check on the progress of existing cases.
TIBCO iProcess Client (ASP) User’s Guide
What can I do with the TIBCO iProcess Client (ASP)? | 3
Bac
k to
Lib
rary
What can I do with the TIBCO iProcess Client (ASP)?
The TIBCO iProcess Client (ASP) enables you to:
• Open and look through your Work Queues (your Personal Queue and any Group Queue or Test Queues which you have access to).
• Open individual Work Items.
• View and enter data into a Form to complete a work item.
• Keep work items in your queue or Release them back to iProcess.
• Forward work items to different queues.
• Set sort, filter or display options on your work queues.
• Search for specific work items in any queue.
• Start new Cases of Procedures.
• Use Case Prediction for forecasting outstanding and expected work items.
• Change the Priority of a work item.
• Use Participation to grant users temporary access to another user or group queue.
• Use Redirection to redirect all work items sent to one queue to an alternative queue.
The rest of this guide explains these steps in detail.
TIBCO iProcess Client (ASP) User’s Guide

4 | Chapter 1 About the TIBCO iProcess Client (ASP)
Bac
k to
Lib
rary
TIBCO iProcess Client (ASP) User’s Guide
| 5
Bac
k to
Lib
rary
Chapter 2 Getting Started
This chapter explains how to start and stop the iProcess Client (ASP), and describes the main area you see in the iProcess Client (ASP) window.
Topics
• Starting the iProcess Client (ASP) from your Browser
• Logging in to an iProcess Engine
• The iProcess Client (ASP) Window
• Logging Out and Closing the iProcess Client (ASP)
TIBCO iProcess Client (ASP) User’s Guide
6 | Chapter 2 Getting Started
Bac
k to
Lib
rary
Starting the iProcess Client (ASP) from your Browser
To start the iProcess Client (ASP) you need to visit the iProcess Client (ASP) startup page.
Your system administrator determines how you get to this page, for example, by typing in its URL or by clicking on a hyperlink from another page. If you do not know how to reach the appropriate page, contact your iProcess System Administrator.
TIBCO iProcess Client (ASP) User’s Guide
Logging in to an iProcess Engine | 7
Bac
k to
Lib
rary
Logging in to an iProcess Engine
To log in to iProcess:
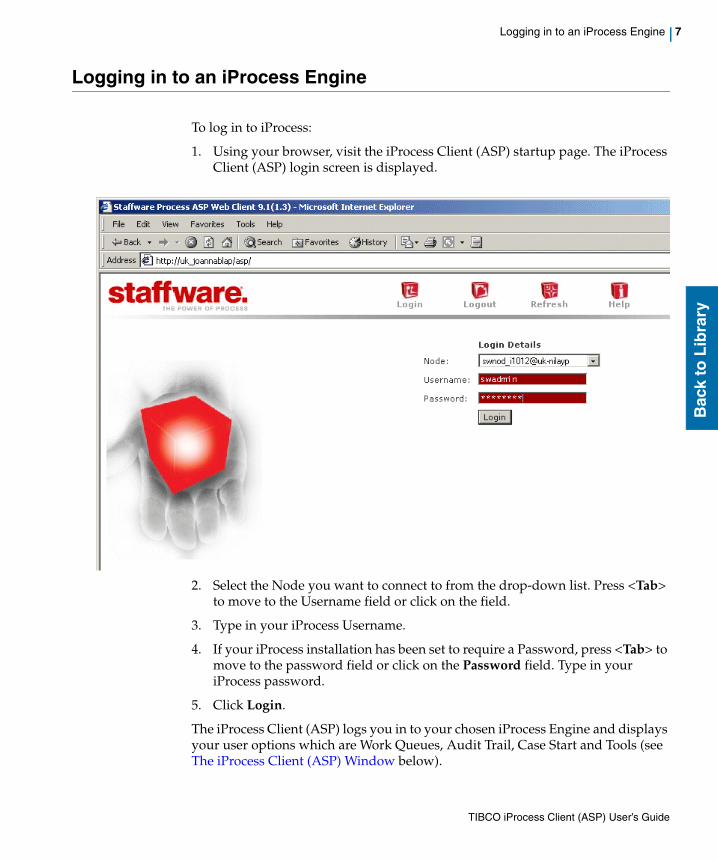
1. Using your browser, visit the iProcess Client (ASP) startup page. The iProcess Client (ASP) login screen is displayed.
2. Select the Node you want to connect to from the drop-down list. Press <Tab> to move to the Username field or click on the field.
3. Type in your iProcess Username.
4. If your iProcess installation has been set to require a Password, press <Tab> to move to the password field or click on the Password field. Type in your iProcess password.
5. Click Login.
The iProcess Client (ASP) logs you in to your chosen iProcess Engine and displays your user options which are Work Queues, Audit Trail, Case Start and Tools (see The iProcess Client (ASP) Window below).
TIBCO iProcess Client (ASP) User’s Guide
8 | Chapter 2 Getting Started
Bac
k to
Lib
rary
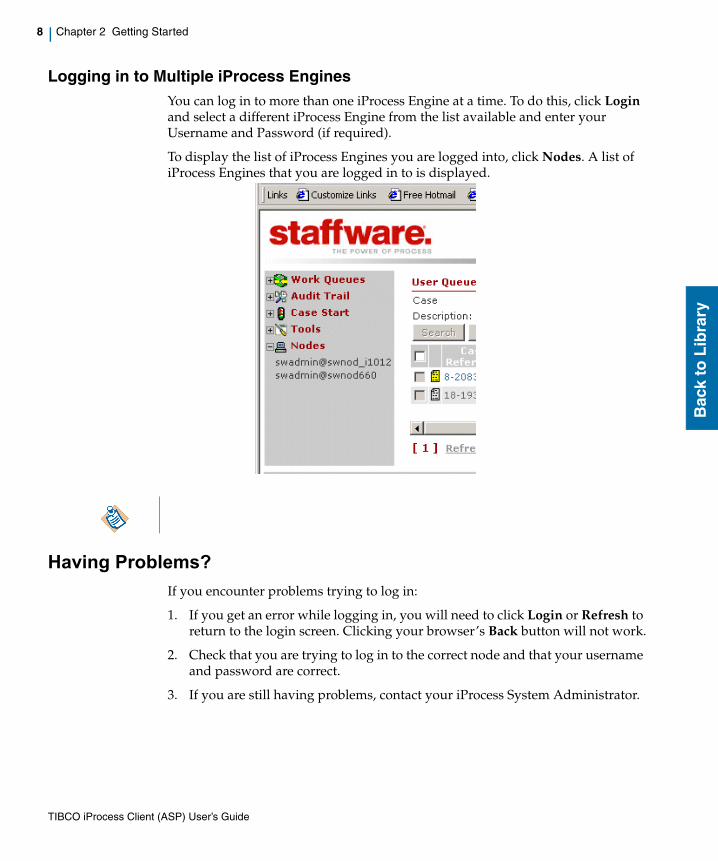
Logging in to Multiple iProcess EnginesYou can log in to more than one iProcess Engine at a time. To do this, click Login and select a different iProcess Engine from the list available and enter your Username and Password (if required).
To display the list of iProcess Engines you are logged into, click Nodes. A list of iProcess Engines that you are logged in to is displayed.
Having Problems?
If you encounter problems trying to log in:
1. If you get an error while logging in, you will need to click Login or Refresh to return to the login screen. Clicking your browser’s Back button will not work.
2. Check that you are trying to log in to the correct node and that your username and password are correct.
3. If you are still having problems, contact your iProcess System Administrator.
TIBCO iProcess Client (ASP) User’s Guide
The iProcess Client (ASP) Window | 9
Bac
k to
Lib
rary
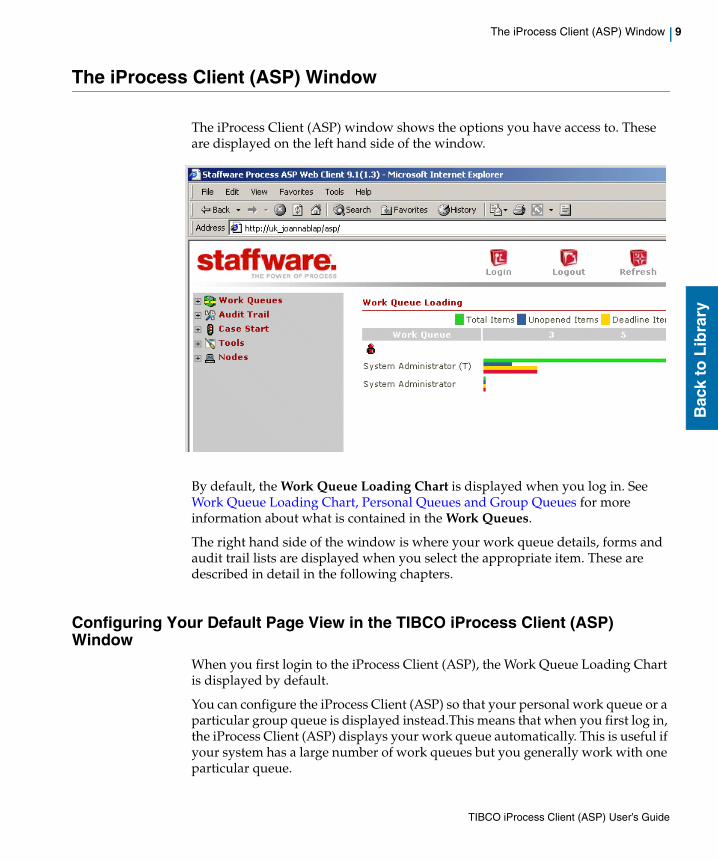
The iProcess Client (ASP) Window
The iProcess Client (ASP) window shows the options you have access to. These are displayed on the left hand side of the window.
By default, the Work Queue Loading Chart is displayed when you log in. See Work Queue Loading Chart, Personal Queues and Group Queues for more information about what is contained in the Work Queues.
The right hand side of the window is where your work queue details, forms and audit trail lists are displayed when you select the appropriate item. These are described in detail in the following chapters.
Configuring Your Default Page View in the TIBCO iProcess Client (ASP) Window
When you first login to the iProcess Client (ASP), the Work Queue Loading Chart is displayed by default.
You can configure the iProcess Client (ASP) so that your personal work queue or a particular group queue is displayed instead.This means that when you first log in, the iProcess Client (ASP) displays your work queue automatically. This is useful if your system has a large number of work queues but you generally work with one particular queue.
TIBCO iProcess Client (ASP) User’s Guide
10 | Chapter 2 Getting Started
Bac
k to
Lib
rary
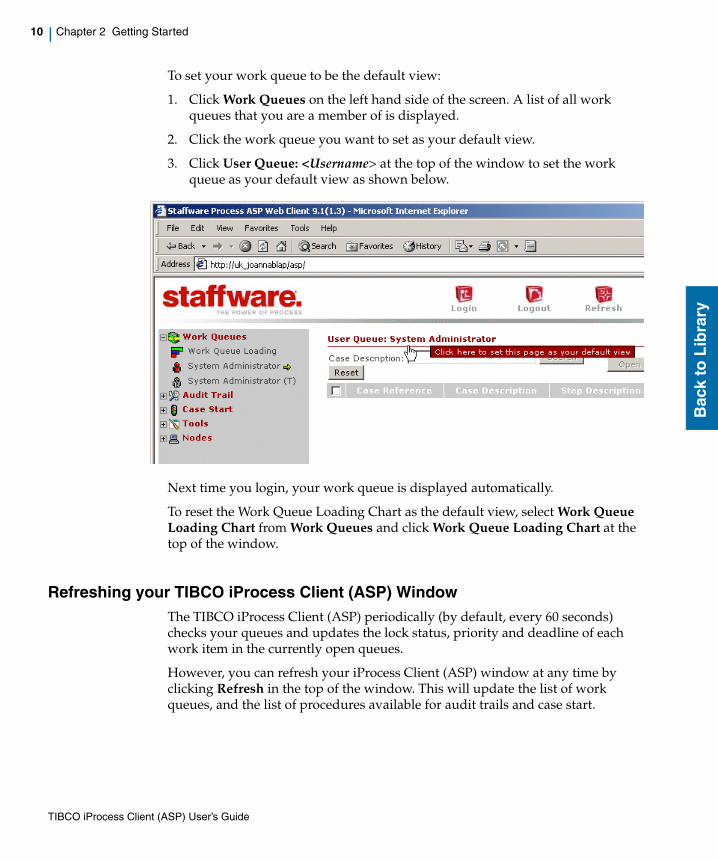
To set your work queue to be the default view:
1. Click Work Queues on the left hand side of the screen. A list of all work queues that you are a member of is displayed.
2. Click the work queue you want to set as your default view.
3. Click User Queue: <Username> at the top of the window to set the work queue as your default view as shown below.
Next time you login, your work queue is displayed automatically.
To reset the Work Queue Loading Chart as the default view, select Work Queue Loading Chart from Work Queues and click Work Queue Loading Chart at the top of the window.
Refreshing your TIBCO iProcess Client (ASP) WindowThe TIBCO iProcess Client (ASP) periodically (by default, every 60 seconds) checks your queues and updates the lock status, priority and deadline of each work item in the currently open queues.
However, you can refresh your iProcess Client (ASP) window at any time by clicking Refresh in the top of the window. This will update the list of work queues, and the list of procedures available for audit trails and case start.
TIBCO iProcess Client (ASP) User’s Guide
The iProcess Client (ASP) Window | 11
Bac
k to
Lib
rary
You can also update the contents of the currently selected work queue and status bar by clicking Refresh Queue at the bottom of the currently displayed page.
Using Browser NavigationWhilst using the iProcess Client (ASP), it is important that you do NOT use the browser’s Back and Forward buttons. Using these can cause unpredictable problems particularly when keeping and releasing forms. See Keeping and Releasing Work Items.
Internet Explorer must be set for the screen refresh to work correctly. From Internet Explorer, select Tools > Internet Options. On the General tab under Temporary Internet Files, select Settings and ensure that Automatically is selected.
TIBCO iProcess Client (ASP) User’s Guide
12 | Chapter 2 Getting Started
Bac
k to
Lib
rary
Logging Out and Closing the iProcess Client (ASP)
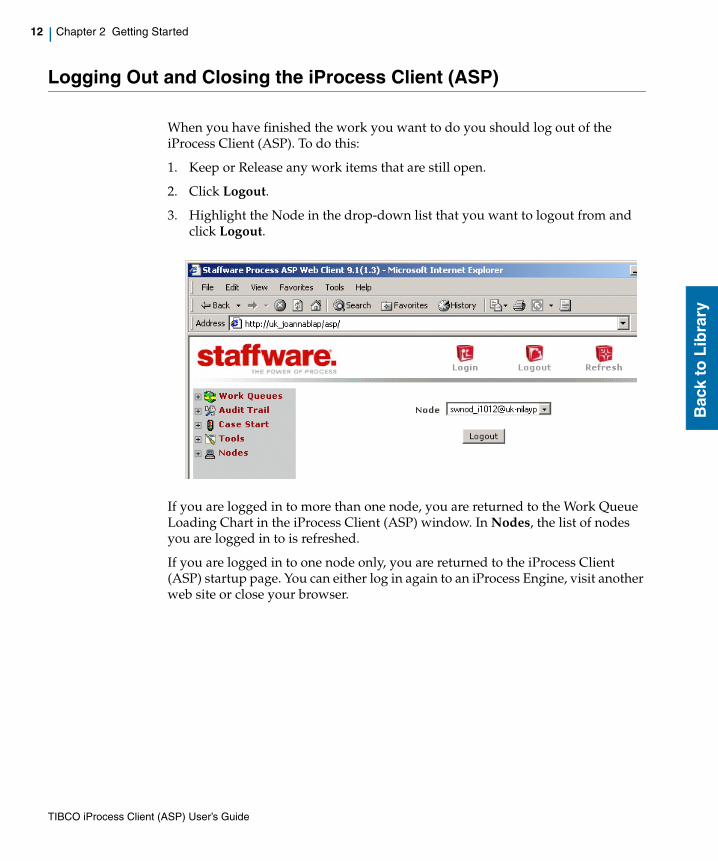
When you have finished the work you want to do you should log out of the iProcess Client (ASP). To do this:
1. Keep or Release any work items that are still open.
2. Click Logout.
3. Highlight the Node in the drop-down list that you want to logout from and click Logout.
If you are logged in to more than one node, you are returned to the Work Queue Loading Chart in the iProcess Client (ASP) window. In Nodes, the list of nodes you are logged in to is refreshed.
If you are logged in to one node only, you are returned to the iProcess Client (ASP) startup page. You can either log in again to an iProcess Engine, visit another web site or close your browser.
TIBCO iProcess Client (ASP) User’s Guide
| 13
Bac
k to
Lib
rary
Chapter 3 Using Work Queues
This chapter explains how to select and organize your work queues and describes the Work Queue Window.
Topics
• Selecting a Work Queue
• Using the Work Queue Window
TIBCO iProcess Client (ASP) User’s Guide
14 | Chapter 3 Using Work Queues
Bac
k to
Lib
rary
Selecting a Work Queue
To select a Work Queue:
1. Click Work Queues on the left hand side of the screen to display the list of all the work queues that you are a member of. These are listed by user name or group name.
If you are logged in to more than one Node, each node you are logged in to is listed. Click the appropriate node to see all available queues on that node.
2. Click on the work queue you want to display. A yellow arrow after the queue name indicates the currently selected queue.
The first time you click Work Queues, it may take a few seconds for the work queues to display. It depends on how your iProcess System Administrator has configured the TIBCO iProcess Client (ASP) and how many work queues your iProcess system has. A Loading... message is displayed while the work queues are being loaded.
TIBCO iProcess Client (ASP) User’s Guide
Selecting a Work Queue | 15
Bac
k to
Lib
rary
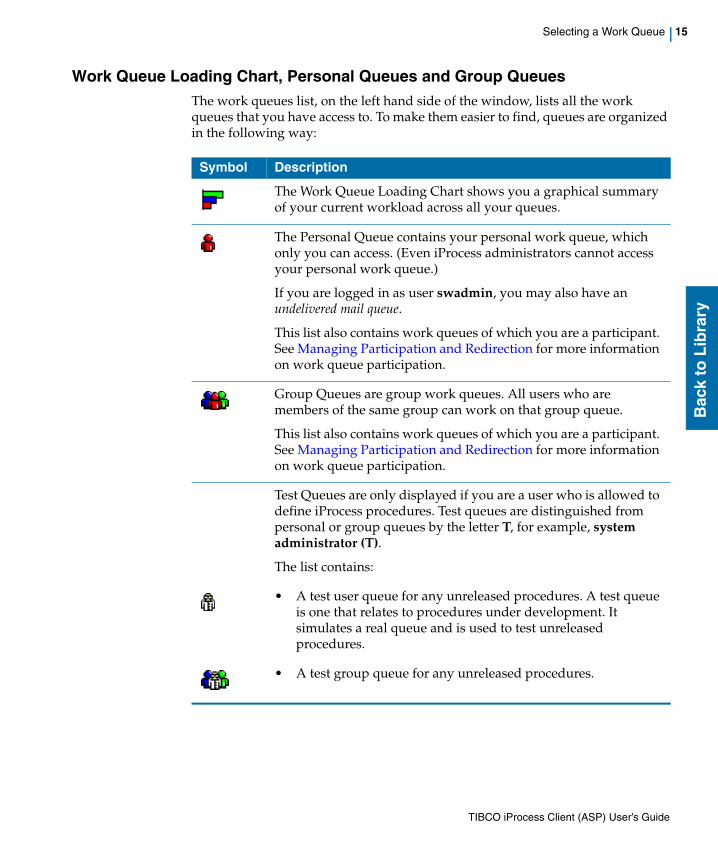
Work Queue Loading Chart, Personal Queues and Group QueuesThe work queues list, on the left hand side of the window, lists all the work queues that you have access to. To make them easier to find, queues are organized in the following way:
Symbol Description
The Work Queue Loading Chart shows you a graphical summary of your current workload across all your queues.
The Personal Queue contains your personal work queue, which only you can access. (Even iProcess administrators cannot access your personal work queue.)
If you are logged in as user swadmin, you may also have an undelivered mail queue.
This list also contains work queues of which you are a participant. See Managing Participation and Redirection for more information on work queue participation.
Group Queues are group work queues. All users who are members of the same group can work on that group queue.
This list also contains work queues of which you are a participant. See Managing Participation and Redirection for more information on work queue participation.
Test Queues are only displayed if you are a user who is allowed to define iProcess procedures. Test queues are distinguished from personal or group queues by the letter T, for example, system administrator (T).
The list contains:
• A test user queue for any unreleased procedures. A test queue is one that relates to procedures under development. It simulates a real queue and is used to test unreleased procedures.
• A test group queue for any unreleased procedures.
TIBCO iProcess Client (ASP) User’s Guide
16 | Chapter 3 Using Work Queues
Bac
k to
Lib
rary
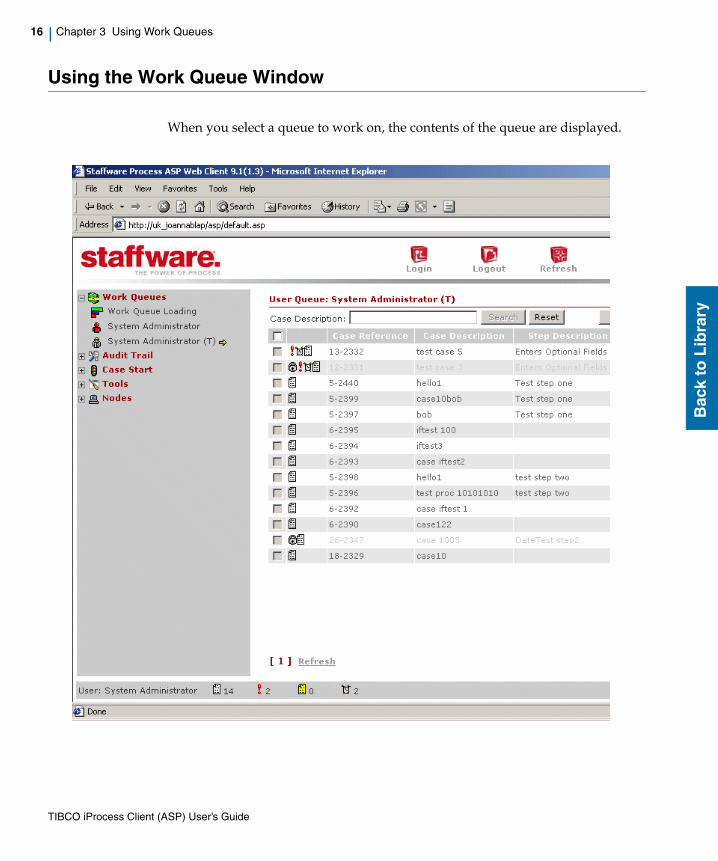
Using the Work Queue Window
When you select a queue to work on, the contents of the queue are displayed.
TIBCO iProcess Client (ASP) User’s Guide

Using the Work Queue Window | 17
Bac
k to
Lib
rary
The Status BarThe status bar shows information about your queue.
What is Displayed in Your Work Queue Loading Chart?The Work Queue Loading Chart shows, in bar chart form, the following information for each visible work queue.
• the total number of items in the queue (in green)
• the number of new items in the queue (in blue)
• the number of items in the queue which have deadlines (in yellow)
Status Bar Item Description
User Shows the name of the user you are currently logged in as.
Shows the total number of work items in the queue.
Shows the number of work items in the queue that have been designated as urgent.
Shows the number of work items in the queue that have not yet been opened.
Shows the number of work items in the queue that have Deadlines on them.
Access Criteria enables you to define the sort, filter and display options on the iProcess Engine. This means you can control the way your queues are displayed in the TIBCO iProcess Client (ASP). See Setting Filter, Display and Sort Options.
TIBCO iProcess Client (ASP) User’s Guide
18 | Chapter 3 Using Work Queues
Bac
k to
Lib
rary
• the number of urgent items in the queue (in red)
What is Displayed in Your Work Queue?Your Work Queue display shows the following information about each work item in the queue.
The first column is untitled but is used to select work items to forward to another queue. See Forwarding Work Items from a Queue.
Use the Work Queue Loading Chart if your work is spread across several queues and you want to know where to start; or if you want an ‘at a glance’ summary of the contents of a very large queue.
Counts and scales shown in the Work Queue Loading Chart do not take into account any filters that are set on the queue.
The columns displayed in the Work Queue display can be changed. See “Changing the Default Work Queue Display” in the TIBCO iProcess Client (ASP) Customization Guide for more information.
TIBCO iProcess Client (ASP) User’s Guide
Using the Work Queue Window | 19
Bac
k to
Lib
rary
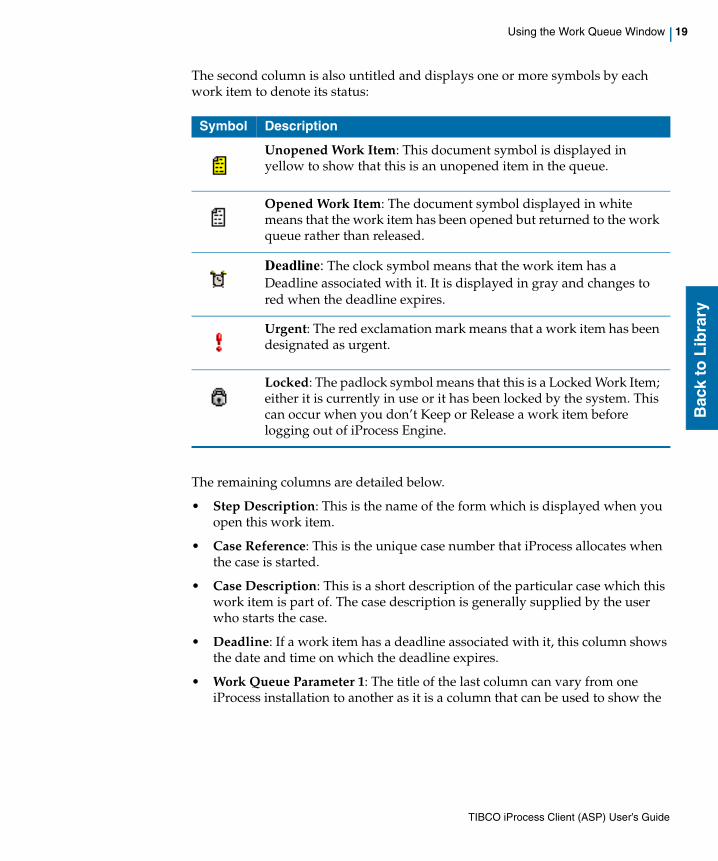
The second column is also untitled and displays one or more symbols by each work item to denote its status:
The remaining columns are detailed below.
• Step Description: This is the name of the form which is displayed when you open this work item.
• Case Reference: This is the unique case number that iProcess allocates when the case is started.
• Case Description: This is a short description of the particular case which this work item is part of. The case description is generally supplied by the user who starts the case.
• Deadline: If a work item has a deadline associated with it, this column shows the date and time on which the deadline expires.
• Work Queue Parameter 1: The title of the last column can vary from one iProcess installation to another as it is a column that can be used to show the
Symbol Description
Unopened Work Item: This document symbol is displayed in yellow to show that this is an unopened item in the queue.
Opened Work Item: The document symbol displayed in white means that the work item has been opened but returned to the work queue rather than released.
Deadline: The clock symbol means that the work item has a Deadline associated with it. It is displayed in gray and changes to red when the deadline expires.
Urgent: The red exclamation mark means that a work item has been designated as urgent.
Locked: The padlock symbol means that this is a Locked Work Item; either it is currently in use or it has been locked by the system. This can occur when you don’t Keep or Release a work item before logging out of iProcess Engine.
TIBCO iProcess Client (ASP) User’s Guide
20 | Chapter 3 Using Work Queues
Bac
k to
Lib
rary
values of a specific iProcess field. For example, the title might be Ref No with the column displaying the customer reference number.
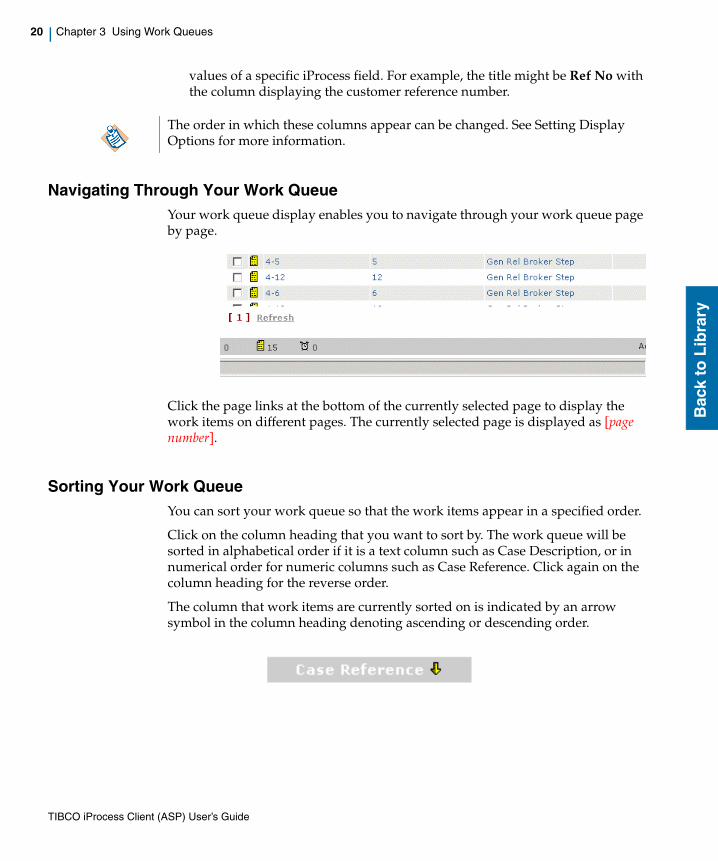
Navigating Through Your Work Queue Your work queue display enables you to navigate through your work queue page by page.
Click the page links at the bottom of the currently selected page to display the work items on different pages. The currently selected page is displayed as [page number].
Sorting Your Work QueueYou can sort your work queue so that the work items appear in a specified order.
Click on the column heading that you want to sort by. The work queue will be sorted in alphabetical order if it is a text column such as Case Description, or in numerical order for numeric columns such as Case Reference. Click again on the column heading for the reverse order.
The column that work items are currently sorted on is indicated by an arrow symbol in the column heading denoting ascending or descending order.
The order in which these columns appear can be changed. See Setting Display Options for more information.
TIBCO iProcess Client (ASP) User’s Guide
| 21
Bac
k to
Lib
rary
Chapter 4 Processing Work Items
Work items are the individual pieces of work - electronic forms - in a work queue which require your attention. To deal with a work item you open it, fill in the form which is displayed, and then Release it from your work queue back to iProcess.
Topics
• Opening Work Items
• Filling in Forms
• Keeping and Releasing Work Items
• Forwarding Work Items from a Queue
• Predicting How Long a Case Will Take to Complete
TIBCO iProcess Client (ASP) User’s Guide

22 | Chapter 4 Processing Work Items
Bac
k to
Lib
rary
Opening Work Items
To open a work item from the list of items in your queue, click on the item you want to open. The form for that item is then displayed.
At the top of the form the procedure description is displayed followed by the case description and step description.
Locked Work ItemsA work item, which is shown in gray, with status is locked. This means that you cannot open it because somebody already has it open. (Locking prevents two people from working on the same work item at the same time.) You will see locked work items in two situations:
• When you open a work item its status immediately changes to locked, and remains so until you keep or release it.
• When you are working in a group queue, items that other users are currently working on are shown as locked.
TIBCO iProcess Client (ASP) User’s Guide
Opening Work Items | 23
Bac
k to
Lib
rary
The TIBCO iProcess Client (ASP) automatically updates the lock status of work items. You will see work items in group queues changing between locked and unlocked as other members of the group work on them.
When you are working in a large or busy group queue, rather than search for an unlocked work item to open you can simply click Open Next to open the first unlocked item in the queue.
TIBCO iProcess Client (ASP) User’s Guide
24 | Chapter 4 Processing Work Items
Bac
k to
Lib
rary
Filling in Forms
The majority of forms have input fields for you to enter information into. To enter information into a field:
1. Click the field.
2. Type the information in the field.
3. Press Tab to move to the next field or click the next field. (Using the <Return> or <Enter> key will not move you to the next field).
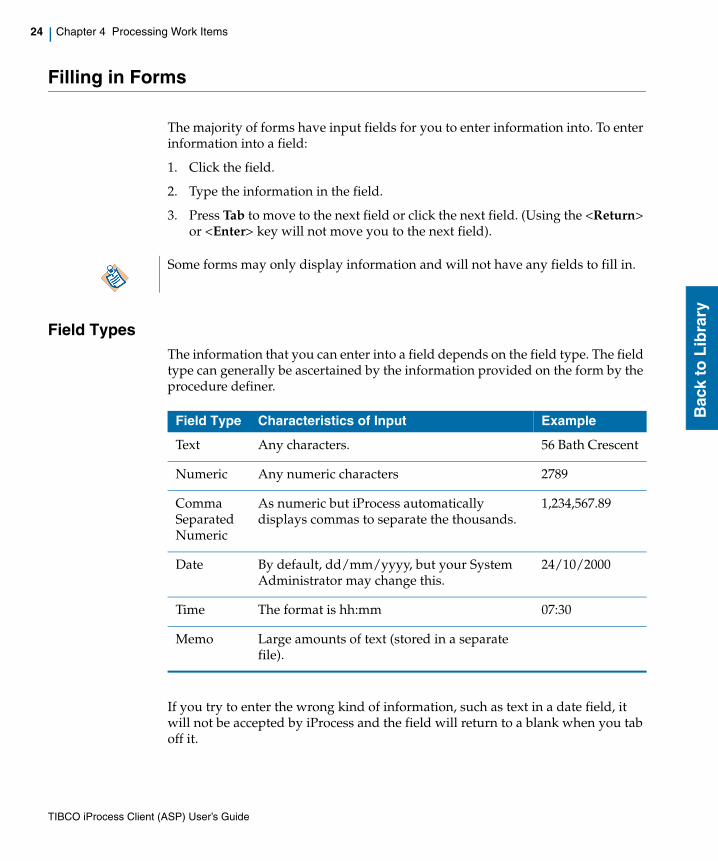
Field TypesThe information that you can enter into a field depends on the field type. The field type can generally be ascertained by the information provided on the form by the procedure definer.
If you try to enter the wrong kind of information, such as text in a date field, it will not be accepted by iProcess and the field will return to a blank when you tab off it.
Some forms may only display information and will not have any fields to fill in.
Field Type Characteristics of Input Example
Text Any characters. 56 Bath Crescent
Numeric Any numeric characters 2789
Comma Separated Numeric
As numeric but iProcess automatically displays commas to separate the thousands.
1,234,567.89
Date By default, dd/mm/yyyy, but your System Administrator may change this.
24/10/2000
Time The format is hh:mm 07:30
Memo Large amounts of text (stored in a separate file).
TIBCO iProcess Client (ASP) User’s Guide
Filling in Forms | 25
Bac
k to
Lib
rary
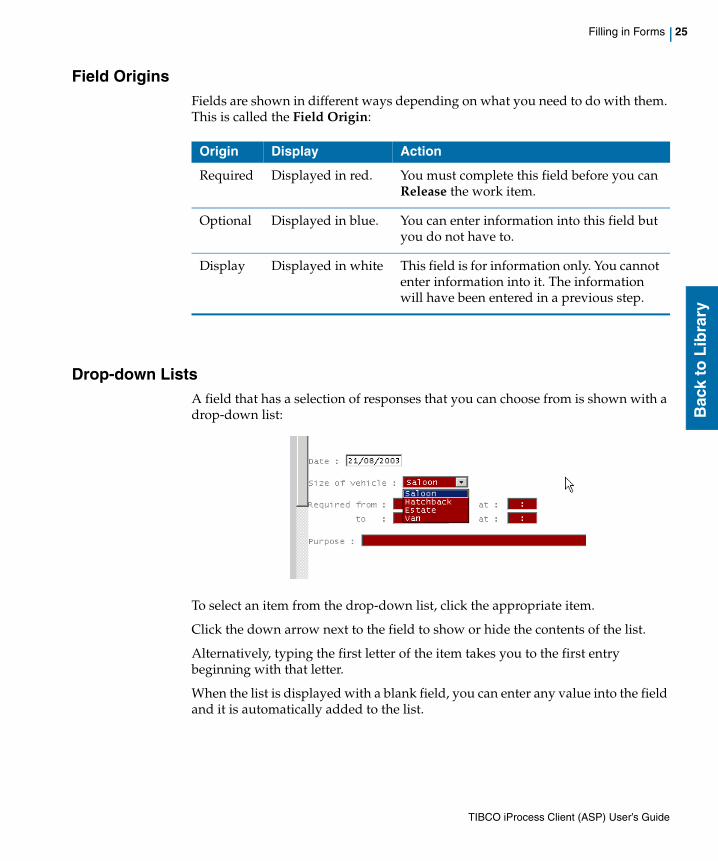
Field OriginsFields are shown in different ways depending on what you need to do with them. This is called the Field Origin:
Drop-down ListsA field that has a selection of responses that you can choose from is shown with a drop-down list:
To select an item from the drop-down list, click the appropriate item.
Click the down arrow next to the field to show or hide the contents of the list.
Alternatively, typing the first letter of the item takes you to the first entry beginning with that letter.
When the list is displayed with a blank field, you can enter any value into the field and it is automatically added to the list.
Origin Display Action
Required Displayed in red. You must complete this field before you can Release the work item.
Optional Displayed in blue. You can enter information into this field but you do not have to.
Display Displayed in white This field is for information only. You cannot enter information into it. The information will have been entered in a previous step.
TIBCO iProcess Client (ASP) User’s Guide
26 | Chapter 4 Processing Work Items
Bac
k to
Lib
rary
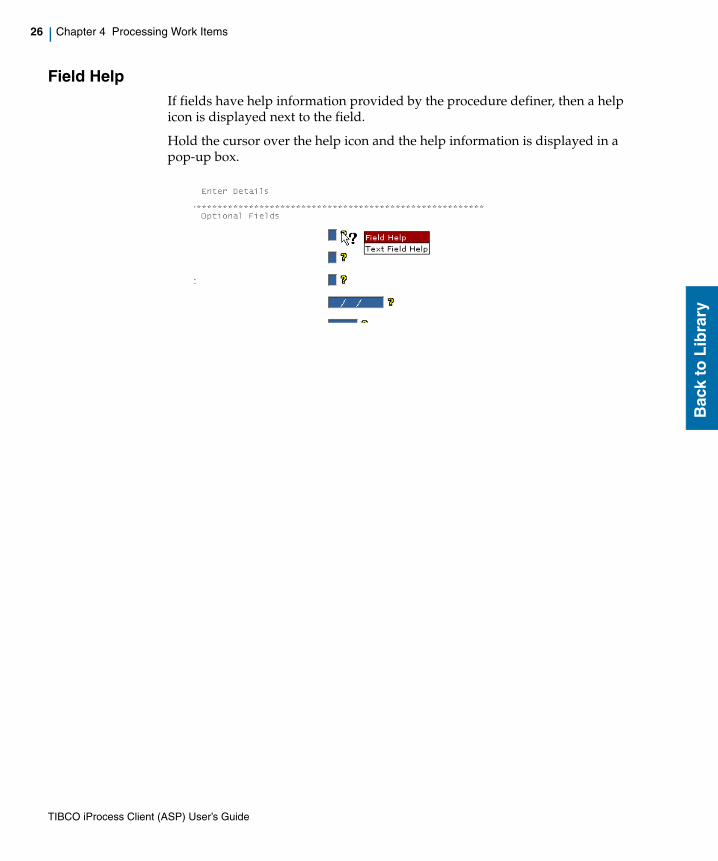
Field HelpIf fields have help information provided by the procedure definer, then a help icon is displayed next to the field.
Hold the cursor over the help icon and the help information is displayed in a pop-up box.
TIBCO iProcess Client (ASP) User’s Guide
Keeping and Releasing Work Items | 27
Bac
k to
Lib
rary
Keeping and Releasing Work Items
When you have finished working on your form you can either Keep or Release it by clicking the appropriate button at the bottom of the form.
Keeping a Work ItemWhen you Keep a work item you are returning it to the work queue. Any information you have entered into fields is saved and you can re-open the work item at a later date.
Click the Keep button at the bottom of the form.
Releasing a Work ItemWhen you have finished working on a form and all of the Required fields are completed, you can Release it. This means that the work item is removed from the work queue and the next step in the procedure is processed by iProcess.
Click the Release button at the bottom of the form.
You MUST either Keep or Release open work items before moving to another page, selecting a different work item or folder or closing your browser. If you do not, any information you have entered will be lost and the work item will be locked. A locked work item in a group queue cannot be opened by any other member of that queue. A locked work item can usually be forced open by the user that locked it or by the iProcess System Administrator.
TIBCO iProcess Client (ASP) User’s Guide
28 | Chapter 4 Processing Work Items
Bac
k to
Lib
rary
Forwarding Work Items from a Queue
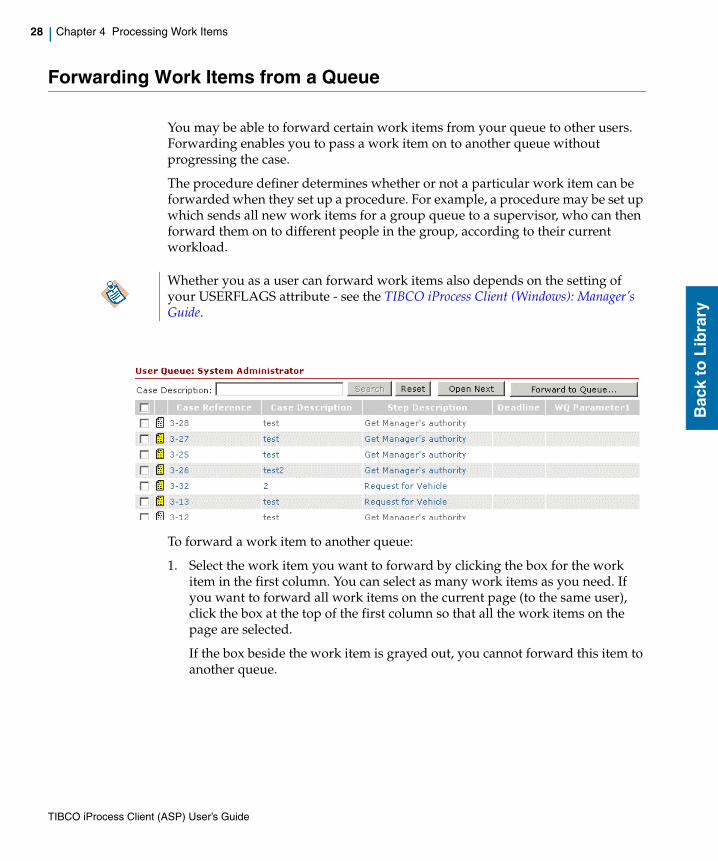
You may be able to forward certain work items from your queue to other users. Forwarding enables you to pass a work item on to another queue without progressing the case.
The procedure definer determines whether or not a particular work item can be forwarded when they set up a procedure. For example, a procedure may be set up which sends all new work items for a group queue to a supervisor, who can then forward them on to different people in the group, according to their current workload.
To forward a work item to another queue:
1. Select the work item you want to forward by clicking the box for the work item in the first column. You can select as many work items as you need. If you want to forward all work items on the current page (to the same user), click the box at the top of the first column so that all the work items on the page are selected.
If the box beside the work item is grayed out, you cannot forward this item to another queue.
Whether you as a user can forward work items also depends on the setting of your USERFLAGS attribute - see the TIBCO iProcess Client (Windows): Manager’s Guide.
TIBCO iProcess Client (ASP) User’s Guide

Forwarding Work Items from a Queue | 29
Bac
k to
Lib
rary
2. Click Forward to Queue. The Forward from queue: username page is opened.
3. From the Forward n work item(s) to queue box:, select the user you want to forward the work item to.
4. Click Forward to Queue.
You cannot forward work items to test queues or (if you are logged in as swadmin) to the Undelivered Work Items queue. Consequently these queues are never listed.
TIBCO iProcess Client (ASP) User’s Guide
30 | Chapter 4 Processing Work Items
Bac
k to
Lib
rary
Finding Particular Work Items
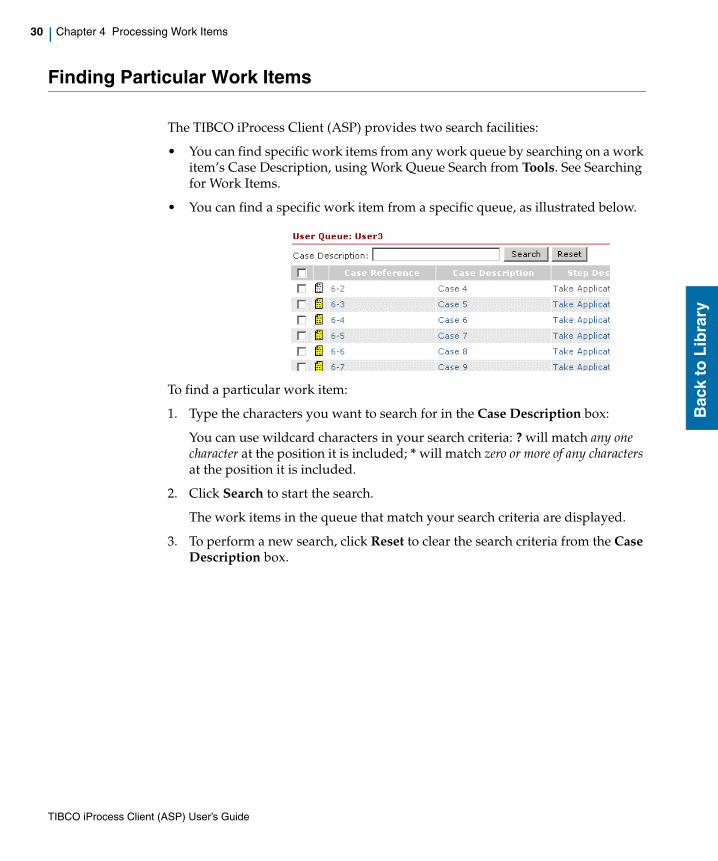
The TIBCO iProcess Client (ASP) provides two search facilities:
• You can find specific work items from any work queue by searching on a work item’s Case Description, using Work Queue Search from Tools. See Searching for Work Items.
• You can find a specific work item from a specific queue, as illustrated below.
To find a particular work item:
1. Type the characters you want to search for in the Case Description box:
You can use wildcard characters in your search criteria: ? will match any one character at the position it is included; * will match zero or more of any characters at the position it is included.
2. Click Search to start the search.
The work items in the queue that match your search criteria are displayed.
3. To perform a new search, click Reset to clear the search criteria from the Case Description box.
TIBCO iProcess Client (ASP) User’s Guide
Predicting How Long a Case Will Take to Complete | 31
Bac
k to
Lib
rary
Predicting How Long a Case Will Take to Complete
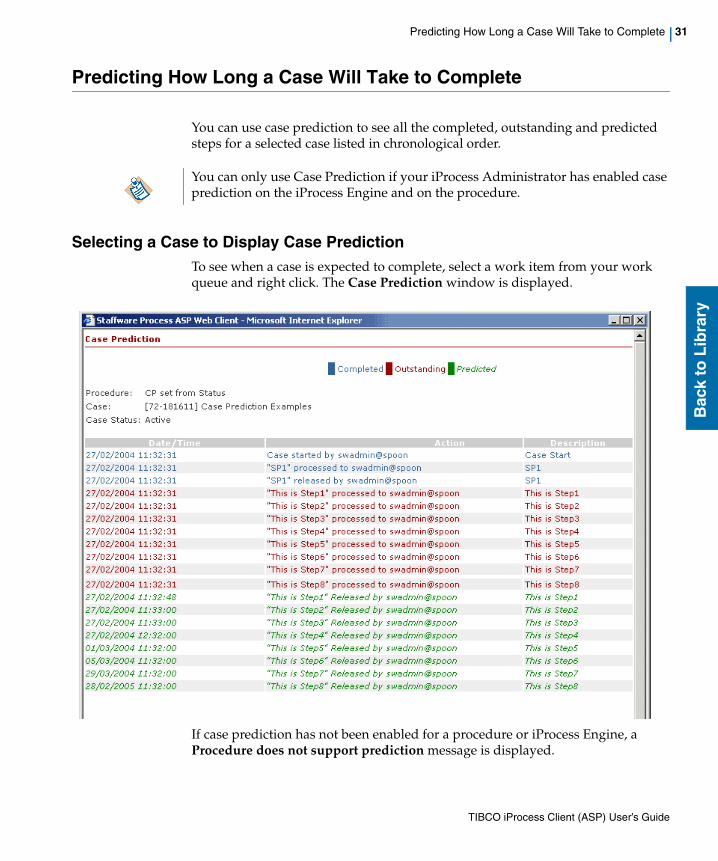
You can use case prediction to see all the completed, outstanding and predicted steps for a selected case listed in chronological order.
Selecting a Case to Display Case PredictionTo see when a case is expected to complete, select a work item from your work queue and right click. The Case Prediction window is displayed.
If case prediction has not been enabled for a procedure or iProcess Engine, a Procedure does not support prediction message is displayed.
You can only use Case Prediction if your iProcess Administrator has enabled case prediction on the iProcess Engine and on the procedure.
TIBCO iProcess Client (ASP) User’s Guide
32 | Chapter 4 Processing Work Items
Bac
k to
Lib
rary
Understanding the Case Prediction WindowThe Case Prediction window shows:
• completed actions (in blue). A completed action is a work item that has been opened and released.
• outstanding actions (in red). An outstanding action is a work item that has been opened and either the form is still being filled in or the work item has been kept.
• predicted actions (in green). A predicted action is a work item that has not been opened yet.
The Case Prediction window is divided into two parts:
• The details of the case are displayed at the top of the window. The following information is displayed:
— Procedure name: The name of the procedure which generated the work item, generally supplied by the procedure definer.
— Case: This consists of:
— the unique case reference number that iProcess allocates when the case is started.
— the short description of the particular case. The case description is generally supplied by the user who starts the case.
— Case Status: This is the status that this case currently holds, for example, active or terminated.
The audit trail for the selected case is displayed below the case details.
— Date/Time: Either the date/time when this action was completed or the date/time this action is predicted to complete (depending on whether the work item is completed or outstanding/predicted).
— Action: The action that has or will take place (depending on whether the work item is completed or outstanding/predicted).
Closing the Case Prediction WindowClick Close Window to return to your work queue.
TIBCO iProcess Client (ASP) User’s Guide
| 33
Bac
k to
Lib
rary
Chapter 5 Starting Cases
This chapter explains how to start cases of a procedure.
Topics
• Selecting a Procedure
• Entering a Case Description
TIBCO iProcess Client (ASP) User’s Guide
34 | Chapter 5 Starting Cases
Bac
k to
Lib
rary
Selecting a Procedure
To select a procedure:
1. Click Case Start on the left hand side of the screen.
If you are logged in to more than one node, each node you are logged in to is listed in the Case Start list. Click the appropriate node.
2. Depending on your iProcess Engine version and the current status of your existing procedures, some or all of the following items are displayed:
— Released
— Unreleased
— Model
Procedures are contained in these lists, depending on their status.
3. Click Released, Unreleased or Model, depending on your requirements. The list of available procedures is displayed.
The first time you click Case Start, it may take a few seconds for the procedures to display. It depends on how your iProcess System Administrator has configured the TIBCO iProcess Client (ASP) and how many procedures your iProcess system has. A Loading... message is displayed while the procedures are being loaded.
If you are logged into a version earlier than Version i10, the procedure version is also displayed.
TIBCO iProcess Client (ASP) User’s Guide
Selecting a Procedure | 35
Bac
k to
Lib
rary
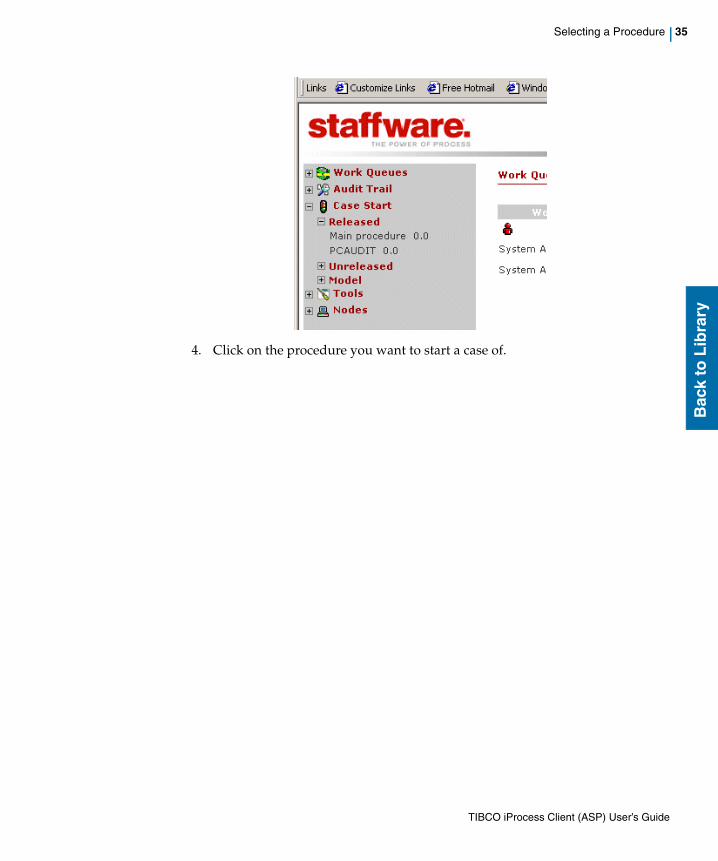
4. Click on the procedure you want to start a case of.
TIBCO iProcess Client (ASP) User’s Guide
36 | Chapter 5 Starting Cases
Bac
k to
Lib
rary
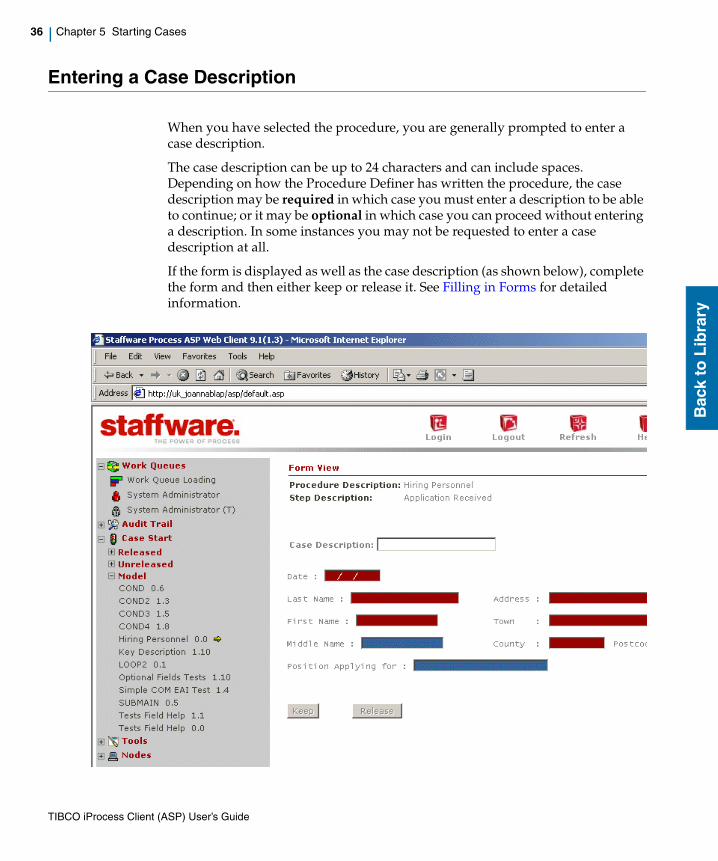
Entering a Case Description
When you have selected the procedure, you are generally prompted to enter a case description.
The case description can be up to 24 characters and can include spaces. Depending on how the Procedure Definer has written the procedure, the case description may be required in which case you must enter a description to be able to continue; or it may be optional in which case you can proceed without entering a description. In some instances you may not be requested to enter a case description at all.
If the form is displayed as well as the case description (as shown below), complete the form and then either keep or release it. See Filling in Forms for detailed information.
TIBCO iProcess Client (ASP) User’s Guide
Entering a Case Description | 37
Bac
k to
Lib
rary
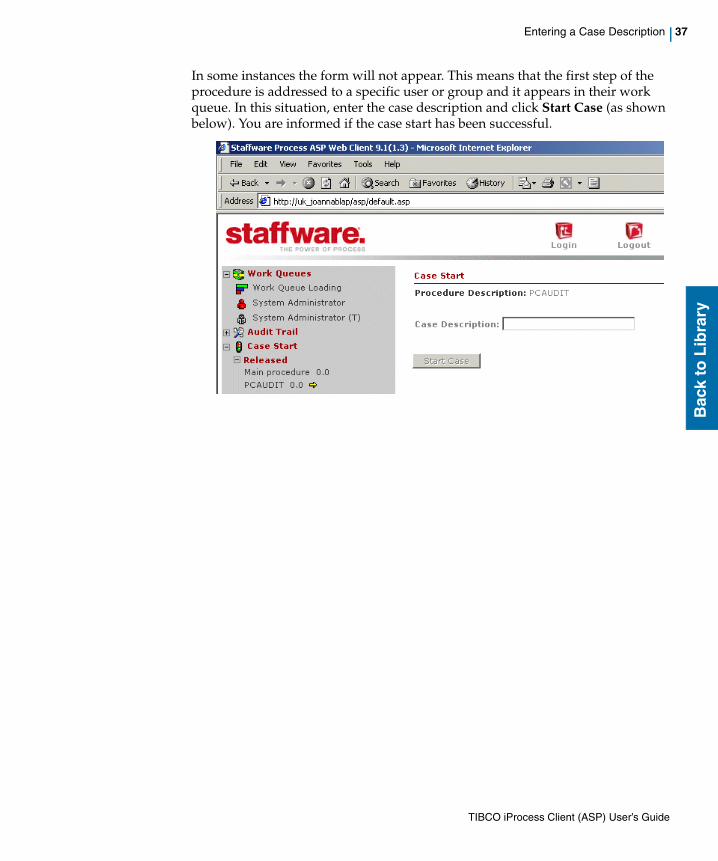
In some instances the form will not appear. This means that the first step of the procedure is addressed to a specific user or group and it appears in their work queue. In this situation, enter the case description and click Start Case (as shown below). You are informed if the case start has been successful.
TIBCO iProcess Client (ASP) User’s Guide
38 | Chapter 5 Starting Cases
Bac
k to
Lib
rary
TIBCO iProcess Client (ASP) User’s Guide

| 39
Bac
k to
Lib
rary
Chapter 6 Using Audit Trails
The Audit Trail gives you information about all cases that have been started for each procedure. Using the audit trail allows you to see how far through the procedure each case has reached, which work queue each step was sent to and who released it.
Topics
• Selecting a Procedure
• Defining an Audit Case List Filter
• Selecting a Case
• Understanding your Audit Trail
TIBCO iProcess Client (ASP) User’s Guide
40 | Chapter 6 Using Audit Trails
Bac
k to
Lib
rary
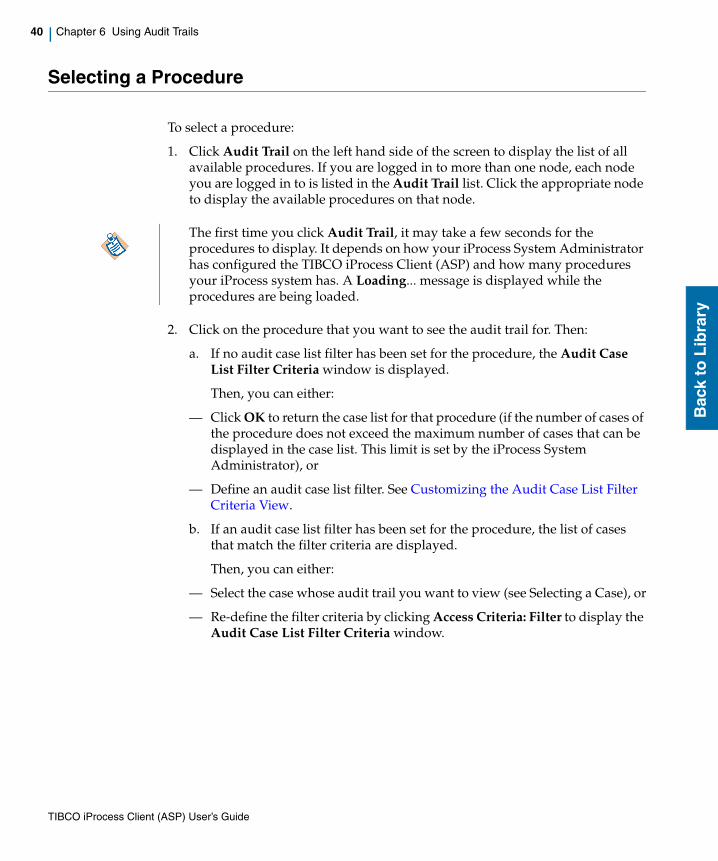
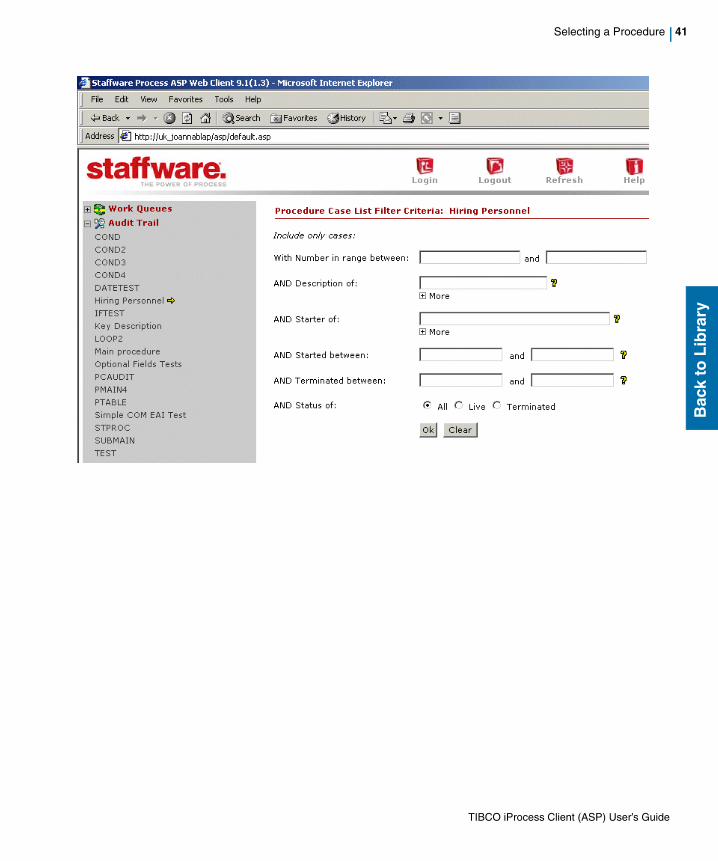
Selecting a Procedure
To select a procedure:
1. Click Audit Trail on the left hand side of the screen to display the list of all available procedures. If you are logged in to more than one node, each node you are logged in to is listed in the Audit Trail list. Click the appropriate node to display the available procedures on that node.
2. Click on the procedure that you want to see the audit trail for. Then:
a. If no audit case list filter has been set for the procedure, the Audit Case List Filter Criteria window is displayed.
Then, you can either:
— Click OK to return the case list for that procedure (if the number of cases of the procedure does not exceed the maximum number of cases that can be displayed in the case list. This limit is set by the iProcess System Administrator), or
— Define an audit case list filter. See Customizing the Audit Case List Filter Criteria View.
b. If an audit case list filter has been set for the procedure, the list of cases that match the filter criteria are displayed.
Then, you can either:
— Select the case whose audit trail you want to view (see Selecting a Case), or
— Re-define the filter criteria by clicking Access Criteria: Filter to display the Audit Case List Filter Criteria window.
The first time you click Audit Trail, it may take a few seconds for the procedures to display. It depends on how your iProcess System Administrator has configured the TIBCO iProcess Client (ASP) and how many procedures your iProcess system has. A Loading... message is displayed while the procedures are being loaded.
TIBCO iProcess Client (ASP) User’s Guide
Selecting a Procedure | 41
Bac
k to
Lib
rary
TIBCO iProcess Client (ASP) User’s Guide
42 | Chapter 6 Using Audit Trails
Bac
k to
Lib
rary
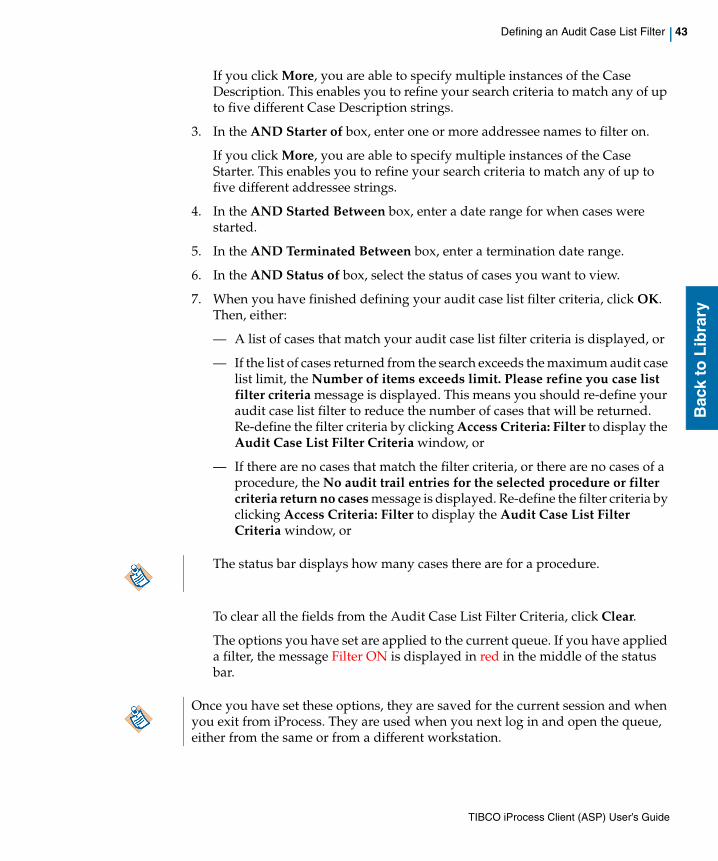
Defining an Audit Case List Filter
Setting an audit case list filter enables you to enter search criteria so that you can find a specific case or a range of cases to view. An audit case list filter enables you to find a case using any of the following search criteria:
To enter Audit Case List Filter Criteria:
1. In the With Number in range between and and boxes, enter a range of case numbers if you want to restrict the case list.
2. In the AND Description of box, enter one or more case description names to filter on.
Filter Criteria Description
Case Number This is the unique case number that iProcess allocates when the case is started.
Case Description This is a short description of this particular case. The case description is generally supplied by the person who starts the case.
Started By This tells you who started this case by giving the short Username followed by @ and the iProcess Engine on which the case was started.
Case Status The current status of the case which can be one of the following:
• LIVE: A case that still has steps outstanding
• TERMINATED: A case that has terminated normally.
Start Date Date and time when the case was started, in the format dd/mm/yyyy hh:mm.
Termination Date Date and time when the case was terminated, in the format dd/mm/yyyy hh:mm.
Procedure Version (optional)
The TIBCO® iProcess Engine Version i10 introduced version control. This means that if you are logged into a TIBCO iProcess Engine Version i10, Procedure Version is included in the display criteria. This tells you the version number of the procedure which generated the case.
TIBCO iProcess Client (ASP) User’s Guide
Defining an Audit Case List Filter | 43
Bac
k to
Lib
rary
If you click More, you are able to specify multiple instances of the Case Description. This enables you to refine your search criteria to match any of up to five different Case Description strings.
3. In the AND Starter of box, enter one or more addressee names to filter on.
If you click More, you are able to specify multiple instances of the Case Starter. This enables you to refine your search criteria to match any of up to five different addressee strings.
4. In the AND Started Between box, enter a date range for when cases were started.
5. In the AND Terminated Between box, enter a termination date range.
6. In the AND Status of box, select the status of cases you want to view.
7. When you have finished defining your audit case list filter criteria, click OK. Then, either:
— A list of cases that match your audit case list filter criteria is displayed, or
— If the list of cases returned from the search exceeds the maximum audit case list limit, the Number of items exceeds limit. Please refine you case list filter criteria message is displayed. This means you should re-define your audit case list filter to reduce the number of cases that will be returned. Re-define the filter criteria by clicking Access Criteria: Filter to display the Audit Case List Filter Criteria window, or
— If there are no cases that match the filter criteria, or there are no cases of a procedure, the No audit trail entries for the selected procedure or filter criteria return no cases message is displayed. Re-define the filter criteria by clicking Access Criteria: Filter to display the Audit Case List Filter Criteria window, or
To clear all the fields from the Audit Case List Filter Criteria, click Clear.
The options you have set are applied to the current queue. If you have applied a filter, the message Filter ON is displayed in red in the middle of the status bar.
The status bar displays how many cases there are for a procedure.
Once you have set these options, they are saved for the current session and when you exit from iProcess. They are used when you next log in and open the queue, either from the same or from a different workstation.
TIBCO iProcess Client (ASP) User’s Guide
44 | Chapter 6 Using Audit Trails
Bac
k to
Lib
rary
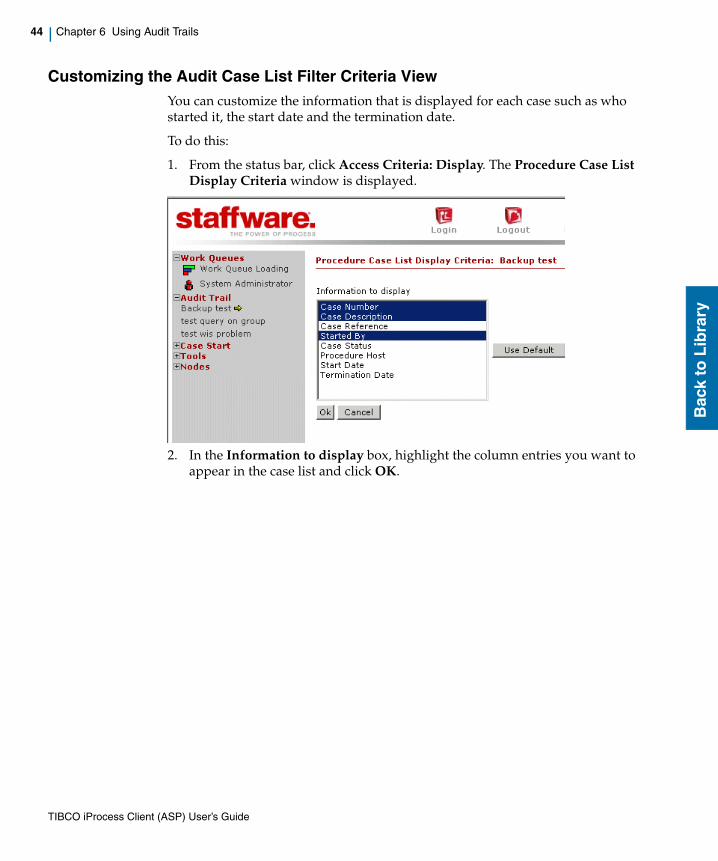
Customizing the Audit Case List Filter Criteria ViewYou can customize the information that is displayed for each case such as who started it, the start date and the termination date.
To do this:
1. From the status bar, click Access Criteria: Display. The Procedure Case List Display Criteria window is displayed.
2. In the Information to display box, highlight the column entries you want to appear in the case list and click OK.
TIBCO iProcess Client (ASP) User’s Guide
Defining an Audit Case List Filter | 45
Bac
k to
Lib
rary
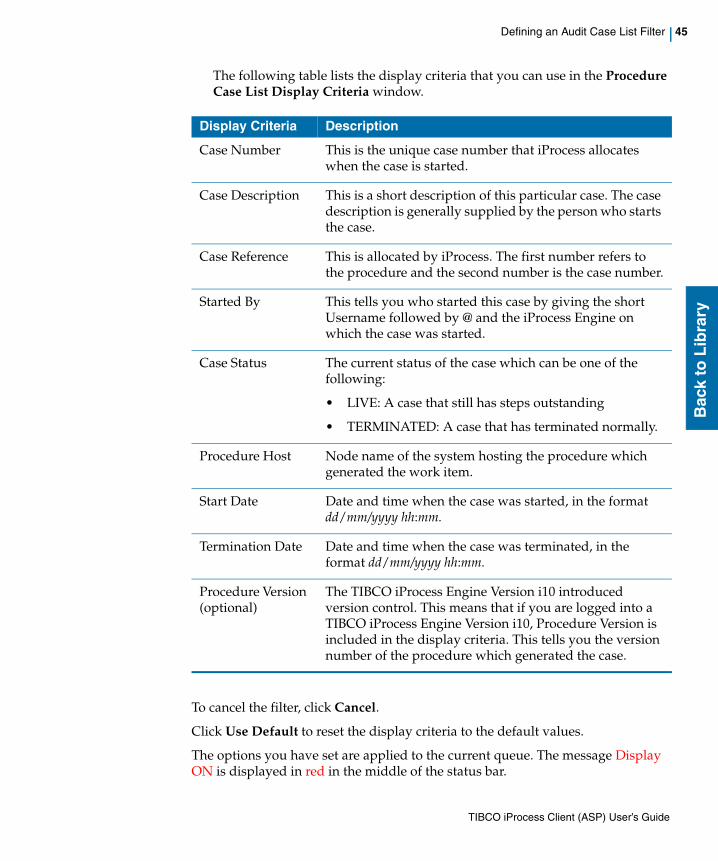
The following table lists the display criteria that you can use in the Procedure Case List Display Criteria window.
To cancel the filter, click Cancel.
Click Use Default to reset the display criteria to the default values.
The options you have set are applied to the current queue. The message Display ON is displayed in red in the middle of the status bar.
Display Criteria Description
Case Number This is the unique case number that iProcess allocates when the case is started.
Case Description This is a short description of this particular case. The case description is generally supplied by the person who starts the case.
Case Reference This is allocated by iProcess. The first number refers to the procedure and the second number is the case number.
Started By This tells you who started this case by giving the short Username followed by @ and the iProcess Engine on which the case was started.
Case Status The current status of the case which can be one of the following:
• LIVE: A case that still has steps outstanding
• TERMINATED: A case that has terminated normally.
Procedure Host Node name of the system hosting the procedure which generated the work item.
Start Date Date and time when the case was started, in the format dd/mm/yyyy hh:mm.
Termination Date Date and time when the case was terminated, in the format dd/mm/yyyy hh:mm.
Procedure Version (optional)
The TIBCO iProcess Engine Version i10 introduced version control. This means that if you are logged into a TIBCO iProcess Engine Version i10, Procedure Version is included in the display criteria. This tells you the version number of the procedure which generated the case.
TIBCO iProcess Client (ASP) User’s Guide
46 | Chapter 6 Using Audit Trails
Bac
k to
Lib
rary
Once you have set these options, they are saved for the current session and when you exit from iProcess. They are used when you next log in and open the queue, either from the same or from a different workstation.
TIBCO iProcess Client (ASP) User’s Guide
Selecting a Case | 47
Bac
k to
Lib
rary
Selecting a Case
The list of cases displayed includes both active cases that are currently going through the procedure and those that have completed.
Click on the case that you want to see the audit trail for.
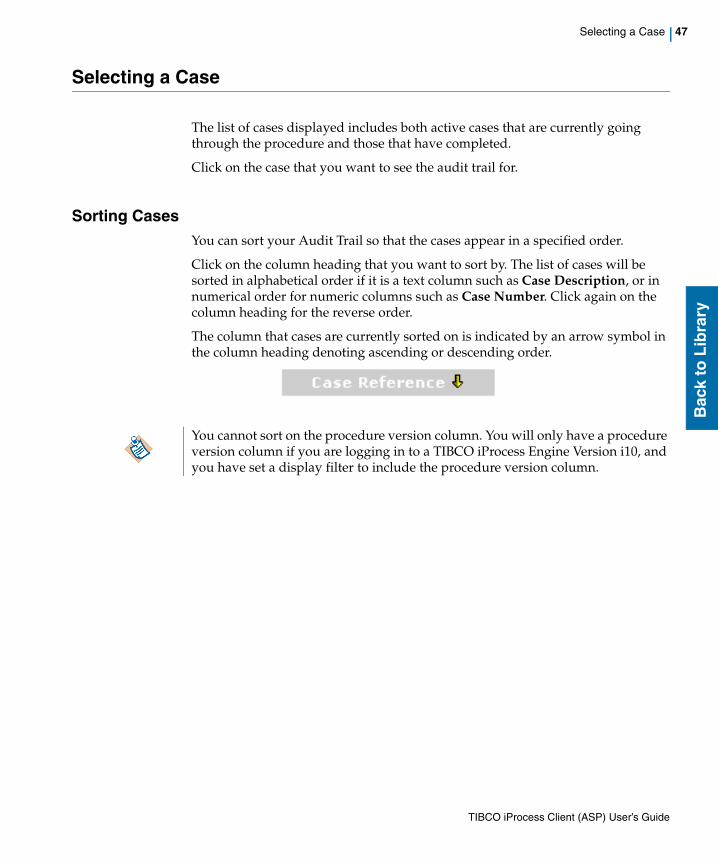
Sorting CasesYou can sort your Audit Trail so that the cases appear in a specified order.
Click on the column heading that you want to sort by. The list of cases will be sorted in alphabetical order if it is a text column such as Case Description, or in numerical order for numeric columns such as Case Number. Click again on the column heading for the reverse order.
The column that cases are currently sorted on is indicated by an arrow symbol in the column heading denoting ascending or descending order.
You cannot sort on the procedure version column. You will only have a procedure version column if you are logging in to a TIBCO iProcess Engine Version i10, and you have set a display filter to include the procedure version column.
TIBCO iProcess Client (ASP) User’s Guide
48 | Chapter 6 Using Audit Trails
Bac
k to
Lib
rary
Understanding your Audit Trail
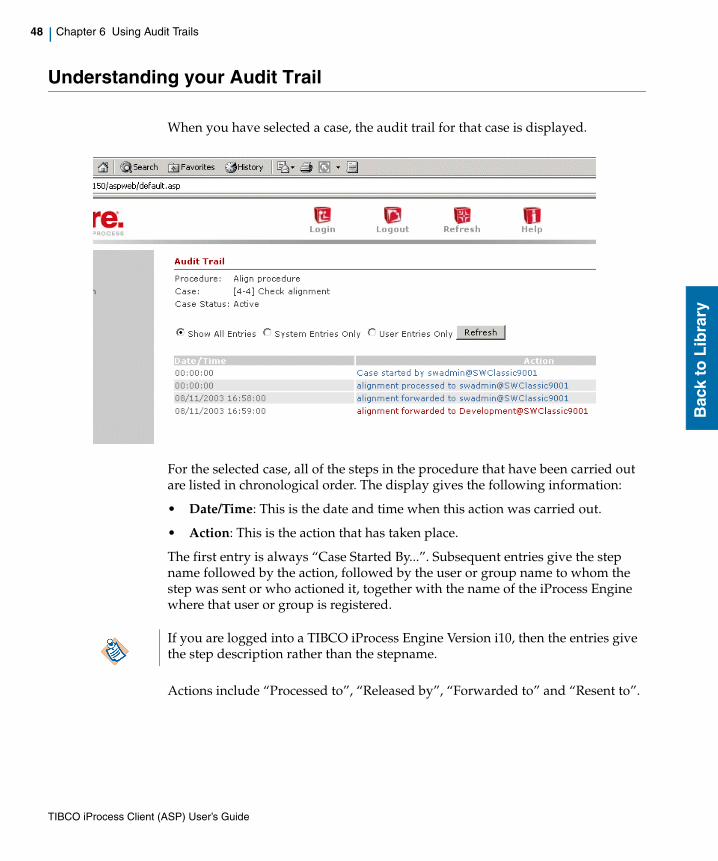
When you have selected a case, the audit trail for that case is displayed.
For the selected case, all of the steps in the procedure that have been carried out are listed in chronological order. The display gives the following information:
• Date/Time: This is the date and time when this action was carried out.
• Action: This is the action that has taken place.
The first entry is always “Case Started By...”. Subsequent entries give the step name followed by the action, followed by the user or group name to whom the step was sent or who actioned it, together with the name of the iProcess Engine where that user or group is registered.
Actions include “Processed to”, “Released by”, “Forwarded to” and “Resent to”.
If you are logged into a TIBCO iProcess Engine Version i10, then the entries give the step description rather than the stepname.
TIBCO iProcess Client (ASP) User’s Guide

Understanding your Audit Trail | 49
Bac
k to
Lib
rary
Sub-procedures can be expanded to show each of the sub-procedure steps by clicking the arrow icon or the red text. Click the arrow icon or red text again to collapse the sub-procedure list.
When a case has completed, the final entry will be “Case terminated normally”. In some instances a case may have been terminated early by the iProcess Administrator. When this has occurred, the entry will read “Case terminated prematurely by ...” and give the user name.
Filtering Audit Trail EntriesYou can set up a filter so that you only display the audit trail entries you want to see.
The following table explains the filter options you can use.
To use the audit trail filter, select your filter option and click Refresh.
The audit trail window is refreshed and displays only the audit trail entries you have specified in your filter.
Display Criteria Description
Show All entries Default option that displays both iProcess and application defined entry types.
System Entries Only Includes only the audit trail entries for the standard iProcess system types. For example, system entries include actions like “Processed to”,“Released by”, “Forwarded to” and “Resent to”.
User Entries Only Includes only the custom application defined entries. For example, custom application-defined entries are entries that have been defined by your system administrator like “Approved by” or “Rejected by”.
TIBCO iProcess Client (ASP) User’s Guide
50 | Chapter 6 Using Audit Trails
Bac
k to
Lib
rary
TIBCO iProcess Client (ASP) User’s Guide
| 51
Bac
k to
Lib
rary
Chapter 7 Organizing Your Work Items
This chapter explains how you can organize and search your work queues so that you can easily find the information you need when you need it.
Topics
• Setting Filter, Display and Sort Options
• Searching for Work Items
• Changing the Case Priority
• Using Queue-Specific Data to Organize or Search Your Work Items Lists
TIBCO iProcess Client (ASP) User’s Guide
52 | Chapter 7 Organizing Your Work Items
Bac
k to
Lib
rary
Setting Filter, Display and Sort Options
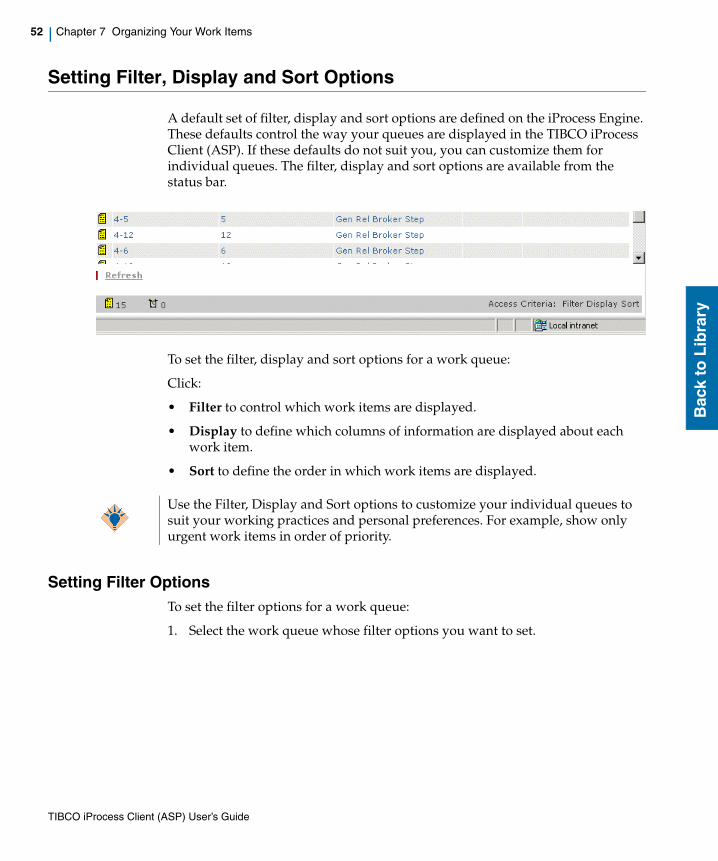
A default set of filter, display and sort options are defined on the iProcess Engine. These defaults control the way your queues are displayed in the TIBCO iProcess Client (ASP). If these defaults do not suit you, you can customize them for individual queues. The filter, display and sort options are available from the status bar.
To set the filter, display and sort options for a work queue:
Click:
• Filter to control which work items are displayed.
• Display to define which columns of information are displayed about each work item.
• Sort to define the order in which work items are displayed.
Setting Filter OptionsTo set the filter options for a work queue:
1. Select the work queue whose filter options you want to set.
Use the Filter, Display and Sort options to customize your individual queues to suit your working practices and personal preferences. For example, show only urgent work items in order of priority.
TIBCO iProcess Client (ASP) User’s Guide
Setting Filter, Display and Sort Options | 53
Bac
k to
Lib
rary
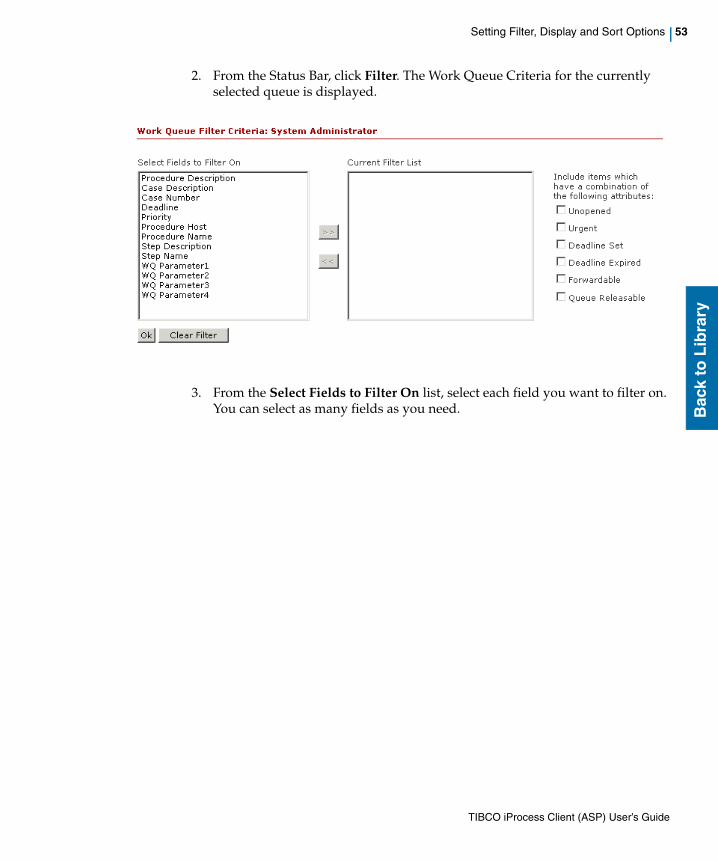
2. From the Status Bar, click Filter. The Work Queue Criteria for the currently selected queue is displayed.
3. From the Select Fields to Filter On list, select each field you want to filter on. You can select as many fields as you need.
TIBCO iProcess Client (ASP) User’s Guide
54 | Chapter 7 Organizing Your Work Items
Bac
k to
Lib
rary
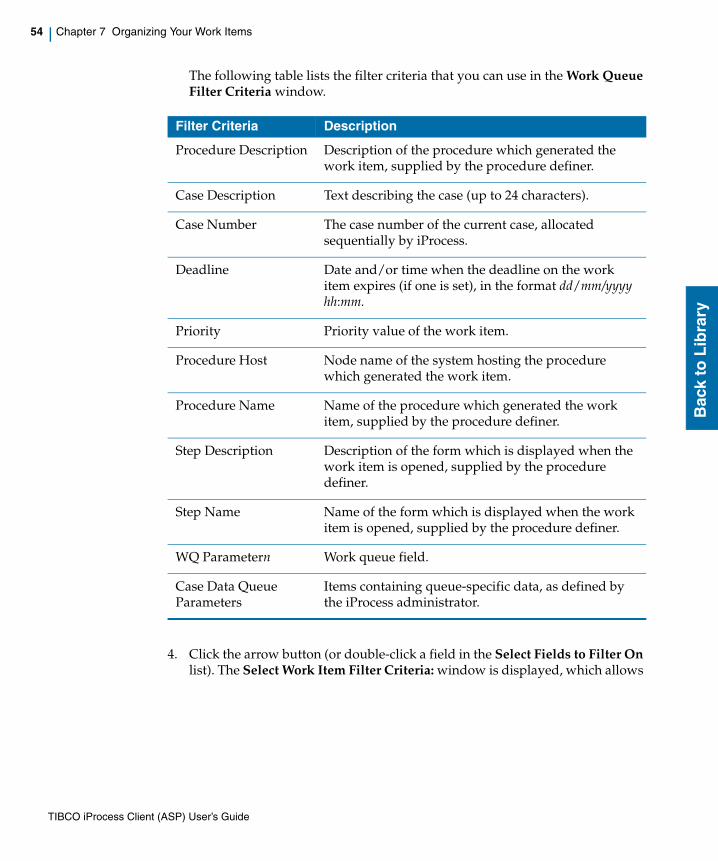
The following table lists the filter criteria that you can use in the Work Queue Filter Criteria window.
4. Click the arrow button (or double-click a field in the Select Fields to Filter On list). The Select Work Item Filter Criteria: window is displayed, which allows
Filter Criteria Description
Procedure Description Description of the procedure which generated the work item, supplied by the procedure definer.
Case Description Text describing the case (up to 24 characters).
Case Number The case number of the current case, allocated sequentially by iProcess.
Deadline Date and/or time when the deadline on the work item expires (if one is set), in the format dd/mm/yyyy hh:mm.
Priority Priority value of the work item.
Procedure Host Node name of the system hosting the procedure which generated the work item.
Procedure Name Name of the procedure which generated the work item, supplied by the procedure definer.
Step Description Description of the form which is displayed when the work item is opened, supplied by the procedure definer.
Step Name Name of the form which is displayed when the work item is opened, supplied by the procedure definer.
WQ Parametern Work queue field.
Case Data Queue Parameters
Items containing queue-specific data, as defined by the iProcess administrator.
TIBCO iProcess Client (ASP) User’s Guide
Setting Filter, Display and Sort Options | 55
Bac
k to
Lib
rary
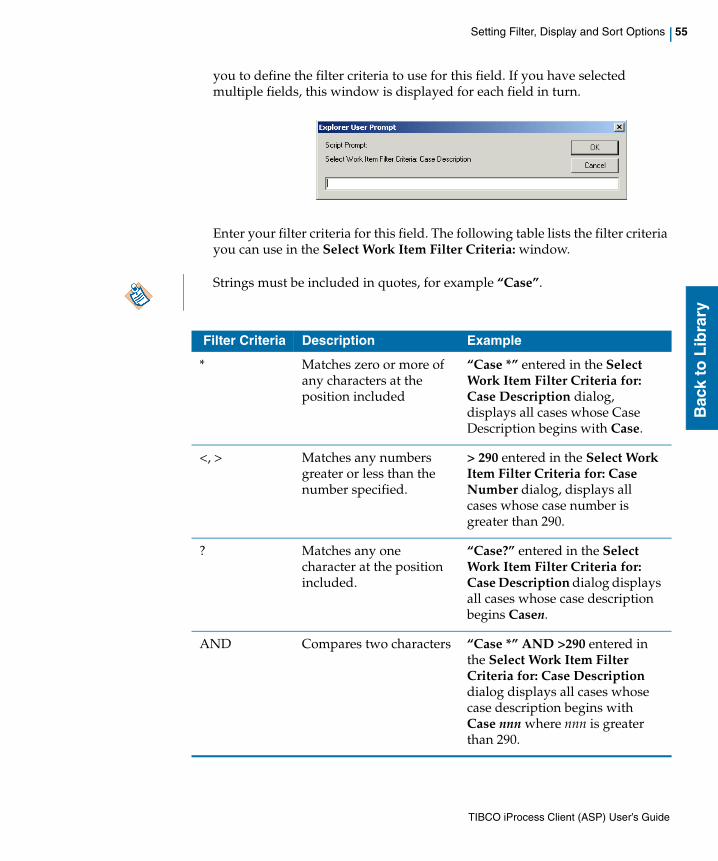
you to define the filter criteria to use for this field. If you have selected multiple fields, this window is displayed for each field in turn.
Enter your filter criteria for this field. The following table lists the filter criteria you can use in the Select Work Item Filter Criteria: window.
Strings must be included in quotes, for example “Case”.
Filter Criteria Description Example
* Matches zero or more of any characters at the position included
“Case *” entered in the Select Work Item Filter Criteria for: Case Description dialog, displays all cases whose Case Description begins with Case.
<, > Matches any numbers greater or less than the number specified.
> 290 entered in the Select Work Item Filter Criteria for: Case Number dialog, displays all cases whose case number is greater than 290.
? Matches any one character at the position included.
“Case?” entered in the Select Work Item Filter Criteria for: Case Description dialog displays all cases whose case description begins Casen.
AND Compares two characters “Case *” AND >290 entered in the Select Work Item Filter Criteria for: Case Description dialog displays all cases whose case description begins with Case nnn where nnn is greater than 290.
TIBCO iProcess Client (ASP) User’s Guide

56 | Chapter 7 Organizing Your Work Items
Bac
k to
Lib
rary
Once you have defined your filter criteria, click OK. The field or fields are then moved to the Current Filter List.
5. Select any combination of the work item attributes to filter the work items based on their status or deadline information. A tick in the box denotes that the attribute is selected.
The following table lists the attributes that you can select. (See What is Displayed in Your Work Queue Loading Chart? for more information about work item status.)
6. When you have finished defining your work queue filter criteria, click OK.
To clear all the fields from the Current Filter List and deselect the attribute check boxes, click Clear Filter.
The options you have set are applied to the current queue. If you have applied a filter the message Filter ON is displayed in red in the middle of the status bar.
Setting Display OptionsTo set the display options for a work queue:
1. Select the work queue whose display options you want to set.
Attribute Description
Unopened Use these criteria to sort work items by their status.
Note: Queue releasable work items are work items that can be directly released from the queue without opening them first. You can only use this facility in the TIBCO iProcess™ Workspace (Windows). However, although this facility is not available in the TIBCO iProcess Client (ASP), you can still use queue releaseable work items as filter criteria.
Urgent
Forwardable
Queue Releasable
Deadline Set Use these criteria to sort work items according to whether or not they have deadlines. (Use Deadline as well to sort items within these categories.) Deadline Expired
Once you have set these options, they are saved for the current session and when you exit from iProcess. They are used when you next log in and open the queue, either from the same or from a different workstation.
TIBCO iProcess Client (ASP) User’s Guide
Setting Filter, Display and Sort Options | 57
Bac
k to
Lib
rary
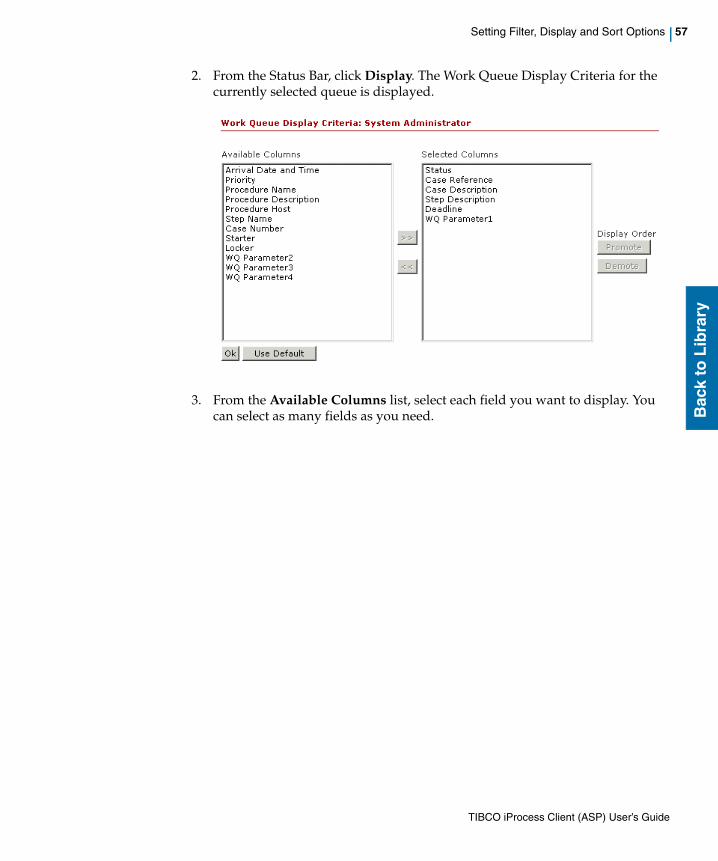
2. From the Status Bar, click Display. The Work Queue Display Criteria for the currently selected queue is displayed.
3. From the Available Columns list, select each field you want to display. You can select as many fields as you need.
TIBCO iProcess Client (ASP) User’s Guide
58 | Chapter 7 Organizing Your Work Items
Bac
k to
Lib
rary
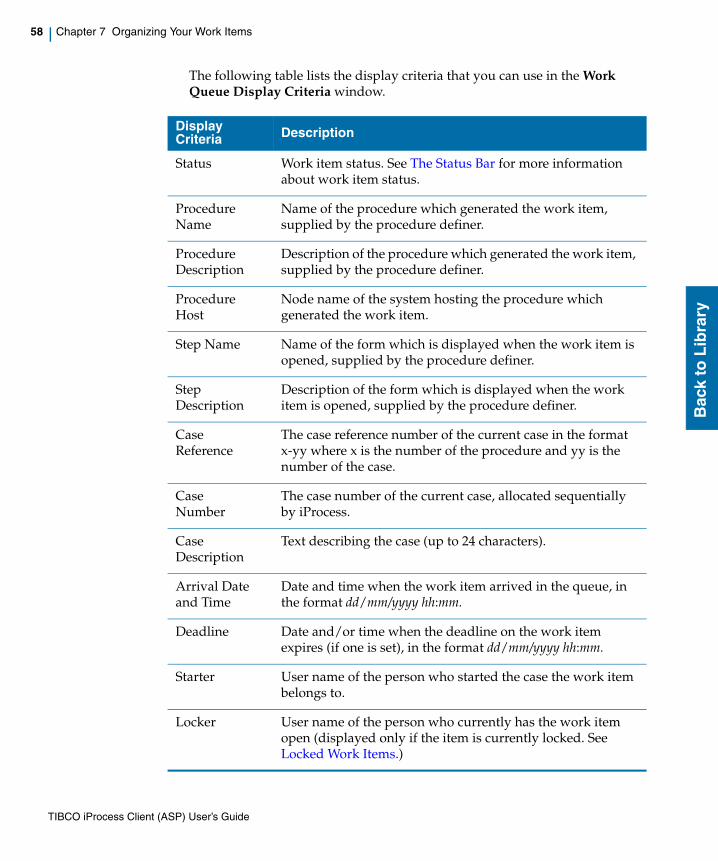
The following table lists the display criteria that you can use in the Work Queue Display Criteria window.
Display Criteria Description
Status Work item status. See The Status Bar for more information about work item status.
Procedure Name
Name of the procedure which generated the work item, supplied by the procedure definer.
Procedure Description
Description of the procedure which generated the work item, supplied by the procedure definer.
Procedure Host
Node name of the system hosting the procedure which generated the work item.
Step Name Name of the form which is displayed when the work item is opened, supplied by the procedure definer.
Step Description
Description of the form which is displayed when the work item is opened, supplied by the procedure definer.
Case Reference
The case reference number of the current case in the format x-yy where x is the number of the procedure and yy is the number of the case.
Case Number
The case number of the current case, allocated sequentially by iProcess.
Case Description
Text describing the case (up to 24 characters).
Arrival Date and Time
Date and time when the work item arrived in the queue, in the format dd/mm/yyyy hh:mm.
Deadline Date and/or time when the deadline on the work item expires (if one is set), in the format dd/mm/yyyy hh:mm.
Starter User name of the person who started the case the work item belongs to.
Locker User name of the person who currently has the work item open (displayed only if the item is currently locked. See Locked Work Items.)
TIBCO iProcess Client (ASP) User’s Guide
Setting Filter, Display and Sort Options | 59
Bac
k to
Lib
rary
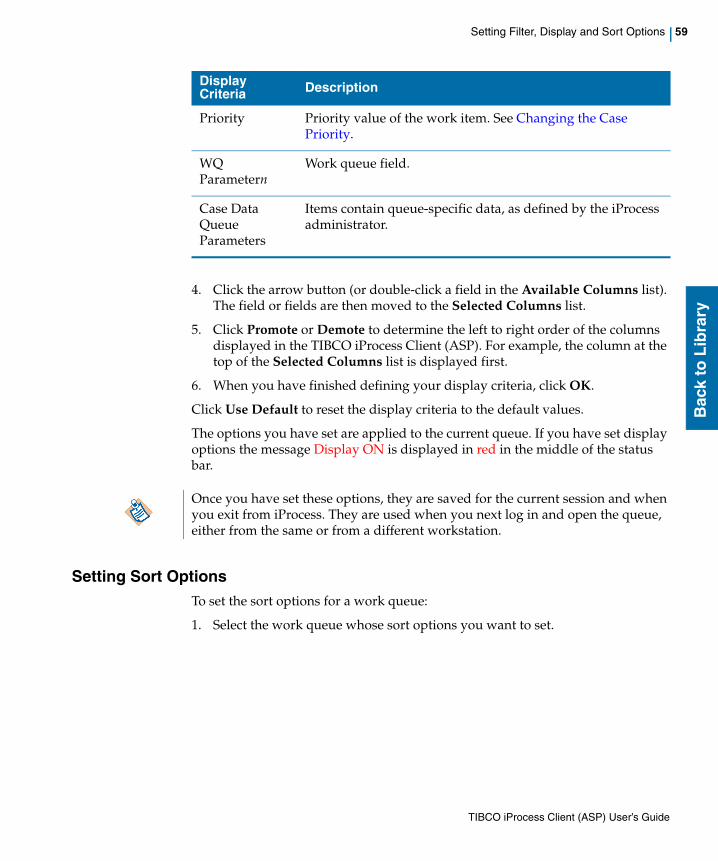
4. Click the arrow button (or double-click a field in the Available Columns list). The field or fields are then moved to the Selected Columns list.
5. Click Promote or Demote to determine the left to right order of the columns displayed in the TIBCO iProcess Client (ASP). For example, the column at the top of the Selected Columns list is displayed first.
6. When you have finished defining your display criteria, click OK.
Click Use Default to reset the display criteria to the default values.
The options you have set are applied to the current queue. If you have set display options the message Display ON is displayed in red in the middle of the status bar.
Setting Sort OptionsTo set the sort options for a work queue:
1. Select the work queue whose sort options you want to set.
Priority Priority value of the work item. See Changing the Case Priority.
WQ Parametern
Work queue field.
Case Data Queue Parameters
Items contain queue-specific data, as defined by the iProcess administrator.
Display Criteria Description
Once you have set these options, they are saved for the current session and when you exit from iProcess. They are used when you next log in and open the queue, either from the same or from a different workstation.
TIBCO iProcess Client (ASP) User’s Guide

60 | Chapter 7 Organizing Your Work Items
Bac
k to
Lib
rary
2. From the Status Bar, click Sort. The Work Queue Sort Criteria for the currently selected queue is displayed.
3. From the Available Sort Fields list, select each field you want to sort on. You can select as many fields as you need.
TIBCO iProcess Client (ASP) User’s Guide
Setting Filter, Display and Sort Options | 61
Bac
k to
Lib
rary
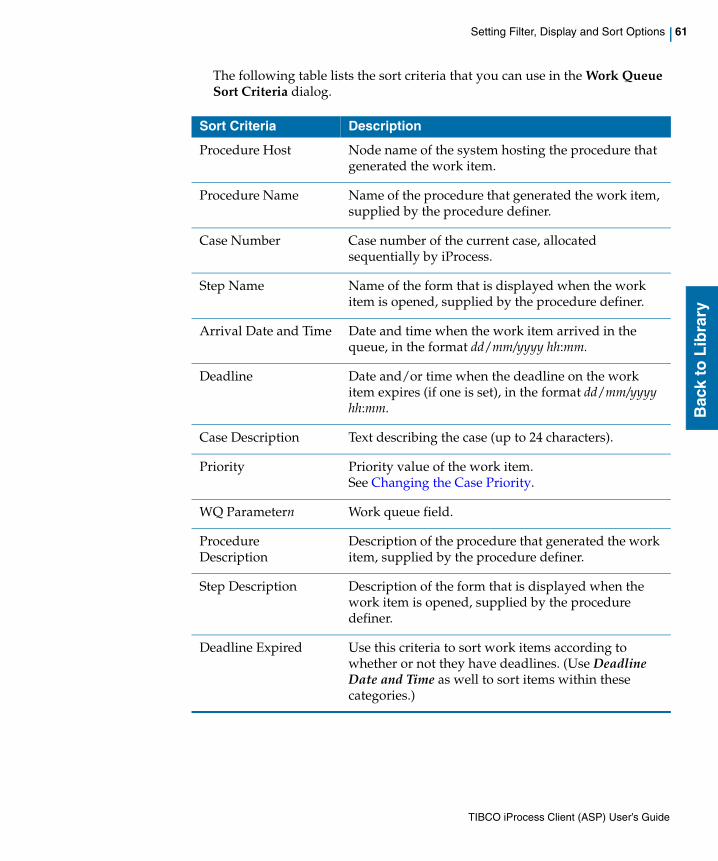
The following table lists the sort criteria that you can use in the Work Queue Sort Criteria dialog.
Sort Criteria Description
Procedure Host Node name of the system hosting the procedure that generated the work item.
Procedure Name Name of the procedure that generated the work item, supplied by the procedure definer.
Case Number Case number of the current case, allocated sequentially by iProcess.
Step Name Name of the form that is displayed when the work item is opened, supplied by the procedure definer.
Arrival Date and Time Date and time when the work item arrived in the queue, in the format dd/mm/yyyy hh:mm.
Deadline Date and/or time when the deadline on the work item expires (if one is set), in the format dd/mm/yyyy hh:mm.
Case Description Text describing the case (up to 24 characters).
Priority Priority value of the work item. See Changing the Case Priority.
WQ Parametern Work queue field.
Procedure Description
Description of the procedure that generated the work item, supplied by the procedure definer.
Step Description Description of the form that is displayed when the work item is opened, supplied by the procedure definer.
Deadline Expired Use this criteria to sort work items according to whether or not they have deadlines. (Use Deadline Date and Time as well to sort items within these categories.)
TIBCO iProcess Client (ASP) User’s Guide
62 | Chapter 7 Organizing Your Work Items
Bac
k to
Lib
rary
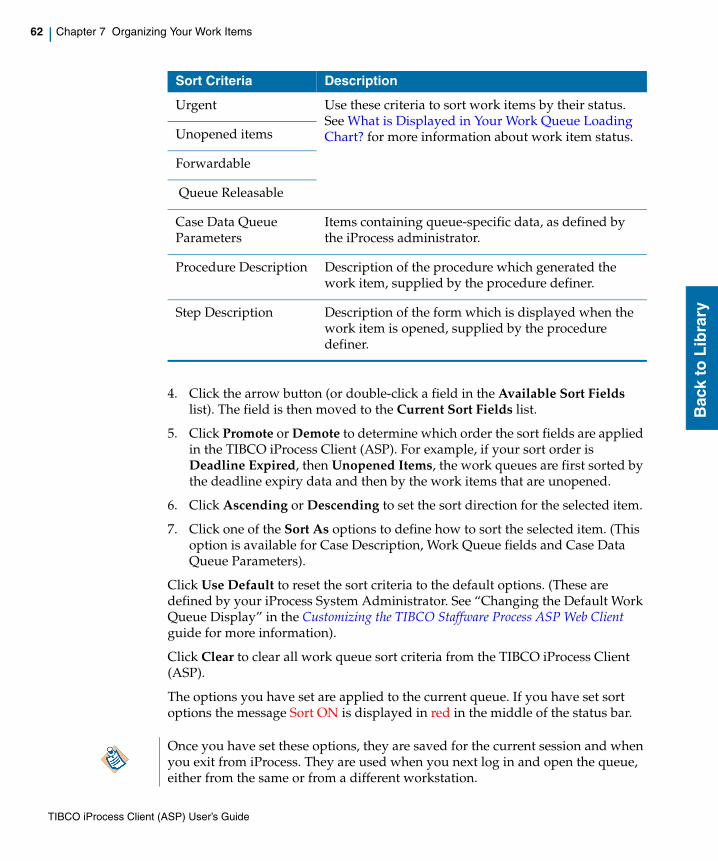
4. Click the arrow button (or double-click a field in the Available Sort Fields list). The field is then moved to the Current Sort Fields list.
5. Click Promote or Demote to determine which order the sort fields are applied in the TIBCO iProcess Client (ASP). For example, if your sort order is Deadline Expired, then Unopened Items, the work queues are first sorted by the deadline expiry data and then by the work items that are unopened.
6. Click Ascending or Descending to set the sort direction for the selected item.
7. Click one of the Sort As options to define how to sort the selected item. (This option is available for Case Description, Work Queue fields and Case Data Queue Parameters).
Click Use Default to reset the sort criteria to the default options. (These are defined by your iProcess System Administrator. See “Changing the Default Work Queue Display” in the Customizing the TIBCO Staffware Process ASP Web Client guide for more information).
Click Clear to clear all work queue sort criteria from the TIBCO iProcess Client (ASP).
The options you have set are applied to the current queue. If you have set sort options the message Sort ON is displayed in red in the middle of the status bar.
Urgent Use these criteria to sort work items by their status. See What is Displayed in Your Work Queue Loading Chart? for more information about work item status.Unopened items
Forwardable
Queue Releasable
Case Data Queue Parameters
Items containing queue-specific data, as defined by the iProcess administrator.
Procedure Description Description of the procedure which generated the work item, supplied by the procedure definer.
Step Description Description of the form which is displayed when the work item is opened, supplied by the procedure definer.
Sort Criteria Description
Once you have set these options, they are saved for the current session and when you exit from iProcess. They are used when you next log in and open the queue, either from the same or from a different workstation.
TIBCO iProcess Client (ASP) User’s Guide
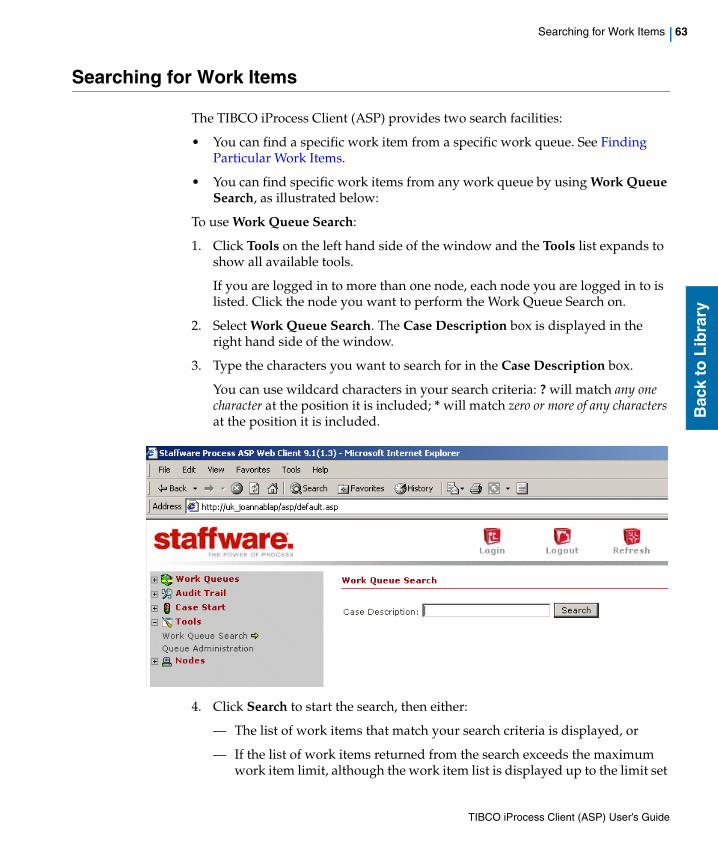
Searching for Work Items | 63
Bac
k to
Lib
rary
Searching for Work Items
The TIBCO iProcess Client (ASP) provides two search facilities:
• You can find a specific work item from a specific work queue. See Finding Particular Work Items.
• You can find specific work items from any work queue by using Work Queue Search, as illustrated below:
To use Work Queue Search:
1. Click Tools on the left hand side of the window and the Tools list expands to show all available tools.
If you are logged in to more than one node, each node you are logged in to is listed. Click the node you want to perform the Work Queue Search on.
2. Select Work Queue Search. The Case Description box is displayed in the right hand side of the window.
3. Type the characters you want to search for in the Case Description box.
You can use wildcard characters in your search criteria: ? will match any one character at the position it is included; * will match zero or more of any characters at the position it is included.
4. Click Search to start the search, then either:
— The list of work items that match your search criteria is displayed, or
— If the list of work items returned from the search exceeds the maximum work item limit, although the work item list is displayed up to the limit set
TIBCO iProcess Client (ASP) User’s Guide

64 | Chapter 7 Organizing Your Work Items
Bac
k to
Lib
rary
by the maximum work item limit, a Number of items exceeds limit. Please refine your case description filter criteria message is displayed. This means you should re-define your work queue search to reduce the number of work items that will be returned. Re-define the work queue search by typing the new characters you want to search for in the Case Description box, or
— If no matches are found, a Work item not found! message is displayed.
5. Click the work item whose details you want to display.
The window is divided into two parts:
• The details of the case are displayed in the top of the window. The following information is displayed:
— Case Status: This is the status that this item currently holds, for example, active or terminated.
— Case Priority: This is the priority level that this item currently holds.
See Changing the Case Priority for more information about Case Priority.
• The audit trail for the selected case is displayed below the case details. The following information is displayed:
— Date/Time: This is the date and time when this action was carried out.
— Action: This is the action that has taken place.
TIBCO iProcess Client (ASP) User’s Guide

Searching for Work Items | 65
Bac
k to
Lib
rary
See Understanding your Audit Trail for more information about audit trails.
Changing the Case PriorityIf you have a MENUNAME attribute of either ADMIN or MANAGER, you can change the priority of individual work items.
Every work item has a priority attached to it which, when used to sort a work queue, can determine where it appears in the queue. Priority levels can change automatically according to rules decided by the person who defined the procedure. You can change the priority of a step so that it appears above or below other items in the work queue.
Work items are given priority values when they arrive in a queue. Priority values range between 1 (the highest) and 999 (the lowest).
A work item’s priority may change over time once it has arrived in a queue. (The procedure definer determines whether or not a work item’s priority escalates in this way.)
A work item will be marked as urgent if its priority value is equal to or less than a specific value. By default this value is 10, but the iProcess administrator can change it as required for individual queues. This is useful if priorities on a particular case have changed suddenly and the work item needs to be processed faster. See “Using Work Item Priorities and Escalation” in the TIBCO iProcess Modeler - Advanced Design guide for more information about setting priorities.
Why Change Work Item Priority?
Listed below are some examples of why you might want to change the priority:
• Priority Relative to Other Cases. It may be that some cases of a procedure need to be dealt with sooner than others and should have a higher priority.
• Priority Relative to the Life of the Case. If you want to increase (or decrease) the priority of a case depending on how long it has been in progress.
You can set user attributes in the User Manager. See “Changing a User’s Attributes Values” in the TIBCO iProcess Client (Windows): Manager’s Guide for more information.
You must include Priority as part of the Display criteria of the work queue to display priority values for work items.
TIBCO iProcess Client (ASP) User’s Guide
66 | Chapter 7 Organizing Your Work Items
Bac
k to
Lib
rary
Defining the Priority of a Case
To define the priority of a work item:
1. Type the new case priority in the Priority box.
2. Click Update. If you have updated the priority a message Updated is displayed in red on the right hand side of the priority field.
TIBCO iProcess Client (ASP) User’s Guide

Using Queue-Specific Data to Organize or Search Your Work Items Lists | 67
Bac
k to
Lib
rary
Using Queue-Specific Data to Organize or Search Your Work Items Lists
There are two types of data item that you can use to organize and search your work items lists, using the Filter, Display and Sort options described in the previous sections:
• An iProcess data item is a piece of case data that is made available by iProcess itself, such as Case Description or Procedure Name. iProcess data items always have the same name, and are available to every queue.
• A queue-specific data item is a piece of case data that is defined within a specific iProcess procedure, such as Invoice Number or Customer Name. The iProcess administrator determines what items are available in what queues, and what their names are, according to the way iProcess is being used.
iProcess provides two ways of defining and using queue-specific data:
— Work queue fields are special iProcess fields that can be used to store queue-specific data, but are always available in the TIBCO iProcess Client (ASP). If the iProcess administrator has not assigned names to these fields they are shown as WQ Parametern (where n is 1, 2, 3 or 4).
— Case Data Queue Parameters (CDQPs) are fields defined and assigned to queues by the iProcess administrator. A queue may have none of these, or many of these. (Only the first 50 CDQPs assigned to a queue are shown in the Work Queue Display Criteria page.)
For example, you may want to be able to sort your work items by customer name, but also be able to search for a specific work item using its invoice number. You can do this if the iProcess administrator has made these items available to your queue, so that they appear in the relevant pages.
TIBCO iProcess Client (ASP) User’s Guide

68 | Chapter 7 Organizing Your Work Items
Bac
k to
Lib
rary
TIBCO iProcess Client (ASP) User’s Guide
| 69
Bac
k to
Lib
rary
Chapter 8 Managing Participation and Redirection
This chapter explains how you can grant users temporary access to another user or group queue by creating Participant Records that record information about which users can be participants in a queue and for what period(s).
You can also redirect all work items sent to one queue to an alternative queue. This could be useful, for example, when a member of staff goes on leave.
Topics
• Adding a Participant Record
• Redirecting Work Items
You must be a Queue Supervisor for a Queue to change its Participant Records or to be able to redirect its work items. Whether you are a Queue Supervisor depends on the setting of your QSUPERVISOR attribute - see “Changing a User’s Attribute Values” in the TIBCO iProcess Workspace (Windows) Manager's Guide.
TIBCO iProcess Client (ASP) User’s Guide
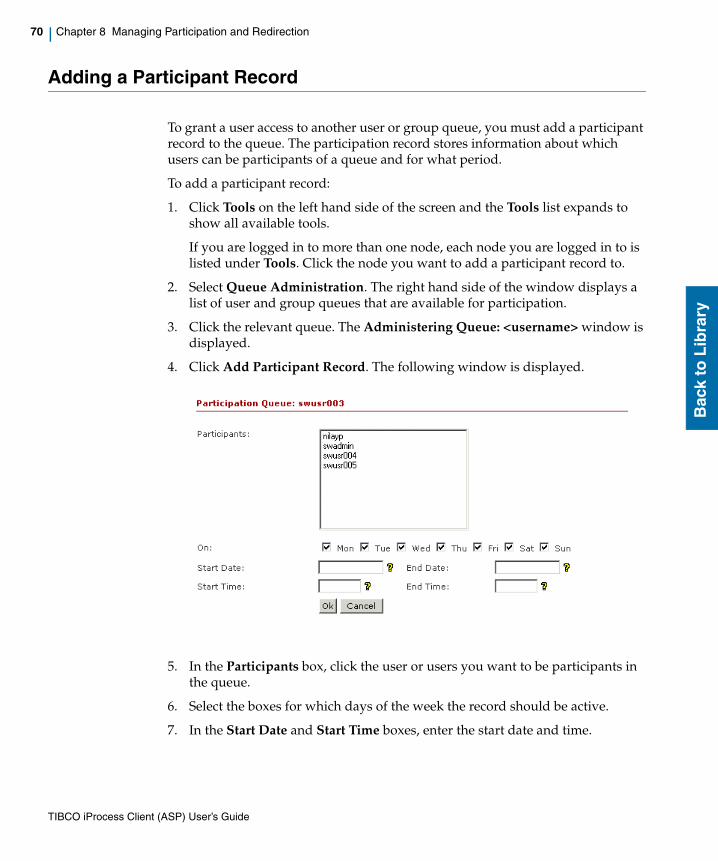
70 | Chapter 8 Managing Participation and Redirection
Bac
k to
Lib
rary
Adding a Participant Record
To grant a user access to another user or group queue, you must add a participant record to the queue. The participation record stores information about which users can be participants of a queue and for what period.
To add a participant record:
1. Click Tools on the left hand side of the screen and the Tools list expands to show all available tools.
If you are logged in to more than one node, each node you are logged in to is listed under Tools. Click the node you want to add a participant record to.
2. Select Queue Administration. The right hand side of the window displays a list of user and group queues that are available for participation.
3. Click the relevant queue. The Administering Queue: <username> window is displayed.
4. Click Add Participant Record. The following window is displayed.
5. In the Participants box, click the user or users you want to be participants in the queue.
6. Select the boxes for which days of the week the record should be active.
7. In the Start Date and Start Time boxes, enter the start date and time.
TIBCO iProcess Client (ASP) User’s Guide
Adding a Participant Record | 71
Bac
k to
Lib
rary
8. In the End Date and End Time boxes, enter the end date and time.
9. Click OK to save your changes.
Start and end times apply to each individual day that participation is set. For example, setting a start time of 09:00 and an end time of 17:30 means that the participation period is between 09:00 and 17:30 for each individual day. Omitting the Time range will result in continuous participation within the date range (as long as all days are selected).
TIBCO iProcess Client (ASP) User’s Guide
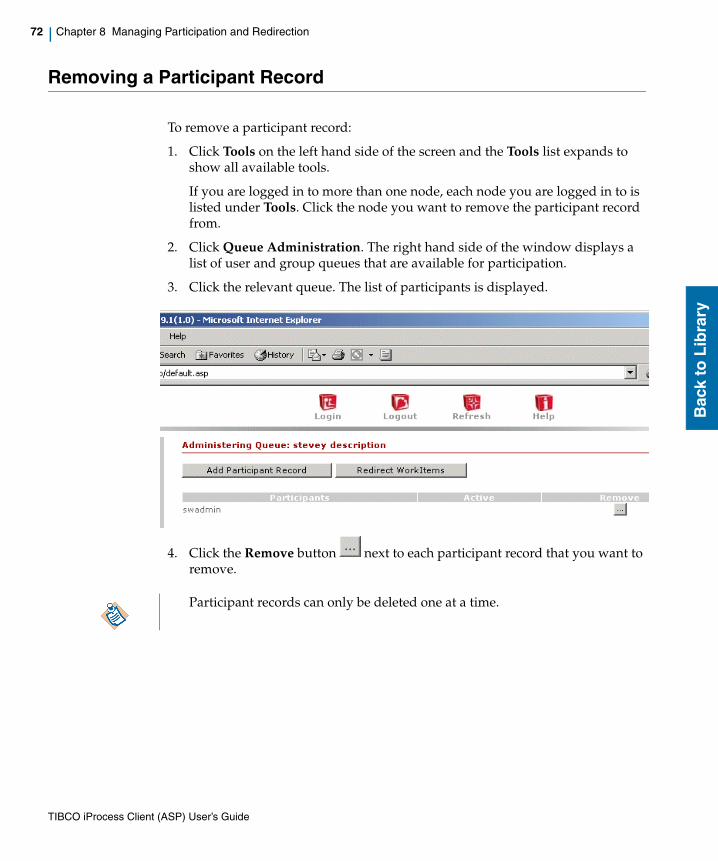
72 | Chapter 8 Managing Participation and Redirection
Bac
k to
Lib
rary
Removing a Participant Record
To remove a participant record:
1. Click Tools on the left hand side of the screen and the Tools list expands to show all available tools.
If you are logged in to more than one node, each node you are logged in to is listed under Tools. Click the node you want to remove the participant record from.
2. Click Queue Administration. The right hand side of the window displays a list of user and group queues that are available for participation.
3. Click the relevant queue. The list of participants is displayed.
4. Click the Remove button next to each participant record that you want to remove.
Participant records can only be deleted one at a time.
TIBCO iProcess Client (ASP) User’s Guide

Redirecting Work Items | 73
Bac
k to
Lib
rary
Redirecting Work Items
To redirect all work items sent to one queue to an alternative queue:
1. Click Tools on the left hand side of the screen and the Tools list expands to show all available tools.
If you are logged in to more than one node, each node you are logged in to is listed under Tools. Click the node which contains the work queue whose work items you want to redirect.
2. Click Queue Administration. The right hand side of the window displays a list of user and group queues that are available for redirection.
3. Select the relevant queue.
4. Click Redirect Work Items. The following window is displayed.
5. In the Redirect To box, click the name of the user or group you want to redirect the work items to.
6. In the Start Date and Start Time boxes, enter the date and time to start redirection.
7. In the End Date and End Time boxes, enter the date and time to end redirection.
Locked work items are not redirected.
The redirection period starts from the specified start date and time and is continuous until the specified end date and time.
TIBCO iProcess Client (ASP) User’s Guide
74 | Chapter 8 Managing Participation and Redirection
Bac
k to
Lib
rary
8. Click OK to confirm queue redirection or Cancel to return to the list of available user and group queues.
To turn off queue redirection, click Clear.
TIBCO iProcess Client (ASP) User’s Guide


