37
TIBCO iProcess ® Workspace (Windows) Installation Software Release 11.3.1 July 2012

TIBCO iProcess® Workspace
(Windows)
InstallationSoftware Release 11.3.1July 2012

Important Information
SOME TIBCO SOFTWARE EMBEDS OR BUNDLES OTHER TIBCO SOFTWARE. USE OF SUCH EMBEDDEDOR BUNDLED TIBCO SOFTWARE IS SOLELY TO ENABLE THE FUNCTIONALITY (OR PROVIDE LIMITEDADD-ON FUNCTIONALITY) OF THE LICENSED TIBCO SOFTWARE. THE EMBEDDED OR BUNDLEDSOFTWARE IS NOT LICENSED TO BE USED OR ACCESSED BY ANY OTHER TIBCO SOFTWARE OR FORANY OTHER PURPOSE.USE OF TIBCO SOFTWARE AND THIS DOCUMENT IS SUBJECT TO THE TERMS AND CONDITIONS OF ALICENSE AGREEMENT FOUND IN EITHER A SEPARATELY EXECUTED SOFTWARE LICENSEAGREEMENT, OR, IF THERE IS NO SUCH SEPARATE AGREEMENT, THE CLICKWRAP END USERLICENSE AGREEMENT WHICH IS DISPLAYED DURING DOWNLOAD OR INSTALLATION OF THESOFTWARE (AND WHICH IS DUPLICATED IN THE LICENSE FILE) OR IF THERE IS NO SUCH SOFTWARELICENSE AGREEMENT OR CLICKWRAP END USER LICENSE AGREEMENT, THE LICENSE(S) LOCATEDIN THE “LICENSE” FILE(S) OF THE SOFTWARE. USE OF THIS DOCUMENT IS SUBJECT TO THOSE TERMSAND CONDITIONS, AND YOUR USE HEREOF SHALL CONSTITUTE ACCEPTANCE OF AND ANAGREEMENT TO BE BOUND BY THE SAME.This document contains confidential information that is subject to U.S. and international copyright laws andtreaties. No part of this document may be reproduced in any form without the written authorization of TIBCOSoftware Inc.TIBCO, The Power of Now, TIBCO ActiveMatrix BusinessWorks, TIBCO iProcess, TIBCO iProcess Suite andTIBCO Enterprise Message Service are either registered trademarks or trademarks of TIBCO Software Inc. in theUnited States and/or other countries.EJB, Java EE, J2EE, and all Java-based trademarks and logos are trademarks or registered trademarks of SunMicrosystems, Inc. in the U.S. and other countries.All other product and company names and marks mentioned in this document are the property of theirrespective owners and are mentioned for identification purposes only.THIS SOFTWARE MAY BE AVAILABLE ON MULTIPLE OPERATING SYSTEMS. HOWEVER, NOT ALLOPERATING SYSTEM PLATFORMS FOR A SPECIFIC SOFTWARE VERSION ARE RELEASED AT THE SAMETIME. SEE THE README FILE FOR THE AVAILABILITY OF THIS SOFTWARE VERSION ON A SPECIFICOPERATING SYSTEM PLATFORM.THIS DOCUMENT IS PROVIDED “AS IS” WITHOUT WARRANTY OF ANY KIND, EITHER EXPRESS ORIMPLIED, INCLUDING, BUT NOT LIMITED TO, THE IMPLIED WARRANTIES OF MERCHANTABILITY,FITNESS FOR A PARTICULAR PURPOSE, OR NON-INFRINGEMENT.THIS DOCUMENT COULD INCLUDE TECHNICAL INACCURACIES OR TYPOGRAPHICAL ERRORS.CHANGES ARE PERIODICALLY ADDED TO THE INFORMATION HEREIN; THESE CHANGES WILL BEINCORPORATED IN NEW EDITIONS OF THIS DOCUMENT. TIBCO SOFTWARE INC. MAY MAKEIMPROVEMENTS AND/OR CHANGES IN THE PRODUCT(S) AND/OR THE PROGRAM(S) DESCRIBED INTHIS DOCUMENT AT ANY TIME.THE CONTENTS OF THIS DOCUMENT MAY BE MODIFIED AND/OR QUALIFIED, DIRECTLY ORINDIRECTLY, BY OTHER DOCUMENTATION WHICH ACCOMPANIES THIS SOFTWARE, INCLUDINGBUT NOT LIMITED TO ANY RELEASE NOTES AND "READ ME" FILES.Copyright © 1994-2012 TIBCO Software Inc. ALL RIGHTS RESERVED.TIBCO Software Inc. Confidential Information

| iii
Contents
Figures . . . . . . . . . . . . . . . . . . . . . . . . . . . . . . . . . . . . . . . . . . . . . . . . . . . . . . . . . . . . . . . . . . . . . . . . .v
Tables . . . . . . . . . . . . . . . . . . . . . . . . . . . . . . . . . . . . . . . . . . . . . . . . . . . . . . . . . . . . . . . . . . . . . . . . .vii
Preface . . . . . . . . . . . . . . . . . . . . . . . . . . . . . . . . . . . . . . . . . . . . . . . . . . . . . . . . . . . . . . . . . . . . . . . . ix
Related Documentation . . . . . . . . . . . . . . . . . . . . . . . . . . . . . . . . . . . . . . . . . . . . . . . . . . . . . . . . . . . . . . . . . . . . . . xTIBCO iProcess Workspace (Windows) Documentation . . . . . . . . . . . . . . . . . . . . . . . . . . . . . . . . . . . . . . . . . xOther TIBCO Product Documentation . . . . . . . . . . . . . . . . . . . . . . . . . . . . . . . . . . . . . . . . . . . . . . . . . . . . . . . xThird-party Documentation . . . . . . . . . . . . . . . . . . . . . . . . . . . . . . . . . . . . . . . . . . . . . . . . . . . . . . . . . . . . . . . xi
Typographical Conventions . . . . . . . . . . . . . . . . . . . . . . . . . . . . . . . . . . . . . . . . . . . . . . . . . . . . . . . . . . . . . . . . . . xii
Connecting with TIBCO Resources . . . . . . . . . . . . . . . . . . . . . . . . . . . . . . . . . . . . . . . . . . . . . . . . . . . . . . . . . . . xivHow to Join TIBCOmmunity . . . . . . . . . . . . . . . . . . . . . . . . . . . . . . . . . . . . . . . . . . . . . . . . . . . . . . . . . . . . . xivHow to Access TIBCO Documentation. . . . . . . . . . . . . . . . . . . . . . . . . . . . . . . . . . . . . . . . . . . . . . . . . . . . . xivHow to Contact TIBCO Support . . . . . . . . . . . . . . . . . . . . . . . . . . . . . . . . . . . . . . . . . . . . . . . . . . . . . . . . . . xiv
Chapter 1 Installation Introduction. . . . . . . . . . . . . . . . . . . . . . . . . . . . . . . . . . . . . . . . . . . . . . . . . .1
Installation Overview . . . . . . . . . . . . . . . . . . . . . . . . . . . . . . . . . . . . . . . . . . . . . . . . . . . . . . . . . . . . . . . . . . . . . . . .2Installation Modes. . . . . . . . . . . . . . . . . . . . . . . . . . . . . . . . . . . . . . . . . . . . . . . . . . . . . . . . . . . . . . . . . . . . . . .2Installation Types . . . . . . . . . . . . . . . . . . . . . . . . . . . . . . . . . . . . . . . . . . . . . . . . . . . . . . . . . . . . . . . . . . . . . . .2
Installation Requirements . . . . . . . . . . . . . . . . . . . . . . . . . . . . . . . . . . . . . . . . . . . . . . . . . . . . . . . . . . . . . . . . . . . .4Supported Platforms. . . . . . . . . . . . . . . . . . . . . . . . . . . . . . . . . . . . . . . . . . . . . . . . . . . . . . . . . . . . . . . . . . . . .4Basic System Requirements. . . . . . . . . . . . . . . . . . . . . . . . . . . . . . . . . . . . . . . . . . . . . . . . . . . . . . . . . . . . . . .4POSIX Threads (pthreads) . . . . . . . . . . . . . . . . . . . . . . . . . . . . . . . . . . . . . . . . . . . . . . . . . . . . . . . . . . . . . . . .5
Chapter 2 Installing TIBCO iProcess Workspace (Windows) . . . . . . . . . . . . . . . . . . . . . . . . . . . .6
Installation in GUI Mode. . . . . . . . . . . . . . . . . . . . . . . . . . . . . . . . . . . . . . . . . . . . . . . . . . . . . . . . . . . . . . . . . . . . . .7
Installation in Silent Mode . . . . . . . . . . . . . . . . . . . . . . . . . . . . . . . . . . . . . . . . . . . . . . . . . . . . . . . . . . . . . . . . . . .14Creating a Response File . . . . . . . . . . . . . . . . . . . . . . . . . . . . . . . . . . . . . . . . . . . . . . . . . . . . . . . . . . . . . . . .14Performing a Silent Installation . . . . . . . . . . . . . . . . . . . . . . . . . . . . . . . . . . . . . . . . . . . . . . . . . . . . . . . . . . . .15
Chapter 3 Uninstalling TIBCO iProcess Workspace (Windows) . . . . . . . . . . . . . . . . . . . . . . . . .17
Pre-removal Consideration . . . . . . . . . . . . . . . . . . . . . . . . . . . . . . . . . . . . . . . . . . . . . . . . . . . . . . . . . . . . . . . . . .18
Uninstalling iProcess Workspace (Windows). . . . . . . . . . . . . . . . . . . . . . . . . . . . . . . . . . . . . . . . . . . . . . . . . . . . .19
TIBCO iProcess Workspace (Windows) Installation

iv | Contents
Appendix A Troubleshooting . . . . . . . . . . . . . . . . . . . . . . . . . . . . . . . . . . . . . . . . . . . . . . . . . . . . 20
The Installer Encounters an Error Trying to Locate pthread.dll. . . . . . . . . . . . . . . . . . . . . . . . . . . . . . . . . . . . . . . 21
Index . . . . . . . . . . . . . . . . . . . . . . . . . . . . . . . . . . . . . . . . . . . . . . . . . . . . . . . . . . . . . . . . . . . . . . . . . 23
TIBCO iProcess Workspace (Windows) Installation

Figures | v
Figures
Figure 1 Choose Destination Location Dialog . . . . . . . . . . . . . . . . . . . . . . . . . . . . . . . . . . . . . . . . . . . . . . . . .8
Figure 2 Setup Type Dialog . . . . . . . . . . . . . . . . . . . . . . . . . . . . . . . . . . . . . . . . . . . . . . . . . . . . . . . . . . . . . . .9
Figure 3 Select Components Dialog. . . . . . . . . . . . . . . . . . . . . . . . . . . . . . . . . . . . . . . . . . . . . . . . . . . . . . . .10
Figure 4 Select TIBCO iProcess Engine Dialog . . . . . . . . . . . . . . . . . . . . . . . . . . . . . . . . . . . . . . . . . . . . . . .11
TIBCO iProcess Workspace (Windows) Installation

vi | Figures
TIBCO iProcess Workspace (Windows) Installation

Tables | vii
Tables
Table 1 General Typographical Conventions . . . . . . . . . . . . . . . . . . . . . . . . . . . . . . . . . . . . . . . . . . . . . . . xii
Table 2 System Requirements . . . . . . . . . . . . . . . . . . . . . . . . . . . . . . . . . . . . . . . . . . . . . . . . . . . . . . . . . . . 4
Table 3 Installed Components. . . . . . . . . . . . . . . . . . . . . . . . . . . . . . . . . . . . . . . . . . . . . . . . . . . . . . . . . . . 10
Table 4 Response Result Codes. . . . . . . . . . . . . . . . . . . . . . . . . . . . . . . . . . . . . . . . . . . . . . . . . . . . . . . . . 16
TIBCO iProcess Workspace (Windows) Installation

viii | Tables
TIBCO iProcess Workspace (Windows) Installation

| ix
Preface
This manual describes how to install TIBCO iProcess Workspace (Windows).
Topics
• Related Documentation, page x
• Typographical Conventions, page xii
• Connecting with TIBCO Resources, page xiv
This software may be available on multiple operating systems. However, notall operating system platforms for a specific software version are released at thesame time. Please see the readme file for the availability of this softwareversion on a specific operating system platform.
TIBCO iProcess Workspace (Windows) Installation

x | Related Documentation
Related Documentation
This section lists documentation resources you may find useful.
TIBCO iProcess Workspace (Windows) DocumentationThe following documents form the TIBCO iProcess Workspace (Windows) andTIBCO iProcess Modeler documentation set, which are supplied with the TIBCOiProcess Workspace (Windows) software:
• TIBCO iProcess Workspace (Windows) Installation Guide Read this manual forinstructions on site preparation and installation.
• TIBCO iProcess Workspace (Windows) Release Notes Read the release notes for alist of new and changed features. This document also contains lists of knownissues and closed issues for this release.
• TIBCO iProcess Suite Documentation Library This library contains all themanuals for TIBCO iProcess Workspace (Windows), TIBCO iProcess Modeler,and other TIBCO products in TIBCO iProcess Suite. The manuals for TIBCOiProcess Workspace (Windows) and TIBCO iProcess Modeler are thefollowings:
— TIBCO iProcess Workspace (Windows) User’s Guide
— TIBCO iProcess Modeler Getting Started
— TIBCO iProcess Modeler Procedure Management
— TIBCO iProcess Modeler Basic Design
— TIBCO iProcess Modeler Advanced Design
— TIBCO iProcess Modeler Integration Techniques
— TIBCO iProcess Expressions and Functions Reference Guide
— TIBCO iProcess Workspace (Windows) Manager’s Guide
Other TIBCO Product DocumentationYou may find it useful to read the documentation for the following TIBCOproducts:
• TIBCO ActiveMatrix BusinessWorks™
• TIBCO Business Studio™
• TIBCO Enterprise Message Service™
TIBCO iProcess Workspace (Windows) Installation

Preface | xi
• TIBCO Hawk®
• TIBCO Rendezvous®
Third-party DocumentationYou may find it useful to read the documentation for the following third-partyproducts:
• Microsoft® Windows®
TIBCO iProcess Workspace (Windows) Installation
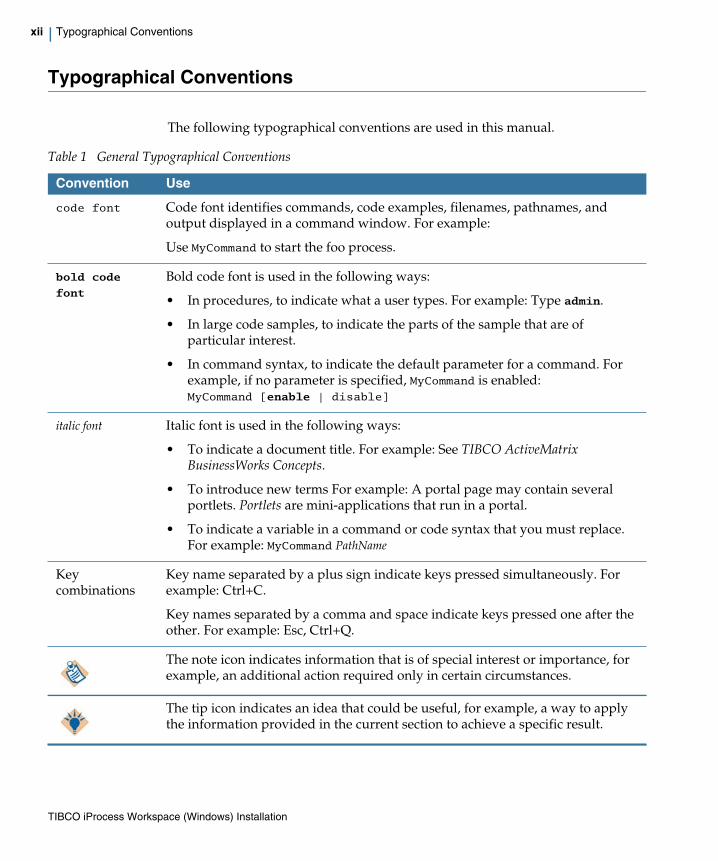
xii | Typographical Conventions
Typographical Conventions
The following typographical conventions are used in this manual.
Table 1 General Typographical Conventions
Convention Use
code font Code font identifies commands, code examples, filenames, pathnames, andoutput displayed in a command window. For example:
Use MyCommand to start the foo process.
bold code
font
Bold code font is used in the following ways:
• In procedures, to indicate what a user types. For example: Type admin.
• In large code samples, to indicate the parts of the sample that are ofparticular interest.
• In command syntax, to indicate the default parameter for a command. Forexample, if no parameter is specified, MyCommand is enabled:MyCommand [enable | disable]
italic font Italic font is used in the following ways:
• To indicate a document title. For example: See TIBCO ActiveMatrixBusinessWorks Concepts.
• To introduce new terms For example: A portal page may contain severalportlets. Portlets are mini-applications that run in a portal.
• To indicate a variable in a command or code syntax that you must replace.For example: MyCommand PathName
Keycombinations
Key name separated by a plus sign indicate keys pressed simultaneously. Forexample: Ctrl+C.
Key names separated by a comma and space indicate keys pressed one after theother. For example: Esc, Ctrl+Q.
The note icon indicates information that is of special interest or importance, forexample, an additional action required only in certain circumstances.
The tip icon indicates an idea that could be useful, for example, a way to applythe information provided in the current section to achieve a specific result.
TIBCO iProcess Workspace (Windows) Installation

Preface | xiii
The warning icon indicates the potential for a damaging situation, for example,data loss or corruption if certain steps are taken or not taken.
Table 1 General Typographical Conventions (Cont’d)
Convention Use
TIBCO iProcess Workspace (Windows) Installation

xiv | Connecting with TIBCO Resources
Connecting with TIBCO Resources
How to Join TIBCOmmunityTIBCOmmunity is an online destination for TIBCO customers, partners, andresident experts. It is a place to share and access the collective experience of theTIBCO community. TIBCOmmunity offers forums, blogs, and access to a varietyof resources. To register, go to http://www.tibcommunity.com.
How to Access TIBCO DocumentationYou can access TIBCO documentation here:
http://docs.tibco.com
How to Contact TIBCO SupportFor comments or problems with this manual or the software it addresses, contactTIBCO Support as follows:
• For an overview of TIBCO Support, and information about getting startedwith TIBCO Support, visit this site:
http://www.tibco.com/services/support
• If you already have a valid maintenance or support contract, visit this site:
https://support.tibco.com
Entry to this site requires a user name and password. If you do not have a username, you can request one.
TIBCO iProcess Workspace (Windows) Installation

| 1
Chapter 1 Installation Introduction
This chapter explains installation modes, requirements, and other options youneed to be aware of before the installation.
Topics
• Installation Overview, page 2
• Installation Requirements, page 4
TIBCO iProcess Workspace (Windows) Installation

2 | Chapter 1 Installation Introduction
Installation Overview
This section provides an overview of the TIBCO iProcess Workspace (Windows)installer.
• Installation Modes, page 2
• Installation Types, page 2
Installation ModesThe installer can run in the following modes on Microsoft Windows platforms.
• GUI Mode
• Silent Mode
GUI Mode
In GUI mode, the installer presents panels that allow you to make choices aboutproduct selection, product location, and so on.
To invoke the installer in GUI mode, double-click the executable.
For detailed information, see Installation in GUI Mode on page 7.
Silent Mode
In Silent mode, the installer uses a response file that was saved during an earlierinstallation. Silent mode installs without prompting you for information.
For detailed information, see Installation in Silent Mode on page 14.
Installation TypesThe following four installation types are available for TIBCO iProcess Workspace(Windows) installation.
• Administrator The Administrator installation type installs TIBCO iProcessWorkspace (Windows) and TIBCO iProcess Administrator.
• Custom The Custom installation type is recommended for advanced users.Choosing this installation type allows you to specify which components toinstall, such as TIBCO iProcess Workspace (Windows), TIBCO iProcessModeler, iProcess Workspace Plug-ins, TIBCO iProcess Administrator, and soon. This option also enables you to uninstall existing installed components.
TIBCO iProcess Workspace (Windows) Installation

Installation Overview | 3
• Modeler The Modeler installation type installs TIBCO iProcess Workspace(Windows), TIBCO iProcess Administrator, and TIBCO iProcess Modeler.
• User The User installation type installs TIBCO iProcess Workspace(Windows) only.
TIBCO iProcess Workspace (Windows) Installation

4 | Chapter 1 Installation Introduction
Installation Requirements
This section describes the installation requirements for this product.
• Supported Platforms, page 4
• Basic System Requirements, page 4
• POSIX Threads (pthreads), page 5
Supported PlatformsThe following Microsoft Windows (x86) platforms are supported:
• Microsoft Windows Server 2008 (64-bit)
• Microsoft Windows Server 2008 R2 (64-bit)
• Microsoft Windows Server 2003 (64-bit)
• Microsoft Windows XP Professional SP3
• Microsoft Windows 7 Professional SP1 (32-bit and 64-bit)
Basic System RequirementsBefore installing TIBCO iProcess Workspace (Windows), make sure your systemmeets the system requirements listed in Table 2. See Microsoft Windowsdocumentation for more information about system requirements.
Microsoft has discontinued standard support for Windows XP. Extended supportis still available, but must be purchased from Microsoft.
TIBCO will continue to support iProcess Workspace (Windows) on Windows XP.However, if a problem with iProcess Workspace (Windows) is reported to TIBCOSupport, and the problem is traced to Windows XP, TIBCO Support will not beable to assist further with the resolution of that problem.
TIBCO therefore recommends that you install iProcess Workspace (Windows) onWindows Server 2008 or Windows 7 instead of Windows XP.
Table 2 System Requirements
Component Requirement
Printer memory 64 MB of printer memory is required to print procedures.
Disk space 56 MB of free space on the hard disk is required.
TIBCO iProcess Workspace (Windows) Installation

Installation Requirements | 5
POSIX Threads (pthreads)On a Windows system, version 2.7.0 of the POSIX Threads (pthreads) library mustbe available on the system PATH of the computer where you intend to installTIBCO iProcess Workspace (Windows), before installation begins.
If you do not already have a POSIX Threads (pthreads) library, you can obtain thePOSIX Threads (pthreads) for Windows distribution set from TIBCO SoftwareInc. by downloading it as follows:
1. Go to the TIBCO Software Product Download Site(http://download.tibco.com/tibco/Index.jsp) website. Entry to this siterequires a username and password. If you do not have a username, you canrequest one.
2. Select Products Home > TIBCO iProcess Workspace (Windows)-Version11.3.1 > TIBCO iProcess Workspace (Windows) Software Version 11.3.1.From the list of files displayed, select the pthreads item.
— For Windows (32-bit), copy the pthread.dll file from the POSIX Threads(pthreads) for Win32 distribution set to the %systemroot%\system32folder on the computer where you intend to install iProcess Workspace(Windows) and make sure that the computer’s PATH system environmentvariable includes the %systemroot%\system32 folder.
— For Windows (64-bit), copy the pthread.dll file from the POSIX Threads(pthreads) for Win32 distribution set to the C:\WINDOWS\SysWOW64 folderon the computer where you intend to install iProcess Workspace(Windows) and make sure that the computer’s PATH system environmentvariable includes the C:\WINDOWS\SysWOW64 folder.
File system NTFS
FAT partitions are not supported by iProcess Workspace (Windows).
Table 2 System Requirements
Component Requirement
TIBCO has validated Version 2.7.0 with iProcess Workspace (Windows). If youwant to use a later version of the library, contact TIBCO Support to confirmwhether or not that version is supported by your iProcess Engine version.
If a supported version of the pthread.dll library is not available on the systemPATH when you run the installer, the installer immediately exits with an errormessage. See The Installer Encounters an Error Trying to Locate pthread.dll onpage 21 for details.
TIBCO iProcess Workspace (Windows) Installation

6 | Chapter 2 Installing TIBCO iProcess Workspace (Windows)
Chapter 2 Installing TIBCO iProcess Workspace(Windows)
This chapter explains how to install or upgrade TIBCO iProcess Workspace(Windows).
Topics
• Installation in GUI Mode, page 7
• Installation in Silent Mode, page 14
You must log on to Microsoft Windows as a user who is a member of theAdministrators group. Otherwise, you are not able to run the installer.
TIBCO iProcess Workspace (Windows) Installation

Installation in GUI Mode | 7
Installation in GUI Mode
To install TIBCO iProcess Workspace (Windows) in GUI mode, complete thefollowing steps:
1. Log on to Microsoft Windows as a user who is a member of the Administratorsgroup.
2. Open the physical media or download the TIBCO iProcess Workspace(Windows) installation package from a network server.
3. Extract the product’s file to a temporary directory and navigate to thetemporary directory.
4. Run Setup.exe. The Choose Setup Language dialog is displayed.
5. Select the language you want displayed in the text of the installation from thedrop-down list and click the OK button. The Welcome dialog appears.
6. Review the information in the Welcome dialog and click the Next button. TheSoftware License Agreement dialog appear.
7. Review the entire TIBCO Software Inc. End User License Agreement.
— Click the No button if you do not agree to the terms of the licenseagreement, and then exit from the installation process.
— Click the Yes button if you agree to the terms of the license agreement. TheChoose Destination Location dialog appears, as shown in Figure 1.
Check if you have already copy the Pthread.dll file to the appropriatedirectory. For detailed information, see POSIX Threads (pthreads) on page 5.
TIBCO iProcess Workspace (Windows) Installation

8 | Chapter 2 Installing TIBCO iProcess Workspace (Windows)
Figure 1 Choose Destination Location Dialog
8. Click the Browse... button to specify a Destination Folder where you want toinstall iProcess Workspace (Windows).
— If this is a new installation, go to step 9.
— If you have installed an iProcess Workspace (Windows) in your chosendestination folder, a dialog appears and displays a message asking if youwant to upgrade your previous installed iProcess Workspace (Windows).
Click the Yes button to upgrade your installation. The Select TIBCOiProcess Configuration dialog appears. You can either select an existingconfiguration set from the TIBCO iProcess Configurations list to update, orenter a new configuration name.
9. Click the Next button, the Setup Type dialog appears, as shown in Figure 2.
TIBCO iProcess Workspace (Windows) Installation

Installation in GUI Mode | 9
Figure 2 Setup Type Dialog
10. Select one of the following installation types in the Setup Type dialog:
— Administrator Select this setup type to install TIBCO iProcess Workspace(Windows) and TIBCO iProcess Administrator.
— Modeler Select this setup type to install TIBCO iProcess Workspace(Windows), TIBCO iProcess Administrator, and TIBCO iProcess Modeler.
— User Select this setup type to install TIBCO iProcess Workspace (Windows)only.
— Custom Select this setup type if you want to specify which components toinstall, such as TIBCO iProcess Workspace (Windows), TIBCO iProcessModeler, iProcess Workspace Plug-ins, TIBCO iProcess Administrator, andso on. This option also enables you to uninstall the existing installedcomponents.
Click the Next button, the Select Components dialog appears, as shown inFigure 3. Check the checkbox in front of the component that you want toinstall. See Table 3 for detailed information.
TIBCO iProcess Workspace (Windows) Installation

10 | Chapter 2 Installing TIBCO iProcess Workspace (Windows)
Figure 3 Select Components Dialog
Table 3 Installed Components
Component Description
TIBCO iProcessWorkspace (Windows)
Check the TIBCO iProcess Workspace (Windows) checkbox to install TIBCOiProcess Workspace (Windows) and Utility Server.
Note: This option is grayed out. You cannot uncheck this checkbox.
TIBCO iProcessAdministrator
Check the TIBCO iProcess Administrator checkbox to install TIBCO iProcessAdministrator.
Case Close & PurgeFacilities
Check the Case Close and Purge facilities checkbox to install the CaseAdministration features.
TIBCO iProcess Plug-inSDK
Check the TIBCO iProcess Plug-in SDK checkbox to install the SDK fordeveloping your own EAI plug-ins.
TIBCO iProcess OpenForms SDK
Check the TIBCO iProcess Open Forms SDK checkbox to install the SDK thatallows you to create your own Forms application for use with the iProcess.
TIBCO iProcess Modeler Check the TIBCO iProcess Modeler checkbox to install the iProcess Modeler.Note: This option is greyed out if you have selected the EAI Plug-ins option,because the EAI Plug-ins option is dependent on the TIBCO iProcess Modeleroption.
TIBCO iProcess Workspace (Windows) Installation

Installation in GUI Mode | 11
11. Click the Next button, the Select TIBCO iProcess Engine dialog appears, asshown in Figure 4.
Figure 4 Select TIBCO iProcess Engine Dialog
Enter the details of the iProcess Engine that you want to connect to by defaultwhen you start the iProcess Workspace (Windows):
— Enter the Machine Name of the computer where the iProcess Engine hasbeen installed.
If you do not fill in any Machine Name here, the installer uses the value ofthe COMPUTERNAME environment variable by default, that is, uses the
EAI Plug-ins Check the EAI Plug-ins checkbox to install all the available iProcess WorkspacePlug-ins.
Click the Change button in the Description area, the Select Sub-componentsdialog appears. You can check the checkboxes in front of the followingsub-components if you want to install it.
—EAI COM - TIBCO iProcess COM Client Plug-in
—EAI MAIL - TIBCO iProcess Email Client Plug-in
—EAI SCRIPT - TIBCO iProcess Script Client Plug-in
—EAI DB - TIBCO iProcess Database Client Plug-in
Table 3 Installed Components
Component Description
TIBCO iProcess Workspace (Windows) Installation

12 | Chapter 2 Installing TIBCO iProcess Workspace (Windows)
name of the computer on which you are installing iProcess Workspace(Windows).
— Enter the RPC Program Number of the iProcess Engine that you want toconnect to.
12. Click the Next button, the Select Program Folder dialog appears. You canspecify a folder name for TIBCO iProcess Workspace (Windows) in theProgram Folders field or select an existing folder from the Existing Folderslist. After installation, you can see this specified folder when selecting AllPrograms from the Start menu.
13. Click the next button, the Start Copying Files dialog appears. Review yourinstallation options in this dialog.
— If you want to change any of your choices, click Back to move back to theappropriate dialog.
— If you are satisfied with your choices, click the Next button. The installerthen installs TIBCO iProcess Workspace (Windows) on your computer.
Most iProcess Engines use RPC numbers in the range from 391875 to391879 inclusive, and using numbers in this range needs to prevent clasheswith other applications. If you enter a number outside this range, awarning message appears. You can choose to use the number you haveentered, or to enter another.
Alternatively, you can change the RPC program number using the iProcessPreference Editor swpref.exe after installation, if you know that youriProcess Engine uses a different RPC program number. For detailedinformation, see “Using the iProcess Preference Editor” in TIBCO iProcessWorkspace (Windows) Manager’s Guide.
If you want to keep an earlier version of TIBCO iProcess Workspace(Windows) on the same computer, TIBCO suggests that you use a differentfolder to avoid conflicts.
TIBCO iProcess Workspace (Windows) Installation

Installation in GUI Mode | 13
14. Complete the installation. After completing the installation, the InstallComplete dialog appears.
15. Click the Finish button to exit the installation program.
If the installer has installed any system files, you need to restart yourcomputer before using the iProcess Workspace (Windows). A dialog appearsto inform you of this and gives you the option to restart either now or later.
No program folders or shortcuts are created for TIBCO iProcess Modeler. You canonly start TIBCO iProcess Modeler from TIBCO iProcess Workspace (Windows).See TIBCO iProcess Workspace (Windows) User’s Guide for more information.
TIBCO iProcess Workspace (Windows) Installation

14 | Chapter 2 Installing TIBCO iProcess Workspace (Windows)
Installation in Silent Mode
If you want to install TIBCO iProcess Workspace (Windows) in silent mode, youmust have installed it in GUI mode on a computer and generated a response filethat provides all the configuration information. You can subsequently use thisresponse file as a script to run a similar installation automatically, without havingto manually enter values in the dialogs. Installation in silent mode makes it easierto roll out TIBCO iProcess Workspace (Windows) across a network, using eithersimple batch files or network management software.
The following procedure explains how to install TIBCO iProcess Workspace(Windows) in silent mode.
• Creating a Response File, page 14
• Performing a Silent Installation, page 15
Creating a Response FileTo generate a response file, complete the following steps:
1. Open a command prompt and type the following command:
setupDir\setup.exe -r -f1responseFileDir:\setup.iss
where:
— setupDir is the directory where you run the installer in GUI mode.
— responseFileDir is the directory where you want to store your generatedresponse file.
For example:E:\TIBCO\setup.exe -r -f1C:\setup.iss
Make sure that the machine you use to create the response file is in the same stateas the machines where you want to perform the installations in silent mode.Otherwise, you may have a problem with extra dialogs.
For example, if you create the response file on a machine that has a previousinstallation of iProcess Workspace (Windows) then an extra dialog is displayedasking if you want to upgrade this installation. If you then try and perform asilent installation with this response file on a machine that does not have aprevious installation of iProcess Workspace (Windows) then the responses in theresponse file will not match the dialogs displayed in the installation program.
TIBCO iProcess Workspace (Windows) Installation

Installation in Silent Mode | 15
2. Run setup.exe, entering the required values to all the prompts as normal. SeeInstallation in GUI Mode on page 7. The installer records your responses in aSetup.iss file that creates in the responseFileDir directory.
3. Start TIBCO iProcess Workspace (Windows) to make sure that it has beencorrectly installed.
Performing a Silent InstallationTo perform an installation in silent mode, complete the following steps:
1. Prepare a response file Setup.iss. For detailed information, see Creating aResponse File on page 14.
2. Log on to Windows as a user who is a member of the Administrators group.
3. Open a command prompt and type the following command:
setupDir\setup.exe -s -f1"responseFileDir:\setup.iss"-f2"logfileDir:\setup.log" /SMS
where:
— setupDir is the directory from which you run the installer in GUI mode.
— responseFileDir is the full path of the response file.
— logfileDir is the full path of a log file you want to create. Through reviewingthe log file, you can know the result of the silent installation. For detailedinformation of the log file, see Viewing the Log File. If you do not use the-f2 parameter, the Setup.log file will be created in the directory whereWindows is installed by default.
— SMS is used to make sure that the silent installation is complete before theinstaller and any network connections close.
4. Press the Enter key on the keyboard. The installer installs iProcess Engine,automatically getting the necessary information from the response file.
5. Start iProcess Engine to make sure that it has been correctly installed.
Viewing the Log File
The log file contains three sections:
• [InstallShield Silent] identifies the version of InstallShield Silent used in thesilent installation. It also identifies the file as a log file.
Strings must be included in quotes, for example “c:\setup.iss”.
TIBCO iProcess Workspace (Windows) Installation

16 | Chapter 2 Installing TIBCO iProcess Workspace (Windows)
• [Application] identifies which application and version have been installed.This section is only created if the [ResponseResult] section contains the resultcode 0, indicating that the installation was successful.
• [ResponseResult] contains one of the following result codes shown in Table 4,indicating whether or not the silent installation succeeded.
Table 4 Response Result Codes
Value Description
0 Success.
-1 General error.
-2 Invalid mode.
-3 Required data not found in the response file.
-4 Not enough memory available.
-5 File does not exist.
-6 Cannot write to the response file.
-7 Unable to write to the log file.
-8 Invalid path to the response file.
-9 Not a valid list type (string or number).
-10 Data type is invalid.
-11 Unknown error during setup.
-12 Dialogs are out of order.
-51 Cannot create the specified folder.
-52 Cannot access the specified file or folder.
-53 Invalid option selected.
TIBCO iProcess Workspace (Windows) Installation

Uninstalling TIBCO iProcess Workspace (Windows) | 17
Chapter 3 Uninstalling TIBCO iProcess Workspace(Windows)
This chapter describes how to uninstall TIBCO iProcess Workspace (Windows).
Topics
• Pre-removal Consideration, page 18
• Uninstalling iProcess Workspace (Windows), page 19
TIBCO iProcess Workspace (Windows) Installation

18 | Chapter 3 Uninstalling TIBCO iProcess Workspace (Windows)
Pre-removal Consideration
Before uninstalling your iProcess Workspace (Windows), TIBCO reminds you:
• The uninstalltion procedure is going to uninstall any of the components thathave been installed by the iProcess Workspace (Windows) installation, such asTIBCO iProcess Modeler or TIBCO iProcess Workspace Plug-ins.
• The components not installed by the iProcess Workspace (Windows)installation, for example, TIBCO iProcess Java Plug-in or plug-ins that youhave created) must be uninstall before performing the iProcess Workspace(Windows) uninstallation. For detailed information a bout how to uninstallthese components, see the installation guides for them.
TIBCO iProcess Workspace (Windows) Installation

Uninstalling iProcess Workspace (Windows) | 19
Uninstalling iProcess Workspace (Windows)
To uninstall TIBCO iProcess Workspace (Windows) from your computer,complete the following steps:
1. Open the Control Panel window on your computer.
2. Double-click the Add or Remove Programs button and select the TIBCOiProcess Workspace (Windows) version item from the list, where version is theversion number of your iProcess Workspace (Windows) installation. Thenclick the Change/Remove button to perform the uninstallation process.
On Windows 7, double-click the Programs and Features button anddouble-click TIBCO iProcess Workspace (Windows) version from the list,where version is the version number of your iProcess Workspace (Windows)installation to perform the uninstallation process.
TIBCO iProcess Workspace (Windows) Installation

20 | Appendix A Troubleshooting
Appendix A Troubleshooting
This appendix describes how to deal with errors that you may encounter wheninstalling TIBCO iProcess Workspace (Windows).
Topics
• The Installer Encounters an Error Trying to Locate pthread.dll, page 21
If the information in this appendix does not help you to resolve the problem, or ifyou are in any way unsure as to how to proceed, contact TIBCO Support forfurther assistance.
TIBCO iProcess Workspace (Windows) Installation

The Installer Encounters an Error Trying to Locate pthread.dll | 21
The Installer Encounters an Error Trying to Locate pthread.dll
ProblemDescription
When you run the installer, the installer exits immediately with one of thefollowing error messages:
accompanied by the following message:
What to Do To resolve this problem:
1. Obtain the POSIX Threads (pthreads) library for Windows distribution setlibrary from TIBCO Software Inc. and make it available on your system PATH.For detailed information, see POSIX Threads (pthreads) on page 5.
2. Run the installer again.
• Failed to locate the 'pthread.dll' component
• The minimum 'pthread.dll' component version required is 2.7.0.
The version available on the system is 2.6.0
• Failed to load the 'pthread.dll' component as no version
information could be found in it
• Failed to determine the version of the 'pthread.dll'
component.
POSIX Threads (pthreads) for Win32 is required in order for thesoftware to run correctly. Please refer to the InstallationGuide for information on where to get hold of this component andhow to install it.
TIBCO iProcess Workspace (Windows) Installation

22 | Appendix A Troubleshooting
TIBCO iProcess Workspace (Windows) Installation

TIBCO iProcess Workspace (Windows) Installation
| 23
Index
B
basic system requirements 4
C
creating a response file 14customer support xiv
I
installation in GUI Mode 7installation in Silent Mode 14installation mode
GUI Mode 2Silent Mode 2
installation modes 2installation overview 2installation types
administrator 2custom 2modeler 3user 3
P
performing a silent installation 15POSIX Threads (pthreads) 5pre-removal consideration 18
R
response file 14
S
support, contacting xivsupported platforms 4system requirement 4
T
technical support xivthird-party documentation xi
U
uninstalling iProcess Workspace (Windows) 19


