22
TIBCO LogLogic ® Universal Collector Installation Software Release 2.8 August 2017 Two-Second Advantage ®

TIBCO LogLogic® Universal CollectorInstallationSoftware Release 2.8August 2017
Two-Second Advantage®

Important Information
SOME TIBCO SOFTWARE EMBEDS OR BUNDLES OTHER TIBCO SOFTWARE. USE OF SUCHEMBEDDED OR BUNDLED TIBCO SOFTWARE IS SOLELY TO ENABLE THE FUNCTIONALITY (ORPROVIDE LIMITED ADD-ON FUNCTIONALITY) OF THE LICENSED TIBCO SOFTWARE. THEEMBEDDED OR BUNDLED SOFTWARE IS NOT LICENSED TO BE USED OR ACCESSED BY ANYOTHER TIBCO SOFTWARE OR FOR ANY OTHER PURPOSE.
USE OF TIBCO SOFTWARE AND THIS DOCUMENT IS SUBJECT TO THE TERMS ANDCONDITIONS OF A LICENSE AGREEMENT FOUND IN EITHER A SEPARATELY EXECUTEDSOFTWARE LICENSE AGREEMENT, OR, IF THERE IS NO SUCH SEPARATE AGREEMENT, THECLICKWRAP END USER LICENSE AGREEMENT WHICH IS DISPLAYED DURING DOWNLOADOR INSTALLATION OF THE SOFTWARE (AND WHICH IS DUPLICATED IN THE LICENSE FILE)OR IF THERE IS NO SUCH SOFTWARE LICENSE AGREEMENT OR CLICKWRAP END USERLICENSE AGREEMENT, THE LICENSE(S) LOCATED IN THE “LICENSE” FILE(S) OF THESOFTWARE. USE OF THIS DOCUMENT IS SUBJECT TO THOSE TERMS AND CONDITIONS, ANDYOUR USE HEREOF SHALL CONSTITUTE ACCEPTANCE OF AND AN AGREEMENT TO BEBOUND BY THE SAME.
This document contains confidential information that is subject to U.S. and international copyright lawsand treaties. No part of this document may be reproduced in any form without the writtenauthorization of TIBCO Software Inc.
TIBCO, Two-Second Advantage, The Power of Now, TIB, Information Bus, Rendezvous, TIBCORendezvous, and Messaging Appliance are either registered trademarks or trademarks of TIBCOSoftware Inc. in the United States and/or other countries.
Enterprise Java Beans (EJB), Java Platform Enterprise Edition (Java EE), Java 2 Platform EnterpriseEdition (J2EE), and all Java-based trademarks and logos are trademarks or registered trademarks ofOracle Corporation in the U.S. and other countries.
All other product and company names and marks mentioned in this document are the property of theirrespective owners and are mentioned for identification purposes only.
THIS SOFTWARE MAY BE AVAILABLE ON MULTIPLE OPERATING SYSTEMS. HOWEVER, NOTALL OPERATING SYSTEM PLATFORMS FOR A SPECIFIC SOFTWARE VERSION ARE RELEASEDAT THE SAME TIME. SEE THE README FILE FOR THE AVAILABILITY OF THIS SOFTWAREVERSION ON A SPECIFIC OPERATING SYSTEM PLATFORM.
THIS DOCUMENT IS PROVIDED “AS IS” WITHOUT WARRANTY OF ANY KIND, EITHER EXPRESSOR IMPLIED, INCLUDING, BUT NOT LIMITED TO, THE IMPLIED WARRANTIES OFMERCHANTABILITY, FITNESS FOR A PARTICULAR PURPOSE, OR NON-INFRINGEMENT.
THIS DOCUMENT COULD INCLUDE TECHNICAL INACCURACIES OR TYPOGRAPHICALERRORS. CHANGES ARE PERIODICALLY ADDED TO THE INFORMATION HEREIN; THESECHANGES WILL BE INCORPORATED IN NEW EDITIONS OF THIS DOCUMENT. TIBCOSOFTWARE INC. MAY MAKE IMPROVEMENTS AND/OR CHANGES IN THE PRODUCT(S)AND/OR THE PROGRAM(S) DESCRIBED IN THIS DOCUMENT AT ANY TIME.
THE CONTENTS OF THIS DOCUMENT MAY BE MODIFIED AND/OR QUALIFIED, DIRECTLY ORINDIRECTLY, BY OTHER DOCUMENTATION WHICH ACCOMPANIES THIS SOFTWARE,INCLUDING BUT NOT LIMITED TO ANY RELEASE NOTES AND "READ ME" FILES.
Copyright © 2010 - 2017 TIBCO Software Inc. All rights reserved.
TIBCO Software Inc. Confidential Information
2
TIBCO LogLogic® Universal Collector Installation

Contents
TIBCO Documentation and Support Services . . . . . . . . . . . . . . . . . . . . . . . . . . . . . . . . . . . . . . . . . . . . . . . . . . . . . . . . .5
Installation . . . . . . . . . . . . . . . . . . . . . . . . . . . . . . . . . . . . . . . . . . . . . . . . . . . . . . . . . . . . . . . . . . . . . . . . . . . . . . . . . . . . . . . . .6
Requirements . . . . . . . . . . . . . . . . . . . . . . . . . . . . . . . . . . . . . . . . . . . . . . . . . . . . . . . . . . . . . . . . . . . . . . . . . . . . . . . . . . . . . . . . . . . . . . . . . . . . . . . . . 6
General Security Considerations . . . . . . . . . . . . . . . . . . . . . . . . . . . . . . . . . . . . . . . . . . . . . . . . . . . . . . . . . . . . . . . . . . . . . . . . . . . . . . . . . . 6
Supported Platforms . . . . . . . . . . . . . . . . . . . . . . . . . . . . . . . . . . . . . . . . . . . . . . . . . . . . . . . . . . . . . . . . . . . . . . . . . . . . . . . . . . . . . . . . . . . . . . 6
Hardware Requirements . . . . . . . . . . . . . . . . . . . . . . . . . . . . . . . . . . . . . . . . . . . . . . . . . . . . . . . . . . . . . . . . . . . . . . . . . . . . . . . . . . . . . . . . . . .7
Ports . . . . . . . . . . . . . . . . . . . . . . . . . . . . . . . . . . . . . . . . . . . . . . . . . . . . . . . . . . . . . . . . . . . . . . . . . . . . . . . . . . . . . . . . . . . . . . . . . . . . . . . . . . . . . .7
LogLogic® Universal Collector . . . . . . . . . . . . . . . . . . . . . . . . . . . . . . . . . . . . . . . . . . . . . . . . . . . . . . . . . . . . . . . . . . . . . . . . . . . . . . . . 8
TIBCO LogLogic® Management Center Agent . . . . . . . . . . . . . . . . . . . . . . . . . . . . . . . . . . . . . . . . . . . . . . . . . . . . . . . . . . . . . . . . .8
Windows Logs . . . . . . . . . . . . . . . . . . . . . . . . . . . . . . . . . . . . . . . . . . . . . . . . . . . . . . . . . . . . . . . . . . . . . . . . . . . . . . . . . . . . . . . . . . . . . . . .8
Limitations . . . . . . . . . . . . . . . . . . . . . . . . . . . . . . . . . . . . . . . . . . . . . . . . . . . . . . . . . . . . . . . . . . . . . . . . . . . . . . . . . . . . . . . . . . . . . . . . . . . . . . . . 9
Prerequisites . . . . . . . . . . . . . . . . . . . . . . . . . . . . . . . . . . . . . . . . . . . . . . . . . . . . . . . . . . . . . . . . . . . . . . . . . . . . . . . . . . . . . . . . . . . . . . . . . . . . . .9
Installing in Graphical Mode . . . . . . . . . . . . . . . . . . . . . . . . . . . . . . . . . . . . . . . . . . . . . . . . . . . . . . . . . . . . . . . . . . . . . . . . . . . . . . . . . . . . . . . . . . 10
Starting Graphical Mode . . . . . . . . . . . . . . . . . . . . . . . . . . . . . . . . . . . . . . . . . . . . . . . . . . . . . . . . . . . . . . . . . . . . . . . . . . . . . . . . . . . . . . . . . 10
On Windows . . . . . . . . . . . . . . . . . . . . . . . . . . . . . . . . . . . . . . . . . . . . . . . . . . . . . . . . . . . . . . . . . . . . . . . . . . . . . . . . . . . . . . . . . . . . . . . . 10
On Linux . . . . . . . . . . . . . . . . . . . . . . . . . . . . . . . . . . . . . . . . . . . . . . . . . . . . . . . . . . . . . . . . . . . . . . . . . . . . . . . . . . . . . . . . . . . . . . . . . . . .11
Installing Universal Collector . . . . . . . . . . . . . . . . . . . . . . . . . . . . . . . . . . . . . . . . . . . . . . . . . . . . . . . . . . . . . . . . . . . . . . . . . . . . . . . . . . . . . 11
Uninstalling Universal Collector . . . . . . . . . . . . . . . . . . . . . . . . . . . . . . . . . . . . . . . . . . . . . . . . . . . . . . . . . . . . . . . . . . . . . . . . . . . . . . . . . . .12
On Windows . . . . . . . . . . . . . . . . . . . . . . . . . . . . . . . . . . . . . . . . . . . . . . . . . . . . . . . . . . . . . . . . . . . . . . . . . . . . . . . . . . . . . . . . . . . . . . . . 12
On Linux . . . . . . . . . . . . . . . . . . . . . . . . . . . . . . . . . . . . . . . . . . . . . . . . . . . . . . . . . . . . . . . . . . . . . . . . . . . . . . . . . . . . . . . . . . . . . . . . . . . . 12
Installing in Console Mode . . . . . . . . . . . . . . . . . . . . . . . . . . . . . . . . . . . . . . . . . . . . . . . . . . . . . . . . . . . . . . . . . . . . . . . . . . . . . . . . . . . . . . . . . . . .13
Starting Console Mode . . . . . . . . . . . . . . . . . . . . . . . . . . . . . . . . . . . . . . . . . . . . . . . . . . . . . . . . . . . . . . . . . . . . . . . . . . . . . . . . . . . . . . . . . . .13
On Windows . . . . . . . . . . . . . . . . . . . . . . . . . . . . . . . . . . . . . . . . . . . . . . . . . . . . . . . . . . . . . . . . . . . . . . . . . . . . . . . . . . . . . . . . . . . . . . . . 13
On Linux . . . . . . . . . . . . . . . . . . . . . . . . . . . . . . . . . . . . . . . . . . . . . . . . . . . . . . . . . . . . . . . . . . . . . . . . . . . . . . . . . . . . . . . . . . . . . . . . . . . .13
Installing Universal Collector . . . . . . . . . . . . . . . . . . . . . . . . . . . . . . . . . . . . . . . . . . . . . . . . . . . . . . . . . . . . . . . . . . . . . . . . . . . . . . . . . . . . . 13
Uninstalling Universal Collector . . . . . . . . . . . . . . . . . . . . . . . . . . . . . . . . . . . . . . . . . . . . . . . . . . . . . . . . . . . . . . . . . . . . . . . . . . . . . . . . . . .14
On Windows . . . . . . . . . . . . . . . . . . . . . . . . . . . . . . . . . . . . . . . . . . . . . . . . . . . . . . . . . . . . . . . . . . . . . . . . . . . . . . . . . . . . . . . . . . . . . . . . 14
On Linux . . . . . . . . . . . . . . . . . . . . . . . . . . . . . . . . . . . . . . . . . . . . . . . . . . . . . . . . . . . . . . . . . . . . . . . . . . . . . . . . . . . . . . . . . . . . . . . . . . . .14
Installing in Silent Mode . . . . . . . . . . . . . . . . . . . . . . . . . . . . . . . . . . . . . . . . . . . . . . . . . . . . . . . . . . . . . . . . . . . . . . . . . . . . . . . . . . . . . . . . . . . . . . 15
Starting Silent Mode . . . . . . . . . . . . . . . . . . . . . . . . . . . . . . . . . . . . . . . . . . . . . . . . . . . . . . . . . . . . . . . . . . . . . . . . . . . . . . . . . . . . . . . . . . . . . 15
Installing Universal Collector . . . . . . . . . . . . . . . . . . . . . . . . . . . . . . . . . . . . . . . . . . . . . . . . . . . . . . . . . . . . . . . . . . . . . . . . . . . . . . . . . . . . . 16
On Windows . . . . . . . . . . . . . . . . . . . . . . . . . . . . . . . . . . . . . . . . . . . . . . . . . . . . . . . . . . . . . . . . . . . . . . . . . . . . . . . . . . . . . . . . . . . . . . . . 16
On Linux . . . . . . . . . . . . . . . . . . . . . . . . . . . . . . . . . . . . . . . . . . . . . . . . . . . . . . . . . . . . . . . . . . . . . . . . . . . . . . . . . . . . . . . . . . . . . . . . . . . . 17
Uninstalling Universal Collector . . . . . . . . . . . . . . . . . . . . . . . . . . . . . . . . . . . . . . . . . . . . . . . . . . . . . . . . . . . . . . . . . . . . . . . . . . . . . . . . . . .17
On Windows . . . . . . . . . . . . . . . . . . . . . . . . . . . . . . . . . . . . . . . . . . . . . . . . . . . . . . . . . . . . . . . . . . . . . . . . . . . . . . . . . . . . . . . . . . . . . . . . 17
On Linux . . . . . . . . . . . . . . . . . . . . . . . . . . . . . . . . . . . . . . . . . . . . . . . . . . . . . . . . . . . . . . . . . . . . . . . . . . . . . . . . . . . . . . . . . . . . . . . . . . . .18
Configuring LogLogic® Universal Collector Default Parameters . . . . . . . . . . . . . . . . . . . . . . . . . . . . . . . . . . . . . . . . . . . . . . . . . . . . . . . . 18
3
TIBCO LogLogic® Universal Collector Installation

Starting and Stopping UC Service . . . . . . . . . . . . . . . . . . . . . . . . . . . . . . . . . . . . . . . . . . . . . . . . . . . . . . . . . . . . . . . . . . . . . . . . . . . . . . . . . . . . 19
. . . . . . . . . . . . . . . . . . . . . . . . . . . . . . . . . . . . . . . . . . . . . . . . . . . . . . . . . . . . . . . . . . . . . . . . . . . . . . . . . . . . . . . . . . . . . . . . . . . . . . . . . . . . . . . . . .19
Upgrading Java . . . . . . . . . . . . . . . . . . . . . . . . . . . . . . . . . . . . . . . . . . . . . . . . . . . . . . . . . . . . . . . . . . . . . . . . . . . . . . . . . . 20
On Windows . . . . . . . . . . . . . . . . . . . . . . . . . . . . . . . . . . . . . . . . . . . . . . . . . . . . . . . . . . . . . . . . . . . . . . . . . . . . . . . . . . . . . . . . . . . . . . . . . . . . . . . . . 20
Upgrade LogLogic® Universal Collector . . . . . . . . . . . . . . . . . . . . . . . . . . . . . . . . . . . . . . . . . . . . . . . . . . . . . . . . . . . . 21
4
TIBCO LogLogic® Universal Collector Installation

TIBCO Documentation and Support Services
Documentation for this and other TIBCO products is available on the TIBCO Documentation site. Thissite is updated more frequently than any documentation that might be included with the product. Toensure that you are accessing the latest available help topics, visit:
https://docs.tibco.com
Product-Specific Documentation
The following documents for this product can be found on the TIBCO Documentation site:
● Web Help
● Installation Guide
● User's Guide
● Release Notes
● Readme
How to Contact TIBCO Support
For comments or problems with this manual or the software it addresses, contact TIBCO Support:
● For an overview of TIBCO Support, and information about getting started with TIBCO Support,visit this site:
http://www.tibco.com/services/support
● If you already have a valid maintenance or support contract, visit this site:
https://support.tibco.com
Entry to this site requires a user name and password. If you do not have a user name, you canrequest one.
How to Join TIBCO Community
TIBCO Community is an online destination for TIBCO customers, partners, and resident experts. It is aplace to share and access the collective experience of the TIBCO community. TIBCO Community offersforums, blogs, and access to a variety of resources including product wikis that provide in-depthinformation, white papers, and video tutorials. In addition, users can submit and vote on featurerequests via the Ideas portal. For a free registration, go to https://community.tibco.com.
5
TIBCO LogLogic® Universal Collector Installation

Installation
Before you run the installer on your Windows or Linux system, you must have appropriatepermissions.
According to your needs, you may decide to install LogLogic® Universal Collector on one or severalmachines. In all cases, make sure you have administrator privileges on the machine where you want toinstall LogLogic® Universal Collector.
Type ofInstallation Recommended if
Graphical mode You want to install LogLogic® Universal Collector on a single machine on aWindows platform.
Console mode You want to install LogLogic® Universal Collector on a single machine on aRed Hat, SUSE Linux Enterprise platform.
Silent mode You want to rapidly deploy LogLogic® Universal Collector on multiplemachines with no interaction with your machine.
Make sure the Windows user account control is turned off to ensure the Loglogic Universal Collectorcollects logs from remote windows sources.
RequirementsYour system must meet the basic hardware and software requirements before you install the product.
General Security ConsiderationsThis section provides security recommendations to be followed when installing the Universal Collectorin a secure manner.
Full security
The administrator must ensure that the machines on which Universal Collectors are installed are fullysecured. These machines should be located in a physically secure environment in which only trustedpersonnel have access.
Password
The administrator must ensure that the default admin password to connect to the machine is changed.A good password has a combination of alphabetic and numeric characters and comprises at least eightcharacters in length. It should be known by a very restricted number of people.
Updates
All operating systems and software installed on the machine must be correctly updated to avoid anysecurity breach which could expose admin rights.
Supported Platforms
The machine where the LogLogic® Universal Collector is installed must be safe and secured by areliable administrator. It must also be synchronized according to an NTP server (for reliable timemanagement).
6
TIBCO LogLogic® Universal Collector Installation
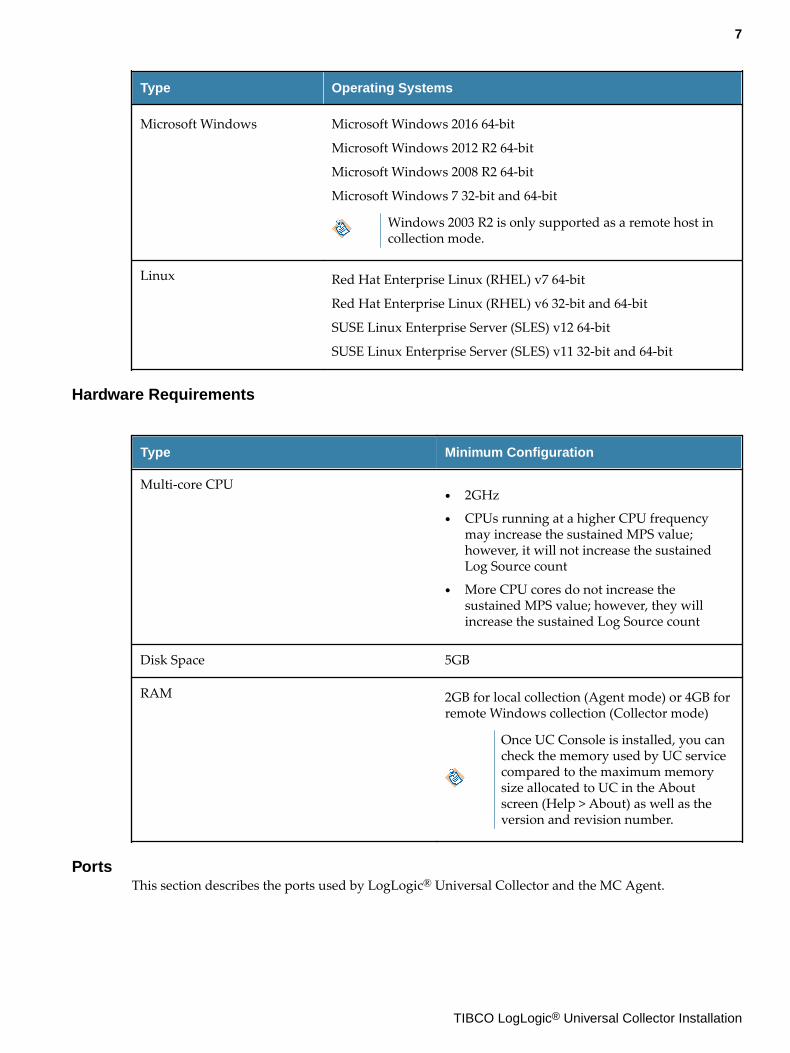
Type Operating Systems
Microsoft Windows Microsoft Windows 2016 64-bit
Microsoft Windows 2012 R2 64-bit
Microsoft Windows 2008 R2 64-bit
Microsoft Windows 7 32-bit and 64-bit
Windows 2003 R2 is only supported as a remote host incollection mode.
Linux Red Hat Enterprise Linux (RHEL) v7 64-bit
Red Hat Enterprise Linux (RHEL) v6 32-bit and 64-bit
SUSE Linux Enterprise Server (SLES) v12 64-bit
SUSE Linux Enterprise Server (SLES) v11 32-bit and 64-bit
Hardware Requirements
Type Minimum Configuration
Multi-core CPU● 2GHz
● CPUs running at a higher CPU frequencymay increase the sustained MPS value;however, it will not increase the sustainedLog Source count
● More CPU cores do not increase thesustained MPS value; however, they willincrease the sustained Log Source count
Disk Space 5GB
RAM 2GB for local collection (Agent mode) or 4GB forremote Windows collection (Collector mode)
Once UC Console is installed, you cancheck the memory used by UC servicecompared to the maximum memorysize allocated to UC in the Aboutscreen (Help > About) as well as theversion and revision number.
PortsThis section describes the ports used by LogLogic® Universal Collector and the MC Agent.
7
TIBCO LogLogic® Universal Collector Installation

LogLogic® Universal Collector
To use the LogLogic® Universal Collector along with the TIBCO LogLogic® Log ManagementIntelligence, you must open specific TCP ports.
Ports Direction Use
5515 Outbound For authenticated and/or encrypted secureconnection with LogLogic® LMI. (althoughdefault can be configured)
5516 Outbound For non-authenticated and non-encryptedconnection with LogLogic® LMI.
Make sure that the LogLogic® Universal Collector - LogLogic® LMI network connection is not blockedby a firewall.
TIBCO LogLogic® Management Center Agent
The LogLogic® Management Center Agent communicates with Management Center about the Asset'sfeatures. To use the LogLogic® Universal Collector along with the LogLogic® Management Center, youmust open specific TCP ports that are used by the LogLogic® Management Center Agent. These are thedefault ports, but you can configure them at any time.
For details on configuring LogLogic® Management Center ports, see Installing Universal Collector.
Ports Direction Use
21616 Outbound Port number used by LogLogic® ManagementCenter Agent to notify LogLogic® ManagementCenter about the changes.
2098 Inbound RMI Server Port number. The default value is2098. This must be a number between 1024 to65535.
2099 Inbound RMI Registry Port number. The default value is2099. This must be a number between 1024 to65535.
Make sure that the LogLogic® Universal Collector - LogLogic® Management Center networkconnection is not blocked by a firewall.
Windows Logs
Ports Direction Use
135 Inbound Remote Procedure Call service, used to remotelymanage services
445 Inbound Server Message Block (SMB), used for datatransfer.
8
TIBCO LogLogic® Universal Collector Installation

LogLogic® Universal Collector uses the dynamic ports to collect logs from Windows.
For Windows Server 2008 and later versions, and Windows Vista and later versions, the defaultdynamic port range is as follows:
● Start port: 49152
● End port: 65535
For Windows 2000, Windows XP, and Windows Server 2003, the dynamic port range is as follows:
● Start port: 1025
● End port: 5000
If your computer network environment uses only Windows Server 2012, Windows Server 2008 R2,Windows Server 2008, Windows 8, Windows 7, or Windows Vista, you must enable connectivity overthe high port range of 49152 through 65535.
If your computer network environment uses Windows Server 2012, Windows Server 2008 R2, WindowsServer 2008, Windows 8, Windows 7, or Windows Vista together with versions of Windows earlier thanWindows Server 2008 and Windows Vista, you must enable connectivity over both the following portranges:
● High port range 49152 through 65535
● Low port range 1025 through 5000
If your computer network environment uses only versions of Windows earlier than Windows Server2008 and Windows Vista, you must enable connectivity over the low port range of 1025 through 5000.
For more details see https://support.microsoft.com.
Limitations
TIBCO LogLogic® Universal Collector v2.8.0 does not provide large scale–enabled managementsoftware for the standalone LogLogic® Universal Collectors as it is assumed that in large scaleenterprise environments IT has already implemented scalable solutions for deploying and monitoringsoftware applications.
The minimum resolution to display TIBCO LogLogic® Universal Collector Console is 1024x768.
The installer requires JRE 8 to be installed on the system, and also the Java executable must be in theuser's PATH. On Linux, it is recommended to install the JRE using an RPM (SUSE, Red Hat) so that Javais automatically available in the user's path.
TIBCO LogLogic® Universal Collector can collect Windows Event Logs on Windows systems.However, collecting windows logs from Linux systems is not supported .
PrerequisitesThis section describes the basic requirements that must be met before installing LogLogic® UniversalCollector.
● Java
You must have JRE 1.8 installed on your machine.
Make sure that the installed Java version must have the same architecture (32-bit or 64-bit) as theoperating system. If not, the LogLogic® Universal Collector monitor shows collection failures. Forexample, a 32-bit JVM must be used by LogLogic® Universal Collector with 32-bit operating system.
● .NET Framework 4.0 or Higher Version
9
TIBCO LogLogic® Universal Collector Installation

On Windows, you must have .NET Framework installed on the LogLogic® Universal Collector hostmachine to collect Windows event logs. If not, an error will appear in the log file and collection willnot work correctly even though the LogLogic® Universal Collector installation is successful.
You must install the supported .Net Framework version based on the operating system installed.
Windows Operating System .Net Framework version
Windows Server 2016, Microsoft Windows2012 R2
4.6.2
Microsoft Windows 2008 R2 4.5.2
Microsoft Windows 7 4.0
Microsoft Windows 2003 R2 (When used inremote host mode)
4.0
● Latest Windows Service Pack
You must install latest service pack on the LogLogic® Universal Collector host machine whencollecting Windows event logs.
Installing in Graphical ModeWhen you run the installer in the GUI mode, the installer prompts you for information about theinstallation environment, and you can do other customizations.
Prerequisites
To begin with, you must modify the User Account Control settings.
Procedure
1. Go to Control Panel > System and Security > click Change User Accounts Control Settings.
2. In the User Account Control Settings screen, move the slider to the Never notify position and clickOK.
3. If you are asked to enter an administrator password, enter and confirm the password.
Starting Graphical Mode
On Windows
Procedure
1. Log in as Local Administrator. You do not need to have Domain Administrator rights, a LocalAdministrator account level is sufficient to run the setup program.
2. Run the LogLogic® Universal Collector setup program: TIB_loguc_xxx_setup_windows.exeAn installation screen is displayed.
10
TIBCO LogLogic® Universal Collector Installation

On Linux
Procedure
1. Connect to the machine as user root.
2. Set the permission to access to the installer folder with the command:chmod 755 <installer file>
3. Launch the LogLogic® Universal Collector executable file by using following command:TIB_loguc_xxx_setup_linux.bin -i swing
Installing Universal Collector
Prerequisites
On Windows, Microsoft Visual C++ 20xx Redistributable is automatically installed on your computer.This is the main component for LogLogic® Universal Collector to run successfully. Therefore, do notuninstall it when LogLogic® Universal Collector is running.
If you are using a pure64 bit operating system such as Windows 2016, Windows 2012 R2, Windows2008 R2 and so on, then make sure you use the pure64 installer accordingly.
Procedure
1. Read the Introduction screen and click Next.
2. Read the License Agreement screen. Select the option to accept the license and click Next.
3. If required, change the installation folder path in the Choose Install Folder and click Next.
4. Enter the absolute path of the data folder in the Get User Input screen. The Data Folder will contain:
The spool file with all the collected logs (the default size is 100MB).
Metadata about collected logs (to restore log collection).
LogLogic Universal Collector internal logs.
A file spool of 100 MB is dedicated to each LMI connection. Therefore, a minimum of 200MB of disk space is required to install the LogLogic® Universal Collector with one LMIconnection.
5. Select Configure MC Agent if you wish to Configure MC Agent now. TIBCO LogLogicManagement Center (MC) is a software which enables you to centrally monitor health and status ofLogLogic® Universal Collector Assets and perform upgrade tasks.If you do not intend to install MC, then do not configure the MC Agent and click Next to go directlyto the LGPL License Agreement screen.
6. In the Get User Input - MC Agent Configuration screen, provide the following values and clickNext.
In the Management Center Host field, enter the IP Address of MC . This enables MC to manage itsAgents and for each MC Agent to send information about its assets and health to MC.
In the MC Notification Port field, enter the port that MC Agents use to communicate withManagement Center.
In the Repositories field, enter the URL that MC Agent will use to discover upgradeable artifacts.
7. In the Get User Input - MC Agent Advanced Configuration screen, provide the following valuesand click Next.
11
TIBCO LogLogic® Universal Collector Installation

In the Server Port field, enter the server port used by the MC Agent for monitoring.
In the Registry Port field, enter the registry port used by the MC Agent for monitoring.
8. In the Verify MC Agent Settings screen, check if the information is correct and click Next.
The MC Agent is always installed in the mcagent directory located in your installationfolder path. For more information about MC and MC Agent, including configuring andverifying MC Agent Settings after installation of MC, as well as instructions on installingthe Agent as a service, refer to the TIBCO LogLogic Management Center AdministrationGuide.
9. In the LGPL License Agreement screen, accept the license agreement, and click Next.This license is required for installing and using LogLogic® Universal Collector.
10. In the Download Assemblies screen, you can automatically download the assemblies from TIBCOor select the previously downloaded assemblies and click Next.If you have previously downloaded the assemblies, you must specify the absolute path to theassemblies zip file. For example: Administrator\Downloads\TIB_loguc_lgpl_<version ofuc>.zip. The installer will not continue if you do not specify the absolute path to the zip file.
You must use the assemblies available from TIBCO.
11. In the Pre-Installation Summary screen, click Install to complete the installation.
12. When the installation is completed, click Done. If the installation has not been completedsuccessfully, open the Universal_Collector_Install_[Timestamp].log to check error messages.This file is in <UC_HOME>\logs.A wrapper.log is also created when the LogLogic® UniversalCollector service starts.
For security reasons, only the administrator group, the file owner, and the system groupare allowed to access this folder.
Uninstalling Universal Collector
On Windows
Procedure
1. Log in as Local Administrator. You do not need to have Domain Administrator rights, a LocalAdministrator account level is sufficient to run the uninstall program.
2. Display the Uninstall window from <UC_HOME>\uninstaller, click uninstall.exe.
3. In the Uninstall Universal Collector screen, click Uninstall.
4. Click Done to close the window.
On Linux
Procedure
1. Connect to the machine as user root.
2. Go to the installation folder and enter the following command:./uninstaller/uninstall
3. Follow the procedure as explained above.
12
TIBCO LogLogic® Universal Collector Installation

Installing in Console ModeUsing the Console mode you can install the software in a non-windows environment. After youprepare the system, you can run the installer in console mode.
Starting Console Mode
On Windows
Procedure
1. Connect to the machine as Local Administrator.
2. Open a command prompt.
3. From the installation folder, enter the command:TIB_loguc_xxx_setup_windows.exe -i console
On Linux
Procedure
1. Connect to the machine as user root.
2. Set the permission to access to the installer folder with the command:chmod 755 <installer file>
3. From the installation folder, launch the Universal Collector executable file:TIB_loguc_xxx_setup_linux.bin
Installing Universal Collector
Procedure
1. Read the introduction and press Enter until you are asked to accept the license.
2. Press y (for yes) to accept the license and press Enter.
3. Enter the path to the LogLogic® Universal Collector Installation directory, then press Enter.
4. Enter the path of the data folder. The default directory for data storage is usually appropriate,however, you can change it. Press Enter to use the default setting. It contains:
The spool file containing all collected logs (default size is 100MB).
Metadata about collected logs (in order to restore log collection).
The LogLogic® Universal Collector internal logs.
5. Type the number 2 and press Enter if you want to configure the MC Agent now. TIBCO LogLogicManagement Center (MC) is a product which enables you to centrally monitor health and status ofLogLogic® Universal Collector Assets and perform upgrade tasks.If you do not intend to configure MC Agent, then type the number 1 and press Enter to go theLGPL License Agreement.
6. In the Get User Input - MC Agent Configuration, provide the following values and press Enter:
13
TIBCO LogLogic® Universal Collector Installation
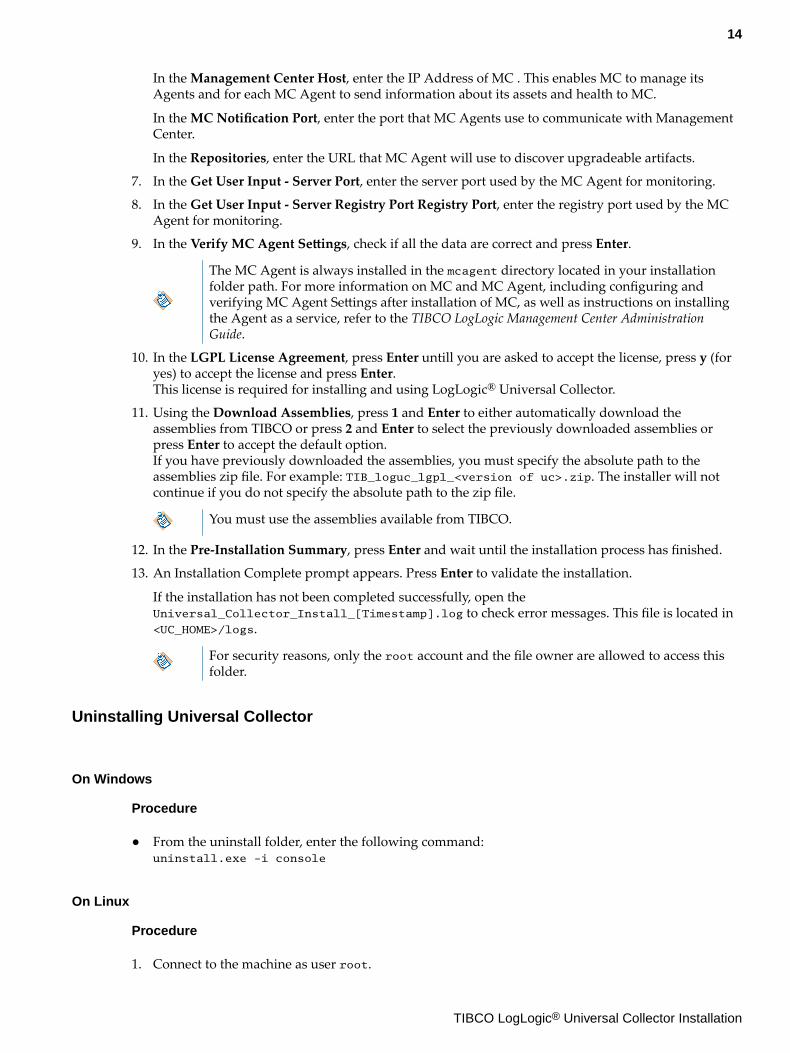
In the Management Center Host, enter the IP Address of MC . This enables MC to manage itsAgents and for each MC Agent to send information about its assets and health to MC.
In the MC Notification Port, enter the port that MC Agents use to communicate with ManagementCenter.
In the Repositories, enter the URL that MC Agent will use to discover upgradeable artifacts.
7. In the Get User Input - Server Port, enter the server port used by the MC Agent for monitoring.
8. In the Get User Input - Server Registry Port Registry Port, enter the registry port used by the MCAgent for monitoring.
9. In the Verify MC Agent Settings, check if all the data are correct and press Enter.
The MC Agent is always installed in the mcagent directory located in your installationfolder path. For more information on MC and MC Agent, including configuring andverifying MC Agent Settings after installation of MC, as well as instructions on installingthe Agent as a service, refer to the TIBCO LogLogic Management Center AdministrationGuide.
10. In the LGPL License Agreement, press Enter untill you are asked to accept the license, press y (foryes) to accept the license and press Enter.This license is required for installing and using LogLogic® Universal Collector.
11. Using the Download Assemblies, press 1 and Enter to either automatically download theassemblies from TIBCO or press 2 and Enter to select the previously downloaded assemblies orpress Enter to accept the default option.If you have previously downloaded the assemblies, you must specify the absolute path to theassemblies zip file. For example: TIB_loguc_lgpl_<version of uc>.zip. The installer will notcontinue if you do not specify the absolute path to the zip file.
You must use the assemblies available from TIBCO.
12. In the Pre-Installation Summary, press Enter and wait until the installation process has finished.
13. An Installation Complete prompt appears. Press Enter to validate the installation.
If the installation has not been completed successfully, open theUniversal_Collector_Install_[Timestamp].log to check error messages. This file is located in<UC_HOME>/logs.
For security reasons, only the root account and the file owner are allowed to access thisfolder.
Uninstalling Universal Collector
On Windows
Procedure
● From the uninstall folder, enter the following command:uninstall.exe -i console
On Linux
Procedure
1. Connect to the machine as user root.
14
TIBCO LogLogic® Universal Collector Installation

2. Go to the installation folder and enter the following command:./uninstaller/uninstall
3. Press Enter and decide whether you want to keep configuration data or not after the uninstallationprocess by selecting the appropriate option.
4. Press Enter. The uninstallation is in progress.
Installing in Silent ModeThe silent mode is recommended when you decide to rapidly deploy LogLogic® Universal Collectorson several machines.
Starting Silent Mode
Procedure
● You must create an installation file in which you must enter the following values:
Parameters Description
INSTALLER_UI Indicate the installation mode, for example,silent
You can also indicate another type ofinstallation mode such as ‘console’or ‘gui’.
USER_INSTALL_DIR Indicate the LogLogic® Universal Collector’sinstallation directory, for example, /opt/LogLogic/Universal_Collector
USER_INPUT_INSTALL_DATA_DIR Indicate the LogLogic® Universal Collector’sdata directory, for example, /opt/LogLogic/Universal_Collector
USER_INPUT_LGPL_URL Indicate the location where you havedownloaded the endorsed zip file from TIBCO.Don't specify this property if you want theinstaller to automatically download the zip filefrom TIBCO.
configureMCAgent Set this value to '1' to tell the installer you wantthe MC Agent configured and installed as aservice.
mcHost Indicate the MC Host.
Default value: 127.0.0.1 but it should bechanged to the IP address where MC isrunning.
15
TIBCO LogLogic® Universal Collector Installation

Parameters Description
mcNotificationPort Indicate the MC Notification Port.
Default value: 21616.
rmiServerPort RMI Server Port.
Default value: 2098.
rmiRegistryPort RMI Registry Port.
Default value: 2099.
agentAddress Set IP address of the MC Agent.
Default value: empty string. This field must beempty unless the MC Agent is hosted on amulti-homed host.
enableHeartbeat Default value: true.
heartbeatInterval Default value: 720.
org.ops4j.pax.url.mvn.repositories Set the location of repositories (to have the MCAgent point to multiple repositories in case thefirst one in the list is not available.)
Installing Universal Collector
On Windows
Procedure
1. Create the installation file, for example, silent.txt.
2. Enter the installation information:
INSTALLER_UI=silent
USER_INSTALL_DIR=C:\\Program Files\\LogLogic\\Universal Collector
USER_INPUT_INSTALL_DATA_DIR=C:\\Program Files\\LogLogic\\Universal Collector
USER_INPUT_LGPL_URL=C:\\Users\\<user>\\Downloads\\xxx.lgpl.zip
The USER_INPUT_LGPL_URL is an optional parameter if you have already downloaded theendorsed zip file from TIBCO.
3. Configure MC Agent if you want to manage LogLogic® Universal Collector using MC:
configureMCAgent=1
mcHost=mc.host.loglogic.com
mcNotificationPort=21616
4. Start the installation using the following command:C:\Temp\UC>TIB_loguc_xxx_setup_windows.exe -f silent.txt
16
TIBCO LogLogic® Universal Collector Installation

Result
The installation is complete.
If the installation has not been completed successfully, open theUniversal_Collector_Install_[Timestamp].log to check error messages. This file is by defaultlocated in C:\Program Files\LogLogic\Universal Collector\logs.
On Linux
Procedure
1. Open a Shell program and login as root.
2. Set the permission to access to the installer folder with the command:chmod 755 <installer file>
3. Create and complete the installation file, for example, silent.txt.
4. Enter the installation information:
INSTALLER_UI=silent
USER_INSTALL_DIR=/opt/LogLogic/Universal_Collector
USER_INPUT_INSTALL_DATA_DIR=/opt/LogLogic/Universal_Collector
USER_INPUT_LGPL_URL=/root/Downloads/xxx.lgpl.zip
The USER_INPUT_LGPL_URL is an optional parameter if you have already downloaded theendorsed zip file from TIBCO.
5. Configure MC Agent if you want to manage LogLogic® Universal Collector using MC:
configureMCAgent=1
mcHost=mc.host.loglogic.com
mNotificationPort=21616
6. Start the installation using the following command:
bash-3.2# sh ./TIB_loguc_xxx_setup_linux.bin -f silent.txt
Result
The installation is complete.
If the installation has not been completed successfully, open theUniversal_Collector_Install_[Timestamp].log to check error messages. This file is by defaultlocated in /opt/LogLogic/Universal_Collector/logs.
Uninstalling Universal Collector
On Windows
Procedure
1. In the silent.txt you have created when installing LogLogic® Universal Collector, enter theuninstall information:INSTALLER_UI=silent
17
TIBCO LogLogic® Universal Collector Installation

2. Go to uninstall folder:C:\Program Files\LogLogic\Universal Collector\uninstaller
3. Start the uninstall process using the following command:uninstall.exe
The uninstallation is complete.
On Linux
Procedure
1. Open a Shell program and login as root.
2. In the silent.txt you have created when installing LogLogic® Universal Collector, enter theuninstall information:INSTALLER_UI=silent
3. Go to the installation folder:/opt/LogLogic/Universal_Collector/uninstaller
4. Start the uninstall process using the following command:./uninstall
The uninstallation is complete.
Configuring LogLogic® Universal Collector Default ParametersDuring installation, if the parameters are set with the default values, you can change the configurationvalues later.
Procedure
1. Stop the LogLogic® Universal Collector service. For details, see Starting and Stopping UC Serviceon page 19.
2. Open UC_HOME\conf\uc.properties file using a text editor.
3. Update the configuration parameter values and save the file.The following properties can be updated after installation.
Parameters Description
USER_INPUT_INSTALL_DATA_DIR The location of the data storage directory. Thedefault location is C:/Program Files/LogLogic/Universal Collector.
Make sure to use / (and not \) fordirectory path separator.
4. Run the following command:Windows: UC_HOME\bin\setup.bat
Linux: UC_HOME/bin/setup
5. Restart the LogLogic® Universal Collector Service. For details, see Starting and Stopping UC Serviceon page 19.
18
TIBCO LogLogic® Universal Collector Installation

Starting and Stopping UC ServiceThe UC Service is automatically activated after the installation. You can manually start and stop the UCService as well.
On Windows
Procedure
1. Log in as Local Administrator.
2. Open the command prompt and run the command to start the service: net start loglogic-uc
3. Open the command prompt and run the command to stop the service: net stop loglogic-ucAlternatively, in Windows from Start > run the command services.msc . In the Services window,double-click on loglogic-uc and then select Start or Stop the service.
On Linux
Procedure
1. Login as a root user.
2. To start the service: service loglogic-uc start
3. To stop the service: service loglogic-uc stop
19
TIBCO LogLogic® Universal Collector Installation

Upgrading Java
On Windows
Procedure
1. Stop LogLogic® Universal Collector and MCagent services if installed and shut down theLogLogic® Universal Collector console .
2. Install Java 1.8 and set it as JAVA_HOME.
While installing JRE 1.8, do not uninstall JRE 1.7, even if you are prompted to do so.
3. Uninstall JRE 1.7 and make sure multiple instances of JRE are not installed on your system.
4. On Windows, run UC_HOME\bin\uninstall-service.bat to uninstall LogLogic® UniversalCollector and UC_HOME\mcagent\bin\uninstall-service.bat to uninstall MCagent services. RunUC_HOME\bin\install-service.bat and UC_HOME\mcagent\bin\install-service.bat toensure if the new Java environment is connected.
Or
5. On Linux, run UC_HOME\bin\uninstall-service to uninstall LogLogic® Universal Collector andUC_HOME\mcagent\bin\uninstall-service to uninstall MCagent services. Run UC_HOME\bin\install-service and UC_HOME\mcagent\bin\install-service to ensure if the new Javaenvironment is connected.
6. After upgrading the Java, upgrade LogLogic® Universal Collector as explained in the followingsection.
20
TIBCO LogLogic® Universal Collector Installation

Upgrade LogLogic® Universal Collector
You can upgrade LogLogic® Universal Collector from the previous version.
When upgrading manually from v2.7.0 to v2.8.0 without Management Center:
Before you start the upgrade process, refer to the TIBCO LogLogic Universal Collector Release Notes for thelatest information.
If you are using Java 1.7, first upgrade to Java 1.8 and then upgrade to LogLogic® Universal Collectorv2.8.0 as described below:
On Windows
1. Log in as Local Administrator.
2. Stop LogLogic® Universal Collector and shut down the LogLogic® Universal Collector console. Forinstructions, see Starting and Stopping UC Service on page 19.
3. Uninstall the previous version from Program Files > LogLogic > Universal Collector click Uninstall.
4. In the Uninstall Universal Collector screen, click Uninstall.
5. Click Done to close the window.
6. Download the new installer file (TIB_loguc_xxx_setup_windows.exe).
7. Run the new installer file.
When choosing the installation path, you must choose the same directory where theprevious version of LogLogic® Universal Collector was installed.
On Linux
1. Log in as a root user.
2. Stop LogLogic® Universal Collector and shut down the LogLogic® Universal Collector console. Forinstructions, see Starting and Stopping UC Service on page 19.
3. Uninstall the previous version. Go to the uninstall folder and enter the following command:./uninstaller/uninstall.
4. Follow the instructions to complete the process.
5. Download the new installer file (TIB_loguc_xxx_setup_linux.bin).
6. Run the new installer file.
When choosing the installation path, you must choose the same directory where theprevious version of LogLogic® Universal Collector was installed.
When upgrading from v2.7.0 to v2.8.0 using TIBCO LogLogic Management Center (MC):
You must first upload the LogLogic® Universal Collector upgrade files into the MC Artifact Repository.Once MC recognizes the updated LogLogic® Universal Collector version is available, you can upgradeLogLogic® Universal Collector using the MC Web UI.
1. Download the following files from TIBCO Software Product Sites:
a. TIB_loguc_xxx_mcbundle.zip
b. TIB_loguc_lgpl_xxx.ZIP
To download the LGPL assemblies from TIBCO, go to http://public.tibco.com/pub/tibco_oss/loguc/ and download the file applicable for your LogLogic® UniversalCollector version.
21
TIBCO LogLogic® Universal Collector Installation

2. Upload these two files into the MC Artifact Repository. For instructions refer to the TIBCO LogLogicManagement Center Administration Guide.
3. Upgrade LogLogic® Universal Collector version using the MC Web UI. For instructions refer to theTIBCO LogLogic Management Center Administration Guide.
22
TIBCO LogLogic® Universal Collector Installation


